Acura RLX HYBRID (2020 year). Manual in english - page 14
 

  Index      Manuals     Acura RLX HYBRID (2020 year). Manual in english


Search            copyright infringement  


Content      ..     12      13      14      15     ..


Acura RLX HYBRID (2020 year). Manual in english - page 14


225

uu

Audio System Basic Operation

u

Audio/Information Screen

Continued

Features

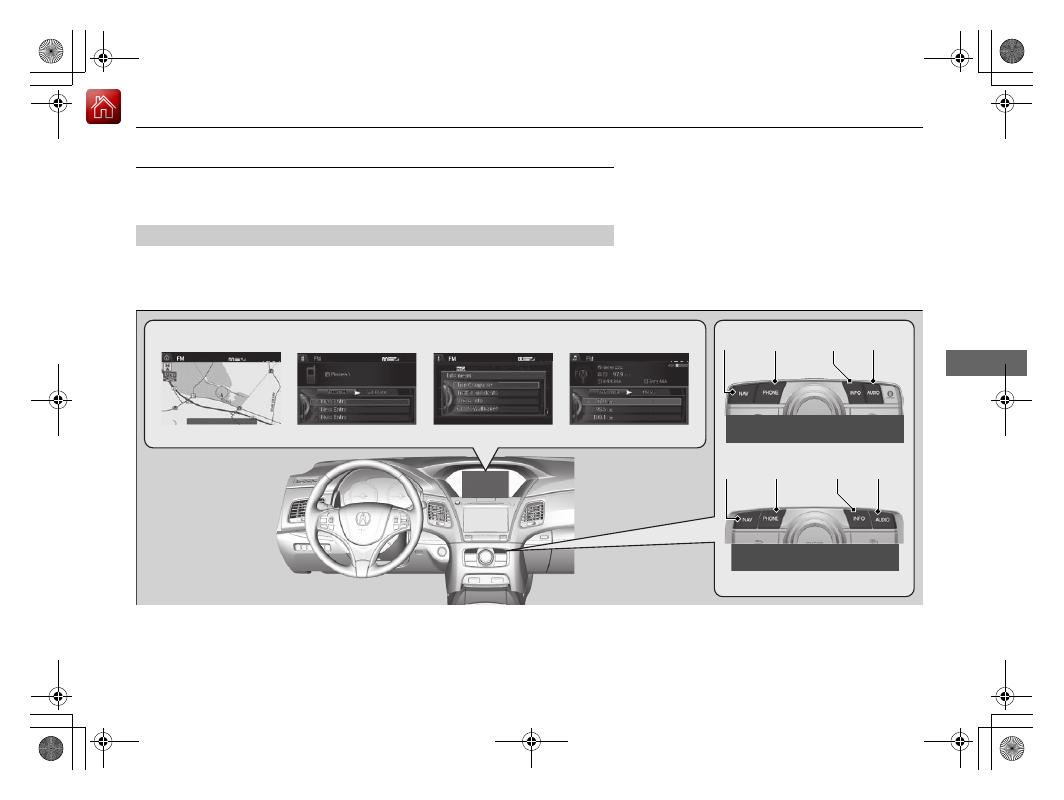
Audio/Information Screen

Displays the audio status and wallpaper. From this screen, you can go to various 
setup options.

Press the 

NAV

PHONE

INFO

 and 

AUDIO

 buttons to go to the corresponding 

display.

Switching the Display

Audio

Info

Navigation

Phone

AUDIO


Button

NAV


Button

PHONE


Button

INFO


Button

Models with surround view camera 
system

Models without surround view 
camera system

AUDIO


Button

NAV


Button

PHONE


Button

INFO


Button

-------------------------------------------------------------------------------------------------------------------------------------------------------------

226

uu

Audio System Basic Operation

u

Audio/Information Screen

Features

Audio

Shows the current audio information.

Navigation

Shows the navigation screen. 

2

 Refer to the Navigation System Manual

Phone

Shows the HFL information. 

2


Bluetooth

®

 HandsFreeLink

®

 P. 324

Info

Shows the 

Trip Computer

 or 

Clock/Wallpaper

 and other information. Rotate 


to select an item, then press 

.

Trip computer (Current Drive)

Shows the range, instant and average fuel economy, and EV/total drive of the 
current trip, as well as the average fuel economy from your last trip.

Trip computer (History of Trip A)

Shows the range, average fuel economy and distances traveled for the current trip, as well 
as the average fuel economy and distances traveled during the last three driving cycles.
Each time you reset the trip meter A, the information on the display updates. The 
history of the previous three driving cycles is kept.

Deleting the history manually

1.

Move   on the 

History of Trip A

 screen to select 

Delete History

, then press 

.

2.

You will receive a confirmation message on the screen. Rotate 

 to select 

Yes

then press 

.

Clock/Wallpaper

Shows a clock screen or an image you import.

-------------------------------------------------------------------------------------------------------------------------------------------------------------

Continued

227

uu

Audio System Basic Operation

u

Audio/Information Screen

Features

Power Distribution Monitor

Consists of two monitoring displays, one that 
indicates the vehicle’s power flow, and the 
other, the torque distribution.

1

Power Distribution Monitor

The power distribution monitor is also displayed on 
the head-up display. See 

Power Distribution 

Monitor

 on  P. 124 for details.

While the vehicle is stationary with the engine 
running, the following may appear on the display.

The High Voltage battery charge level gauge shows 
the current High Voltage battery charge level.
The amount shown here is the same level as the 
gauge amount shown in the instrument panel.

2

 High Voltage Battery Charge Level Gauge


P. 113

High Voltage 
Battery 
Charge Level 
Gauge

Engine Icon

Torque 
Indicator

Torque 
Indicator

Power Flow Indicator

-------------------------------------------------------------------------------------------------------------------------------------------------------------

uu

Audio System Basic Operation

u

Audio/Information Screen

228

Features

You can change, store, and delete the wallpaper on the audio/information screen.

Import wallpaper

You can import up to three images, one at a time, for wallpaper from a USB flash 
drive.

1.

Connect the USB flash drive to the USB port.

2

USB Port

 P. 213

2.

Press the 

SETTINGS

 button.

3.

Rotate 

 to select 

System Settings

, then 

press .

4.

Move 

 or 

 to select the 

Clock

 tab.

5.

Rotate 

 to select 

Clock/Wallpaper 

Type

, then press 

.

6.

Move 

 to select 

Wallpaper

.

u

The screen will change to the wallpaper 
list.

7.

Move 

 to select 

Add New Wallpaper

then press 

.

8.

Rotate 

 to select a desired picture.

u

The preview is displayed on the left side 
on the screen.

9.

Press 

, then move 

 to select 

Start 

Import

.

u

The confirmation message will appear. 
Then the display will return to the 
wallpaper list.

Wallpaper Setup

1

Wallpaper Setup

When importing wallpaper files, the image must be 
in the USB flash drive’s root directory.

Images in a folder cannot be imported.

The file name must be fewer than 64 characters.

The file format of the image that can be imported 
is BMP (bmp) or JPEG (jpg).

The individual file size limit is 6 MB.

The maximum image size is 1,680 x 936 pixels. If 
the image size is less than 420 × 234 pixels, the 
image is displayed in the middle of the screen with 
the extra area appearing in black.

Up to 255 files can be selected.

If the USB flash drive does not have any pictures, 
the 

No files detected

 message appears.

-------------------------------------------------------------------------------------------------------------------------------------------------------------

229

uu

Audio System Basic Operation

u

Audio/Information Screen

Features

Select wallpaper

1.

Press the 

SETTINGS

 button.

2.

Rotate 

 to select 

System Settings

, then press 

.

3.

Move 

 or 

 to select the 

Clock

 tab.

4.

Rotate 

 to select 

Clock/Wallpaper Type

, then press 

.

5.

Move  

to 

select 

Wallpaper

.

u

The screen changes to the wallpaper list.

6.

Rotate 

 to select a desired wallpaper.

u

The preview is displayed on the left side on the screen.

7.

Press .

u

The pop-up menu appears on the screen.

8.

Rotate 

 to select 

Set

, then press 

.

u

The display will return to the wallpaper list.

Delete wallpaper

1.

Press the 

SETTINGS

 button.

2.

Rotate 

 to select 

System Settings

, then press 

.

3.

Move 

 or 

 to select the 

Clock

 tab.

4.

Rotate 

 to select 

Clock/Wallpaper Type

, then press 

.

5.

Move  

to 

select 

Wallpaper

.

u

The screen changes to the wallpaper list.

6.

Rotate 

 to select a wallpaper that you want to delete, then press 

.

u

The preview is displayed on the left side on the screen.

7.

Press .

u

The pop-up menu appears on the screen.

8.

Rotate 

 to select 

Delete

, then press 

.

u

The confirmation message will appear.

9.

Rotate 

 to select 

Yes

, then press 

 to delete completely.

u

The display will return to the wallpaper list.

1

Wallpaper Setup

From the pop-up menu, rotate 

 to select 

Preview


and press 

 to see a preview at full-size screen.

To go back to the previous screen, press 

 to select 

OK

, or press the 

BACK

 button.

When the file size is large, it takes a while to be 
previewed.

-------------------------------------------------------------------------------------------------------------------------------------------------------------

230

uu

Audio System Basic Operation

u

Adjusting the Sound

Features

Adjusting the Sound

1.

Press the 

MENU

 button.

2.

Rotate 

 to select 

Sound

, then press 

.

Rotate 

 to scroll through the following 

choices:

1

Adjusting the Sound

The SVC has four modes: 

Off

Low

Mid

, and 

High

.

SVC adjusts the volume level based on the vehicle 
speed. As you go faster, audio volume increases. As 
you slow down, audio volume decreases.

DTS Neural Surround is a trademark of DTS, Inc.

2

Adjusting the Sound

 P. 224

On Demand Multi-Use Display

TM

MENU

 Button

Speed-sensitive 
Volume 
Compensation

Bass

Treble

Fader

Balance

Subwoofer

SVC

Center

DTS Neural 

Surround

-------------------------------------------------------------------------------------------------------------------------------------------------------------

231

uu

Audio System Basic Operation

u

Display Setup

Features

Display Setup

You can change the brightness or color theme of the audio/information screen.

1.

Press the 

SETTINGS

 button.

2.

Rotate 

 to select 

System Settings

, then 

press .

3.

Move  

or  

to 

select 

the 

Display

 tab.

4.

Rotate  

to 

select 

Brightness

, then press 

.

5.

Rotate 

 to adjust the setting.

1.

Press the 

SETTINGS

 button.

2.

Rotate 

 to select 

System Settings

, then 

press .

3.

Move  

or  

to 

select 

the 

Others

 tab.

4.

Rotate 

 to select 

Background Color

then press 

.

5.

Rotate 

 to select the setting you want, 

then press 

.

Changing the Screen Brightness

1

Changing the Screen Brightness

You can change the 

Contrast

 and 

Black Level


settings in the same manner.

Changing the Screen’s Color Theme

-------------------------------------------------------------------------------------------------------------------------------------------------------------

232

uu

Audio System Basic Operation

u

Voice Control Operation

Features

Voice Control Operation

Your vehicle has a voice control system that allows hands-free operation of most of 
the navigation system functions.
The voice control system uses the 

 (Talk) and 

 (hang-up/back) buttons on 

the steering wheel and a microphone near the map lights on the ceiling.

To achieve optimum voice recognition when using the voice control system:

Make sure the correct screen is displayed for the voice command that you are 
using.
The system recognizes only certain commands. Available voice commands.

2

Voice Portal Screen

 P. 233

Close the windows and moonroof.

Adjust the dashboard and side vents so air does not blow onto the microphone 
on the ceiling.

Speak clearly in a clear, natural speaking voice without pausing between words.

Reduce any background noise if possible. The system may misinterpret your 
command if more than one person is speaking at the same time.

Refer to the Voice Help feature.

2

Refer to the Navigation System Manual

Voice Recognition

1

Voice Control Operation

When you press the 

 button, a helpful prompt asks 

what you would like to do. Press and release the 


button again to bypass this prompt and give a 
command.

1

Voice Recognition

The voice control system can only be used from the 
driver’s seat because the microphone unit removes 
noises from the front passenger’s side.

-------------------------------------------------------------------------------------------------------------------------------------------------------------

233

uu

Audio System Basic Operation

u

Voice Control Operation

Continued

Features

When the 

 (Talk) button is pressed, 

available voice commands appear on the 
screen.
For a complete list of commands, say 

“Voice 

Help”

 after the beep or select 

Voice Help

.

You can see the list of commands in 

Voice 

Info

 on the Info menu screen. Select 

Info,


then select 

.

The system only recognizes the commands 
on the following pages, at certain screens. 
Free form voice commands are not 
recognized.

Voice Portal Screen

Phone Call

This can be only used when the phone is 
connected. When the system recognizes the 

Phone call

 command, the screen will 

change the dedicated screen for the voice 
recognition of the phone.

Call <Your Contact Name>

Call <Phone Number>

Music Search

This can be only used when the iPod or HDD 
device is connected.

Voice Help

You can see a list of the available 
commands on the screen.

Navigation Commands

Useful Commands

Phone Commands

Audio Commands

On Screen Commands

Music Search Commands

General Commands

Climate Control Commands

All Commands

Voice Settings

Getting Started

Navigation

The screen changes the navigation screen.

2

Refer to the Navigation System Manual

-------------------------------------------------------------------------------------------------------------------------------------------------------------

234

uu

Audio System Basic Operation

u

Voice Control Operation

Features

Audio

When the system recognizes the 

Audio


command, the screen will change the 
dedicated screen for the voice recognition 
of the audio.

Audio On

*1

Audio Off

*1

FM

AM

SXM

Disc

HDD

USB

iPod

Bluetooth

®

 Audio

Pandora

*

AUX

2

Audio Commands

 P. 235

*1: These commands toggle the function on and 
off, so the command may not match your 
intended action.

Climate Control

The screen changes the climate control 
screen.

2

Climate Control Commands

 P. 236

The system accepts these commands on the 
voice portal top screen.

Call <Your Contact Name>

Call <Phone Number>

What time is it?

What is today’s date?

Useful Commands

The system accepts these commands on the 
dedicated screen for the voice recognition 
of the phone.

Call <Your Contact Name>

Call <Phone Number>

Phone Commands

* Not available on all models

-------------------------------------------------------------------------------------------------------------------------------------------------------------

235

uu

Audio System Basic Operation

u

Voice Control Operation

Continued

Features

The system accepts these commands on the 
dedicated screen for the voice recognition 
of the audio.

Radio FM Commands

Radio tune to <87.7-107.9> FM

Radio FM preset <1-12>

Radio AM Commands

Radio tune to <530-1710> AM

Radio AM preset <1-6>

Radio SXM Commands

SXM channel <0-999>

Radio SXM preset <1-12>

Disc Commands

Disc play

Disc play track <1-30>

HDD Commands

HDD play

HDD play track <1-30>

Music Search

What album is this?

What am I listening to?

Audio Commands

iPod Commands

iPod play

iPod play track <1-30>

Music Search

What album is this?

What am I listening to?

USB Commands

USB play

USB play track <1-30>

Bluetooth

®

 Audio Commands

Bluetooth

®

 Audio play

NOTE:

Bluetooth

®

 Audio commands may not work 

on some phones or

 Bluetooth

®

 Audio 

devices.

Pandora Commands

*

Pandora play

AUX Commands

AUX play

The system accepts the voice command 
operation of the voice recognition screen.

On Screen Commands

* Not available on all models

-------------------------------------------------------------------------------------------------------------------------------------------------------------

236

uu

Audio System Basic Operation

u

Voice Control Operation

Features

The system accepts these commands on the


Music Search

 screen.

Using Song By Voice

Song By Voice

TM

 is a feature that allows you 

to select music from your iPod or HDD 
device using Voice Commands. To activate 
this mode, you must press the 

 (Talk) 

button and say: 

“Music Search”.

Song By Voice Commands

Music Search

What am I listening to?

Who am I listening to?

Who is this?

What's playing?

Who's playing?

What album is this?

Music Search Commands

Play Commands

Play artist <Name>

Play album <Name>

Play song <Name>

Play composer <Name>

Play genre <Name>

Play playlist <Name>

List Commands

List artist <Name>

List album <Name>

List composer <Name>

List genre <Name>

List playlist <Name>

What time is it?

What is today's date?

General Commands

The system accepts these commands on the


Climate control

 screen.

Climate Control Automatic

Climate Control On

*1

Climate Control Off

*1

Air conditioner On

*1

Air conditioner Off

*1

Defrost On

*1

Defrost Off

*1

Vent

Dash and Floor

Floor Vents

Floor and Defrost

Fan Speed Up

Fan Speed Down

Fan Speed <1-7>

Temperature Up

Temperature Down

Temperature Max Heat

Temperature Max Cool

Temperature <57-87> Degrees (U.S.)

Temperature <18-32> Degrees (Canada)

*1: These commands toggle the function 
on and off, so the command may not match 
your intended action.

Climate Control Commands

-------------------------------------------------------------------------------------------------------------------------------------------------------------

237

uu

Audio System Basic Operation

u

Playing AM/FM Radio

Continued

Features

Playing AM/FM Radio

Audio/Information Screen

On Demand Multi-Use Display

TM

Tune Up/Down Icons

Select  

or  

to 

tune the radio frequency.

MENU Button

Press to display the menu items.

 (Power) Button

Press to turn the audio system 
on and off.

Source

Select to change a band or change 
an audio source.

Tune

Select to switch to tune mode.

Preset Icons

Select to store a station.
To listen to a stored channel, select 

1

-

6

 (AM) or 

1

-

12

 (FM).

Skip/Seek Icons

Select 

 or 

 to search up 

and down the selected band for 
a station with a strong signal.

More

Select to display the menu items.

BACK Button

Press to go back to the previous display.

VOL (Volume) Knob 
(Pushed out)

Turn to adjust the volume.

Interface Dial/ENTER Button

Press and turn to select preset radio 
stations.
Move up, down, right and left to 
select secondary menu.

Scan

Select to sample each of the 
strongest stations on the selected 
band for 10 seconds.

-------------------------------------------------------------------------------------------------------------------------------------------------------------

uu

Audio System Basic Operation

u

Playing AM/FM Radio

238

Features

To store a station:

1.

Tune to the selected station.

2.

Move 

 or 

 to select the 

Preset

 tab.

3.

Rotate 

 to select the preset number you want to store the station.

4.

Press and hold 

 for a few seconds.

You can also store that station by the following procedure.

1.

Tune to the selected station.

2.

Press the 

MENU

 button.

3.

Rotate  

to 

select 

Save Preset

, then press 

.

4.

Rotate 

 to select the preset number you want to store that station, then press 

.

1.

Tune to the selected station.

2.

Change the display to the preset screen.

3.

Select and hold the preset number you want to store that station.

You can also store that station by the following procedure.

1.

Tune to the selected station.

2.

Select 

More

.

3.

Select 

Save Preset

.

4.

Select the preset number you want to store that station.

Preset Memory

1

Playing AM/FM Radio

You can control the AM/FM radio using voice 
commands.

2

Voice Control Operation

 P. 232

The 

ST

 indicator appears on the display indicating 

stereo FM broadcasts.
Stereo reproduction in AM is not available.

Switching the Audio Mode
Press the 

SOURCE

 button on the steering wheel.

2

Audio Remote Controls

 P. 215

You can also switch the mode by pressing the 

MENU


button and selecting 

Change Source

 on the 

Audio 

menu

 screen.

You can store 6 AM stations and 12 FM stations into 
the preset memory.

HD Radio Technology manufactured under license 
from iBiquity Digital Corporation. U.S. and Foreign 
Patents. HD Radio

TM

 and the HD, HD Radio, and 

“Arc” logos are proprietary trademarks of iBiquity 
Digital Corp.

Models with HD Radio

TM

 feature

Interface Dial

On Demand Multi-Use Display

TM

-------------------------------------------------------------------------------------------------------------------------------------------------------------

239

uu

Audio System Basic Operation

u

Playing AM/FM Radio

Continued

Features

Provides text data information related to your selected RDS-capable FM station.

To find an RDS station from Station List

1.

Move  

or  

to 

select 

the 

Station List


tab.

2.

Rotate 

 to select the station, then press 

.

Manual update

Updates your available station list at any time.
Rotate  

to 

select 

Refresh

, then press 

.

You can also update a station by the following procedure.

1.

Press the 

MENU

 button while listening to an FM station.

2.

Rotate 

 to select 

Refresh Station List

, then press 

.

Radio Data System (RDS)

-------------------------------------------------------------------------------------------------------------------------------------------------------------

240

uu

Audio System Basic Operation

u

Playing AM/FM Radio

Features

Radio text

Display the radio text information of the selected RDS station.

1.

Press the 

MENU

 button.

2.

Rotate  

to 

select 

Radio Text

, then press 

.

Scan

Samples each of the strongest stations on the selected band for 10 seconds.

1.

Press the 

MENU

 button.

2.

Rotate  

to 

select 

Scan

, then press 

.

To turn off scan, press 

 to select 

Cancel Scan

, or press the 

BACK

 button.

2

Playing AM/FM Radio

 P. 237

To turn off scan, select 

Stop Scan

.

Interface Dial

On Demand Multi-Use Display

TM

-------------------------------------------------------------------------------------------------------------------------------------------------------------


Content      ..     12      13      14      15     ..