Acura RLX HYBRID (2020 year). Manual in english - page 12
 

  Index      Manuals     Acura RLX HYBRID (2020 year). Manual in english


Search            copyright infringement  


Content      ..     10      11      12      13     ..


Acura RLX HYBRID (2020 year). Manual in english - page 12


uu

Interior Lights/Interior Convenience Items

u

Interior Convenience Items

192

Co
ntrols

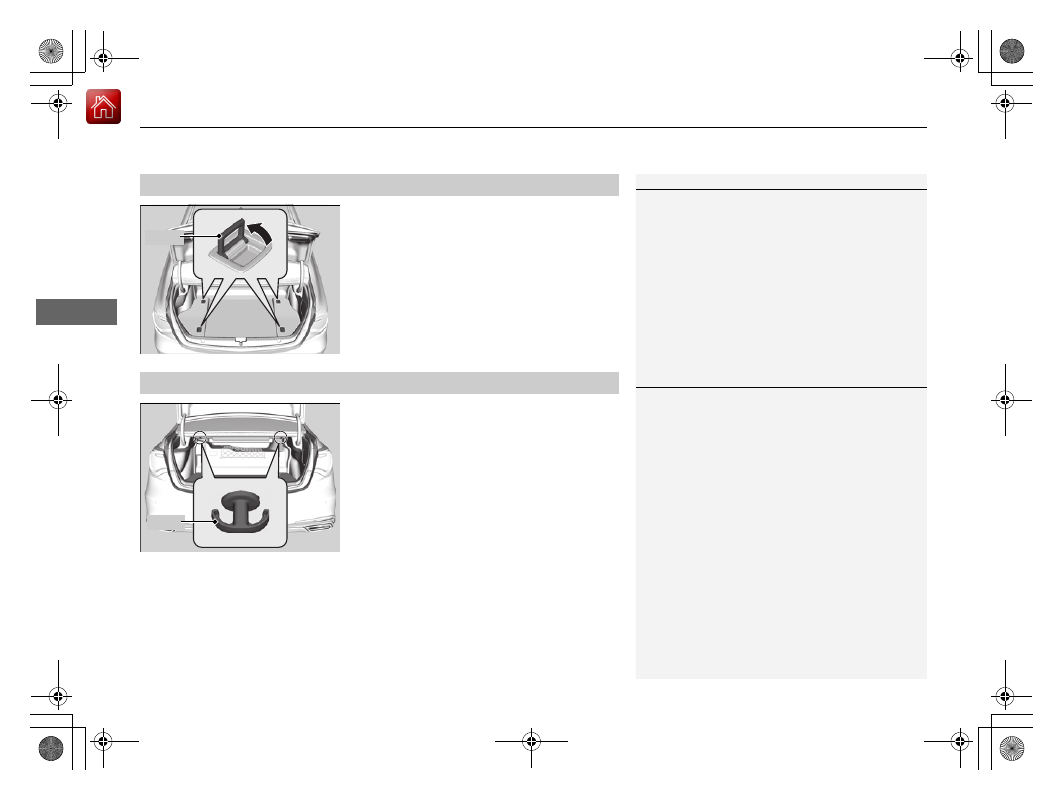
The tie-down anchors on the trunk floor can 
be used to install a net for securing items.

The cargo hooks in the trunk can be used to 
install a net for securing items.

Tie-down Anchors

1

Tie-down Anchors

Distribute cargo evenly on the floor of the trunk, 
placing the heaviest items on the bottom and as far 
forward as possible.

2

Maximum Load Limit

 P. 375

Hook

Cargo Hooks

1

Cargo Hooks

Distribute cargo evenly on the floor of the trunk, 
placing the heaviest items on the bottom and as far 
forward as possible.

2

Maximum Load Limit

 P. 375

Hook

-------------------------------------------------------------------------------------------------------------------------------------------------------------

Continued

193

uu

Interior Lights/Interior Convenience Items

u

Interior Convenience Items

Co
ntrols

In addition to the larger cargo area, the trunk 
incorporates a small shelf above the High 
Voltage (HV) battery module that can carry up 
to 15 lbs (7 kg). Do not exceed this capacity.

The cargo net can be used to help hold down 
items stored in the trunk.

In the event a flat tire, a tire repair kit is 
provided beneath the trunk floor.

2

Temporarily Repairing a Flat Tire

 P. 541

Cargo Area

1

Cargo Area

NOTICE

Heavy objects may damage the trunk shelf.
Make sure any items put on the shelf weigh less than 
15 lbs (7 kg).

Tiered Storage Area

Cargo Net

U.S. models

Canadian models

-------------------------------------------------------------------------------------------------------------------------------------------------------------

uu

Interior Lights/Interior Convenience Items

u

Interior Convenience Items

194

Co
ntrols

The power mode must be in ON to use the 
heated steering wheel.

Press the button on the left side of the 
steering wheel.

When a comfortable temperature is reached, 
press the button again to turn it off.

The heated steering wheel is turned off every 
time you start the power system, even if you 
turned it on the last time you drove the 
vehicle.

Heated Steering Wheel

1

Heated Steering Wheel

Do not use the heated steering wheel continuously 
when the power system is off. Under such conditions, 
the 12-volt battery may be weakened, making the 
power system difficult to start.

-------------------------------------------------------------------------------------------------------------------------------------------------------------

Continued

195

uu

Interior Lights/Interior Convenience Items

u

Interior Convenience Items

Co
ntrols

The power mode must be in ON to use the 
seat heaters.

Press the seat heater button:
Once - The HI setting (three indicators on)
Twice - The MID setting (two indicators on)
Three times - The LO setting (one indicator on)
Four times - The OFF setting (no indicators on)

Front Seat Heaters

*

1

Front Seat Heaters

*

Do not use the seat heaters even in LO when the 
power system is off. Under such conditions, the 12-
volt battery may be weakened, making the power 
system difficult to start.

3

WARNING

Heat induced burns are possible when 
using seat heaters.

Persons with a diminished ability to sense 
temperature (e.g., persons with diabetes, 
lower-limb nerve damage, or paralysis) or 
with sensitive skin should not use seat 
heaters.

* Not available on all models

-------------------------------------------------------------------------------------------------------------------------------------------------------------

uu

Interior Lights/Interior Convenience Items

u

Interior Convenience Items

196

Co
ntrols

The power mode must be in ON to use the 
seat heaters and ventilation.

Press the seat heater or the seat ventilation 
button:
Once - The HI setting (three indicators on)
Twice - The MID setting (two indicators on)
Three times - The LO setting (one indicator on)
Four times - The OFF setting (no indicators on)

Front Seat Heaters and Ventilation

*

1

Front Seat Heaters and Ventilation

*

Do not use the seat heaters and the seat ventilation 
even in LO when the power system is off. Under such 
conditions, the 12-volt battery may be weakened, 
making the power system difficult to start.

3

WARNING

Heat induced burns are possible when 
using seat heaters.

Persons with a diminished ability to sense 
temperature (e.g., persons with diabetes, 
lower-limb nerve damage, or paralysis) or 
with sensitive skin should not use seat 
heaters.

* Not available on all models

-------------------------------------------------------------------------------------------------------------------------------------------------------------

Continued

197

uu

Interior Lights/Interior Convenience Items

u

Interior Convenience Items

Co
ntrols

The power mode must be in ON to use the 
seat heaters.

There is no heater in the rear center seating 
position.
Press the seat heater button:
Once - The HI setting (three indicators on)
Twice - The MID setting (two indicators on)
Three times - The LO setting (one indicator on)
Four times - The OFF setting (no indicators on)

To open the sunglasses holder, push and 
release the indent. To close, push it again until 
it latches.

You can store eyeglasses and other small 
items in this holder.

Rear Seat Heaters

1

Rear Seat Heaters

Do not use the seat heaters even in LO when the 
power system is off. Under such conditions, the 12-
volt battery may be weakened, making the power 
system difficult to start.

3

WARNING

Heat induced burns are possible when 
using seat heaters.

Persons with a diminished ability to sense 
temperature (e.g., persons with diabetes, 
lower-limb nerve damage, or paralysis) or 
with sensitive skin should not use seat 
heaters.

Sunglasses Holder

1

Sunglasses Holder

Keep the holder closed while driving except when 
accessing stored items.

Push

-------------------------------------------------------------------------------------------------------------------------------------------------------------

uu

Interior Lights/Interior Convenience Items

u

Interior Convenience Items

198

Co
ntrols

The power rear sunshade can be operated with the power mode in ON.

To raise:

 Press the button.

To lower:

 Press the button again.

When the transmission is put into 

(

R

, the rear 

sunshade lowers automatically.

u

If the vehicle is travelling at 10 mph (15 
km/h) or more, or if the transmission is 
put into 

(

P

, the sunshade returns to its 

original position.

Even if the power mode is switched to OFF, 
the sunshade can be operated for 
approximately 1 minute.

Power Rear Sunshade

*

1

Power Rear Sunshade

*

If the sunshade stops while moving, check for and 
clear any obstacles, then push the button again.

3

WARNING

Opening or closing the sunshade on 
someone’s hands or fingers can cause 
serious injury.

Make sure all hands and fingers are clear of 
the sunshade before opening or closing it.

Front

Rear

* Not available on all models

-------------------------------------------------------------------------------------------------------------------------------------------------------------

199

uu

Interior Lights/Interior Convenience Items

u

Interior Convenience Items

Co
ntrols

Pull the tab and roll up the sunshade all the 
way. Use the hooks to hang it.

Expanded Rear Door Sunshades

*

1

Expanded Rear Door Sunshades

*

Use the sunshades only when the windows are fully 
closed. Using the shade while a window is open can 
unhook and blow off the shade, hitting and possibly 
hurting anyone sitting near the window.

Hook

Tab

* Not available on all models

-------------------------------------------------------------------------------------------------------------------------------------------------------------

200

Co
ntrols

Climate Control System

Using Automatic Climate Control

The automatic climate control system maintains the interior temperature you select. 
The system also selects the proper mix of heated or cooled air that raises or lowers 
the interior temperature to your preference as quickly as possible.

Use the system when the power system is on.

1.

Press the 

AUTO

 button.

2.

Adjust the interior temperature using the driver’s side or passenger’s side 
temperature control switch.

3.

Press the 

 (on/off) button to cancel.

In addition to the button/switch operations, you can control the climate control 
system from the On Demand Multi-Use Display

TM

 touch screen.

1

Using Automatic Climate Control

If any buttons/icons on the touch screen are pressed 
while using the climate control system in auto, the 
function of the button/icon that was pressed will take 
priority.
The AUTO indicator will go off, but functions 
unrelated to the button/icon that was pressed will be 
controlled automatically.

To prevent cold air from blowing in from outside, the 
fan may operate at low speed for a while after the 

AUTO

 button has been pressed.

If the interior is very warm, you can cool it down 
more rapidly by partially opening the windows, 
turning the system on auto, and setting the 
temperature to low. Change the fresh mode to 
recirculation mode until the temperature cools down.

When you set the temperature to the lower or upper 
limit, 

Lo

 or 

Hi

 is displayed.

Pressing the 

 button switches the climate control 

system between on and off. When turned on, the 
system returns to your last selection.

When you unlock the doors with your remote, the driver’s 
ID (

Driver 1

 or 

Driver 2

) is detected, and the climate 

control settings are turned to the respective mode 
automatically when you set the power mode to ON.

The High Voltage battery level being low may reduce 
the climate control system performance.

 (On/off) Button

AUTO

 Button

On Demand Multi-Use Display

TM

Driver’s Side 
Temperature 
Control Switch

Passenger’s Side 
Temperature 
Control Switch

Passenger’s Side 
Temperature

Driver’s Side 
Temperature

-------------------------------------------------------------------------------------------------------------------------------------------------------------

Continued

201

uu

Climate Control System

u

Using Automatic Climate Control

Co
ntrols

Operating from the On Demand Multi-Use Display

TM

1

Using Automatic Climate Control

You can store two customized climate control 
settings to the system and recall them from the On 
Demand Multi-Use Display

TM

.

2

Shortcuts

 P. 218

On Demand Multi-Use Display

TM

A/C

 (Air Conditioning) and 

SYNC

 (Synchronized) Icon

Driver’s Side 
Vent Mode Icon

Driver’s Side 
Temperature Control 
Icon

Recirculation/
Fresh Air mode 
Icon

Passenger’s Side 
Vent Mode Icon

Fan Control Icon

Passenger’s Side 
Temperature Control 
Icon

-------------------------------------------------------------------------------------------------------------------------------------------------------------

uu

Climate Control System

u

Using Automatic Climate Control

202

Co
ntrols

Changing the interior temperature setting

1.

Select the driver’s or passenger’s side 
temperature control.

2.

Change the temperature setting from the 
following:

Temperature bar

: Select a point where your 

desired temperature setting is.
Farther to the left is for a lower, and to the 
right for a higher setting.

3

/

4

: To raise or lower the temperature 

setting one degree at a time.
While you select and hold 

3

/

4

, the 

temperature decreases or increases.

MAX COOL ON/OFF

: To rapidly cool down 

the interior.

u

The AUTO indicator comes on. The 
setting returns to the previously selected 
value when you select it again.

MAX HEAT ON/OFF

: To rapidly warm up the 

interior.

u

The AUTO indicator comes on. The 
setting returns to the previously selected 
value when you select it again.

1

Using Automatic Climate Control

When you set the temperature to the lower or upper 
limit, 

Lo

 or 

Hi

 is displayed.

When you set the 

MAX COOL

 or 

MAX HEAT

MAX 

COOL

 or 

MAX HEAT

 is displayed.

The side you selected.

Temperature Bar

-------------------------------------------------------------------------------------------------------------------------------------------------------------

Continued

203

uu

Climate Control System

u

Using Automatic Climate Control

Co
ntrols

Switching the vent mode

1.

Select the driver’s or passenger’s side vent 
mode.

2.

Select a desired vent mode icon, or 

Driver 

Mode Auto

 (driver’s side)/

Passenger 

Mode Auto

 (passenger’s side): The system 

automatically selects the vent mode most 
suitable to the ambient environment.

Vent mode

: Dashboard vents and back of the center 

console

: Dashboard and floor vents, and back of 

the center console

: Floor vents
: Floor and defroster vents (driver’s side 

only)

A/C on and off

1.

Select 

A/C

.

2.

Select 

ON

 or 

OFF

.

1

Switching the vent mode

While the climate control system is in auto, 

Driver 

Mode Auto

 or 

Passenger Mode Auto

 is 

highlighted.

The side you selected.

-------------------------------------------------------------------------------------------------------------------------------------------------------------

uu

Climate Control System

u

Using Automatic Climate Control

204

Co
ntrols

SYNC on and off

1.

Select 

SYNC

.

2.

Select 

ON

 for synchronization mode, and 

OFF

 for dual mode.

u

When in synchronization mode, the 
passenger’s side temperature and vent 
mode become the same as the driver’s 
side settings.

3.

Adjust the temperature or change the 
mode from the driver’s side.

Changing the fan speed

1.

Select .

2.

Change the fan speed with one of the 
following:
The fan speed level indicators: Select your 
desired speed level. The smaller indicator is 
for a slower speed, and the larger for a 
faster speed.

(

+

/

(

-

: To go up or down one level at a 

time.

Fan AUTO

: The system automatically 

selects the fan speed most suitable to the 
ambient environment.

1

SYNC on and off

When you press the 

 button, the system changes 

to synchronization mode.

When the system is in dual mode, the driver’s side 
temperature and vent mode, and the passenger’s 
side temperature and vent mode can be set 
separately.

You can also return to dual mode by changing the 
passenger’s side temperature or switching the vent mode.

The system adjusts each temperature based on the 
information of the sunlight sensor and the sun 
position updated by the navigation system’s GPS.

1

Changing the fan speed

While the climate control system is in auto, 

Fan 

AUTO

 is highlighted.

Fan Speed Level Indicators

-------------------------------------------------------------------------------------------------------------------------------------------------------------

Continued

205

uu

Climate Control System

u

Using Automatic Climate Control

Co
ntrols

Switching between the recirculation and fresh air modes

1.

Select ,  

or  

currently 

shown.

2.

Switch the mode depending on 
environmental conditions to the following:

 (recirculation mode): Recirculates air 

from the vehicle’s interior through the system.

 (auto mode): Automatically switch 

between the recirculation and fresh air modes 
most suitable to environmental conditions. If 
the ambient temperature is low, the mode 
may not change to recirculation to keep the 
windows from fogging up.

 (fresh air mode): Maintains outside 

ventilation. Keep the system in fresh air mode 
in normal situations.

1

Switching between the recirculation and fresh air modes

While the climate control system is in AUTO, 

 is 

highlighted.

-------------------------------------------------------------------------------------------------------------------------------------------------------------

uu

Climate Control System

u

Using Automatic Climate Control

206

Co
ntrols

Shortcuts

You can store two sets of your preferred temperature, fan speed, and vent mode 
settings to the climate control system.

To store a set of the climate control settings:

1.

Select 

Shortcuts

.

2.

Adjust the climate control system to your 
preference.

2

Climate Control System

 P. 200

3.

Select 

Climate

.

4.

Select 

Edit

.

5.

Select 

Add

.

6.

Select 

Preset 1

 or 

Preset 2

 you want to 

store your settings to.

To recall one of the settings:

1.

Select 

Shortcuts

.

2.

Select 

Climate

.

3.

Select 

Preset 1

 or 

Preset 2

.

To delete a preset:

1.

Select 

Shortcuts

.

2.

Select 

Climate

.

3.

Select 

Edit

.

4.

Select 

Delete

.

5.

Select 

Preset 1

 or 

Preset 2

 you want to 

delete.

1

Shortcuts

You can also store a set by pressing and holding the 
preset number you want to store that setting after 
step 3.

-------------------------------------------------------------------------------------------------------------------------------------------------------------

Continued

207

uu

Climate Control System

u

Using Automatic Climate Control

Co
ntrols

Pressing the 

 button turns the air 

conditioning system on and automatically 
switches the system to fresh air mode.

Press the 

 button again to turn off, the 

system returns to the previous settings.

To rapidly defrost the windows

1.

Press the 

 button.

2.

Select the recirculation mode.

2

Switching between the recirculation 
and fresh air modes

 P. 205

Defrosting the Windshield and Windows

1

Defrosting the Windshield and Windows

For your safety, make sure you have a clear view 
through all the windows before driving.

Do not set the temperature near the upper or lower 
limit.
When cold air hits the windshield, the outside of the 
windshield may fog up.

If the side windows fog up, adjust the vents so that 
the air hits the side windows.

1

To rapidly defrost the windows

After defrosting the windows, switch over to fresh air 
mode.
If you keep the system in recirculation mode, the 
windows may fog up from humidity. This impedes 
visibility.

-------------------------------------------------------------------------------------------------------------------------------------------------------------


Content      ..     10      11      12      13     ..