Acura RLX HYBRID (2020 year). Manual in english - page 11
 

  Index      Manuals     Acura RLX HYBRID (2020 year). Manual in english


Search            copyright infringement  


Content      ..     9      10      11      12     ..


Acura RLX HYBRID (2020 year). Manual in english - page 11


176

uu

Adjusting the Seats

u

Front Seats

Co
ntrols

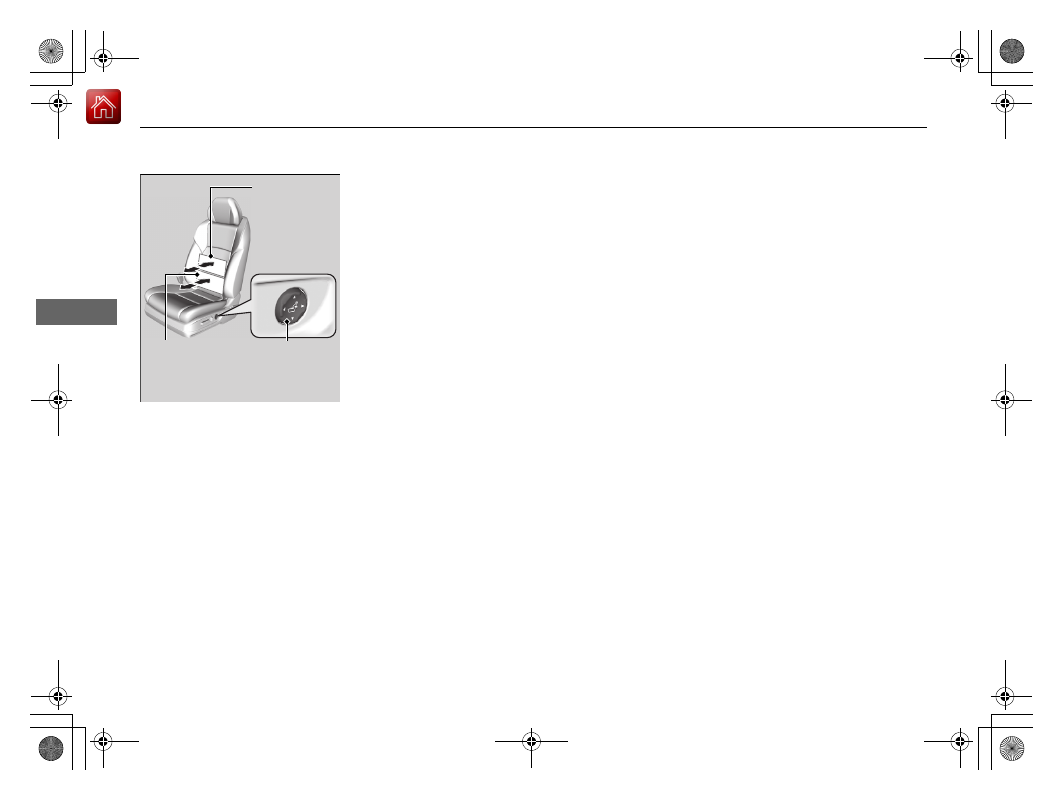
Lumbar Support Adjustment Switch

Press the top:

 To increase the higher part of 

the lumbar support.

Press the bottom:

 To increase the lower part 

of the lumbar support. (The higher part 
support is decreased.)

Press the front:

 To increase the entire 

lumbar support.

Press the rear:

 To decrease the entire lumbar 

support.

Higher part of 
the Lumbar 
support

Lumbar 
Support 
Adjustment 
Switch

Lower part of 
the Lumbar 
support

-------------------------------------------------------------------------------------------------------------------------------------------------------------

177

uu

Adjusting the Seats

u

Front Seats

Co
ntrols

Adjust the driver’s seat-back to a comfortable, 
upright position, leaving ample space 
between your chest and the airbag cover in 
the center of the steering wheel.

The front seat passenger should also adjust 
their seat-back to a comfortable, upright 
position.

Reclining a seat-back so that the shoulder part of the belt no longer rests against the 
occupant’s chest reduces the protective capability of the belt. It also increases the 
chance of sliding under the belt in a crash and being seriously injured. The farther a 
seat-back is reclined, the greater the risk of injury.

Adjusting the Seat-Backs

1

Adjusting the Seat-Backs

Do not put a cushion, or other object, between the 
seat-back and your back. Doing so may interfere with 
proper seat belt or airbag operation.

If you cannot get far enough away from the steering 
wheel and still reach the controls, we recommend 
that you investigate whether some type of adaptive 
equipment may help.

3

WARNING

Reclining the seat-back too far can result in 
serious injury or death in a crash.

Adjust the seat-back to an upright position, 
and sit well back in the seat.

-------------------------------------------------------------------------------------------------------------------------------------------------------------

178

uu

Adjusting the Seats

u

Head Restraints

Co
ntrols

Head Restraints

Your vehicle is equipped with head restraints in all seating positions.

Head restraints are most effective for 
protection against whiplash and other rear-
impact crash injuries when the center of the 
back of the occupant’s head rests against the 
center of the restraint. The tops of the 
occupant’s ears should be level with the 
center height of the restraint.

To raise the head restraint:

Pull it upward.

To lower the head restraint:

Push it down while pressing the release 
button.

Adjusting the Front and Rear Outer Head Restraint Positions

1

Adjusting the Front and Rear Outer Head Restraint Positions

In order for the head restraint system to work 
properly:

Do not hang any items on the head restraints, or 
from the restraint legs.

Do not place any object between an occupant and 
the seat-back.

Install each restraint in its proper location.

3

WARNING

Improperly positioning head restraints 
reduces their effectiveness and increases 
the likelihood of serious injury in a crash.

Make sure head restraints are in place and 
positioned properly before driving.

Position head in the center 
of the head restraint.

-------------------------------------------------------------------------------------------------------------------------------------------------------------

179

uu

Adjusting the Seats

u

Head Restraints

Co
ntrols

A passenger sitting in the center back seating 
position should adjust the height of their head 
restraint to an appropriate position before the 
vehicle begins moving.

To raise the head restraint:

Pull it upward.

To lower the head restraint:

Push it down while pressing the release 
button.

Head restraints can be removed for cleaning or repair.

To remove a head restraint:

Pull the restraint up as far as it will go. Then push the release button, and pull the 
restraint up and out.

To reinstall a head restraint:

Insert the legs back in place, then adjust the head restraint to an appropriate height 
while pressing the release button. Pull up on the restraint to make sure it is locked 
in position.

Changing the Rear Center Seat Head Restraint Positions

Removing and Reinstalling the Head Restraints

1

Removing and Reinstalling the Head Restraints

3

WARNING

Failure to reinstall, or correctly reinstall, the 
head restraints can result in severe injury 
during a crash.

Always replace the head restraints before 
driving.

-------------------------------------------------------------------------------------------------------------------------------------------------------------

180

uu

Adjusting the Seats

u

Maintain a Proper Sitting Position

Co
ntrols

Maintain a Proper Sitting Position

After all occupants have adjusted their seats and head restraints, and put on their 
seat belts, it is very important that they continue to sit upright, well back in their 
seats, with their feet on the floor, until the vehicle is safely parked and the power 
system is off.

Sitting improperly can increase the chance of injury during a crash. For example, if 
an occupant slouches, lies down, turns sideways, sits forward, leans forward or 
sideways, or puts one or both feet up, the chance of injury during a crash is greatly 
increased.

In addition, an occupant who is out of position in the front seat can be seriously or 
fatally injured in a crash by striking interior parts of the vehicle or being struck by an 
inflating front airbag.

1

Maintain a Proper Sitting Position

3

WARNING

Sitting improperly or out of position can 
result in serious injury or death in a crash.

Always sit upright, well back in the seat, 
with your feet on the floor.

-------------------------------------------------------------------------------------------------------------------------------------------------------------

181

uu

Adjusting the Seats

u

Armrest

Co
ntrols

Armrest

Pull down the armrest in the center backrest.

Using the Rear Seat Armrest

-------------------------------------------------------------------------------------------------------------------------------------------------------------

182

Co
ntrols

Interior Lights/Interior Convenience Items

Interior Lights

ON

The interior lights come on regardless whether 
the doors are open or closed.

Door activated

The interior lights come on in the following 
situations:

When any doors are opened.

You unlock the driver’s door.

When the power mode is set to VEHICLE 
OFF.

OFF

The interior lights remain off regardless 
whether the doors are open or closed.

Interior Light Switches

1

Interior Light Switches

In the door activated position, the interior lights fade 
out and go off about 30 seconds after the doors are 
closed.
The lights go off after 30 seconds in the following 
situations:

When you unlock the driver’s door but do not open 
it.

When you set the power mode to VEHICLE OFF but 
do not open a door.

You can change the interior lights dimming time.

2

Customized Features

 P. 295

The interior lights go off immediately in the following 
situations:

When you lock the driver’s door.

When you close the driver’s door in ACCESSORY 
mode.

 When you set the power mode to ON.

If you leave any doors open, the interior lights go off 
after about 15 minutes.

To avoid draining the battery, do not leave the 
interior light on for an extended length of time when 
the power system is off.

Door Activated Position

Off

On

-------------------------------------------------------------------------------------------------------------------------------------------------------------

183

uu

Interior Lights/Interior Convenience Items

u

Interior Lights

Co
ntrols

The map lights can be turned on and off by 
pressing the 

 (map light) button.

Map Lights

1

Map Lights

When the interior light switch is in the door activated 
position and any door is open, the map light will not 
go off when you press the 

 (map light) button.

Front

Rear

-------------------------------------------------------------------------------------------------------------------------------------------------------------

184

uu

Interior Lights/Interior Convenience Items

u

Interior Convenience Items

Co
ntrols

Interior Convenience Items

Press the release button to open the glove 
box.

Removable shelf

The shelf in the glove box is detachable. To 
remove it, disengage the tabs.

The removable shelf can be stored upside 
down in the glove box.

Glove Box

1

Glove Box

3

WARNING

An open glove box can cause serious injury 
to your passenger in a crash, even if the 
passenger is wearing the seat belt.

Always keep the glove box closed while 
driving.

Glove Box

Release Button

Tab

Shelf

-------------------------------------------------------------------------------------------------------------------------------------------------------------

Continued

185

uu

Interior Lights/Interior Convenience Items

u

Interior Convenience Items

Co
ntrols

You can lock the glove box, trunk, and/or 
navigation system, entering a PIN code from 
the On Demand Multi-Use Display

TM

.

To lock:
1.

Select 

Shortcuts

.

2.

Select 

Valet

.

3.

Select the item you want to be PIN-
protected from the locked area, then select 

OK

.

Valet Mode

1

Valet Mode

If you need to give the key to someone else, lock the 
cover in the rear center seat-back first, and give the 
keyless access remote without a built-in key as a valet 
key.

2

When You Cannot Open the Trunk

 P. 582

Locked Area

-------------------------------------------------------------------------------------------------------------------------------------------------------------

uu

Interior Lights/Interior Convenience Items

u

Interior Convenience Items

186

Co
ntrols

4.

The previous code is displayed. Select 

OK

.

u

You will receive a confirmation message 
on the display. Select 

OK

.

When you enter the PIN code for the first time 
or if you want to change the code:

1.

Select 

Shortcuts

.

2.

Select 

Valet

.

3.

Select the item you want to be PIN-
protected from the locked area, then select 

OK

.

4.

Enter your selected four-digit PIN code, 
then select 

OK

.

5.

You will be asked to enter the same four-
digit PIN code again. Enter, then select 

OK

.

u

You will receive a confirmation message 
on the display. Select 

OK

.

To unlock:
1.

Select 

Valet

.

2.

Select 

Unlock

.

3.

Enter the four-digit PIN code you have 
previously selected, then select 

OK

.

1

Valet Mode

The PIN code entering screen also appears when you 
press:

The glove box open button

The trunk release button on the trunk, on the 
remote, or the trunk opener on the driver’s door

While the glove box or the trunk is PIN-protected.

If you have locked all the items of the locked area, the 
PIN code entering screen appears with the power 
mode in ACCESSORY.

You can cancel the valet mode when you manually 
open the trunk.

2

When You Cannot Open the Trunk

 P. 582

If you have only set 

Navi, Phone, Audio

 PIN-

protected but forgot your four-digit PIN code, you 
need to go to a dealer to have the set valet mode 
reset. 

-------------------------------------------------------------------------------------------------------------------------------------------------------------

Continued

187

uu

Interior Lights/Interior Convenience Items

u

Interior Convenience Items

Co
ntrols

Your vehicle has a multi-function center 
console. It includes a storage compartment, 
an armrest, and a sliding tray.

Push the button on either side of the console 
compartment to open the console 
compartment.

You can put small items in the sliding tray 
located in the console compartment lid. To 
use the tray, push the button, then slide the 
console compartment lid out fully. To close 
the lid, push the button. It is automatically slid 
back.

Console Compartment

1

Console Compartment

The console compartment light comes on when the 
parking lights are on.

Button

Sliding Tray

Button

-------------------------------------------------------------------------------------------------------------------------------------------------------------

188

uu

Interior Lights/Interior Convenience Items

u

Interior Convenience Items

Co
ntrols

Slide the lid using the release knob to use the 
center pocket.
To close it, push the release knob. It is 
automatically slid back.

Center Pocket

Knob

-------------------------------------------------------------------------------------------------------------------------------------------------------------

Continued

189

uu

Interior Lights/Interior Convenience Items

u

Interior Convenience Items

Co
ntrols

Front seat beverage holders

Press the raised detent to open the lid. To 
close the lid, push it down until it latches.

Front door beverage holders

Rear seat beverage holders

The rear beverage holders are in the rear seat 
armrest. Open the beverage holders by pulling 
the latch up on the front.

Beverage Holders

1

Beverage Holders

NOTICE

Spilled liquids damage the upholstery, carpeting, and 
electrical components in the interior.

Be careful when you are using the beverage holders. 
Hot liquid can scald you.

Push

Latch

-------------------------------------------------------------------------------------------------------------------------------------------------------------

uu

Interior Lights/Interior Convenience Items

u

Interior Convenience Items

190

Co
ntrols

The accessory power sockets can be used when the power mode is in ACCESSORY 
or ON.

Center pocket

Open the lid and the cover to use it.

Console compartment

Open the console lid and the cover to use it.

Accessory Power Sockets

1

Accessory Power Sockets

NOTICE

Do not insert an automotive type cigarette lighter 
element.
This can overheat the power socket.

The accessory power sockets are designed to supply 
power for 12-volt DC accessories that are rated 180 
watts (15 amps) or less.

To prevent 12-volt battery drain, only use the power 
socket with the power system on.

When both sockets are being used, the combined 
power rating of the accessories should not exceed 
180 watts (15 amps).

-------------------------------------------------------------------------------------------------------------------------------------------------------------

Continued

191

uu

Interior Lights/Interior Convenience Items

u

Interior Convenience Items

Co
ntrols

There is a coat hook on the rear grab handle 
of both sides. Pull it down to use it.

There is a coat hook on the door pillar of both 
sides.

Coat Hooks

1

Coat Hooks

The coat hooks are not designed for large or heavy 
items.

-------------------------------------------------------------------------------------------------------------------------------------------------------------


Content      ..     9      10      11      12     ..