RAM ProMaster (2023 year). Manual in english - page 13
 

  Index      Manuals     RAM ProMaster (2023 year). Manual in english


Search            copyright infringement  


Content      ..     11      12      13      14     ..


RAM ProMaster (2023 year). Manual in english - page 13


IN CASE OF EMERGENCY

201

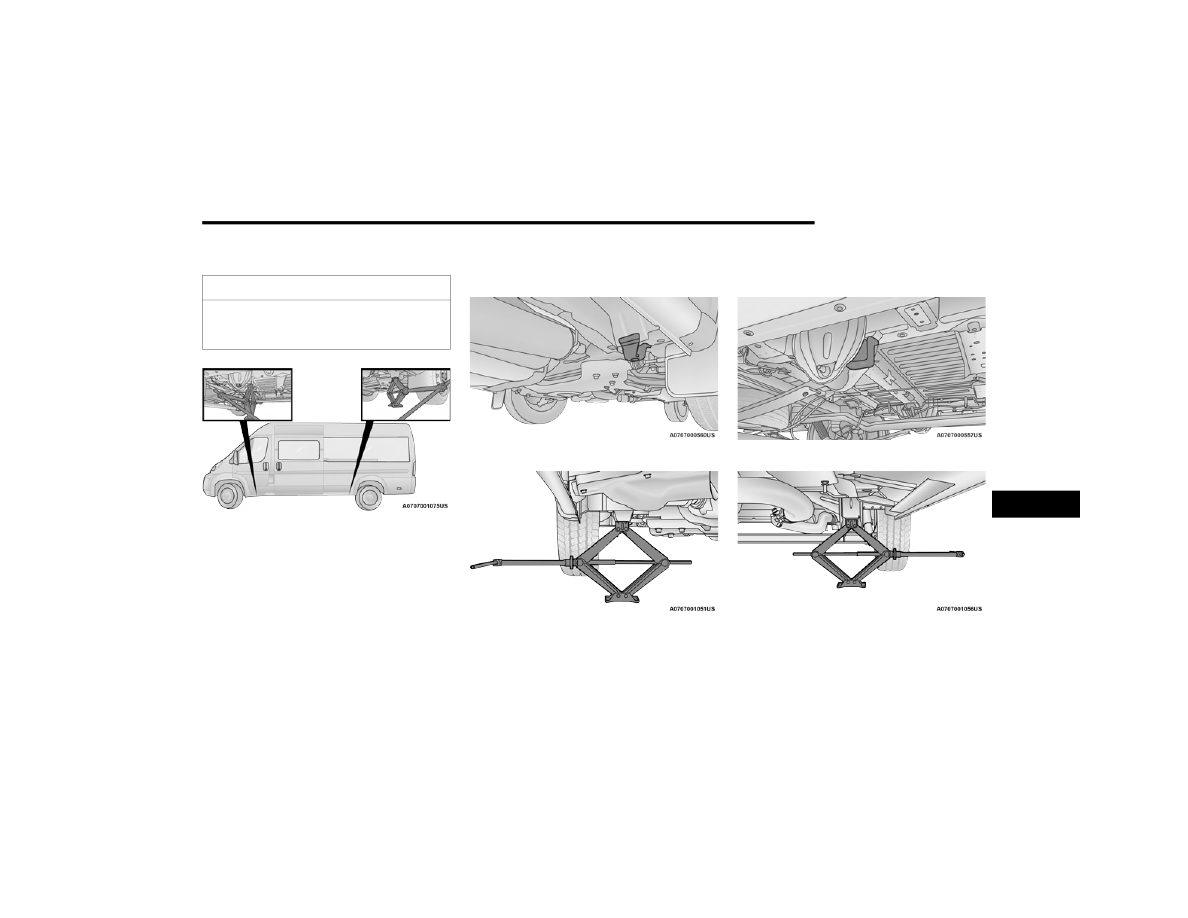
2. There are two jack engagement locations on 

each side of the vehicle body.

Jacking Engagement Locations

NOTE:

The front jacking location is located behind the 

front tire and in front of the driver/passenger door.

Front Lifting Point

Front Jacking Location

NOTE:

The rear jacking location is located in front of the 

rear tire and in front of the leaf spring mount.

Rear Lifting Point

Rear Jacking Location

CAUTION!

Do not attempt to raise the vehicle by jacking on 

locations other than those indicated in the 

Jacking Instructions for this vehicle.

7

-------------------------------------------------------------------------------------------------------------------------------------------------------------

202

IN CASE OF EMERGENCY


3. Place the wrench handle and lug bolt adapter 

on the jack screw and turn clockwise until the 

jack head is properly engaged in the described 

location. Do not raise the vehicle until you are 

sure the jack is securely engaged.

4. Raise the vehicle by turning the jack screw 

clockwise, using the wrench handle and lug 

bolt adapter. Raise the vehicle only until the 

tire just clears the surface and enough 

clearance is obtained to install the spare tire. 

Minimum tire lift provides maximum stability.

5. Remove the wheel lug bolts. For vehicles with 

wheel covers, remove the cover from the 

wheel by hand. Do not pry the wheel cover off. 

Then pull the wheel off the hub.

6. Install the spare tire. Lightly tighten the wheel 

lug bolts.

Mounting Spare Tire

NOTE:

Do not install the wheel cover on the spare tire.
7. Lower the vehicle by turning the jack screw 

left, making sure it is securely on the ground. 

Tighten the lug nuts/bolts in a star pattern 

until each nut/bolt has been tightened twice. 

Ensure that the socket is fully engaged on

the lug nut/bolt (do not insert it halfway)  

Ú

page 269.

Torque Patterns

8. Lower the jack to its fully-closed position.
9. Stow the damaged wheel/spare tire by 

reinstalling the wheel retainer and using the 

cable winch mechanism to securely tighten 

under the vehicle before driving.

WARNING!

Being under a jacked-up vehicle is dangerous. 

The vehicle could slip off the jack and fall on 

you. You could be crushed. Never get any part of 

your body under a vehicle that is on a jack. If you 

need to get under a raised vehicle, take it to a 

service center where it can be raised on a lift.

WARNING!

Raising the vehicle higher than necessary can 

make the vehicle less stable. It could slip off the 

jack and hurt someone near it. Raise the vehicle 

only enough to remove the tire.

WARNING!

To avoid the risk of forcing the vehicle off the 

jack, do not tighten the wheel nuts fully until the 

vehicle has been lowered. Failure to follow this 

warning may result in serious injury.

CAUTION!

Be sure to mount the spare tire with the valve 

stem facing outward. The vehicle could be 

damaged if the spare tire is mounted incorrectly.

-------------------------------------------------------------------------------------------------------------------------------------------------------------

IN CASE OF EMERGENCY

203

Reinstalling The Retainer

Damaged Wheel Stowage

10. Install the winch extension and rotate the 

wrench handle clockwise until the winch 

mechanism operator hears “three clicks” from 

the device to indicate the wheel is properly 

stowed under the vehicle.

11. Stow the jack, jack handle and winch handle 

tools back in the storage compartment.

12. Check the spare tire pressure as soon as 

possible. Correct the tire pressure, as 

required.

For vehicles with aluminum wheels:
The center cap must be pushed out from the rear 

to install the retainer and stow the tire.

W

HEEL

 C

OVERS

The wheel covers on the vehicle are held in place 

by the wheel lug bolts and can be removed after 

the wheel lug bolts are taken off.

TIRE SERVICE KIT — IF EQUIPPED

Use this QR code to access your 

digital experience.
Depending on vehicle trim level, 

tire service kit models may vary.
Small punctures up to 1/4 inch 

(6 mm) in the tire tread can be 

sealed with the Tire Service Kit. 

Foreign objects (e.g., screws or nails) should not

be removed from the tire. The Tire Service Kit 

can be used in outside temperatures down to 

approximately -4°F (-20°C).
This kit will provide a temporary tire seal, allowing 

you to drive your vehicle up to 100 miles (160 km) 

with a maximum speed of 50 mph (80 km/h).

WARNING!

A loose tire or jack thrown forward in a collision or 

hard stop could endanger the occupants of the 

vehicle. Always stow the jack parts and the spare tire 

in the places provided. Have the deflated (flat) tire 

repaired or replaced immediately.

CAUTION!

Use a back-and-forth motion to remove the 

hub cap. Do not use a twisting motion when 

removing the hub cap, damage to the hub cap 

finish may occur.

7

-------------------------------------------------------------------------------------------------------------------------------------------------------------

204

IN CASE OF EMERGENCY


Tire Service Kit Components And Operation

Tire Service Kit Components

Using The Mode Select Knob And Hoses
Your Tire Service Kit is equipped with the following 

symbols to indicate the air or sealant mode.

Selecting Air Mode 

Push in the Mode Select Knob and 

turn to this position for air pump oper

-

ation only.

Selecting Sealant Mode 

Push in the Mode Select Knob and turn to 

this position to inject the Tire Service Kit 

Sealant and to inflate the tire.

Using The Power Button 

Push and release the Power Button 

once to turn On the Tire Service Kit. 

Push and release the Power Button 

again to turn Off the Tire Service Kit.

Using The Deflation Button 

Push the Deflation Button to reduce 

the air pressure in the tire if it 

becomes overinflated.

Tire Service Kit Usage Precautions

Replace the Tire Service Kit Sealant Bottle prior 

to the expiration date (printed at the lower right 

hand corner on the bottle label) to assure 

optimum operation of the system. See the 

Sealant Bottle Replacement in this section for 

further information.

The Sealant Bottle is a one tire application use 

and needs to be replaced after each use. Always 

replace these components immediately at your 

original equipment vehicle dealer.

When the Tire Service Kit sealant is in a liquid 

form, clean water, and a damp cloth will remove 

the material from the vehicle or tire and wheel 

components. Once the sealant dries, it can 

easily be peeled off and properly discarded.

For optimum performance, make sure the valve 

stem on the wheel is free of debris before 

connecting the Tire Service Kit.

The Tire Service Kit Sealant is only intended

to seal punctures less than 1/4 inch (6 mm) 

diameter in the tread/contact surface of your 

vehicle’s tires.

The Tire Service Kit Sealant is not intended to 

seal punctures on the tires' side walls.

You can use the Tire Service Kit air pump to 

inflate bicycle tires. The kit also comes with 

two needles, located in the Accessory Storage 

Compartment (on the bottom of the air pump) 

for inflating sport balls, rafts, or similar inflat

-

able items. However, use only the Air Pump and 

make sure the Mode Select Knob is in the Air 

Mode when inflating such items to avoid 

injecting sealant into them.

Do not lift or carry the Tire Service Kit by the hoses.

1 — Sealant/Air Hose
2 — Hose Accessories
3 — Mode Select Knob
4 — Pressure Gauge
5 — Deflation Button
6 — Power Switch
7 — Sealant Bottle
8 — Power Plug

-------------------------------------------------------------------------------------------------------------------------------------------------------------

IN CASE OF EMERGENCY

205

(Continued)

Sealing A Tire With Tire Service Kit

Whenever You Stop To Use Tire Service Kit:

1. Pull over to a safe location and turn on the 

vehicle’s Hazard Warning Flashers.

2. Verify that the valve stem (on the wheel with 

the deflated tire) is in a position that is near to 

the ground. This will allow the Tire Service Kit 

Hose to reach the valve stem and keep the Tire 

Service Kit flat on the ground. This will provide 

the best positioning of the kit when injecting 

the sealant into the deflated tire and running 

the air pump. Move the vehicle as necessary to 

place the valve stem in this position before 

proceeding.

3. Place the gear selector in PARK, then push and 

release the ENGINE START/STOP button to set 

the ignition switch to the OFF position.

4. Apply the parking brake.

WARNING!

Do not attempt to seal a tire on the side of the 

vehicle closest to traffic. Pull far enough off 

the road to avoid the danger of being hit when 

using the Tire Service Kit.

Do not use Tire Service Kit or drive the vehicle 

under the following circumstances:

If the puncture in the tire tread is approxi

-

mately 1/4 inch (6 mm) or larger.

If the tire has any sidewall damage.

If the tire has any damage from driving 

with extremely low tire pressure.

If the tire has any damage from driving on 

a flat tire.

If the wheel has any damage.

If you are unsure of the condition of the 

tire or the wheel.

Keep Tire Service Kit away from open flames 

or heat source.

A loose Tire Service Kit thrown forward in a 

collision or hard stop could endanger the 

occupants of the vehicle. Always stow the Tire 

Service Kit in the place provided. Failure to 

follow these warnings can result in injuries 

that are serious or fatal to you, your passen

-

gers, and others around you.

Take care not to allow the contents of Tire 

Service Kit to come in contact with hair, eyes, 

or clothing. Tire Service Kit sealant is harmful 

if inhaled, swallowed, or absorbed through the 

skin. It causes skin, eye, and respiratory irrita

-

tion. Flush immediately with plenty of water if 

there is any contact with eyes or skin. Change 

clothing as soon as possible, if there is any 

contact with clothing.

Tire Service Kit Sealant solution contains 

latex. In case of an allergic reaction or rash, 

consult a physician immediately. Keep Tire 

Service Kit out of reach of children. If swal

-

lowed, rinse mouth immediately with plenty of 

water and drink plenty of water. Do not induce 

vomiting! Consult a physician immediately.

WARNING!

7

-------------------------------------------------------------------------------------------------------------------------------------------------------------

206

IN CASE OF EMERGENCY


Setting Up To Use Tire Service Kit:
1. Uncoil the Sealant Hose and then remove the 

cap from the fitting at the end of the hose.

2. Place the Tire Service Kit flat on the ground 

next to the deflated tire.

3. Remove the cap from the valve stem 

and then screw the fitting at the end of 

the Sealant Hose onto the valve stem.

4. Uncoil the Power Plug and insert the 

plug into the vehicle’s 12 Volt power 

outlet.

NOTE:

Do not remove foreign objects (e.g., screws or 

nails) from the tire.
Injecting Tire Service Kit Sealant Into The 

Deflated Tire:

1. Always start the vehicle before turning 

the Tire Service Kit on.

2. Ensure the Mode Select Knob is to the 

Sealant Mode position.

3. After pushing the Power Button, the 

sealant (white fluid) will flow from the 

Sealant Bottle through the Sealant Hose 

and into the tire.

NOTE:

Sealant may leak out through the puncture in 

the tire.
If the sealant (white fluid) does not flow within 

0 – 10 seconds through the Sealant Hose:
1. Push the Power Button to turn the Tire Service 

Kit off. Disconnect the Sealant Hose from the 

valve stem. Make sure the valve stem is free 

of debris. Reconnect the Sealant Hose to the 

valve stem. Check that the Mode Select Knob 

is in the Sealant Mode position and not Air 

Mode. Push the Power Button to turn the Tire 

Service Kit on.

2. Connect the Power Plug to a different 12 Volt 

power outlet in your vehicle or another vehicle, 

if available. Make sure the vehicle is running 

before turning the Tire Service Kit on.

3. The Sealant Bottle may be empty due to 

previous use. Call for assistance.

If the sealant (white fluid) does flow through the 

Sealant Hose:

1. Continue to operate the pump until 

sealant is no longer flowing through 

hose (typically takes 30 - 70 seconds). 

As the sealant flows through the Sealant 

Hose, the Pressure Gauge can read as high as 

70 psi (4.8 bar). The Pressure Gauge will 

decrease quickly from approximately 70 psi 

(4.8 bar) to the actual tire pressure when the 

Sealant Bottle is empty.

2. The pump will start to inject air into the 

tire immediately after the Sealant Bottle 

is empty. Continue to operate the pump 

and inflate the tire to the cold tire 

inflation pressure found on the tire and loading 

information label located in the driver-side door 

opening. Check the tire pressure by looking at the 

Pressure Gauge.

If the tire does not inflate to at least 26 psi 

(1.8 bar) within 15 minutes:

The tire is too badly damaged. Do not attempt to 

drive the vehicle further. Call for assistance.

-------------------------------------------------------------------------------------------------------------------------------------------------------------

IN CASE OF EMERGENCY

207

If the tire inflates to the recommended pressure or 

is at least 26 psi (1.8 bar) within 15 minutes:
NOTE:

If the tire becomes overinflated, push the Deflation 

Button to reduce the tire pressure to the recom

-

mended inflation pressure before continuing.

1. Push the Power Button to turn the Tire 

Service Kit off.

2. Remove the speed limit label from the 

Tire Service Kit and place sticker on the 

steering wheel.

3. Immediately disconnect the Sealant Hose 

from the valve stem, reinstall the cap on the 

fitting at the end of the hose, and place the Tire 

Service Kit in the vehicle storage location.

Drive Vehicle:

 Immediately after injecting sealant 

and inflating the tire, drive the vehicle 

5 miles (8 km) or 10 minutes to ensure 

distribution of the Tire Service Kit Sealant 

within the tire. Do not exceed 50 mph (80 km/h).

After Driving:

Pull over to a safe location and turn on the 

vehicle’s Hazard Warning Flashers.

Verify that the valve stem (on the wheel with

the deflated tire) is in a position that is near to 

the ground. This will allow the Tire Service Kit 

Hose to reach the valve stem and keep the Tire 

Service Kit flat on the ground. This will provide 

the best positioning of the kit when injecting the 

sealant into the deflated tire and running the 

air pump. Move the vehicle as necessary to 

place the valve stem in this position before 

proceeding.

Place the transmission in PARK (P) and cycle the 

ignition in the OFF position.

Apply the parking brake.

NOTE:

If tire has improper inflation follow these next steps:
1. Uncoil the Sealant Hose, and then remove the 

cap from the fitting at the end of the hose.

2. Place the Tire Service Kit flat on the 

ground next to the deflated tire.

3. Remove the cap from the valve stem, and then 

screw the fitting at the end of the Sealant Hose 

onto the valve stem.

4. Uncoil the Power Plug and insert the 

plug into the vehicle's 12 Volt power 

outlet.

5. Uncoil the Hose and screw the fitting at 

the end of the hose onto the valve stem.

6. Turn the Mode Select Knob and turn to 

the Air Mode position.

7. Check the pressure in the tire by reading the 

Pressure Gauge.

If tire pressure is less than 19 psi (1.3 bar):
The tire is too badly damaged. Do not attempt to 

drive the vehicle further. Call for assistance.

WARNING!

The Tire Service Kit is not a permanent flat tire 

repair. Have the tire inspected and repaired or 

replaced after using the Tire Service Kit. Do not 

exceed 50 mph (80 km/h) until the tire is repaired 

or replaced. Failure to follow this warning can result 

in injuries that are serious or fatal to you, your 

passengers, and others around you. Have the tire 

checked as soon as possible at an authorized dealer.

7

-------------------------------------------------------------------------------------------------------------------------------------------------------------

208

IN CASE OF EMERGENCY


If the tire pressure is 19 psi (1.3 bar) or higher:

1. Push the Power Button to turn on Tire 

Service Kit and inflate the tire to the cold 

tire inflation pressure found on the tire 

and loading information label located in 

the driver-side door opening.
NOTE:

If the tire becomes overinflated, push the Deflation 

Button to reduce the tire pressure to the recom

-

mended inflation pressure before continuing.
2. Disconnect the Tire Service Kit from the valve 

stem, reinstall the cap on the valve stem and 

unplug from 12 Volt outlet.

3. Place the Tire Service Kit in its proper storage 

area in the vehicle.

4. Have the tire inspected and repaired or 

replaced at the earliest opportunity at an 

authorized dealer or tire service center.

5. Remove the Speed Limit sticker from the 

steering wheel after the tire has been repaired.

6. Replace the Sealant Bottle at an authorized 

dealer as soon as possible.

NOTE:

When having the tire serviced, advise the autho

-

rized dealer or service center that the tire has been 

sealed using the Tire Service Kit.

Sealant Bottle Replacement:
1. Unwrap the power cord.
2. Unwrap the hose.

Hose Location

3. Remove the bottle cover.

Remove The Bottle Cover

4. Rotate the bottle up beyond vertical to release.

Rotate The Bottle Up

5. Pull the bottle away from the Compressor.

Remove The Bottle

-------------------------------------------------------------------------------------------------------------------------------------------------------------

IN CASE OF EMERGENCY

209

NOTE:

For sealant bottle installation, follow these 

steps in reverse order.

The Sealant Bottle is a one tire application use 

and needs to be replaced after each use. Always 

replace these components immediately at your 

original equipment vehicle dealer.

Replace the Tire Service Kit Sealant Bottle prior to 

the expiration date (printed on the bottle label) to 

ensure optimum operation of the system.

Sealant Bottle Expiration Date Location

A

LTERNATE

 T

IRE

 S

ERVICE

 K

IT

 — 

I

F

 E

QUIPPED

Depending on vehicle trim levels, the Tire Service 

Kit designs may vary and can be stored in the 

driver’s door pocket or the passenger’s side 

compartment area.

T

IRE

 S

ERVICE

 K

IT

 C

OMPONENTS

 A

ND


O

PERATION

Tire Service Kit Components

WARNING!

As required by current regulations, the information 

on chemical substances for the protection of human 

health and the environment and on the safe use 

of the sealing fluid are on the packaging label. 

Compliance with the indications on the label is 

an essential condition to ensure the safety and 

effectiveness of the product. Remember to carefully 

read the label before use. The user of the product is 

responsible for any damages caused by improper 

use. The sealing fluid has an expiration date. 

Replace the bottle if the sealant has expired.

CAUTION!

Dispose of the bottle and the sealant liquid 

properly. Have them disposed of in compliance 

with national and local regulations.

1 — Power Button
2 — Mode Select Knob
3 — Sealant Hose (Clear)
4 — Sealant Bottle
5 — Air Pump Hose (Black)
6 — Sealant Bottle Release Button
7 — Power Plug
8 — Pressure Gauge
9 — Deflation Button

7

-------------------------------------------------------------------------------------------------------------------------------------------------------------

210

IN CASE OF EMERGENCY


(Continued)

Using The Mode Select Knob And Hoses

Your Tire Service Kit is equipped with the following 

symbols to indicate the air or sealant mode.

Selecting Air Mode 

Push in the Mode Select Knob (2) and 

turn to this position for air pump oper

-

ation only. Use the Black Air Pump 

Hose (5) when selecting this mode.

Selecting Sealant Mode 

Push in the Mode Select Knob (2) and 

turn to this position to inject the Tire 

Service Kit Sealant and to inflate the 

tire. Use the Sealant Hose (3) when 

selecting this mode.

Using The Power Button 

Push and release the Power Button (1) 

once to turn on the Tire Service Kit. 

Push and release the Power Button (1) 

again to turn Off the Tire Service Kit.

Using The Deflation Button 

Push the Deflation Button (9) to 

reduce the air pressure in the tire if it 

becomes overinflated.

T

IRE

 S

ERVICE

 K

IT

 U

SAGE

 P

RECAUTIONS

The Sealant Bottle (4) and Sealant Hose (3) 

are a one tire application use and need to be 

replaced after each use. Always replace these 

components immediately at your original equip

-

ment vehicle dealer.

When the Tire Service Kit sealant is in a liquid 

form, clean water and a damp cloth will remove 

the material from the vehicle or tire and wheel 

components. Once the sealant dries, it can 

easily be peeled off and properly discarded.

For optimum performance, make sure the valve 

stem on the wheel is free of debris before 

connecting the Tire Service Kit.

You can use the Tire Service Kit air pump to inflate 

bicycle tires. The kit also comes with two needles, 

located in the Accessory Storage Compartment 

(on the bottom of the air pump) for inflating sport 

balls, rafts, or similar inflatable items. However, use 

only the Air Pump Hose (5) and make sure the Mode 

Select Knob (2) is in the Air Mode when inflating 

such items to avoid injecting sealant into them.

The Tire Service Kit Sealant is only intended to seal 

punctures less than 1/4 inch (6 mm) diameter in 

the tread of your tire.

Do not lift or carry the Tire Service Kit by the hoses.

WARNING!

Do not attempt to seal a tire on the side of the 

vehicle closest to traffic. Pull far enough off 

the road to avoid the danger of being hit when 

using the Tire Service Kit.

Do not use Tire Service Kit or drive the vehicle 

under the following circumstances:

If the puncture in the tire tread is approxi

-

mately 1/4 inch (6 mm) or larger.

If the tire has any sidewall damage.

If the tire has any damage from driving 

with extremely low tire pressure.

If the tire has any damage from driving on 

a flat tire.

If the wheel has any damage.

If you are unsure of the condition of the 

tire or the wheel.

Keep Tire Service Kit away from open flames 

or heat source.

A loose Tire Service Kit thrown forward in a 

collision or hard stop could endanger the 

occupants of the vehicle. Always stow the Tire 

Service Kit in the place provided. Failure to 

follow these warnings can result in injuries 

that are serious or fatal to you, your passen

-

gers, and others around you.

-------------------------------------------------------------------------------------------------------------------------------------------------------------

IN CASE OF EMERGENCY

211

S

EALING

 A T

IRE

 W

ITH

 T

IRE

 S

ERVICE

 K

IT

(A) Whenever You Stop To Use Tire Service Kit:

1. Pull over to a safe location and turn on the 

vehicle’s Hazard Warning Flashers.

2. Verify that the valve stem (on the wheel with 

the deflated tire) is in a position that is near to 

the ground. This will allow the Tire Service Kit 

Hoses (3) and (5) to reach the valve stem and 

keep the Tire Service Kit flat on the ground. 

This will provide the best positioning of the kit 

when injecting the sealant into the deflated 

tire and running the air pump. Move the 

vehicle as necessary to place the valve stem in 

this position before proceeding.

3. Place the transmission in PARK (P) (auto 

transmission) or in Gear (manual transmission) 

and place the ignition in the OFF position.

4. Apply the parking brake.

(B) Setting Up To Use Tire Service Kit:

1. Push in the Mode Select Knob (2) and turn to 

the Sealant Mode position.

2. Uncoil the Sealant Hose (3) and then remove 

the cap from the fitting at the end of the hose.

3. Place the Tire Service Kit flat on the ground 

next to the deflated tire.

4. Remove the cap from the valve stem and then 

screw the fitting at the end of the Sealant Hose 

(3) onto the valve stem.

5. Uncoil the Power Plug (7) and insert the plug 

into the vehicle’s 12 Volt power outlet.

NOTE:

Do not remove foreign objects (e.g., screws or 

nails) from the tire.

(C) Injecting Tire Service Kit Sealant Into 

The Deflated Tire:

Always start the engine before turning ON the 

Tire Service Kit.

NOTE:

Manual transmission vehicles must have the 

parking brake engaged and the gear selector in 

NEUTRAL.

After pushing the Power Button (1), the sealant 

(white fluid) will flow from the Sealant Bottle (4) 

through the Sealant Hose (3) and into the tire.

NOTE:

Sealant may leak out through the puncture in 

the tire.
If the sealant (white fluid) does not flow within 

0 – 10 seconds through the Sealant Hose (3):
1. Push the Power Button (1) to turn Off the Tire 

Service Kit. Disconnect the Sealant Hose (3) 

from the valve stem. Make sure the valve 

stem is free of debris. Reconnect the Sealant 

Hose (3) to the valve stem. Check that the 

Mode Select Knob (2) is in the Sealant Mode 

position and not Air Mode. Push the Power 

Button (1) to turn On the Tire Service Kit.

2. Connect the Power Plug (7) to a different 

12 Volt power outlet in your vehicle or another 

vehicle, if available. Make sure the engine is 

running before turning ON the Tire Service Kit.

Take care not to allow the contents of Tire 

Service Kit to come in contact with hair, eyes, 

or clothing. Tire Service Kit sealant is harmful 

if inhaled, swallowed, or absorbed through the 

skin. It causes skin, eye, and respiratory irrita

-

tion. Flush immediately with plenty of water if 

there is any contact with eyes or skin. Change 

clothing as soon as possible, if there is any 

contact with clothing.

Tire Service Kit Sealant solution contains 

latex. In case of an allergic reaction or rash, 

consult a physician immediately. Keep Tire 

Service Kit out of reach of children. If swal

-

lowed, rinse mouth immediately with plenty of 

water and drink plenty of water. Do not induce 

vomiting! Consult a physician immediately.

WARNING!

7

-------------------------------------------------------------------------------------------------------------------------------------------------------------

212

IN CASE OF EMERGENCY


3. The Sealant Bottle (4) may be empty due to 

previous use. Call for assistance.

NOTE:

If the Mode Select Knob (2) is on Air Mode and the 

pump is operating, air will dispense from the Air 

Pump Hose (5) only, not the Sealant Hose (3).
If the sealant (white fluid) does flow through the 

Sealant Hose (3):
1. Continue to operate the pump until sealant is no 

longer flowing through the hose (typically takes 

30 - 70 seconds). As the sealant flows through the 

Sealant Hose (3), the Pressure Gauge (8) can read 

as high as 70 psi (4.8 Bar). The Pressure Gauge (8) 

will decrease quickly from approximately 70 psi 

(4.8 Bar) to the actual tire pressure when the 

Sealant Bottle (4) is empty.

2. The pump will start to inject air into the tire 

immediately after the Sealant Bottle (4) is 

empty. Continue to operate the pump and 

inflate the tire to the pressure indicated on the 

tire pressure label on the driver-side latch 

pillar (recommended pressure). Check the tire 

pressure by looking at the Pressure Gauge (8).

If the tire does not inflate to at least 26 psi 

(1.8 Bar) pressure within 15 minutes:

The tire is too badly damaged. Do not attempt to 

drive the vehicle further. Call for assistance.

NOTE:

If the tire becomes overinflated, push the Deflation 

Button to reduce the tire pressure to the recom

-

mended inflation pressure before continuing.
If the tire inflates to the recommended pressure or 

is at least 26 psi (1.8 Bar) pressure within 

15 minutes:
1. Push the Power Button (1) to turn off the Tire 

Service Kit.

2. Remove the Speed Limit sticker from the top of 

the Sealant Bottle (4) and place the sticker on 

the instrument panel.

3. Immediately disconnect the Sealant Hose (3) 

from the valve stem, reinstall the cap on the 

fitting at the end of the hose, and place the Tire 

Service Kit in the vehicle storage location.

(D) Drive Vehicle:

Immediately after injecting sealant and inflating the 

tire, drive the vehicle 5 miles (8 km) or 10 minutes to 

ensure distribution of the Tire Service Kit Sealant within 

the tire. Do not exceed 50 mph (80 km/h).

(E) After Driving:

Pull over to a safe location  

Ú

page 211.

1. Push in the Mode Select Knob (2) and turn to 

the Air Mode position.

2. Uncoil the power plug and insert the plug into 

the vehicle's 12 Volt power outlet.

3. Uncoil the Air Pump Hose (5) (black in color) 

and screw the fitting at the end of hose onto 

the valve stem.

4. Check the pressure in the tire by reading the 

Pressure Gauge (8).

CAUTION!

The metal end fitting from Power Plug (8) may get 

hot after use, so it should be handled carefully.

Failure to reinstall the cap on the fitting at the end 

of the Sealant Hose (6) can result in sealant 

contacting your skin, clothing, and the vehicle’s 

interior. It can also result in sealant contacting 

internal Tire Service Kit components which may 

cause permanent damage to the kit.

WARNING!

Tire Service Kit is not a permanent flat tire repair. 

Have the tire inspected and repaired or replaced 

after using Tire Service Kit. Do not exceed 50 mph 

(80 km/h) until the tire is repaired or replaced. 

Failure to follow this warning can result in injuries 

that are serious or fatal to you, your passengers, and 

others around you.

-------------------------------------------------------------------------------------------------------------------------------------------------------------

IN CASE OF EMERGENCY

213

If tire pressure is less than 19 psi (1.3 Bar):
The tire is too badly damaged. Do not attempt to 

drive the vehicle further. Call for assistance.
If the tire pressure is 19 psi (1.3 Bar) or higher:
1. Push the Power Button (1) to turn on Tire 

Service Kit and inflate the tire to the pressure 

indicated on the tire and loading information 

label on the driver-side door opening.

NOTE:

If the tire becomes overinflated, push the Deflation 

Button to reduce the tire pressure to the recom

-

mended inflation pressure before continuing.
2. Disconnect the Tire Service Kit from the valve 

stem, reinstall the cap on the valve stem and 

unplug from 12 Volt outlet.

3. Place the Tire Service Kit in its proper storage 

area in the vehicle.

4. Have the tire inspected and repaired or 

replaced at the earliest opportunity at an 

authorized dealer or tire service center.

5. Remove the Speed Limit sticker from the 

instrument panel after the tire has been 

repaired.

6. Replace the Sealant Bottle (4) and Sealant 

Hose (3) assembly at an authorized dealer as 

soon as possible  

Ú

page 213.

NOTE:

When having the tire serviced, advise the autho

-

rized dealer or service center that the tire has been 

sealed using the Tire Service Kit.

(F) Sealant Bottle And Hose Replacement:

1. Replace the Tire Service Kit Sealant Bottle (4) 

and Sealant Hose (3) prior to the expiration 

date (printed at the upper right hand corner 

on the bottle label) to assure optimum 

operation of the system  

Ú

page 213.

Tire Service Kit Sealant Expiration Date Location

2. Uncoil the Sealant Hose (3) (clear in color).
3. Locate the red colored round Sealant Bottle 

release button at the lower right hand corner 

of the kit.

4. Push and hold the Sealant Bottle release 

button, then pull out the bottle holding the 

button.

5. Clean any remaining sealant from the Tire 

Service Kit housing.

6. Position the new Sealant Bottle (4) in the 

housing so that the Sealant Hose (3) aligns 

with the hose slot in the front of the housing. 

Push and hold the Sealant Bottle release 

button, then push the bottle into the housing 

by holding the button. An audible click will be 

heard indicating the bottle is locked into place. 

Release the button.

7. Verify that the cap is installed on the fitting at 

the end of the Sealant Hose (3) and return the 

hose to its storage area (located on top of the 

housing).

8. Return the Tire Service Kit to its storage 

location in the vehicle.

7

-------------------------------------------------------------------------------------------------------------------------------------------------------------

214

IN CASE OF EMERGENCY


(Continued)

JUMP STARTING

If your vehicle has a discharged battery, it can be jump 

started using a set of jumper cables and a battery in 

another vehicle or by using a portable battery booster 

pack. Jump starting can be dangerous if done 

improperly, so please follow the procedures in this 

section carefully.
NOTE:

When using a portable battery booster pack, follow 

the manufacturer’s operating instructions and 

precautions.

P

REPARATIONS

 F

OR

 J

UMP

 S

TART

The vehicle’s jump starting remote posts are located 

under the hood, in the engine compartment on the 

driver's side.
The Remote positive (+) Post is covered with a 

protective cap located on the side of the Front 

Power Distribution Center.
The Remote negative (-) Post is located on the core 

support closest to the front of the vehicle.

Jump Starting Locations

See the following steps to prepare for jump 

starting:
1. Apply the parking brake, shift the automatic 

transmission into PARK (P) and turn the 

ignition to the OFF position.

2. Turn off the heater, radio, and all electrical 

accessories.

3. Pull upward and remove the protective cover 

over the remote positive (+) battery post.

4. If using another vehicle to jump start the 

battery, park the vehicle within the reach of the 

jumper cables, apply the parking brake and 

make sure the ignition is OFF.

WARNING!

Do not attempt jump starting if the battery is 

frozen. It could rupture or explode and cause 

personal injury.

CAUTION!

Do not use a portable battery booster pack or 

any other booster source with a system voltage 

greater than 12 Volts or damage to the battery, 

starter motor, alternator or electrical system 

may occur.

Remote Positive (+) Post
Remote Negative (-) Post

WARNING!

Do not allow vehicles to touch each other as 

this could establish a ground connection and 

personal injury could result.

Take care to avoid the radiator cooling fan 

whenever the hood is raised. It can start 

anytime the ignition switch is ON. You can be 

injured by moving fan blades.

-------------------------------------------------------------------------------------------------------------------------------------------------------------

IN CASE OF EMERGENCY

215

J

UMP

 S

TARTING

 P

ROCEDURE

Connecting The Jumper Cables
1. Connect the positive (+) end of the jumper 

cable to the remote positive (+) post of the 

discharged vehicle.

NOTE:

The remote positive (+) post is located in the 

engine compartment on the driver's side under the 

cover of the Front Power Distribution Center.
2. Connect the opposite end of the positive (+) 

jumper cable to the positive (+) post of the 

booster battery.

3. Connect the negative (-) end of the jumper 

cable to the negative (-) post of the booster 

battery.

4. Connect the opposite end of the negative (-) 

jumper cable to the remote negative post or a 

good engine ground of the discharged vehicle. 

A “ground” is an exposed metallic/unpainted 

part of the engine, frame or chassis, such as 

an accessory bracket or large bolt. The ground 

must be away from the battery and the fuel 

injection system.

NOTE:

The remote negative (-) post is located in the front 

of the engine compartment on the driver's side.

5. Start the engine in the vehicle that has the 

booster battery. Let the engine idle a few 

minutes and then start the engine in the 

vehicle with the discharged battery.

6. Once the engine is started, follow the discon

-

necting procedure.

Disconnecting The Jumper Cables
1. Disconnect the negative (-) end of the jumper 

cable from the remote negative (-) post of the 

vehicle with the discharged battery.

2. Disconnect the opposite end of the negative (-) 

jumper cable from the negative (-) post of the 

booster battery.

3. Disconnect the positive (+) end of the jumper 

cable from the positive (+) post of the booster 

battery.

Remove any metal jewelry such as rings, 

watch bands and bracelets that could make 

an inadvertent electrical contact. You could be 

seriously injured.

Batteries contain sulfuric acid that can burn 

your skin or eyes and generate hydrogen gas 

which is flammable and explosive. Keep open 

flames or sparks away from the battery.

WARNING!

Failure to follow this jump starting procedure 

could result in personal injury or property 

damage due to battery explosion.

CAUTION!

Failure to follow these procedures could result in 

damage to the charging system of the booster 

vehicle or the discharged vehicle.

WARNING!

WARNING!

Do not connect the jumper cable to the negative 

(-) post of the discharged battery. The resulting 

electrical spark could cause the battery to 

explode and could result in personal injury.

7

-------------------------------------------------------------------------------------------------------------------------------------------------------------

216

IN CASE OF EMERGENCY


4. Disconnect the opposite end of the positive (+) 

jumper cable from the remote positive (+) post 

of the discharged vehicle, and reinstall the 

protective cap.

5. Close the cover of the Front Power Distribution 

Center.

If frequent jump starting is required to start your 

vehicle you should have the battery and charging 

system inspected at an authorized dealer.

B

ATTERY

 L

OCATION

There are two remote jump starting posts under 

the hood which is the recommended jump start 

location. If access to the battery is needed, an 

access panel on the driver’s side floor will allow for 

battery access.

Battery Access Panel

Battery Location

IF YOUR ENGINE OVERHEATS 

If the vehicle is overheating, it will need to be 

serviced by an authorized dealer.
In any of the following situations, you can reduce 

the potential for overheating by taking the 

appropriate action.

On the highways — slow down.

In city traffic — while stopped, place the trans

-

mission in NEUTRAL (N), but do not increase the 

engine idle speed while preventing vehicle 

motion with the brakes.

NOTE:

There are steps that you can take to slow down an 

impending overheat condition: 

If your Air Conditioner (A/C) is on, turn it off. 

The A/C system adds heat to the engine cooling 

system and turning the A/C off can help remove 

this heat.

You can also turn the temperature control to 

maximum heat, the mode control to floor and 

the blower control to high. This allows the heater 

core to act as a supplement to the radiator and 

aids in removing heat from the engine cooling 

system.

CAUTION!

Accessories plugged into the vehicle power 

outlets draw power from the vehicle’s battery, 

even when not in use (i.e., cellular devices, etc.). 

Eventually, if plugged in long enough without 

engine operation, the vehicle’s battery will 

discharge sufficiently to degrade battery life 

and/or prevent the engine from starting.

-------------------------------------------------------------------------------------------------------------------------------------------------------------


Content      ..     11      12      13      14     ..