RAM ProMaster City (2022 year). Manual in english - page 6
 

  Index      Manuals     RAM ProMaster City (2022 year). Manual in english


Search            copyright infringement  


Content      ..     4      5      6      7     ..


RAM ProMaster City (2022 year). Manual in english - page 6


88

MULTIMEDIA


UCONNECT INTRODUCTION

I

DENTIFYING

 Y

OUR

 R

ADIO

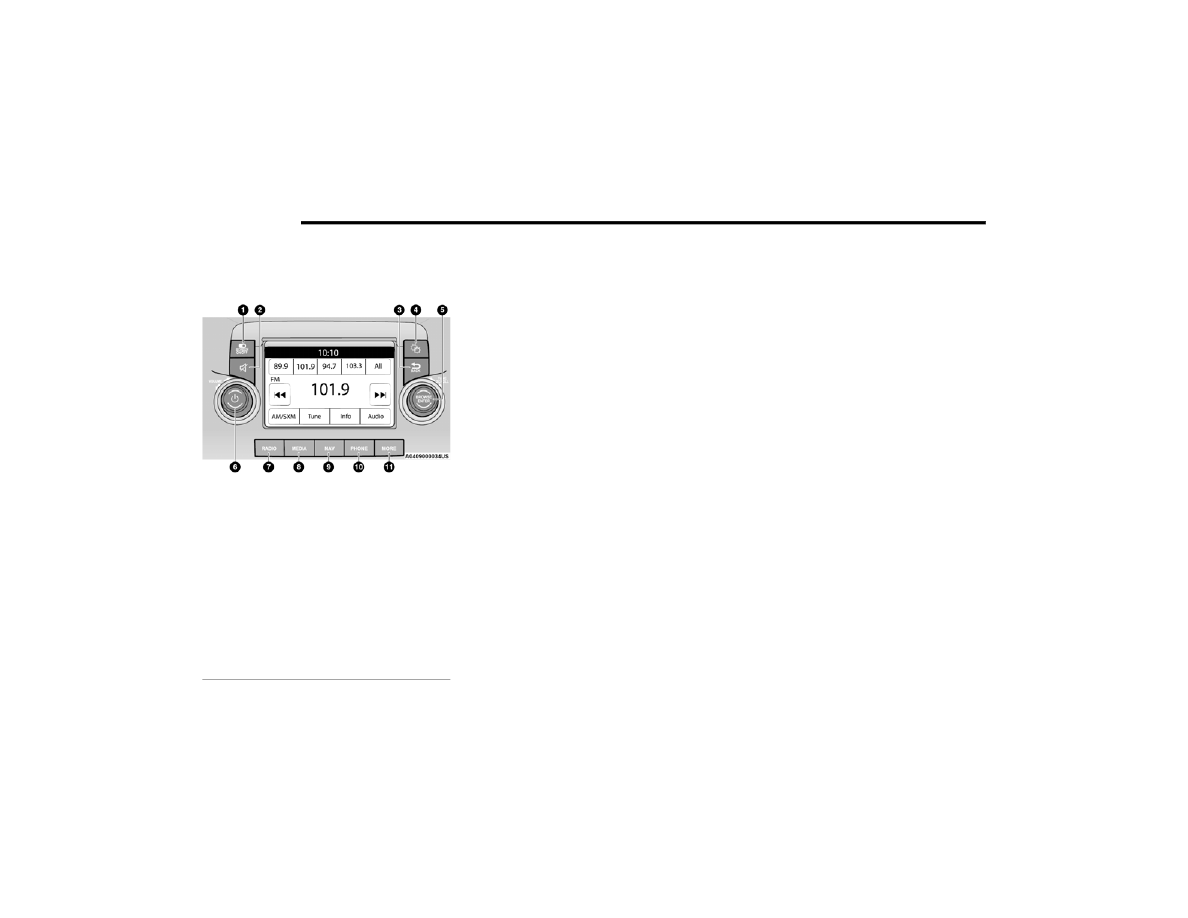
Uconnect 3/3 NAV With 5-inch Display

NOTE:

Uconnect screen images are for illustration 

purposes only and may not reflect exact software 

for your vehicle.

1 — SCREEN OFF Button
2 — Mute Button
3 — BACK Button
4 — Settings Button
5 — ENTER/BROWSE & TUNE/SCROLL Knob
6 — VOLUME & On/Off Button
7 — RADIO Button
8 — MEDIA Button
9 — NAV/CAMERA Button
10 — PHONE Button
11 — MORE Button

-------------------------------------------------------------------------------------------------------------------------------------------------------------

MULTIMEDIA

89

Feature

Description

Settings

Push the Settings button to access the Uconnect Settings.

BACK

Push the BACK button to return to a previous page.

ENTER/BROWSE & TUNE/SCROLL Knob

Push the ENTER/BROWSE button to accept a highlighted selection on the 

screen. Rotate the TUNE/SCROLL rotary knob to scroll through a list or tune a 

radio station.

MORE

Push the MORE button to access additional options such as “Trip” and 

“Clock”.

PHONE

Push the PHONE button to enter Phone Mode and access the hands-free 

phone system.

NAV/CAMERA

Push the CAMERA button to see the rear view image on the radio display. If 

equipped, push the NAV button to access Navigation Mode, the system’s 

built-in navigation feature.

MEDIA

Push the MEDIA button to enter Media Mode and access controls for external 

audio sources.

RADIO

Push the RADIO button to enter Radio Mode and access the system’s radio 

functions.

VOLUME & On/Off

Rotate the rotary knob to adjust the volume. Push the VOLUME & On/Off 

button to turn the system on or off.

Mute

Push the Mute button to turn the audio of the radio system off. Push it again 

to turn the audio on.

SCREEN OFF

Push the SCREEN OFF button to turn the screen on or off.

5

-------------------------------------------------------------------------------------------------------------------------------------------------------------

90

MULTIMEDIA


S

AFETY

 A

ND

 G

ENERAL

 I

NFORMATION

Safety Guidelines

Please read the manual carefully before using the 

system. It contains instructions on how to use the 

system in a safe and effective manner.
Please read and follow these safety precautions. 

Failure to do so may result in injury or property 

damage.

Glance at the screen only when it is safe to do 

so. If prolonged viewing of the screen is 

required, park in a safe location and set the 

parking brake.

Stop use immediately if a problem occurs. 

Failure to do so may cause injury or damage to 

the product. Return it to an authorized dealer to 

repair.

Ensure the volume level of the system is set to a 

level that still allows you to hear outside traffic 

and emergency vehicles.

Safe Usage Of The Uconnect System

Your system is a sophisticated electronic 

device. Do not let young children use your 

system.

Permanent hearing loss may occur if you play 

your music or sound system at loud volumes. 

Exercise caution when setting the volume on 

your system.

Keep drinks, rain and other sources of moisture 

away from your system. Besides damage to your 

system, moisture can cause electric shocks as 

with any electronic device.

NOTE:

Many features of this system are speed 

dependent. For your own safety, it is not possible to 

use some of the touchscreen features while the 

vehicle is in motion.

Care And Maintenance

Touchscreen

Do not press the touchscreen with any hard or 

sharp objects (pen, USB stick, jewelry, etc.) 

which could scratch the touchscreen surface!

Do not spray any liquid or caustic chemicals 

directly on the screen! Use a clean and dry 

microfiber lens cleaning cloth in order to clean 

the touchscreen.

If necessary, use a lint-free cloth dampened 

with a cleaning solution, such as isopropyl 

alcohol or an isopropyl alcohol and water solu

-

tion ratio of 50:50. Be sure to follow the solvent 

manufacturer's precautions and directions  

Ú

page 245.

WARNING!

ALWAYS drive safely with your hands on the 

steering wheel. You have full responsibility and 

assume all risks related to the use of the 

Uconnect features and applications in this 

vehicle. Only use Uconnect when it is safe to do 

so. Failure to do so may result in an accident 

involving serious injury or death.

CAUTION!

Do NOT attach any object to the touchscreen, 

doing so can result in breaking the touchscreen.

-------------------------------------------------------------------------------------------------------------------------------------------------------------

MULTIMEDIA

91

UCONNECT MODES

R

ADIO

 M

ODE

Operating Radio Mode

Uconnect 3/3 NAV With 5-inch Display Radio Mode

The radio is equipped with the following modes:

FM

AM

SiriusXM® Radio

Push the Radio button on the faceplate to enter 

the Radio Mode. The different tuner modes, FM/

AM/SXM, can then be selected by pressing the 

corresponding buttons on the touchscreen in the 

Radio mode.

SWITCHING THE SYSTEM ON/OFF

The screen will switch on/off when the Volume & 

On/Off button is pushed.

VOLUME/POWER

Rotate the Volume knob to adjust the volume. 

When the audio system is turned on, the sound will 

be set at the same volume level as last played.
Push the On/Off button to turn the system on or 

off.

ENTER/BROWSE AND TUNE/SCROLL 

CONTROL

Turn the rotary Tune/Scroll knob clockwise to 

increase or counterclockwise to decrease the radio 

station frequency.

SEEK FUNCTIONS

Seek Up   And Seek Down   
Press and release the Seek Up   or Seek Down   

button on the touchscreen to tune the radio to the 

next available station or channel. If the radio 

reaches the starting station after passing through 

the entire band two times, the radio will stop at the 

station where it began.
Fast Seek Up   And Fast Seek Down 
Press, hold, and then release the Seek Up   or 
Seek Down   button on the touchscreen to 

advance the radio through the available stations or 

channels at a faster rate. The radio stops at the 

next available station or channel when the button 

on the touchscreen is released.

NOTE:

Pressing and holding either the Seek Up   or 
Seek Down   button will scan the different 

frequency bands at a slower rate.

1 — Preset Buttons
2 — All Presets Button
3 — Seek Down Button
4 — Radio Band Button (FM/AM/SXM)
5 — Direct Tune Button
6 — Info Button
7 — Audio Settings Button
8 — Seek Up Button

5

-------------------------------------------------------------------------------------------------------------------------------------------------------------

92

MULTIMEDIA


DIRECT TUNE

Press the Tune button located at the bottom of the 

radio screen to directly tune to a desired radio 

station or channel.
Press the available number button on the 

touchscreen to begin selecting a desired station. 

Once a number has been entered, any numbers 

that are no longer possible (stations that cannot be 

reached) will become deactivated/grayed out.

INFO

Press the Info button to display the current track 

information. Press the X button to cancel this 

feature.

SETTING THE PRESETS

The Presets are available for all Radio Modes, and 

are activated by pressing any of the four Preset 

buttons, located at the top of the screen.
When you are receiving a station that you wish to 

commit into memory, press and hold the desired 

numbered button for more that two seconds or 

until you hear a confirmation beep.
The Radio stores up to 12 presets in each of the 

Radio modes. Four presets are visible at the top of 

the radio screen.
Pressing the All button on the radio home screen 

will display all of the preset stations for that mode.

SIRIUSXM® SATELLITE RADIO MODE 

Uconnect 3/3 NAV With 5-inch Display Changing To 

SiriusXM®

SiriusXM® Satellite Radio uses direct 

satellite-to-receiver broadcasting technology to 

provide clear, coast-to-coast radio content. 

SiriusXM® is a subscription-based service.
Visit 

siriusxm.com/getallaccess

 or review your 

SiriusXM® Radio pamphlet in your Owner’s 

Manual kit.
SiriusXM® services require subscriptions sold 

separately after the trial included with the new 

vehicle purchase. If you decide to continue your 

service at the end of your trial subscription, the 

plan you choose will automatically renew and bill at 

then-current rates until you call SiriusXM® at 

866-635-2349 to cancel. See SiriusXM® 

Customer Agreement for complete terms at 

www.siriusxm.com

 (US) or 

www.siriusxm.ca


(Canada). All fees and programming subject to 

change. Our satellite service is available to those 

at least 18 and older in the 48 contiguous US and 

D.C. Our SiriusXM® satellite service is also 

available in Canada and Puerto Rico (with 

coverage limitations). Our Internet radio service is 

available throughout our satellite service area and 

in AK. © 2021 SiriusXM® Radio Inc. SiriusXM® 

and all related marks and logos are trademarks of 

SiriusXM® Radio Inc.
This functionality is only available for radios 

equipped with a Satellite receiver. In order to 

receive satellite radio, the vehicle needs to be 

outside with a clear view to the sky.
If the screen shows “Acquiring Signal”, you might 

have to change the vehicle’s position in order to 

receive a signal. In most cases, the satellite radio 

does not receive a signal in underground parking 

garages or tunnels.
No Subscription
Radios equipped with a satellite receiver require a 

subscription to the SiriusXM® Service. When the 

radio does not have the necessary subscription, 

the radio is able to receive the Preview channel 

only.

-------------------------------------------------------------------------------------------------------------------------------------------------------------

MULTIMEDIA

93

Acquiring SiriusXM® Subscription
To activate the SiriusXM® Satellite Radio 

subscription, US visit 

www.UconnectPhone.com


or call: 1-800-643-2112
Canada visit 

www.UconnectPhone.com

 or call: 

1-800-465-2001 (English)or 1-800-387-9983 

(French)

NOTE:

You will need to provide the SiriusXM® ID (RID) 

located at the bottom of the Channel 0 screen.
The Satellite Mode is activated by a press of the 

SXM button on the touchscreen.
When in Satellite mode:

The SXM button on the touchscreen is high

-

lighted.

The SiriusXM® Presets are displayed at the top 

of the screen.

The SiriusXM® Channel Number is displayed in 

the center.

The Program Information is displayed at the 

bottom of the Channel Number.

The SiriusXM® function buttons are displayed 

below the Program Information.

Tuning is done by operating the Tune Knob or by 

Direct Tune, similar to other Radio Bands.
In addition to the tuning operation functions 

common to all radio modes, the Replay, Traffic/

Weather button, and Favorite button functions are 

available in SiriusXM® Mode.

Uconnect 3/3 NAV With 5-inch Display SiriusXM® 

Satellite Radio

Replay 
The replay function provides a means to store and 

replay up to 22 minutes of music audio and 

48 minutes of talk radio. Once the channel is 

switched, content in replay memory is lost.
Press the Replay button on the touchscreen. The 

Play/Pause, Rewind/Forward and Live buttons will 

display at the top of the screen, along with the 

replay time.
You can exit by pressing the Replay button on the 

touchscreen any time during the Replay mode.

1 — Browse Button
2 — Radio Bands Button
3 — Direct Tune Button
4 — Info Button
5 — Next Button

5

-------------------------------------------------------------------------------------------------------------------------------------------------------------

94

MULTIMEDIA


Play/Pause

Press the Pause/Play button on the touchscreen to 

pause the playing of live or rewound content at any 

time. Play can be resumed by pressing the Pause/

Play button on the touchscreen.

Rewind

Press the Rewind button on the touchscreen to 

rewind the content in steps of five seconds. 

Pressing the Rewind button on the touchscreen for 

more than two seconds rewinds the content. The 

radio begins playing the content at the point at 

which the press is released.

Forward

Each press of the Forward button on the 

touchscreen forwards the content in steps of five 

seconds. Forwarding of the content can only be 

done when the content is previously rewound, and 

therefore, cannot be done for live content. A 

continuous press of the Forward button on the 

touchscreen also forwards the content. The radio 

begins playing the content at the point at which the 

press is released.

Live

Press the Live button on the touchscreen to 

resume the playing of live content.

-------------------------------------------------------------------------------------------------------------------------------------------------------------

MULTIMEDIA

95

Favorites 
Press the Favorites button on the touchscreen to 

activate the Favorites Menu, which will time out 

within 20 seconds in absence of user interaction.
You can exit the Favorites Menu by a press of the X 

button.
The Favorites feature enables you to set a favorite 

artist or song that is currently playing. The radio 

then uses this information to alert you when either 

the favorite artist or song is being played at any 

time by any of the SiriusXM® Channels.
The maximum number of favorites that can be 

stored in the Radio is 50.
Favorite Artist: While the song is playing, to set a 

favorite artist, press the Favorites button on the 

touchscreen and then the Favorite Artist button on 

the touchscreen.
Favorite Song: While the song is playing, to set a 

favorite song, press the Favorites button on the 

touchscreen and then the Favorite Song button on 

the touchscreen.

Browse In SXM 
Press the Browse button on the touchscreen to 

edit Presets, Favorites, Game Zone, and Jump 

settings, along with providing the SiriusXM® 

Channel List.
This screen contains many submenus. You can exit 

a submenu to return to a parent menu by pressing 

the Back arrow.
All
Press the All button on the Browse Screen. When 

pressing the All button, the following categories 

become available:

Channel List: Press the Channel List to display 

all the SiriusXM® Channel Numbers. You can 

scroll the Channel List by pressing the Up and 

Down arrows located on the right side of the 

screen. Scrolling can also be done by operating 

the TUNE/SCROLL knob.

Genre: Press the Genre button on the touch

-

screen to display a list of Genres. You can select 

any desired Genre by pressing the Genre List; 

the radio tunes to a channel with the content in 

the selected Genre.

Favorites
Press the Favorites button on the Browse screen.
The Favorites menu provides a means to edit the 

Favorites List and to configure the Alert Settings, 

along with providing a list of Channels currently 

airing any of the items in the Favorites List.
You can scroll the Favorites List by pressing the Up 

and Down arrows located at the right side of the 

screen. Scrolling can also be done by operating the 

TUNE/SCROLL knob as well.
Remove Favorites
Press the Remove Favorites tab at the top of the 

screen. Press the Delete All button on the 

touchscreen to delete all of the Favorites or press 

the Trash Can icon next to the Favorite to be 

deleted.
Alert Settings
Press the Alert Settings tab at the top of the 

Favorites screen. The Alert Settings menu allows 

you to choose from a visual alert or audible and 

visual alert when one of your favorites is airing on 

any of the SiriusXM® channels.

5

-------------------------------------------------------------------------------------------------------------------------------------------------------------

96

MULTIMEDIA


Game Zone
Press the Game Zone button, located at the left of 

the Browse screen. This feature provides you with 

the ability to select teams, edit the selection, and 

set alerts.
On-Air
Press the On-Air tab at the top of the screen. The 

On-Air List provides a list of Channels currently 

airing any of the items in the Selections List, and 

pressing any of the items in the list tunes the radio 

to that channel.
Add/Delete — If Equipped
Press the Add/Delete button on the touchscreen to 

activate the League Scroll List. Press the chosen 

league and a scroll list of all teams within the 

league will appear, then you can select a team by 

pressing the corresponding box. A check mark 

appears for all teams that are chosen.

Remove Selection/Trash Can Icon
Press the Remove Selection tab at the top of the 

screen. Press the Delete All button on the 

touchscreen to delete all of the selections or press 

the Trash Can icon next to the selection to be 

deleted.
Alert Settings
Press the Alert Setting tab at the top of the screen. 

The Alert Settings menu allows you to choose from 

“Alert me to on-air games upon start” or “Alert 

upon score update” or both when one or more of 

your selections is airing on any of the SiriusXM® 

channels.
Tune Start
Tune Start begins playing the current song from 

the beginning when you tune to a music channel 

using one of the 12 presets. This feature occurs 

the first time the preset is selected during that 

current song.

AUDIO SETTINGS 

Press the Audio button within the Settings Main 

Menu to activate the Audio Settings screen.

Uconnect 3/3 NAV With 5-inch Display

1 — Balance/Fade
2 — Equalizer
3 — Speed Adjusted Volume
4 — Surround Sound
5 — Loudness
6 — Radio Off With Door

-------------------------------------------------------------------------------------------------------------------------------------------------------------

MULTIMEDIA

97

Audio Setting

Description

Balance/Fade

Press the Balance/Fade button on the touchscreen to balance audio between 

the front speakers or fade the audio between the rear and front speakers. 

Press the Front, Rear, Left or Right buttons or press and drag the red Speaker 

icon to adjust the Balance/Fade.

Equalizer

Press the + or – buttons or press and drag the level bar to increase or 

decrease each of the equalizer bands. The level value, which spans between 

plus or minus nine, is displayed at the top of each of the bands.

Speed Adjusted Volume

The Speed Adjusted Volume is adjusted by selecting from “Off”, “1”, “2”, or 

“3”. This alters the automatic adjustment of the audio volume with variation 

to vehicle speed. Volume increases automatically as speed increases to 

compensate for normal road noise.

Surround Sound — If Equipped

When Surround Sound is on, you can hear audio coming from every direction 

as in a movie theatre or home theatre system.

Loudness — If Equipped

When Loudness is on, the sound quality at lower volumes improves.

Auto Play

The Auto Play feature begins playing music as soon as a USB Media device is 

connected to one of the vehicle’s Media USB ports when it is turned on. Press 

Off to turn the setting off.

Radio Off With Door

The Radio Off With Door feature, when activated, keeps the radio on until the 

driver or passenger door is opened or when the Radio Off Delay selected time 

has expired.

5

-------------------------------------------------------------------------------------------------------------------------------------------------------------

98

MULTIMEDIA


RADIO VOICE COMMANDS

Use your voice to quickly get to the AM, FM, or 

SiriusXM® Satellite Radio stations you would like 

to hear. (Subscription or included SiriusXM® 

Satellite Radio trial required.)
Push the VR button   and wait for the beep to say 

a command. See some examples below:

“Tune to ninety-five-point-five FM”

“Tune to Satellite Channel Hits 1”

Did You Know: At any time, if you are not sure of 

what to say or want to learn a Voice Command, 
push the VR button   and say “Help”. The system 

provides you with a list of commands.

M

EDIA

 M

ODE

Operating Media Mode

Media Operation

Media Mode is entered by pushing the MEDIA 

button located on the faceplate.

AUDIO SOURCE SELECTION

Once in Media Mode, press the Source button and 

the desired mode button. USB and Bluetooth® are 

the Media sources available. You can select the 

Browse button to be given these options:

Now Playing

Artists

Albums

Genres

Songs

Playlists

Folders

You can select the Source button, Play/Pause 

button, or the Info button for artist information on 

the current song playing.

SEEK UP/SEEK DOWN

Seek Up  /Seek Down 
Press and release the Right Arrow   button on the 

touchscreen for the next selection. Press and 
release the Left Arrow   button on the 

touchscreen to return to the beginning of the 

current selection, or return to the beginning of the 

previous selection if the track is within the first few 

seconds of the current selection.

1 — Seek Down Button
2 — Browse Button
3 — Source Button
4 — Play/Pause Button
5 — Info Button
6 — Next Button
7 — Seek Up Button

-------------------------------------------------------------------------------------------------------------------------------------------------------------

MULTIMEDIA

99

Fast Seek Up  /Fast Seek Down 
Press and hold the Right Arrow   or Left Arrow   

button on the touchscreen and the desired mode 

will begin to fast forward or reverse through the 

current track until the button on the touchscreen is 

released.

TRACK SELECTION (BROWSE)

Rotate the Browse button to scroll through and 

select a desired track on the device or USB. Press 

the Exit button on the touchscreen if you wish to 

cancel the browse function.

REPEAT

Press the Repeat button on the touchscreen to 

repeat the song selection. To cancel repeat, press 

the Repeat button on the touchscreen a second 

time.

SHUFFLE

Press the Shuffle button on the touchscreen to 

play the selections on the USB or Bluetooth® 

device in random order to provide an interesting 

change of pace. Press the Shuffle button on the 

touchscreen a second time to turn this feature off.

INFO

Press the Info button to display the current track 

information. Press the X button to cancel this 

feature.

USB Mode

USB Mode is entered by either inserting a USB 

Jump Drive cable into the USB port or by pushing 

the MEDIA button located on the faceplate. Once in 

Media Mode, press the Source button on the 

touchscreen and select “USB”.

NOTE:

The system supports only FAT32 or ExFAT 

formatted USB devices. The system does not 

support devices with a capacity higher than 64GB. 

The system does not support USB hubs connected 

to the USB port of the vehicle. Connect your multi

-

media device directly to the USB port using the 

specific connection cable for the device if 

necessary.
Inserting USB Device
Gently insert the USB device into the USB port. If 

you insert a USB device with the ignition ON, the 

unit will switch to USB Mode and begin to play. The 

display will show the track number and index time 

in minutes and seconds. Play will begin at the start 

of track 1.

Browse
Press the Browse button on the touchscreen to 

select Artist, Album, Genre, Song, Playlist or Folder 

from the USB device. Once the desired selection is 

made, you can chose from the available media by 

pressing the button on the touchscreen. Press the 

Exit button on the touchscreen if you wish to cancel 

the browse function.

Bluetooth® Mode

Before proceeding, the Bluetooth® device must be 

paired with the Uconnect Phone to communicate 

with the Uconnect system  

Ú

page 102.

Once the Bluetooth® device is paired to the 

Uconnect system, push the MEDIA button located 

on the faceplate. Once in Media Mode, press the 

Source button on the touchscreen and select 

Bluetooth®.

NOTE:

For mobile phone compatibility and pairing instruc

-

tions, please visit 

UconnectPhone.com

.

5

-------------------------------------------------------------------------------------------------------------------------------------------------------------

100

MULTIMEDIA


Voice Commands Media

Uconnect offers connections via USB and 

Bluetooth®. Voice operation is only available for 

connected USB devices.
Push the VR button  . After the beep, say one of 

the following commands and follow the prompts to 

switch your media source or choose an artist.

“Change source to Bluetooth®”

“Change source to USB”

“Play artist Beethoven”; “Play album Greatest 

Hits”; “Play song Moonlight Sonata”; “Play genre 

Classical”

Did You Know: Press the Browse button on the 

touchscreen to see all of the music on your USB 

device. Your Voice Command must match exactly 

how the artist, album, song, and genre information 

is displayed.

P

HONE

 M

ODE


Overview

Uconnect Phone is a voice-activated, hands-free, 

in-vehicle communications system. Uconnect 

Phone allows you to dial a phone number with your 

mobile phone.

Uconnect Phone supports the following features:
Voice Activated Features 

Hands-Free dialing via Voice (“Call John Smith 

Mobile” or “Dial 248-555-1212”).

Hands-Free text-to-speech listening of your 

incoming SMS messages.

Hands-Free Text Message Replying: Forward 

one of 18 predefined SMS messages to 

incoming calls/text messages.

Redialing last dialed numbers (“Redial”).

Calling back the last incoming call number (“Call 

Back”).

Viewing call logs on screen (“Show Incoming 

Calls,” “Show Outgoing Calls,” “Show Missed 

Calls,” or “Show Recent Calls”).

Searching Contacts phone number (“Search for 

John Smith Mobile”).

Screen Activated Features 

Dialing via Keypad using touchscreen.

Viewing and Calling contacts from Phonebooks 

displayed on the touchscreen.

Setting Favorite Contact phone numbers so they 

are easily accessible on the Main Phone screen.

Viewing and Calling contacts from recent call 

logs.

Reviewing your recent Incoming SMS 

Messages.

Pairing up to 10 phones/audio devices for easy 

access to connect to them quickly.

NOTE:

Your phone must be capable of SMS messaging via 

Bluetooth® for messaging features to work 

properly.
Your mobile phone’s audio is transmitted through 

your vehicle’s audio system; the system will 

automatically mute your radio when using the 

Uconnect Phone.
For Uconnect customer support:

US — visit 

UconnectPhone.com

 or call

877-855-8400

Canada — visit 

UconnectPhone.com

 or call

800-465-2001 (English)
800-387-9983 (French)

Visit 

UconnectPhone.com

Uconnect Phone allows you to transfer calls 

between the system and your mobile phone as you 

enter or exit your vehicle and enables you to mute 

the system's microphone for private conversation.

-------------------------------------------------------------------------------------------------------------------------------------------------------------

MULTIMEDIA

101

The Uconnect Phone is driven through your 

Bluetooth® “Hands-Free Profile” mobile phone. 

Uconnect features Bluetooth® technology — the 

global standard that enables different electronic 

devices to connect to each other without wires or a 

docking station. Ensure you phone is turned on 

with Bluetooth® active and has been paired to the 

vehicle's Uconnect Phone. The Uconnect Phone 

allows up to 10 mobile phones or audio devices to 

be linked to the system. Only one linked (or paired) 

mobile phone and one audio device can be used 

with the system at a time.
Uconnect Phone Button
The Uconnect Phone button on your steering wheel 

is used to get into the phone mode and make calls, 

show recent, incoming or outgoing calls, view 

phonebook, etc. When you push the button you will 

hear a BEEP. The BEEP is your signal to give a 

command.

Uconnect Voice Command Button
The Uconnect Voice Command button on your 

steering wheel is only used for “barge in” and when 

you are already in a call or want to make another 

call.
The button on your steering wheel is also used to 

access the Voice Commands for the Uconnect 

Voice Command features.

Phone Operation

OPERATION

Voice commands can be used to operate the 

Uconnect Phone and to navigate through the 

Uconnect Phone menu structure. Voice commands 

are required after most Uconnect Phone prompts. 

There are two general methods for how Voice 

Command works:
1. Say compound commands like “Call John 

Smith mobile”.

2. Say the individual commands and allow the 

system to guide you to complete the task.

You will be prompted for a specific command and 

then guided through the available options.

Prior to giving a voice command, one must wait 

for the beep, which follows the “Listen” prompt 

or another prompt.

For certain operations, compound commands 

can be used. For example, instead of saying 

“Call” and then “John Smith” and then “mobile”, 

the following compound command can be said: 

“Call John Smith mobile.”

For each feature explanation in this section, 

only the compound command form of the voice 

command is given. You can also break the 

commands into parts and say each part of the 

command when you are asked for it. For 

example, you can use the compound command 

form voice command “Search for John Smith,” 

or you can break the compound command form 

into two voice commands: “Search Contacts” 

and when asked, “John Smith.” Please 

remember, the Uconnect Phone works best 

when you talk in a normal conversational tone, 

as if speaking to someone sitting a few feet/

meters away from you.

HELP COMMAND

If you need assistance at any prompt, or if you want 

to know your options at any prompt, say “Help” 

following the beep.
To activate the Uconnect Phone from idle, simply 

push the Phone button (if active) on your steering 

wheel and say a command or say “Help”. All 

Uconnect Phone sessions begin with a push of the 

VR button or Phone button on the radio faceplate.

WARNING!

ALWAYS drive safely with your hands on the 

steering wheel. You have full responsibility and 

assume all risks related to the use of the 

Uconnect features and applications in this 

vehicle. Only use Uconnect when it is safe to do 

so. Failure to do so may result in an accident 

involving serious injury or death.

5

-------------------------------------------------------------------------------------------------------------------------------------------------------------

102

MULTIMEDIA


CANCEL COMMAND

At any prompt, after the beep, you can say “Cancel” 

and you will be returned to the main menu.
You can also push the VR button or Phone button 

on your steering wheel when the system is listening 

for a command and be returned to the main or 

previous menu.

PAIR (LINK) UCONNECT PHONE TO A MOBILE 

PHONE

To begin using your Uconnect Phone, you must pair 

your compatible Bluetooth®-enabled mobile 

phone. Mobile phone pairing is the process of 

establishing a wireless connection between a 

cellular phone and the Uconnect system.
To complete the pairing process, you will need to 

reference your mobile phone’s manual. Please 

visit 

UconnectPhone.com

 for complete mobile 

phone compatibility information.

Uconnect 3/3 NAV With 5-inch Display

NOTE:

You must have Bluetooth® enabled on your 

phone to complete this procedure.

The vehicle must be in PARK or at a standstill.

Follow the steps below to pair your phone:
1. Place the ignition in the ACC or ON/RUN 

position.

2. Push the Phone button.

NOTE:

If there are no phones currently connected 

with the system, a pop-up will appear asking 

if you would like to pair a mobile phone.

This pop-up only appears when the user 

enters phone mode and no other device(s) 

have previously been paired. If the system 

has a phone previously paired, even if no 

phone is currently connected with the 

system, this pop-up will not appear.

3. Select “Yes” to begin the pairing process.
4. Search for available devices on your 

Bluetooth®-enabled mobile phone.

Press the Settings button on your mobile 

phone.

Select Bluetooth® and ensure it is enabled. 

Once enabled, the mobile phone will begin 

to search for Bluetooth® connections.

5. If “No” is selected and you still would like to 

pair a mobile phone, press the Pairing or 

Settings button from the Uconnect Phone 

main screen.

Press the Add Device button.

Search for available devices on your 

Bluetooth®-enabled mobile phone (see 

below). When prompted on the phone, 

select “Uconnect” and accept the connec

-

tion request.

-------------------------------------------------------------------------------------------------------------------------------------------------------------

MULTIMEDIA

103

6. Uconnect Phone will display an in-progress 

screen while the system is connecting.

7. When your mobile phone finds the Uconnect 

system, select “Uconnect.”

8. When prompted on the mobile phone, accept 

the connection request from Uconnect Phone.

9. When the pairing process has successfully 

completed, the system will prompt you to 

choose whether or not this is your favorite 

phone. Selecting “Yes” will make this phone 

the highest priority. This phone will take 

precedence over other paired phones within 

range and will connect to the Uconnect system 

automatically when entering the vehicle. Only 

one mobile phone and/or one Bluetooth® 

audio device can be connected to the 

Uconnect system at a time. If “No” is selected, 

simply select “Uconnect” from the mobile 

phone/audio device Bluetooth® screen, and 

the Uconnect system will reconnect to the 

Bluetooth® device.

NOTE:

For phones which are not made a favorite, the 

phone priority is determined by the order in which 

it was paired. The latest phone paired will have the 

higher priority.

NOTE:

During the pairing procedure, you may receive a 

pop-up on your mobile phone for the Uconnect 

System to access your “messages” and “contacts”. 

Selecting “Ok” or “Allow” will sync your contacts 

with the Uconnect System.
You can also use the following VR command to 

bring up the Paired Phone screen from any screen 

on the radio: 

“Show Paired Phones”

NOTE:

Software updates on your phone or the Uconnect 

system may interfere with the Bluetooth® 

connection. If this happens, simply repeat the 

pairing process. However, first, make sure to 

delete the device from the list of phones on your 

Uconnect system. Next, be sure to remove 

Uconnect from the list of devices in your phone’s 

Bluetooth® settings.

PAIR A BLUETOOTH® STREAMING AUDIO 

DEVICE

1. Press the Media button on the faceplate to 

begin.

2. Change the source to “Bluetooth®”.
3. Press the Bluetooth® button on the 

touchscreen to display the Paired Audio 

Devices screen.

4. Press the Add Device button on the 

touchscreen.

NOTE:

If there is no device currently connected with the 

system, a pop-up will appear.
5. Search for available devices on your 

Bluetooth®-enabled audio device. When 

prompted on the device, or confirm the PIN 

shown on the Uconnect screen.

6. Uconnect Phone will display an in-process 

screen while the system is connecting.

7. When the pairing process has successfully 

completed, the system will prompt you to 

choose whether or not this is your favorite 

device. Selecting “Yes” will make this device 

the highest priority. This device will take 

precedence over other paired devices within 

range.

NOTE:

For devices which are not made a favorite, the 

device priority is determined by the order in which 

it was paired. The latest device paired will have the 

higher priority.
You can also use a following VR command to bring 

up a list of paired audio devices:

“Show Paired Phones”

5

-------------------------------------------------------------------------------------------------------------------------------------------------------------


Content      ..     4      5      6      7     ..