RAM ProMaster City (2022 year). Manual in english - page 7
 

  Index      Manuals     RAM ProMaster City (2022 year). Manual in english


Search            copyright infringement  


Content      ..     5      6      7      8     ..


RAM ProMaster City (2022 year). Manual in english - page 7


104

MULTIMEDIA


CONNECTING TO A PARTICULAR MOBILE 

PHONE OR AUDIO DEVICE AFTER PAIRING

Uconnect Phone will automatically connect to the 

highest priority paired phone and/or Audio Device 

within range. If you need to choose a particular 

phone or audio device follow these steps: 
1. Press the Settings button on the faceplate.
2. Press the Paired Phones/Audio Sources 

buttons.

3. Press to select the particular phone or the 

particular audio device. A pop-up menu will 

appear; press “Connect Phone”.

4. Press the X to exit out of the Settings screen.

DISCONNECTING OR DELETING A PHONE OR 

AUDIO DEVICE 

Uconnect 3/3 NAV With 5-inch Display

1. Press the Uconnect Phone Pairing or Settings 

button on the faceplate.

2. Press the Paired Phones/Audio Sources 

button.

3. Press the Settings button located to the right 

of the device name for a different phone or 

audio device than the currently connected 

device or press the preferred Connected 

Phone from the list.

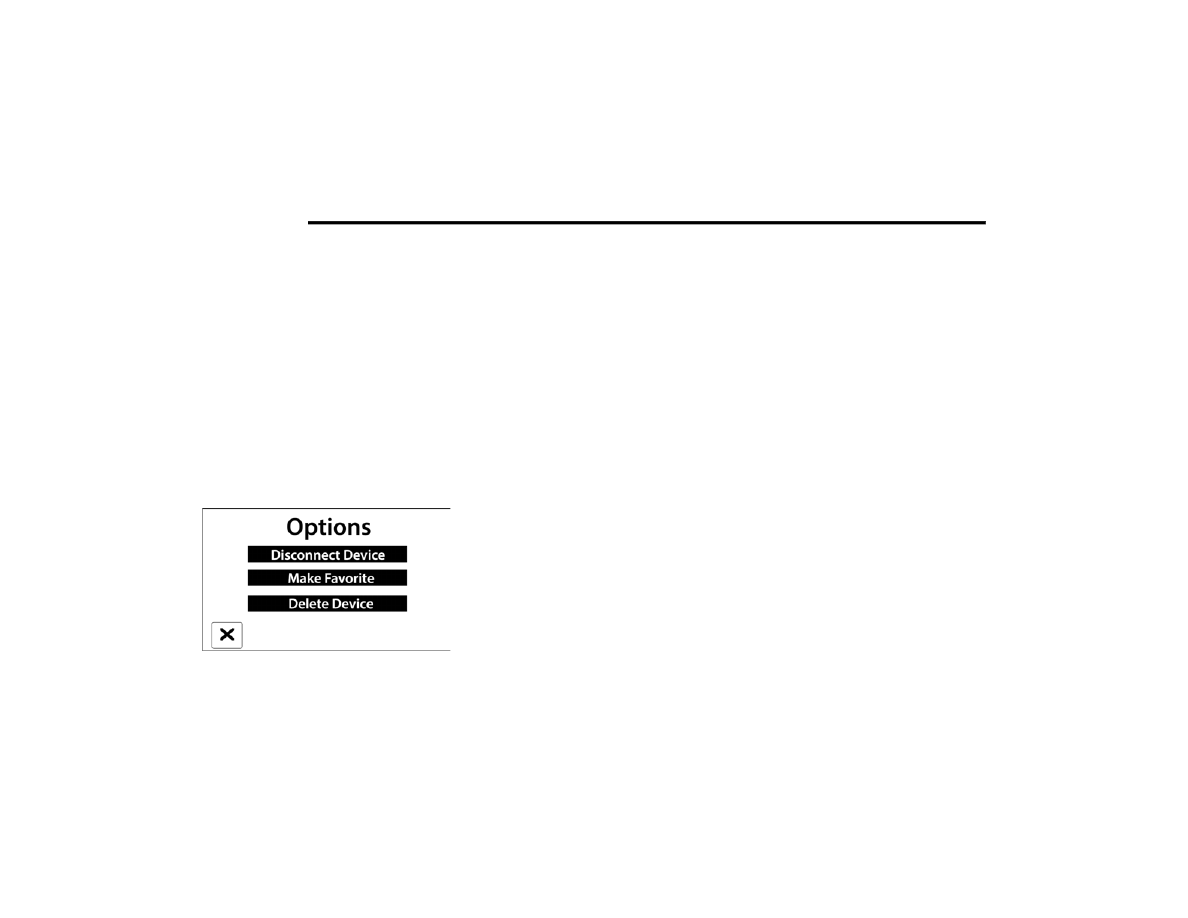
4. The option’s pop-up will be displayed.
5. Press the Disconnect Device or the Delete 

Device button on the touchscreen.

6. Press the X to exit out of the Settings screen.

MAKING A PHONE OR AUDIO DEVICE A 

FAVORITE

1. On the Paired Phone/Audio sources screen, 

press the Settings button located to the right 

of the device name for a different phone or 

audio device than the currently connected 

device or press the preferred Connected 

Phone from the list.

2. The option’s pop-up will be displayed.
3. Press the Make Favorite button on the 

touchscreen; you will see the chosen device 

move to the top of the list.

4. Press the X to exit out of the Settings screen.

PHONEBOOK DOWNLOAD (AUTOMATIC 

PHONEBOOK TRANSFER FROM MOBILE 

PHONE) — IF EQUIPPED

If supported by your phone, Uconnect Phone has 

the ability to download contact names and number 

entries from the mobile phone’s phonebook. 

Specific Bluetooth® Phones with Phonebook 

Access Profile may support this feature. Your 

mobile phone may receive a pop-up asking for 

permission for the Uconnect System to access your 

messages and contacts. Selecting “Ok” or “Allow” 

will sync your contacts with the Uconnect System.
See the Uconnect website, 

UconnectPhone.com

, 

for supported phones.

To call a name from a downloaded mobile 

phonebook,  

Ú

page 108.

Automatic download and update of a phone

-

book, if supported, begins as soon as the 

Bluetooth® wireless phone connection is made 

to the Uconnect Phone, for example, after you 

start the vehicle.

A maximum of 5,000 contact names with four 

numbers per contact will be downloaded and 

updated every time a phone is connected to the 

Uconnect Phone.

-------------------------------------------------------------------------------------------------------------------------------------------------------------

MULTIMEDIA

105

Depending on the maximum number of entries 

downloaded, there may be a short delay before 

the latest downloaded names can be used. Until 

then, if available, the previously downloaded 

phonebook is available for use.

Only the phonebook of the currently connected 

mobile phone is accessible.

This downloaded phonebook cannot be edited 

or deleted on the Uconnect Phone. These can 

only be edited on the mobile phone. The 

changes are transferred and updated to 

Uconnect Phone on the next phone connection.

MANAGING YOUR FAVORITES — IF EQUIPPED

There are two ways you can add an entry to your 

favorites:
1. After loading the mobile phonebook, press 

the Favorites button on the touchscreen, and 

then press one of the +Add Favorite Contact 

buttons that appears on the list.

2. After loading the mobile phonebook, select 

“Contacts” from the Phone main screen, and 

then select the appropriate number. Press the 

Down Arrow button next to the selected 

number to display the options pop-up. In the 

pop-up, select “Add to Favorites”.

NOTE:

If the Favorites list is full, you will be asked to 

remove an existing favorite.

TO REMOVE A FAVORITE — IF EQUIPPED

1. To remove a Favorite, select “Favorites” from 

the Phone main screen.

2. Next, select the Down Arrow icon next to the 

contact you want to remove from your 

favorites. This will bring up the options for that 

Favorite contact.

3. Deselect the Star icon to delete the Favorite.

Phone Call Features

The following features can be accessed through 

the Uconnect Phone if the feature(s) are available 

and supported by Bluetooth® on your mobile 

service plan. For example, if your mobile service 

plan provides three-way calling, this feature can be 

accessed through the Uconnect Phone. Check with 

your mobile service provider for the features that 

you have.
Listed below are the phone options with Uconnect 

Phone:

Redial

Dial by pressing in the number

Voice Commands (Dial by Saying a Name, Call 

by Saying a Phonebook Name, Redial or Call 

Back)

Favorites

Mobile Phonebook

Recent Call Log

SMS Message Viewer

CALL CONTROLS

The touchscreen allows you to control the following 

call features:

Uconnect 3/3 NAV With 5-inch Display

1 — Answer
2 — Mute/Unmute
3 — Ignore
4 — Transfer

5

-------------------------------------------------------------------------------------------------------------------------------------------------------------

106

MULTIMEDIA


Other phone call features include:

End Call

Hold/Unhold/Resume

Swap two active calls

KEY PAD NUMBER ENTRY

1. Press the Phone button on the faceplate.
2. Press the Dial/Keypad button on the 

touchscreen.

3. The Touch-Tone screen will be displayed.
4. Use the numbered buttons on the 

touchscreens to enter the number and press 

“Dial/Call”.

RECENT CALLS 

You may browse a list of the most recent of each of 

the following call types: 

All Calls

Incoming Calls or Calls Received

Outgoing Calls or Calls Made

Missed Calls

Calls without a reply

These can be accessed by pressing the Recent 

Calls button on the phone main screen.
You can also push the VR button on your steering 

wheel and perform the above operation. For 

example, say “Show my incoming calls”.

ANSWER OR IGNORE AN INCOMING CALL — 

NO CALL CURRENTLY IN PROGRESS

When you receive a call on your mobile phone, the 

Uconnect Phone will interrupt the vehicle audio 

system. Push the Uconnect Phone button on the 

steering wheel, press the Answer button on the 

touchscreen.

Uconnect 3/3 NAV With 5-inch Display

ANSWER OR IGNORE AN INCOMING CALL — 

CALL CURRENTLY IN PROGRESS

If a call is currently in progress and you have 

another incoming call, you will hear the same 

network tones for call waiting that you normally 

hear when using your mobile phone. Push the 

Uconnect Phone button on the steering wheel, 

press the Answer button on the touchscreen, or 

press the Caller ID box to place the current call on 

hold and answer the incoming call.

NOTE:

Phones that are compatible with the Uconnect 

system in the market today do not support 

rejecting an incoming call when another call is in 

progress. Therefore, the user can only answer an 

incoming call or ignore it.

PLACE/RETRIEVE A CALL FROM HOLD

During an active call, press the Hold or Call On Hold 

button on the Phone main screen.

MAKING A SECOND CALL WHILE CURRENT 

CALL IS IN PROGRESS

You can place a call on hold by pressing the Hold 

button on the Phone main screen, then dial a 

number from the keypad, recent calls, SMS Inbox 

or from the phonebooks.
To go back to the first call:  

Ú

page 107

To combine two calls:  

Ú

page 107

1 — Answer Button
2 — Caller ID Box

-------------------------------------------------------------------------------------------------------------------------------------------------------------

MULTIMEDIA

107

TOGGLING BETWEEN CALLS — IF EQUIPPED

Uconnect 3/3 NAV With 5-inch Display

If two calls are in progress (one active and one on 

hold), press the Swap Calls button on the Phone 

main screen. Only one call can be placed on hold 

at a time.
You can also push the Phone button to toggle 

between the active and held phone call.

JOIN CALLS

When two calls are in progress (one active and one 

on hold), press the Join/Merge Calls Call button 

the Phone main screen to combine all calls into a 

conference call.

CALL TERMINATION

To end a call in progress, momentarily press the 

End Call button on the touchscreen or the Phone 

End button on the steering wheel. Only the active 

call(s) will be terminated and if there is a call on 

hold, it will become the new active call.

REDIAL

Press the Redial button on the touchscreen, or 

push the VR button and after the “Listening” 

prompt and the following beep, say “Redial.”
The Uconnect Phone will call the last number that 

was dialed from your mobile phone.

CALL CONTINUATION

Call continuation is the progression of a phone call 

on the Uconnect Phone after the vehicle ignition 

has been switched to OFF.

NOTE:

The call will remain within the vehicle audio system 

until the phone becomes out of range for the 

Bluetooth® connection. It is recommended to 

press the Transfer button on the touchscreen 

when leaving the vehicle.

Advanced Phone Connectivity

TRANSFER CALL TO AND FROM MOBILE 

PHONE

The Uconnect Phone allows ongoing calls to be 

transferred from your mobile phone to the Uconnect 

Phone without terminating the call. To transfer an 

ongoing call from your connected mobile phone to the 

Uconnect Phone or vice versa, press the Transfer 

button on the Phone main screen.

Things You Should Know About Uconnect 

Phone

VOICE COMMAND

For the best performance:

Always wait for the beep before speaking

Speak normally, without pausing, just as you 

would speak to a person sitting a few feet/

meters away from you

Ensure that no one other than you is speaking 

during a voice command period

Low-To-Medium Blower Setting

Low-To-Medium Vehicle Speed

Low Road Noise

Smooth Road Surface

Fully Closed Windows

Dry Weather Conditions

5

-------------------------------------------------------------------------------------------------------------------------------------------------------------

108

MULTIMEDIA


Even though the system is designed for many 

languages and accents, the system may not always 

work for some.

NOTE:

It is recommended that you do not store names in 

your Favorites phonebook while the vehicle is in 

motion.
Number and name recognition rate is optimized 

when the entries are not similar. You can say “O” 

(letter “O”) for “0” (zero).
Even though international dialing for most number 

combinations is supported, some shortcut dialing 

number combinations may not be supported.

Audio Performance
Audio quality is maximized under:

Low-To-Medium Blower Setting

Low-To-Medium Vehicle Speed

Low Road Noise

Smooth Road Surface

Fully Closed Windows

Dry Weather Conditions

Operation From The Driver's Seat

Performance such as audio clarity, echo, and 

loudness to a large degree rely on the phone and 

network, and not the Uconnect Phone.
Echo at the far end can sometimes be reduced by 

lowering the in-vehicle audio volume.
Phone Voice Commands
Making and answering hands-free phone calls is 

easy with Uconnect. When the Phonebook button 

is illuminated on your touchscreen, your system is 

ready. Check 

UconnectPhone.com

 for mobile 

phone compatibility and pairing instructions.

Push the Phone button   and wait for the beep to 

say a command. See some examples below:

“Call John Smith”

“Dial 123 456 7890”

“Redial” (call previous outgoing phone number)

“Call back” (call previous incoming phone 

number)

Did You Know: When providing a Voice Command, 
push the Phone button   and say “Call”, then 

pronounce the name exactly as it appears in your 

phone book. When a contact has multiple phone 

numbers, you can say “Call John Smith work”.
Voice Text Reply — If Equipped
Uconnect can announce incoming text messages. 
Push the VR button   or Phone button   and 

say:
1. “Listen” to have the system read an incoming 

text message. (Must have compatible mobile 

phone paired to Uconnect system.)

2. “Reply” after an incoming text message has 

been read.

Listen to the Uconnect prompts. After the 

beep, repeat one of the predefined messag

-

es and follow the system prompts.

WARNING!

ALWAYS drive safely with your hands on the 

wheel. You have full responsibility and assume 

all risks related to the use of the Uconnect 

features and applications in this vehicle. Only 

use Uconnect when it is safe to do so. Failure to 

do so may result in an accident involving serious 

injury or death.

-------------------------------------------------------------------------------------------------------------------------------------------------------------

MULTIMEDIA

109

NOTE:

Only use the numbering listed in the provided 

table. Otherwise, the system will not transpose the 

message.

Did You Know: Your mobile phone must have the 

full implementation of the Message Access Profile 

(MAP) to take advantage of this feature. For details 

about MAP, visit 

UconnectPhone.com

.

Apple® iPhone® iOS 5 or later supports reading 

incoming text messages only. For further 

information on how to enable this feature on your 

Apple® iPhone®, refer to your iPhone® “User 

Manual”.
Did You Know: Voice Text Reply is not compatible 

with iPhone®, but if your vehicle is equipped with 

Siri® Eyes Free, you can use your voice to send a 

text message.
Siri® Eyes Free — If Equipped
When used with your Apple® iPhone® connected 

to your vehicle, Siri lets you use your voice to send 

text messages, select media, place phone calls 

and much more. Siri uses your natural language to 

understand what you mean and responds back to 

confirm your requests. The system is designed to 

keep your eyes on the road and your hands on the 

wheel by letting Siri help you perform useful tasks.

To enable Siri, push and hold, then release the 

Uconnect Voice Recognition (VR) button on the 

steering wheel. After you hear a double beep, you 

can ask Siri to play podcasts and music, get 

directions, read text messages, and many other 

useful requests.

BLUETOOTH® COMMUNICATION LINK

Mobile phones may lose connection to the 

Uconnect Phone. When this happens, the 

connection can generally be re-established by 

restarting the mobile phone. Your mobile phone is 

recommended to remain in Bluetooth® ON mode.

POWER-UP

After switching the ignition key from OFF to either 

the ON/RUN or ACC position, or after a language 

change, you must wait at least 15 seconds prior to 

using the system  

Ú

page 245.

PRE-DEFINED VOICE TEXT REPLY 

RESPONSES

Yes.

Stuck in 

traffic.

See you later.

No.

Start without 

me.

I’ll be late.

Okay.

Where are 

you?

I will be 5 <or 

10, 15, 20, 

25, 30, 45, 

60> minutes 

late.

Call me.

Are you there 

yet?

I’ll call you 

later.

I need 

directions.

See you in 5 

<or 10, 15, 

20, 25, 30, 

45, 60> 

minutes.

I’m on my way. Can’t talk right 

now.

I’m lost.

Thanks.

5

-------------------------------------------------------------------------------------------------------------------------------------------------------------

110

MULTIMEDIA


NAVIGATION MODE — IF EQUIPPED

O

PERATING

 N

AVIGATION

 M

ODE

 —

I

F

 E

QUIPPED

Planning A Route

Using the search bar provides a wide range of ways 

to find places and then navigate to them. You can 

search for your destination in different ways:

A specific address

A partial address

A type of place

A zip code

A city to navigate to a city center

A Point of Interest (POI) near your current location

Latitude and longitude coordinates

Using Search
Press the Search button   in the Main menu to 

start searching. The search screen will open, 

displaying the keyboard and the following buttons:

Navigation Search

1 — Back Button
2 — Search Box
3 — Type Of Search
4 — View Button
5 — 123?! Button
6 — Keyboard Layout Button
7 — List/Map Button
8 — Show/Hide Keyboard Button

-------------------------------------------------------------------------------------------------------------------------------------------------------------

MULTIMEDIA

111

Feature

Description

Back Button

Press the Back button to return to the previous screen.

Search Box

Enter your search term in the search input box. As you type, matching 

addresses and Points of Interest (POI) are shown.

Type Of Search

Press this button to change the type of search to any of the following:

Whole Map: Select this option to search your current map with no limit to 

the search radius. Your current location is the center of the search. The 

results are ranked by exact match.

Near Me: Select this option to search with your current GPS location as the 

search center. The results are ranked by distance.

In Town or City: Select this option to use a town or city as the center of your 

search. Enter the town or city name using the keyboard on the touchscreen. 

When you have selected the town or city from the results list, you can search 

for an address or POI in that city.

Along Route: When a route has been planned, you can select this option to 

search along your route for a specific type of location, such as a POI cate

-

gory. When prompted, enter the type of location and then select it in the 

right-hand column to carry out the search.

Near Destination: When a route has been planned, you can select this 

option to use your destination as the center of your search.

Latitude Longitude: Select this option to enter a pair of latitude and longi

-

tude coordinates.

NOTE:

By default, the current map is searched. Once you have used search, the last 

search type you selected is used.

5

-------------------------------------------------------------------------------------------------------------------------------------------------------------

112

MULTIMEDIA


Planning A Route — Searching For A City Center
When planning a route to a city center, you can 

search for a town, city, or postal code.
1. Enter the name of the city or town.

Searching For A City Center

2. Select the Points Of Interest tab.

Addresses List

3. Select the city center POI.

City Center

NOTE:

The city center location is shown on the map.
4. Select “Drive”.

View Button

Press this button to return to the Map View or Guidance View.

Show/Hide Keyboard Button

Press this button to show or hide the keyboard.

List/Map Button

Select this button to switch between showing the results in a list or showing 

the results on the map.

Keyboard Layout Button

Press this button to change your keyboard layout to another language.

123?! Button

Press this button to use numbers and symbols on your keyboard. Select the =\< 

button to toggle between the numbers and more symbols. Select the ABC button 

to go back to the general keyboard.

Feature

Description

-------------------------------------------------------------------------------------------------------------------------------------------------------------

MULTIMEDIA

113

Drive Button

As soon as you start driving, the Guidance View is 

shown automatically.
Planning A Route — Searching For A POI
You can search for a POI type, such as a restaurant 

or tourist attraction. Alternatively, you can search 

for a specific POI  

Ú

page 125.

1. Use the keyboard to enter the name of the 

POI.

NOTE:

When searching, the whole map is selected. If you 

want to change how the search is done, select the 

button to the right of the search box. You can then 

change where the search is done. For example, 

along the route or in a city.

2. Select a POI category, such as “Restaurant”. If 

you select a POI category, only POIs from that 

category are shown. You can then select an 

the desired POI. The location is shown on the 

map.

3. To see more information about the POI, select 

the POI on the map and then select the Pop-up 

Menu button. Select “More Information” on 

the pop-up menu.

4. To plan a route to this destination, select the 

Drive button.

Drive Button

Planning A Route — Searching By Entering 

Coordinates
1. Press the Search Type button.
2. Select “Latitude Longitude”.
3. Type in the pair of coordinates:

Decimal values

Degrees, minutes and seconds

GPS standard coordinates

4. Select a suggestion for the destination.
5. To plan a route, select the Drive button.

Planning A Route Using The Map
1. Move the map and zoom in until you can see 

the desired destination.

2. Select the destination by pressing and holding 

the screen for about one second.

NOTE:

A pop-up menu shows the nearest address.
3. To plan a route to this destination, select the 

Drive button.

5

-------------------------------------------------------------------------------------------------------------------------------------------------------------

114

MULTIMEDIA


Planning A Route Using My Places
1. Select the Main Menu button.
2. Select “My Places”.
3. Select the Place you want to navigate to. For 

example: Home.

My Places

4. To plan a route to this Place, select the Drive 

button.

Finding A Parking Lot
1. Press the Parking button   from the Main 

Menu.

NOTE:

If a route is planned, the map shows parking lots 

near your destination. If a route isn’t planned, the 

map shows parking lots near your current location. 

You also have an option to view the parking lots in 

a list by pressing the Menu button.
2. Select a parking lot from the map or the list.

Find A Parking Lot

3. To plan a route to your chosen parking lot, 

select the drive button.

Finding A Gas Station
1. Press the Main Menu button.
2. Select “Gas Station”.

NOTE:

You also have an option to view the gas stations in 

a list by pressing the Menu button.

Find A Gas Station

3. Select a gas station from the map or the list. By 

opening the pop-up menu, you can add the gas 

station as a stop on your route. You can also 

plan a route to your chosen gas station by 

pressing the Drive button. Your system will 

plan a route, and guidance to your destination 

will begin. The Guidance View will be shown 

automatically once you start driving.

Changing Your Route

MAKING CHANGES TO YOUR ROUTE

After planning a route, the route and destination 

can be changed. There are various ways to change 

the route without the need to completely replan 

the entire journey.
To change the current route, press the Current 
Route button   in the main menu.

-------------------------------------------------------------------------------------------------------------------------------------------------------------

MULTIMEDIA

115

CURRENT ROUTE MENU

Route Option

Description

Clear Route

Press the   button to clear the currently planned route. The Current Route 

Menu will close, and the screen will return to the Map View.

Find Alternative

Press the   button while driving on a planned route to show up to three 

alternative routes on the Map View. Each alternative route shows the 

difference in travel time.
Select the chosen route by tapping on the time pop-up.
Press “Let’s GO”. Guidance to the destination will automatically begin, and 

the Guidance View appears automatically as you begin driving.

Avoid Blocked Road

Press the   button to avoid an unexpected obstacle that is blocking the road 

on the route. A new route will be found that avoids blocked roads.
You may be shown a maximum of two alternatives depending on the road 

network between you and your destination.
The new route is shown on the Map View with the difference in travel time in a 

pop-up.
Select the new route by pressing the time pop-up. Guidance to your 

destination will resume avoiding blocked roads, and the Guidance View will 

appear automatically as you begin driving.

NOTE:

It may not be possible to find an alternative route around the blocked road if 

none exists.

5

-------------------------------------------------------------------------------------------------------------------------------------------------------------

116

MULTIMEDIA


Avoid Part Of Road

Press the   button to avoid part of the current route.
You are shown a list of the sections that make up your current route.
Select the section of the route you want to avoid. A pop-up menu will appear 

on the map showing the location of the instruction.
To avoid the chosen section of the route, select “Avoid”. A new route is 

planned that will avoid the chosen route sections, and the new route will 

appear in Map View.

NOTE:

To avoid more sections of the route, repeat the steps above. It may not be 

possible to find an alternative route around the section if none exists.

Avoid Toll Roads And More

Select the   button to avoid some types of route features that are on your 

currently planned route. These include ferries, toll roads and unpaved roads.

Show Instructions

Press the   button to see a list of turn-by-turn instructions for the planned 

route.
The instructions include the following information:

Current location

Street names

Up to two road numbers shown in road signs (if available)

An instruction arrow

An instruction description

The distance between two consecutive instructions

Exit number

The full addresses of stops on your route

Route Option

Description

-------------------------------------------------------------------------------------------------------------------------------------------------------------

MULTIMEDIA

117

Add Stop To Route

Press the   button to add a stop to the route.
You can add a stop by selecting a point on the map. In Map View, zoom in on 

the map and press and hold to select a location. Then, select the pop-up 

menu button and press “Add to Current Route”.
You route will be recalculated to include your stop.

Change Route Type

Press the   button to change the type of route used to plan the route. The 

route will be recalculated using the new route type selected.
You can select the following types of routes:

Fastest Route

Shortest Route

Most Eco-Friendly Route

Avoid Interstate Highways

You can set the default route type in the Settings menu.

Reorder Stops

Press the   button to see the list of stops for your current route. You can 

change the order of the stops on your route by pressing “Edit Stops”. Use the 

Up and Down arrows to change the order of your stops. The route will be 

recalculated with the stops in that changed order.

NOTE:

You can also delete stops from the route by pressing the Edit Stops button and 

then press the Delete button. The stop will be removed from the route, and the 

route will be recalculated.

Route Option

Description

5

-------------------------------------------------------------------------------------------------------------------------------------------------------------

118

MULTIMEDIA


Voice Command — If Equipped

ABOUT VOICE COMMAND

Instead of pressing the touchscreen to control your 

Navigation system, you can use your voice to 

control navigation.
For example, to switch to 2D view, you can say 

“2D view”.
To view a list of available commands, press the 

Help button in the Main menu and then press 

“What can I say?”.

USING VOICE CONTROL

The following example shows how to use voice 

control to plan a journey to your Home address:
1. Push the Voice Recognition   button on the 

steering wheel to turn on the microphone.

A screen will pop up with examples of com

-

mands.

NOTE:

Press the Help button in the Main menu then press 

“What can I say?” to see a full list of commands.
2. When you hear a beep, say a command of your 

choice. For example, you can say “Navigate 

home”.

Pay Route or Track Preview

Press   button to watch a preview of the planned route or track.

NOTE:

This feature is not available while driving.

Stop Route Preview

Press   button to stop the preview of the planned route.

Route Option

Description

WARNING!

ALWAYS drive safely with your hands on the 

wheel. You have full responsibility and assume 

all risks related to the use of the Uconnect 

features and applications in this vehicle. Only 

use Uconnect when it is safe to do so. Failure to 

do so may result in an accident involving serious 

injury or death.

-------------------------------------------------------------------------------------------------------------------------------------------------------------

MULTIMEDIA

119

NOTE:

For accurate results, speak normally without trying 

to articulate words in an unnatural way. If there is 

excessive road noise, for example, you may need 

to speak directly into the microphone.
3. If the command is correct, say “Yes”.

NOTE:

If the command is incorrect, say “No” and repeat 

the command after you hear the prompt and tone 

again. Your Navigation system plans a route from 

your current location to your destination. To stop 

your Navigation system from listening out for 

further commands, say “Cancel”.

Guidance View

The Guidance View is used to guide you along the 

route to your destination. As soon as you start 

driving, your Navigation system will immediately 

start guiding you to your destination with spoken 

instructions and visual instructions on the 

touchscreen. You can also see your current 

location and details along your route, including 3D 

buildings in some cities. The Guidance View is 

normally in 3D. To show a 2D map with the map 

moving in your direction of travel, change the 2D 

and 3D default settings  

Ú

page 123.

NOTE:

When you have planned a route and the 3D 

Guidance View is shown, select the switch view 

button to change to the Map View and use the 

interactive features.

Guidance View

1 — Switch View Button
2 — Instruction Panel
3 — Route Bar
4 — Zoom Button
5 — Main Menu Button
6 — Speed Panel
7 — Current Location

5

-------------------------------------------------------------------------------------------------------------------------------------------------------------


Content      ..     5      6      7      8     ..