RAM 3500 Chassis Cab (2021 year). Manual in english - page 20
 

  Index      Manuals     RAM 3500 Chassis Cab (2021 year). Manual in english


Search            copyright infringement  


Content      ..     18      19      20      21     ..


RAM 3500 Chassis Cab (2021 year). Manual in english - page 20


314

SAFETY


Older Children And Child Restraints 

Children who are two years old or who have 

outgrown their rear-facing convertible child seat 

can ride forward-facing in the vehicle. 

Forward-facing child seats and convertible child 

seats used in the forward-facing direction are 

for children who are over two years old or who 

have outgrown the rear-facing weight or height 

limit of their rear-facing convertible child seat. 

Children should remain in a forward-facing child 

seat with a harness for as long as possible, up 

to the highest weight or height allowed by the 

child seat.
All children whose weight or height is above

the forward-facing limit for the child seat should 

use a belt-positioning booster seat until the 

vehicle’s seat belts fit properly. If the child 

cannot sit with knees bent over the vehicle’s 

seat cushion while the child’s back is against 

the seatback, they should use a belt-positioning 

booster seat. The child and belt-positioning 

booster seat are held in the vehicle by the 

seat belt.

WARNING!

Never place a rear-facing child restraint in front 

of an air bag. A deploying passenger front air 

bag can cause death or serious injury to a child 

12 years or younger, including a child in a 

rear-facing child restraint.

Never install a rear-facing child restraint in 

the front seat of a vehicle. Only use a 

rear-facing child restraint in the rear seat.

If the vehicle does not have a rear seat, do 

not transport a rear-facing child restraint in 

that vehicle.

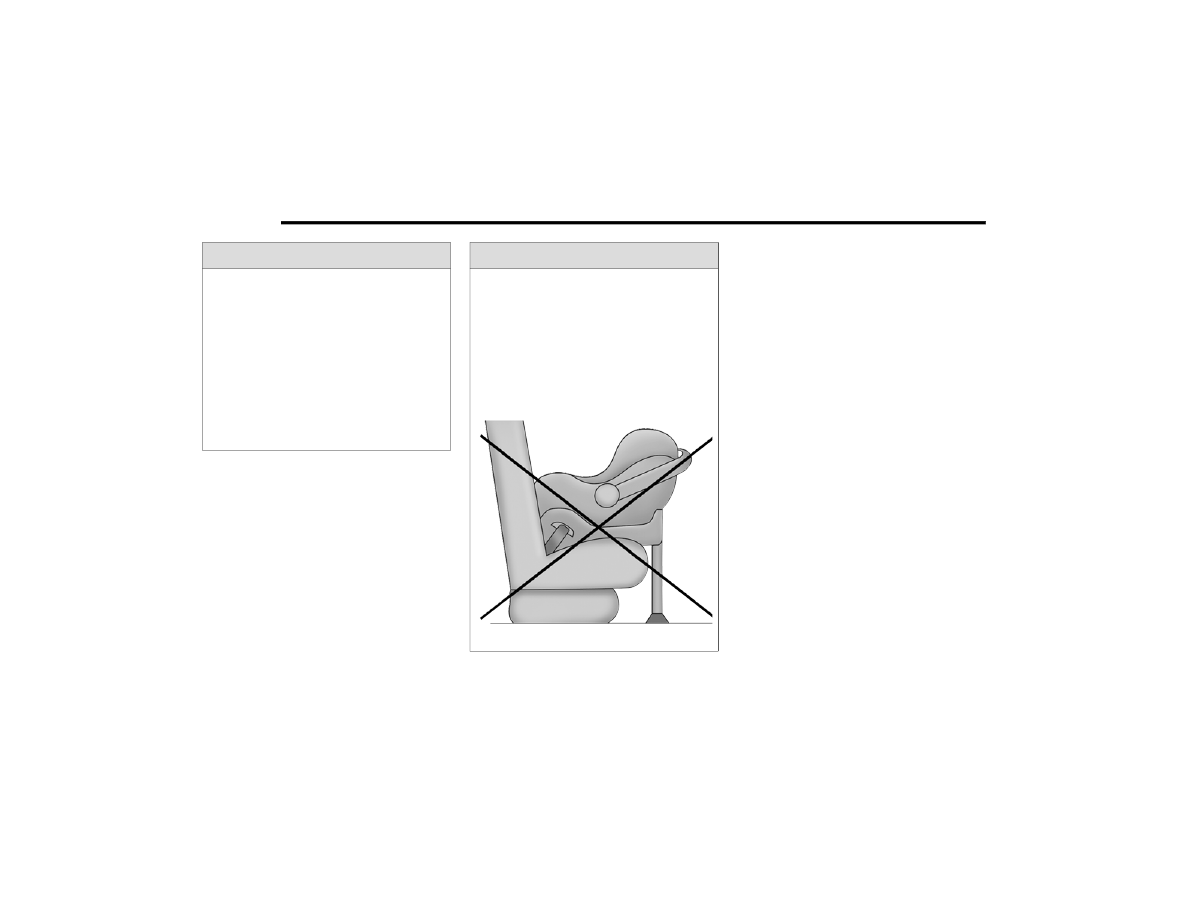
WARNING!

Do not install a rear-facing car seat using a 

rear support leg in this vehicle. The floor of 

this vehicle is not designed to manage the 

crash forces of this type of car seat. In a 

crash, the support leg may not function as it 

was designed by the car seat manufacturer, 

and your child may be more severely injured 

as a result.

-------------------------------------------------------------------------------------------------------------------------------------------------------------

SAFETY

315

Children Too Large For Booster Seats 

Children who are large enough to wear the 

shoulder belt comfortably, and whose legs are 

long enough to bend over the front of the seat 

when their back is against the seatback, should 

use the seat belt in a rear seat. Use this simple 

5-step test to decide whether the child can use

the vehicle’s seat belt alone:

1. Can the child sit all the way back against

the back of the vehicle seat?

2. Do the child’s knees bend comfortably over 

the front of the vehicle seat – while the child

is still sitting all the way back?

3. Does the shoulder belt cross the child’s

shoulder between the neck and arm?

4. Is the lap part of the belt as low as possible,

touching the child’s thighs and not the

stomach?

5. Can the child stay seated like this for the

whole trip?

If the answer to any of these questions was 

“no”

,

 then the child still needs to use a booster 

seat in this vehicle. If the child is using the lap/

shoulder belt, check seat belt fit periodically 

and make sure the seat belt buckle is latched. 

A child’s squirming or slouching can move the 

belt out of position. If the shoulder belt contacts 

the face or neck, move the child closer to the 

center of the vehicle, or use a booster seat to 

position the seat belt on the child correctly.

WARNING!

Improper installation can lead to failure of 

an infant or child restraint. It could come

loose in a collision. The child could be badly

injured or killed. Follow the child restraint 

manufacturer’s directions exactly when 

installing an infant or child restraint.

After a child restraint is installed in the

vehicle, do not move the vehicle seat forward 

or rearward because it can loosen the child 

restraint attachments. Remove the child 

restraint before adjusting the vehicle seat 

position. When the vehicle seat has been 

adjusted, reinstall the child restraint.

When your child restraint is not in use, 

secure it in the vehicle with the seat belt or 

LATCH anchorages, or remove it from the 

vehicle. Do not leave it loose in the vehicle. 

In a sudden stop or accident, it could strike 

the occupants or seatbacks and cause 

serious personal injury.

WARNING!

Never allow a child to put the shoulder belt 

under an arm or behind their back. In a crash, 

the shoulder belt will not protect a child 

properly, which may result in serious injury 

or death. A child must always wear both the 

lap and shoulder portions of the seat belt 

correctly.

6

-------------------------------------------------------------------------------------------------------------------------------------------------------------

316

SAFETY


Recommendations For Attaching Child Restraints 

Restraint Type

Combined Weight of the 

Child + Child Restraint

Use Any Attachment Method Shown With An “X” Below

LATCH – Lower 

Anchors Only

Seat Belt Only

LATCH – Lower 

Anchors + Top 

Tether Anchor

Seat Belt + Top 

Tether Anchor

Rear-Facing Child 

Restraint

Up to 65 lbs (29.5 kg)

X

X

Rear-Facing Child 

Restraint

More than 65 lbs (29.5 kg)

X

Forward-Facing Child 

Restraint

Up to 65 lbs (29.5 kg)

X

X

Forward-Facing Child 

Restraint

More than 65 lbs (29.5 kg)

X

-------------------------------------------------------------------------------------------------------------------------------------------------------------

SAFETY

317

Lower Anchors And Tethers For CHildren 

(LATCH) Restraint System 

LATCH Label

Your vehicle is equipped with the child restraint 

anchorage system called LATCH, which stands 

for Lower Anchors and Tethers for CHildren. 

The LATCH system has three vehicle anchor

points for installing LATCH-equipped child 

seats. There are two lower anchorages located 

at the back of the seat cushion where it meets 

the seatback and one top tether anchorage 

located behind the seating position. These 

anchorages are used to install LATCH-equipped 

child seats without using the vehicle’s seat 

belts. Some seating positions may have a top 

tether anchorage but no lower anchorages.

In these seating positions, the seat belt must be 

used with the top tether anchorage to install the 

child restraint. Please see the following table for 

more information.

LATCH Positions For Installing Child 

Restraints In This Vehicle

Regular Cab LATCH Positions

 Top Tether Anchorage Symbol

6

-------------------------------------------------------------------------------------------------------------------------------------------------------------

318

SAFETY


Crew Cab 60/40 Split Bench LATCH Positions

Crew Cab Full Bench LATCH Positions

 Lower Anchorage Symbol (2 Anchorages Per 

Seating Position)

 Top Tether Anchorage Symbol

 Lower Anchorage Symbol (2 Anchorages Per 

Seating Position)

 Top Tether Anchorage Symbol

Frequently Asked Questions About Installing Child Restraints With LATCH

What is the weight limit (child’s weight + weight 

of the child restraint) for using the LATCH 

anchorage system to attach the child restraint?

65 lbs (29.5 kg)

Use the LATCH anchorage system until the combined 

weight of the child and the child restraint is 65 lbs 

(29.5 kg). Use the seat belt and tether anchor instead of 

the LATCH system once the combined weight is more 

than 65 lbs (29.5 kg).

-------------------------------------------------------------------------------------------------------------------------------------------------------------

SAFETY

319

Can the LATCH anchorages and the seat belt be 

used together to attach a rear-facing or 

forward-facing child restraint?

No

Do not use the seat belt when you use the LATCH 

anchorage system to attach a rear-facing or 

forward-facing child restraint.
Booster seats may be attached to the LATCH anchorages 

if allowed by the booster seat manufacturer. See your 

booster seat owner’s manual for more information.

Can a child seat be installed in the center 

position using the inner LATCH lower 

anchorages from the outboard seating 

positions?

N/A – Regular / Crew Split Rear Bench
No – Crew Full Rear Bench

Regular Cab Front/Full Bench Rear Seat: Use the seat 

belt and tether anchor to install a child seat in the center 

seating position.
Split Bench Rear Seat: Use the supplied center lower 

anchorages to install a child restraint in the center 

position.

Can two child restraints be attached using a 

common lower LATCH anchorage?

No

Never “share” a LATCH anchorage with two or more child 

restraints. If the center position does not have dedicated 

LATCH lower anchorages, use the seat belt to install a 

child seat in the center position next to a child seat using 

the LATCH anchorages in an outboard position.

Can the rear-facing child restraint touch the 

back of the front passenger seat?

Yes

The child seat may touch the back of the front passenger 

seat if the child restraint manufacturer also allows 

contact. See your child restraint owner’s manual for 

more information.

Can the rear head restraints be removed?

Yes

The head restraints can be removed in every rear seating 

position if they interfere with the installation of the child 

restraint  

Ú

page 38.

Frequently Asked Questions About Installing Child Restraints With LATCH

6

-------------------------------------------------------------------------------------------------------------------------------------------------------------

320

SAFETY


Locating The LATCH Anchorages — Crew 

Cab Only 

The lower anchorages are round bars 

that are found at the rear of the seat 

cushion where it meets the seatback. 

They are just visible when you lean 

into the rear seat to install the child restraint. 

You will easily feel them if you run your finger 

along the gap between the seatback and seat 

cushion.

Crew Cab Rear Outboard Seats Driver Side

Locating The Upper Tether Anchorages

Regular Cab models have tether strap 

anchorages behind the front center 

and right seats. Crew Cab models 

have tether strap anchorages located 

behind each of the rear seats.

Regular Cab Tether Anchorages (Behind Covers)

Crew Cab Outboard Tether Anchorage

Crew Cab Center Tether Anchorage With Head 

Restraint In Raised Position

LATCH-compatible child restraint systems will be 

equipped with a rigid bar or a flexible strap on 

each side. Each will have a hook or connector

to attach to the lower anchorage and a way to 

tighten the connection to the anchorage. 

1 — Tether Strap Hook
2 — Tether Strap To Child Restraint
3 — Tether Anchor

-------------------------------------------------------------------------------------------------------------------------------------------------------------

SAFETY

321

Forward-facing child restraints and some 

rear-facing child restraints will also be equipped 

with a tether strap. The tether strap will have a 

hook at the end to attach to the top tether 

anchorage and a way to tighten the strap after 

it is attached to the anchorage.

Center Seat LATCH

Regular Cab or Crew Cab Full Bench Rear Seat: 

No Lower Center LATCH Anchorages Available

Crew Cab Split Bench Rear Seat: Center LATCH 

Anchorages Available
If a child restraint installed in the center 

position blocks the seat belt webbing or buckle 

for the outboard position, do not use that 

outboard position. If a child seat in the center 

position blocks the outboard LATCH anchors or 

seat belt, do not install a child seat in that 

outboard position.

Always follow the directions of the child 

restraint manufacturer when installing your 

child restraint. Not all child restraint systems 

will be installed as described here.

To Install A LATCH-Compatible Child 

Restraint

If the selected seating position has a 

Switchable Automatic Locking Retractor (ALR) 

seat belt, stow the seat belt, following the 

instructions below. See  

Ú

page 322 to check 

what type of seat belt each seating position has.

1. Loosen the adjusters on the lower straps 

and on the tether strap of the child seat so 

that you can more easily attach the hooks 

or connectors to the vehicle anchorages.

2. Place the child seat between the lower 

anchorages for that seating position. If the 

second row seat can be reclined, you may 

recline the seat and/or raise the head 

restraint (if adjustable) to get a better fit.

If the rear seat can be moved forward and 

rearward in the vehicle, you may wish to 

move it to its rear-most position to make 

room for the child seat. You may also move 

the front seat forward to allow more room 

for the child seat.

3. Attach the lower hooks or connectors of the 

child restraint to the lower anchorages in 

the selected seating position.

4. If the child restraint has a tether strap, 

connect it to the top tether anchorage. 

See  

Ú

page 327 for directions to attach a 

tether anchor.

WARNING!

Do not install a child restraint in the center 

position using the LATCH system. This posi

-

tion is not approved for installing child 

seats using the LATCH attachments. 

You must use the seat belt and tether 

anchor to install a child seat in the center 

seating position.

Never use the same lower anchorage to 

attach more than one child restraint. 

For typical installation instructions, see  

Ú

page 321.

WARNING!

Never use the same lower anchorage to attach 

more than one child restraint. For typical 

installation instructions, see  

Ú

page 321.

6

-------------------------------------------------------------------------------------------------------------------------------------------------------------

322

SAFETY


5. Tighten all of the straps as you push the 

child restraint rearward and downward into 

the seat. Remove slack in the straps 

according to the child restraint 

manufacturer’s instructions.

6. Test that the child restraint is installed 

tightly by pulling back and forth on the child 

seat at the belt path. It should not move 

more than 1 inch (25.4 mm) in any 

direction.

How To Stow An Unused Switchable-ALR 

(ALR) Seat Belt:

When using the LATCH attaching system to 

install a child restraint, stow all ALR seat belts 

that are not being used by other occupants or 

being used to secure child restraints. An unused 

belt could injure a child if they play with it and 

accidentally lock the seat belt retractor. Before 

installing a child restraint using the LATCH 

system, buckle the seat belt behind the child 

restraint and out of the child’s reach. If the 

buckled seat belt interferes with the child 

restraint installation, instead of buckling it 

behind the child restraint, route the seat belt 

through the child restraint belt path and then 

buckle it. Do not lock the seat belt. Remind all 

children in the vehicle that the seat belts are not 

toys and that they should not play with them.

Installing Child Restraints Using The 

Vehicle Seat Belt

Child restraint systems are designed to be 

secured in vehicle seats by lap belts or the lap 

belt portion of a lap/shoulder belt.

WARNING!

Improper installation of a child restraint to 

the LATCH anchorages can lead to failure of 

the restraint. The child could be badly 

injured or killed. Follow the child restraint 

manufacturer’s directions exactly when 

installing an infant or child restraint.

Child restraint anchorages are designed to 

withstand only those loads imposed by 

correctly-fitted child restraints. Under no 

circumstances are they to be used for adult 

seat belts, harnesses, or for attaching other 

items or equipment to the vehicle.

WARNING!

Improper installation or failure to properly 

secure a child restraint can lead to failure 

of the restraint. The child could be badly 

injured or killed.

Follow the child restraint manufacturer’s 

directions exactly when installing an infant 

or child restraint.

-------------------------------------------------------------------------------------------------------------------------------------------------------------

SAFETY

323

The seat belts in the passenger seating 

positions are equipped with either a Switchable 

Automatic Locking Retractor (ALR) or a cinching 

latch plate or both. Both types of seat belts are 

designed to keep the lap portion of the seat belt 

tight around the child restraint so that it is not 

necessary to use a locking clip. The ALR 

retractor can be “switched” into a locked mode 

by pulling all of the webbing out of the retractor 

and then letting the webbing retract back into 

the retractor. If it is locked, the ALR will make a 

clicking noise while the webbing is pulled back 

into the retractor. The cinching latch plate is 

designed to hold the lap portion of the seat belt 

tight when webbing is pulled tight and straight 

through a child restraint’s belt path.
See the “Automatic Locking Mode” description  

Ú

page 301 for additional information on ALR.

Please see the table below and the following 

sections for more information.

Lap/Shoulder Belt Systems For Installing 

Child Restraints In This Vehicle 

Regular Cab Automatic Locking Retractor (ALR) 

Locations

Crew Cab Automatic Locking Retractor (ALR) 

Locations

ALR — Switchable Automatic Locking Retractor

 Top Tether Anchorage Symbol

Cinching Latch plate — Cinching Latch plate
ALR — Switchable Automatic Locking Retractor

 Top Tether Anchorage Symbol

6

-------------------------------------------------------------------------------------------------------------------------------------------------------------

324

SAFETY


Frequently Asked Questions About Installing Child Restraints With Seat Belts

What is the weight limit (child’s weight + weight of 

the child restraint) for using the Tether Anchor with 

the seat belt to attach a forward facing child 

restraint?

Weight limit of the Child Restraint

Always use the tether anchor when using the seat 

belt to install a forward facing child restraint, up to 

the recommended weight limit of the child restraint.

  
Can the rear-facing child restraint touch the back of 

the front passenger seat?

Yes

Contact between the front passenger seat and the 

child restraint is allowed, if the child restraint 

manufacturer also allows contact.

Can the rear head restraints be removed?

Yes

The head restraints can be removed in every rear 

seating position if they interfere with the installation 

of the child restraint  

Ú

page 38.

Can the buckle stalk be twisted to tighten the seat 

belt against the belt path of the child restraint?

Yes – Cinching Latch Plate
No – ALR

In positions with cinching latch plates (CINCH), the 

buckle stalk may be twisted up to 3 full turns. Do not 

twist the buckle stalk in a seating position with an 

ALR retractor.

-------------------------------------------------------------------------------------------------------------------------------------------------------------

SAFETY

325

Installing A Child Restraint With A 

Switchable Automatic Locking Retractor 

(ALR): 

Child restraint systems are designed to be 

secured in vehicle seats by lap belts or the lap 

belt portion of a lap/shoulder belt.

1. For Crew Cab Models

Place the child seat in the center of the 

seating position. If the second row seat can 

be reclined, you may recline the seat and/or 

raise the head restraint (if adjustable) to get 

a better fit. If the rear seat can be moved 

forward and rearward in the vehicle, you 

may wish to move it to its rear-most position 

to make room for the child seat. You may 

also move the front seat forward to allow 

more room for the child seat.

For Regular Cab Models

Place the child seat in the center of the 

seating position. Move the vehicle seat as 

far rearward as possible to keep the child as 

far from the passenger air bag as possible.

2. Pull enough of the seat belt webbing from 

the retractor to pass it through the belt path 

of the child restraint. Do not twist the belt 

webbing in the belt path.

3. Slide the latch plate into the buckle until you 

hear a “click.”

4. Pull on the webbing to make the lap portion 

tight against the child seat.

5. To lock the seat belt, pull down on the 

shoulder part of the belt until you have 

pulled all the seat belt webbing out of the 

retractor. Then, allow the webbing to retract 

back into the retractor. As the webbing 

retracts, you will hear a clicking sound. 

This means the seat belt is now in the 

Automatic Locking mode.

6. Try to pull the webbing out of the retractor. 

If it is locked, you should not be able to pull 

out any webbing. If the retractor is not 

locked, repeat step 5.

7. Finally, pull up on any excess webbing to 

tighten the lap portion around the child 

restraint while you push the child restraint 

rearward and downward into the vehicle 

seat.

8. If the child restraint has a top tether strap 

and the seating position has a top tether 

anchorage, connect the tether strap to

the anchorage and tighten the tether strap. 

See  

Ú

page 327 for directions to attach a 

tether anchor.

9. Test that the child restraint is installed 

tightly by pulling back and forth on the child 

seat at the belt path. It should not move 

more than 1 inch (25.4 mm) in any 

direction.

Any seat belt system will loosen with time, so 

check the belt occasionally, and pull it tight if 

necessary.

WARNING!

Improper installation or failure to properly 

secure a child restraint can lead to failure 

of the restraint. The child could be badly 

injured or killed.

Follow the child restraint manufacturer’s 

directions exactly when installing an infant 

or child restraint.

6

-------------------------------------------------------------------------------------------------------------------------------------------------------------

326

SAFETY


Installing A Child Restraint With A Cinching 

Latch Plate (CINCH) — If Equipped:

Child restraint systems are designed to be 

secured in vehicle seats by lap belts or the lap 

belt portion of a lap/shoulder belt.

1. Place the child seat in the center of the 

seating position. If the second row seat can 

be reclined, you may recline the seat and/or 

raise the head restraint (if adjustable) to get 

a better fit. If the rear seat can be moved 

forward and rearward in the vehicle, you may 

wish to move it to its rear-most position to 

make room for the child seat. You may also 

move the front seat forward to allow more 

room for the child seat.

2. Next, pull enough of the seat belt webbing 

from the retractor to pass it through the belt 

path of the child restraint. Do not twist the 

belt webbing in the belt path.

3. Slide the latch plate into the buckle until you 

hear a “click.”

4. Finally, pull up on any excess webbing to tighten 

the lap portion around the child restraint while 

you push the child restraint rearward and 

downward into the vehicle seat.

5. If the child restraint has a top tether strap 

and the seating position has a top tether 

anchorage, connect the tether strap to

the anchorage and tighten the tether strap. 

See  

Ú

page 327 for directions to attach a 

tether anchor.

6. Test that the child restraint is installed 

tightly by pulling back and forth on the child 

seat at the belt path. It should not move 

more than 1 inch (25.4 mm) in any 

direction.

Any seat belt system will loosen with time, so 

check the belt occasionally, and pull it tight if 

necessary.
If the buckle or the cinching latch plate is too 

close to the belt path opening of the child 

restraint, you may have trouble tightening the 

seat belt. If this happens, disconnect the latch 

plate from the buckle and twist the short 

buckle-end belt up to three full turns to shorten 

it. Insert the latch plate into the buckle with the 

release button facing out, away from the child 

restraint. Repeat steps 4 to 6, above, to 

complete the installation of the child restraint.
If the belt still cannot be tightened after you 

shorten the buckle, disconnect the latch plate 

from the buckle, turn the buckle around one 

half turn, and insert the latch plate into the 

buckle again. If you still cannot make the child 

restraint installation tight, try a different seating 

position.

WARNING!

Improper installation or failure to properly 

secure a child restraint can lead to failure 

of the restraint. The child could be badly 

injured or killed.

Follow the child restraint manufacturer’s 

directions exactly when installing an infant 

or child restraint.

-------------------------------------------------------------------------------------------------------------------------------------------------------------

SAFETY

327

Installing Child Restraints Using The Top 

Tether Anchorage

Regular Cab Trucks:

 In the regular cab truck, the top tether 

anchorages are located behind the center and 

right passenger seats. There is a plastic cover 

over each anchorage. To attach the tether strap 

of the child restraint:

1. Place the child restraint on the seat and 

adjust the tether strap so that it will reach 

over the seat back, under the head restraint 

and to the tether anchor directly behind the 

seat.

Regular Cab Tether Anchorages

2. Route the tether strap to provide the most 

direct path between the anchorage and the 

child seat. The tether strap should go between 

the head restraint posts underneath the head 

restraint. You may need to adjust the head 

restraint to the upward position to pass the 

tether strap underneath the head restraint and 

between its posts.

3. Lift the cover (if so equipped), and attach 

the hook to the square opening in the sheet 

metal. Tighten the tether strap according to 

the child seat manufacturer’s instructions.

Crew Cab Trucks

 The top tether anchorages in this vehicle are 

tether strap loops located between the rear 

glass and the back of the rear seat. There is a 

tether strap loop located behind each seating 

position. Follow the steps below to attach the 

tether strap of the child restraint.

WARNING!

Do not attach a tether strap for a rear-facing 

car seat to any location in front of the car 

seat, including the seat frame or a tether 

anchorage. Only attach the tether strap of a 

rear-facing car seat to the tether anchorage 

that is approved for that seating position, 

located behind the top of the vehicle seat.

For the location of approved tether 

anchorages in your vehicle, see  

Ú

page 317.

1 — Tether Strap Hook
2 — Tether Strap To Child Restraint
3 — Tether Anchor

WARNING!

Never place a rear-facing child restraint in 

front of an air bag. A deploying Passenger 

Front Air Bag can cause death or serious 

injury to a child 12 years or younger, including 

a child in a rear-facing child restraint.

6

-------------------------------------------------------------------------------------------------------------------------------------------------------------

328

SAFETY


Right Or Left Outboard Seats:

1. Raise the head restraint and reach 

between the rear seat and rear glass to 

access the tether strap loop.

Head Restraint In Raised Position

Tether Strap Loop With Center Head Restraint In 

Raised Position

2. Place a child restraint on the seat and adjust 

the tether strap so that it will reach over the 

seat back, under the head restraint, through 

the tether strap loop behind the seat and 

over to the tether strap loop behind the 

center seat.

3. Pass the tether strap hook under the head 

restraint behind the child seat, though the 

tether strap loop behind the seat and over 

to the center tether strap loop.

Tether Strap Through Outboard Tether Strap Loop

4. Attach the hook to the center tether strap 

loop (see diagram). Tighten the tether strap 

according to the child seat manufacturer’s 

instructions.

Tether Strap Through Outboard Tether Strap Loop And 

Attached To Center Tether Strap Loop

NOTE:

If there are child seats in both of the outboard 

(left and right) seating positions, the tether 

strap hooks of both child seats should be 

connected to the center tether strap loop. 

This is the correct way to tether two outboard 

child seats.

-------------------------------------------------------------------------------------------------------------------------------------------------------------

SAFETY

329

Center Seat:

1. Raise the head restraint and reach 

between the rear seat and rear glass to 

access the tether strap loop.

Tether Strap Loop With Head Restraint In Raised 

Position

2. Place a child restraint on the seat and adjust 

the tether strap so that it will reach over the 

seat back, under the head restraint, through 

the tether strap loop behind the seat and 

over to the tether strap loop behind either the 

right or left outboard seat.

3. Pass the tether strap hook under the head 

restraint behind the child seat, though the 

tether strap loop behind the seat and over 

to the right or left outboard tether strap 

loop.

Tether Strap Through Center Tether Strap Loop

4. Attach the hook to the outboard tether strap 

loop (see diagram). Tighten the tether strap 

according to the child seat manufacturer’s 

instructions.

Tether Strap Through Center Tether Strap Loop And 

Attached To Outboard Tether Strap Loop

Installing Three Child Restraints:

1. Place a child restraint on each outboard 

rear seat. Route the tether straps following 

the directions for right and left seating 

positions, above.

2. Attach both hooks to the center tether strap 

loop, but do not tighten the straps yet.

3. Place a child restraint on the center rear 

seat. Route the tether strap following the 

directions for the center seating position, 

above.

4. Attach the hook to the outboard tether strap 

loop.

6

-------------------------------------------------------------------------------------------------------------------------------------------------------------


Content      ..     18      19      20      21     ..