Acura RL. Manual - part 781


  Index      Acura     Acura RL - service repair manual 2005-2008 year


Search            


Content   ..  779  780  781  782   ..


Acura RL. Manual - part 781


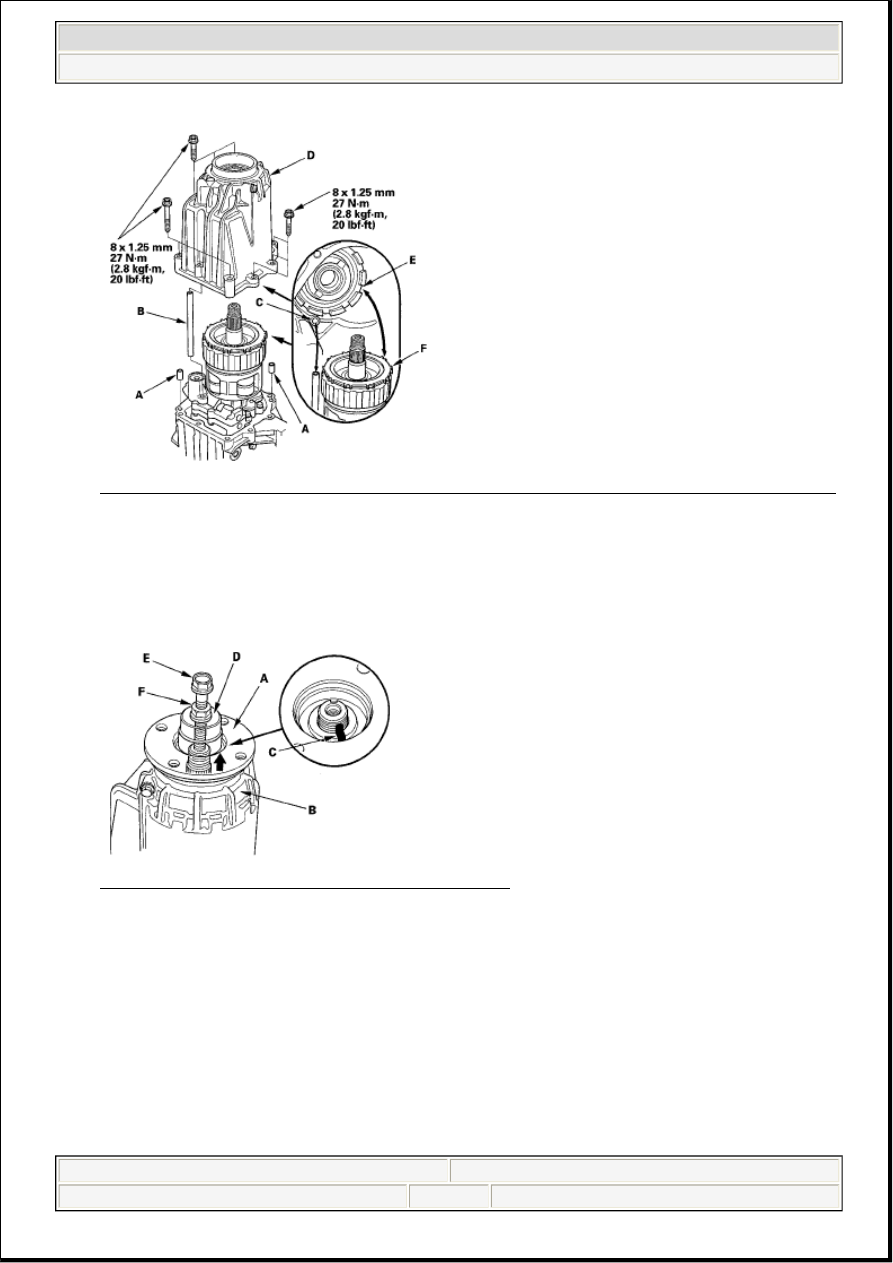
Fig. 211: Identifying Front Case, Dowel Pins And High Clutch Tabs With Torque Specifications
Courtesy of AMERICAN HONDA MOTOR CO., INC.
 

23. Align the hole (C) of the front case (D) with the 8 x 130 mm pipe. Align the groove (E) of the front 

case with the high clutch tabs (F), then install the front case onto the center case.  

24. Set the companion flange (A) onto the front case (B) by aligning the reference mark (C), then install 

the 36 mm socket (D), the 8 mm flange bolt (E), and the 8 mm nut (F) as shown. 

Fig. 212: Setting Companion Flange Onto Front Case 
Courtesy of AMERICAN HONDA MOTOR CO., INC. 

25. Tighten the 8 mm nut, then install the companion flange.  

26. Install the new 23 mm O-ring (A), the 23 mm backup ring (B), the 22 mm spring washer (C), and the 

new 22 mm locknut (D). 

NOTE:

Apply ATF to the 23 mm O-ring.


2007 Acura RL 

2005-08 DRIVELINE/AXLES Rear Differential - RL


me 


Friday, June 05, 2009 3:02:19 PM

Page 151  © 2005 Mitchell Repair Information Company, LLC. 

Fig. 213: Identifying Locknut, O-Ring And Spring Washer 
Courtesy of AMERICAN HONDA MOTOR CO., INC. 

27. Install the companion flange holder to the companion flange, then tighten the new 22 mm locknut to 

the specified torque. 

TORQUE: 118 N.m (12.0 kgf.m, 87 lbf.ft)  

Fig. 214: Identifying Companion Flange Holder 
Courtesy of AMERICAN HONDA MOTOR CO., INC. 

28. Stake the locknut tab (A) into the groove in the input shaft. 

Fig. 215: Staking Locknut Tab Into Groove In Input Shaft 
Courtesy of AMERICAN HONDA MOTOR CO., INC. 

29. Install the rear differential (see REAR DIFFERENTIAL INSTALLATION ).  


2007 Acura RL 

2005-08 DRIVELINE/AXLES Rear Differential - RL


me 


Friday, June 05, 2009 3:02:19 PM

Page 152  © 2005 Mitchell Repair Information Company, LLC. 

SIDE CASE OIL SEAL REPLACEMENT

Special Tools Required  

Oil seal driver C 070AD-RJC0130  

Driver, 56 x 62 mm 070AD-PYZA100  

1. Remove the rear differential (see REAR DIFFERENTIAL REMOVAL ).  

2. Remove the 40 x 72 x 7.5 mm dust seal (A) with a commercially available seal remover. 

Fig. 216: Removing Dust Seal 
Courtesy of AMERICAN HONDA MOTOR CO., INC. 

3. Remove the thrust washer.  

4. Install a 6 mm screw (P/N 93901-16580) (A) at each • mark (4 places, 90 degrees apart) (B) of 35.5 x 

70 x 9 mm oil seal (C), then remove the 35.5 x 70 x 9 mm oil seal as shown. 

Fig. 217: Removing Oil Seal 
Courtesy of AMERICAN HONDA MOTOR CO., INC. 

5. Install the new 35.5 x 70 x 9 mm oil seal (A) with the drivers. 

NOTE:

Do not thread the 6 mm screws into the 35.5 x 70 x 9 mm oil seal more 
than 5 mm (0.197 in.).


2007 Acura RL 

2005-08 DRIVELINE/AXLES Rear Differential - RL


me 


Friday, June 05, 2009 3:02:19 PM

Page 153  © 2005 Mitchell Repair Information Company, LLC. 

Fig. 218: Installing Oil Seal 
Courtesy of AMERICAN HONDA MOTOR CO., INC. 

6. Install the thrust washer (A), then install the new 40 x 72 x 7.5 mm dust seal (B) with the drivers. 

Fig. 219: Installing Dust Seal 
Courtesy of AMERICAN HONDA MOTOR CO., INC. 

7. Install the rear differential (see REAR DIFFERENTIAL INSTALLATION ).  

CENTER CASE SIDE OIL SEAL REPLACEMENT 

Special Tools Required  

Oil seal driver A 070AD-RJC0110  

Oil seal driver B 070AD-RJC0120  

Driver handle 15 x 135L 07749-0010000  

Attachment, 78 x90 mm 07GAD-SD40101  

1. Remove the rear differential (see REAR DIFFERENTIAL REMOVAL ).  

2. Remove the left side case (A), the right side case (B), the six 8 x 14 mm dowel pins (C), and the two 

O-rings (D). 


2007 Acura RL 

2005-08 DRIVELINE/AXLES Rear Differential - RL


me 


Friday, June 05, 2009 3:02:19 PM

Page 154  © 2005 Mitchell Repair Information Company, LLC. 


Content   ..  779  780  781  782   ..