Acura RL. Manual - part 342


  Index      Acura     Acura RL - service repair manual 2005-2008 year


Search            


Content   ..  340  341  342  343   ..


Acura RL. Manual - part 342


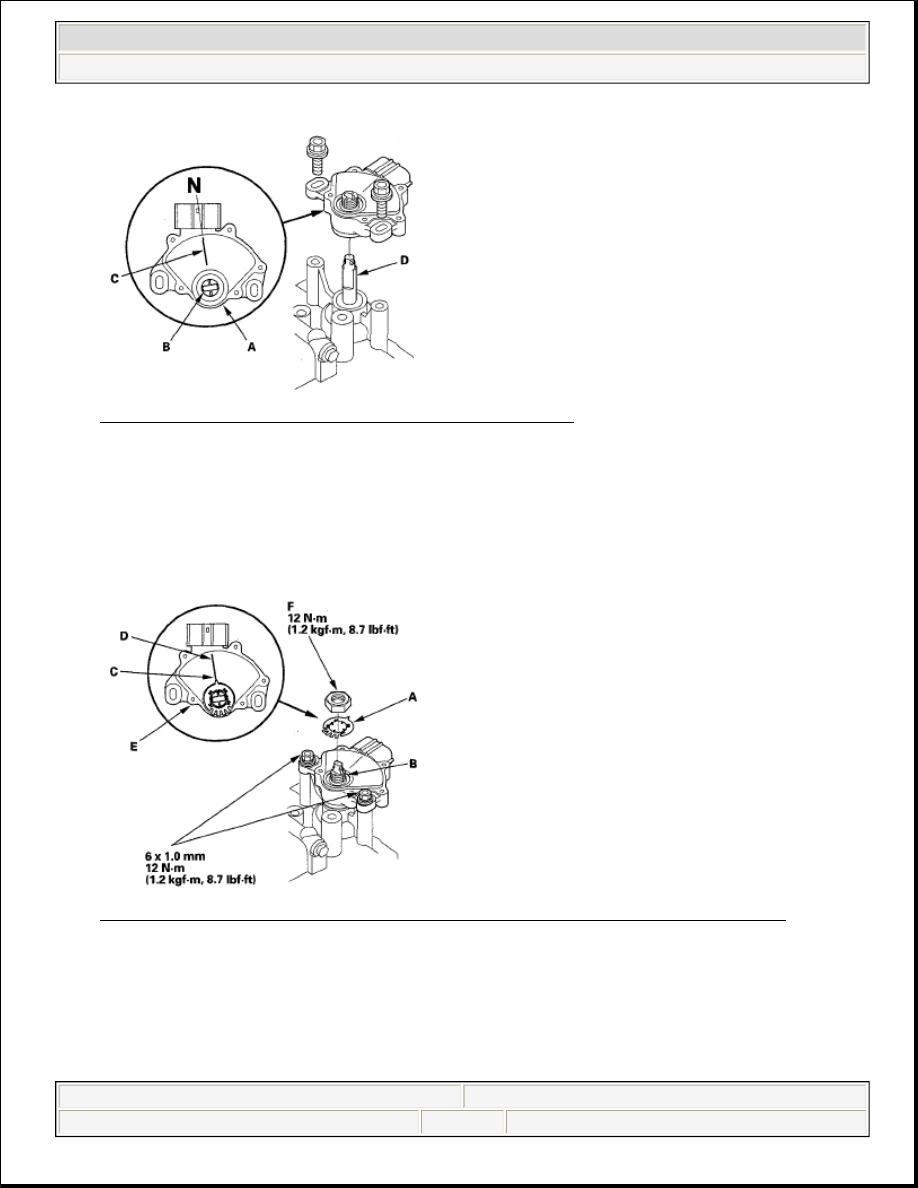
Fig. 621: Aligning Transmission Range Switch Line And Hole 
Courtesy of AMERICAN HONDA MOTOR CO., INC. 

61. Install the transmission range switch gently over the selector control shaft (D), and install the bolts 

loosely.  

62. Install the new lock washer (A) over the selector control shaft (B) with aligning the projection (C) of the 

lock washer with the N positioning line (D) on the transmission range switch (E), and install the locknut 
(F). 

Fig. 622: Installing Transmission Range Switch And Locknut With Torque Specifications 
Courtesy of AMERICAN HONDA MOTOR CO., INC. 

63. Push the locknut against the transmission housing to seat the range switch into the selector control shaft, 

and tighten the locknut to 12 N.m (1.2 kgf.m, 8.7 lbf.ft) while holding the selector control shaft with a 6 
mm wrench. Bend the lock tabs against the locknut. 


2007 Acura RL 

2005-08 TRANSMISSION Automatic Transmission - RL


me 


Friday, June 05, 2009 1:18:19 PM

Page 539 

© 2005 Mitchell Repair Information Company, LLC. 

Fig. 623: Tightening Locknut 
Courtesy of AMERICAN HONDA MOTOR CO., INC. 

64. Tighten the bolts securing the transmission range switch to 12 N.m (1.2 kgf.m, 8.7 lbf.ft).  

65. Install the control lever (A), spring washer (B), lock washer (C), and locknut (D) on the selector control 

shaft (E). 

Fig. 624: Installing Transmission Range Switch Control Lever With Torque Specifications 
Courtesy of AMERICAN HONDA MOTOR CO., INC. 

66. Install the new O-ring (A) on the input shaft (mainshaft) speed sensor (B), and install the input shaft 

(mainshaft) speed sensor and the sensor washer (C). 


2007 Acura RL 

2005-08 TRANSMISSION Automatic Transmission - RL


me 


Friday, June 05, 2009 1:18:19 PM

Page 540 

© 2005 Mitchell Repair Information Company, LLC. 

Fig. 625: Installing Input Shaft (Mainshaft) Speed Sensor With Torque Specifications 
Courtesy of AMERICAN HONDA MOTOR CO., INC. 

67. Install the new O-ring (D) on the output shaft (countershaft) speed sensor (E), and install the output shaft 

(countershaft) speed sensor.  

68. Install the 4th clutch transmission fluid pressure switch (A) with the new sealing washer (B). Tighten the 

switch by gripping the metal part. 

Fig. 626: Identifying 4th Clutch Transmission Fluid Pressure Switch With Torque Specifications 
Courtesy of AMERICAN HONDA MOTOR CO., INC. 

69. Install the 3rd clutch transmission fluid pressure switch (A) with the new sealing washer (B). Tighten the 

switch by gripping the metal part. 


2007 Acura RL 

2005-08 TRANSMISSION Automatic Transmission - RL


me 


Friday, June 05, 2009 1:18:19 PM

Page 541 

© 2005 Mitchell Repair Information Company, LLC. 

Fig. 627: Identifying Fluid Pressure Switches, ATF Lines, ATF Temperature Sensor With Torque 
Specifications
 
Courtesy of AMERICAN HONDA MOTOR CO., INC. 

70. Install the ATF cooler lines (C) with the new sealing washers (D) and the line bolts (E).  

71. Install the connector bracket (F), and secure the ATF lines with the 6.0 mm bolt (G) on the transmission 

housing. Tighten the bolts to 12 N.m (1.2 kgf.m, 8.7 lbf.ft).  

72. Install the ATF temperature sensor (H) with the new O-ring (I). Install the connector on the connector 

bracket and harness clamp on the bracket.  

73. Install the 2nd clutch transmission fluid pressure switch (A) with the new sealing washer (B). Tighten the 

switch by gripping the metal part. 

Fig. 628: Identifying 2nd Clutch Transmission Fluid Pressure Switch With Torque Specifications 
Courtesy of AMERICAN HONDA MOTOR CO., INC.


2007 Acura RL 

2005-08 TRANSMISSION Automatic Transmission - RL


me 


Friday, June 05, 2009 1:18:19 PM

Page 542 

© 2005 Mitchell Repair Information Company, LLC. 


Content   ..  340  341  342  343   ..