Acura RL. Manual - part 340
 

  Index      Acura     Acura RL - service repair manual 2005-2008 year


Search            


Content   ..  338  339  340  341   ..


Acura RL. Manual - part 340


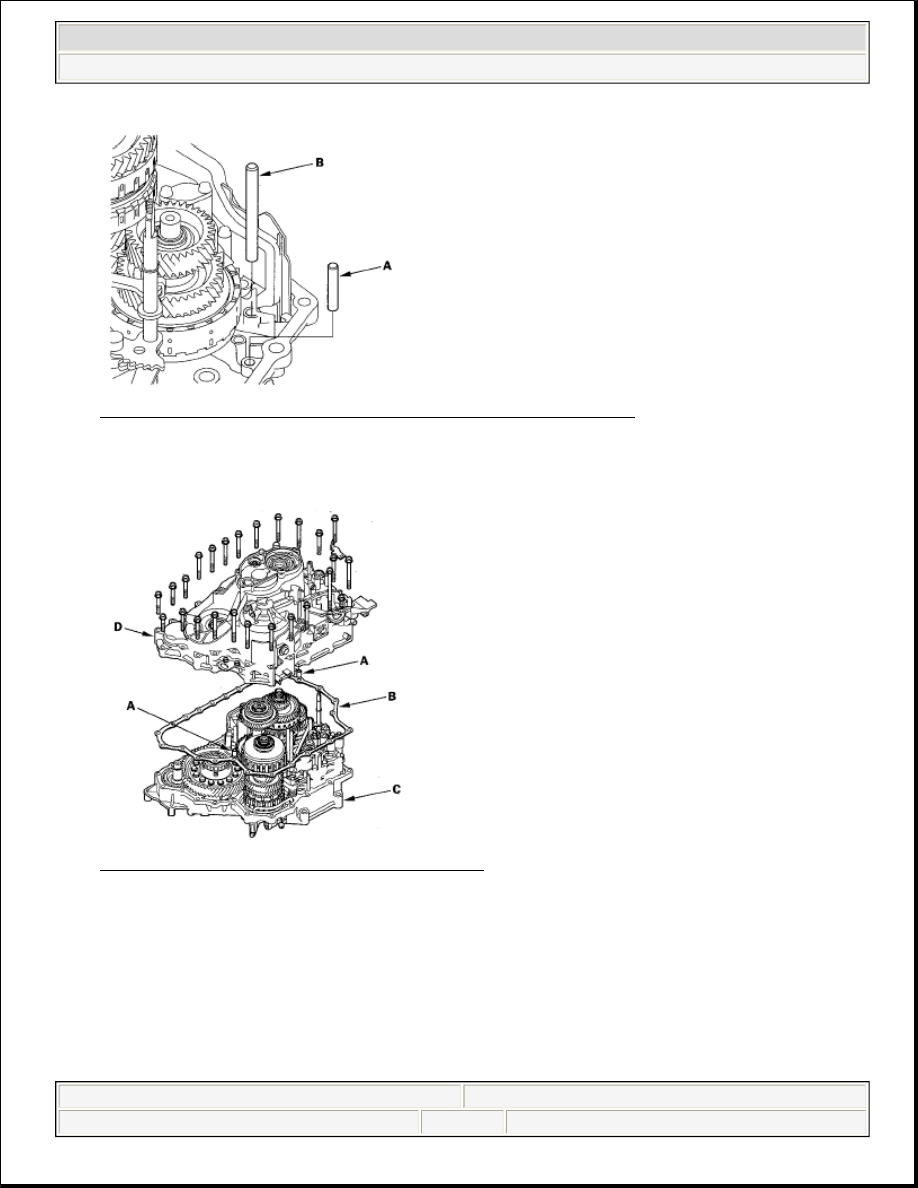
Fig. 605: Identifying ATF Feed Pipes And Torque Converter Housing 
Courtesy of AMERICAN HONDA MOTOR CO., INC. 

33. Install the two dowel pins (A) and the new gasket (B) on the torque converter housing (C). 

Fig. 606: Identifying Case Dowel Pins And Gasket 
Courtesy of AMERICAN HONDA MOTOR CO., INC. 

34. Place the transmission housing (D) on the torque converter housing.  

35. Wrap a screwdriver tip with tape to prevent damage to the reverse idler gear teeth. Engage the reverse 

idler gear with reverse gears by rotating the idler gear using the screwdriver. 


2007 Acura RL 

2005-08 TRANSMISSION Automatic Transmission - RL


me 


Friday, June 05, 2009 1:18:18 PM

Page 531 

© 2005 Mitchell Repair Information Company, LLC. 

Fig. 607: Rotating Idler Gear Using Screwdriver 
Courtesy of AMERICAN HONDA MOTOR CO., INC. 

36. While expanding the snap ring of the countershaft bearing with snap ring pliers, install the transmission 

housing onto the bearing part-way. Then release the snap ring pliers, and push down on the housing until 
it bottoms and the snap ring snaps into place in the transmission housing snap ring groove. 

Fig. 608: Installing Transmission Housing Using Expanding Snap Ring Pliers 
Courtesy of AMERICAN HONDA MOTOR CO., INC. 

37. Install the transmission housing mounting bolts (21 bolts) and the bolt (A) along with the transmission 

hanger (B) and the transmission ground terminal bracket (C), and tighten the bolts in at least two steps in 
a criss-cross pattern to 44 N.m (4.5 kgf.m, 33 lbf.ft). 


2007 Acura RL 

2005-08 TRANSMISSION Automatic Transmission - RL


me 


Friday, June 05, 2009 1:18:18 PM

Page 532 

© 2005 Mitchell Repair Information Company, LLC. 

Fig. 609: Identifying Transmission Housing Mounting Bolts, Transmission Hanger And 
Transmission Ground Terminal Bracket With Torque Specifications
 
Courtesy of AMERICAN HONDA MOTOR CO., INC. 

38. Install and tighten the two mounting bolts (D) to 39 N.m (4.0 kgf.m, 29 lbf.ft). Keep the mounting bolts 

free of grease or oil.  

39. Install and tighten the special bolt (E) to 64 N.m (6.5 kgf.m, 47 lbf.ft).  

40. Install the mainshaft holder onto the mainshaft 

Fig. 610: Identifying Mainshaft Holder On Mainshaft 
Courtesy of AMERICAN HONDA MOTOR CO., INC. 

41. Install the new lock washer (A) with the marked side (B) up over the mainshaft (C), and apply ATF to the 

surfaces of the lock washer and old locknut (D). 


2007 Acura RL 

2005-08 TRANSMISSION Automatic Transmission - RL


me 


Friday, June 05, 2009 1:18:18 PM

Page 533 

© 2005 Mitchell Repair Information Company, LLC. 

Fig. 611: Identifying Lock Washer Installation Position On Mainshaft 
Courtesy of AMERICAN HONDA MOTOR CO., INC. 

42. Install the old locknut, and tighten it to seat the lock washer to 178 N.m (18.2 kgf.m, 132 lbf.ft), then 

remove the old locknut.  

43. Install the new locknut and tighten it to 176 N.m (18.2 kgf.m, 132 lbf.ft), then stake the locknut into its 

shaft to a depth (A) of 0.7-1.3 mm (0.03-0.05 in.) using a 3.5 mm punch (B). 

Fig. 612: Staking The Locknut 
Courtesy of AMERICAN HONDA MOTOR CO., INC. 

44. Install the end cover (A), dowel pin (B), and new O-ring (C). 


2007 Acura RL 

2005-08 TRANSMISSION Automatic Transmission - RL


me 


Friday, June 05, 2009 1:18:18 PM

Page 534 

© 2005 Mitchell Repair Information Company, LLC. 


Content   ..  338  339  340  341   ..