BAIC BJ40 (2023 year). Manual in english - page 2
90
Open and Close Doors
2
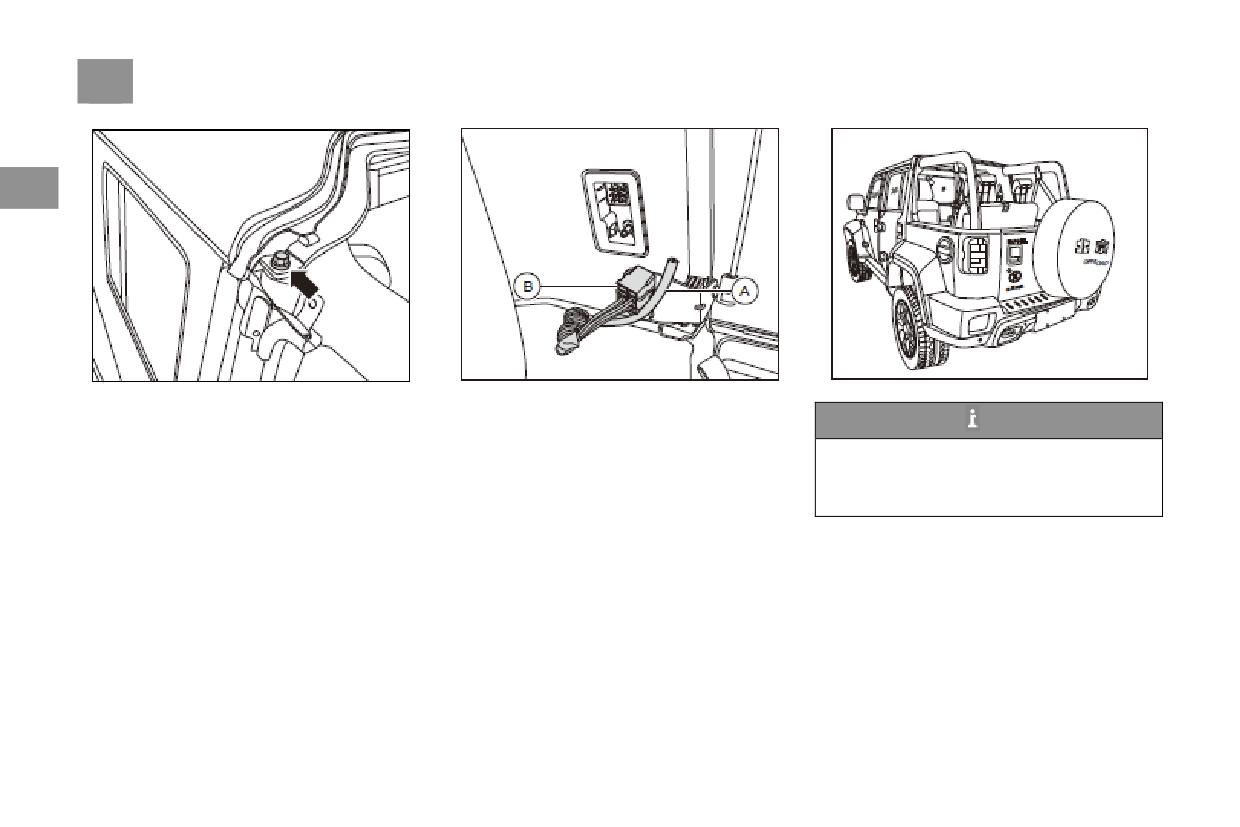
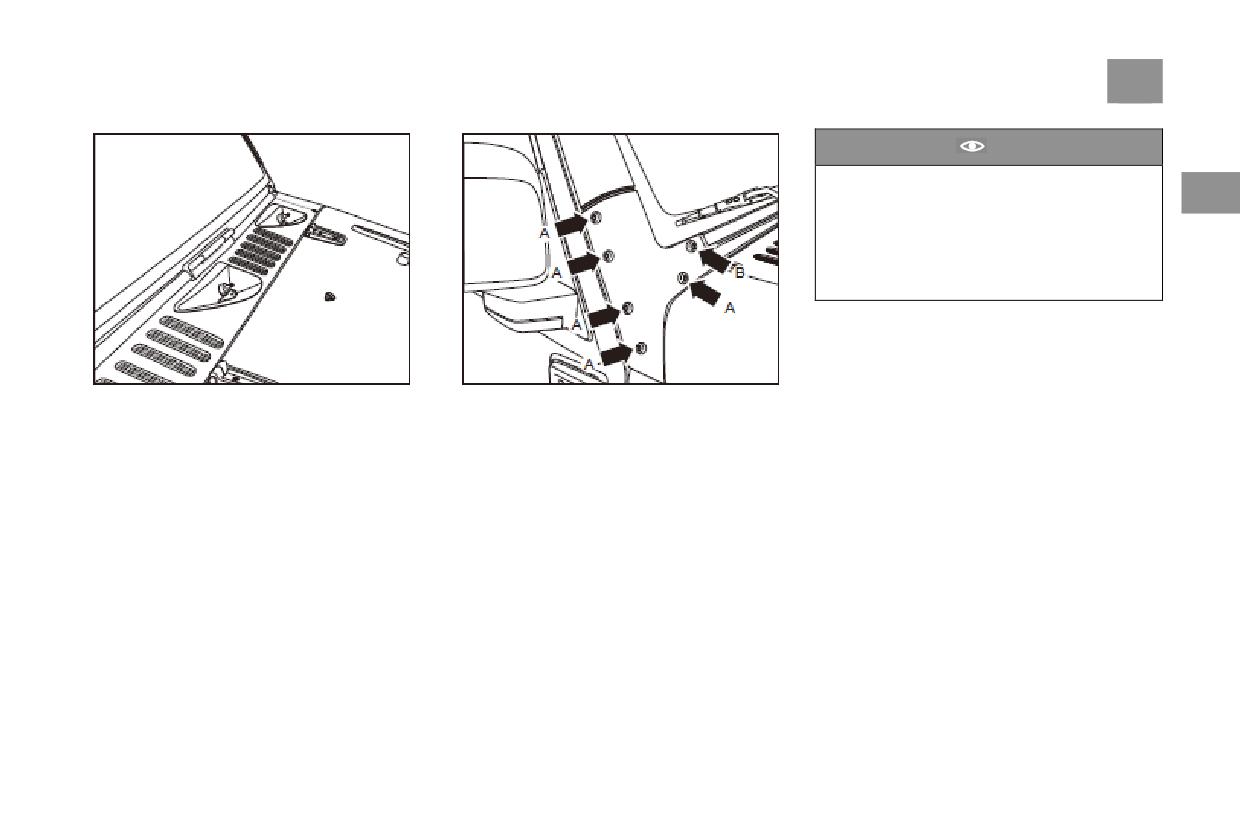
4. Remove bolts (left and right) above column B
5. Unplug the right side of the rear panel -
Lift the roof up slightly and move to back.
as shown in Figure
B-and Rubber tube - A - (illustrated position).
Tips
This operation may require a lot of help.
After removal, the Rear top cover should be
placed on the horizontal ground or on soft
objects to prevent damage.
Open and Close Doors
91
Installation can be done in the reverse order of
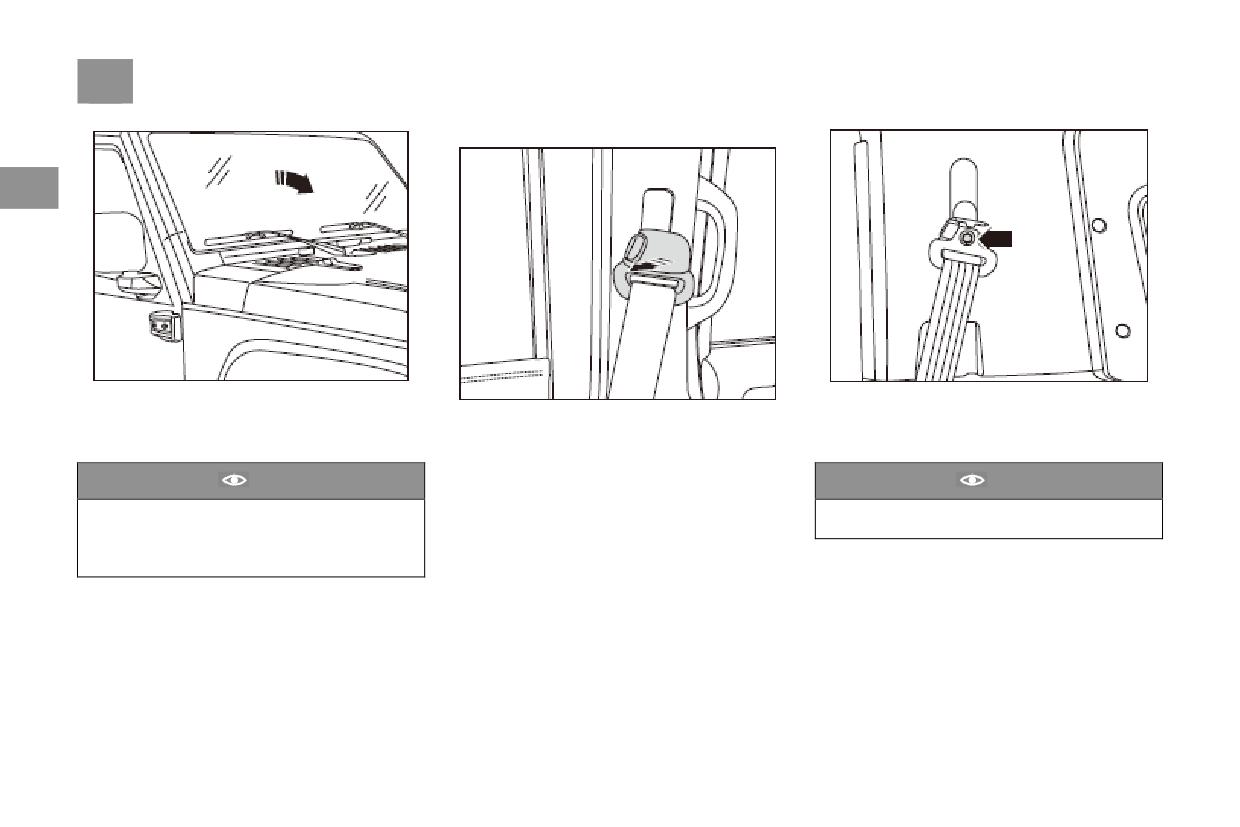
Front windshield overturned
Warning
disassembly. When installing, it should be noted
Apart from the removable roof cover, the front
that the rear cover should be level with the car
windshield can also be rolled forward on the
Therefore, we strongly recommend that you
body (or slightly lower than 1 mm).
engine hatch cover to enjoy the pleasure of
consult
Beijing
Automobile
Special
2
driving in the field.
Distribution Store before proceeding with
Warning
relevant operations. If you want to feel the
Caution
Professional tools are needed when
driving feeling of the front windshield
disassembling and assembling the Rear top
Front windshield can prevent the intrusion of
flipping forward, please flip the front
cover. If the operation is improper, it is easy
flying stones, branches and other objects on
windshield forward and fix the front
to cause damage to vehicle parts. Or there
the road, especially in some traffic accidents
windshield firmly with the engine hatch
are
unpredictable
problems
with
can play a very important role in safety
cover after the front windshield flipping
unreasonable assembly. Serious cases can
protection, so when the front windshield folds
forward. Fasten your seat belt before driving.
also lead to personal injury, so we strongly
forward and overturns on the engine
When driving, it is recommended that the
recommend that you consult the authorised
compartment cover, please do not drive on
speed should not exceed 16 km/h and keep
dealership before doing related operations.
the road.
driving in low gear. Before returning to
To fold the front windshield, a series of
normal driving, please restore the front
disassembly and assembly work is needed,
windshield to its original position and install
during which many professional tools and parts
the components.
are used, and operators are required to have
some relevant experience. If the operation is
Warning
improper, it is easy to cause damage to vehicle
parts and even personal injury.
In the process of disassembly, each
component must be properly placed in a safe
place in order to prevent parts from being
lost or damaged, or causing danger to
personnel.
92
Open and Close Doors
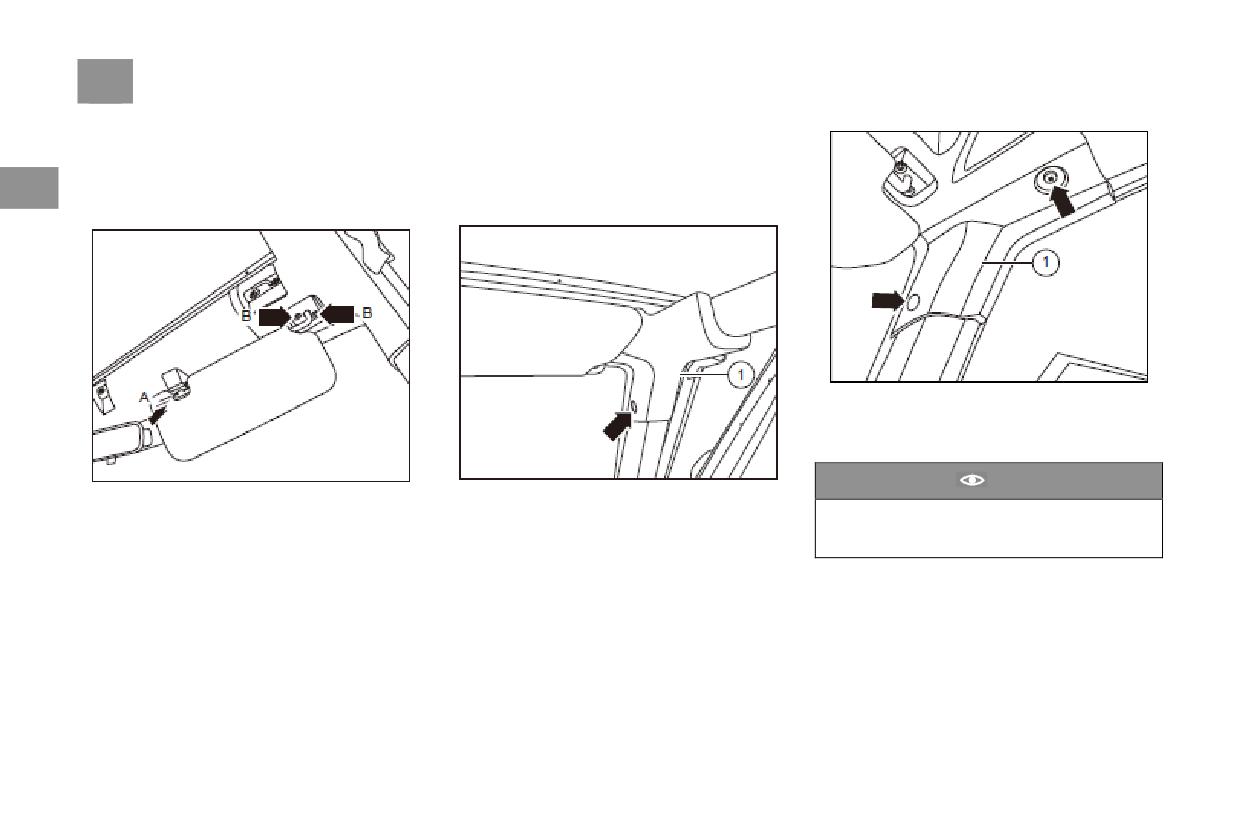
Detailed disassembly steps are as follows:
2. First pull out the shade shafts on both sides
1.Remove the roof cover according to the
along the direction of arrow A, remove two
previous description,place the roof cover and
locking screw-arrow B-, and finally remove two
2
fixing bolts in a safe place to prevent damage or
front shades (take the right side of the vehicle as
danger.
an example).
3. Remove the locking screw-arrow-on both
sides, and then remove the windshield angle
trim-1-. (Take the right side of the vehicle as an
example).
Caution
The tree-shaped clasp on the interior panel is
a disposable part, which needs to be replaced
after disassembly.
Open and Close Doors
93
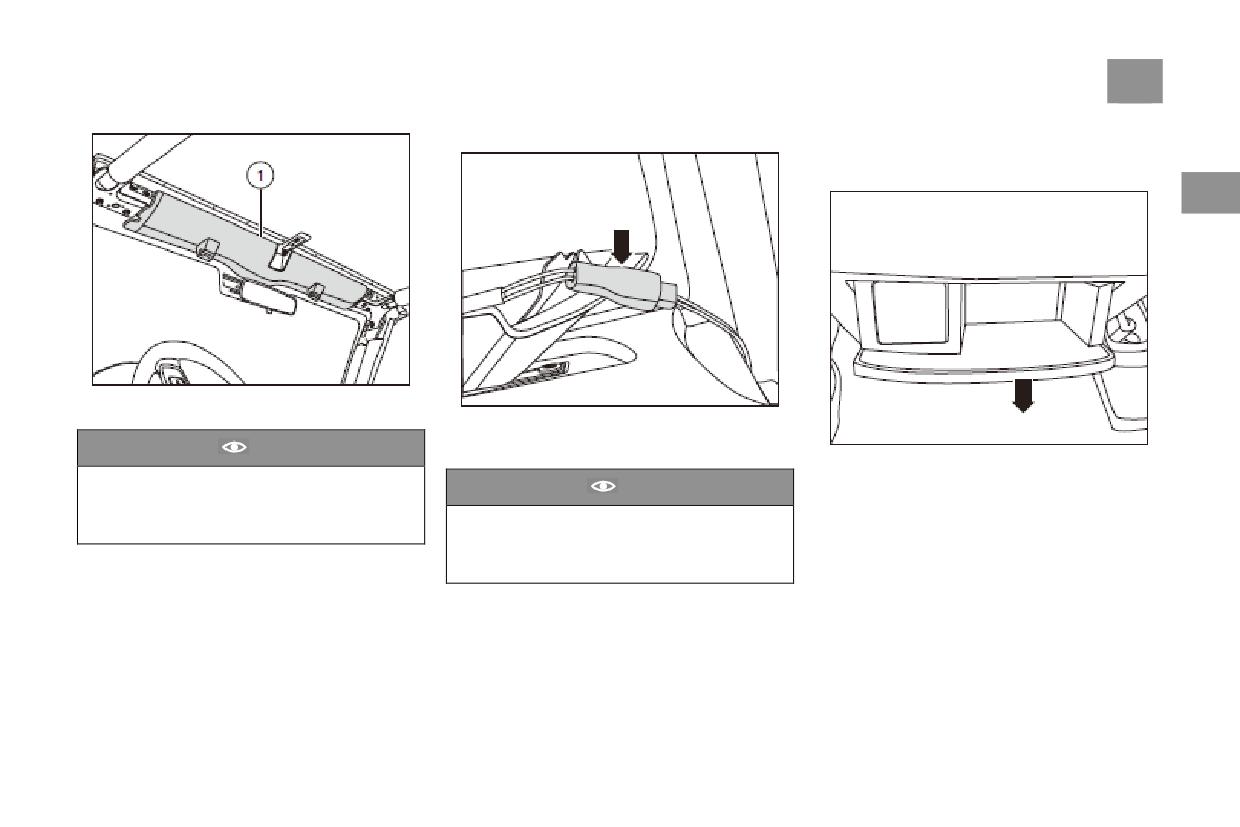
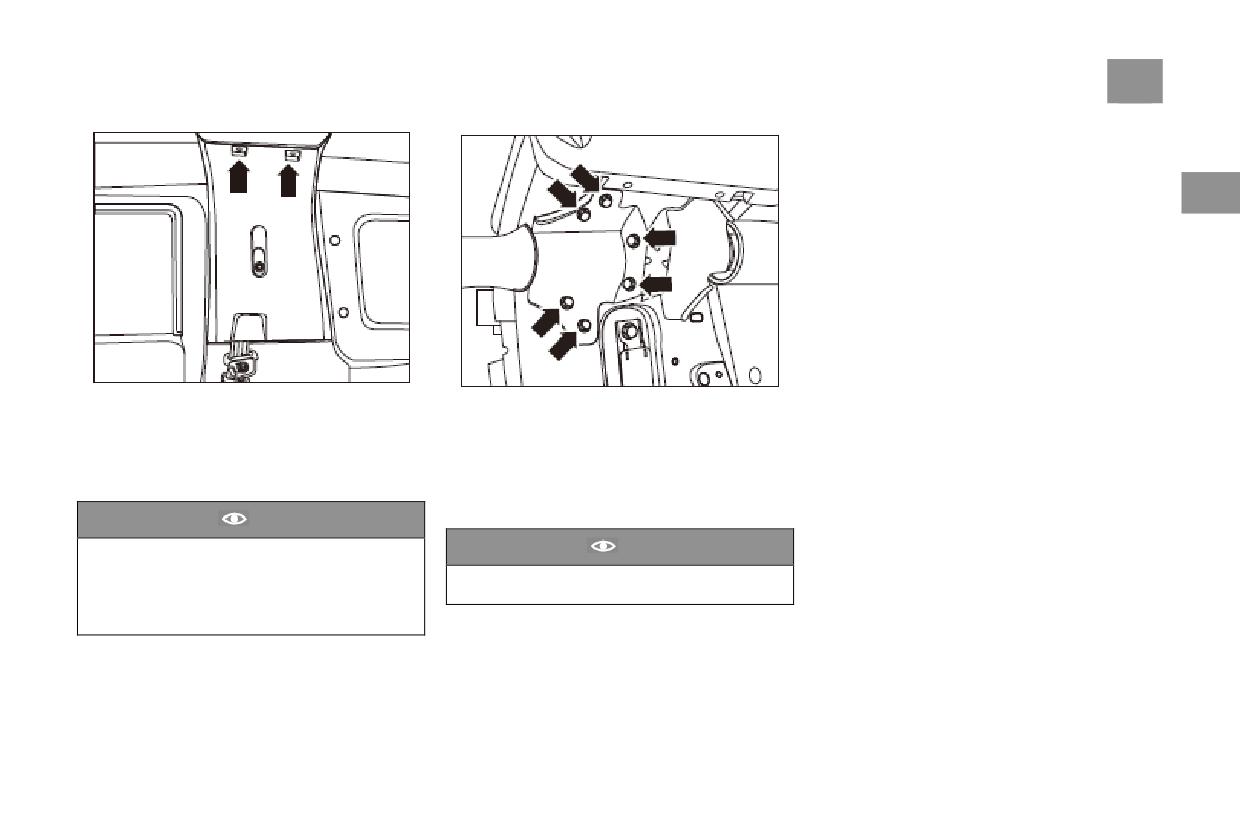
5. Release the A-pillar speaker plug
6. Loosen the antenna plug of the front
windshield, which is located in the dashboard
on the passenger side.
2
4. Remove the beam interior panel above the
windshield as shown in the figure. -1-
First remove the A-pillar trim on both sides, and
then release the icon plug (take the right side of
Caution
the vehicle as an example)
First remove the glove box: Open the glove box
The beam interior panel on the windshield is
and slowly pull out the glove box in the
Caution
fixed by 10 fasteners, and the fastener is a
direction of the arrow shown.
disposable part. New parts need to be
The beam interior panel on the windshield is
replaced after disassembly.
fixed by 10 fasteners, and the fastener is a
disposable part. New parts need to be
replaced after disassembly.
94
Open and Close Doors
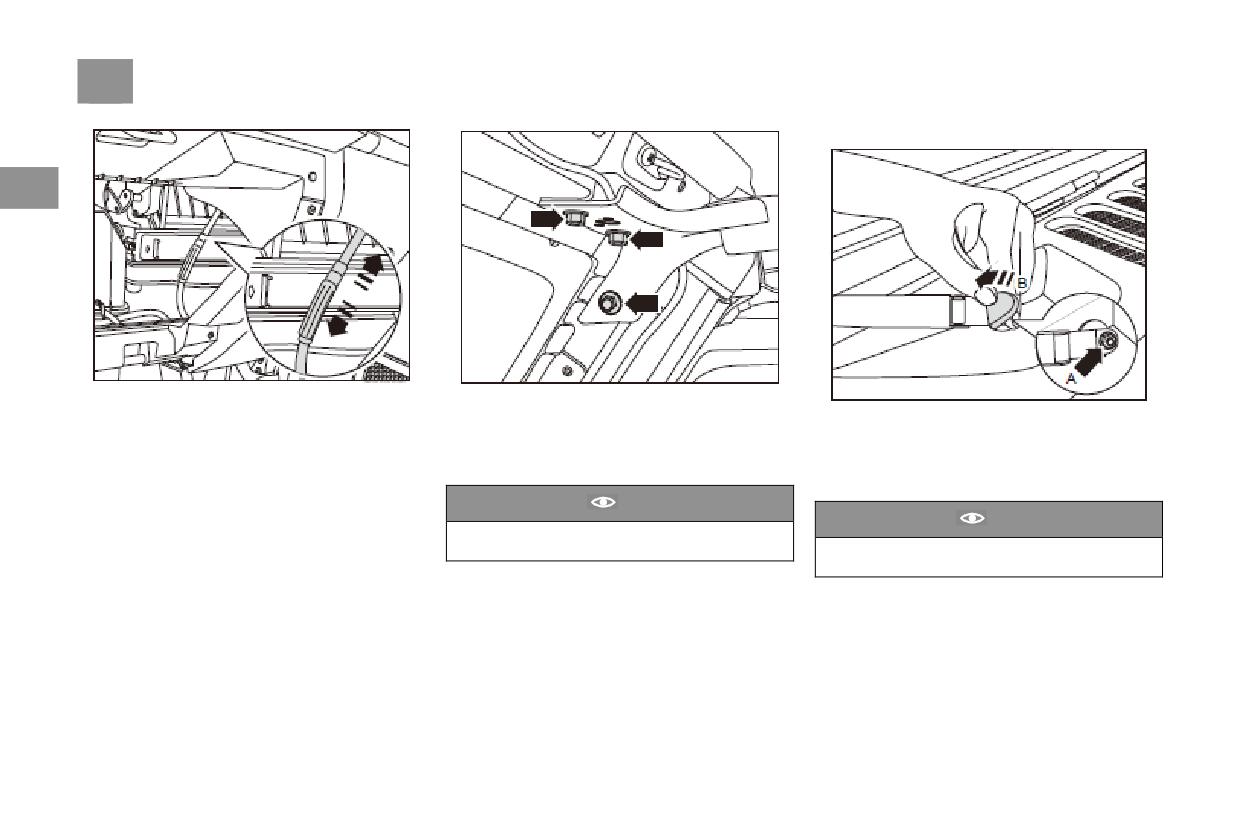
8. Remove wiper arm
2
Find the antenna plug of the front windshield
7. Remove the fastening bolts connecting the
and loosen it according to the graphic method
front windshield with the left and right anti-roll
Open the wiper arm nut cover along the arrow B
(the plug is inside the glove box).
bars. There are 3 fastening bolts on each side,
shown in the figure, and remove the fixed nut -
total 6 bolts. (Take the right side of the vehicle
arrow A-. Both wiper arm retaining nuts need to
as an example).
be removed
(The right side as an example)
Caution
Caution
These bolts are installed with a torque
requirement of 24 +2Nm.
The requirement torque of fixed wiper arm
nut is 19±NM
Open and Close Doors
95
Caution
The length of these screw is not exactly the
same. The screw in the figure-A-position is
2
slightly
shorter than that in the
figure-B-position. It should not be confused
in installation. In addition, the screw has a
torque requirement of
20
+ 2NM during
installation.
Pull the wiper arm out of the wiper motor shaft
9. Remove the round head screw that fixes the
with a puller (pay attention to the installation
lower left and right sides of the front window, 6
position when disassembling, so that it can be
units on each side, total 12 units. Remove the
used normally when recovering).
triangle plate of the front window (take the right
side of the vehicle as an example).
96
Open and Close Doors
11. Remove B-pillar trim panel. 2
2
10. In the direction of the arrow as shown in the
Unscrew the retaining bolts of the seat belt
figure, slowly put the front windshield down
To do so, it is necessary to first remove the seat
height adjuster and then remove the seat belt
and firmly fasten the front windshield to the
belt height adjusters on both sides (the picture
height adjuster (the picture here takes the right
engine hood.
here takes the right side of the vehicle as an
side of the vehicle as an example).
example). As shown in the figure, pry and
Caution
Caution
remove the outer housing of the seat belt height
The front windshield fixing straps provided
adjuster. Tips
A torque of 45±10Nm Is required when
among the accompanying tools may be used
reinstalling this bolt.
to firmly fasten the front windshield to the
engine hood.
Open and Close Doors
97
13. Before driving the vehicle, be sure to reset
the seat belts on both sides by taking steps
which are the opposite of the steps described in
Item 11 above. The front windshield folding
2
down operation is now at an end.
Loosen the expansion screws in the position
12. Remove the retaining bolts which connect
shown in the figure (there are a total of
B-pillar and the left and right stabilizer bars.
4expansion screws, with
2 on each side),
There are a total of 12 retaining bolts, with 6 on
remove the B-pillar trim panel (the picture here
each side. (The picture here takes the right side
takes the right side of the vehicle as an
of the vehicle as an example.) Then, remove the
example).
stabilizer bars on both sides and put them in a
Caution
safe place.
The expansion parts of the expansion screws
Caution
and the knuckles which are used to fasten the
A torque of
24±2Nm is required when
B-pillar trim panel are all disposable parts
reinstalling these bolts.
and must be replaced with new pieces after
removal.
98
A/C System
If the humidity is rather high, when the A/C
Controller circuit will be powered on. It will
A/C System
system is turned on, minor mist or fogging may
automatically resume the working state of the
General Instructions
be found on the vehicle windows. This is
A/C controller stored after the last time power
2
normal for most vehicles which are equipped
was removed, and restore the initial settings of
The A/C system can reduce the air temperature
with an electronic A/C system. It is not a fault.
the A/C system automatically. Warning
and humidity inside the vehicle.
After the A/C system has run for approximately
The A/C is only available when the engine is
Warning
several seconds, the fogging will disappear.
running. At this time, all the vehicle windows
should be closed.
Caution
● Vehicle window blurring and smudging
The running of the A/C system adds an extra
can extremely easily increase the risk of
load to the engine. Under extremely hot
Only when the fan is turned on can the A/C
accidents and death. For the sake of safety,
start to operate. When the air volume
conditions or when the engine needs to run at
all vehicle windows must be free from ice,
adjustment knob is off, or when the
full load (such as when climbing a long
snow and fog, so as to ensure clear vision.
temperature approaches zero degrees, the
mountainous road or driving amidst congested
●For example, murky air inside the vehicle
A/C will not cool the air.
traffic), this will result in high engine
can easily make the driver feel tired, sluggish
The A/C filter can remove pollen and dust
temperature. If the pointer approaches the red
and detracted, and thus susceptible to
which the hot and cold air system brings in from
area of the thermometer, you should switch off
accidents and death.
outside.
the A/C until the engine temperature returns to
●The A/C system must be diagnosed and
normal.
The A/C filter must be replaced at the time of
repaired by technicians with special
To cool the engine, the radiator cooling fan may
regular maintenance.
knowledge and using special tools. Therefore,
If you often drive in areas of poor air quality,
continue to run after the engine is turned off.
when the A/C system has a fault, make sure
you should shorten the A/C air filter
During this period, if the A/C and the air
to contact an authorized BAIC dealership for
replacement cycle. If it is found that the air flow
volume adjustment knob are in ON mode, the
checks.
A/C switch indicator light will continue to
emitting from the outlets is not as smooth as
work.
usual, you should replace the A/C air filter as
soon as possible. When the ignition key is
turned from the “LOCK” or “ACC” position to
the “ON” position, the A/C
A/C System
99
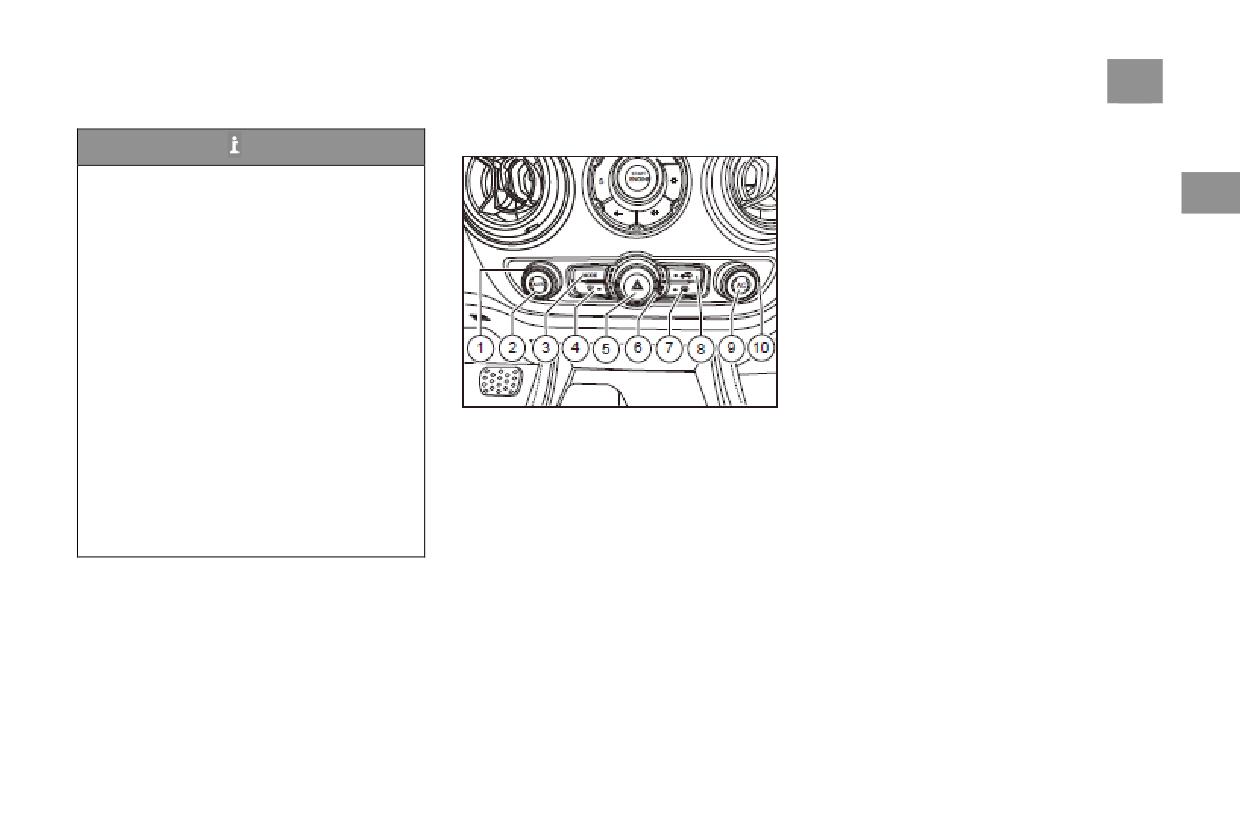
A/C Control Panel
9. A/C switch
Tips
10.Right temp. Knob
● When the exterior temperature and
When DUAL button isn’t operated, manually
humidity are both very high, the moisture in
operate this button, you may adjust driver and
2
the air will condense on the evaporator of the
passenger side outlet air temperature. When
refrigeration system and form water drops
DUAL button is operated, manually operate this
which fall off from the evaporator, causing
button, you may only adjust driver side outlet
water accumulation under the vehicle. This is
air temperature.
a normal occurrence and there is no need to
The temperature’s control range is from LO
worry about it.
18.5~HI 31.5, per step of the button represents
●Be sure to keep the air inlet at the front
0.5 ℃。 Temperature changes are displayed
part of the windshield free of blockage by
synchronously on the large central control
snow, ice or tree leaves so as to ensure
screen
normal heating and refrigeration and
Rotate the button in anticlockwise direction,
prevent fogging of the front windshield.
setting lower temperature. When temperature is
1. Left temp. knob
●Only after the vehicle windows are closed
lower than 18.5℃,LO is appeared, it will start
2. AUTO mode switch
can the A/C system play its maximum role.
max cooling state, Mode switch automatically
3. Mode selection swich
However, if it is very hot inside the vehicle
changes to face blowing mode, max air flow
4. Front defroster switch
due to exposure to strong sunlight, be sure to
rate, go on rotating in anticlockwise direction,
5.Hazard waring switch
temporarily open the vehicle windows to let
no change temperature.
6. Fan speed knob
the hot air inside escape. This will speed up
7. Rear defroster switch
cooling inside the vehicle.
8. Mixed vent knob
100 A/C System
When the temperature is higher than 31.5℃, HI
Front defrost mode: under max cooling, heating
the left temperature knob can be operated
is appeared, max heating mode is started,
state, no exit front defrost mode while operating
without operating other switches, and the air
automatically change to foot blowing mode,
the knob, air blowing temperature is
conditioning system can be operated. It will
2
max air flow, rotate in clockwise direction, no
automatically controlled according to current
withdraw from the maximum refrigeration or
any change.
atmosphere.
heating state and restore the AUTO state. The
In OFF condition, the temperature operation
left temperature is based on the set value.
Caution
knob no use, A/C don’t start work.
The direction of the wind will be selected
Under max cooling state: go on rotate the knob
In order to avoid personnel error operation,
according to the five modes of blowing surface,
in anticlockwise direction, no change; rotate the
while the knob is rapidly continuously
blowing surface-blowing foot, blowing foot,
knob in clockwise direction, exit max cooling
rotated, the temperature can only be
blowing surface-defrosting and defrosting.
state, setting temperature to
18.5 ℃ , other
adjusted by 2.5℃ at most. Because the rear
When it is blowing foot-defrosting, pressing this
settings go back to before max cooling state.
defrost needs large power consumption, only
switch again will adjust to blowing surface
Under max heating state: go on rotate the knob
start work while the engine is started.
mode. The wind mode state is displayed
in clockwise direction, no change; rotate the
2. AUTO mode switch
synchronously in the large screen of the central
knob in anticlockwise direction, exit max
After pressing the AUTO switch, the working
control system.
indicator light will be on, and the air
The direction of the wind will be selected
heating state, setting temperature to 31.5℃,
conditioning system will enter the automatic
according to the five modes of blowing surface,
other settings go back to before max heating
state.
control program。 Air outlet temperature, air
blowing surface-blowing foot, blowing foot,
volume, air outlet direction and air circulation
blowing surface-defrosting and defrosting.
are all automatically controlled by the air
When it is blowing foot-defrosting, pressing this
switch again will adjust to blowing surface
conditioning system.AUTO working status is
mode. The wind mode state is displayed
displayed synchronously in the large central
control screen.
synchronously in the large screen of the central
Users can adjust left and right temperature
control system.
knobs according to their own feelings, which
4. Front defrost switch
Manual operation of this switch, air
can change the default temperature setting value
conditioning outlet mode for window blowing,
of the air conditioning system to improve
comfort; in the AUTO state, the left temperature
external circulation, issued A/C open request
knob can be adjusted to enter the maximum
Signal, A/C working indicator lights up, air
refrigeration or heating state, and automatically
volume air conditioning automatically adjusts to
5 gear(if the air volume is greater than 5 gear
withdraw from the AUTO mode. At this time,
A/C System
101
before defrosting switch, the original air volume
When the knob is operated clockwise, the air
Caution
is maintained). The defrosting working state
volume of the air conditioner increases until the
before defrosting is displayed synchronously in
maximum air volume is no longer changed.
In order to avoid misoperation, the air
the large screen of central control. For quick
Operate the knob counter-clockwise, the air
volume knob is set when it is rotated rapidly
2
defrosting, please manually adjust the air
volume of the air conditioner decreases until the
and continuously. Air volume changes can
volume to the maximum gear after defrosting
air volume decreases to a first-class air, again
only be adjusted at most two gears at a time,
switch before operation
After counter-clockwise rotation, the air
and in any case, The air volume must be
In AUTO state, operate this switch, the air
conditioning system shuts down and enters the
adjusted to gear before the air conditioning
conditioner will be defrosted before entering the
OFF state. The air volume status is displayed
system can be shut down. When the air
working state, and withdraw from AUTO
synchronously in the large screen of the central
conditioning system is shut down, the
Status.
control system.
operation of this knob can only reach 1 wind
Operate this switch under any working
When the air conditioning system is in OFF
volume first, and then adjust to the required
condition and the air conditioning system will
state, the air volume knob is operated manually,
air volume.
enter the pre-defrosting mode. If this switch is
the air volume is 1 gear, and other modes are
7. Rear defroster switch
operated again, the air conditioning system will
restored. Return to the state before the last OFF.
After the “Rear defrost” button is pressed down,
automatically restore to the working state before
In the AUTO state, when the switch is operated,
the system will start to heat up the rear
defrosting, including OFF status.
the air volume increases or decreases by 1 gear
windshield for
15min. The left and right
6. Air volume and shutdown knob
(if it is reduced to 0, it enters the shutdown state,
external rearview mirrors will start to warm up
if it is 8 gear, it remains unchanged), exits the
too. Meanwhile, the work indicator light will be
AUTO state, and other modes remain
lit. When the “Rear defrost” button is pressed
unchanged. In the mode of maximum
down again, the system will continue to heat up
refrigeration, maximum heating and front
the rear windshield glass and the left and right
defrosting, the air volume will increase or
external rearview mirrors will stop heating.
decrease by operating this knob. Small 1 (if
Meanwhile, the work indicator light will go out.
reduced to 0, enter shutdown state, if 8, remain
unchanged), other modes remain unchanged.
102 A/C System
Press down the automatic running key(AUTO),
Rotate the knob in clockwise direction, the
Caution
and the air conditioning system will enter
temperature will go up. When the temperature is
Rear defroster function is only worked while
automatic running mode. The key indicator light
higher than 32℃, if you go on rotating the knob,
2
the engine is working because it has much
will also be lit and the AUTO icon will appear
no change of the temperature.
electricity consumption.
on the display screen. If any key other than the
In OFF condition, no need of operating
8. Internal & External Circulation Switchover
rear defrosting key, the system OFF key or the
temperature knob, A/C doesn’t work.
Key
temperature key is pressed down while the
when operate this knob in AUTO condition,
When the internal & external circulation
system is in automatic running mode, the
only the temperature of air blowing of passenger
switchover key is not pressed, the defaulting
system will then execute the command of this
side can be adjusted. In max cooling and heating
running state of the system is the external
key. As the icon on the screen disappears, the
state, no need of right temperature knob.
circulation mode. After the internal & external
key indicator light will go off at the same time.
Caution
circulation switchover key is pressed down, the
Other originally automatically running function
indicator light on this key will be lit and the
will continue to be automatically controlled by
To avoid operation mistake, when the
running mode of the system will be internal
the system.
temperature knob is rotated continuously
circulation.
10. Right temperature knob
fast, only 2.5℃ is permitted once.
While the system is in a standby state,
Whatever DUAL is started or not, when operate
Dual Temperature Zone Switchover Key
9. A/C switch
this knob manually, only the temperature of air
(DUAL)
When A/C indicator is ON, so the refrigeration
blowing of passenger side can be adjusted, but
function is started. When A/C indicator is
not the driver side.
OFF, so the refrigeration function is closed.
Temperature range is from 18-18.5~31.5-32,
Only the engine is working, A/C can start work;
each step of the knob means 0.5℃.
when the engine doesn’t work, though the A/C
Rotate the knob in anticlockwise direction,
indicator is ON, but A/C can’t work.
temperature will go down.
if you go on rotating the knob, no change of the
temperature.
A/C System
103
This key is used to switch over between the
Interior heating
Fast cooling
single zone mode and the dual zone mode. The
1. Turn the left\right temp. knob to above 24℃.
For maximum refrigeration, all windows must
system is in the single zone mode by default.
2. Select Mode switch, set airflow distribution,
be closed. Press the A/C button, turn the mode
Pressing this key can switch to dual zone mode,
2
blowing foot mode is recommended.
selection knob to head mode, turn the mixed
and the display screen will display DUAL icon.
vent adjustment knob to the lowest temperature
3. Turn the Air volume knob, set the amount of
In the single zone mode, only the set
air coming out.
point and put the air volume control knob to the
temperature of the set side can be adjusted. In
Grade 8 position.
Interior refrigeration
other words, when the set temperature
1.Turn the left\right temp. knob to lower than
Caution
increase/decrease key of the right side is
adjusted, the set temperature of the right side
24℃.
If the temperature inside the vehicle is very
will also increase/decrease; if the set
2.Press the A/C switch, start refrigeration
high when the engine is started, it may take
function, the indicator light is ON.
temperature of the right side is adjusted in the
some time for the A/C to fully take effect.
3.Press the Mode switch, set the airflow mode,
single zone mode, the system will enter the dual
Before turning on the A/C, set the fan to
zone mode and the set temperature of the right
head blowing is recommended.
maximum speed and open the vehicle
side will also change. But, the set temperature
4. Press the A/C outlet airflow mode switch-3-,
windows. Circulate air inside the vehicle for
of the left side will remain unchanged. When
set airflow mode, face direction blowing mode
a short period of time so as to quickly lower
is recommanded.
the single/dual zone switchover key is pressed
the temperature inside the vehicle.
under the single zone control mode, the system
will switch to the dual zone mode. In other
words, when the set temperature of the left side,
the set temperature of the right side will not
change, and vice versa. When the system is in
the automatic running mode, press down this
key and the system will remain in the automatic
running state and the AUTO icon display will
not change. When the system is in a standby
state, pressing down this key will be deemed as
an invalid command.
104 A/C System
A/C Maintenance
A/C Filter
Caution
The A/C system is fully sealed. The main
The A/C filter (as a standard configuration for
maintenance work of the system should only be
vehicles equipped with an A/C) is located inside
●Park the vehicle in a cool place as much as
2
done by qualified technical personnel. To enable
the A/C box case at the left front side of the
possible. Parking in the hot sun can heat up
the system remains in its best state, the vehicle
glove box. It helps to keep the air inside the
the air inside the vehicle, thus increasing the
owner should make sure to operate the system
vehicle fresh and prevent pollen and dust from
time taken to cool the vehicle. If you have to
for a short period of time each week (even in
entering the vehicle. To keep it working
park your vehicle in direct sunlight, please
winter). When the engine is at normal operating
properly, it is necessary to check whether the
open the vehicle windows to let out the hot
temperature, start the A/C and keep it on for at
filter is dirty every time the vehicle is inspected.
air inside for the first few minutes after the
least 10 minutes while driving the vehicle at a
If necessary, it should be replaced.
A/C system is turned on.
stable speed.
●When using the A/C system, please close
The extra moisture generated during the
the vehicle windows. The entry of air from
dehumidification process is drained outside by
outside will lower A/C efficiency.
the system via the drainage pipe in the vehicle
●When the A/C system is running, please
bottom. This may cause water accumulation on
confirm that the air inlet in front of the front
the road surface when the vehicle is still. This is
windshield is unobstructed, such as by tree
no cause for concern.
leaves or other objects. The accumulation of
blocking objects at the air inlet will affect the
flow of air.
A/C System
105
A/C Outlets
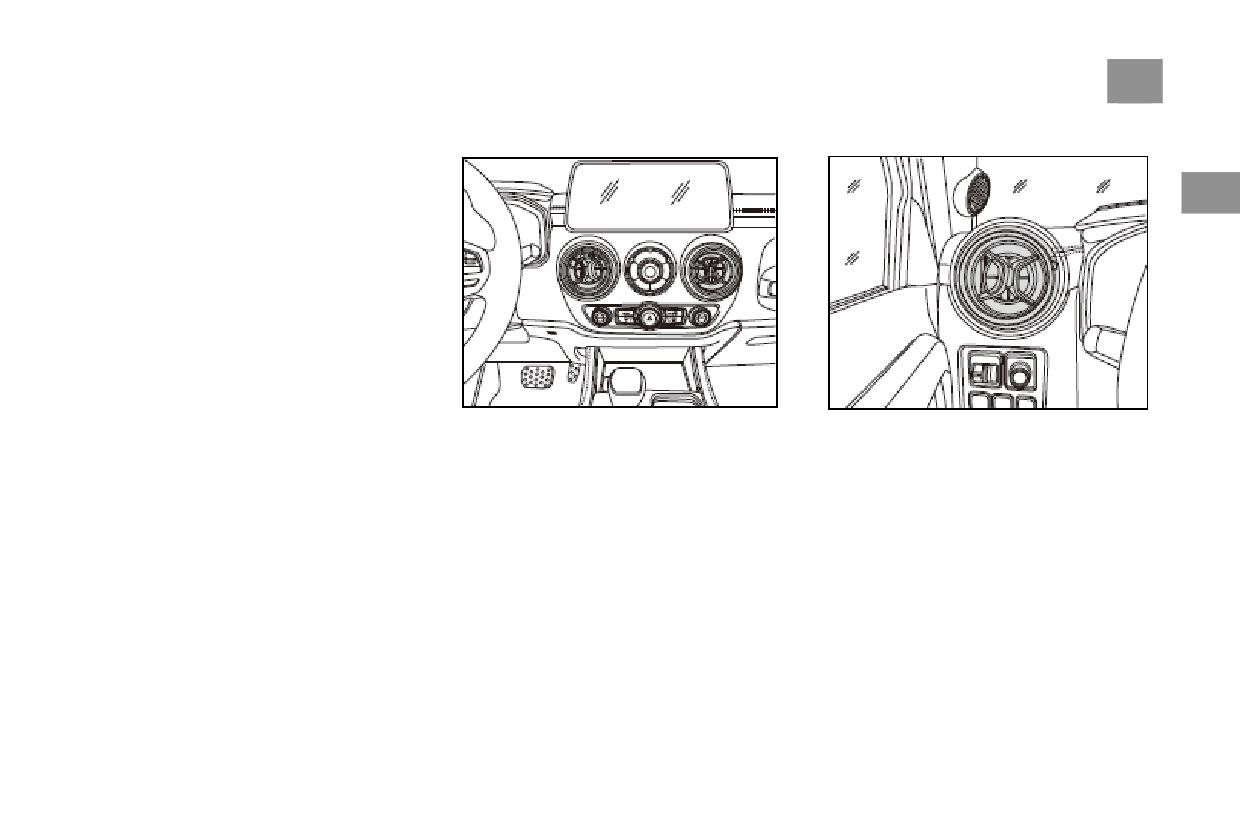
Central Air outlets
Driver Side Air outlets
The A/C system of this vehicle has a total of 4
outlets
1. Side outlets
2
There are 2 side outlets, one each on the left and
right side of the instrument panel.
2. Central outlets
There are 2 central outlets, which are located in
the middle of the instrument panel.
3. Foot outlets
2, respectively located in the driver’s and the
front passenger’s step space.
4. Rear outlets
There are 2 rear outlets, which are located on
the back of the front center armrest.
To adjust the volume of airflow of each outlet, it
To adjust the volume of airflow of each outlet, it
is necessary to push any arrow-marked place of
is necessary to push any arrow-marked place of
the outlet,
the outlet,
106 A/C System
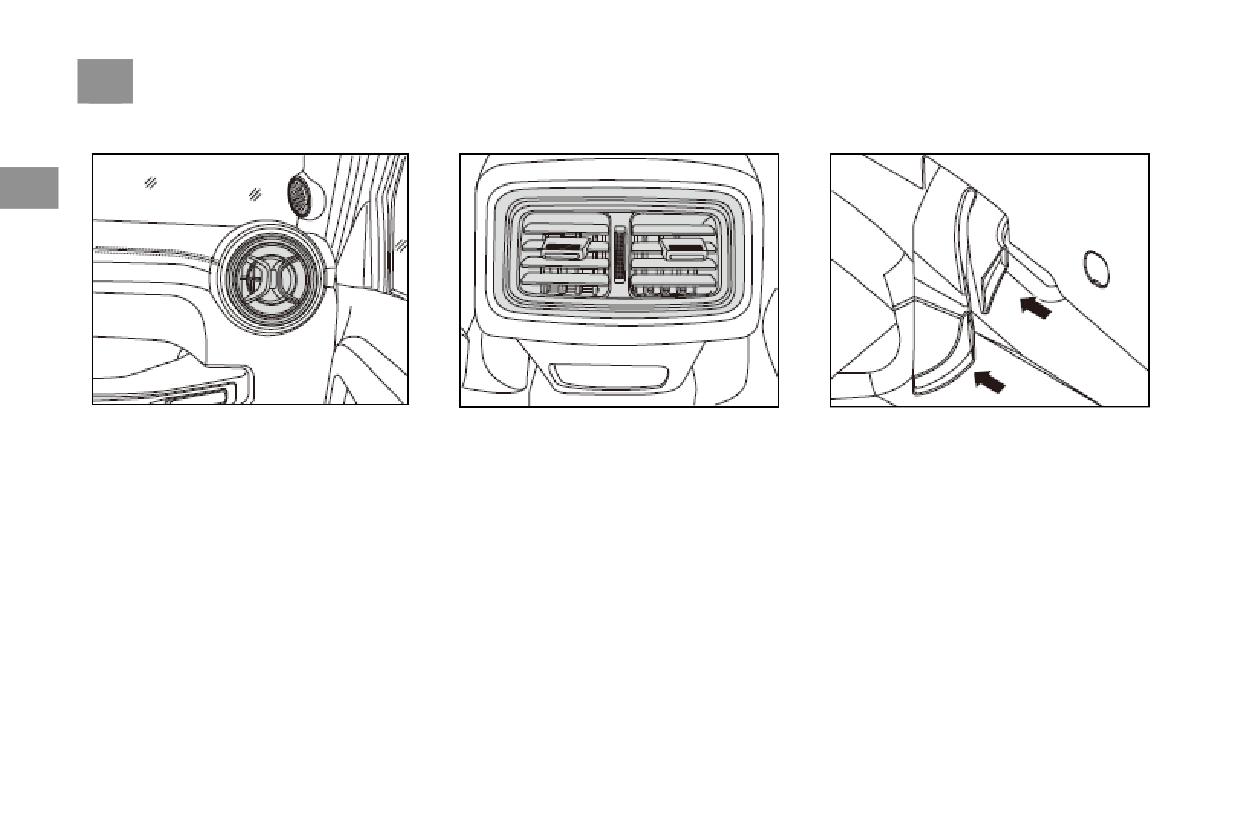
Front Passenger outlets
Rear outlets
Rear Left outlets
2
The driver's side outlets is adjusted in the same
Rear left outlets for foot
To adjust the direction of the air flow of the
way as the central outlets.
outlets, turn the convex tongue at the center of
the outlets upwards and downwards and left and
right.
A/C System
107
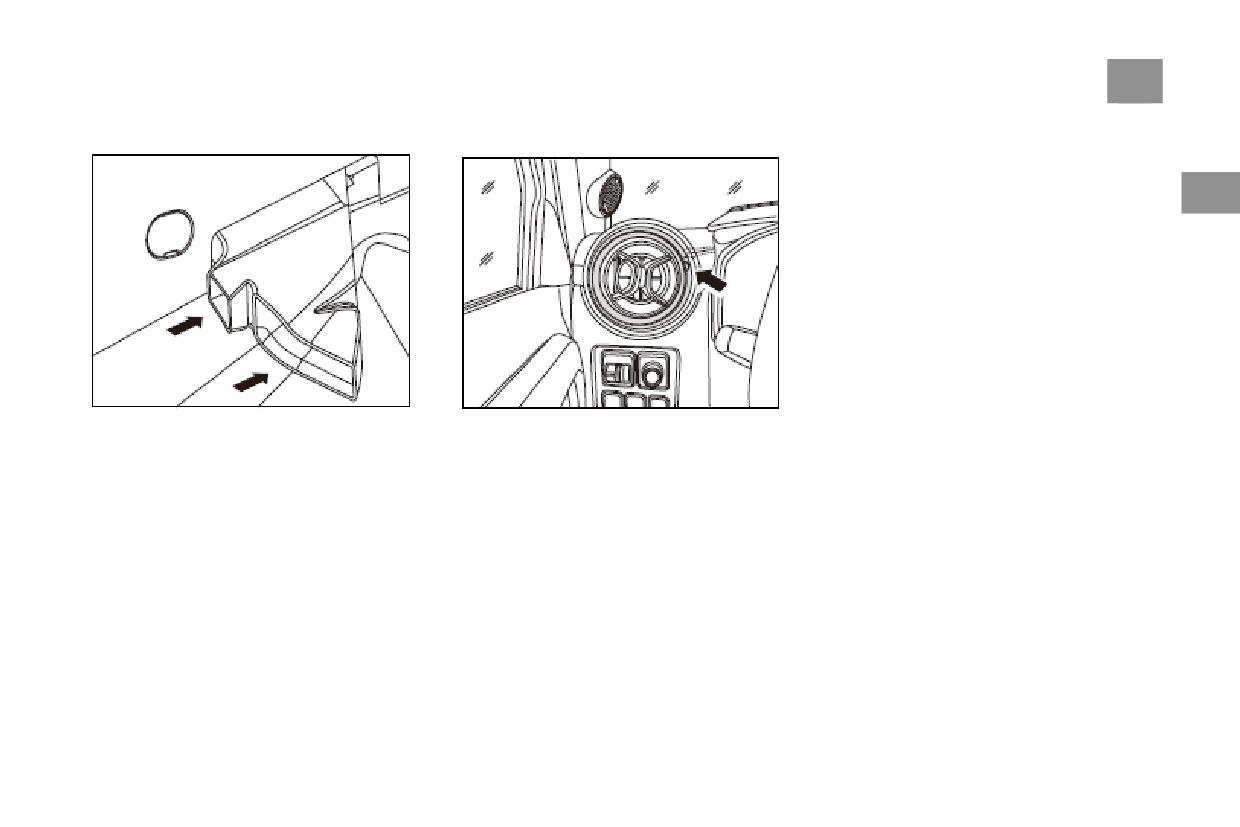
Rear Right outlets
Outlets Switch
2
Rear right outlets for foot
Outlets switch makes open or close of vent door,
the vent door is closed in clockwise direction to
the end position, the vent door is closed in
opened in anticlockwise direction to the end
position.
108 Vehicle Lights and Vision
Vehicle Light Switches
Vehicle Lights and Vision
Caution
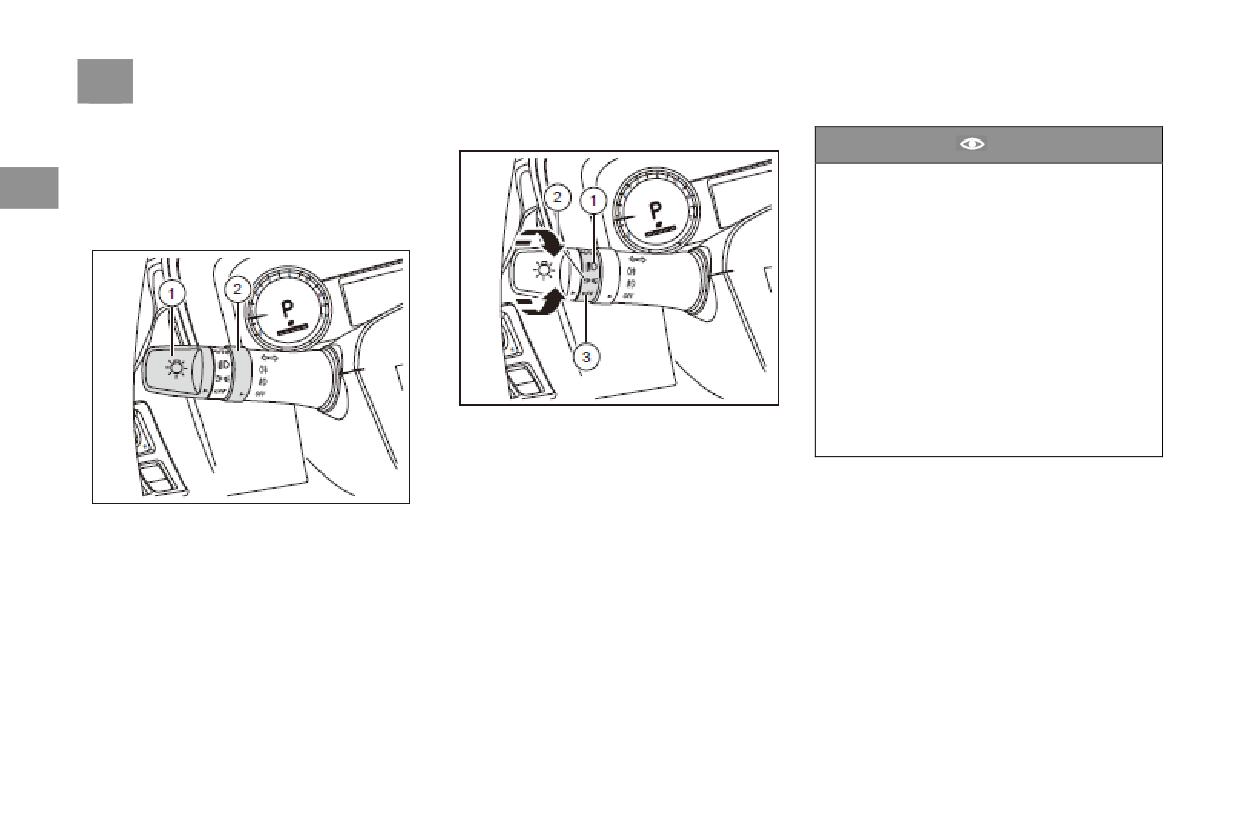
Exterior Vehicle Lights
●When the engine is turned off, do not leave
2
The vehicle light control part is located on the
the headlights or other lights on for long
rear left multi-functional operating lever of the
periods of time. Otherwise, the battery power
steering wheel.
will be reduced.
●During periods of rain or when the vehicle
is being washed, mist may form on the inner
side of the translucent mirrors of the
headlights. This is not a fault but a normal
phenomenon, like the fogging of windows in
damp weather. After the lights are turned on,
the heat produced will evaporate any
mistiness. However, if water condenses inside
the headlights, please take the vehicle to an
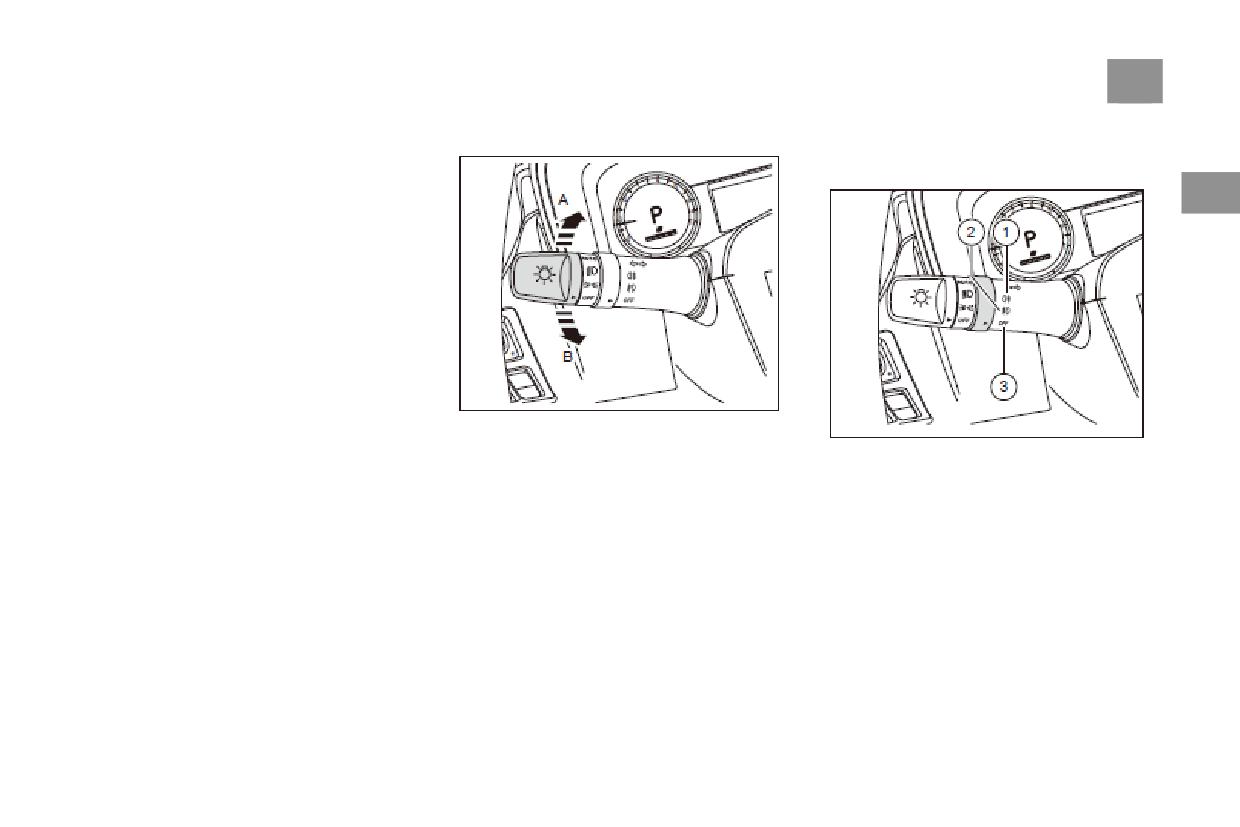
As shown in the figure, when the vehicle light
authorized BAIC dealership to have it
control knob is turned to the “OFF” position-3-,
checked.
it indicates that all the vehicle lights are
switched off and none are lit (except the hazard
warning lights). When the knob is turned to
1. Vehicle light switch knob
position -2-, namely the small lights position,
2. Fog light control knob
the parking lights, the tail light, the front and
rear marker lights, the vehicle plate light and the
instrument backlight will be lit. Meanwhile, the
display screen backlight of the information
center of the instrument will be reduced to 40%
of its daytime brightness to prevent dazzling.
When the knob is turned to position -1-, namely
the low beam position, the headlight low beam
will also be switched on.
Vehicle Lights and Vision
109
Low/High Beam Light Switchover
Turn signal lights
indicate that you want to change your driving
When the headlight low beam is turned on, push
lane. When the operating lever is released, the
the left multi-functional operating lever in the
turn signal light will go out.
opposite direction to the steering wheel. The
2
headlights will change from low beam to high
beam. In addition, the blue indicator light on the
combination instrument will be lit again. Then,
reset the operating lever on the left side, and the
headlights will change from high beam back to
low beam again.
Overtaking Flashing Signal
No matter where the vehicle light switch knob is,
pull the left multi-functional operating lever in
the direction of the steering wheel, and the high
beam light of the headlight will be lit. Upon
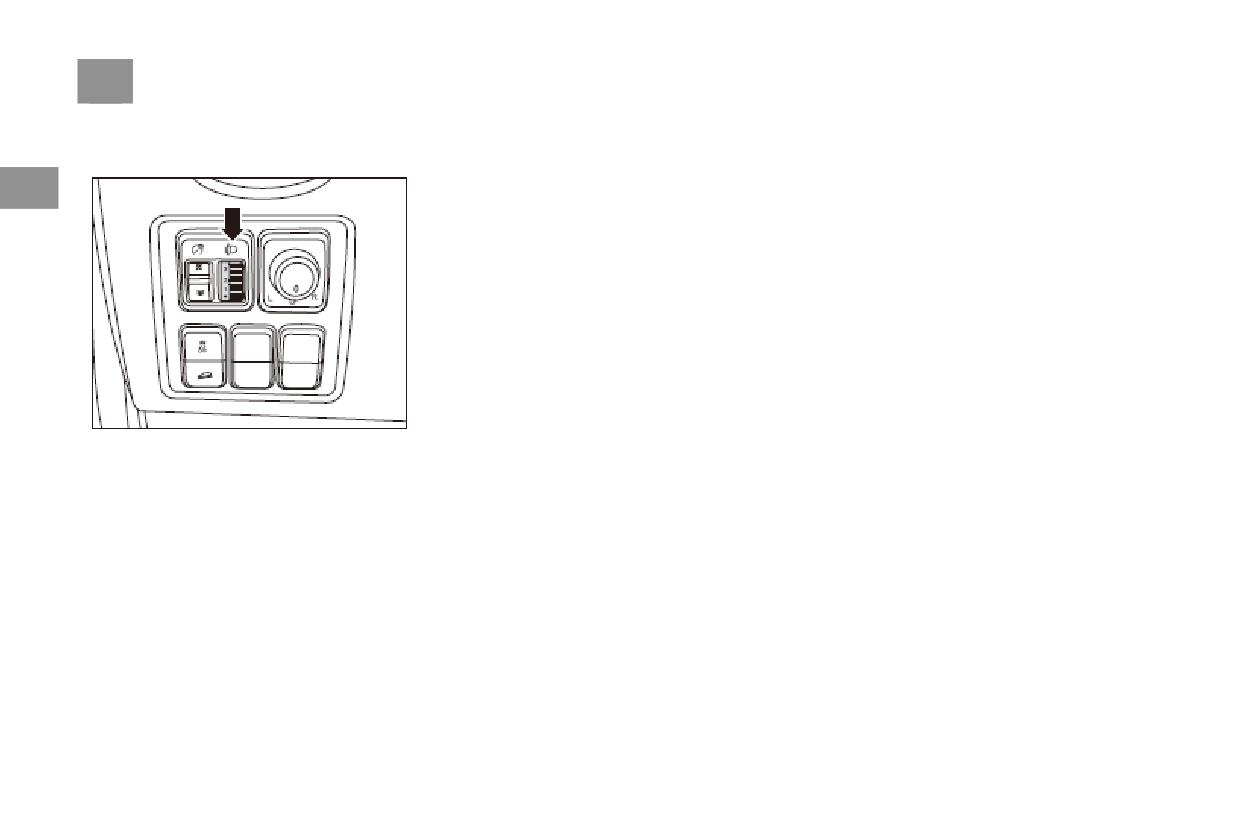
Pull the left multi-functional operating lever
release, the operating lever will automatically be
-Arrow A- upwards, and the right turn signal
restored to its original state.
Fog Light Control Switch
light will be switched on. Meanwhile, the green
indicator light of the combination instrument
When the light switch is in the small light
position or the low beam light position, turn the
will flash; push the left multi-functional
fog light control knob to position -2-, and the
operating lever -Arrow B- downwards, and the
front fog light will be switched on. Turn the fog
left turn signal light will be switched on.
light control knob to position -1-, and the front
Meanwhile, the green indicator light of the
combination instrument will flash. After the
and rear fog lights will be both switched on.
When the fog light control knob points to
turning action is completed and the steering
position -3-, the front and rear fog lights will be
wheel is reset, the lights handle will
both switched off, rear fog light can't be lit
automatically be reset too. The exterior turn
signal light and the steering indicator light on
separately.
the combination instrument will go out. By
lightly pulling the operating lever upwards or
downwards by half of the scale, you can
110 Vehicle Lights and Vision
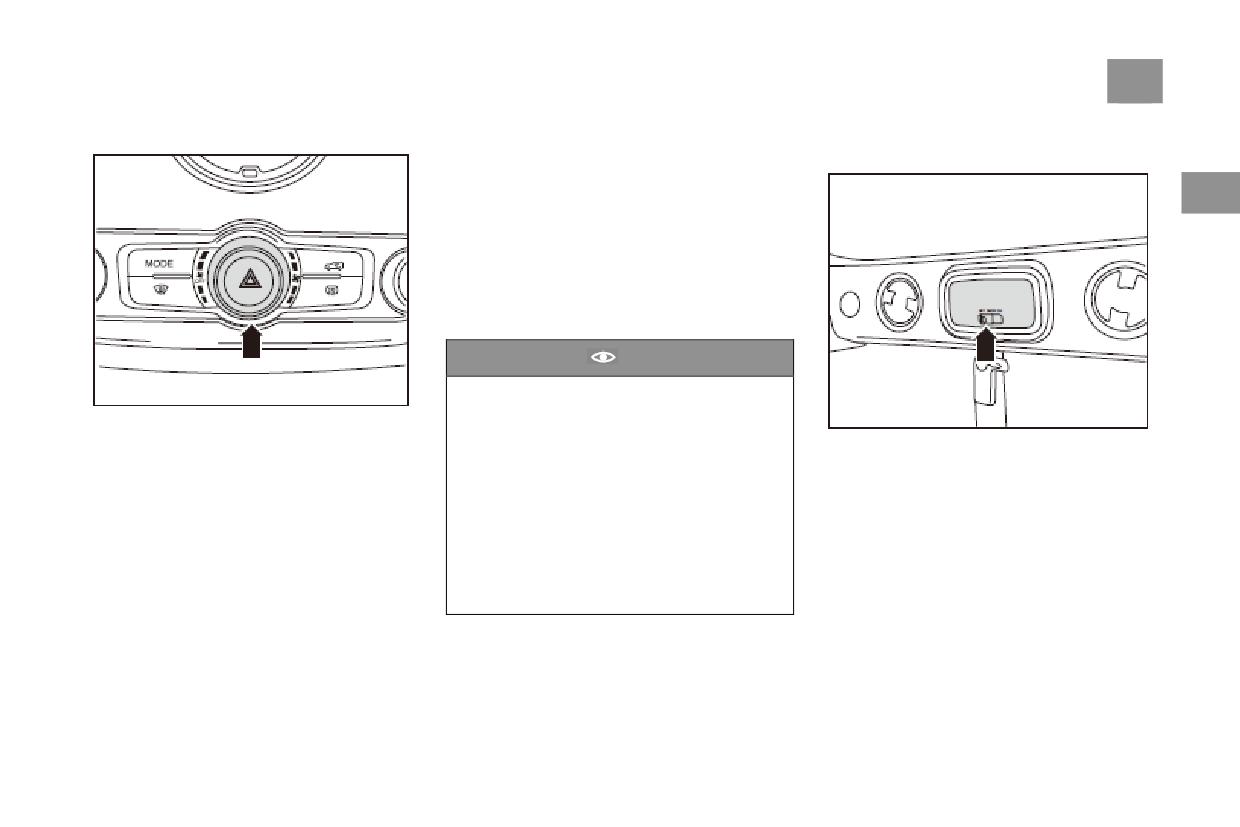
Manual Adjustment of Headlight
Use the following road surface conditions as
High Beam Delay
references and adjust the lighting height of the
The high beam delay function will provide you
Height
headlights by turn the rolling wheel upwards
with lighting via the headlights after you leave
2
and downwards:
the vehicle.
●Position “0”
Before moving the ignition key from the “ON”
Only use this to adjust the headlights when the
position, if the light switch is in the low beam
driver, or only the driver and front passenger are
light position, turn off the engine, park the
in the vehicle (when there is no luggage).
vehicle, turn off the low beam light switch, and
●Position “1”
remove the key. After leaving the vehicle, press
All seats are filled.
down the locking button of the remote control
●Position “2”
key, and then the headlights will be
All seats are filled and the trunk load is evenly
automatically lit and show you the road ahead.
distributed (reach the permissible axle load of
The duration over which the headlights are lit
the rear axle and do not exceed the maximum
can be set up via the information center of the
permissible laden mass).
instrument panel. For details, refer to Page 051
●Position “3”
"Information Center".
The angle of the low beam lights is affected by
Only the driver, and the trunk load is evenly
Light Reminder
the distribution of passenger and luggage weight
distributed (reach the permissible axle load of
If a vehicle light is not switched off after the
inside the vehicle. Adjust the headlight height to
the rear axle and do not exceed the maximum
ignition switch has been turned off, there will be
ensure the correct adjustment so there is
permissible laden mass).
a buzzing sound when the door on the driver’s
sufficient lighting to the front of the vehicle,
side is opened.
without dazzling other road users. As shown in
the figure, the headlight height manual
adjustment roller is located in the dashboard
switch array.
Vehicle Lights and Vision
111
Hazard Warning Light
3.There is emergency congestion.
Interior Lights
4. When the vehicle tows another vehicle or is
Reading light
towed by another vehicle.
After the hazard warning light is switched on,
2
all the turn signal lights will flash at the same
time. The two turn signal lights on the
combination instrument and the indicator light
on the hazard warning light switch will also
flash and issue a rhythmic prompting sound.
When the ignition switch is turned off, the
hazard warning lights will still work.
Caution
●Long hours of using the hazard warning
light will consume battery power. Even when
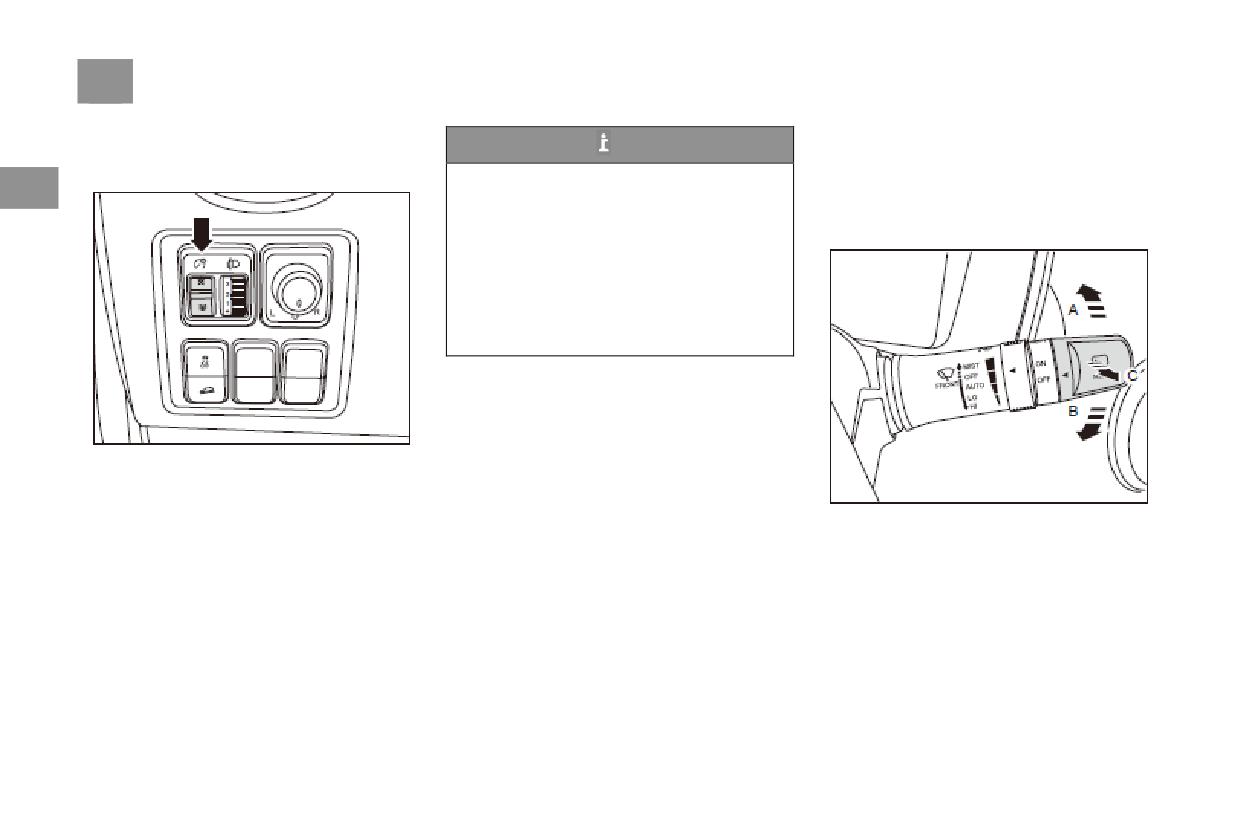
As shown in the figure, the hazard warning light
the ignition switch is turned off, it will still
switch is located inside the central control
consume battery power.
The reading light is located in the middle of the
switch array.
●When using the hazard warning light, be
underside of the roof. As shown in the figure,
In the event of emergency congestion, the
the reading light switch has a total of
3
sure to strictly follow the relevant laws and
hazard warning light may be used to draw the
regulations.
positions:
attention of other road users and avoid traffic
DOOR: The reading light will be automatically
●If the hazard warning light does not work,
accidents. In the event of the following
lit after the vehicle door is opened and gradually
situations, the hazard warning light should be
other ways must be adopted to draw the
go out after approximately 15s of continuous
attention of other road users to your vehicle.
turned on:
lighting. Interior lights have an energy-saving
The method used must comply with the
1. Vehicle breaks down due to technical fault.
mode and will automatically go out after a
relevant traffic laws and regulations.
2.Vehicle is at the end of the vehicle flow in
maximum length of lighting of approximately 8
traffic congestion.
minutes.
OFF: The reading light is turned off.
ON: Regardless of the state of the vehicle doors,
the reading light can belt.
112 Vehicle Lights and Vision
ON: Regardless of the state of the vehicle doors,
Windshield Wiper Tips
the reading light can belt.
Tips
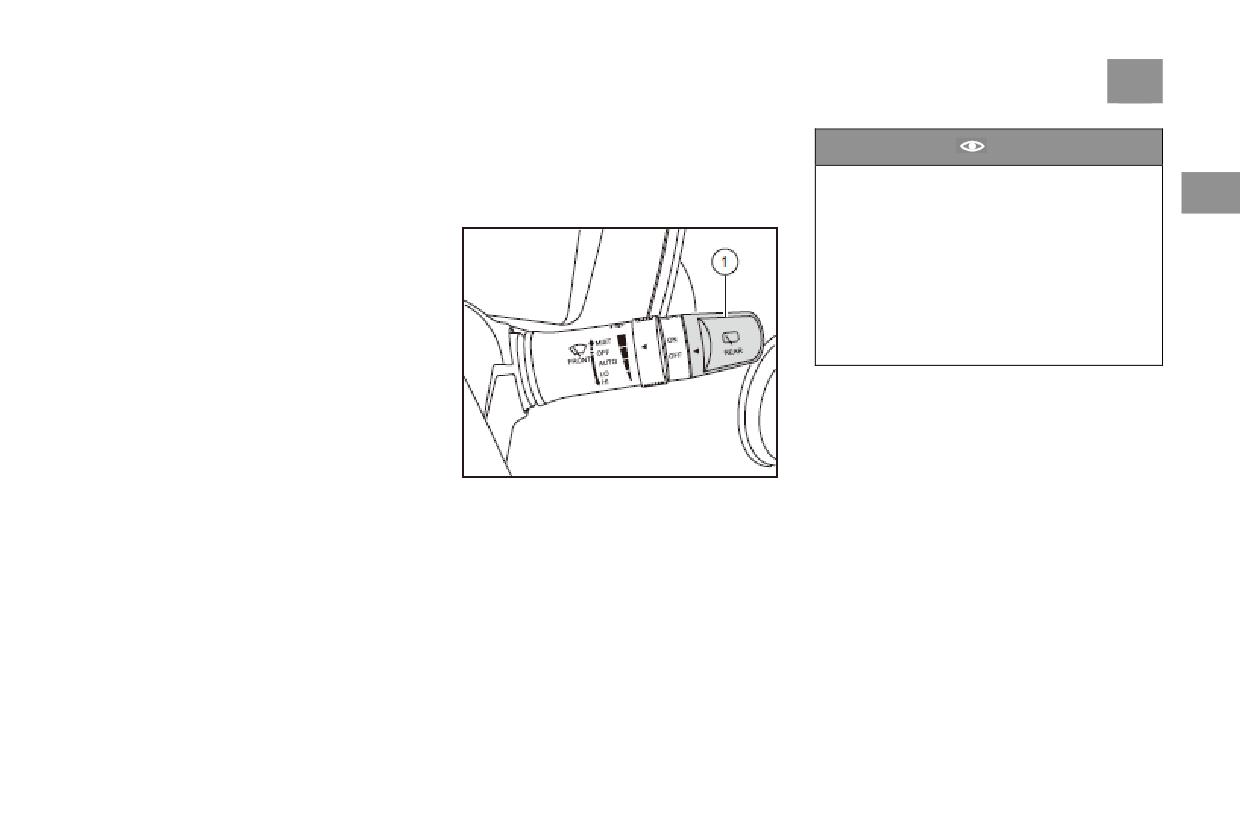
The front windshield wiper
If the ignition key is in the LOCK position or
Backlight Brightness Adjustment
The control part of the front windshield wipers
2
in pulled-out mode, the power leakage
is a function contained in the rear right
protection function will be turned on: The
multi-functional operating lever on the steering
fog lights, the headlights and the reading
wheel.
light will be turned off after approximately 8
minutes. If one or several of the fog lights, the
headlights and the reading light are switched
on again, the timing will start again. In the
event of remote locking within 8 minutes, the
corresponding light(s) will be turned off.
As shown in the figure, the backlight brightness
adjustment roller is located in the dashboard
switch array on the driver’s side. When the
vehicle light control knob is in the small light
Point Wiping
position or the low beam light position, the
In the “OFF” position, push the right
backlights of the various buttons, the main
multi-functional operating lever in the direction
instrument and the radio will be lit. Turning the
of -Arrow A- as shown in the figure, and the
adjustment roller upwards increases the amount
wipers will carry out point wiping. In other
of backlighting, while turning it downwards
words, every time the operating lever is
reduces it.
operated, the wipers will wipe once only. After
the upward push action is completed, the
operating lever will automatically reset.
Vehicle Lights and Vision
113
Intermittent wiping and continuous wiping
When the washing and wiping cycle ends, if the
Caution
In the “OFF” position, press the right
wiper control lever is in any position other than
multi-functional operating lever downwards by
“OFF”, then the wipers will continue to execute
●It is prohibited to use the wipers when the
1 position in the direction of -Arrow B-, and the
the corresponding mode after completing the
windshield glass is dry.
2
front windshield wipers will start intermittent
washing and wiping cycle.
● Before using the wipers in low
wiping. Press it downwards by 2 positions, and
temperatures or hot conditions, make sure
the wipers will start continuous wiping at low
that the wiper blades are not frozen or stuck
speed. Press it downwards by 3 positions, and
to the windshield.
the wipers will start continuous wiping at high
●In winter, be sure to clear snow and ice
speed.
which are accumulated on the wiper arms
Front Windshield Cleaning
and the wiper blades, including the areas
In the direction of -Arrow C-(towards the chest
which the wiper blade may reach.
of the driver), pull the right multi-functional
operating lever, and the washing nozzle of the
front windshield will spray windshield cleaning
agent and the wipers will automatically wipe in
several cycles.
When the windshield washer is working, after
the ignition switch is turned off, the wipers will
Intermittent Wiping Frequency
continue to run until they stop after being reset.
As shown in the figure, turn the end position -1-
In washing and wiping mode, if the position of
of the operating lever on the right side, and the
the wiper control lever on the right side changes,
intermittent wiping frequency of the front
then the corresponding function will be
windshield wipers can be controlled. Turning it
executed. An exception is as follow: If the
upwards (clockwise) will reduce the frequency,
intermittent mode is selected, the wiper will
while turning it downwards (anticlockwise) will
only start to enter the intermittent mode after
increase the frequency of intermittent wiping.
completing the
114 Vehicle Lights and Vision
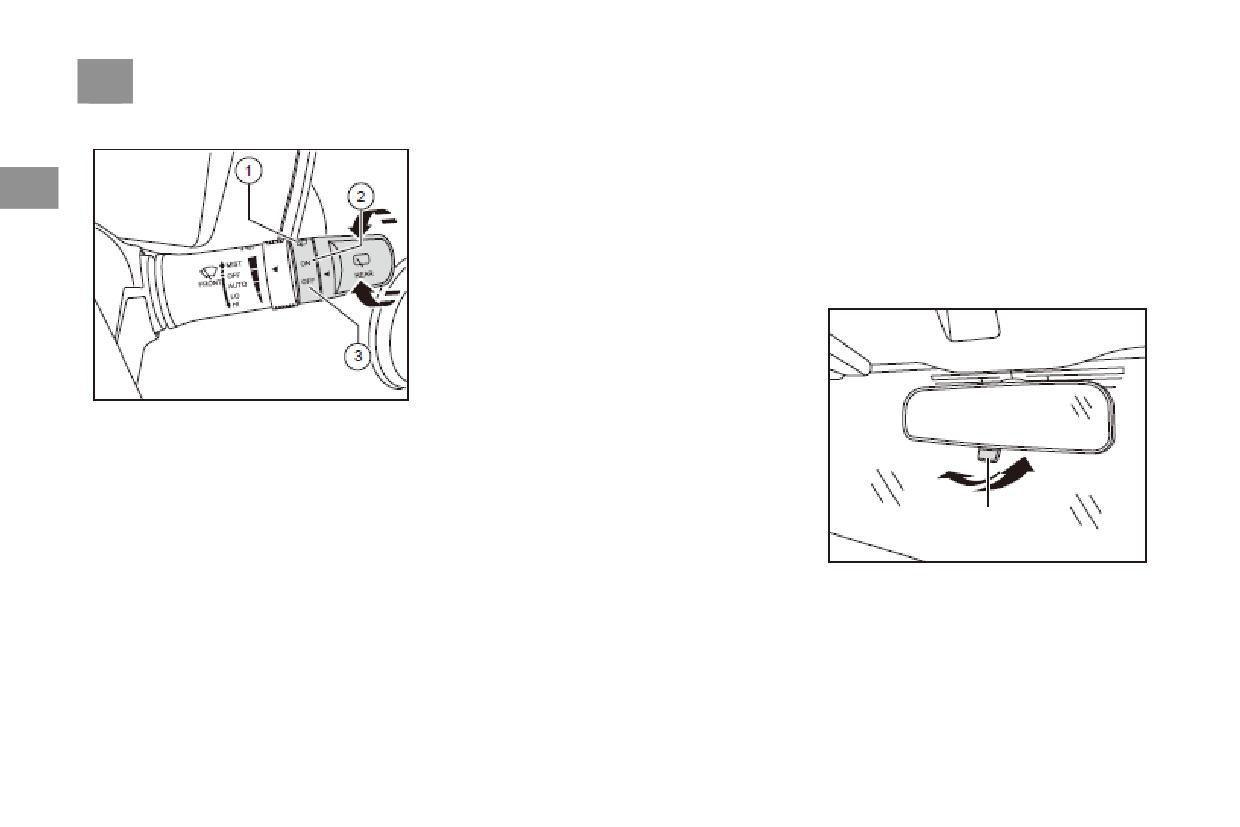
Rear Windshield Wiper
2. OFF
Rearview Mirror
In this position, the rear windshield wiper will
Interior Rearview Mirror
be switched off.
This vehicle is equipped with a manual
2
3. Intermittent wiping by rear wiper
dimming interior rearview mirror.
In this position, the rear windshield wiper will
Be sure to keep the surface of the interior
execute the intermittent wiping action.
rearview mirror clean and adjust it to the best
4. Continuous, low-speed wiping by rear wiper
visual angle. Before starting driving, be sure to
In this position, the rear windshield wiper will
properly adjust the rearview mirror.
execute the continuous, low-speed wiping
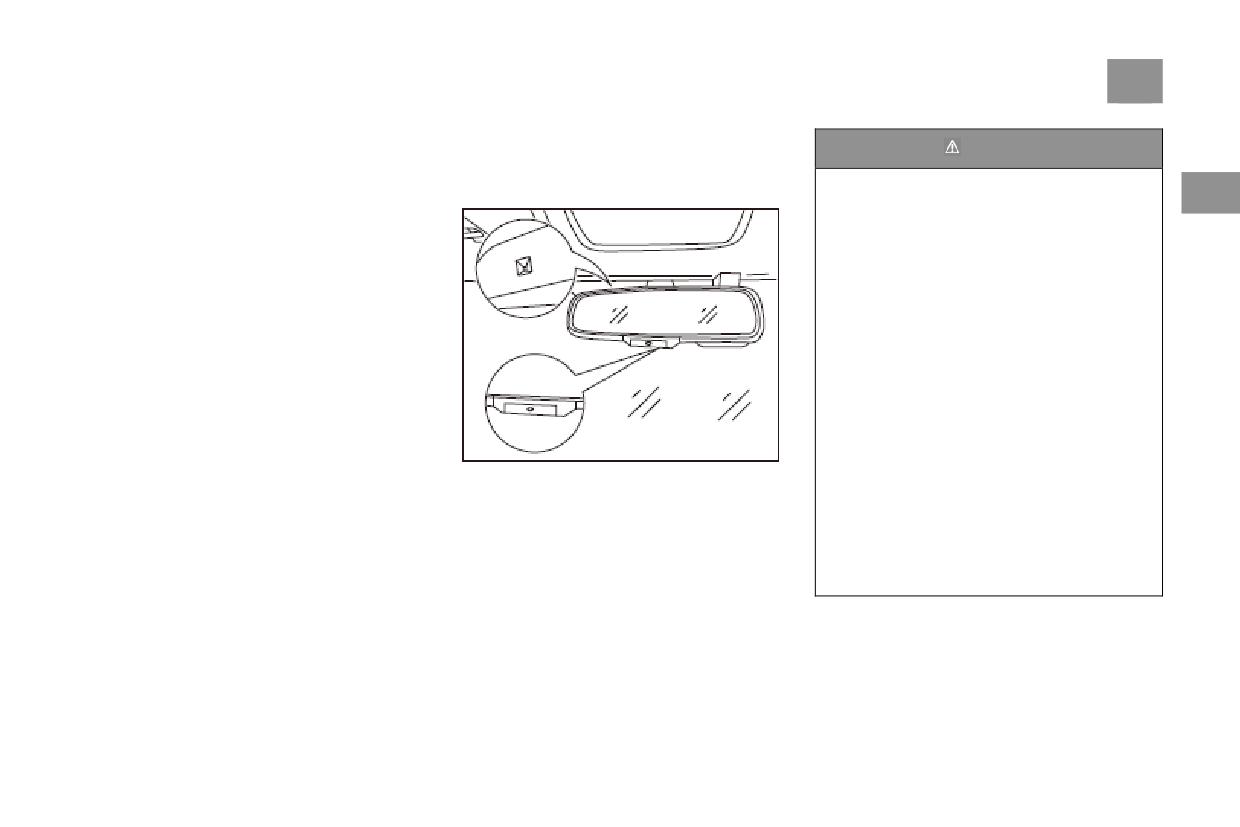
Manual anti dazzle interior rearview mirror
action.
The figure shows the control unit of the rear
windshield wiper. It is located on the right
daytime
multi-functional operating lever. This unit
night
includes the following switch positions:
1. Rear windshield washing
lever
When the control ring is turned to the upper or
lower limit position -1-, the spray nozzle of the
rear windshield washer will spray cleaning
agent onto the rear windshield and then the rear
windshield wiper will automatically wipe
several times in cycles. Upon release, the
control ring will automatically reset.
Vehicle Lights and Vision
115
There are two positions for the manual interior
Exterior Rearview Mirror
Warning
anti-glare rearview mirror, which are day and
This vehicle is equipped with an electronic
night positions.
exterior rearview mirror, which has the electric
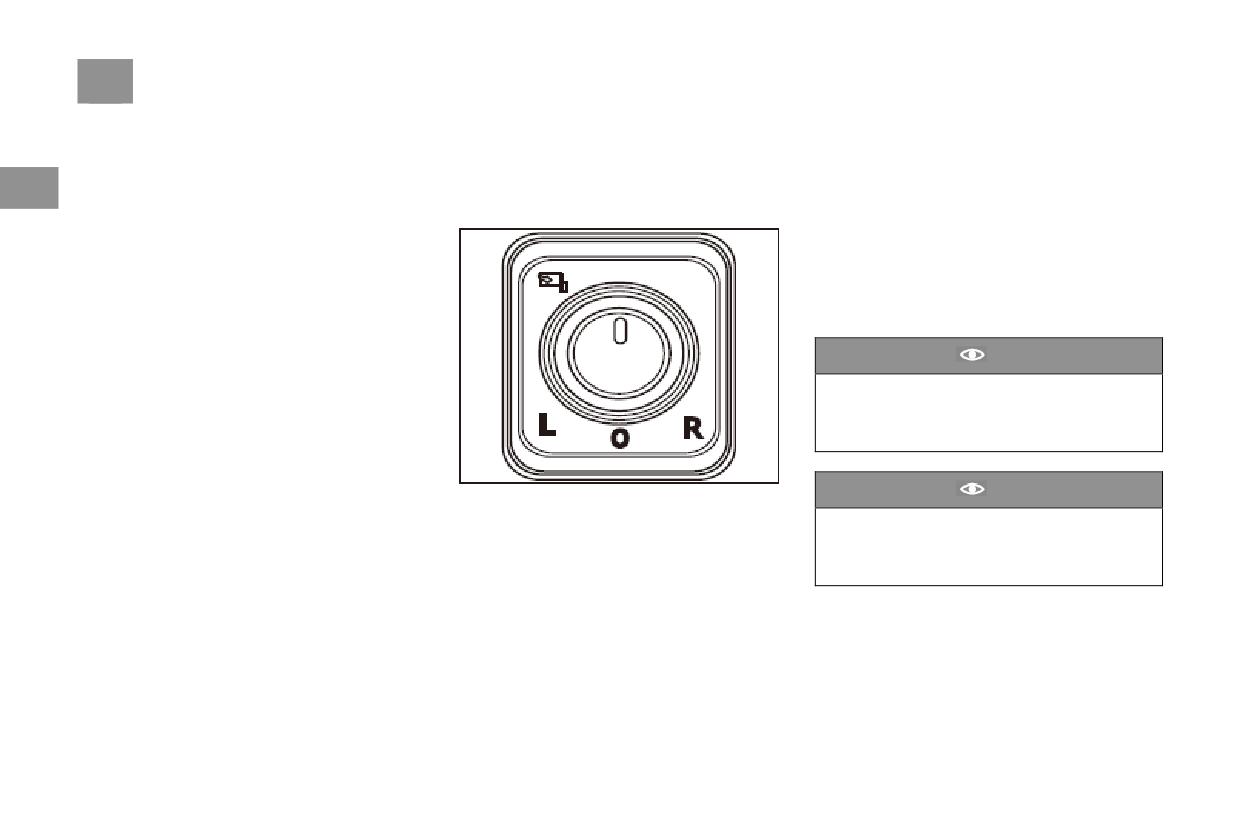
●In order to ensure the normal function of
The adjustment level can be moved back and
adjustment and electronic folding functions.
the anti-glare sensors on both sides of the
2
forth to adjust the interior rearview mirror. At
endoscope, it is forbidden to use finger or
night, the lever on the mirror base can be pulled
object contact or cover sensor.
backwards to the “Night” position to reduce the
●In order to ensure the normal function of
dazzling effect which the light of vehicles
camera in streaming media system, it is
behind may cause to the driver. When the lever
forbidden to cover camera lens with objects.
is pushed backwards, the interior rearview
Area. In order to make the camera image
mirror will return to the initial position, namely
clear, please be timely when the lens and rear
the “Daytime” position and normal vision will
windshield are dirty. Clean up. Streaming
be restored.
media rearview mirror system does not
display video Out of Head Vision, Under
Bumpers or Vehicles The following children,
pedestrians, cyclists, Cars, animals or other
objects come on either side. sense The known
Automatic anti-glare inner and rear mirror can
distance may be different from the actual
automatically adjust the inner and rear mirror
distance. No To rely solely on streaming
according to the intensity of the front and rear
media camera screen To turn to. Lack of
light.
concentration before turning may lead to
The color depth can reduce the dizziness caused
Injury, death or vehicle damage. Steering
by the rear vehicle lights to the eyes.
and Be sure to check behind and around the
vehicle before braking Area.
116 Vehicle Lights and Vision
The inside rearview mirror can display an image
Outside rear view mirrors
Rotate the adjustment knob to the left to
of the mirror camera.
The car is equipped with an electric exterior
indicate that the left Outside rear view mirrorsis
The choice of the brightness of the interior
mirror, and the Outside rear view mirrorshas
selected.
2
mirror screen can be set on the radio navigation
electric adjustment and electric folding.
Rotating to the right indicates that the right
entertainment system.
Outside rear view mirrorselectric adjustment
Outside rear view mirrorsis selected.
The user can turn off the display of the camera
Then you can adjust the position of the exterior
video through the switch on the inner rear view
side mirrors by pulling the adjustment knob up
mirror.
and down and left and right.
Thereby switching to a physical mirror mirror.
Move up and down to adjust the vertical
position of the mirror. Move left and right to
adjust the horizontal position of the mirror.
Caution
When rotating the mirror to adjust the
switch knob,
Don't use too much force. Too much force
may cause the knob to fail.
Caution
As shown in the figure, the Outside rear view
mirrors are controlled by the mirror adjustment
The field of view shown in the Outside rear
switch.
view mirrorsmay affect the driver's mastery
The mirror adjustment switch is located in the
of the exact position of the rear vehicle.
driver's side instrument panel switch group.
Please pay special attention!
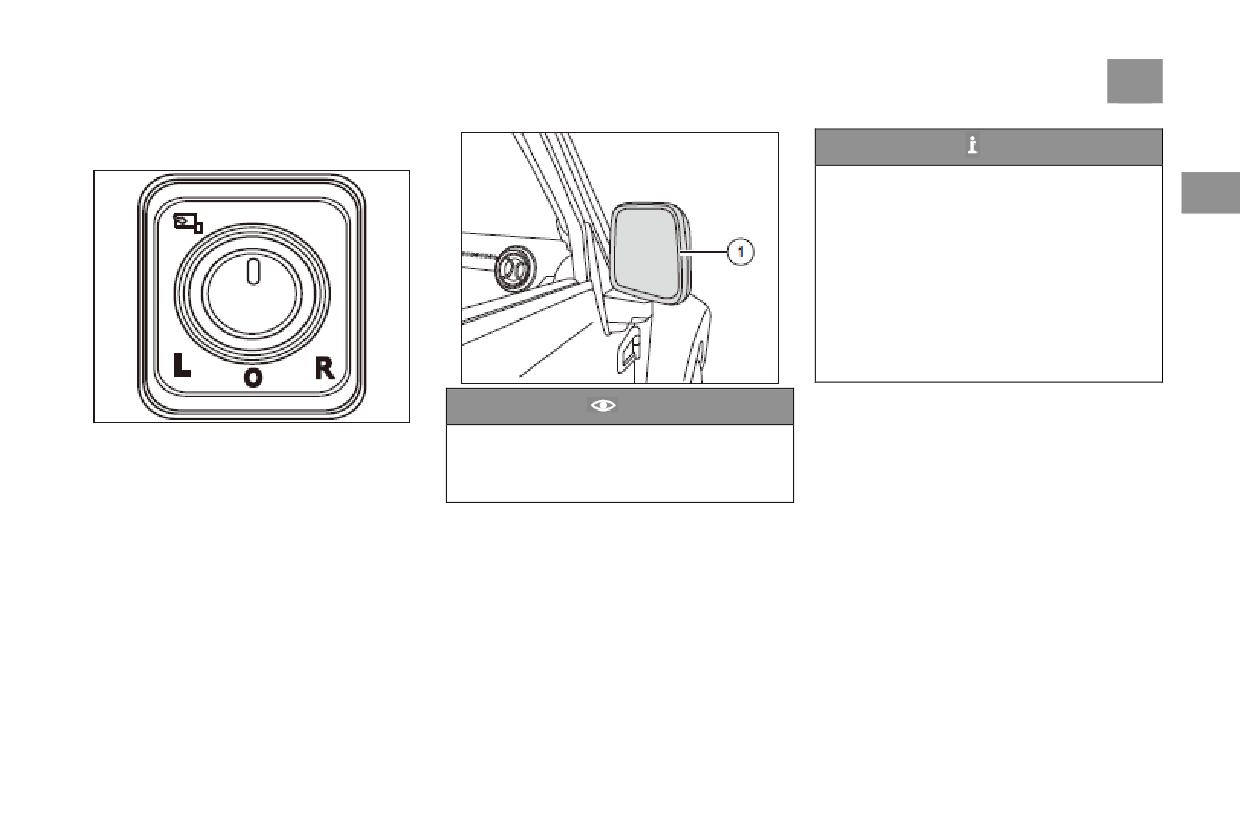
Vehicle Lights and Vision
117
Outside rear view mirrors for electric folding
*
Tips
●If the ignition key is in the LOCK position
or in pulled-out mode, the power leakage
2
protection function will be turned on: The
fog lights, the headlights and the reading
light will be turned off after approximately 8
minutes.
● If one or several of the fog lights, the
headlights and the reading light are switched
on again, the timing will start again. In the
event of remote locking within 8 minutes, the
corresponding light(s) will be turned off.
Caution
As shown in the figure, the Outside rear view
It is forbidden to drive the vehicle in any
mirrors electric folding button is in the driver's
Outside rear view mirrors-1- when folded
side instrument panel switch group.
Doing so will result in reduced visual
The switch knob is rotated to the upper side, the
perception and may result in an accident!
exterior rear view mirror is electrically folded,
rotated to other gear positions, and the exterior
rear view mirror is electrically deployed.
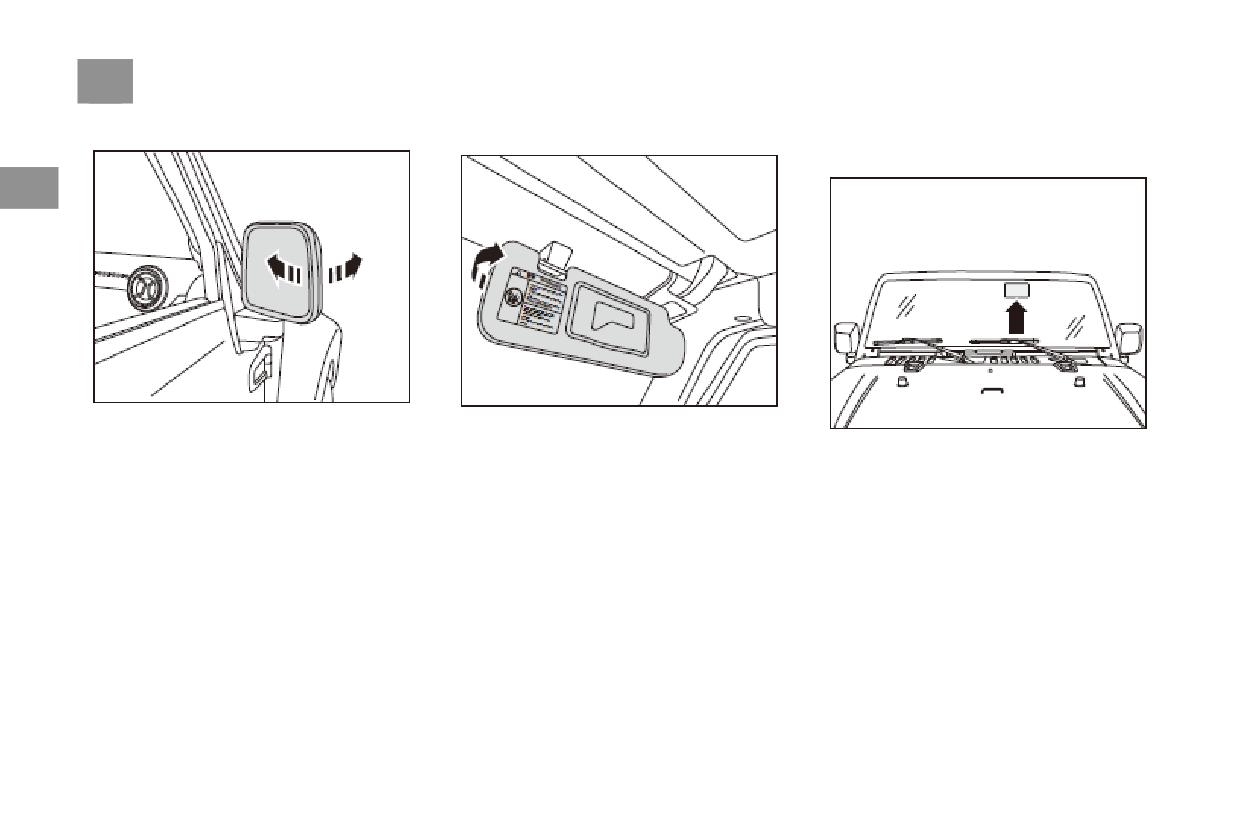
118 Vehicle Lights and Vision
Manual rear view mirror folding *
Sun visor with makeup mirror
Car
electronic
identification
microwave window
2
Pushing the Outside rear view mirrors forward
The sun visor on the driver's and passenger's
or backward allows the Outside rear view
side can be pulled out of the respective brackets
The microwave window is used to install the
mirrors to be unfolded or folded.
and then turned in the direction of the - arrow -
electronic sign of the car. The installation
to block the sunlight from the door window. (In
position does not allow the film to be attached,
the figure, the sun visor on the passenger's side
the heated wire is not allowed, the antenna is
is taken as an example).
not allowed, the driving field of view is not
affected, and the data is effectively read.
The microwave window is allowed to be
embodied in the form of pitting, and the black
area and the pitting point have no effect on the
electronic identification receiving signal.
Seat and storage facilities
119
Seat and storage facilities
Warning
Warning
The importance of correct seats
Incorrect seating posture of the driver and
●The seat can only be adjusted while the
passenger can cause serious injury
vehicle is stationary. If the seat is adjusted
2
adjustment
All drivers and passengers must sit in their
while the vehicle is running, it can easily lead
Properly adjusting the seat ensures that the seat
seats.
to accidents.
belt and airbag are fully protected.
The driver and front passenger seats can be
●All occupants must wear the seat belts on
●For the driver and the Passenger, the torso
their seats correctly.
should always be at least 25 cm away from
adjusted in a variety of occupant sizes.
Children on the road must be protected with
the steering wheel or dashboard. If the
Always adjust the front seats correctly before
driving the car:
a suitable child protection system.
spacing is less than 25 cm, the airbag system
●All headrests must be properly adjusted
will not be fully functional - risk of injury
● It is able to operate all the operating
according to the height of the occupants and
mechanisms on the instrument panel accurately,
always wear a seat belt to give the occupants
efficiently and safely.
the best protection.
●Relax in a sitting position and not fatigue.
●Keep your feet in the foot space while the
●Fully utilize the protection of seat belts and
vehicle is in motion, not on the dashboard,
airbags.
out of the window or on the seat. Incorrect
sitting posture can cause serious injury when
the airbag is triggered.
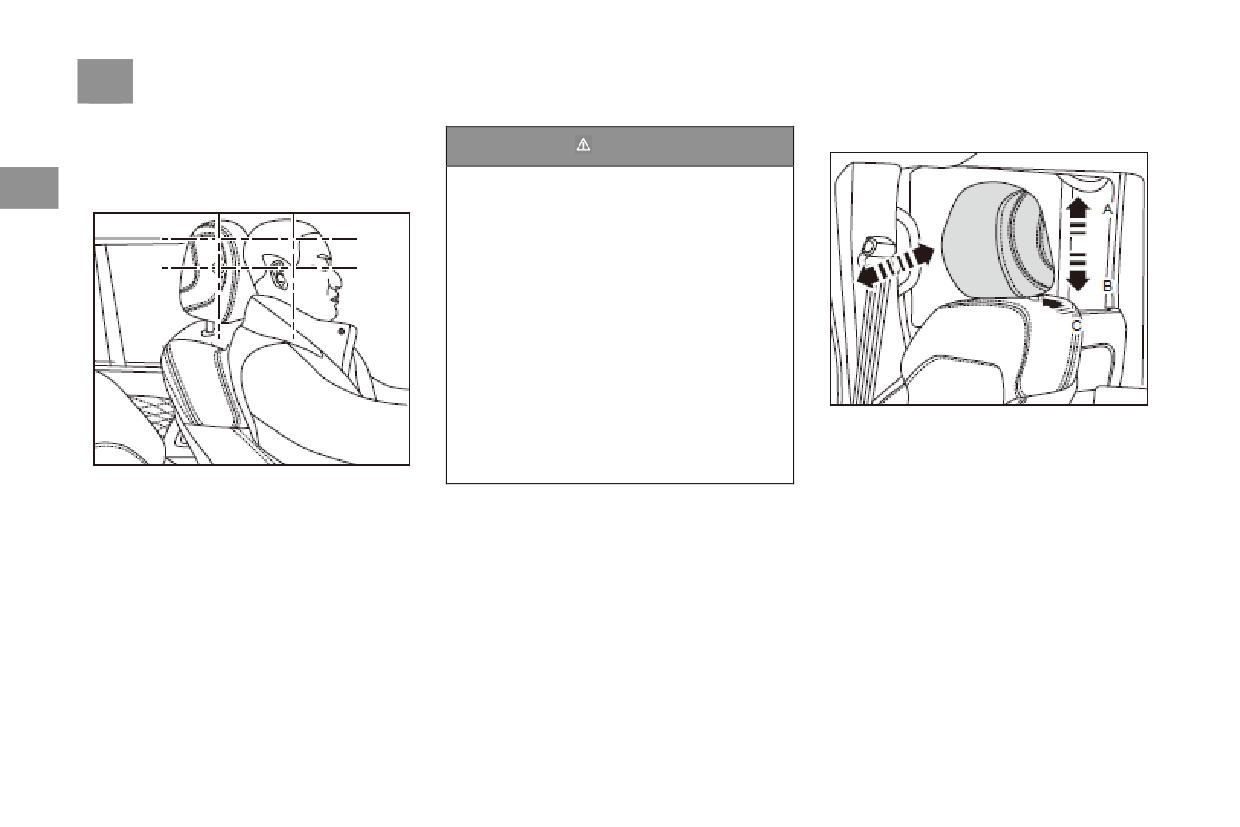
120 Seat and storage facilities
Headrest
Adjust the front seat headrest
Warning
Correct adjustment of the headrest is essential to
protect the occupants and reduce accident and
●If the headrest is removed or the headrest
2
injury rates.
is adjusted/improperly installed, it is very
easy to seriously injure the occupant in the
event of an accident.
●The occupant must adjust the headrest
according to his or her body shape.
●If the headrest is not properly adjusted, it
will increase the risk of injury to the
occupant if there is an emergency or
emergency braking while driving.
●The height of the headrest must be suitable
for the height of the occupant. The upper
edge should be as high as possible on the top
For safety and comfort, adjust the headrest
of the head, and the center of the head should
before driving.
be as close as possible to the center of the
1. Grasp the sides of the headrest and lift the
Adjust the headrest so that the center of your
headrest.
headrest along the - arrow A- direction to lift
back is right in the center of the headrest.
the headrest to the desired position.
If the center of your head and the center of the
2. Grasp both sides of the headrest, press the
headrest do not maintain the correct position as
adjustment button in the direction of - arrow C-,
shown in the figure, it is extremely vulnerable in
and then press the headrest down in the - arrow
the event of an accident.
B- direction to press the headrest down to the
desired position.
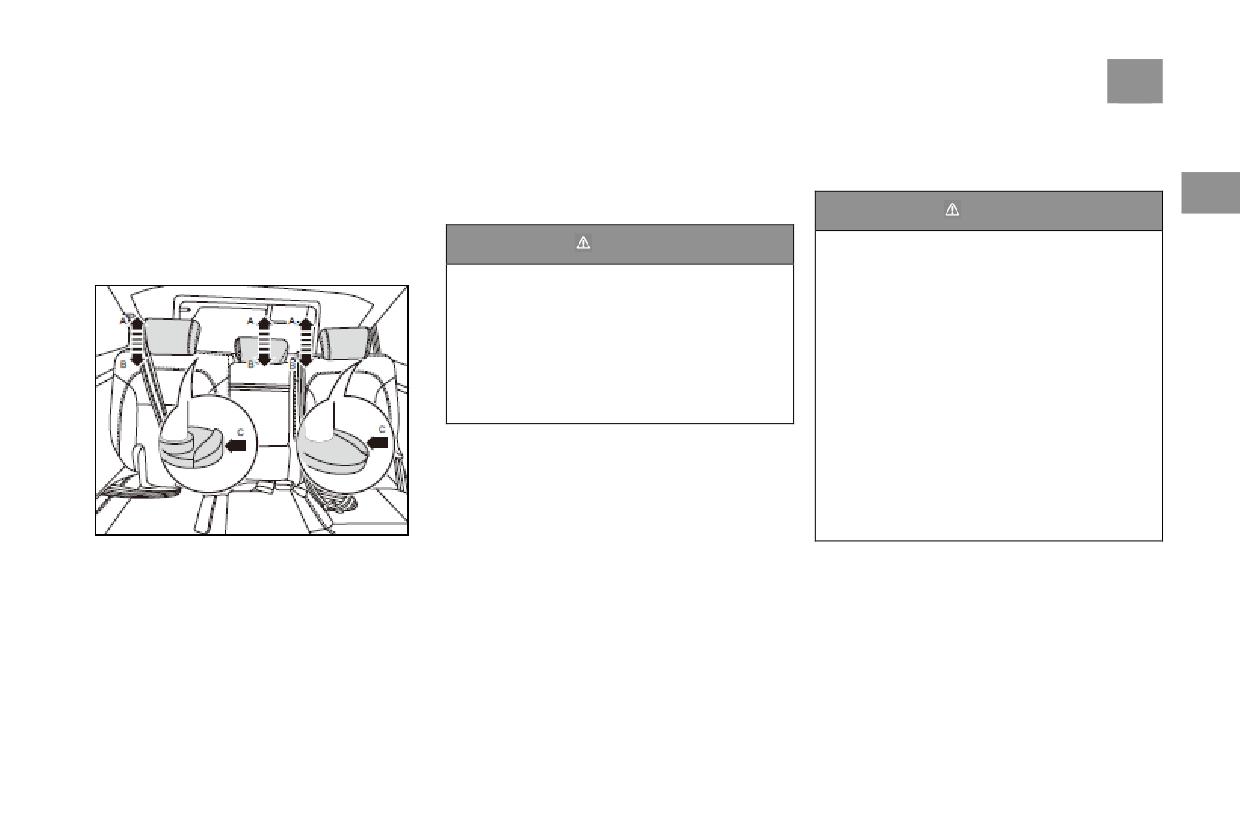
Seat and storage facilities
121
3. Front and rear adjustment of the headrest:
2. Grasp the sides of the headrest and press the
Seat
The occupant sits on the seat, grab both sides of
adjustment button in the direction of - arrow C
Front seat
the headrest at the same time, adjust the
- and then press the headrest down in the
Driver seat
headrest forward to the proper position; adjust
direction of - arrow B - to lower the headrest to
2
the headrest to the front gear and continue to
the desired position.
Warning
adjust the headrest forward, the headrest can be
Warning
When the driver's airbag is inflated, there is
returned To the last position.
extreme pressure, especially if the driver is
Vehicle with three headrests
Do not remove the headrest, otherwise the
very close to the airbag, which can cause
person will be seriously injured in the event
serious injury or even death.
of an accident:
Because the danger zone of the driver's
●After installing the headrest, the headrest
airbag is within 50-75 mm of the front of the
must be properly adjusted according to its
airbag, it provides you with enough safety
body shape for best protection.
space at a distance of 25 cm from the driver's
● Please read and follow the warning
airbag. This distance is the distance from the
instructions carefully.
center of the steering wheel to your sternum.
If you are sitting less than 25 cm, you can
adjust the driver's seat position in the
following ways:
●Move the seat as far back as possible while
still
ensuring that the pedal is still
comfortable.
For safety and comfort, adjust the headrest
before driving.
1. Grasp the sides of the headrest and lift the
headrest along the - arrow A- direction to lift
the headrest to the desired position.
122 Seat and storage facilities
●Slightly tilt the seat back back. Although
Front passenger seat
Front seat heating *
the vehicle design is different, for most
Warning
drivers, even if the driver's seat is moved to
2
the front position, the seat back can be tilted
The front passenger airbag also has
slightly back to a distance of 25 cm. If it is
considerable pressure when it is opened, so
difficult for the driver to see the road ahead
when the front passenger is very close to the
after tilting the seat back, use a hard non-slip
airbag, it can cause serious injury or even
cushion to raise the seat or raise the seat (if
death. Adjust the seat back so that the front
your vehicle has this feature).
passenger seat is as far away as possible from
●If the steering wheel is adjustable, tilt it
the airbag.Front passenger seat
down. Position the airbag against your chest
instead of the head and neck.
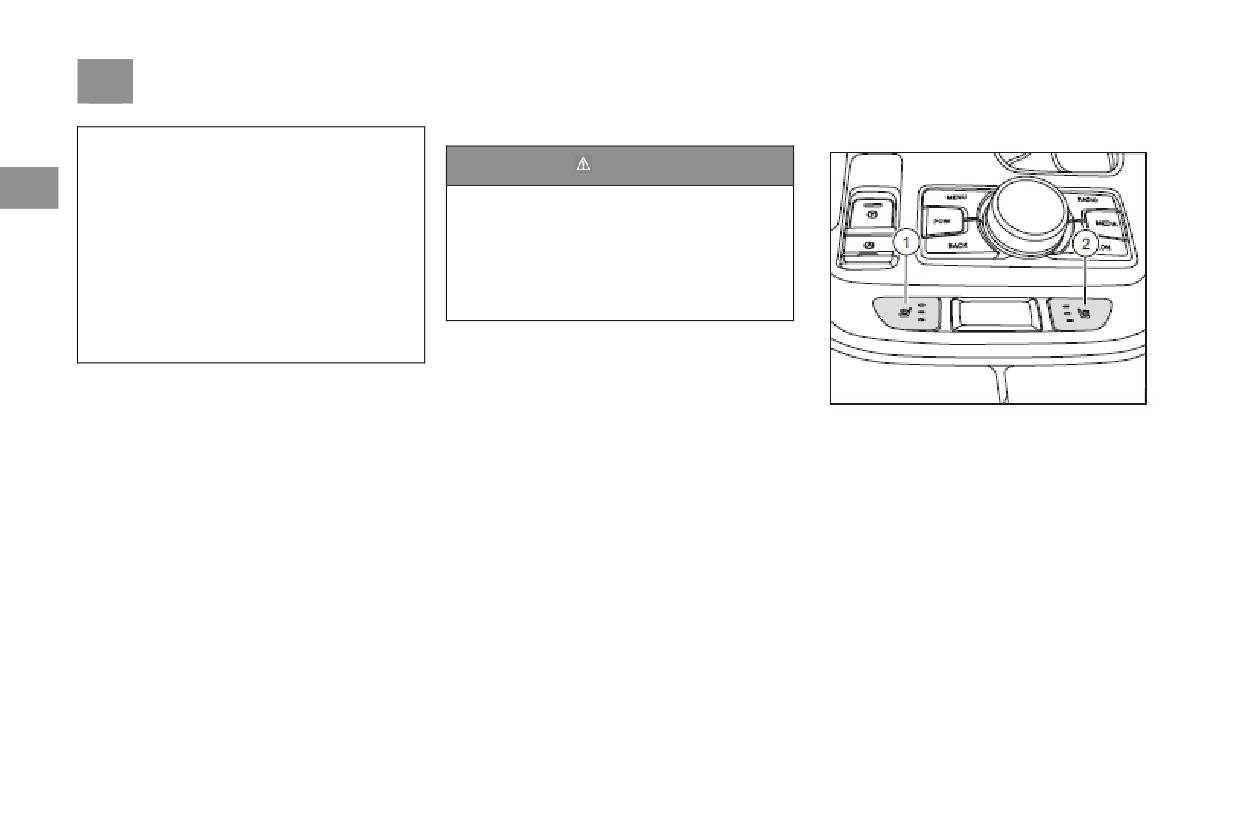
1. Driver seat heating button
2. Passenger seat heating button
When the start/stop button is in the “RUN”
mode, the three working indicators of the
driving and Passenger side seat heating switches
are illuminated. At this time, the seat
temperature is the highest, and once the button
is pressed, the indicator lights are turned off
from top to bottom. The seat temperature is
lowered by one step, and so on, and the switch
button is cycled. Some models may not be
equipped with this switch depending on the
model.
Seat and storage facilities
123
Front seat electric adjustment*
The driver's seat has a 6-way electric adjustable
function and the front passenger seat has a
4-way electric adjustable function.
2
Electric waist support (such as equipment):
Coupon seat electric adjustment:
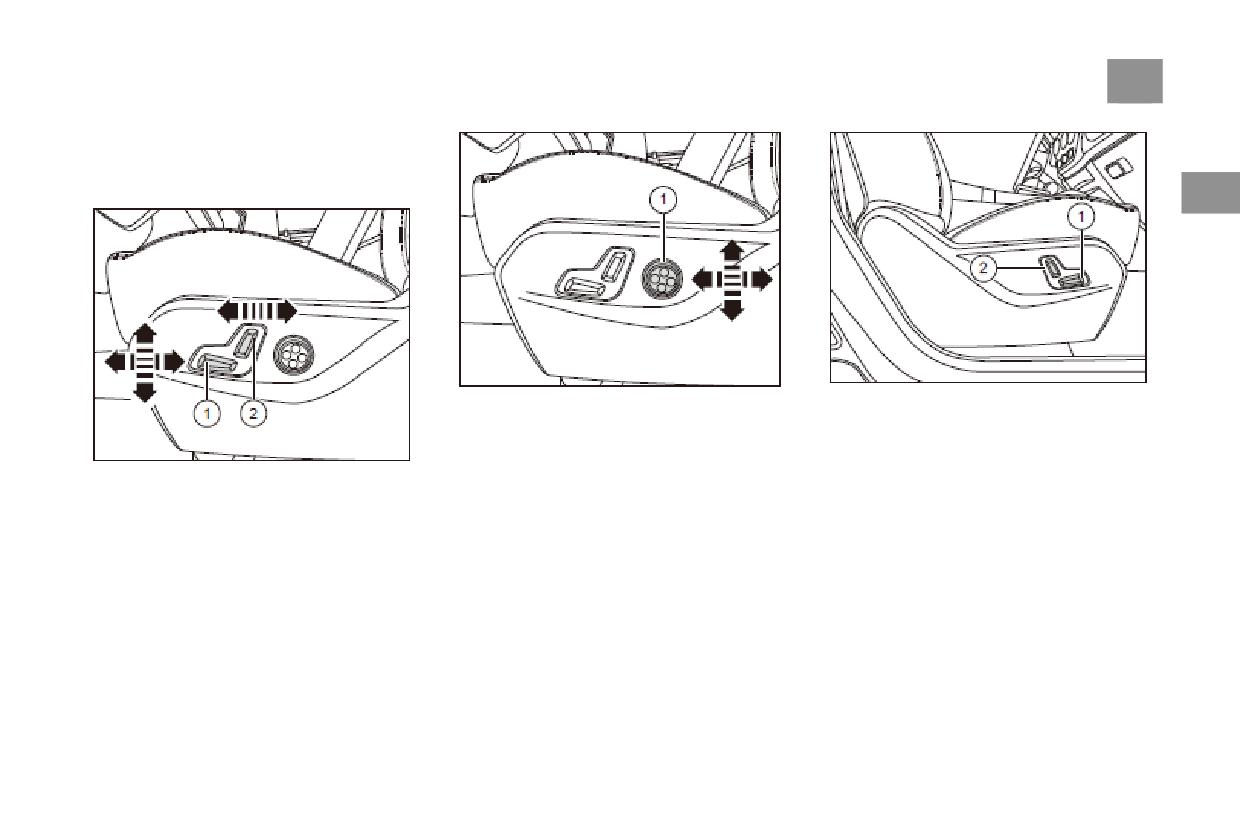
The electric waist control button -1- is located
Push the front and rear switch -1- to adjust the
on the outside of the driver's seat.
front and rear movement of the seat position.
Press the upper part of the control button to
Front and rear toggle switch -2- upper, the
Driver seat adjustment:
move the waist support upwards;
backrest angle of the seat back can be adjusted.
Toggle switch -1-, according to the left side -
Press the lower part of the control button to
arrow - direction in the figure, you can adjust
move the waist support downwards;
the height of the seat or move back and forth.
Press the front of the control button to move the
Front and rear toggle switch -2-, according to
waist forward;
the right side of the figure - arrow - direction,
Press the back of the control button to move the
you can adjust the backrest angle of the seat
waist back;
back.
124 Seat and storage facilities
Front seat manual adjustment *
The driver's seat has a 6-way adjustable function
and the front passenger's seat has a 4-way
2
adjustable function.
Seat back adjustment:
Seat height adjustment (only for driver seat):
The backrests of the two seats in the front row
Press the height adjustment handle down and
can also be adjusted. The picture here takes the
down -3-, the seat surface will move downwards;
driver's seat as an example. If the driver and the
the height adjustment handle will be pulled back
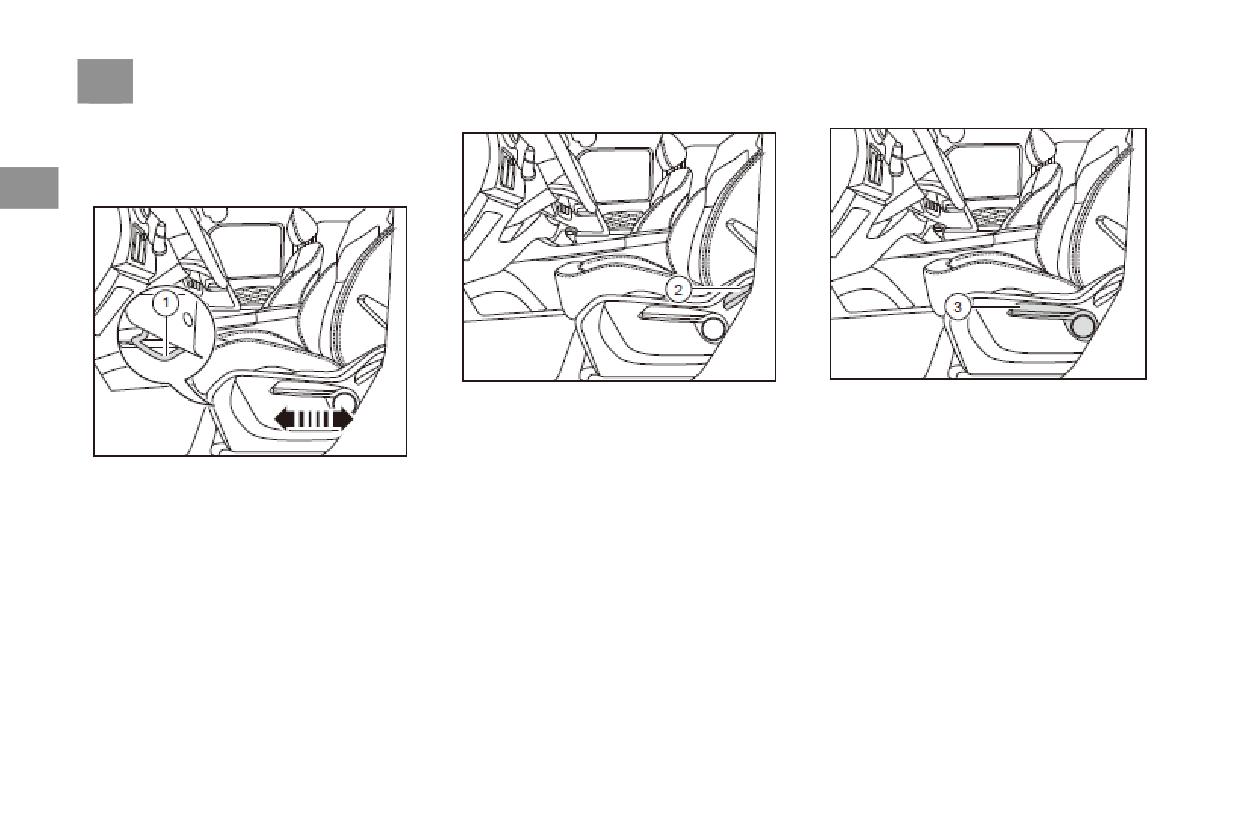
Seat front and rear adjustment:
Passenger want to adjust the seat back, lean the
and forth, and the seat surface will move
The front two seats can be adjusted back and
body forward slightly, and gently pull up the
upwards.
forth, here the driver side is taken as an example.
horizontal part -2- on the seat back angle
Pull up the adjustment lever -1- under the front
adjustment handle, and lean back to close the
of the seat and adjust the seat to the proper
seat back. In a comfortable position, release the
position. Loosen the adjustment lever and move
handle and the seat back is locked in that
the seat slightly back and forth until the seat
position.
lock mechanism is locked.
Seat and storage facilities
125
Caution
Caution
● After adjusting the seat position, try
●The seat position set by the manufacturer:
sliding the seat back and forth to ensure that
the front and rear adjustment stroke is
2
the seat is locked in place.
240mm, the seat design position can be
●Push the upper part of the seat back back
adjusted
forward
200mm, rearward
and forth to ensure that the seat back is
adjustment 40mm; the driving seat design
securely locked, otherwise it may interfere
position can be adjusted upward
20mm
with the normal operation of the seat belt.
downward adjustment
25mm; front row
●Do not place objects under the driver's or
back design The angle is 22°, the design
front passenger's seat. Otherwise, the seat
position can be adjusted backward by 50°,
and the forward adjustment is 25°; with the
lock mechanism may be affected or the seat
position adjustment lever may be pushed up
4-way adjustment headrest, it can be
accidentally. The seat may suddenly move
adjusted back and forth for a total of 3 steps
Backrest lumbar adjustment (only for driver
and cause the vehicle to be easily driven. out
of about 26mm.
seat):
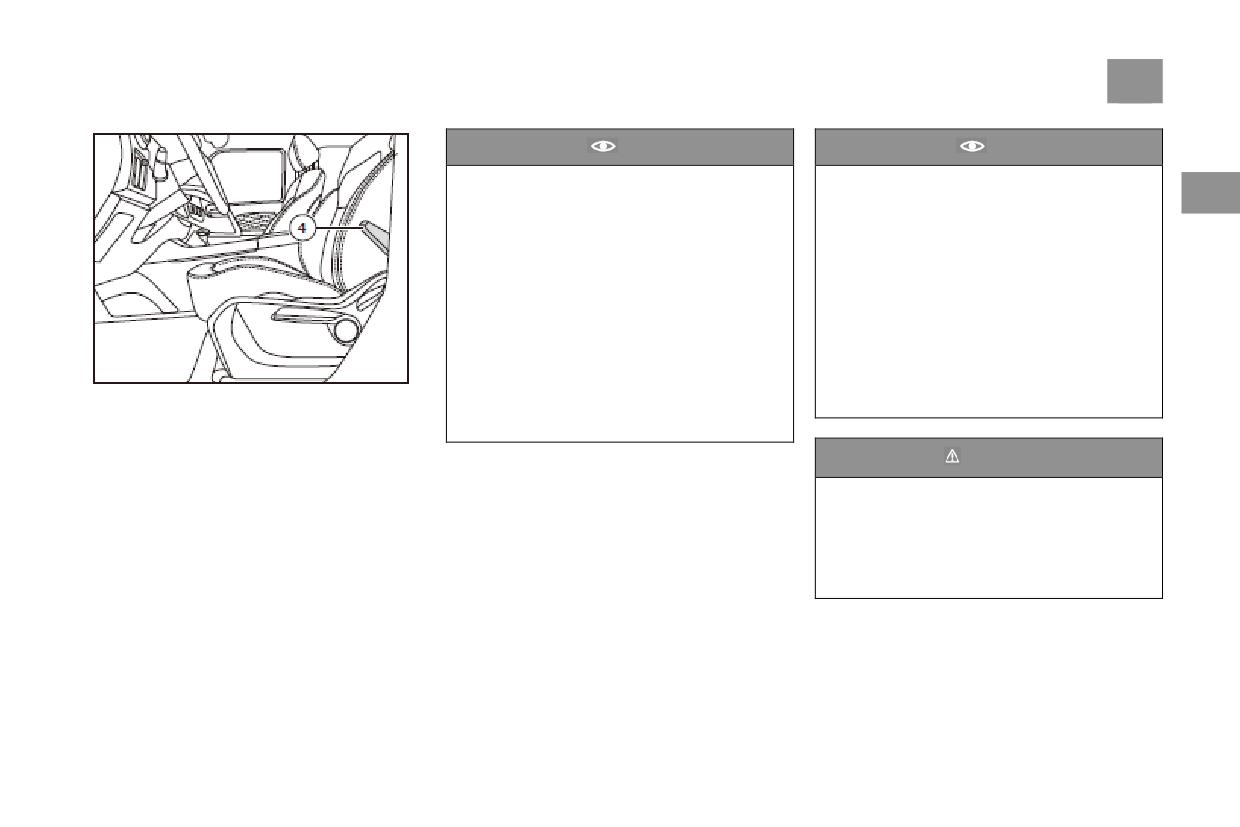
Pull the adjustment handle up and down -4- to
of control.
increase the lumbar support; press the
Warning
adjustment handle down and down to lower the
lumbar support.
●Never adjust the seat while the vehicle is
moving, as the seat can move unexpectedly
and cause the vehicle to lose contro
●Do not let the seat hit the occupants or
luggage when adjusting the seat.Seat and
storage facilities
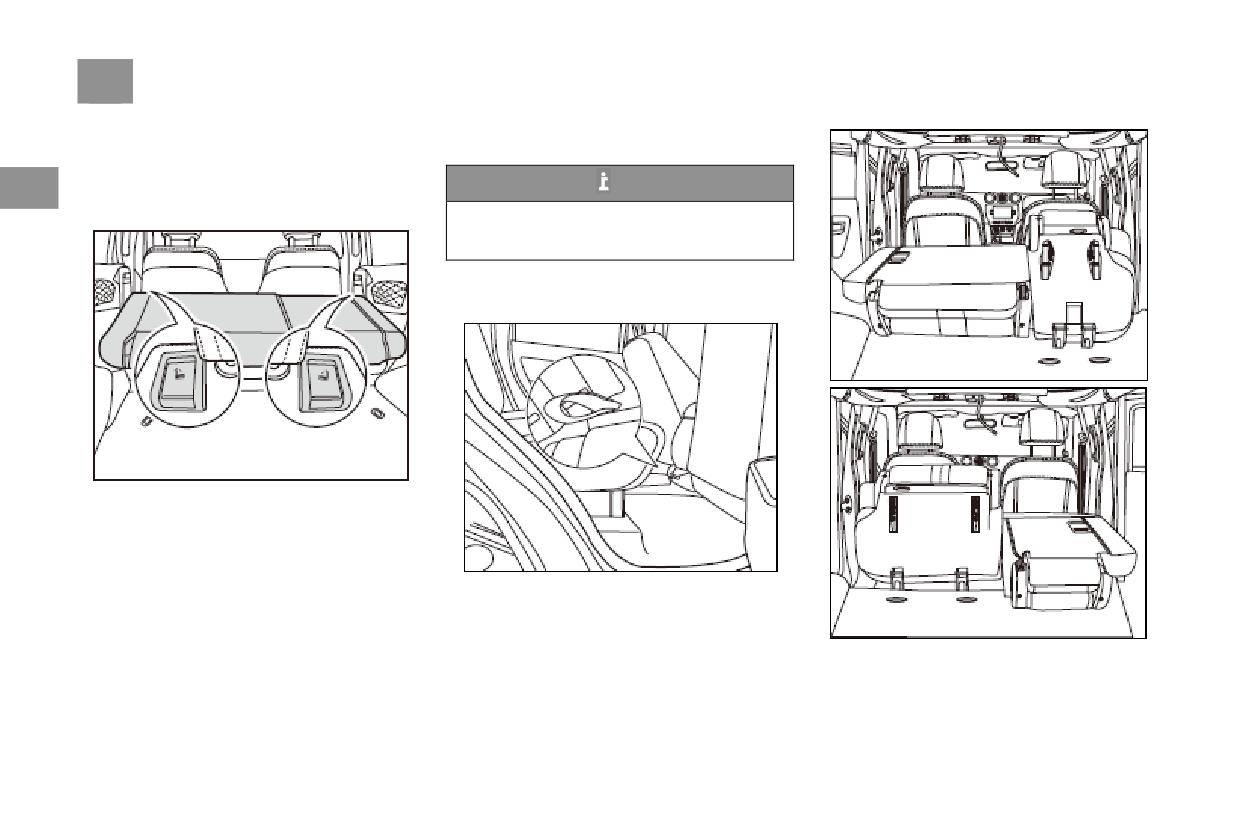
126 Seat and storage facilities
Rear seat
Fold the seat back to full contact with the seat
Rear seat folding
cushion
This car is equipped with a rear 4/6 split seat. If
2
Tips
you need to place large items in the rear seat,
you can fold and flip the back seat back.
Before folding the rear seats, it is necessary
to adjust the front seat position to ensure the
rear seat folding space.
Flip
Pull down the seat straps under the sides of the
seat as shown, and then lift the seat up.
As shown in the figure above, pull up the two
folding locks on the back seat backrest to
control the seat down function on the left or
right side of the rear row.
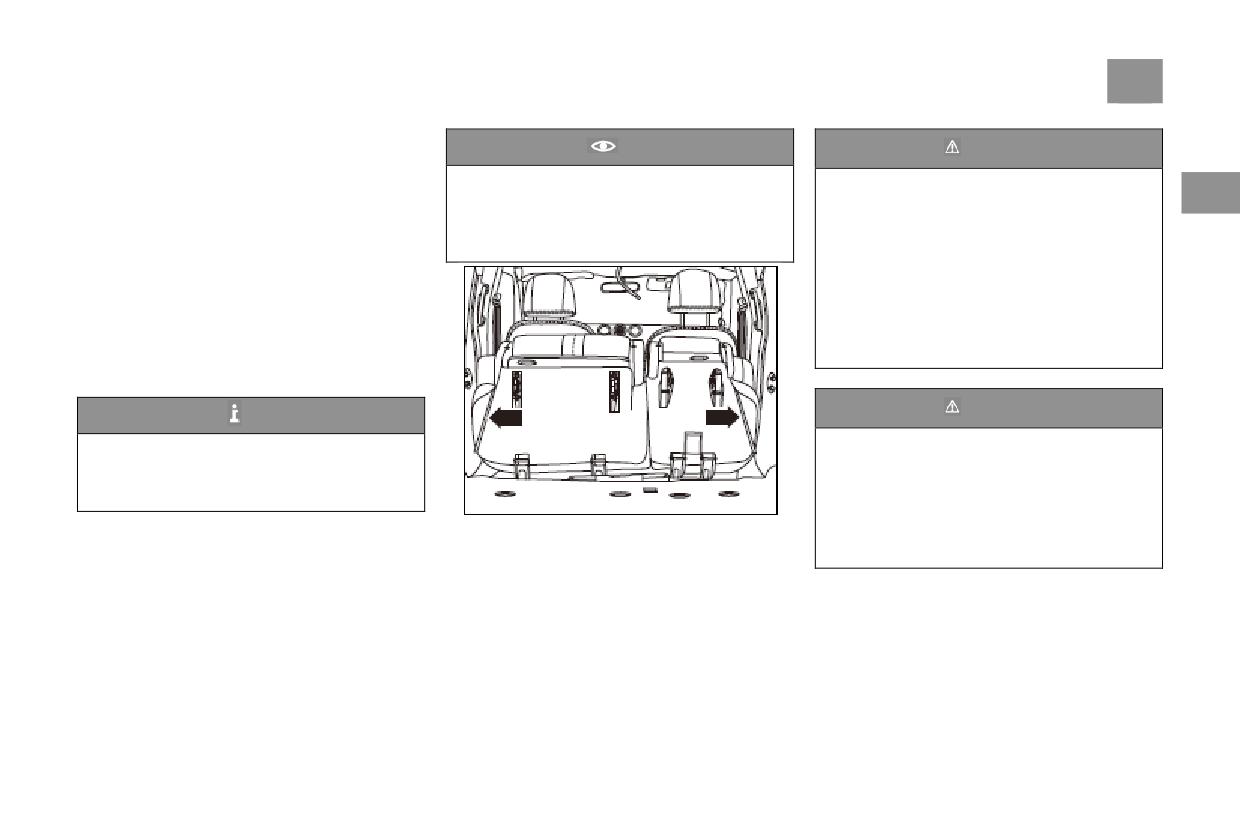
Seat and storage facilities
127
Then turn the seat up and forward to the
Caution
Warning
extreme position to reverse the rear seat.
When the one seat is double-turned, the seat belt
When the vehicle is moving, the rear seat that
●It is very dangerous to ride in the baggage
buckle is stuck to the felt on the side of the other
needs to be carefully turned up is down. At
area. In a crash, an occupant riding in this
2
side seat.
this time, the fixing hook in the seat pocket of
area is likely to be seriously injured or even
The advanced 4/6 split seat allows for different
the seat should be hung on the armrest of the
killed.
space requirements on both sides to
body side guard as indicated by the arrow.
●Make sure that every occupant in the car is
accommodate living loads.
seated on the seat and properly fasten the
When you need to restore, you can reverse the
seat belt.
operation. After recovery, push the seat to
●In a crash, if the seat is not properly locked
confirm that the seat is fully locked.
to the fixture, the occupant may be injured.
Backrest angle design requirements:
Make sure the seat is fully locked.
The backrest is designed for an angle of 23°, 4°
forward and 10° backward.
Warning
Tips
Push the upper part of the seat back back
● To prevent personal injury, passengers
and forth to ensure that the seat back is
should not sit in the rear luggage area or fold
securely locked, otherwise it may interfere
the rear seats up.
with the normal operation of the seat belt.
●The rear luggage space is for the carriage
of goods only, not for passenger seats.
Passengers should sit in the seat and fasten
their seat belts.
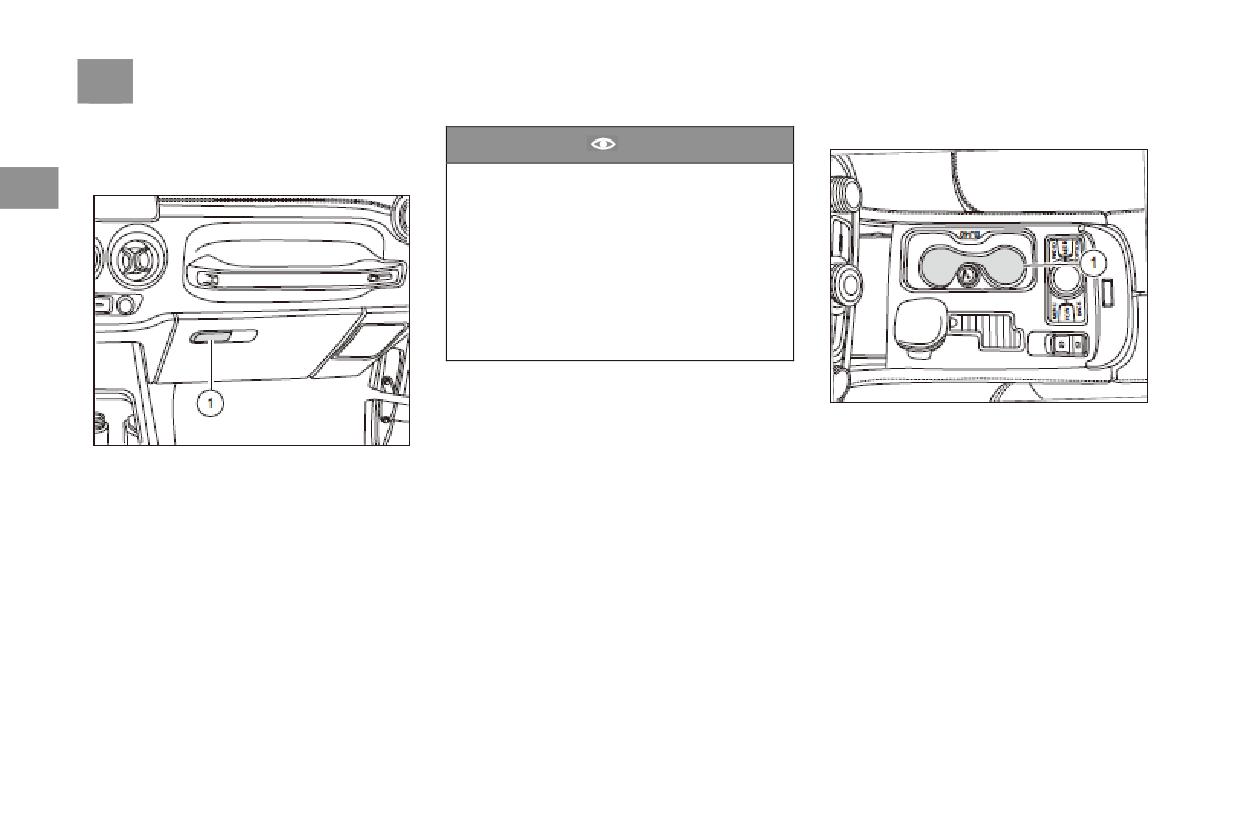
128 Seat and storage facilities
Storage facility
Cup holder
Caution
Storage facility Front passenger side glove
box
●When storing liquid in the glove box, only
2
tightly closed or unopened containers can be
stored. Spilled liquid can damage the
decorations and electrical components inside
the glove box and dashboard.
●The glove box must be closed when the
vehicle is running, otherwise the items in the
glove box may fly out during an emergency
braking or an accident, causing injury to the
occupants.
The cup holder -1- is located in the front center
console, where an ashtray can also be placed
(purchased by yourself).
Pull the handle -1- to open the glove box and
push the glove box cover to close the glove box.
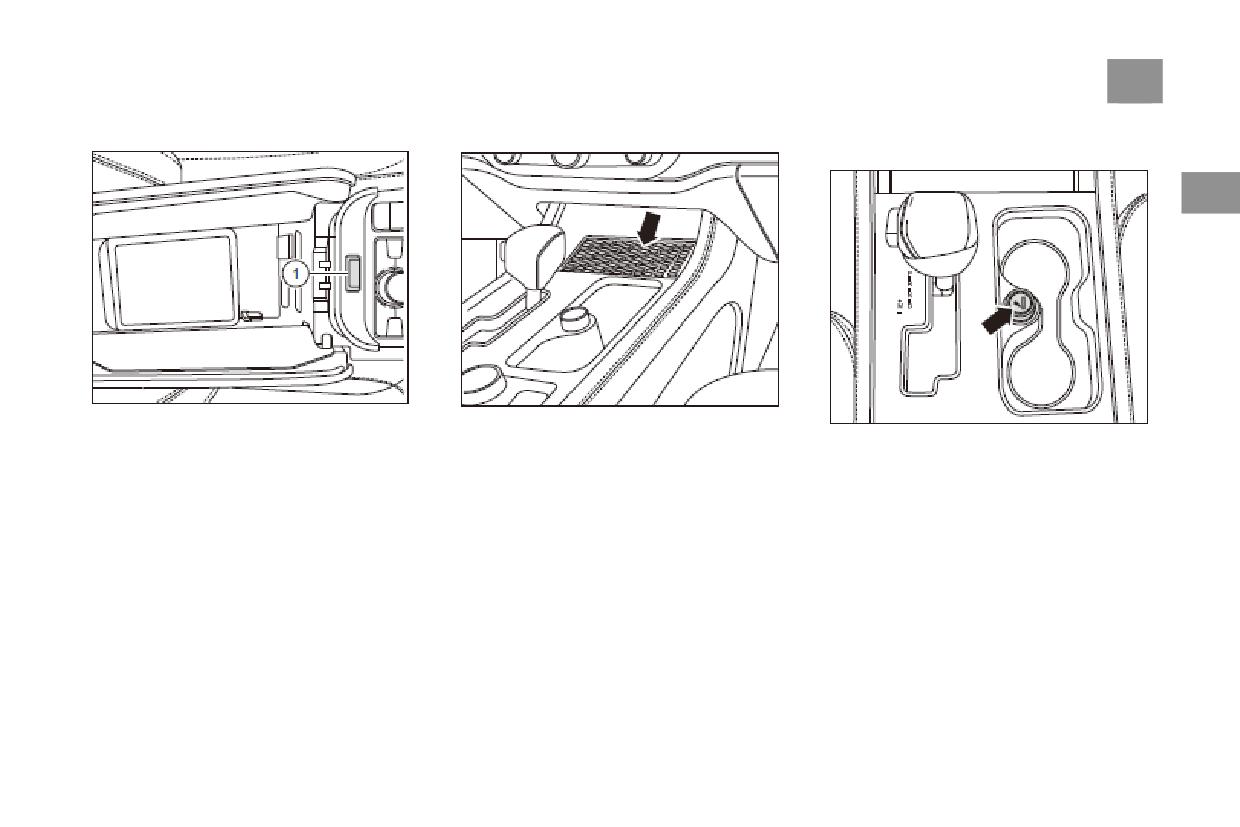
Seat and storage facilities
129
Front central armrest storage box
Small storage box
Front row integrated power outlet (cigarette
lighter / 12V power supply)
2
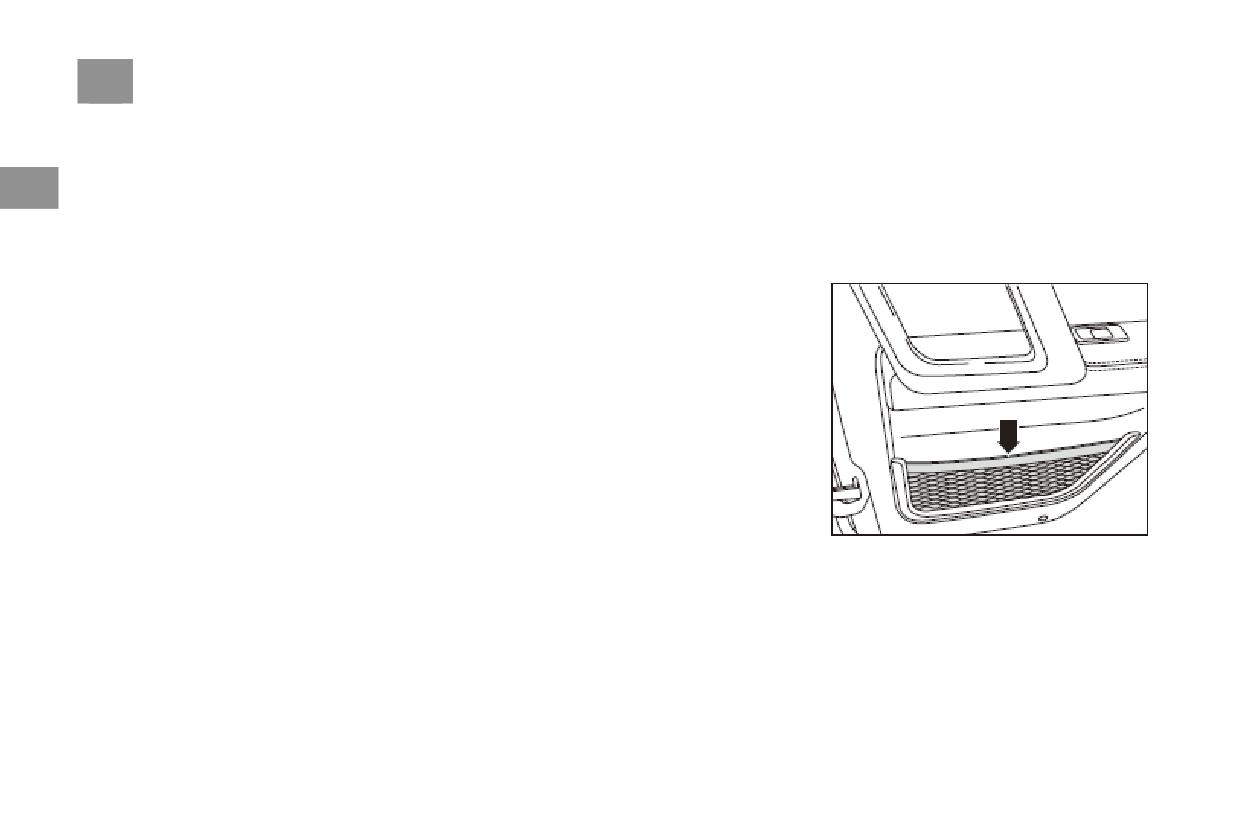
As shown in the figure, press the switch -1- near
The storage box (arrow position shown) is
the front passenger side and lift the storage
located next to the cigarette lighter and can store
The cigarette lighter (the position of the arrow
compartment cover upwards to open the upper
small items.
shown) is located below the instrument control
storage compartment of the front center armrest.
panel.
Lower the front storage compartment upper
1. Press the cigarette lighter button.
storage compartment by placing the storage
2. Wait until the cigarette lighter pops up
compartment cover down.
automatically.
3. Pull out the cigarette lighter and ignite the
cigarette at the reddish heating coil.
4. After use, plug the cigarette lighter back into
the outlet.
5. When the cigarette lighter is used as a power
outlet, it can be connected to an electrical device
such as a mobile phone. Some electrical
accessories may not be compatible with the
cigarette lighter socket and may blow the
vehicle or adapter fuse.
130 Seat and storage facilities
Precautions:
3. Adding any electrical equipment to the
Door debris bag
1. Frequent plugging and unplugging of the
vehicle may damage the vehicle or cause other
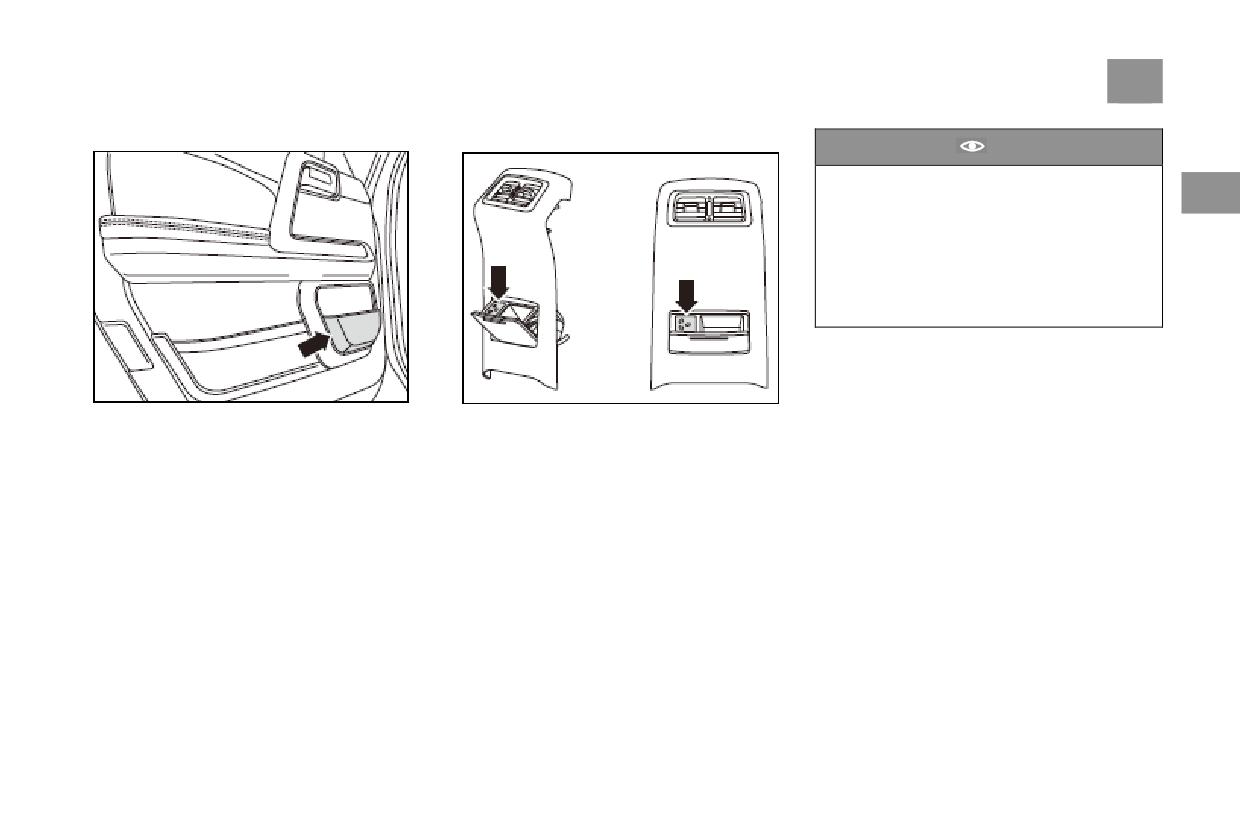
There is a sundries bag arrow below each side
cigarette lighter will invalidate the function of
parts to malfunction. The resulting repairs are
of the door (- different models are not the same),
2
the cigarette lighter. Please fix the purpose of
not covered by the warranty. Never use
can be used to store small items such as maps.
the cigarette lighter as much as possible. Do not
equipment with a maximum power rating of
The weight of the load shall not exceed 0.6kg,
switch between the cigarette lighter and the
more than 120W. Please consult BAIC Special
and the diameter of the round object shall not
power socket function frequently.
Service Center before adding electrical
exceed 70cm. The picture here uses the right
2. Pressing the cigarette lighter while the
equipment.
door as an example.
cigarette lighter is heating will make the
4. Be sure to use the power plug that does not
cigarette lighter unable to open the heating core
touch the metal shrapnel inside the cigarette
when it is very hot. Overheating can damage the
lighter. Otherwise, the function of the cigarette
cigarette lighter or the heating core or the fuse
lighter will be invalid.
may blow. Do not hold the cigarette lighter
5. The cigarette lighter is used as a power socket.
while the cigarette lighter is heating.
Improper use may cause damage. These
damages are not guaranteed.
6. Never hang any type of accessory or auxiliary
bracket on the plug.
Seat and storage facilities
131
Driver's side door storage boxs
220V power interface*
Caution
●Do not use more than 150W of electrical
appliances, otherwise the electrical system
2
may be damaged;
● Improper use of the outlet may result in
serious personal injury or fire, so do not
allow the child to stay alone in the vehicle;
●Do not spill liquids into the power outlet,
as this may be dangerous.
The storage box is located below the driver's
Located under the rear exhaust vent
side door.
1. The 220V power supply can only be used
while the engine is running. Connect the
electrical plug and insert the plug into the socket
to the limit position.
2. Use a plug that matches the power outlet to
avoid damaging the outlet;
3. Please use only accessories approved by
BAIC;
4. LED indicator Light Green When the 220V
power supply is in normal working condition,
the red light flashes 220V and the power supply
is in an abnormal state. Please go to the
after-sales service center for inspection and
maintenance.
132 Parts and modification
Parts and modification
Modified
Warning
Removing the parts on the vehicle or replacing
When the vehicle leaves the factory, the engine
Installation of unsuitable accessories or
the original parts with parts not approved by
2
compartment front wall, B-pillars and other
modified vehicles may affect the handling
BAIC Auto will seriously impair the handling
components are affixed with data labels and
stability and other performance of the vehicle
stability and reliability of the vehicle.
signs, which are marked with important data
and may result in serious injury or death.
E.g:
and information on the use of the vehicle. Do
If the car phone, alarm device, transceiver radio
●Installing larger or smaller wheels and tires
not remove or damage labels and tags, and
communication device and low-power audio
will interfere with the normal operation of the
always keep the data and information clear and
system are properly installed, it will not
vehicle's anti-lock braking system (ABS) and
readable.
interfere with the computer control system on
other systems.
The company has adopted the latest safety
the car, such as the anti-lock braking system
●Modification of the steering wheel and other
technology to design the car to ensure that the
(ABS).
safety features may cause system malfunction.
car has excellent active safety and passive safety.
Before installing any accessories, you should
Therefore, in order to maintain the excellent
be aware of:
characteristics of the car, please be sure to
Make sure that the attachment does not cause
contact BAIC Auto Special Dealer before
the lights to dim or affect the normal handling
installing accessories or replacing parts.
or performance of the vehicle.
It is recommended that you always use
accessories and parts approved by our company.
If you install parts that are not approved by our
company, we will not undertake the quality
guarantee.
Parts and modification
133
Warning
Warning
● Improper modification or improper
● Modifications to the front of the vehicle
installation of the vehicle can easily lead to
and the engine compartment may deteriorate
2
malfunctions
and
accidents.
It
is
the pedestrian protection of the vehicle and
recommended to always use the accessories
violate road driving regulations.
and parts approved by the company, because
the adaptability, reliability and safety of the
above accessories and parts have been
strictly verified by our company.
● Improper modification or repair of the
vehicle may impair the protection of the
airbag, resulting in system failure and fatal
accidents. Accessories such as beverage cup
holders, telephone holders, etc. must not be
mounted or attached to the enclosure of the
airbag module or within the scope of the
airbag.
● Improper operation or modification of
the vehicle will affect the function of the
airbag system and cause serious injury or
death.
● Do not install wheels and tires that are
not approved by our company.
3. Driving guide
Start and drive
135
Transmission system
145
Braking System
146
Parking assist system
160
Driving skills
164
Start and drive
135
● When the button is pressed for the first time:
Start and drive
Tips
the “RUN” mode is turned on, the meter is lit,
and all the powered devices such as the display
● Automatic transmission model: The shift
Start/stop button
are in the on state;
lever is in the P or N position and the brake
● When the button is pressed for the second
pedal must be depressed to start the engine.
● Manual transmission model: The clutch
3
time: “ACC” mode is turned on, and the
accessory circuit such as radio and cigarette
pedal must be depressed to start the engine.
lighter is turned on.
For safety reasons, it is strongly
recommended to place the shift lever in the
● When the button is pressed for the third time:
neutral position before starting the engine.
Returns to the "OFF" mode.
● Pressing the start/stop button allows the
Press the start/stop button one by one to cycle
engine to start or switch the power mode, but
through the three modes “OFF” → “RUN”
the smart key must be placed in an effective
→ “ACC”.
area that the vehicle can detect.
Steering system
1. Do not leave the steering wheel in the dead
position (left or right) for more than 15 seconds,
which will damage the power steering system.
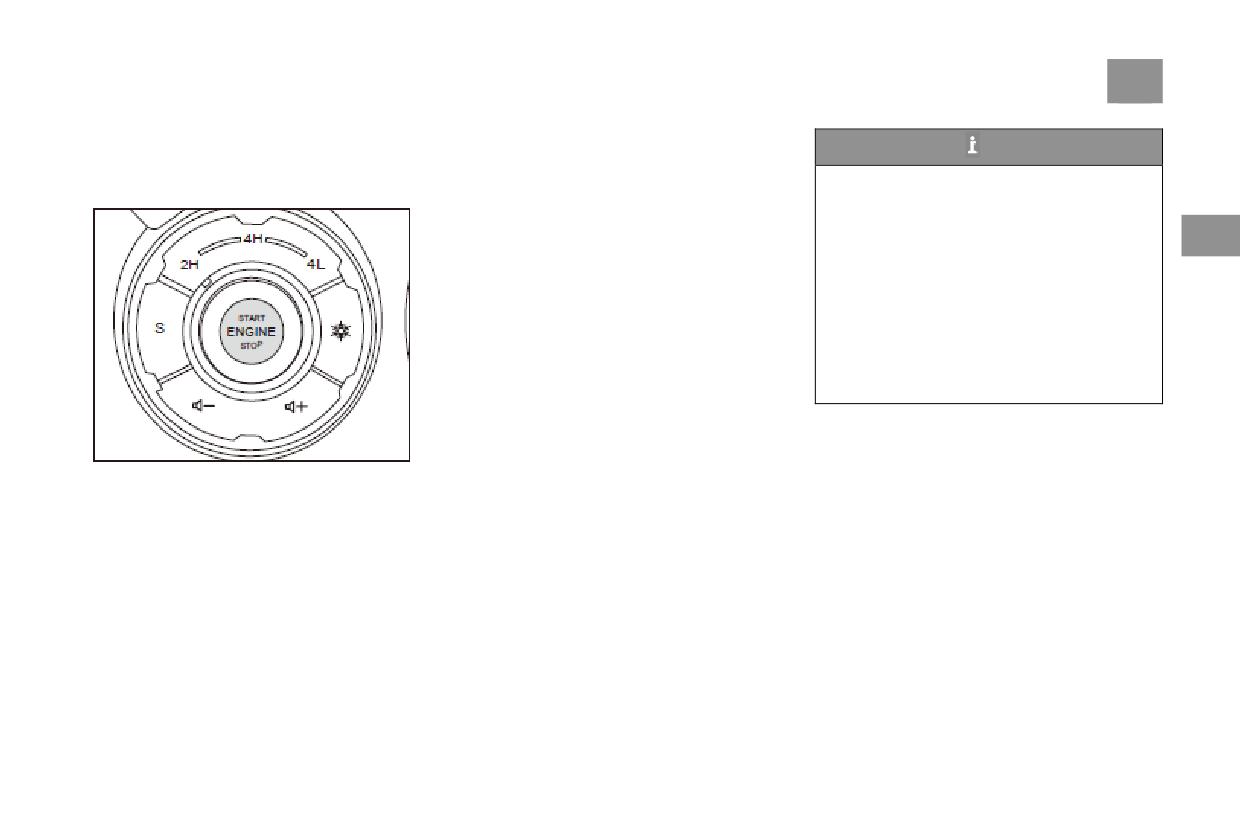
The start/stop button is located in the middle of
2. For cold zone users whose temperature is
the air conditioning vent of the center console.
below -20 °C, the steering fluid needs to be
Power mode switching:
replaced with a special low temperature
Automatic transmission: Put the shift lever in
resistant steering fluid at the authorised
the P or N position with the brake pedal
dealership.
released;
Manual transmission: When the clutch pedal is
not pressed; press the start/stop button, the
power mode will switch in the following order:
136 Start and drive
Electrical anti-theft function
Smart key standby starting function
Emergency stop function
Electronic anti-theft function is used to prevent
If the vehicle is in a strong signal interference
Emergency shutdown mode can be used when
others from illegally stealing vehicles.The
area, or the battery of the intelligent remote
normal mode fails to shut down the engine.Step
transceiver chip in the remote key is equipped
control key is low, when you press the start/stop
on the brake, and press the start/stop button
with an electronic code that is sent to the
button to try to start the vehicle, the display
twice or long press the start/stop button 2s
3
vehicle.The engine can only be started if the
screen of the driving computer on the meter will
within 2s continuously to shut down the engine.
chip's electronic code matches the vehicle's ID
display "no intelligent key found", at this time,
Start engine
code.If you use an incorrectly coded key (or
the standby start function should be adopted.
Start the engine with the start/stop
other tool), the engine will not work.
Vehicle with AT
button
Automatic driving lock/ stop unlock
Put the gear in the "P/N" position, press the
When the intelligent key is within the effective
When all the doors are locked, after unlocking
brake pedal, put the smart key into the
detection range, the starting method of the
the door with the smart key, no one of the four
designated key identification position in the cup
vehicle equipped with start/stop function is as
doors and two doors has been opened within 30
holder, and press the start/stop button to start the
follows:
seconds, and the central door lock will
engine.
Manual transmission model:
Vehicle with MT
automatically lock.When the vehicle speed is
●Press the clutch pedal to the bottom and hold
higher than the set value, the central door lock
Put in neutral position, press the clutch pedal,
it;Put the shift lever in neutral position;
will automatically lock all doors.When the
put the smart key into the designated key
●Press the start/stop button to start the engine.
vehicle stalls, the doors unlock automatically.
identification position in the cup holder, press
the start/stop button, and start the engine.
Start and drive
137
Automatic transmission model:
Warning
Caution
Press the brake pedal to the bottom and hold it;
Put the shift lever in the position of P or N;
When starting a cold engine, it takes several
●Do not start or run the engine in a poorly
Press the start/stop button to start the engine
ventilated place or enclosed room.Because
seconds for the oil to reach the normal
the engine exhaust is colorless odorless toxic
working pressure, which may cause running
Tips
noise.
gas, can cause coma and even asphyxiation
3
●If the engine does not start successfully
death.
Vehicle start
within about
10 seconds, release the
●Do not leave the vehicle unattended while
Idle speed and engine coolant temperature.The
start/stop button and wait 10 to 15 seconds to
the engine is running.
engine idle speed gradually decreases to normal
repeat the normal start procedure.
idle speed with the increase of coolant
● Do not start the engine with a start
●If multiple starts are unsuccessful, please
temperature.In cold weather, it may take longer
assist.Otherwise, explosion or high speed
go to Authorised dealership to check the
for the engine to idle from high to low.To start
engine operation may occur, causing
vehicle for troubleshooting.
casualties.
at a high idle speed, run the engine for at least
15 seconds.At the same time, release the clutch
●To prevent damage to the starter, start the
pedal or brake pedal at a speed not too fast, in
engine for no more than about 10 seconds at
case the vehicle suddenly forward and cause an
a time, and wait 10 to 15 seconds before
accident.
starting again.
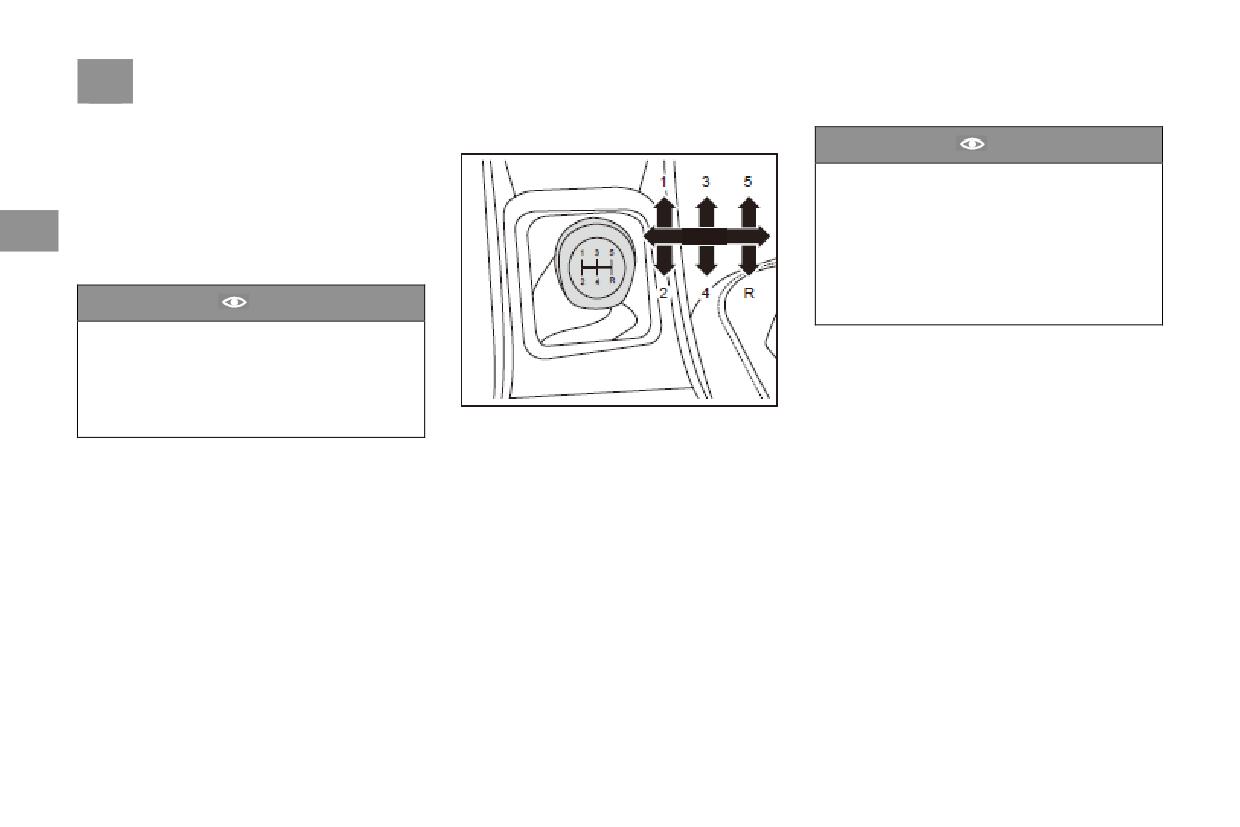
138 Start and drive
Shut down the engine
MT *
Caution
Stop the car, apply parking brake, put the shift
lever in neutral, automatic transmission should
● Don't try to start the engine when the
be placed in P, release the brake pedal or clutch
transmission is in gear, because the car may
pedal, press the start/stop button, shut off the
move.
3
engine.
●Before starting the engine, make sure that
Put the start/stop button in "ACC" position and
the shift lever is in neutral position.
the engine will stop
●Do not start the vehicle in a gear other
than 1st and reverse to avoid damage to the
Caution
engine, gearbox and clutch.
After a heavy load operation, it is
recommended that the engine run at idle for
a few minutes before shutting down.This
allows the cooling system to continue
working to lower the temperature of the
Press the clutch pedal to the bottom and start the
engine.
engine.Shift the transmission lever from neutral
into "1", slowly lift the clutch pedal, and the car
starts to drive
When changing gear, be sure to step on the
clutch pedal to the end, after changing to the
next gear, should slowly release the clutch
pedal.
Start and drive
139
Vehicle speed recommend
Corrective operation for MT
When the vehicle is running or the engine is
speed(km/h)
Shift with gentle force, avoid excessive force,
idling, do not put your foot on the clutch pedal,
gear
lest the clutch overheat or even damage.
normal
acceleration
prevent damage to transmission gear.
Do not put your hand on the shift lever all the
Do not use "half clutch" method to stop the car
1 st
5-20
0-30
time when the car is running, to avoid premature
on the slope, so as not to damage the clutch.
2 st
15-40
20-60
wear of the shift fork.
When changing gears, the clutch should be fully
3
3 st
30-70
40-100
Switch from forward to reverse, or from reverse
pressed down to avoid damage to the
4 st
50 以上
70-150
transmission or clutch.
to forward, and be sure to stop completely to
5 st
70-140
-
When the vehicle is stuck and needs to be hit by
avoid damaging the transmission.
Do not use low gear for long periods of time at
forward and reverse gear rotation, the vehicle
speed should not be more than 25km/h to avoid
high speeds, so as not to reduce engine
Tips
damage to the transmission system.
life.When the vehicle in a gear at a high speed,
Forced gear reduction: the vehicle speed
do not force into a low gear, so as not to damage
Warning
shall not exceed 50km/h when shifting to
the engine or transmission.
second gear;The speed should not exceed
When slowing down or going uphill, do not
●Don't glide downhill in neutral or turn off
30km/h when changing gears.
overload the engine or drive too slowly in a
the engine.When slowing down or going
certain high gear.The engine should be shifted
uphill, do not overshoot the engine
to a lower gear to avoid overheating.
To drive too slowly under load or in a high
gear.The engine should be shifted to a lower
gear to avoid overheating.
●Don't drive too fast in reverse.
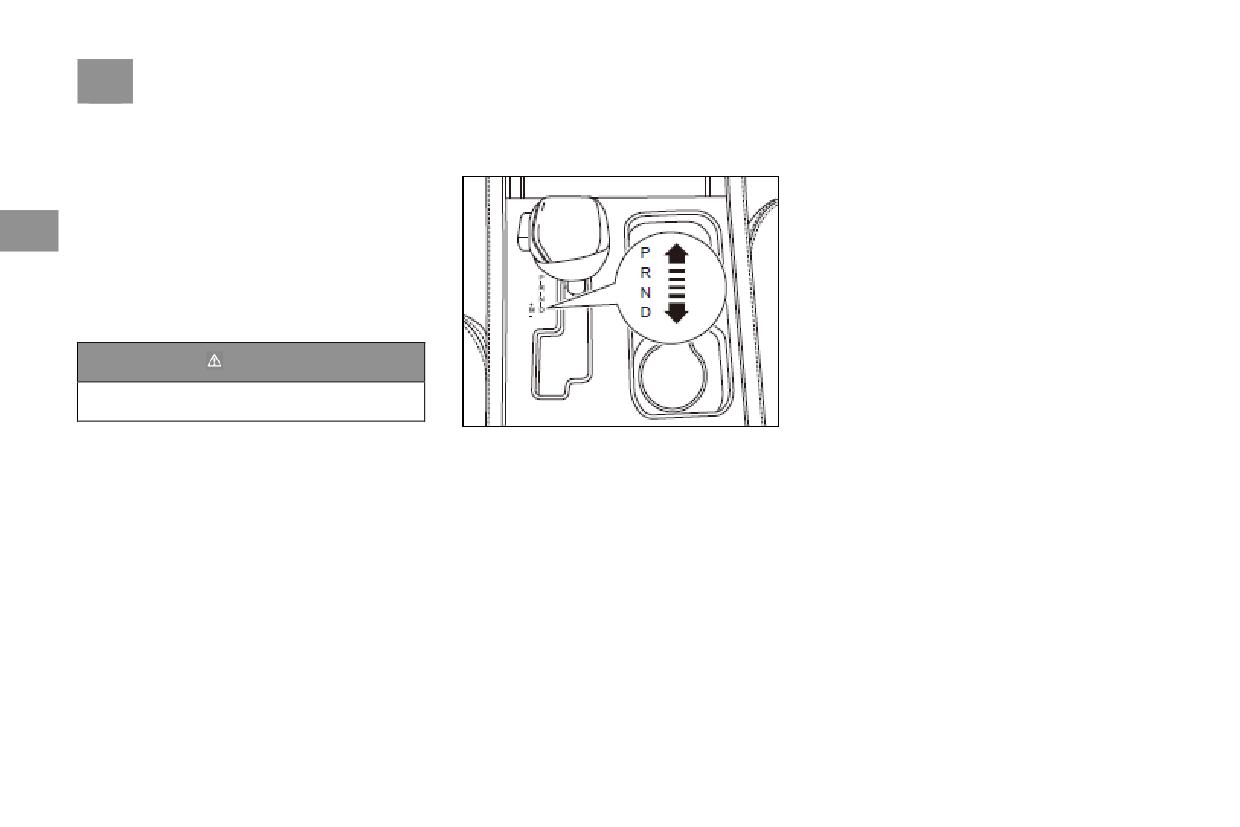
140 Start and drive
Reverse gear
Driving instruction
●The automatic shift control mechanism has a
When the engine is running, the clutch pedal
AT* gear instruction
P lock structure, which means that the gear can
should be pressed to the end before hanging the
only be moved from P when the brake pedal is
reverse gear, pause for a moment and then put
pressed down and the vehicle is powered up or
the shift lever into reverse gear. Otherwise, the
started.
3
gear will crash when hanging the reverse gear.
"R" (reverse):
Once the gear is put into reverse gear, the
●When the vehicle is in "R" gear, make sure
reversing indicator will be lit up, and the
that it is completely stable. When the vehicle is
instrument will issue a prompt sound.For
in "R" gear from "P" or "N" gear, the brake
information on reversing radar systems, page
pedal must be pressed to the bottom. When the
160, reversing radar systems.
vehicle is in "R" gear, the reversing light will
automatically light up.
Warning
"N" (neutral):
Put the car in reverse only when it has
●Choose "N" when the vehicle is completely
stopped.
stationary and the engine needs to be idling for a
short period of time, such as waiting for a traffic
●The gear shifting control mechanism is a step
signal.In neutral position, transmission is not
gear shifting type. According to the gear
locked, must use parking brake or pedal.
changing prompt on the gear changing panel,
"D" (driving gear):
the gear shifting operation is carried out in a
●Generally, this gear is used when the vehicle
specific direction.
is
driving forward. The system will
●Only after the vehicle is safe and stable, and
automatically put into high or low gear
the brake to the bottom can be put into or out of
according to the engine load and speed.
"P" gear.
Start and drive
141
"M" (manual) :
●Put the shifter lever in its other gear from
Caution
●When shifting the shift lever from "D" to "M",
"N", leaving the engine idling.
the transmission will enter the M gear mode,
●According to the change of resistance (such
●When driving in manual mode, the vehicle
and the dashboard will display the current actual
as traction, climbing a long slope, etc.), the
will not automatically shift up. Please also
gear M, push forward and backward through the
vehicle will start the corresponding gear shift
pay attention to the speed and load of the
shift lever, and then enter the manual mode, and
process, by changing into a lower gear to
vehicle to shift up timely, otherwise the
3
the dashboard will display the corresponding
provide greater power to the vehicle.This
engine and automatic transmission will be
actual gear.
prevents frequent gear changes.
damaged.
Driving operation:
●A cold engine starts at a high speed, so be
●When the car is being towed, remove the
●Press the brake pedal to the bottom, put the
careful when you put it into "D" or "R"
drive wheel from the ground.
shift lever in P/N, and start the engine.
before the engine warms up.
●Step on the brake pedal, put the shift lever
●Before starting the engine, make sure the
into "D" and enter the normal shift procedure.
gear is in "P" or "N". Do not try to start the
● After the vehicle is put into gear, the
engine in other gears.
electronic parking brake is released first, and
then the brake pedal is released and the
accelerator pedal is pressed slowly. The vehicle
can start to drive.When parking, press down the
brake pedal, stop the vehicle, apply parking
brake, and put the shift lever into "P" gear.
142 Start and drive
Shift gear display *
●Always apply parking brake until you are
Warning
On models equipped with automatic
ready to drive away. Remember that once you
●The driver must carry the remote control
transmissions, the shift position display in the
have selected the driving gear, the automatic
key with him when he leaves the
assembly instrument will show the current shift
gear will slow forward or backward.
car.Otherwise, people who stay in the car
position of the shift lever.
●
After selecting the driving gear and the
3
may mistakenly start the engine or electrical
The gear character on the gear shift panel has
engine is running, do not keep the vehicle
equipment, causing serious injuries.
the function of displaying with the gear, that is,
stationary (always choose "N" if you need to
●Be sure to apply parking brake when
when the gear shift lever is in a certain gear
idle for a long time).
stopping.If parking, do not leave anyone in
position, the character of the gear position is
● Vehicles in the wet slippery road, should
the vehicle, otherwise it may inadvertently
backlit and displayed.When the shift lever is in
choose snow mode to start.Specific operation:
remove the parking brake and cause the
any gear position of manual mode, M, M+ and
after the vehicle stops completely, put the gear
vehicle to move.
M- gear characters are backlit.
lever into the D gear, press the button on the
●When parking or stopping with the engine
How to use automatic transmission
center console, enter the snow mode, step on the
running, be careful not to press the
The following information is especially
accelerator slowly, and start driving.
accelerator pedal for too long.Otherwise, the
important for drivers unfamiliar with vehicles
engine or exhaust system may overheat and
equipped with automatic transmissions.
cause a fire.
Start the
●Do not park vehicles near inflammable and
●The engine can only be started when the shift
explosive objects, pay attention to the
lever is in "P" or "N".
direction of vehicles, do not make exhaust
●The brake pedal should be pressed before
spray to plants and damage the green belt.
starting the engine.
●When "D" or "R" is selected and the vehicle
is stationary, do not allow the engine to run at
high speed.
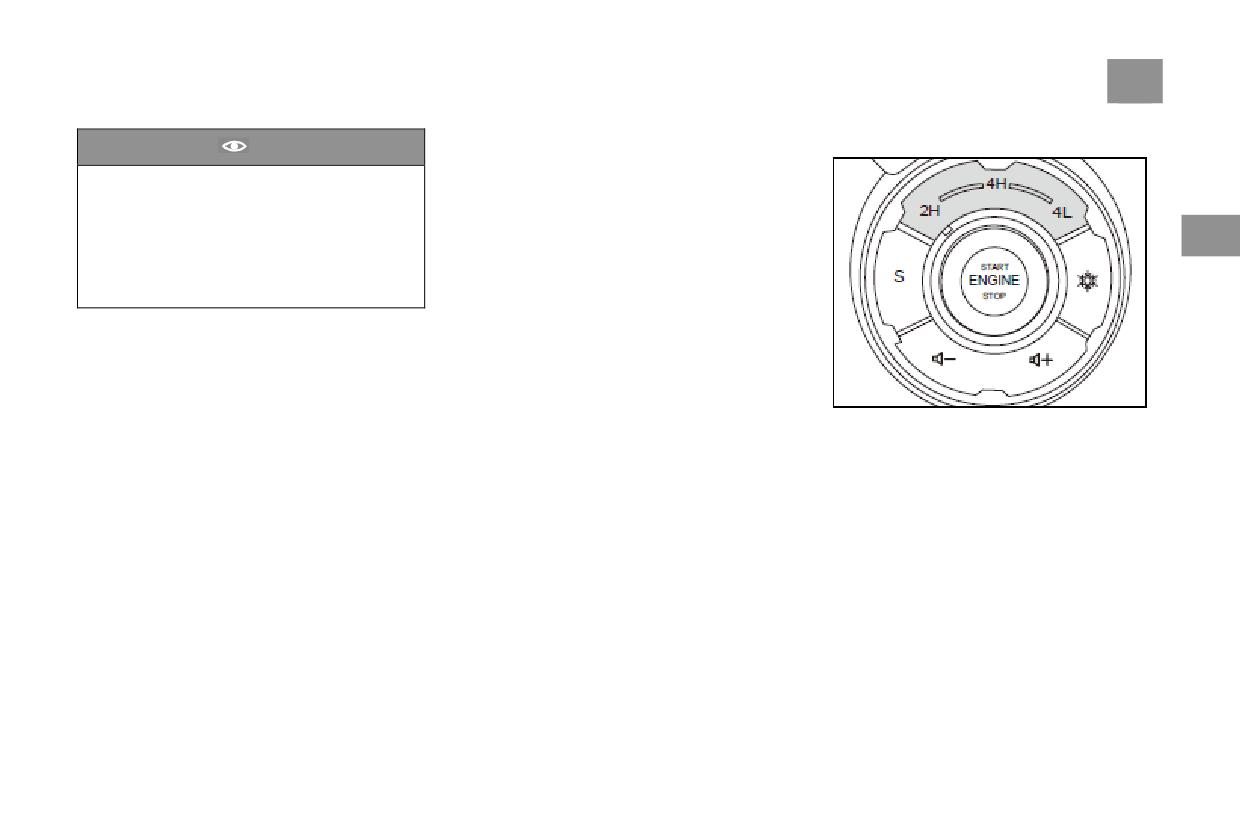
Start and drive
143
Reverse
Electric transfer Case
Caution
1. Park the vehicle steadily
●Do not put the vehicle into "P" or "R",
2. Press the brake pedal and put the shift lever
otherwise the transmission will be seriously
into the "R" position
damaged.
3. After putting into "R" gear, slowly release the
● When the vehicle is driving, especially
brake pedal and drive in reverse gear.
3
when idling, please do not slip into neutral.
In reverse
●When the vehicle is parked for a long time,
● the reversing lights are on
please hang the "P" for parking brake.
● reverse rear-view system starts
Special case in which transmission functions
automatically and displays the reverse image in
are limited
the multimedia display screen (suitable for some
When the transmission hardware, CAN
car models)
communication or TCU work failure, the
● when the reversing radar is started and
vehicle function limits the use, enters the
approaching an obstacle, it will be prompted by
corresponding limping mode (the vehicle may
the sound alarm of different frequencies (see
This vehicle is equipped with electric
not be able to lift the gear normally, or fixed in
"reversing radar system" on page 160).
four-wheel drive transfer box, which has the
a specific gear, etc.), and through the TCU fault
following gears:
indicator light or text on the meter to warn.The
2H: two-wheel drive, rear wheel drive, used in
vehicle can continue to drive, it is suggested to
normal driving conditions, no need for
repair as soon as possible.
four-wheel drive driving.
4H: four-wheel drive high-grade, four-wheel
drive, can be used for a short time for rain, snow,
mud, gravel or general off-road road surface,
not allowed to use on dry or paved road surface.
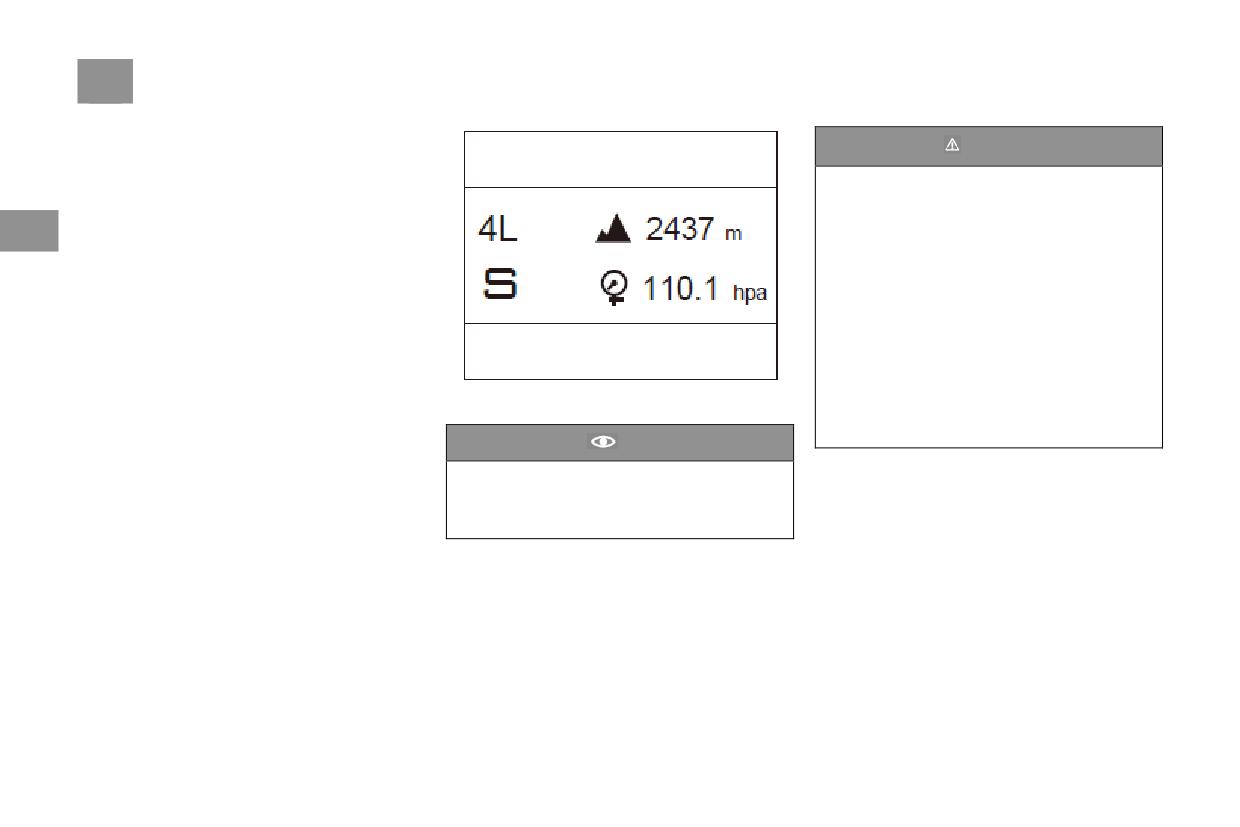
144 Start and drive
4L: four-wheel drive, low-gear, four-wheel
Warning
drive, can be used for a short time on off-road
roads requiring low speed and high traction. It is
● if the transfer gear is not fully engaged, it
not allowed to be used on dry or paved roads.
may cause damage to the transfer or the
Switch gear
vehicle loses power and control, resulting in
3
Switch between 2H and 4H
personal injury accident
During the driving process of the vehicle (the
● do not use four-wheel drive mode in dry
required speed is less than 30km/h), the driver
hard road for a long time.
can switch between 2H and 4H at will without
● if abnormal vibration of chassis is found
stopping the vehicle, but should be in a straight
when turning, please check whether the
and uniform speed.
transfer gear is not placed in "2H".
Switch between 4H and 4L:
● use 4L only when additional traction is
1. Stop and keep the engine running;
required, and do not use 4L for long periods
2. Press the clutch pedal or move the
The upper left position of cluster displays the
of time.
transmission lever to position N;
current shift position
● the driving speed of vehicles in four-wheel
3. Turn transfer transfer switch to 4L or 4H
drive mode shall not be higher than 60KM/H
gears.Note: for MT models, don't lift the clutch
Caution
until transfer is completed;In the process of gear
In order to avoid parts failure caused by
changing, the target gear blinking, after the
incorrect operation, this model does not
completion of gear changing, the target gear is
support the vehicle to install wheel side
always bright.
clutch!
Transmission System
145
The following will cause transmission parts
Transmission System
Caution
failure,
When entering the off-road zone, drive
1. Depress the brake pedal and accelerator pedal
General descriptions
slowly and do not exceed 25km/h.
at the same time, and lift the clutch.
Improper operation of the driver on off-road
Avoid sudden acceleration, to prevent the
2. The front wheel encounters a large obstacle,
road will cause abnormal damage to the
wheel suddenly violent rotation, resulting in
depress the accelerator pedal in a hurry to get
3
transmission system.
idling skid
out of the jam.
Operation requirements (steep slope, uneven
When the vehicle is released from the jam, it
3. The wheel flips out and slams on the gas
mountain area, muddy road section):
1. Four-wheel low-gear drive, maintain stable
is forbidden to accelerate sharply or lift the
pedal.
clutch suddenly.
4. Kill the steering wheel at the same time, one
throttle.Drive slowly, not exceeding 25 km/h.
side of the wheel under stress (such as: a step or
2. Avoid rapid acceleration and violently lift the
clutch to avoid abnormal damage to the
pit) drive axle stress is too large.
transmission system.
3. Once the vehicle cannot get out of the jam by
itself, do not force the operation.Please call for
help immediately.
146 Brake system
At this point, the foot should be removed from
Vehicles will also travel 20 meters, too far in an
Brake system
the accelerator pedal and should be shifted to a
emergency.So it's important to have a good
Geeral descriptions
lower gear to use the engine to assist braking.
distance from other cars.
After passing through deep water, the brake
Of course, the actual braking distance varies
Disc brakes are installed on all four wheels of
must be checked.Step on the brake moderately,
greatly depending on the road surface (highway
the vehicle.The booster helps reduce the force
3
see if it feels normal.If abnormal, should
or sand road), road conditions (wet, dry, icy),
required to the brake pedal.
frequently light step on the brake until it returns
tire tread, brake condition, vehicle weight and
The driving brake system has two sets of brake
pipes.One line failed and the other stopped the
to normal.
brake force size.
vehicle properly.However, the brake pedal must
The braking operation includes sensing time and
Avoid slamming on the brake pedal
reaction time.
unnecessarily.It is wrong for some drivers to
be pressed harder than usual.Go to Authorised
First, to decide whether to step on the brake
drive too hard, such as slamming on the
dealership for maintenance as soon as possible.
pedal, this is the feeling time.Then you have to
accelerator pedal and then the brake pedal,
Placing the foot on the brake pedal while the
vehicle is in motion will cause the brake to
lift your foot and press the pedal. That's the
rather than keeping pace with traffic.The brake
operate slightly and generate heat, thereby
reaction time
has no time to cool down between successive
The average reaction time is about three
emergency braking, and if the brake pedal is
reducing brake effectiveness and shortening the
quarters of a second.But that's just the average
frequently slammed, the brake wear will be
life of brake friction pads and reducing fuel
time. Maybe one driver's reaction time is shorter,
accelerated.Keeping pace with the flow of
efficiency.Braking lights on all the time can also
cause confusion among rear drivers
but the other driver's reaction time is two to
traffic and keeping a certain distance will
When going down a long slope, continuous use
three seconds, or even longer.Age, physical
greatly reduce unnecessary braking, which will
condition, alertness, coordination and vision all
improve braking effect and extend brake life.
of the brake will make it accumulate heat,
affect reaction times, as do alcohol, drugs and
thereby reducing the effectiveness of the brake
depression.Even though the reaction time is
about three-quarters of a second, when the
vehicle speed is 100km/h,
Brake system
147
If the engine flameout in the road, should take
Influence factor for braking effect
In rainy days and wet slippery road driving,
the normal brake but do not use the inching
1. Wear
should control the speed, prevent skidding; In
brake, otherwise the brake pedal will be more
The wear of brake friction plates depends
the encounter of water, should be low uniform
laborious. Even if the engine stalls, there is still
largely on the mode of use and driving
speed through. After passing through the section
some brake power available for braking, but it is
conditions, especially for those cars that often
with deep water, because the brake friction disc
used when braking. Once the brake assistance is
and brake disc will be soaked by water,
drive in urban traffic and short distances or
3
exhausted, the braking time will be prolonged
drive in sports mode. Therefore, it is very
affecting the braking effect, to lightly step on
and the brake pedal will be more laborious.
necessary to check the thickness of brake
the brake several times, so that the brake parts
friction plate in Authorised dealership within
to maintain dry recovery performance.
the specified time interval.
In the salt road, if there is no braking for a long
time, the braking effect will be delayed and
In downhill driving should be timely change
delayed, so it is necessary to remove the salt
low gear, so as to use the engine brake power,
so as to reduce the brake load. If you want to
layer on the brake disc and friction plate.
increase the braking force, do not continue
3. Plateau environment
braking, but should be interrupted braking.
Due to the long mountain slope in the plateau
area, the brake has a high use frequency, a long
Wet /sprinkle salt
In some driving conditions, such as in water or
time and often works continuously under the
rain after driving, or after washing the car,
forced dynamic working condition. All these
because of wet or in winter because of low
factors will make the braking effect worse.
temperature brake disc and friction disc ice,
Therefore, we advise the vehicle not to taxi in
neutral and avoid frequent braking when going
brake action will occur delay lag, must first
downhill. Use low gear to control the speed
brake several times, dry the brakedisc.
through the braking action of the engine itself,
which can reduce the working intensity of the
wheel brake, reduce the brake temperature.
148 Brake system
In the use of engine braking, the lower the
4. Snow and ice
6. Braking system failure
transmission gear, the higher the engine speed,
Due to the low friction coefficient of snow &
If you find that the braking distance suddenly
the greater the drag force, the more obvious the
ice covered surface, the braking distance will be
becomes longer or the brake pedal travel
braking effect.
greatly extended during braking, and the
becomes longer, there may be a fault with the
The plateau region has thin air and low air
braking distance will increase with the increase
braking system. In this case, should
3
pressure, which is different from the
of vehicle speed. Therefore, special attention
immediately drive to the nearest Beijing car
atmospheric pressure of the plain. In plateau
should be paid to control the speed and maintain
dealership repair. During the way, keep the
area, due to the effect on the brake booster
a large safe distance from the leading vehicle or
speed low, adjust your driving style, and apply
diaphragm per unit area of the atmospheric
the lateral vehicle when driving on snow & ice
more force to the brake pedal when braking.
pressure is less than a standard atmospheric
covered surface.
7. Brake overheating
pressure, so the brake power will become
No idling on ice and snow road.
When you do not need to brake, do not lightly
smaller, and produce the same power effect time
5. Surface rust
step on the brake pedal and make the brake
get longer, and this is a normal physical
If the vehicle has been parked for a long time or
"skid", which will lead to overheating of the
phenomena, so when braking in plateau region
you have not used the brake system for a long
brake, extend the braking distance and increase
need to put greater brake pedal force. When
time, then the brake disc friction plate may
wear.
braking is needed, do not slam on the brake
develop rust, and the friction plate may develop
If spoiler, wheel trim plate, etc., must not affect
pedal many times, but keep the foot on the
dirt. We recommend that you clean the brake
the flow of air to the front brake, otherwise the
brake pedal to ensure the braking effect by
disc several times before driving.
brake will overheat.
controlling the brake pedal force.
149
Brake system
The brake pedal
Brake system status and brake
Warning
Do not place thick MATS or other foreign
system failure
objects near the brake pedal. This will affect the
Do not drive a vehicle with worn brake pads,
Warning lights
travel of the brake pedal in an emergency.
which can make braking difficult and may
When parking brake is applied or the brake fluid
Ensure that the brake pedal is fully operational
lead to accidents
level is below the specified level, the brake
under all circumstances.
3
warning light will be on. Before driving, the
Do not rest your foot on the brake pedal when
parking brake should be completely released
braking is not required. Otherwise, brake
and the brake warning lights should be off. If
temperature will rise, brake disc premature wear,
the brake warning lights come on while the
or even damage the brake.
vehicle is in motion, this means that the brake is
Brake friction pad
less effective. Park the vehicle in a safe place
Disc brakes with warning devices emit a squeal
by:
of metal friction when the brake pads wear out
● if the brake pedal is pressed, when the
to the limit. If you hear this sound, go to
braking effect is weakened, press the brake
Authorised dealership as soon as possible to
pedal with more force.
replace the new brake friction pad.
Emergency braking should be avoided as far as
possible during the first 200km of driving after
replacement of the friction pad.
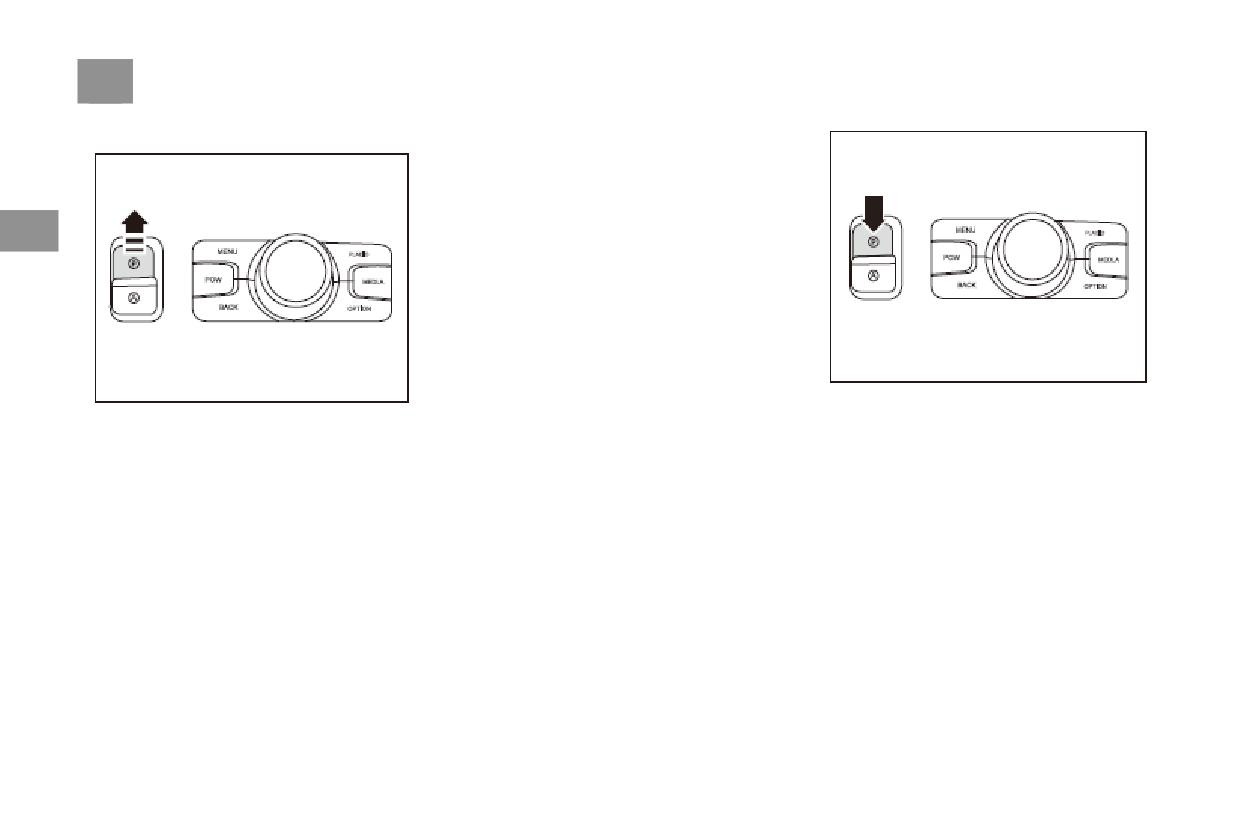
150 Brake system
Electric parking brake (EPB)
when the start/stop button is placed in "OFF"
mode, the vehicle will park automatically, and
then the red parking light on
Apply Secondary electronic parking:
In some special cases, the second clamping of
3
brake calipers can be realized by putting the
start/stop button in "RUN" mode and pulling the
electronic parking switch button upward along
the arrow direction for 3 seconds when the
vehicle is already parked.
Manually release electronic parking:
Manually apply electronic parking:
When the start/stop button is in "RUN" mode,
When the vehicle is in a stationary state and the
press the brake pedal and push down the
start/stop button is in the "RUN" mode, pull the
electronic parking switch button along the arrow
electronic parking switch button upward along
direction to release the electronic parking brake.
the arrow direction to apply the electronic
At this time, the red parking light on the
parking brake and prevent car slipping. At this
combined instrument is off
time, the red parking light on the instrument
cluster will be on.
Automatically apply electronic parking:
The vehicle is in any gear and
Brake system
151
Caution
Caution
Caution
● if the brake pedal is not pressed, push
● when transfer box is at 4L, transmission
● When the start/stop button is in the
down the electronic parking switch, the
is on D /R transmission; if EPB is used for a
"OFF" state, if the electronic parking is in
electronic parking will not release. cluster
long time, the combined instrument display
the release state, the parking can be realized
display prompt "please brake.
will prompt "if long"
by pulling up the electronic parking switch
3
● after the automatic gear stops, apply the
● if two or more wheel speed sensors fail,
for 3 seconds.
electronic parking first, and then put the
the start/stop button in the "RUN" state
● when the yellow indicator light on the
shift lever in the "P" position.
cannot stop by pulling up the electrical park
cluster is on, it means that the electronic
● in some special cases, if the electronic
to realizes parking. The cluster display
parking system fails. Please contact
parking brake is not required , the electronic
indicates "if parking, please turn off the
authorised dealership
parking switch can be pushed downward and
engine and pull the EPB switch long”. When
Vehicle maintenance.
hold on more than 3s before turning off the
start/stop button In the "OFF" state, pull up
start/stop button, then the vehicle will not
the electronic parking switch for 3 seconds to
apply brake.
realize parking.
152 Brake system
Automatic release of electronic parking:
ABS anti-lock brake system
ABS working mode
First make sure the doors are closed and fasten
Anti-lock braking system (ABS) can prevent the
When the vehicle speed reaches about 20km/h,
the seat belt well.Shift from P or N to D or R,
wheel from locking when the vehicle is braking,
an automatic detection process is started.You
step on the accelerator, and the electronic
which will ensure the vehicle's controllability
can hear the pump running.
parking will be automatically released.
and directional stability during braking.
ABS can't shorten the braking distance on
3
The main function of ABS anti-lock braking
gravel and icy roads, but it retains some steering
Caution
system is to improve the active safety when
control because the wheels don't lock
● make sure the driver's safety belt is
driving.ABS will automatically adjust the
completely.
fasten, otherwise parking automatic release
braking pressure of each wheel.Before the
It is normal to feel the brake pedal shake and
function cannot be realized.
wheel is about to lock, the brake pressure
hear the click sound when ABS system is
● if the driver does not fasten the safety
decreases automatically, and then increase the
working.If the speed range of a wheel is too low
belt, the cluster display will prompt "please
brake pressure to the wheel until it is about to
relative to the vehicle speed and tends to lock,
fasten the driver's safety belt to release the
lock.The electronic components of the brake
ABS will reduce the braking pressure on the
electronic handbrake".
system receive signals from the wheel speed
wheel.This adjustment process can be detected
sensor, which accurately contain the speed of
by the brake pedal noise.As a driver, you know
wheel rolls.This information is continuously
that the wheels tend to lock (ABS range).At this
processed to adjust brake pressure as accurately
point to continue to keep the brake pedal
as possible.Braking pressure can be adjusted up
completely down, steering the vehicle out of
to 12 times per second, but ABS cannot be
danger.
expected to shorten braking distance in all
cases.For example, on gravel or freshly fallen
snow surfaces, braking distances can be long,
even if you drive carefully and slowly.
Brake system
153
Before the vehicle stops or danger situation ends,
ABS warning lights
Warning
must not loosen the brake pedal! The brake
ABS integrates a monitoring system to check all
pedal cannot be repeatedly pressed, which will
system related electrical components in real
After the failure of ABS system, the normal
stop ABS work and may increase the braking
time.
braking system will still work and will not be
distance.
When the anti-lock braking system fails, the
affected by the loss of ABS function, but the
If the road is slippery, ABS is enabled even
braking
distance
will
increase
ABS warning lamp will be on. When the
3
when the brake pedal is lightly pressed, which
start/stop button is in the "RUN" position, the
correspondingly.
allows the driver to obtain information about
light will be on for 2~3 seconds, and then off.
road characteristics through braking and then
Make sure the lights go off before the vehicle
adjust his driving style.
moves.
When the ABS warning light is on during the
Warning
driving process, do not make emergency
ABS braking system cannot violate the
braking, or the vehicle may have the risk of
principles of physics. So get into good driving
unstable driving. Be sure to gently press the
habits and don't take advantage of the ABS
brake pedal and park the vehicle in a safe place.
system to drive too fast.
Restart the engine and check if the warning
To get the shortest possible braking distance
lights go off after a few minutes of driving. If
and improve track stability on dry and wet
the warning lights are off during driving, there
roads, brake as hard as possible and conduct
is no problem.
emergency avoidance operation as needed.
If the warning light is not off, or if the warning
light is on again while driving. Please go to
Authorised dealership to repair the vehicle as
soon as possible.
154 Brake system
ABS system daily maintenance
● high water content of brake fluid will not
EBD electronic braking force
ABS system is composed of mechatronic
only cause bad braking due to evaporation of
distribution system
components, with high reliability, usually
water, and may corrosion of the braking system,
Automatically adjust the braking force
without regular maintenance. The following
leading to ABS performance decline, so, should
distribution ratio of front and rear axles to
be replaced regularly, generally at least two
points are helpful to improve the performance of
improve braking efficiency (to a certain extent,
3
the system and further reduce the failure rate of
years replacement.
it can shorten the braking distance), and
the system:
● When the ABS warning lamp:
cooperate with ABS to improve braking
● ABS ECU is composed of precision
1. Keep ON
stability.
electronic parts, strong collision and knock easy
2. Light up for a long time during driving
to damage the electronic parts, therefore, try to
3. When the start/stop button changes from
avoid ECU by collision.
"OFF" state to "RUN" state, the ABS alarm
● do not let oil pollution to ABS electrical
lamp on the combined instrument does not work
connectors, especially metal terminals, so as not
all the time.
It must be repaired in time. When using the
to cause poor electrical contact.
braking system before troubleshooting, attention
● do not make the wheel sensor contaminated
must be paid to controlling the braking strength
with oil or other debris, especially in the gear
to avoid wheel lock.
ring position near.
Brake system
155
ESP electronic stability system *
ESP improves control of the vehicle at its
The ESP indicator
ESP can effectively reduce the risk of sideslip.
dynamic limits, such as acceleration and corners.
When the start/stop button is located in the
The ESP only works when the engine is running.
It can reduce the risk of sideslip in all road
"ON" position, the ESP indicator in the
In exceptional circumstances, ESP functions can
conditions, thus improving the driving stability
combined instrument will light up, and the
be disabled, such as:
of vehicles.
self-inspection will begin, indicator will be off
In the electronic stability system, it also
after self-checking
3
● When the vehicle is equipped with anti-skid
integrates anti-lock braking system (ABS),
If the ESP light flashes during driving, the ESP
chains.
electronic braking force distribution system
system is currently operating.
● driving on deep snow or soft roads
(EBD) and traction control system (TCS), ramp
If the ESP light does not go out after the
● When a vehicle is stuck somewhere (e.g. on
auxiliary function (HHC), HBA, HDC, anti-roll
self-inspection or continues to light during
a muddy road) and has to move back and forth
(RMI), AUTOHOLD
driving, the ESP system is defective and the
In the absence of these conditions, the ESP
vehicle should drive at a low speed to the
electronic stability system should be turned on.
nearest Authorised dealership for maintenance.
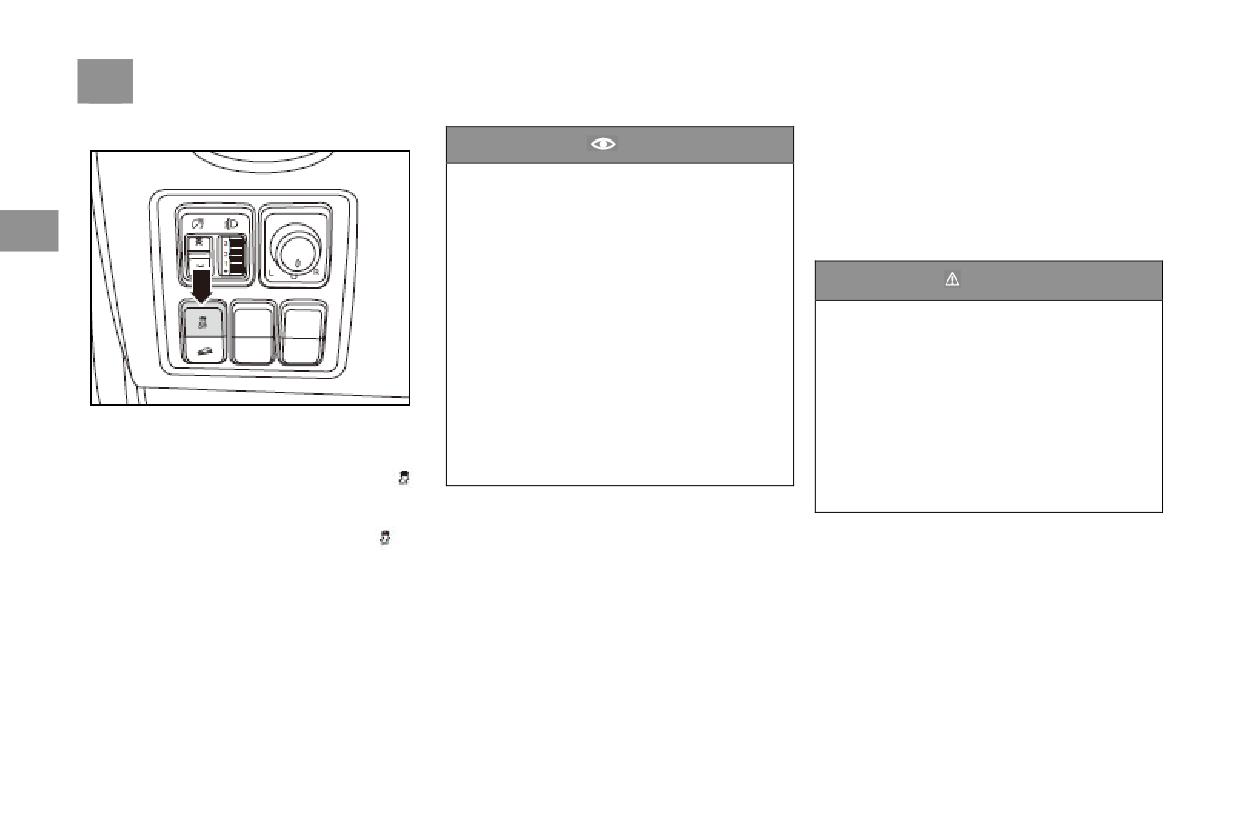
156 Brake system
ESP OFF Function
Transfer case 4H/4L: ESP OFF indicator light
Caution
is automatically on, indicating that the ESP
● Transfer case 4H/4L,Press ESP OFF
system is in partial functional state, including
button fleetly< 3s,It is only for switching
ABS, EBD, TCS, HHC, HBA and HDC. Hill
off ESP and Torque Control with
descent function. While ESP system is in
3
TCS ,Retain other functions.
service, ESPOFF indicator light is off and ESP
indicator light
flashes.
● Transfer case 4H/4L,Press ESP OFF
button for a long time (3s-10s),It is only for
Warning
switching off ESP and TCS,Retain other
functions.
Electronic Stability Program (ESP) only
provides limited control on stability of the
●Transfer case 2H:Press ESP OFF button
vehicle during driving, so even when the
< 10s.It is only for switching off ESP and
vehicle is equipped with ESP, you must
TCS,Retain other functions.
adjust your driving method at any time
●When switching off the ESP function by
depending on the road conditions and traffic
Transfer case 2H: it is at default that ESP
pressing ESP OFF button, the ESP function
situation. This is especially important for
function is on.
will be automatically restored and the ESP
driving on smooth and wet pavements. To
Press ESP OFF button to switch off ESP
OFF indicator light becomes off when the
eliminate possibility of accidents, don’t take a
function, and the ESP OFF indicator light
vehicle is driving at speeds above 80km/h.
risk to drive even though the driving safety is
on the combination instrument will be on.
improved with this system.
Press ESPOFF button again to start ESP
function, and the ESPOFF indicator light
on
the combination instrument will be off.
Brake system
157
Traction Control System (TCS) *
Hydraulic Brake Assist (HBA)*
Hill-start Hold Control (HHC)*
TCS can prevent the driving wheel from
The brake assist system is for purpose of brake
In case of grade more than 4°, either to continue
slipping during acceleration.
force optimization. The brake assist system
driving after parking during driving uphill or to
TCS is a part of ESP. Under extremely
helps to improve the brake force and shorten the
reverse after parking during driving downhill,
unfavorable road conditions, start, acceleration
brake distance. When the driver depresses the
the hill-start hold control is automatically
and driving uphill is possible or easier only with
brake pedal very quickly, the brake assist
activated at any time, and within about 0.5~2S
3
the traction control system (TCS).
system will automatically adjust the brake force
after the brake is released, HHC can still
Operation methods of TCS:
to the maximum value until ABS provides
provide powerful brake force to ensure brake of
TCS can automatically function, without
control intervention. Keep depressing the brake
the vehicle so as to prevent the vehicle from
intervention from the driver. It monitors speed
pedal until the required braking is achieved.
sliding and to enable easy driving, and with
of the driving wheel through the sensor of ABS.
Once the brake pedal is released, the brake
elimination of slope sliding trouble, comfort and
In case of wheel slipping, the engine torque will
assist system will be automatically shut down.
control safety will be greatly improved.
be automatically reduced to enable the driving
In case ABS fails, the brake assist system is also
force comply with road conditions, which can
out of service.
be achieved within all speed ranges.
TCS works jointly with ABS. In case of fault to
ABS, TCS is also disabled.
158 Brake system
Hill Descent Control (HDC)*
3. When the driver increases the speed of the
Autohold
vehicle to more than
35km/h through the
HDC enables driving at constant speed during
The auto hold function can help driver to take
driving downhill.
accelerator pedal, HDC exits and is on standby;
off easily on the ramp.After releasing the brake
As an additional function to ESP system, HDC
when the speed keeps increasing to more than
pedal, the system continues to brake, the driver
can be used when the driver hopes to maintain
60km/h, HDC completely exits, and HDC
had enough time to press the accelerator pedal
3
indicator light is off, indicating that HDC is
constant speed (Transfer case 2H/4H, between
to take off, and this function ensures the takeoff
switched off.
8km/h~35km/h; Transfer case 4L, between
convenience at the time of automatic parking
4km/h~35km/h) when driving downhill.
4. When the yellow HDC indicator light is on, it
relief.
HDC operation methods:
is Indicates that the HDC is disabled.Please go
Turn On Autohold
1. Press HDC switch to activate Hill Descent
as soon as possible Beijing auto dealership
When the engine is operating and the driver has
repair vehicles.
Control function, and green HDC indicator light
fasten his seat belt, driver side door closed ,
will be on indicating that HDC function is
Roll
Movement
Intervention
press the AUTOHOLD switch button to activate
activated and ready; press HDC switch again to
(RMI)*
this function.and then the indicator lamp of
shut down HDC function;
auto-hold switch button will go on.
RMI is started when there is overturn potential
2. When HDC is on and the vehicle is driving
Active Autohold
after lateral inclination of vehicle body or height
downhill, if the driver does not perform brake
of the wheel above the ground exceeds a certain
1. When the engine is operating and the driver
operation or acceleration operation and the
limit during driving, or the steering angle
has fasten his seat belt, driver side door
vehicle will beis driving at speeds between
exceeds a certain limit, and it can reduce the
closed,turn on AUTO HOLD ,Depress the brake
4km/h (Transfer case 4L) 8km/h (Transfer case
pedal until the vehicle stops,AUTO HOLD
overturn risks by braking the wheels and
2H/4H) ~35km/h, HDC starts functioning and
function is working,the parking indicator lamp
reducing the engine torque.
the vehicle can remain driving at the initial
on the instrument will turn green.
speed, and at this time, HDC indicator light is
flashing;
Brake system
159
2. The accelerator pedal is depressed during
Autohold Function Auto Exit
take off, AUTOHOLD function is automatically
When the AUTOHOLD function is active, Put it
removed, and the parking indicator lamp on the
in D or R, the accelerator pedal is depressed,
instrument will turn off.
AUTOHOLD auto exit, the vehicle will takeoff.
3. If the accelerator is not pressed after 3 min,
Caution
switch to EPB mode, EPB red parking lights
3
point.
● For MT vehicles,On a level road, pull in
Turn Off Autohold
Neutral,the
accelerator
pedal
is
Press the "AUTOHOLD" switch from function
depressed,AUTOHOLD
function
auto
is off, switch indicator is off.
exit,Please take care of safety.
Autohold Is Forced To Exit
●AUTOHOLD monitors vehicle status,If the
Since the driver's seat belt is unfastened, driver
brake pedal is released after monitoring the
side door opened and Engine shuts down, the
brake Insufficient pressure, ESP will be
auto hold function will be forced to exit.
actively pressurized Keep the vehicle
If AUTOHOLD is enabled, at the same time as
stationary. ESP actively increase Pressure
the driver's seat belt is unfastened, driver side
will generate noise which is the ESP
door opened and Engine shuts down or Press the
electricity pump The working sound of the
"AUTOHOLD" switch, the brake pedal was not
machine is normal.
pressed down, Enter EPB mode, instrument
● When the instrument display prompt
green indicator
"since.AUTOHOLD system failure ", said
Lights off, electronic parking red indicator
AUTOHOLD is disabled. Please as soon as
lights
point.
possible Go to Beijing car dealership to
inspect and repair the car Vehicles.
160 Parking Assist System
Parking Assist System
Display Signal
Left, center and right sensors are composed of
Explanatory Notes on the Parking
four layers set of indicators that shows the status
of obstacles.Each group of display bars
Assist System
independently displays the information of
Four sensors for the reversing radar system
3
measured obstacles,Group to group display
Install the rear bumper,When in reverse,parking
radar system automatically activated.When the
does not interfere with each other.
system is activated,It will check the
When there are multiple obstacles in the
approximate distance from the rear of the
detection range, the nearest obstacle is
vehicle.And based on the distance to the
displayed.
obstacle in the information Display on the
The display bar in zone 4 is red to represent
control screen.And sent by loudspeaker Make
obstacles about 0 ~30 cm from the rear of the
the corresponding prompt sound.
vehicle Within the scope of;
The indicator bar on the central control display
The display bar in zone 3 is yellow to represent
Acoustical Signal
screen is based on obstacles that object is
obstacles about 30 cm ~60 cm from the rear of
The audio alarm signal of parking assist system
displayed in the rear distance orientation of the
the vehicle Within the scope of;
is sent out by the loudspeaker driven by the
vehicle.And the closer the obstacle is to the
The display bar in zone 2 is yellow, representing
central control display.As the distance between
vehicle, the higher the frequency of the sound
obstacles about 60 cm ~ 90 cm from the rear of
the obstacle and the vehicle gets closer, the
signal will be.(the indicator in the figure above
the vehicle Within the scope of;
frequency of intermittent chirping increases.The
Bar signal strength for example, possibly with
he display bar in zone 1 is green, representing
distance between the barrier and the spare tire
actual situation Discrepancy).
obstacles about 90 cm ~150 cm from the rear of
When it's less than 30 centimeters, it becomes
the vehicle Within the scope of.
continuous.
Parking Assist System
161
Detection Range
Reversing Rearview System*
Warning
The detection range of the sensor is limited to
General Instructions
the vicinity of the rear bumper. Be sure to
● While reversing, pay particular attention
The reversing rearview camera on the rear
determine the safe distance around the vehicle
to those obstacles which are higher or lower
bumpers can assist the driver in reversing or
and drive slowly. The maximum detection
than the reversing sensor.
dispatching. Vehicle rear images from rearview
distance of the sensor varies with the size of
● In certain particular situations, some
camera are displayed on the screen of the
3
obstacles. The sensor can detect fairly large
obstacles very close to the vehicle will not be
original navigation system.
objects such as walls at a maximum distance of
detected by the reversing radar system and
Reversing rearview system is a system for
150cm away. However, for small obstacles
thus may cause damage to the vehicle, or to
display of the rear environment while parking
particularly rod-shaped objects, its detection
objects such as short stumps, flower bed
the vehicle at low speed (like entering the
distance is less than 150cm.
edges, etc.
garage). The reversing rearview system is only a
The detection range at the edge angles of the
● Sensor being damaged and polluted, snow
reversing assist system. It cannot replace the
vehicle rear is 90cm.
or ice covering the sensor or ultrasonic waves
driver’s objective analysis of objects.
The detection range in the middle of the vehicle
generated near the vehicle (such as: by big
rear is 150cm.
trucks ’ air braking or pneumatic
hammers) may all affect the normal working
of the sensor.
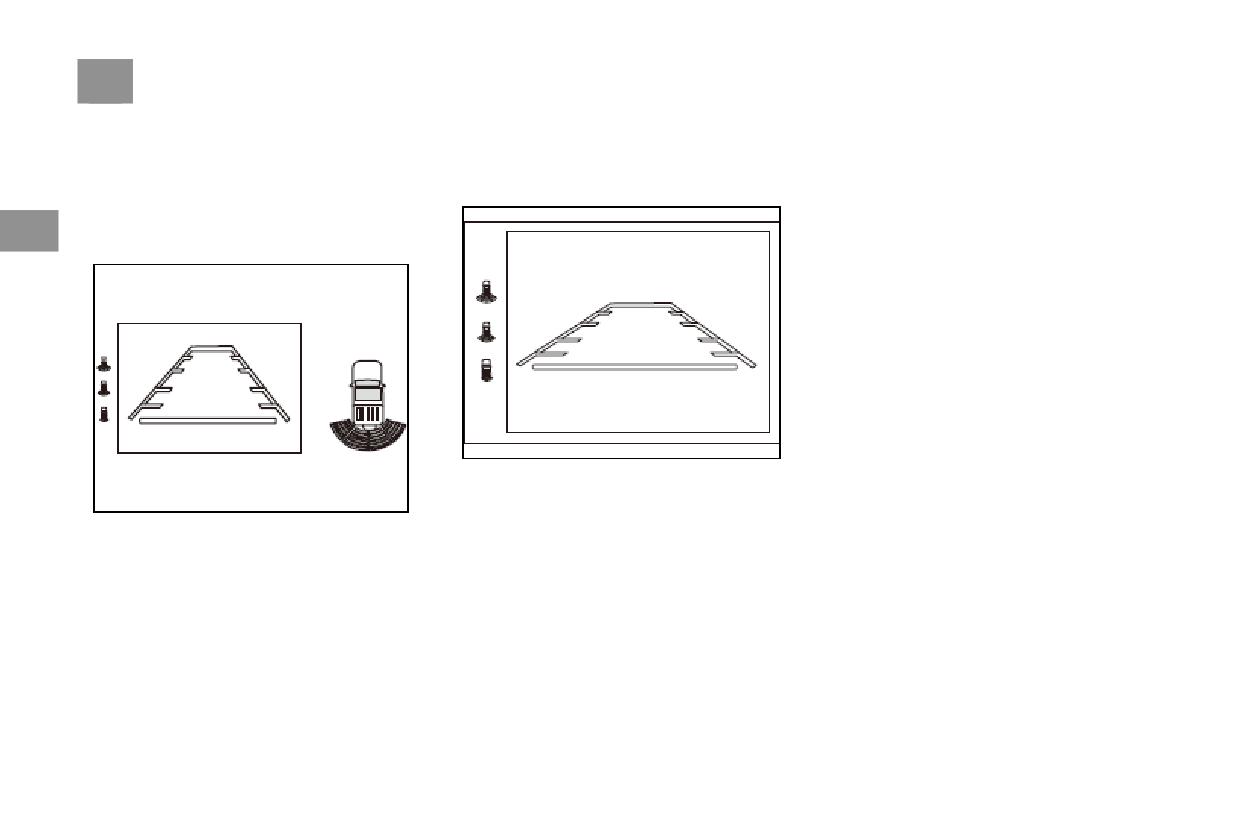
162 Parking Assist System
System Start
Reversing radar system image will be
System Exit
When the vehicle is at R gear, the reverse
superposed and displayed in the reversing
In the following two cases, the reversing
rearview system will be automatically started,
rearview image, and for details, refer to
rearview system exits:
and reverse rearview interface is shown on the
“Reversing Radar System” on page 160.
1. At speed>15km/h, DVD display will show
DVD display screen. Reversing radar signals are
“Warning!!! Over-speed! PAS system is OFF.
3
superposed and displayed on the reversing
Please drive safely! , and exit the reverse
rearview image.
rearview image after 1s; when the speed
is<15km/h again, go to the reverse rearview
image again;
2. Bring the vehicle to exit R gear.
The red line block is a safety warning area,
indicating 0.3m position;
The yellow line block is a safety prompt area,
Yellow scale by near the distance is 1 m, 1.5 m,
2 m, 2.5 m, 3 m.
Parking Assist System
163
System Fault
● Extreme weathers, like bright sunshine, ice
Precautions for Reversing Rearview
In case of fault to reverse rearview system, no
and snow, may influence the display effects of
System
image will be shown on the reverse rearview
the reverse rearview images, so adjust the
The reversing rearview system is only a
interface, and words “reverse rearview camera
driving method accordingly.
reversing assist system. It cannot replace the
fails” appear on DVD display screen. At this
● While reversing, the driver must be
driver’s objective analysis of objects. The
time, the reverse rearview system fails to
responsible for checking whether there are
3
camera has some blind areas, so some positions
operate properly, and it should be repaired and
people (especially children) and small animals
are beyond its reach.
detected at an authorized BAIC dealership.
in the operating area. During reversing, don’t
Keep the camera clean and free of ice so that it
● During reversing, don’t be completely
completely rely on the reversing rearview
can properly function. When using high
absorbed by the reversing rearview image, but
system. Observe the surroundings even at very
pressure cleaning equipment to wash the vehicle,
also observe the surrounding traffic situation at
low speed during operation.
do not spray and wash the camera for a long
any time, including traffic situation in front of
time. During spray cleaning, the nozzle must be
the vehicle.
more than 10cm from the camera.
● It is impossible to accurately judge the
distance between the vehicle and the object with
the rearview camera, so environmental
conditions shall be judged based on physical
conditions.
● The reversing rearview system inevitably
has some blind areas, and things in these areas
are beyond its reach.
● Keep the rearview camera clean because the
camera covered with ice, snow or foreign
matters will result in vague or no image.
164 Driving Skills
Driving Skills
A vehicle equipped with a limited slip
Preparations Before Driving
differential rear axle assembly should be driven
It is best to carry out safety checks before
Driving Tips
more slowly over bends than a vehicle with an
driving. Spending just a few minutes checking
Driving on Paved Road
ordinary differential vehicles, because under the
will help you drive safely and enjoy your
Compared with ordinary vehicles, this vehicle
limited-slip effect, high-speed cornering may
driving. You can make the check as long as you
3
cause the wheels to skid or loss control.
has a large ground clearance, so as to adapt to
are basically familiar with the various parts of
When the rear wheels on one side of a vehicle
driving on off-road. The special design means
the vehicle.
that the vehicle is taller than ordinary vehicles.
equipped with a limited slip differential rear
axle assembly skid, they may generate fast
Warning
While driving this vehicle, try to avoid abruptly
impact rotations. This is a result of the structure
turning to prevent the vehicle from going out of
Drunk driving is one of the most common
of the limited slip differential and it is a normal
control or even overturning.
causes of accidents. One’s driving ability falls
Driving on Off-Road
occurrence.
significantly with the rise in alcoholic content
To gain a bigger traction improve operability on
Caution
in the driver’s blood. If you have drunk
wet and skid or difficult road sections while
alcohol, do NOT drive. Passengers should
Despite the off-road functions of this vehicle,
driving off-road, be sure to put the transfer case
travel in vehicles driven by people who has
the driver still needs to pay attention and
into low gear.
not consumed alcohol. Instead, they may take
watch the road conditions so as to prevent
When dragging or controlling the vehicle at low
a taxi or other public transport instead. After
accidents and personal injury.
speed on a road surface covered with thick snow,
drinking alcohol, even coffee or cold shower
change the transmission to low gear and when
will not keep you alert. Similarly, some
necessary, also shift the transfer case to low
prescription or non-prescription drugs will
gear. However, do not drive the vehicle in too
affect people’s alertness, sensory sharpness
low a gear. Otherwise, it will generate too large
and reaction time. Before driving under the
a torque and make the wheels skid.
impact of these drugs, please consult with the
While driving on ice or wet, slippery roads, do
doctor or druggist.
not use too low a gear, because the braking
action of the engine may cause the wheels to
skid or go out of control.
Driving Skills
165
Before Starting the Engine
Move the front passenger’s seat backwards as
After Starting the Engine
Tire: check tire pressure and whether the tires
much as possible.
Fuel leakage: After the vehicle has parked for a
have cuts, damage or excessive wear.
Ensure that babies and children are properly
while, check for leakage of fuel, engine oil,
Wheel nuts: ensure that no nuts are lost or
positioned in accordance with regulatory
water or other liquids in the vehicle. After use,
loose.
requirements so as to ensure that they receive
there may be water drops from the A/C. This is
Vehicle lights: ensure that the front lights,
maximum protection in the event of an accident.
a normal occurrence.
3
brake lights, high brake lights, taillights,
Instruments and controllers: in particular, be
While Driving
steering signal lights and other vehicle lights all
sure that the instrument indicator lights and the
Instruments: Be sure that instruments work
work normally. Check the beam direction of the
defroster all work normally.
normally.
headlights. Check light direction of the
Brake pedal: be sure that the pedal has
Brake: On a safe road, check and confirm that
sufficient free clearance.
headlight.
when braked, the vehicle will not tilt towards
All oil levels: ensure that all the oil levels are
Seat belt: ensure that you and other passengers
any side.
have seated and fastened your seat belt properly
normal.
Other abnormalities: Check whether parts are
(children sit in the rear row and use special seat
12V battery and cable conditions: based on
loosened or have leaks and listen for abnormal
belts).
the colors of the indicator, check 12V battery
noises.
conditions. Check for corrosion or looseness on
Move the driver’s seat backwards as much as
possible. Meanwhile, ensure good vision and
the blocks or cracks on the casing. Check that
effectively control the steering wheel, the clutch
the cables are well connected.
pedal, the brake pedal, the accelerator pedal and
other control components which are used during
normal driving. Check whether there is any
display of faults on the instrument panel.
166 Driving Skills
Driving During Run-In Period
Wear in the Engine
In the early period of wearing in, the inner
A new engine must undergo a wearing-in of
frictional resistance of the engine is much
To ensure the service life of the vehicle, a run-in
period is needed in the early stages after the
1500km.
bigger than after the wearing-in. Only after
vehicle is put into use. Only after the run-in
The vehicle speed should be under 80km/h in
wearing it in can all the moving parts of the
period has completed can the vehicle be put into
the first 160km and under 90km/h in the first
engine reach the best coordinated state.
3
800km.
After wearing it in according to the above
normal use. Provisions on the Run-In Period:
During the run-in period, be sure to comply with
requirements, the engine will have both a
● Select a fairly good road and drive with
the following:
prolonged service life and reduced fuel
reduced load and in limited speed.
● After a cold start, run the engine for 15s
consumption.
● Do NOT drive with the accelerator fully
before starting to drive.
Wearing in Tires and Brake Pads
depressed or accelerate abruptly.
● During the initial driving period, avoid
In the first 500km, be sure to drive at medium
● Avoid emergency braking.
driving for a long period of time at full
speed so that the tires can be properly worn in
● Strictly execute the operating specifications
acceleration or at the maximum vehicle speed.
In the first 200km, new brake pads cannot reach
and keep the engine at its normal working
the best frictional state and careful wearing-in is
Also avoid driving over a long period of time at
temperature. Before regular maintenance, do
needed.
the same vehicle speed or a high idle speed.
NOT replace the engine oil.
● During the initial driving period, no engine
● Make sure to regularly maintain the vehicle,
adjustment is usually needed.
fasten external bolts and nuts. Pay attention to
● Unless the workload is very heavy, before
changes in the sound and temperature of various
the specific initial maintenance mileage, it is not
assemblies while driving, and promptly make
necessary to replace the engine oil or the engine
adjustments.
oil filter.
● During the initial driving period, do not add
any friction-reducing additive into the engine oil,
because such additives will affect the run-in of
the piston rings.
Driving Skills
167
Key Points of Driving in Different
Warning
Warning
Situations
● New tires and braking pads that have not
● When driving on a downward slope, the
● In side winds, be sure to drive at low speed.
been worn in do not have the best attachment
brake is stressed, which could extremely
This will help controlling the vehicle.
force or frictional force. Therefore, within
easily cause overheating. It is therefore
● Keep the correct angle, and avoid driving on
the first 500km, be sure to drive carefully to
suggested that you switch to a low gear
3
tall objects, or objects with sharp edges, or on
wear in the tires and protect against
before driving downhill so as to reduce
other road obstacles, because this may cause tire
accidents.
vehicle speed and fully leverage the braking
puncturing and other types of serious damage.
● New brake pads must also be worn in
effect of the engine to reduce the load of the
● When driving on bumpy or uneven roads, be
accordance with the above requirements.
brake.
sure to reduce the vehicle speed. Any impacts or
● While driving, be sure to keep a suitable
● Be sure to apply the brake based on road
scratches from failing to do so may seriously
distance from other vehicles and be careful to
and traffic conditions. Do NOT depress the
damage the vehicle.
prevent situations which require emergency
brake pedal when it is not necessary to do.
● When the vehicle is washed or when the
braking. Because in such situations, the new
Doing so will wear down and overheat the
vehicle is driven through deep water, the brake
tires and braking pads have not been worn in
brake , resulting in overly long braking
may get wet. Look around to see whether it is
and could easily cause traffic accidents.
distance and excessive wear of the brake.
safe and lightly depress the brake pedal. If you
● If the brake is wet or ice forms on it, or
● Do NOT turn off the engine and let the
cannot sense the normal braking force, the brake
when the vehicle is driven on road sprayed
vehicle coast. Doing so will cause the braking
may have become wet. To make it dry, drive the
with salt, its braking effect will fall.
booster to not work and the braking distance
vehicle at a low speed while ensuring safety.
will greatly increase, thus increasing the risk
Meanwhile, lightly depress the brake pedal.
of accidents.
Drive carefully. If the brake still does not work
● Do NOT use the brake fluid for too long.
safely, you need to park the vehicle on the road
Be sure to replace the brake fluid by the
side and contact an authorized BAIC dealership
specified cycle.
for assistance.
168 Driving Skills
Driving During Rain
Warning
Warning
When driving on slippery roads
● Before driving, ensure that the parking
● When there is rain, please drive carefully
●When driving on slippery road, emergency
brake has been fully released.
because the visibility is low, the vehicle
braking, acceleration and steering may cause
● While driving, do NOT put your foot on
windows are foggy, and the road is very
the tires to skid. This will reduce the steering
3
the brake pedal. Doing so will cause the
slippery.
performance of the vehicle and thus cause an
braking pads to overheat and result in
● When rain starts to fall, be sure to drive
accident.
unnecessary wear and fuel waste.
carefully because the road surface becomes
●When the engine speed changes drastically,
● When driving down long and steep slopes,
slippery.
such as in the event of emergency engine
be sure to slow down and shift to a low gear.
● When rain is falling, do NOT drive at high
braking, it may cause the vehicle to skid and
Remember that excessive use of the brakes
speed on expressways. This is because a water
result in an accident.
will make them overheat and be unable to
film will form between the tires and the road
● After driving through a water puddle,
work normally.
surface, which affects the normal operation of
lightly depress the brake pedal to ensure that
● While driving on slippery road, exercise
the steering and braking systems.
the brake functions normally. Wet brake
extra care when accelerating, raising or
pads cannot guarantee normal braking. If the
lowering the gear or braking. Sudden
brake on one side becomes wet and cannot
acceleration or engine braking may cause the
work normally, it will affect steering control
vehicle to slide or the wheels to run in idle.
and cause accidents. Do NOT drive on road
● If the brake is already wet, the braking
full of water after heavy rains. This may
distance required will be longer than normal.
cause serious damage to the vehicle.
In addition, the vehicle may tilt to one side
and the parking brake will not be able to
firmly brake the vehicle.
Driving Skills
169
Driving in Water
While driving in water, besides maintaining low
Running Water
Although your vehicle can drive in shallow
speed, try to avoid stopping the vehicle or
If the water is running and the water level is
water, the following precautions shall be taken
shifting the gear.
rising (for example during rainstorm), avoid
into account prior to driving in water:
Don’t release the accelerator or accelerate the
crossing the water, but continue to drive after
vehicle. The vehicle should be driven at
the water level drops and/or the flow speed is
Caution
constant speed at the lower gear and with
reduced. If the vehicle has to pass the water,
3
When driving in water, the speed must not
moderate-high accelerator opening, but not at
avoid driving in water more than 20cm deep.
exceed 8km/h. As a preventive measure,
high speed, in order to prevent water spraying.
Running water will erode the river bed, which
make sure to ascertain the water depth
After leaving the road with surface water, the
will make the vehicle trapped in deeper water.
before driving in the water, and check all
vehicle must be driven at slow speed, and
Determine the entry point and the exit point in
fluids after the driving. Damages which may
lightly depress the brake pedal for several times
advance.
be caused by driving in water are beyond the
to dry the moisture on the brake pad.
Still Water
warranty of new vehicle.
Don’t immediately start the engine which has
Avoid driving in still water more than 50cm
Take care when driving in water to ensure
shut down while the vehicle is running in water,
deep, and slow down the vehicle as appropriate
safety and to prevent damage to your vehicle. If
but place the vehicle to “N” gear as soon as
to reduce impacts by water wave. When driving
possible and drag it to a safe location with less
in water more than 50cm deep, the max speed
the vehicle has to drive in water, before that, try
to determine the water depth and conditions in
accumulated water.
shall not exceed 8km/h.
water (as well as position of obstacle). Take
care when driving in deep water, and maintain
steady speed less than 8km/h to reduce impacts
by water wave.
170 Driving Skills
Maintenance
Key Points of Driving in Winter
Be sure that engine oil viscosity is suitable for
After driving in water, check your vehicle for its
Be sure to fully warm up the engine. After
driving in cold weather.
working fluid and lubricants (engine oil,
starting the engine, pre-heat it for a while so that
In winter, a lot of summer-used engine oil
transmission oil, axle and transfer case) to
the engine oil fully lubricates the various
remaining inside the engine may make the
ensure that the fluids are not contaminated.
cylinders, and then drive the vehicle slowly.
vehicle difficult to start. If you are not sure
3
Wash/replace the contaminated fluids (which
which engine oil should be used, please contact
Drive off at low speed. This will give a
appear to be milky or foamed) as soon as
an authorized BAIC dealership for help.
sufficient time for the lubrication oil of the
possible to avoid damage to components.
transmission, the transfer case and the rear axle
Check Engine Coolant
to lubricate all lubrication positions.
Be sure to use a coolant that is recognized by
Warning
Check the Condition of the Battery and
BAIC.
●When driving on slippery road, emergency
Power Cables
If it is found that insufficient engine coolant is
braking, acceleration and steering may cause
Check the battery, including its joints an electric
left, please promptly replenish the coolant.
the tires to skid. This will reduce the steering
wire. Extremely cold weather will affect the
performance of the vehicle and thus cause an
battery. This is because more energy is needed
accident.
to start and drive vehicle and the battery
●When the engine speed changes drastically,
capacity will fall. Before driving the vehicle,
such as in the event of emergency engine
check whether the engine speed is normal.
braking, it may cause the vehicle to skid and
Check whether the headlights are as bright as
result in an accident.
usual. If necessary, charge or replace the battery.
● After driving through a water puddle,
In extremely cold weather, battery of low
lightly depress the brake pedal to ensure that
capacity may be frozen and thus makes it
the brake functions normally. Wet brake
impossible to start the vehicle.
pads cannot guarantee normal braking. If the
brake on one side becomes wet and cannot
work normally, it will affect steering control
and cause accidents. Do NOT drive on road
full of water after heavy rains. This may
cause serious damage to the vehicle.
Driving Skills
171
Avoid the freezing of door locks
Efficient Use of Vehicle
●Do NOT keep your foot on the brake pedal.
Spray some de-icer or glycerol into the door
This will cause overly early wear, overheating
●Maintain the proper tire pressure. Insufficient
lock holes to prevent them from being frozen.
and fuel waste.
air pressure will cause tire wear and waste fuel.
Use glass detergent containing anti-freeze agent.
●While driving, avoid collisions with curbs. Be
● Wheels must be positioned accurately. If
This product is sold at all authorized BAIC
sure to lower vehicle speed when driving on
they aren’t, this will cause overly fast wear of
dealerships.
uneven road.
3
the tires. It will also increase the engine load
Prevent snow or ice from
●Prevent mud and other objects from sticking
and waste fuel.
accumulating in fender.
to the chassis of the vehicle. This can not only
●Do NOT let the vehicle carry unnecessary
When snow or ice accumulates in the fender, it
reduce the weight of the vehicle but also prevent
loads. Overly heavy loads will increase the
will make steering difficult. When driving in
corrosion.
burden of the engine load and consume a lot of
cold weather, be sure to frequently stop the
fuel.
●Adjust the vehicle and keep it in its best
vehicle and check whether snow or ice has
working state.
● Accelerate slowly and steadily and avoid
accumulated in fender.
Dirty air filters, unsuitable valve clearances,
sudden starts. Shift to a high gear to drive as
For different driving destinations, BAIC
dirty spark plugs, dirty engine oil and grease
soon as possible.
suggests that some necessary emergency
will all reduce engine performances and waste
●Avoid areas with traffic congestion as much
supplies should be carried.
fuel. To prolong the service life of all parts and
as possible, and avoid continuous acceleration
Items that may need to be put in the vehicle
lower operating expenses, be sure to carry out
and deceleration. Stop-and-go driving wastes
include: tire anti-skid chains, vehicle window
regular maintenance. When frequently driving
fuel.
scrapers, sandbags or salt bags, signal flash
in harsh conditions, be sure to maintain the
●Avoid unnecessary parking and braking, and
devices, small shovels, jumper cables, etc.
vehicle more frequently.
maintain a steady vehicle speed. Drive in tune
with the traffic signal lights to reduce stop times
to a minimum, or drive on access roads without
traffic lights. Keep a suitable driving distance
from other vehicles so as to avoid emergency
braking. This will also reduce brake wear.
172 Driving Skills
Fuel Economy
● Perform regular maintenance in accordance
Fuel economy is related to many factors.
with the maintenance requirements.
Personal driving habits have a major impact on
● When the vehicle has stopped at a signal
fuel consumption. The recommendations below
light or a stop sign and needs to be restarted, be
will help to achieve the best fuel economy:
sure to accelerate slowly at an even speed.
3
● After starting from a low temperature, drive
● Plan the driving route to avoid unnecessary
slowly for several minutes and speed up after
stops.
the engine has warmed up.
●Keep tire pressures at the recommended level.
● Remove unnecessary objects and drive.
● Keep the air filter clean and maintain the
● Maintain a suitable tire pressure.
vehicle
in
accordance
with
the
● Choose to drive on good road.
recommendations and requirements in the User
● Do NOT drive too violently. Accelerate
Manual.
slowly. Do NOT quickly depress the accelerator
● Keep the vehicle condition well adjusted.
at starting or quickly apply the brake when
Improper engine adjustment will waste fuel and
stopping.
increase expenses.
● When driving at high speeds, do NOT open
the vehicle windows.
● Rationally use the A/C, the audio system,
etc.
● Turn off unnecessary switches.
● When parking for a long period of time, turn
off the engine and avoid letting the engine run at
idle speed for a long time.
● On flat road, drive at an economical speed.
● Based on the driving speed, choose a
suitable gear and do NOT drive at high speeds
at low gear.
4 Maintenance and Service
Safety maintenance
174
Fuel system
177
Interior maintenance
180
Exterior maintenance
183
Engine compartment
190
Engine oil
194
Coolant
198
Brake fluid
202
Power steering fluid
205
Battery
207
Windshield washing liquid and wiper blade
211
Tire
214
174 Safety and Maintenance
Warning
Caution
Safety and Maintenance
Only some important safety precautions are
Incorrect vehicle maintenance or driving
Service items not mentioned in this chapter
problematic vehicles may cause traffic
listed in this section. We are unable to list all
should all be performed by accredited or other
accidents, serious injury or even death.
of the dangers which you may come across
qualified technicians.
during your maintenance operations.
Potential Vehicle Hazards
Safety Precautions
●Carbon monoxide: The carbon monoxide of
To avoid potential dangers, before starting
4
the engine exhaust is a toxic gas. Be sure to
maintenance, please read the contents of this
operate the engine in well-ventilated places.
section and confirm that you have the needed
●Scalding: While at work, the engine, cooling
tools and techniques.
system and the exhaust system will generate
●Park the vehicle on flat ground, turn off the
high temperatures, which can scald extremely
engine, and apply the parking brake.
easily. Thus, wait approximately 30 minutes
● When cleaning parts, be sure to use
after the vehicle has been turned off for the
degreasing agents or parts cleaning agents sold
engine, cooling system and the exhaust system
on the market. Use of gasoline is prohibited.
to cool down before touching the parts.
●It is prohibited to put lit cigarettes, sparks or
open fires close to batteries or the relevant parts
of the fuel system.
●When maintaining batteries or compressed air,
be sure to wear goggles and protective clothing.
Safety and Maintenance
175
Routine Maintenance
Replace Brake Fluid
Exhaust Emission Control
Vehicle safety, reliable drive ability and good
Regardless of the driven mileage of a vehicle,
Your vehicle has been equipped with exhaust
performance all partly depend on how you
its brake fluid should be replaced every two
emission and evaporation devices which comply
maintain your vehicle.
years. When the two-year period expires, our
with the state and legal provisions. You should
Because maintenance is the responsibility of the
authorized dealership will replace the brake
be aware that: all unauthorized replacements,
vehicle owner, you must follow BAIC’s
fluid when it is replacing the engine oil or
refitting and adjustments of these devices by the
suggestions to perform routine maintenance of
performing inspections, thus saving you from
vehicle owner him/herself or vehicle repair
your vehicle, replace the engine oil and
making an extra visit to the dealership.
personnel are unlawful and the vehicle owner
4
routinely check and replace the brake fluid and
Replace Coolant
him/herself or vehicle repair personnel shall be
coolant.
responsible for any consequences thus caused.
Regardless of the driven mileage of a vehicle,
Maintenance Record
its engine coolant should be replaced at least
In addition, you should not make any
The Warranty Manual includes maintenance
every two years. When the two-year period
adjustment to the engine settings. The purpose
record pages, which you can use to record
expires, our authorized dealership will replace
of formulating these provisions is to ensure that
your vehicle complies with the strict laws and
information on the engine oil replacements and
the coolant when it is being replaced the engine
regulations on exhaust emission. Incorrect
inspections which have been made for your
oil or performing inspections, thus saving you
vehicle. Our authorized dealerships will also use
from making an extra visit to the dealership.
engine settings will have a negative impact on
the maintenance record pages to record
exhaust emission, engine performance and fuel
information on brake fluid replacements, airbag
consumption and generate high temperatures,
thus causing damage to the three-way catalytic
module replacements, seat belt tightening
converter and the engine.
devices, etc.
After each engine oil replacement and
inspection, be sure to ask the authorized BAIC
dealership to sign and seal the maintenance
record page.
176 Safety and Maintenance
Maintenance by Vehicle Owner
Safety during Vehicle Repair
6. Make sure that sparks are kept far away from
the engine compartment.
1. Check coolant level
After the engine stops running, the cooling fan
2. Check brake fluid level
may continue to run for some time. , Be sure to
7. Wear protective clothing if working on the
3. Check power steering fluid level
keep away from the fan when working on the
vehicle. If possible, be sure to wear gloves
4. Check windshield cleaning agent level
engine compartment.
which are made of non-absorbent material.
8. While working on the engine compartment,
5. Check tire pressure and state
To maintain the vehicle, be sure to comply with
be sure to remove any watches or jewelry.
6. Check the air-conditioning effects
the following safety points:
4
1. Keep your hands and clothes a safe distance
9. Do NOT let the metal parts of the tools or the
Special Operational States
from the drive belt and pulley.
vehicle come into contact with the wiring
If your vehicle is often driven in dusty
2. If the vehicle has just been used, do NOT
terminals of the battery.
environments, extreme weather, or extremely
high or low ambient temperature, you should
touch any part of the exhaust or cooling system
pay extra attention to vehicle maintenance. For
before the engine fully cools down.
details, please contact the authorized BAIC
3. When the engine is running or the start/stop
dealership
button is turned on, do NOT touch the electrical
wires or electrical parts.
4. Do NOT let the engine operate in a poor
ventilation place because the exhaust is toxic
and is extreme dangerous.
5. Do NOT work under a vehicle which is only
supported by a jack when its wheels are
replaced.
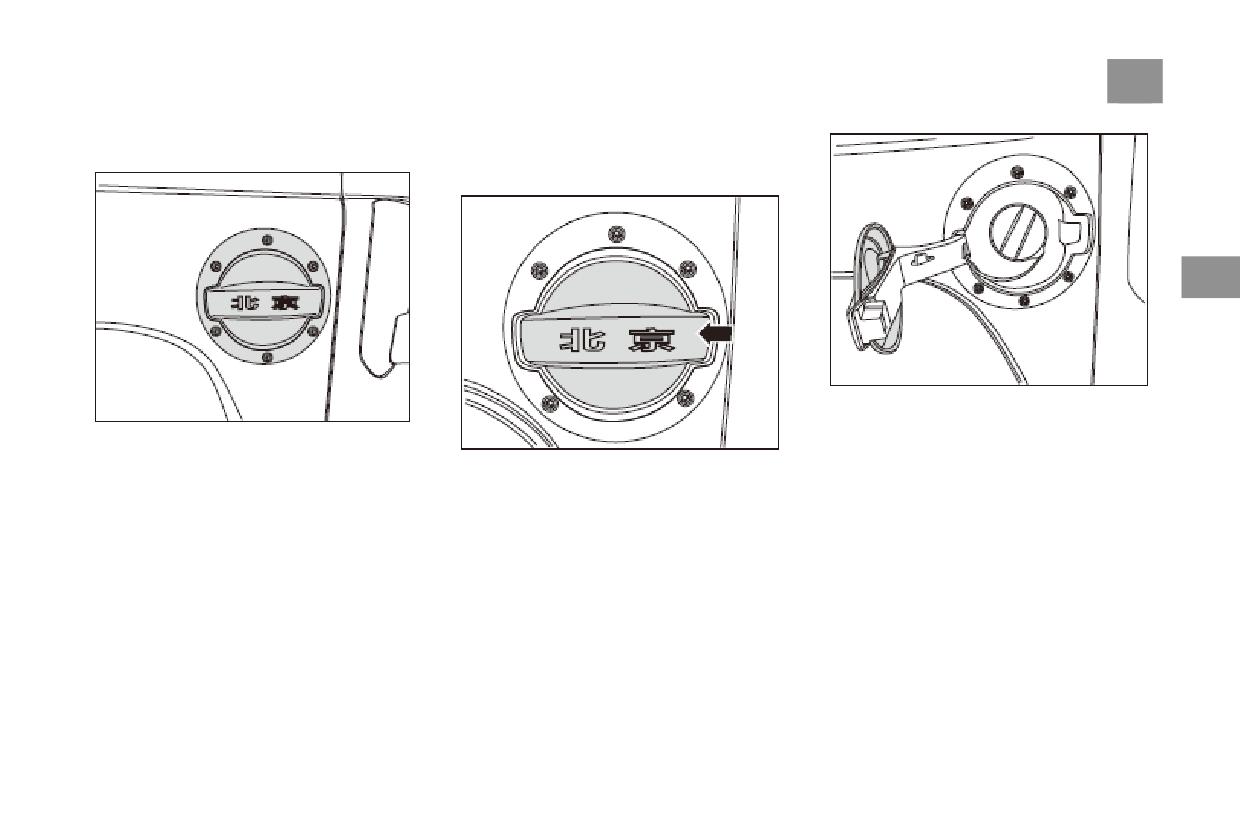
Fuel System
177
Fuel System
Adding Fuel
Before adding fuel, please turn off the engine
first. Then, follow the steps below:
4
2. Refueling door will open, then remove the
cap and start adding fuel.
The fuel filler is located on the left rear wall
3. Add fuel. At this point, pay attention to the
panel.
gesture of holding the nozzle: Do not tilt the
1. Unlock by remote key or central lock
nozzle and try to insert it into the fuel adding
switch, then press the area pointed by arrow in
pipe as deep as possible.
picture
4. When the refueling nozzle automatically
stops, continue refueling at a lower refueling
speed. The second time the refueling nozzle
stops, do not attempt to continue refueling any
more.
5. Close the cap and rotate slowly clockwise
until hear three clicks.
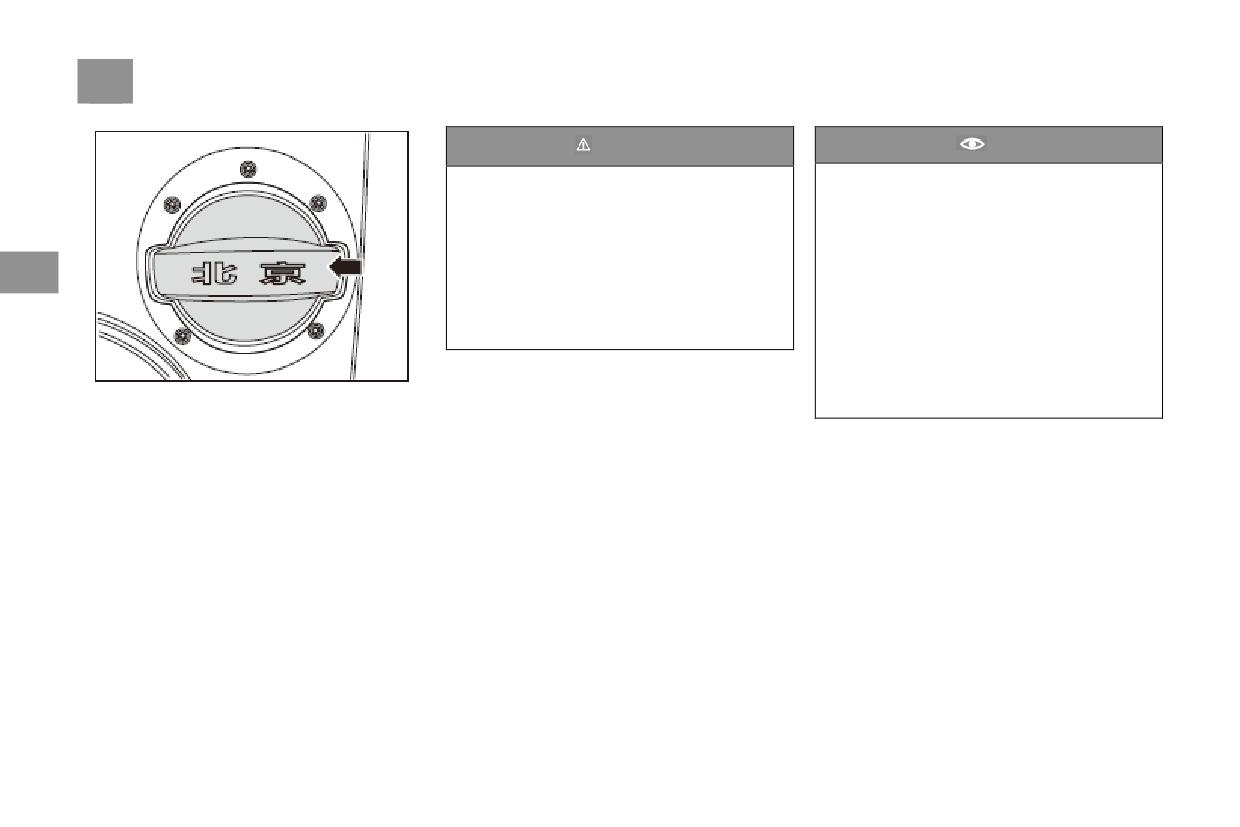
178 Fuel System
Warning
Caution
As long as you follow the above instructions
●When refueling, must not smoke. There
for refueling, after the second automatic stop
should be no spark or open flame.。
of the refueling gun, the tank is "full" and no
●When you open the fuel tank cap, do not
further refueling is required, otherwise the
remove it immediately. In hot weather, if the
expansion space in the tank will also be filled
fuel filler cap is suddenly removed,
4
up -- fuel may overflow when heated.。
high-pressure gas can be ejected from the
Immediately wipe the fuel that spills onto the
refueling piper and resulting in injuries.
paint
●Ensure that fuel filler cap is tightened to
Try not to run out of fuel on cars which
prevent fuel spillage in an accident.
equipped catalyst. Since irregular fuel supply
may lead to fire missing, the unburned fuel
will enter the exhaust and cause the catalyst
6. Closed the refueling cap, and then press the
overheating or damaged.。
arrow area to close the refueling door.
7. When the door lock is locked, the refueling
door is locked.
Fuel System
179
Fuel
Use the specific gasoline to ensure the
performance (see technical data section for
details)
Using low-rating or poor quality gasoline can
lead to engine damage .
Caution
4
If the gasoline octane rating (RON) used in
an emergency is lower than engine required.
The engine can only run at medium speed
and low load. Heavy engine load or high
engine speed at full throttle can damage the
engine. If possible, it is required that fill with
fuel that meets the octane rating.
Vehicles equipped with catalyst can only use
unleaded gasoline, the catalyst can be
damaged once after using the leaded gasoline.