Kia Sorento (2024 year). Manual in english - page 4
 

  Index      Kia     Kia Sorento (2024 year). Manual in english


Search            copyright infringement  


Content      ..     2      3      4      5     ..


Kia Sorento (2024 year). Manual in english - page 4


23

4

4

Features of your vehicle

Door locks

The rear door safety locks should be 
used whenever children are in the vehi

-

cle.

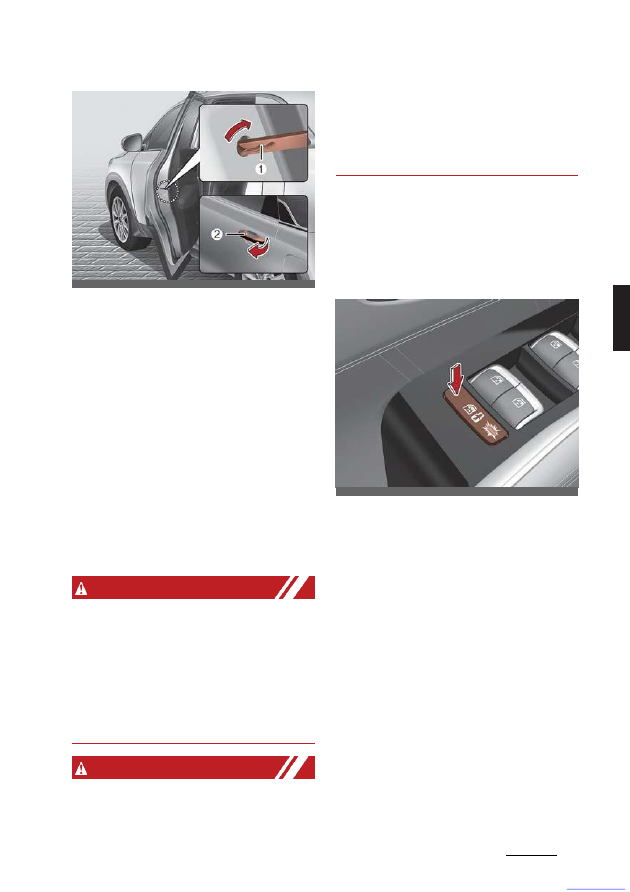
The child safety lock is located on the 
edge of each rear door. When the child 
safety lock is in the lock position (1), the 
rear door will not open if the inner door 
handle is pulled.

To lock the child safety lock, insert a key
(or screwdriver) into the hole and turn it to
the lock position.

To allow a rear door to be opened from 
inside the vehicle, unlock the child safety 
lock.

To open the rear door, pull the outside 
door handle (2).

W ARNING

Rear door locks
If children accidentally open the rear 
doors while the vehicle is in motion, they 
could fall out and be severely injured or 
killed. To prevent children from opening 
the rear doors from the inside, the rear 
door safety locks should be used when

-

ever children are in the vehicle.

W ARNING

• The system does not detect every 

obstacle approaching the vehicle exit.

• The driver and passenger are respon

-

sible for the accident occurred while 
exiting the vehicle. Always check the 
surrounding before you exit the vehi

-

cle.

Electronic child safety lock sys

-

tem (if equipped)

If you push the electronic child safety 
lock switch and the indicator illuminates, 
rear passengers cannot open the rear 
door from inside the vehicle.

To cancel the electronic child safety lock, 
push the electronic child safety lock 
switch one more time and then the indi

-

cator turns off.

Safe Exit Assist is operated when the 
electronic child safety lock is activated 
and Safe Exit Assist is selected in the 
cluster. However, Safe Exit Assist does 
not automatically activate the electronic 
child safety lock system.

The electronic child safety lock is always 
on when the ENGINE START/STOP
but

-

ton is in the ON or ignition ON state

and for approximately 3 minutes after the 
engine is turned off.

If your vehicle is equipped with the Elec

-

tronic child safety lock, the Child-protec

-

tor rear door locks, which are manually 
operated, are not provided.

OMQ4040419

OMQ4040008

CarManuals2.com

Features of your vehicle

24

4

Door locks

If electronic child safety lock is activated,
rear passenger cannot open or close the
rear window also. For more details, refer
to "Windows" on page 4-41.

CAUTION

If the Electronic child safety lock is not 
operated when pushing the Electronic 
child safety lock switch, the message is 
displayed and the alarm will sound.

If this occurs, have the system checked 
by an authorized Kia dealer.

In case of an emergency

If the electrical power door lock switch is 
not operating (e.g., dead car battery) the 
only way to lock the door(s) is with the 
mechanical key from the outside key 
hole.

Doors without an outside key hole can 
be locked as follows:

1. Open the door.
2. Insert the key into the emergency door

lock hole and turn the key to the lock
position as shown.

3. Close the door securely.

NOTICE

If the electrical power to door lock switch 
is not operating (e.g., dead car battery) 
and the liftgate is closed, you will not be 
able to open the liftgate until power is 
restored.

Rear Occupant Alert (ROA) Sys

-

tem (if equipped)

The Rear Occupant Alert (ROA) is pro

-

vided to help prevent exiting the vehicle 
with a rear passenger left in the vehicle.

1st alert

When you open the front door after 
opening and closing the rear door and 
turning off the engine, the "Check rear 
seats" warning message appears on the 
cluster.

2nd alert

• After the 1st alert, the 2nd alert oper

-

ates when any movement is detected 
in the rear seat after the driver's door 
is closed and all the doors are locked. 
The horn will activate for about 25 
seconds. If the system continues to

OMQ4040107L

OMQ4A040007

CarManuals2.com

25

4

4

Features of your vehicle

Door locks

detect a movement the alert operates
up to 8 times.

• Unlock the door with the remote key

or smart key to stop the alert.

• The system detects movement in the

vehicle for 24 hours after the door is
locked.

The 2nd alert is activated only after the
prior activation of the 1st alert.

Operation

You can activate or deactivate the ROA 
from the User Settings mode in the clus

-

ter LCD display.

The option can be found under the fol

-

lowing menu:

1. Press the MODE button (

) several

times on the steering wheel until 'User 
Settings' menu appears on the LCD.

2. Select 'Convenience

→ Rear

Occupant Alert' with the MOVE switch
(

/

)

and the OK button on the steering 
wheel.

If your vehicle is equipped with the info

-

tainment system, the option can be found 
under the following menu:

1. Press the SETUP button of the info

-

tainment system.

2. Press 'Vehicle 

→ Convenience →

Rear Occupant Alert' on the
infotainment system screen.

NOTICE

• Make sure that all the windows are 

closed. If the window is open, the alert 
may activate by the sensor detecting 
an unintended movement (e.g., wind 
or bugs).

• If you do not want to use the Rear 

Occupant Alert (ROA) system, press 
OK button on the steering wheel when 
the 1st alert is displayed on the clus

-

ter. Doing so will deactivate the 2nd 
alert once.

• If boxes or objects are stacked in the 

vehicle, the system may not detect 
the obstacle. Also, the warning may 
generate if the box or object falls off.

• The sensor may not operate normally 

if the senor is obscured by foreign 
substances.

• The alert may activate if movement in 

the driver or passenger seat is 
detected.

• The alert may activate with the doors 

locked due to car wash or surround

-

ing vibration or noise.

• Inside movement detection is stopped 

under remote start status.

W ARNING

• Even if your vehicle is equipped with 

the Rear Occupant Alert (ROA) sys

-

tem, always make sure you check the 
rear seat before you exit the vehicle.

The alert may not operate if:

OMQ4A041568L

CarManuals2.com

Features of your vehicle

26

4

Driver Position Memory System

- The movement does not continue

for a certain period of time or the
movement is small.

- If a child sits on a vehicle seat with

-

out a child car seat.

- The rear passenger is covered with

an obstacle such as a blanket.

- Also, always be cautious of the pas

-

senger's safety as the detection 
function and 2nd alert may not 
operate depending on the sur

-

rounding environment and certain 
conditions.

W ARNING

The door lock system may not work if the
electrical system is compromised. 
Accordingly, please train children pas

-

sengers regarding how to open the car 
door manually before an emergency sit

-

uation arises. That way, they would be 
able to open the door manually in the 
event an emergency situation arises.

Driver Position Memory Sys

-

tem (if equipped)

The Driver Position Memory System is 
provided to store and recall the following 
memory settings with a simple button 
operation.

• Driver's seat position
• Outside rear view mirror position
• Instrument panel illumination intensity

Head Up Display (HUD) position and

brightness (if equipped)

W ARNING

Never attempt to operate the driver 
position memory system while the vehi

-

cle is moving.

This could result in loss of control, and 
an accident causing death, serious 
injury, or property damage.

NOTICE

• If the battery is disconnected, the 

memory settings will be erased.

• If the Driver Position Memory System 

does not operate normally, have the 
system checked by an authorized Kia 
dealer.

OMQ4A040004

CarManuals2.com

27

4

4

Features of your vehicle

Driver Position Memory System

Storing memory positions

1. The ignition switch or ENGINE START/

STOP button is in the ON position.

2. Adjust the driver's seat position, out

-

side rear view mirror position, instru

-

ment panel illumination intensity and
head-up display height/brightness to
the desired position.

3. Press the SET button. The system

will beep once and notify you "Press
but

-

ton to save settings"on the LCD

dis

-

play.

4. Press one of the memory buttons (1 or 

2) within 4 seconds. The system will 
beep twice when the memory has 
been successfully stored.

5. "Settings 1 (or 2) saved" will appear on 

the LCD display.

Recalling memory positions

1. The ignition switch or ENGINE START/ 

STOP button is in the ON position.

2. Press the desired memory button (1 or 

2). The system will beep once, and 
then the driver's seat position, outside 
rear view mirror position, instrument 
panel illumination intensity and head-
up display height/brightness will auto

-

matically adjust to the stored posi

-

tions.

3. "Settings 1 (or 2) applied" will appear 

on the LCD display.

• While recalling the "1" memory posi

-

tion, pressing the SET or 1 button tem

-

porarily stops the adjustment of the 
recalled memory position. Pressing
the 2 button recalls the "2" memory 
position.

• While recalling the "2" memory posi

-

tion, pressing the SET or 2 button 
temporarily stops the adjustment of 
the recalled memory position. Press

-

CarManuals2.com

ing the 1 button recalls the "1" memory 
position.

• While recalling the stored positions, 

pressing one of the control buttons for
the driver's seat, outside rear view 
mirror, or instrument panel illumina

-

tion will cause the movement of that 
component to stop and move in the 
direction that the control button is 
pressed.

Driver position memory system 
reset

If the Driver position memory system does
not work properly, initialize the sys

-

tem as

follows.

How to initialize:
1. Stop the vehicle and open the driver's 

door with the ignition switch or 
ENGINE START/STOP button in the 
ON position and the vehicle shifted to 
P (Park).

2. Pull the driver's seat forward as far as 

possible and have the seatback 
upright as much as possible using the 
driver's seat forward/backward 
adjustment and seatback angle 
(recline) switches.

3. Push the SET button and seat forward 

movement switch for 2 seconds 
simultaneously.

Initialization in the process:
1. Initialization begins as the alarm 

sounds.

2. The seat and seatback will automati

-

cally move backwards. The alarm 
sound will continue while the system 
is in operation.

3. Initialization will be complete after the 

seat and seatback move to the center 
with an alarm sound. If, however, 
cases as follows occur, the initializa

-

Features of your vehicle

28

4

Driver Position Memory System

tion process will come to a stop and 
the alarm sound will stop as well.

• When pushing driving position mem

-

ory system button

• When pushing driver's seat height 

adjustment switch

• When shifting from P (Park) to other 

positions

• When driving speed exceeds 3 km/h

When the driver's door is closed

Easy access function

The system will move the driver's seat
automatically as follows:

Without smart key system
• It will move the driver's seat rearward

when the ignition key is removed and
the driver's door is opened.

• It will move the driver's seat forward

when the ignition switch or ENGINE
START/STOP button is in the ACC
or ON position.

With smart key system
• It will move the driver's seat rearward 

when the ENGINE START/STOP
but

-

ton is in the OFF position and the 

driver's door is opened.

• It will move the driver's seat forward

when the vehicle is turned ON or the
driver's door is closed with the smart
key with you.

You can activate or deactivate the Easy 
Access Function from the User Settings 
Mode on the LCD display. For more 
details, refer to "User settings mode" on 
page 4-82. If your vehicle is equipped 
with additional navigation, please refer to
the infotainment system manual sep

-

arately supplied.

NOTICE

Upward/downward movement of the seat
may not work when passengers get

on/off the vehicle in order to prevent 
foot injuries in certain places.

CarManuals2.com

29

4

4

Features of your vehicle

Liftgate

Liftgate

W ARNING

Exhaust fumes
If you drive with the liftgate open, you will 
draw dangerous exhaust fumes into your
vehicle which can cause serious injury or
death to vehicle occupants.

If you must drive with the liftgate open, 
keep the air vents and all windows open 
so that additional outside air comes into 
the vehicle.

W ARNING

Rear cargo area
Occupants should never ride in the rear 
cargo area where no restraints are avail

-

able. To avoid injury in the event of an 
accident or sudden stops, occupants 
should always be properly restrained.

Opening the liftgate

• The liftgate is locked or unlocked 

when all doors are locked or unlocked 
with the transmitter (or smart key) or 
central door lock switch.

• Only the liftgate is unlocked if the lift

-

gate unlock button on the transmitter 
or smart key is pressed for approxi

-

mately 1 second.

• If unlocked, the liftgate can be opened 

by pressing the handle and pulling it 
up.

• Once the liftgate is opened and then 

closed, the liftgate locks automati

-

cally. (All doors must be locked.)

NOTICE

In cold and wet climates, door lock and
door mechanisms may not work prop

-

erly due to freezing conditions.

W ARNING

The liftgate swings upward. Make sure 
no objects or people are near the rear of 
the vehicle when opening the liftgate.

CAUTION

Make certain that you close the liftgate 
before driving your vehicle. Possible 
damage may occur to the liftgate gas 
lifters and attached hardware if the lift

-

gate is not closed prior to driving.

Closing the liftgate

• To close the liftgate, lower and push 

down the liftgate firmly. Make sure 
that the liftgate is securely latched.

OMQ4041009

OMQ4A041486

CarManuals2.com

Features of your vehicle

30

4

Liftgate

W ARNING

Make sure your hands, feet and other 
parts of your body are safely out of the 
way before closing the liftgate.

W ARNING

Exhaust fumes
The liftgate lid should be always kept 
completely closed while the vehicle is in 
motion. If it is left open or ajar, poison

-

ous exhaust gases may enter the car 
and serious illness or death may result.

CAUTION

Make sure nothing is near the liftgate 
latch and striker while closing the lift

-

gate. It may damage the liftgate's latch.

Emergency liftgate safety release

Your vehicle is equipped with the emer

-

gency liftgate safety release lever 
located on the bottom of the liftgate.
When someone is inadvertently locked 
in the luggage compartment.

The liftgate can be opened by doing as 
follows:

1. Input the mechanical key into the 

hole.

2. Push the mechanical key to the right 

(1).

3. Push up the liftgate.

W ARNING

• You and your passengers must be 

aware of the location of the Emer

-

gency Liftgate Safety Release lever
in this vehicle and how to open the lift

-

gate in case you are accidentally 
locked in the liftgate.

• NEVER allow anyone to occupy the 

liftgate of the vehicle at any time. If the
liftgate is partially or totally latched and
the person is unable to get out, serious
injury or death could occur due to lack
of ventilation, exhaust fumes and rapid
heat build- up, or because of exposure
to cold weather conditions. The liftgate
is also a highly dangerous location in
the event of a crash because it is not a
protected occupant space but is a part
of the vehicle's crush zone.

• Your vehicle should be kept locked 

and the Smart Key should be kept out 
of the reach of children. Parents 
should teach their children about the 
dangers of playing in liftgates.

• Use the release lever for emergencies 

only.

W ARNING

• No one should be allowed to occupy 

the cargo area of the vehicle at any 
time. The cargo area is a very danger

-

ous location in the event of a crash.

• Use the release lever for emergencies

only. Use with extreme caution, espe

-

cially while the vehicle is in motion.

OMQ4041010

CarManuals2.com

31

4

4

Features of your vehicle

Power liftgate

CAUTION

Make sure there are no people or objects
around the liftgate before open

-

ing or

closing the liftgate. Wait until the liftgate
is open fully and stopped before loading
or unloading cargo from the vehicle.

W ARNING

Do not grasp the part supporting the lift

-

gate (gas lifter), as this may cause seri

-

ous injury.

Power liftgate (if equipped)

Power liftgate operating condi

-

tions

The power liftgate operates when the 
gear is in P (Park) with the engine run

-

ning. However, the power liftgate will 
operate regardless of the gear position 
when the engine is off. Also, the liftgate 
can be opened only when vehicle speed 
is below 3 km/h (1.8 mph).

For safety, before attempting to open or
close the liftgate, make sure the vehicle
is in P (Park).

W ARNING

• Never leave children or animals unat

-

tended in your vehicle. Children may 
operate the power liftgate. Doing so 
can result in injury to themselves or 
others and can damage the vehicle.

• Make sure that there are no people or 

objects in the path of the power liftgate
or smart liftgate prior to use. Serious
injury, damage to the vehicle or
damage to surrounding objects (for 
example, walls, ceilings, vehicles, etc.) 
may result if contact with the liftgate 
occurs.

• A liftgate covered with snow or 

equipped with heavy objects (e.g. bike

OMQ4A041561

OMQ4A041488

CarManuals2.com

Features of your vehicle

32

4

Power liftgate

racks, ladders) may not be opened; 
with the liftgate open, it may be acci

-

dentally closed, causing injuries to 
anyone around the vehicle.

• Do not open the liftgate if the liftgate is

covered with snow or equipped with
heavy objects.

• Make sure to remove snow and heavy

objects before opening the liftgate.

NOTICE

• Do not close or open the liftgate man

-

ually. This may cause damage to the 
power liftgate. If it is necessary to close
or open the liftgate manually when the
battery is discharged or dis

-

connected, do not apply excessive 
force.

• Do not operate the power liftgate more

than 10 times continuously when the
engine is not running. Use the power 
liftgate with the engine run

-

ning when

the power liftgate is used repeatedly to
prevent battery dis

-

charge.

• Do not leave the power liftgate open 

for a long period of time. This may 
drain the battery.

• Do not apply excessive force when 

the power liftgate is operating. Doing 
so could result in vehicle damage.

• Do not grab or hold on to the liftgate 

support struts at any time. Damage to 
the liftgate support struts could result. 
Deformation of the liftgate support 
struts may cause vehicle damage and 
personal injury may occur.

• Do not modify or repair any part of

the power liftgate by yourself. This
must be done by an authorized Kia
dealer.

• Do not operate the power liftgate 

under the following conditions. The 
power liftgate may not operate prop

-

erly.

- One side of the vehicle is lifted to 

inspect the vehicle or change a tire

- Parking on an uneven road such as 

a slope, etc.

• Close the liftgate completely and lock 

all doors and liftgate using the central 
door lock button before using an 
automatic car wash.

• Do not spray high pressure water 

directly on the power liftgate outside 
open/close button. The liftgate may 
open unintentionally.

INFORMATION

• If the liftgate is not fully closed and 

vehicle speed is at or above 3 km/h 
(1.8 mph), a warning will sound 10 
times. Immediately park the vehicle at a
safe place, close the liftgate, and 
check that the liftgate open warning on
the instrument cluster is turned off.

OMQ4A041561

CarManuals2.com

33

4

4

Features of your vehicle

Power liftgate

• In cold and wet climates, the outside 

power liftgate open/close button may 
not work properly due to freezing 
conditions. If this occurs, remove the 
ice before using the outside power 
liftgate open/close button or use the 
power liftgate open/close button on the
smart key or the instrument panel.

• Operating the power liftgate more than

5 times continuously could cause 
damage to the operating motor. If this 
occurs, the power liftgate will not 
operate to prevent the motor from 
overheating. If any of the power 
liftgate buttons are pressed to try to 
open the liftgate, the chime will sound 
3 times, but the liftgate will remain 
closed. Allow the power liftgate sys

-

tem to cool for about 1 minute before 
operating the system again.

Operating the power liftgate

Power liftgate open/close button 
(Smart key, Instrument panel) (if
equipped)

press the button to stop liftgate opera

-

tion.

If the smart key is not within operation 
range (approximately 10 m) from the 
vehicle, liftgate operation will stop with a
warning sound for 5 seconds.

When the liftgate is closed, press the 
power liftgate open/close button for 1
second. The power liftgate opens with a
warning sound.

While the liftgate is opening, press the 
button to stop liftgate operation.

When the power liftgate is opened, press 
and hold the power liftgate open/close 
button to close the liftgate. If you release 
the button while the liftgate is closing, 
power liftgate operation will stop with a
warning sound for 5 seconds.

Also, if the smart key is not within opera

-

tion range (approximately 10 m) from the
vehicle, power liftgate operation will stop
with a warning sound for 5 sec

-

onds.

OMQ4041436

OMQ4A051262

While the liftgate is opening or closing,

CarManuals2.com

Features of your vehicle

34

4

Power liftgate

Power liftgate open/close button 
(Outside the power liftgate)

When the liftgate is closed, press the 
power liftgate open/close button to open 
the liftgate.

If the vehicle is locked, press the power 
liftgate open/close button with the smart 
key in your possession.

If the liftgate is unlocked, the liftgate will 
open or close with a warning sound 
when the power liftgate open/close but

-

ton is pressed without carrying the smart
key.

Power liftgate open/close button 
(Inside the power liftgate)

Press the power liftgate open/close but

-

ton. The liftgate opens or closes with a
warning sound.

Power liftgate lock button (Inside 
the power liftgate)

Press the power liftgate lock button while
carrying the smart key. The liftgate 
closes and locks with a warning sound. 
Additionally, all doors will lock.

The liftgate can be closed and locked, 
and all doors locked only when the but

-

ton is pressed while the engine is off.

Automatic reverse

During power liftgate operation if the 
power liftgate senses any obstacle, the 
liftgate will stop or will fully open. The 
automatic reverse feature may not oper

-

ate properly, or it may operate unex

-

pectedly under the following 
circumstances:
• The automatic reverse feature may 

not detect the resistance if the 
detected resistance is below a certain 
level, or if the liftgate is almost fully 
closed near the latched position.

• The automatic reverse feature may 

operate if a strong impact is applied 
with no obstructions placed.

W ARNING

Never intentionally place any object or 
part of your body in the path of the 
power liftgate to make sure the auto

-

OMQ4A042009

OMQ4051249

OMQ4051250

CarManuals2.com

Resetting the power liftgate

In some circumstances resetting the 
power liftgate operation may need to be 
performed. Some instances where reset

-

ting the power liftgate may be required 
include:
• When the 12-volt battery is recharged

When the 12-volt battery is reinstalled
after removal or replacement

• When the related fuse is reinstalled 

after removal or replacement

4

35

4

Features of your vehicle

Power liftgate

matic reverse feature operates. Serious 
injury, or damage to the vehicle or object 
may occur.

INFORMATION

The power liftgate may stop operating if 
the automatic reverse feature operates 
more than two times while attempting to 
open or close the liftgate. If this occurs, 
carefully open or close the liftgate man

-

ually, and then after 30 seconds try to 
operate the power liftgate automatically 
again.

Setting the power liftgate

To use each feature, you must select the 
opening speed or opening height from 
the settings menu. Deselect the settings 
when you do not want to use the fea

-

ture.

Power liftgate opening speed

To adjust the power liftgate speed, 
select 'User Settings

→ Door/liftgate →

Power liftgate Opening Speed

→ Fast/ 

Slow' in the instrument cluster or 'Setup

→ Vehicle Settings → Door/liftgate →

Power liftgate Opening Speed

→ Fast/ 

Slow' in the infotainment system. 
(Default setting is 'Fast')

Power liftgate opening height

To

adjust the power liftgate opening
height, select 'User Settings

→ Door/

liftgate

→ Power liftgate Opening Height

→ Full Open/Level 3/Level 2/Level 1/ 

User Height Setting' in the instrument
cluster or 'Setup

→ Vehicle Settings →

Door/liftgate

→ Power liftgate Opening 

Height

→ Full Open/Level 3/Level 2/ 

Level 1/User Height Setting' in the info

-

tainment system.

See additional information in supplied 
Infotainment Manual.

User height setting

1. Position the liftgate manually to the

height you prefer.

2. Press the power liftgate open/close

button located inside the liftgate for
more than 3 seconds.

If 'User Height Setting' is selected for 
the power liftgate opening height, the 
power liftgate will automatically open 
to the height manually set by you.

INFORMATION

• If the power liftgate opening height 

has not been manually set, the power 
liftgate will fully open when 'User 
Height Setting' from the infotainment 
system is selected.

• If one of the height setting (Full Open/ 

Level 3/Level 2/Level 1) is selected 
from the settings menu in the info

-

tainment system, and then 'User 
Height Setting' is selected, the liftgate 
will open to the height manually set by
you.

• The power liftgate opening speed and 

opening height settings change 
according to the linked User Profile. If 
the User Profile is changed, power 
liftgate opening speed and opening 
height settings will change accord

-

ingly.

CarManuals2.com

Features of your vehicle

36

4

Power liftgate

1. With the vehicle off or running, put 

the gear in P (Park).

2. Press the power liftgate open/close 

inner button and outer button simul

-

taneously until a chime sounds.

3. Slowly close the liftgate manually.
4. Press the power liftgate open/close

outer button. The power liftgate will
open with a chime sound.

Wait until the liftgate fully opens to 
complete resetting. If the liftgate stops 
before it is fully open, resetting cannot 
be completed.

INFORMATION

If the power liftgate does not operate 
properly after the above procedure,

have the system inspected by an autho

-

rized Kia dealer.

Emergency liftgate safety release

To unlock and open the liftgate manu

-

ally from inside the luggage compart

-

ment, perform the following procedure:

1. Insert a long, flat object, such as a key

into the opening at the bottom of the
liftgate.

2. Slide the latch in the direction of the

arrow to unlock the liftgate.

3. Push the liftgate to open.

W ARNING

• For emergencies, be fully aware of the 

location of the emergency liftgate 
safety release latch in the vehicle and 
how to open the liftgate if you are 
accidentally locked in the luggage 
compartment.

• No one, including animals, should be 

allowed to occupy the luggage com

-

partment of the vehicle at any time. 
The luggage compartment is a very 
dangerous location in the event of an 
accident.

OMQ4A051262

OMQ4A042009

OMQ4041010

CarManuals2.com

37

4

4

Features of your vehicle

Smart Liftgate with Auto Open

• Use the release latch for emergencies 

only. Use extreme caution, especially 
while the vehicle is in motion.

Smart Liftgate with Auto Open (if
equipped)

On a vehicle equipped with a smart key, 
the liftgate can be opened using the 
Smart Liftgate with Auto Open system.

How to use the Smart Liftgate 
with Auto Open

The liftgate can be opened with no-
touch activation satisfying all the condi

-

tions below.
• After 15 seconds when all doors are 

closed and locked

• Positioned in the detecting area for 

more than 3 seconds.

NOTICE

The Smart Liftgate with Auto Open does 
not operate when:
• The smart key is detected within 15

seconds after the doors are closed 
and locked, and is continuously 
detected.

• The smart key is detected within 15 

seconds after the doors are closed 
and locked, and 1.5 m (60 in) from the 
front door handles. (for vehicles 
equipped with Welcome Light)

• A door is not locked or closed.

The smart key is in the vehicle.

OMQ4A041567

CarManuals2.com

Features of your vehicle

38

4

Smart Liftgate with Auto Open

1. Setting

To activate the Smart Liftgate with 
Auto Open, go to 'User Settings

Door

→ Smart Liftgate with Auto 

Open' on the LCD display.

2. Detect and Alert

If you are positioned in the detecting 
area (50 ~100 cm [20 ~ 40 inches] 
behind the vehicle) carrying a smart 
key, the hazard warning lights will 
blink and chime will sound to alert you 
the smart key has been detected and 
the liftgate will open.

NOTICE

Do not approach the detecting area if 
you do not want the liftgate to open. If 
you have unintentionally entered the 
detecting area and the hazard warning 
lights and chime starts to operate, leave 
the detecting area with the smart key. 
The liftgate will stay closed.

3. Automatic opening

The hazard warning lights will blink
and chime 6 times and then the lift

-

gate will open.

W ARNING

• Make sure you close the liftgate

before driving your vehicle.

• Make sure there are no people or

objects around the liftgate before
opening or closing the liftgate.

• Make sure objects in the liftgate do 

not come out when opening the lift

-

gate on a slope. It may cause serious 
injury.

• Make sure to deactivate the Smart 

Liftgate with Auto Open when wash

-

ing your vehicle. Otherwise, the lift

-

gate may open inadvertently.

• The key should be kept out of reach 

of children. Children may inadver

-

tently open the Smart Liftgate with 
Auto Open while playing around the 
rear area of the vehicle.

CAUTION

Liftgate lift
Make certain that you close the liftgate 
before driving your vehicle. Possible 
damage may occur to the liftgate gas

OMQ4A042013

OMQ4A042015

CarManuals2.com

39

4

4

Features of your vehicle

Smart Liftgate with Auto Open

lifters and attached hardware if the lift

-

gate is not closed prior to driving.

How to deactivate the Smart Lift

-

gate with Auto Open function using
the smart key

1. Door lock

2. Door unlock

3. Liftgate open

4. Panic button

5. Remote start
If you press any button of the smart key 
during the Detect and Alert stage, the 
Smart Liftgate with Auto Open function 
will be deactivated.

Make sure to be aware of how to deacti

-

vate the Smart Liftgate with Auto Open 
function for emergency situations.

NOTICE

• If you press the door unlock button (2),

the Smart Liftgate with Auto Open 
function will be deactivated temporar

-

ily. But, if you do not open any door for
30 seconds, the Smart Liftgate with
Auto Open function will be acti

-

vated

again.

• If you press the liftgate open button

(3) for more than 1 second, the liftgate 
opens.

• If you press the door lock button (1) or 

liftgate open button (3) when the 
Smart Liftgate with Auto Open func

-

tion is not in the Detect and Alert 
stage, the Smart Liftgate with Auto 
Open function will not be deactivated.

• In case you have deactivated the 

Smart Liftgate with Auto Open func

-

tion by pressing the smart key button 
and opened a door, the Smart Liftgate 
with Auto Open function can be acti

-

vated again by closing and locking all 
doors.

Detecting area

• The Smart Liftgate with Auto Open 

operates with a welcome alert if the 
smart key is detected within 50 ~ 100 
cm (20 ~ 40 inches) from the liftgate.

• The alert stops at once if the smart 

key is positioned outside the detecting 
area during the Detect and Alert 
stage.

NOTICE

• The Smart Liftgate with Auto Open 

function will not work if any of the fol

-

lowing occurs:

- The smart key is close to a radio 

transmitter such as a radio station 
or an airport which can interfere

OMQ4041584

OMQ4A041571MX

CarManuals2.com

Features of your vehicle

40

4

Smart Liftgate with Auto Open

with normal operation of the trans

-

mitter.

- The smart key is near a mobile two 

way radio system or a cellular 
phone.

- Another vehicle's smart key is being 

operated close to your vehicle.

• The detecting range may decrease or 

increase when :

- One side of the tire is raised to 

replace a tire or to inspect the vehi

-

cle.

- The vehicle is slantingly parked on 

a slope or unpaved road, etc.

CarManuals2.com

41

4

4

Features of your vehicle

Windows

Windows

The doors of this vehicle are equipped with power windows that can be operated by a 
switch.

1. Driver's door power window switch

2. Front passenger's door power window switch

3. Rear door (left) power window switch

4. Rear door (right) power window switch

5. Window opening and closing

6. Automatic power window up*/down*

7. Power window lock switch

*: if equipped

OMQ4AH040016

CarManuals2.com

Features of your vehicle

42

4

Windows

NOTICE

In cold and wet climates, power windows 
may not work properly due to freezing 
conditions.

The ignition switch or ENGINE START/ 
STOP button must be in the ON position 
for power windows to operate.

Each door has a power window switch 
that controls the door's window. The 
driver has a power window lock button 
which can block the operation of rear 
passenger windows. The power windows 
can be operated for approximately 3
minutes after ignition switch or ENGINE 
START/STOP button turned to the ACC 
or LOCK position. However, if the front 
doors are opened, the power windows 
cannot be operated even within the 3
minutes period.

The driver's door has a master power 
window switch that controls all the win

-

dows in the vehicle.

If the window cannot be closed because 
it is blocked by objects, remove the 
objects and close the window.

NOTICE

While driving with the rear windows down 
or with the sunroof (if equipped) in an
open (or partially open position), your 
vehicle may demonstrate a wind buffet

-

ing or pulsation noise. This noise is a
normal occurrence and can be reduced 
or eliminated by taking the following 
actions. If the noise occurs with one or 
both of the rear windows down, partially 
lower both front windows approximately
2.5 cm (1 inch) If you experience the 
noise with the sunroof open, slightly 
reduce the size of the sunroof opening.

CAUTION

Do not install any accessories in the 
vehicle that extend into the open win

-

dow area. Such objects will impact the 
proper function of the Automatic rever

-

sal "jam protection" feature.

NOTICE

If you press the one-touch window but

-

ton for micro adjustment, the glass will 
go down to a specific location to improve
your convenience.

Window opening and closing

You

can open and close windows using the
power window switch.

Type A

To open or close a window, press down
or pull up the front portion of the corre

-

sponding switch to the first detent posi

-

tion (5).

OMQ4040444

CarManuals2.com

43

4

4

Features of your vehicle

Windows

Type B - Auto up/down window (if
equipped)

Pressing or pulling up the power window 
switch momentarily to the second detent 
position (6) completely lowers or raises 
the window even when the switch is 
released. To stop the window at the 
desired position while the window is in 
operation, pull up or press down and 
release the switch.

To reset the power windows

If the power window does not operate 
normally, the automatic power window 
system must be reset as follows:

1. Turn the ignition switch or ENGINE 

START/STOP button to the ON
posi

-

tion.

2. Close the window and continue pull

-

ing up the power window switch for at 
least 1 second after the window is 
completely closed.

Automatic reversal (if equipped)

If the upward movement of the window 
is blocked by an object or part of the 
body, the window will detect the resis

-

tance and will stop upward movement. 
The window will then lower approxi

-

mately 30 cm (11.8 inches) to allow the 
object to be cleared.

If the window detects the resistance 
while the power window switch is pulled 
up continuously, the window will stop 
upward movement then lower approxi

-

mately 2.5 cm (1 inches).

And if the power window switch is pulled 
up continuously again within 5 seconds 
after the window is lowered by the auto

-

matic window reversal feature, the auto

-

matic window reversal will not operate.

NOTICE

The automatic reverse feature for the 
window is only active when the "auto up" 
feature is used by fully pulling up the 
switch. The automatic reverse feature will
not operate if the window is raised using
the halfway position on the power 
window switch.

OMQ4040445

ODEEV068020NR

CarManuals2.com

Features of your vehicle

44

4

Windows

W ARNING

Always check for obstructions before 
raising any window to avoid injuries or 
vehicle damage. If an object less than
0.16 of an inch (4 mm) in diameter is 
caught between the window glass and 
the upper window channel, the auto

-

matic reverse window may not detect 
the resistance and will not stop and 
reverse direction.

W ARNING

The automatic reverse feature doesn't 
activate while resetting the power win

-

dow system. Make sure body parts or 
other objects are safely out of the way 
before closing the windows to avoid inju

-

ries.

CAUTION

Do not install any accessories in the 
vehicle that extend into the open win

-

dow area. Such objects could prevent 
the automatic reverse feature from 
functioning.

Power window lock button

The driver can disable the power win

-

dow switches on the rear passengers' 
doors by pressing the power window 
lock button to the lock position 
(pressed).

When the power window lock button is 
pressed:
• The driver's master control can oper

-

ate all passengers' power windows.

• The front passenger's control can 

operate the front passenger's power 
window.

• The rear passengers' control cannot

operate the rear passenger's power
window.

*If the power window lock switch is 

operated (indicator turns on), rear pas

-

senger cannot open the rear door (if 
equipped with the Electronic Child 
Safety Lock System). For more details, 
refer to "Electronic child safety lock 
system (if equipped)" on page 4-23.

CAUTION

• To prevent possible damage to the 

power window system, do not open or 
close two windows or more at the 
same time. This will also ensure the 
longevity of the fuse.

• Never try to operate the main switch 

on the driver's door and the individual 
door window switch in opposite direc

-

tions at the same time. If this is done, 
the window will stop and cannot be 
opened or closed.

OMQ4040017

CarManuals2.com

45

If vehicle is left unattended after operat

-

ing the Remote window opening func

-

tion, theft may be possible. In addition,
please use caution there might be a mal

-

function due to the inflow of water while raining.

4

Features of your vehicle

Windows

W ARNING

Windows
• NEVER leave the keys in your

vehicle with unsupervised children,
when the engine is running.

• NEVER leave any child unattended in 

the vehicle. Even very young children 
may inadvertently cause the vehicle 
to move, entangle themselves in the 
windows, or otherwise injure them

-

selves or others.

• Always double check to make sure all

arms, hands, head and other obstruc

-

tions are safely out of the way before
closing a window.

• Do not allow children play with the 

power windows. Keep the driver's door
power window lock button in the LOCK
position (pressed). SERIOUS INJURY
can result from unintentional window
operation by the child.

• Do not extend heads or any limbs out

-

side the window while the vehicle is in
motion.

Remote window opening (if
equipped)

You can still control the windows move

-

ment with the engine turned off.

Press the Door Unlock button (1) for 
more than 3 seconds. The window 
moves down after the doors are 
unlocked, as long as you press the door 
unlock button (1). The window move

-

ment stops, when you release the door 
unlock button (1).

*The window will go up as much as the 

lock button (1) pressed and stops 
when the button is released.

W ARNING

CAUTION

• The remote window opening function 

may abruptly stop, when you move 
away from your vehicle during opera

-

tion. Stay in close proximity from your 
vehicle, while monitoring the window 
movement.

• One of the windows may stop operat

-

ing, when the window is interrupted by
certain force. However, the other 
windows will keep operating. Thus, 
you should make sure that all win

-

dows are opened.

• Be careful when using the remote 

window opening function, as the 
doors will be unlocked.

OMQ4041579

CarManuals2.com

Features of your vehicle

46

4

Hood

Hood

The hood serves as a cover for the 
engine compartment.

Open the hood if maintenance work 
needs to be performed in the engine 
compartment or if you need to look at 
the compartment.

Opening the hood

1. Pull the release lever to unlatch the 

hood. The hood should pop open 
slightly.

2. Go to the front of the vehicle, raise the 

hood slightly, push the secondary 
hood release lever (1) to the left and lift
the hood (2).

3. Pull out the support rod.

4. Hold the hood opened with the sup

-

port rod.

W ARNING

Support rod
• After driving, the engine compart

-

ment and support rod will be hot. 
Grasp the support rod in the area 
wrapped in rubber to prevent burns.

• The support rod must be inserted 

completely into the hole provided 
whenever you inspect the engine 
compartment. This will prevent the 
hood from falling and possibly injur

-

ing you.

Hood open warning

The hood warning message will appear 
on the LCD display when hood is open.

OMQ4A041018

OMQ4041446

OMQ4A040564C

OMQ4040110

CarManuals2.com

47

4

4

Features of your vehicle

Hood

The warning chime will operate when the
vehicle is being driven at or above 3
km/h (2 mph) with the hood open.

Closing the hood

following:
• All filler caps in the engine com

-

partment must be correctly 
installed.

• Gloves, rags or any other combusti

-

ble material must be removed from
the engine compartment.

2. Lower the hood until it is about 30 cm 

(12 inches) above the closed position 
and let it drop. Make sure that it locks 
into place.

3. Check that the hood has engaged 

properly.
• If the hood can be raise slightly, it is 

not properly engaged.

• Open it again and close it with a lit

-

tle more force.

CAUTION

Hood obstruction
Before closing the hood, ensure that all 
obstructions are removed from the hood 
opening. Closing the hood with an 
obstruction present in the hood opening

may result in severe personal injury or 
property damage.

W ARNING

Fire risk
Do not leave gloves, rags or any other 
combustible material in the motor com

-

partment. Doing so may cause a heat-
induced fire.

W ARNING

Unsecured hood
Always double check to be sure that the 
hood is firmly latched before driving 
away. If it is not latched, the hood could 
fly open while the vehicle is being driven, 
causing a total loss of visibility, which
may result in an accident.

OMQ4A041596N

1. Before closing the hood, check the

CarManuals2.com

Features of your vehicle

48

4

Fuel filler door

Fuel filler door

The vehicle's fuel filler door must be 
opened and closed by hand from out

-

side the vehicle.

Opening the fuel filler door

To unlock fuel filler door:
• Press the unlock button on your smart 

key

• Press the Central Door unlock button 

on armrest trim of driver's door

• Pull the driver's inside door handle 

outward

1. Turn the engine off.
2. Ensure the driver's door is unlocked 

for unlocking fuel filler door.

3. Press the rear center edge of fuel filler 

door.

4. Pull the fuel filler door (1) out to fully 

open.

5. To remove the fuel tank cap (2), turn it 

counterclockwise. You may hear a
hissing noise as the pressure inside 
the tank equalizes.

6. Place the cap on the fuel filler door.

NOTICE

The fuel filler door will unlock when 
Driver's door is unlocked

To unlock fuel filler door:
• Press the unlock button on your smart 

key

• Press the Central Door unlock button 

on armrest trim of

driver’s door

• Pull the driver’s inside door handle 

outward

The fuel filler door will lock when all 
doors are locked

To lock fuel filler door:
• Press the lock button on your smart 

key

• Press the Central Door lock button on 

armrest trim of

driver’s door

All doors will automatically lock after 

the vehicle speed exceeds 15km/h(9.3 
mph) Fuel door is also locked when vehi

-

cle speed exceeds 15km/h(9.3 mph)

OMQ4A042021

OMQ4040023

CarManuals2.com

49

4

4

Features of your vehicle

Fuel fillerdoor

C A U T I O N

Before refueling, be sure to check what 
type of fuel is used for your vehicle.

If you put diesel or ethanol fuel into a
gasoline-powered vehicle, it may affect 
the fuel system and cause serious dam

-

age to the vehicle.

N O T I C E

If the fuel filler door does not open 
because ice has formed around it, tap 
lightly or push on the door to break the 
ice and release the door. Do not pry on 
the door. If necessary, spray around the 
door with an approved de-icer fluid (do 
not use radiator anti-freeze) or move the 
vehicle to a warm place and allow the ice 
to melt.

Closingthefuelfillerdoor

To lock fuel filler door:
• Press the lock button on your smart 

key

• Press the Central Door lock button on 

armrest trim of driver's door

*All doors will automatically lock after 

the vehicle speed exceeds 15km/h. 
Fuel lid is also locked when vehicle 
speed exceeds 15km/h

1. To install the fuel tank cap, turn it 

clockwise until it "Clicks".

2. Close the fuel filler door by pressing 

rear center edge of the fuel filler door.

N O T I C E

Press the vehicle's fuel door to LOCK 
position when the fuel filler door is com

-

pletely closed in order to lock the fuel filler 
door.

If the fuel filler door is not completely 
closed, the fuel filler door will not be 
locked.

W A R N I N G

Refueling
Always remove the fuel cap carefully 
and slowly. If the cap is venting fuel or if 
you hear a hissing sound, wait until the 
condition stops before completely 
removing the cap.

If pressurized fuel sprays out, it can 
cover your clothes or skin and subject 
you to the risk of fire and burns.

N O T I C E

When refueling on unlevel ground, the 
fuel gauge may not point to the F posi

-

tion. It is not a malfunction. If you move 
your vehicle to a level ground, the fuel 
gauge will move to the full position.

N O T I C E

Tighten the cap until it clicks one time, 
otherwise, the engine warning indicator 
light will illuminate.

C A U T I O N

Keep the door into LOCK position when 
the vehicle is being washed (i.e. high 
pressure washer, automatic car washer, 
etc.)

W A R N I N G

Always tighten your fuel cap before you
leave the fuel station. Failure to securely
install your fuel cap can lead to fuel spill

-

age in an accident and increase fire risk.

CarManuals2.com

Features of your vehicle

50

4

Fuel filler door

W ARNING

Fire/explosion risk
Read and follow all warnings posted at 
the gas station facility. Failure to follow 
all warnings will result in severe personal 
injury, severe burns or death due to fire 
or explosion.

W ARNING

Static electricity
• Before touching the fuel nozzle, you 

should eliminate potentially danger

-

ous static electricity discharge by 
touching another metal part of the 
vehicle, a safe distance away from the 
fuel filler neck, nozzle, or other gas 
source.

• Do not get back into a vehicle once 

you have begun refueling since you 
can generate static electricity by 
touching, rubbing or sliding against 
any item or fabric (polyester, satin, 
nylon, etc.) capable of producing 
static electricity. Static electricity dis

-

charge can ignite fuel vapors resulting 
in rapid burning. If you must reenter 
the vehicle, you should once again 
eliminate potentially dangerous static 
electricity discharge by touching a
metal part of the vehicle, away from 
the fuel filler neck, nozzle or other 
gasoline source.

W ARNING

Portable fuel container
When using an approved portable fuel 
container, be sure to place the container 
on the ground prior to refueling. Static 
electricity discharge from the container 
can ignite fuel vapors causing a fire.
Once refueling has begun, contact with 
the vehicle should be maintained until

the filling is complete. Use only
approved portable plastic fuel contain

-

ers designed to carry and store gasoline.

W ARNING

Cell phone fires
Do not use cellular phones while refuel

-

ing. Electric current and/or electronic 
interference from cellular phones can 
potentially ignite fuel vapors causing a
fire.

W ARNING

Refueling & Vehicle fires
When refueling, always shut the engine 
off. Sparks produced by electrical com

-

ponents related to the engine can ignite 
fuel vapors causing a fire. Once refuel

-

ing is complete, check to make sure the 
filler cap and filler door are securely 
closed, before starting the engine.

W ARNING

Smoking
DO NOT use matches or a lighter and 
DO NOT SMOKE or leave a lit
cigarette in your vehicle while at a gas
station especially during refueling.
Automotive fuel is highly flammable and
can result in fire when ignited.

Make sure to refuel your vehicle accord

-

ing to "Fuel requirements" on page 1-2.

If the fuel filler cap requires replace

-

ment, use only a genuine Kia cap or the 
equivalent specified for your vehicle. An 
incorrect fuel filler cap can result in a
serious malfunction of the fuel system or 
emission control system.

CarManuals2.com

51

4

4

Features of your vehicle

Fuel filler door

CAUTION

Exterior paint
Do not spill fuel on the exterior surfaces
of the vehicle. Any type of fuel spilled on
painted surfaces may damage the paint.

W ARNING

• Do not allow anyone that has not dis

-

charged static electricity from their 
body to come close to an open fuel 
tank.

• Do not inhale vaporized fuel.

W ARNING

Risk of injury from fuel
Fuels are poisonous and harmful to your 
health.
• Fuel contains substances that are 

harmful if inhaled.

• Do not swallow fuel or let it come into 

contact with skin, eyes or clothing.

• Do not inhale fuel vapors.
• Keep children away from fuel.
If you or other people come into contact 
with fuel, observe the following:
• Immediately rinse fuel off your skin 

with soap and water.

• If fuel comes into contact with your 

eyes, immediately rinse them thor

-

oughly with clean water. Seek medical 
attention immediately.

• If you swallow fuel, seek medical 

attention immediately. Do not induce 
vomiting.

• Change immediately out of clothing 

that has come into contact with fuel.

NOTICE

Damage caused by the wrong fuel
Fuel that does not conform to the 
required quality can lead to increased 
wear as well as damage to the engine 
and exhaust system. Only use the fuel 
recommended.

NOTICE

Damage caused by the wrong fuel

Vehicles with a gasoline engine:
Even small amounts of the wrong fuel 
could result in damage to the fuel sys

-

tem, the engine and the emission control 
system.

NOTICE

Do not use diesel or ethanol to refuel 
vehicles with a gasoline engine.

NOTICE

Do not switch on the ignition if you acci

-

dentally refuel with the wrong fuel. Oth

-

erwise, fuel can enter the fuel system.

Even small amounts of the wrong fuel 
could result in damage to the fuel sys

-

tem and the engine. Have the system 
serviced by an authorized Kia dealer.

NOTICE

Do not overfill the fuel tank
Do not overfill the fuel tank; otherwise 
fuel may spill, causing harm to the envi

-

ronment and damaging the vehicle.

CarManuals2.com

Features of your vehicle

52

4

Panorama sunroof

Panorama sunroof (if 
equipped)

If your vehicle is equipped with a sun

-

roof, you can slide or tilt your sunroof
with the sunroof switch located on the
overhead console.

The sunroof can only be operated when 
the ignition switch or ENGINE START/ 
STOP button is in the ON or START
posi

-

tion.

The sunroof can be operated for 
approximately 3 minutes after the igni

-

tion switch or ENGINE START/STOP
but

-

ton is in the ACC or LOCK/OFF

position. However, if the front door is
open, the sunroof cannot be operated
even within the 3 minute period.

W ARNING

• Never adjust the sunroof or sunshade 

while driving. This could result in loss 
of control and an accident that may 
cause injury, or property damage.

• Do not leave the engine running and 

the key in your vehicle with unsuper

-

vised children. Unattended children 
could operate the sunroof, which 
could result in serious injury.

• Do not sit on the top of the vehicle. It 

may cause injury or vehicle damage.

NOTICE

Do not operate the sunroof when roof 
bars are installed on the vehicle or when 
there is luggage on the roof.

Power sunshade

Use the power sunshade to block direct 
sunlight coming through the sunroof 
glass.
• Push the sunroof switch rearward to 

the first detent position, the power 
sunshade automatically slides open.

• Push the sunroof switch forward to 

the first detent position, the power 
sunshade automatically closes. How

-

ever, if the sunroof glass is open, the 
glass will close first.

To stop the power sunshade at any 
point, push the sunroof switch in any 
direction.

NOTICE

• Do not pull or push the power sun

-

shade by hand as such action may 
damage the power sunshade or cause 
it to malfunction.

• Wrinkles formed on the power sun

-

shades are normal due to material 
characteristic.

ODL3049470L

OMQ4A041563

CarManuals2.com

53

4

4

Features of your vehicle

Panorama sunroof

Tilt open/close

• Push the sunroof switch upward, the 

sunroof glass tilts open. However, if 
the power sunshade is close, the sun

-

shade will open first.

• Push the sunroof switch upward or 

forward when the sunroof glass is tilt 
opened, the sunroof glass automati

-

cally closes.

To stop the sunroof movement at any 
point, push the sunroof switch in any 
direction.

Slide open/close

• Push the sunroof switch rearward to 

the first detent position, the sunroof 
glass opens. However, if the power 
sunshade is close, the power sun

-

shade will open first.

Push the sunroof switch forward to the
first detent position, the sunroof glass
closes. However, if the sunroof glass
is close, the power sunshade will close.

• Push the sunroof switch forward or 

rearward to the second detent posi

-

tion, the power sunshade and sunroof 
glass operate automatically (auto
slide feature).

To stop the sunroof movement at any
point, push the sunroof switch in any
direction.

Automatic reversal

If the power sunshade or sunroof glass 
senses any obstacle while it is closing 
automatically, it will reverse direction 
then stop at a certain position.

The auto reverse function may not work 
if an object thin or soft is caught between
the sliding power sunshade or sunroof
glass and sunroof sash.

W ARNING

• Make sure heads, hands, arms or any

other body parts or objects are out of
the way before operating the sunroof.
Body parts or objects may get caught
causing injuries or vehicle damage.

• Never deliberately use your body

parts to test the automatic reversal

OMQ4PH041617L

OMQ4041592N

OCDW049449

CarManuals2.com

Features of your vehicle

54

4

Panorama sunroof

function. The power sunshade or sun

-

roof glass may reverse direction, but 
there is a risk of injury.

NOTICE

• Do not continue to push the sunroof 

switch after the sunroof is fully 
opened, closed, or tilted. Damage to 
the sunroof motor could occur.

• Continuous operations such as slide 

open/close, tilt open/close, etc. may 
cause the motor or sunroof system to 
malfunction.

• Regularly remove any accumulated 

dust on the sunroof rail.

• Dust accumulated between the sun

-

roof and roof panel can make noise. 
Open the sunroof and remove dust 
regularly using a clean cloth.

• Do not try to open the sunroof when 

the temperature is below freezing or 
when the sunroof is covered with 
snow or ice. The sunroof may not 
work properly and may break if 
opened by force.

• Do not open or drive with the sunroof 

glass open immediately after rain or 
washing the vehicle. Water may wet 
the interior of the vehicle.

• Do not extend any luggage outside 

the sunroof while driving. Vehicle 
damage may occur if the vehicle sud

-

denly stops.

W ARNING

Do not extend your head, arms, body 
parts or objects outside the sunroof 
while driving. Injuries may occur if the 
vehicle suddenly stops.

Resetting the sunroof

In some circumstances resetting the 
sunroof operation may need to be per

-

formed. Some instances where resetting 
the sunroof may be required include:
• When the 12-volt battery is either dis

-

connected or discharged

• When the sunroof fuse is replaced
• If the sunroof one-touch AUTO OPEN/ 

CLOSE operation is not functioning 
properly

Sunroof resetting procedure

1. It is recommended to perform the 

reset procedure with the vehicle 
engine running. Start the vehicle in P
(Park).

2. Make sure the power sunshade and 

sunroof glass are in the fully closed 
position. If the power sunshade and 
sunroof glass are open, push the 
switch forward until the sunshade and 
sunroof glass are fully closed.

3. Release the switch when the power 

sunshade and sunroof glass are fully 
closed.

4. Push the switch forward until the 

power sunshade and sunroof glass 
moves slightly. Then release the 
switch.

OMQ4041593N

CarManuals2.com


Content      ..     2      3      4      5     ..