Kia Sorento (2024 year). Manual in english - page 3
 

  Index      Kia     Kia Sorento (2024 year). Manual in english


Search            copyright infringement  


Content      ..     1      2      3      4      ..


Kia Sorento (2024 year). Manual in english - page 3


51

3

3

Safety features of your vehicle

Air bag - Advanced Supplemental Restraint System

W ARNING

SRS wiring
Do not tamper with or disconnect SRS 
wiring or other components of the SRS 
system. Doing so could result in injury, 
due to accidental deployment of the air 
bags or by rendering the SRS inopera

-

tive.

W ARNING

No attaching objects
No objects (such as crash pad cover, cel

-

lular phone holder, cup holder, perfume or
stickers) should be placed over or near
the air bag modules on the steering 
wheel, instrument panel, windshield 
glass, and the front passenger's panel 
above the glove box. Such objects could 
cause harm if the vehicle is in a crash 
severe enough to cause the air bags to 
deploy.

Do not place any objects over the air bag 
or between the air bag and yourself.

Additionally, never place or insert any 
object into any small opening near side 
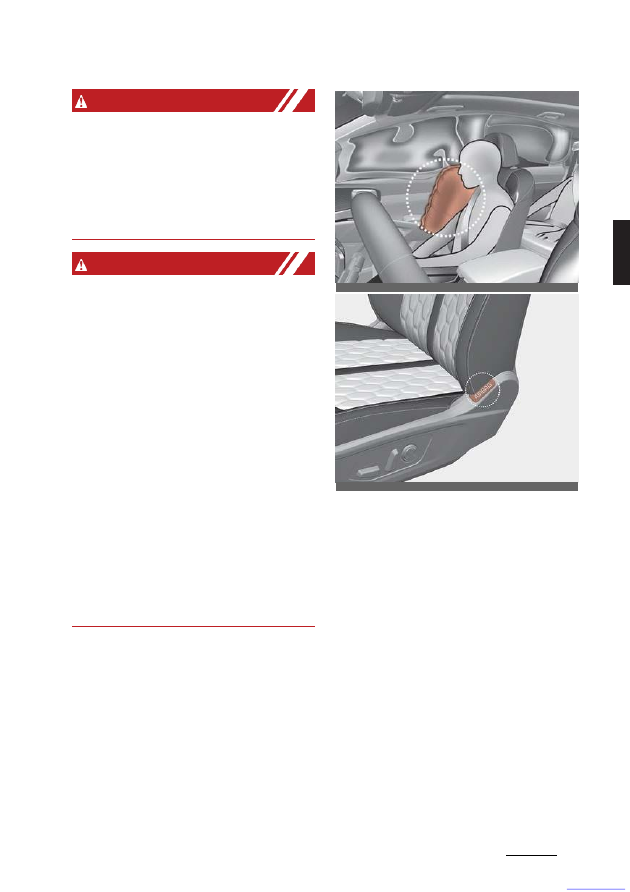
airbag labels attached to the vehicle 
seats.

When the air bag deploys, the object 
may affect the deployment and result in 
unexpected accident or bodily harm.

Side air bag

Your vehicle is equipped with a side air 
bag in each front seat.

*The actual air bags in the vehicle may 

differ from the illustration.

The purpose of the air bag is to provide 
the vehicle's driver and/or the front pas

-

senger with additional protection than 
that offered by the seat belt alone.
• The side air bags are designed to 

deploy during certain side-impact col

-

lisions, depending on the crash sever

-

ity of impact.

• The side air bags may deploy on the 

side of the impact or on both sides.

• The side curtain air bags on both

sides of the vehicle will deploy if a roll

-

over or possible rollover is detected.

• The side air bags are not designed to 

deploy in all side impact or rollover 
situations.

OMQ4AH030074

OMQ4A030049

CarManuals2.com

Safety features of your vehicle

52

3

Air bag - Advanced Supplemental Restraint System

W ARNING

Unexpected deployment
Avoid impact to the side impact airbag 
sensor when the ignition switch or 
ENGINE START/STOP button is ON
to prevent unexpected deployment of
the side air bag.

• The side air bag is supplemental to 

the driver's and the passenger's seat 
belt systems and is not a substitute 
for them. Therefore your seat belts 
must be worn at all times while the 
vehicle is in operation.

• For best protection from the side air 

bag system and to avoid being injured 
by the deploying side air bag, both 
front seat occupants should sit in an 
upright position with the seat belt 
properly fastened. The driver's hands 
should be placed on the steering 
wheel at the 9:00 and 3:00 positions. 
The passenger's arms and hands 
should be placed on their laps.

W ARNING

Deployment
Do not install any accessories including 
seat covers, on the side or near the side 
air bag as this may affect the deploy

-

ment of the side air bags.

• If the seat or seat cover is damaged, 

have the vehicle checked and 
repaired by an authorized Kia dealer. 
Inform the dealer that your vehicle is 
equipped with side air bags and an 
Occupant Detection System (ODS).

W ARNING

Flying objects
Do not place any objects (an umbrella, 
bag, etc.) between the front door and

the front seat. Such objects may become 
dangerous projectiles if the side airbag 
inflates.

W ARNING

No attaching objects
• Do not place any objects over the air 

bag or between the air bag and your

-

self. Also, do not attach any objects 
around the area the air bag inflates 
such as the door, side door glass, 
front and rear pillar.

• Do not put any objects between the 

side airbag label and seat cushion. It 
could cause harm if the vehicle is in a
crash severe enough to cause the air 
bags to deploy.

• Never place or insert any object into 

any small opening near side airbag 
labels attached to the vehicle seats. 
When the air bag deploys, the object 
may affect the deployment and result 
in unexpected accident or bodily 
harm.

• Do not install any accessories on the 

side or near the side air bags.

Curtain air bag

Curtain air bags are located along both 
sides of the roof rails above the front 
and rear doors.

CarManuals2.com

53

3

3

Safety features of your vehicle

Air bag - Advanced Supplemental Restraint System

*The actual air bags in the vehicle may 

differ from the illustration.

They are designed to help protect occu

-

pants in certain side impacts and to help 
prevent them from ejecting out of the 
vehicle as a result of a rollover, espe

-

cially when the seat belts are also in use.
• The curtain air bags are designed to 

deploy during certain side impact col

-

lisions, depending on the severity of 
impact. However, when side deploy

-

ment threshold is satisfied at front-
impact, side air bags may deploy.

• The curtain air bags may deploy on 

the side of the impact or on both 
sides.

• Also, the curtain air bags on both 

sides of the vehicle will deploy in cer

-

tain rollover situations.

• The curtain air bags are not designed

to deploy in all side impact or rollover
situations.

Do not allow the passengers to lean their 
heads or bodies against the doors, put 
their arms on the doors, stretch their 
arms out of the window or place objects 
between the doors and passengers
when they are seated on seats equipped 
with side impact and/or curtain air bags.

NOTICE

Never try to open or repair any compo

-

nents of the side and curtain air bag sys

-

tem. This should only be done by an 
authorized Kia dealer.

W ARNING

No attaching objects
• Do not place any objects over the air 

bag. Also, do not attach any objects 
around the area the air bag inflates 
such as the door, side door glass, 
front and rear pillar, roof side rail.

• Do not hang hard, breakable, or 

heavy objects on the coat hooks for 
safety reasons.

OMQ4030077

OMQ4AH030076

CarManuals2.com

Safety features of your vehicle

54

3

Air bag - Advanced Supplemental Restraint System

Air bag collision sensors

*The actual shape and position of sensors may differ from the illustration.

1. Supplemental Restraint System (SRS) control module/rollover sensor

2. Front impact sensor

3. Side pressure sensors (front door)

4. Side impact sensor (B-pillar)

5. Side impact sensor (C-pillar)

OMQ4A031341

1

2

3

4

5

OMQ4030051

OMQ4031052

OMQ4030053

OMQ4030080

OMQ4A031054MX

CarManuals2.com

55

3

3

Safety features of your vehicle

Air bag - Advanced Supplemental Restraint System

W ARNING

Air bag sensors
• Do not hit or allow any objects to 

impact the locations where air bags or 
sensors are installed.

This may cause unexpected air bag 
deployment, which could result in 
serious personal injury or death.

• If the installation location or angle of 

the sensors is altered in any way, the 
air bags may deploy when they 
should not or they may not deploy 
when they should.

Therefore, do not try to perform main

-

tenance on or around the air bag sen

-

sors. Have the vehicle checked and 
repaired by an authorized Kia dealer.

• Do not arbitrarily touch the front 

impact sensor. When the angle of the 
sensor is changed, the air bag system 
may malfunction.

Problems may arise if the sensor instal

-

lation angles are changed due to the 
deformation of the front bumper, front 
end module, body or front doors where 
side collision sensors are installed. Have 
the vehicle checked and repaired by an 
authorized Kia dealer.

Installing bumper guards (or side step or 
running board) or replacing a bumper (or
front door module) with non-genuine 
parts may adversely affect your vehicle's 
collision and air bag deployment perfor

-

mance.

Kia Genuine bumper guards/bumpers
are parts we guarantee for quality and
performance.

Why didn't my air bag go off in a
collision? (Inflation and non-infla

-

tion conditions of the air bag)

There are many types of accidents in 
which the air bag would not be expected 
to provide additional protection.

These include rear impacts, second or
third collisions in multiple impact acci

-

dents, as well as low speed impacts.

Air bag inflation conditions

Front air bags

Front air bags are designed to inflate in
a frontal collision depending on several
factors, including the severity of impact
of the front collision.

OMQ4030055

CarManuals2.com

Safety features of your vehicle

56

3

Air bag - Advanced Supplemental Restraint System

Side and curtain air bags

*The actual air bags in the vehicle may 

differ from the illustration.

Side and/or curtain air bags are 
designed to inflate when an impact is 
detected by side collision sensors 
depending on several factors, including 
the severity of impact resulting from a
side impact collision.

Also, the side and curtain air bags are 
designed to inflate when a rollover is 
detected by a rollover sensor.

Although the front air bags (driver's and 
front passenger's air bags) are primarily 
designed to inflate in frontal collisions, 
they may inflate in other types of colli

-

sions if the front impact sensors detect a
sufficient frontal force in another type of 
impact.

Similarly, although side and curtain air 
bags are designed to inflate in certain 
side impact collisions, they may inflate in 
other types of collisions where a side 
force is detected by the sensors. For 
instance, side air bag and/or curtain air 
bags may inflate if rollover sensors indi

-

cate the possibility of a rollover occur

-

ring (even if none actually occurs) or in 
other situations, including when the 
vehicle is tilted while being towed.

Even if side and/or curtain air bags do 
not provide impact protection in a roll

-

over, they will deploy to prevent ejection 
of occupants, especially those who are 
restrained with seat belts.

If the vehicle chassis is impacted by 
bumps or objects on unimproved roads, 
the air bags may deploy. Drive carefully 
on unimproved roads or on surfaces not 
designed for vehicle traffic to prevent 
unintended air bag deployment.

Air bag non-inflation conditions

• Air bags may not deploy in certain 

low-speed collisions where the air bag 
would not add any benefit beyond the 
protection already offered by the seat 
belts.

• Front air bags are not designed to 

inflate in rear collisions, because 
occupants are moved backward by

OMQ4031056

OMQ4AH030078

OMQ4030057

CarManuals2.com

57

3

3

Safety features of your vehicle

Air bag - Advanced Supplemental Restraint System

the force of the impact. In this case, 
inflated air bags would not be able to 
provide any additional benefit.

• Front airbags may not inflate in side 

impact collisions, because passen

-

gers move in the direction of the colli

-

sion. Thus, in side impacts, frontal 
airbag deployment would not provide 
additional occupant protection.

• In an angled collision, the force of 

impact may direct the occupants in a
direction where the air bags would not 
be able to provide any additional ben

-

efit, and thus the sensors may not 
deploy any air bags.

• Just before impact, drivers often brake

heavily. Such heavy braking lowers 
the front portion of the vehicle causing
it to "ride" under a vehicle with a higher
ground clearance. Air bags may not
inflate in this "under- ride" situation 
because deceleration forces that are
detected by sensors may be 
significantly reduced by such "under-
ride" collisions.

• Front air bags may not inflate in all 

rollover accidents when the SRS Con

-

trol Module (SRSCM) indicates that 
the front air bag deployment would 
not provide additional occupant pro

-

tection.

OMQ4030058

OMQ4031059

OMQ4030060

OMQ4030062

CarManuals2.com

Safety features of your vehicle

58

3

Air bag - Advanced Supplemental Restraint System

• Airbags may not inflate if the vehicle 

collides with an object such as a utility 
pole or tree. This is because the point 
of impact is concentrated in one area 
and the full force of the impact is not 
delivered to the sensors.

Supplemental Restraint System 
(SRS) care

The Supplemental Restraint System 
(SRS) is virtually maintenance-free and 
so there are no parts you can safely ser

-

vice by yourself.

If the SRS air bag warning light does not 
illuminate, or continuously remains on, 
have your vehicle immediately inspected 
by an authorized Kia dealer.

Any work on the SRS, such as 
removing, installing, repairing, or any
work on the steering wheel, the front
passenger's

panel, front seats and roof rails must be
performed by an authorized Kia dealer.
Improper handling of the SRS may result
in serious personal injury.

For cleaning the air bag pad covers, use 
only a soft, dry cloth or one which has 
been moistened with plain water. Sol

-

vents or cleaners could adversely affect 
the air bag covers and proper deploy

-

ment of the system.

If components of the air bag system must
be discarded, or if the vehicle must be
scrapped, certain safety precautions 
must be observed. An authorized Kia 
dealer knows these precautions and can 
give you the necessary information. Fail

-

ure to follow these precautions and pro

-

cedures could increase the risk of bodily 
injury.

W ARNING

Tampering with SRS
Do not tamper with or disconnect SRS 
wiring or other components of the SRS 
system. Doing so could result in the acci

-

dental inflation of the air bag or render 
the SRS inoperative.

W ARNING

Towing vehicle
Always have the ignition off and wait for 
3 minutes when your vehicle is being 
towed. The side air bags may inflate if 
the vehicle is tilted such as when being 
towed because of the rollover sensors in 
the vehicle.

Additional safety precautions

• Never let passengers ride in the

cargo area or on top of a folded-
down back seat. All occupants 
should sit upright, fully back in their

OMQ4031061

OMQ4031063

CarManuals2.com

59

3

3

Safety features of your vehicle

Air bag - Advanced Supplemental Restraint System

seats with their seat belts on and their 
feet on the floor.

• Passengers should not move out of

or change seats while the vehicle is
moving. A passenger who is not 
wearing a seat belt during a crash or 
emergency stop can be thrown 
against the inside of the vehicle, 
against other occupants, or out of the 
vehicle.

• Each seat belt is designed to

restrain one occupant. If more than 
one person uses the same seat belt, 
they could be seriously injured or 
killed in a collision.

• Do not use any accessories on seat

belts. Devices claiming to improve 
occupant comfort or reposition the seat
belt can reduce the protection provided 
by the seat belt and increase the
chance of serious injury in a crash.

• Passengers should not place hard or

sharp objects between them

-

selves

and the air bags. Carrying hard or
sharp objects on your lap or in your
mouth can result in injuries if an air bag
inflates.

• Keep occupants away from the air

bag covers. All occupants should sit 
upright, fully back in their seats with 
their seat belts on and their feet on the
floor. If occupants are too close to the
air bag covers, they could be injured if
the air bags inflate.

• Do not attach or place objects on or

near the air bag covers. Any object 
attached to or placed on the front or 
side air bag covers could interfere with
the proper operation of the air bags.

• Do not modify the front seats.Modi

-

fication of the front seats could inter

-

fere with the operation of the

supplemental restraint system sens

-

ing components or side air bags.

• Do not place items under the front

seats. Placing items under the front 
seats could interfere with the opera

-

tion of the supplemental restraint sys

-

tem sensing components and wiring 
harnesses.

• Never hold an infant or child on

your lap. The infant or child could be 
seriously injured or killed in the event 
of a crash. All infants and children 
should be properly restrained in 
appropriate child safety seats or seat 
belts in the rear seat.

W ARNING

• Sitting improperly or out of position 

can cause occupants to be shifted too 
close to a deploying air bag, strike the 
interior structure or be thrown from the
vehicle resulting in serious injury or
death.

• Always sit upright with the seatback in 

an upright position, centered on the 
seat cushion with your seat belt on, 
legs comfortably extended and your 
feet on the floor.

Adding equipment to or modify

-

ing

your air bag-equipped vehicle

If you modify your vehicle by changing 
your vehicle's frame, bumper system, 
front end or side sheet metal or ride 
height, this may affect the operation of 
your vehicle's air bag system.

Air bag warning labels

Air bag warning labels, some required by
the Canada Motor Vehicle Safety 
Standards (CMVSS), are attached to the 
sun visor to alert the driver and passen

-

gers of potential risks of the air bag sys

-

tem.

CarManuals2.com

Safety features of your vehicle

60

3

Air bag - Advanced Supplemental Restraint System

OMQ4A030100

CarManuals2.com

Features of your vehicle

4

CarManuals2.com

Keys ................................................................................................. 4-7

Remote

key.........................................................................................................

4-7

Smart

key.............................................................................................................

4-9

Battery replacement ...................................................................................... 4-
11

Limp home (override) procedure............................................................ 4-13

Immobilizer system ..................................................................... 4-14

Folding key immobilizer system.............................................................. 4-
14

Smart key immobilizer system.................................................................4-
14

Theft-alarm system ..................................................................... 4-16

Armed

stage ..................................................................................................... 4-

16

Theft-alarm stage .......................................................................................... 4-
17

Disarmed stage ............................................................................................... 4-
17

Door

locks..................................................................................... 4-18

With the smart key ........................................................................................ 4-
18

With the mechanical key............................................................................. 4-
19

Operating door locks from inside the vehicle .................................. 4-20

Door lock/unlock features..........................................................................4-22

Child-protector rear door lock..................................................................4-22

Electronic child safety lock system ........................................................4-
23

In case of an emergency ........................................................................... 4-
24

Rear Occupant Alert (ROA) System...................................................... 4-
24

Driver Position Memory System ................................................4-26

Storing memory positions ..........................................................................4-
27

Recalling memory positions ......................................................................4-
27

4

Features of your vehicle

CarManuals2.com

Power liftgate............................................................................... 4-31

Operating the power liftgate ....................................................................4-33

Setting the power liftgate...........................................................................4-
35

Resetting the power liftgate......................................................................4-
35

Emergency liftgate safety release..........................................................4-
36

Smart Liftgate with Auto Open .................................................4-37

How to use the Smart Liftgate with Auto Open ...............................4-37

How to deactivate the Smart Liftgate with Auto Open

function using the smart key ....................................................................4-39

Detecting area .................................................................................................4-
39

Windows

.......................................................................................4-41

Window opening and closing ...................................................................4-
42

Power window lock button ....................................................................... 4-44

Hood ............................................................................................. 4-46

Opening the hood......................................................................................... 4-
46

Hood open warning ..................................................................................... 4-
46

Closing the hood ............................................................................................4-
47

Fuel filler door............................................................................. 4-48

Opening the fuel filler door ...................................................................... 4-48

Closing the fuel filler door......................................................................... 4-49

Panorama sunroof ...................................................................... 4-52

Power

sunshade .............................................................................................4-

52

Tilt open/close .................................................................................................4-
53

Slide open/close .............................................................................................4-
53

Automatic reversal ........................................................................................4-
53

Resetting the sunroof.................................................................................. 4-
54

Features of your vehicle

4

CarManuals2.com

Horn .................................................................................................................... 4-
58

Mirrors.......................................................................................... 4-59

Inside rear view mirror................................................................................ 4-59

Outside rear view mirror............................................................................ 4-68

Instrument cluster ....................................................................... 4-71

Full LCD cluster ...............................................................................................4-
72

Adjusting instrument cluster illumination ...........................................4-73

Gauges................................................................................................................4-

73

Transmission shift indicator ......................................................................4-

77

LCD display...................................................................................4-79

LCD display modes.......................................................................................4-
80

LCD displays................................................................................ 4-88

Trip information (trip computer) ............................................................ 4-88

Digital

speedometer..................................................................................... 4-

90

Service mode .................................................................................................. 4-
90

LCD display messages................................................................................. 4-
91

Warning and indicator lights .................................................... 4-95

Warning lights................................................................................................. 4-
95

Indicator lights ...............................................................................................4-
101

Head-Up Display (HUD)............................................................4-105

Head-Up Display Information................................................................ 4-105

Head-Up Display Setting ......................................................................... 4-
106

Rear View Monitor (RVM) ....................................................... 4-106

Rear View Monitor Settings .................................................................... 4-
107

Rear View Monitor Operation................................................................ 4-108

Rear View Monitor Malfunction and Limitations...........................4-108

360

° camera monitoring system ............................................ 4-109

4

Features of your vehicle

CarManuals2.com

360

° camera monitoring system Malfunction and

Limitations

........................................................................................................4-

112

Reverse Parking Distance Warning (PDW) ............................ 4-112

Reverse Parking Distance Warning Settings ....................................4-
112

Reverse Parking Distance Warning Operation ............................... 4-113

Reverse Parking Distance Warning Malfunction and

Precautions

..................................................................................................... 4-

114

Forward/Reverse Parking Distance Warning (PDW)............ 4-116

Forward/Reverse Parking Distance Warning Settings .................4-117

Forward/Reverse Parking Distance Warning Operation............ 4-118

Forward/Reverse

Parking

Distance

Warning

Malfunction

and

Precautions

....................................................................................................

4-

120

Lighting .......................................................................................

4-121

Battery saver function ................................................................................4-
121

Headlamp delay function..........................................................................4-
121

Daytime Running Light (DRL)..................................................................4-
121

Lighting

control..............................................................................................4-

121

Operating high beam ................................................................................4-
124

Operating turn signals and lane change signals ...........................4-124

Operating front fog light ......................................................................... 4-125

High Beam Assist (HBA) ........................................................................... 4-
125

Wipers and washers ..................................................................4-128

Auto

control

....................................................................................................4-129

Operating windshield washers ............................................................. 4-130

Operating rear window wiper and washer switch ....................... 4-130

Welcome system ........................................................................ 4-131

Interior

lights .............................................................................. 4-132

Automatic turn off function..................................................................... 4-132

Map lamp......................................................................................................... 4-132

Features of your vehicle

4

CarManuals2.com

Vanity mirror lamp ..................................................................................... 4-
134

Glove box lamp ............................................................................................ 4-
134

Climate control system ............................................................. 4-135

System operation .........................................................................................4-
135

Climate control air filter.............................................................................4-137

Checking the amount of air conditioner refrigerant and compres

-

sor

lubricant ....................................................................................................4-137

Manual climate control system ................................................ 4-139

Heating and air conditioning .................................................................. 4-
141

Automatic climate control system...........................................4-146

Heating and air conditioning automatically .................................... 4-148

Heating and air conditioning manually............................................. 4-150

Windshield defrosting and defogging ...................................4-156

Defogging inside windshield.................................................................. 4-
156

Defrosting outside windshield............................................................... 4-156

Auto defogging system .............................................................................4-
157

Defroster ......................................................................................................... 4-
158

Defogging

logic............................................................................................ 4-

158

Storage compartment ...............................................................4-159

Center console storage ............................................................................ 4-
159

Glove box........................................................................................................ 4-
160

Interior features........................................................................ 4-160

Cup

holder...................................................................................................... 4-

160

Seat warmer ................................................................................................... 4-
161

Air ventilation seat .......................................................................................4-
163

Sun

visor...........................................................................................................4-

4

Features of your vehicle

CarManuals2.com

Side curtain.................................................................................................... 4-
170

Floor mat anchors....................................................................................... 4-
170

Luggage net holder......................................................................................4-
171

Cargo security screen ................................................................................ 4-
172

Luggage

board..............................................................................................4-

173

Luggage

tray..................................................................................................4-

174

Luggage side tray ........................................................................................4-
174

Exterior

features

........................................................................4-175

Roof rack .........................................................................................................4-175

Infotainment

system..................................................................4-176

Audio system .................................................................................................4-176

IC ................................................................................................. 4-180

7

4

4

Features of your vehicle

Keys

Features of your vehicle

Keys

Record your key number

The key code number 
is stamped on the key 
code tag attached to 
the key set. Should

you lose your keys, this number will 
enable an authorized Kia dealer to dupli

-

cate the keys easily. Remove the key 
code tag and store it in a safe place.
Also, record the key code number and 
keep it in a safe and handy place, but 
not in the vehicle.

W ARNING

Aftermarket keys
Use only Kia original parts for the igni

-

tion key in your vehicle. If an aftermarket 
key is used, the ignition switch or 
ENGINE START/STOP button may not 
return to ON after START. If this hap

-

pens, the starter will continue to operate 
causing possible fire due to excessive 
current in the wiring.

Remote key

With a remote key, you can lock or 
unlock the door and liftgate.

Lock (1)

All doors are locked if the lock button is 
pressed. If all doors are closed, the haz

-

ard warning lights will blink and the chime
will sound once to indicate that all doors
are locked.

Also, if the lock button is pressed once 
more within 4 seconds, the hazard warn

-

ing lights will blink and the chime will 
sound once to confirm that the door is 
locked.

However, if any door remains open, the 
hazard warning lights (and/or the chime) 
will not operate. But if all doors are closed
after the lock button is pressed, the
hazard warning lights will blink once.

Unlock (2)

The driver's door is unlocked if the unlock
button is pressed once. The haz

-

ard

warning lights will blink twice to indi

-

cate

that the driver's door is unlocked.

All doors are unlocked if the unlock but

-

ton is pressed once more within 4 sec

-

onds. The hazard warning lights will blink
and the chime will sound twice again to
indicate that all doors are unlocked. After
pressing this button, the doors will lock
automatically unless you open any door
within 30 seconds.

If you attempt to lock or unlock the door 
by pressing the door lock/unlock button 
in any of the following countries, the door
will not be locked or unlocked.
• When you want to lock or unlock the 

door in the ACC or ON state.

• When you want to lock a door in a car 

with one or more doors open.

Depending on the vehicle, the driver can
turn off or set the 2-press unlock setting
function.

OMQ4041587

CarManuals2.com

Features of your vehicle

8

4

Keys

NOTICE

If the remote key is inoperative due to 
exposure to water or liquids, it will not be 
covered by your manufacturer's vehicle 
warranty.

Panic alarm (3)

The horn sounds and the hazard warn

-

ing lights blink for about 30 seconds if 
this button is pressed for more than 0.5 
seconds. To stop the horn and lights, 
press any button on the transmitter.

Mechanical key

If the remote key does not operate nor

-

mally, you can lock or unlock the door 
by using the mechanical key.

To unfold the key, press the release but

-

ton then the key will unfold automati

-

cally.

To fold the key, fold the key manually 
while pressing the release button.

CAUTION

Key button operation
Do not fold the key without pressing the 
release button. This may damage the 
key.

Transmitter precautions

The transmitter will not work if any of 
the following occurs:
• The ignition key is in the ignition 

switch.

• You exceed the operating distance 

limit. (about 33 ft [10 m].)

• The battery in the transmitter is weak.

Other vehicles or objects may be
blocking the signal.

• The weather is extremely cold.
• The remote key is close to a radio 

transmitter such as a radio station or 
an airport which can interfere with 
normal operation of the transmitter.

When the transmitter does not work 
properly, open and close the door with 
the ignition key. If you have a problem 
with the remote key, contact an autho

-

rized Kia dealer.
• If the transmitter is in close proximity to 

your cell phone or smart phone, the 
signal from the transmitter could be 
blocked by normal operation of your 
cell phone or smart phone. This is 
especially important when the phone 
is active such as making calls, receiv

-

ing calls, text messaging, and/or 
sending/receiving emails. Avoid plac

-

ing the remote key and your cell 
phone or smart phone in the same 
pants or jacket pocket and maintain 
adequate distance between the two 
devices.

CAUTION

Transmitter
Keep the transmitter away from water or 
any liquid as, it can become damaged 
and not function properly.

OMQ4041588

CarManuals2.com

9

4

4

Features of your vehicle

Keys

NOTICE

If the remote key is inoperative due to 
exposure to water or liquids, it will not be 
covered by your manufacturer's vehicle 
warranty.

Smart key (if equipped)

With a smart key, you can lock or unlock
a door and even start the engine without
inserting the key.

Lock (1)

All doors are locked if the lock button is 
pressed. If all doors are closed, the haz

-

ard warning lights will blink and the chime
will sound once to indicate that all doors
are locked.

Also, if the lock button is pressed once 
more within 4 seconds, the hazard warn

-

ing lights will blink and the chime will 
sound once to confirm that the door is 
locked.

However, if any door remains open, the 
hazard warning lights (and/or the chime) 
will not operate. But if all doors are closed
after the lock button is pressed, the
hazard warning lights will blink once.

Unlock (2)

The driver's door is unlocked if the unlock
button is pressed once. The haz

-

ard

warning lights will blink twice to indi

-

cate

that the driver's door is unlocked.

All doors are unlocked if the unlock but

-

ton is pressed once more within 4 sec

-

onds. The hazard warning lights will blink
and the chime will sound twice again to
indicate that all doors are unlocked. After
pressing this button, the doors will lock
automatically unless you open any door
within 30 seconds.

If you attempt to lock or unlock the door 
by pressing the door lock/unlock button 
in any of the following countries, the door
will not be locked or unlocked.
• When you want to lock or unlock the 

door in the ACC or ON state.

• When you want to lock a door in a car 

with one or more doors open.

Depending on the vehicle, the driver can
turn off or set the 2-press unlock setting
function.

NOTICE

If the smart key is inoperative due to 
exposure to water or liquids, it will not be 
covered by your manufacturer's vehicle 
warranty.

Liftgate open (3) (if equipped)

The liftgate is opened (if equipped) if the 
button is pressed for more than 1 sec

-

ond.

Panic alarm (4)

The horn sounds and the hazard warn

-

ing lights blink for about 30 seconds if
this button is pressed for more than 0.5

OMQ4041584

CarManuals2.com

Features of your vehicle

10

4

Keys

seconds. To stop the horn and lights, 
press any button on the transmitter.

Remote start (5) (if equipped)

You

can start the vehicle using the remote 
start button (5) of the smart key.

To start the vehicle remotely:
• Lock the doors by pressing the door 

lock button (1) within 32 ft (10 m) dis

-

tance from the vehicle.

• Press the remote start button for over 2

seconds within 4 seconds after lock

-

ing the doors.

Press the remote start button once to 
turn off the vehicle.

If no further action for operating/driving 
the vehicle is taken, the vehicle will be 
turned off 10 minutes after starting the 
vehicle remotely.

While remote starting, the hazard warn

-

ing lights blink 3 times. If you want to 
stop the engine, press the Remote Start 
button (5) again.

Start-up

You can start the vehicle without insert

-

ing the key.

* For more information, refer to "ENGINE

START/STOP button (if equipped)" on
page 5-10.

Mechanical key

If the smart key does not operate nor

-

mally, you can lock or unlock the door
by using the mechanical key.

To remove the mechanical key, press 
and hold the release button (1) and 
remove the mechanical key (2).

To reinstall the mechanical key, put the 
key into the hole and push it until a
"click" sound is heard.

W ARNING

Smart key
Never leave the keys in your vehicle with 
unsupervised children. Leaving children 
unattended in a vehicle with a manual 
ignition key or a smart key is dangerous.

Children copy adults and they could 
place the key in the ignition switch or 
press the start button. The key would 
enable children to operate power win

-

dows or other controls, or even make the 
vehicle move, which could result in seri

-

ous bodily injury or death.

Smart key precautions

The smart key may not work if any of 
the following occur:
• The smart key is close to a radio 

transmitter such as a radio station or 
an airport which can interfere with 
normal operation of the smart key.

• The smart key is near a mobile two-

way radio system or a cellular phone.

OSK3048400NR

CarManuals2.com

11

4

4

Features of your vehicle

Keys

• Another vehicle's smart key is being 

operated close to your vehicle.

When the smart key does not work cor

-

rectly, open and close the door with the 
mechanical key and contact an autho

-

rized Kia dealer.

If the smart key is in close proximity to 
your cell phone or smart phone, the sig

-

nal from the smart key could be blocked 
by normal operation of your cell phone or
smart phone. This is especially important
when the phone is active, such as when
making calls, receiving calls, text
messaging, and/or sending/ receiving
emails. Avoid placing the smart key and
your cell phone or smart phone in the
same pants or jacket pocket and 
maintain adequate distance between the 
two devices.

To prevent the electronic key from 
becoming damaged by magnetic fields, 
do not leave it near the following electri

-

cal appliances:
• TVs
• Personal computers
• Cellular phones, cordless phones and 

battery chargers

• Table lamps
• Induction cookers

NOTICE

Loss of the smart key
A maximum of 2 smart keys can be reg

-

istered to a single vehicle.

If you happen to lose your smart key, you
will not be able to start the vehicle. You
should immediately take the vehicle and
remaining key to your authorized Kia
dealer (tow the vehicle, if necessary) to
protect it from potential theft.

CAUTION

Transmitter
Keep the transmitter away from water or 
any liquid, as it can become damaged 
and not function properly.

NOTICE

If the smart key is inoperative due to 
exposure to water or liquids, it will not be

covered by your manufacturer's vehicle 
warranty.

NOTICE

NOTICE

If you have to leave the vehicle's key with 
a parking attendant, remove the 
mechanical key for your own use and 
provide the attendant with the electronic 
key only.

NOTICE

When bringing a smart key onto an air

-

plane, make sure you do not press any 
button on the key while inside the cabin. 
If you are carrying the key in your bag 
etc., make sure that the buttons cannot 
be pressed accidentally. If you press a
button, the key may emit radio waves 
that could interfere with the operation of 
the aircraft.

Battery replacement

The remote key or smart key uses a 3
volt lithium battery which will normally 
last for several years.

CarManuals2.com

Features of your vehicle

12

4

Keys

If you are unsure how to use or replace 
the battery, contact an authorized Kia 
dealer.

1. Detach mechanical key from your 

smart key.

2. Pry open the key cover.
3. Replace the smart key cover with a

new battery. (CR2032) When replac

-

ing the battery, make sure the battery 
position is correct.

4. Install the battery in the reverse order 

of removal.

For remote key or smart key replace

-

ment, visit an authorized Kia dealer.

The remote key or smart key is designed 
to give you years of trouble-free use, 
however it can malfunction if exposed to 
moisture or static electricity. If you are 
unsure how to use or replace the bat

-

tery, contact an authorized Kia dealer.

Using the wrong battery can cause the 
remote key or smart key to malfunction. 
Be sure to use the correct battery.

An inappropriately disposed 
battery can be harmful to the 
environment and human 
health. Dispose the battery

according to your local law(s) or regula

-

tion.

W ARNING

THIS PRODUCT CONTAINS A
BUT

-

TON BATTERY

If swallowed, a lithium button battery can
cause severe or fatal injuries within 2
hours.
Keep batteries out of reach of children. 

If you think batteries may have been
swallowed or placed inside any part of the
body, seek immediate medical atten

-

tion.

CAUTION

Remote key/Smart key damage
The remote key or smart key can mal

-

function if dropped, exposed to mois

-

ture, static electricity, heat or direct 
sunlight.

W ARNING

IC WARNING
This device complies with Industry Can

-

ada licence-exempt RSS standard(s).

1. This device may not cause interfer

-

ence, and

2. This device must accept any interfer

-

ence, including interference that may 
cause undesired operation of the 
device.

This device complies with Indus

-

try Canada licence-exempt RSS
standard(s).

Operation is subject to the following 
conditions:

1. This device may not cause interfer

-

ence, and

2. This device must accept any interfer

-

ence, including interference that may

OSK3048402NR

CarManuals2.com

13

4

4

Features of your vehicle

Keys

cause undesired operation of the 
device.

3. Changes or modifications not 

expressly approved by the party 
responsible for compliance could void 
the user's authority to operate the 
device.

NOTICE

Changes or modifications not expressly 
approved by the party responsible for 
compliance could void the user's author

-

ity to operate the equipment. If the smart
key is inoperative due to changes or
modifications not expressly approved by
the party responsible for compliance, it
will not be covered by your manufac

-

turer's vehicle warranty.

Limp home (override) procedure 

When you turn the ignition switch to the 
ON position, if the immobilizer indicator (

(immobilizer indicator)) goes off 

after blinking 5 times, your transponder 
equipped in the ignition key is out of 
order. You cannot start the engine with

-

out the limp home procedure. To start the
engine, you have to input your pass

-

word by using the ignition switch. Your 
password is only available from an 
authorized Kia dealership. Contact an 
authorized dealer for more information.

The following procedure is how to input 
your password of

1. Turn the ignition switch to the ON 

position. The immobilizer indicator (

(immobilizer indicator)) will blink

5 times and go off indicating the 
beginning of the limp home proce

-

dure.

2. Turn the ignition switch to the ACC 

position.

3. To enter the first digit (in this example 

“2”), turn the ignition switch to the ON 
and ACC position twice. Perform the 
same procedure for the next digits 
between 3 seconds and 10 seconds 
(for example, for

“3”, turn the ignition 

ON and ACC 3 times).

4. If all of the digits have been input suc

-

cessfully, you have to start the engine 
within 30 seconds. If you attempt to 
start the engine after 30 seconds, the 
engine will not start and you will have 
to input your password again.

After performing the limp home pro

-

cedure, you have to see an authorized 
Kia dealer immediately to inspect and 
repair your ignition key or immobilizer 
system.

CarManuals2.com

Features of your vehicle

14

4

Immobilizer system

Immobilizer system

Folding key immobilizer system

Your immobilizer system is comprised of a
small transponder in the ignition key and
electronic devices inside the vehicle.

With the immobilizer system, whenever 
you insert your ignition key into the igni

-

tion switch and turn it to ON, it checks 
and determines and verifies that the 
ignition key is valid.

If the key is determined to be valid, the 
engine will start.

If the key is determined to be invalid, the 
engine will not start.

Deactivating the immobilizer sys

-

tem

Insert the ignition key into the key cylin

-

der and turn it to the ON position.

Activating the immobilizer sys

-

tem

Turn the ignition key to the OFF position. 
The immobilizer system activates auto

-

matically. Without a valid ignition key for 
your vehicle, the engine will not start.

Your Immobilizer password is a cus

-

tomer unique password and should be 
kept confidential. Do not leave this num

-

ber anywhere in your vehicle.

NOTICE

Keep each key separately in order to 
avoid a starting malfunction.

NOTICE

In order to prevent theft of your vehicle, 
do not leave spare keys anywhere in 
your vehicle. Your immobilizer password 
is a customer unique password should

be kept confidential. Do not leave this 
number anywhere in your vehicle.

NOTICE

• Do not put metal accessories near the 

ignition switch.

• Metal accessories may interrupt the 

transponder signal and may prevent 
the engine from being started.

NOTICE

If you need additional keys or lose your 
keys, consult an authorized Kia dealer.

CAUTION

Immobilizer damage
Do not expose your immobilizer system 
to moisture, static electricity or rough 
handling. This may damage your immo

-

bilizer.

CAUTION

Immobilizer alterations
Do not change, alter or adjust the immo

-

bilizer system because it could cause the
immobilizer system to malfunction.

Smart key immobilizer system

The immobilizer system protects your 
vehicle from theft. If an improperly 
coded key (or other device) is used, the 
vehicle's power system is disabled.

When the ENGINE START/STOP
button is placed in the ON position, the
immobi

-

lizer system indicator should

come on briefly, then go off. If the
indicator starts to blink, the system does
not recognize the coding of the key.

Place the ENGINE START/STOP
button in the OFF position, then place
the

CarManuals2.com

15

Changes or modifications not expressly 
approved by the party responsible for 
compliance could void the user's author

-

ity to operate the equipment. If the smart
key is inoperative due to changes or
modifications not expressly approved by
the party responsible for compliance,
it will not be covered by your manufac

-

4

turer's vehicle warranty.

4

Features of your vehicle

Immobilizer system

ENGINE START/STOP button in the
ON position again.

If the system repeatedly does not recog

-

nize the coding of the key, contact your 
Kia dealer.

Do not attempt to alter this system or 
add other devices to it. Electrical prob

-

lems could result that may make your 
vehicle inoperable.

Deactivating the immobilizer sys

-

tem

Change the ENGINE START/STOP
but

-

ton to the ON position.

Activating the immobilizer sys

-

tem

Change the ENGINE START/STOP
but

-

ton to the OFF position. The 

immobilizer system activates
automatically. Without a valid smart key
for your vehicle, the engine will not start.

NOTICE

When starting the vehicle, do not use the 
key with other immobilizer keys around. 
Otherwise, the vehicle may not start or 
may stop soon after it starts. Keep each 
key separate in order to avoid a starting 
malfunction.

NOTICE

If you need additional keys or lose your 
keys, contact an authorized Kia dealer.

This device complies with Indus

-

try Canada licence-exempt RSS
standard(s).

Operation is subject to the following two 
conditions:

1. This device may not cause interfer

-

ence, and

2. This device must accept any interfer

-

ence, including interference that may 
cause undesired operation of the 
device.

NOTICE

CarManuals2.com

Features of your vehicle

16

4

Theft-alarm system

Theft-alarm system

This system is designed to provide pro

-

tection from unauthorized entry into the 
vehicle.
This system is operated in three stages:

Armed stage

• Theft-alarm stage

Disarmed stage

If triggered, the system provides an 
audible alarm with blinking of the haz

-

ard warning lights.

CAUTION

Do not attempt to alter this system or 
add other devices to it.

Armed stage

Using the remote key

Park the vehicle and stop the engine. 
Arm the system as described below.

1. Turn off the engine and remove the 

ignition key from the ignition switch.

2. Make sure that all doors (and liftgate) 

and the engine hood are closed and 
latched.

3. Lock the doors by pressing the lock 

button on the folding key.

After completion of the steps above, the 
hazard warning lights will blink once to 
indicate that the system is armed.

If any door (and liftgate) or engine hood 
remains open, the hazard warning lights 
won't operate and theft-alarm will not 
arm. After this, if all doors (and liftgate) 
and engine hood are closed, the hazard 
warning lights blink once.

Using the smart key

Park the vehicle and stop the engine. 
Arm the system as described below.

1. Turn off the engine.
2. Make sure that all doors, the hood 

and liftgate are closed and latched.

3. Lock the doors by pressing the button 

of the front outside door handle with 
the smart key in your possession. 
After completion of the steps above, 
the hazard warning lights will operate 
once to indicate that the system is 
armed. If any door (or liftgate) or hood 
remains open, the hazard warning 
lights and the chime will not operate 
and the theft-alarm will not arm. If all 
doors and liftgate and hood are closed
after the lock button is pressed, the
hazard warning lights blink once. The
system can also be armed by locking
the doors with the key from the front
doors; however, the hazard warning
lights will not blink using this method.

4. Lock the doors by pressing the lock 

button on the smart key. After com

-

pletion of the steps above, the hazard 
warning lights will operate once to 
indicate that the system is armed.

NOTICE

The theft-alarm system can be deacti

-

vated by an authorized Kia dealer.

CarManuals2.com

17

4

4

Features of your vehicle

Theft-alarm system

If you want this feature, consult an 
authorized Kia dealer.

NOTICE

Do not arm the system until all passen

-

gers have left the vehicle. If the system is 
armed while a passenger(s) remains in 
the vehicle, the alarm may be activated 
when the remaining passenger(s) leaves 
the vehicle. If any door (or liftgate) or 
hood is opened within 30 seconds after 
the system enters the armed stage, the 
system will be disarmed to prevent 
unnecessary alarm.

Theft-alarm stage

The alarm will be activated if any of the 
following occurs while the system is 
armed.
• A front or rear door is opened without 

using the smart key.

• The liftgate is opened without using 

the smart key.

• The hood is opened.
The horn will sound and the hazard 
warning lights will blink continuously for 
approximately 27 seconds, and repeat 
the horn 3 times unless the system is 
disarmed. To turn off the system, unlock 
the doors with the folding key or smart 
key.

Disarmed stage

The system will be disarmed when:

Using the remote key

• The door unlock button is pressed.

The engine is started. (within 3 sec

-

onds)

• The ignition switch is in the "ON" posi

-

tion for 30 seconds or more.

Using the smart key

• The door unlock button is pressed.
• The button of the front outside door is 

pressed while carrying the smart key.

• The engine is started. (within 3 sec

-

onds)

After pressing the unlock button, the 
hazard warning lights will blink and the 
chime will sound twice (in smart key) to 
indicate that the system is disarmed.

After pressing the unlock button, if any 
door (or liftgate) is not opened within 30 
seconds, the system will be rearmed.

NOTICE

• Avoid trying to start the engine while 

the alarm is activated. The vehicle 
starting motor is disabled during the 
theft-alarm stage.

If the system is not disarmed with the 
folding key, insert the key into the 
ignition switch, turn the ignition switch 
to the ON position and wait for 30 
seconds. Then the system will be dis

-

armed.

• If you lose your keys, consult your

authorized Kia dealer.

CAUTION

Adjusting alarm system
Do not change, alter or adjust the theft 
alarm system in your vehicle. Improper 
installation of the alarm system could 
damage the vehicle or cause the system 
to malfunction.

NOTICE

Malfunctions caused by improper alter

-

ations, adjustments or modifications to
the theft-alarm system are not covered
by your vehicle manufacturer warranty.

CarManuals2.com

Features of your vehicle

18

4

Door locks

This device complies with Indus

-

try Canada licence-exempt RSS
standard(s).

Operation is subject to the following two 
conditions:

1. This device may not cause interfer

-

ence, and

2. This device must accept any interfer

-

ence, including interference that may 
cause undesired operation of the 
device.

NOTICE

Changes or modifications not expressly 
approved by the party responsible for 
compliance could void the user's author

-

ity to operate the equipment. If the smart
key is inoperative due to changes or
modifications not expressly approved by
the party responsible for compliance, it
will not be covered by your manufac

-

turer's vehicle warranty.

Door locks

Know how to use the door lock so that 
you can lock or unlock the door if neces

-

sary.

With the smart key

Carrying the smart key, you may lock 
and unlock the vehicle doors (and lift

-

gate). Also, you may start the engine. 
Refer to the following for more details.

Locking

Pressing the button of the front driver 
side door handles with all doors closed 
and any door unlocked, locks all the 
doors. If all doors and engine hood are 
closed, the hazard warning lights will 
blink once to indicate that all doors are 
locked.

The button will only operate when the 
smart key is within 28 ~ 40 inches (0.7 ~
1 m) from the driver side door handle. If 
you want to make sure that a door has 
locked or not, you should pull the driver 
side door handle.

Even though you press the driver side 
door handle buttons, the doors will not 
lock and the chime will sound for 3 sec

-

onds if any of following occur:
• The smart key is in the vehicle.

OMQ4040522

CarManuals2.com

19

4

4

Features of your vehicle

Door locks

• The ignition switch or ENGINE START/

STOP button is in the ACC or ON
posi

-

tion.

• Any door except the liftgate is open.

Unlocking

Pressing the button of the front driver 
side door handles with all doors closed 
and locked, unlocks all the doors. The 
hazard warning lights blink twice to indi

-

cate that all doors are unlocked.

The button will only operate when the 
smart key is within 28 ~ 40 inches (0.7 ~
1 m) from the front driver side door han

-

dle.

When the smart key is recognized in the 
area of 28 ~ 40 inches (0.7 ~ 1 m) from 
the front driver side door handle, other 
people can also open the door without 
possession of the smart key.

After pressing the button, the doors will
lock automatically unless you open any
door within 30 seconds.

With the mechanical key

1. Pull out the door handle.
2. Press the lever (1) located inside the 

bottom part of the cover with a key or 
flat-head screwdriver.

3. Push out the cover (2) while pressing 

the lever (only the driver's door can be 
locked/unlocked).

4. Turn the key toward the rear of the 

vehicle to unlock and toward the front 
of the vehicle to lock. Only the driver's 
door can be locked or unlocked.

• Doors can also be locked and 

unlocked with the transmitter.

• Once the doors are unlocked, they 

may be opened by pulling the door 
handle.

• When closing the door, push the door 

by hand. Make sure the doors are 
closed securely.

NOTICE

• When locking the door with a

mechanical key, be aware that only 
the driver's door can be locked/ 
unlocked.

• To lock all doors, operate the central 

lock switch inside the vehicle. Open 
the car door using the inner handle, 
then close the door and lock the 
driver's door with a mechanical key.

• Refer to "Operating door locks from 

inside the vehicle" on page 4-20 to 
lock from inside the vehicle.

NOTICE

• Be careful not to lose or scratch the 

cover when removing it.

• When the key cover freezes and does 

not open, tap it lightly or indirectly 
warm (hand temperature, etc.) it up.

• Do not apply excessive force to the 

door and door handle. It may be dam

-

aged.

OMQ4AH040543

CarManuals2.com

Features of your vehicle

20

4

Door locks

NOTICE

• In cold and wet climates, door lock 

and door mechanisms may not work 
properly due to freezing conditions.

• If the door is locked/unlocked multiple 

times in rapid succession with either 
the vehicle key or door lock switch, the
system may stop operating tem

-

porarily in order to protect the circuit 
and prevent damage to system com

-

ponents.

W ARNING

• Securely close your door before you 

begin driving. Failure to fully close 
your door may cause it to be opened 
during vehicle operation.

• Keep your body out of the way of the 

closing door to prevent injuries.

W ARNING

If any passengers must remain in the 
vehicle while it is very hot or cold out

-

side, there is risk of injuries or danger to 
life. Do not lock the vehicle from the out

-

side when there are passengers in the 
vehicle.

CAUTION

Do not unnecessarily open and close the 
door repeatedly or with excessive force. 
Such action can damage the vehicle 
door.

NOTICE

Always place the ENGINE
START/STOP button in the OFF
position, engage the parking brake,
close all windows, and lock all doors
when leaving your vehicle unattended.

• To lock a door without the key, push 

the central door lock button (2) when 
the ignition switch or ENGINE START/ 
STOP button is in the OFF position 
and close the door (3).

• If you lock the door with the central 

door lock button (2), all vehicle doors 
will lock automatically.

NOTICE

Always remove the ignition key, engage 
the parking brake, close all windows, 
and lock all doors when leaving your 
vehicle unattended.

Operating door locks from inside 
the vehicle

You can operate door locks with the 
door lock handle or central door lock 
switch.

OMQ4041005

CarManuals2.com

21

4

4

Features of your vehicle

Door locks

With the door handle

• Front door

If the inner door handle is pulled when
the door is locked, the door will unlock
and open.

• Rear door

If the inner door handle is pulled once
when the door is locked, the door will
unlock.

If the inner door handle is pulled once
more, the door will open.

Door lock malfunction
If a power door lock ever fails to function 
while you are in the vehicle, try one or 
more of the following techniques to exit:
• Operate the door unlock feature 

repeatedly (both electronic and man

-

ual) while simultaneously pulling on 
the door handle.

• Operate the other door locks and han

-

dles, front and rear.

• Lower a front window and use the key 

to unlock the door from outside.

• Move to the cargo area and open the 

liftgate.

W ARNING

Do not pull the inner door handle of 
driver's (or passenger's) door while the 
vehicle is moving.

With central door lock switch

Driver side

Passenger side

1. Door Lock

2. Door Unlock

3. Doors indicating light
Operate by pressing the central door 
lock switch.
• To lock all vehicle doors, press the 

central door lock switch (1) of driver 
and passenger side.

OMQ4A040006

OMQ4AH040416

OMQ4AH040418

CarManuals2.com

Features of your vehicle

22

4

Door locks

• To unlock all vehicle doors, press cen

-

tral door unlock switch (2) of driver and
passenger side.

When all vehicle doors are locked, the 
indicating lights (3) on the driver's door 
and passenger's door will turn on. If any 
door is unlocked, it would go off.

Any door is opened, the doors will not 
lock even though the central door lock 
switch is pressed.

W ARNING

Doors
• The doors should always be fully 

closed and locked while the vehicle is 
in motion to prevent accidental open

-

ing of the door. Locked doors will also 
discourage potential intruders when 
the vehicle stops or slows down.

• Be careful when opening doors and 

watch out for vehicles, motorcycles, 
bicycles or pedestrians approaching 
the vehicle in the path of the door. 
Opening a door when something is 
approaching can result in an accident 
to cause vehicle damage or serious 
injury.

NOTICE

Unlocked vehicles
Leaving your vehicle unlocked can 
increase the risk of vehicle theft or any 
possible criminal harm caused by some

-

one hiding in your vehicle while you are 
gone. Always remove the ignition key, 
engage the parking brake, close all win

-

dows and lock all doors when leaving 
your vehicle unattended.

W ARNING

Unattended children/animals Never
leave children or animals unat

-

tended

in your vehicle. An enclosed
vehicle can become extremely hot, caus

-

ing death or severe injury to unattended
children or animals who cannot escape
the vehicle.

Door lock/unlock features

The vehicle is equipped with door lock/
unlock features for the safety and con

-

venience of passengers.

CarManuals2.com

Impact sensing door unlock sys

-

tem

All doors will automatically unlock when 
an impact causes the air bags to deploy.

Speed sensing door lock system

All doors will automatically lock after the 
vehicle speed exceeds 15 km/h (10 
mph).

You can activate or deactivate the auto 
door lock/unlock features in the vehicle. 
Refer to "User settings mode" on page 4-
82.

Child-protector rear door lock (if
equipped)

The child safety lock is provided to help 
prevent children from accidentally open

-

ing the rear doors from inside the vehi

-

cle.


Content      ..     1      2      3      4      ..