FANUC MANUAL GUIDE i. OPERATOR’S MANUAL - page 23
2.VIEWING AND SETTING TOOL OFFSET VALUES TOOL MANAGEMENT
B-63874EN/05
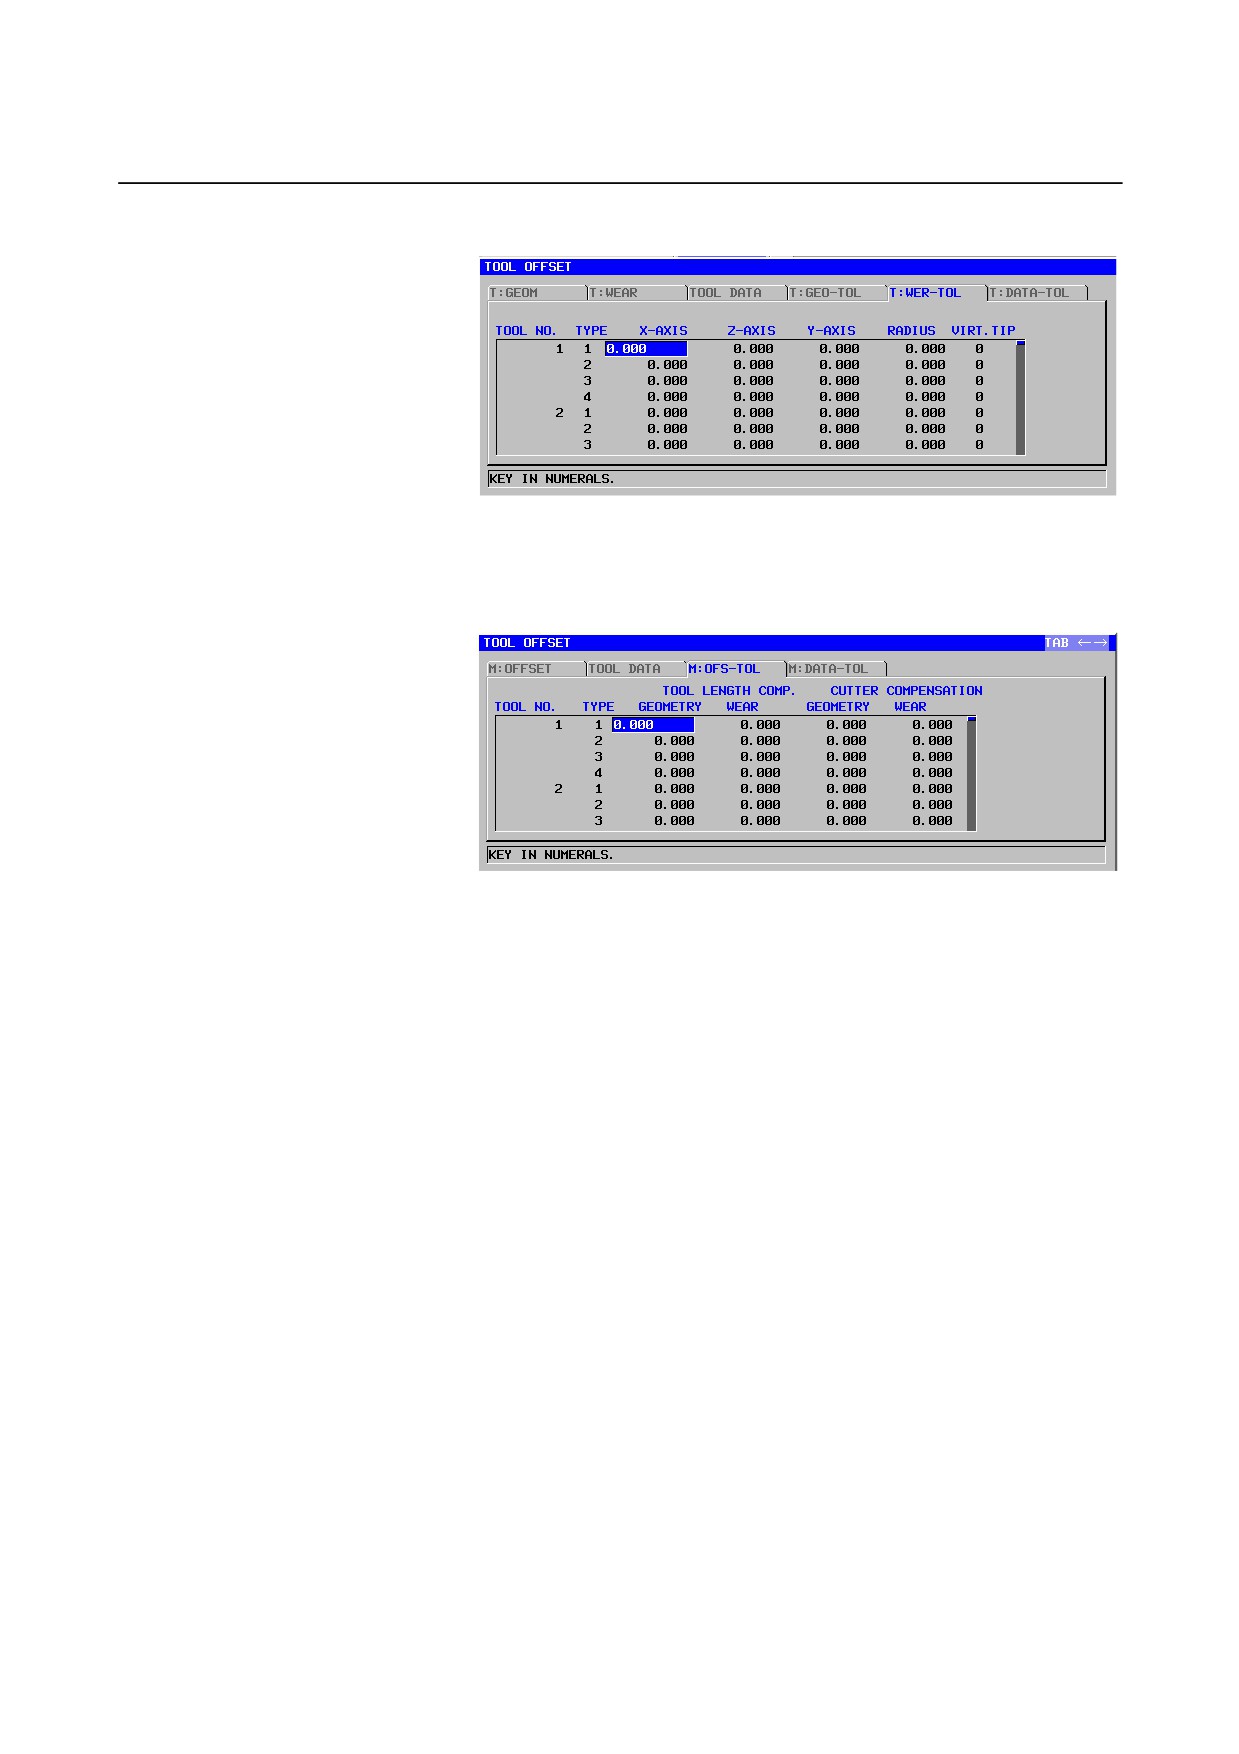
(2) Turning wear offset screen (on a tool number by tool number basis)
The display items are the same as those on the “Turning geometric
offset screen (on a tool number by tool number basis)”.
(3) Milling offset screen (on a tool number by tool number basis)
The display items are the same as those on the “Turning geometric
offset screen (on a tool number by tool number basis)”.
- 642 -
B-63874EN/05
TOOL MANAGEMENT
2.VIEWING AND SETTING TOOL OFFSET VALUES
2.3
TOOL OFFSET
A value of up to six digits (not including '-' and '.') can be set. For tool
offset in T mode, if the “7-digit tool offset input” option is effective, a
value of up to seven digits can be set.
The valid number of digits in the fractional part depends on the
settings of the NC.
- 643 -
2.VIEWING AND SETTING TOOL OFFSET VALUES TOOL MANAGEMENT
B-63874EN/05
2.4
NOTES
NOTE
If bit 1 (TOF) of parameter No. 14823 is 0, the tool
number-by-tool number offset value setting screen
does not appear.
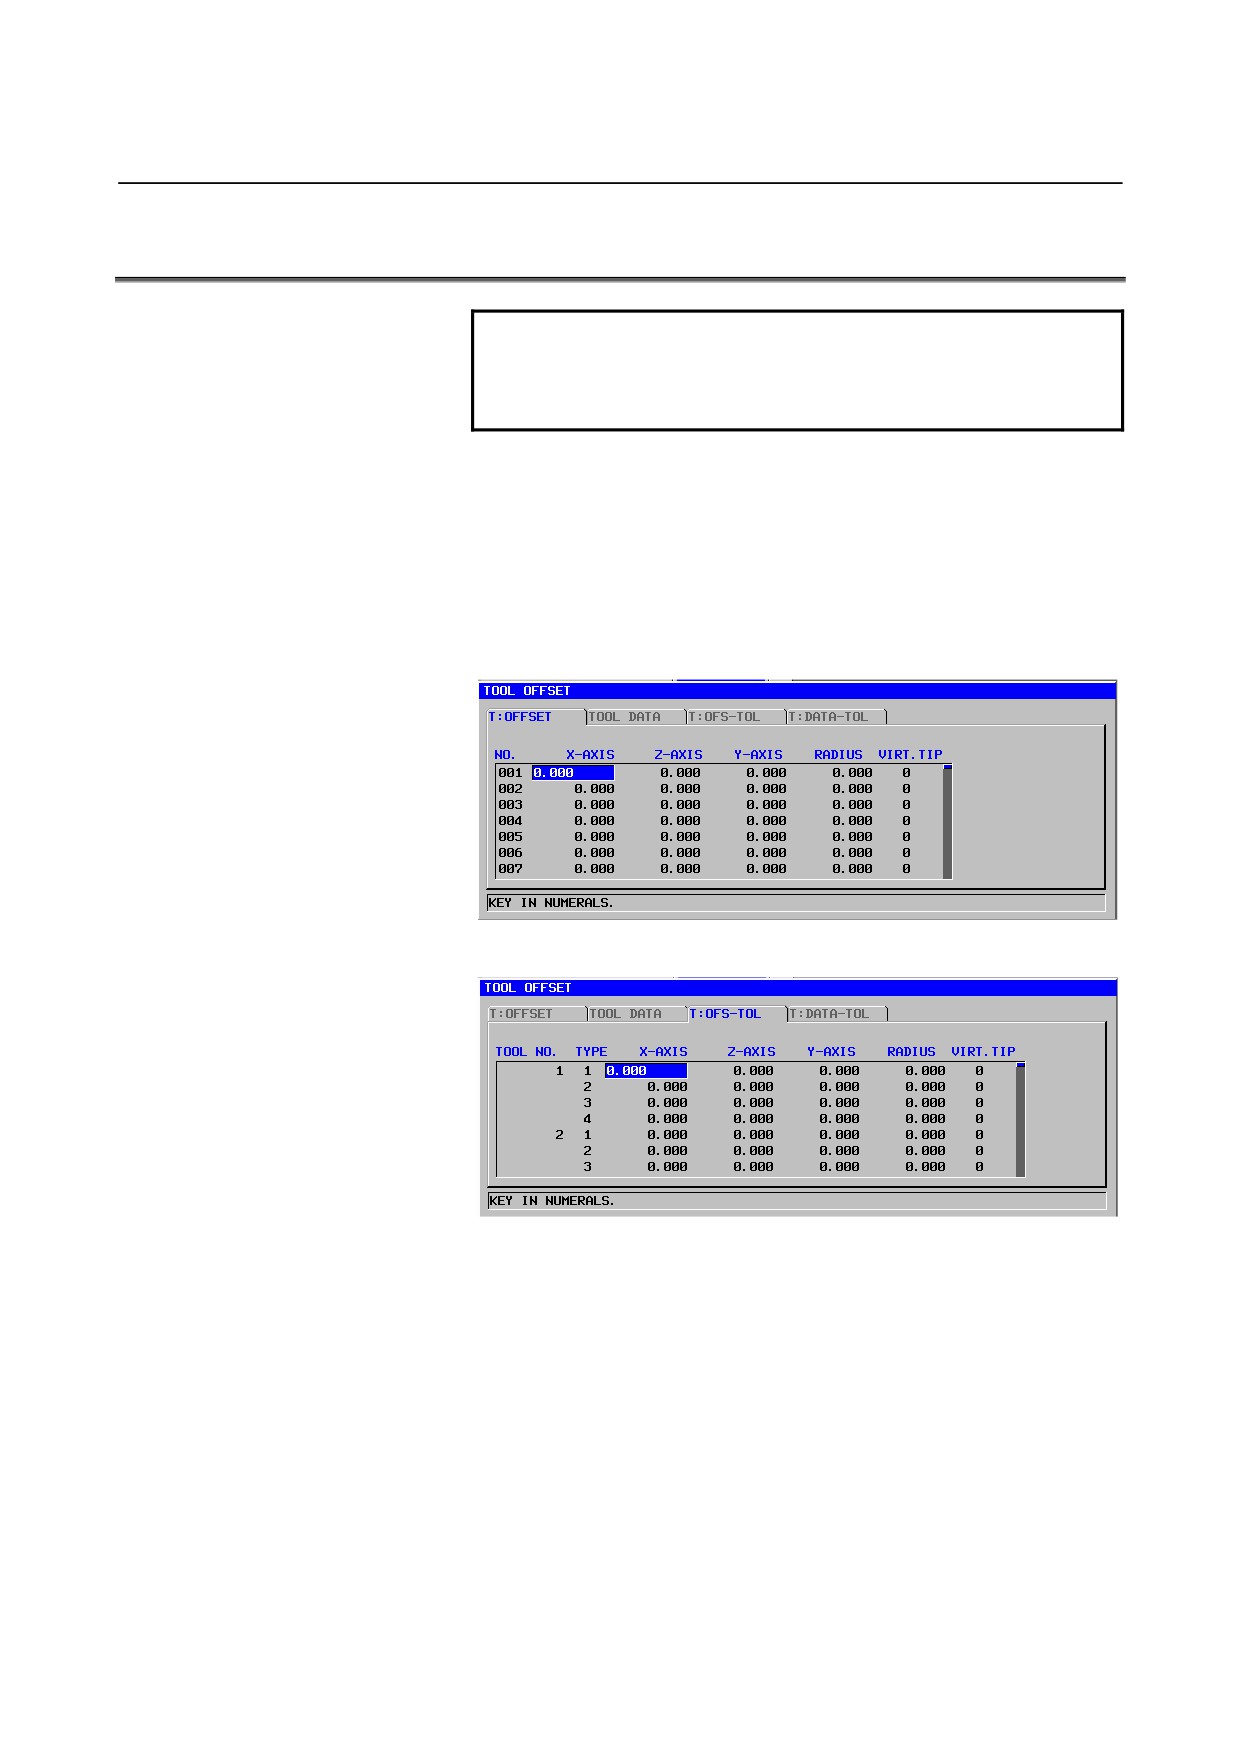
Screens that appear differently depending on whether options are provided
“Tool geometric and wear offset” (lathe systems (standard models and
complex machining functions)), “tool offset memory type B”, and
“tool offset memory type C”
(machining systems) are optional
functions. If these options are not provided, screens appear as shown
below.
- Screen that appears when “Set tool offset” is selected
- Turning offset screen (on a tool number by tool number basis)
- 644 -
B-63874EN/05
TOOL MANAGEMENT
2.VIEWING AND SETTING TOOL OFFSET VALUES
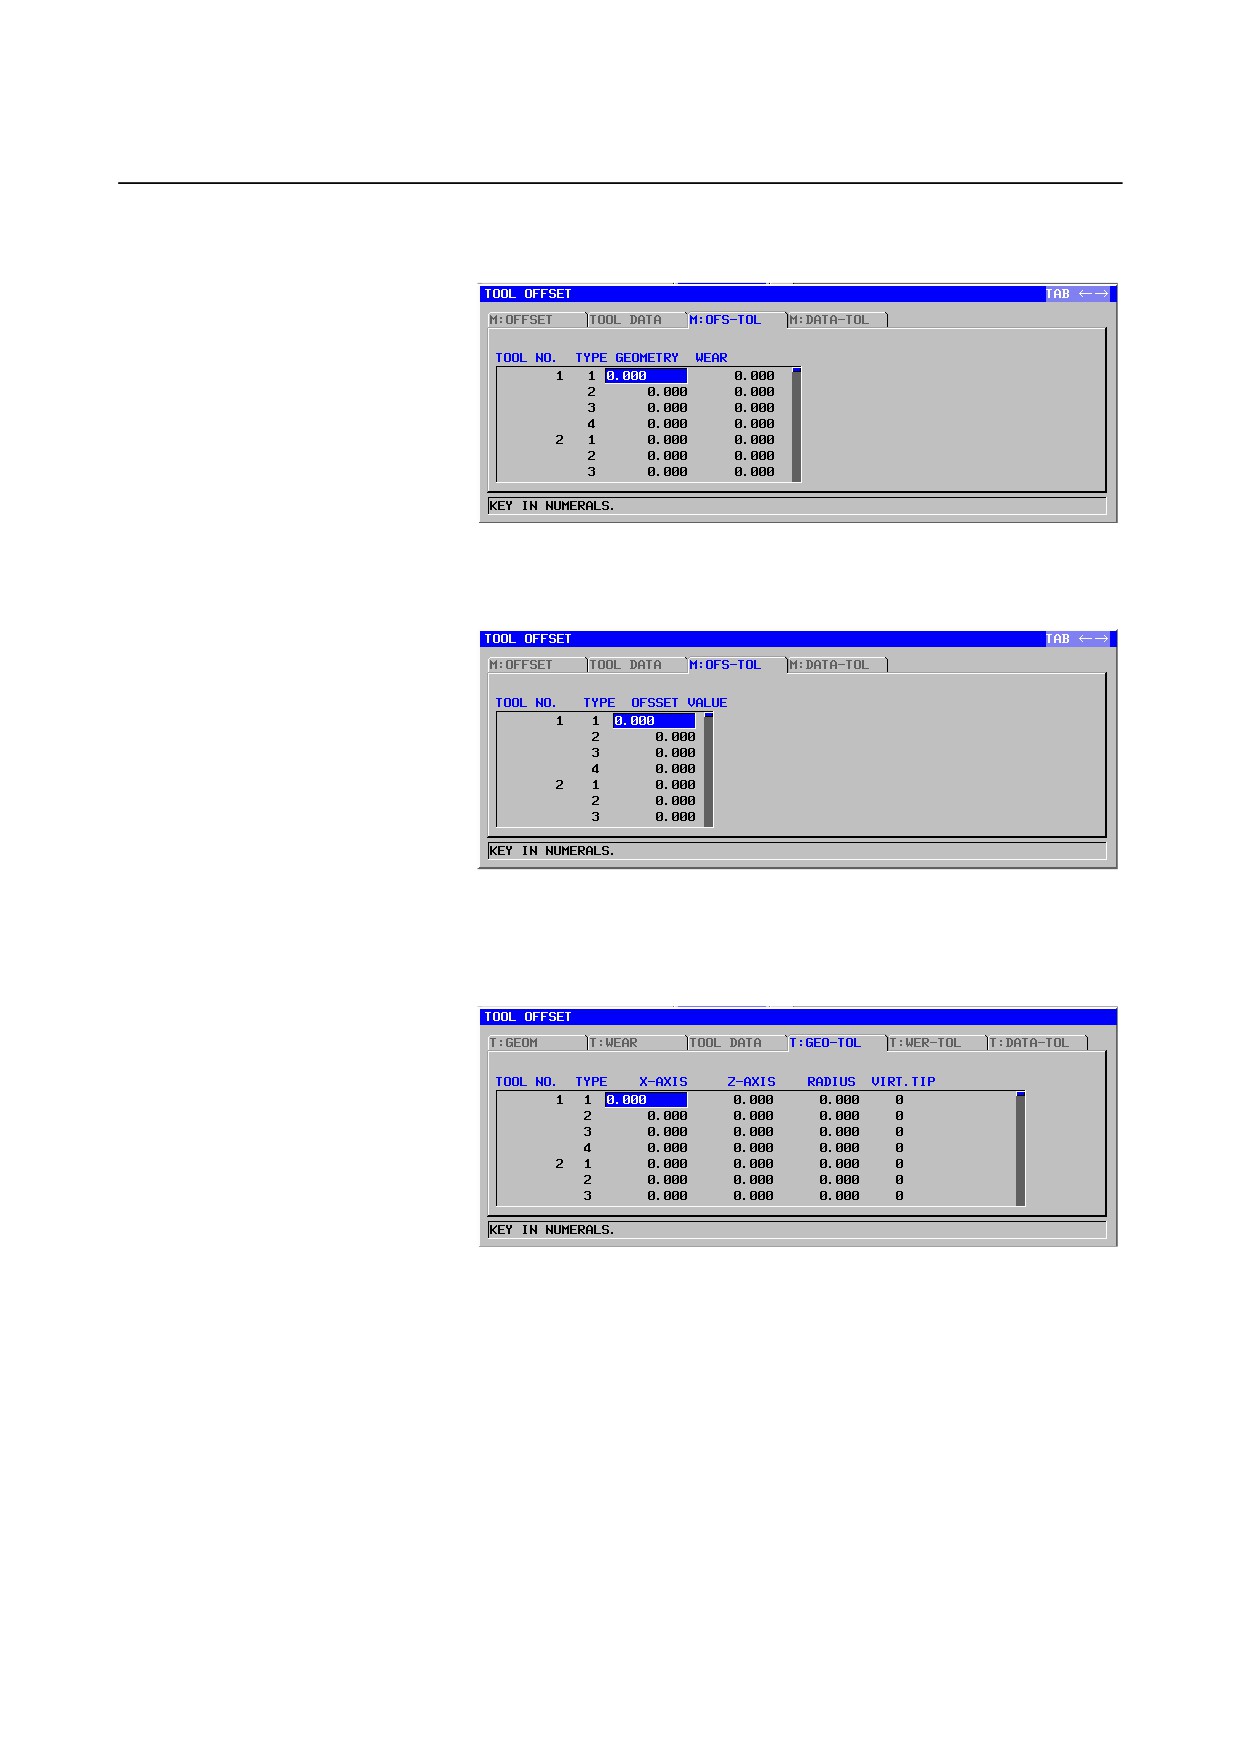
- Milling offset screen (on a tool number by tool number basis)
(If “tool offset memory type B” is provided (machining systems))
(If “tool offset memory type B” and “tool offset memory type C” are
not provided
(machining systems) and
“tool geometric and wear
offset” is not provided (complex machines))
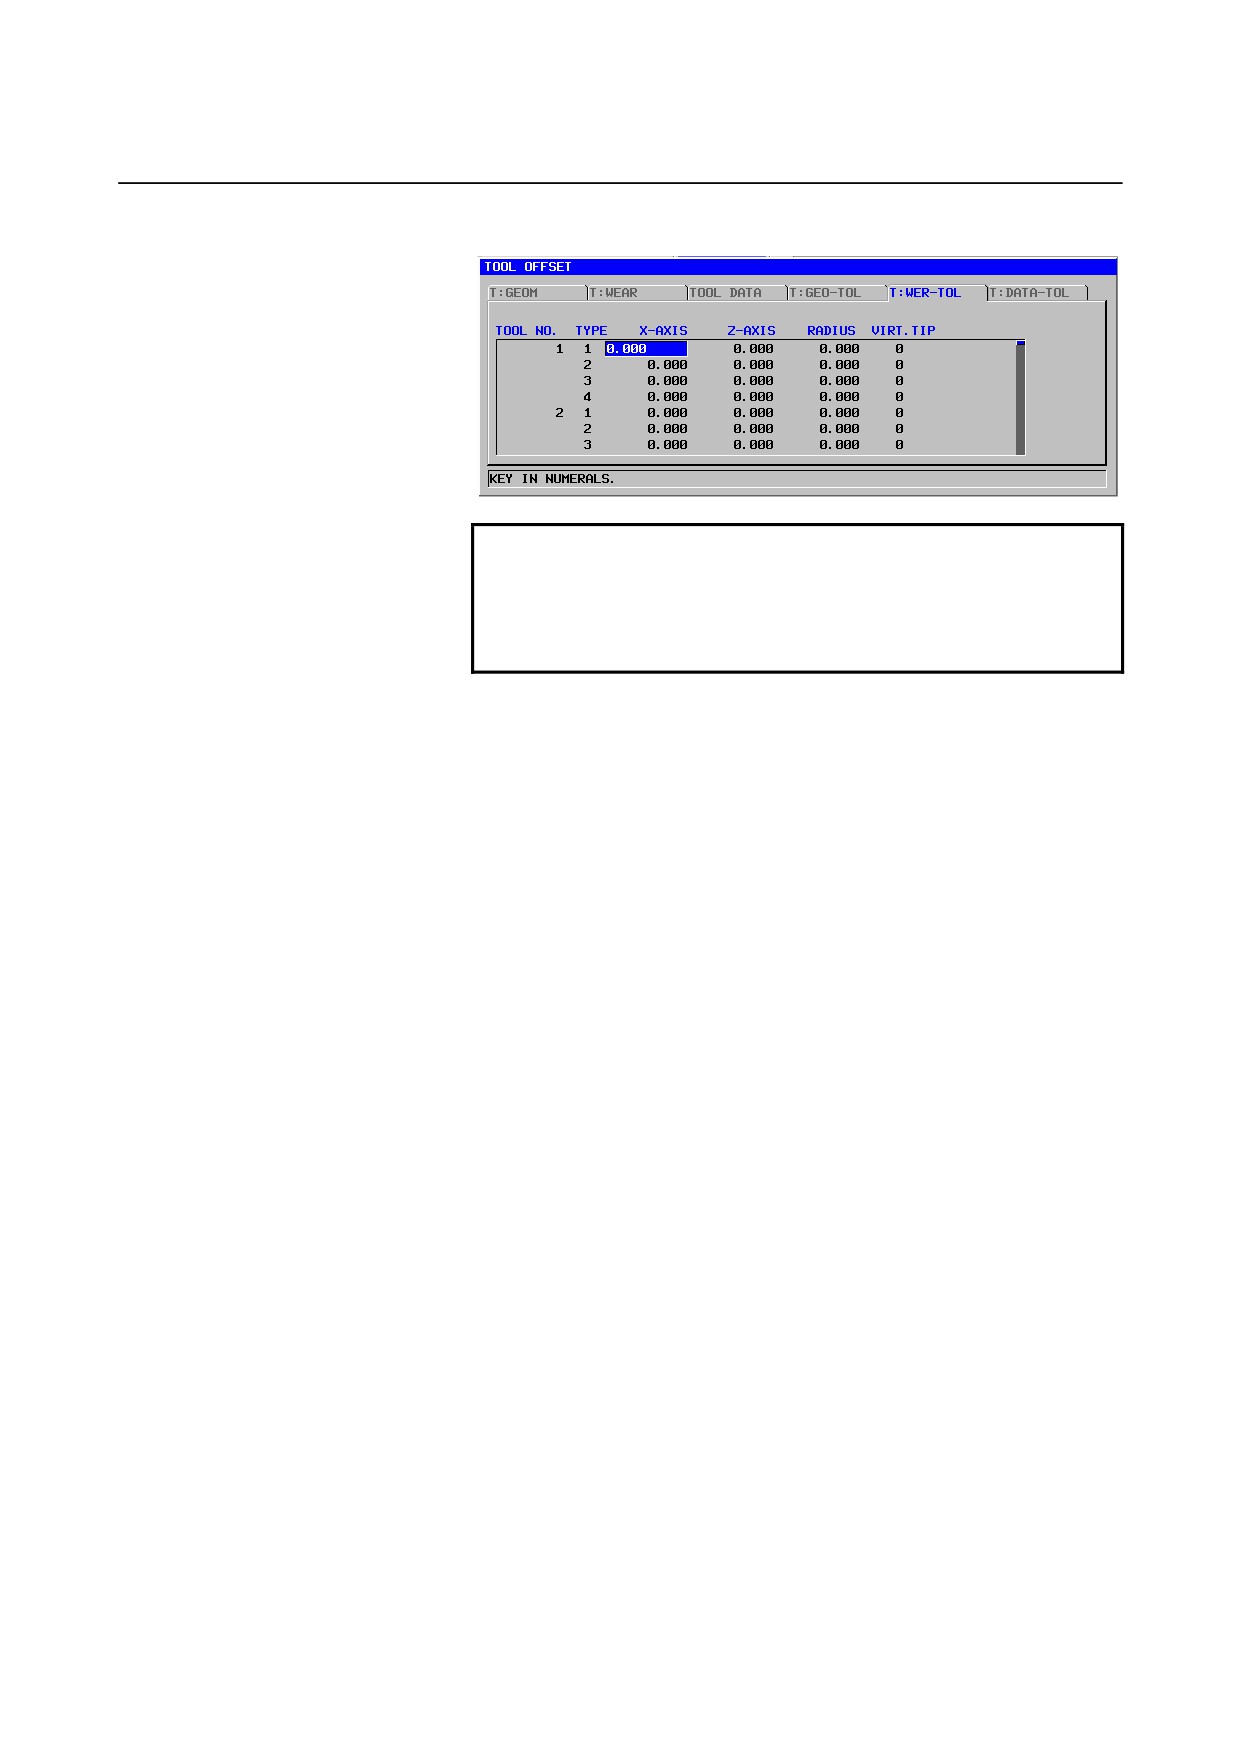
“Y-axis offset” is an optional function. If this option is not provided,
screens appear as shown below.
- Turning geometric offset screen (on a tool number by tool number basis)
- 645 -
2.VIEWING AND SETTING TOOL OFFSET VALUES TOOL MANAGEMENT
B-63874EN/05
- Turning wear offset screen (on a tool number by tool number basis)
NOTE
1 On machining center CNCs, the turning tool offset
setting screen does not appear.
2 For lathe CNCs (standard models), the milling tool
offset setting screen does not appear.
- 646 -
B-63874EN/05
TOOL MANAGEMENT
2.VIEWING AND SETTING TOOL OFFSET VALUES
2.5
DISABLE WARNING MESSAGE
WRONG VALUE OF PARAMETER No. 14823 :
Displayed if the value of parameter No. l4823 is outside the
range of 1 to 999 and the tool number-by-tool number tool offset
setting screen is selected. No data is displayed on the screen.
TOOL MANAGEMENT DATA ACCESS ERROR :
Displayed if the system fails to read or write tool and offset
numbers.
- 647 -
3.VIEWING AND SETTING TOOL MANAGEMENT DATA TOOL MANAGEMENT B-63874EN/05
3
VIEWING AND SETTING TOOL
MANAGEMENT DATA
This screen is effective only if bit 3 (TMG) of parameter No. 14823 is
1.
- 648 -
B-63874EN/05 TOOL MANAGEMENT
3.VIEWING AND SETTING TOOL MANAGEMENT DATA
3.1
SELECTING THE TOOL MANAGEMENT DATA SETTING
SCREEN
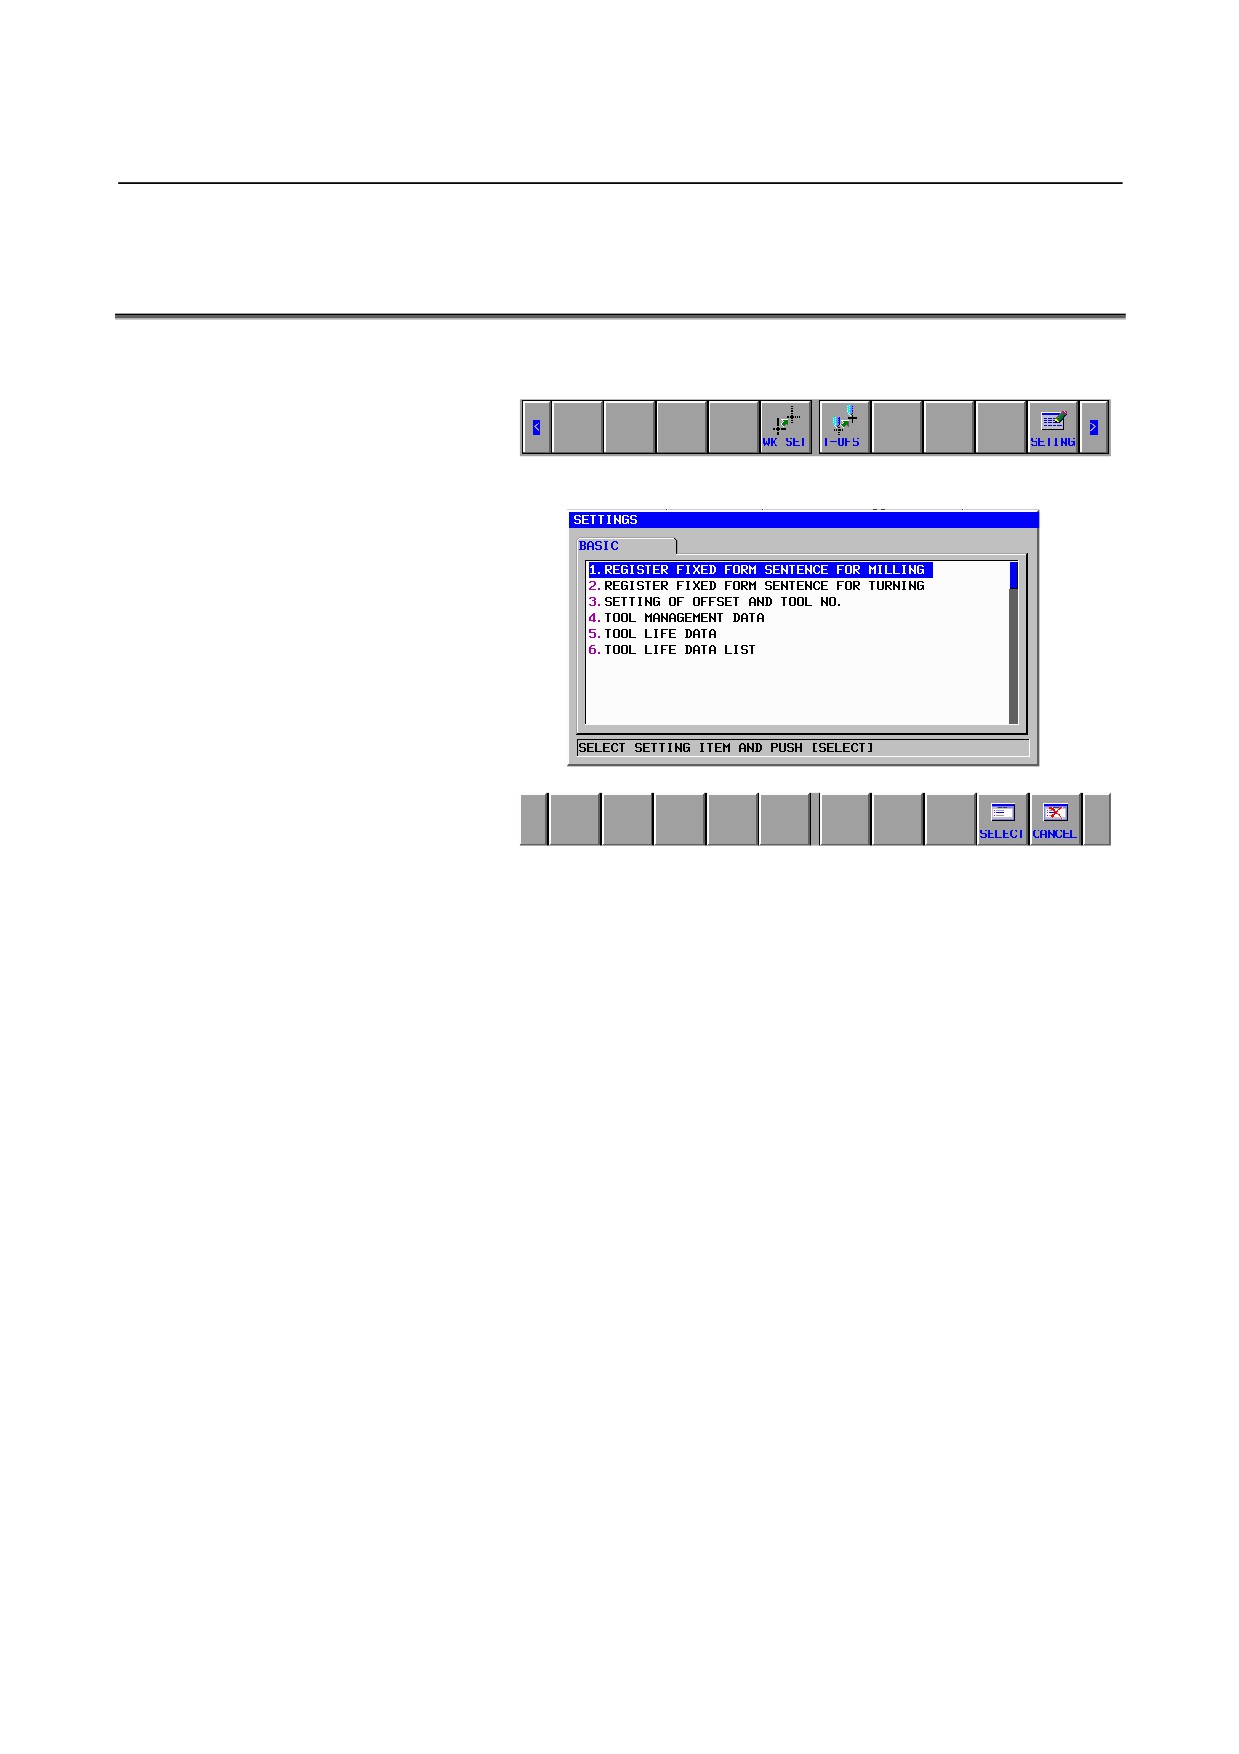
<1> Press [>] on the initial screen of each mode to display the soft
keys shown below, then press [SETING]:
<2> The following screen appears.
<3> From this screen, select “TOOL MANAGEMENT DATA”, and
the tool management data setting screen appears.
- 649 -
3.VIEWING AND SETTING TOOL MANAGEMENT DATA TOOL MANAGEMENT B-63874EN/05
3.2
MAGAZINE DATA SCREENS (MAGAZINE 1 TO 4)
3.2.1
Screen Display Items
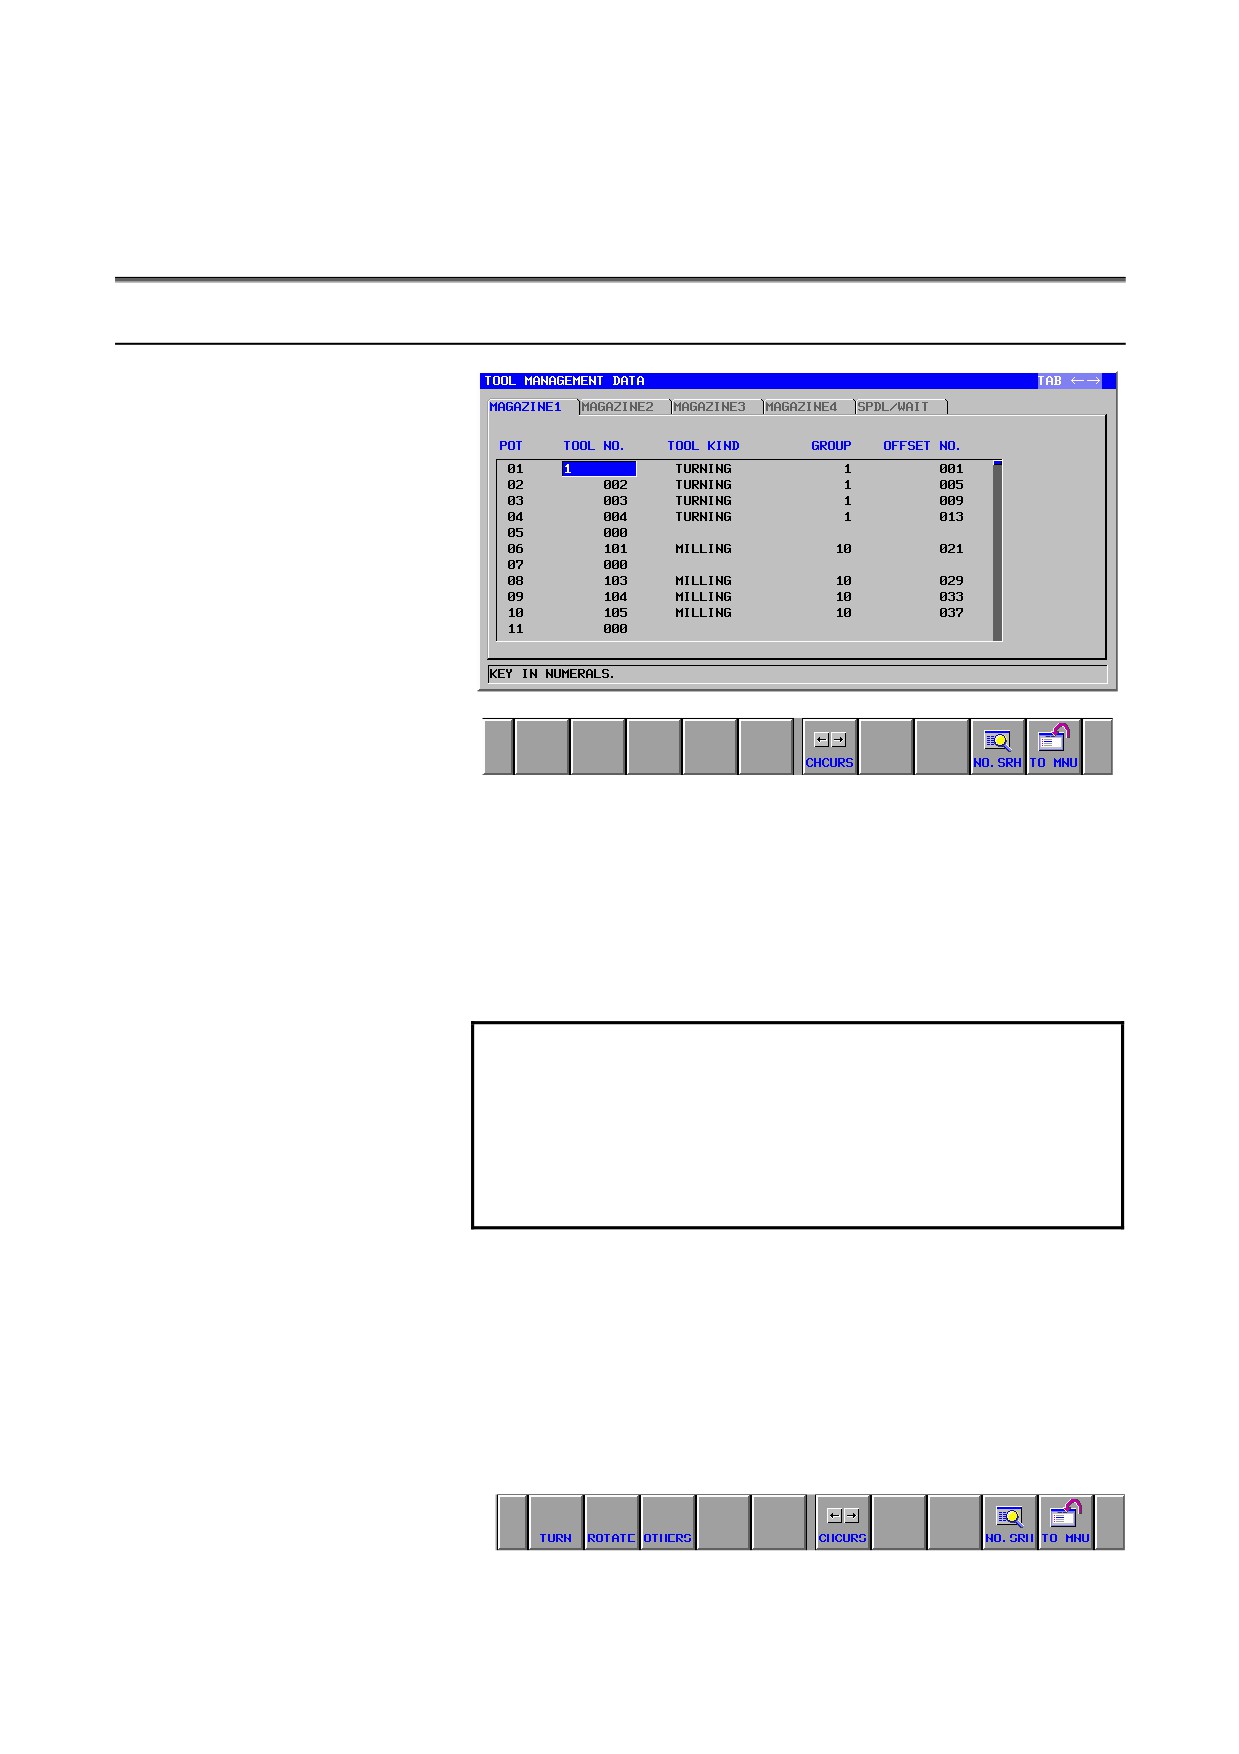
The tool number, type, group number, and offset number
corresponding to each pot are displayed.
You can change tool numbers, types, and group numbers.
Display items
POT:
Pot numbers are displayed.
You cannot set new ones from the screen.
NOTE
On the individual magazine data screens, as many
pots as the “number of data items” set in
parameters Nos. 13222, 13227, 13232, and 13237
are displayed, beginning with the “start pot number”
set in NC parameters Nos. 13223, 13228, 13233,
and 13238.
TOOL NO.:
To register a new tool number in an empty tool number field,
enter a new number and press the [INPUT] key.
To invalidate an existing tool number, enter 0.
TOOL KIND:
The
“tool type” corresponding to each tool number, as
determined from the tool management data table, is displayed.
To select the desired one, press the corresponding soft key.
- 650 -
B-63874EN/05 TOOL MANAGEMENT
3.VIEWING AND SETTING TOOL MANAGEMENT DATA
GROUP:
The “group number” corresponding to each tool number, as
determined from the tool management data table, is displayed.
To set a new one, enter a value.
OFFSET NO.:
The “offset number” corresponding to each tool number, as
determined from the tool management data table, is displayed.
You cannot change offset numbers from this screen.
Soft keys
[TO MNU]:
Return to the menu screen.
[CHCURS]:
Switches the system between cursor modes.
3.2.2
Displayed Warning Messages
MAGAZINE MANAGEMENT DATA ACCESS ERROR :
Displayed if the system fails to normally read or write the data
corresponding to the pot numbers in the magazine management
data table.
TOOL MANAGEMENT DATA ACCESS ERROR :
Displayed if the system fails to read or write tool management
data such as tool numbers, types, and group numbers.
INVALID INPUT :
Displayed if the entered value is outside the valid range.
- 651 -
3.VIEWING AND SETTING TOOL MANAGEMENT DATA TOOL MANAGEMENT B-63874EN/05
3.3
SPINDLE AND STANDBY POSITION TOOL DISPLAY
SCREEN
3.3.1
Screen Display Items
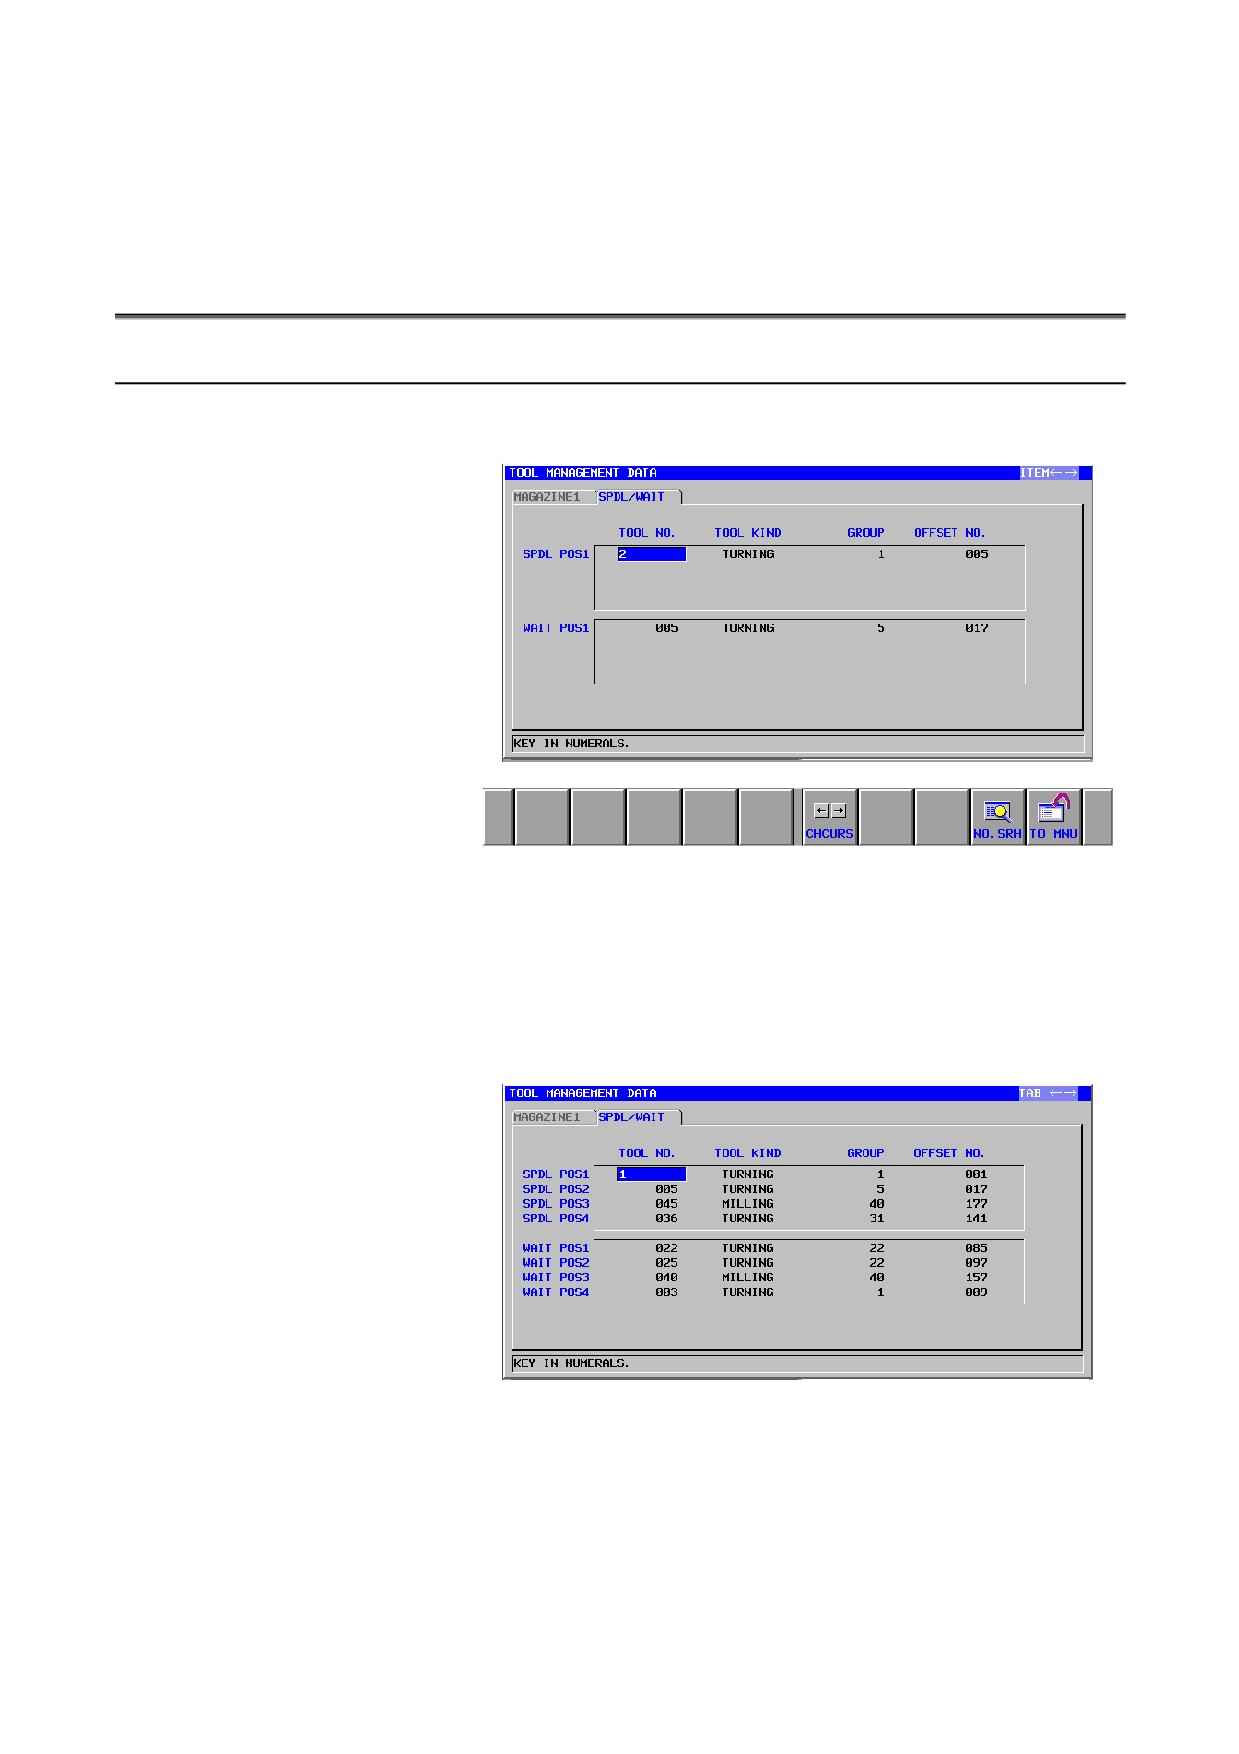
This screen displays the tools at spindle positions and at subpots
(standby positions).
The number of displayed spindle positions and the number of
displayed standby positions vary depending on the settings of
Parameter No. 13250 (number of effective spindles)
Parameter No. 13251 (number of effective standby positions)
If the setting of parameter No. 13250 is 4 (maximum) and that of
parameter No. 13251 is 4 (maximum), the screen appears as shown
below.
Display items
TOOL NO.:
To change the tool number at a spindle or standby position, move
the cursor to that number, enter a new value, and press [INPUT].
To invalidate an existing tool number, enter 0.
- 652 -

B-63874EN/05 TOOL MANAGEMENT
3.VIEWING AND SETTING TOOL MANAGEMENT DATA
TOOL KIND:
The
“tool type” corresponding to each tool number, as
determined from the tool management data table, is displayed.
To select the desired one, press the corresponding soft key.
GROUP:
The “group number” corresponding to each tool number, as
determined from the tool management data table, is displayed.
To set a new one, enter a value.
OFFSET NO.:
The “offset number” corresponding to each tool number, as
determined from the tool management data table, is displayed.
You cannot change offset numbers from this screen.
Explanation of soft keys
[TO MNU]:
Return to the menu screen.
[CHCURS]:
Switches the system between cursor modes.
3.3.2
Displayed Warning Messages
MAGAZINE MANAGEMENT DATA ACCESS ERROR :
Displayed if the system fails to normally read or write spindle or
standby position data from the magazine management data table.
TOOL MANAGEMENT DATA ACCESS ERROR :
Displayed if the system fails to read or write tool management
data such as tool numbers, types, and group numbers.
INVALID INPUT :
Displayed if the entered tool number is outside the valid range.
- 653 -
4.VIEWING AND SETTING LIFE MANAGEMENT DATA TOOL MANAGEMENT B-63874EN/05
4
VIEWING AND SETTING LIFE
MANAGEMENT DATA
This screen is effective only if bit 4 (TLF) of parameter No. 14823 is
1.
- 654 -
B-63874EN/05 TOOL MANAGEMENT
4.VIEWING AND SETTING LIFE MANAGEMENT DATA
4.1
SELECTING THE LIFE MANAGEMENT DATA SETTING
SCREEN
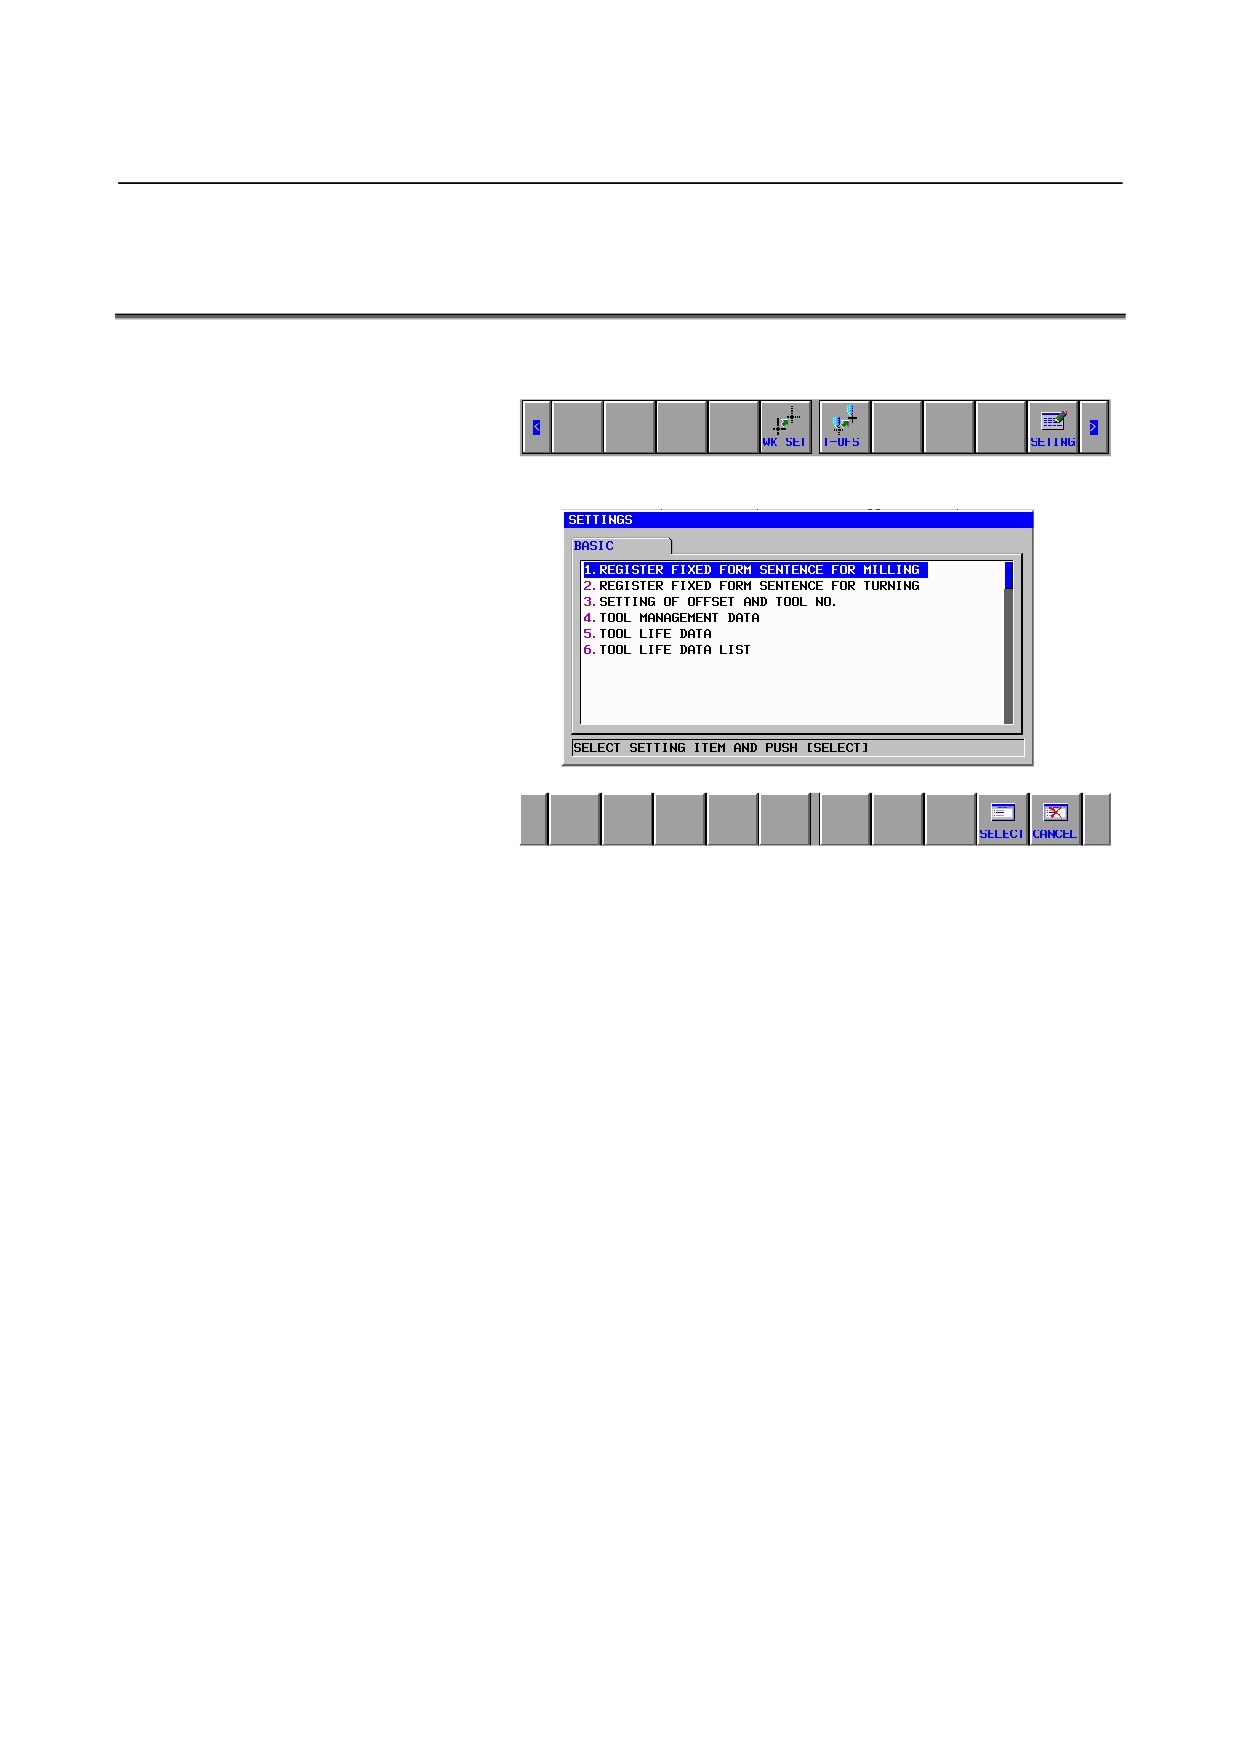
<1> Press [>] on the initial screen of each mode to display the soft
keys shown below, then press [SETING]:
<2> The following screen appears.
<3> From this screen, select “TOOL LIFE DATA”, and the life
management data setting screen appears.
- 655 -
4.VIEWING AND SETTING LIFE MANAGEMENT DATA TOOL MANAGEMENT B-63874EN/05
4.2
SCREEN DISPLAY ITEMS
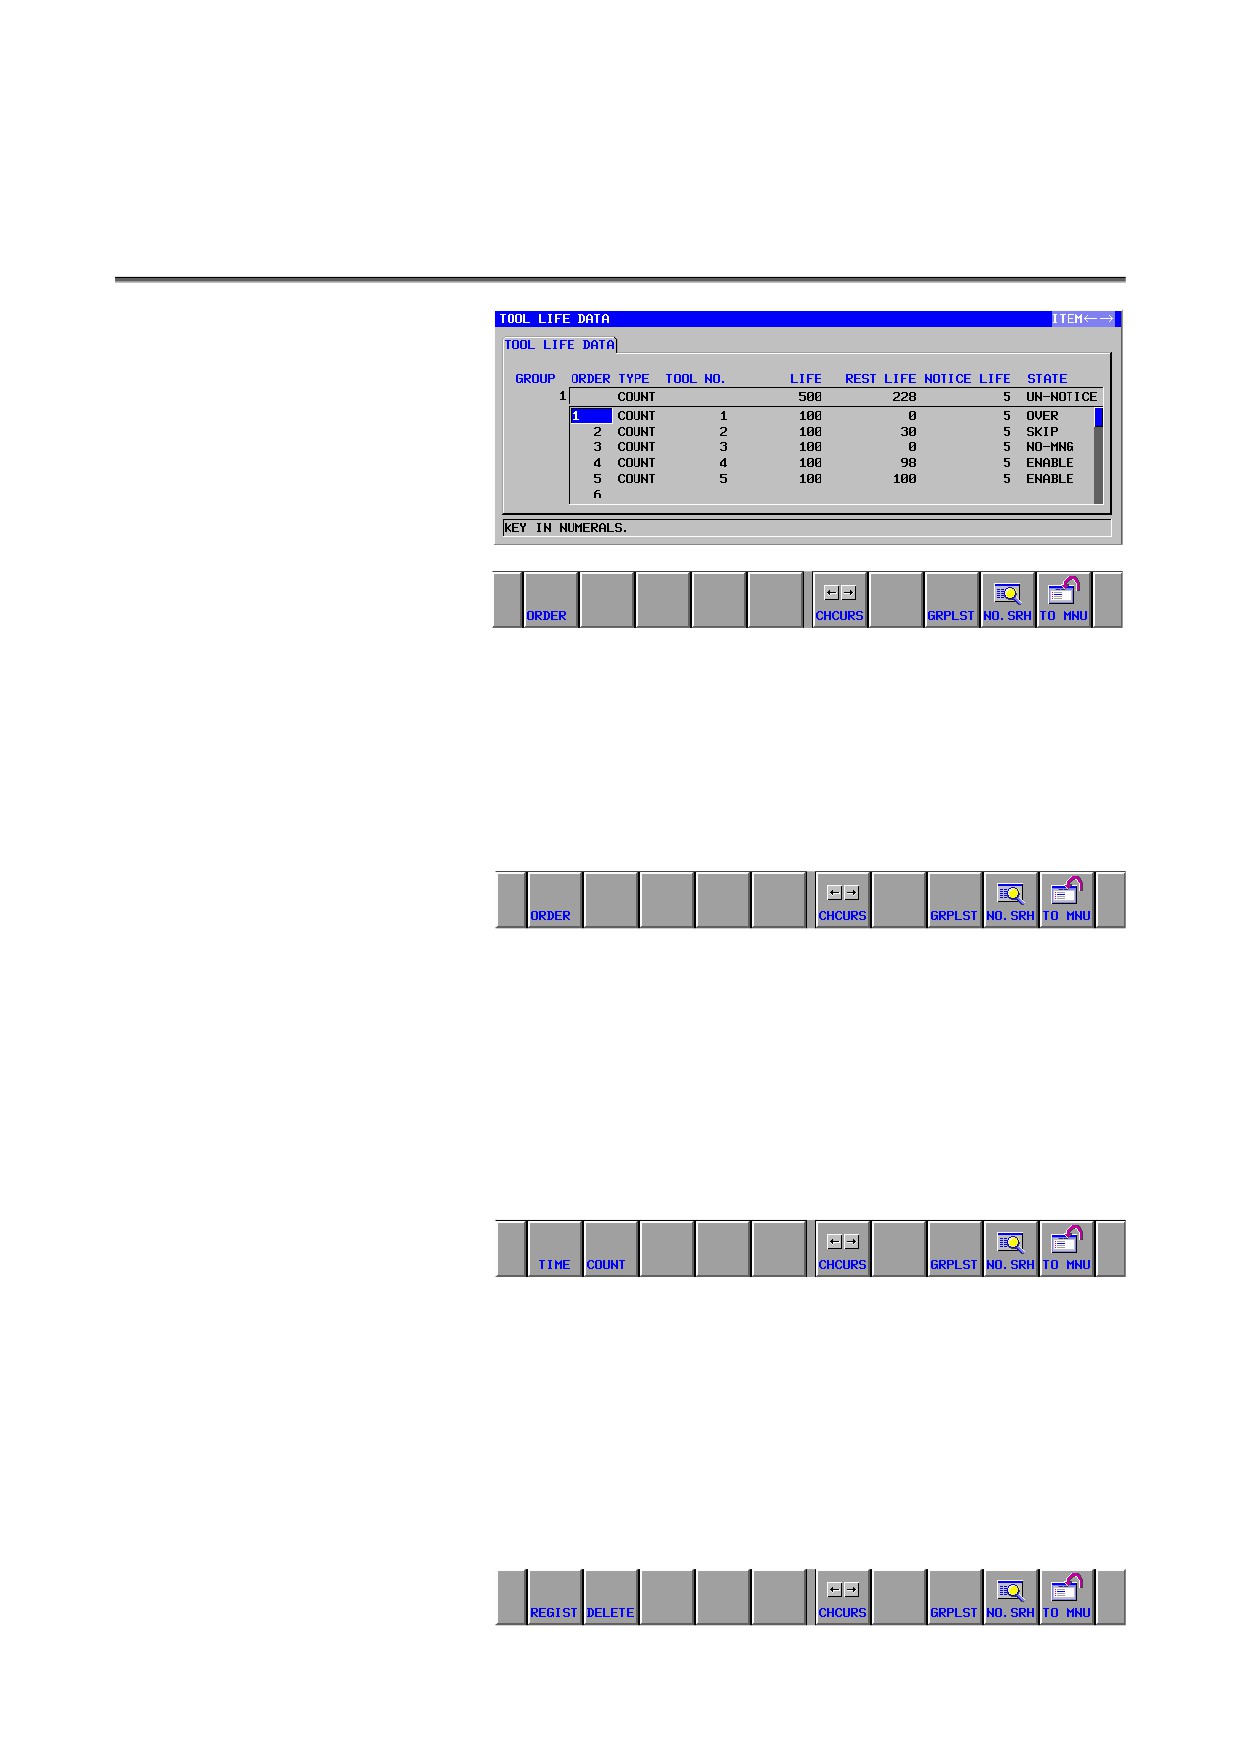
Display items
ORDER:
In the first column for each tool, the value indicating the priority
of the tool is displayed.
By positioning the cursor on this item and entering a new value,
you can change the priority of that tool (described in detail later).
As many values as the number of tools in the group plus one are
displayed so that you can add a new tool.
GROUP:
The group numbers in the tool management data table are
displayed.
COUNT:
The count types (time or number of times of use) in the tool
management data table are displayed.
For each group, the life count type (time or number of times of
use) can be specified.
To specify the desired type, press the corresponding soft key.
TOOL NO.:
The tool numbers with the same group number are displayed.
The numbers are displayed in the order in which the tools will be
used.
You can register a tool number with the group.
To register a tool, move the cursor at the bottom (blank portion)
of the tool number column for that group and press [REGIST] or
press INPUT. On the contrary, if you want to delete an existing
tool, move the cursor to the number of that tool and press
[DELETE].
- 656 -
B-63874EN/05 TOOL MANAGEMENT
4.VIEWING AND SETTING LIFE MANAGEMENT DATA
LIFE:
The life of each tool, as determined from the tool management
data table, is displayed.
You can set the life of each tool.
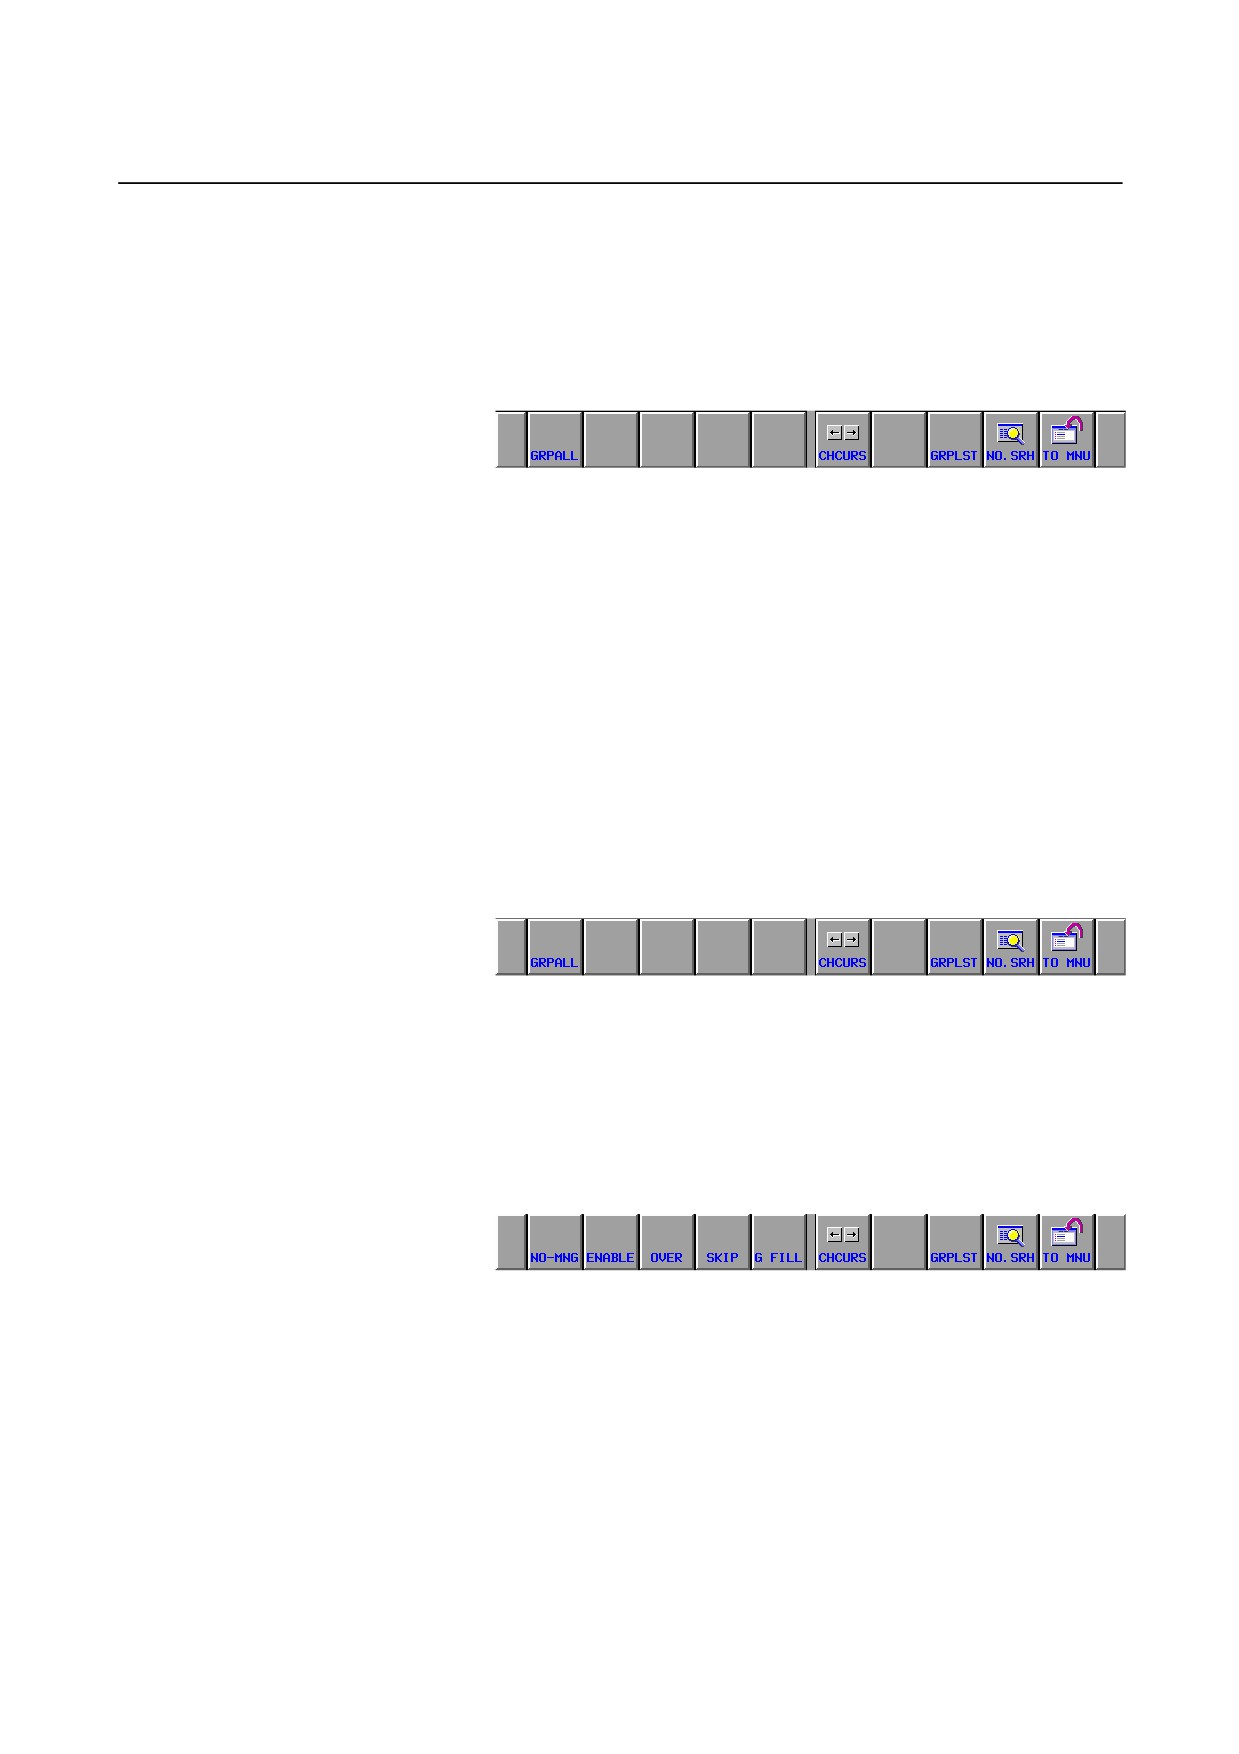
By pressing [GRPALL] after entering a value, you can set the
same life for all the tools in the group.
In the first row for each group, the sum of the lives of the tools
registered with that group is displayed.
REST LIFE:
The rest of the life of each tool, as determined from the tool
management data table, is displayed.
By reconfiguring data, you can increase the rest of the life.
In the first row for each group, the sum of the rests of the lives of
the tools registered with that group is displayed.
NOTICE LIFE:
The announced life of each tool, as determined from the tool
management data table, is displayed.
You can set the announced life of each tool (rest of life after
which an announcement signal is issued).
By pressing [GRPALL] after entering a value, you can set the
same announced life for all the tools in the group.
In the first row for each group, the rest of life after which the life
state of that group changes to “announced” is displayed.
You can also set the announced life of each group.
STATE:
The state of each tool, as determined from the tool management
data table
(invalid, present, absent, in use, skipped
(tool
damaged)), is displayed.
To select the desired one, press the corresponding soft key.
In the first row for each group, the life state of that group (not
announced or announced) is displayed.
- 657 -
4.VIEWING AND SETTING LIFE MANAGEMENT DATA TOOL MANAGEMENT B-63874EN/05
4.3
CHANGING TOOL PRIORITY
You can change the priority of the tools in a group.
Procedure for changing priority
<1> Position the cursor on the priority value in the first column for
the desired tool and enter a new value.
<2> Press [ORDER] or press INPUT, and the priority of the tool
changes to the new value. Those tools that have priority values
greater than the entered new value before the change are
assigned their previous values plus one, respectively.
- 658 -
B-63874EN/05 TOOL MANAGEMENT
4.VIEWING AND SETTING LIFE MANAGEMENT DATA
4.4
UPDATING LIFE VALUES DISPLAYED ON THE TOOL
LIFE DATA SCREEN
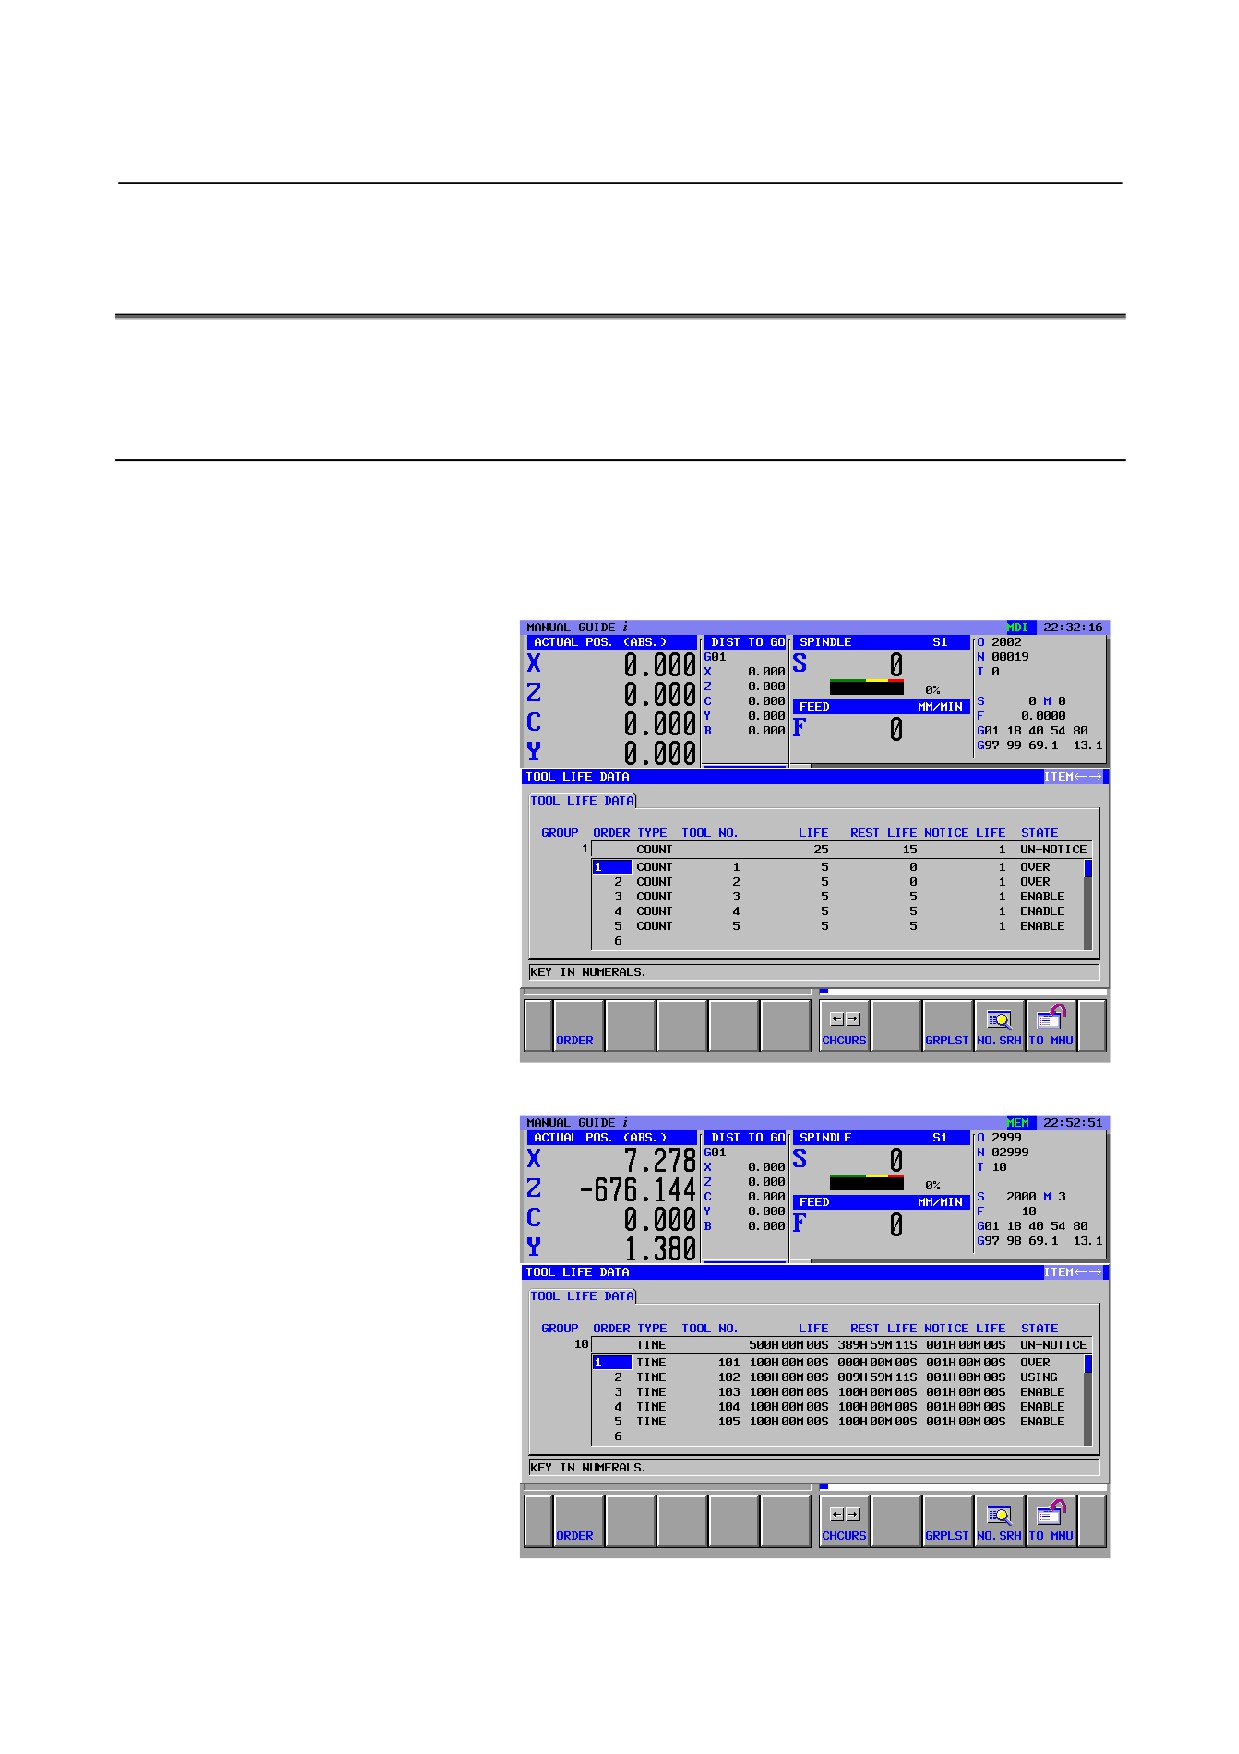
When the tool life data is changed with operating program, the tool
life data is updated on the tool life management data screen.
4.4.1
Operation
<1> Press [SETTING].
<2> Select “TOOL LIFE DATA” from the menu screen.
<3> The following screen appears.
(The case count type is “COUNT”)
(The case count type is “TIME”)
- 659 -
4.VIEWING AND SETTING LIFE MANAGEMENT DATA TOOL MANAGEMENT B-63874EN/05
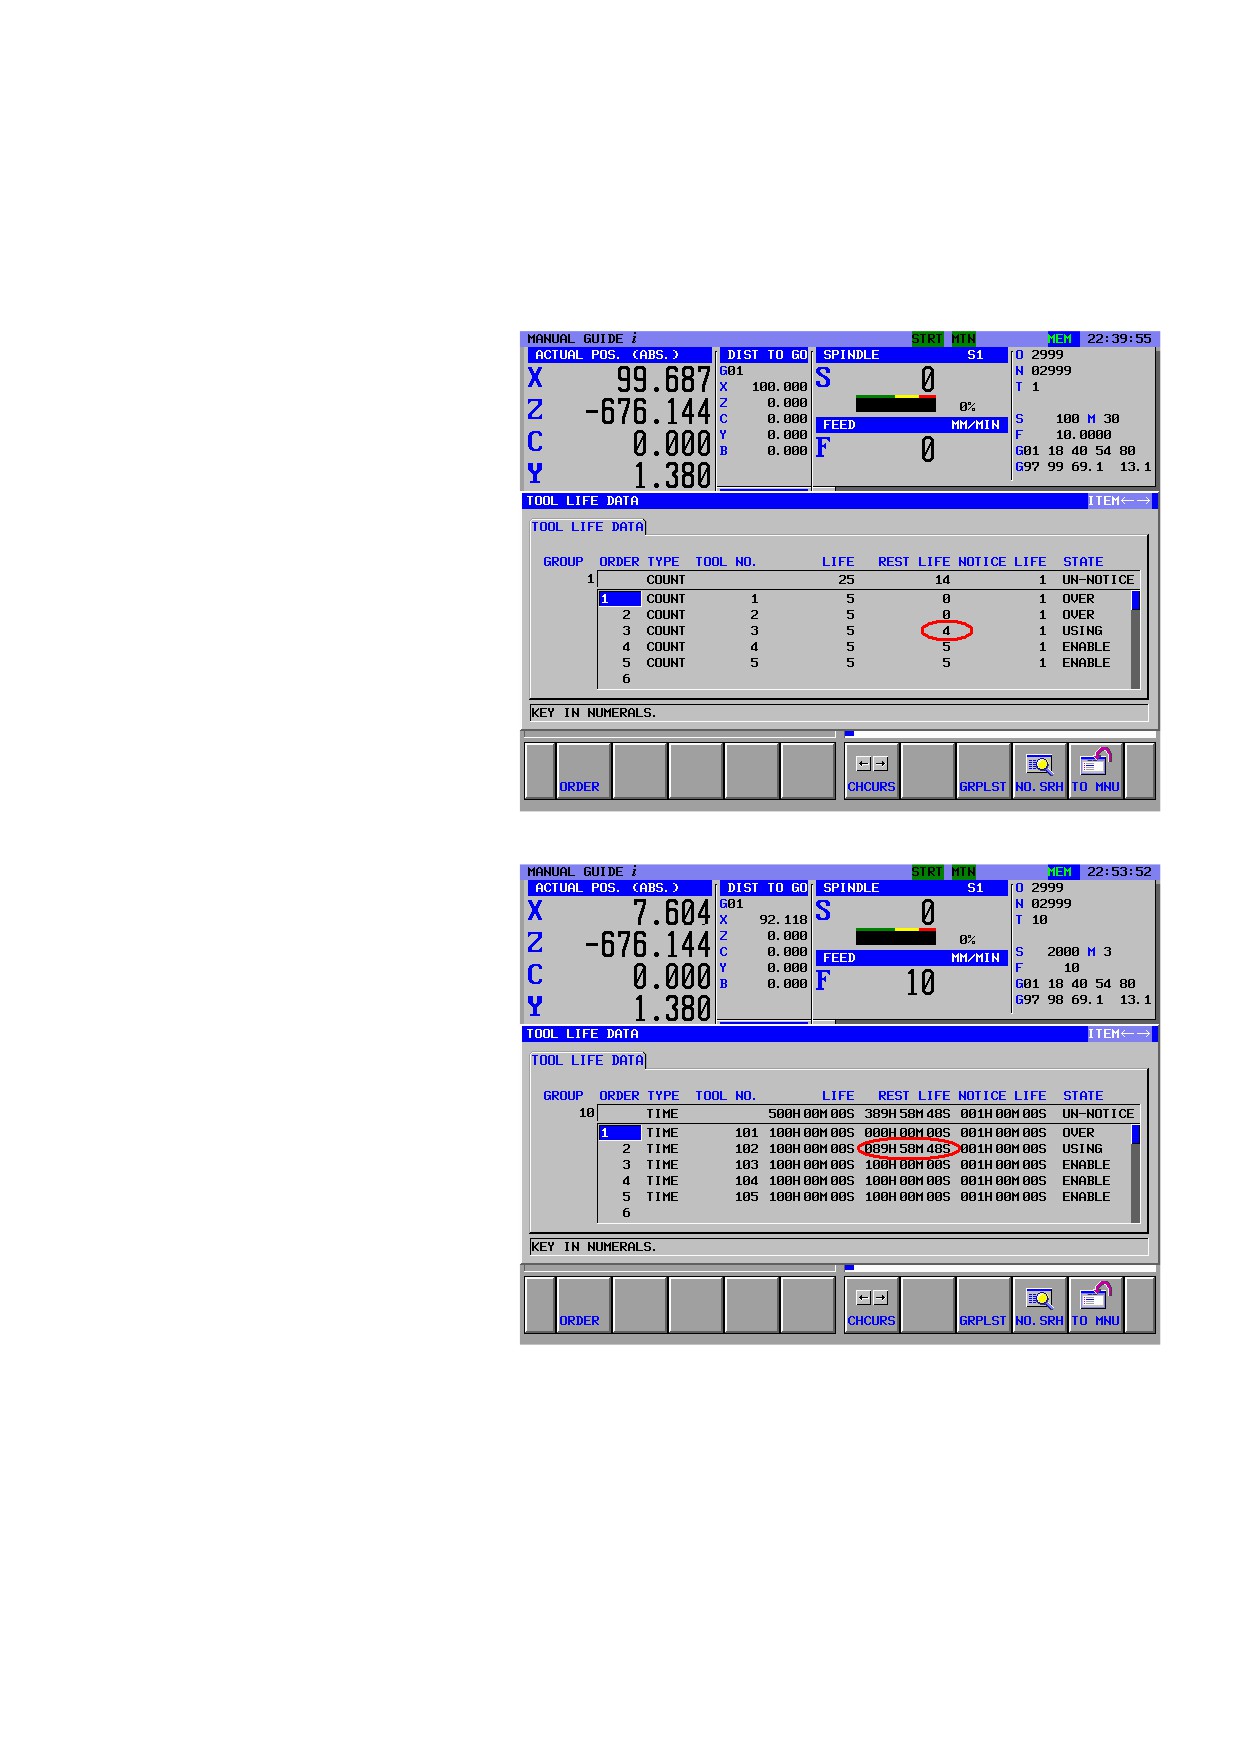
<4> If the tool life data is changed with operating program, the
displayed life data is updated.
(The case count type is “COUNT”)
(The case count type is “TIME”)
- 660 -
B-63874EN/05 TOOL MANAGEMENT
4.VIEWING AND SETTING LIFE MANAGEMENT DATA
4.5
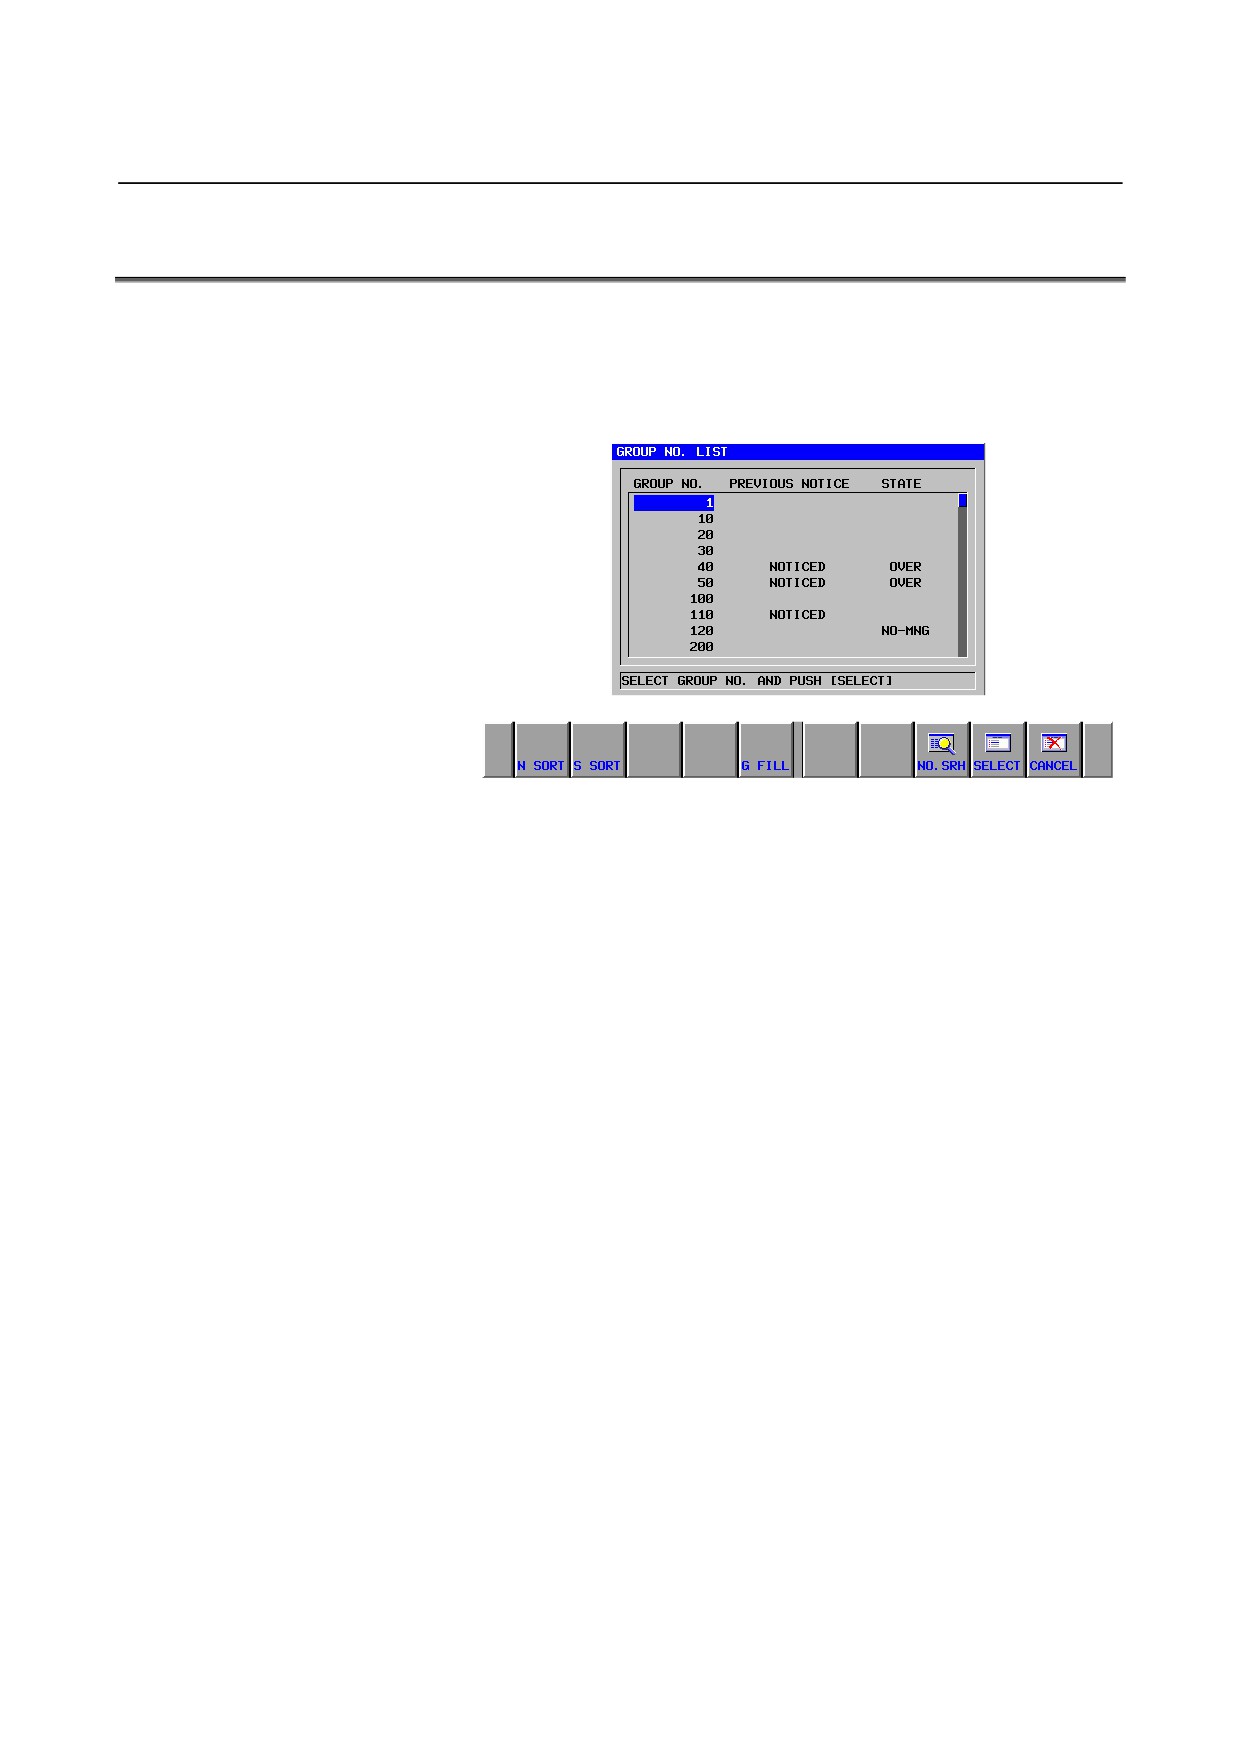
GROUP NUMBER LIST DISPLAY
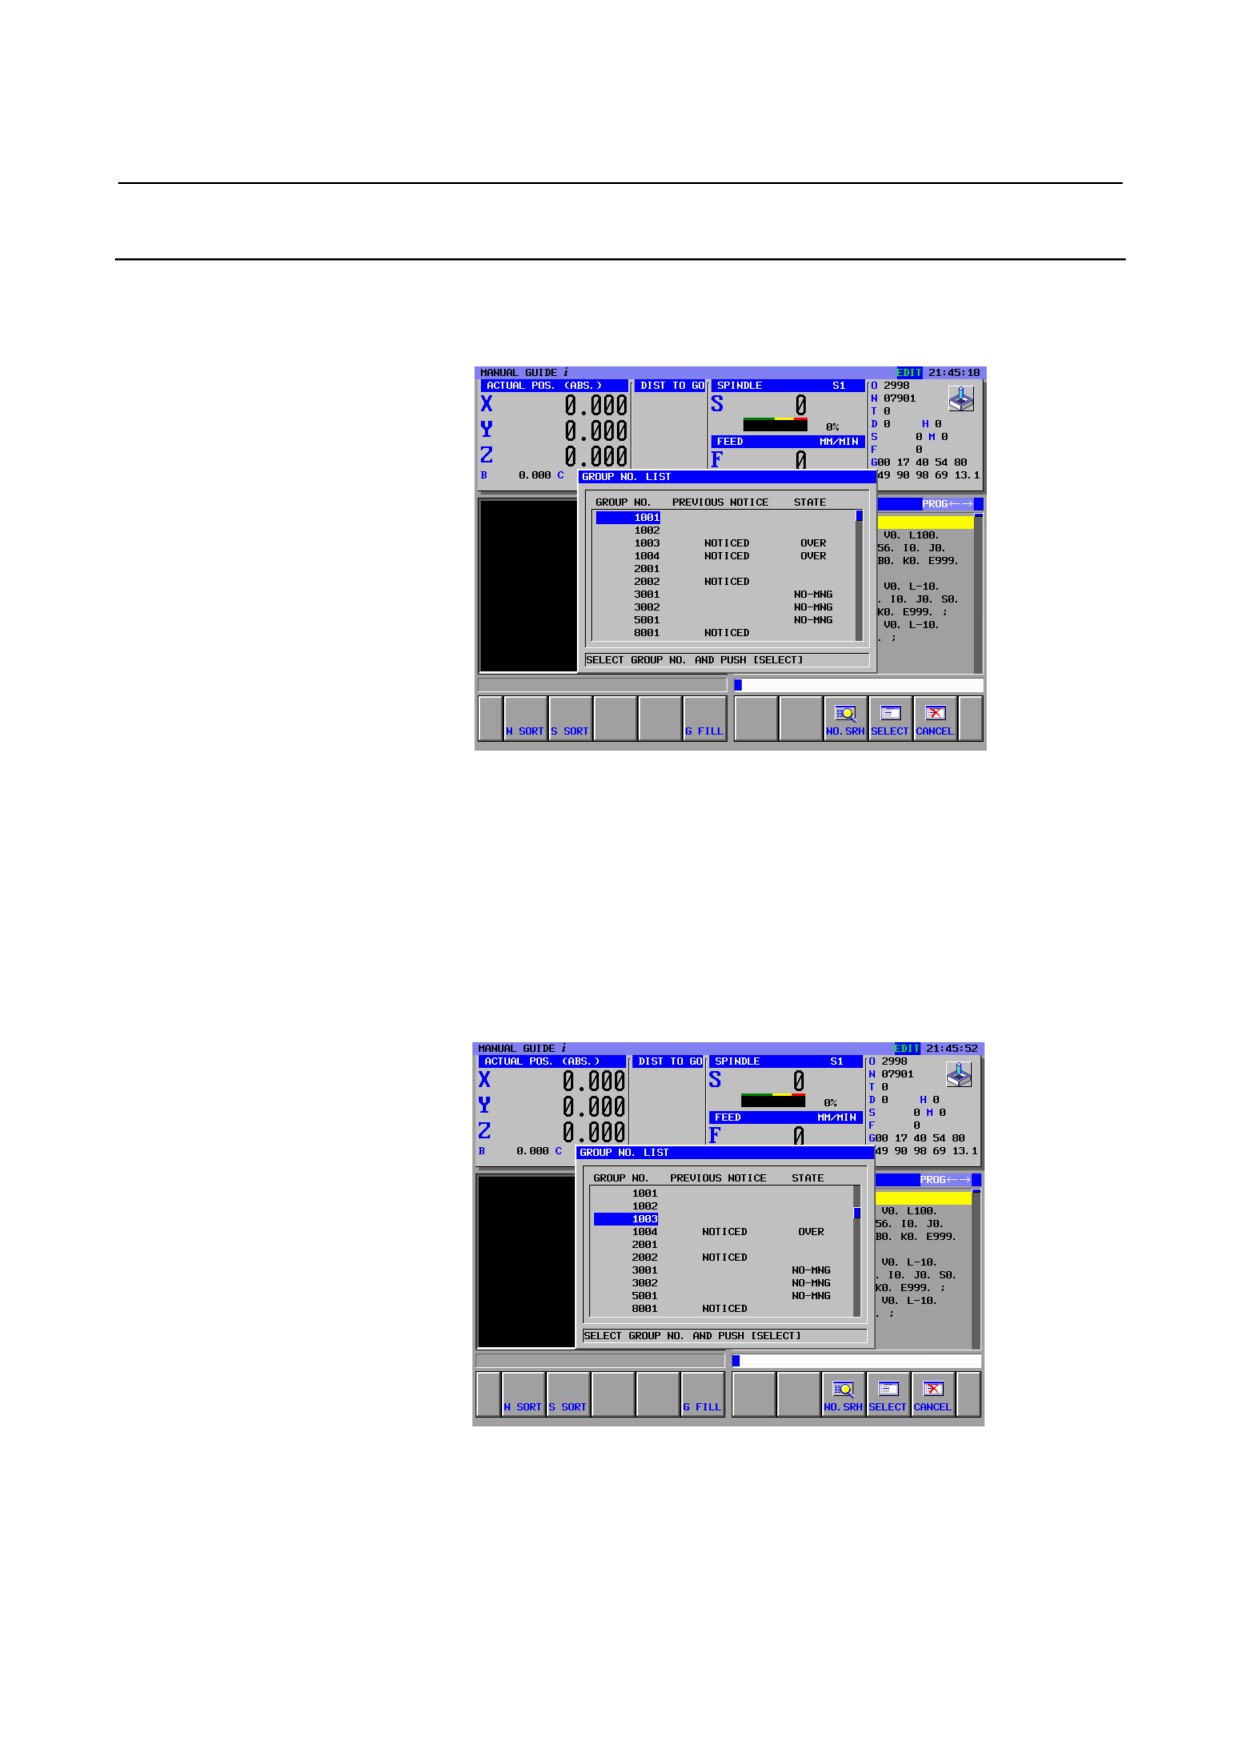
A list of the life states of groups can be displayed. Groups can be
sorted in the order of number or life state.
Pressing
[GRPLST] when the life management data screen is
displayed displays the following screen:
In the "PREVIOUS NOTICE" column, "NOTICED" is displayed only
for those groups with the Previous Notice Flag set. In the "STATE"
column, "OVER" is displayed for a group when the life states of all
tools belonging to the group are "OVER", "SKIP", and/or
"NO-NMG".
- 661 -
4.VIEWING AND SETTING LIFE MANAGEMENT DATA TOOL MANAGEMENT B-63874EN/05
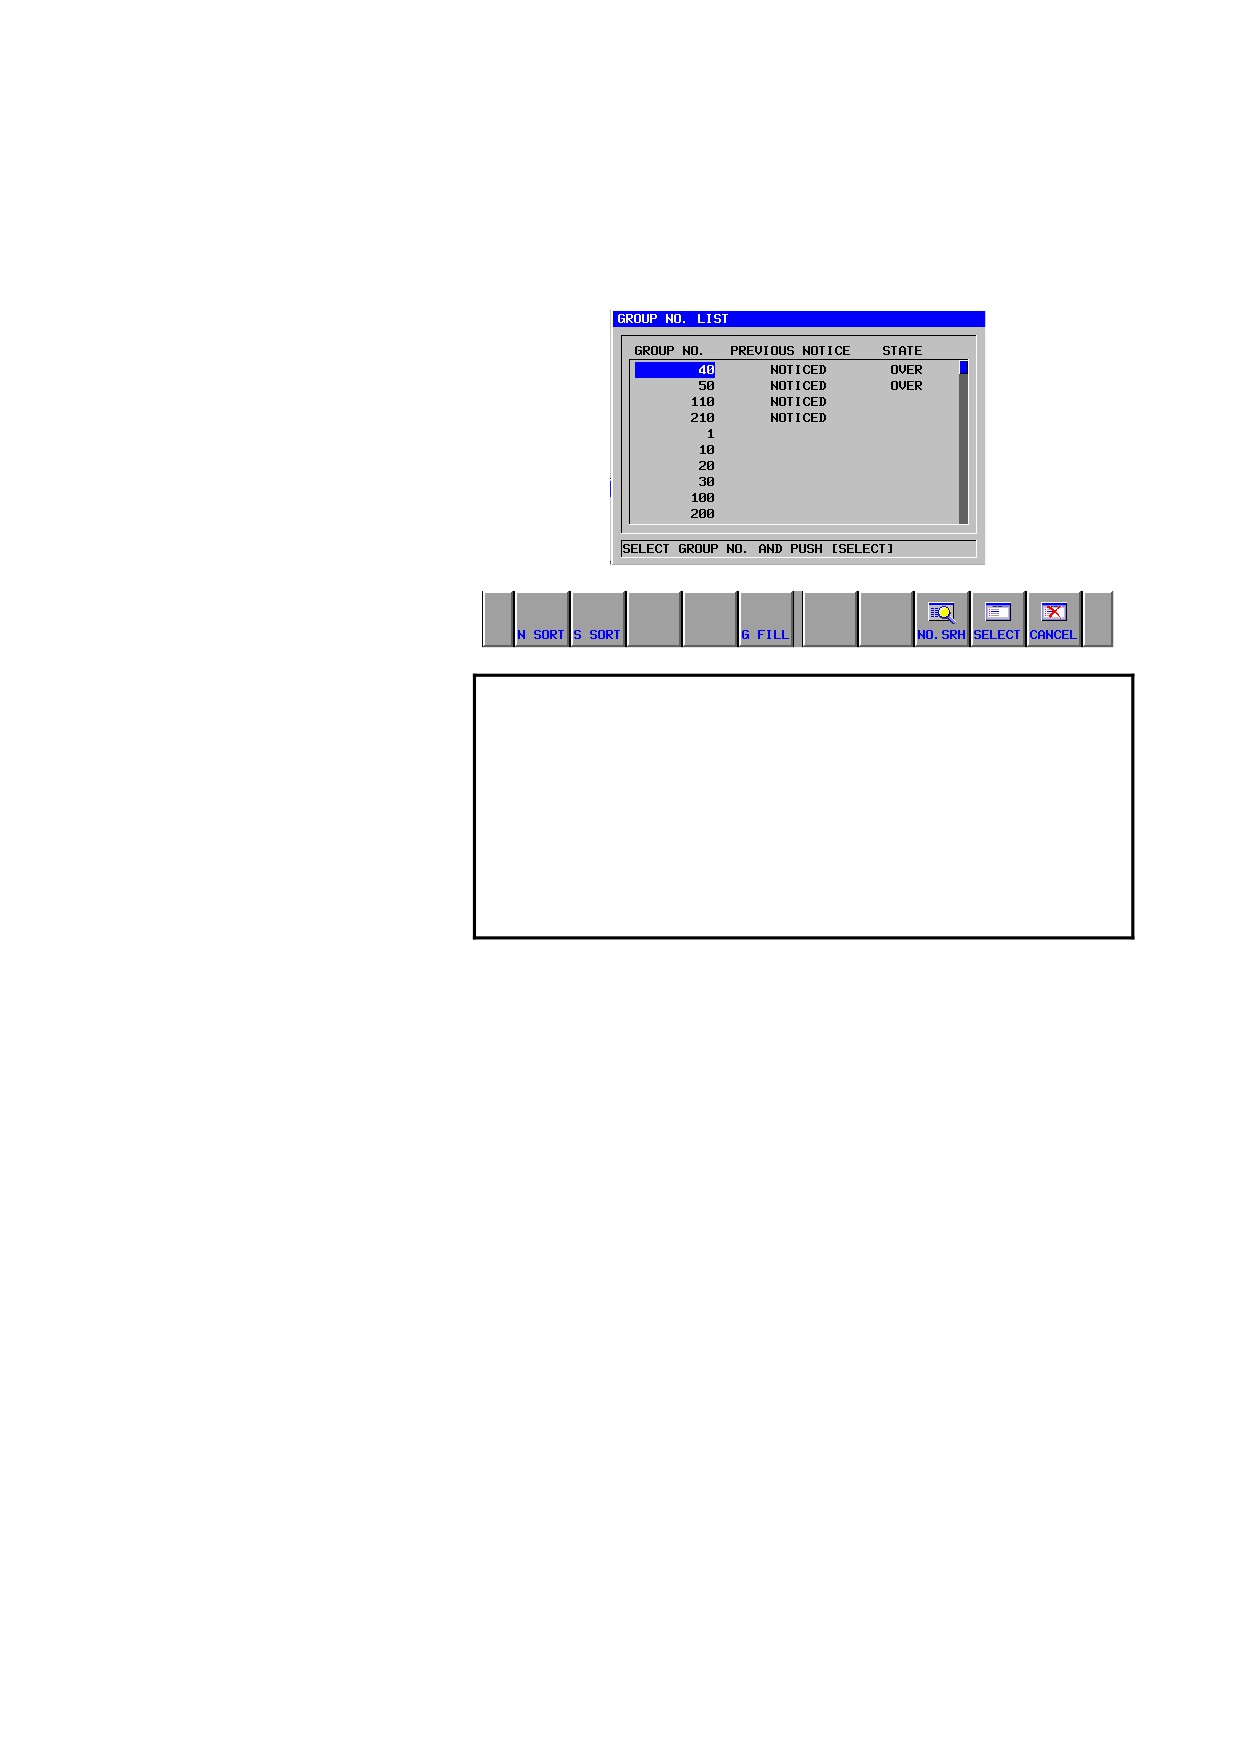
Display of groups sorted in the order of number or life state
When [S SORT] is pressed on the group number list screen, the group
numbers are displayed in the life state/previous notice order.
NOTE
When group numbers are displayed in the order of
life state, the groups are displayed in the following
order:
<1> Groups for which "OVER" is displayed in the
"STATE" column
<2> Groups for which "NOTICED" is displayed in
the "PREVIOUS NOTICE" column
<3> Groups other than <1> and <2>
Pressing [N SORT] displays groups sorted by group number.
Group selection
Place the cursor over a group number to be selected, then press
[SELECT]. The life management data screen of the selected group
number appears.
- 662 -
B-63874EN/05 TOOL MANAGEMENT
4.VIEWING AND SETTING LIFE MANAGEMENT DATA
4.6
DISPLAY OF GROUP NUMBER LIST
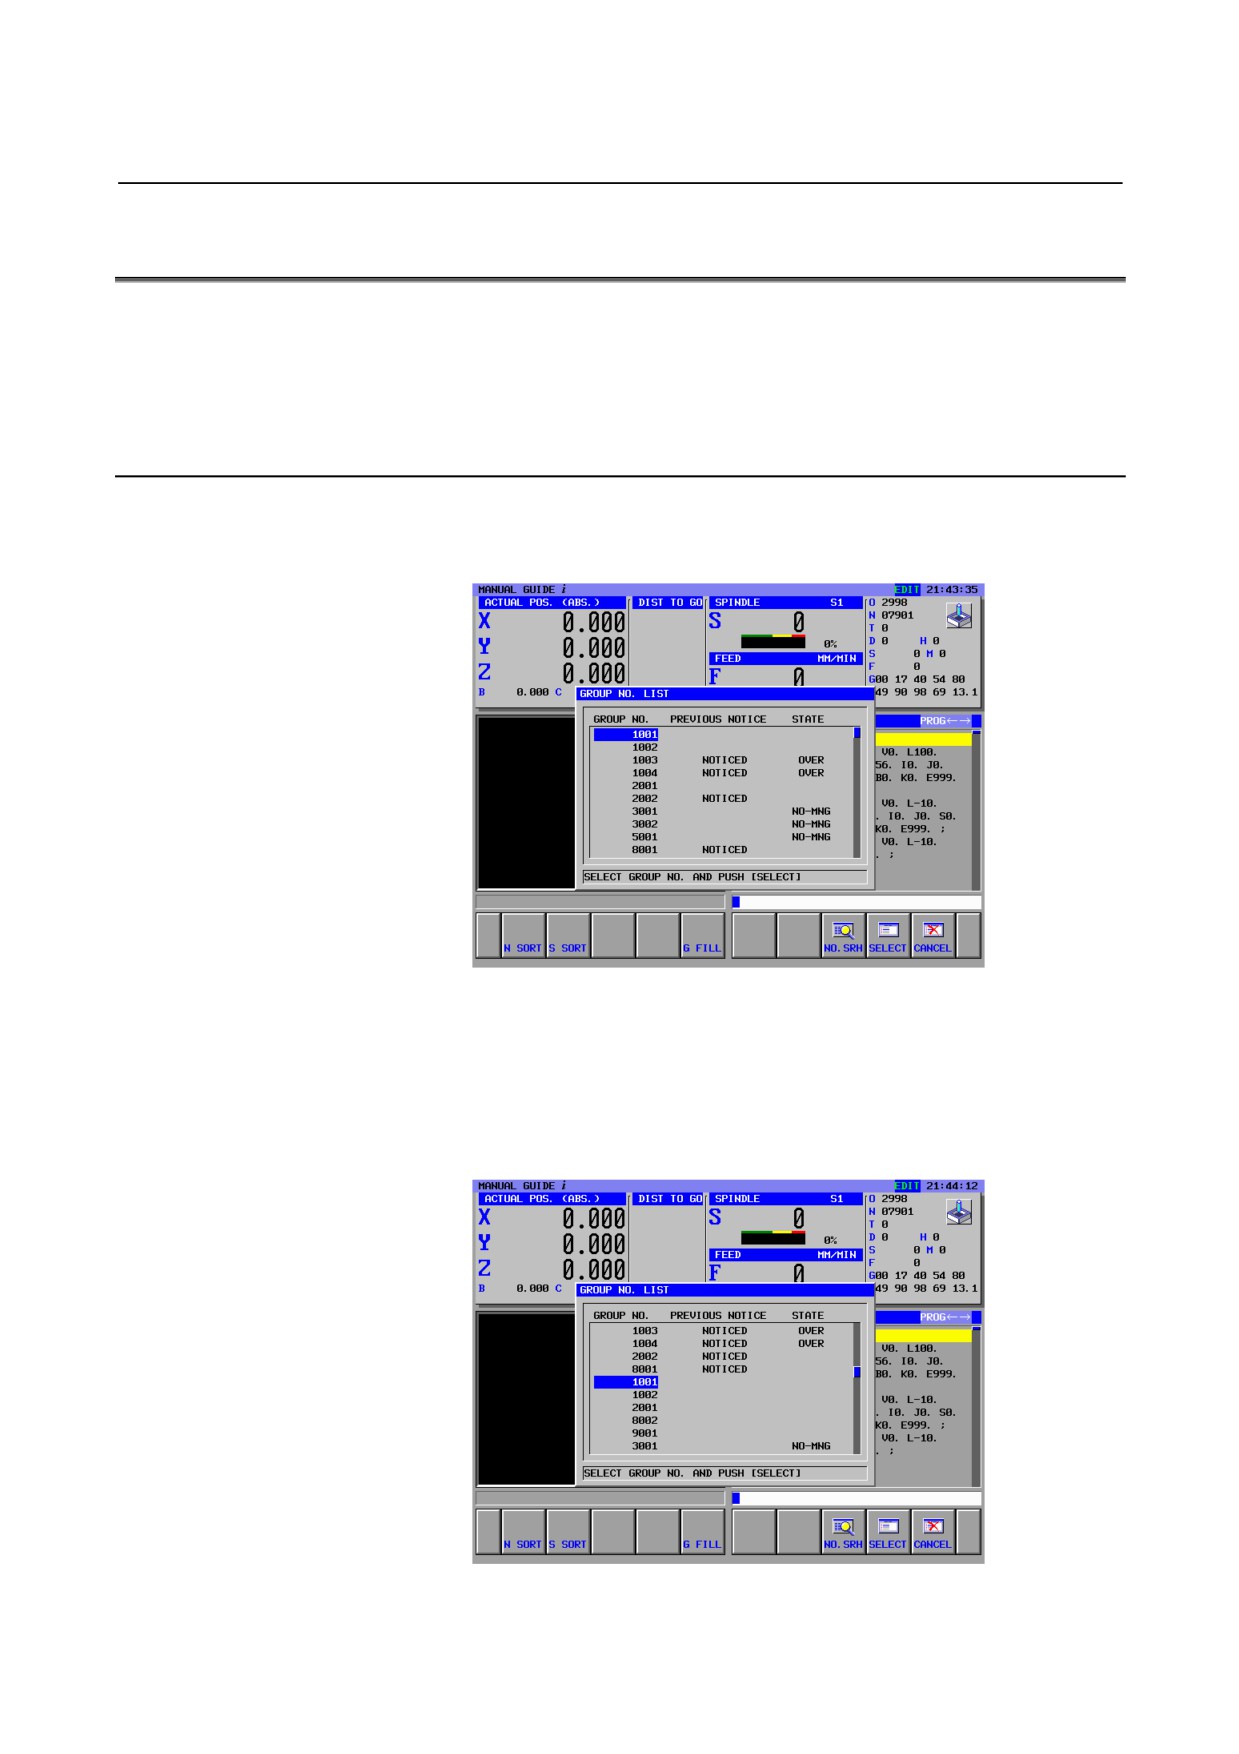
On the group number list, the state of the group which is not managed
is displayed as “NO-MNG”
The life of the group of which life state is over can be restored on the
group number list.
4.6.1
Display Life States of Group
On the tool life data screen, pressing
[GRPLST] displays the
following screen.
When the states of the all tools, which belong to same group, are not
managed, the group life state is displayed as “NO-MNG”.
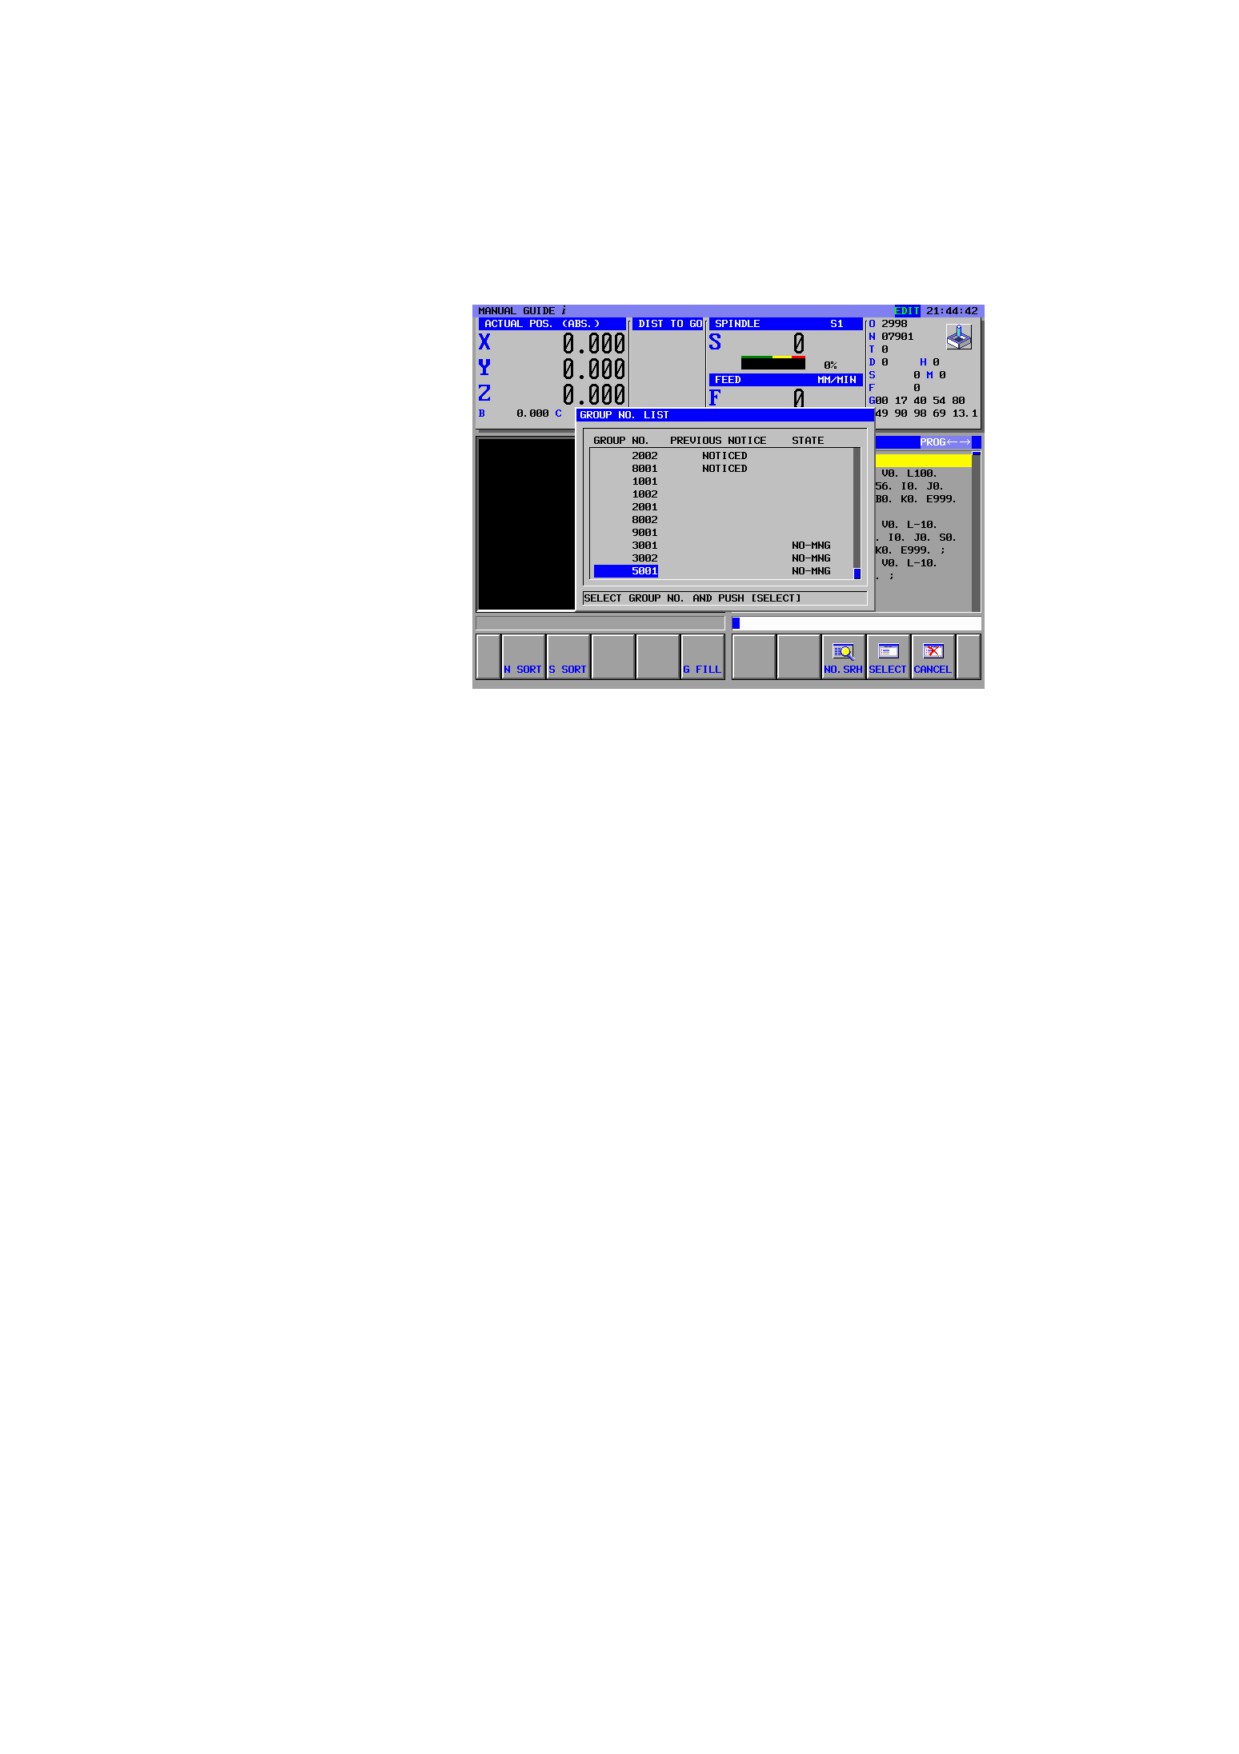
And the life state of the group, which is not “NO-MNG” and does not
include “ENABLE” or “USING” tool, is displayed as “OVER”
Form this screen, pressing [S SORT] displays the following screen.
- 663 -
4.VIEWING AND SETTING LIFE MANAGEMENT DATA TOOL MANAGEMENT B-63874EN/05
The group which state is no managed is displayed at the bottom of the
list as following.
- 664 -
B-63874EN/05 TOOL MANAGEMENT
4.VIEWING AND SETTING LIFE MANAGEMENT DATA
4.6.2
Restore Group Life
On the tool life data screen, pressing [G FILL] displays the following
screen.
Move the cursor to the group of which state is “OVER”, and press [G
FILL]. And the life states of the tools, which belong to the group,
change to “ENABLE”, and the rest life value becomes same as the life
value.
And the group notice life state changes “UN-NOTICE”.
The tool life state which is “NO-MNG” or “SKIP” is not updated
when [G FILL] is pressed.
When the group life is restored, the group life state is no longer
"OVER".
- 665 -

4.VIEWING AND SETTING LIFE MANAGEMENT DATA TOOL MANAGEMENT B-63874EN/05
4.7
DISPLAYED WARNING MESSAGES
“TOOL MANAGEMENT DATA ACCESS ERROR”:
Displayed if the system fails to read or write tool management
data such as tool numbers and group numbers.
“INVALID INPUT”:
Displayed if the entered value is outside the valid range.
“GROUP LIFE STATE IS NOT 'OVER'.”
When [G FILL] is pressed on the tool life data screen, this
warning is displayed if the group state of the current cursor
position is not “OVER”.
4.8
SETTING THE LIFE NOTICE FLAG
To display the life state ("NOTICED" or "UN-NOTICE") of a group
on the life management data screen, the "Previous Notice Flag" of tool
management data needs to be set with the PMC.
The MANUAL GUIDE i system displays "NOTICED" as the state of
a group when the "Previous Notice Flag" is set to the state described
below.
If bit 3 (ETE) of parameter No. 13200 = 0
When the "Previous Notice Flag" of one of the tools that belong
to a group is set to "NOTICED"
If bit 3 (ETE) of parameter No. 13200 = 1
When the "Previous Notice Flags" of all tools that belong to a
group are set to "NOTICED"
Method of modifying the PMC ladder program
Modify the ladder program so that the tool management data
"Previous Notice Flag" of the tool being used is set to
1
("NOTICED") when the NC outputs a tool life arrival notice signal.
For the "Previous Notice Flag" of tool management data, bit 7 of
customization item 0 is used.
Item
Bit
Meaning
Description of data
Previous Notice
0:UN-NOTICE
7
Flag
1:NOTICED
6
5
Customization item
4
0
3
2
1
0
- 666 -
B-63874EN/05 TOOL MANAGEMENT
5.TOOL LIFE DATA LIST SCREEN
5
TOOL LIFE DATA LIST SCREEN
The tool life state of all tools can be displayed on the tool life
management data list screen.
- 667 -
5.TOOL LIFE DATA LIST SCREEN TOOL MANAGEMENT
B-63874EN/05
5.1
SELECTING THE LIFE MANAGEMENT DATA LIST
SCREEN
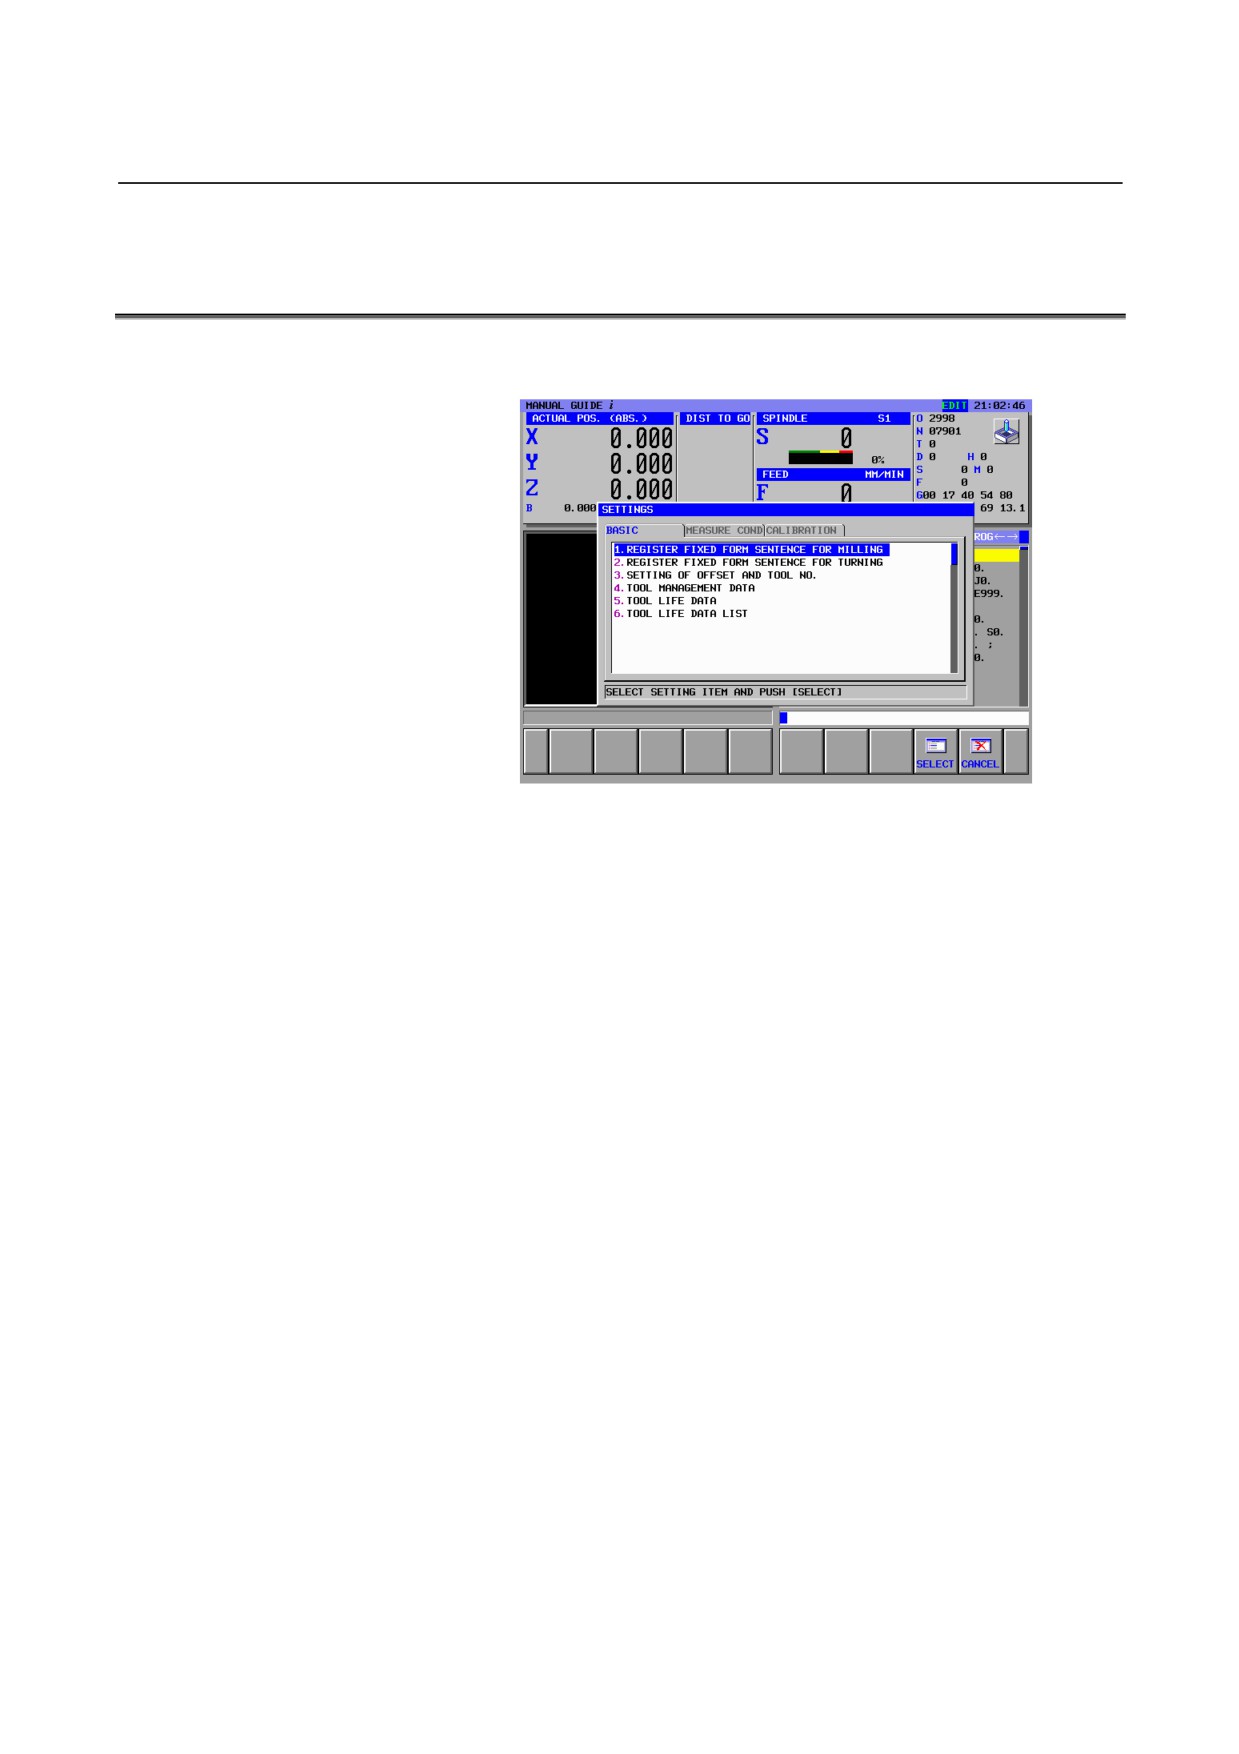
<1> Press [SETTING], and the following screen appears.
This item is displayed when the parameter No.14823#5 is ’1’.
- 668 -
B-63874EN/05 TOOL MANAGEMENT
5.TOOL LIFE DATA LIST SCREEN
5.2
LIFE MANAGEMENT DATA LIST SCREEN
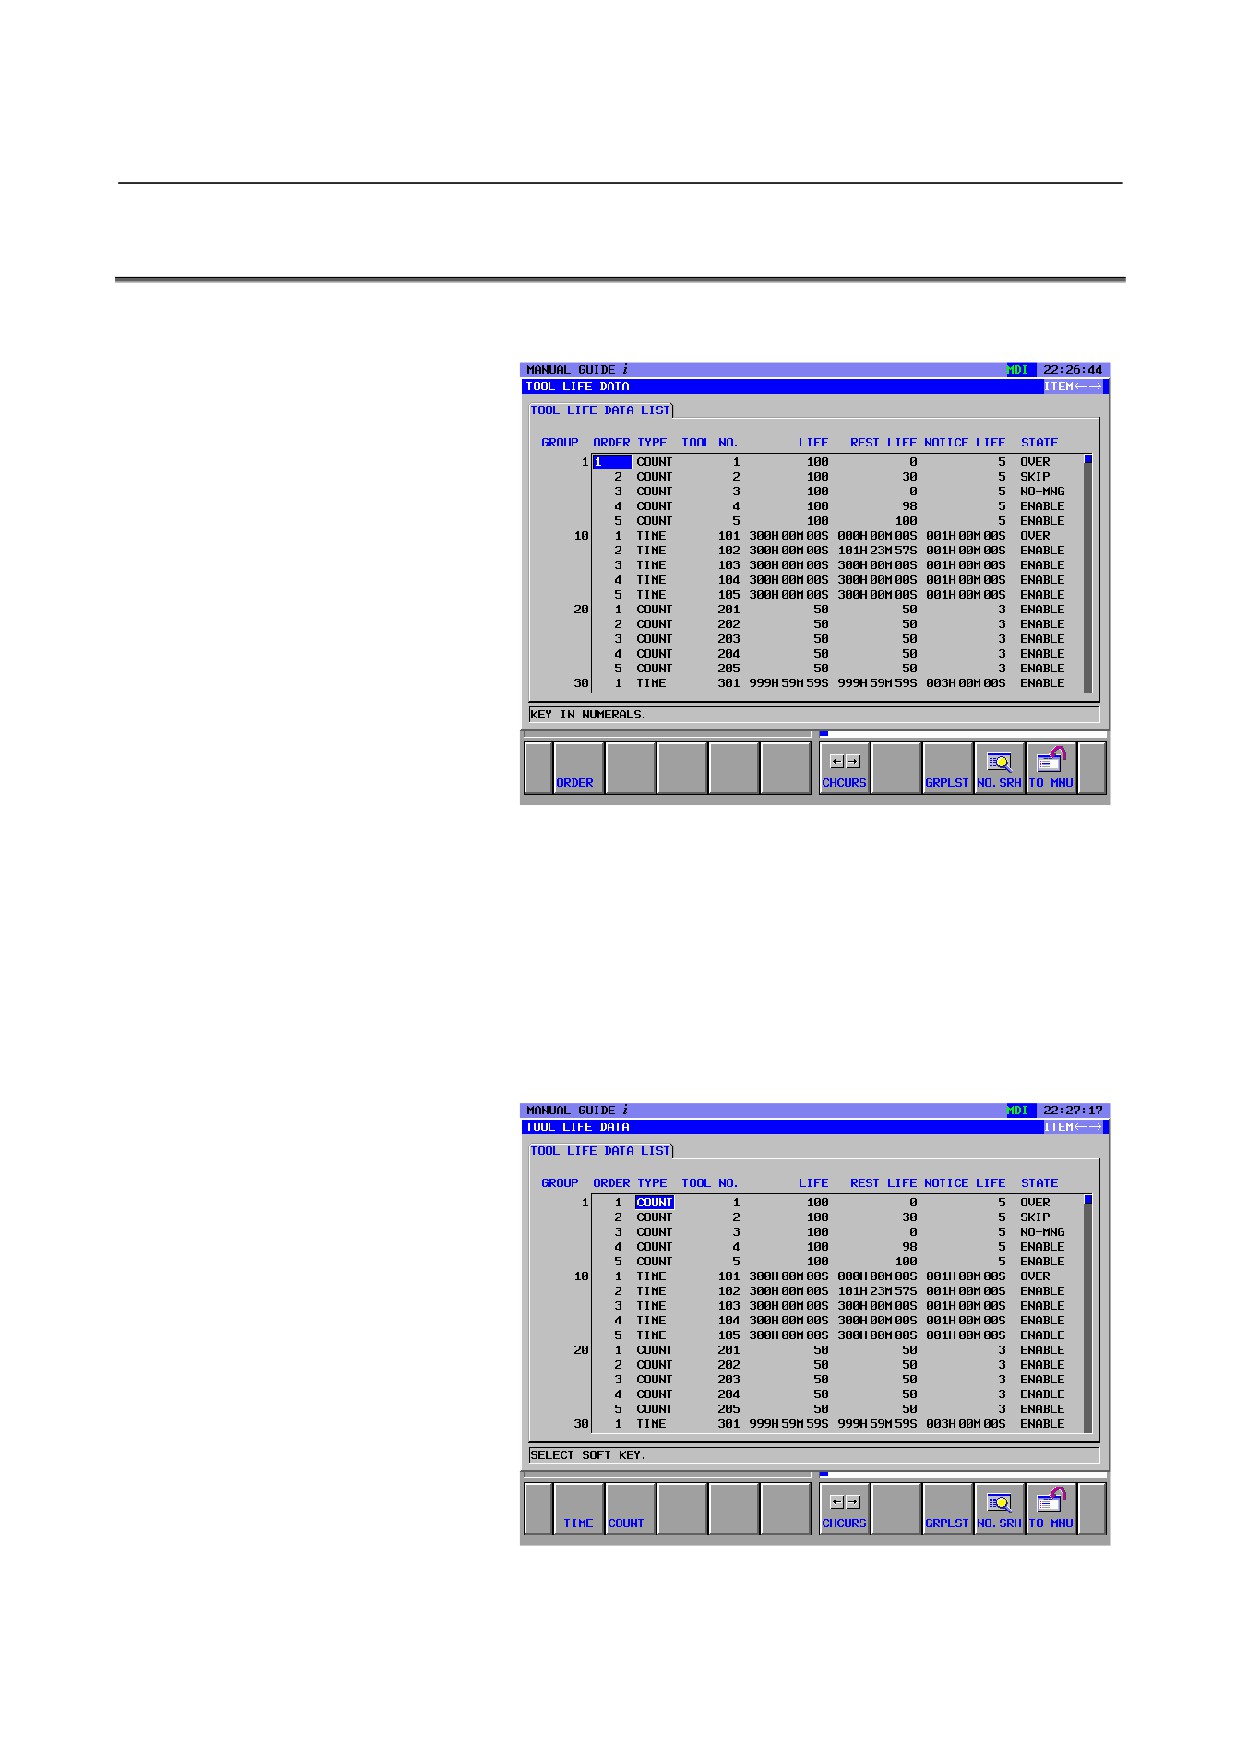
<1> From "BASIC" tab screen on SETTINGS menu, select “TOOL
LIFE DATA LIST”, and the following screen appears.
•
Tool life state for all tools are displayed as a list form.
•
Group number is displayed at the left end.
•
The life state indication of each tool is the same as that on
the conventional life management data screen.
•
On this screen, you can change the priority of the tools
which are belong to the same group with cursor pointed tool.
The action performed by pressing each soft key is the same
as that on the conventional life management data screen.
<2> Move the cursor to “TYPE”, and the following screen appears.
•
On this screen, you can change the count type of the tools
which are belong to the same group with cursor pointed tool.
- 669 -
5.TOOL LIFE DATA LIST SCREEN TOOL MANAGEMENT
B-63874EN/05
The action performed by pressing each soft key is the same
as that on the conventional life management data screen.
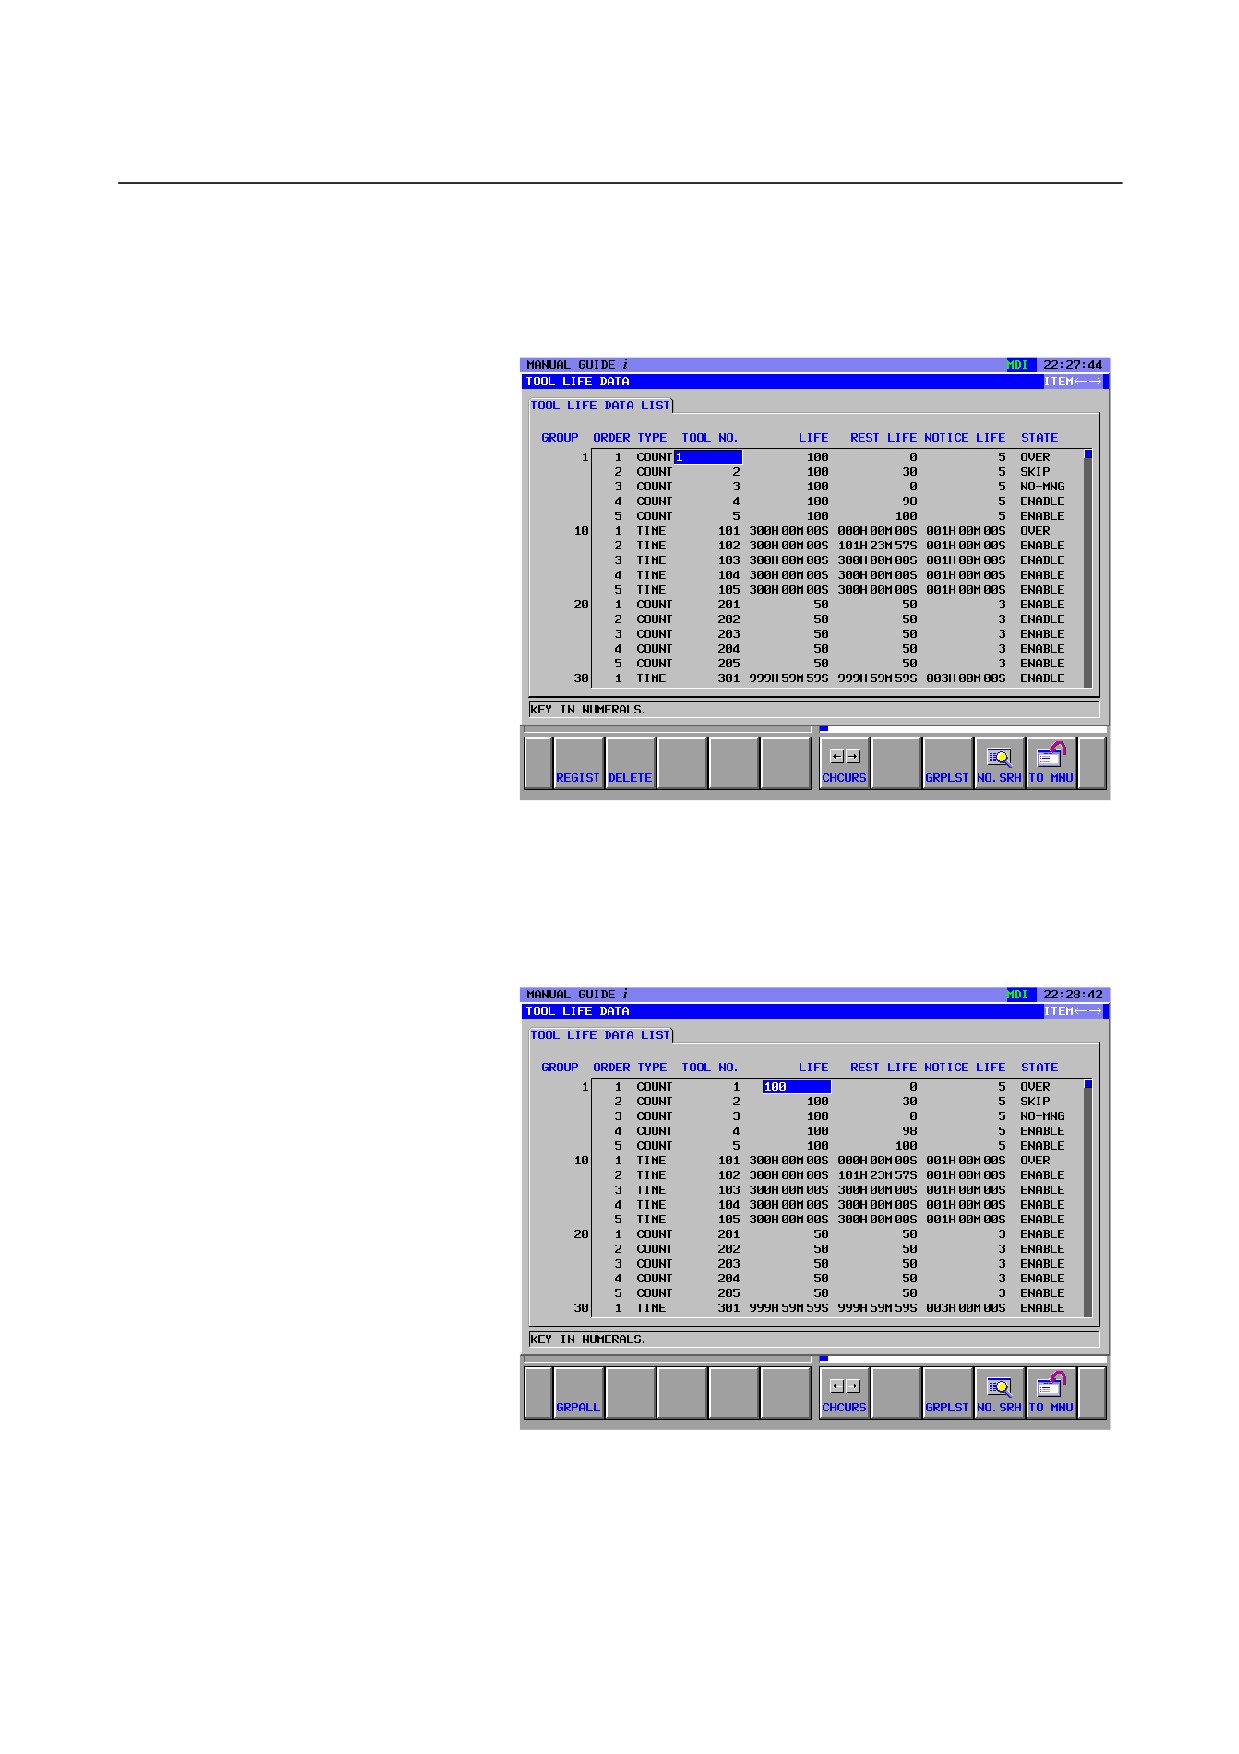
<3> Move the cursor to “TOOL NO.”, and the following screen
appears.
•
On this screen, you can change the tool number of which is
pointed by the cursor. The action performed by pressing
each soft key is the same as that on the conventional life
management data screen.
<4> Move the cursor to “LIFE”, and the following screen appears.
•
On this screen, you can change the tool life value of which
is pointed by the cursor. The action performed by pressing
each soft key is the same as that on the conventional life
management data screen.
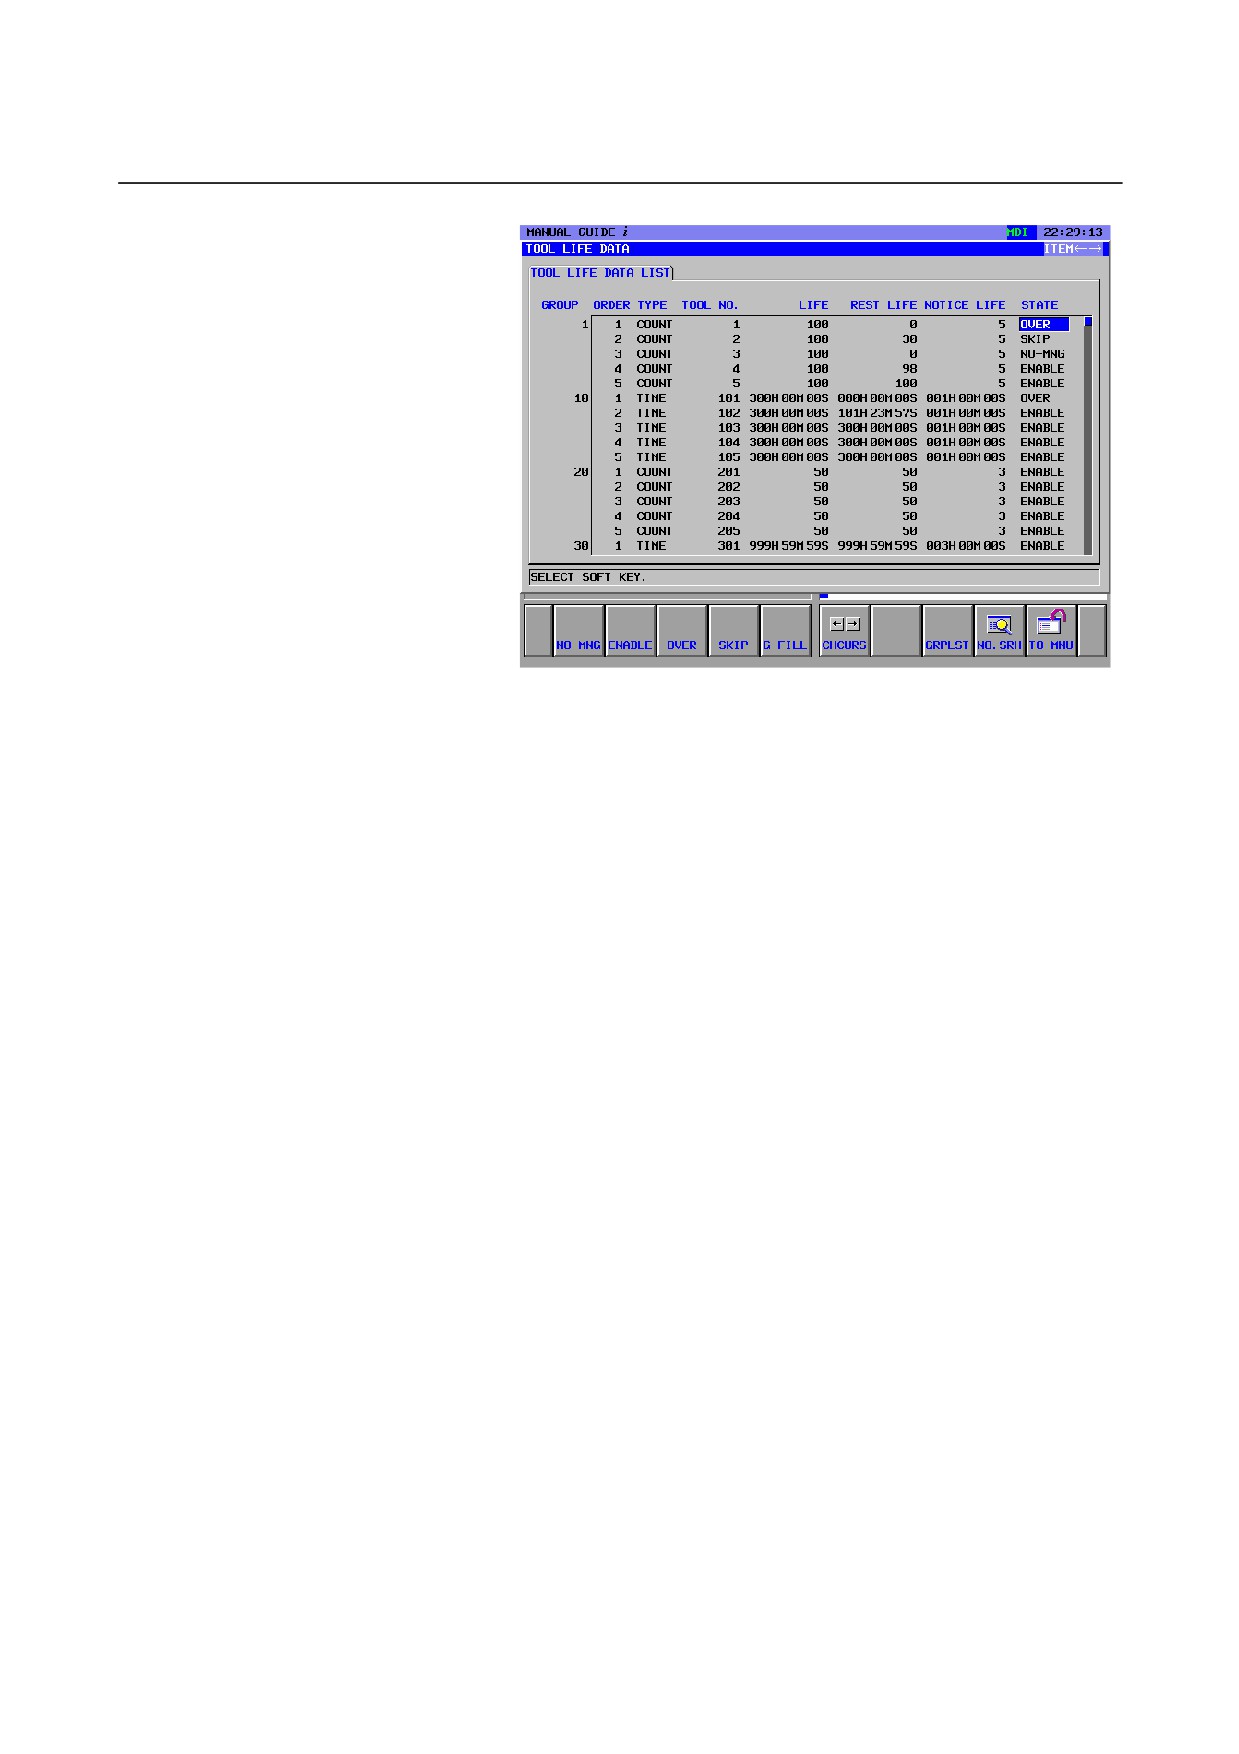
<5> Move the cursor to “STATE”, and the following screen appears.
- 670 -
B-63874EN/05 TOOL MANAGEMENT
5.TOOL LIFE DATA LIST SCREEN
•
On this screen, you can change the tool life state of which is
pointed by the cursor. The action performed by pressing
each soft key is the same as that on the conventional life
management data screen.
<6> Pressing [GRPLST] displays the list of the life states of groups.
The data displayed is the same as that on the conventional group
number list screen. When a group number is selected in the
group number list window, the life management data list screen
appears with the cursor placed on the first tool of the selected
group.
<7> When the tool life data is changed with operating program, the
tool life data is updated on the tool life data list screen.
- 671 -