FANUC Series 16i/160i/160is-MODEL B, Series 18i/180i/180is-MODEL B, Series 21i/210i/210is-MODEL B. MAINTENANCE MANAUL - page 26
10. AC SPINDLE (SERIAL INTERFACE)
B-63525EN/02
(4) If the output voltage is not correct, perform the following calculation,
and change the value of parameter 3730 to adjust the gain of the D/A
converter:
10V
Setting +
(Current value of PRM 3730)
Measured voltage
(5) Execute an S command again and confirm that the output voltage is
correct.
.Restore the original parameter values.
722
B-63525EN/02
11.TROUBLESHOOTING
TROUBLESHOOTING
11
This chapter describes troubleshooting procedure.
11.1
CORRECTIVE ACTION FOR FAILURES
725
11.2
NO MANUAL OPERATION NOR AUTOMATIC
OPERATION CAN BE EXECUTED
727
11.3
JOG OPERATION CANNOT BE DONE
731
11.4
HANDLE OPERATION CANNOT BE DONE
735
11.5
AUTOMATIC OPERATION CANNOT BE DONE
740
11.6
CYCLE START LED SIGNAL HAS
TURNED OFF
748
11.7
NOTHING IS DISPLAYED ON THE LCD
WHEN THE POWER IS TURNED ON
750
11.8
THE DISPLAY ON THE LCD UNIT FLASHES . . 754
11.9
INPUT FROM AND OUTPUT TO I/O DEVICES
CANNOT BE PERFORMED INPUT/OUTPUT
CANNOT BE PERFORMED PROPERLY
755
11.10
IN A CONNECTOR PANEL I/O UNIT, DATA IS
INPUT TO AN UNEXPECTED ADDRESS
757
11.11
IN A CONNECTOR PANEL I/O UNIT, NO DATA IS
OUTPUT TO AN EXPANSION UNIT
758
11.12
ALARM 85 TO 87
(READER/PUNCHER INTERFACE ALARM) . . . 759
11.13
ALARM 90 (REFERENCE POSITION
RETURN IS ABNORMAL)
765
11.14
ALARM 300 (REQUEST FOR REFERENCE
POSITION RETURN)
767
11.15
ALARM 401 (V READY OFF)
768
11.16
ALARM 404 (V READY ON)
772
11.17
ALARM 462 (SEND CNC DATA FAILED)
ALARM 463 (SEND SLAVE DATA FAILED)
775
11.18
ALARM 417
(DIGITAL SERVO SYSTEM IS ABNORMAL) . . 778
11.19
ALARM 700 (OVERHEAT: CONTROL UNIT) . . 779
11.20
ALARM 701 (OVERHEAT: FAN MOTOR)
780
11.21
ALARM 704 (SPINDLE SPEED FLUCTUATION
DETECTION ALARM)
782
11.22
ALARM 749 (SERIAL SPINDLE
COMMUNICATION ERROR)
783
11.23
ALARM 750
(SPINDLE SERIAL LINK STARTUP FAILURE) .
784
11.24
ALARM 5134 (FSSB: OPEN READY TIME OUT)
ALARM 5135 (FSSB: ERROR MODE)
ALARM 5137 (FSSB: CONFIGURATION ERROR)
ALARM 5197 (FSSB: OPEN TIME OUT)
ALARM 5198 (FSSB: ID DATA NOT READ) . . .
787
723
11. TROUBLESHOOTING
B-63525EN/02
11.25 ALARM 5136
(FSSB: NUMBER OF AMPS IS SMALL)
791
11.26 ALARM 900 (ROM PARITY)
794
11.27 ALARMS 910 AND 911 (SRAM PARITY)
796
11.28 ALARMS 912 TO 919 (DRAM PARITY)
799
11.29 ALARMS 920 AND 921 (SERVO ALARMS)
801
11.30 ALARM 926 (FSSB ALARM)
805
11.31 ALARM 930 (CPU INTERRUPT)
811
11.32 ALARM 935 (SRAM ECC ERROR)
813
11.33 ALARM 950 (PMC SYSTEM ALARM)
815
11.34 ALARM 951 (PMC WATCHDOG ALARM)
818
11.35 ALARM 972
(NMI ALARM ON AN OPTION BOARD)
819
11.36 ALARM 973
(NMI ALARM WITH AN UNKNOWN CAUSE) . 820
11.37 ALARM 974 (F-BUS ERROR)
821
11.38 ALARM 975 (BUS ERROR)
824
11.39 ALARM 976 (LOCAL BUS ERROR)
825
11.40 SERVO ALARMS
826
11.41 SPC ALARMS
831
11.42 SPINDLE ALARMS
832
724

B-63525EN/02
11.TROUBLESHOOTING
When a failure occurs, it is important to correctly grasp what kind of
11.1
failure occured and take appropriate action, to promptly recover the
CORRECTIVE
machine.
ACTION FOR
Check for the failure according to the following procedure :
FAILURES
With what
When?
What failure?
operation?
Grasp the kind of failure
↓
Appropriate action
↓
Recovery
11.1.1
Investigating the
(1) When and how many times (frequency of occurrences)
Conditions Under
(2) With what operation
(3) What failure occurred
which Failure Occurred
1
When did the failure occur?
⋅
Date and time?
⋅
Occurred during operation? (how long was the operation?)
⋅
Occurred when the power was turned on?
⋅
Was there any lightening surge, power failure, or other disturbances
to the power supply?
How many times has it occurred
⋅
Only once?
⋅
Occurred many times ? (How many times per hour, per day, or per
month?)
2
With what operation did it occur ?
⋅
What was the NC mode when the failure occurred?
Jog mode/memory operation mode /MDI mode /reference position
return mode
⋅
If during program operation,
1) Where in the program ?
2) Which program No. and sequence No. ?
3) What program ?
4) Occurred during axial movement ?
5) Occurred during the execution of an M/S/T code ?
6) Failure specific to the program ?
⋅
Does the same operation cause the same failure ?
(Check the repeatability of the failure.)
⋅
Occurred during data input/output ?
<Feed axes and spindles>
⋅
For a failure related to feed axis servo
1) Occurred at both low feedrate and high feedrate ?
2) Ocurred only for a certain axis ?
725
11. TROUBLESHOOTING
B-63525EN/02
⋅
For a failure related to spindles
When did the failure occur ? (during power-on, acceleration,
deceleration, or constant rotation)
3
What failure occurred ?
⋅
Which alarm was displayed on the alarm display screen?
(Check the axis along which an alarm has occurred for alarms 300
to 599.)
⋅
Is the screen correct ?
⋅
If machining dimensions are incorrect
1) How large is the error ?
2) Is the position display on the CRT correct ?
3) Are the offsets correct ?
4
Other information
⋅
Is there noise origin around machine?
If the failure has not occurred frequently, the cause may be external
noise to the power supply or inductive noise on machinery cables.
Operate other machines connected to the same power line and see
if noise come from the relays or compressors.
⋅
Is it taken any countermeasure for noise in machine side?
⋅
Check the following for the input power supply voltage :
1) Is there variation in the voltage ?
2) Are the voltages different depending on the phase ?
3) Is the standard voltage supplied ?
⋅
How high is the ambient temperature of the control unit?
Refer to manual about noise.
⋅
Has excessive vibration been applied to the control unit?
5
When you contact our service center, specify the following items :
1) Name of the NC unit
2) Name of the machine tool builder and type of machine
3) Software series/version of the NC
4) Specifications of the servo amplifier and motor
(for a failure related to the servo)
5) Specifications of the spindle amplifier and spindle motor
(for a failure related to a spindle)
⋅
See the drawing issued by the machine tool builder for the locations
of the NC unit and servo/spindle amplifiers.
⋅
We use the following specification codes :
Servo /spindle amplifier : A06B-VVVV-HVVV
Servo/spindle amplifier
: A06B-VVVV-BVVV
NOTE
The mark ‘V’ represents a number.
726
B-63525EN/02
11.TROUBLESHOOTING
11.2
NO MANUAL OPERA-
TION NOR AUTOMAT-
IC OPERATION CAN
BE EXECUTED
Points
(1) Execute the following procedure when no manual nor automatic
operation is done
(2) Check whether position display shows correct position
(3) Check CNC status display
(4) Check CNC internal status using diagnostic function
Causes and
Countermeasures
1. Position display
(1) Check CNC status display (Refer to Section 1.9 CNC STATUS
(relative, absolute,
DISPLAY for detail.)
machine coordinate)
(a) Emergency stop status (Emergency stop signal is turned on)
does not change
If status display shows
EMG
the emergency stop signal is input.
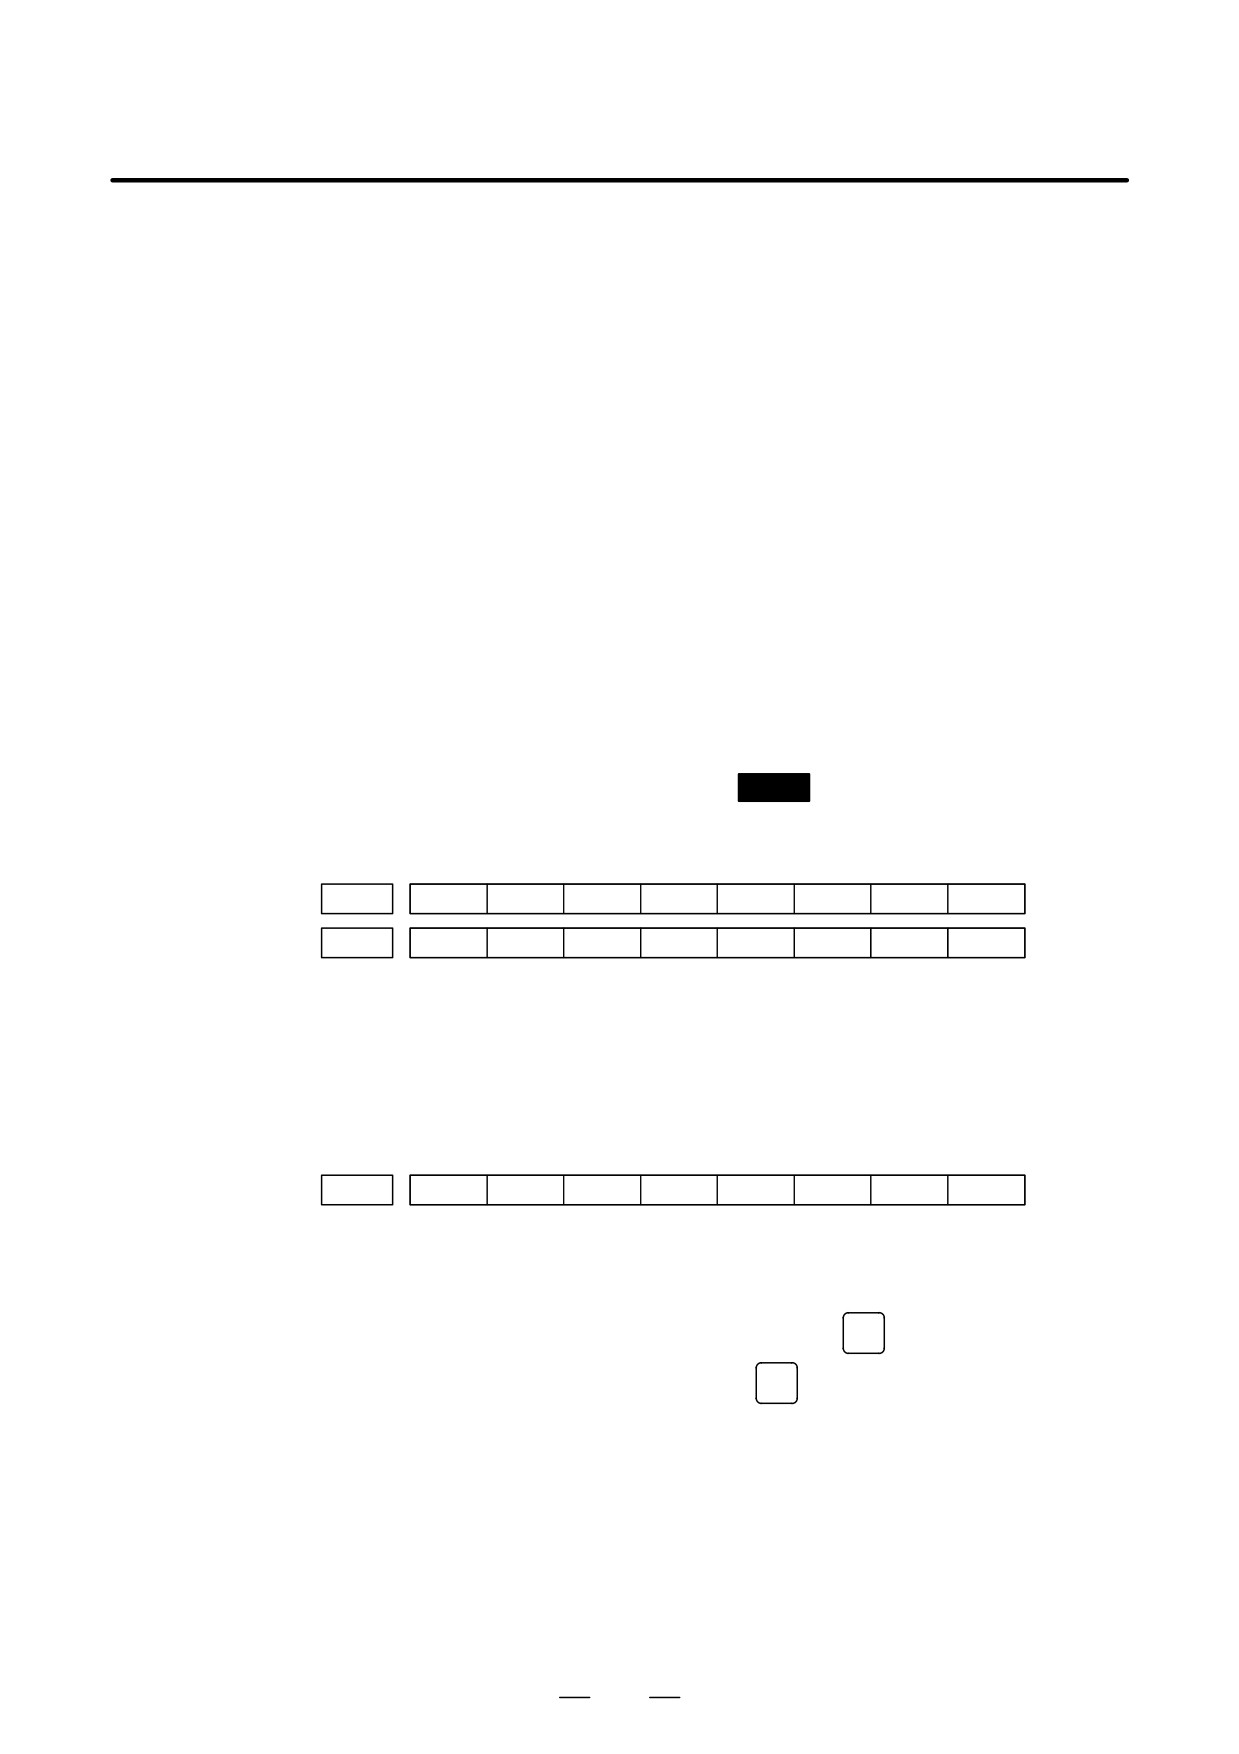
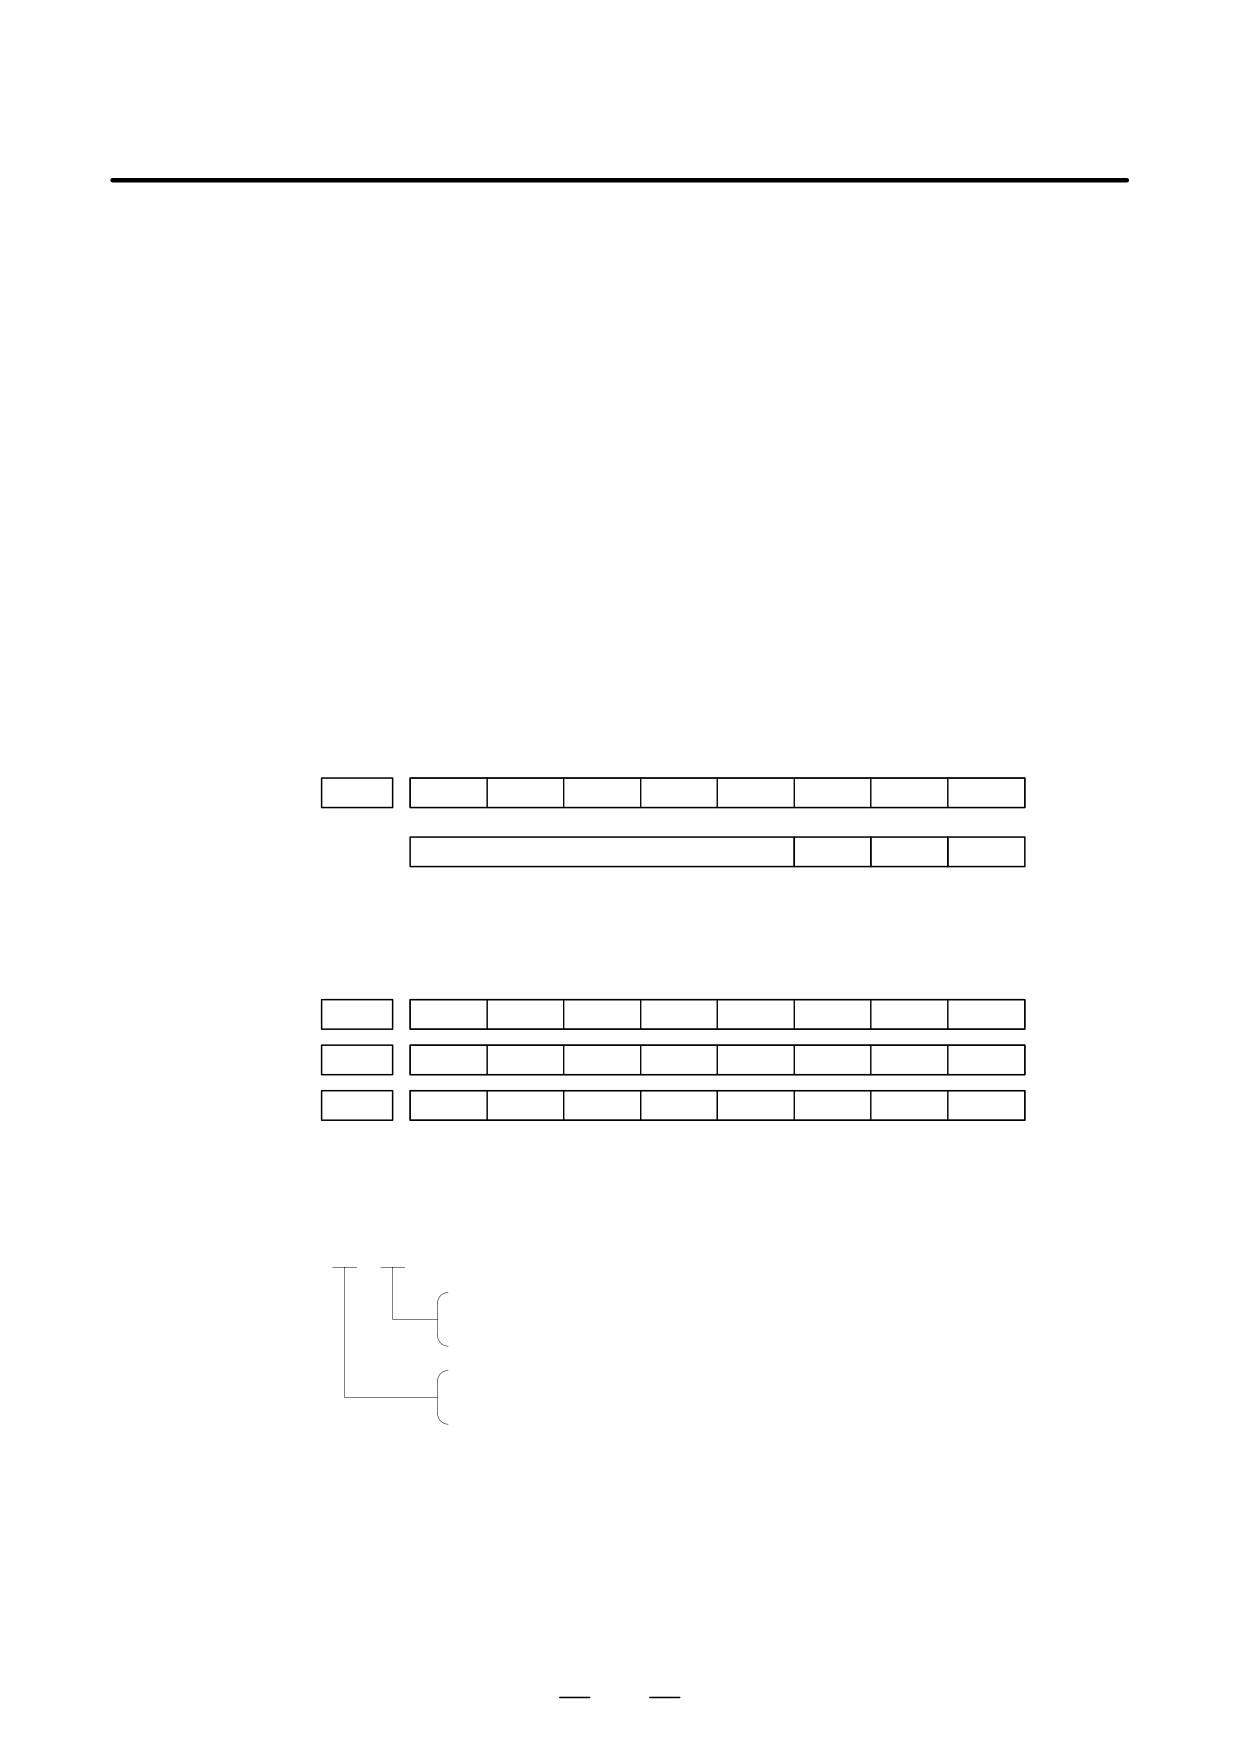
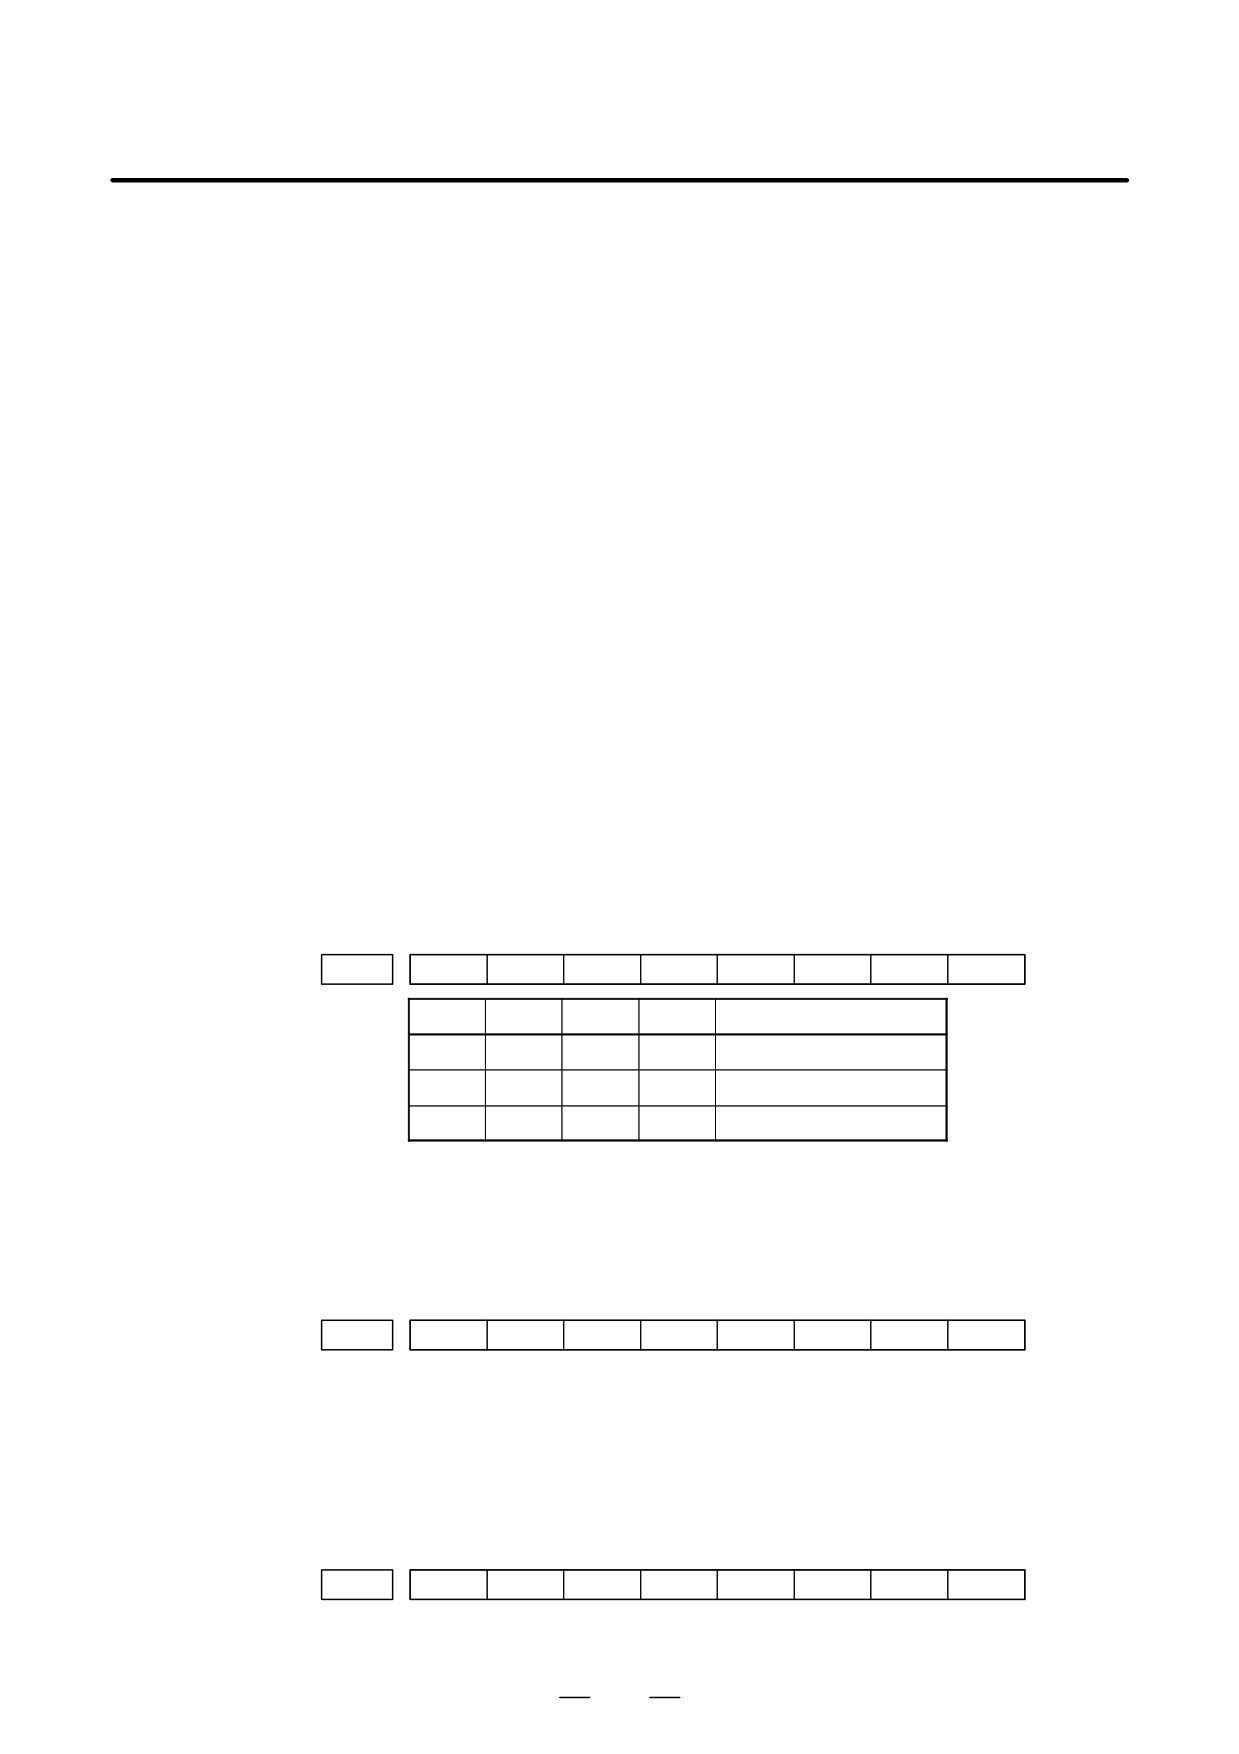
Check the following signal using the PMC’s diagnostic function
(PMCDGN).
#7
#6
#5
#4
#3
#2
#1
#0
X1008
*ESP
G0008
*ESP
ESP=0 indicates that emergency stop signal is input.
(b) It is a reset status
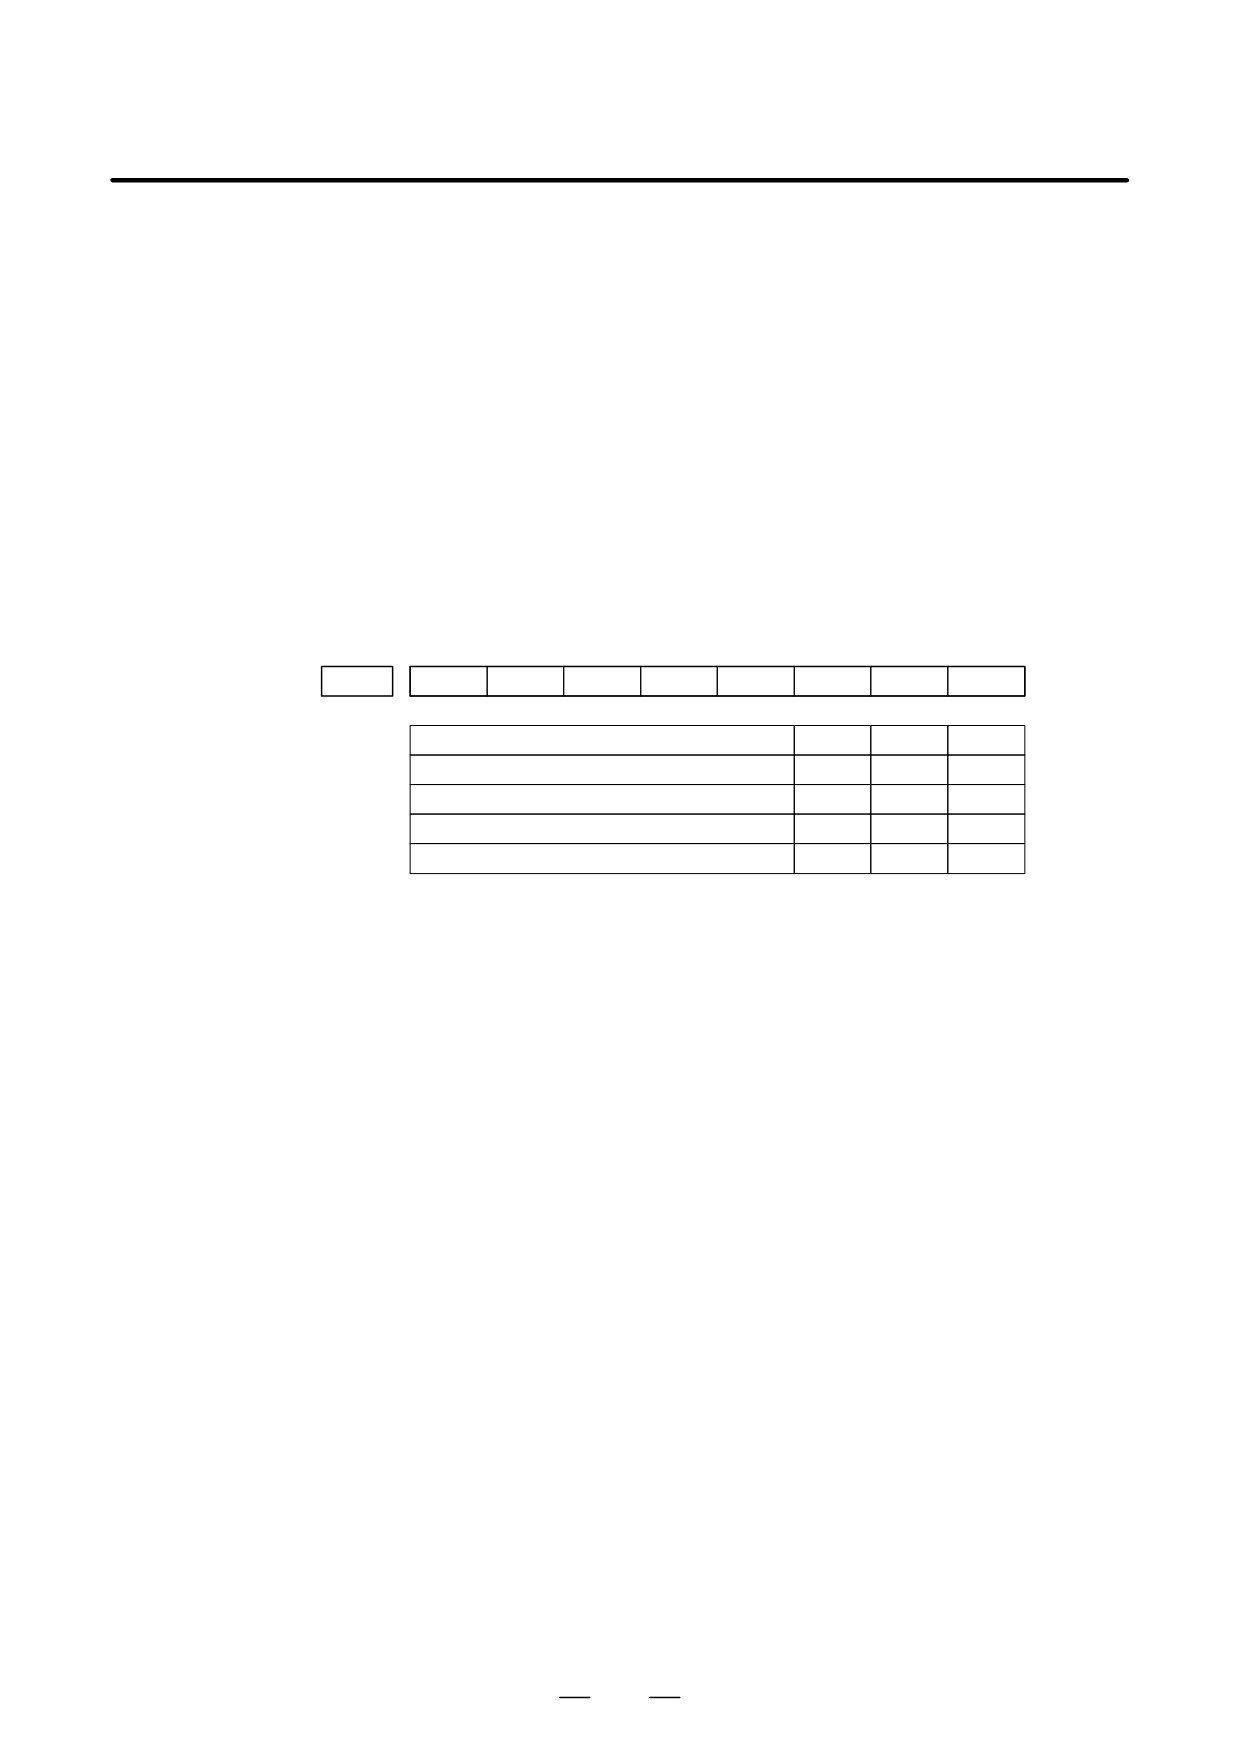
When RESET is displayed, any of a reset is functioned. Check the
following signal using the PMC’s diagnostic funciton
(PMCDGN).
1) An input signal from the PMC functions
#7
#6
#5
#4
#3
#2
#1
#0
G0008
ERS
RRW
When ERS is 1, external reset signal is input.
When RRW is 1, reset & rewing signal is input.
2) RESET key on the MDI keyboard functions
When the signals in 1) are 0,
RESET
key may be functioning.
Check the contact of
RESET
key using a tester.
When it is abnormal, change the keyboard.
727
11. TROUBLESHOOTING
B-63525EN/02
(c) Confirm the status of modes
Operation mode status is displayed on the lower part of CRT as
follows :
If nothing is displayed, mode select signal is not input. Check mode
select signal using PMC’s diagnostic function (PMCDGN).
For details, refer to section 1.9 CNC STATUS DISPLAY.
(Example of display)
JOG : Manual operation (JOG) mode
HND : Manual handle (MPG) mode
MDI : Manual data input (MDI) mode
MEM : Automatic operation (Memory) mode
EDIT: EDIT (Memory edit) mode
<Mode select signal>
#7
#6
#5
#4
#3
#2
#1
#0
G0043
MD4
MD2
MD1
↓
↓
↓
Manual operation (JOG) mode
1
0
1
Manual handle (MPG) mode
1
0
0
Manual data input (MDI) mode
0
0
0
Automatic operation (Memory) mode
0
0
1
EDIT (Memory edit) mode
0
1
1
(2) Check diagnostic data 000 to 025 of the CNC Check an item for which
1 is displayed
No. Message
Display
000
WAITING FOR FIN SIGNAL
: 0
001
MOTION
: 0
002
DWELL
: 0
a.003
IN-POSITION CHECK
: 0
004
FEEDRATE OVERRIDE 0%
: 0
b.005
INTERLOCK / START LOCK
: 1 (Example)
006
SPINDLE SPEED ARRIVAL CHECK
: 0
010
PUNCHING
: 0
011
READING
: 0
012
WAITING FOR (UN) CLAMP
: 0
c.013
JOG FEEDRATE OVERRIDE 0%
: 0
d.014
WAITING FOR RESET, ESP, RRW OFF
: 0
015
EXTERNAL PROGRAM NUMBER SEARCH : 0
Items with a to d relate with manual and automatic operation and its
detail is shown below.
728
B-63525EN/02
11.TROUBLESHOOTING
a. In-position check is
It shows that positioning is not yet completed. Check the contents of the
being done
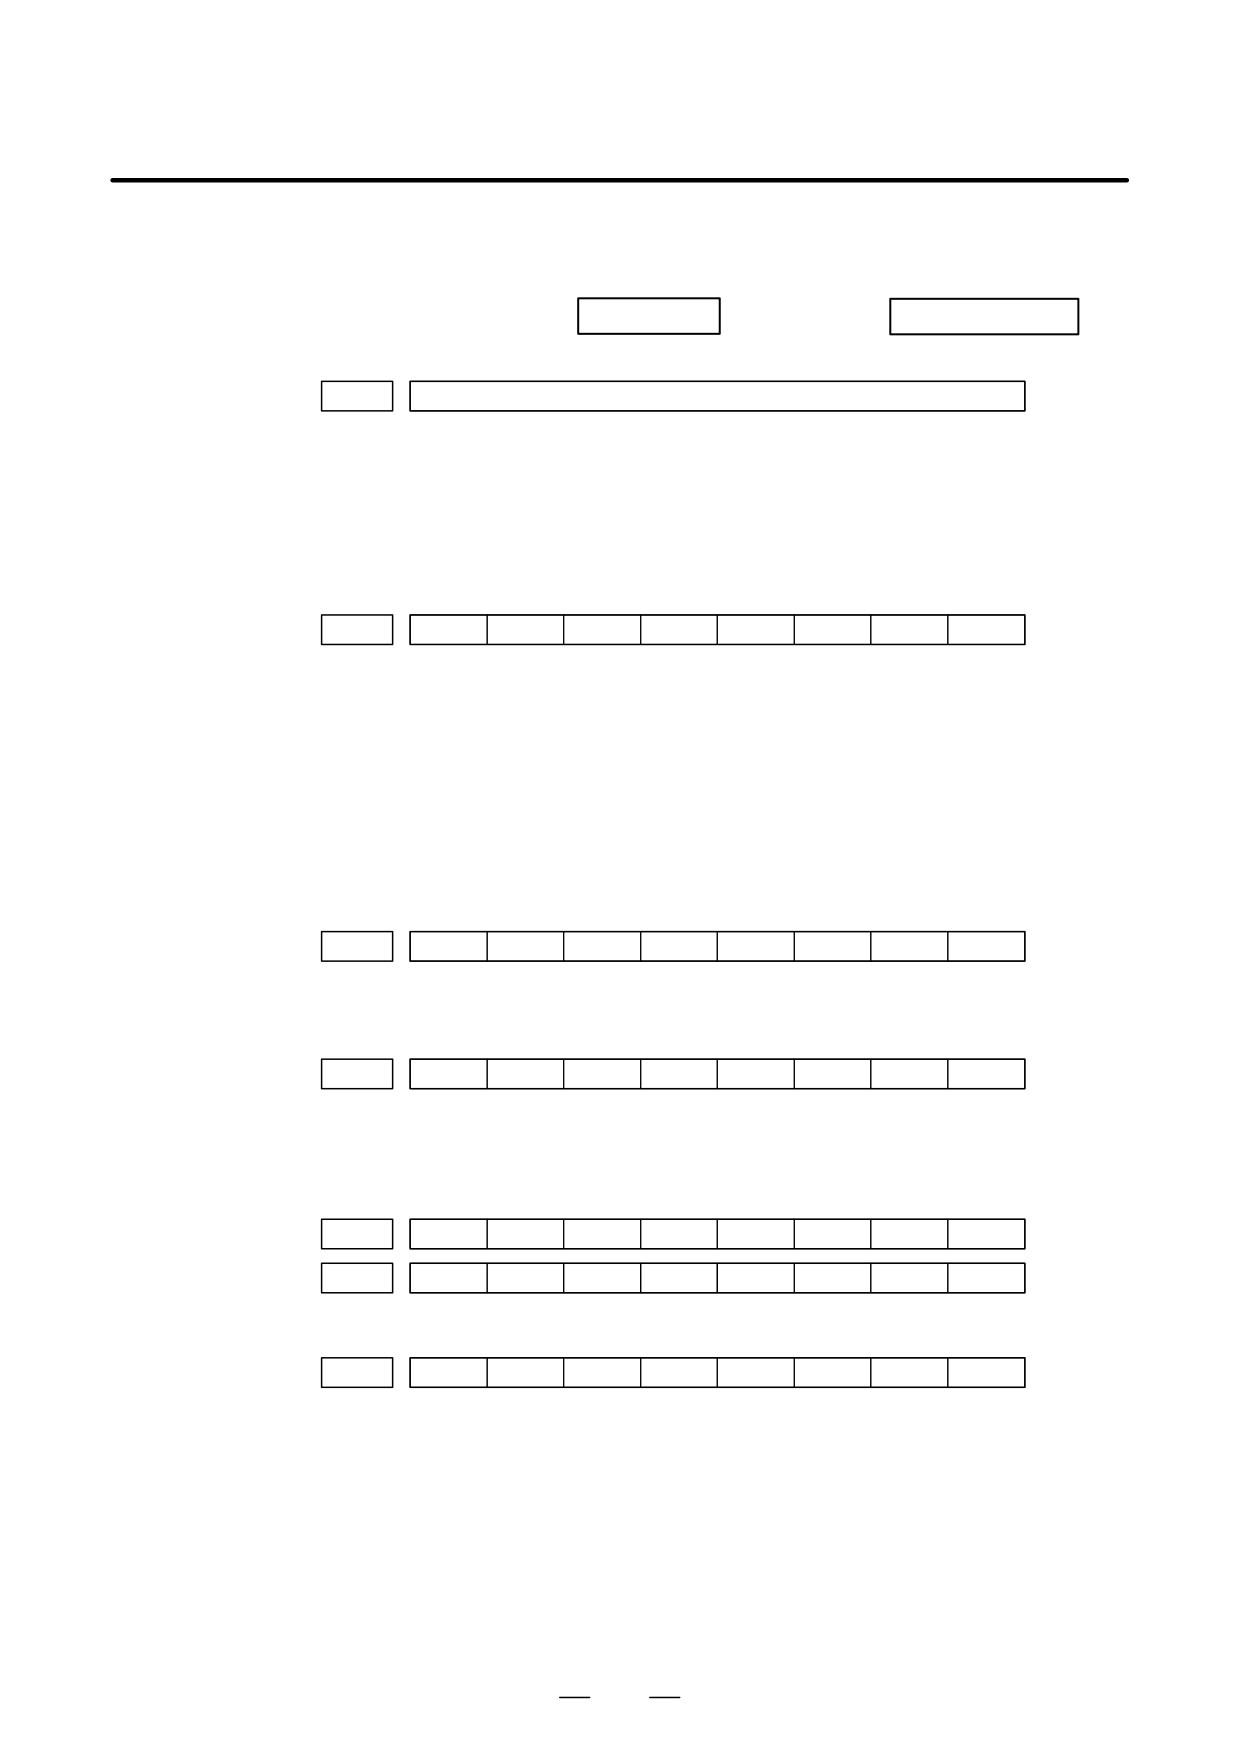
following diagnostic number. (It is 1 in the following condition)
DGN 0300
Position Error
>PARAM 1826
In-position width
1) Check the parameters according to the parameter list.
1825
Servo loop gain per axis
(Normal : 3000)
2) Servo system may be abnormal. Refer to servo alarm 400, 410, and
411.
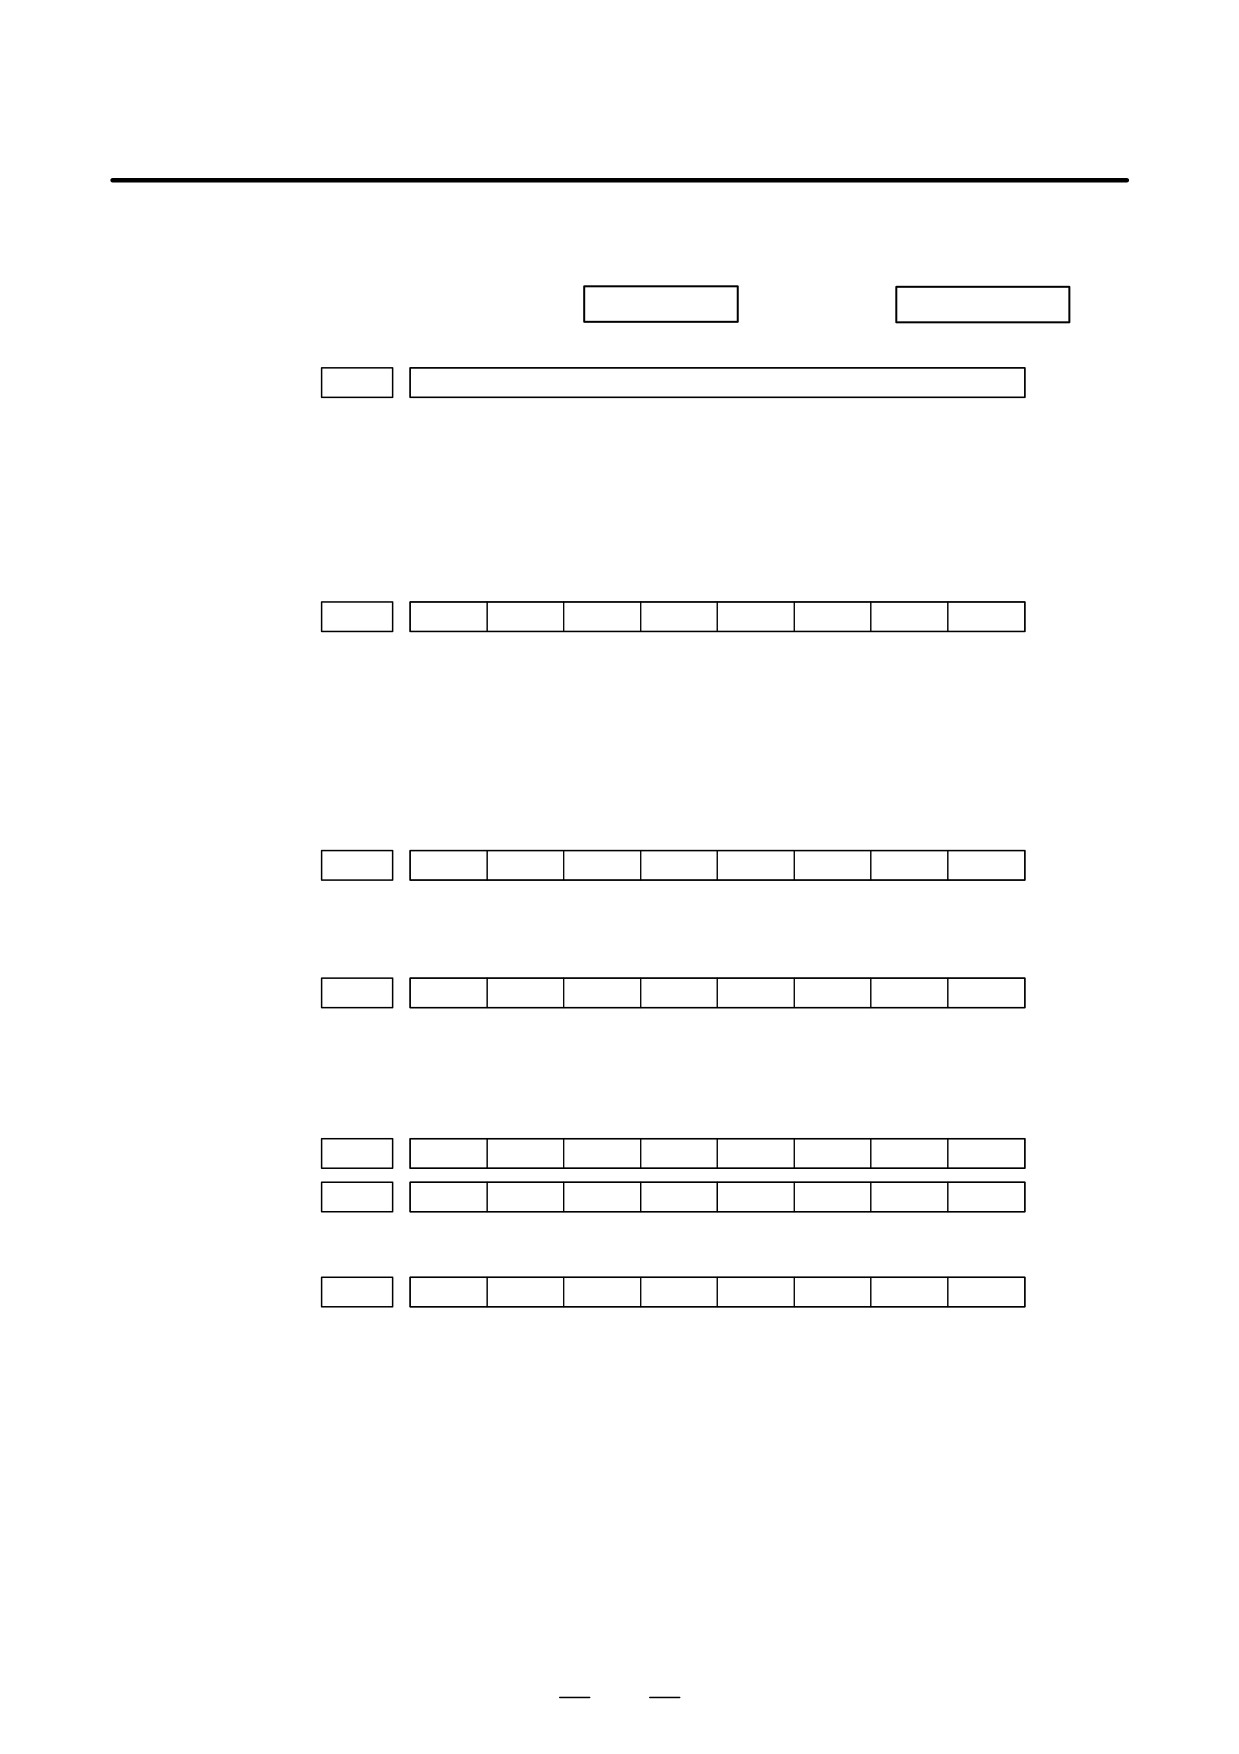
b. Interlock or start lock
There are a plural interlock signals. Check at first which interlock signal
signal is input
is used by the machine tool builder at the parameters shown below.
#7
#6
#5
#4
#3
#2
#1
#0
3003
DAU
DIT
ITX
ITL
#0 ITL=0 shows interlock signal *IT is effective. To 1)
#2 ITX=0 shows interlock signal *ITn is effective. To 2)
#3 DIT=0 shows interlock signal "MITn is effective. To 3)
#4 DAU=When it is “1,” the interlock signal ("MITn) is effective
even in automatic operation.
Go to 3).
Check state of effective interlock signals using the diagnostic function
(PMCDGN) of the PMC.
1)
Interlock signal (*IT) is input.
#7
#6
#5
#4
#3
#2
#1
#0
G0008
*IT
*IT=0 shows that interlock signal is input.
2)
Axis interlock signal (*ITn) is input.
#7
#6
#5
#4
#3
#2
#1
#0
G0130
*IT8
*IT7
*IT6
*IT5
*IT4
*IT3
*IT2
+IT1
*ITn=0 shows interlock signal is input.
3)
Interlock signal per axis and direction ("MITn) is input.
D M series
#7
#6
#5
#4
#3
#2
#1
#0
G0132
+MIT4
+MIT3
+MIT2
+MIT1
G0134
-MIT4
-MIT3
-MIT2
-MIT1
D T series
#7
#6
#5
#4
#3
#2
#1
#0
X0004
-MIT2
+MIT2
-MIT1
+MIT1
"MITn=1 shows interlock signal per axis and direction is input.
* In T series, "MITn is effective only when the manual operation is
used.
729
11. TROUBLESHOOTING
B-63525EN/02
c. Jog feedrate override is
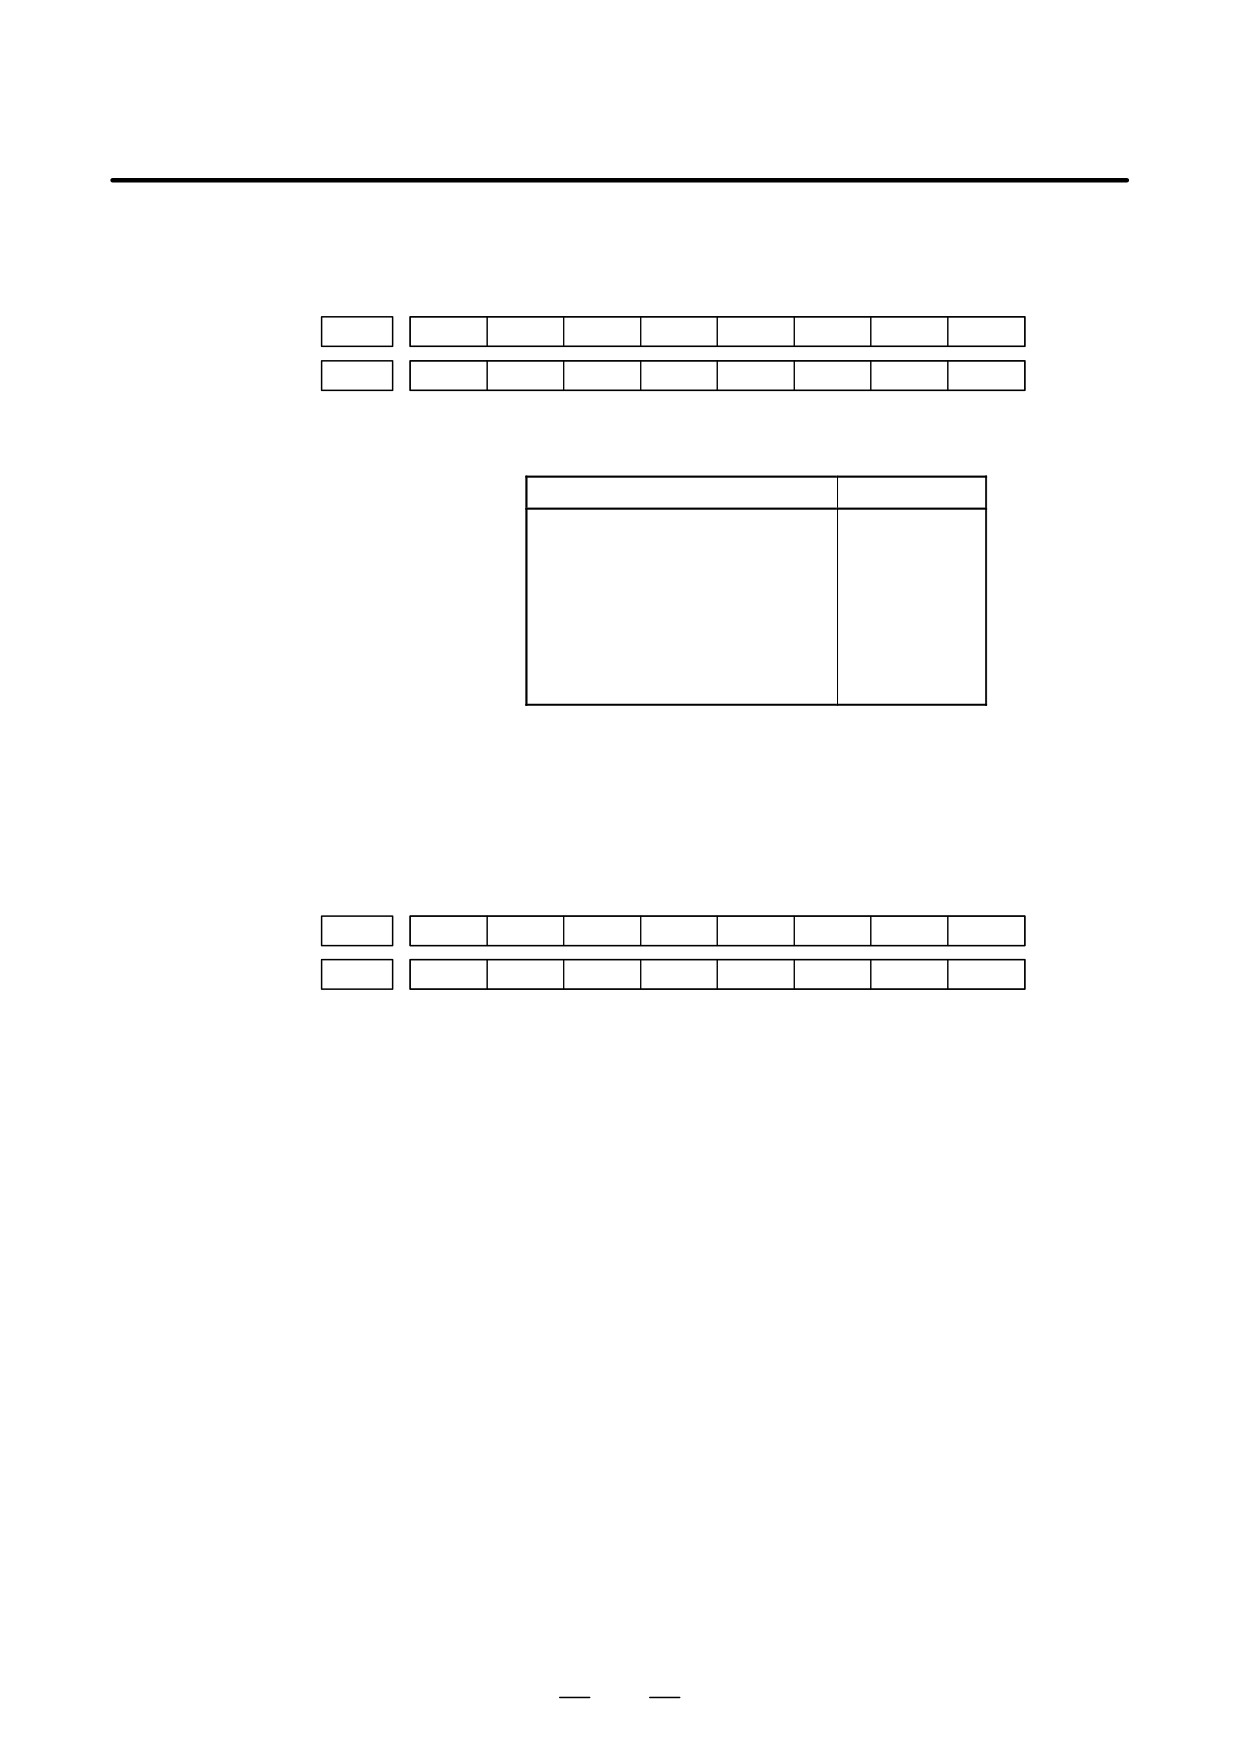
Check the signals using PMC’s diagnostic function (PMCDGN)
0%
#7
#6
#5
#4
#3
#2
#1
#0
G0010
*JV7
*JV6
*JV5
*JV4
*JV3
*JV2
*JV1
*JV0
G0011
*JV15
*JV14
*JV13
*JV12
*JV11
*JV10
*JV9
*JV8
When the override is 0% all bits of the above address becomes
1111
1111 or 0000
0000.
*JV15 .
JV0
Override
1111 1111 1111 1111
0.00%
1111 1111 1111 1110
0.01%
:
:
1101 1000 1110 1111
100.00%
:
:
0000 0000 0000 0001
655.34%
0000 0000 0000 0000
0.00%
d. NC is in a reset state
In this case, RESET is also displayed on the status display. Check it using
the procedure of b above.
2. When machine
(1) Machine lock signal (MLK) is input.
coordinate value does
not update on position
display
#7
#6
#5
#4
#3
#2
#1
#0
G0044
MLK
G0108
MLK8
MLK7
MLK6
MLK5
MLK4
MLK3
MLK2
MLK1
MLK : All axes machine lock
MLKn : Each axis machine lock
When the signal is 1, the corresponding machine lock signal is input.
730
B-63525EN/02
11.TROUBLESHOOTING
11.3
JOG OPERATION
CANNOT BE DONE
Points
(1) Check whether position display is operating.
(2) Check CNC status display.
(3) Check internal status using Diagnostic funciton.
Causes and Remedies
1. Position display
(1) Check mode selection status (JOG mode is not selected).
(relative, absolute,
When status display shows JOG, it is normal.
machine cooordinate)
When status display does not show JOG, mode select signal is not
does not change
selected correctly. Confirm the mode select signal using PMC’s
diagnostic function (PMCDGN).
<Mode select signal>
#7
#6
#5
#4
#3
#2
#1
#0
G0043
MD4
MD2
MD1
↓
↓
↓
Manual operation (JOG) mode
1
0
1
(2) Feed axis and direction select signal is not input Check the signal using
PMC’s diagnostic function (PMCDGN).
#7
#6
#5
#4
#3
#2
#1
#0
G0100
+J8
+J7
+J6
+J5
+J4
+J3
+J2
+J1
G0102
-J8
-J7
-J6
-J5
-J4
-J3
-J2
-J1
G0086
-Ja
+Ja
-Jg
+Jg
When a bit is “1”, the corresponding feed axis direction
selection signal has been entered.
)
J
g
:
Both X- and Y-axes simultaneously (feed along a straight line or circle)
a
:
Both X- and Y-axes simultaneously (feed in the normal direction)
) : Feed in the ) direction
* : Feed in the * direction
Example)
In the normal state, pressing the “+X” button on the operator’s panel
causes the signal +Jn to be displayed as “1”.
* This signal becomes effective when the rise of the signal is
detected. If, therefore, the direction selection signal has been
entered before jog mode selection, axis movement is not
performed; set the bit “0” and then re-check the signal.
731
11. TROUBLESHOOTING
B-63525EN/02
* By defining a straight line or arc in the CNC beforehand using the
R area of the PMC, +Jg and "Ja allow the tool to move along both
X- and Y-axes simultaneously. The exchange of information with
the R area of the PMC is performed by the macro software or PMC
sequence program created by the MTB.
(3) Check CNC’s diagnostic function 000 to 015. Check the items for
which 1 is displayed at right side.
No. Message
Display
000
WAITING FOR FIN SIGNAL
: 0
001
MOTION
: 0
002
DWELL
: 0
a.
003
IN-POSITION CHECK
: 0
004
FEEDRATE OVERRIDE 0%
: 0
b.
005
INTERLOCK / START LOCK
: 1(Example)
006
SPINDLE SPEED ARRIVAL CHECK
: 0
010
PUNCHING
: 0
011
READING
: 0
012
WAITING FOR (UN) CLAMP
: 0
c.
013
JOG FEEDRATE OVERRIDE 0%
: 0
d.
014
WAITING FOR RESET, ESP, RRW OFF
: 0
015
EXTERNAL PROGRAM NUMBER SEARCH
: 0
Items with a to d relate with manual and automatic operation and its
detail is shown below.
732
B-63525EN/02
11.TROUBLESHOOTING
a. In-position check is
It shows that positioning is not yet completed. Check the contents of the
being done
following diagnostic number. (It is 1 in the following condition)
DGN 0300
Position Error
>PARAM 1826
In-positio width
1) Check the parameters according to the parameter list.
1825
Servo loop gain per axis
(Normal : 3000)
2) Servo system may be abnormal. Refer to servo alarm 400, 410, and
411.
b. Interlock or start lock
There are a plural interlock signals. Check at first which interlock signal
signal is input
is used by the machine tool builder at the parameters shown below.
#7
#6
#5
#4
#3
#2
#1
#0
PARAM
3003
DIT
ITX
ITL
#0 ITL=0 shows interlock signal *IT is effective. To 1)
#2 ITX=0 shows interlock signal *ITn is effective. To 2)
#3 DIT=0 shows interlock signal "MITn is effective. To 3)
Check state of effective interlock signals using the diagnostic function
(PMCDGN) of the PMC.
1) Interlock signal (*IT) is input.
#7
#6
#5
#4
#3
#2
#1
#0
G0008
*IT
*IT=0 shows that interlock signal is input.
2) Axis interlock signal (*ITn) is input.
#7
#6
#5
#4
#3
#2
#1
#0
G0130
*IT8
*IT7
*IT6
*IT5
*IT4
*IT3
*IT2
+IT1
*ITn=0 shows interlock signal is input.
3) Interlock signal per axis and direction (+/- MITn) is input
⋅ M series
#7
#6
#5
#4
#3
#2
#1
#0
G0132
+MIT4
+MIT3
+MIT2
+MIT1
G0134
-MIT4
-MIT3
-MIT2
-MIT1
⋅ T series
#7
#6
#5
#4
#3
#2
#1
#0
X0004
-MIT2
+MIT2
-MIT1
+MIT1
"MITn=1 shows interlock signal per axis and direction is input.
* For the T series, "MITn is valid only for manual operation.
733
11. TROUBLESHOOTING
B-63525EN/02
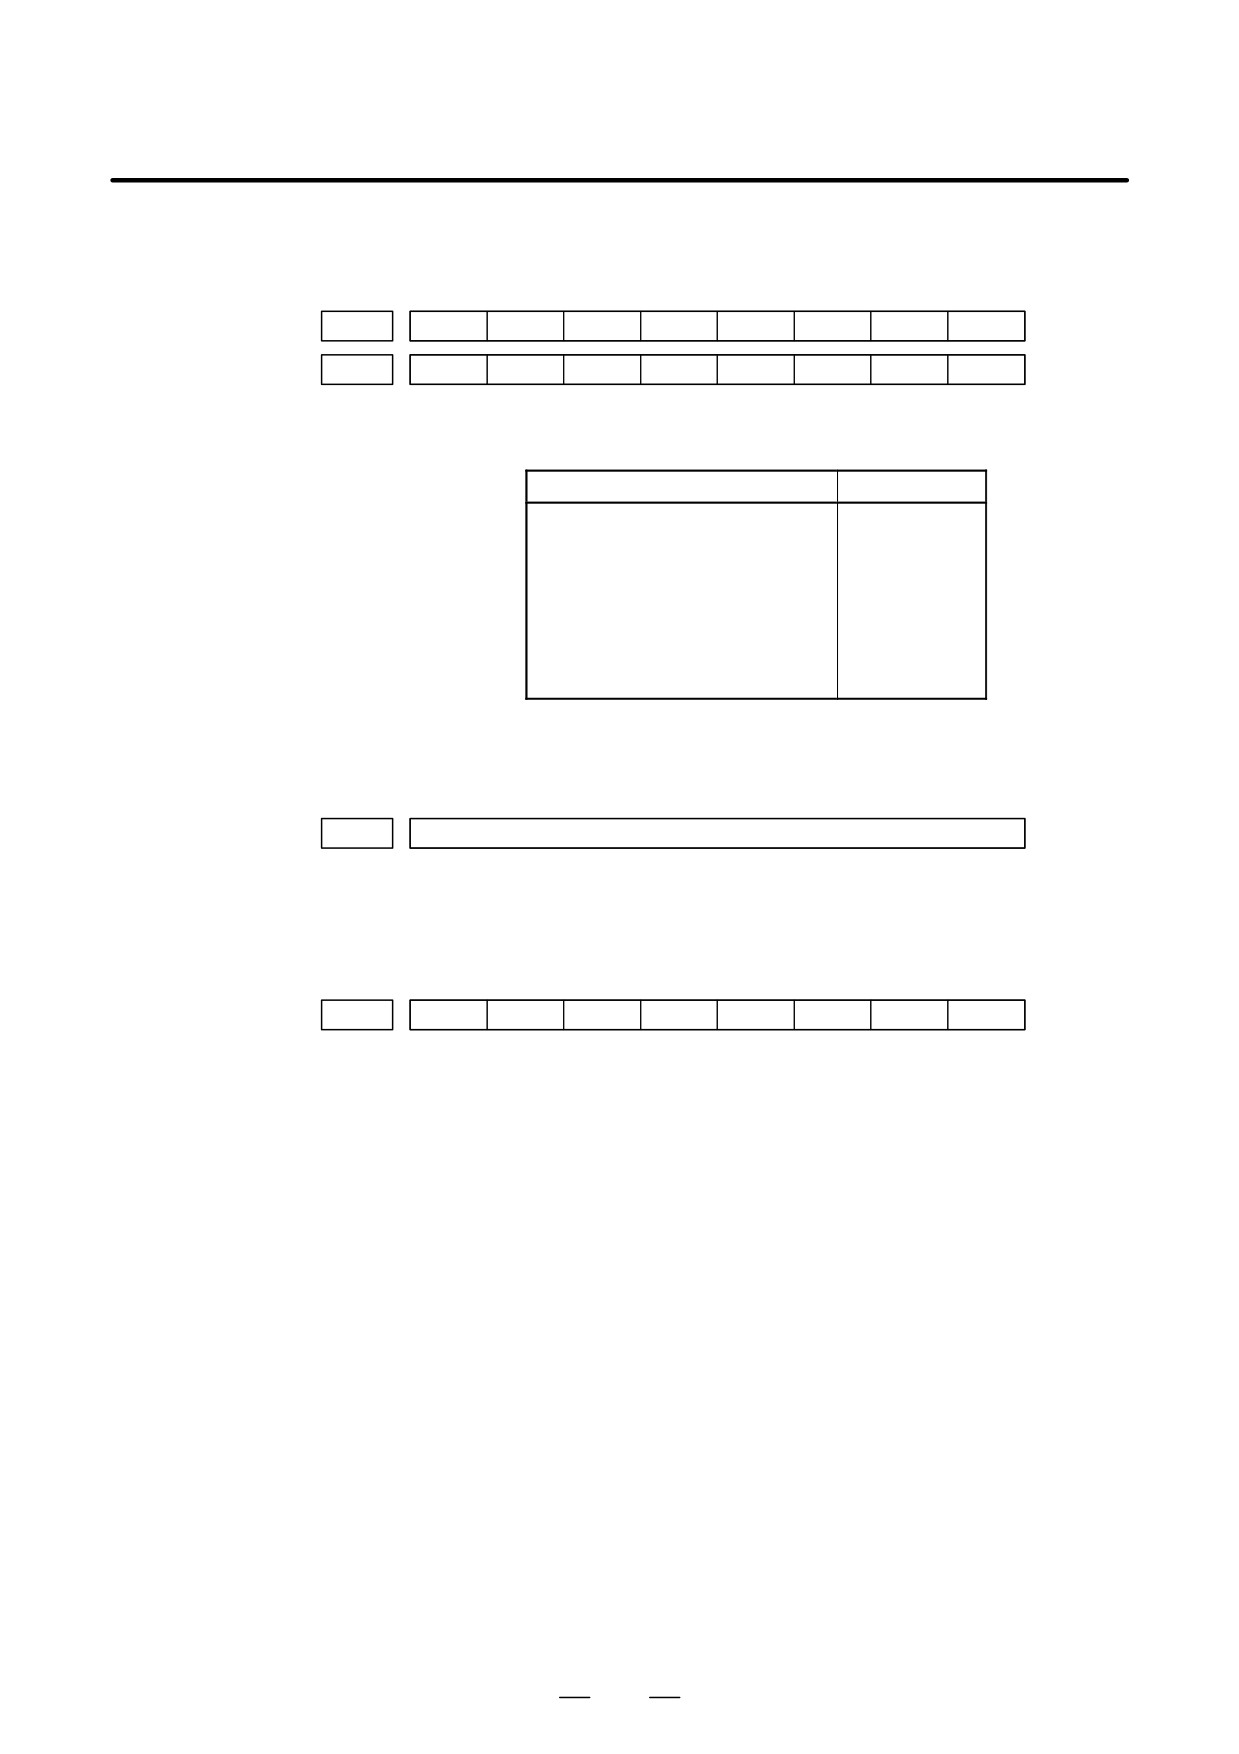
c. Jog feedrate override is
Check the signals using PMC’s diagnostic function (PMCDGN)
0%
#7
#6
#5
#4
#3
#2
#1
#0
G0010
*JV7
*JV6
*JV5
*JV4
*JV3
*JV2
*JV1
*JV0
G0011
*JV15
*JV14
*JV13
*JV12
*JV11
*JV10
*JV9
*JV8
When the override is 0% all bits of the above address becomes
1111
1111 or 0000
0000.
*JV15 .
JV0
Override
1111 1111 1111 1111
0.00%
1111 1111 1111 1110
0.01%
:
:
1101 1000 1110 1111
100.00%
:
:
0000 0000 0000 0001
655.34%
0000 0000 0000 0000
0.00%
d. NC is in a reset state
In this case, RESET is also displayed on the status display. Check it using
the procedure of 1 above.
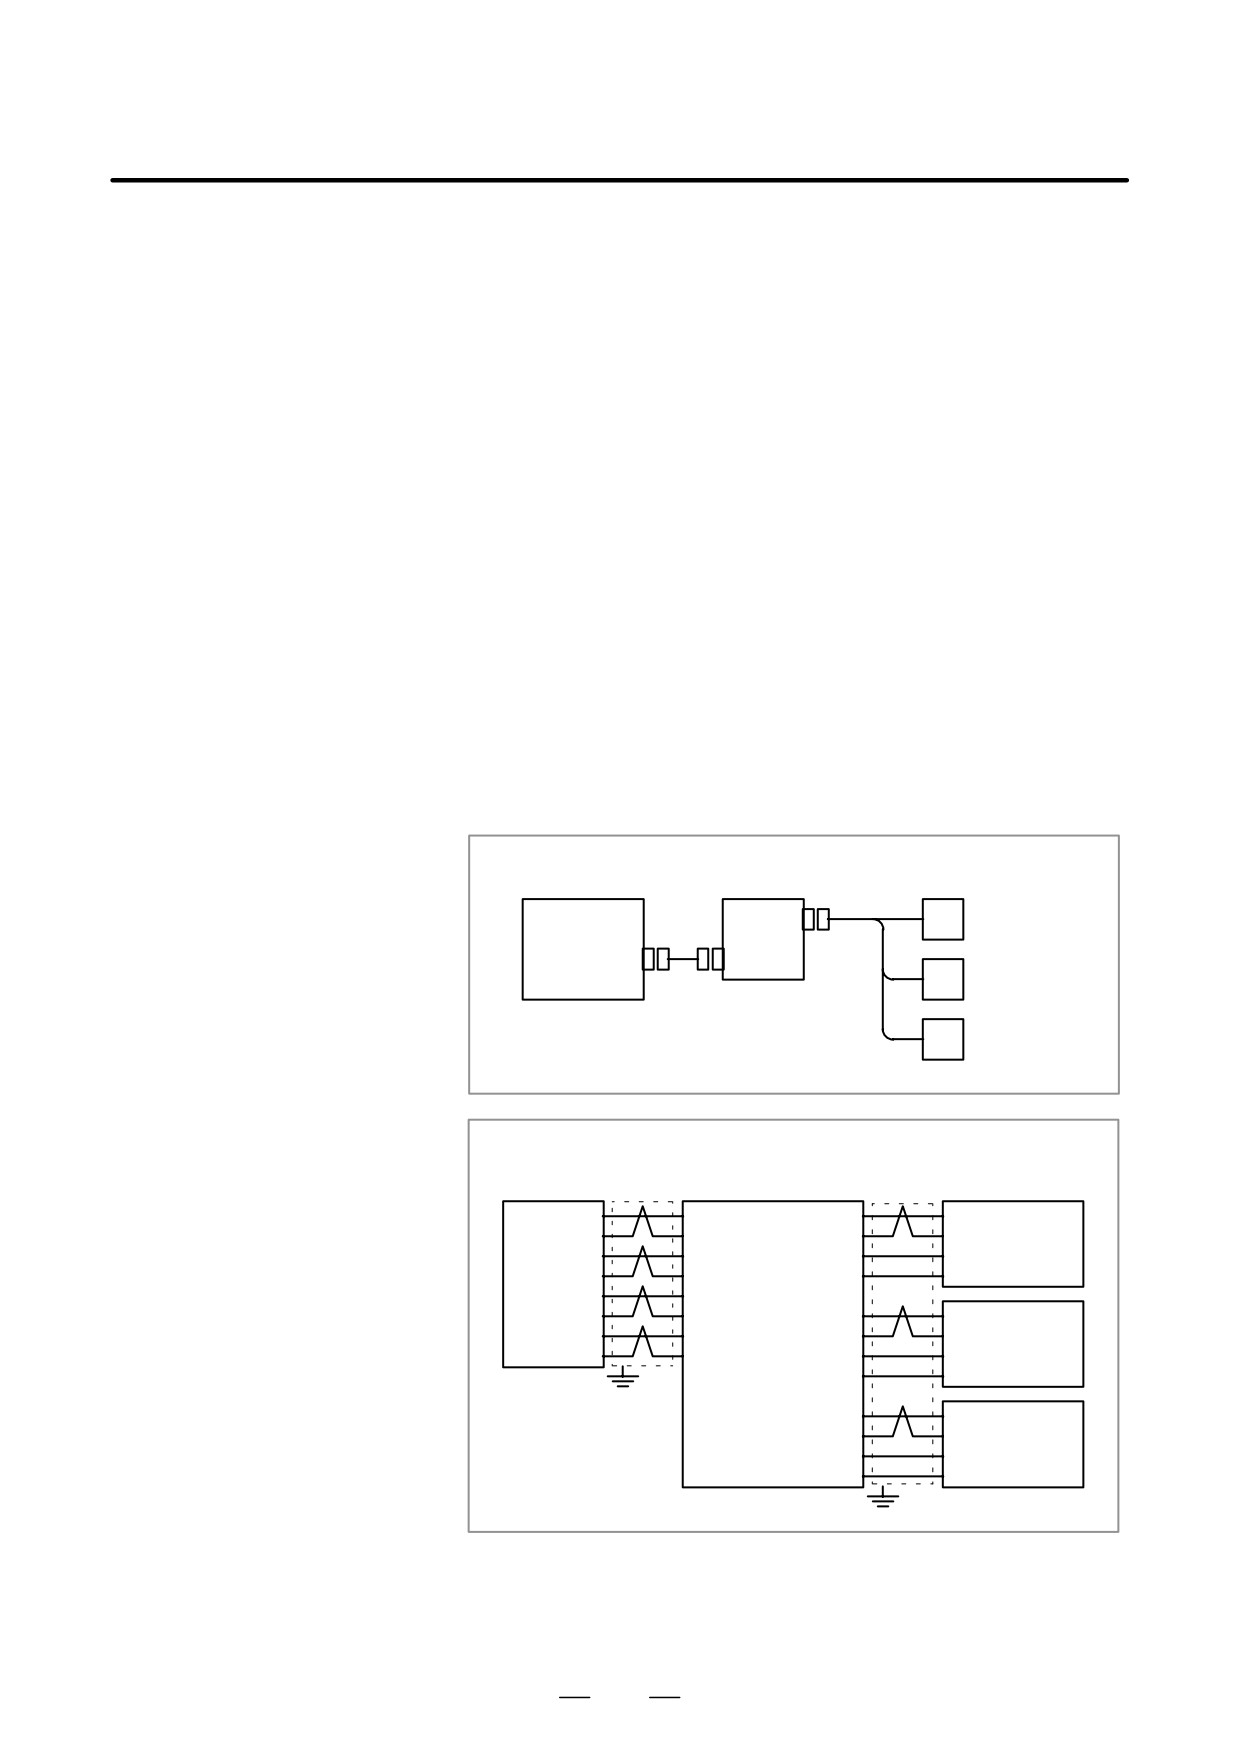
(4) Jog feed rate setting (Parameter) is not correct.
1423
Jog feedrate per axis
(5) Manual feed per revolution is selected ( T series)
This funciton feeds an axis synchronized with spindle rotation and
whether this function is used or not is selected by the following
parameter:
#7
#6
#5
#4
#3
#2
#1
#0
1402
JRV
#3 (JRV)
0 : Jog feed is of feed per minute
1 : Jog feed is of feed per revolution
(a) When parameter JRV is set to 1, feed rate of the axis is calculated
by synchronizing with rotation of the spindle. Therefore, rotate the
spindle.
(b) If the axis does not move even when the spindle is rotated, check
the detector of the spindle (position coder) and the cable between
the position coder and the CNC if it is short-circuited or
ungrounded.Refer to 2.4 for connection diagram.
(6) The specified axis is the index table indexing axis.
<M series>
For the index table indexing axis (B-axis), jog feed, incremental feed,
and manual handle feed cannot be performed.
734
B-63525EN/02
11.TROUBLESHOOTING
11.4
HANDLE OPERATION
CANNOT BE DONE
Causes and actions
If manual handle operation cannot be performed, the probable causes
include the following:
D The servo is not activated.
D Manual pulse generators are not connected properly to the I/O module.
D The I/O link of the I/O module is not allocated, or is not allocated
properly.
D A related input signal is not input due to a parameter setting error.
1
The servo is not
Check that the LED on the servo amplifier indicates “0”. If a number
activated
other than “0” is indicated, the servo is not activated. In this state, even
JOG operation and automatic operation cannot be operated.
Check the servo-related parameters and the wiring.
2
Checking the manual
(1) Cable failures (such as breaks)
pulse generators
Examine the cables for faults such as breaks and short-circuits,
referring to the figure below.
CNC
Distributed I/O module
(motherboard) Operator’s panel I/O module
First manual
JA3
#1
pulse generator
IOLINK
JD1B
(JD1A)
Second manual
#2
pulse generator
Third manual
#3
pulse generator
CNC
Distributed I/O module
Manual pulse
(motherboard)
Operator’s panel I/O module
generators
Shield
Shield
JD1A
JD1B
JA3
SIN(01)
(03)SOUT
HA1(01)
HA1
*SIN(02)
(04)*SOUT
HB1(02)
HB1
First
SOUT(03)
(01)SIN
+5V(09)
+5V
*SOUT(04)
(02)*SIN
0V(12)
0V
0V(11)
(11)0V
0V(12)
(12)0V
HA2(03)
HA2
0V(13)
(13)0V
HB2(04)
HB2
Second
0V(14)
(14)0V
+5V(18)
+5V
0V(14)
0V
HA3(05)
HA3
HB3(06)
HB3
Third
+5V(20)
+5V
0V(16)
0V
735
11. TROUBLESHOOTING
B-63525EN/02
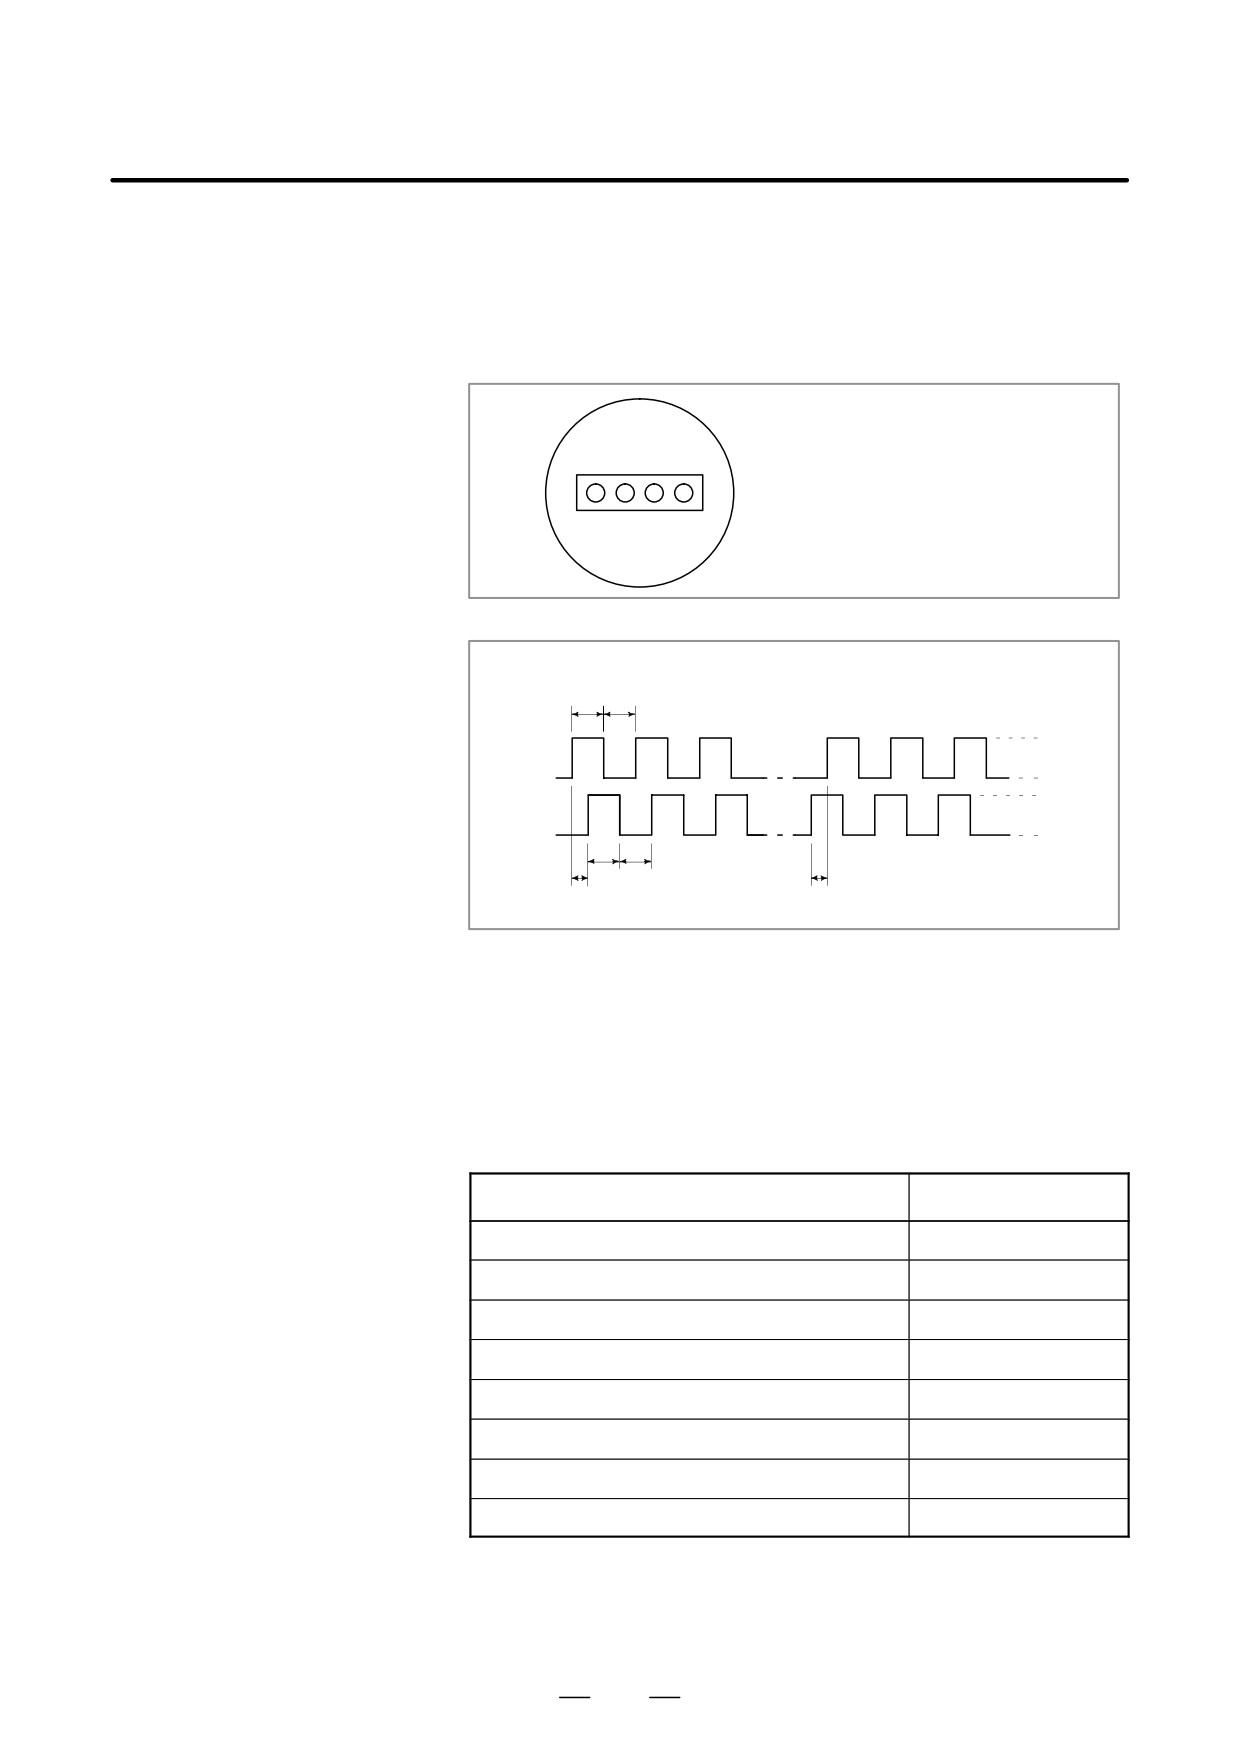
(2) Manual pulse generator failures
When rotated, a manual pulse generator generates the signals shown
below. Using an oscilloscope, measure the signals from the screw
terminal block located at the rear of a manual pulse generator. If no
signals are output, measure the +5 V voltage.
Rear of a manual pulse generator
Screw terminal
block
HA: Manual pulse generator phase A signal
HB: Manual pulse generator phase B signal
+5V
0V HA HB
When rotated in the plus direction
When rotated in the minus direction
1 : 1
+5V
HA
On
Off
On
Off
0V
+5V
HB
On
Off
On
Off
0V
1 : 1
1/4 (phase difference)
1/4
Check the on/off ratio and the phase difference between HA and HB.
3
Allocation of the I/O link
If the I/O module is not allocated properly in I/O link allocation, the pulses
of the I/O module
of the manual pulse generators are not transmitted to the CNC, making
it impossible to perform manual handle operation.
The I/O modules to which manual pulse generators can be connected are
listed below.
Name
Specifications
I/O module for connector panel (extended module A)
A03B-0815-C002
I/O module for operator’s panel (supporting matrix input)
A20B-2002-0470
I/O module for operator’s panel
A20B-2002-0520
Interface unit for machine operator’s panel
A20B-2201-0110
Main panel A of machine operator’s panel
A02B-0236-0230
Main panel B of machine operator’s panel
A02B-0236-0231
Main panel A1 of machine operator’s panel
A02B-0236-0240
Main panel B1 of machine operator’s panel
A02B-0236-0241
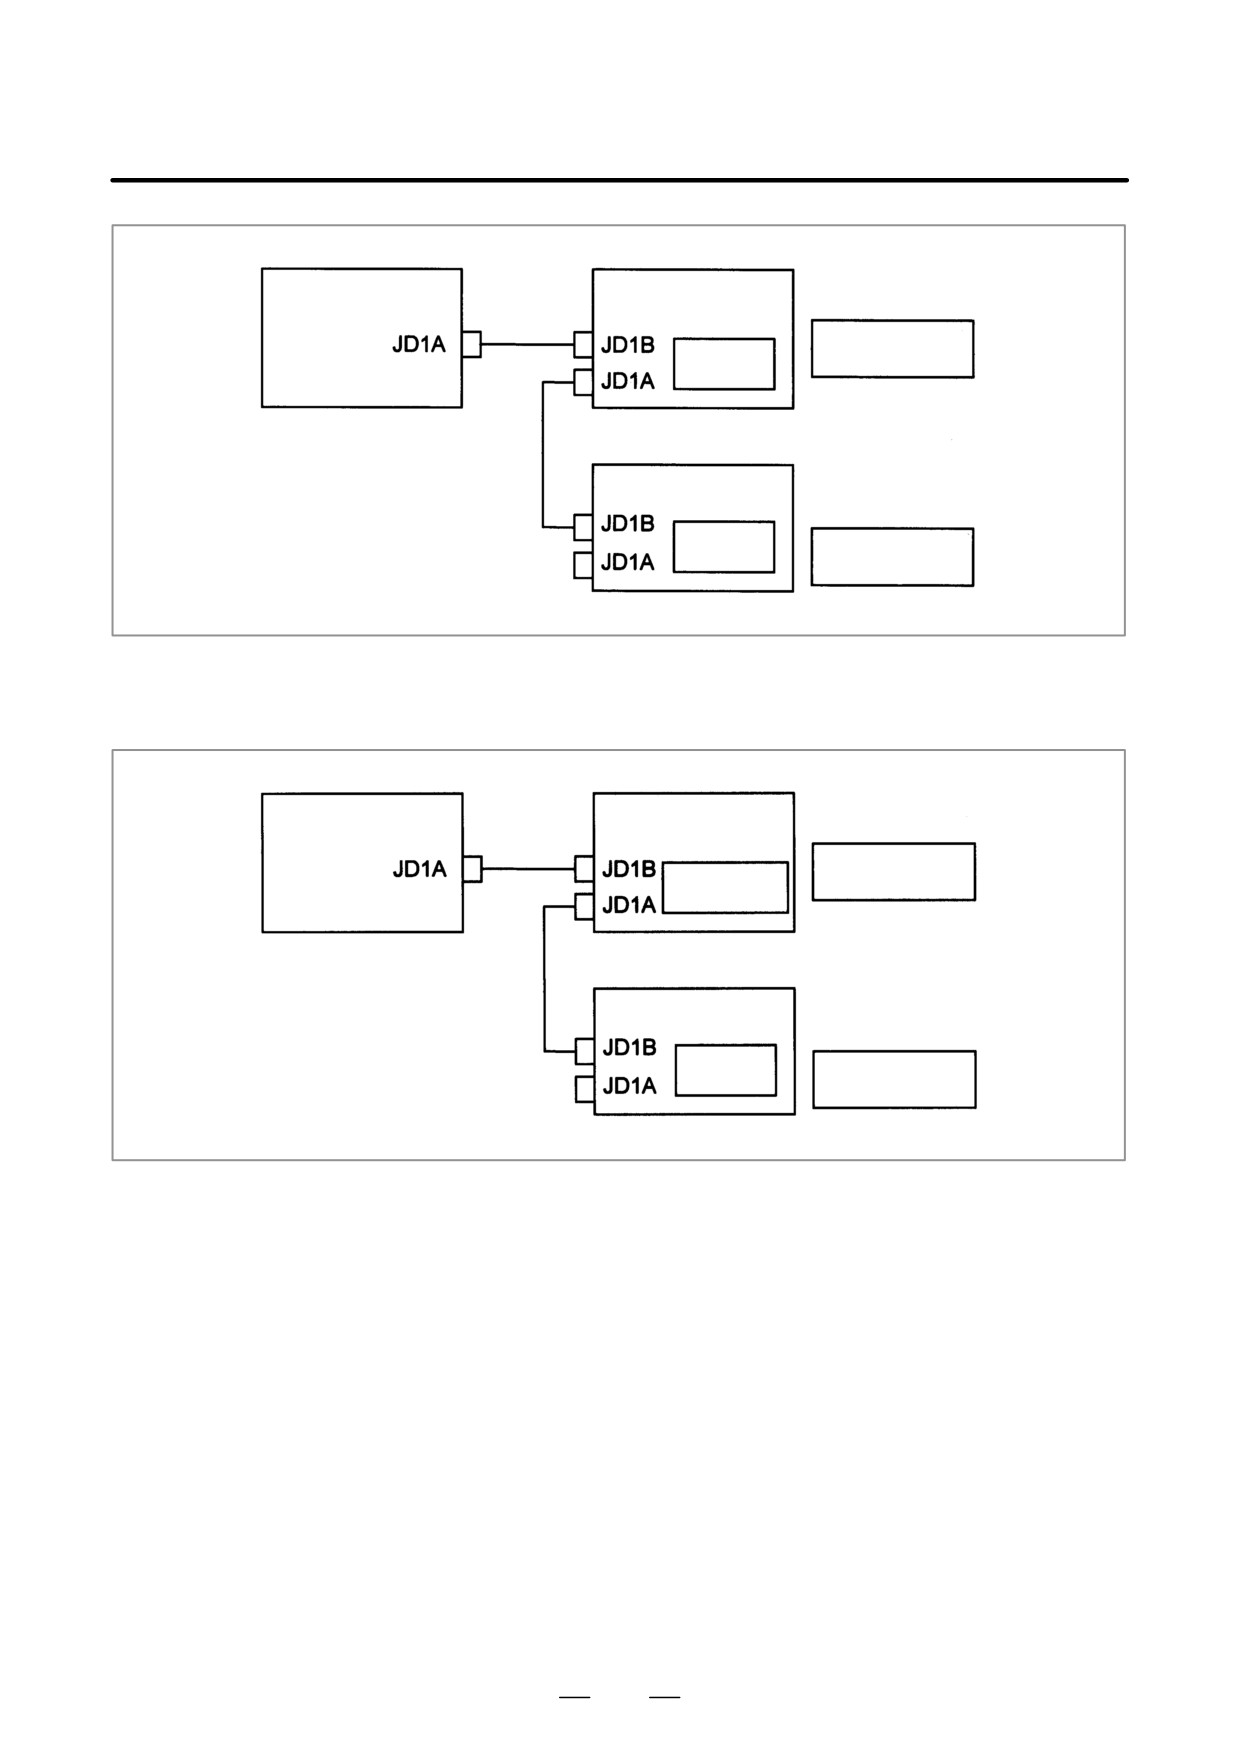
If a multiple number of these modules are used and are allocated so that
they use a manual pulse generator, the module nearest the CNC becomes
effective because of the I/O link connection.
736
B-63525EN/02
11.TROUBLESHOOTING
I/O module for connec-
Control unit
Group 0
tor panel
This manual pulse
Allocated to
generator I/F is
use a manual
effective.
pulse generator
Operator’s panel I/O
module
Group 1
Allocated to
This manual pulse
use a manual
generator I/F is not
pulse generator
effective.
In this example, the manual pulse generator connected to the I/O module
for a connector panel in group 0 is effective.
I/O module for connec-
Control unit
Group 0
tor panel
This manual pulse
Allocated so as not
generator I/F is not
to use a manual
effective.
pulse generator
Operator’s panel I/O
module
Group 1
Allocated to
This manual pulse
use a manual
pulse generator
generator I/F is
effective.
If the I/O module for a connector panel in group 0 is allocated so as not
to use a manual pulse generator, as in this example, the manual pulse
generator interface of the operator’s panel I/O module in group 1 is
effective.
The allocation can be confirmed on the allocation edit screen. Selecting
[EDIT] and then [MODULE] from the PMC screen causes the allocation
edit screen to be displayed.
After editing allocation, write the changes to the FROM on the [I/O]
screen. Otherwise, the changes will be lost when the power is turned off.
If allocation is performed properly, when a manual pulse generator is
rotated, the bits count up/down in the area of the corresponding input
signal (X). Select [PMCDGN] and then [STATUS] from the PMC screen
to display the corresponding address, and rotate the manual pulse
generator to check that the bits count up/down.
737
11. TROUBLESHOOTING
B-63525EN/02
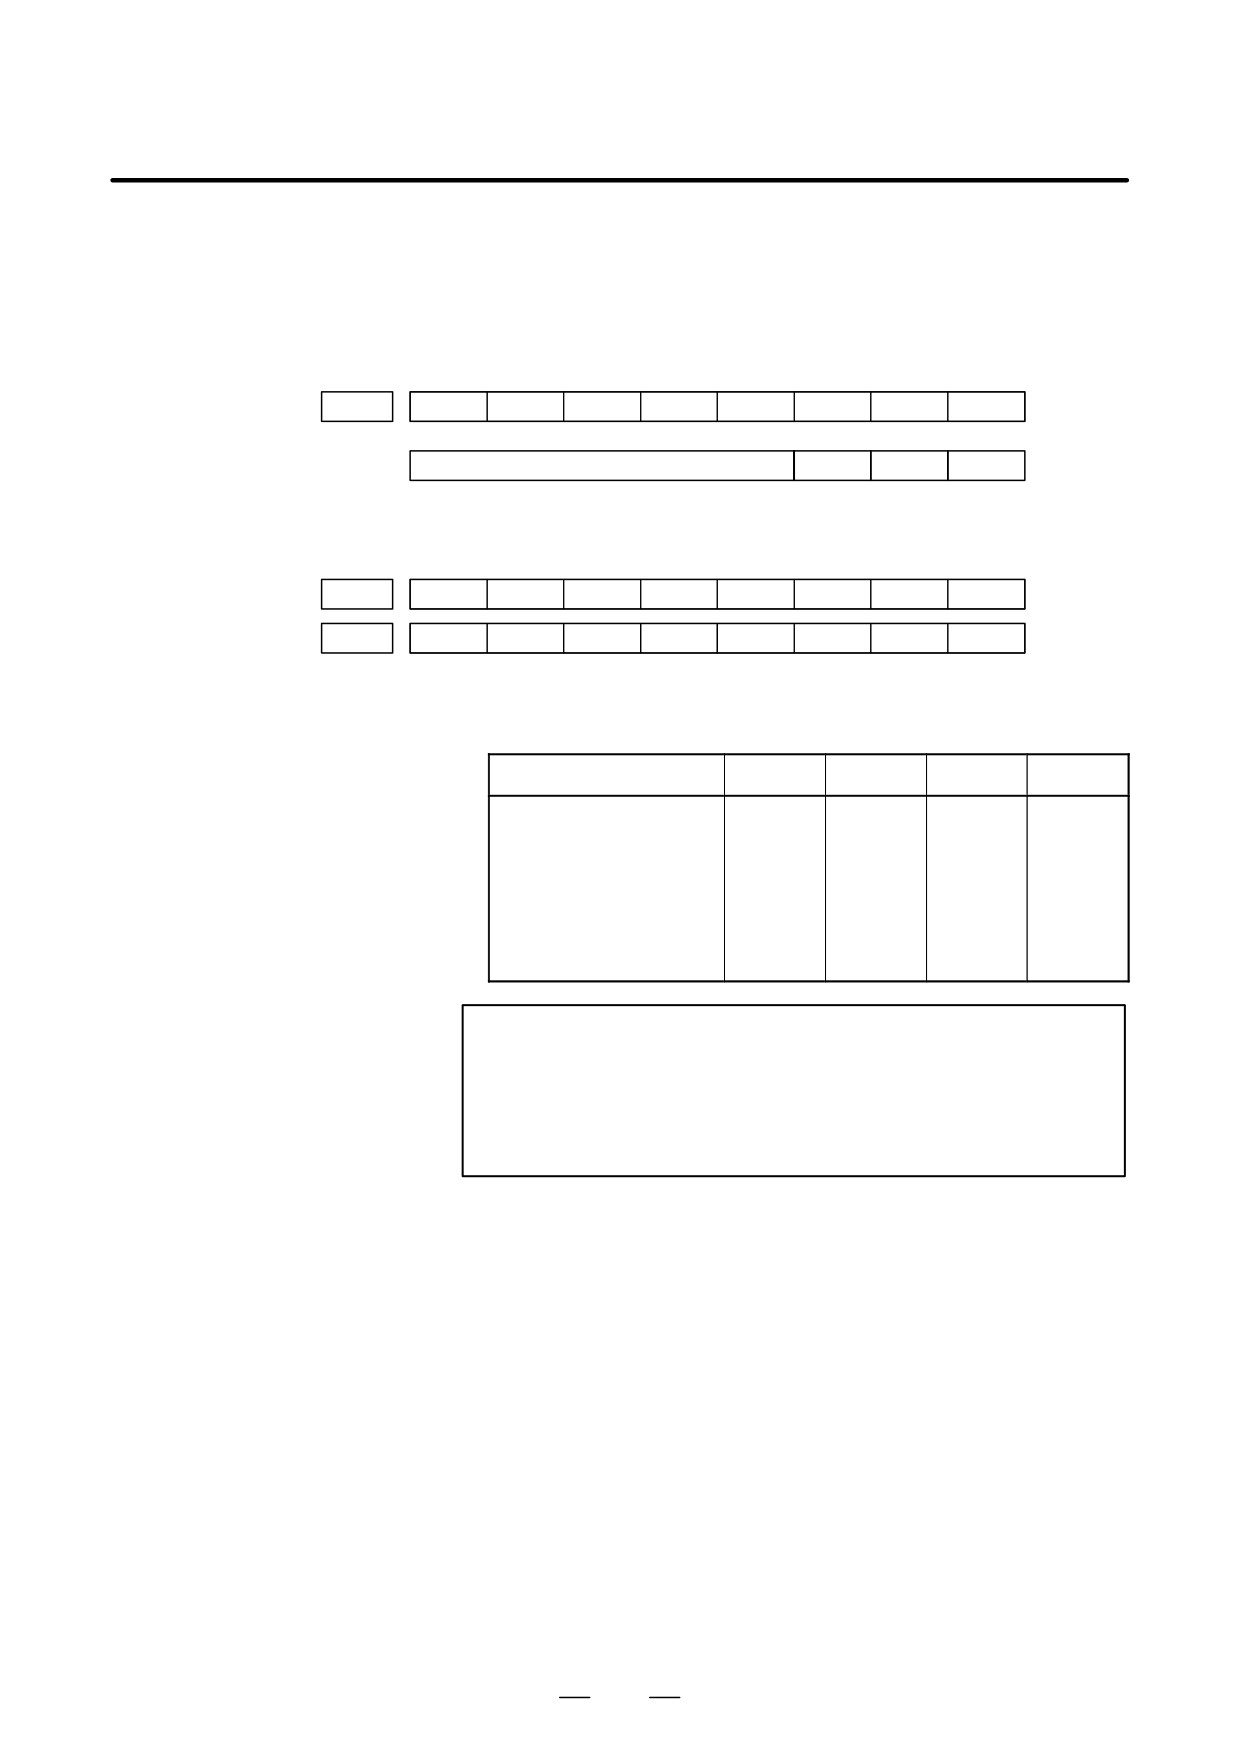
4
Checking the parameters
(1) Check CNC status display at lower left corner of the CRT.
and input signals
(See Section 1.9.)
When the status display shows HND, mode selection is correct.
If it is not HND, mode select signal is not input correctly. Check the
mode select signal using the PMC’s diagnostic function(PMCDGN).
#7
#6
#5
#4
#3
#2
#1
#0
G0043
MD4
MD2
MD1
↓
↓
↓
Manuale handle mode
1
0
0
(2) Manual handle feed axis select signal is not input.
Check the signals using PMC’s diagnostic function (PMCDGN).
#7
#6
#5
#4
#3
#2
#1
#0
G0018
HS2D
HS2C
HS2B
HS2A
HS1D
HS1C
HS1B
HS1A
G0019
HS3D
HS3C
HS3B
HS3A
When axis select switch for manual handle feed is selected on the
machine operator’s panel, if the signals are input as follows, it is
normal.
Selected axis
HSnD
HSnC
HSnB
HSnA
no selection
0
0
0
0
1st axis
0
0
0
1
2nd axis
0
0
1
0
3rd axis
0
0
1
1
4th axis
0
1
0
0
5th axis
0
1
0
1
6th axis
0
1
1
0
7th axis
0
1
1
1
8th axis
1
0
0
0
NOTE
In the above table, n is the number of the manual pulse
generator
(MPG) and up to 3 MPGs can be used.
A feed axis is selected by 4-bit code of A to D.
738
B-63525EN/02
11.TROUBLESHOOTING
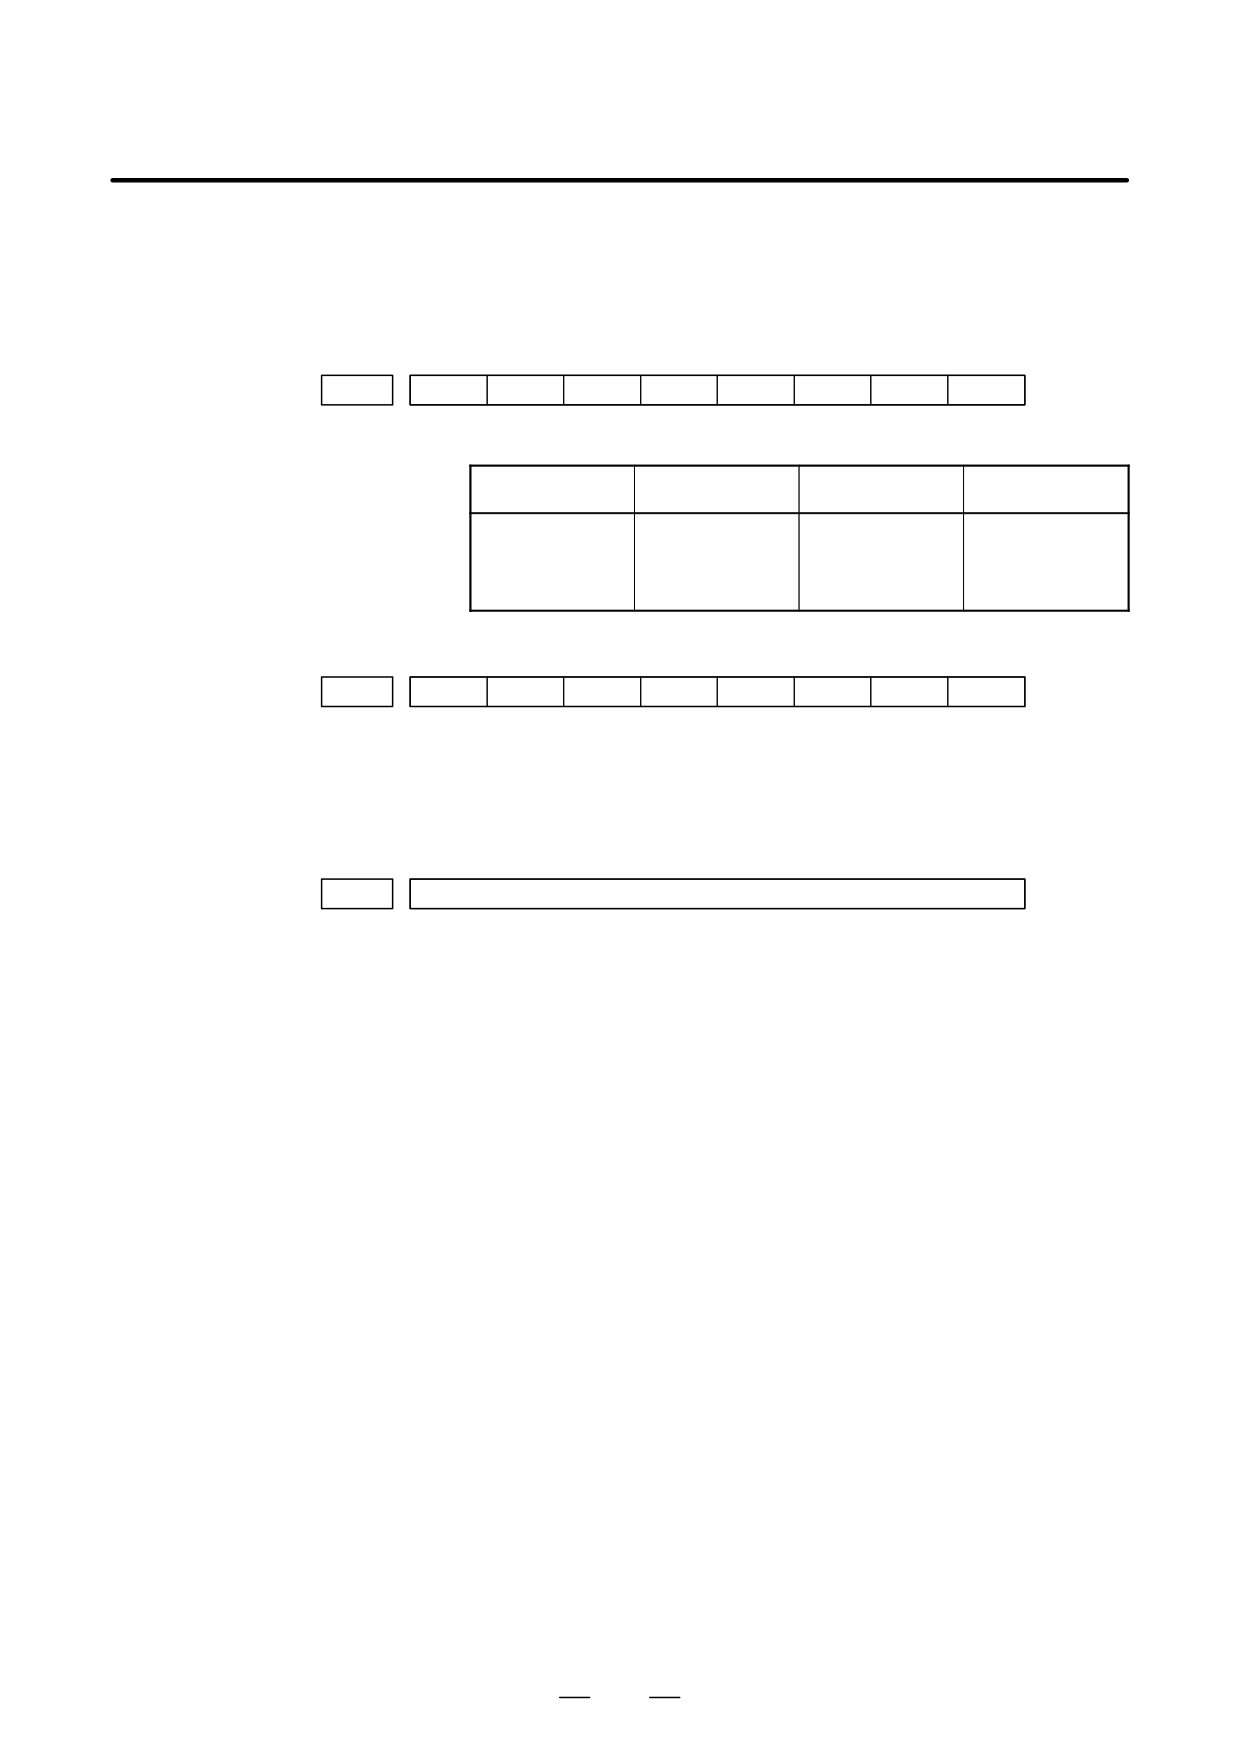
(3) Manual handle feed multiplication is not correct
Check the following signals using PMC’s PCDGN. Also confirm the
following parameters based on the parameter list.
#7
#6
#5
#4
#3
#2
#1
#0
G0019
MP2
MP1
In handle mode, the travel distance per step can be changed.
MP2
MP1
Step feed
Handle feed
0
0
1
1
0
1
10
10
1
0
100
Mn
1
1
1000
Nn
#7
#6
#5
#4
#3
#2
#1
#0
PARAM
7102
HNGx
#0(HNGx)
The direction of rotation of the manual pulse generator and the direction
of the travel of the machine are:
0 : Same
1 : Opposite
PARAM
7110
Number of manual pulse generators used (1 to 3).
(4) The specified axis is the index table indexing axis.
<M series>
For the index table indexing axis (B-axis), jog feed, incremental feed,
and manual handle feed cannot be performed.
739
11. TROUBLESHOOTING
B-63525EN/02
11.5
AUTOMATIC
OPERATION
CANNOT BE DONE
Points
(1) Check manual operation is possible.
(2) Check the status of cycle start LED on machine operator’s manual.
(3) Check status of CNC.
Causes and Remedies
When manual operation is either impossible, perform countermeasure,
based on the previous item “Jog operation cannot be done”.
Confirm that a correct mode is selected according to the mode select status
of CNC status display. Also, by confirming the automatic operation
status it is possible to identify cycle operation, feed hold and cycle stop
state.
1. When cycle operation is
“****” is displayed at status display on CRT.
not started (Cycle start
(1) Mode select signal is not correct.
LED does not light)
When the mode select signal is input correctly, following status
display is done.
MDI
:Manual data input mode (MDI)
MEM :Memory operation mode
RMT
:Remote operation mode
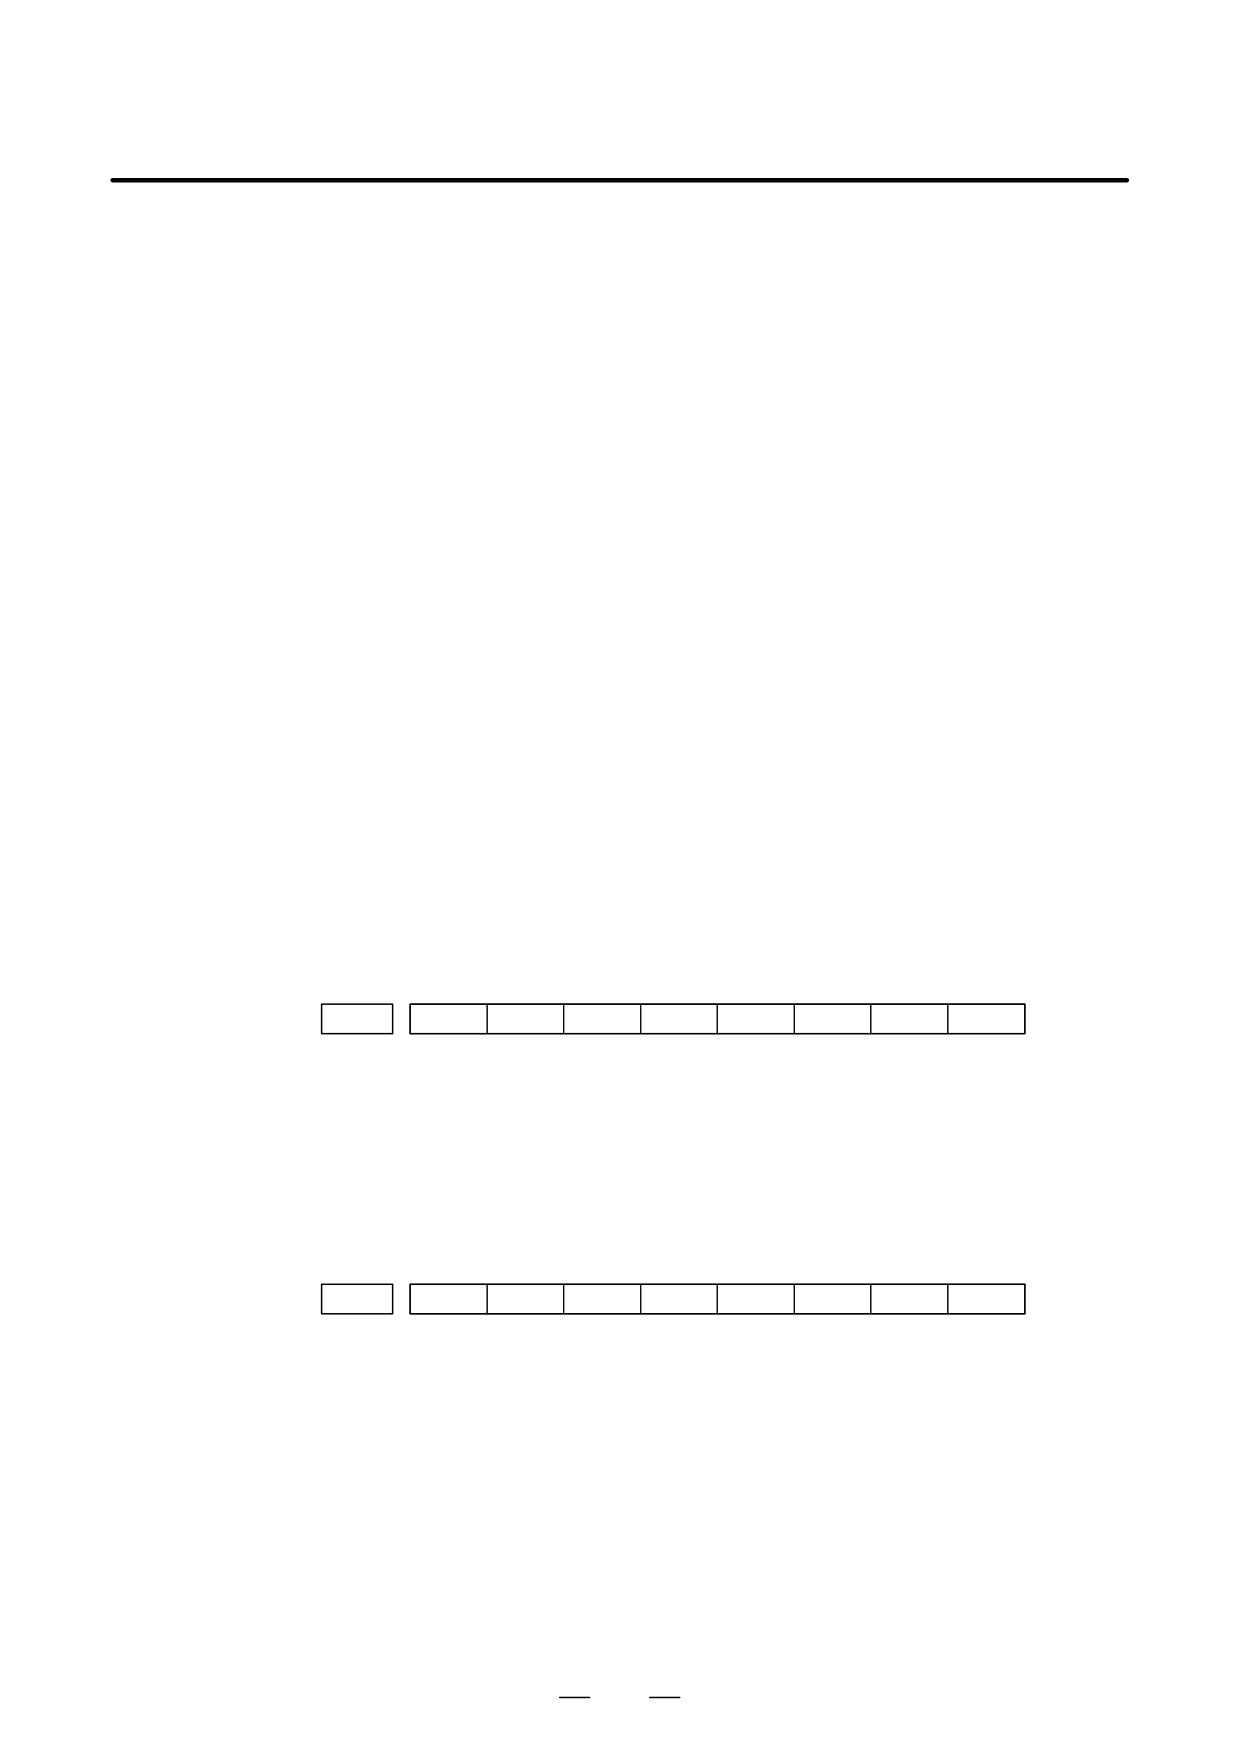
If status display does not show a correct status, check the mode signal
with following diagnosis function of PMC side (PMCDGN).
#7
#6
#5
#4
#3
#2
#1
#0
G0043
DNCI
MD4
MD2
MD1
DNCI
MD4
MD2
MD1
Mode select
–
0
0
0
Manual data input mode
0
0
0
1
Memory operation mode
1
0
0
1
Remote operation mode
(2) Cycle start signal is not input
This signal turns 1 when cycle start button is pressed and turns 0 when
it is released. The cycle start actuates when it changes from 1 to 0.
Check the state of the signal using PMC’s diagnostic
function(PMCDGN).
#7
#6
#5
#4
#3
#2
#1
#0
G0007
ST
#2 (ST)
: Cycle start signal
(3) Feed hold signal is input
Under normal state, the feed hold signal is 1 when the feed hold button
is not pressed.
Check the state of this signal using the PMC’s diagnostic function
(PMCDGN) .
#7
#6
#5
#4
#3
#2
#1
#0
G0008
*SP
#5 (*SP)
: Feed hold signal
740
B-63525EN/02
11.TROUBLESHOOTING
2. When an automatic
CNC’s status display shows “STRT” on the CRT.
operation is in progress
(1) Check the contents of diagnostic nos. 000 to 015.
(Cycle start LED is lit)
No. Message
Display
a.
000
WAITING FOR FIN SIGNAL
: 1(Example)
b.
001
MOTION
: 0
c.
002
DWELL
: 0
d.
003
IN-POSITION CHECK
: 0
e.
004
FEEDRATE OVERRIDE 0%
: 0
f.
005
INTERLOCK / START LOCK
: 0
g.
006
SPINDLE SPEED ARRIVAL CHECK
: 0
010
PUNCHING
: 0
011
READING
: 0
012
WAITING FOR (UN) CLAMP
: 0
h.
013
JOG FEEDRATE OVERRIDE 0%
: 0
i.
014
WAITING FOR RESET, ESP, RRW OFF
: 0
015
EXTERNAL PROGRAM NUMBER SEARCH
: 0
Items with a to i relate with an automatic operation and their details
are as follows :
a. An auxiliary function is
An auxiliary function (M/S/T/B) specified in a program is not ended.
being executed (waiting
Check according to the following procedure.
for FIN signal)
First, check the parameter setting to confirm the type of the interface of
the auxiliary function.
#7
#6
#5
#4
#3
#2
#1
#0
3001
HSIF
#7(HSIF)
0 : M/S/T/B is of normal interface.
1 : M/S/T/B is of high-speed interface.
1) Normal interface
When the auxiliary function finish signal turns from 1 to 0, the
auxiliary function is supposed to be ended and the next block is read
for operation. Confirm the status of this signal using PMC’s
diagnostic function(PMCDGN).
#7
#6
#5
#4
#3
#2
#1
#0
G0004
FIN
#3 (FIN)
: Auxiliary function finish signal
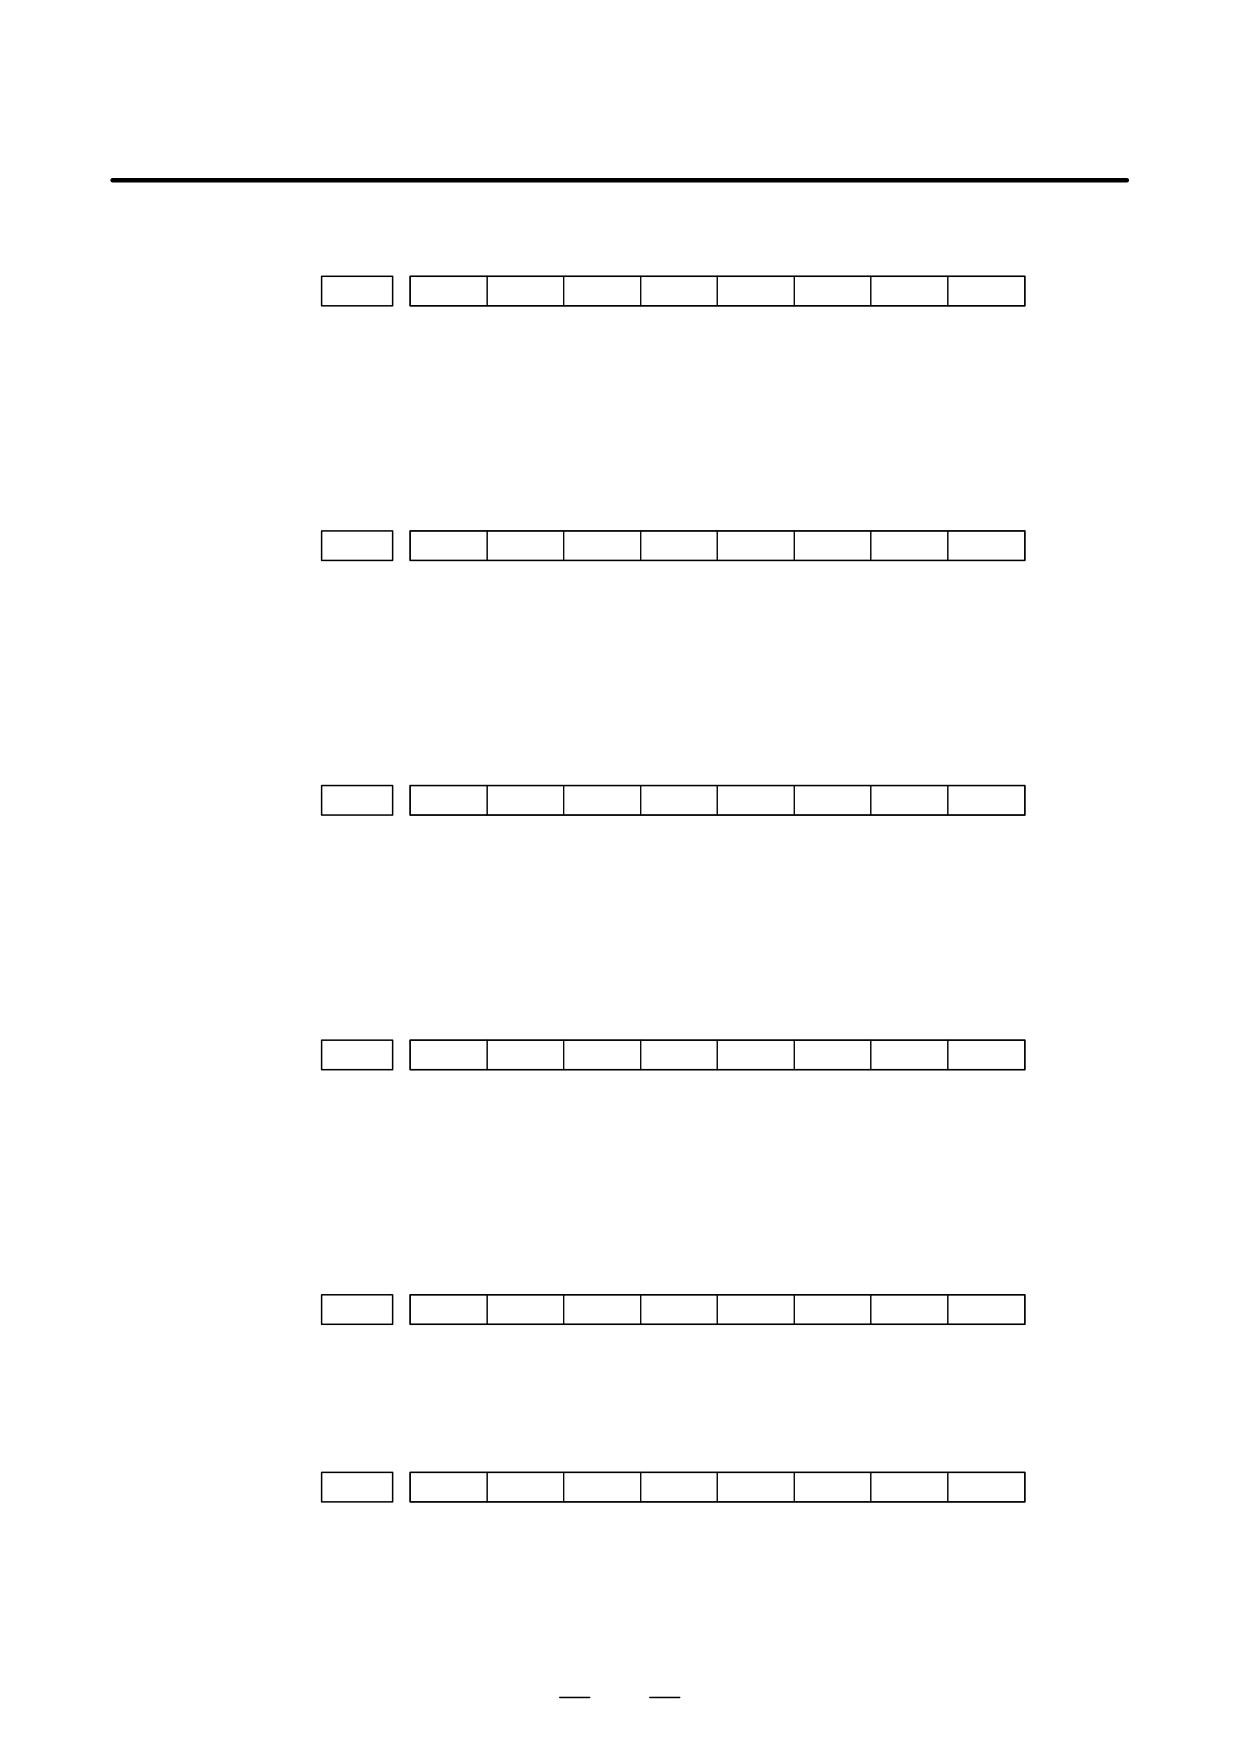
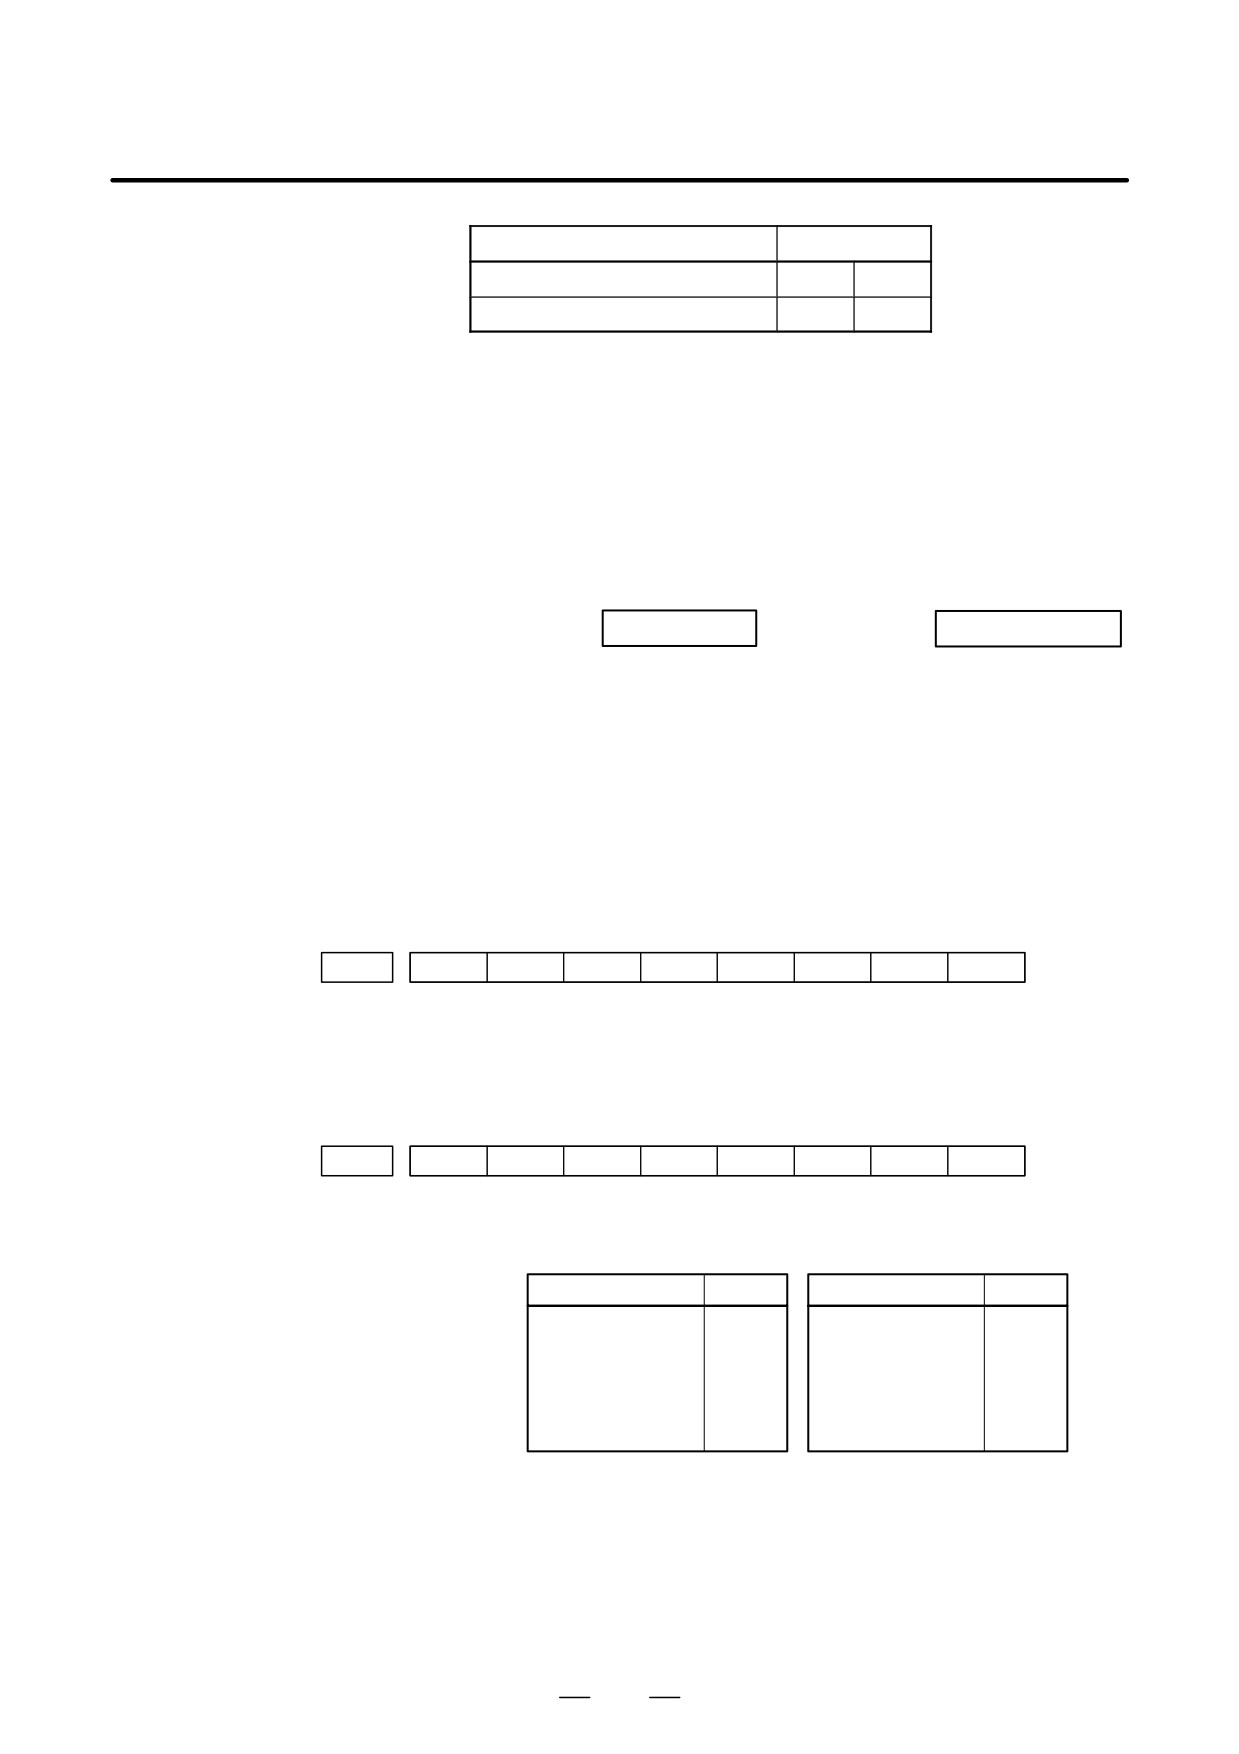
2) High-speed interface
The auxiliary function is supposed to be ended when the signals are
in the following state. Confirm it using PMC’s diagnostic function
(PMCDGN).
741
11. TROUBLESHOOTING
B-63525EN/02
<M series>
#7
#6
#5
#4
#3
#2
#1
#0
G0005
BFIN
TFIN
SFIN
MFIN
#0(MFIN)
: M function finish signal
#2(SFIN)
: S function finish signal
#3(TFIN)
: T function finish signal
#4(BFIN)
: 2nd auxiliary function finish signal
#7
#6
#5
#4
#3
#2
#1
#0
F0007
BF
TF
SF
MF
#0(MF)
: M function strobe signal
#2(SF)
: S function strobe signal
#3(TF)
: T function strobe signal
#7(BF)
: 2nd auxiliary function strobe signal
<T series>
#7
#6
#5
#4
#3
#2
#1
#0
G0005
BFIN
TFIN
SFIN
MFIN
#0(MFIN)
: M function completion signal
#2(SFIN)
: S function completion signal
#3(TFIN)
: T function completion signal
#4(BFIN)
: Second auxiliary function completion signal
#7
#6
#5
#4
#3
#2
#1
#0
F0007
BF
TF
SF
MF
#0(MF)
: M function strobe signal
#2(SF)
: S function strobe signal
#3(TF)
: T function strobe signal
#4(BF)
: Second auxiliary function strobe signal
<M/T series>
#7
#6
#5
#4
#3
#2
#1
#0
G0004
MFIN3
MFIN2
#4(MFIN2)
: Second M function completion signal
#5(MFIN3)
: Third M function completion signal
#7
#6
#5
#4
#3
#2
#1
#0
F0008
MF3
MF2
#4(MF2)
: Second M function strobe signal
#5(MF3)
: Third M function strobe signal
* The second and third M functions are enabled only when bit 7 (M3B)
of parameter No. 3404 is set to 1.
742
B-63525EN/02
11.TROUBLESHOOTING
Signal
End state
Finish signal
0
1
store signal
0
1
b. Travel command is being
CNC is reading an axis command (X,Y,Z,...) in a program and giving the
executed
command to the axis.
c. A dwell command is
CNC is reading a dwell command (G04) in a program and is executing
being executed
the dwell command.
d. In-position check
Positioning
(G00) to a specified position of a specified axis is not
(confirming positioning)
completed.
is being done
Whether positioning is completed or not is checked as the servo position
error amount. Check it CNC’s diagnostic function as follows:
DGN no.300
Position Error
> PARAM 1826
In-position width
Position error amount almost becomes 0, when positioning of an axis
completes and when the amount becomes within the in-posiiton width,
it is assumed that positioning completes and the next block is exected.
If position error amount does not become within the in-position width,
refer to servo alarm 400, 4n0 and 4n1.
e. Feedrate override is at
Actual feedrate is overridden by the override signals to a programmed
0%
feedrate. Check the override signals using the PMC’s diagnostic function
(PMCDGN).
<Normal override signal>
#7
#6
#5
#4
#3
#2
#1
#0
G0012
*FV7
*FV6
*FV5
*FV4
*FV3
*FV2
*FV1
*FV0
*FVn
:Feedrate override
<2nd override signal (option)>
Feed rate is overridden more finely using the signals below:
See MTB’s manual whether this feature is equipped.
#7
#6
#5
#4
#3
#2
#1
#0
G0013
*AFV7
*AFV6
*AFV5
*AFV4
*AFV3
*AFV2
*AFV1
*AFV0
*AFVn
:2nd feed rate override
<State of override signal>
*FV7@@@@@@@*FV0
*AFV7@@@@@@*AFV0
11 1 1 1 1 1 1
0%
11 1 1 1 1 1 1
0%
11 1 1 1 1 1 0
1%
11 1 1 1 1 1 0
1%
:
:
:
:
10 0 1 1 0 1 1
100%
10 0 1 1 0 1 1
100%
:
:
:
:
00 0 0 0 0 0 1
254%
00 0 0 0 0 0 1
254%
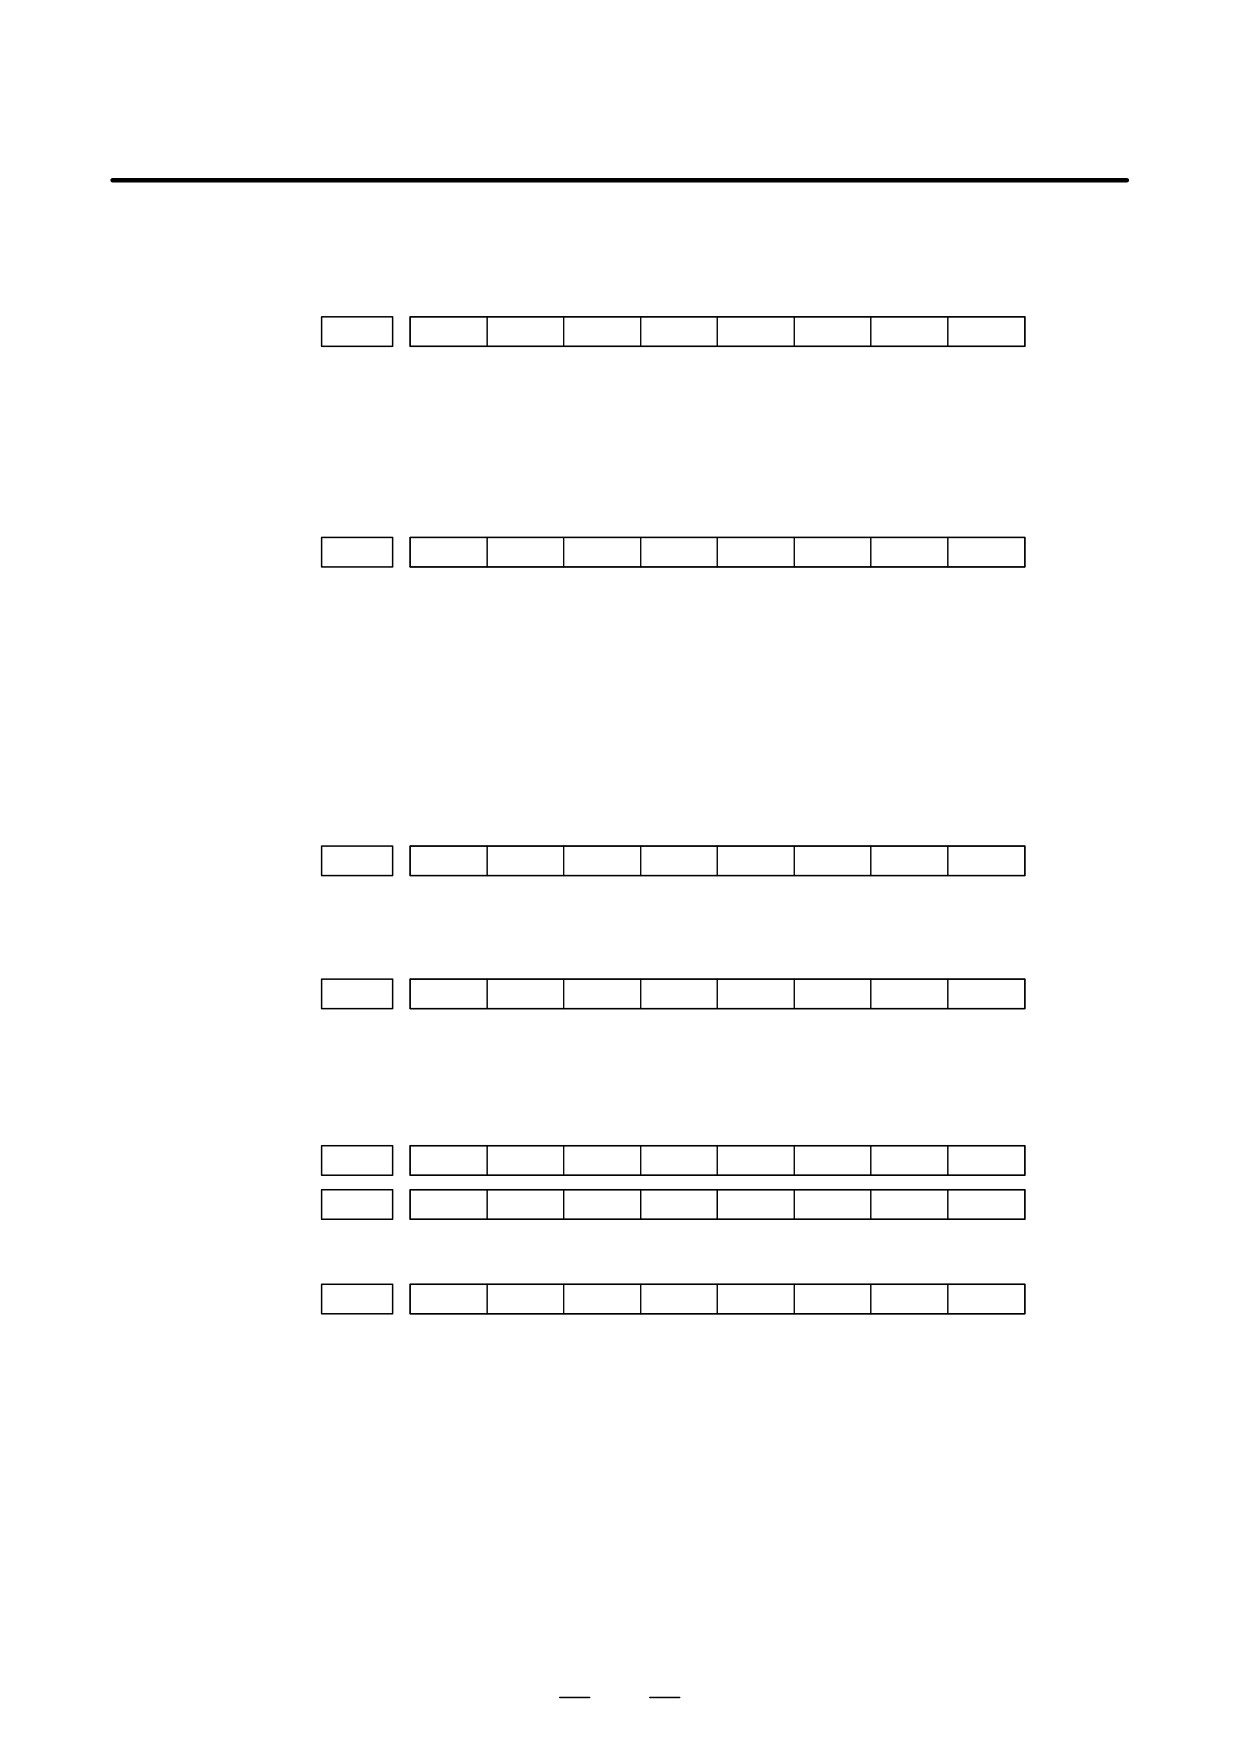
00 0 0 0 0 0 0
0%
00 0 0 0 0 0 0
0%
743
11. TROUBLESHOOTING
B-63525EN/02
f.
Interlock signal or start
<T series only>
lock signal is input
Start lock signal is input
#7
#6
#5
#4
#3
#2
#1
#0
G0007
STLK
#1 (STLK)
With this signal being 1, start lock signal is input.
<Common to T series and M series>
There are a plural number of interlock functions. Parameters are set by
machine tool builders for which interlock function is used.
Therefore, confirm the following parameters at first:
#7
#6
#5
#4
#3
#2
#1
#0
3003
DAU
DIT
ITX
ITL
#0 (ITL)
0 : Interlock signal(*IT) is valid.
#2 (ITX)
0 : Interlock signal (*ITn) is valid.
#3 (DIT)
0 : Interlock signal ("MITn) is valid.
#4 (DAU)
1 : Interlock signal ("MITn) is valid in both manual operation and
automatic operation.
Confirm which interlock signal is activated by the PMC’s diagnostic
function (PMCDGN) .
1) Interlock signal (*IT) is input
#7
#6
#5
#4
#3
#2
#1
#0
G0008
*IT
#0 (*IT)
: When this bit is 0, interlock signal is input.
2) Interlock signal per each axis (*ITn) is input
#7
#6
#5
#4
#3
#2
#1
#0
G0130
*IT8
*IT7
*IT6
*IT5
*IT4
*IT3
*IT2
*IT1
*ITn When the bit is 0, the corresponding axis’s interlock signal is input.
3) Interlock signal per axis and direction("MITn) is input
⋅ M series
#7
#6
#5
#4
#3
#2
#1
#0
G0132
+MIT4
+MIT3
+MIT2
+MIT1
G0134
-MIT4
-MIT3
-MIT2
-MIT1
⋅ T series
#7
#6
#5
#4
#3
#2
#1
#0
X0004
-MIT2
+MIT2
-MIT1
+MIT1
"MITn=1 shows interlock signal per axis and direction is input.
* For the T series, "MITn is valid only for manual operation.
4) Controlled axis detach function is running. A detached axis is
specified for travelling.
*This function is valid when CNC parameter No.1005#7=1. For
whether this function is running or not, confirm the following signal
using PMC’s diagnostic function (PMCDGN). Check the axis
concerned.
744
B-63525EN/02
11.TROUBLESHOOTING
#7
#6
#5
#4
#3
#2
#1
#0
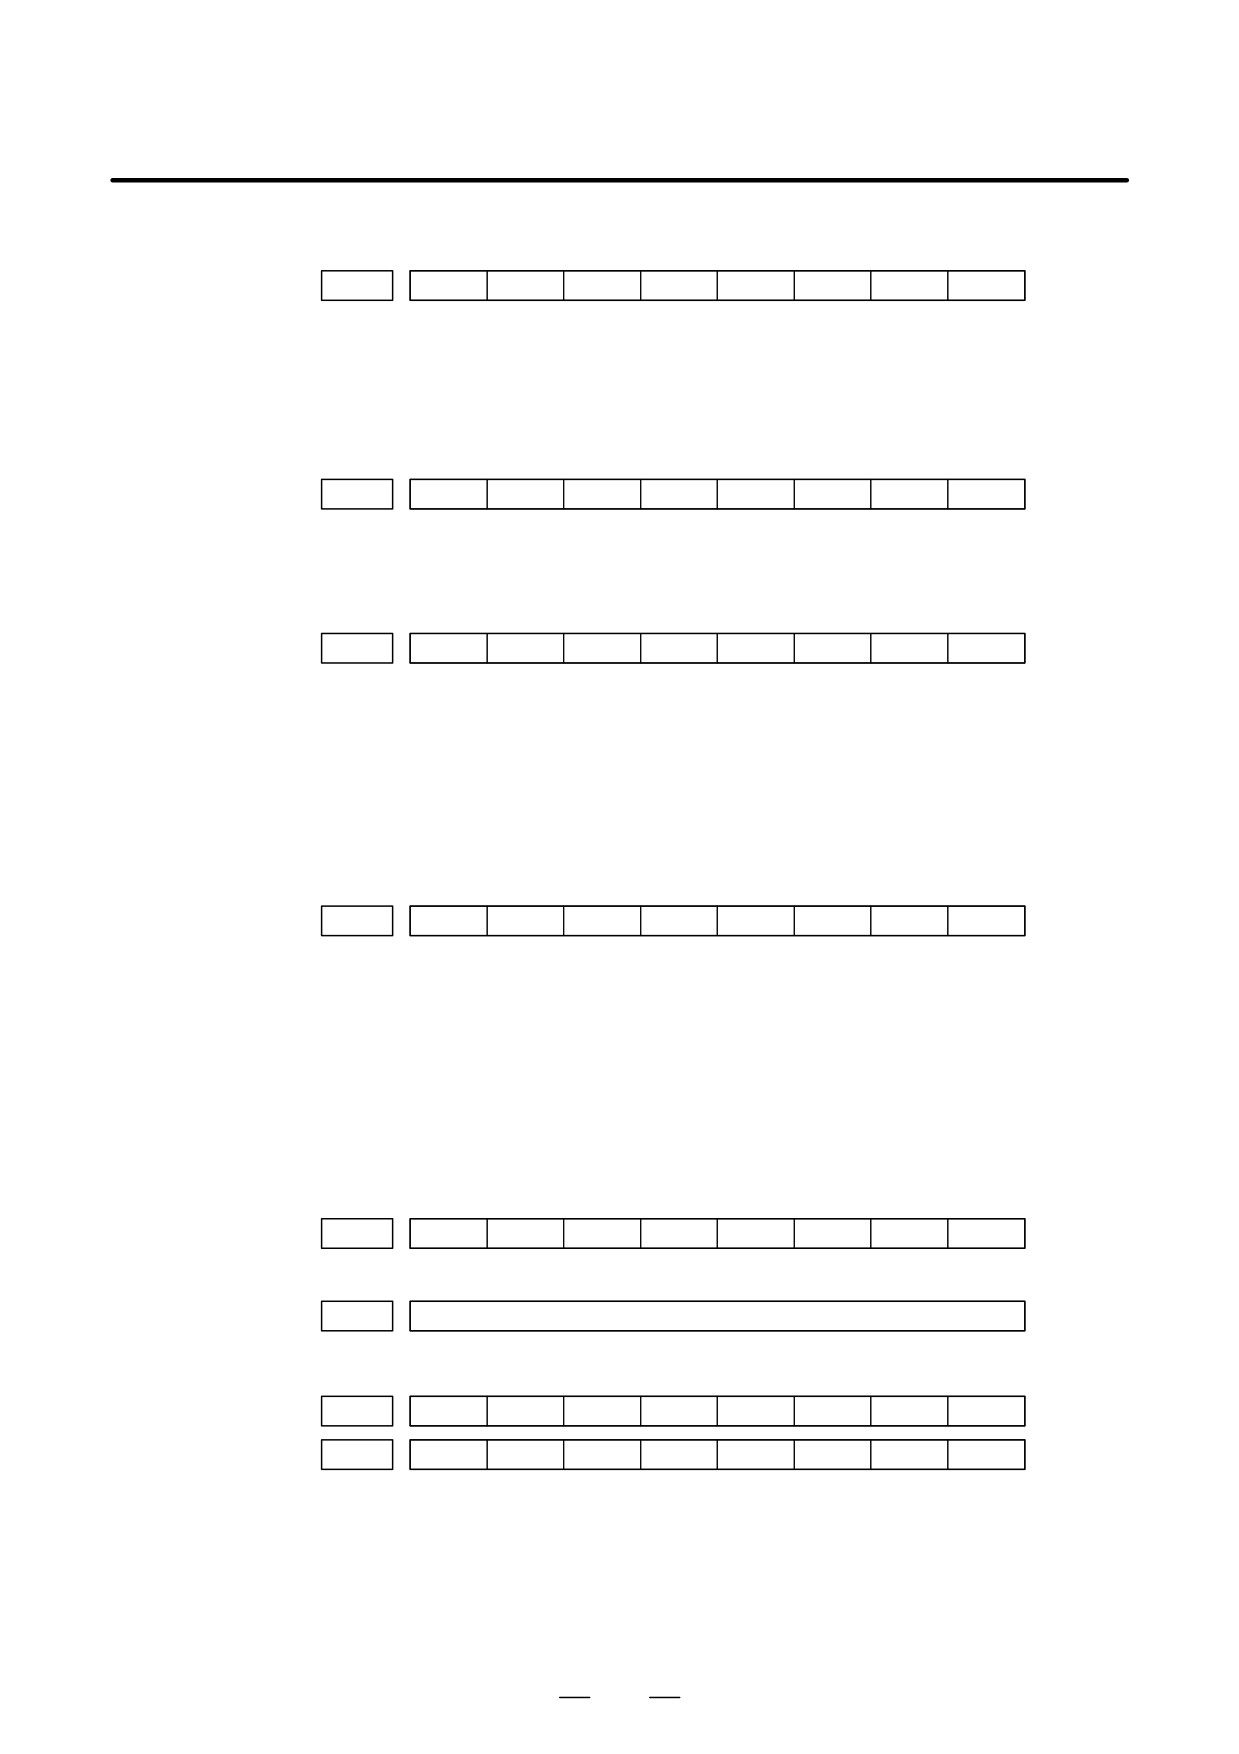
F0110
MDTCH8
MDTCH7
MDTCH6
MDTCH5
MDTCH4
MDTCH3
MDTCH2
MDTCH1
When signal MDTHn is “1”, the axis detach function is in valid.
The control axis detach function becomes valid by the following
signal issued from the PMC or a CNC side parameter. Check as in the
following procedure :
1) The control axis detach signal (DTCHn) is input.
#7
#6
#5
#4
#3
#2
#1
#0
G0124
DTCH8
DTCH7
DTCH6
DTCH5
DTCH4
DTCH3
DTCH2
DTCH1
If it is 1, the corresponding axis is detached.
2) The following parameter enables the control axis detach function to
the corresponding axis.
#7
#6
#5
#4
#3
#2
#1
#0
0012
RMVx
#7(RMVx) 0 : Controlled axis is connected
1 : Controlled axis is detached
g. CNC is waiting for
Actual spindle speed does not arrive at a speed specified in a program.
spindle speed arrival
Confirm the signal state using the PMC’s diagnostic function
signal to be input
(PMCDGN).
#7
#6
#5
#4
#3
#2
#1
#0
G0029
SAR
#4(SAR) : When this signal is 0, spindle speed does not arrive at the specified speed.
This function is valid when PARAM 3708#0=1.
h. Manual feedrate override
Normally manual feedrate override function is used for jog feed.
is 0% (dry run)
But when DRN(dry run) signal turns on during an auomatic
operation,override values set with these signals become valid to the
following speed set by a parameter.
#7
#6
#5
#4
#3
#2
#1
#0
G0046
DRN
#7(DRN) : Dry run signal is input with this signal being 1.
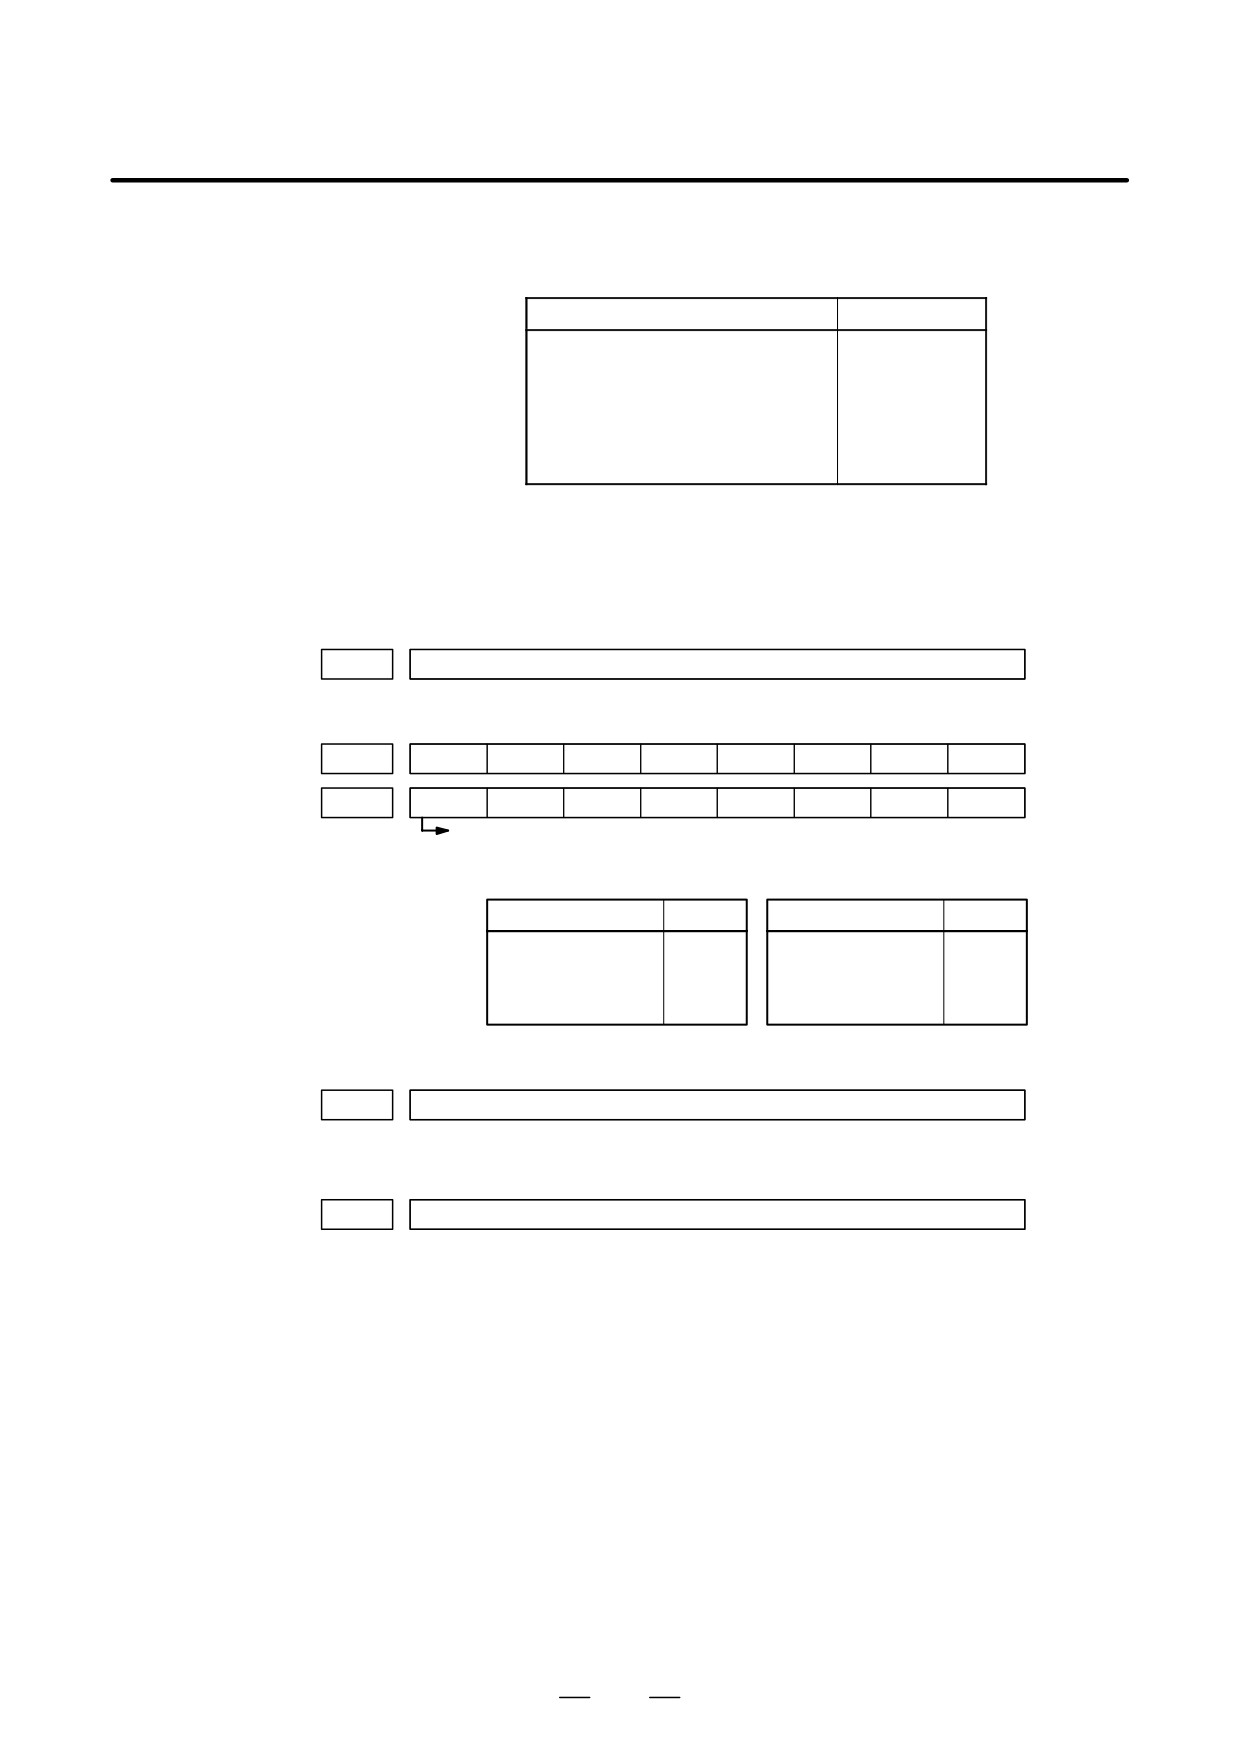
1410
Dry run rate
The rate when the following override value is 100%.
#7
#6
#5
#4
#3
#2
#1
#0
G0010
*JV7
*JV6
*JV5
*JV4
+JV3
*JV2
*JV1
*JV0
G0011
*JV15
*JV14
*JV13
*JV12
+JV11
*JV10
*JV9
*JV8
745
11. TROUBLESHOOTING
B-63525EN/02
When override value is 0%, all bits of the above address is
[1111 . . .
1111] or [0000
0000].
*JV15 .
JV0
Override
1111 1111 1111 1111
0.00%
1111 1111 1111 1110
0.01%
:
1101 1000 1110 1111
100.00%
:
0000 0000 0000 0001
655.34%
0000 0000 0000 0000
0.00%
i.
NC is in a reset state
In this case, the CNC’s status display shows RESET. Refer to item 1.
(2) Only rapid traverse in positioning (G00) does not function Confirm
the following parameter and signals from the PMC.
(a) Setting value of rapid traverse rate
1420
Rapid traverse rate per axis
(b) Rapid traverse override signals
#7
#6
#5
#4
#3
#2
#1
#0
G0014
ROV2
ROV1
G0096
HROV
*HROV6
*HROV5
*HROV4
*HROV3
*HROV2
*HROV1
*HROV0
(HROV-0)
(HROV=1)
ROV1
ROV2
Override
*HROV6
*HROV0
Override
0
0
100%
1 1
1
1
1
1
1
0%
1
1
50%
1 1
1
1
1
1
0
1%
0
1
25%
:
:
1
1
Fo
0 0
1
1
0
1
1
100%
1421
Rapid traverse override F0 rate
(3) Only feed (other than G00) does not function
(a) Maximum feedrate set by parameter is incorrect.
1422
Maximum feedrate
Feedrate is clamped at this upper feedrate.
(b) Feedrate is specified by feed per revolution (mm/rev)
1) Position coder does not rotate
Check the connection between spindle and position coder
The following failure is considered:
⋅
T iming belt is broken
⋅
Key is removed
⋅
Coupling is loose
⋅
Connector of signal cable is loosened
2) Position coder is faulty
746
B-63525EN/02
11.TROUBLESHOOTING
(c) Thread cutting does not operate
1) Position coder does not rotate
Check the connection between spindle and position coder
The following failure is considered:
⋅
Timing belt is broken
⋅
Key is removed
⋅
Coupling is loose
⋅
Connector of signal cable is loosened
2) Position coder is faulty
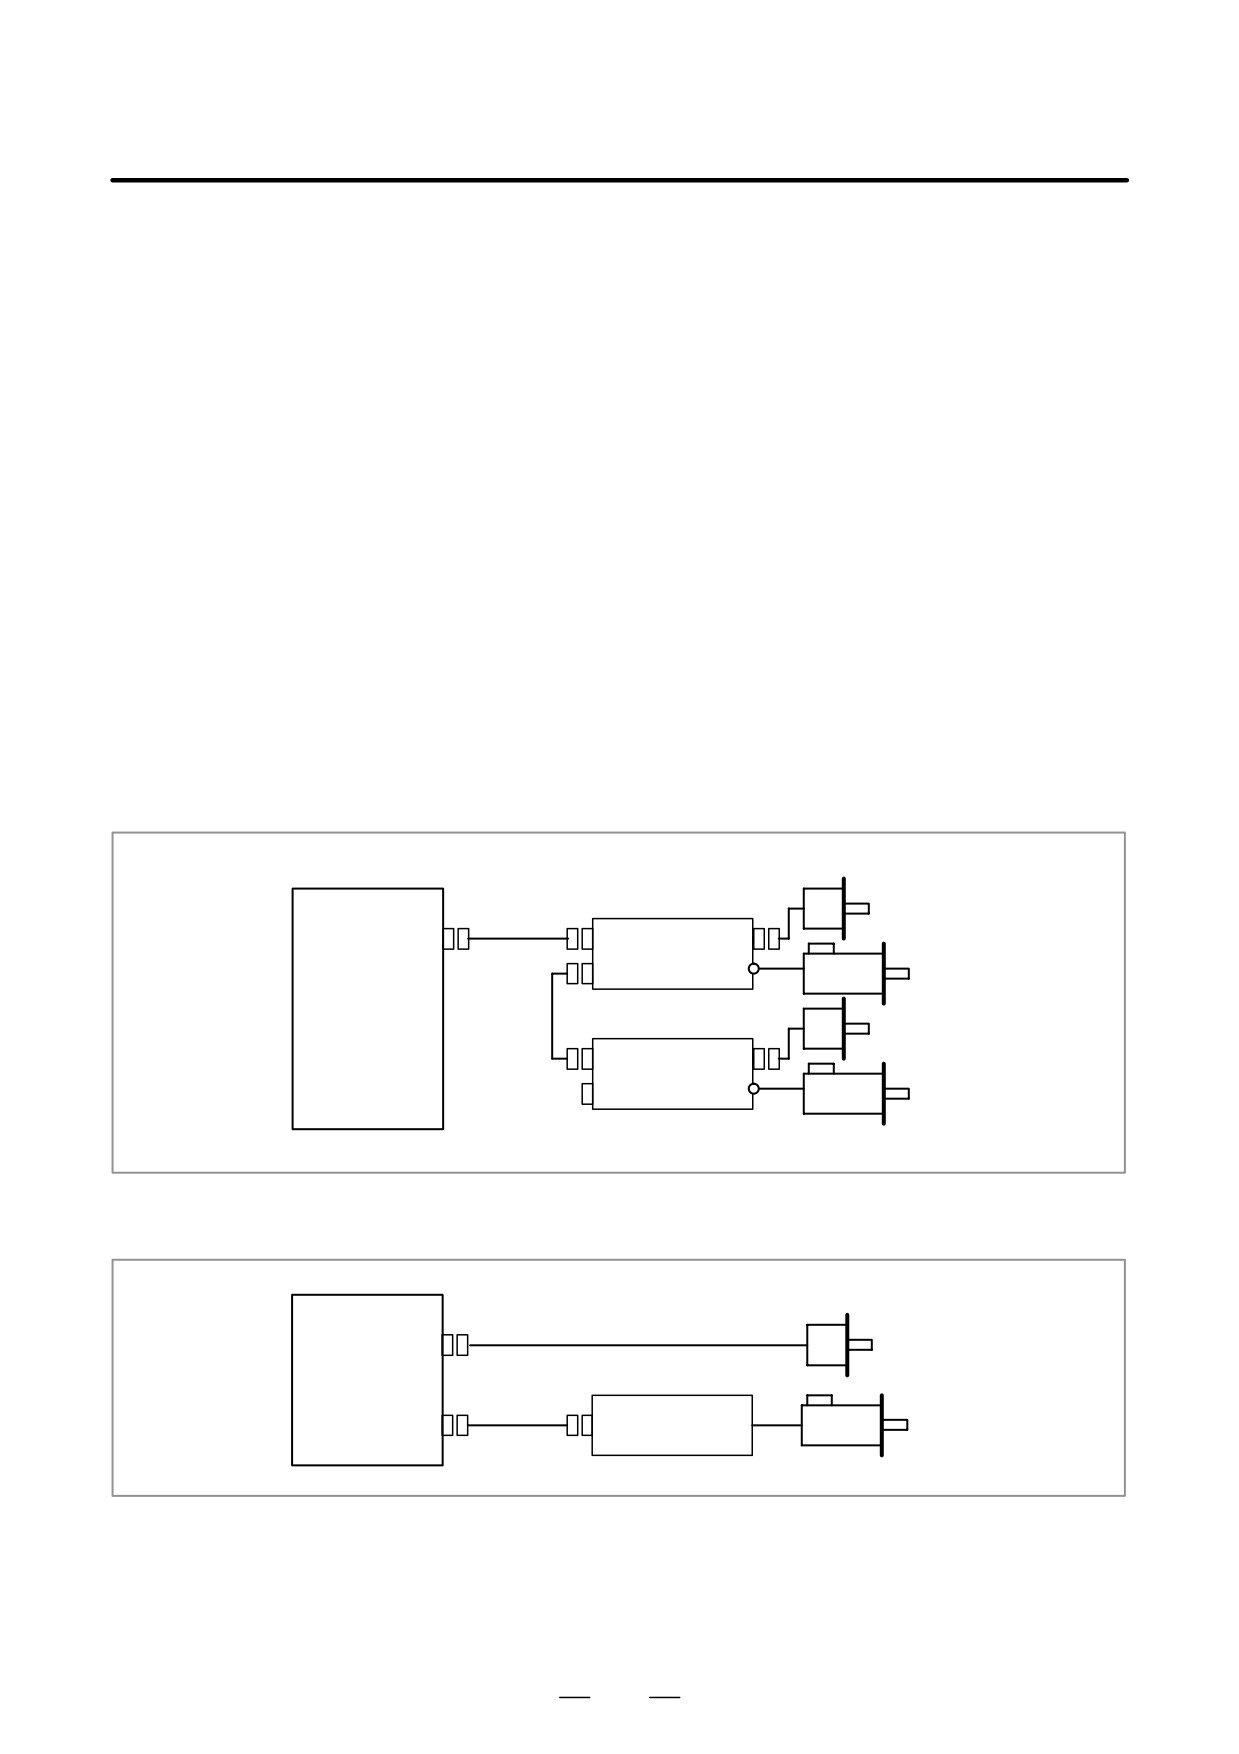
Position coder is connected to the spindle amplifier when serial
interface spindle is used or connected to the CNC when analog
interface spindle is used.
For details of connection, refer to the following.
<T series>
Whether A/B phase signals from the position coder are read
correctly, can be judged also by the spindle speed display on the
CRT screen (position screen). (However, it is not displayed
when PARAM 3105#2=0).
<αi series spindle amplifier>
Position
CNC
coder
JA7B
JYA3
JA41
SPM
JA7A
Spindle
motor
Position
coder
JA7B
JYA3
SPM
Spindle
JA7A
motor
<Analog interface spindle amplifier>
CNC
JA41
Position
coder
Analog spindle
Spindle
JA40
amplifier
motor
(d) A cutting feed block containing a feedrate command (F command)
with a feedrate of 0 is specified.
If FCO (bit 7 of parameter No. 1404) is set to 1, P/S alarm 11 is not
issued even if a feedrate command (F command) with a feedrate of
0 is issued.
747
11. TROUBLESHOOTING
B-63525EN/02
11.6
CYCLE START LED
SIGNAL HAS
TURNED OFF
Points
(1) After cycle operation is started, then stopped, check as follows:
(2) Confirm cycle start LED on machine operator’s panel.
(3) Confirm CNC’s diagnostic function.
Causes and Remedies
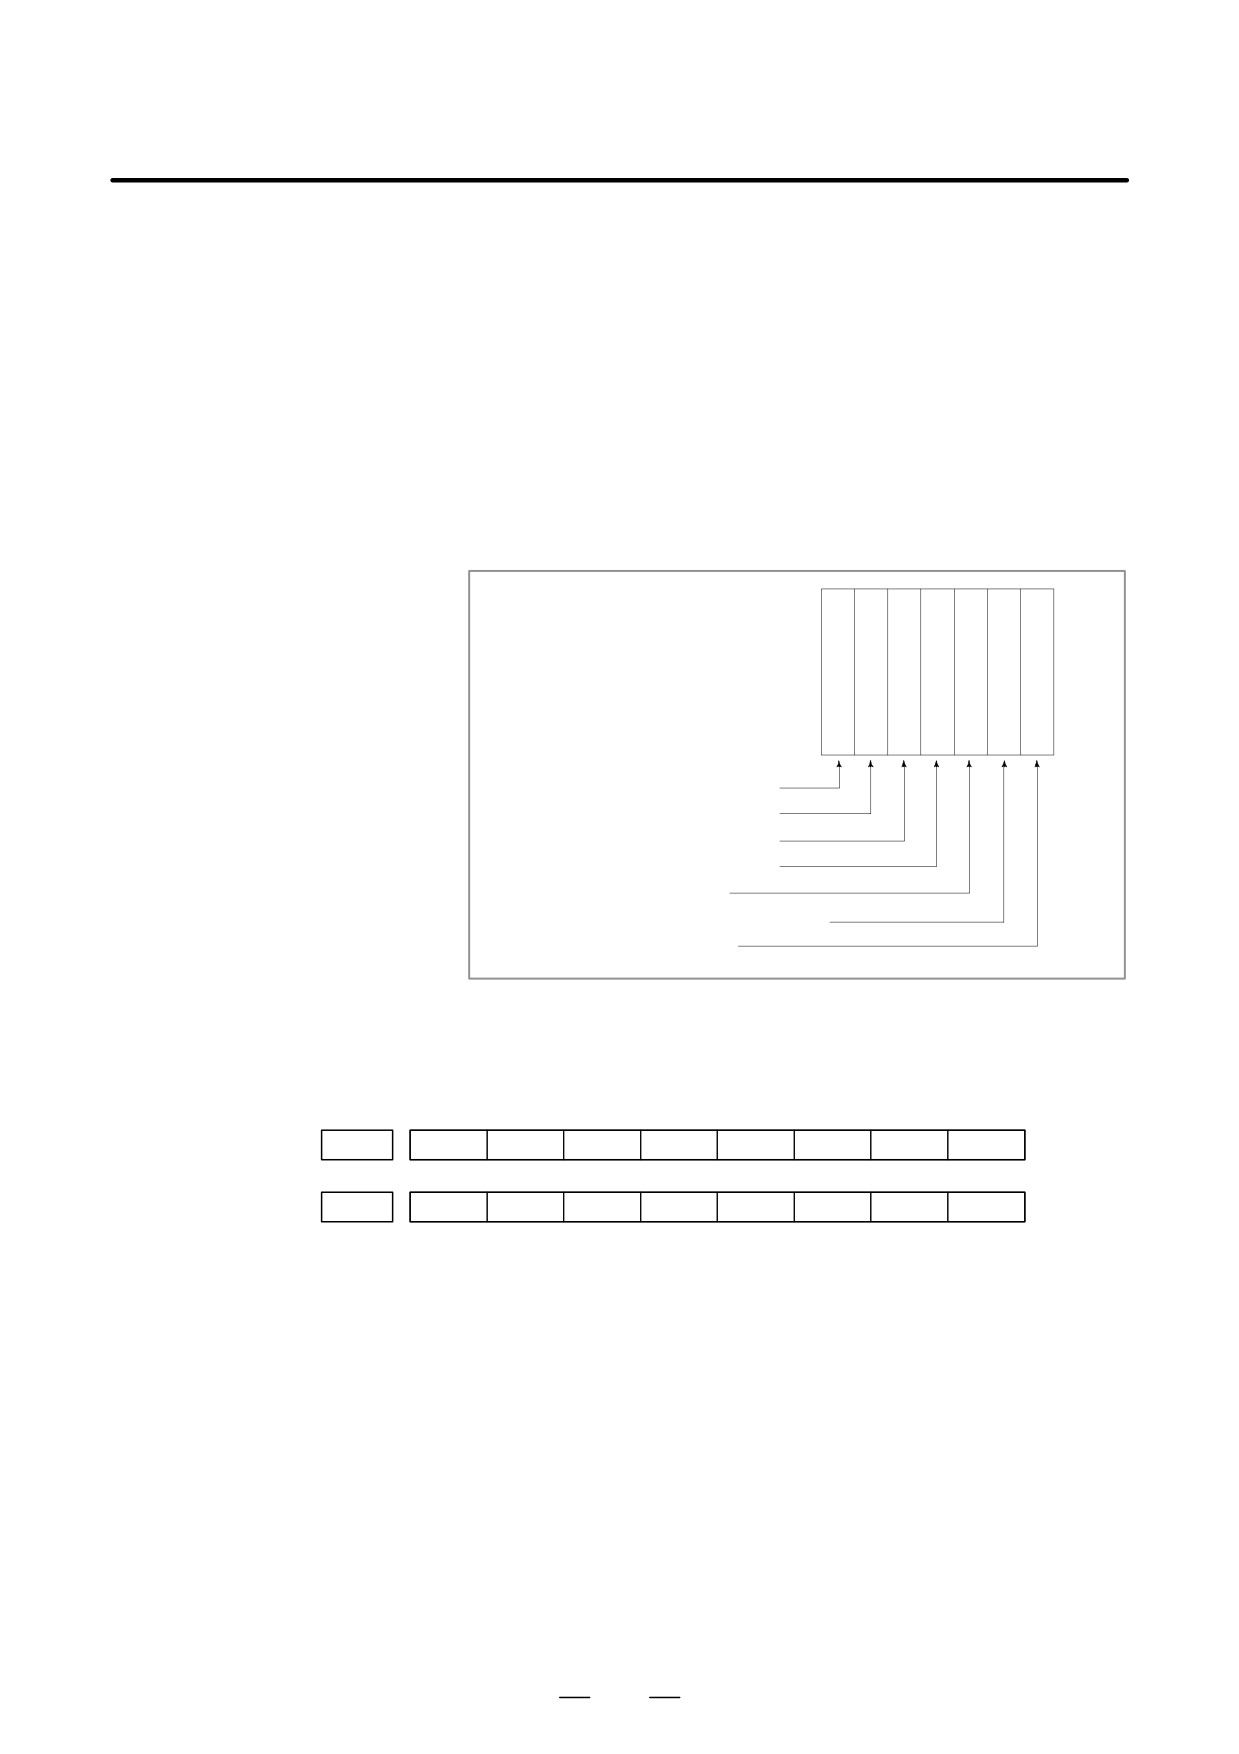
The reason why cycle start LED signal (STL) has turned off are displayed
on CNC’s diagnostic numbers 020 to 025 as follows:
020 CUT SPEED UP/DOWN
1
0
0
0
1
0
0
021 RESET BUTTON ON
0
0
1
0
0
0
0
022 RESET AND REWIND ON
0
0
0
1
0
0
0
023 EMERGENCY STOP ON
1
0
0
0
0
0
0
024 RESET ON
1
1
1
1
0
0
0
025 STOP MOTION OR DWELL
1
1
1
1
1
1
0
a. Emergency stop signal
b. External reset signal
c. Reset button on MDI
d. Reset & rewind signal
e. Servo alarm
f.
Feed hold by switching mode
g. Single block stop
Details of signals a to g are as follows:
Confirm the signals concerned using diagnostic function (PMCDGN).
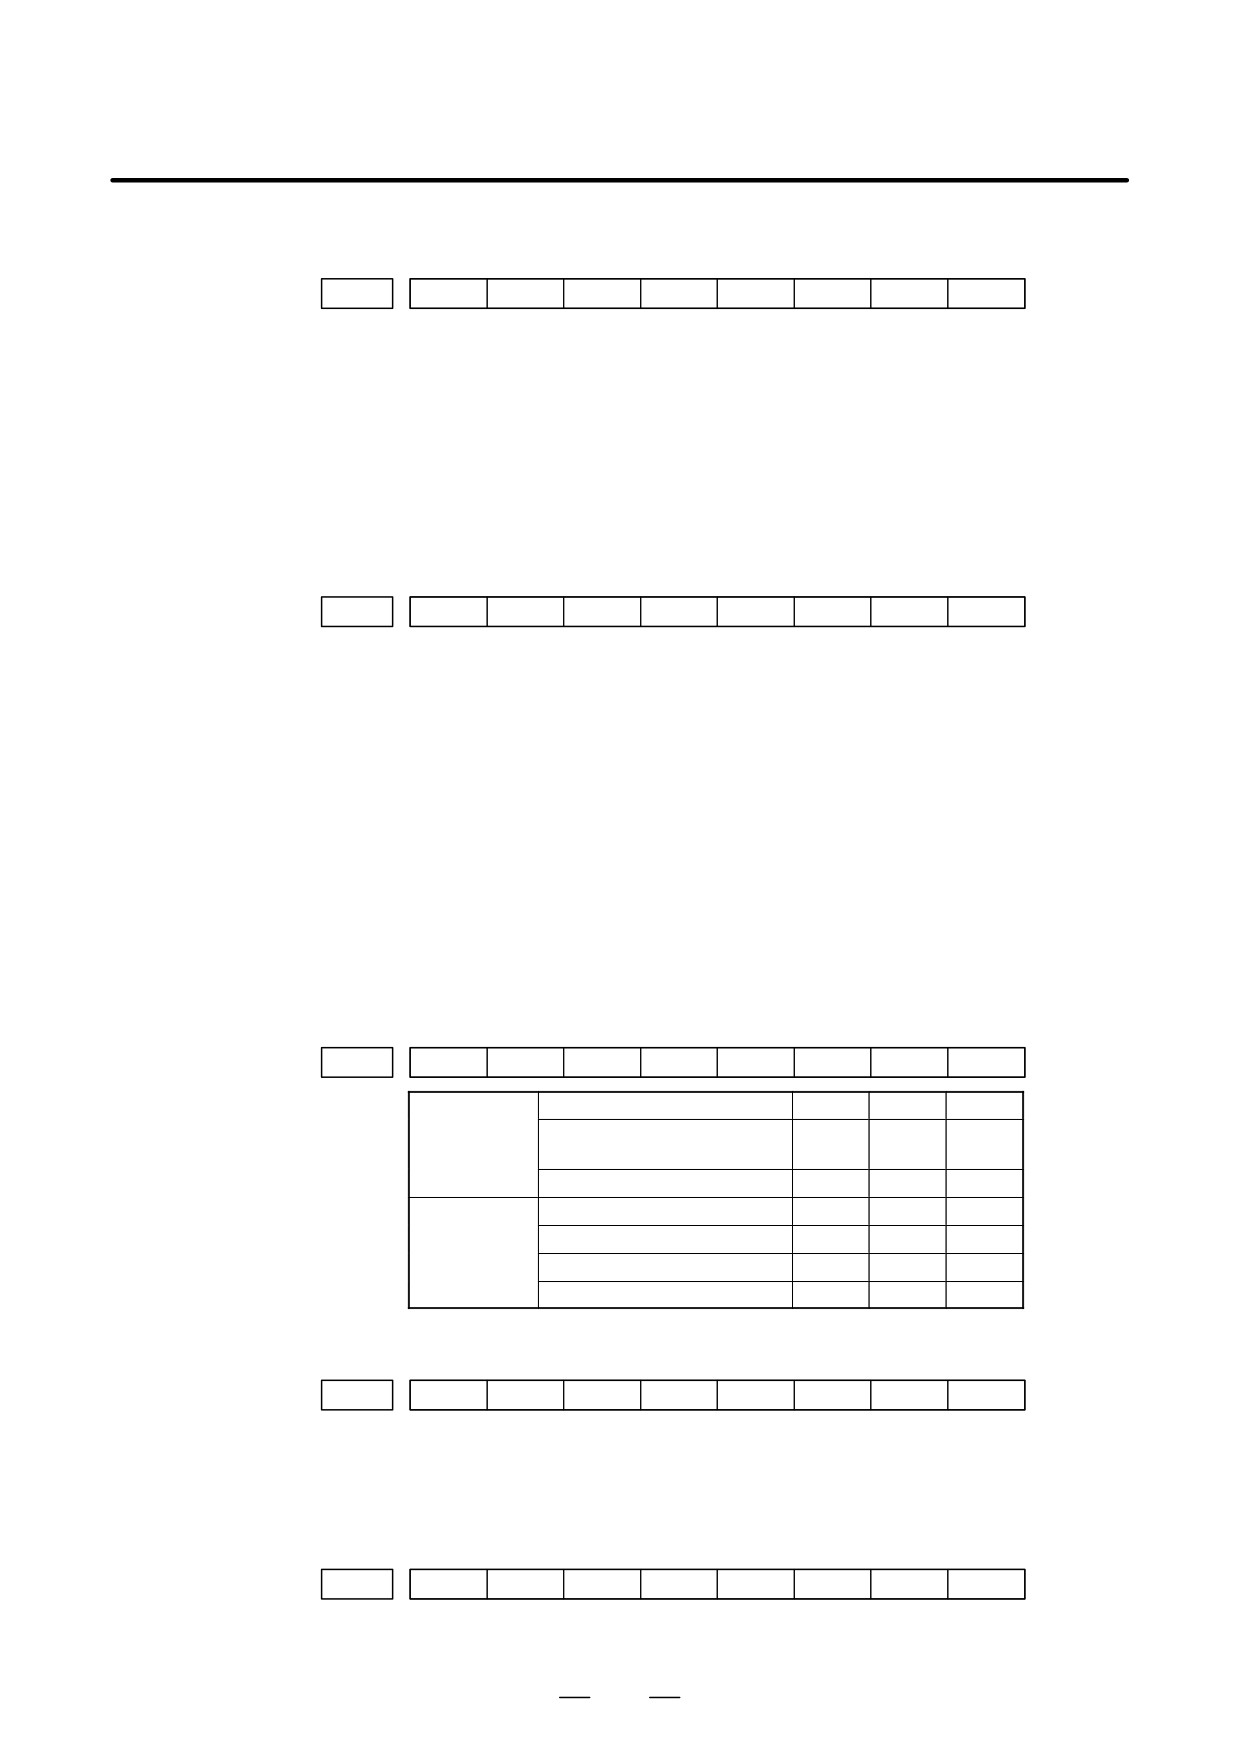
a. Emergency stop is input
#7
#6
#5
#4
#3
#2
#1
#0
X1008
*ESP
#7
#6
#5
#4
#3
#2
#1
#0
G0008
*ESP
*ESP=0
: Emergency stop signal is input :
748
B-63525EN/02
11.TROUBLESHOOTING
b. External reset signal is
input
#7
#6
#5
#4
#3
#2
#1
#0
G0008
ERS
#7(ERS) :
When the bit is 1, external reset signal is input.
This signal is usually used for a confirmation signal of M02 when an M02
is specified in a program as the end of a program.
Therefore, when M02 is executed, this signal is input.
c. Reset button on the MDI
An automatic operation is put into a reset status when RESET key on the
is pressed
MDI panel is pressed.
d. Reset & rewind signal is
input
#7
#6
#5
#4
#3
#2
#1
#0
G0008
RRW
#6(RRW) :
When this signal is 1, the reset & rewind signal is input.
This signal is usually used for a confirmation signal of M30 when an M30
is specified in a program as the end of a program.
Therefore, when M30 is executed, this signal is input.
e. Servo alarm has
When any servo alarm has generated, cycle operation is put into the reset
generated
state and operation stop.
f.
Cycle operation is in a
The cycle operation becomes feed hold state in the following cases:
feed hold state
1) Modes are switched from an automatic operation mode to a manual
operation mode.
2) Feed hold signal is input.
<Mode select signal>
#7
#6
#5
#4
#3
#2
#1
#0
G0043
MD4
MD2
MD1
memory edit(EDIT)
0
1
1
Automatic
Automatic operation
0
0
1
operation
(AUTO)
Manual data input (MDI)
0
0
0
Jog feed (JOG)
1
0
0
Manual
Handle/step
1
0
1
operation
TEACH IN HANDLE
1
1
1
TEACH IN JOG
1
1
0
<Feed hold signal>
#7
#6
#5
#4
#3
#2
#1
#0
G0008
*SP
#5(*SP) : When this signal is 0, the feed hold signal is input.
g. It become single block
stop during automatic
operation
#7
#6
#5
#4
#3
#2
#1
#0
G0046
SBK
#1(SBK) When this signal is 1, the single block signal is input.
749
11. TROUBLESHOOTING
B-63525EN/02
11.7
NOTHING IS
DISPLAYED ON THE
LCD WHEN THE
POWER IS TURNED
ON
Causes and actions
If nothing is displayed on the LCD at power-up or if the LCD is locked
with “GRAPHIC IS READY.” or the slot status screen displayed, the
probable causes include the following:
D For the LCD-mounted
D The LCD cable or backlight cable is not connected.
type
D The necessary software is not installed.
D The motherboard, display control card, CPU card, or inverter board is
defective.
D For the stand-alone type
D The LCD unit is not connected to the power supply.
D The LCD cable or backlight cable is not connected.
D The LCD unit is not connected to the CNC with the optical cable or
the cable is broken.
D The necessary software is not installed.
D The main CPU board, display control card, or LCD unit is defective.
If “GRAPHIC IS READY.BOOT START”. is displayed, this indicates
that the display control circuit has started up normally but that the CNC
has not started up.
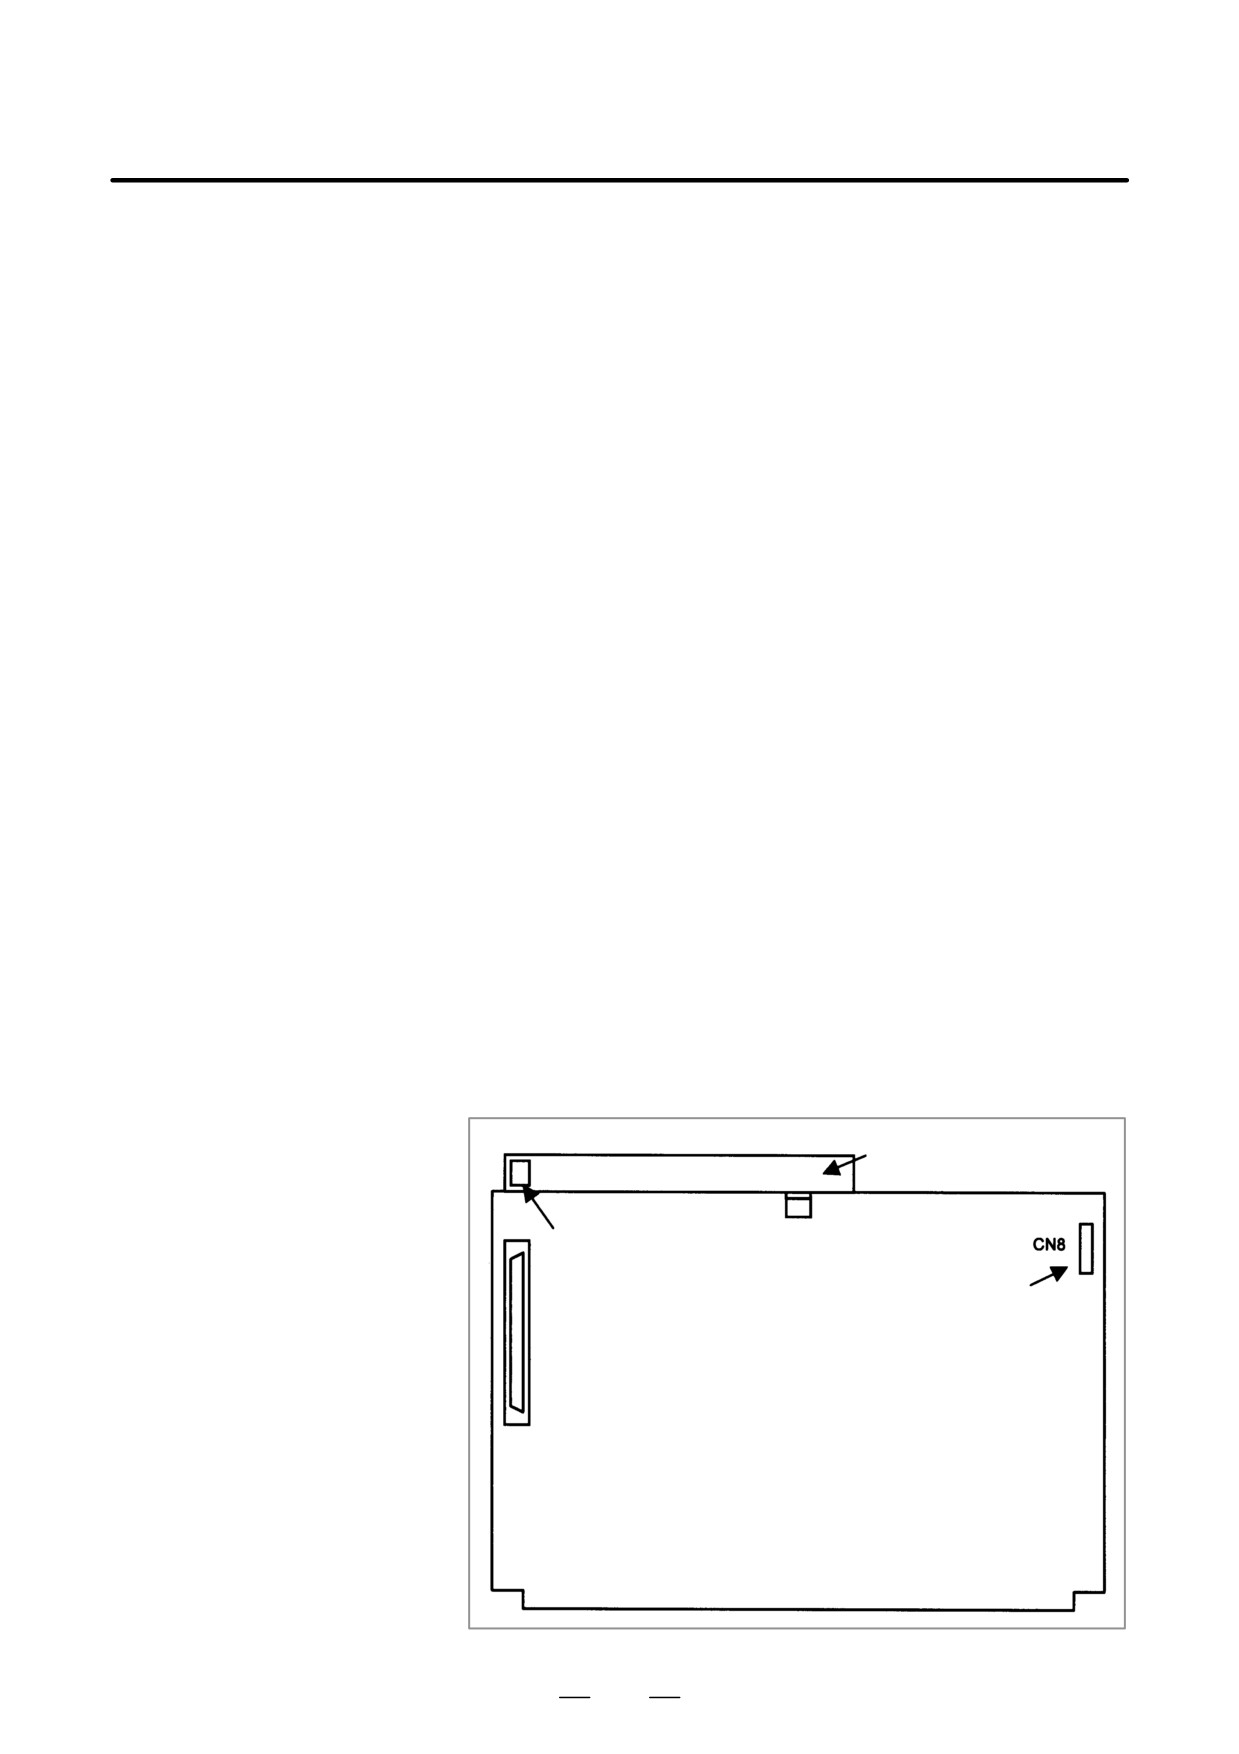
[For the LCD-mounted
type]
Inverter printed circuit
board
Connector for connecting
the backlight cable
Connector for connecting
the LCD cable
Motherboard (without a PC)
750
B-63525EN/02
11.TROUBLESHOOTING
D LCD display
Referring to the hardware chapter, check the LCD on/off status of the
motherboard.
If the motherboard has started up normally and the LCD display indicates
normal operation, a probable cause is a fault of the display system, such
as a cable not connected or a defective inverter board.
If the LCD display is locked in the middle of the startup process, the
probable causes include defective hardware (or installation failure) and
the necessary software not installed.
D Connection of the LCD
Check that the LCD and backlight cables are connected firmly to the
and backlight cables
corresponding connectors.
These cables are connected before shipment from FANUC. This check
is, however, required because the cables may be disconnected during
maintenance.
D The necessary software
If necessary software is not stored in the FROM module, the CNC may
is not installed
not start up.
D Defective printed circuit
If the motherboard or display control card is defective or is not correctly
board
installed, the CNC may not start up.
Check that the card PCBs are engaged firmly with the connectors on the
motherboard.
If any of the above actions does not solve the problem, replace the display
control card, CPU card, and motherboard.
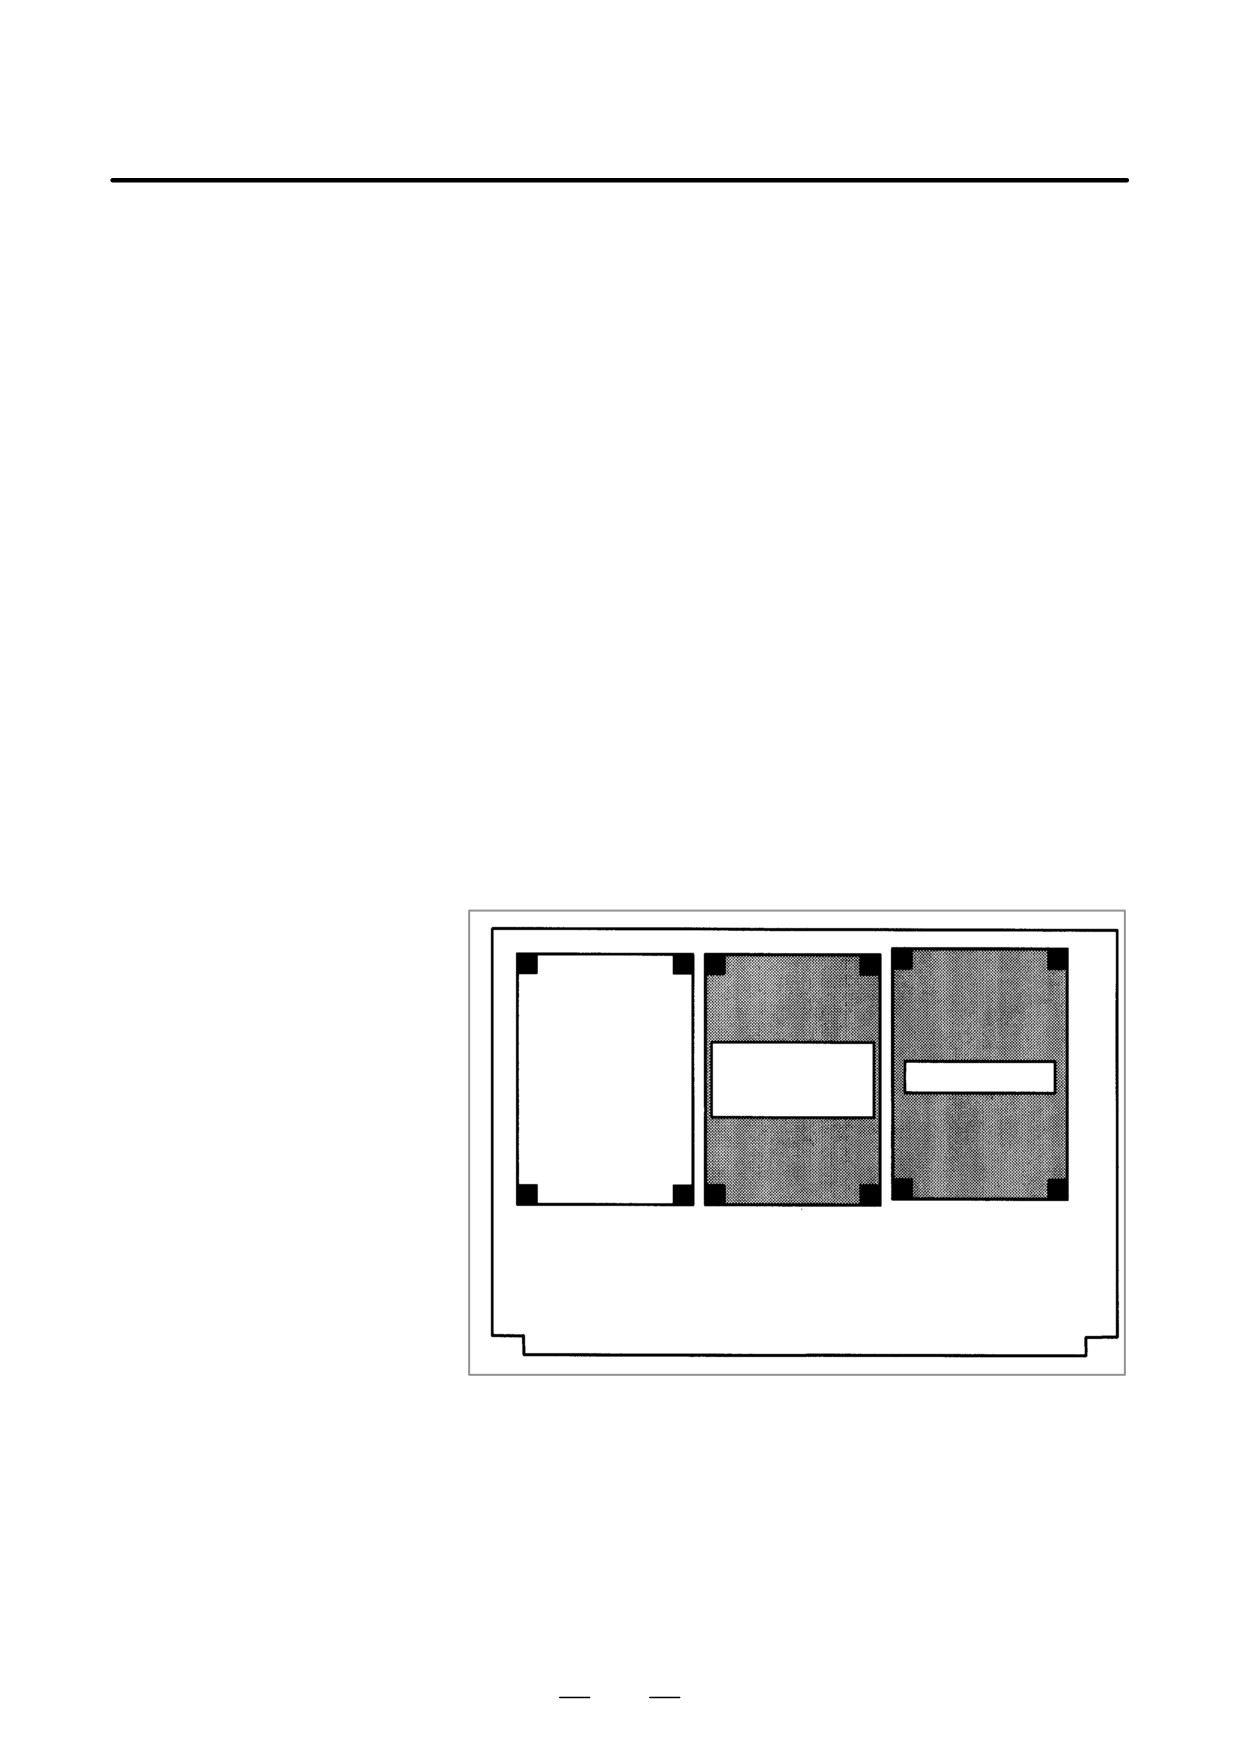
D Installation positions of
the display control card,
and CPU card
Display control
CPU card
card
Motherboard
751