FANUC Series 16i/160i/160is-MODEL B, Series 18i/180i/180is-MODEL B, Series 21i/210i/210is-MODEL B. MAINTENANCE MANAUL - page 24
8. EMBEDDED ETHERNET FUNCTION
B-63525EN/02
8.8.4
This subsection describes how to check the state of communication
between the CNC and personal computer.
Checking
Communication
Checking the connection status and settings
If communication with the CNC is not satisfactory or fails from time to
time, check the communication link by using the method described
below. The ping command is used to check communication.
Checking from the
See Item 6 of Section 3.2, ”EMBEDDED ETHERNET MAINTENANCE
embedded Ethernet side
SCREEN”.
If no response is received from the remote device, the cause is considered
to be a hardware connection error and/or software setting error. Check the
hardware connection and software settings.
Checking from the
An example where a personal computer (OS: Windows NT 4.0) is used
personal computer side
is described below.
Method of checking:
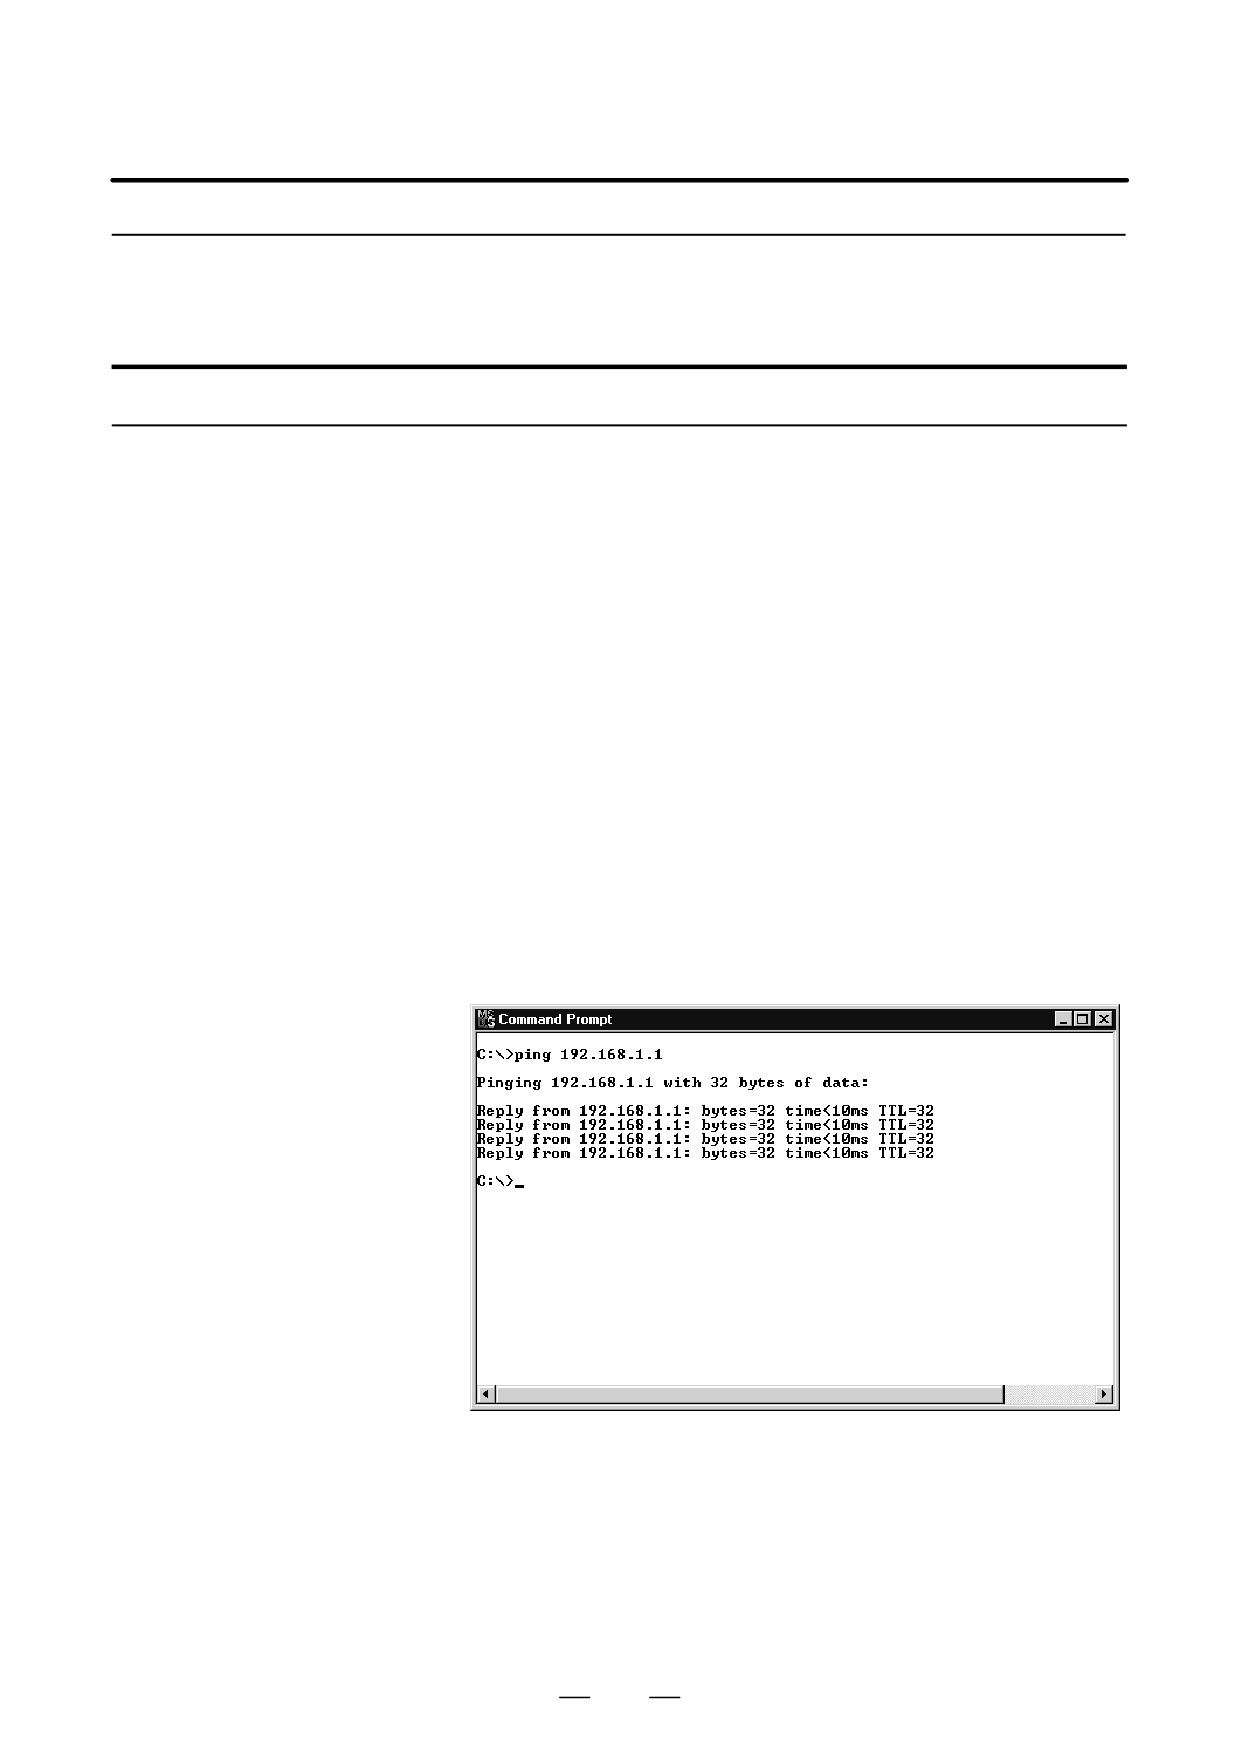
Open the command prompt, then enter ”ping NC-IP-address”. A normal
connection has been established if a response is received.
The example below supposes that the IP address of the CNC is
192.168.1.1.
1) When a response is received (normal)
662
B-63525EN/02
8. EMBEDDED ETHERNET FUNCTION
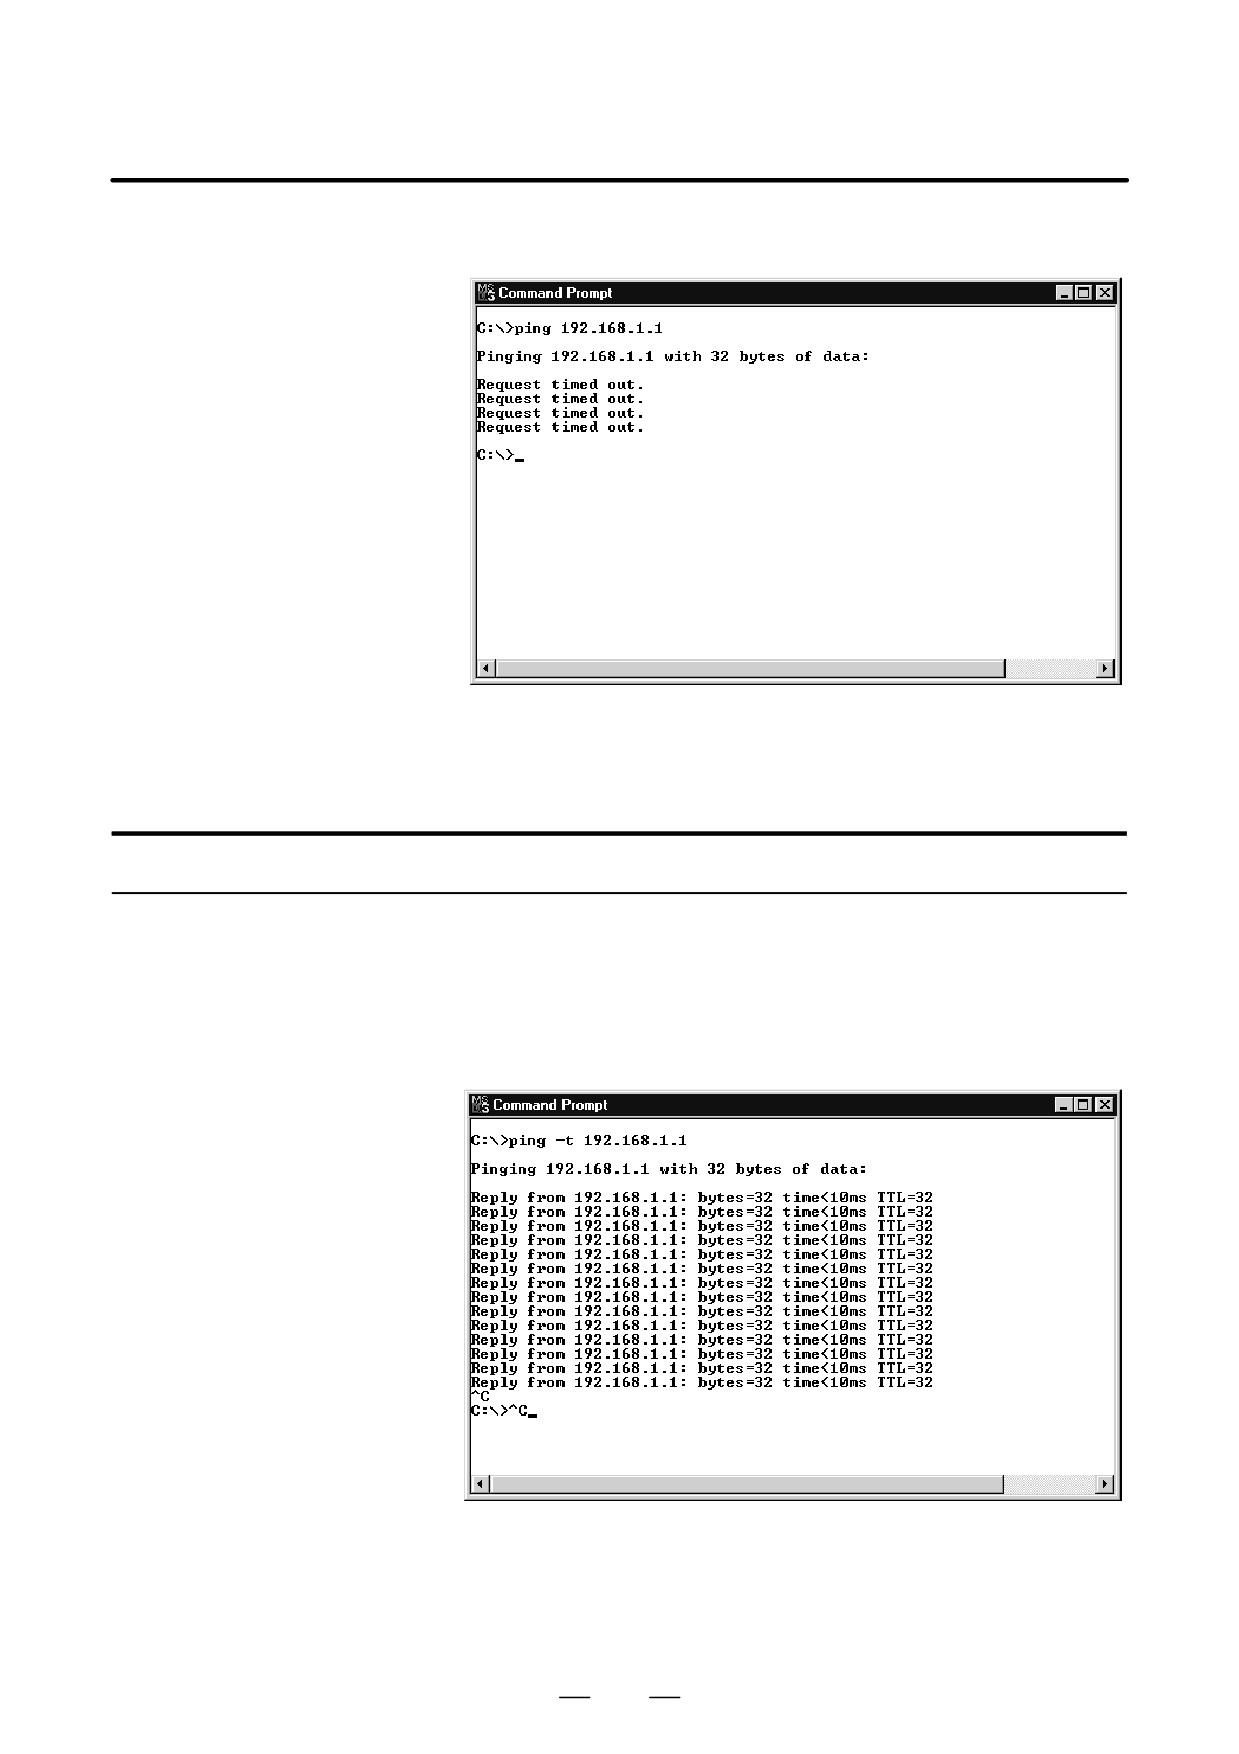
2) When no response is received (error)
If no response is received from the CNC, the cause is considered to be
a hardware connection error and/or software setting error. Check the
hardware connection and software settings.
Checking the influence of noise
The method of checking communication errors caused by noise is
described below.
The ping command is used for this checking as well.
The -t option of the ping command is used. Until the ”Ctrl + C” keys are
pressed simultaneously, ping packets are transmitted.
1. Influence of noise from peripheral equipment (device)
1) Turn on the power to the machine with the embedded Ethernet
function for which a noise influence check is to be made, and ensure
that communication is enabled.
663
8. EMBEDDED ETHERNET FUNCTION
B-63525EN/02
2) Press the emergency stop button of the machine to turn off
servo/spindle amplifier activation, then issue a ping command
from the personal computer.
3) Count the number of lost packets (to which no response is
returned).
If lost packets occur in this state, there is probably an influence of
noise from peripheral equipment.
Action: Locate the noise source and recheck the
cabling to eliminate the influence of noise.
2.
Influence of noise from the installed machine
1) Next, release the emergency stop state of the machine to turn on
servo/spindle amplifier activation, then issue another ping
command from the personal computer.
2) Count the number of lost packets.
If this number is greater than the number of Item 1 above, the cause
is considered to be noise generated by the machine itself. In
general, the grounding of the machine or the grounding of the
communication destination is defective.
Action: Check the grounding of the machine and the
communication destination, and insulate the machine
from the communication backbone.
664
B-63525EN/02
8. EMBEDDED ETHERNET FUNCTION
If an error occurs with the embedded Ethernet function, the log screen of
8.9
the embedded Ethernet function displays an error message.
ERROR MESSAGES
This section describes error messages displayed on the log screen.
The major error messages are described below.
If an error occurs, display the log screen and check the error message to
identify the cause of the error.
Multiple error messages may be displayed for an error. So, check the
display times of error messages.
8.9.1
OWN IP ADDRESS IS NOTHING
The IP address of the local node is not set. Set an IP address correctly.
EMB_ETH MASTER
OWN IP ADDRESS(???) IS INVALID
CTRL LOG Screen
The setting (???) of the IP address of the local node is incorrect. Correct
the IP address.
SUBNET MASK IS NOTHING
The subnet mask of the local node is not set. Set a correct subnet mask.
SUBNET MASK(???) IS INVALID
The setting (???) of the subnet mask of the local node is incorrect. Correct
the subnet mask.
ROUTER IP ADDRESS(???) IS INVALID
The setting (???) of the IP address of the router is incorrect. Correct the
IP address of the router.
TCP PORT NUMBER(???) IS INVALID
The setting (???) of the TCP port number is incorrect. Correct the TCP
port number.
UDP PORT NUMBER(???) IS INVALID
The setting (???) of the UDP port number is incorrect. Correct the UDP
port number.
UDP INTERVAL TIME(???) IS INVALID
The setting (???) of the time interval for UDP transmission is incorrect.
Correct the time interval.
Embedded LANC SelfTest Error [???]
An error was detected when the LAN controller of the embedded Ethernet
was initialized.
The error code is [???]. Hardware replacement is needed.
665

8. EMBEDDED ETHERNET FUNCTION
B-63525EN/02
8.9.2
TCP PORT NUMBER(???) IS INVALID
The setting (???) of the TCP port number is incorrect. Correct the TCP
EMB_ETH
port number.
FOCAS1/ETHER LOG
Illegal Broadcast IP ADDRESS
Screen
The broadcast address for UDP transmission is incorrect. Correct the
subnet mask and IP address of the local node.
Illegal Power-on Date or Time
The current time setting of the CNC is incorrect. Correct the clock of the
CNC.
ALL TASKS(C1) ARE BUSY
The FOCAS1/Ethernet function or DNC1/Ethernet function is already
engaged in communication with five applications.
Terminate
unnecessary communication applications on the personal computer.
If the cable is disconnected before communication is completed, the
embedded Ethernet may need to be reset and initialized.
Err accept() [???]
An error occurred when a connection request from the personal computer
is being awaited. The error code is [???]. This error message is output,
for example, when the embedded Ethernet is reset.
Err recv() [???]
An error occurred during data reception. The error code is [???].
This error message is output, for example, when the embedded Ethernet
is reset before communication is closed.
8.9.3
Login User is invalid
The setting of the user name or password is incorrect. Check the user
EMB_ETH FTP
name and password.
TRANSFER LOG
Parameters are invalid
Screen
The port number and IP address of the host computer set on the parameter
setting screen are incorrect. Check the settings of the port number and IP
address.
(???) is not found
The host computer with which an attempt is made to perform FTP
communication cannot be found on the network. The IP address of the
host computer to be connected with is indicated by (???). Check if the
power to the host computer is turned on and if the host computer is
connected to the network correctly.
8.9.4
FACTOLINK#1 IP ADDRESS(???) IS INVALID
The setting of the IP address (???) of the FACTOLINK server is incorrect.
EMB_ETH FACTOLINK
Check the setting of the IP address.
LOG Screen
FACTOLINK#1 PORT NUMBER(???) IS INVALID
The port number (???) of the FACTOLINK server is incorrect. Check the
setting of the program number.
Err ALREADY CONNECTED
An additional request is made for connection with a port already
connected.
The embedded Ethernet needs to be reset.
666
B-63525EN/02
8. EMBEDDED ETHERNET FUNCTION
This section briefly describes Ethernet-related terms.
8.10
The descriptions below provide minimum information only. For further
GLOSSARY FOR
information, refer to relevant publications available on the market.
ETHERNET
TCP/IP
For Ethernet-based communication, the TCP/IP (Transmission Control
Protocol/Internet Protocol) protocol is generally used. A protocol is a set
of rules used to ensure smooth communication between communication
devices connected via a transmission line. The TCP/IP protocol is a part
of the hierarchical structure consisting of the protocols and services
indicated below.
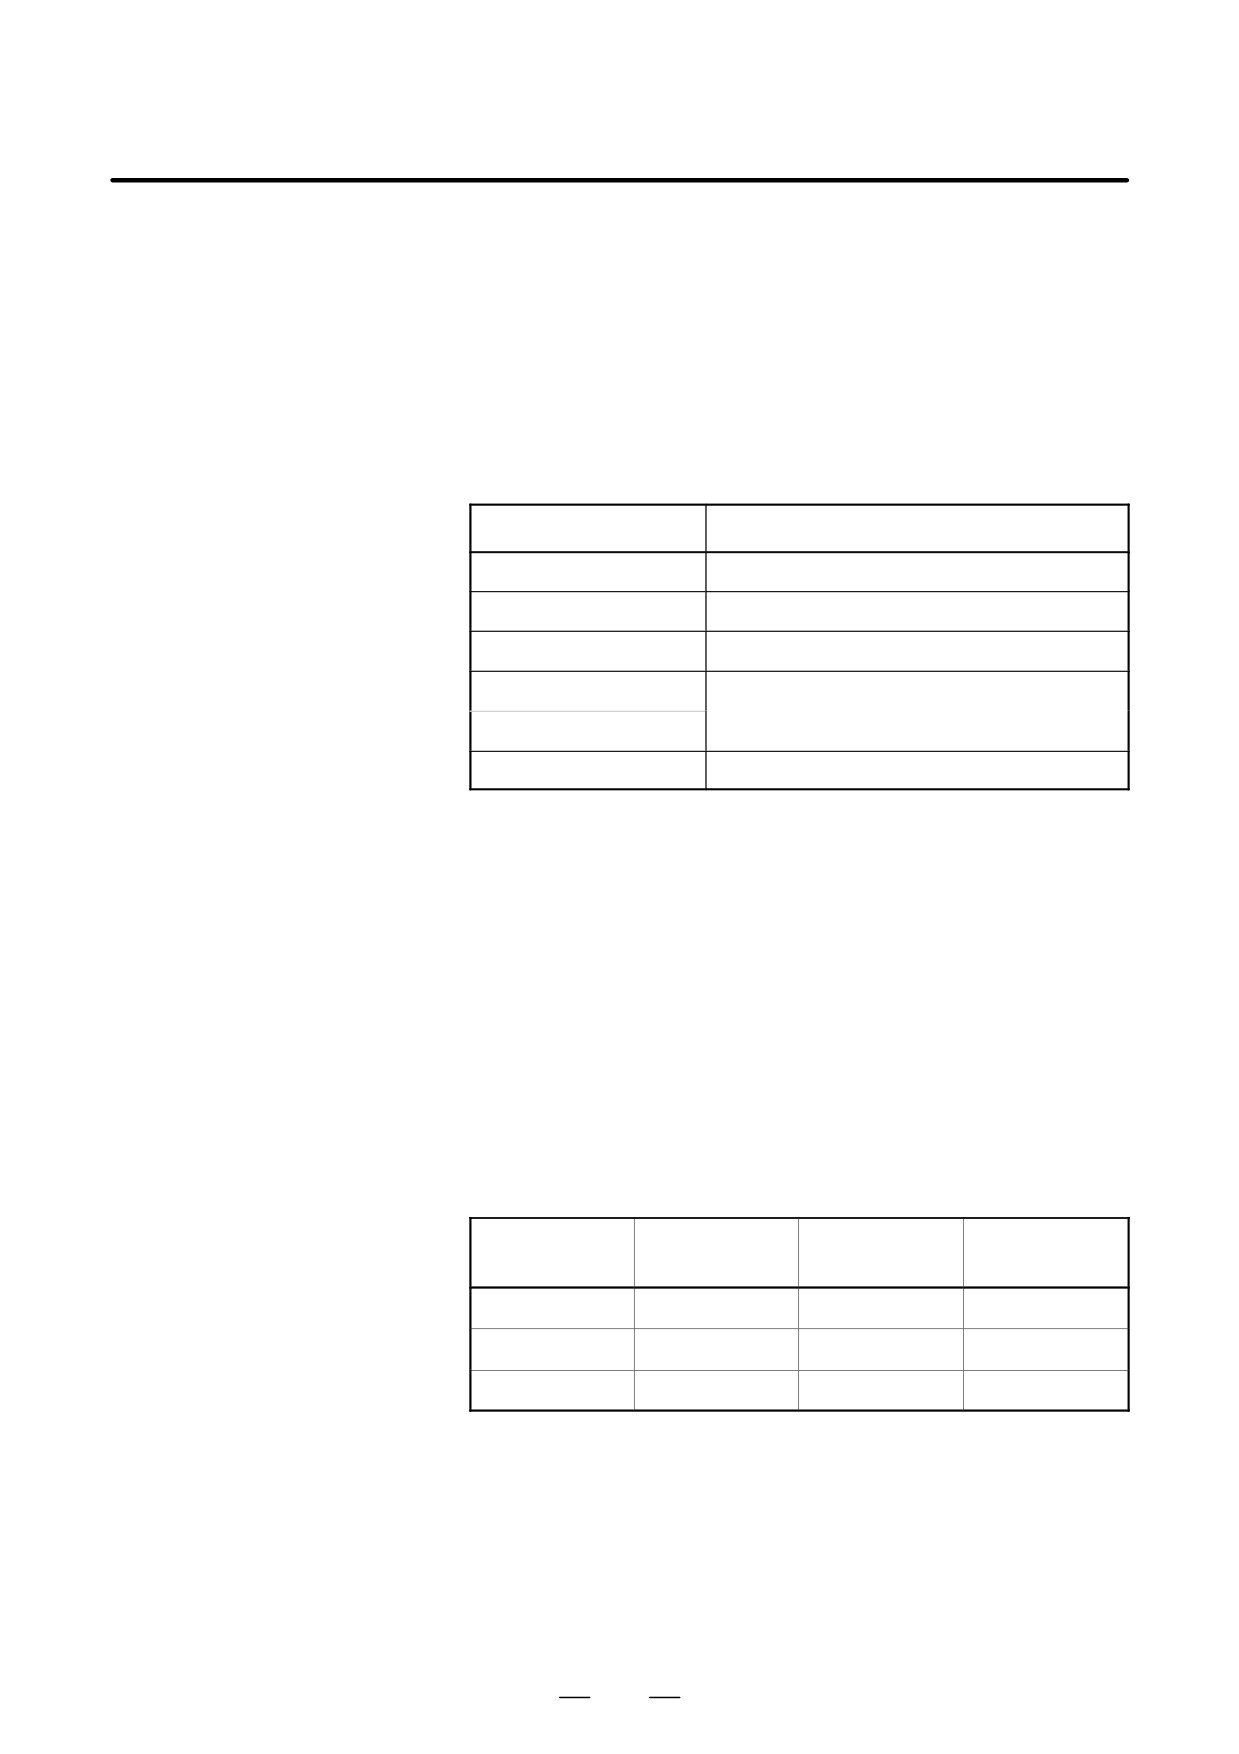
Hierarchy
Protocol/network service
Application layer
User services such as FTP
Transport layer
Protocols such as TCP and UDP
Network layer
Protocols such as IP and ICMP
Data link layer
Protocols such as ARP and RARP
MAC layer
Physical layer
Hardware such as cables and devices
In general, the TCP/IP protocol is a generic term that represents the
protocols installed in the transport layer and network layer.
IP address (INET
With TCP/IP, an address referred to as an IP address (INET address) is
address)
used to identify a specified communication device among the
communication devices connected via Ethernet. So, for communication
using TCP/IP, each communication device connected to Ethernet must
have a unique IP address assigned.
An IP address is four octets (bytes) long. Usually, an IP address is
represented by four 8-bit (octet or byte) fields separated by a period from
each other. Each octet can have a value from 0 to 255.
An IP address consists of the address of the network to which the
communication device is connected, and the host address of the
communication device. Networks are classified into three classes by
group size: class A, class B, and class C.
First octet value
Network ad-
Host address
dress section
section
Class A
0 to 127
Âxxx.xxx.xxx.xxx
xxx.xxx.xxx.xxx
ÂÂÂ
ÂÂÂÂ
Class B
128 to 191
x.xxx.xxx.xxx
xxx.xxx.xxx.xxx
ÂÂÂ
Class C
192 to 223
xxx.xxx.xxx.xxx
xxx.xxx.xxx.xxx
(A hatched portion indicates the section of each address.)
If a network supports no more than 255 communication devices, class C
is generally used.
The IP addresses of all communication devices on one network have the
same network address, and only the host address of each communication
device is unique on the network.
An IP address with its network address and host address all set to 0 or 255
is unusable.
667
8. EMBEDDED ETHERNET FUNCTION
B-63525EN/02
IP addresses are internationally managed systematically. This means that
before an IP address can be used, the IP address must be obtained formally
from the international organization.
If the network used by a user is a local network closed within the user’s
environment (not connected to an outside network), unique IP addresses
may be set freely under the control and responsibility of the user. For a
local network, the following network addresses can be used without
formal registration: 1 address (10) for class A, 16 addresses (172.16 to
172.31) for class B, and 256 addresses (192.168.0 to 192.168.255) for
class C. So, it is recommended that IP addresses with these network
addresses be used for a local network.
Subnet mask (mask
Mask address for indicating the network address section of an IP address.
address)
For a network of class A, specify 255.0.0.0.
For a network of class B, specify 255.255.0.0.
For a network of class C, specify 255.255.255.0.
MAC address (Ethernet
A MAC address is assigned to the Ethernet control board of each
address)
communication device, and is used to identify each communication
device on the MAC layer (lower part of the data link layer). A unique
address obtained from an international organization is used so that no
address duplication occurs among Ethernet control board suppliers.
Port number
The port number is a 16-bit integer used to associate the transport layer
(TCP or UDP) of TCP/IP and a process of the application layer. Port
numbers from 0 to about 8000 are called well-known port numbers and
assigned to standard applications
(such as Telnet and FTP). The
assignment of port numbers is described in Assigned Numbers
[RFC1340].
When using the FOCAS1/Ethernet function and DNC1/Ethernet
function, assign port numbers other than the well-known port numbers.
Broadcast
Transmitting a message to all nodes in the same segment
Client
Device or application that requests a service
Server
Device or application that provides a service
668
9. DIGITAL SERVO
B-63525EN/02
DIGITAL SERVO
9
This chapter describes servo tuning screen required for maintenance of
digital servo and adjustment of reference position.
9.1
INITIAL SETTING SERVO PARAMETERS
670
9.2
SERVO TUNING SCREEN
684
9.3
ADJUSTING REFERENCE POSITION
(DOG METHOD)
687
9.4
DOGLESS REFERENCE POSITION SETTING . . .
690
9.5
αi SERVO WARNING INTERFACE
692
9.6
αi SERVO INFORMATION SCREEN
694
669
9. DIGITAL SERVO
B-63525EN/02
This section describes how to set initial servo parameters, which is used
9.1
for field adjustment of machine tool.
INITIAL SETTING
1. Turn on power at the emergency stop condition.
SERVO PARAMETERS
2. Set the parameter to display the servo tuning screen.
#7
#6
#5
#4
#3
#2
#1
#0
3111
SVS
#0 (SVS)
0 : Servo tuning screen is not displayed.
1 : Servo tuning screen is displayed.
3. Turn off the power once then turn it on again.
4. Display the servo parameter setting screen by the following
operation:
SYSTEM
key
[SV.PARA].
5. Input data required for initial setting using the cursor and page key.
SERVO SETTING
X-AXIS
Y-AXIS
(1)INITIAL SET BIT
00000000
00000000
PRM
2000
(2)MOTOR ID NO.
47
47
PRM
2020
(3)amr
00000000
00000000
PRM
2001
(4)cmr
2
2
PRM
1820
(5)FEED GEAR N
1
1
PRM
2084
(6)
(N/M) M
125
125
PRM
2085
(7)DIRECTION SET
111
111
PRM
2022
(8)VELOCITY PULSE NO.
8192
8192
PRM
2023
(9)POSITION PULSE NO.
12500
12500
PRM
2024
(10)REF.COUNTER
8000
8000
PRM
1821
(1) Initial set bit
#7
#6
#5
#4
#3
#2
#1
#0
2000
PRMCAL
DGPRM
PLC01
#3 (PRMCAL)
1 : Turns to 1 when the initial setting is done.
The following parameters are set automatically in
accordance with the no. of pulses of pulse coder:
PRM 2043(PK1V), PRM 2044(PK2V), PRM 2047(POA1),
PRM 2053(PPMAX),PRM 2054(PDDP),
PRM 2056(EMFCMP),
PRM 2057(PVPA), PRM 2059(EMFBAS),
PRM 2074(AALPH),PRM 2076(WKAC)
#1 (DGPRM)l
0 : Initial setting of digital servo parameter is done.
1 : Initial setting of digital servo parameter is not done.
#0 (PLC01)
0 : Values of parameter 2023 and 2024 are used as they are:
1 : Values of parameter 2023 and 2024 are multiplied by 10.
670
9. DIGITAL SERVO
B-63525EN/02
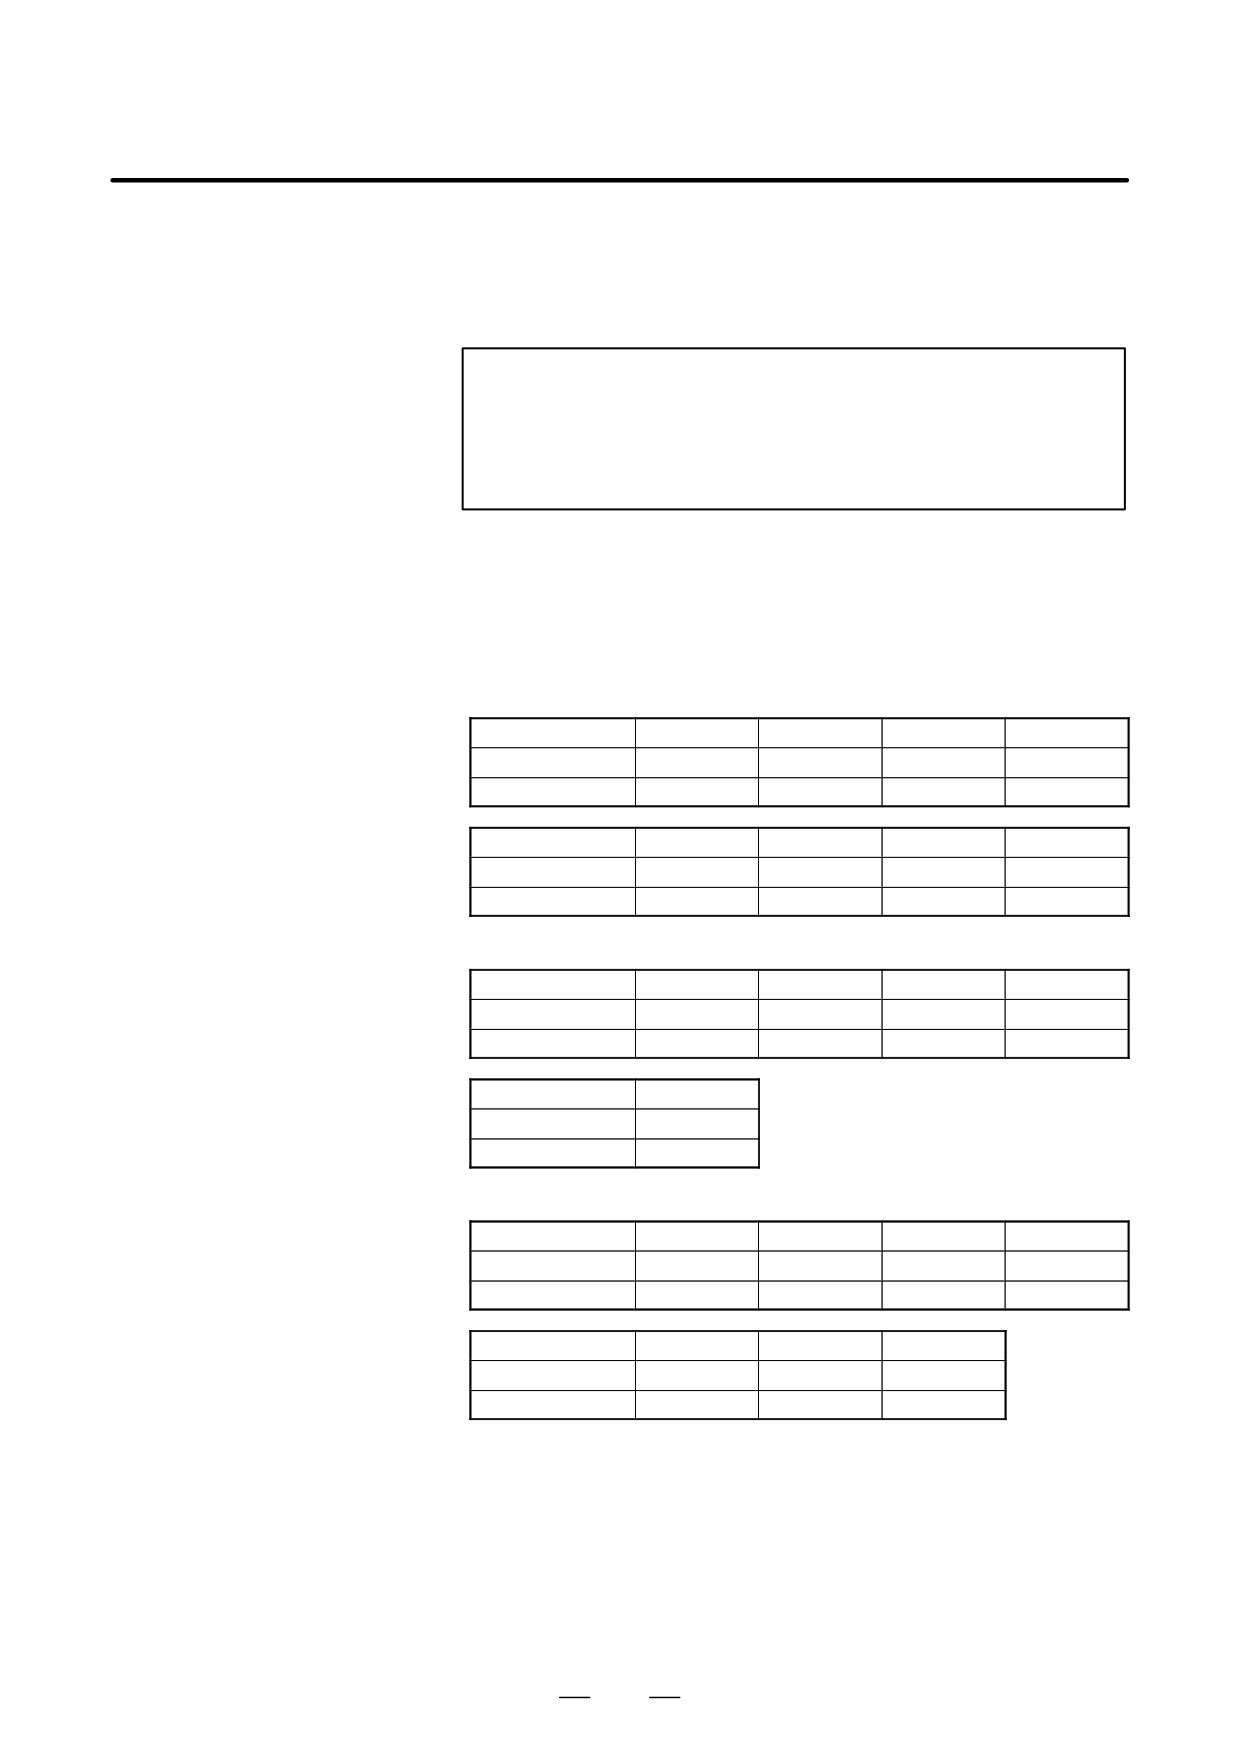
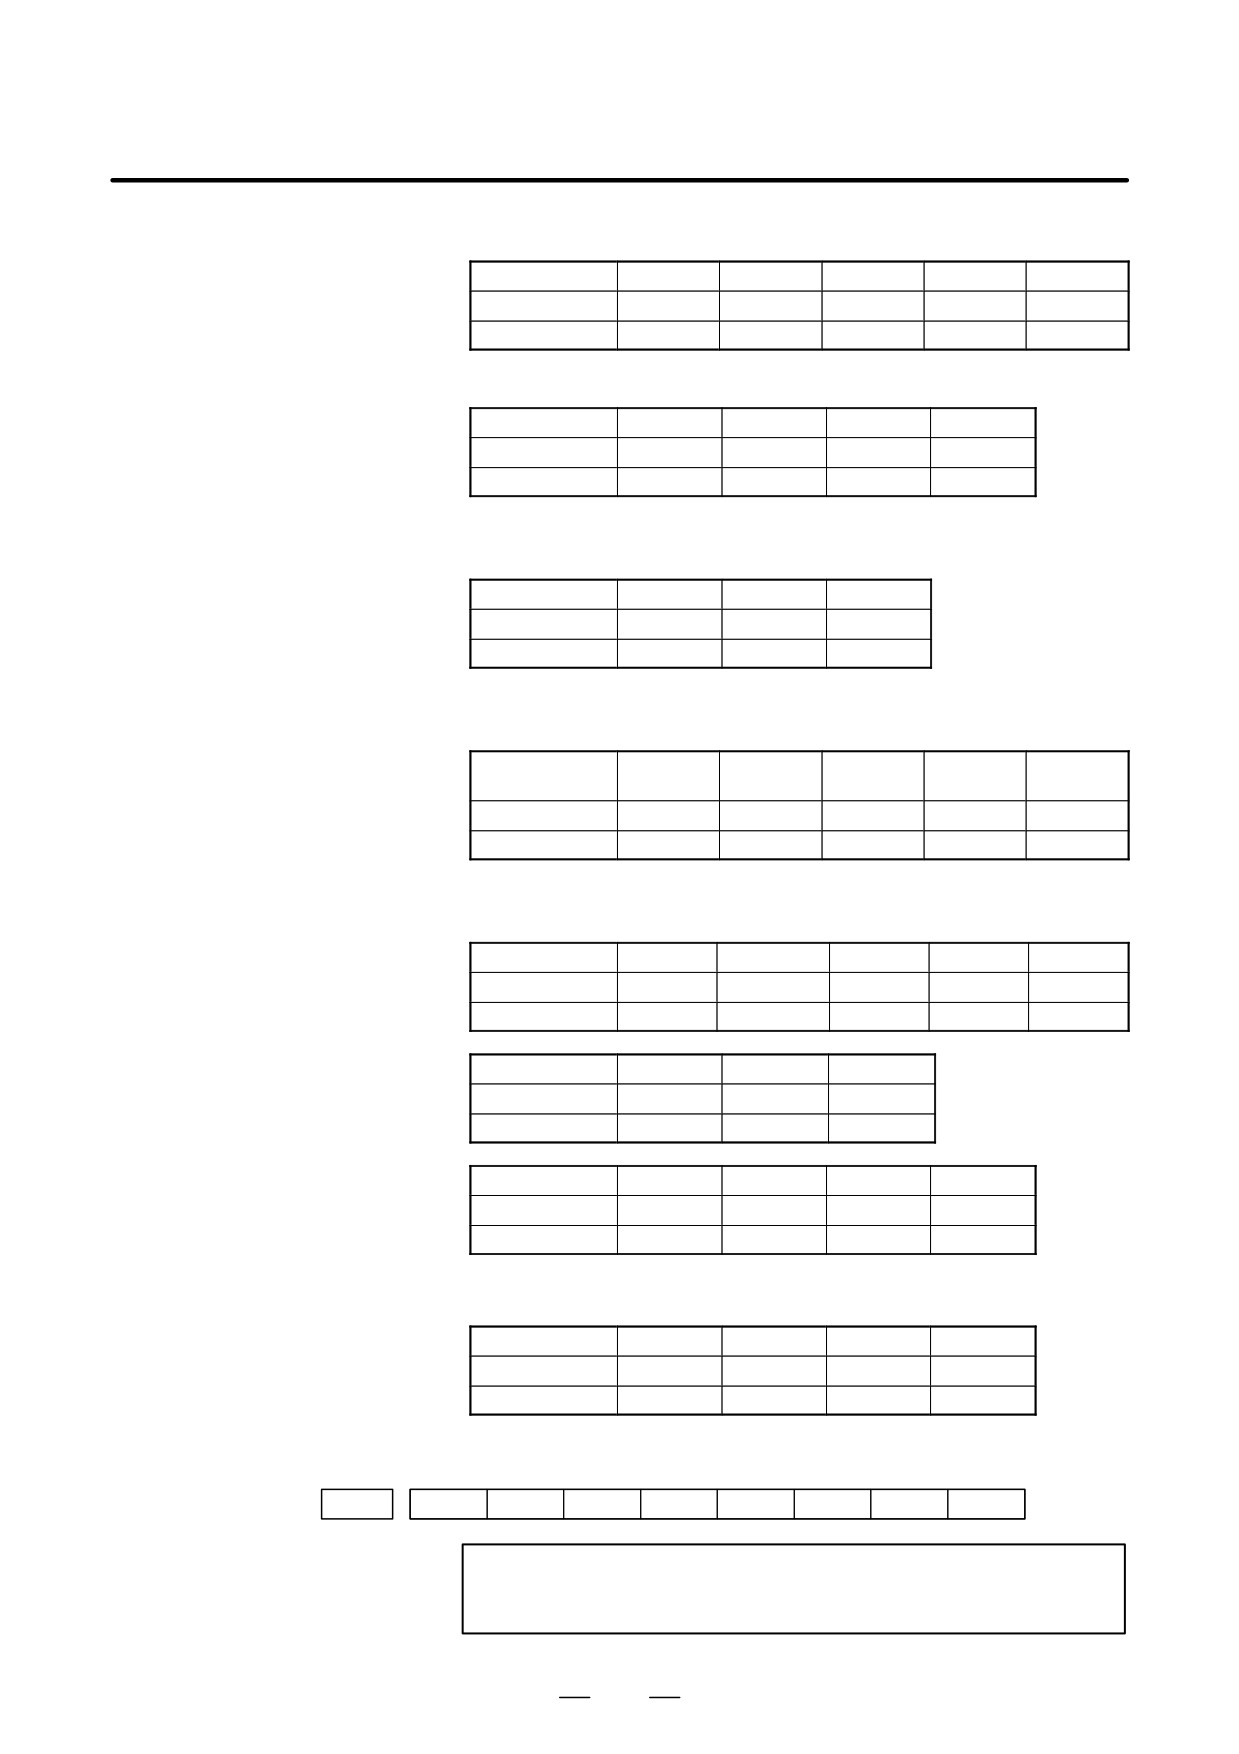
(2) Motor ID No.
Select the motor ID No. of the servo motor to be used, according to the
motor model and drawing number
(the middle four digits of
A06B-XXXX-BXXX) listed in the tables on subsequent pages.
NOTE
Servo axes are controlled in groups of two axes. So, for
successive servo control numbers (odd number and even
number), motor type number unified for servo HRV1 or for
servo HRV2 or HRV3 must be specified.
(a) αi series servo motor
In the following tables for αi series servo motor, The motor type
numbers not enclosed in parentheses are for servo HRV1, and the
motor type numbers enclosed in parentheses are for servo HRV2
and HRV3.
- αi series servo motor
Motor model
α1/5000i
α2/5000i
α4/3000i
α8/3000i
Motor specification
0202
0205
0223
0227
Motor type No.
152(252)
155(255)
173(273)
177(377)
Motor model
α12/3000i
α22/3000i
α30/3000i
α40/3000i
Motor specification
0243
0247
0253
0257
Motor type No.
193(293)
197(297)
203(303)
207(307)
- αCi series servo motor
Motor model
αC4/3000i
αC8/2000i
αC12/2000i
αC22/2000i
Motor specification
0221
0226
0241
0246
Motor type No.
171(271)
176(276)
191(291)
196(296)
Motor model
αC30/1500i
Motor specification
0251
Motor type No.
201(301)
- αMi series servo motor
Motor model
αM2/5000i
αM3/5000i
αM8/4000i
αM12/4000i
Motor specification
0212
0215
0235
0238
Motor type No.
162(262)
165(265)
185(285)
188(288)
Motor model
αM22/4000i
αM30/4000i
αM40/4000i
Motor specification
0265
0268
0272
Motor type No.
215(315)
218(318)
222(322)
671
9. DIGITAL SERVO
B-63525EN/02
- Linear motor
Motor model
1500A/4
3000B/2
6000B/2
9000B/2
Motor specification
0410
0411
0412
0413
Motor type No.
90
91
92
93
Motor model
15000C/2
3000B/4
6000B/4
9000B/4
Motor specification
0414
0411-B811
0412-B811
0413-B811
Motor type No.
94
120
121
122
Motor model
15000C/3
300D/4
600D/4
900D/4
Motor specification
0414-B811
0421
0422
0423
Motor type No.
123
124
125
126
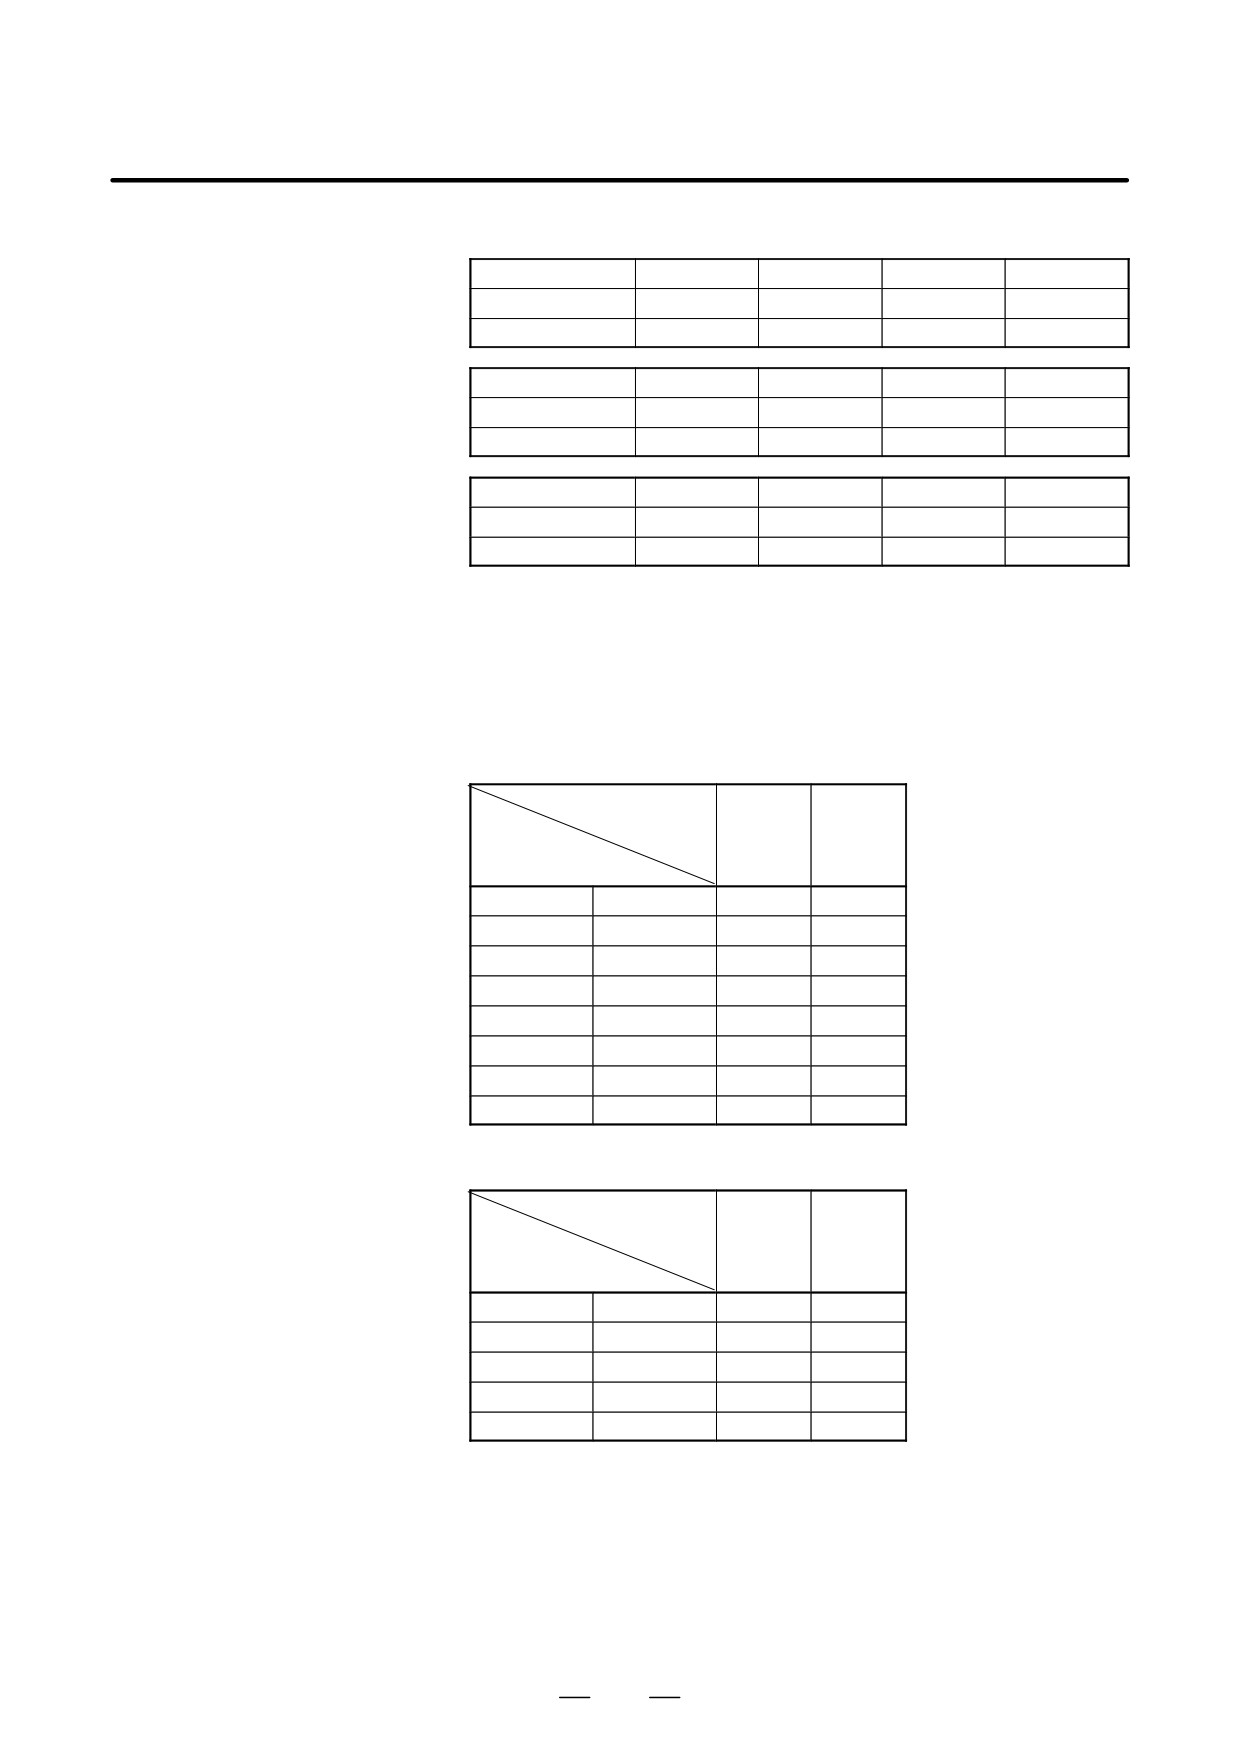
The motor type numbers are for servo HRV1.
These motor type Nos. may not be supported depending on the servo
software being used.
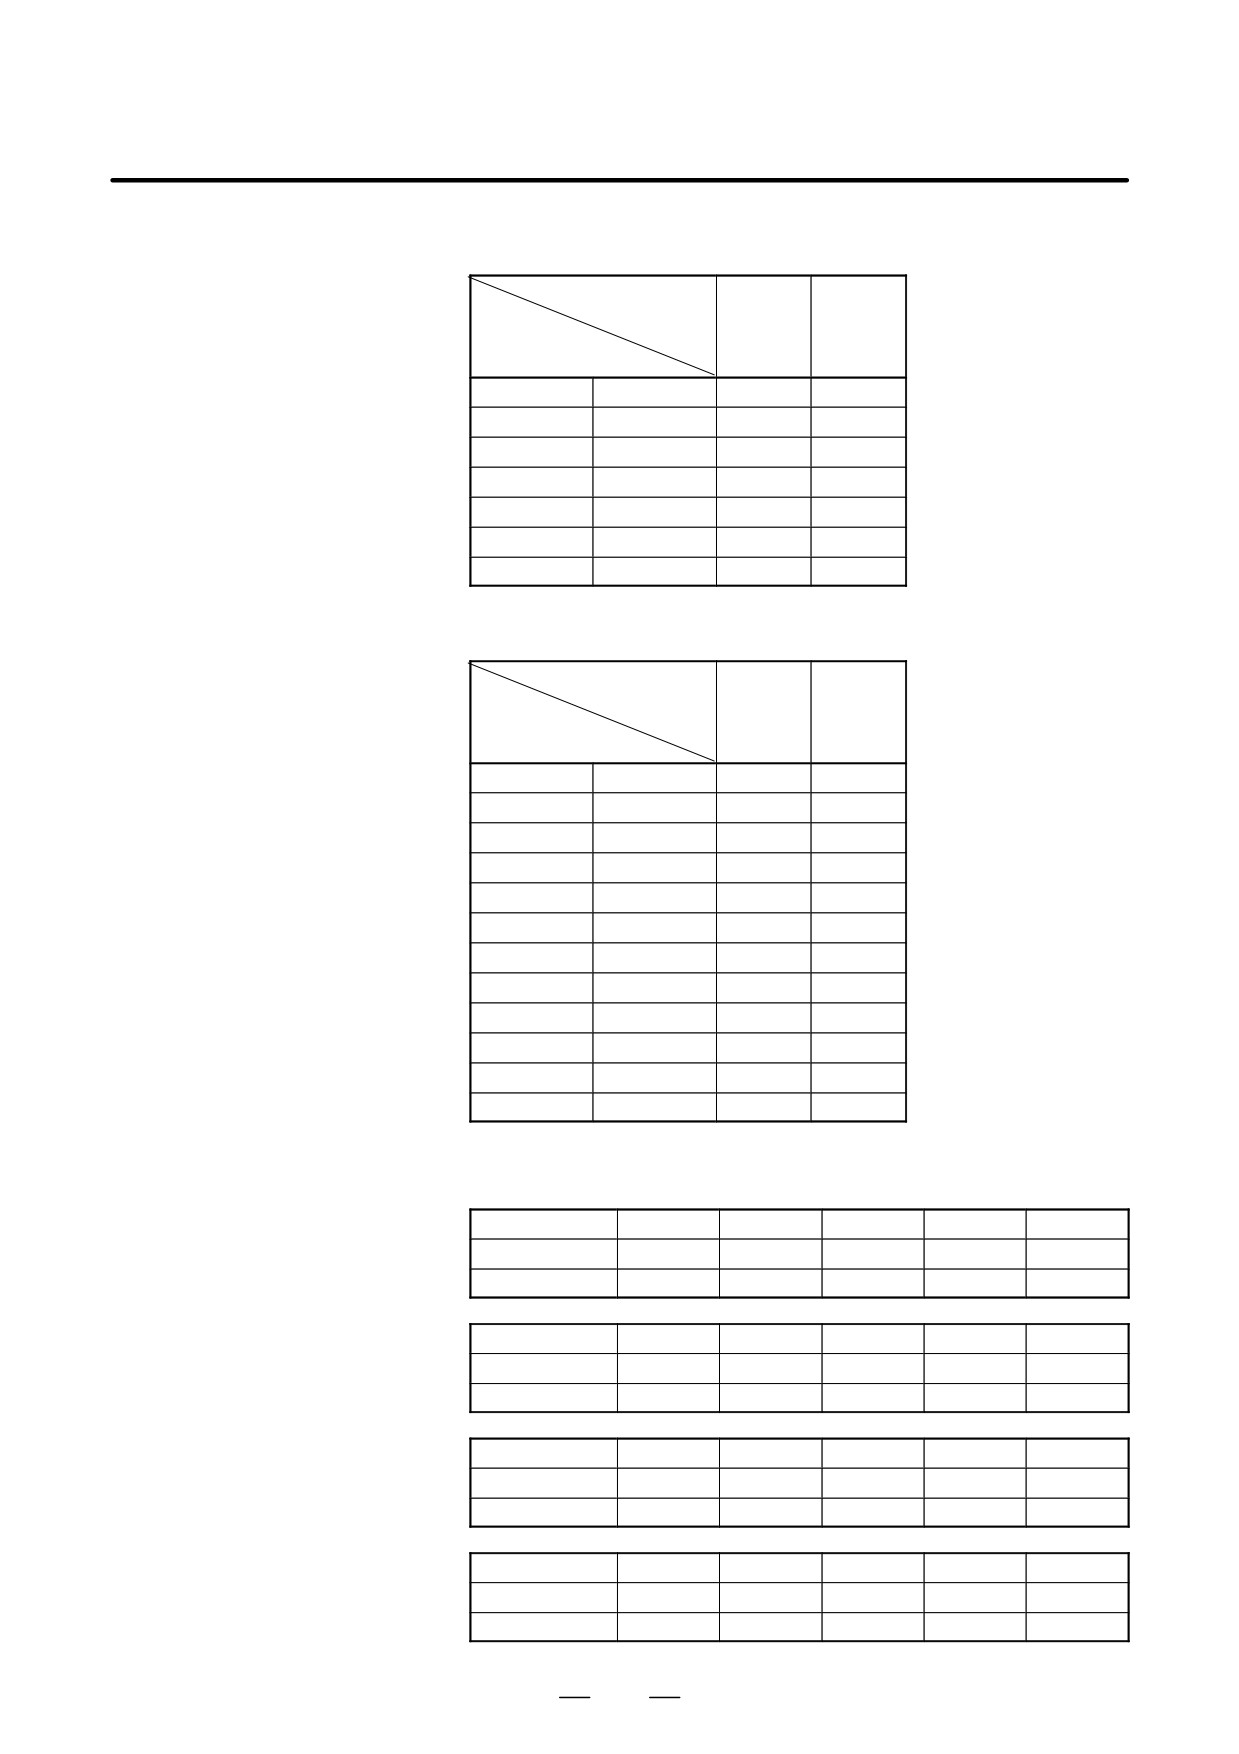
The following lists the motor type Nos. together with the applicable servo
software series and editions (A or later).
- αi series servo motor
Servo software series
9060
90B0
Motor
model and
motor type number
α1/5000i
152(252)
A
H
α2/5000i
155(255)
A
H
α4/4000i
173(273)
A
H
α8/3000i
177(277)
A
H
α12/3000i
193(293)
A
H
α22/3000i
197(297)
A
H
α30/3000i
203(303)
A
H
α40/3000i
207(307)
A
H
- αCi series servo motor
Servo software series
9060
90B0
Motor
model and
motor type number
αC4/3000i
171(271)
A
H
αC8/2000i
176(276)
A
H
αC12/2000i
191(291)
A
H
αC22/2000i
196(296)
A
H
αC30/1500i
201(301)
A
H
672
9. DIGITAL SERVO
B-63525EN/02
- αMi series servo motor
Servo software series
9060
90B0
Motor
model and
motor type number
αM2/5000i
162(262)
A
H
αM3/5000i
165(265)
A
H
αM8/4000i
185(285)
A
H
αM12/4000i
188(288)
A
H
αM22/4000i
215(315)
A
H
αM30/4000i
218(318)
A
H
αM40/4000i
222(322)
A
H
- Linear motor
Servo software series
9060
90B0
Motor
model and
motor type number
1500A/4
90
A
A
3000B/2
91
A
A
6000B/2
92
A
A
9000B/2
93
A
A
15000C/2
94
A
A
3000B/4
120
A
A
6000B/4
121
A
A
9000B/4
122
A
A
15000C/3
123
A
A
300D/4
124
A
A
600D/4
125
A
A
900D/4
126
A
A
The motor type numbers are for servo HRV1.
(b) For a series servo motor
Model name
a 0.5
a 1/3000
a 2/2000
a 2.5/3000
a 3/3000
Drawing number
0113
0371
0372
0374
0123
Format number
13
61
46
84
15
Model name
a 6/2000
a 6/3000
a 12/2000
a 12/3000
a 22/1500
Drawing number
0127
0128
0142
0143
0146
Format number
16
17
18
19
27
Model name
a 22/2000
a 22/3000
a 30/1200
a 30/2000
a 30/3000
Drawing number
0147
0148
0151
0152
0153
Format number
20
21
28
22
23
Model name
a 40/FAN
a 40/2000
a 65
a 100
a 150
Drawing number
0158
0157
0331
0332
0333
Format number
29
30
39
40
41
673
9. DIGITAL SERVO
B-63525EN/02
For aL series servo motor
Model name
a L3/3000
a L6/2000
a L9/3000
a L25/3000
a L50/2000
Drawing number
0561
0562
0564
0571
0572
Format number
56 or 68
57 or 69
58 or 70
59
60
For aC series servo motor
Model name
a C3/2000
a C6/2000
a C12/2000
a C22/1500
Drawing number
0121
0126
0141
0145
Format number
7
8
9
10
For aHV series servo motor
Model name
a 12HV
a 22HV
a 30HV
Drawing number
0176
0177
0178
Format number
3
4
5
For aE and b series servo motor
Model name
a 0.5
b 1/3000
b 2/3000
b 3/3000
b 6/2000
a E1/3000
a E2/3000
a E3/3000
a E6/2000
Drawing number
0113
0101
0102
0105
0106
Format number
13
35
36
33
34
For aM series servo motor
Model name
a M2/3000
a M2.5/3000
a M3/3000
a M6/3000
a M9/3000
Drawing number
0376
0377
0161
0162
0163
Format number
97
98
24
25
26
Model name
a M22/3000
a M30/3000
a M50/3000
Drawing number
0165
0166
0169
Format number
100
101
108
Model name
a M6HV
a M9HV
a M22HV
a M30HV
Drawing number
0182
0183
0185
0186
Format number
104
105
106
107
For linear motor
Model name
1500A
3000B
6000B
9000B
Drawing number
0410
0411
0412
0413
Format number
90
91
92
93
(3) Arbitrary AMR function
#7
#6
#5
#4
#3
#2
#1
#0
PRM
2001
AMR7
AMR6
AMR5
AMR4
AMR4
AMR3
AMR2
AMR1
For each axis
NOTE
Set “00000000”.
674
9. DIGITAL SERVO
B-63525EN/02
(4) CMR
PRM
1820
Command multiply ratio
1
1) When CMR is 1/2 to 1/27
Set value=
+100
CMR
2) When CMR is 0.5 to 48
Set value=2×CMR
(5) Turn off the power then back on.
(6) N/M of feed gear (F⋅FG)
PRM
2084
n for flexible feed gear
PRM
2085
m for flexible feed gear
Setting for the α pulse coder in the semi-closed mode
(Note 1)
Necessary position feedback pulses
F⋅FG numerator (v 32767)
per motor revolution
=
(as irreducible fraction)
F⋅FG
denominator (v 32767)
1,000,000
(Note 2)
NOTE
1
For both F⋅FG number and denominator, the maximum
setting value (after reduced) is 32767.
2
αi pulse coders assume one million pulses per motor
revolution, irrespective of resolution, for the flexible feed
gear setting.
3
If the calculation of the number of pulses required per motor
revolution involves π, such as when a rack and pinion are
used, assume π to be approximately 355/113.
[Example]
For detection in 1 µm units, specify as follows:
Ball screw lead
Number of necessary
F⋅FG
(mm/rev)
position pulses
(pulses/rev)
10
10000
1/100
20
20000
2/100 or 1/50
30
30000
3/100
[Example]
If the machine is set to detection in 1,000 degree units with a gear
reduction ratio of 10:1 for the rotation axis, the table rotates by 360/10
degrees each time the motor makes one turn.
1000 position pulses are necessary for the table to rotate through one
degree.
The number of position pulses necessary for the motor to make one turn
is:
360/10
1000 = 36000 with reference counter = 36000
F⋅FG numerator
36000
36
=
F⋅FG denominator
= 1,000,000
1000
675
9. DIGITAL SERVO
B-63525EN/02
Setting for use of a separate detector (full-closed)
Number of position pulses corresponding
F⋅FG
numerator (v 32767)
to a predetermined amount of travel
=
(as irreducible fraction)
F⋅FG denominator (v 32767)
Number of position pulses corresponding
to a predetermined amount of travel from
a separate detector
[Example]
To detect a distance of 1-µm using a 0.5-µm scale, set the following:
Numerator of F⋅FG
L/1
1
=
Denominator of F⋅FG
= L/0.5
2
<<Examples of calculation>>
1/1000 mm
1/10000 mm
One revolution 8mm
n=1/m=125
n=2/m=25
of motor
10mm
n=1/m=100
n=1/m=10
12mm
n=3/m=250
n=3/m=25
(7) Direction of travel
PRM
2022
Rotational direction of motor
111 : Normal (clockwise)
-111 : Reverse (counterclockwise)
(8) Number of velocity pulses and position pulses
1) For serial αi pulse coder, or serial a pulse coder
Increment system : 1/1000mm
Increment system : 1/10000mm
Paramter No.
Closed loop
Semi-closed loop
Closed loop
Semi-closed loop
High resolution setting
2000
xxxx xxx 0
xxxx xxx 1
Separate detector
1815
0010 0010
0010 0000
0010 0010
0010 0000
No. of velocity feedback pulses
2023
8192
819
No. of position feedback pulses
2024
NS
12500
NS/10
1250
NOTE
1
NS is the number of position feedback pulses per one
revolution of the motor (multiplied by four)
2
Even if the system employs a closed loop, bit 3 of parameter
2002 is 1 and bit 4 is 0.
(9) Reference counter
PRM
1821
Reference counter capacity for each axis (0 - 99999999)
6. Turn off the power then back on.
(10) FSSB display and setting screen
Connecting the CNC control unit to servo amplifiers via
a
high-speed serial bus (FANUC Serial Servo Bus, or FSSB), which
uses only one fiber optics cable, can significantly reduce the amount
of cabling in machine tool electrical sections.
Axis settings are calculated automatically according to the
interrelationships between axes and amplifiers entered on the FSSB
setting screen. Parameter Nos. 1023, 1905, 1910 to 1919, 1936, and
1937 are specified automatically according to the results of the
calculation.
676
9. DIGITAL SERVO
B-63525EN/02
D Display
The FSSB setting screen displays FSSB-based amplifier and axis
information. This information can also be specified by the operator.
1. Press function key
SYSTEM
2. To display [FSSB], press continuous menu key
several times.
3. Pressing soft key
[FSSB] causes the AMP SET screen (or the
previously selected FSSB setting screen) to appear, with the following
soft keys displayed.
AMP
AXIS
MAINTE
(OPRT)
The FSSB setting screens include: AMP SET, AXIS SET, and AMP
MAINTENANCE.
Pressing soft key [AMP] causes the AMP SET screen to appear.
Pressing soft key [AXIS] causes the AXIS SET screen to appear.
Pressing soft key [MAINTE] causes the AMP MAINTENANCE
screen to appear.
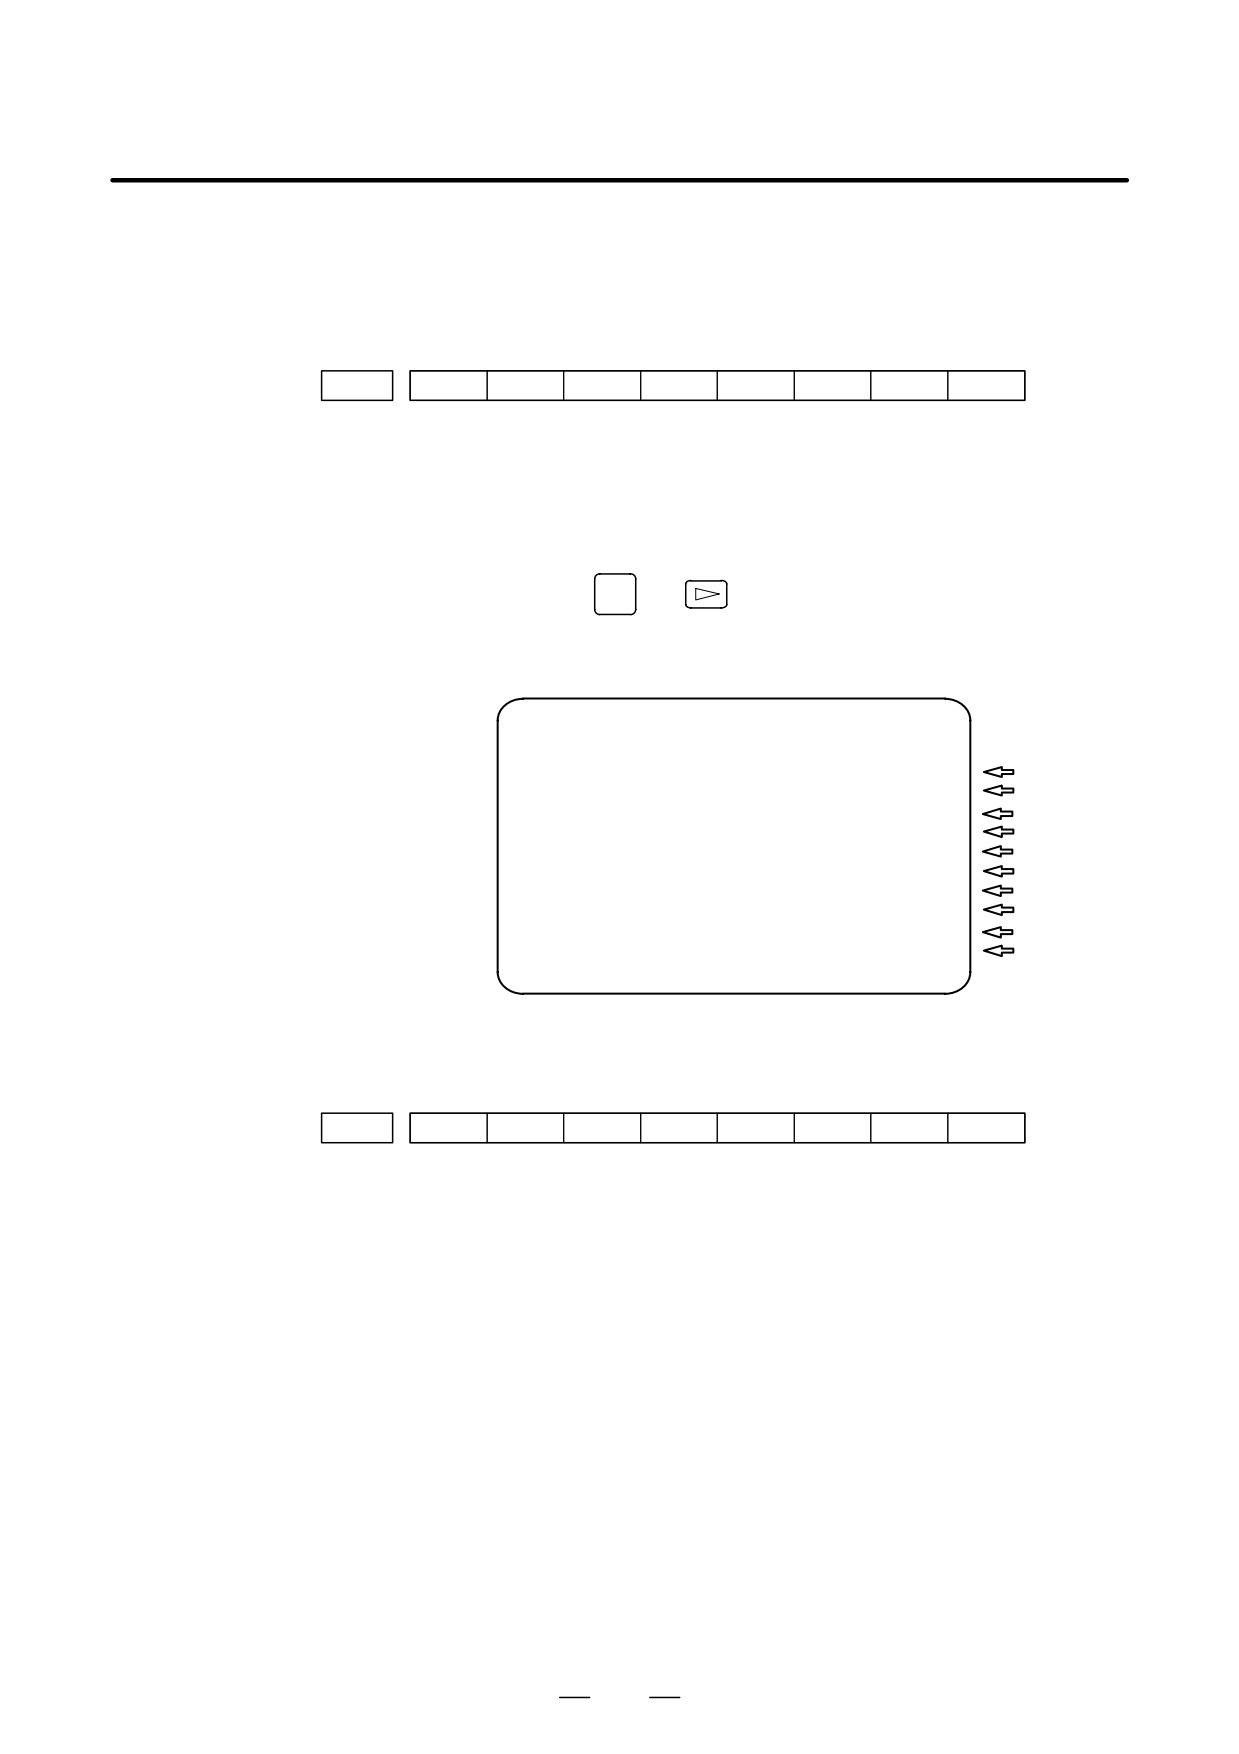
1) Amplifier setting screen
The amplifier setting screen consists of two sections: the first section
displays information about the slave, while the second section
displays information about the pulse modules.
AMPLIFIER SETTING
O1000 N00001
NO. AMP
SERIES UNIT
CUR. AXIS NAME
1
A1-L
α
SVM-HV
40AL
1
X
2
A1-M
α
SVM
12A
2
Y
3
A2-L
β
SVM
40A
3
Z
4
A3-L
α
SVM
20A
4
A
5
A3-M
α
SVM
40A
5
B
7
A4-L
α
SVU
240A
6
C
NO. EXTRA
TYPE PCB ID
6
M1
A
0000 DETECTOR(8AXES)
8
M2
B
12AB
>_
MDI **** *** ***
13:11:56
[ AMP
][ AXIS
][ MAINTE ][
][(OPRT)]
The amplifier setting screen consists of the following items:
D NO. (slave number)
The numbers of up to ten slaves (up to eight amplifiers and up to two
pulse modules) connected via the FSSB are displayed sequentially,
with the one nearest to the CNC being number 1.
D AMP (amplifier type)
The amplifier type display consists of the letter A, which stands for
“amplifier,” a number that indicates the placing of the amplifier, as
counted from that nearest to the CNC, and a letter such as L (first axis)
or M (second axis) indicating the placing of the axis in the amplifier.
677
9. DIGITAL SERVO
B-63525EN/02
D
AXIS NO. (controlled axis number)
The axis number of each controlled axis specified in parameters (Nos.
1920 to 1929) is displayed. If a number specified in these parameters
falls outside the range of between 1 and the maximum number of
controlled axes, 0 is displayed.
D
NAME (controlled axis name)
The axis name assigned to a parameter (No. 1020) corresponding to
a particular controlled axis number is displayed. If the controlled axis
number is 0, - is displayed.
D
The following items are displayed as amplifier information:
⋅ UNIT (servo amplifier unit type)
⋅ SERIES (servo amplifier name)
⋅ CURRENT (maximum rating)
D
The following items are displayed as pulse module information:
⋅ SEPARATE
This display consists of the letter M, which stands for “pulse
module” and a number indicating the placing of the pulse module,
as counted from that nearest to the CNC.
⋅ TYPE
This display is a letter indicating the type of the pulse module.
⋅ PCB ID
This display consists of four digits indicating the pulse module ID
(hexadecimal). The pulse module ID is followed by DETECTOR
(8-AXES) for the eight-axis separate detector module or
DETECTOR (4-AXES) for the four-axis separate detector module.
2)
Axis setting screen
The axis setting screen displays the information shown below:
AXIS SETTING
O1000 N00001
AXIS NAME AMP
M1 M2
1-DSF Cs
TNDM
1
X A1-L
0
0
0
0
1
2
Y A1-M
1
0
1
0
0
3
Z A2-L
0
0
0
1
0
4
A A3-L
0
0
0
0
2
5
B A3-M
0
0
0
0
0
6
C A4-L
0
0
0
0
0
>_
MDI **** *** ***
13:11:56
[ AMP
][ AXIS
][ MAINTE ][
][(OPRT)]
This axis setting screen displays the following items:
D AXIS (controlled axis number)
This item is the placing of the NC controlled axis.
D NAME (controlled axis name)
D AMP (type of the amplifier connected to each axis)
678
9. DIGITAL SERVO
B-63525EN/02
D
M1 (connector number for pulse module 1)
This item is the number of the connector for pulse module 1, specified
in parameter No. 1931.
D
M2 (connector number for pulse module 2)
This item is the number of the connector for pulse module 2, specified
in parameter No. 1932.
D
1-DSF
This item is the value specified in bit 0 (parameter 1 DSP) of parameter
No. 1904. It is 1 for an axis (such as a learning control axis, high-speed
current loop axis, or high-speed interface axis) that exclusively uses
a DSP, which is usually shared by two-axes.
D
Cs: Cs contour controlled axis
This item is the value specified in parameter No. 1933. It is 1 for the
Cs contour controlled axis.
D
TNDM (M series only)
This item is the number specified in parameter No. 1934. Consecutive
odd and even numbers are displayed for the master and slave axes for
tandem control.
3)
Amplifier maintenance screen
The amplifier maintenance screen displays maintenance information
for servo amplifiers. This screen consists of the following two pages,
either of which can be selected by pressing the
or
key.
AMPLIFIER MAINTENANCE
O1000 N00001
AXIS NAME AMP
SERIES
UNIT AXES CUR.
1
X A1-L
α SVM-HV
2
40AL
2
Y A1-M
α
SVM
2
12A
3
Z A2-L
β
SVM
1
40A
4
A A3-L
α
SVM
2
20A
5
B A3-M
α
SVM
2
40A
6
C A4-L
α
SVU
1
240A
MDI **** *** ***
13:11:56
[ AMP
][ AXIS
][ MAINTE ][
][
]
679
9. DIGITAL SERVO
B-63525EN/02
AMPLIFIER MAINTENANCE
O1000 N00001
AXIS
NAME EDITION
TEST
MAINTE-NO.
1
X
01A
010123
01
2
Y
01A
010123
01
3
Z
01A
010123
01
4
A
02B
010123
01
5
B
02B
010123
01
6
C
02B
010123
01
MDI **** *** ***
13:11:56
[ AMP
][ AXIS
][ MAINTE ][
][
]
The amplifier maintenance screen displays the following items:
D AXIS (controlled axis number)
D NAME (controlled axis name)
D AMP (type of amplifier connected to each axis)
D SERIES (servo amplifier series of an amplifier connected to each axis)
D UNIT (unit type of a servo amplifier connected to each axis)
D AXES (maximum number of axes controlled by an amplifier
connected to each axis)
D CUR. (maximum rating for amplifiers connected to each axis)
D EDITION (unit version number of an amplifier connected to each axis)
D TEST (date of test performed on an amplifier connected to each axis)
Example) 010123 = January 23, 2001
D MAINTE-NO.
(engineering change number for an amplifier
connected to each axis)
D Setting
On an FSSB setting screen (other than the amplifier maintenance screen),
pressing soft key [(OPRT)] displays the following soft keys:
SET
READ
INPUT
To enter data, place the machine in MDI mode or the emergency stop state,
position the cursor to the point where a desired item is to be input, then
enter the desired data and press soft key [INPUT] (or the
INPUT
key on the
MDI panel).
When soft key [SET] is pressed after data has been entered, a warning
message is displayed if the entered data contains an error. When the data
is satisfactory, the corresponding parameter is set up.
To restore the previous value of a parameter if, for example, an entered
value is incorrect, press soft key [READ].
When the power is turned on, values are read from the parameters and
displayed on the screen.
680
9. DIGITAL SERVO
B-63525EN/02
CAUTION
1
For the parameters to be specified on the FSSB setting
screen, do not attempt to enter values on the parameter
screen using the MDI or a G10 command. Use only the
FSSB screen to enter values for these parameters.
2
If pressing soft key [SET] results in a warning message
being displayed, retry data entry, or press soft key [READ]
to clear the warning message. Note that pressing the reset
key does not clear the warning message.
1) Amplifier setting screen
AMPLIFIER SETTING
O1000 N00001
NO. AMP
SERIES UNIT
CUR. AXIS NAME
1
A1-L
α
SVM-HV
40AL
1
X
2
A1-M
α
SVM
12A
2
Y
3
A2-L
β
SVM
40A
3
Z
4
A3-L
α
SVM
20A
4
A
5
A3-M
α
SVM
40A
5
B
7
A4-L
α
SVU
240A
6
C
NO. EXTRA
TYPE PCB ID
6
M1
A
0000 DETECTOR(8AXES)
8
M2
B
12AB
>_
MDI **** *** ***
13:11:56
[SETTING][
][ READ ][
][ INPUT ]
The amplifier setting screen displays the following items:
D NO. (controlled axis number)
For this item, enter a value of between 1 and the maximum number of
controlled axes. If a number that falls outside this range is entered, the
warning message “INVALID FORMAT” appears. If the entered
controlled axis number is duplicate or
0, the warning message
“SPECIFIED DATA IS OUT OF RANGE” appears when soft key
[SET] is pressed to assert the entered value. In this case, no value can
be entered for the parameter.
NOTE
When the servo of another system is controlled, FSSB
cannot be set automatically.
Be careful when controlling two or three systems.
To control the servo of another system, make manual
settings as described in Appendix G.
681
9. DIGITAL SERVO
B-63525EN/02
2) Axis setting screen
AXIS SETTING
O1000 N00001
AXIS NAME AMP
M1 M2
1-DSF Cs
TNDM
1
X A1-L
0
0
0
0
1
2
Y A1-M
1
0
1
0
0
3
Z A2-L
0
0
0
1
0
4
A A3-L
0
0
0
0
2
5
B A3-M
0
0
0
0
0
6
C A4-L
0
0
0
0
0
>_
MDI **** *** ***
13:11:56
[SETTING][
][ READ ][
][ INPUT ]
On the axis setting screen, the following items can be specified:
D
M1 (connector number for pulse module 1)
For an axis that uses pulse module 1, enter a connector number using
a number in the range of between 1 and the maximum number of axes
for pulse module 1. When pulse module 1 need not be used, enter 0.
If a number that falls outside the valid range is entered, the warning
message “INVALID FORMAT” is displayed.
D
M2 (connector number for pulse module 2)
For an axis that uses pulse module 2, enter a connector number using
a number in the range of between 1 and the maximum number of axes
for pulse module 2. When pulse module 2 need not be used, enter 0.
If a number that falls outside the valid range is entered, the warning
message “INVALID FORMAT” is displayed.
D
1-DSF
Enter 1 for the following axes, each of which exclusively uses a DSP,
which is usually shared by two-axes. If a number other than 0 or 1 is
entered, the warning message “INVALID FORMAT” is displayed.
⋅ Learning control axis
⋅ High-speed current loop axis
⋅ High-speed interface axis
D
Cs (Cs contour controlled axis)
Enter 1 for the Cs contour controlled axis. If a number other than 0
or 1 is entered, the warning message “INVALID FORMAT” is
displayed.
D
TNDM
Enter odd and even numbers for the master and slave axes for tandem
control. These numbers must be consecutive and in the range of
between 1 and 8. If a number that falls outside the valid range is
entered, the warning message “INVALID FORMAT” is displayed.
682
9. DIGITAL SERVO
B-63525EN/02
When soft key [SET] is pressed on the axis setting screen after data entry,
the warning message “SPECIFIED DATA IS OUT OF RANGE” is
displayed if any of the following conditions is satisfied.
D Both M1 and M2 are nonzero for an axis.
D Any two of TWO-AXES, Cs, and TANDEM are nonzero for an axis.
D A duplicate value is specified for M1.
D A duplicate value is specified for M2.
D A duplicate value is specified for Cs.
D A duplicate value is specified for TANDEM.
D An invalid master/slave axis pair is specified for TANDEM.
683
9. DIGITAL SERVO
B-63525EN/02
9.2
SERVO TUNING
SCREEN
9.2.1
Set a parameter to display the servo tuning screen.
Parameter Setting
#7
#6
#5
#4
#3
#2
#1
#0
3111
SVS
#0 (SVS)
0 : Servo tuning screen is not displayed.
1 : Servo tuning screen is displayed.
9.2.2
1. Press
SYSTEM
key
and soft key [SV. PARA] in this order.
Displaying Servo
2. Press soft key [SV.TUN] to select the servo tuning screen.
Tuning Screen
SERVO TUNING
01234 N12345
(PAMAMETER)
(MONITOR)
(1)
FUN.BIT
00000000
ALARM 1
00000000
(9)
(2)
LOOP GAIN
3000
ALARM 2
00000000
(10)
(3)
TURNING SET.
0
ALARM 3
10000000
(11)
(4)
SET PERIOD
0
ALARM 4
00000000
(12)
(5)
INT.GAIN
113
ALARM 5
00000000
(13)
(6)
PROP.GAIN
-1015
LOOP GAIN
2999
(14)
(7)
FILER
0
POS ERROR
556
(15)
(8)
VELOC.GAIN
125
CURRENT%
10
(16)
SPEED RPM
100
(17)
SV SET
SV TUN
OPE
(1)
Function bit
: PRM 2003
(2)
Loop gain : PRM 1825
(3)
Tuning start :
(4)
Set period :
(5)
Integral gain
: PRM 2043
(6)
Proportional gain
: PRM 2044
(7)
Filter
: PRM 2067
(PRM 2021)+256
(8)
Velocity gain
Set value=
×100
256
(9)
Alarm 1 : DGN 200 (Details of alarm 400 and 414)
(10) Alarm 2 : DGN 201 (Details of disconnection alarm, overload)
(11)
Alarm 3 : DGN 202 (Details of alarm 319)
(12) Alarm 4 : DGN 203 (Details of alarm 319)
(13) Alarm 5 : DGN 204 (Details of alarm 414)
(14) Loop gain : Actual loop gain
(15) Position error : Actual position error(DGN 300)
(16) Current(%) : Indicate current with % to the rated value.
(17) Current(A) : Indicate current with A.
(18) Speed RPM : Number of motor actual rotation
684
9. DIGITAL SERVO
B-63525EN/02
#7
#6
#5
#4
#3
#2
#1
#0
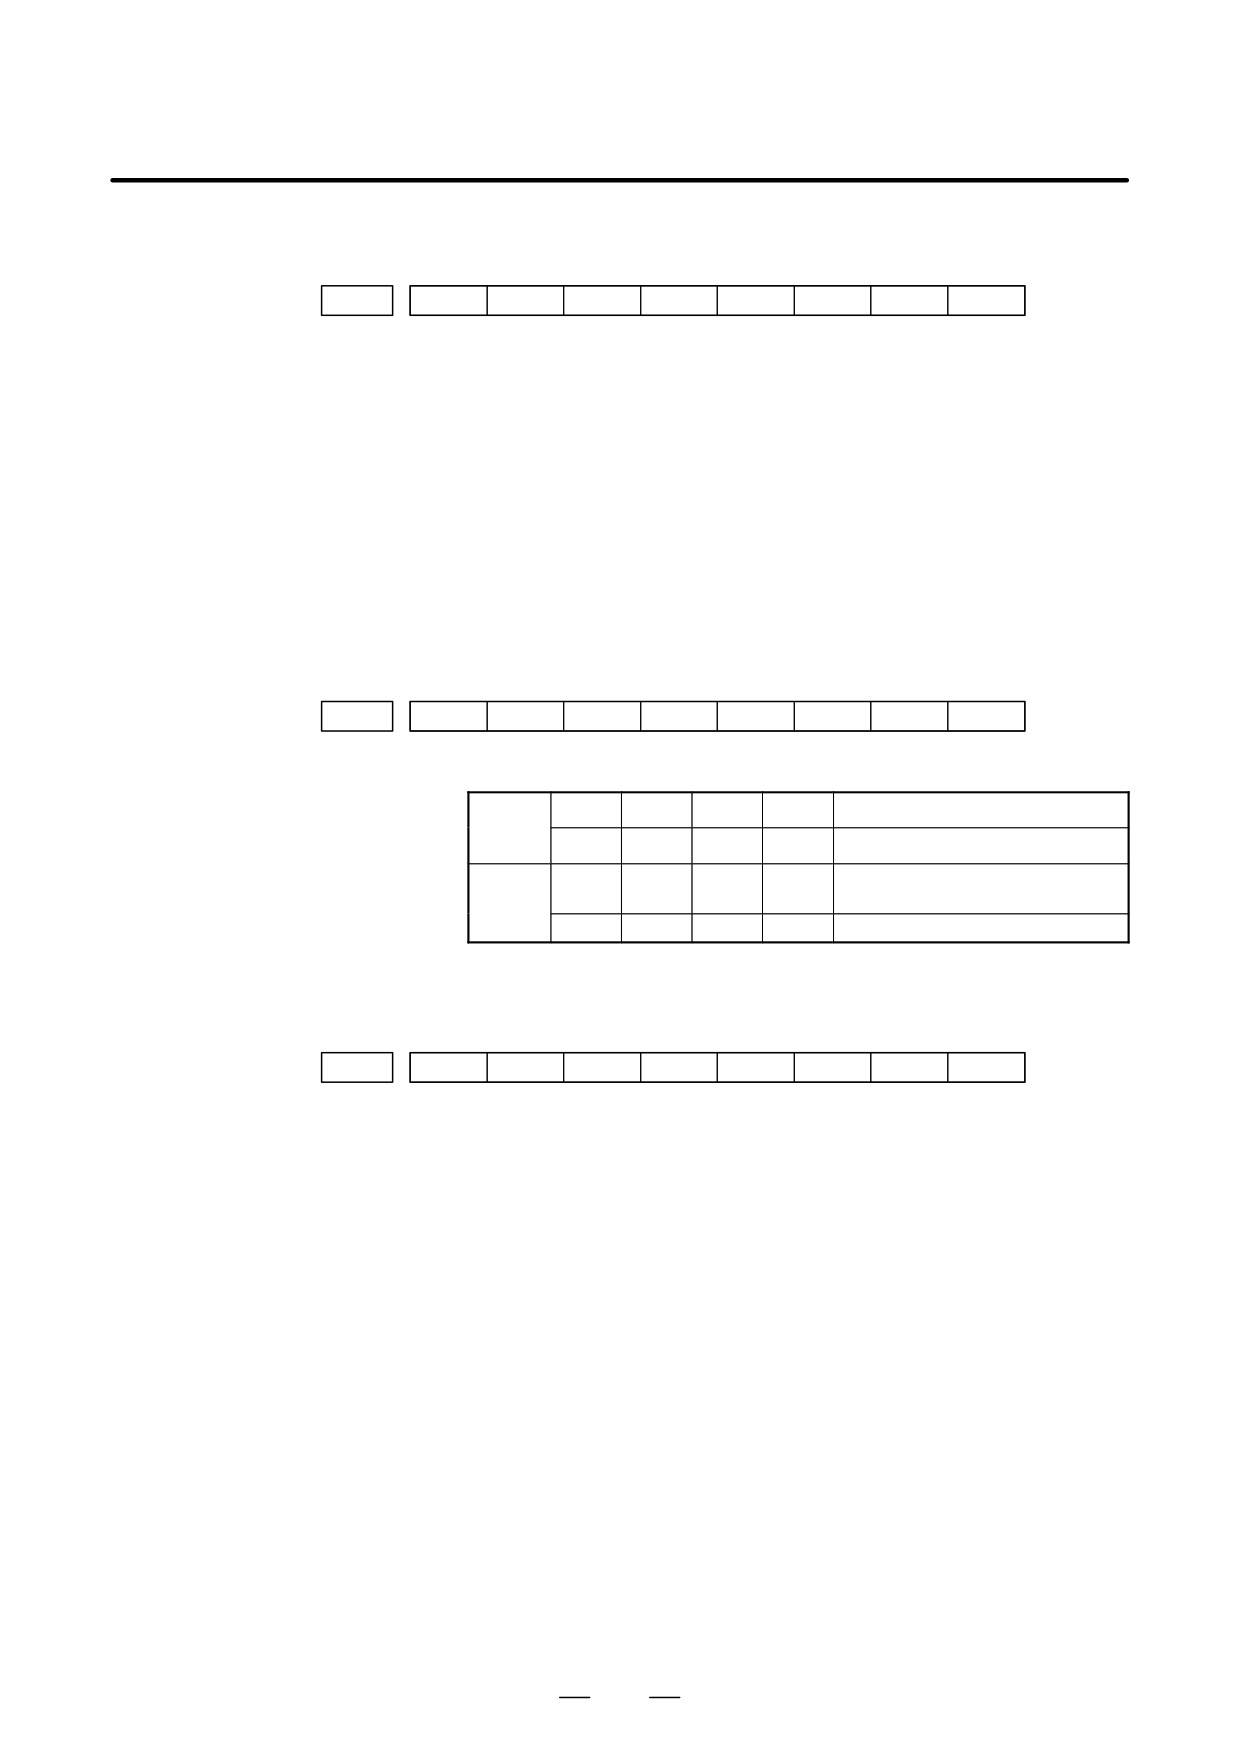
Alarm1
OVL
LV
OVC
HCA
HVA
DCA
FBA
OFA
DGN (200)
:
#7 (OVL)
:
Overload alarm
#6 (LV)
:
Insufficient voltage alarm
#5 (OVC)
:
Overcurrent alarm
#4 (HCA)
:
Abnormal current alarm
#3 (HVA)
:
Excessive voltage alarm
#2 (DCA)
:
Discharge alarm
#1 (FBA)
:
Disconnection alarm
#0 (OFA)
:
Overflow alarm
#7
#6
#5
#4
#3
#2
#1
#0
Alarm2
ALD
EXP
DGN (201) ⇓
Over-
0
—
—
—
Amplifier overheat
load
alarm
1
—
—
—
Motor overheat
Discon-
1
—
—
1
Separate type pulse coder disconnec-
nection
tion (Hardware)
alarm
0
—
—
0
Pulse coder disconnection (software)
#7
#6
#5
#4
#3
#2
#1
#0
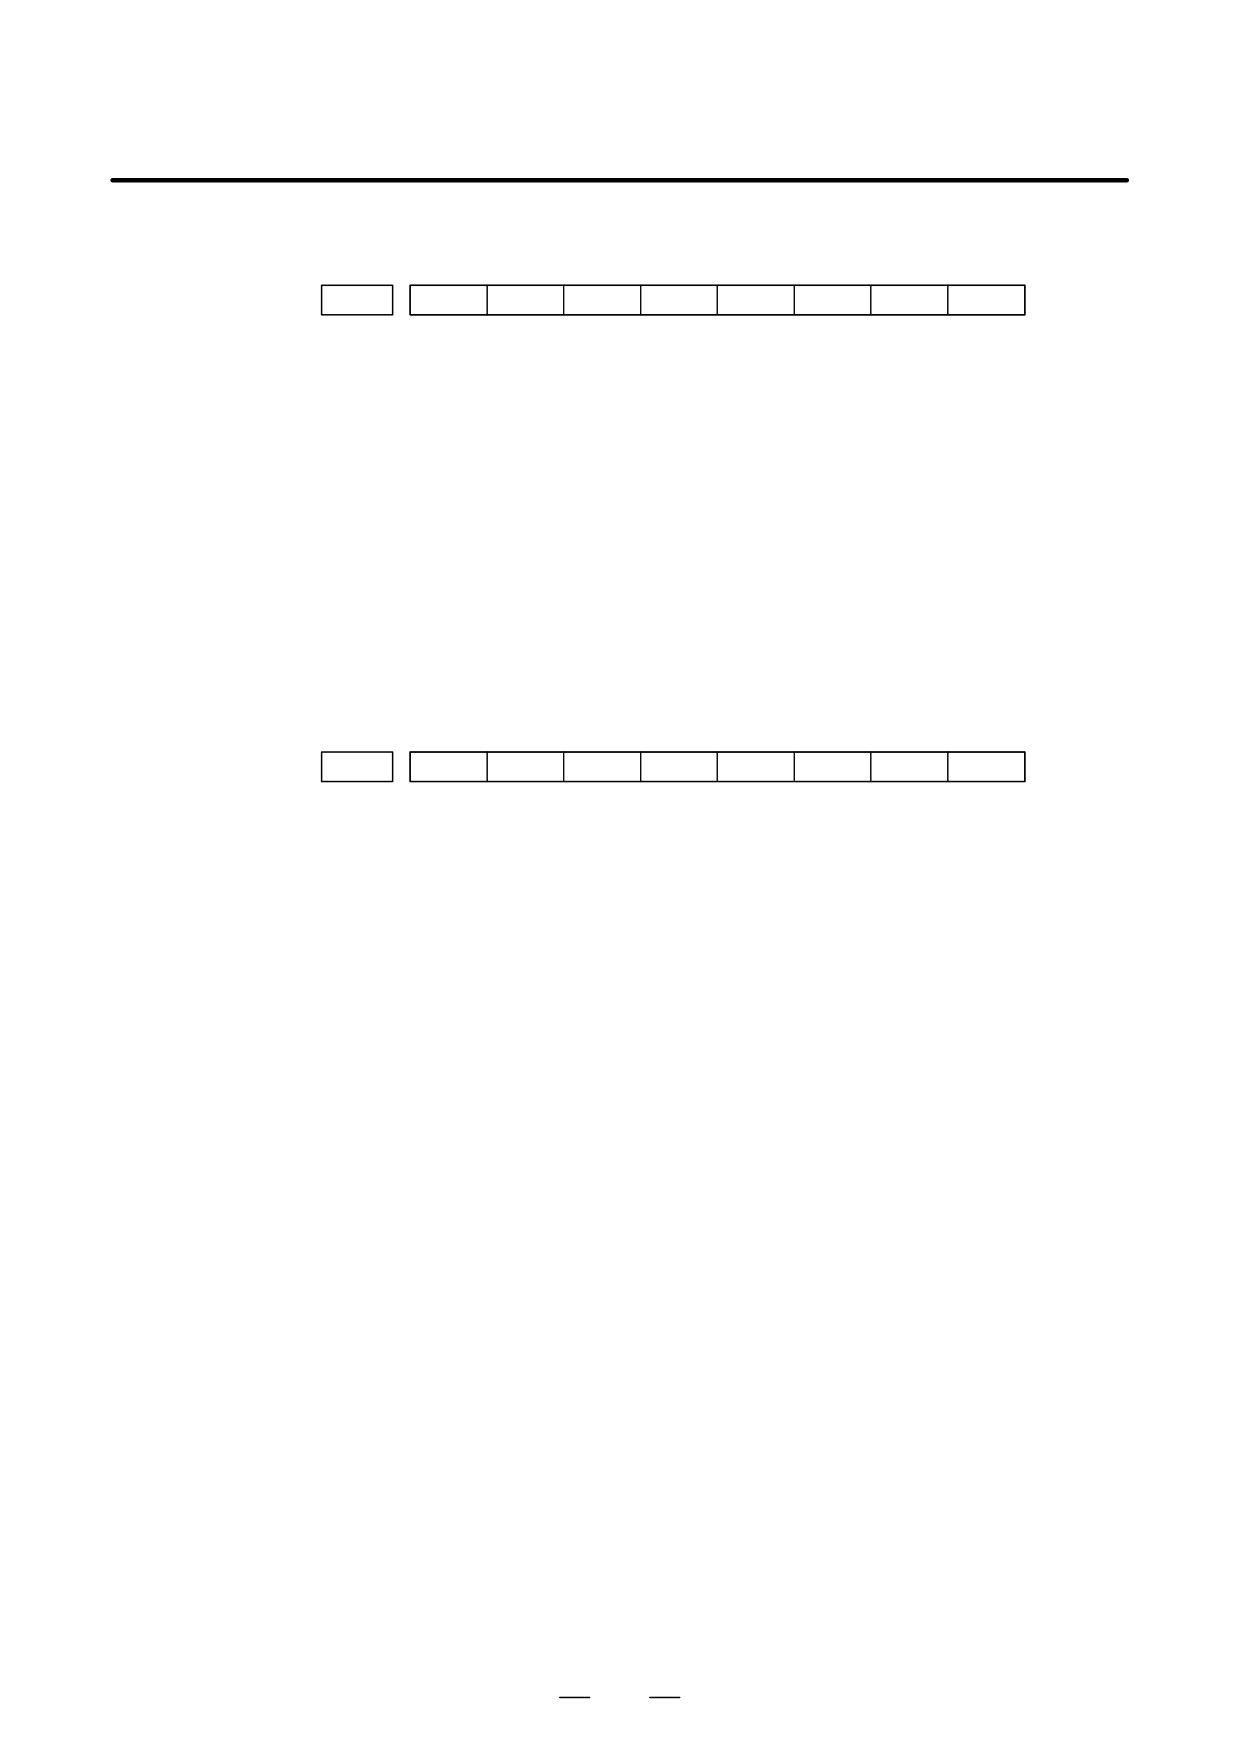
Alarm3
CSA
BLA
PHA
RCA
BZA
CKA
SPH
DGN (202)
:
#6 (CSA)
:
Hardware of serial pulse coder is abnormal.
#5 (BLA)
:
Battery voltage is in low (warning).
#4 (PHA)
:
Serial pulse coder or feedback cable is abnormal.
Counting the feedback signal is in error.
#3 (RCA)
:
Serial pulse coder is faulty.
Counting is in error.
If the RCA bit is set to 1 when both the FBA bit (bit 1 of alarm 1) and
ALD bit of alarm 2 are set to 1 and the EXP bit of alarm 2 (internal
hardware disconnection) is set to 1, a count miss alarm (CMAL)
occurs in the α pulse coder.
#2 (BZA)
:
Battery voltage becomes 0.
Replace batteries and set the reference position.
#1 (CKA)
:
Serial pulse coder is faulty.
Internal clock has stopped.
#0 (SPH)
:
Serial pulse coder or feedback cable is faulty.
Counting the feedback signal is in error.
685
9. DIGITAL SERVO
B-63525EN/02
#7
#6
#5
#4
#3
#2
#1
#0
Alarm4
DTE
CRC
STB
PRM
DGN (203)
:
#7 (DTE)
:
Communication error of serial pulse coder.
There is no response.
Generally, a leading cause is a break in a wire.
#6 (CRC)
:
Communication error of serial pulse coder.
Transmitted data is in error.
#5 (STB)
:
Communication error of serial pulse coder.
Transmitted data is in error.
#4 (PRM)
:
The alarm is detected by the digital servo, the values specified in the
parameter is not correct.
#7
#6
#5
#4
#3
#2
#1
#0
Alarm5
OFS
MCC
LDM
PMS
DGN (204)
:
#6 (OFS)
:
A/D conversion of current value of digital servo is abnormal.
#5 (MCC)
:
Contacts of electro-magnetic contactor of servo amplifier is blown
#4 (LDM)
:
LED of α pulse coder is abnormal.
#3 (PMS)
:
No. of feedback pulses are in error because α pulse coder or feedback
cable is faulty.
686
9. DIGITAL SERVO
B-63525EN/02
9.3
ADJUSTING
REFERENCE
POSITION
(DOG METHOD)
9.3.1
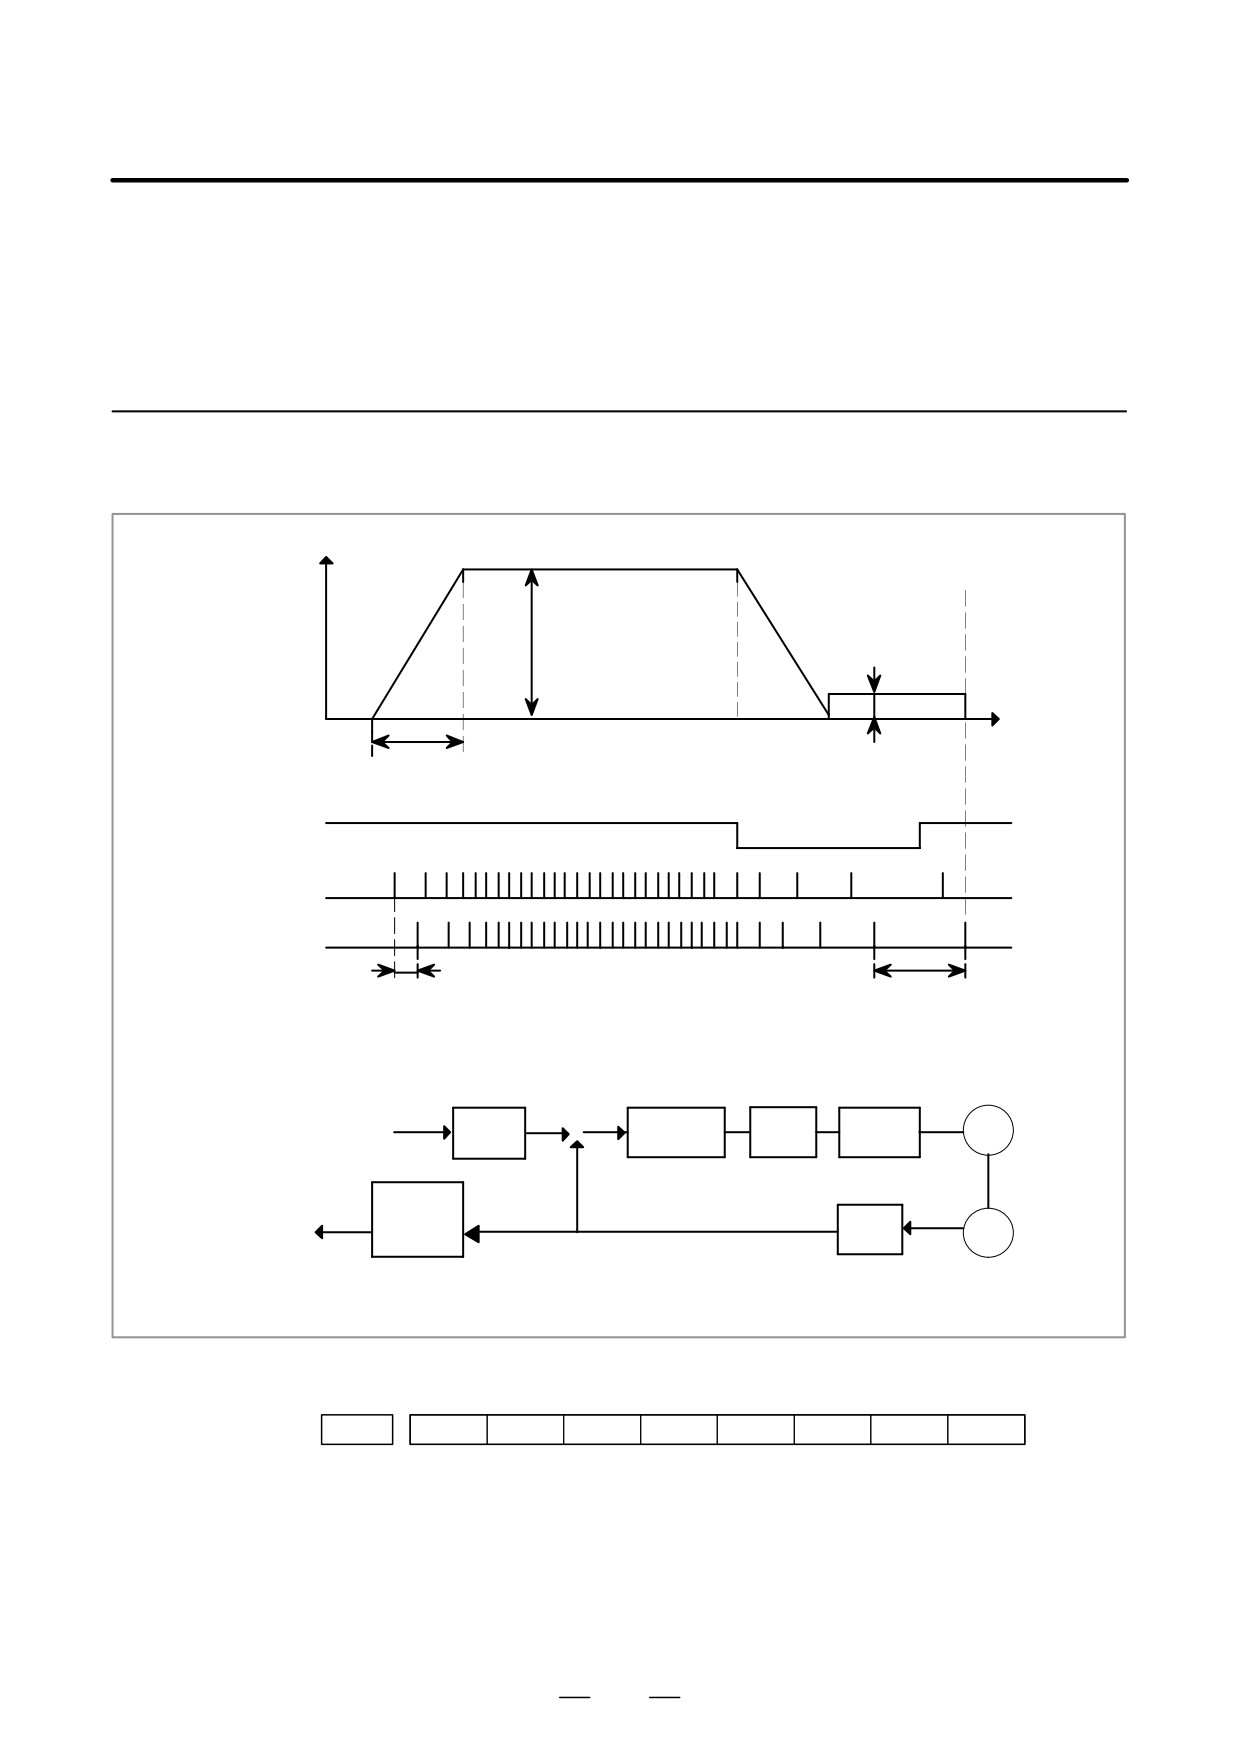
General
Speed
Rapid traverse
(PRM1420α)
FL rate
(PRM1425 α )
Time
Rapid traverse acc./dec. time constant (PRM1620 α )
*DECα
PCZ
Grid
Grid shift amount
Reference counter capacity
(PRM1850)
(PRM1821)
10mm/rev
10000P
+
Error
Proportion
Speed
CMR
f
gain
M
Command
counter
loop
–
(Serial)
4
Refere
GRID
FFG
PC
count.
10000P/rev
Counter capacity
(Flexible feed gear)
10000P
D Parameter
#7
#6
#5
#4
#3
#2
#1
#0
PRM
1002
DLZ
#1(DLZ)
0 : Reference position return method is normal (dog).
1 : Dogless reference position setting is used.
687
9. DIGITAL SERVO
B-63525EN/02
#7
#6
#5
#4
#3
#2
#1
#0
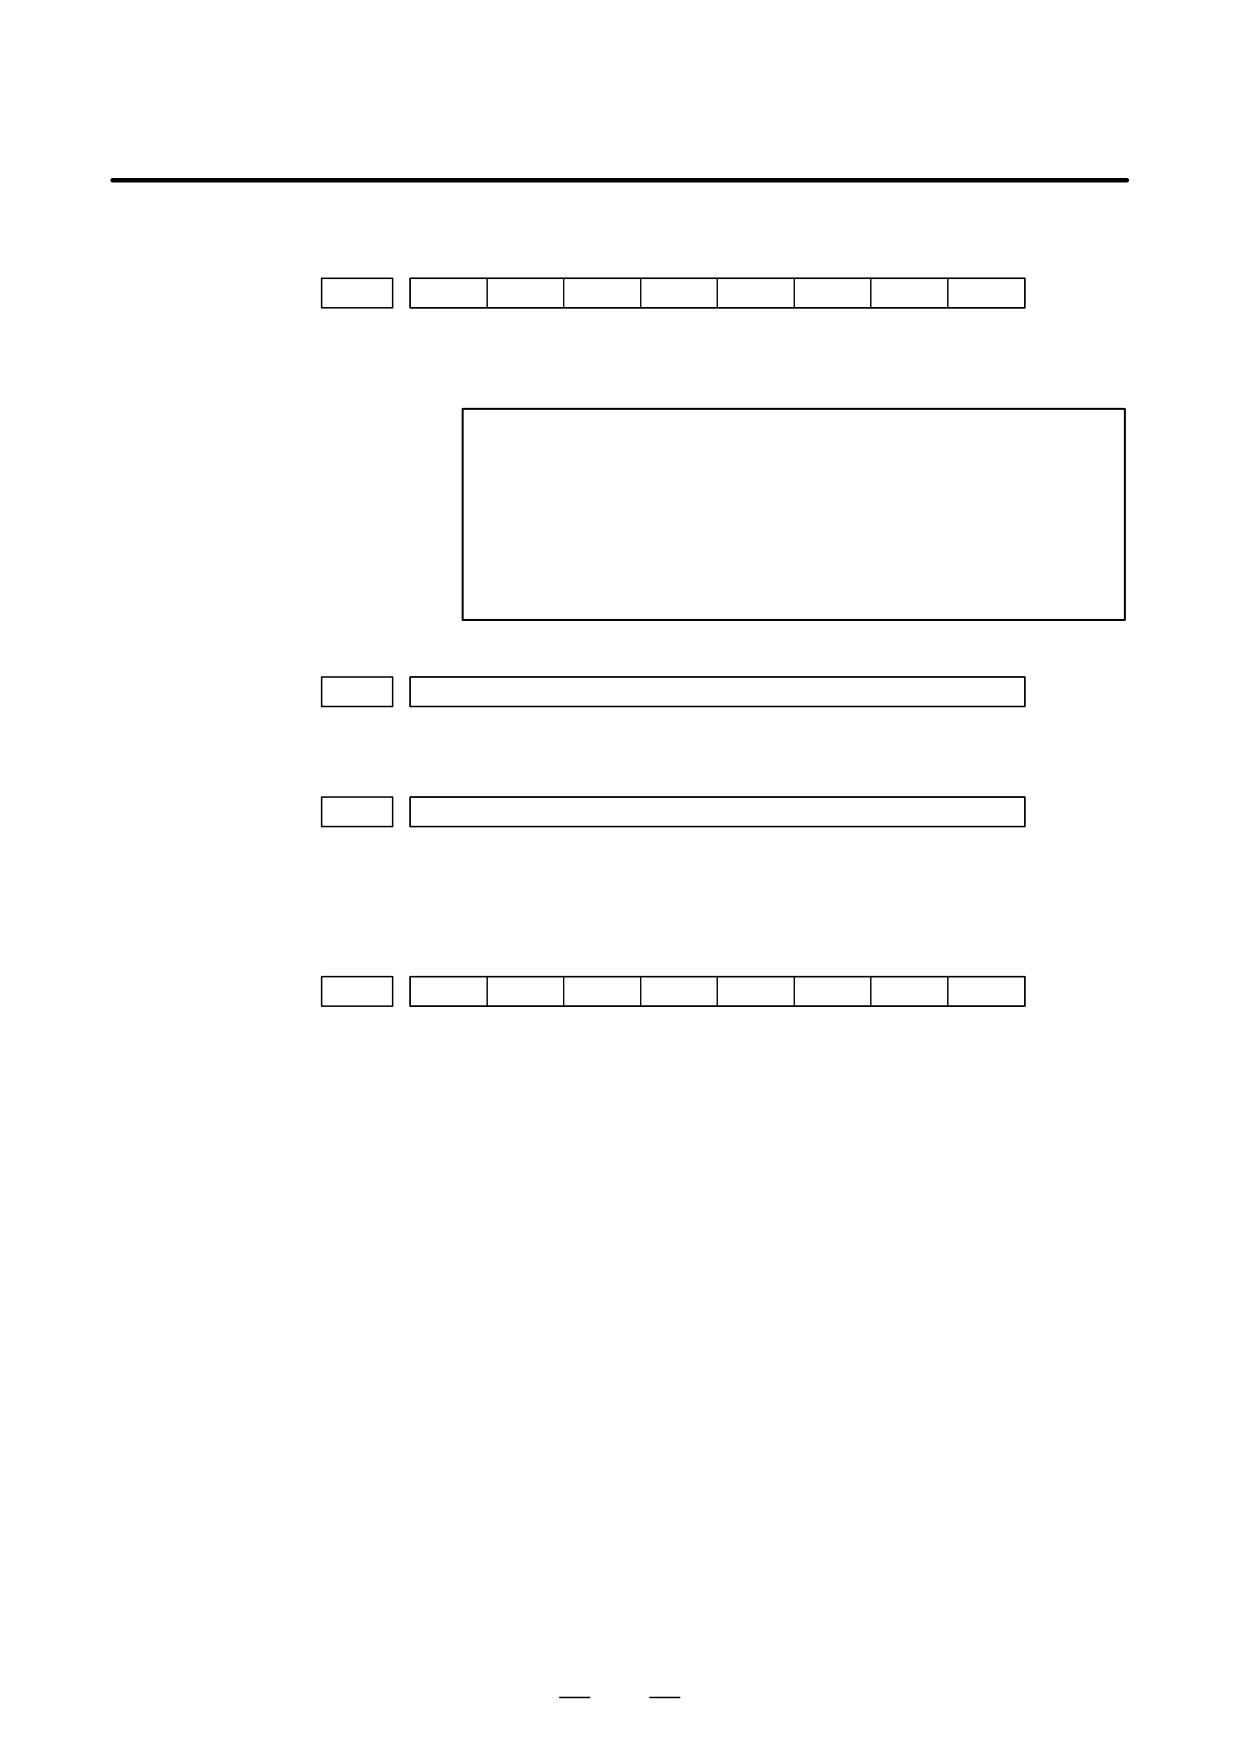
PRM
1005
DLZ
#1(DLZ)
0 : The normal method (dog) is used for reference position return.
1 : Reference position setting without dogs is used (axis by axis).
NOTE
A reference position can be set axis by axis by setting bit 1
of parameter No. 1002 to 0 and setting bit 1 of parameter
No. 1005. Reference position setting without dogs cannot
be used for a spindle positioning axis and Cs contour axis.
When these axes are involved, use bit 1 of parameter No.
1005.
PRM
1821
Reference counter capacity
[P]
No. of feedback pulses or its division by an integer is set.
PRM
1850
Grid shift amount per axis
[P]
When the resolution is 0.0001mm, set the value in the unit ten times
the detection unit.
#7
#6
#5
#4
#3
#2
#1
#0
PRM
1815
APC
APZ
OPT
#5(APC)
0 : Position detector is other than absolute pulse coder.
1 : Position detector is absolute pulse coder.
#4(APZ)
Zero position of absolute pulse coder is :
0 : Not established
1 : Established
(Turns to 1 after establishment)
To manually change the value of the APZ bit from 0 to 1 without first
returning to the reference position
when using serial pulse coder α , follow this procedure: Back up the
data with the battery and give the motor one or more turns.
Turn the power off then on again, then change the APZ bit setting
from 0 to 1.
#1(OPT)
0 : Position detection is performed by the pulse coder built in the motor.
1 : Separate type pulse coder or linear scale is used.
688
9. DIGITAL SERVO
B-63525EN/02
D Separate Type Pulse
Coder or Linear Scale is
Used
PRM
1821
Reference counter capacity per axis
[P]
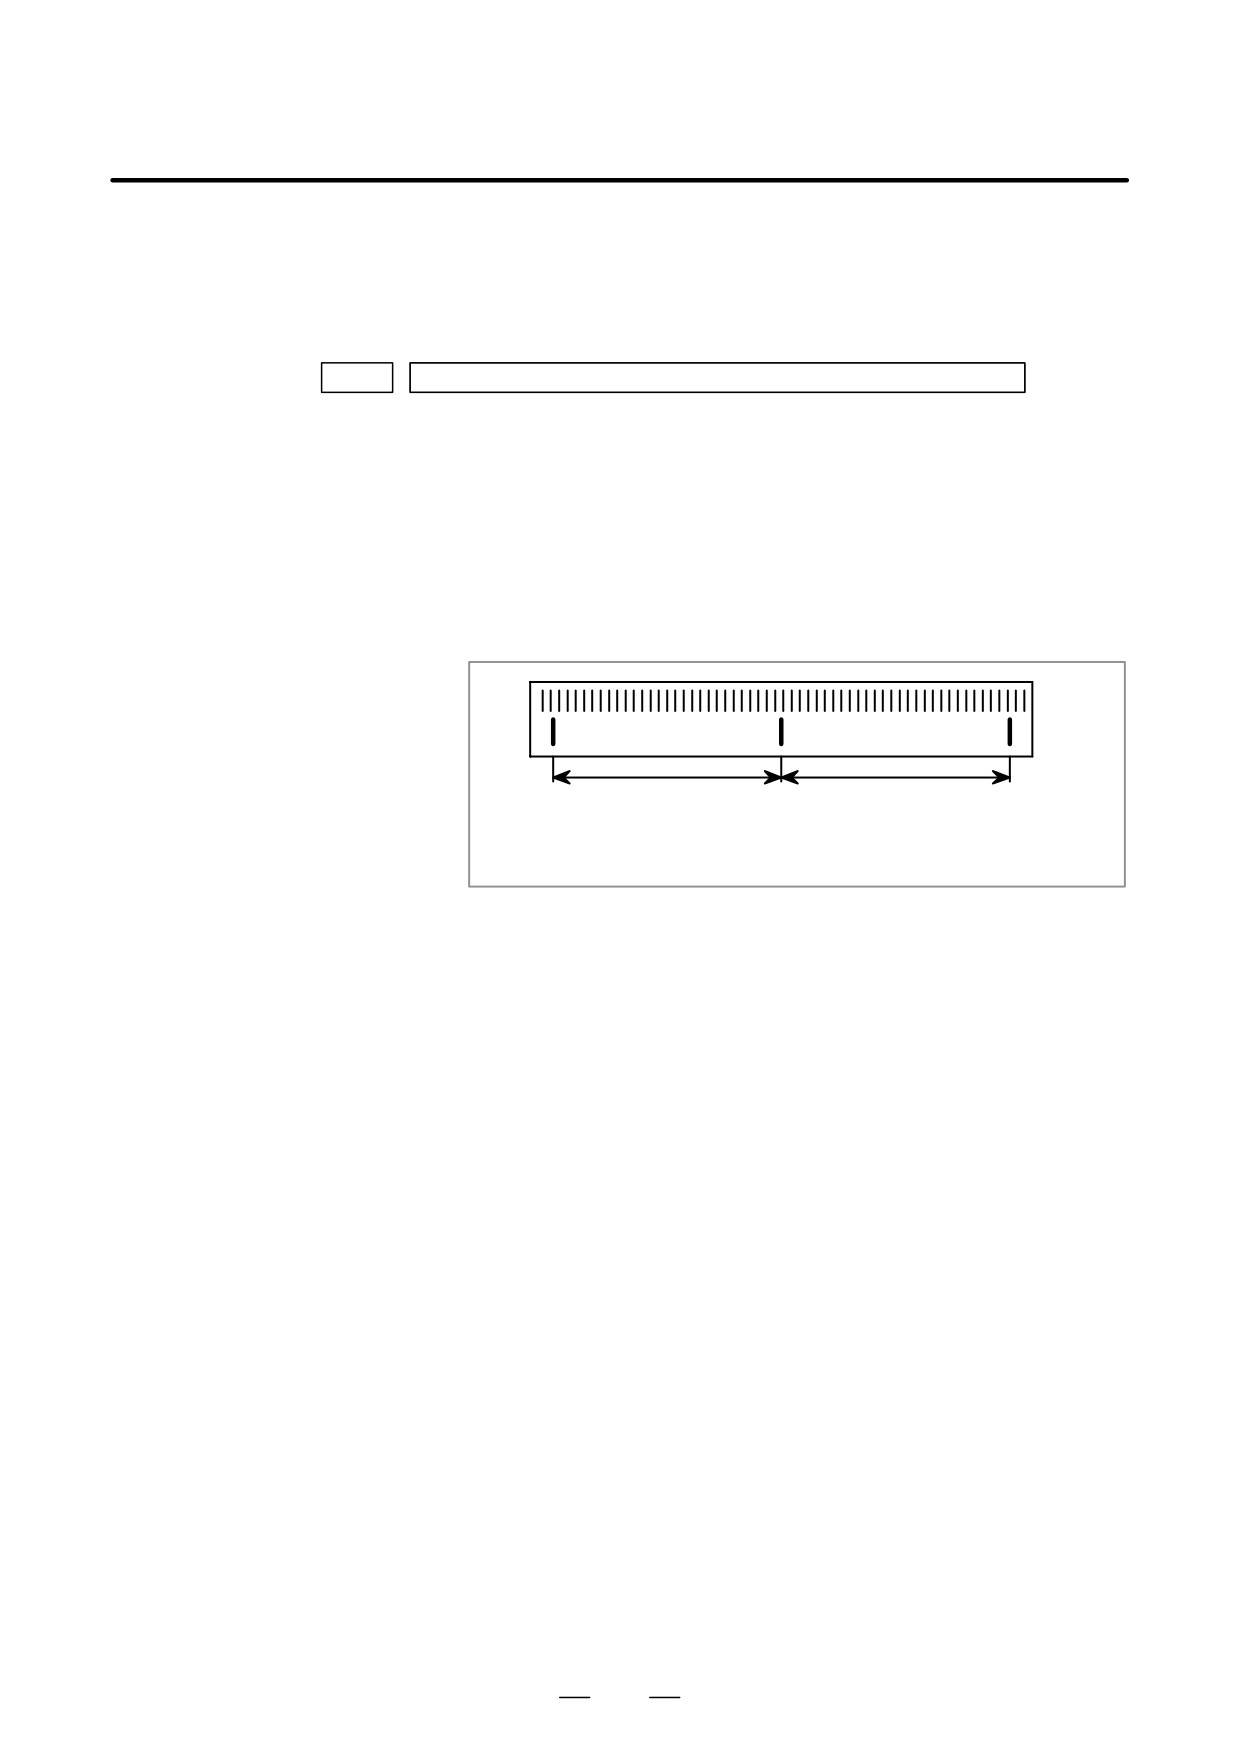
Normally, the number of feedback pulses per motor revolution is set to
the reference counter capacity.
When plural reference marks are on a linear scale, a quotient of the
distance between the reference marks divided by an interfer may be used
as a reference counter capacity:
Example)
(1µ m)
300mm ⇒ reference counter
30000
20000
15000
10000 etc
689
9. DIGITAL SERVO
B-63525EN/02
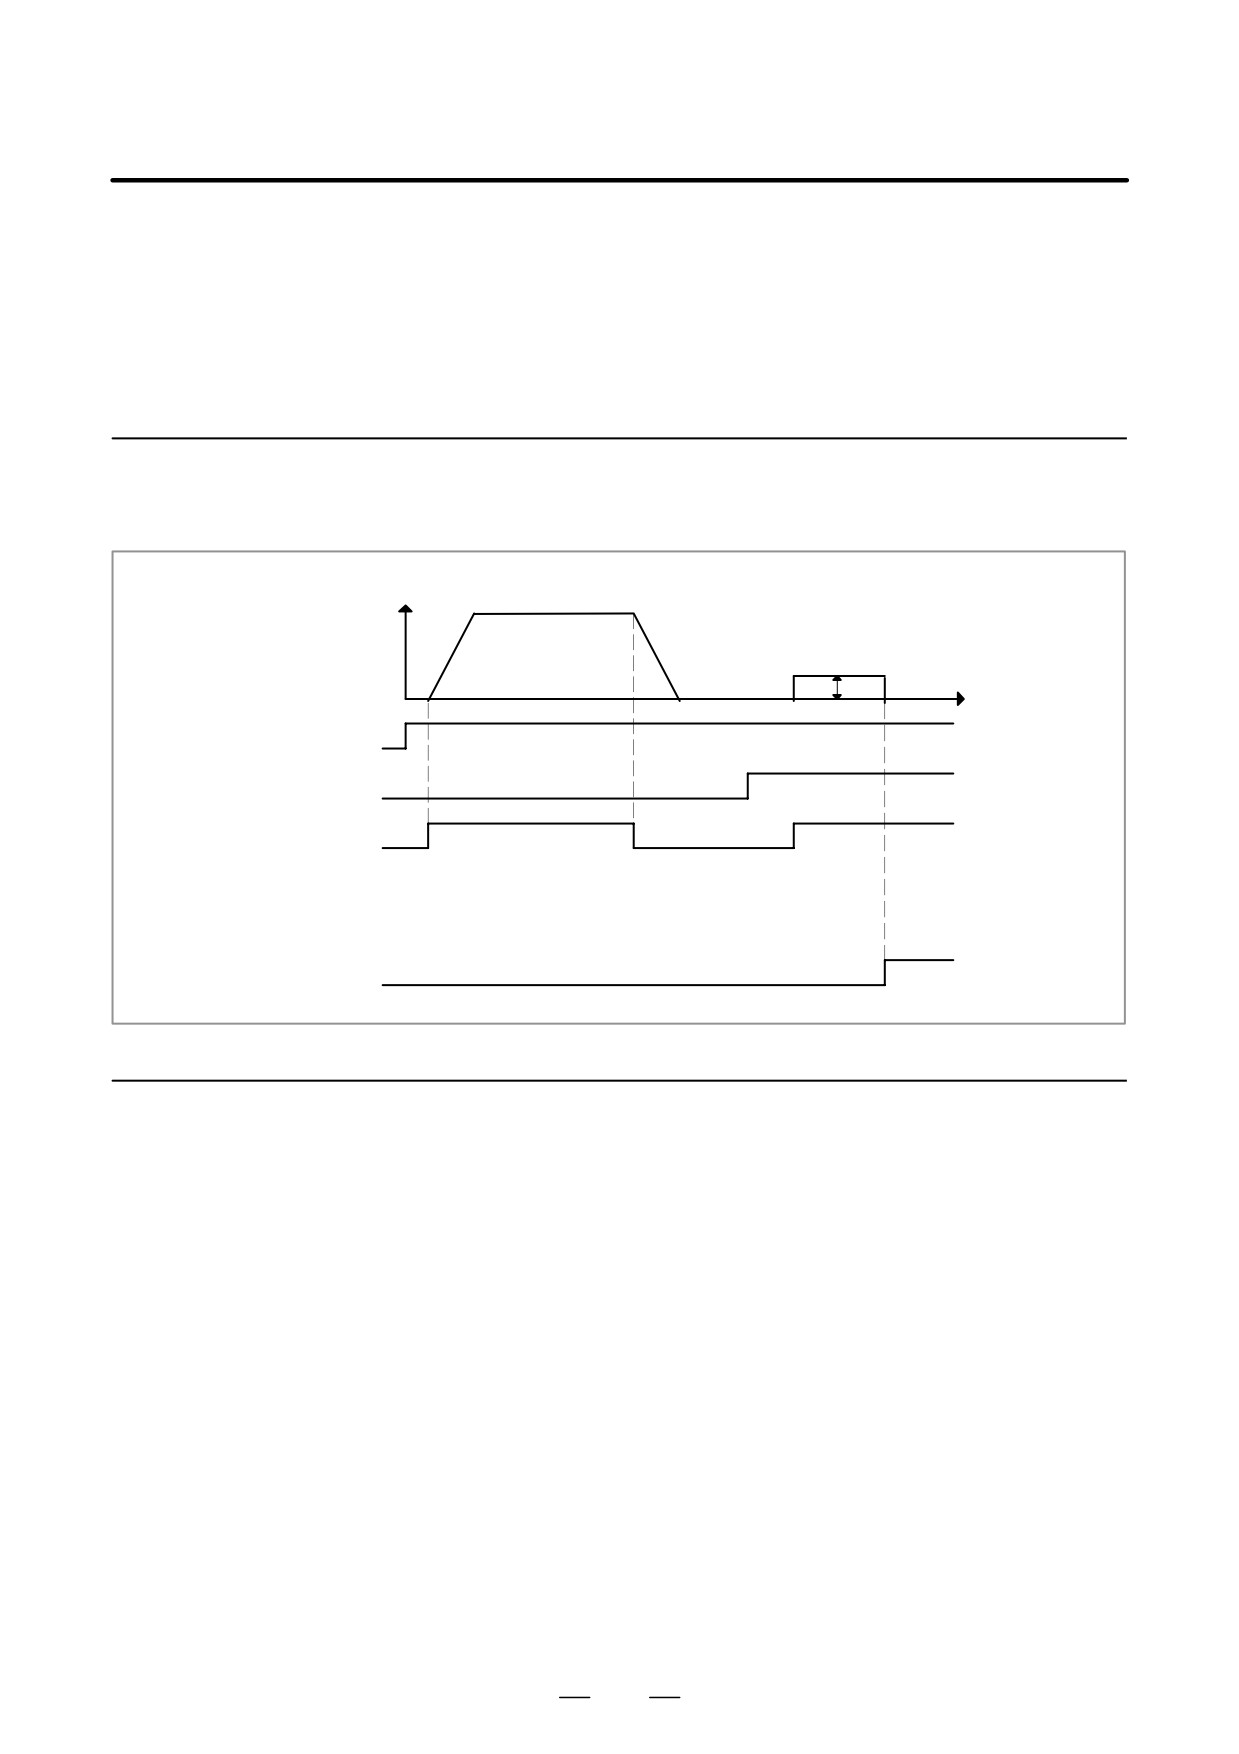
When there are no dog nor limit switch for reference position return, this
9.4
function enables the tool to return the reference position that is set by
DOGLESS
MTB.
REFERENCE
When the absolute position detector is used, the reference position once
POSITION SETTING
set remains also during power off. When the absolute detector is replaced
or absolute position is lost, perform this setting.
9.4.1
General
Speed
Reference position return
FL rate (PRM 1425)
Time
JOG
ZRN
+Jα
GRID
ZP α
9.4.2
1
Move the tool near the reference position using a manual operation.
Operation
2
Select the reference position return mode or switch.
3
Press a button for an axis-and-direction-select-signal + or -, and the
machine moves to the next grid, then stops.
(This position is set as the reference position).
After the reference position has been set, select the reference position
return mode(ZRN signal is 1) and turn on an axis-and-direction-
select signal, then the tool returns to the reference position.
690
9. DIGITAL SERVO
B-63525EN/02
9.4.3
Associated Parameters
#7
#6
#5
#4
#3
#2
#1
#0
PRM
1002
DLZ
#1(DLZ)
0 : Dog is used for reference position return
1 : Dogless reference position setting (all axes)
#7
#6
#5
#4
#3
#2
#1
#0
PRM
1005
DLZ
#1(DLZ)
0 : The normal method (dog) is used for reference position return.
1 : Reference position setting without dogs is used (axis by axis).
NOTE
A reference position can be set axis by axis by setting bit 1
of parameter No. 1002 to 0 and setting bit 1 of parameter
No. 1005. Reference position setting without dogs cannot
be used for a spindle positioning axis and Cs contour axis.
When these axes are involved, use bit 1 of parameter No.
1005.
#7
#6
#5
#4
#3
#2
#1
#0
PRM
1006
ZMI
#5(ZMI)
0 : Reference position return and backlash initial direction is +.
1 : Reference position return and backlash initial direction is -.
After ZRN signal becomes 1, manual feed direction is always the
direction set by this parameter irrespective of an axis selection signal.
691