FANUC Series 0i-MODEL D, Series 0i Mate-MODEL D. OPERATOR'S MANUAL - page 18

9.CREATING PROGRAMS
OPERATION
B-64304EN/02
11 After registering all programs, press the [PRGRM] soft key. The registered programs are converted
to the conversational format and displayed.
12 Press the
key to return to the program head.
Procedure 2: Modifying a block
1
Move the cursor to the block to be modified on the program screen and press the [C.A.P] soft key.
Or, press the [C.A.P] soft key first to display the conversational screen, then press the
or
page key until the block to be modified is displayed.
2
When data other than a G code is to be altered, just move the cursor to the data and key in a desired
value, then press the [INPUT] soft key or
key.
3
When a G code is to be altered, press the menu return key
and the soft key [G.MENU]. Then
the G code menu appears. Select a desired G code, then key in the value. For example, to specify a
cutting feed, since the G code menu indicates G01, key in G01. Then press the soft key [BLOCK].
The detailed screen of the G code is displayed, so enter the data.
4
After data is changed completely, press the
key. This operation replaces an entire block of a
program.
Procedure 3: Inserting a block
1
On the conversational screen, display the block immediately before a new block is to be inserted, by
using the page keys. On the program screen, move the cursor with the page keys and cursor keys to
immediately before the point where a new block is to be inserted.
2
Press the soft key [G.MENU] to display the G code menu. Then enter new block data.
3
When input of one block of data is completed in step 2, press the
key. This operation inserts a
block of data.
Procedure 4: Deleting a block
1
On the conversational screen, display the contents of a block to be deleted, then press the
key.
2
The contents of the block displayed are deleted from program memory. Then the contents of the next
block are displayed on the conversational screen.
Notes
With a machining center system, the names of the basic three axes are X, Y, and Z at all times.
With a lath system, the names of the basic two axes are X and Z at all times.
- 486 -
B-64304EN/02
OPERATION
10.EDITING PROGRAMS
10 EDITING PROGRAMS
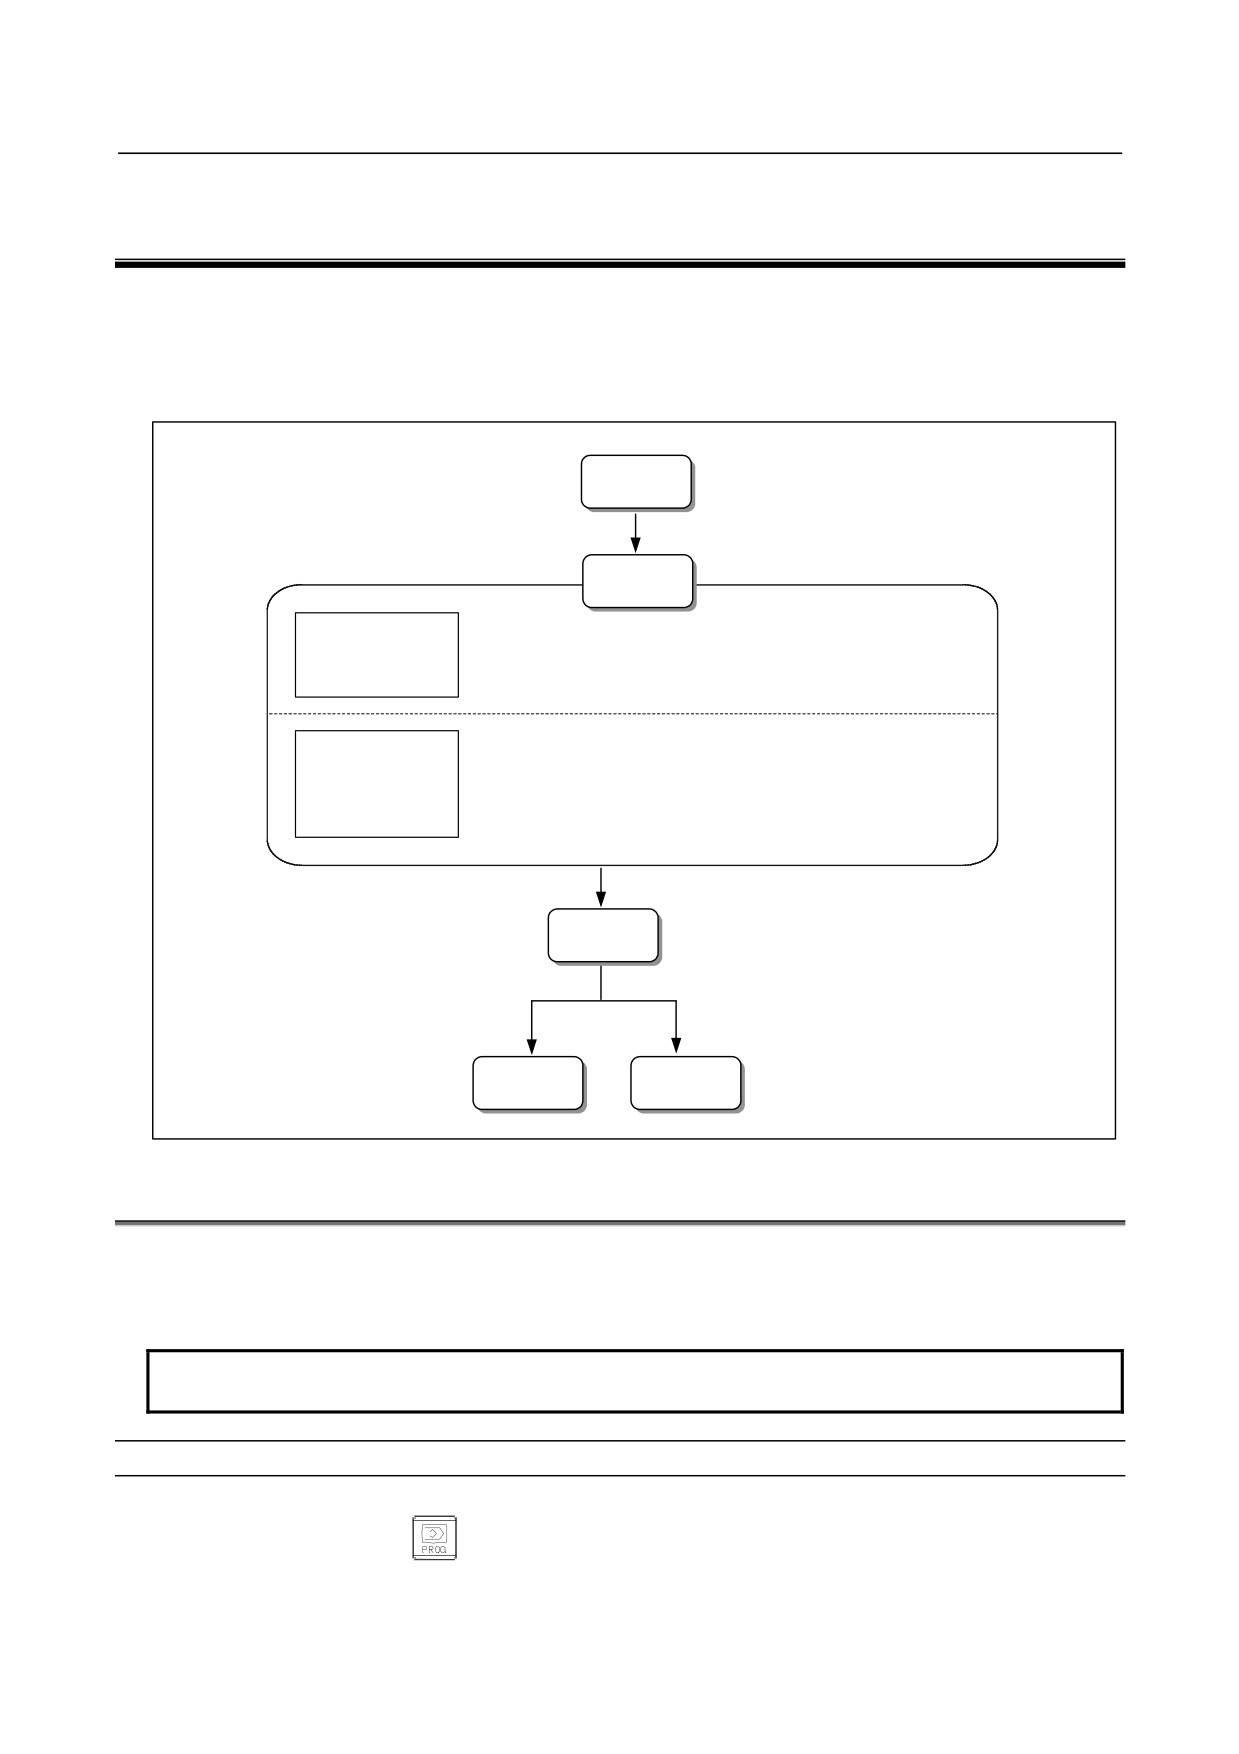
This chapter describes how to edit programs registered in the CNC. Editing includes the insertion,
modification, and deletion of words. Editing also includes deletion of the entire program and automatic
insertion of sequence numbers. This chapter also describes program search, sequence number search,
word search, and address search, which are performed before editing the program.
Creation and
registration
Editing
1) Program search
See III-10.4.
Search for part
2) Sequence number search
See III-10.5.
of program to be
3) Word search
See III-10.2.1.
edited
4) Address search
See III-10.2.1.
1) Inserting, altering, and deleting a word
See III-10.2.3 to 10.2.5.
2) Deleting blocks
See III-10.3.
Inserting, altering,
3) Deleting programs
See III-10.6.
and deleting
4) Copying/moving programs
See III-10.7.
programs
Management
Output
Execution
10.1 EDIT DISABLE ATTRIBUTE
When the 8-level data protection function is used, the edit disable attribute can be set for each program.
Programs with the edit disable attribute cannot be edited.
So, before a program can be edited, the edit disable attribute, if set for the program, needs to be removed.
NOTE
The 8-level data protection function is optional.
Procedure for removing the edit disable attribute
1
Select EDIT mode.
2
Press the function key
3
Press the soft key [DIR].
- 487 -
10.EDITING PROGRAMS
OPERATION
B-64304EN/02
4
Press the soft key [DIR+] to display a detailed program list.
(Each time the soft key [DIR+] is pressed, the program list display switches between detailed display
and normal display.)
5
Select a program whose edit disable attribute is to be removed.
Move the cursor with the cursor key
or
to a program whose edit disable attribute is to
be removed.
6
Press the soft key [(OPRT)].
7
Press the soft key [CHANGEATTRIB] (or [ATTRIB] when an 8.4-inch display unit is used).
8
Press the soft key [EDIT ENABLE] (or the soft key [EDT ON] when an 8.4-inch display unit is
used).
9
Press the soft key [END].
CAUTION
1 After completing editing, set the edit disable attribute as necessary.
2 To set the edit disable attribute, follow the same procedure as for removing the
attribute.
In the step 7, press the soft key [EDIT DISABL].
10.2 INSERTING, ALTERING AND DELETING A WORD
This section outlines the procedure for inserting, altering, and deleting a word in a program registered in
memory.
Procedure for inserting, altering and deleting a word
1
Select EDIT mode.
2
Press the function key
3
Select a program to be edited.
If a program to be edited is selected, perform the operation 4.
If a program to be edited is not selected, search for the program number.
4
Move the cursor to the position to be edited, with one of the methods below.
•
Scan method
•
Word search method
•
Address search method
For each method, refer to III-10.1.1.
5
Perform an operation such as altering, inserting, or deleting a word.
Explanation
-
Concept of word and editing unit
A word is an address followed by a number. With a custom macro, the concept of word is ambiguous.
So the editing unit is considered here.
The editing unit is a unit subject to alteration or deletion in one operation. In one scan operation, the
cursor indicates the start of an editing unit.
An insertion is made after an editing unit.
Definition of editing unit
• Program portion from an address to immediately before the next address
• An address is an alphabet, IF, WHILE, GOTO, END, DO=, or ;
(EOB).
According to this definition, a word is an editing unit.
For convenience in the explanation of editing below, the "editing unit" is referred to as the "word".
- 488 -
B-64304EN/02
OPERATION
10.EDITING PROGRAMS
WARNING
When a change, insertion, or deletion was performed on data of a program by
pausing machining with the single block stop, feed hold, or other operations
during execution of a program, be sure to return the cursor to the original position
before restarting the program. To execute the program with the cursor
positioned at another position, be sure to make a reset.
Otherwise, the program may not be executed as expected from the program
shown on the screen after machining restarts.
10.2.1 Word Search
For convenience, selecting a word with the cursor is referred to as scanning a word.
A word can be scanned by moving the cursor to the word, by performing a word search operation, or by
performing an address search operation.
For convenience in the explanation below, selecting a word by performing a word search operation or
address search operation may be referred to as searching for a word.
Procedure for scanning a program (cursor move operation)
Move the cursor word by word.
Move the cursor according to the procedure below to scan a desired word.
1
Press the cursor key
The cursor moves forward word by word; the cursor is displayed at a selected word.
2
Press the cursor key
The cursor moves backward word by word; the cursor is displayed at a selected word.
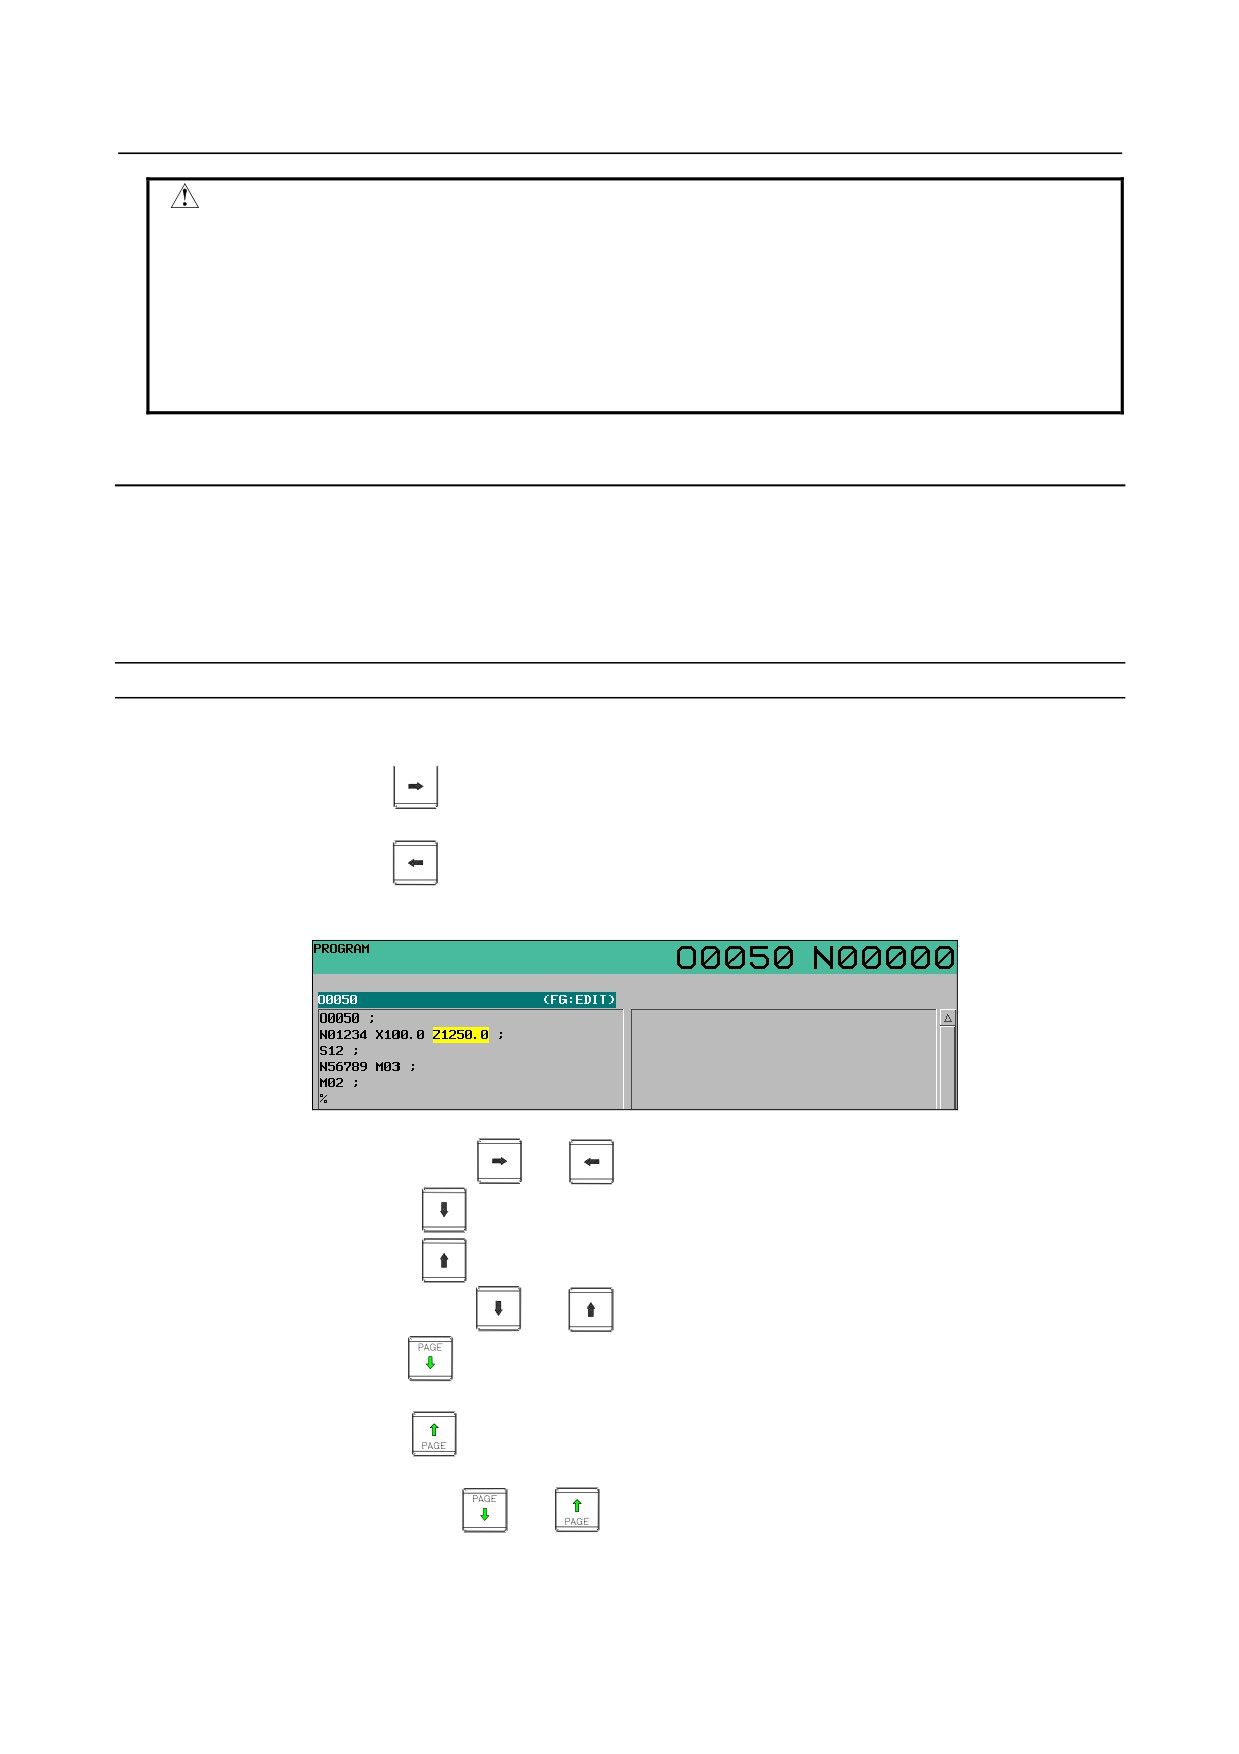
Example: When the cursor moves to Z1250.0
3
Holding down the cursor key
or
moves words continuously.
4
Pressing the cursor key
moves the cursor to the first word of the next block.
5
Pressing the cursor key
moves the cursor to the first word of the previous block.
6
Holding down the cursor key
or
moves the cursor to the head of a block continuously.
7
Pressing the page key
changes the screen display to the next page and moves the cursor to the
first word.
8
Pressing the page key
changes the screen display to the previous page and moves the cursor
to the first word.
9
Holding down the page key
or
displays one page after another.
- 489 -
10.EDITING PROGRAMS
OPERATION
B-64304EN/02
Procedure for searching a word
-
Search using a soft key
1.
Select EDIT or MEMORY mode.
2.
Press function key
3.
Key in a word to be found.
4.
Pressing soft key [SRH↓] makes a word search in the forward direction from the cursor position.
5.
If the program includes the word to be found, the cursor moves to the word. If the word cannot be
found when a search has been made up to the end of the program, the cursor moves to the end of the
program and the warning message "THE STRING IS NOT FOUND" is displayed.
6.
Pressing soft key [SRH↓] again makes another search for the same word.
7.
To search for a different word, enter the word in the key-in buffer then press soft key [SRH↓].
8.
Pressing soft key [SRH↑] makes a search in the reverse direction.
-
Search using the cursor keys
1.
Select EDIT or MEMORY mode.
2.
Press function key
3.
Key in a word to be found.
4.
Pressing cursor key
makes a word search in the forward direction.
5.
If the program includes the word to be found, the cursor moves to the word. If the word cannot be
found, the warning message "THE STRING IS NOT FOUND" is displayed.
Pressing cursor key
after keying in a word makes a search in the reverse direction.
NOTE
1 To search for a word, the character string that completely matches the word to
be found must be specified.
Example)
X100.0 cannot be found by specifying X1. Specify X100.0.
G01 cannot be found by specifying G1. Specify G01.
2 Unlike word search using a soft key, word search using the cursor keys
demands that a word to be found be set each time.
Procedure for searching an address
-
Search using a soft key
1.
Select EDIT or MEMORY mode.
2.
Press function key
3.
Key in an address to be found.
4.
Pressing soft key [SRH↓] makes an address search in the forward direction from the cursor position.
5.
If the program includes the word containing the set address, the cursor moves to the word. If the
word containing the set address cannot be found when a search has been made up to the end of the
program, the cursor moves to the end of the program and the warning message "THE STRING IS
NOT FOUND" is displayed.
6.
Pressing soft key [SRH↓] again makes another search for the same address.
7.
To search for a different address, enter the address in the key-in buffer then press soft key [SRH↓].
8.
Pressing soft key [SRH↑] makes a search in the reverse direction.
-
Search using the cursor keys
1.
Select EDIT or MEMORY mode.
- 490 -
B-64304EN/02
OPERATION
10.EDITING PROGRAMS
2.
Press function key
3.
Key in an address to be found.
4.
Pressing cursor key
makes an address search in the forward direction.
5.
If the program includes the word containing the set address, the cursor moves to the word. If the
word containing the set address cannot be found, the cursor moves to the end of the program and the
warning message "THE STRING IS NOT FOUND" is displayed.
6.
Pressing cursor key
after keying in an address makes a search in the reverse direction.
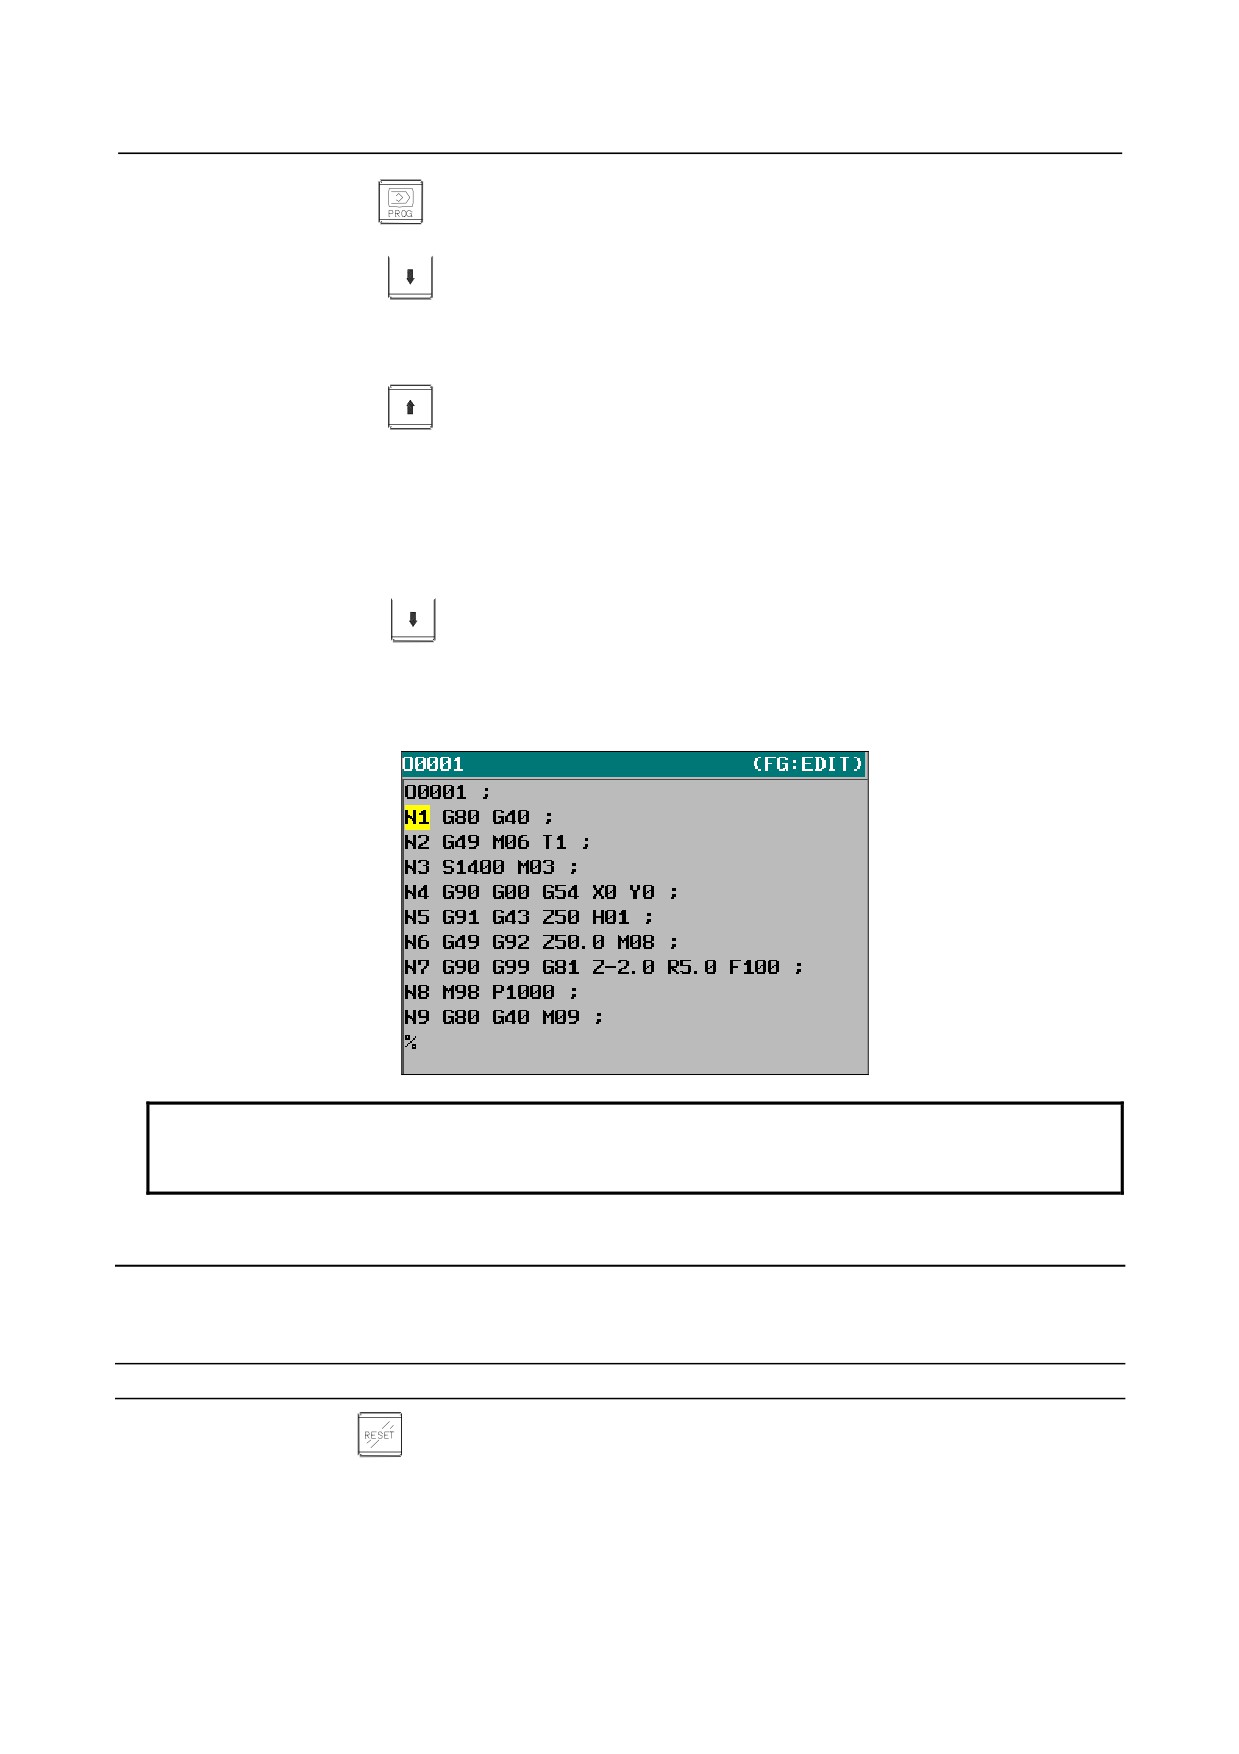
Example) To make an address search for "M"
1.
Key in "M".
2.
Pressing soft key [SRH↓] moves the cursor to "M06" placed on the same line as N2.
3.
Pressing soft key [SRH↓] again moves the cursor to "M03" placed on the same line as N3.
4.
Pressing soft key [SRH↑] moves the cursor to "M06" placed on the same line as N2.
5.
Pressing cursor key
after keying in "M" moves the cursor to "M03" placed on the same line
as N3.
6.
If continuation of search operation in the forward direction finds no more address, the cursor moves
to the last line and the warning message "THE STRING IS NOT FOUND" is displayed.
NOTE
Unlike address search using a soft key, address search using the cursor keys
demands that an address to be found be set each time.
10.2.2 Heading a Program
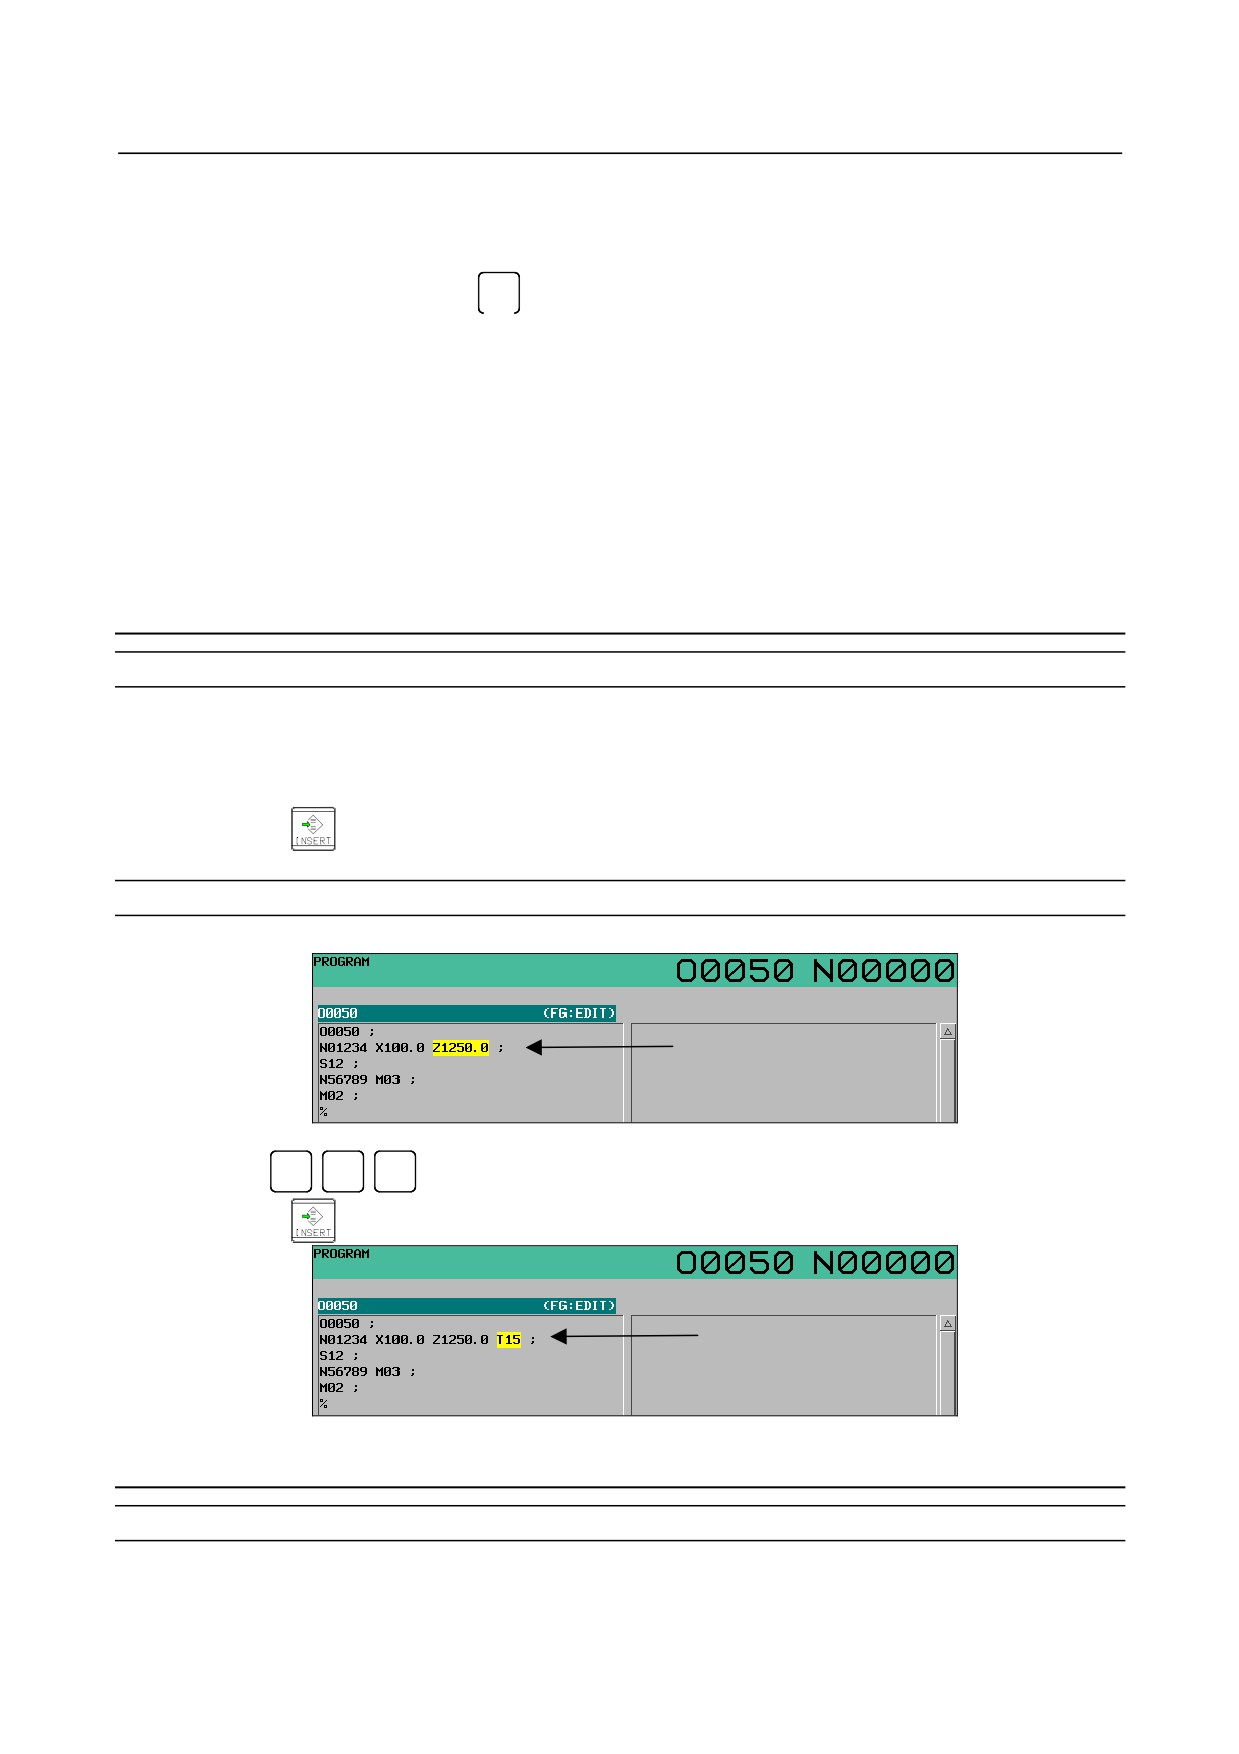
The cursor can be jumped to the top of a program. This function is called heading the program pointer.
This section describes the four methods for heading the program pointer.
Procedure for heading a program
Method 1
1 Press
key when the program screen is selected in EDIT mode. When the cursor has
returned to the start of the program, the contents of the program are displayed from its
start on the screen.
- 491 -
10.EDITING PROGRAMS
OPERATION
B-64304EN/02
Method 2
1 Search for the program number.
When the program screen is selected in MEMORY or EDIT mode, enter a program
number.
(Press address key
O
then type the program number.)
2 Press soft key [O SEARCH].
Method 3
1 Select the program screen or program check screen in MEMORY mode.
2 Press soft key [(OPRT)].
3 Press soft key [REWIND].
Method 4
1 Select the program screen in EDIT mode.
2 Press soft key [(OPRT)].
3 Press soft key [REWIND].
10.2.3 Inserting a Word
Procedure for inserting a word
1
Search for or scan the word immediately before a word to be inserted.
2
Key in an address to be inserted.
3
Key in data.
4
Press the
key.
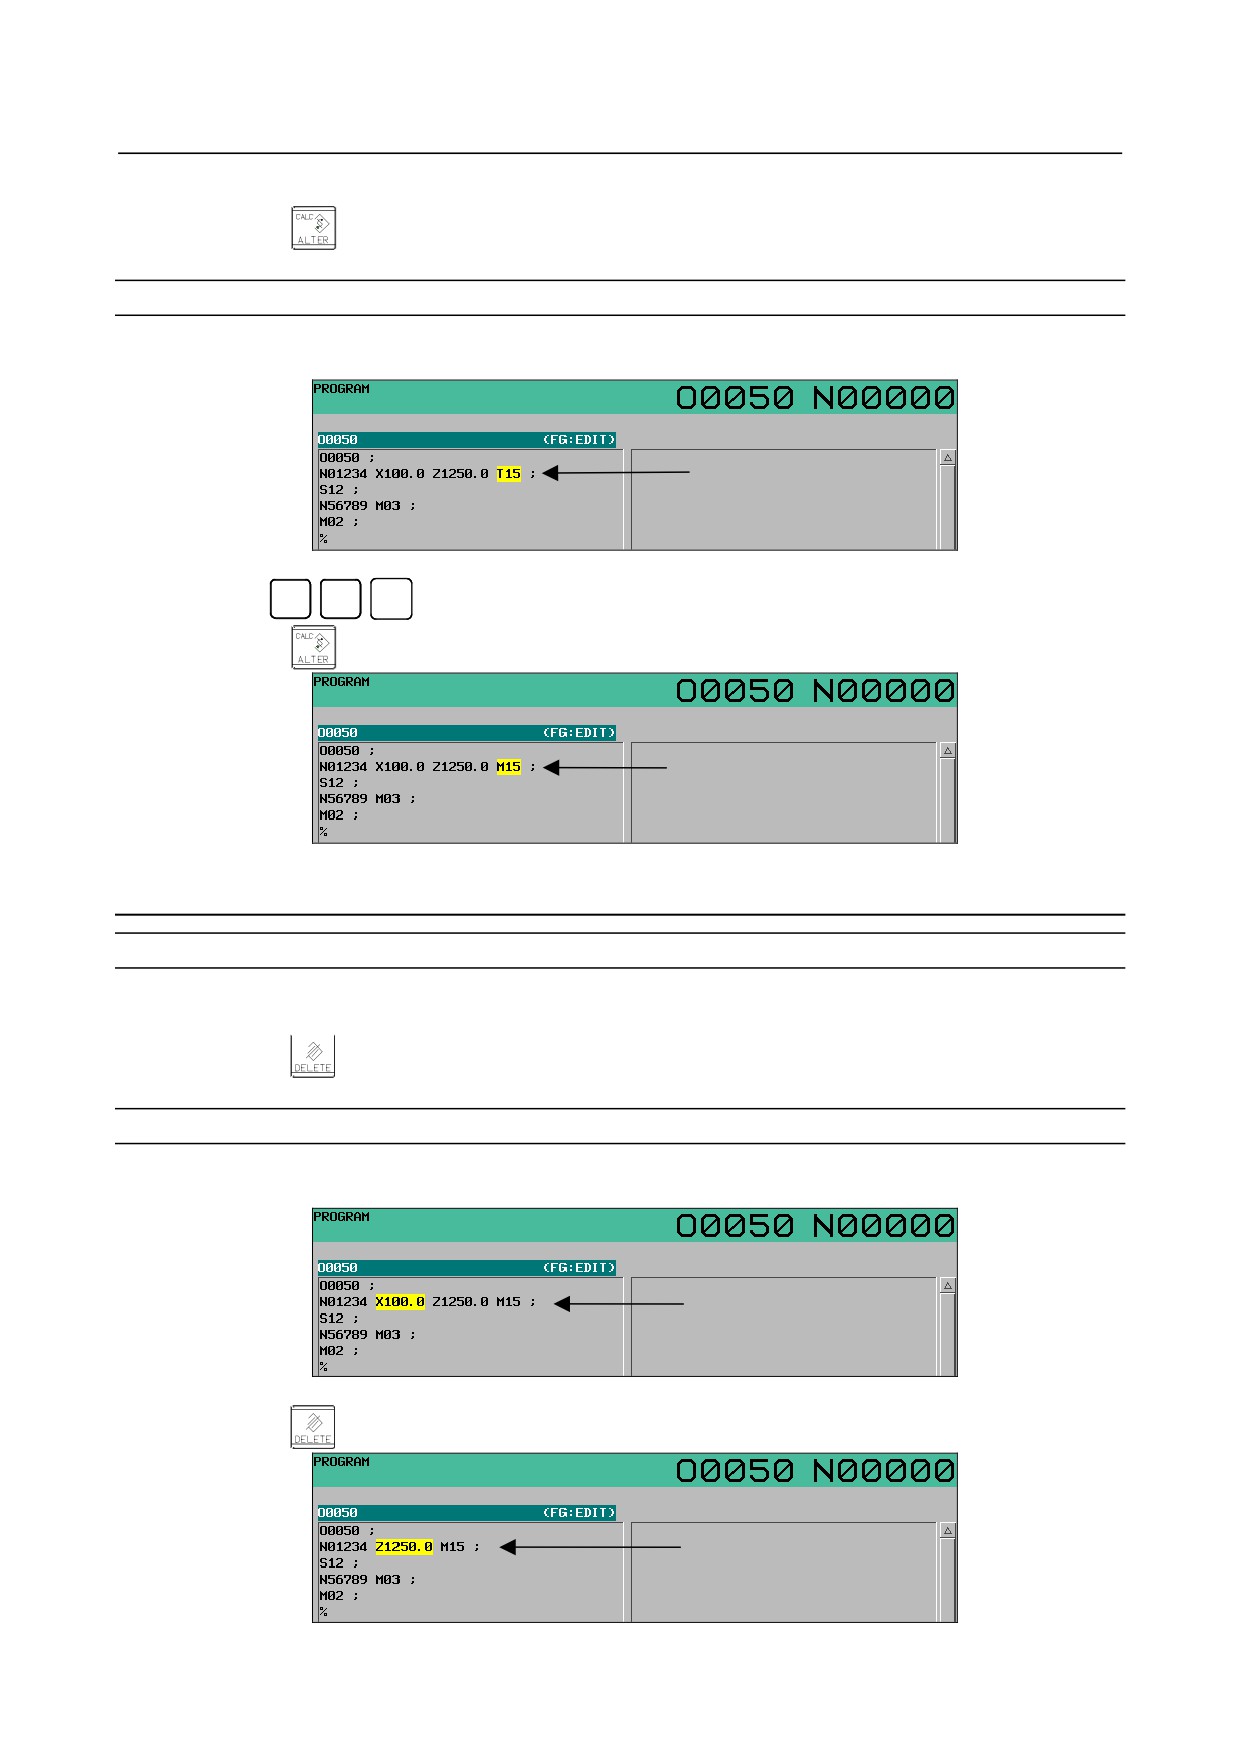
Example of Inserting T15
1
Search for or scan Z1250.
Z1250.0 is searched
for/scanned.
2
Key in
T
1
5
3
Press the
key.
T15 is inserted.
10.2.4 Altering a Word
Procedure for altering a word
1
Search for or scan a word to be altered.
2
Key in an address to be inserted.
- 492 -
B-64304EN/02
OPERATION
10.EDITING PROGRAMS
3
Key in data.
4
Press the
key.
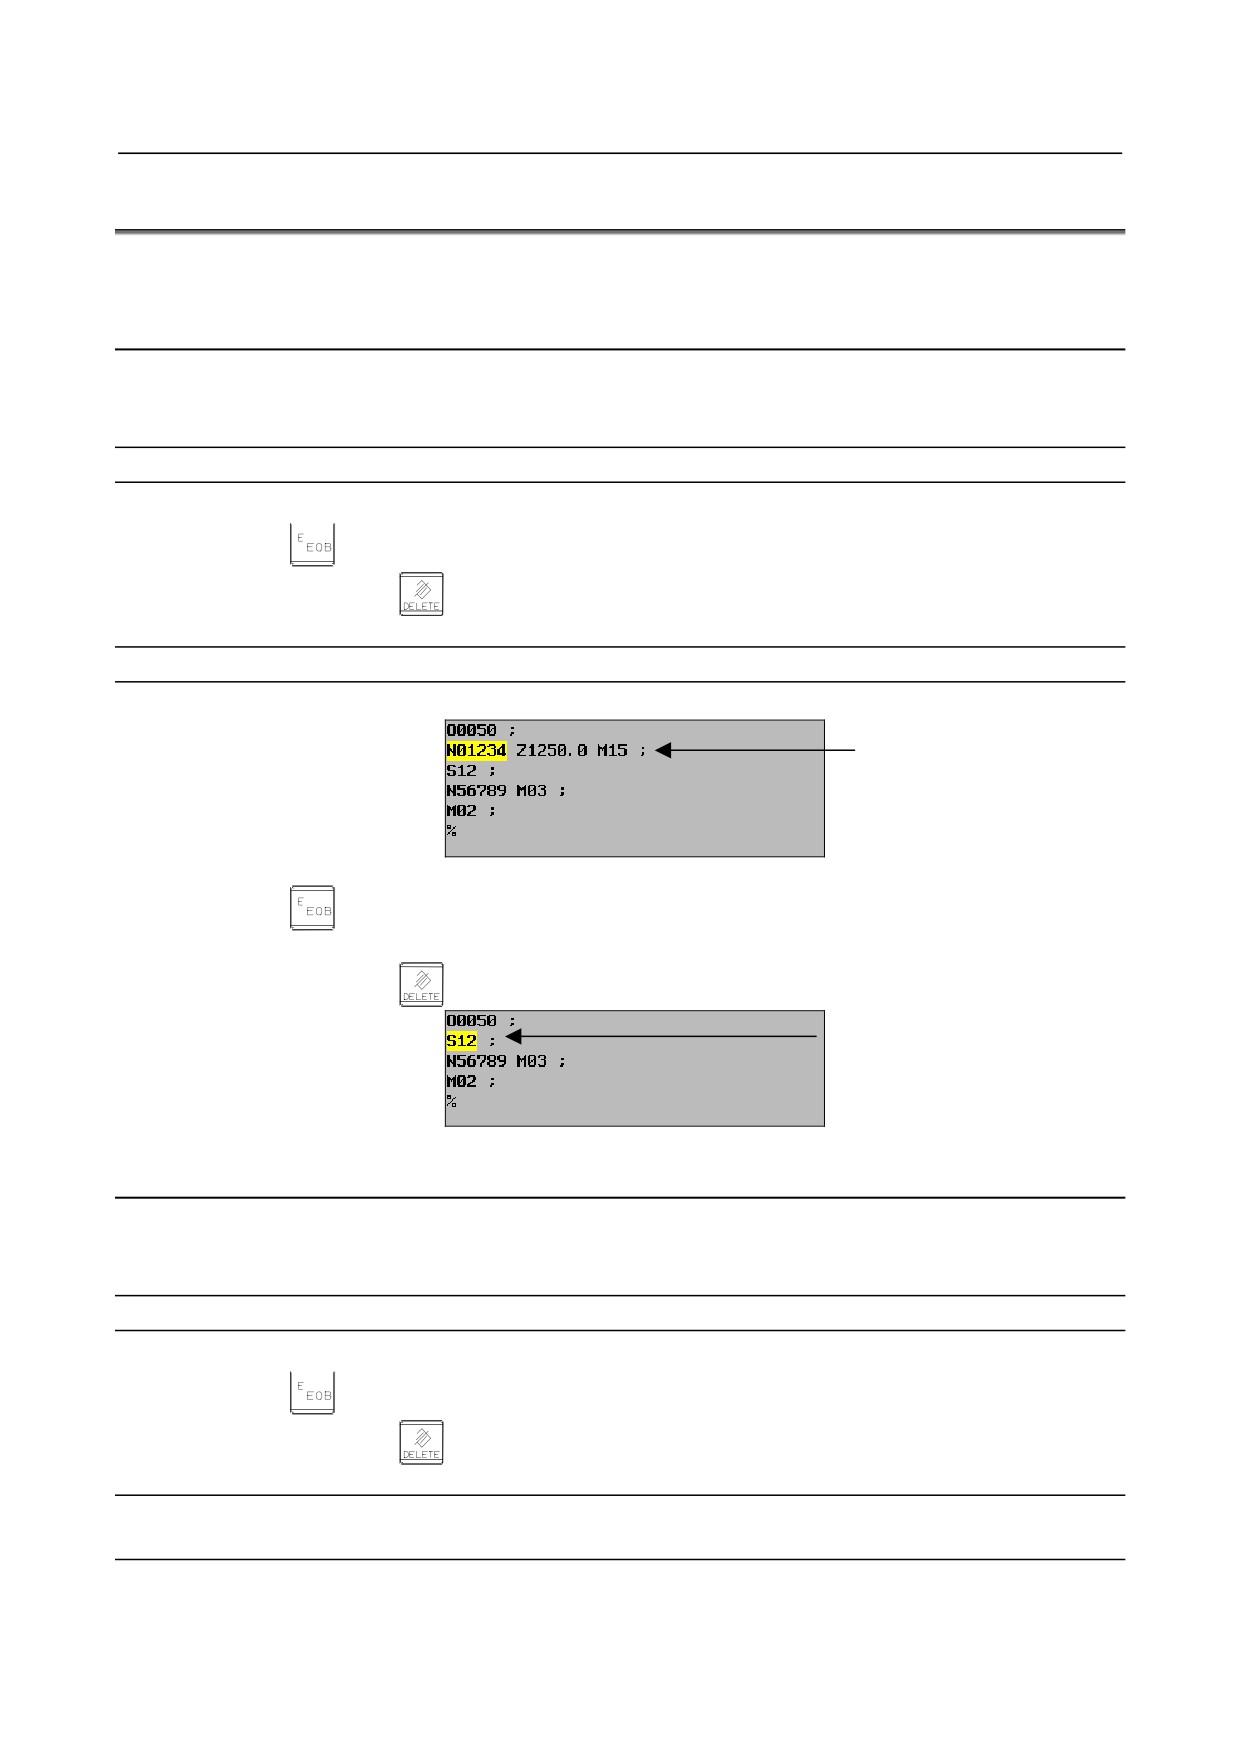
Example of changing T15 to M15
1
Search for or scan T15.
T15 is searched for/scanned.
2
Key in
M
1
5
3
Press the
key.
T15 is changed to M15.
10.2.5 Deleting a Word
Procedure for deleting a word
1
Search for or scan a word to be deleted.
2
Press the
key.
Example of deleting X100.0
1
Search for or scan X100.0.
X100.0 is searched
for/scanned.
2
Press the
key.
X100.0 is deleted.
- 493 -
10.EDITING PROGRAMS
OPERATION
B-64304EN/02
10.3 DELETING BLOCKS
A block or blocks can be deleted in a program.
10.3.1 Deleting a Block
The portion from the current word position to the next EOB is deleted. The cursor is then placed in the
word next to the deleted EOB.
Procedure for deleting a block
1
Search for or scan address N for a block to be deleted.
2
Press the
key.
3
Press the editing key
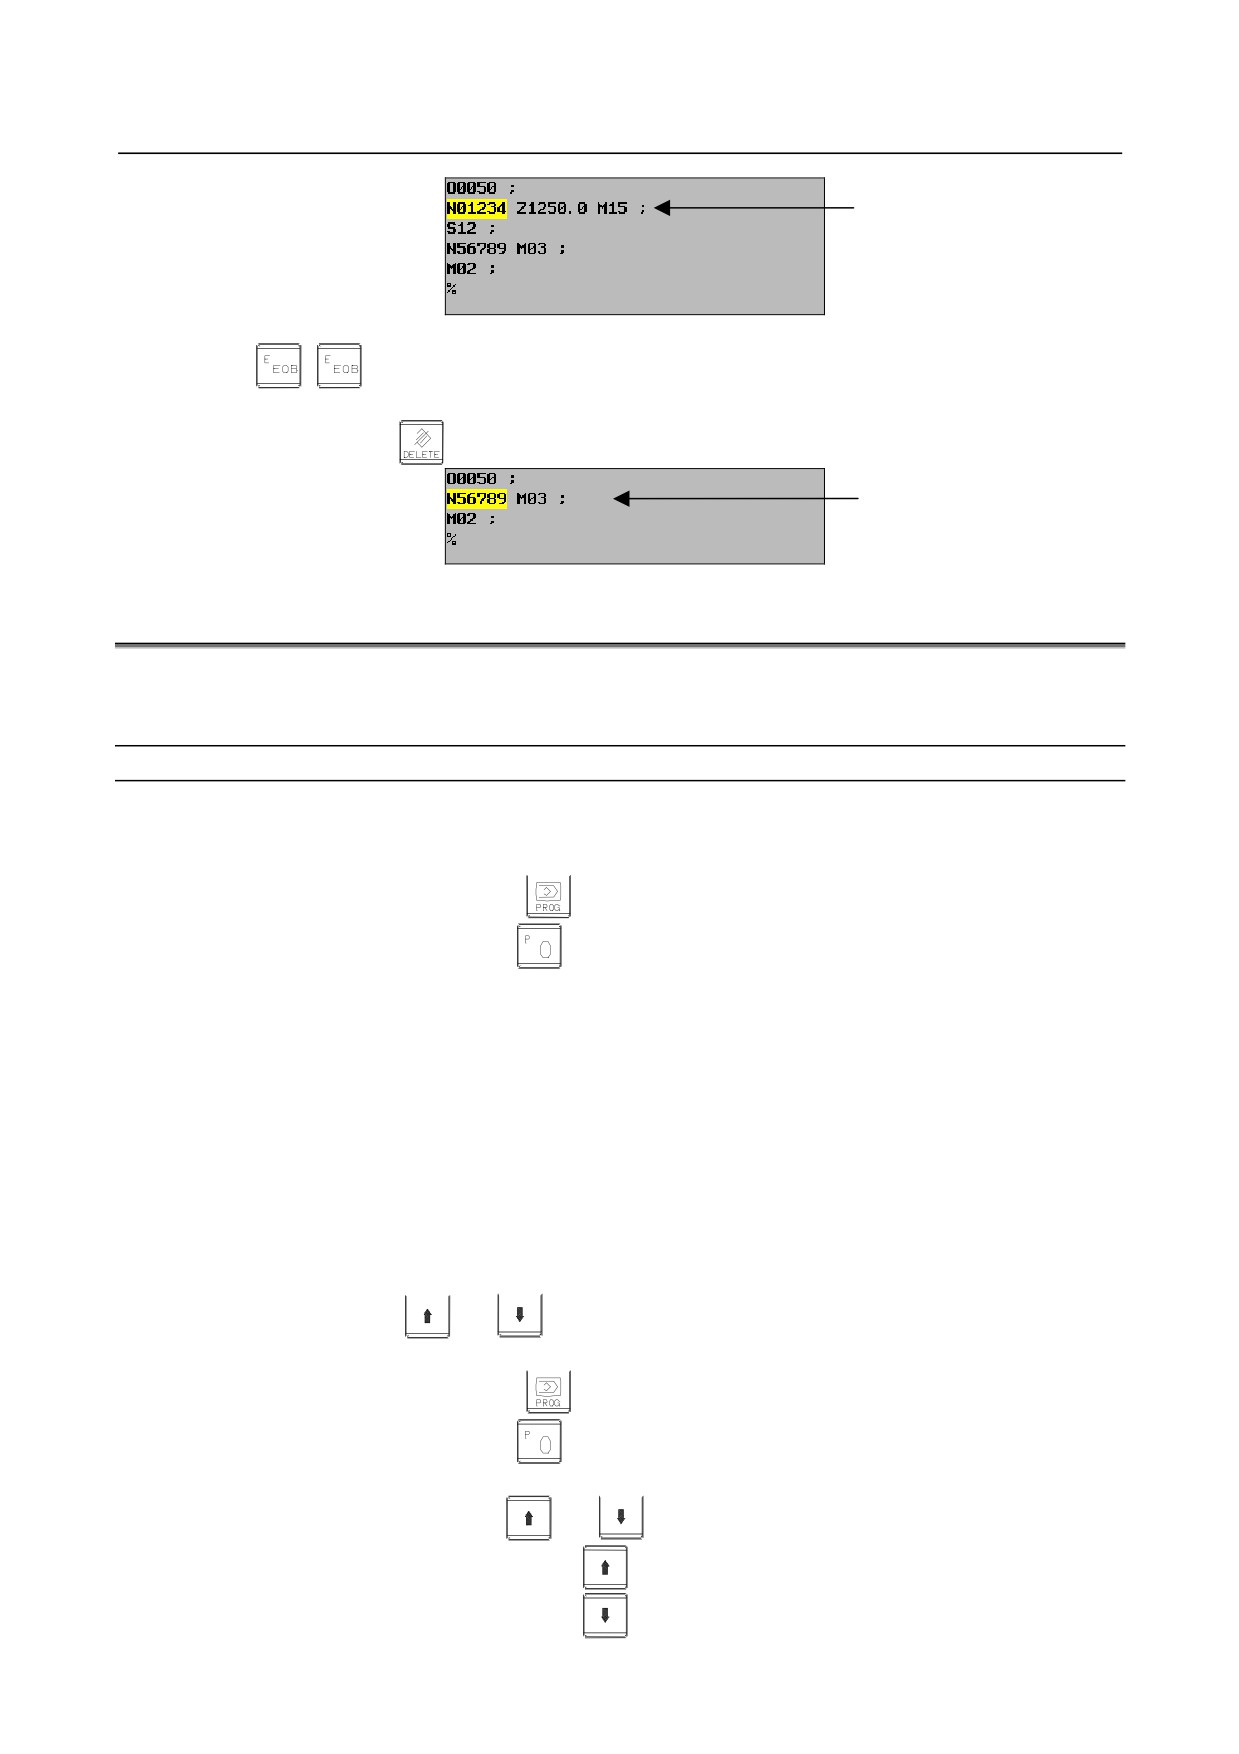
Example of deleting a block of N01234
1
Search for or scan N01234.
N01234 is searched
for/scanned.
2
Press the
key.
3
Press the editing key
Block containing N01234
has been deleted.
10.3.2 Deleting Multiple Blocks
The several blocks in the forward direction from the current word position up to the EOB of the farthest
of those blocks are deleted. The cursor is then placed in the word next to the deleted EOB.
Procedure for deleting blocks
1
Search for or scan a word in the first block of a portion to be deleted.
2
Press the
key as many times as the number of blocks that you want to delete.
3
Press the editing key
Example of deleting blocks from N01234 to the EOB of a block which is two blocks
ahead
1
Search for or scan N01234.
- 494 -
B-64304EN/02
OPERATION
10.EDITING PROGRAMS
N01234 is searched
for/scanned.
2
Press
3
Press the editing key
Blocks from N01234
to the EOB of a block
which is two blocks
ahead are deleted.
10.4 PROGRAM SEARCH
When memory holds multiple programs, a program can be searched for. There are four methods as
follows.
Procedure for program search
Method 1 To search for a program with this method, key in the desired program number then press
operation selection soft key [O SEARCH].
1
Select EDIT or MEMORY mode.
2
Press function key
to display the program screen.
3
Press address key
• For a program registered in the CNC memory, address key entry may be
omitted.
4
Key in a program number to be found.
5
Press operation selection soft key [O SEARCH].
Upon completion of search operation, the found program number is displayed in the
upper right area of the screen.
If the desired program number is not found, the warning message "SPECIFIED
PROGRAM NOT FOUND" is displayed when a 5-digit or longer program number
is specified for search operation.
When a character not following step 3 or 4 above is entered for search operation, the
warning message "FORMAT ERROR" is displayed.
Method 2 To search for a program with this method, key in the desired program number then press
cursor key
or
1
Select EDIT or MEMORY mode.
2
Press function key
to display the program screen.
3
Press address key
4
Key in a program number to be found.
5
Press cursor key
or
• Pressing cursor key
searches the previous program.
• Pressing cursor key
searches the next program.
- 495 -
10.EDITING PROGRAMS
OPERATION
B-64304EN/02
Upon completion of search operation, the found program number is displayed in the
upper right area of the screen.
If the desired program number is not found, the warning message "SPECIFIED
PROGRAM NOT FOUND" is displayed when a 5-digit or longer program number
is specified for search operation.
When a character not following step 3 or 4 above is entered for search operation, the
warning message "FORMAT ERROR" is displayed.
Method 3 This method searches the next program from the current program.
1
Select EDIT or MEMORY mode.
2
Press function key
to display the program screen.
3
Press operation selection key [O SEARCH].
4
Upon completion of search operation, the found program number is displayed in the
upper right area of the screen.
Method 4 To search for a program, press address key
then press cursor key
or
1
Select EDIT or MEMORY mode.
2
Press function key
to display the program screen.
3
Press address key
4
Press cursor key
or
• Pressing cursor key
searches the previous program.
• Pressing cursor key
searches the next program.
Upon completion of search operation, the found program number is displayed in the
upper right area of the screen.
10.5 SEQUENCE NUMBER SEARCH
Sequence number search operation is usually used to search for a sequence number in the middle of a
program so that execution can be started or restarted at the block of the sequence number.
Example)
Sequence number 02346 in a program (O0002) is searched for.
PROGRAM
O0001 ;
N01234 X100.0 Z100.0 ;
S12 ;
:
O0002 ;
Selected program
This section is searched
N02345 X20.0 Z20.0 ;
starting at the beginning.
N02346 X10.0 Z10.0 ;
Target sequence
(Search operation is
:
number is found.
performed only within a
O0003 ;
program.)
:
Procedure for sequence number search
Procedure
1
Select MEMORY mode.
- 496 -
B-64304EN/02
OPERATION
10.EDITING PROGRAMS
2
Press function key
3
If the program contains a sequence number to be searched for, perform the operations 4 to 7 below.
If the program does not contain a sequence number to be searched for, select the program number of
the program that contains the sequence number to be searched for.
4
Press address key
5
Key in a sequence number to be searched for.
6
Press soft key [N SRH].
7
Upon completion of search operation, the sequence number searched for is displayed in the
upper-right corner of the screen.
If the specified sequence number is not found in the program currently selected, alarm PS0060
occurs.
Explanation
-
Operation during Search
Those blocks that are skipped do not affect the CNC. This means that the data in the skipped blocks such
as coordinates and M, S, and T codes does not alter the CNC coordinates and modal values.
So, in the first block where execution is to be started or restarted by using a sequence number search
command, be sure to enter required M, S, and T codes and coordinates. A block searched for by sequence
number search usually represents a point of shifting from one process to another. When a block in the
middle of a process must be searched for to restart execution at the block, specify M, S, and T codes, G
codes, coordinates, and so forth as required from the MDI after closely checking the machine tool and NC
states at that point.
-
When the optional block skip function is enabled
When the optional block skip function is enabled for a block, the sequence numbers included in the block
are excluded as sequence number search targets.
Limitation
-
Searching in sub-program
During sequence number search operation, M98Pxxxx (subprogram call) is not executed. So an alarm
PS0060 is raised if an attempt is made to search for a sequence number in a subprogram called by the
program currently selected.
Main program
Subprogram
O1234
O5678
:
:
:
N88888
M98 P5678 ;
:
:
M99 ;
:
:
If an attempt is made to search for N8888 in the example above, an alarm occurs.
Fig. 10.5 (a)
10.6 DELETING PROGRAMS
Programs registered in memory can be deleted, either one program by one program or all at once.
10.6.1 Deleting One Program
A single program can be deleted.
- 497 -
10.EDITING PROGRAMS
OPERATION
B-64304EN/02
Procedure for deleting one program
1
Select the EDIT mode.
2
Press function key
to display the program screen.
3
Press address key
4
Key in a desired program number.
5
Press the editing key
. The program with the entered program number is deleted.
10.6.2 Deleting All Programs
All programs can be deleted.
Procedure for deleting all programs
1
Select the EDIT mode.
2
Press function key
to display the program screen.
3
Press address key
4
Key in -9999.
5
Press editing key
to delete all programs.
- 498 -
B-64304EN/02
OPERATION
10.EDITING PROGRAMS
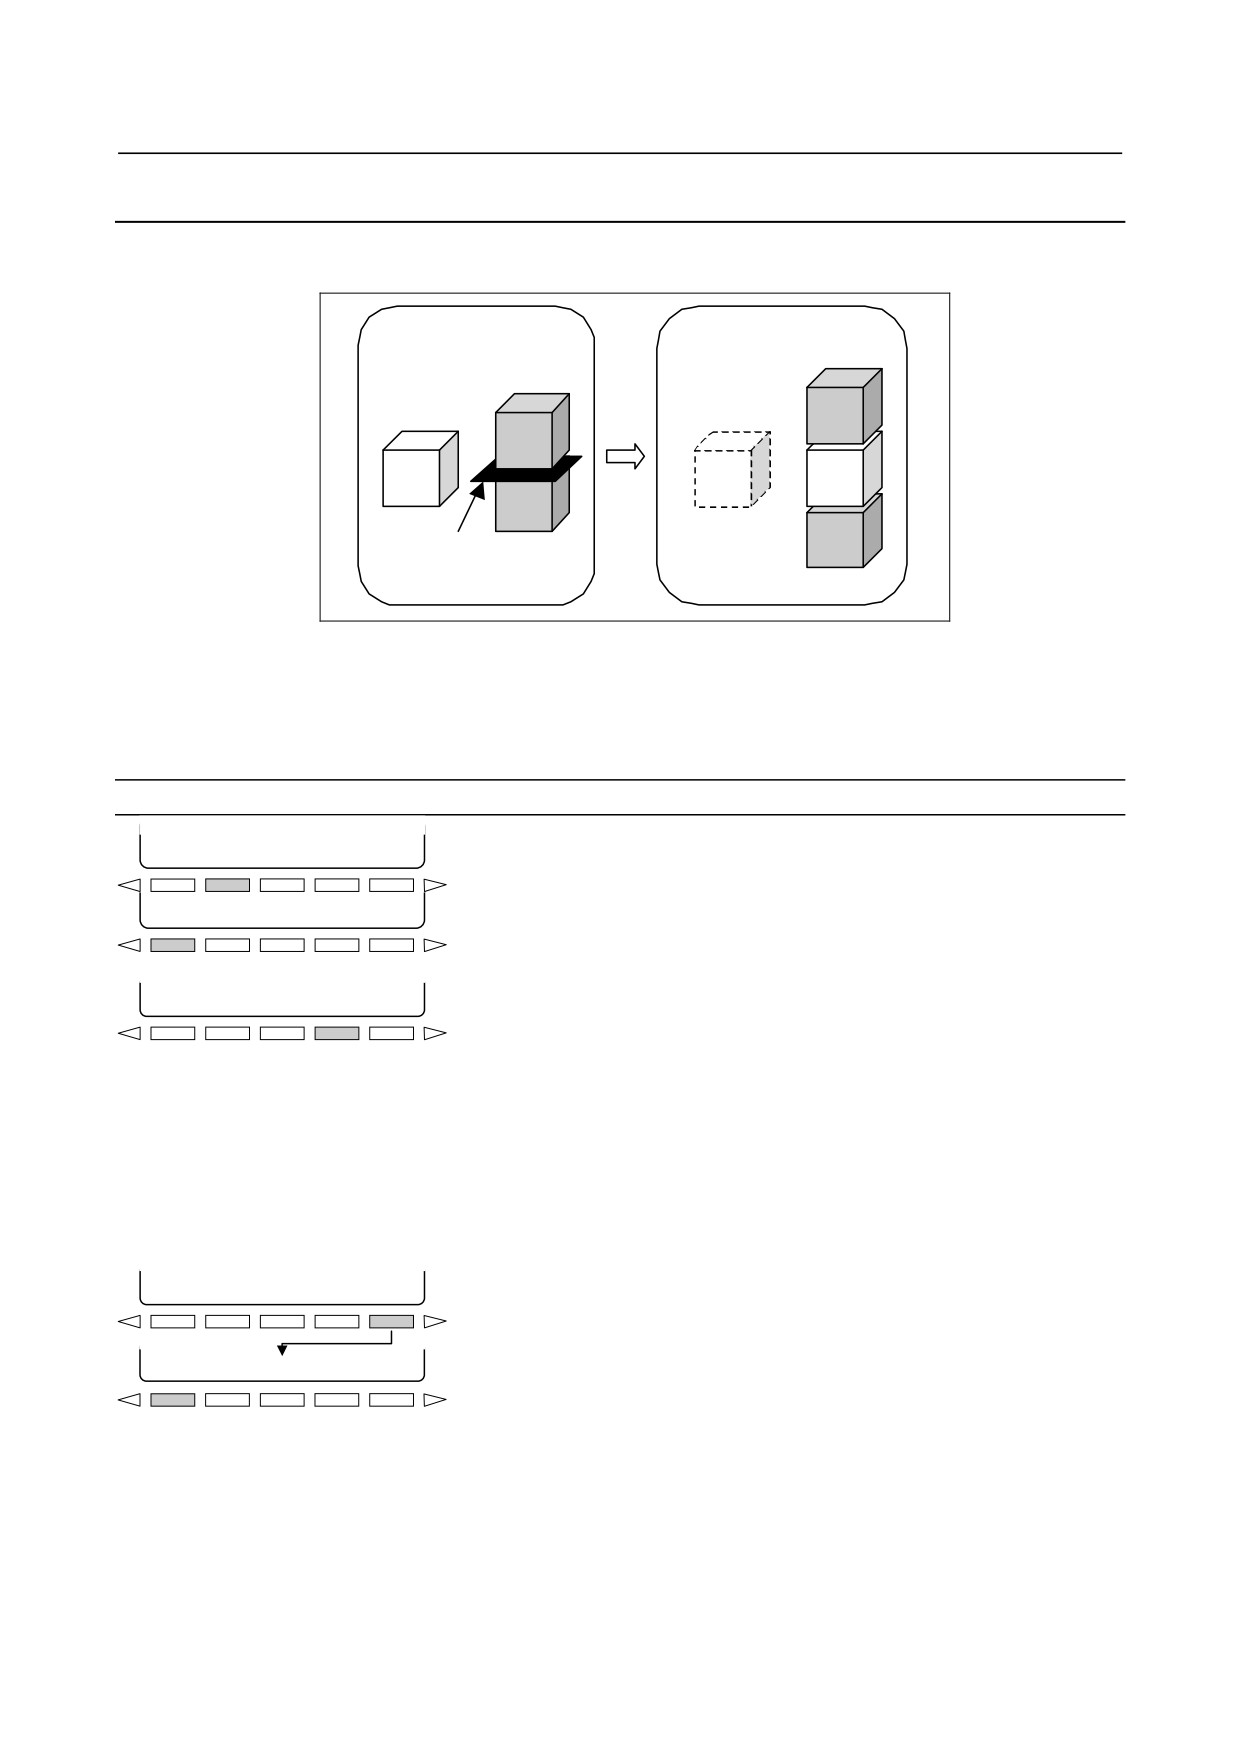
10.7 COPYING/MOVING PROGRAMS
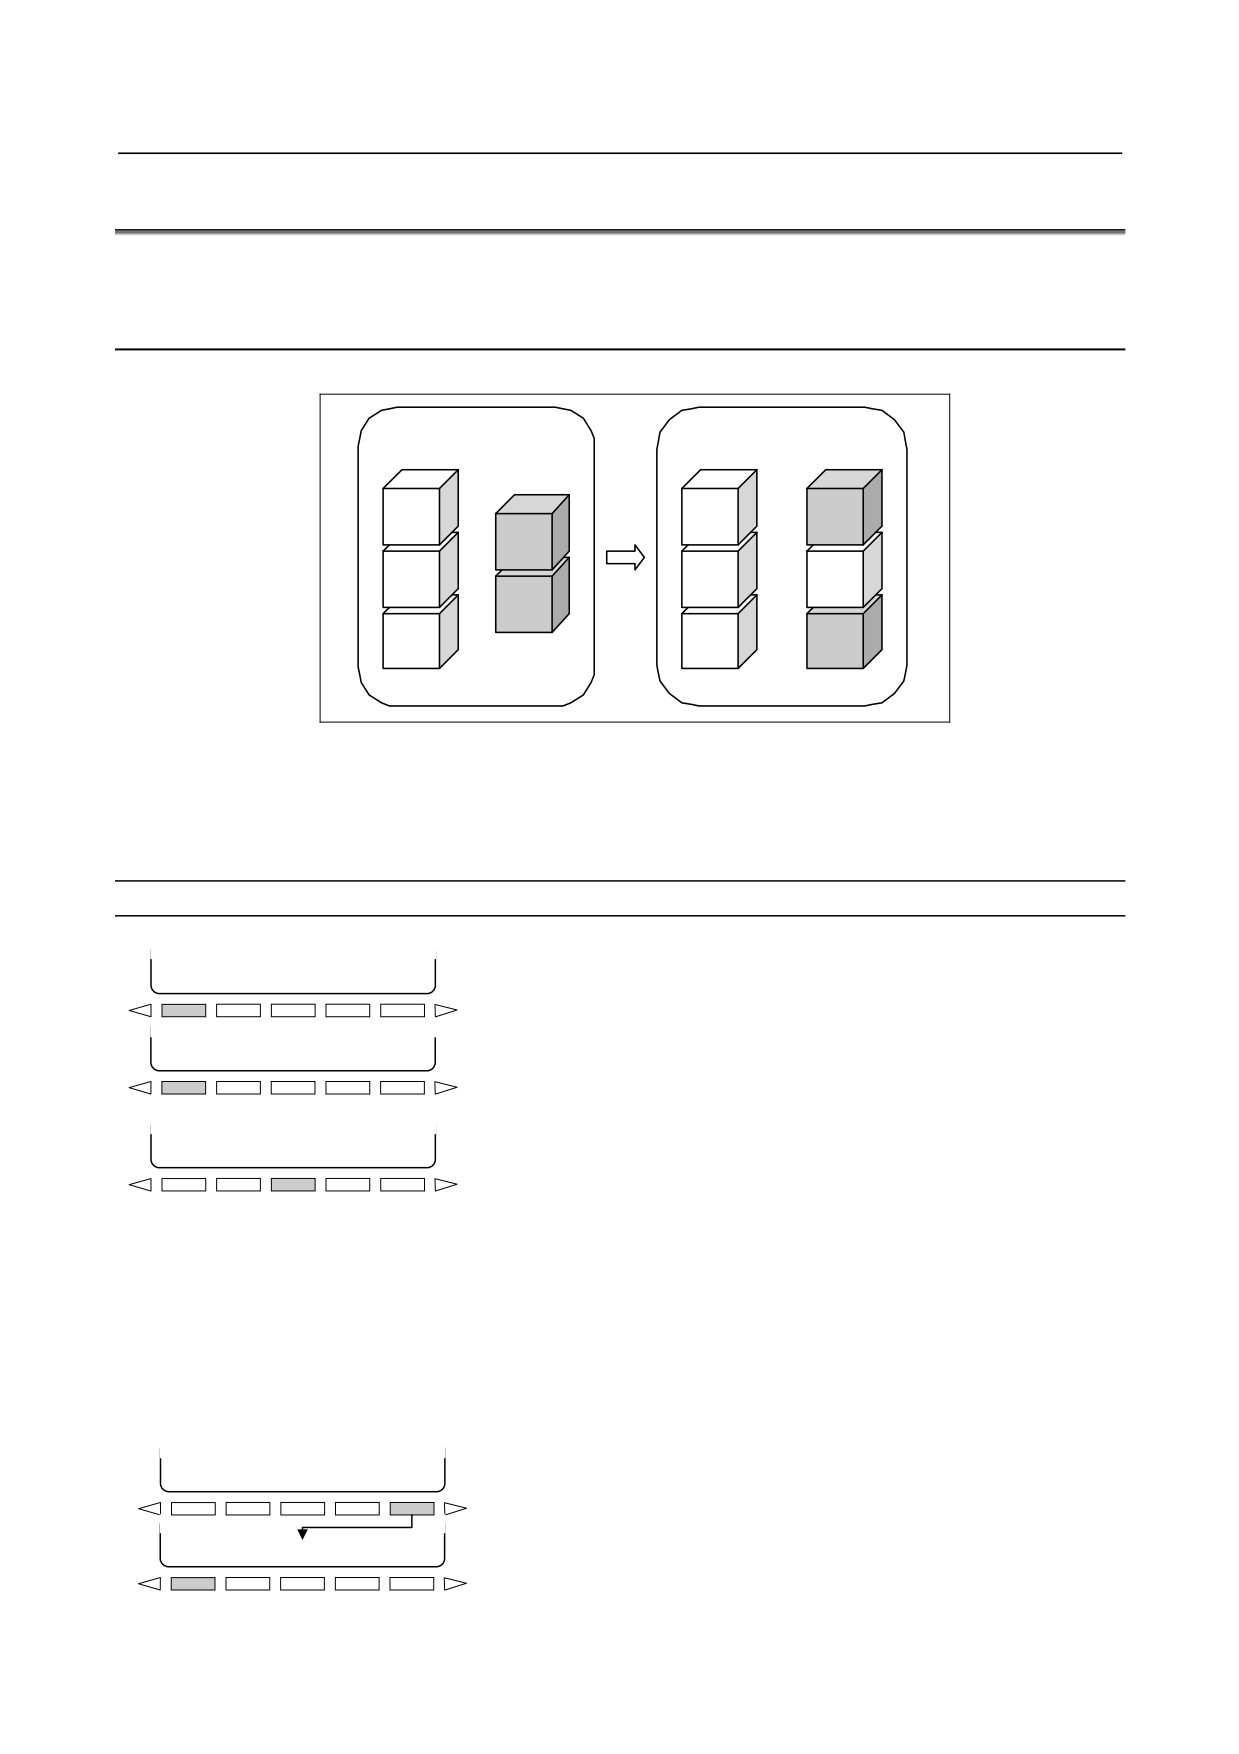
An entire program or a part of a program can be copied or moved.
10.7.1 Copying a Part of a Program
A part of a program being displayed can be copied and pasted to another area.
Before copy
After copy
Oxxxx
Oyyyy
Oxxxx
Oyyyy
A
A
B
B
B
C
C
Fig. 10.7.1 (a) Copying a part of a program
In Fig. 10.7.1 (a), program B of program number xxxx is copied and pasted into the program of program
number yyyy. The program of program number xxxx remains unchanged before and after the copy
operation.
Procedure for copying a part of a program
1.
Move the cursor to a desired copy start position.
2.
Press soft key [SELECT].
[SELECT]
[SEL-ALL]
[COPY]
[CUT]
[PASTE]
3.
When the cursor is moved, the range from the copy start position
[CANCEL] [SEL-ALL]
[COPY]
[CUT]
[PASTE]
to the current cursor position is selected and displayed in the
same color as the cursor color.
To cancel the selection, press soft key [CANCEL].
4.
Press soft key [COPY]. The selected program range is stored in
[CANCEL] [SEL-ALL]
[COPY]
[CUT]
[PASTE]
the copy buffer.
If the size of the selected program range exceeds the capacity of
the copy buffer, the selection is terminated with the warning
message "EXCEED THE CAPACITY OF COPY BUFFER".
If soft key [COPY] is pressed with no program range selected,
the warning message "WORDS ARE NOT SELECTED" is
displayed and the copy buffer is cleared. If the program size of
the selected range exceeds the upper limit of the copy buffer, the
warning message "EXCEED THE CAPACITY OF COPY
BUFFER" is displayed. The selected range is not released.
5.
Search for a paste target program.
6.
Move the cursor to the desired paste position.
[SELECT] [SEL-ALL]
[COPY]
[CUT]
[PASTE]
7.
Press soft key
[PASTE] then press soft key [BUF-EX]. The
contents copied in step 4 are pasted after the cursor. If [BUF-EX]
is pressed when the copy buffer is empty, the warning message
[BUF-EX]
[SPCPRG] [
] [
] [
]
"COPY BUFFER IS EMPTY" is displayed.
- 499 -
10.EDITING PROGRAMS
OPERATION
B-64304EN/02
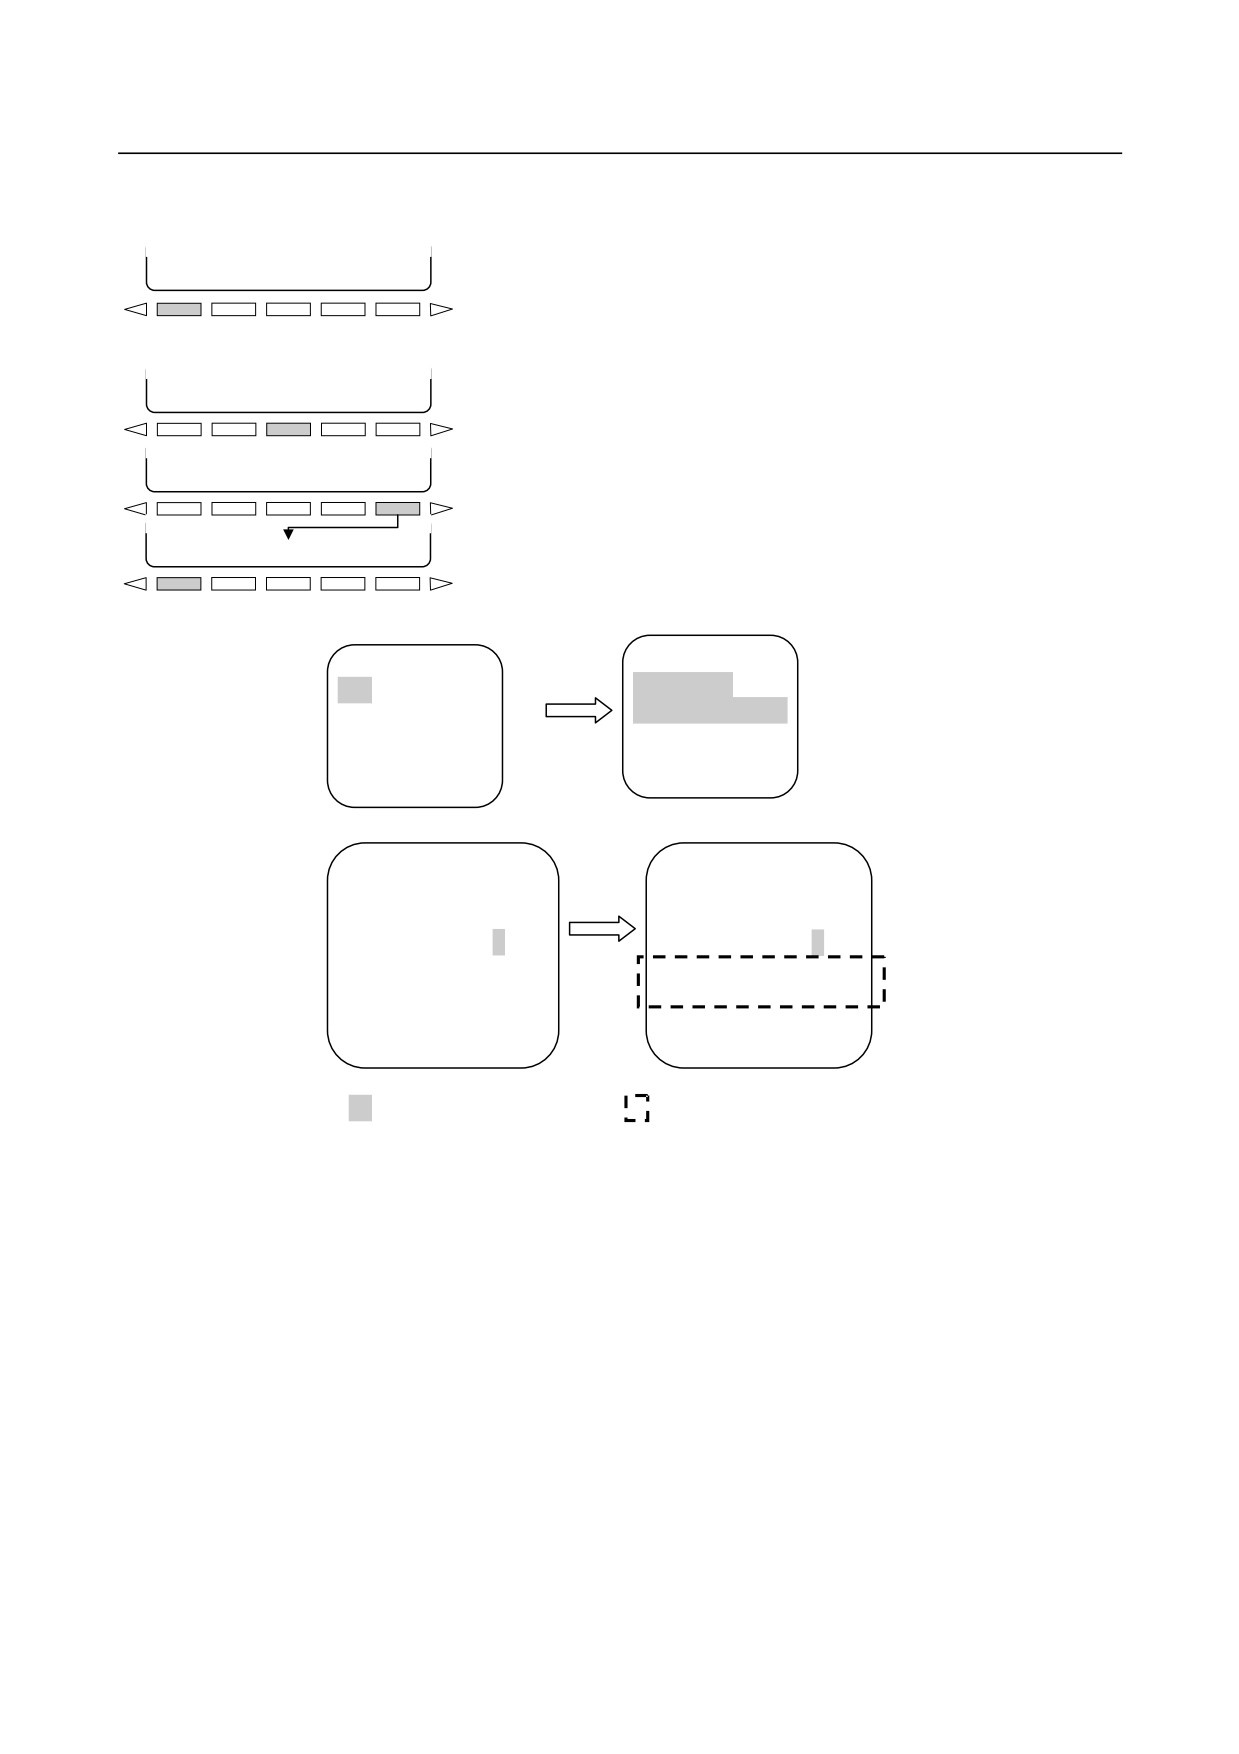
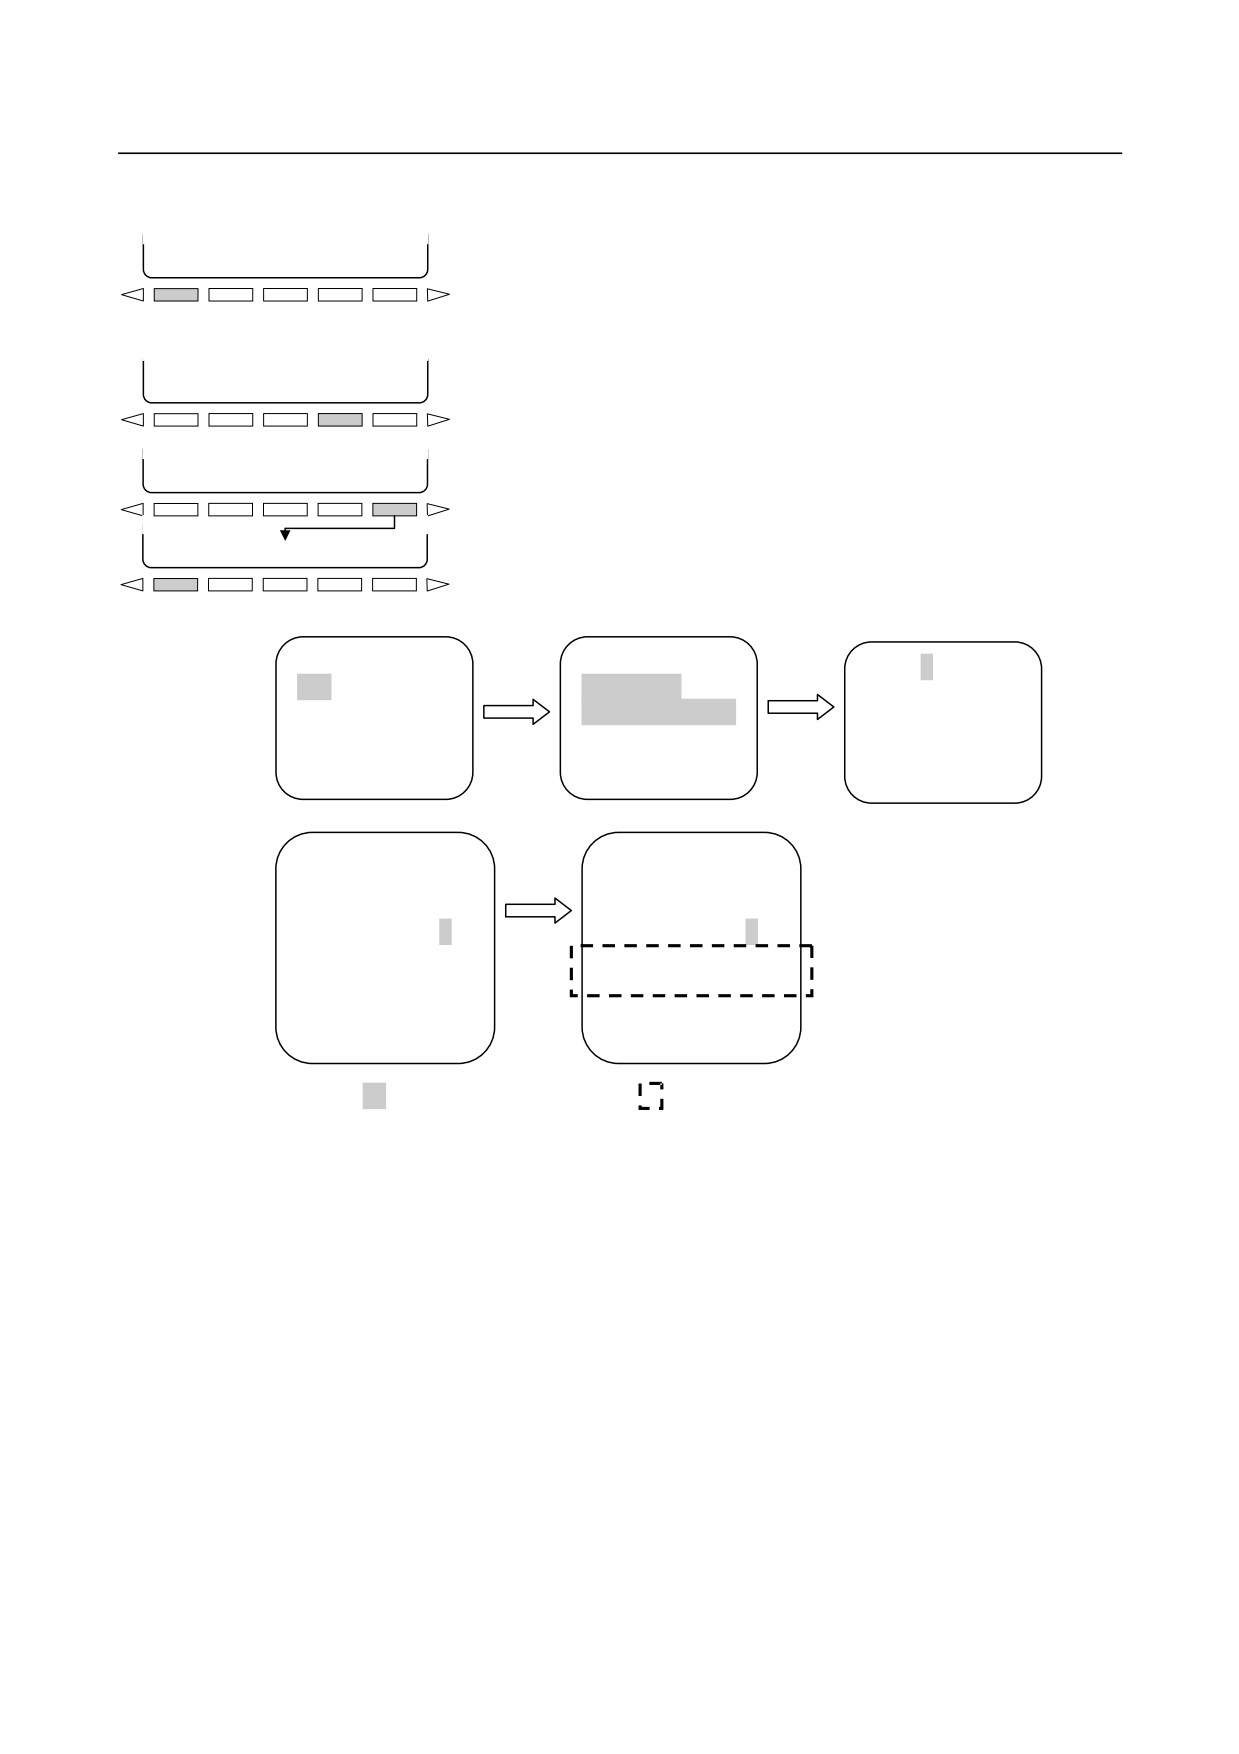
Example 1) A part of O0001 is copied to O0002.
1.
Display O0001 then move the cursor to a desired copy start
position. (<1>)
[SELECT]
[SEL-ALL]
[COPY]
[CUT]
[PASTE]
2.
Press soft key [SELECT].
3.
When the cursor is moved, the range from the copy start position
to the current cursor position is selected and displayed in the
same color as the cursor color. (<3>)
[CANCEL] [SEL-ALL]
[COPY]
[CUT]
[PASTE]
4.
Press soft key [COPY]. The selected program range is stored in
the copy buffer.
5.
Search for O0002 then move the cursor to the position where the
[SELECT]
[SEL-ALL]
[COPY]
[CUT]
[PASTE]
contents copied from O0001 are to be inserted. (<5>)
6.
Press soft key
[PASTE] then press soft key [BUF-EX]. The
contents copied from O0001 are pasted after the cursor. (<6>)
[BUF-EX]
[SPCPRG]
[
]
[
] [
]
<1>
<3>
[SELECT]
+
O0001 ;
O0001 ;
Move cursor.
G00 X0 Y0 ;
G00 X0 Y0 ;
G01 X100.0 F100 ;
G01 X100.0 F100 ;
Y-100.0 ;
Y-100.0 ;
M30 ;
M30 ;
<5>
<6>
O0002 ;
O0002 ;
[PASTE]
N1 G92 X0 Y0;
N1 G92 X0 Y0;
+
N2 G91 G17 G00 Y4.0 ;
N2 G91 G17 G00 Y4.0 ;
N3 G01 Y25.0 F120
;
N3 G01 Y25.0 F120
;
N4 G03 X20.0 R20.0 ;
G00 X0 Y0 ;
N5 G01 X25.0 ;
G01 X100.0 F100 ;
N4 G03 X20.0 R20.0 ;
N5 G01 X25.0 ;
: Cursor & selection range
: Paste range
For convenience of explanation, the cursor of <6> is placed at the same position as for <5>.
Actually, the cursor moves to the last word of pasted contents.
- 500 -
B-64304EN/02
OPERATION
10.EDITING PROGRAMS
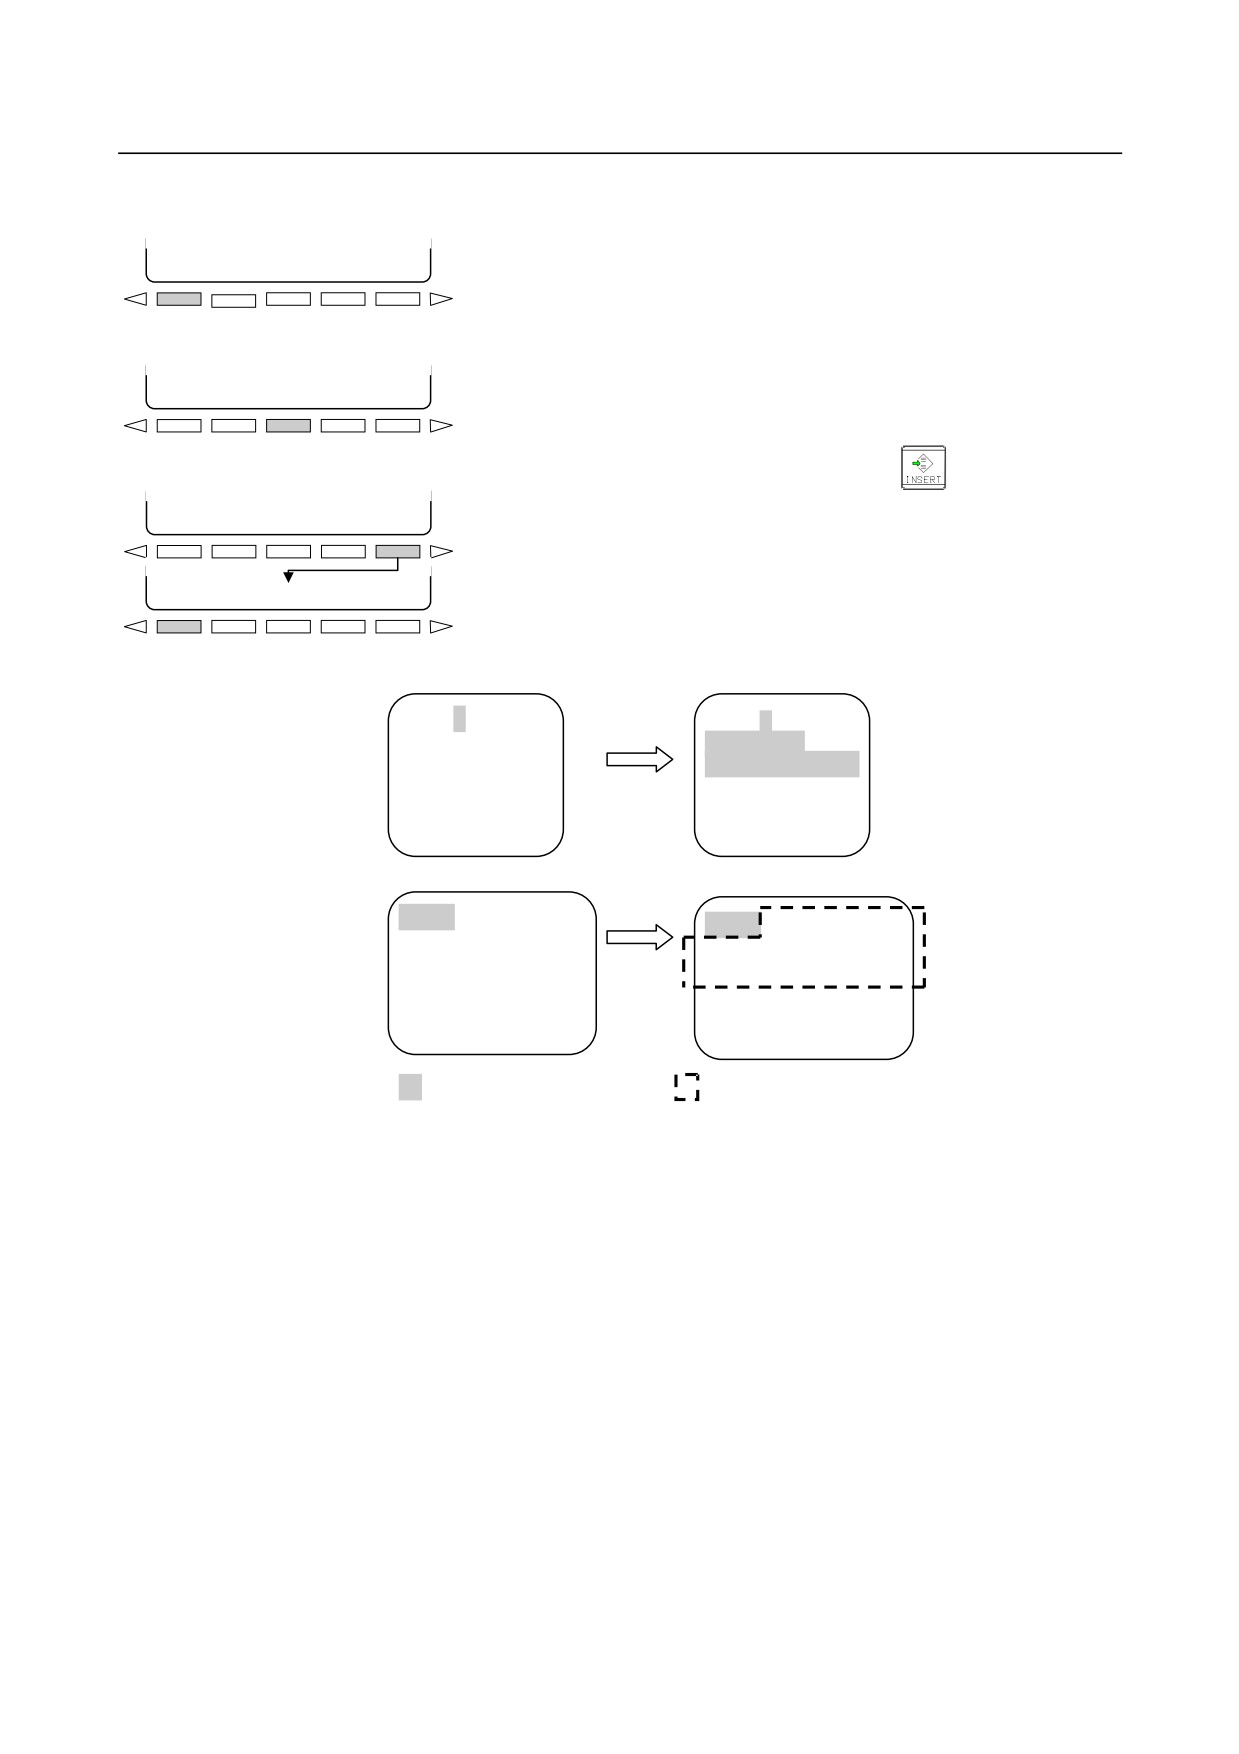
Example 2) A part of O0001 is copied to create O0003 newly.
1.
Display O0001 then move the cursor to a desired copy start
position. (<1>)
[SELECT] [SEL-ALL]
[COPY]
[CUT]
[PASTE]
2.
Press soft key [SELECT].
3.
When the cursor is moved, the range from the copy start position
to the current cursor position is selected and displayed in the
same color as the cursor color. (<3>)
[CANCEL] [SEL-ALL]
[COPY]
[CUT]
[PASTE]
4.
Press soft key [COPY]. The selected program range is stored in
the copy buffer.
5.
Key in "O0003" then press editing key
to create the new
program O0003. (<5>)
[SELECT] [SEL-ALL]
[COPY]
[CUT]
[PASTE]
6.
Press soft key
[PASTE] then press soft key [BUF-EX]. The
contents copied from O0001 are pasted. (<6>)
[BUF-EX]
[SPCPRG] [
] [
] [
]
<1>
<3>
[SELECT]
+
O0001
;
O0001
;
Move cursor.
G00 X0 Y0 ;
G00 X0 Y0 ;
G01 X100.0 F100 ;
G01 X100.0 F100 ;
Y-100.0 ;
Y-100.0 ;
M30 ;
M30 ;
[PASTE]
<5>
<6>
+
O0003
[BUF-EX]
O0003
;
G00 X0 Y0 ;
G01 X100.0 F100 ;
: Cursor & selection range
: Paste range
For convenience of explanation, the cursor of <6> is placed at the same position as for <5>.
Actually, the cursor moves to the last word of pasted contents.
- 501 -
10.EDITING PROGRAMS
OPERATION
B-64304EN/02
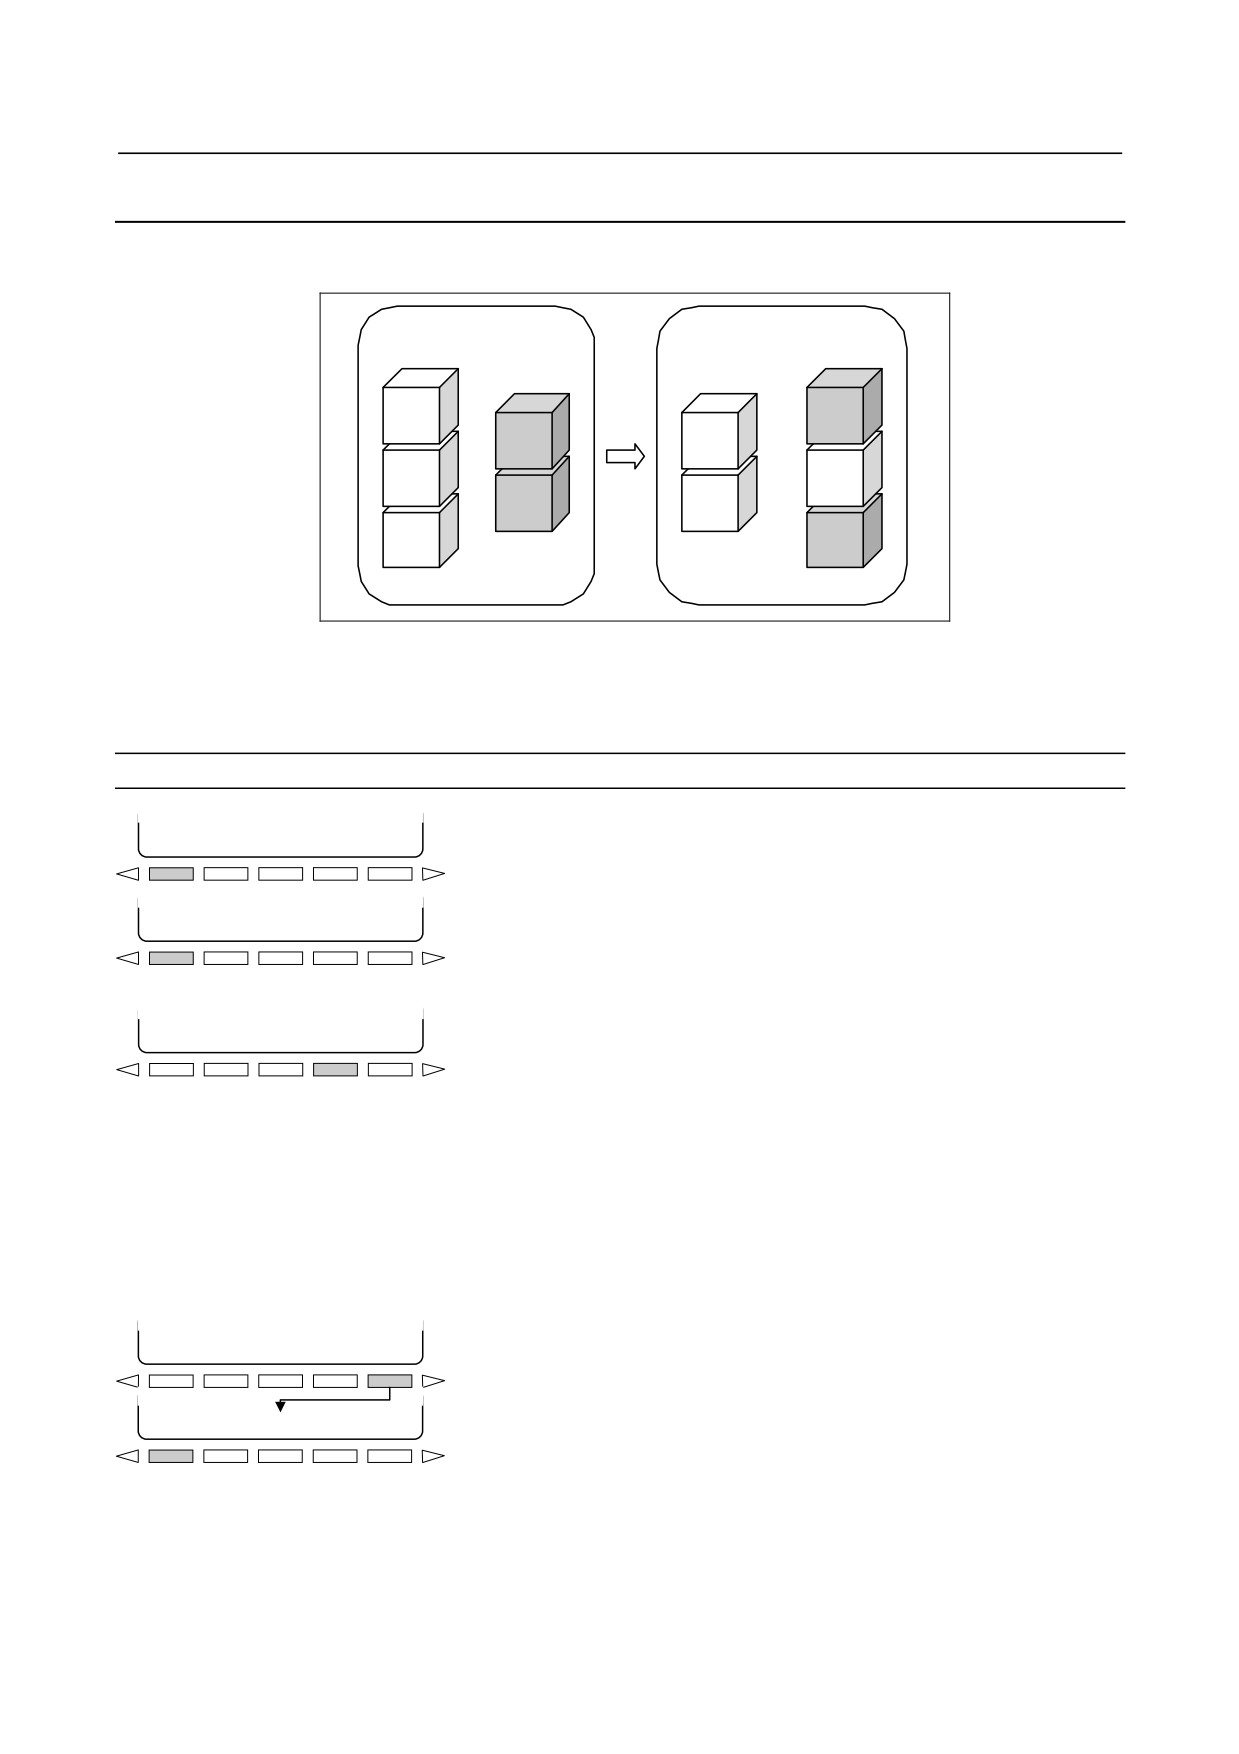
10.7.2 Moving a Part of a Program
A part of a program being displayed can be cut and pasted to another area.
Before move
After move
Oxxxx
Oyyyy
Oxxxx
Oyyyy
A
A
B
B
C
C
Fig. 10.7.2 (a) Moving a part of a program
In Fig. 10.7.2 (a), program B of program number xxxx is cut and pasted into the program of program
number yyyy.
Procedure for moving a part of a program
1.
Move the cursor to a desired cut start position.
[SELECT] [SEL-ALL]
[COPY]
[CUT]
[PASTE]
2.
Press soft key [SELECT].
[CANCEL] [SEL-ALL]
[COPY]
[CUT]
[PASTE]
3.
When the cursor is moved, the range from the cut start position
to the current cursor position is selected and displayed in the
same color as the cursor color.
To cancel the selection, press soft key [CANCEL].
4.
Press soft key [CUT]. The selected program range is stored in the
[CANCEL] [SEL-ALL]
[COPY]
[CUT]
[PASTE]
copy buffer. At the same time, the selected program range is cut.
After the cutting, the cursor moves to before the cut range.
If soft key [CUT] is pressed with no program range selected, the
warning message "WORDS ARE NOT SELECTED" is
displayed and the copy buffer is cleared.
If the program size of the selected range exceeds the upper limit
of the copy buffer, the warning message "EXCEED THE
CAPACITY OF COPY BUFFER" is displayed. The selected
range is not released. In this case, no cut operation is performed.
5.
Search for a paste target program.
6.
Move the cursor to the desired paste position.
[SELECT]
[SEL-ALL]
[COPY]
[CUT]
[PASTE]
7.
Press soft key
[PASTE] then press soft key [BUF-EX]. The
program range cut in step
4 is pasted after the cursor. If
[BUF-EX] is pressed when the copy buffer is empty, the warning
[BUF-EX]
[SPCPRG] [
] [
] [
]
message "COPY BUFFER IS EMPTY" is displayed.
- 502 -
B-64304EN/02
OPERATION
10.EDITING PROGRAMS
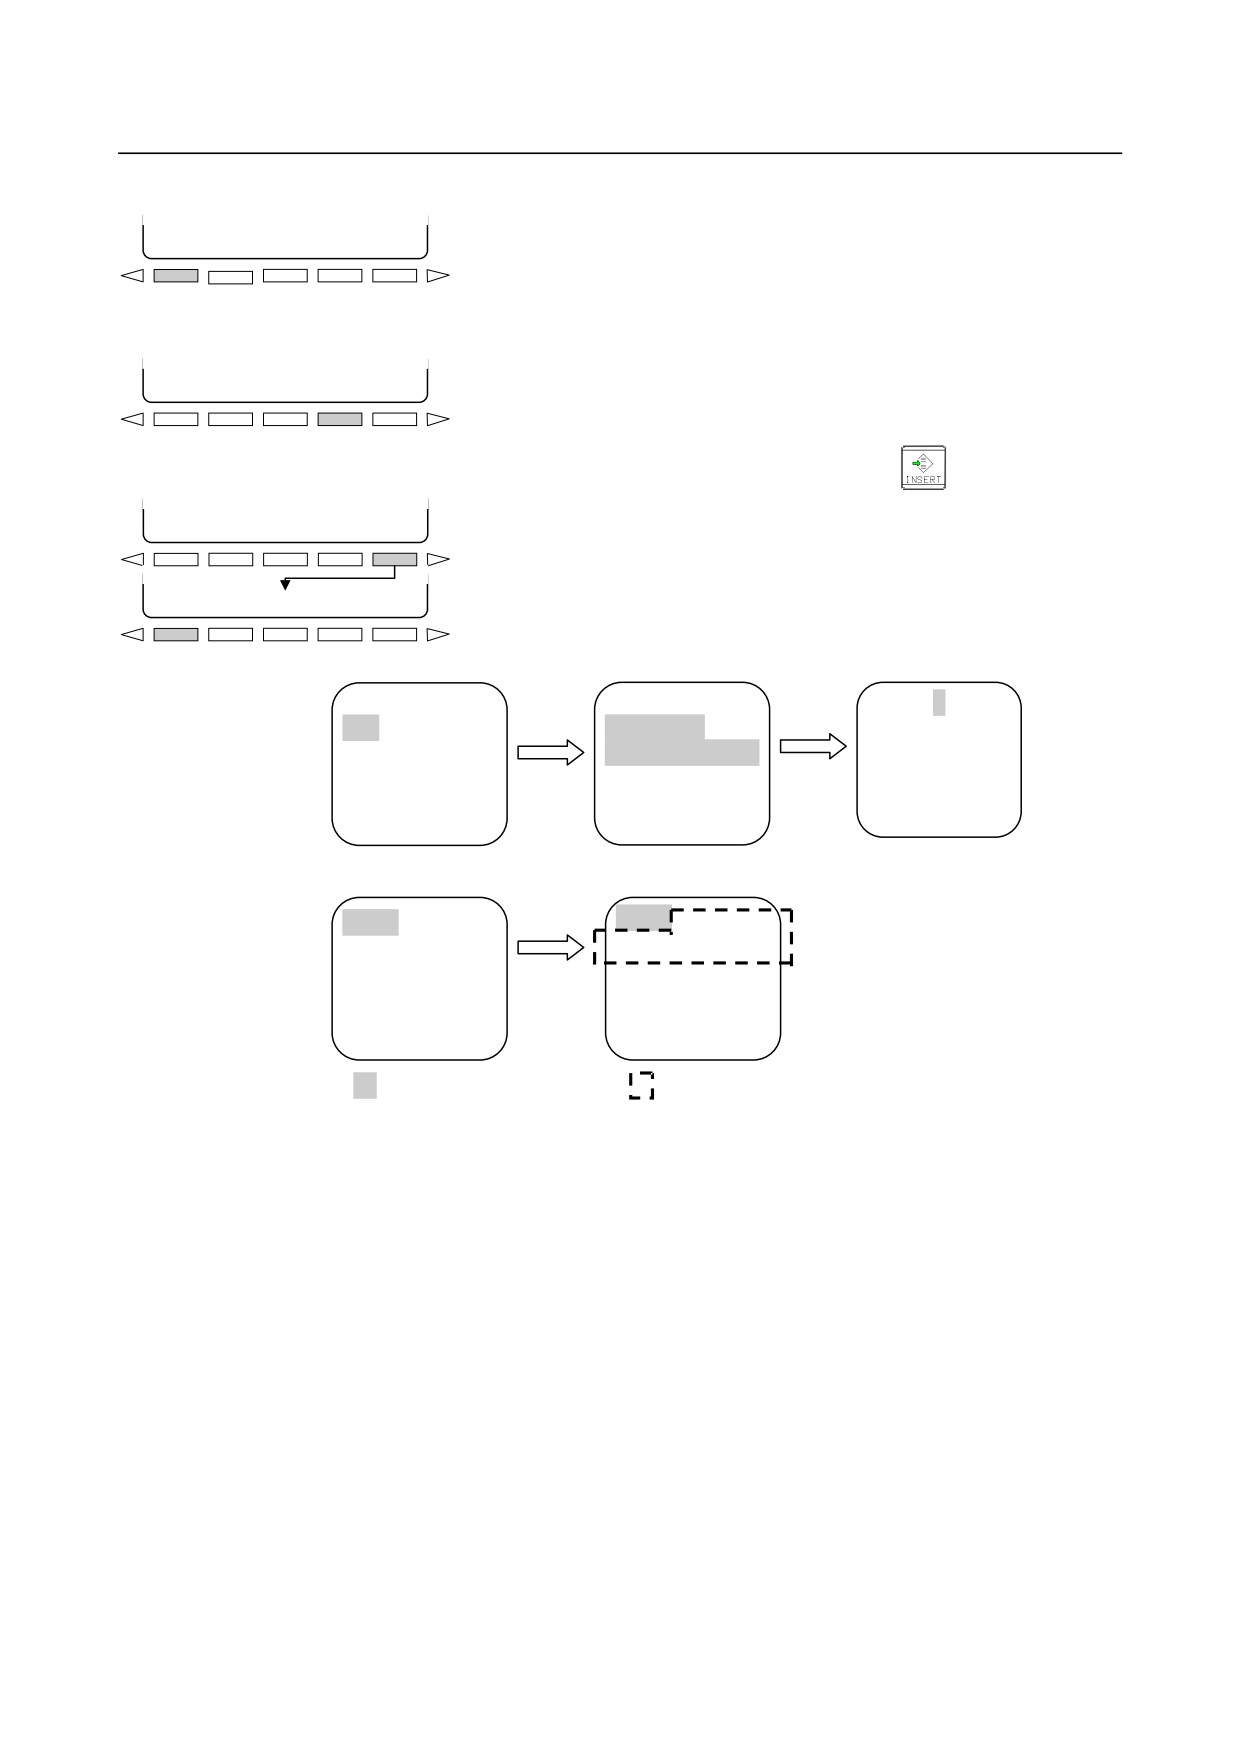
Example 1) A part of O0001 is moved to O0002.
1.
Display O0001 then move the cursor to a desired cut start
position. (<1>)
[SELECT] [SEL-ALL]
[COPY]
[CUT]
[PASTE]
2.
Press soft key [SELECT].
3.
When the cursor is moved, the range from the cut start position
to the current cursor position is selected and displayed in the
same color as the cursor color. (<3>)
[CANCEL] [SEL-ALL]
[COPY]
[CUT]
[PASTE]
4.
Press soft key [CUT]. The selected program range is cut. (<4>)
5.
Search for O0002 then move the cursor to the position where the
contents cut from O0001 are to be inserted. (<5>)
[SELECT] [SEL-ALL]
[COPY]
[CUT]
[PASTE]
6.
Press soft key
[PASTE] then press soft key [BUF-EX].
The
contents cut from O0001 are pasted after the cursor. (<6>)
[BUF-EX]
[SPCPRG]
[
]
[
] [
]
<1>
[SELECT]
<3>
<4>
+
O0001 ;
Move
O0001 ;
O0001
;
[CUT]
G00
X0 Y0 ;
cursor.
G00 X0 Y0 ;
Y-100.0 ;
G01 X100.0 F100 ;
G01 X100.0 F100 ;
M30 ;
Y-100.0 ;
Y-100.0 ;
M30 ;
M30 ;
<5>
<6>
[PASTE]
O0002 ;
O0002 ;
+
N1 G92 X0 Y0;
N1 G92 X0 Y0;
[BUF-EX]
N2 G91 G17 G00 Y4.0 ;
N2 G91 G17 G00 Y4.0 ;
N3 G01 Y25.0 F120
;
N3 G01 Y25.0 F120
;
N4 G03 X20.0 R20.0 ;
G00 X0 Y0 ;
N5 G01 X25.0 ;
G01 X100.0 F100 ;
N4 G03 X20.0 R20.0 ;
N5 G01 X25.0 ;
: Cursor & selection range
: Paste range
For convenience of explanation, the cursor of <6> is placed at the same position as for <5>.
Actually, the cursor moves to the last word of pasted contents.
- 503 -
10.EDITING PROGRAMS
OPERATION
B-64304EN/02
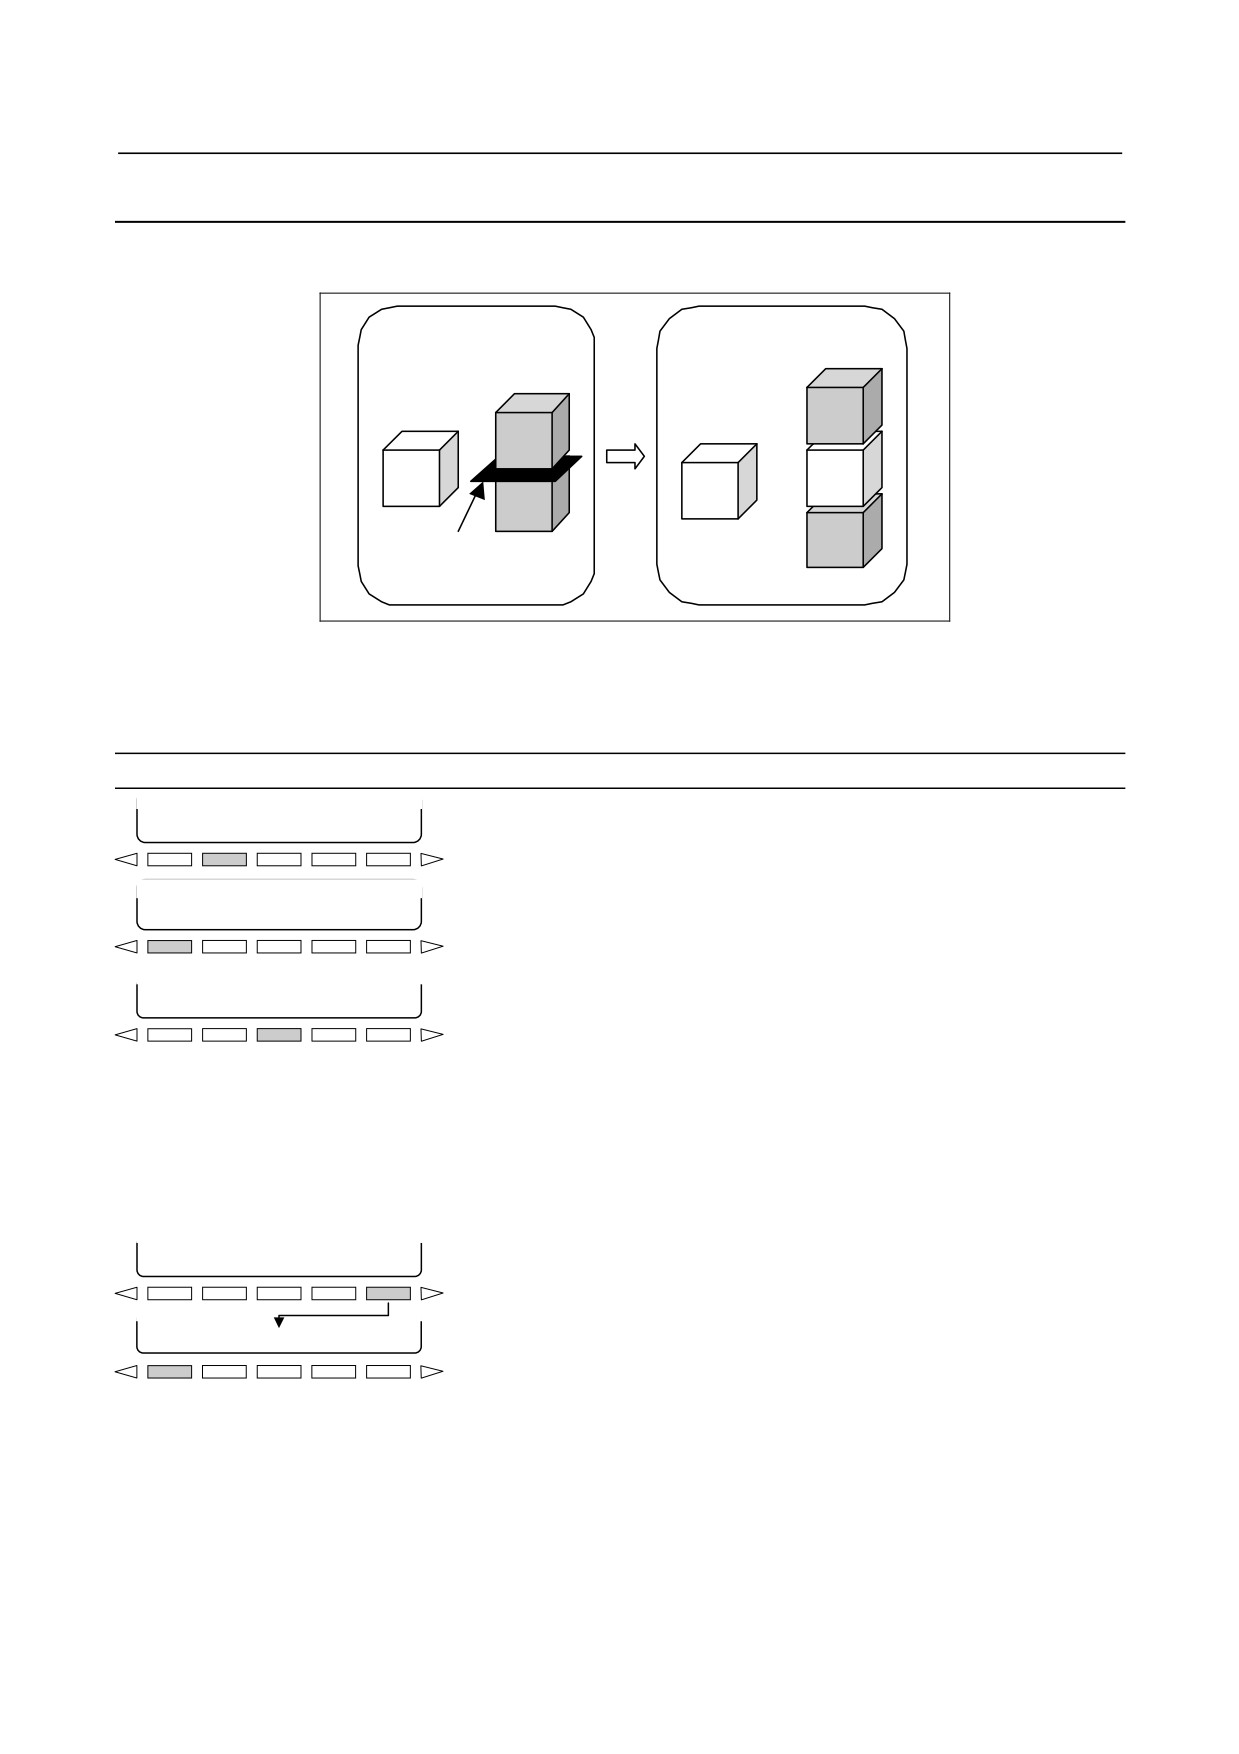
Example 2) A part of O0001 is cut to create O0003 newly.
1.
Display O0001 then move the cursor to a desired cut start
[SELECT]
[SEL-ALL]
[COPY]
[CUT]
[PASTE]
position. (<1>)
2.
Press soft key [SELECT].
3.
When the cursor is moved, the range from the cut start position
to the current cursor position is selected and displayed in the
same color as the cursor color. (<3>)
[CANCEL] [SEL-ALL]
[COPY]
[CUT]
[PASTE]
4.
Press soft key [CUT]. The selected program range is cut. (<4>)
5.
Key in "O0003" then press editing key
to create the new
program O0003. (<5>)
[SELECT] [SEL-ALL]
[COPY]
[CUT]
[PASTE]
6.
Press soft key
[PASTE] then press soft key [BUF-EX]. The
contents cut from O0001 are pasted. (<6>)
[BUF-EX]
[SPCPRG] [
] [
] [
]
<1>
<3>
<4>
[SELECT]
+
O0001 ;
Move
O0001 ;
O0001 ;
[CUT]
G00
X0 Y0 ;
cursor.
G00 X0 Y0 ;
Y-100.0 ;
G01 X100.0 F100 ;
G01 X100.0 F100 ;
M30 ;
Y-100.0 ;
Y-100.0 ;
M30 ;
M30 ;
<5>
<6>
[PASTE]
+
O0003
[BUF-EX]
O0003
G00 X0 Y0 ;
G01 X100.0 F100 ;
: Cursor & selection range
: Paste range
For convenience of explanation, the cursor of <6> is placed at the same position as for <5>.
Actually, the cursor moves to the last word of pasted contents.
- 504 -
B-64304EN/02
OPERATION
10.EDITING PROGRAMS
10.7.3 Copying an Entire Program
An entire program can be copied and pasted to another area.
Before copy
After copy
Oxxxx
Oyyyy
Oxxxx
Oyyyy
A
A
A
Insertion
position
Fig. 10.7.3 (a)
In Fig. 10.7.3 (a), the program of program number xxxx is inserted into the program of program number
yyyy. The program of program number xxxx remains unchanged before and after the insertion.
Procedure for copying an entire program
1.
Display a program to be copied.
[SELECT]
[SEL-ALL]
[COPY]
[CUT]
[PASTE]
2.
Press soft key
[SEL-ALL]. The entire program except its O
number is selected and displayed in the same color as the cursor
color.
[CANCEL] [SEL-ALL]
[COPY]
[CUT]
[PASTE]
To cancel the selection, press soft key [CANCEL].
[SELECT] [SEL-ALL]
[COPY]
[CUT]
[PASTE]
3.
Press soft key [COPY]. The entire program is stored in the copy
buffer.
If soft key [COPY] is pressed with no program range selected,
the warning message "WORDS ARE NOT SELECTED" is
displayed and the copy buffer is cleared. If the program size of
the selected range exceeds the upper limit of the copy buffer, the
warning message "EXCEED THE CAPACITY OF COPY
BUFFER" is displayed. The selected range is not released.
4.
Search for a paste target program.
[SELECT] [SEL-ALL]
[COPY]
[CUT]
[PASTE]
5.
Move the cursor to the desired paste position.
6.
Press soft key
[PASTE] then press soft key [BUF-EX]. The
contents copied in step 3 are pasted after the cursor. If [BUF-EX]
[BUF-EX]
[SPCPRG] [
] [
] [
]
is pressed when the copy buffer is empty, the warning message
"COPY BUFFER IS EMPTY" is displayed.
- 505 -
10.EDITING PROGRAMS
OPERATION
B-64304EN/02
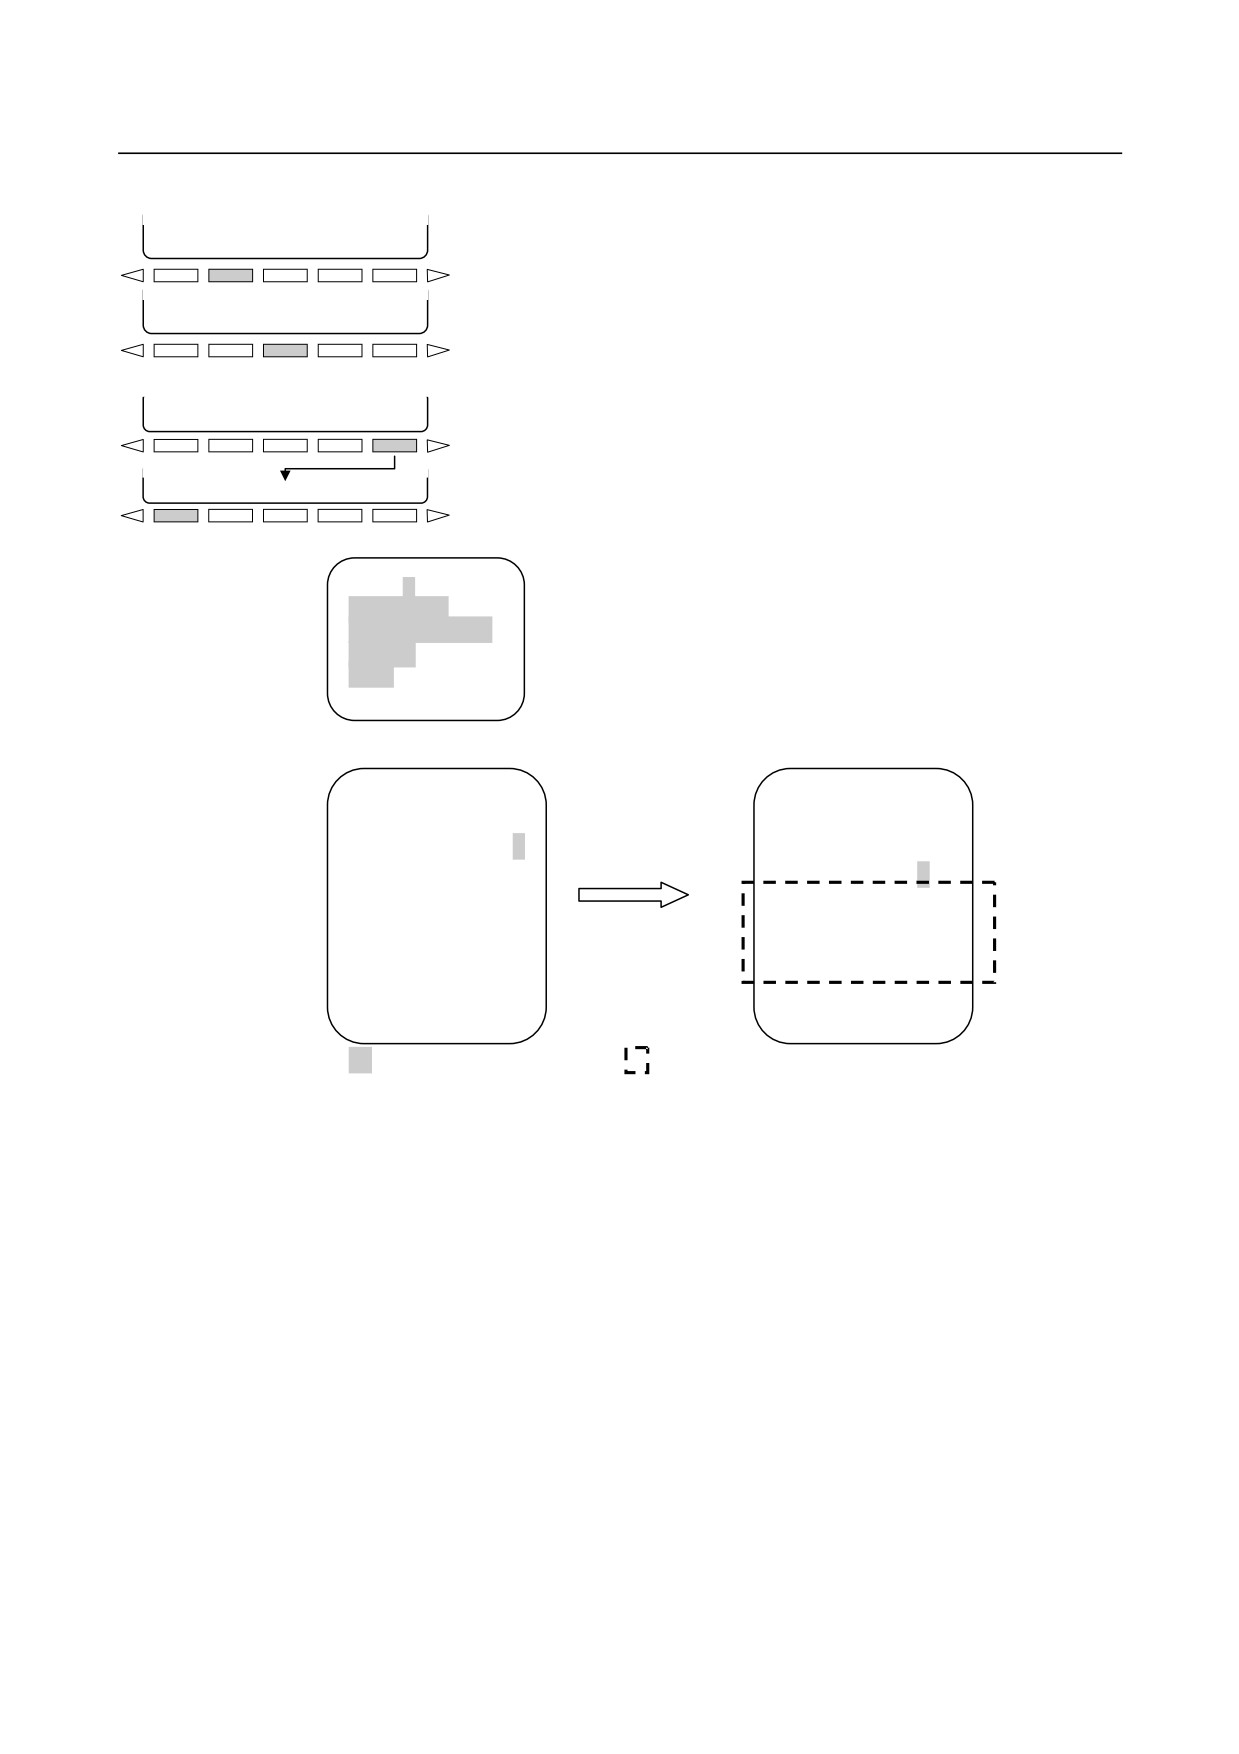
Example) O0001 is copied and pasted to O0002.
1.
Display O0001 then press soft key
[SEL-ALL]. The entire
[SELECT] [SEL-ALL]
[COPY]
[CUT]
[PASTE]
program is selected and highlighted in the same color as the
cursor color. (<1>)
2.
Press soft key [COPY].
[SELECT] [SEL-ALL]
[COPY]
[CUT]
[PASTE]
3.
Display O0002 then move the cursor to the desired O0001
insertion position. (<3>)
4.
Press soft key [PASTE] then press soft key [BUF-EX]. O0001 is
[SELECT] [SEL-ALL]
[COPY]
[CUT]
[PASTE]
pasted after the cursor. (<4>)
[BUF-EX]
[SPCPRG] [
] [
]
[
]
<1>
O0001
;
G00 X0 Y0 ;
G01 X100.0 F100 ;
Y-100.0 ;
M30 ;
<3>
<4>
O0002 ;
O0002 ;
N1 G92 X0 Y0;
N1 G92 X0 Y0;
[PASTE]
N2 G91 G17 G00 Y4.0
;
N2 G91 G17 G00 Y4.0 ;
+
N3 G01 Y25.0 F120 ;
[BUF-EX]
N3 G01 Y25.0 F120
;
N4 G03 X20.0 R20.0 ;
G00 X0 Y0 ;
N5 G01 X25.0 ;
G01 X100.0 F100 ;
Y-100.0 ;
M30 ;
N4 G03 X20.0 R20.0 ;
N5 G01 X25.0 ;
: Cursor & selection range
: Paste range
For convenience of explanation, the cursor of <4> is placed at the same position as for <3>.
Actually, the cursor moves to the last word of pasted contents.
- 506 -
B-64304EN/02
OPERATION
10.EDITING PROGRAMS
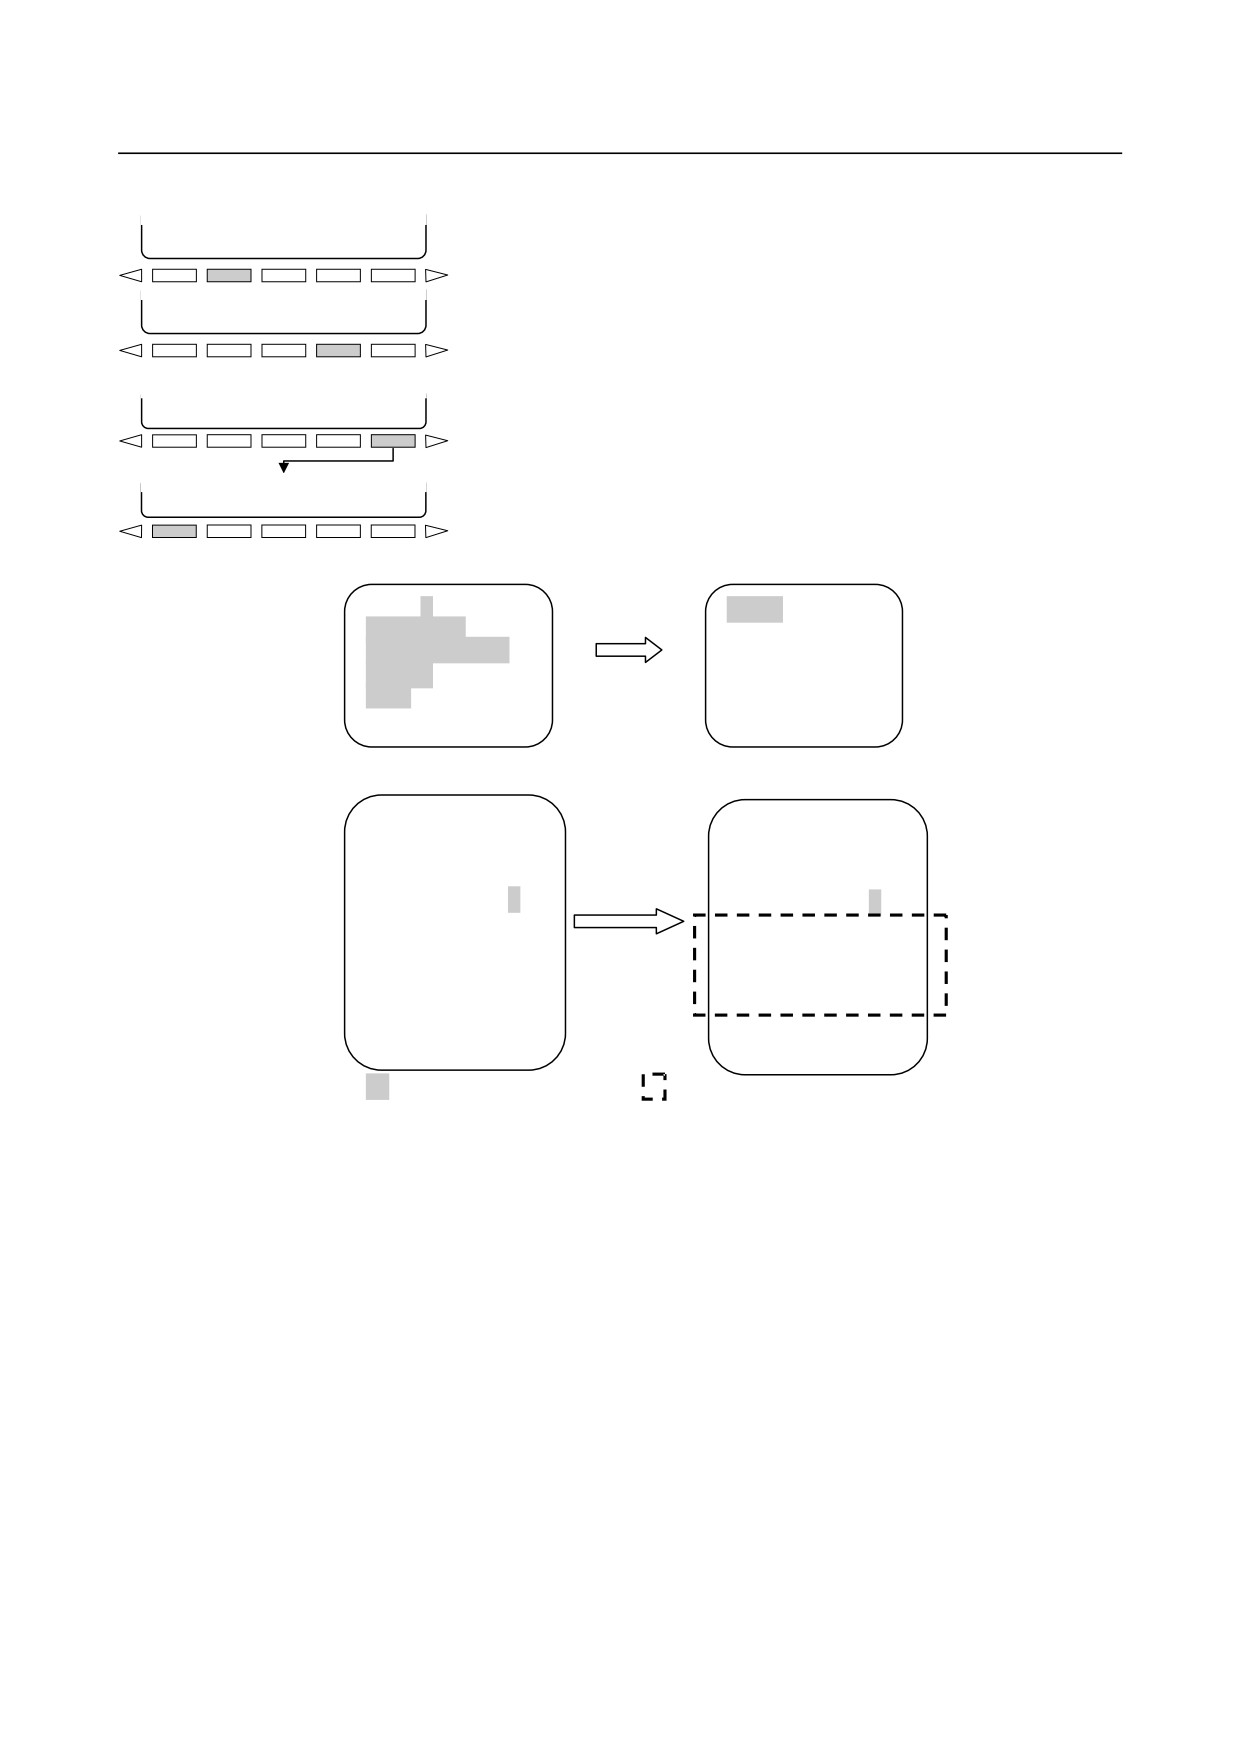
10.7.4 Moving an Entire Program
An entire program can be cut and pasted to another area.
Before move
After move
Oxxxx
Oyyyy
Oxxxx
Oyyyy
A
A
A
Insertion
position
Fig. 10.7.4 (a)
In Fig. 10.7.4 (a), the program of program number xxxx is inserted into the program of program number
yyyy. The contents of the program of program number xxxx are deleted. However, the deleted program
remains as an empty program.
Procedure for moving an entire program
1.
Display a program to be cut.
[SELECT]
[SEL-ALL]
[COPY]
[CUT]
[PASTE]
2.
Press soft key
[SEL-ALL]. The entire program except its O
number is selected and displayed in the same color as the cursor
[CANCEL] [SEL-ALL]
[COPY]
[CUT]
[PASTE]
color.
To cancel the selection, press soft key [CANCEL].
[SELECT] [SEL-ALL]
[COPY]
[CUT]
[PASTE]
3.
Press soft key [CUT]. The entire program is stored in the copy
buffer. At the same time, the contents of the program are cut.
If soft key [CUT] is pressed with no program range selected, the
warning message "WORDS ARE NOT SELECTED" is
displayed and the copy buffer is cleared. If the program size of
the selected range exceeds the upper limit of the copy buffer, the
warning message "EXCEED THE CAPACITY OF COPY
BUFFER" is displayed. The selected range is not released. In
this case, no cut operation is performed.
4.
Search for a paste target program.
[SELECT] [SEL-ALL]
[COPY]
[CUT]
[PASTE]
5.
Move the cursor to the desired paste position.
6.
Press soft key
[PASTE] then press soft key [BUF-EX]. The
program cut in step 3 is pasted after the cursor. If [BUF-EX] is
[BUF-EX]
[SPCPRG] [
] [
] [
]
pressed when the copy buffer is empty, the warning message
"COPY BUFFER IS EMPTY" is displayed.
- 507 -
10.EDITING PROGRAMS
OPERATION
B-64304EN/02
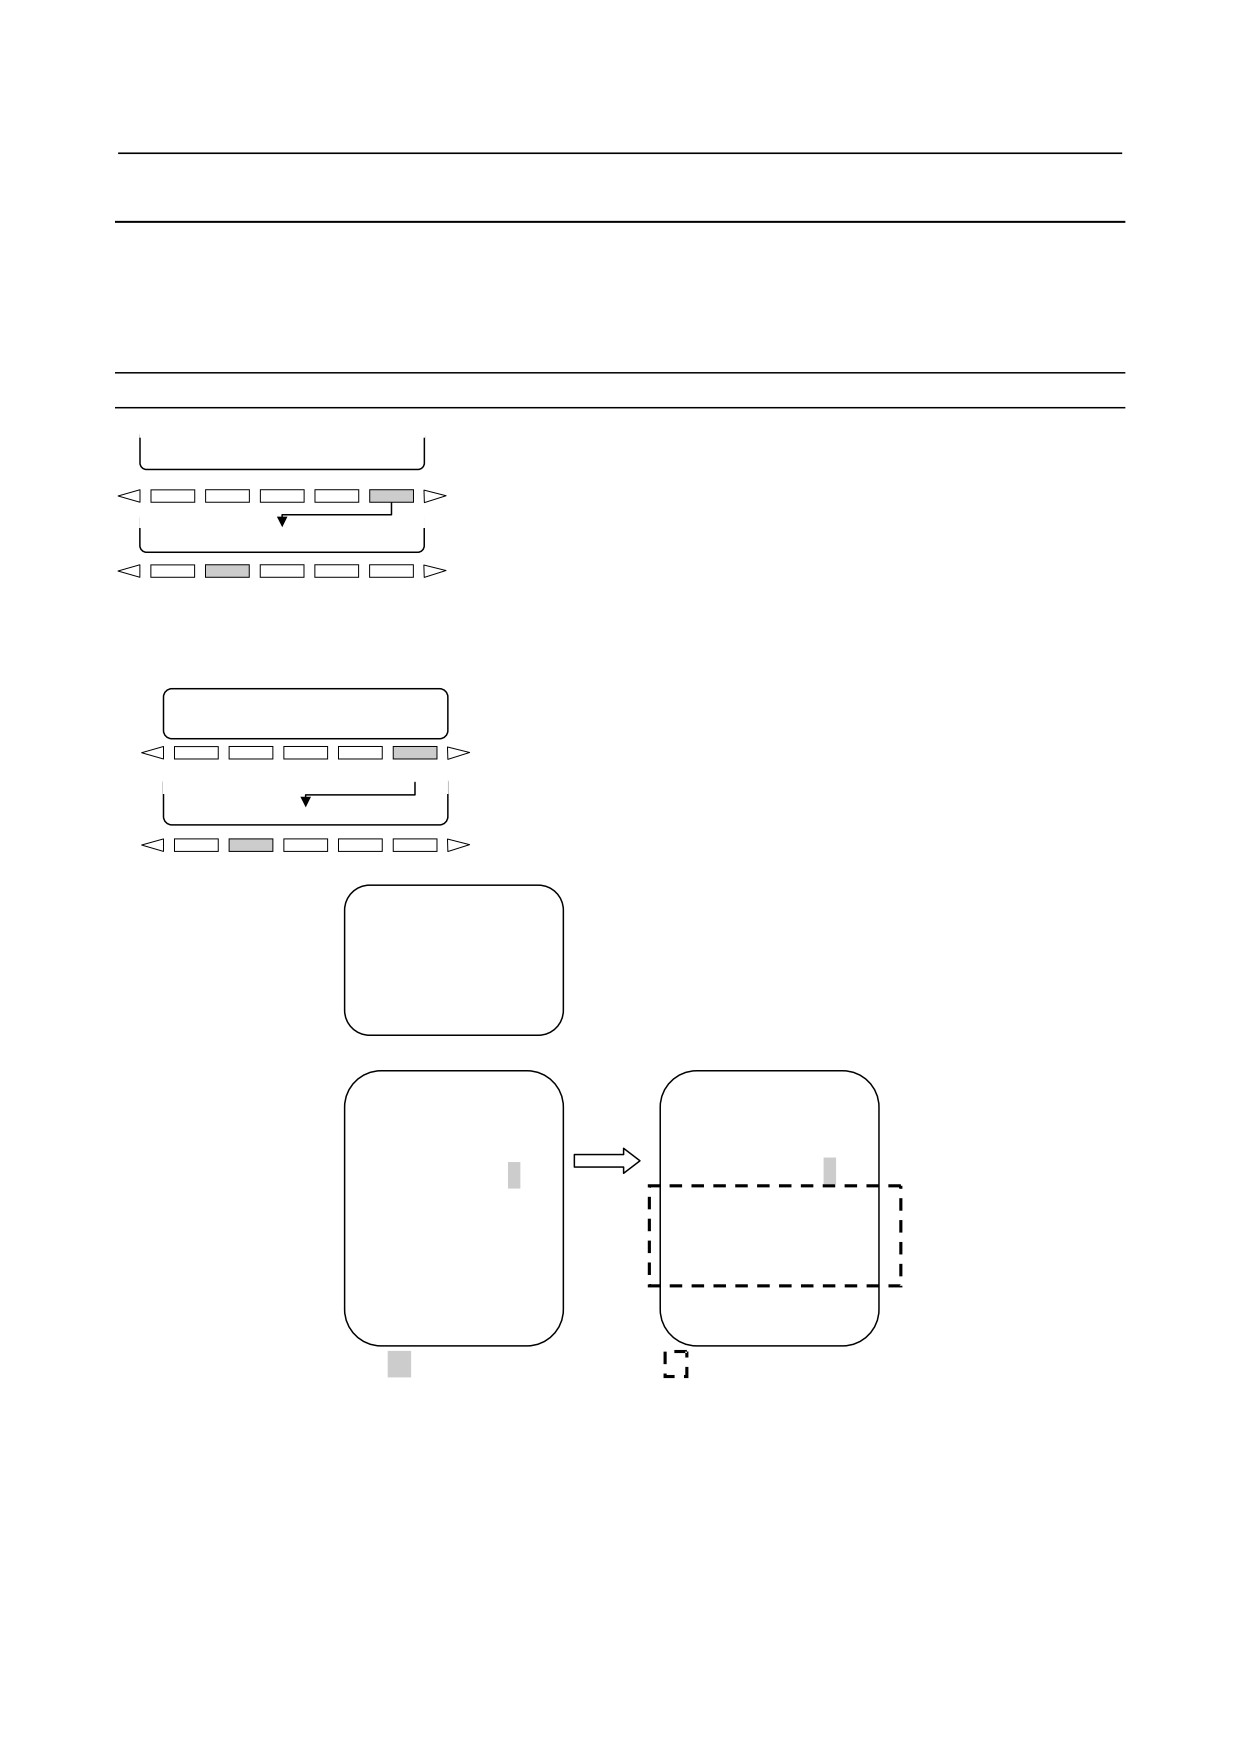
Example) O0001 is cut and pasted to O0002.
1.
Display O0001 then press soft key
[SEL-ALL]. The entire
[SELECT] [SEL-ALL]
[COPY]
[CUT]
[PASTE]
program is selected and highlighted in the same color as the
cursor color. (<1>)
2.
Press soft key [CUT].
[SELECT] [SEL-ALL]
[COPY]
[CUT]
[PASTE]
3.
Display O0002 then move the cursor to the desired O0001
insertion position. (<3>)
4.
Press soft key [PASTE] then press soft key [BUF-EX]. O0001 is
[SELECT] [SEL-ALL]
[COPY]
[CUT]
[PASTE]
pasted after the cursor. (<4>)
[BUF-EX]
[SPCPRG]
[
] [
] [
]
<1>
O0001
;
O0001
G00 X0 Y0 ;
[CUT]
G01 X100.0 F100 ;
Y-100.0 ;
M30 ;
<3>
<4>
O0002 ;
O0002 ;
N1 G92 X0 Y0;
N1 G92 X0 Y0;
[PASTE]
N2 G91 G17 G00 Y4.0 ;
+
N2 G91 G17 G00 Y4.0 ;
N3 G01 Y25.0 F120
;
[BUF-EX]
N3 G01 Y25.0 F120 ;
N4 G03 X20.0 R20.0 ;
G00 X0 Y0 ;
N5 G01 X25.0 ;
G01 X100.0 F100 ;
Y-100.0 ;
M30 ;
N4 G03 X20.0 R20.0 ;
N5 G01 X25.0 ;
: Cursor & selection range
: Paste range
For convenience of explanation, the cursor of <4> is placed at the same position as for <3>.
Actually, the cursor moves to the last word of pasted contents.
- 508 -
B-64304EN/02
OPERATION
10.EDITING PROGRAMS
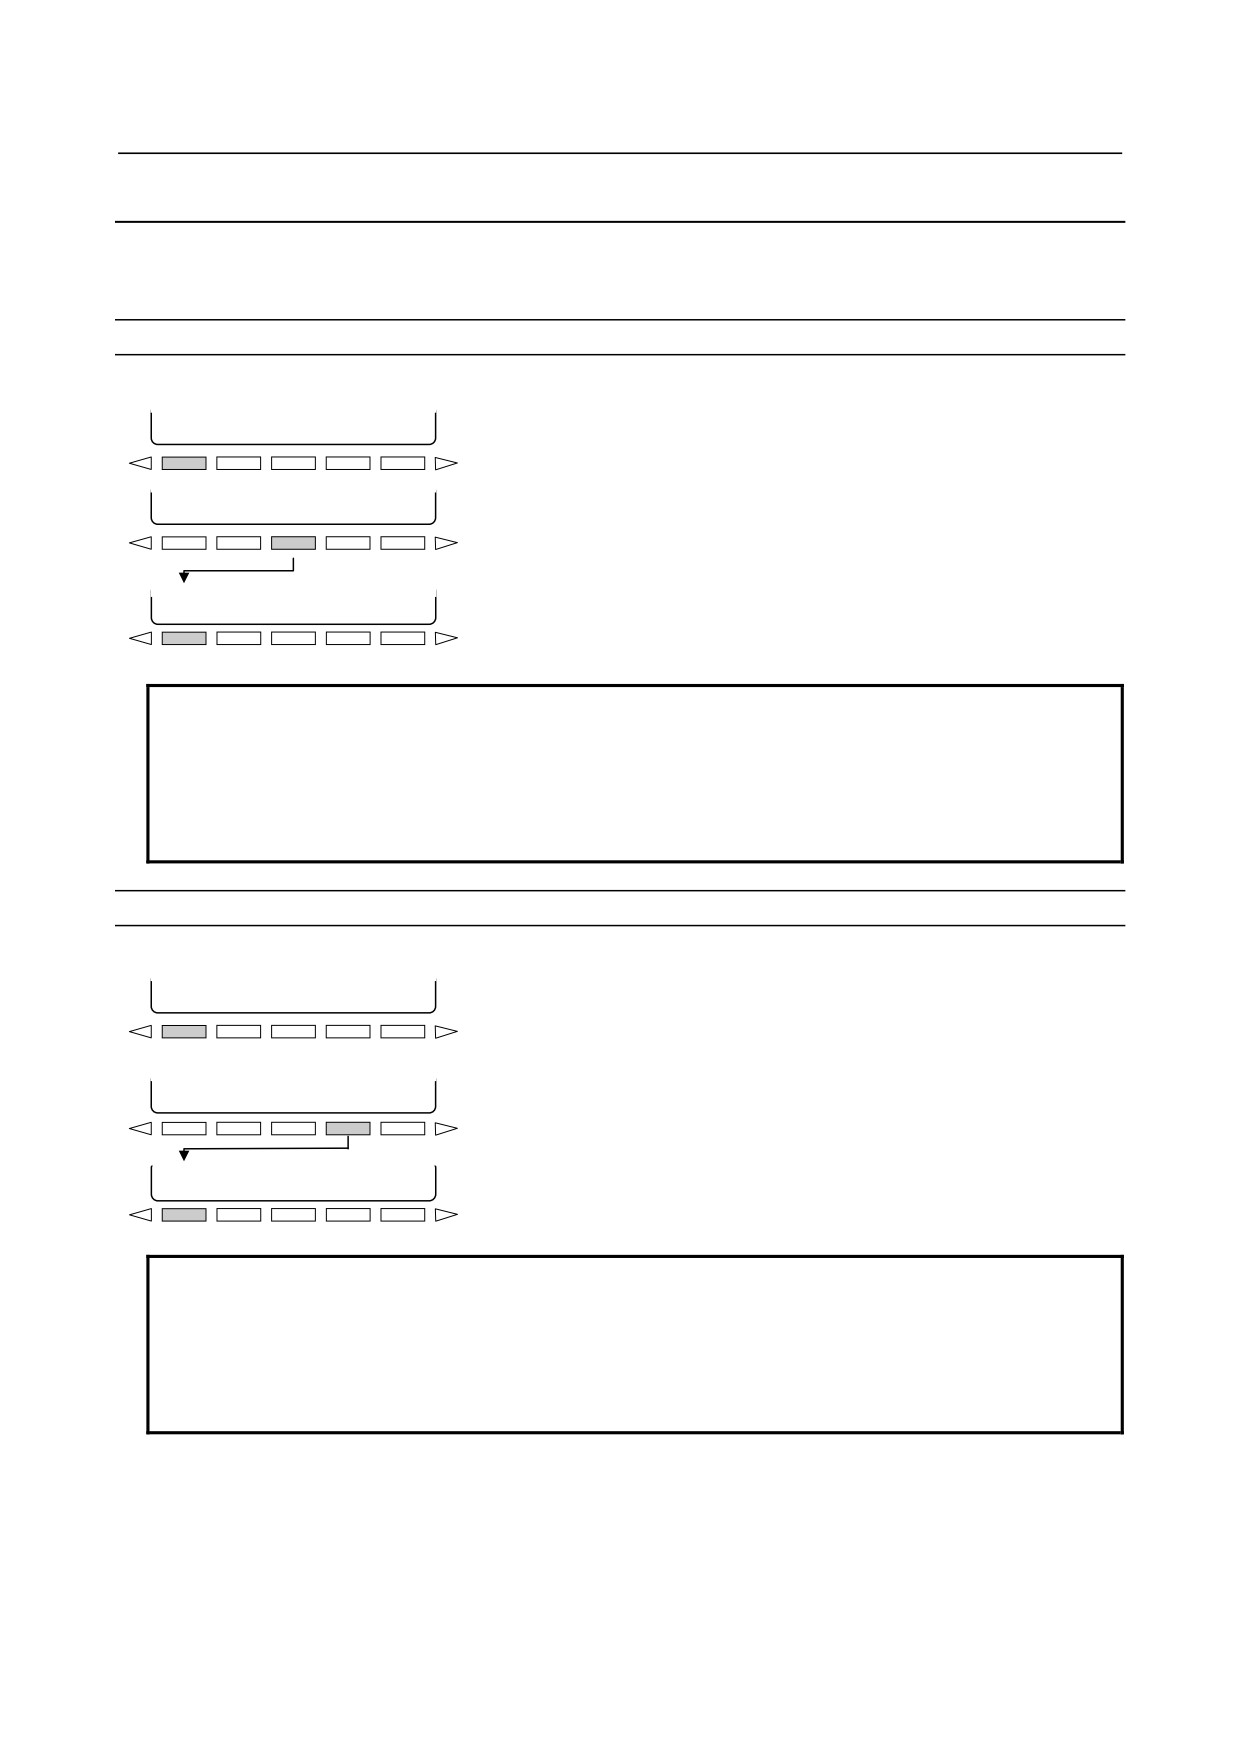
10.7.5 Copy Specifying a Program Number
An entire program can be copied to the current cursor position by specifying its program number.
With this function, an entire program can be copied easily.
Even when the size of a program exceeds the capacity of the copy buffer, the entire program can be
copied.
Procedure for copying a program by specifying its program number
1.
Display a paste target program then move the cursor immediately
[SELECT] [SEL-ALL]
[COPY]
[CUT]
[PASTE]
before the desired paste position.
2.
Press soft key [PASTE] then key in the program number of a
program to be pasted. Next, press [SPCPRG]. The program of the
[BUF-EX]
[SPCPRG] [
] [
] [
]
program number keyed in is pasted after the cursor. When
[SPCPRG] is pressed with no program number selected, the
warning message "PROGRAM IS NOT SPECIFIED" is
displayed.
Example) O0001 is copied and pasted to O0002.
1.
Search for O0002 then move the cursor to the desired O0001
[SELECT] [SEL-ALL]
[COPY]
[CUT]
[PASTE]
insertion position. (<1>)
2.
Press soft key
[PASTE] then key in "O0001". Next, press
[SPCPRG]. O0001 is pasted after the cursor. (<2>)
[
] [
] [
]
[BUF-EX]
[SPCPRG]
O0001 G00 X0 Y0 ;
G01 X100.0 F100 ;
Y-100.0 ;
M30 ;
<1>
<2>
“O0001”
O0002 ;
+
O0002 ;
N1 G92 X0 Y0;
[SPCPRG]
N1 G92 X0 Y0;
N2 G91 G17 G00 Y4.0 ;
N2 G91 G17 G00 Y4.0 ;
N3 G01 Y25.0 F120
;
N3 G01 Y25.0 F120
;
N4 G03 X20.0 R20.0 ;
G00 X0 Y0 ;
Copied from
N5 G01 X25.0 ;
G01 X100.0 F100 ;
O0001
Y-100.0 ;
M30 ;
N4 G03 X20.0 R20.0 ;
N5 G01 X25.0 ;
: Cursor & selection range
: Paste range
For convenience of explanation, the cursor of <2> is placed at the same position as for <1>.
Actually, the cursor moves to the last word of pasted contents.
- 509 -
10.EDITING PROGRAMS
OPERATION
B-64304EN/02
10.7.6 Copying/Moving to the Key-in Buffer
The copy/move destination of a selected word is changed from the copy buffer to the key-in buffer. With
this function, the user can perform editing while checking contents to be copied/moved.
Procedure: Copying to the key-in buffer
1.
Set bit 2 of parameter No. 3205 to 1.
2.
Display a desired program.
[SELECT] [SEL-ALL]
[COPY]
[CUT]
[PASTE]
3.
Press soft key [SELECT].
4.
When the cursor is moved, the range from the copy start position
to the current cursor position is selected and displayed in the
[SELECT] [SEL-ALL]
[COPY]
[CUT]
[PASTE]
same color as the cursor color.
5.
If soft key
[COPY] is pressed with no range selected, the
warning message "WORDS ARE NOT SELECTED" is
displayed and the copy buffer is cleared. Press soft key [COPY]
[KEYIN] [COPYBUF][
] [
] [
]
then press soft key [KEYIN]. The selected word range is input to
the key-in buffer.
NOTE
1 When performing a normal copy operation, press soft key [COPY] then press
[COPYBUF].
2 Up to 127 characters can be copied. If [KEYIN] is pressed when more than 127
characters are selected, the warning message "EXCEED THE CAPACITY OF
KEYIN BUFFER" is displayed.
Procedure: Moving to the key-in buffer
1.
Set bit 2 of parameter No. 3205 to 1.
2.
Display a desired program.
[SELECT] [SEL-ALL]
[COPY]
[CUT]
[PASTE]
3.
Press soft key [SELECT].
4.
When the cursor is moved, the range from the cut start position
to the current cursor position is selected and displayed in the
same color as the cursor color.
[SELECT] [SEL-ALL]
[COPY]
[CUT]
[PASTE]
5.
Press soft key [CUT] then press soft key [KEYIN]. The selected
word range is input to the key-in buffer.
[KEYIN] [COPYBUF][
] [
] [
]
NOTE
1 When performing a normal move operation, press soft key [CUT] then press
[COPYBUF].
2 Up to 127 characters can be moved. If [KEYIN] is pressed when more than 127
characters are selected, the warning message "EXCEED THE CAPACITY OF
KEYIN BUFFER" is displayed.
- 510 -
B-64304EN/02
OPERATION
10.EDITING PROGRAMS
10.8 REPLACING
A string in a program is replaced with a specified string.
Procedure for replacing
1.
Enter the EDIT mode or MDI mode (MDI screen).
2.
Press the function key
3.
Press the soft key [(OPRT)].
4.
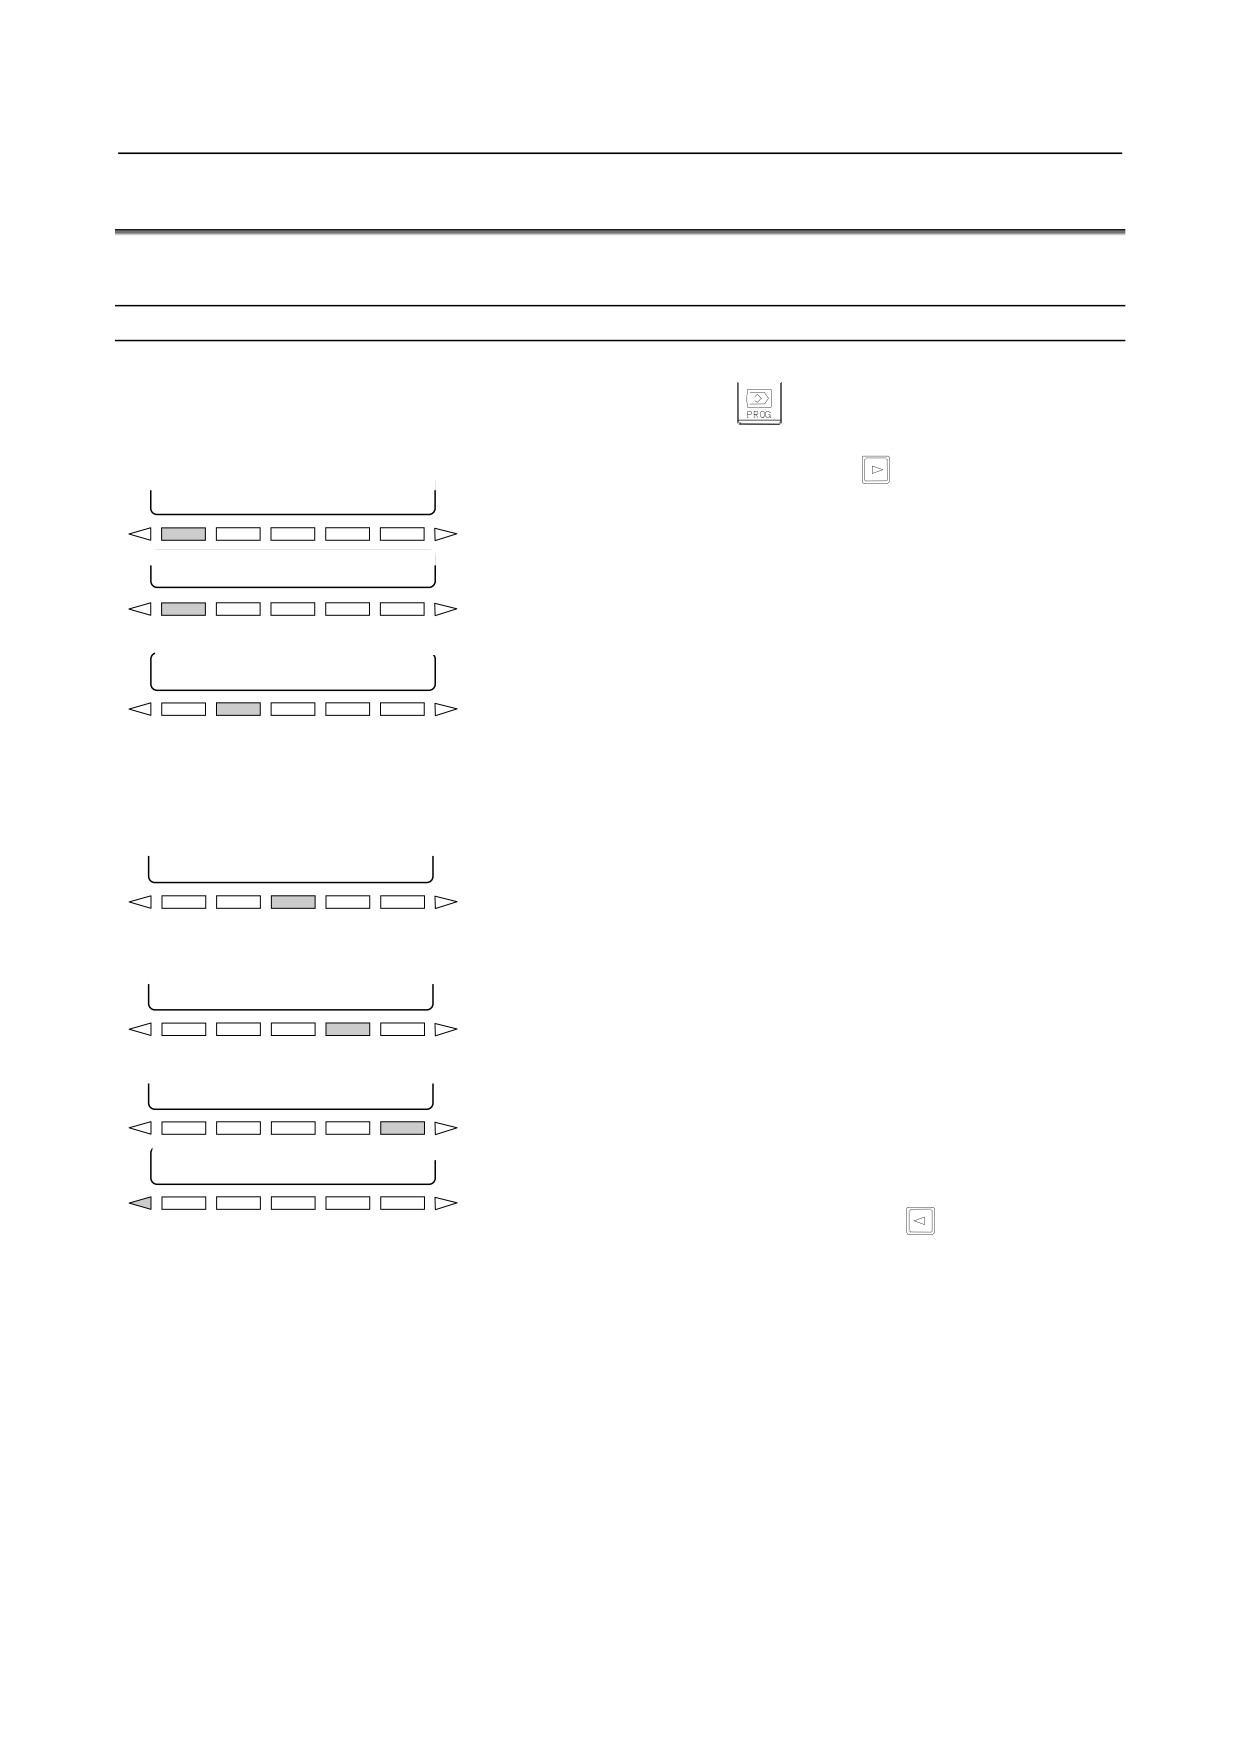
Press the continuous menu key
until soft key
[REP]
[ REP
]
[
] [
] [
]
[
]
appears.
5.
Press the soft key [REP].
6.
Key in the word to be replaced.
[BEFORE]
[
] [
] [
]
[
]
7.
Press the soft key [BEFORE].
8.
Key in the replacing word.
9.
Press the soft key
[AFTER]. The word set by soft key
[BEFORE] is searched for and the cursor moves to the word.
[
]
[ AFTER] [
] [
]
[
]
•
If the word set by soft key [BEFORE] is not found, the
warning message "THE STRING IS NOT FOUND" is
displayed.
10.
Press soft key [EX-SGL] or [ALL] to replace the string. To
move the cursor to the next string without replacing the string,
press [SKIP].
• If soft key [SKIP] is pressed, the word at the cursor position
[
] [
] [ SKIP ] [EX-SGL] [ ALL ]
is not replaced and the next word is searched for. If no
word is found at the current cursor position and later, the
cursor moves to the end of the program and the warning
message "THE STRING IS NOT FOUND" is displayed.
• If soft key [EX-SGL] is pressed, the word at the cursor
[
] [
] [ SKIP ] [EX-SGL] [ ALL ]
position is replaced.
Then, a search in the forward
direction is made and the cursor moves. If no word is
found at the current cursor position and later, the cursor
[
] [
] [ SKIP ] [EX-SGL] [ ALL ]
moves to the end of the program and the warning message
"THE STRING IS NOT FOUND" is displayed.
• If soft key [ALL] is pressed, all words that are present at the
[
] [
] [ SKIP ] [EX-SGL] [ ALL ]
current cursor position and later are replaced.
11.
To finish the replacement, press soft key
- 511 -

10.EDITING PROGRAMS
OPERATION
B-64304EN/02
10.9 EDITING OF CUSTOM MACROS
Unlike ordinary programs, custom macro programs are modified, inserted, or deleted based on editing
units.
Custom macro words can be entered in abbreviated form.
Comments can be entered in a program.
Refer to the III-9.1 for the comments of a program.
Explanation
-
Editing unit
When editing a custom macro already entered, the user can move the cursor to each editing unit that starts
with any of the following characters and symbols:
(a) Address
(b)
# located at the start of the left side of a substitution statement
(c)
/, (,=, and ;
(d) First character of IF, WHILE, GOTO, END, DO, POPEN, BPRNT, DPRNT and PCLOS
On the screen, a blank is placed before each of the above characters and symbols.
Example) Example of display where one blank is inserted
N001 X-#100 ;
#1 =123 ;
N002 /2 X[12/#3] ;
N003 X-SQRT[#3/3*[#4+1]] ;
N004 X-#2 Z#1 ;
N005 #5 =1+2-#10 ;
IF[#1NE0] GOTO10 ;
WHILE[#2LE5] DO1 ;
#[200+#2] =#2*10 ;
#2 =#2+1 ;
END1 ;
-
Abbreviations of custom macro word
When a custom macro word is altered or inserted, the first two characters or more can replace the entire
word.
Namely,
WHILE → WH
GOTO → GO XOR → XO AND → AN SIN → SI
ASIN → AS
COS → CO ACOS → AC TAN → TA ATAN → AT
SQRT → SQ
ABS → AB BCD → BC BIN → BI
FIX → FI
FUP → FU
ROUND → RO END → EN POPEN → PO
BPRNT → BP
DPRNT → DP
PCLOS → PC EXP → EX
THEN → TH
Example) Keying in
WH [AB [#2 ] LE RO [#3 ] ] has the same effect as
WHILE
[ABS
[#2 ] LE ROUND [#3 ] ]
The program is also displayed in this way.
NOTE
The arithmetic function POW cannot be replaced with PO.
10.10 PASSWORD FUNCTION
With the password function, bit 4 (NE9) of parameter No. 3202 used to protect the programs of program
numbers O9000 to O9999 can be locked using two parameters, namely, PASSWD (parameter No. 3210)
and KEYWD (parameter No. 3211). In the locked state, bit 4 (NE9) of parameter No. 3202 cannot be set
- 512 -

B-64304EN/02
OPERATION
10.EDITING PROGRAMS
to 0. Thus, protection of the programs of program numbers O9000 to O9999 can be canceled only when
the correct keyword is set.
A locked state means that the value set in the parameter PASSWD differs from the value set in the
parameter KEYWD. The values set in these parameters are not displayed. The locked state is released
when the value already set in the parameter PASSWD is also set in parameter KEYWD. When 0 is
displayed in parameter PASSWD, parameter PASSWD is not set.
Procedure for locking and unlocking
Locking
1
Set the MDI mode.
2
Enable parameter writing (III-12.3.1). At this time, alarm SW0100 is issued on the CNC.
3
Set parameter No. 3210 (PASSWD). At this time, the locked state is set.
4
Disable parameter writing.
5
Press the
key to release the alarm state.
Unlocking
1
Set the MDI mode.
2
Enable parameter writing (III-12.3.1). At this time, alarm SW0100 is issued on the CNC.
3
In parameter No. 3211 (KEYWD), set the same value as set in parameter No. 3210 (PASSWD) for
locking. At this time, the locked state is released.
4
Set bit 4 (NE9) of parameter No.3202 to 0.
5
Disable parameter writing.
6
Press the
key to release the alarm state.
7
Subprograms from program Nos. 9000 to 9999 can now be edited.
Explanation
-
Setting parameter PASSWD
The locked state is set when a value is set in the parameter PASSWD. However, note that parameter
PASSWD can be set only when the locked state is not set (when PASSWD = 0, or PASSWD = KEYWD).
If an attempt is made to set the parameter PASSWD in a state other than this state, a write protect warning
is issued. When the locked state is set (when parameter PASSWD ≠ 0 and parameter PASSWD ≠
parameter KEYWD), the parameter NE9 is automatically set to 1. In this case, a write protect warning is
issued when an attempt is made to set NE9 to 0.
-
Changing parameter PASSWD
Parameter PASSWD can be changed when the locked state is released (when PASSWD = 0, or PASSWD
= KEYWD). After step 3 in the procedure for unlocking, a new value can be set in the parameter
PASSWD. From that time on, this new value must be set in parameter KEYWD to release the locked
state.
-
Setting 0 in parameter PASSWD
When 0 is set in the parameter PASSWD, the number 0 is displayed, and the password function is
disabled. In other words, the password function can be disabled by either not setting parameter
PASSWD at all, or by setting 0 in parameter PASSWD after step 3 of the procedure for unlocking. To
ensure that the locked state is not entered, care must be taken not to set a value other than 0 in parameter
PASSWD.
-
Re-locking
After the locked state has been released, it can be set again by setting a different value in parameter
PASSWD, or by turning the power to the NC off then on again to reset parameter KEYWD.
- 513 -
10.EDITING PROGRAMS
OPERATION
B-64304EN/02
CAUTION
Once the locked state is set, parameter NE9 cannot be set to 0 and parameter
PASSWD cannot be changed until the locked state is released or the memory
all-clear operation is performed. Special care must be taken in setting parameter
PASSWD.
10.11 SIMULTANEOUS EDITING OF 2-PATH PROGRAMS
T
Simultaneous editing of 2-path programs enables simultaneous editing of programs for two paths on a
single screen.
This function is enabled when the following conditions are satisfied:
•
2-path control system
•
Bit 2 (DOP) of parameter No.3193 = 0
•
Bit 0 (DHD) of parameter No.3106 = 1
Explanation
-
Procedure
1
Place path 1 and path 2 in EDIT mode.
2
Press function key
3
Press soft key [PROGRAM] to display the program editing screen.
-
Screen display
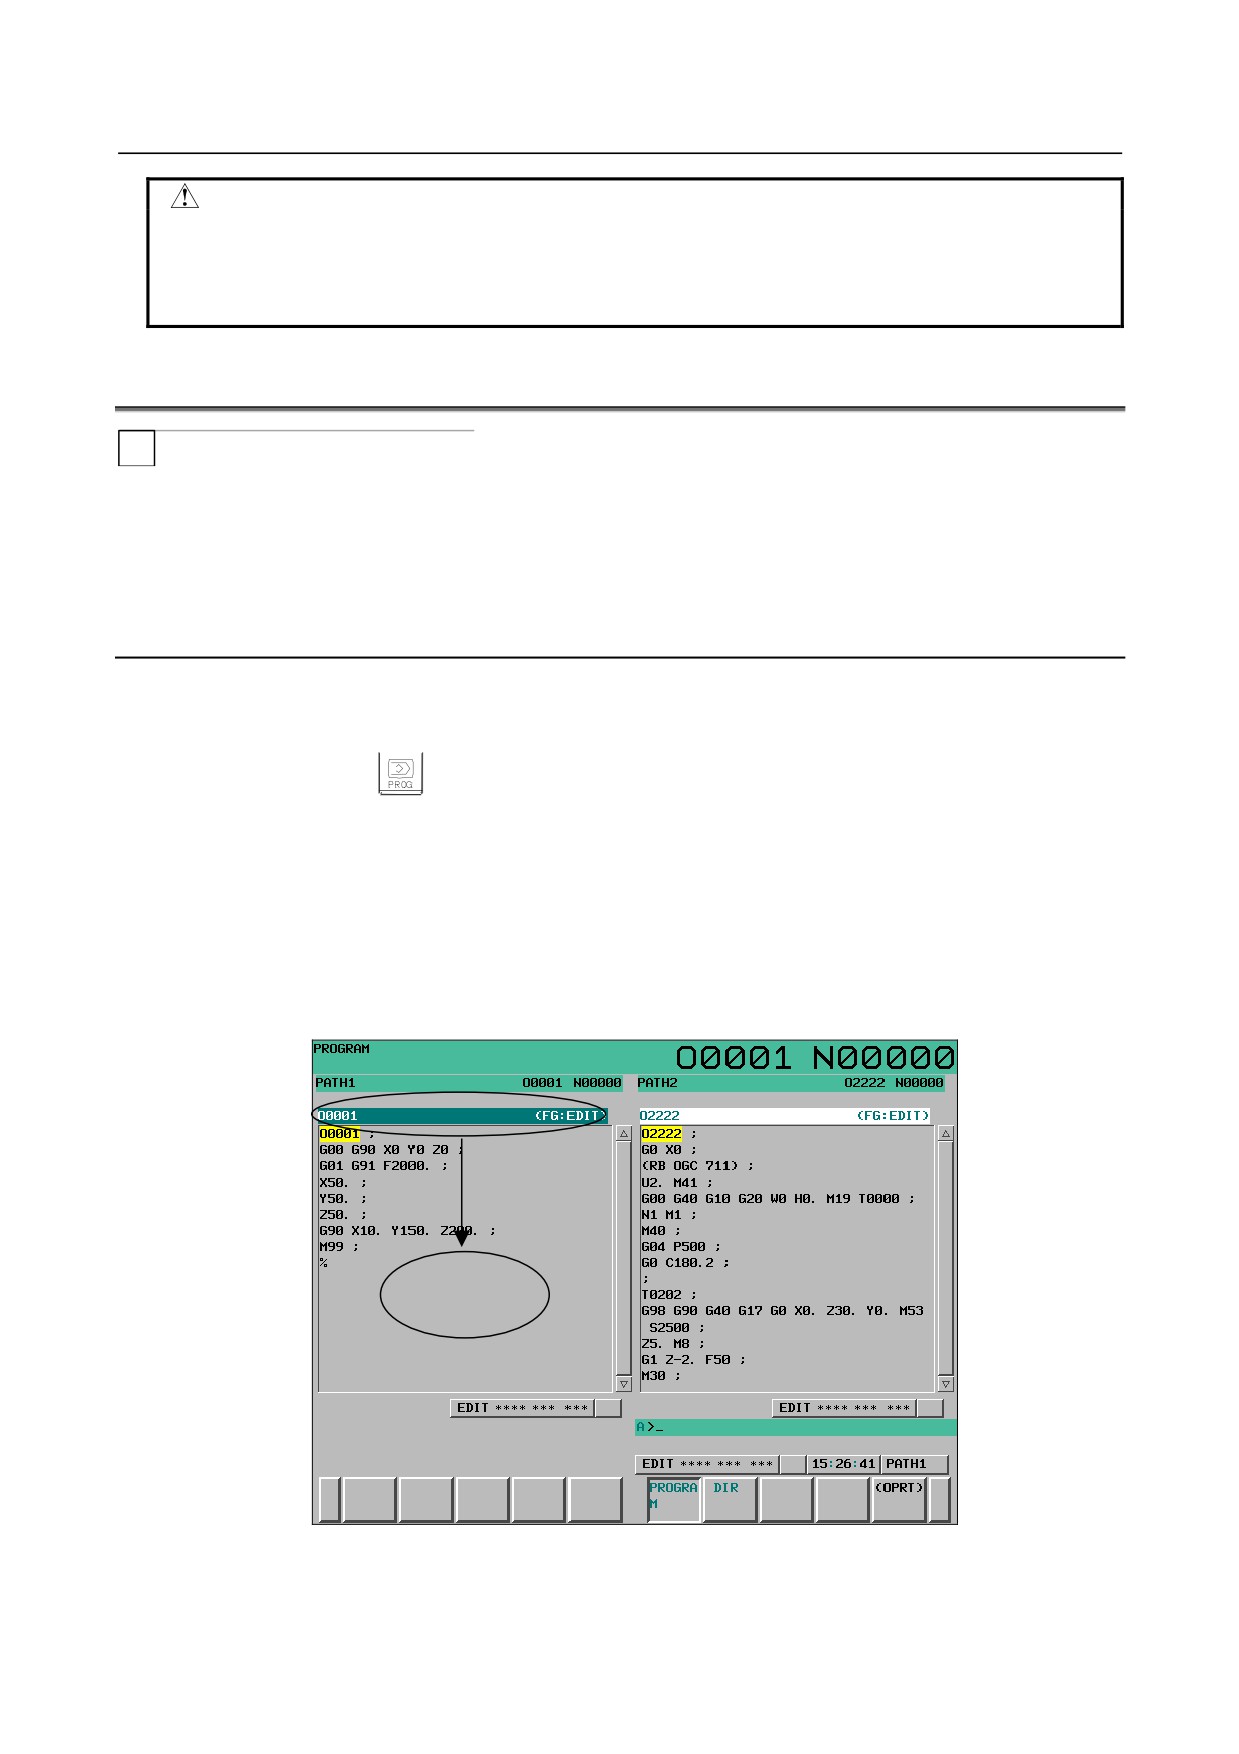
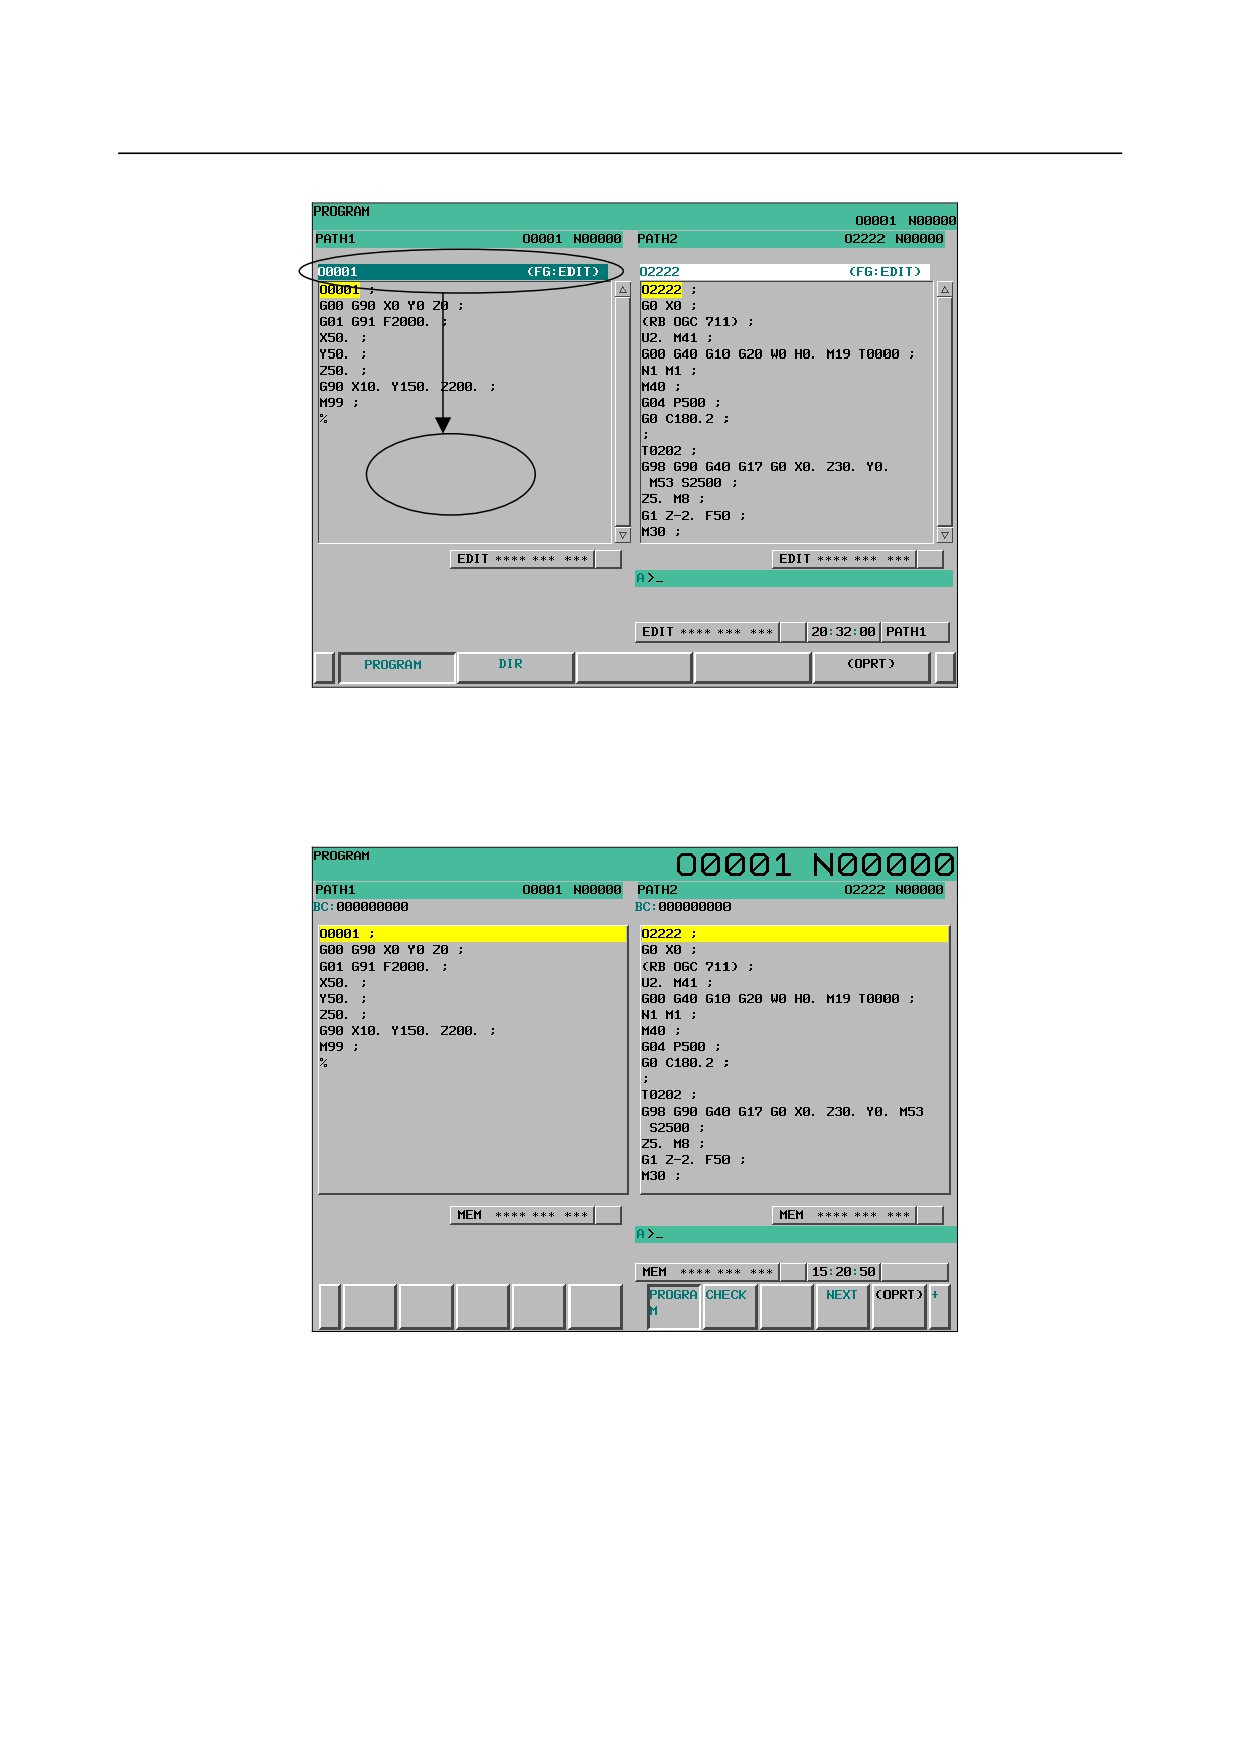
Figure 10.11 (a) to (c) show examples of performing simultaneous editing of 2-path programs.
Above each program is a status line on which three items of information are displayed: the program
number, "FG:EDIT", which indicates that the program is being edited in the foreground, and the path
name.
For the program currently being edited, its status line is displayed in reverse video.
Target of
editing
Fig. 10.11 (a) Simultaneous editing of 2-path programs screen (10.4-inch LCD)
- 514 -
B-64304EN/02
OPERATION
10.EDITING PROGRAMS
Target of
editing
Fig. 10.11 (b) Simultaneous editing of 2-path programs screen (8.4-inch LCD)
-
Modes
When both of path 1 and path 2 are placed in EDIT mode or MEM mode, the programs of both paths are
simultaneously displayed on the program screen. When a path placed in EDIT mode is selected, program
editing can be performed.
Fig. 10.11 (c) Screen for simultaneous 2-path program editing (MEM mode)
-
Switching the path subject to editing
The path selected with the path selection signal is subject to editing.
-
Conditions for enabling simultaneous display and editing
Simultaneous editing of 2-path programs is disabled in the following cases:
• When the program screen is selected as the full screen
• When both paths are placed in EDIT or MEM mode in foreground editing
• The virtual MDI key function is disabled.
- 515 -