FANUC Series 0i-MODEL F Plus. CONNECTION MANUAL (FUNCTION) - page 174
 

  Index      Manuals     FANUC Series 0i-MODEL F Plus. CONNECTION MANUAL (FUNCTION) B-64693EN-1/01


Search            copyright infringement  


Content      ..     172      173      174      175     ..


FANUC Series 0i-MODEL F Plus. CONNECTION MANUAL (FUNCTION) - page 174


8. MULTI-PATH CONTROL


B-64693EN-1/01


- 1346 - 

(4)  Program example 
 

Path 1 

Path 2   


N1000   . . . 

N2000    . . . 

Independent machining of each path 


N1010  Z80.0 ; 

N2010  Z150.0 ; 

Move the workpiece and the chuck to position 


N1020    M200 P12 ;  N2020    M200 P12 ; 

Waiting 


N2030  M61 ;       Workpiece clamping and start of synchronization 


N1040    M201 P12 ;  N2040    M201 P12 ; 

Waiting 


N1050  M3  S800 ;   

Forward spindle rotation 


N1060  Z- 25.0 ; 


Movement along the Z1 axis 


N1070    . . . 


Machining along the X1 and Z1 axes 


N1080    M200 P12 ;  N2080    M200 P12 ; 

Waiting 


N1090  M62 ;       Cancellation of synchronization and unclamping of 

workpiece 


N1100    M201 P12; 

N2100  M201 P12; 

Waiting 


N1110    . . . 

N2110    . . . 

Independent machining of each path 


where 
M61 is an M code that clamps the workpiece and sets signal SYNC2 <G1138.1> to 1, and 
M62 is an M code that sets signal SYNC2 <G1138.1> to 0 and unclamps the workpiece. 


NOTE 

1  An operation to make the speeds of spindles S1 and S2 identical is required. To 

do this, issue a spindle command of path 1 to both S1 and S2. 

2  A waiting M code is an M code without buffering. 


  - 

Examples of independent control and interpolation on the X1 and Z2 axes 

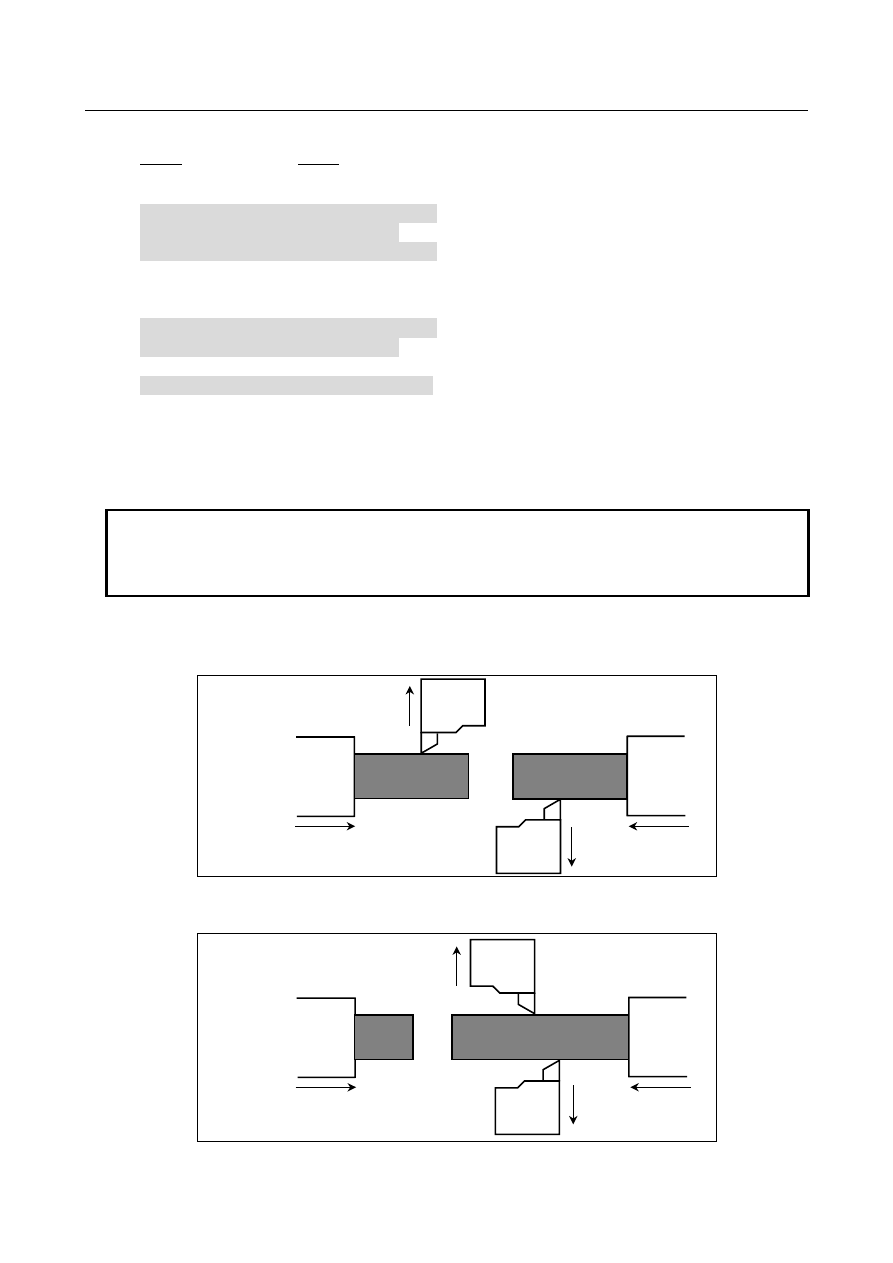
(1)  Machine configuration 

(a)  Independent control 

  Separate machining operations 

are performed in path 1 (X1-Z1) 
and in path 2 (X2-Z2) 
 

Z1 

Spindle S1 

Turret 1 

X1 

Turret 2 
 

X2 

Z2 

Spindle S2 


Fig. 8.6.2 (i) 

 
(b)  Interpolation on the X1 and Z2 axes 


Machining is performed with 
turret (X1) and spindle S2 
(Z2). 

Z1 

Spindle 


Turret 1 

X1 

Turret 2 

Z2 

Spindle 


X2 


Fig. 8.6.2 (j) 


B-64693EN-1/01


8. MULTI-PATH CONTROL


- 1347 - 

There are two ways to perform interpolation on the X1 and Z2 axes. 
1. 

Use the program of path 2 to issue a command to the X2 and Z2 axes to synchronize the X1 (slave) 
axis to the X2 (master) axis and to park the X2 (master) axis. For path 1, do not issue a move 
command. 

2. 

Perform composite control to let the X1 and X2 axes interchange between paths. For path 1, do not 
issue a move command. 

 
The following explains the ways using synchronous control and composite control separately. 


  If using synchronous control 

(1)  Parameter settings 

To synchronize the X1 (slave) axis to the X2 (master) axis, set parameter No. 8180x of path 1 
to "201". 

For both X1 (slave) and X2 (master) axes, no mirror image is required because the direction 
away from the center of the workpiece is the plus direction of coordinates. 

Do not perform synchronous error detection because the X2 (master) axis is parked. 

During synchronization, the difference between the X2 (master) and X1 (slave) axes in 
positional deviation is displayed as No. 3502 on the diagnosis data of path 1. 

(2)  Signal operation 

To start synchronous control on the X2 (master) axis and the X1 (slave) axis, set signals 
SYNC1 <G0138.0> and PK1 <G1122.0> to 1. 

To cancel synchronization, set signals SYNC1 <G0138.0> and PK1 <G1122.0> to 0. 

When an emergency stop, NC reset, or alarm occurs, set SYNC1 <G0138.0> and PK1 
<G1122.0> to 0. 

Set signals other than SYNC1 <G0138.0> and PK1 <G1122.0> to 0. 

(3)  Program example 
 

Path 1 

Path 2 


N1000   . . . 

N2000    . . . 

Independent machining of each path 


N1010  Z0 ; 

N2010  Z20.0 ; 

Move each workpiece to position 


N1020  X120.0 ; 

N2020  X120.0 ; 

Move each X axis to the synchronization start 
position (X1=X2) 


N1030  M200 P12;  N2030    M200 P12 ; 

Waiting 


N2040  M55 ; 

Synchronize the X2 and X1 axes and start parking 
on the X2 axis 


N1050    M201 P12 ;  N2050    M201 P12 ; 

Waiting 


N2060  T0212 ; 

Set the offset for turret 1 


N2070 S1000 M4 ; 

Reverse spindle rotation 


N2080 G0 X30.0 Z55.0 ;  


N2090 G1 F0.2 W-15.0 ;        Machining along the X1 and Z2 axes 


N2100    . . . 


N1110    M200 P12 ;  N2110    M200 P12 ; 

Waiting 


N2120  M56 ;      

Cancellation of synchronization and parking 


N1130  M201 P12 ;  N2130    M201 P12 ; 

Waiting 


N1140   . . . 

N2140   . . . 

Independent machining of each path   


where 
M55 is an M code to start the control of turret 1 with the program of path 2, and M56 is an M code 
that cancel the control of turret 1 with the program of path 2. 


NOTE 


During synchronous control on the X axis, no move command can be issued 
from path 1 to the X1 (slave) axis, but movement along the Z1 axis is possible. 


8. MULTI-PATH CONTROL


B-64693EN-1/01


- 1348 - 


  If using composite control 

(1)  Parameter settings 

To perform composite control by letting the X1 and X2 axes interchange, set parameter No. 
8183x of path 2 to "101". 

Because the direction of the coordinates on the X1 axis is opposite from that of the coordinates 
on the X2 axis, set bit 6 (MCDx) of parameter No. 8162 of path 2 to 1. 

To automatically set the position of turret 1 in the workpiece coordinate system of path 2 at the 
start of composite control, set bit 4 (MPMx) of parameter No. 8162 of path 2 to 1. 

To automatically set the position of turret 1 in the workpiece coordinate system of path 1 at the 
end of composite control, set bit 5 (MPSx) of parameter No. 8162 of path 1 to 1. 

Assuming that the X coordinate of the reference position of turret 1 in the workpiece coordinate 
system of path 2 is -150.0 mm as shown in the figure below, set parameter No. 8184x of path 2 
to "-150000" to automatically set the coordinate system. 


Reference position of 
turret 1 

150.0 mm 

Z2 

X2 


Fig. 8.6.2 (k) 

 
(2)  Signal operation 

To start composite control on the X2 and X1 axes, set signal MIX1 <G1128.0> to 1. 

To cancel composite control, set signal MIX1 <G1128.0> to 0. 

When an emergency stop, NC reset, or alarm occurs, set MIX1 <G1128.0> to 0. 

Set signals other than MIX1 <G1128.0> to 0. 

(3)  Program example 
 

Path 1 

Path 2 


N1000    . . . 

N2000    . . . 

Independent machining of each path 


N1010  Z0 ; 

N2010  Z20.0 ; 

Move each workpiece to position 


N2020  X120. ; 

Move along the X2 axis to a non-interference 
position 


N1030    M200 P12 ;  N2030    M200 P12 ; 

Waiting 


N2040  M55 ; 

Start composite control on the X2 and X1 axes 
(perform automatic coordinate system setup) 


N1050    M201 P12 ;  N2050    M201 P12 ; 

Waiting 


N2060  T0212 ; 

Set the offset for turret 1 


N2070  S1000  M4 ; 


N2080 G0 U10.0 W- 20.0 ;      Machining along the X1 and Z2 axes 


N2090 G1 F0.2 W- 15.0 ; 


N2100    . . . 


N1110    M200 P12 ;  N2110    M200 P12 ; 

Waiting 


N2120  M56 ; 

Cancel composite control (perform automatic 
coordinate system setup) 


N1120    M201 P12 ;  N2120    M201 P12 ; 

Waiting 


N1130    . . . 

N2130  . . . 

Independent machining of each path 


B-64693EN-1/01


8. MULTI-PATH CONTROL


- 1349 - 


where 
M55 is an M code to start the control of turret 1 with the program of path 2, and   
M56 is an M code that cancel the control of turret 1 with the program of path 2. 


NOTE 

1  At the start and end of composite control, you do not necessarily perform 

automatic setup of the coordinate system. If you do not perform automatic 
setting, the program will set an appropriate one internally. 

2  During composite control on the X axis, you can issue a move command for the 

X axis in path 1 to move the tool along the X2 axis. 

3  With the parameter settings above, turret 1 will be positioned on the minus side 

of the X coordinates in the workpiece coordinate system of path 2. For this 
reason, specify with the opposite sign as usual, such as U+10.0 and U-10.0 to 
move turret 1 toward the center of the workpiece and move it away from it, 
respectively. 
If this is inconvenient, specify the following parameter settings: 


  Bit 6 (MCDx) of parameter No. 8162  = 0 


  Parameter No. 8184x 

= 150000 


These settings cause turret 1 to exist on the plus side of the X coordinates 
virtually. 


Actual position of turret 1 

Spindle S2 

X2 

Z2 

Virtual position of turret 1 

Bit 6 (MCDx) of parameter No. 8162  = 1 
No. 8184x 

= -150000 

Bit 6 (MCDx) of parameter No. 8162  = 0 
No. 8184x 

= 150000 


Fig. 8.6.2 (l) 


8. MULTI-PATH CONTROL


B-64693EN-1/01


- 1350 - 

  - 

Examples of independent control and of interpolation on X1-Z2 and X2-Z1 

(1)  Machine configuration 

(a)  Independent control 


Workpiece 1 and turret 1 
are controlled with 
program of path 1 

Z1 

X1 

Spindle S1 

Z2 

X2 

Spindle S2 

Workpiece 2 and turret 2 
are controlled with 
program of path 2 
 

Turret 1 

Turret 2 


Fig. 8.6.2 (m) 

 
(b)  X1-Z2 and X2-Z1 interpolation 


Workpiece 2 and turret 1 
are controlled with 
program of path 2 
 

Z1 

X1 

Spindle S1 

Z2 

X2 

Spindle S2 

Workpiece 1 and turret 2 
are controlled with 
program of path 2 


Turret 2 

Turret 1 


Fig. 8.6.2 (n) 

 
(2)  Parameter settings 

To perform composite control by letting the X1 and X2 axes interchange, set parameter No. 
8183x of path 2 to "101". 

Because the direction of the coordinates on the X1 axis is opposite from that of the coordinates 
on the X2 axis, set bit 6 (MCDx) of parameter No. 8162 of path 2 to 1. 

To automatically set the position of the remote turret in the workpiece coordinate system of 
each path at the start of composite control, set bit 4 (MPMx) of parameter No. 8162 of each of 
paths 1 and 2 to 1. 

To automatically set the position of the local turret in the workpiece coordinate system of each 
path at the end of composite control, set bit 5 (MPSx) of parameter No. 8162 of each of paths 1 
and 2 to 1. 

B-64693EN-1/01


8. MULTI-PATH CONTROL


- 1351 - 

Assuming that the relations between the workpiece coordinates of each path and the reference 
position are as shown in the figure below, set parameter No. 8184x of path 1 to "200000" and 
No. 8184x of path 2 to "180000". 


Reference position 
of turret 1 

Z1 

X1 

Z2 

X2 

200.0mm 

120.0mm 

180.0mm 

Reference 
position of turret 2 


Fig. 8.6.2 (o) 

 
(3)  Signal operation 

To start composite control on the X2 and X1 axes, set signal MIX1 <G1128.0> to 1. 

To cancel composite control, set signal MIX1 <G1128.0> to 0. 

When an emergency stop, NC reset, or alarm occurs, set signal MIX1 <G1128.0> to 0. 

Set signals other than signal MIX1 <G1128.0> to 0. 

 
(4)  Program example 
 

Path 1 

Path 2   


N1000  . . . 

N2000    . . . 

Independent machining of each path 


N1010    M200 P12 ; 

N2010    M200 P12 ; 

Waiting 


N2020  M55 ;      

Start composite control on the X1 and 
X2 axes 


N1030    M201 P12 ; 

N2030    M201 P12 ; 

Waiting 


N1040  T0313  ; 

N2040  T0212  ; 

Selection of composite control tool and 
setting of offset 


N1050  G50  W120.0 ; 

N2050 G50 W120.0 ; 

Shifting of Z axis workpiece coordinate 
system 


N1060  S1000  M4  ; 

N2060  S1500  M4  ; 


N1070  G0  X20.0  Z15.0 ;  N2070  G0  X15.0 Z30.0; 


N1080  G1  F0.5 W- 8.0 ; 

N2080 G1 F0.1 W-5.0 ; 

Start of composite control 


N1090    . . . 

N2090    . . . 


N1100    M200 P12 ; 

N2100    M200 P12 ; 

Waiting 


N2110  M56 ;      

End of composite control 


N1120    M201 P12 ; 

N2120    M201 P12 ; 

Waiting 


N1130  G50  W- 120.0 ; 

N2130 G50 W-120.0 ; 

Shifting of Z axis workpiece coordinate 
system 


N1140    . . . 

N2140    . . . 

Independent machining of each path 

 
where 

M55 is an M code to start composite control (set signal MIX1 <G1128.0> to 1), and 
M56 is an M code to cancel composite control (set signal MIX1 <G1128.0> to 0). 


8. MULTI-PATH CONTROL


B-64693EN-1/01


- 1352 - 

NOTE 


At the start and end of composite control, you do not necessarily perform 
automatic setup of the coordinate system. If you do not perform automatic 
setting, the program will set an appropriate one internally. 


Others 

In the preceding explanation, a single synchronous control or composite control operation is 
explained. In reality, however, you can select multiple synchronous control or composite control 
operations and execute them at the same time: Set all necessary parameters in advance, and specify 
which synchronous or composite control to perform, using appropriate signals. Make sure that a 
single axis is not subject to multiple synchronous/composite control operations at the same time. 

You can set only a single set of axes subject to synchronous or composite control. If you require 
multiple sets, use the programmable parameter input function (G10) to change the parameter settings 
in the program. Before changing parameters, make sure that the associated synchronous or 
composite control has been canceled. If parameters are changed during Synchronous control or 
Composite control, the changes will not take effect immediately. For the changes made to the 
parameters to take effect, it is necessary to turn off synchronous or composite control mode and turn 
it back on. 


(Example) 
 

Change parameter settings to synchronize the Z2 (slave) axis to the Y1 (master) axis. 
(To set parameter No. 8180z of path 2 to "103", execute a program such as that shown below.) 
N0200    . . . 
N0210  G10  L50  ;   

Start of parameter settings 

N0220  N8180  P2  R103  ;  Set parameter No. 8180z to "103". 
N0230  G11  ; 


End of parameter settings 

N0240    . . . 
Execute blocks G10 and G11 while the Y1 and Z2 axes are not subject to synchronous or 
composite control. 


Troubleshooting 

1. 

Unable to start synchronous or composite control. (No alarm occurs.) 
(1)  The correct synchronous or composite control have not been set up. 

  To perform synchronous or composite control, you must set up the correct. 

(2)  The synchronous/composite control axis selection signals <Gn128> or <Gn138> is not changed 

from 0 to 1. 

  Synchronous or composite control starts when the synchronous/composite control axis 

selection signal <Gn128> or <Gn138> is changed from 0 to 1. After synchronous or 
composite control ends due to a reset or alarm, merely canceling the reset or alarm cause 
will not cause synchronous or composite control to restart. After canceling the reset or 
alarm cause, you must make the signal rise again. 

(3)  The axis number of the axis subject to synchronous or composite control is not set in the 

appropriate parameter. 

  To perform synchronous control, set the axis number of the master axis in parameter No. 

8180. To perform composite control, set the axis number of the interchanging  axis in 
parameter No. 8183. If using a 2-path interface, use the parameter of path 2. 

(4)  Synchronous or composite control cannot be started if the NC unit is one of the following 

states: 

Emergency stop 

Reset 

Servo alarm   

Alarm PW0000 

Alarm related to synchronous or composite control 

B-64693EN-1/01


8. MULTI-PATH CONTROL


- 1353 - 


Synchronous or composite control cannot be started, either, if the axis on which synchronous or 
composite control is to start is either of the following states: 

Servo off 

Overtravel 

 
2. 

An attempt to raise a synchronous or composite start signal results in an alarm. 
(1)  An attempt is made to use an axis already under synchronous or composite control for another 

synchronous or composite signal operation. (Alarms PS0352 and PS0357) 

  You cannot use a single axis for a combination of multiple synchronous or composite 

control operations. Note, however, that the synchronous master axis can be the master of 
multiple synchronous slave axes at the same time. You can add additional slave axes while 
synchronous control is in progress. 

(2)  The axis number set in a parameter is greater than the number of controllable axes. (Alarms 

PS0350 and PS0355) 

  The number of the synchronous master axis and that of the interchanging axis subject to 

composite control must not exceed the number of axes controllable in the remote path (or 
the local path if you are to perform synchronous control in that path). 

(3)  The tool is moving along the axis that you want to control. (Alarms PS0351 and PS0356) 

  At the start of synchronous or composite control, the tool must be stopped on the axis 

subject to that control. That the tool is stopped on an axis means that the speed specified 
after acceleration/deceleration is zero. 

(4)  An axis on which you want to perform synchronous or composite control belongs to another 

machine group. (Alarms PS0350 and PS0355) 

  The axes on which you want to perform synchronous or composite control must be of the 

same machine group. 

 
3. 

An attempt to cancel synchronous or composite control results in alarms PS0351 and PS0356. 
(1)  The tool is moving along the axis on which the control you want to cancel. 

  To cancel synchronous or composite control, the tool must be stopped on the axis on 

which to cancel it. That the tool is stopped on an axis means that the speed specified after 
acceleration/deceleration is zero. Before canceling, make sure that the movement in 
progress signal Fn102 has changed to 0. 


4. 

During synchronous control or composite control, an alarm occurs. 
(1)  A move command is issued for a synchronous slave axis. (Alarm PS0353) 

  No move command can be issued for a synchronous slave axis, whether it be automatic or 

manual. 

(2)  A move command is issued for an axis under composite control for which bit 7 (MUMx) of 

parameter No. 8162 is set to 1. (Alarm PS0353) 

  During composite control, no move command can be issued for an axis for which bit 7 

(MUMx) of parameter No. 8162 is set to 1, whether it be automatic or manual. 

(3)  During synchronous control, an automatic reference position return command with G28 is 

issued for a parking master axis. (Alarm PS0354) 

  In this case, a reference position return is performed on the slave axis, requiring that the 

reference position of the slave axis be established. 

(4)  During composite control, an automatic reference position return command with G28 is issued. 

(Alarm PS0359) 

  In this case, a reference position return is performed on the remote interchanging axis, 

requiring that the reference position of the interchanging axis be established. 

(5)  During synchronous control, a 3-dimensional coordinate conversion is specified. (Alarm 

PS0367) 

  For the synchronous master axis to be specified in 3-dimensional coordinate conversion 

mode, set bit 2 (PKUx) of parameter No. 8162 to 1. 


Content      ..     172      173      174      175     ..