Cisco Industrial Ethernet 4000, 4010 and 5000 Switch Software. Configuration Guide (2022) - page 32

Configuring IP Unicast Routing
Configuring OSPF
DETAILED STEPS
Command
Purpose
1.
configure terminal
Enter global configuration mode.
2.
router ospf process-id
Enable OSPF routing, and enter router configuration mode.
3.
summary-address address mask
(Optional) Specify an address and IP subnet mask for
redistributed routes so that only one summary route is
advertised.
4.
area area-id virtual-link router-id
(Optional) Establish a virtual link and set its parameters. See
[hello-interval seconds]
Configuring OSPF Interfaces, page 869 for parameter
[retransmit-interval seconds] [trans]
definitions and the Default OSPF Configuration, page 867
[[authentication-key key] |
for virtual link defaults.
message-digest-key keyid md5 key]]
5.
default-information originate
(Optional) Force the ASBR to generate a default route into
[always] [metric metric-value]
the OSPF routing domain. Parameters are all optional.
[metric-type type-value] [route-map
map-name]
6.
ip ospf name-lookup
(Optional) Configure DNS name lookup. The default is
disabled.
7.
ip auto-cost reference-bandwidth
(Optional) Specify an address range for which a single route
ref-bw
will be advertised. Use this command only with area border
routers.
8.
distance ospf {[inter-area dist1]
(Optional) Change the OSPF distance values. The default
[inter-area dist2] [external dist3]}
distance for each type of route is 110. The range is 1 to 255.
9.
passive-interface type number
(Optional) Suppress the sending of hello packets through the
specified interface.
10.
timers throttle spf spf-delay
(Optional) Configure route calculation timers.
spf-holdtime spf-wait
spf-delay—Delay between receiving a change to SPF
calculation. The range is from 1 to 600000 miliseconds.
spf-holdtime—Delay between first and second SPF
calculation. The range is form 1 to 600000 in
milliseconds.
spf-wait—Maximum wait time in milliseconds for SPF
calculations. The range is from 1 to 600000 in
milliseconds.
11.
ospf log-adj-changes
(Optional) Send syslog message when a neighbor state
changes.
12.
end
Return to privileged EXEC mode.
13.
show ip ospf [process-id [area-id]]
Display lists of information related to the OSPF database for
database
a specific router. For some of the keyword options, see
Monitoring OSPF, page 879.
14.
copy running-config startup-config
(Optional) Save your entries in the configuration file.
EXAMPLE
In the following example, the summary address 10.1.0.0 includes address 10.1.1.0, 10.1.2.0, 10.1.3.0, and so on. Only
the address 10.1.0.0 is advertised in an external link-state advertisement.
877

Configuring IP Unicast Routing
Configuring OSPF
Switch(config)# router ospf 201
Switch(config-router)# summary-address 10.1.0.0 255.255.0.0
Switch(config-router)# end
Changing LSA Group Pacing
The OSPF LSA group pacing feature allows the router to group OSPF LSAs and pace the refreshing, check-summing,
and aging functions for more efficient router use. This feature is enabled by default with a 4-minute default pacing
interval, and you will not usually need to modify this parameter. The optimum group pacing interval is inversely
proportional to the number of LSAs the router is refreshing, check-summing, and aging. For example, if you have
approximately 10,000 LSAs in the database, decreasing the pacing interval would benefit you. If you have a very small
database (40 to 100 LSAs), increasing the pacing interval to 10 to 20 minutes might benefit you slightly.
BEFORE YOU BEGIN
Do not change the packet pacing timers unless all other options to meet OSPF packet flooding requirements have been
exhausted. Specifically, network operators should prefer summarization, stub area usage, queue tuning, and buffer
tuning before changing the default flooding timers. Furthermore, there are no guidelines for changing timer values; each
OSPF deployment is unique and should be considered on a case-by-case basis. The network operator assumes the risks
associated with changing the default timer values.
DETAILED STEPS
Command
Purpose
1.
configure terminal
Enter global configuration mode.
2.
router ospf process-id
Enable OSPF routing, and enter router configuration mode.
3.
timers pacing lsa-group seconds
Change the group pacing of LSAs.
4.
end
Return to privileged EXEC mode.
5.
show running-config
Verify your entries.
6.
copy running-config startup-config
(Optional) Save your entries in the configuration file.
To return to the default value, use the no timers pacing lsa-group router configuration command.
EXAMPLE
The following example configures OSPF group packet-pacing updates between LSA groups to occur in 60-second
intervals for OSPF routing process 1:
Switch(config)# router ospf 1
Switch(config-router)# timers pacing lsa-group 60
Configuring a Loopback Interface
OSPF uses the highest IP address configured on the interfaces as its router ID. If this interface is down or removed, the
OSPF process must recalculate a new router ID and resend all its routing information out its interfaces. If a loopback
interface is configured with an IP address, OSPF uses this IP address as its router ID, even if other interfaces have higher
IP addresses. Because loopback interfaces never fail, this provides greater stability. OSPF automatically prefers a
loopback interface over other interfaces, and it chooses the highest IP address among all loopback interfaces.
BEFORE YOU BEGIN
The IP address for the loopback interface must be unique and not in use by another interface.
878

Configuring IP Unicast Routing
Configuring OSPF
DETAILED STEPS
Command
Purpose
1.
configure terminal
Enter global configuration mode.
2.
interface loopback 0
Create a loopback interface, and enter interface
configuration mode.
3.
ip address address mask
Assign an IP address to this interface.
4.
end
Return to privileged EXEC mode.
5.
show ip interface
Verify your entries.
6.
copy running-config startup-config
(Optional) Save your entries in the configuration file.
Use the no interface loopback 0 global configuration command to disable the loopback interface.
EXAMPLE
Switch(config)# interface loopback 0
Switch(config-if)# ip address 10.108.1.1 255.255.255.0
Monitoring OSPF
You can display specific statistics such as the contents of IP routing tables, caches, and databases.
Following are some of the privileged EXEC commands for displaying OSPF statistics. For more show ip ospf database
privileged EXEC command options and for explanations of fields in the resulting display, see Cisco IOS IP Routing: OSPF
Command Reference.
Command
Purpose
show ip ospf [process-id]
Display general information about OSPF routing
processes.
show ip ospf [process-id] database [router] [link-state-id]
Display lists of information related to the OSPF
database.
show ip ospf [process-id] database [router] [self-originate]
show ip ospf [process-id] database [router] [adv-router [ip-address]]
show ip ospf [process-id] database [network] [link-state-id]
show ip ospf [process-id] database [summary] [link-state-id]
show ip ospf [process-id] database [asbr-summary] [link-state-id]
show ip ospf [process-id] database [external] [link-state-id]
show ip ospf [process-id area-id] database [database-summary]
show ip ospf border-routes
Display the internal OSPF routing ABR and ASBR
table entries.
show ip ospf interface [interface-name]
Display OSPF-related interface information.
show ip ospf neighbor [interface-name] [neighbor-id] detail
Display OSPF interface neighbor information.
show ip ospf virtual-links
Display OSPF-related virtual links information.
879
Configuring IP Unicast Routing
Configuring EIGRP
Configuring EIGRP
Enhanced IGRP (EIGRP) is a Cisco proprietary enhanced version of the Interior Gateway Routing Protocol (IGRP). EIGRP
uses the same distance vector algorithm and distance information as IGRP; however, the convergence properties and
the operating efficiency of EIGRP are significantly improved.
The convergence technology employs an algorithm referred to as the Diffusing Update Algorithm (DUAL), which
guarantees loop-free operation at every instant throughout a route computation and allows all devices involved in a
topology change to synchronize at the same time. Routers that are not affected by topology changes are not involved in
recomputations.
IP EIGRP provides increased network width. With RIP, the largest possible width of your network is 15 hops. Because the
EIGRP metric is large enough to support thousands of hops, the only barrier to expanding the network is the
transport-layer hop counter. EIGRP increments the transport control field only when an IP packet has traversed 15 routers
and the next hop to the destination was learned through EIGRP.
EIGRP has these four basic components:
Neighbor discovery and recovery is the process that routers use to dynamically learn of other routers on their directly
attached networks. Routers must also discover when their neighbors become unreachable or inoperative. Neighbor
discovery and recovery is achieved by periodically sending small hello packets. As long as hello packets are
received, the neighbor is alive and functioning. When this status is determined, the neighboring routers exchange
routing information.
The reliable transport protocol is responsible for guaranteed, ordered delivery of EIGRP packets to all neighbors. It
supports intermixed transmission of multicast and unicast packets. Some EIGRP packets must be sent reliably, and
others need not be. For efficiency, reliability is provided only when necessary. For example, on a multiaccess network
that has multicast capabilities, it is not necessary to send hellos reliably to all neighbors individually. Therefore, EIGRP
sends a single multicast hello with an indication in the packet informing the receivers that the packet need not be
acknowledged. Other types of packets (such as updates) require acknowledgment, which is shown in the packet.
To ensure low convergence time, the reliable transport sends multicast packets quickly when there are
unacknowledged packets pending.
The DUAL finite state machine handles the decision process for all route computations. It tracks all routes advertised
by all neighbors and uses the distance information (known as a metric) to select efficient, loop-free paths. DUAL
selects routes to be inserted into a routing table based on feasible successors. A successor is a neighboring router
used for packet forwarding that has a least-cost path to a destination that is guaranteed not to be part of a routing
loop.
When there are no feasible successors, but there are neighbors advertising the destination, a recomputation must
occur to determine a new successor. The amount of time it takes to recompute the route affects the convergence
time. When a topology change occurs, DUAL tests for feasible successors to avoid unnecessary recomputation.
The protocol-dependent modules are responsible for network layer protocol-specific tasks. An example is the IP
EIGRP module, which is responsible for sending and receiving EIGRP packets that are encapsulated in IP. It is also
responsible for parsing EIGRP packets and informing DUAL of the new information received. Routing decisions are
stored in the IP routing table. EIGRP also redistributes routes learned by other IP routing protocols.
This section includes the following topics:
Default EIGRP Configuration, page 881
Configuring Basic EIGRP Parameters, page 882
Configuring EIGRP Interfaces, page 883
Configuring EIGRP Route Authentication, page 884
Configuring EIGRP Stub Routing, page 886
Monitoring and Maintaining EIGRP, page 887
880

Configuring IP Unicast Routing
Configuring EIGRP
Default EIGRP Configuration
Feature
Default Setting
Auto summary
Enabled. Subprefixes are summarized to the classful network boundary when crossing
classful network boundaries.
Default-information
Exterior routes are accepted and default information is passed between EIGRP
processes when doing redistribution.
Default metric
Only connected routes and interface static routes can be redistributed without a
default metric. The metric includes:
Bandwidth: 0 or greater kbps.
Delay (tens of microseconds): 0 or any positive number that is a multiple of 39.1
nanoseconds.
Reliability: any number between 0 and 255 (255 means 100 percent reliability).
Loading: effective bandwidth as a number between 0 and 255 (255 is 100 percent
loading).
MTU: maximum transmission unit size of the route in bytes. 0 or any positive
integer.
Distance
Internal distance: 90.
External distance: 170.
EIGRP log-neighbor changes
Disabled. No adjacency changes logged.
IP authentication key-chain
No authentication provided.
IP authentication mode
No authentication provided.
IP bandwidth-percent
50 percent.
IP hello interval
For low-speed nonbroadcast multiaccess (NBMA) networks: 60 seconds; all other
networks: 5 seconds.
IP hold-time
For low-speed NBMA networks: 180 seconds; all other networks: 15 seconds.
IP split-horizon
Enabled.
IP summary address
No summary aggregate addresses are predefined.
Metric weights
tos: 0; k1 and k3: 1; k2, k4, and k5: 0.
Network
None specified.
NSF1 Awareness
Enabled2. Allows Layer 3 switches to continue forwarding packets from a neighboring
NSF-capable router during hardware or software changes.
Offset-list
Disabled.
Router EIGRP
Disabled.
Set metric
No metric set in the route map.
Traffic-share
Distributed proportionately to the ratios of the metrics.
Variance
1 (equal-cost load balancing).
1. NSF = Nonstop Forwarding
2. EIGRP NSF awareness is enabled for IPv4 on switches running the IP services image.
881
Configuring IP Unicast Routing
Configuring EIGRP
To create an EIGRP routing process, you must enable EIGRP and associate networks. EIGRP sends updates to the
interfaces in the specified networks. If you do not specify an interface network, it is not advertised in any EIGRP update.
Nonstop Forwarding Awareness
The EIGRP NSF Awareness feature is supported for IPv4 in the IP services image. When the neighboring router is
NSF-capable, the Layer 3 switch continues to forward packets from the neighboring router during the interval between
the primary Route Processor (RP) in a router failing and the backup RP taking over, or while the primary RP is manually
reloaded for a nondisruptive software upgrade.
This feature cannot be disabled. For more information on this feature, see the “Configuring Nonstop Forwarding” chapter
in the High Availability Configuration Guide, Cisco IOS Release 15S.
Configuring Basic EIGRP Parameters
In this procedure, configuring the routing process is required; other steps are optional.
BEFORE YOU BEGIN
Complete the EIGRP network strategy and planning for your network.
882

Configuring IP Unicast Routing
Configuring EIGRP
DETAILED STEPS
Command
Purpose
1.
configure terminal
Enter global configuration mode.
2.
router eigrp autonomous-system
Enable an EIGRP routing process, and enter router
configuration mode. The AS number identifies the routes
to other EIGRP routers and is used to tag routing
information.
3.
network network-number
Associate networks with an EIGRP routing process. EIGRP
sends updates to the interfaces in the specified networks.
4.
eigrp log-neighbor-changes
(Optional) Enable logging of EIGRP neighbor changes to
monitor routing system stability.
5.
metric weights tos k1 k2 k3 k4 k5
(Optional) Adjust the EIGRP metric. Although the defaults
have been carefully set to provide excellent operation in
most networks, you can adjust them.
Caution: Setting metrics is complex and is not
recommended without guidance from an experienced
network designer.
6.
offset list [access-list number | name] {in
(Optional) Apply an offset list to routing metrics to
| out} offset [type number]
increase incoming and outgoing metrics to routes learned
through EIGRP. You can limit the offset list with an access
list or an interface.
7.
no auto-summary
(Optional) Disable automatic summarization of subnet
routes into network-level routes.
8.
ip summary-address eigrp
(Optional) Configure a summary aggregate.
autonomous-system-number address
mask
9.
end
Return to privileged EXEC mode.
10.
show ip protocols
Verify your entries.
For NSF awareness, the output shows:
*** IP Routing is NSF aware ***
EIGRP NSF enabled
11.
copy running-config startup-config
(Optional) Save your entries in the configuration file.
Use the no forms of these commands to disable the feature or return the setting to the default value.
EXAMPLE
The following example configures EIGRP autonomous system 1 and establishes neighbors through networks 172.16.0.0
and 192.168.0.0:
Switch(config)# router eigrp 1
Switch(config-router)# network 172.16.0.0
Switch(config-router)# network 192.168.0.0
Configuring EIGRP Interfaces
Other optional EIGRP parameters can be configured on an interface basis.
883

Configuring IP Unicast Routing
Configuring EIGRP
BEFORE YOU BEGIN
Enable EIGRP as described in the Configuring Basic EIGRP Parameters, page 882.
DETAILED STEPS
Command
Purpose
1.
configure terminal
Enter global configuration mode.
2.
interface interface-id
Enter interface configuration mode, and specify the
Layer 3 interface to configure.
3.
no shutdown
Enable the interface if necessary. By default, UNIs
and ENIs are disabled and NNIs are enabled.
4.
ip bandwidth-percent eigrp percent
(Optional) Configure the percentage of bandwidth
that can be used by EIGRP on an interface. The
default is 50 percent.
5.
ip summary-address eigrp
(Optional) Configure a summary aggregate address
autonomous-system-number address mask
for a specified interface (not usually necessary if
auto-summary is enabled).
6.
ip hello-interval eigrp
(Optional) Change the hello time interval for an
autonomous-system-number seconds
EIGRP routing process. The range is 1 to 65535
seconds. The default is 60 seconds for low-speed
NBMA networks and 5 seconds for all other
networks.
7.
ip hold-time eigrp
(Optional) Change the hold time interval for an EIGRP
autonomous-system-number seconds
routing process. The range is 1 to 65535 seconds.
The default is 180 seconds for low-speed NBMA
networks and 15 seconds for all other networks.
Caution: Do not adjust the hold time without
consulting Cisco technical support.
8.
no ip split-horizon eigrp
(Optional) Disable split horizon to allow route
autonomous-system-number
information to be advertised by a router out any
interface from which that information originated.
9.
end
Return to privileged EXEC mode.
10.
show ip eigrp interface
Display which interfaces EIGRP is active on and
information about EIGRP relating to those interfaces.
11.
copy running-config startup-config
(Optional) Save your entries in the configuration file.
Use the no forms of these commands to disable the feature or return the setting to the default value.
EXAMPLE
The following example allows EIGRP to use up to 75 percent (42 kbps) of a 56-kbps serial link in autonomous system
209:
Switch(config)# interface serial 0
Switch(config-if)# bandwidth 56
Switch(config-if)# ip bandwidth-percent eigrp 209 75
Configuring EIGRP Route Authentication
EIGRP route authentication provides MD5 authentication of routing updates from the EIGRP routing protocol to prevent
the introduction of unauthorized or false routing messages from unapproved sources.
884

Configuring IP Unicast Routing
Configuring EIGRP
BEFORE YOU BEGIN
Enable EIGRP as described in the Configuring Basic EIGRP Parameters, page 882.
DETAILED STEPS
Command
Purpose
1.
configure terminal
Enter global configuration mode.
2.
interface interface-id
Enter interface configuration mode, and specify
the Layer 3 interface to configure.
3.
no shutdown
Enable the interface if necessary. By default,
UNIs and ENIs are disabled and NNIs are
enabled.
4.
ip authentication mode eigrp
Enable MD5 authentication in IP EIGRP packets.
autonomous-system md5
5.
ip authentication key-chain eigrp
Enable authentication of IP EIGRP packets.
autonomous-system key-chain
6.
exit
Return to global configuration mode.
7.
key chain name-of-chain
Identify a key chain and enter key-chain
configuration mode. Match the name configured
in Step 4.
8.
key number
In key-chain configuration mode, identify the key
number.
9.
key-string text
In key-chain key configuration mode, identify the
key string.
10.
accept-lifetime start-time {infinite | end-time |
(Optional) Specify the time period during which
duration seconds}
the key can be received.
The start-time and end-time syntax can be
either hh:mm:ss Month date year or hh:mm:ss
date Month year. The default is forever with the
default start-time and the earliest acceptable
date as January 1, 1993. The default end-time
and duration is infinite.
11.
send-lifetime start-time {infinite | end-time |
(Optional) Specify the time period during which
duration seconds}
the key can be sent.
The start-time and end-time syntax can be
either hh:mm:ss Month date year or hh:mm:ss
date Month year. The default is forever with the
default start-time and the earliest acceptable
date as January 1, 1993. The default end-time
and duration is infinite.
12.
end
Return to privileged EXEC mode.
13.
show key chain
Display authentication key information.
14.
copy running-config startup-config
(Optional) Save your entries in the configuration
file.
Use the no forms of these commands to disable the feature or to return the setting to the default value.
885
Configuring IP Unicast Routing
Configuring EIGRP
EXAMPLE
The following example configures EIGRP to apply authentication to address-family autonomous system 1 and identifies
a key chain named SITE1:
Switch(config)# router eigrp virtual-name
Switch(config-router)# address-family ipv4 autonomous-system 1
Switch(config-router-af)# af-interface ethernet0/0
Switch(config-router-af-interface)# authentication key-chain SITE1
Switch(config-router-af-interface)# authentication mode md5
Configuring EIGRP Stub Routing
The EIGRP stub routing feature reduces resource utilization by moving routed traffic closer to the end user. In a network
using EIGRP stub routing, the only allowable route for IP traffic to the user is through a switch that is configured with
EIGRP stub routing. The switch sends the routed traffic to interfaces that are configured as user interfaces or are
connected to other devices.
When using EIGRP stub routing, you need to configure the distribution and remote routers to use EIGRP and to configure
only the switch as a stub. Only specified routes are propagated from the switch. The switch responds to all queries for
summaries, connected routes, and routing updates.
Note: EIGRP stub routing only advertises connected or summary routes from the routing tables to other switches in the
network. The switch uses EIGRP stub routing at the access layer to eliminate the need for other types of routing
advertisements. If you try to configure multi-VRF-CE and EIGRP stub routing at the same time, the configuration is not
allowed.
Any neighbor that receives a packet informing it of the stub status does not query the stub router for any routes, and a
router that has a stub peer does not query that peer. The stub router depends on the distribution router to send the proper
updates to all peers.
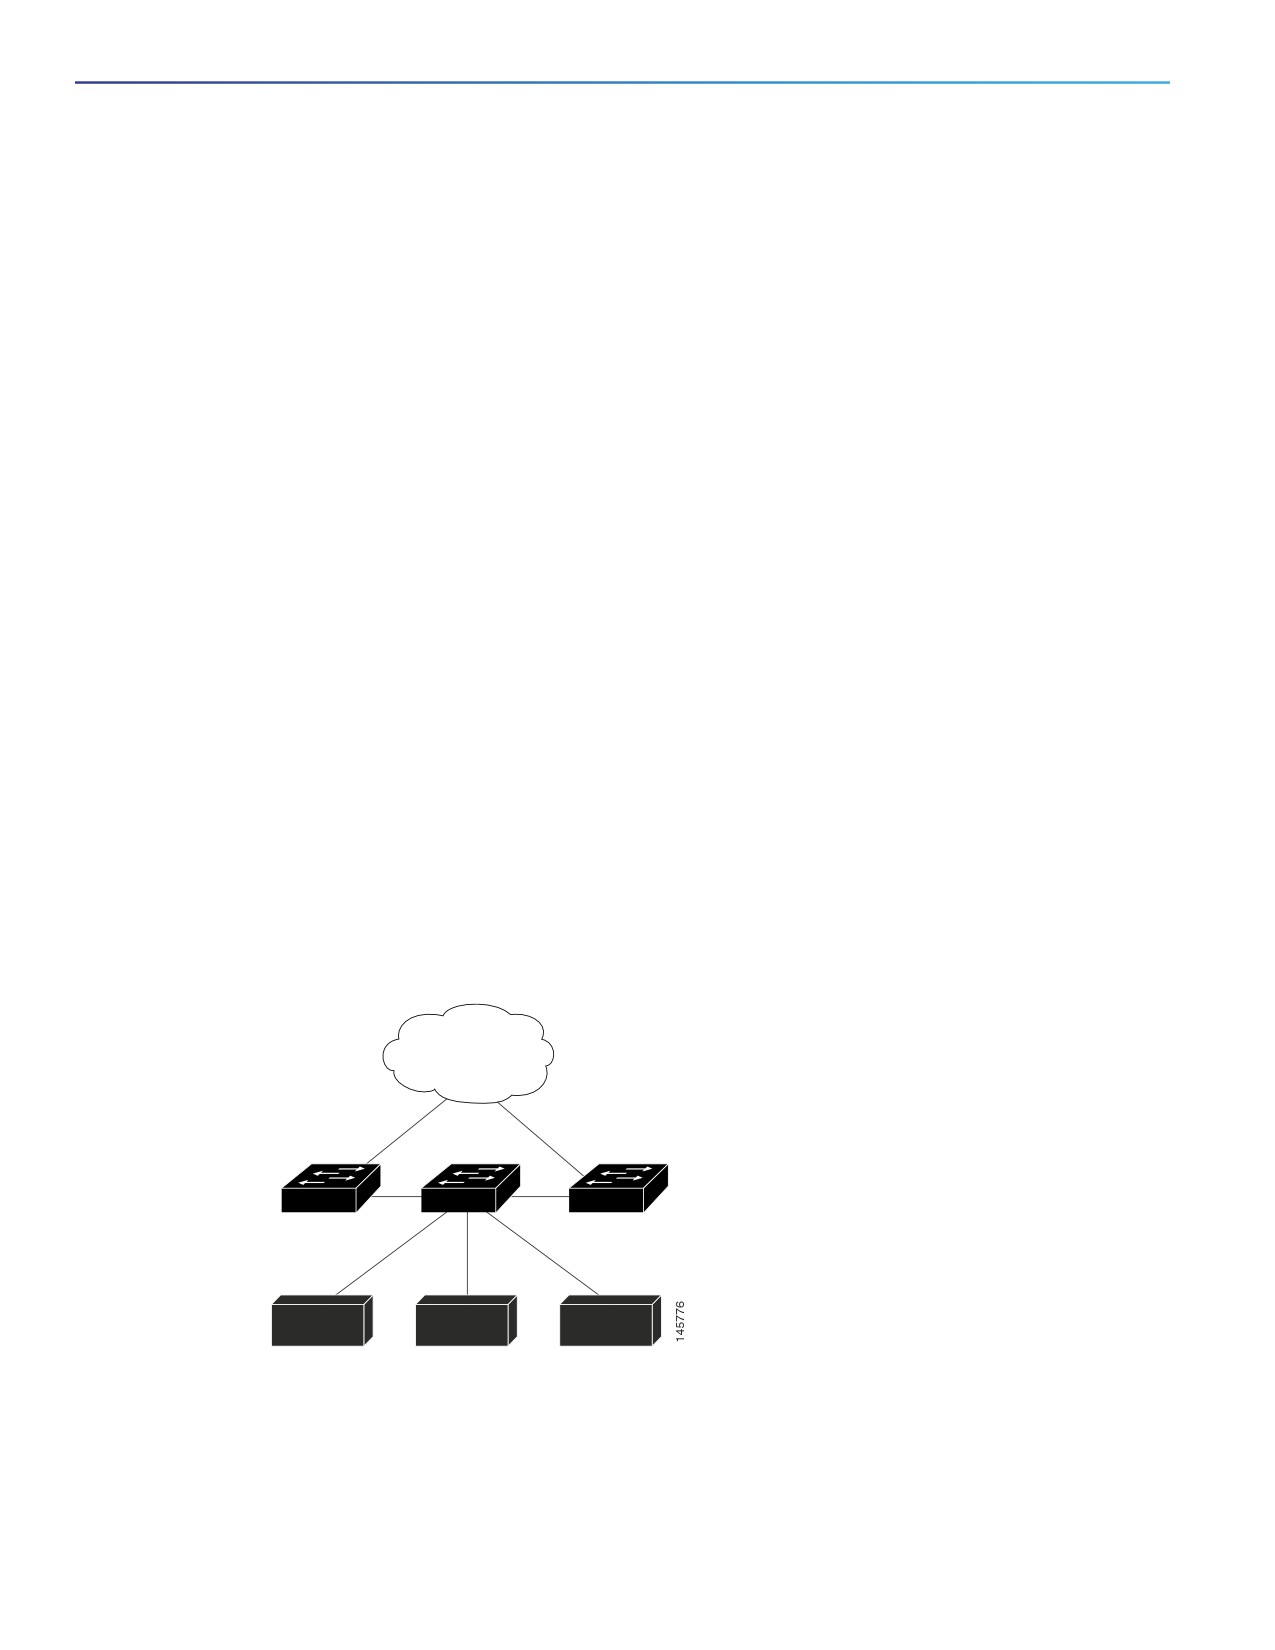
In Figure 102 on page 886, switch B is configured as an EIGRP stub router. Switches A and C are connected to the rest
of the WAN. Switch B advertises connected, static, redistribution, and summary routes to switch A and C. Switch B does
not advertise any routes learned from switch A (and the reverse).
Figure 102 EIGRP Stub Router Configuration
Routed to WAN
Switch A
Switch B
Switch C
Host A
Host B
Host C
For more information about EIGRP stub routing, see IP Routing: EIGRP Configuration Guide, Cisco IOS Release 15M&T.
BEFORE YOU BEGIN
Complete the EIGRP network strategy and planning for your network.
886

Configuring IP Unicast Routing
Configuring EIGRP
DETAILED STEPS
Command
Purpose
1.
configure terminal
Enter global configuration mode.
2.
router eigrp 1
Configure a remote or distribution router to run an EIGRP
process and enter router configuration mode.
3.
network network-number
Associate networks with an EIGRP routing process.
4.
eigrp stub [receive-only |
Configure a remote router as an EIGRP stub router. The
connected | static | summary]
keywords have these meanings:
Enter receive-only to set the router as a receive-only
neighbor.
Enter connected to advertise connected routes.
Enter static to advertise static routes.
Enter summary to advertise summary routes.
5.
end
Return to privileged EXEC mode.
6.
show ip eigrp neighbor detail
Verify that a remote router has been configured as a stub router
with EIGRP. The last line of the output shows the stub status of
the remote or spoke router.
7.
copy running-config
(Optional) Save your entries in the configuration file.
startup-config
Enter the show ip eigrp neighbor detail privileged EXEC command from the distribution router to verify the configuration.
EXAMPLE
In the following example, the eigrp stub command is used to configure the router as a stub that advertises connected
and summary routes:
Switch(config)# router eigrp 1
Switch(config-router)# network 10.0.0.0
Switch(config-router)# eigrp stub
Monitoring and Maintaining EIGRP
You can delete neighbors from the neighbor table. You can also display various EIGRP routing statistics.
887
Configuring IP Unicast Routing
Configuring BGP
Command
Purpose
clear ip eigrp neighbors [if-address | interface]
Delete neighbors from the neighbor table.
show ip eigrp interface [interface] [as number]
Display information about interfaces configured for EIGRP.
show ip eigrp neighbors [type-number]
Display EIGRP discovered neighbors.
show ip eigrp topology
Display the EIGRP topology table for a given process.
[autonomous-system-number] | [[ip-address]
mask]]
show ip eigrp traffic [autonomous-system-number]
Display the number of packets sent and received for all or a
specified EIGRP process.
Configuring BGP
The Border Gateway Protocol (BGP) is an exterior gateway protocol used to set up an interdomain routing system for
loop-free exchanges of routing information between autonomous systems. Autonomous systems are made up of routers
that operate under the same administration and that run Interior Gateway Protocols (IGPs), such as RIP or OSPF, within
their boundaries and that interconnect by using an Exterior Gateway Protocol (EGP). BGP Version 4 is the standard EGP
for interdomain routing in the Internet.
For details about BGP configuration and commands, see the BGP documents listed in Related Documents, page 966.
Routers that belong to the same autonomous system (AS) and that exchange BGP updates run internal BGP (IBGP), and
routers that belong to different autonomous systems and that exchange BGP updates run external BGP (EBGP). Most
configuration commands are the same for configuring EBGP and IBGP. The difference is that the routing updates are
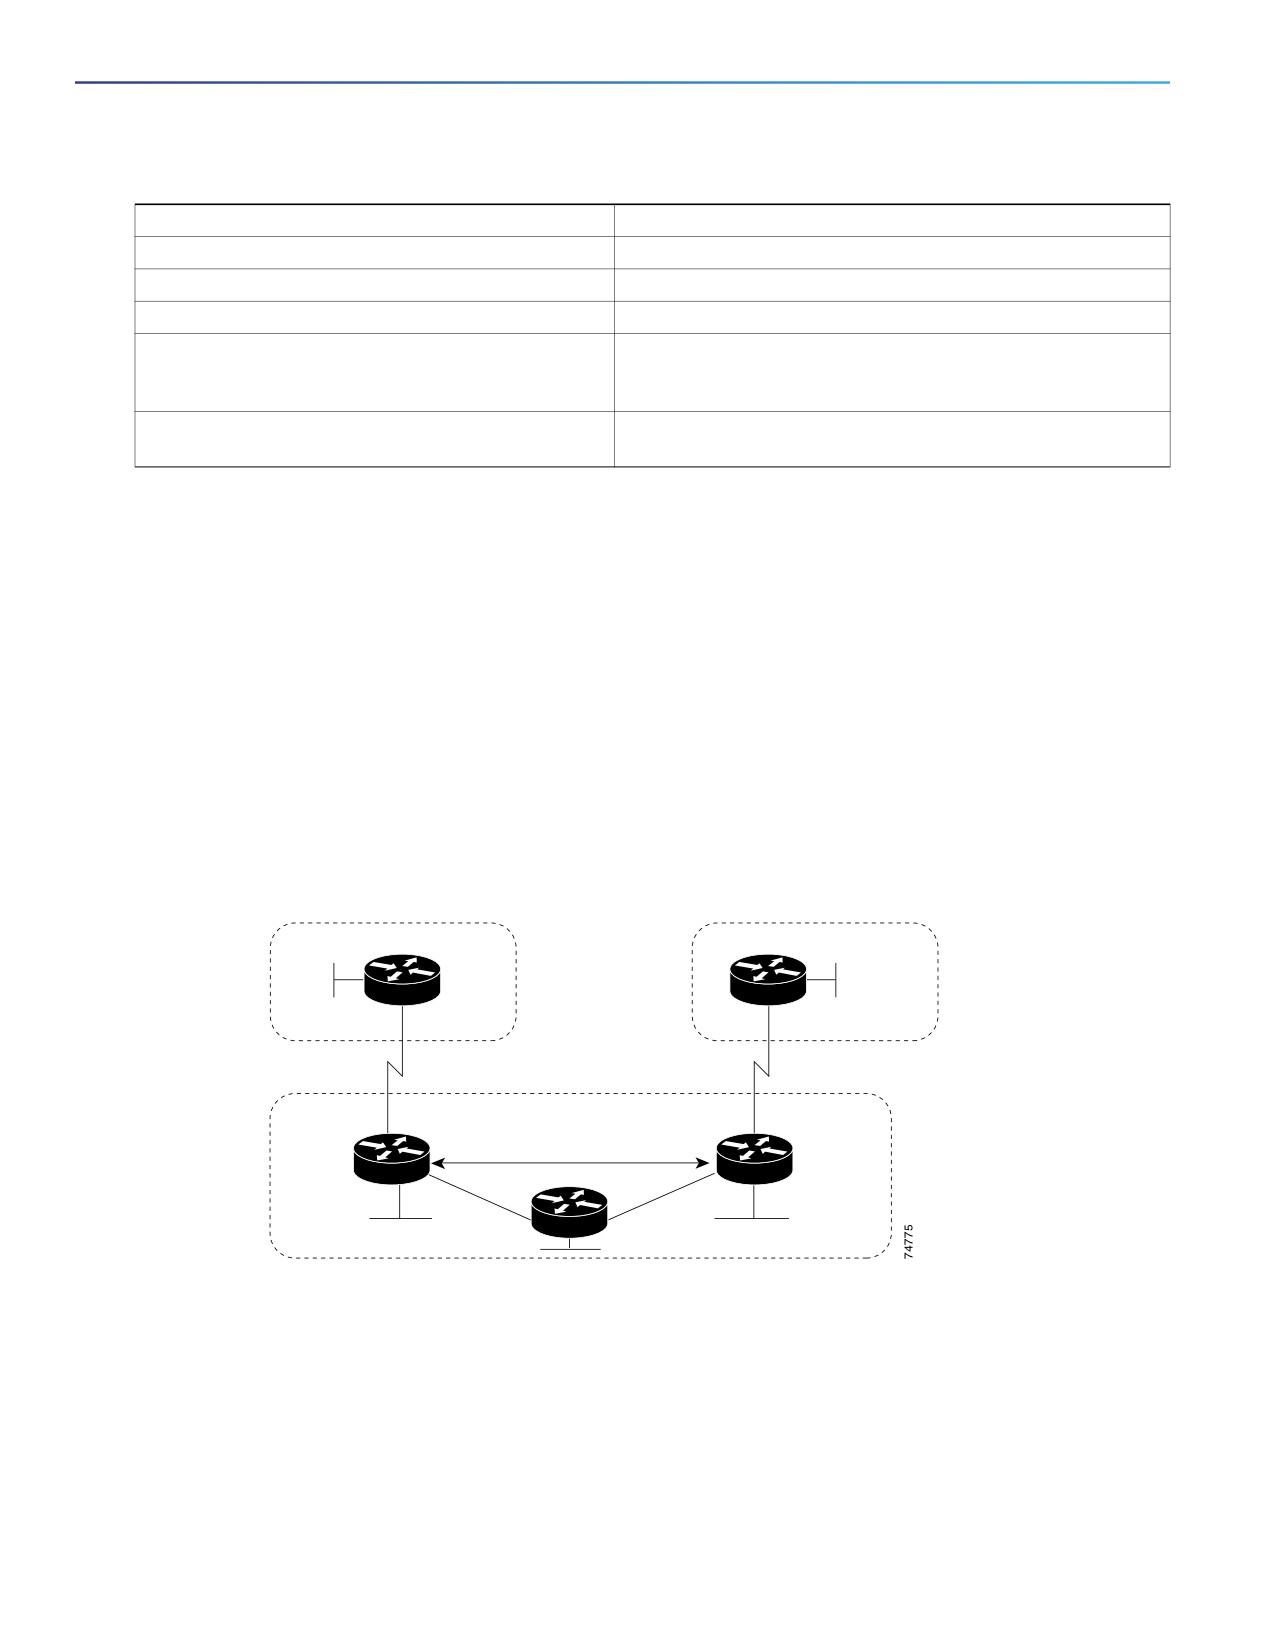
exchanged either between autonomous systems (EBGP) or within an AS (IBGP). Figure 103 on page 888 shows a
network that is running both EBGP and IBGP.
Figure 103 EBGP, IBGP, and Multiple Autonomous Systems
AS 100
Router A
Router D
AS 300
129.213.1.2
192.208.10.1
EBGP
EBGP
129.213.1.1
192.208.10.2
IBGP
Router B
Router C
175.220.212.1
175.220.1.2
AS 200
Before exchanging information with an external AS, BGP ensures that networks within the AS can be reached by defining
internal BGP peering among routers within the AS and by redistributing BGP routing information to IGPs that run within
the AS, such as IGRP and OSPF.
Routers that run a BGP routing process are often referred to as BGP speakers. BGP uses the Transmission Control
Protocol (TCP) as its transport protocol (specifically port 179). Two BGP speakers that have a TCP connection to each
other for exchanging routing information are known as peers or neighbors. In Figure 103 on page 888, Routers A and B
are BGP peers, as are Routers B and C and Routers C and D. The routing information is a series of AS numbers that
describe the full path to the destination network. BGP uses this information to construct a loop-free map of autonomous
systems.
888
Configuring IP Unicast Routing
Configuring BGP
The network has these characteristics:
Routers A and B are running EBGP, and Routers B and C are running IBGP. Note that the EBGP peers are directly
connected and that the IBGP peers are not. As long as there is an IGP running that allows the two neighbors to reach
one another, IBGP peers do not have to be directly connected.
All BGP speakers within an AS must establish a peer relationship with each other. That is, the BGP speakers within
an AS must be fully meshed logically. BGP4 provides two techniques that reduce the requirement for a logical full
mesh: confederations and route reflectors.
AS 200 is a transit AS for AS 100 and AS 300—that is, AS 200 is used to transfer packets between AS 100 and AS
300.
BGP peers initially exchange their full BGP routing tables and then send only incremental updates. BGP peers also
exchange keepalive messages (to ensure that the connection is up) and notification messages (in response to errors or
special conditions).
In BGP, each route consists of a network number, a list of autonomous systems that information has passed through (the
autonomous system path), and a list of other path attributes. The primary function of a BGP system is to exchange
network reachability information, including information about the list of AS paths, with other BGP systems. This
information can be used to determine AS connectivity, to prune routing loops, and to enforce AS-level policy decisions.
A router or switch running Cisco IOS does not select or use an IBGP route unless it has a route available to the next-hop
router and it has received synchronization from an IGP (unless IGP synchronization is disabled). When multiple routes are
available, BGP bases its path selection on attribute values. See Configuring BGP Decision Attributes, page 896 for
information about BGP attributes.
BGP Version 4 supports classless interdomain routing (CIDR) so you can reduce the size of your routing tables by creating
aggregate routes, resulting in supernets. CIDR eliminates the concept of network classes within BGP and supports the
advertising of IP prefixes.
This section includes the following topics:
Default BGP Configuration, page 890
Enabling BGP Routing, page 892
Managing Routing Policy Changes, page 895
Configuring BGP Decision Attributes, page 896
Configuring BGP Filtering with Route Maps, page 899
Configuring BGP Filtering by Neighbor, page 900
Configuring Prefix Lists for BGP Filtering, page 901
Configuring BGP Community Filtering, page 903
Configuring BGP Neighbors and Peer Groups, page 905
Configuring Aggregate Addresses, page 907
Configuring Routing Domain Confederations, page 909
Configuring BGP Route Reflectors, page 910
Configuring Route Dampening, page 911
Monitoring and Maintaining BGP, page 912
889

Configuring IP Unicast Routing
Configuring BGP
Default BGP Configuration
Feature
Default Setting
Aggregate address
Disabled: None defined.
AS path access list
None defined.
Auto summary
Enabled.
Best path
The router considers as-path in choosing a route and does not compare
similar routes from external BGP peers.
Compare router ID: Disabled.
BGP community list
Number: None defined. When you permit a value for the community number,
the list defaults to an implicit deny for everything else that has not been
permitted.
Format: Cisco default format (32-bit number).
BGP confederation
Identifier: None configured.
identifier/peers
Peers: None identified.
BGP Fast external fallover
Enabled.
BGP local preference
100. The range is 0 to 4294967295 with the higher value preferred.
BGP network
None specified; no backdoor route advertised.
BGP route dampening
Disabled by default. When enabled:
Half-life is 15 minutes.
Re-use is 750 (10-second increments).
Suppress is 2000 (10-second increments).
Max-suppress-time is 4 times half-life; 60 minutes.
BGP router ID
The IP address of a loopback interface if one is configured or the highest IP
address configured for a physical interface on the router.
Default information originate
Disabled.
(protocol or network
redistribution)
Default metric
Built-in, automatic metric translations.
Distance
External route administrative distance: 20 (acceptable values are from 1 to
255).
Internal route administrative distance: 200 (acceptable values are from 1 to
255).
Local route administrative distance: 200 (acceptable values are from 1 to
255).
Distribute list
In (filter networks received in updates): Disabled.
Out (suppress networks from being advertised in updates): Disabled.
Internal route redistribution
Disabled.
IP prefix list
None defined.
890

Configuring IP Unicast Routing
Configuring BGP
Feature
Default Setting
Multi exit discriminator (MED)
Always compare: Disabled. Does not compare MEDs for paths from neighbors
in different autonomous systems.
Best path compare: Disabled.
MED missing as worst path: Disabled.
Deterministic MED comparison is disabled.
Neighbor
Advertisement interval: 30 seconds for external peers; 5 seconds for internal
peers.
Change logging: Enabled.
Conditional advertisement: Disabled.
Default originate: No default route is sent to the neighbor.
Description: None.
Distribute list: None defined.
External BGP multihop: Only directly connected neighbors are allowed.
Filter list: None used.
Maximum number of prefixes received: No limit.
Neighbor
Next hop (router as next hop for BGP neighbor): Disabled.
Password: Disabled.
Peer group: None defined; no members assigned.
Prefix list: None specified.
Remote AS (add entry to neighbor BGP table): No peers defined.
Private AS number removal: Disabled.
Route maps: None applied to a peer.
Send community attributes: None sent to neighbors.
Shutdown or soft reconfiguration: Not enabled.
Timers: keepalive: 60 seconds; holdtime: 180 seconds.
Update source: Best local address.
Version: BGP Version 4.
Weight: Routes learned through BGP peer: 0; routes sourced by the local
router: 32768.
NSF1 Awareness
Disabled2. Allows Layer 3 switches to continue forwarding packets from a
neighboring NSF-capable router during hardware or software changes.
Route reflector
None configured.
891
Configuring IP Unicast Routing
Configuring BGP
Feature
Default Setting
Synchronization (BGP and IGP)
Enabled.
Table map update
Disabled.
Timers
Keepalive: 60 seconds; holdtime: 180 seconds.
1. NSF = Nonstop Forwarding
2. BGP NSF Awareness can be enabled for IPv4 on switches with the IP services image by enabling Graceful Restart.
Nonstop Forwarding Awareness
The BGP NSF Awareness feature is supported for IPv4 in the IP services image. To enable this feature with BGP routing,
you need to enable Graceful Restart. When the neighboring router is NSF-capable, and this feature is enabled, the Layer
3 switch continues to forward packets from the neighboring router during the interval between the primary Route
Processor (RP) in a router failing and the backup RP taking over, or while the primary RP is manually reloaded for a
nondisruptive software upgrade. For more information, see IP Routing: BGP Configuration Guide, Cisco IOS Release
15M&T.
Enabling BGP Routing
To enable BGP routing, you establish a BGP routing process and define the local network. Because BGP must completely
recognize the relationships with its neighbors, you must also specify a BGP neighbor.
BGP supports two kinds of neighbors: internal and external. Internal neighbors are in the same AS; external neighbors
are in different autonomous systems. External neighbors are usually adjacent to each other and share a subnet, but
internal neighbors can be anywhere in the same AS.
The switch supports the use of private AS numbers, usually assigned by service providers and given to systems whose
routes are not advertised to external neighbors. The private AS numbers are from 64512 to 65535. You can configure
external neighbors to remove private AS numbers from the AS path by using the neighbor remove-private-as router
configuration command. Then when an update is passed to an external neighbor, if the AS path includes private AS
numbers, these numbers are dropped.
If your AS must pass traffic through it from another AS to a third AS, it is important to be consistent about the routes it
advertises. If BGP advertises a route before all routers in the network learn about the route through the IGP, the AS might
receive traffic that some routers can not yet route. To prevent this from happening, BGP must wait until the IGP has
propagated information across the AS so that BGP is synchronized with the IGP. Synchronization is enabled by default.
If your AS does not pass traffic from one AS to another AS, or if all routers in your autonomous systems are running BGP,
you can disable synchronization, which allows your network to carry fewer routes in the IGP and allows BGP to converge
more quickly.
BEFORE YOU BEGIN
You should know your network design and how you want traffic to flow through it before configuring BGP. Gather the
network requirements you need, which should include the following:
Whether you need to run IBGP for internal connectivity
External connectivity to the service provider network
Configuration parameters such as neighbor IP addresses and their AS number, and which networks you will advertise
through BGP
892

Configuring IP Unicast Routing
Configuring BGP
DETAILED STEPS
Command
Purpose
1.
configure terminal
Enter global configuration mode.
2.
ip routing
Enable IP routing (required only if IP routing is
disabled).
3.
router bgp autonomous-system
Enable a BGP routing process, assign it an AS number,
and enter router configuration mode. The AS number
can be from 1 to 65535, with 64512 to 65535
designated as private autonomous numbers.
4.
network network-number [mask
Configure a network as local to this AS, and enter it in
network-mask] [route-map
the BGP table.
route-map-name]
5.
neighbor {ip-address | peer-group-name}
Add an entry to the BGP neighbor table specifying that
remote-as number
the neighbor identified by the IP address belongs to
the specified AS.
For EBGP, neighbors are usually directly connected,
and the IP address is the address of the interface at the
other end of the connection.
For IBGP, the IP address can be the address of any of
the router interfaces.
6.
neighbor {ip-address | peer-group-name}
(Optional) Remove private AS numbers from the
remove-private-as
AS-path in outbound routing updates.
7.
no synchronization
(Optional) Disable synchronization between BGP and
an IGP.
8.
no auto-summary
(Optional) Disable automatic network summarization.
By default, when a subnet is redistributed from an IGP
into BGP, only the network route is inserted into the
BGP table.
9.
bgp fast-external-fallover
(Optional) Automatically reset a BGP session when a
link between external neighbors goes down. By
default, the session is not immediately reset.
10.
bgp graceful-restart
(Optional) Enable NSF awareness on switch. By
default, NSF awareness is disabled.
893

Configuring IP Unicast Routing
Configuring BGP
Command
Purpose
11.
end
Return to privileged EXEC mode.
12.
show ip bgp network network-number
Verify the configuration.
or
show ip bgp neighbor
Verify that NSF awareness (Graceful Restart) is
enabled on the neighbor.
If NSF awareness is enabled on the switch and the
neighbor, this message appears:
Graceful Restart Capability: advertised and
received
If NSF awareness is enabled on the switch, but not on
the neighbor, this message appears:
Graceful Restart Capability: advertised
13.
copy running-config startup-config
(Optional) Save your entries in the configuration file.
Use the no router bgp autonomous-system global configuration command to remove a BGP AS. Use the no network
network-number router configuration command to remove the network from the BGP table. Use the no neighbor
{ip-address | peer-group-name} remote-as number router configuration command to remove a neighbor. Use the no
neighbor {ip-address | peer-group-name} remove-private-as router configuration command to include private AS
numbers in updates to a neighbor. Use the synchronization router configuration command to re-enable synchronization.
EXAMPLE
These examples show how to configure BGP on the routers in Figure 103 on page 888.
Router A:
Switch(config)# router bgp 100
Switch(config-router)# neighbor 129.213.1.1 remote-as 200
Router B:
Switch(config)# router bgp 200
Switch(config-router)# neighbor 129.213.1.2 remote-as 100
Switch(config-router)# neighbor 175.220.1.2 remote-as 200
Router C:
Switch(config)# router bgp 200
Switch(config-router)# neighbor 175.220.212.1 remote-as 200
Switch(config-router)# neighbor 192.208.10.1 remote-as 300
Router D:
Switch(config)# router bgp 300
Switch(config-router)# neighbor 192.208.10.2 remote-as 200
To verify that BGP peers are running, use the show ip bgp neighbors privileged EXEC command. This is the output of
this command on Router A:
Switch# show ip bgp neighbors
BGP neighbor is 129.213.1.1, remote AS 200, external link
BGP version 4, remote router ID 175.220.212.1
BGP state = established, table version = 3, up for 0:10:59
Last read 0:00:29, hold time is 180, keepalive interval is 60 seconds
Minimum time between advertisement runs is 30 seconds
894

Configuring IP Unicast Routing
Configuring BGP
Received 2828 messages, 0 notifications, 0 in queue
Sent 2826 messages, 0 notifications, 0 in queue
Connections established 11; dropped 10
Anything other than state = established means that the peers are not running. The remote router ID is the highest IP
address on that router (or the highest loopback interface). Each time the table is updated with new information, the table
version number increments. A table version number that continually increments means that a route is flapping, causing
continual routing updates.
For exterior protocols, a reference to an IP network from the network router configuration command controls only which
networks are advertised. This is in contrast to Interior Gateway Protocols (IGPs), such as EIGRP, which also use the
network command to specify where to send updates.
Managing Routing Policy Changes
Routing policies for a peer include all the configurations that might affect inbound or outbound routing table updates.
When you have defined two routers as BGP neighbors, they form a BGP connection and exchange routing information.
If you later change a BGP filter, weight, distance, version, or timer, or make a similar configuration change, you must reset
the BGP sessions so that the configuration changes take effect.
There are two types of reset: hard reset and soft reset. The switch supports a soft reset without any prior configuration
when both BGP peers support the soft route refresh capability, which is advertised in the OPEN message sent when the
peers establish a TCP session. A soft reset allows the dynamic exchange of route refresh requests and routing
information between BGP routers and the subsequent re-advertisement of the respective outbound routing table.
When soft reset generates inbound updates from a neighbor, it is called dynamic inbound soft reset.
When soft reset sends a set of updates to a neighbor, it is called outbound soft reset.
A soft inbound reset causes the new inbound policy to take effect. A soft outbound reset causes the new local outbound
policy to take effect without resetting the BGP session. As a new set of updates is sent during outbound policy reset, a
new inbound policy can also take effect.
Table 65
Advantages and Disadvantages of Hard and Soft Resets
Type of Reset
Advantages
Disadvantages
Hard reset
No memory overhead.
The prefixes in the BGP, IP, and FIB tables
provided by the neighbor are lost. Not
recommended.
Outbound soft reset
No configuration; no storing of routing table
Does not reset inbound routing table updates.
updates.
Dynamic inbound soft
Does not clear the BGP session and cache.
Both BGP routers must support the route
reset
refresh capability.
Does not require storing of routing table
updates and has no memory overhead.
BEFORE YOU BEGIN
Enable BGP routing as described in the Enabling BGP Routing, page 892.
895

Configuring IP Unicast Routing
Configuring BGP
DETAILED STEPS
Command
Purpose
1.
show ip bgp neighbors
Display whether a neighbor supports the route refresh capability. When
supported, this message appears for the router:
Received route refresh capability from peer.
2.
clear ip bgp {* | address |
Reset the routing table on the specified connection.
peer-group-name}
Enter an asterisk (*) to specify that all connections be reset.
Enter an IP address to specify the connection to be reset.
Enter a peer group name to reset the peer group.
3.
clear ip bgp {* | address |
(Optional) Perform an outbound soft reset to reset the inbound routing
peer-group-name} soft
table on the specified connection. Use this command if route refresh is
out
supported.
Enter an asterisk (*) to specify that all connections be reset.
Enter an IP address to specify the connection to be reset.
Enter a peer group name to reset the peer group.
4.
show ip bgp
Verify the reset by checking information about the routing table and
show ip bgp neighbors
about BGP neighbors.
EXAMPLE
In the following example, an outbound soft reset is initiated for sessions with all routers in the autonomous system
numbered 35700:
Switch# clear ip bgp 35700 soft out
Configuring BGP Decision Attributes
When a BGP speaker receives updates from multiple autonomous systems that describe different paths to the same
destination, it must choose the single best path for reaching that destination. The decision is based on the value of
attributes that the update contains and other BGP-configurable factors. The selected path is entered into the BGP routing
table and propagated to its neighbors.
When a BGP peer learns two EBGP paths for a prefix from a neighboring AS, it chooses the best path and inserts that
path in the IP routing table. If BGP multipath support is enabled and the EBGP paths are learned from the same
neighboring autonomous systems, multiple paths are installed in the IP routing table. Then, during packet switching,
per-packet or per-destination load balancing is performed among the multiple paths. The maximum-paths router
configuration command controls the number of paths allowed.
These factors summarize the order in which BGP evaluates the attributes for choosing the best path:
1. If the path specifies a next hop that is inaccessible, drop the update. The BGP next-hop attribute, automatically
determined by the software, is the IP address of the next hop that is going to be used to reach a destination. For
EBGP, this is usually the IP address of the neighbor specified by the neighbor remote-as router configuration
command. You can disable next-hop processing by using route maps or the neighbor next-hop-self router
configuration command.
2. Prefer the path with the largest weight (a Cisco proprietary parameter). The weight attribute is local to the router and
not propagated in routing updates. By default, the weight attribute is 32768 for paths that the router originates and
zero for other paths. You can use access lists, route maps, or the neighbor weight router configuration command
to set weights.
896
Configuring IP Unicast Routing
Configuring BGP
3.
Prefer the route with the highest local preference. Local preference is part of the routing update and exchanged
among routers in the same AS. The default value of the local preference attribute is 100. You can set local preference
by using the bgp default local-preference router configuration command or by using a route map.
4.
Prefer the route that was originated by BGP running on the local router.
5.
Prefer the route with the shortest AS path.
6.
Prefer the route with the lowest origin type. An interior route or IGP is lower than a route learned by EGP, and an
EGP-learned route is lower than one of unknown origin or learned in another way.
7.
Prefer the route with the lowest multi-exit discriminator (MED) metric attribute if the neighboring AS is the same for
all routes considered. You can configure the MED by using route maps or by using the default-metric router
configuration command. When an update is sent to an IBGP peer, the MED is included.
8.
Prefer the external (EBGP) path over the internal (IBGP) path.
9.
Prefer the route that can be reached through the closest IGP neighbor (the lowest IGP metric). This means that the
router will prefer the shortest internal path within the AS to reach the destination (the shortest path to the BGP
next-hop).
10. If these conditions are all true, insert the route for this path into the IP routing table:
• Both the best route and this route are external.
• Both the best route and this route are from the same neighboring autonomous system.
• Maximum-paths is enabled.
11. If multipath is not enabled, prefer the route with the lowest IP address value for the BGP router ID. The router ID is
usually the highest IP address on the router or the loopback (virtual) address, but might be implementation-specific.
BEFORE YOU BEGIN
Enable BGP routing as described in the Enabling BGP Routing, page 892.
897

Configuring IP Unicast Routing
Configuring BGP
DETAILED STEPS
Command
Purpose
1.
configure terminal
Enter global configuration mode.
2.
router bgp autonomous-system
Enable a BGP routing process, assign it an AS
number, and enter router configuration mode.
3.
bgp best-path as-path ignore
(Optional) Configure the router to ignore AS path
length in selecting a route.
4.
neighbor {ip-address | peer-group-name}
(Optional) Disable next-hop processing on BGP
next-hop-self
updates to a neighbor by entering a specific IP
address to be used instead of the next-hop
address.
5.
neighbor {ip-address | peer-group-name}
(Optional) Assign a weight to a neighbor
weight weight
connection. Acceptable values are from 0 to
65535; the largest weight is the preferred route.
Routes learned through another BGP peer have a
default weight of 0; routes sourced by the local
router have a default weight of 32768.
6.
default-metric number
(Optional) Set a MED metric to set preferred paths
to external neighbors. All routes without a MED will
also be set to this value. The range is 1 to
4294967295. The lowest value is the most
desirable.
7.
bgp bestpath med missing-as-worst
(Optional) Configure the switch to consider a
missing MED as having a value of infinity, making
the path without a MED value the least desirable
path.
8.
bgp always-compare med
(Optional) Configure the switch to compare MEDs
for paths from neighbors in different autonomous
systems. By default, MED comparison is only done
among paths in the same AS.
9.
bgp bestpath med confed
(Optional) Configure the switch to consider the
MED in choosing a path from among those
advertised by different subautonomous systems
within a confederation.
10.
bgp deterministic med
(Optional) Configure the switch to consider the
MED variable when choosing among routes
advertised by different peers in the same AS.
11.
bgp default local-preference value
(Optional) Change the default local preference
value. The range is 0 to 4294967295; the default
value is 100. The highest local preference value is
preferred.
12.
maximum-paths number
(Optional) Configure the number of paths to be
added to the IP routing table. The default is to only
enter the best path in the routing table. The range
is from 1 to 8. Having multiple paths allows load
balancing among the paths.
13.
end
Return to privileged EXEC mode.
14.
show ip bgp
Verify the reset by checking information about the
show ip bgp neighbors
routing table and about BGP neighbors.
15.
copy running-config startup-config
(Optional) Save your entries in the configuration
file.
898

Configuring IP Unicast Routing
Configuring BGP
Use the no form of each command to return to the default state.
EXAMPLE
The following example forces all updates destined for 10.108.1.1 to advertise this router as the next hop:
Switch(config)# router bgp 109
Switch(config-router)# neighbor 10.108.1.1 next-hop-self
In the following example, the local BGP routing process is configured to compare the MED from alternative paths,
regardless of the autonomous system from which the paths are received:
Switch(config)# router bgp 500000
Switch(config-router)# bgp always-compare-med
Configuring BGP Filtering with Route Maps
Within BGP, you can use route maps to control and to modify routing information and to define the conditions by which
routes are redistributed between routing domains. See Using Route Maps to Redistribute Routing Information, page 953
for more information about route maps. Each route map has a name that identifies the route map (map tag) and an
optional sequence number.
BEFORE YOU BEGIN
Enable BGP routing as described in the Enabling BGP Routing, page 892.
DETAILED STEPS
Command
Purpose
1.
configure terminal
Enter global configuration mode.
2.
route-map map-tag [[permit | deny] |
Create a route map, and enter route-map configuration
sequence-number]]
mode.
3.
set ip next-hop ip-address
(Optional) Set a route map to disable next-hop processing.
[...ip-address] [peer-address]
In an inbound route map, set the next hop of matching
routes to be the neighbor peering address, overriding
third-party next hops.
In an outbound route map of a BGP peer, set the next hop
to the peering address of the local router, disabling the
next-hop calculation.
4.
end
Return to privileged EXEC mode.
5.
show route-map [map-name]
Display all route maps configured or only the one specified to
verify configuration.
6.
copy running-config startup-config
(Optional) Save your entries in the configuration file.
Use the no route-map map-tag command to delete the route map. Use the no set ip next-hop ip-address command
to re-enable next-hop processing.
EXAMPLE
In the following example, the inbound route map named rmap sets the next hop:
Switch(config)# route-map rmap permit 10
Switch(config-route-map)# set ip next-hop 10.2.0.1
899

Configuring IP Unicast Routing
Configuring BGP
Configuring BGP Filtering by Neighbor
You can filter BGP advertisements by using AS-path filters, such as the as-path access-list global configuration
command and the neighbor filter-list router configuration command. You can also use access lists with the neighbor
distribute-list router configuration command. Distribute-list filters are applied to network numbers. See Controlling
Advertising and Processing in Routing Updates, page 962 for information about the distribute-list command.
You can use route maps on a per-neighbor basis to filter updates and to modify various attributes. A route map can be
applied to either inbound or outbound updates. Only the routes that pass the route map are sent or accepted in updates.
On both inbound and outbound updates, matching is supported based on AS path, community, and network numbers.
Autonomous-system path matching requires the match as-path access-list route-map command, community-based
matching requires the match community-list route-map command, and network-based matching requires the ip
access-list global configuration command.
BEFORE YOU BEGIN
Enable BGP routing as described in the Enabling BGP Routing, page 892.
DETAILED STEPS
Command
Purpose
1.
configure terminal
Enter global configuration mode.
2.
router bgp autonomous-system
Enable a BGP routing process, assign it an AS number, and
enter router configuration mode.
3.
neighbor {ip-address | peer-group
(Optional) Filter BGP routing updates to or from neighbors
name} distribute-list
as specified in an access list.
{access-list-number | name} {in | out}
Note: You can also use the neighbor prefix-list router
configuration command to filter updates, but you cannot
use both commands to configure the same BGP peer.
4.
neighbor {ip-address | peer-group
(Optional) Apply a route map to filter an incoming or
name} route-map map-tag {in | out}
outgoing route.
5.
end
Return to privileged EXEC mode.
6.
show ip bgp neighbors
Verify the configuration.
7.
copy running-config startup-config
(Optional) Save your entries in the configuration file.
Use the no neighbor distribute-list command to remove the access list from the neighbor. Use the no neighbor
route-map map-tag router configuration command to remove the route map from the neighbor.
EXAMPLE
The following router configuration mode example applies list 39 to incoming advertisements from neighbor172.16.4.1.
List 39 permits the advertisement of network 10.109.0.0.
Switch(config)# router bgp 109
Switch(config-router)# network 10.108.0.0
Switch(config-router)# neighbor 172.16.4.1 distribute-list 39 in
Configuring BGP Filtering By Access Lists
Another method of filtering is to specify an access list filter on both incoming and outbound updates, based on the BGP
autonomous system paths. Each filter is an access list based on regular expressions. (See Using Regular Expressions in
BGP for more information on forming regular expressions.) To use this method, define an autonomous system path
access list, and apply it to updates to and from particular neighbors.
900

Configuring IP Unicast Routing
Configuring BGP
BEFORE YOU BEGIN
Enable BGP routing as described in the Enabling BGP Routing, page 892.
DETAILED STEPS
Command
Purpose
1.
configure terminal
Enter global configuration mode.
2.
ip as-path access-list
Define a BGP-related access list.
access-list-number {permit | deny}
as-regular-expressions
3.
router bgp autonomous-system
Enter BGP router configuration mode.
4.
neighbor {ip-address | peer-group
Establish a BGP filter based on an access list.
name} filter-list {access-list-number |
name} {in | out | weight weight}
5.
end
Return to privileged EXEC mode.
6.
show ip bgp neighbors [paths
Verify the configuration.
regular-expression]
7.
copy running-config startup-config
(Optional) Save your entries in the configuration file.
EXAMPLE
In the following example, an autonomous system path access list (number 500) is defined to configure the router to not
advertise any path through or from autonomous system 65535 to the 10.20.2.2 neighbor:
Switch(config)# ip as-path access-list 500 deny _65535_
Switch(config)# ip as-path access-list 500 deny ^65535$
Switch(config)# router bgp 50000
Switch(config-router)# neighbor 192.168.1.1 remote-as 65535
Switch(config-router)# neighbor 10.20.2.2 remote-as 40000
Switch(config-router)# neighbor 10.20.2.2 filter-list 500 out
Switch(config-router)# end
Configuring Prefix Lists for BGP Filtering
You can use prefix lists as an alternative to access lists in many BGP route filtering commands, including the neighbor
distribute-list router configuration command. Filtering by a prefix list involves matching the prefixes of routes with those
listed in the prefix list, as when matching access lists. When there is a match, the route is used. Whether a prefix is
permitted or denied is based upon these rules:
An empty prefix list permits all prefixes.
An implicit deny is assumed if a given prefix does not match any entries in a prefix list.
When multiple entries of a prefix list match a given prefix, the sequence number of a prefix list entry identifies the
entry with the lowest sequence number.
By default, sequence numbers are generated automatically and incremented in units of five. If you disable the automatic
generation of sequence numbers, you must specify the sequence number for each entry. You can specify sequence
values in any increment. If you specify increments of one, you cannot insert additional entries into the list; if you choose
very large increments, you might run out of values.
You do not need to specify a sequence number when removing a configuration entry. Show commands include the
sequence numbers in their output.
901

Configuring IP Unicast Routing
Configuring BGP
Before using a prefix list in a command, you must set up the prefix list.
BEFORE YOU BEGIN
Enable BGP routing as described in the Enabling BGP Routing, page 892.
DETAILED STEPS
Command
Purpose
1.
configure terminal
Enter global configuration mode.
2.
ip prefix-list list-name [seq seq-value]
Create a prefix list with an optional sequence number to
deny | permit network/len [ge
deny or permit access for matching conditions. You must
ge-value] [le le-value]
enter at least one permit or deny clause.
network/len is the network number and length (in bits)
of the network mask.
(Optional) ge and le values specify the range of the
prefix length to be matched. The specified ge-value
and le-value must satisfy this condition: len < ge-value
< le-value < 32
3.
ip prefix-list list-name seq seq-value
(Optional) Add an entry to a prefix list, and assign a
deny | permit network/len [ge
sequence number to the entry.
ge-value] [le le-value]
4.
end
Return to privileged EXEC mode.
5.
show ip prefix list [detail | summary]
Verify the configuration by displaying information about a
name [network/len] [seq seq-num]
prefix list or prefix list entries.
[longer] [first-match]
6.
copy running-config startup-config
(Optional) Save your entries in the configuration file.
To delete a prefix list and all of its entries, use the no ip prefix-list list-name global configuration command. To delete
an entry from a prefix list, use the no ip prefix-list seq seq-value global configuration command. To disable automatic
generation of sequence numbers, use the no ip prefix-list sequence number command; to reenable automatic
generation, use the ip prefix-list sequence number command. To clear the hit-count table of prefix list entries, use the
clear ip prefix-list privileged EXEC command.
EXAMPLE
In the following example, a prefix list is configured to deny the default route 0.0.0.0/0:
Switch(config)# ip prefix-list RED deny 0.0.0.0/0
In the following example, a prefix list is configured to permit traffic from the 172.16.1.0/24 subnet:
Switch(config)# ip prefix-list BLUE permit 172.16.1.0/24
In the following example, a prefix list is configured to permit routes from the 10.0.0.0/8 network that have a mask length
that is less than or equal to 24 bits:
Switch(config)# ip prefix-list YELLOW permit 10.0.0.0/8 le 24
In the following example, a prefix list is configured to deny routes from the 10.0.0.0/8 network that have a mask length
that is greater than or equal to 25 bits:
Switch(config)# ip prefix-list PINK deny 10.0.0.0/8 ge 25
902
Configuring IP Unicast Routing
Configuring BGP
In the following example, a prefix list is configured to permit routes from any network that have a mask length from 8 to
24 bits:
Switch(config)# ip prefix-list GREEN permit 0.0.0.0/0 ge 8 le 24
In the following example, a prefix list is configured to deny any route with any mask length from the 10.0.0.0/8 network:
Switch(config)# ip prefix-list ORANGE deny 10.0.0.0/8 le 32
Configuring BGP Community Filtering
One way that BGP controls the distribution of routing information based on the value of the COMMUNITIES attribute. A
community is a group of destinations that share some common attribute. Each destination can belong to multiple
communities. AS administrators can define to which communities a destination belongs. By default, all destinations
belong to the general Internet community. The community is identified by the COMMUNITIES attribute, an optional,
transitive, global attribute in the numerical range from 1 to 4294967200. These are some predefined, well-known
communities:
internet—Advertise this route to the Internet community. All routers belong to it.
no-export—Do not advertise this route to EBGP peers.
no-advertise—Do not advertise this route to any peer (internal or external).
local-as—Do not advertise this route to peers outside the local autonomous system.
Based on the community, you can control which routing information to accept, prefer, or distribute to other neighbors. A
BGP speaker can set, append, or modify the community of a route when learning, advertising, or redistributing routes.
When routes are aggregated, the resulting aggregate has a COMMUNITIES attribute that contains all communities from
all the initial routes.
You can use community lists to create groups of communities to use in a match clause of a route map. As with an access
list, a series of community lists can be created. Statements are checked until a match is found. As soon as one statement
is satisfied, the test is concluded.
To set the COMMUNITIES attribute and match clauses based on communities, see the match community-list and set
community route-map configuration commands in the Using Route Maps to Redistribute Routing Information, page 953.
By default, no COMMUNITIES attribute is sent to a neighbor. You can specify that the COMMUNITIES attribute be sent to
the neighbor at an IP address by using the neighbor send-community router configuration command.
BEFORE YOU BEGIN
Enable BGP routing as described in the Enabling BGP Routing, page 892.
903

Configuring IP Unicast Routing
Configuring BGP
DETAILED STEPS
Command
Purpose
1.
configure terminal
Enter global configuration mode.
2.
ip community-list
Create a community list, and assign it a number.
community-list-number {permit |
deny} community-number
The community-list-number is an integer from 1 to 99 that
identifies one or more permit or deny groups of
communities.
The community-number is the number configured by a set
community route-map configuration command.
3.
router bgp autonomous-system
Enter BGP router configuration mode.
4.
neighbor {ip-address | peer-group
Specify that the COMMUNITIES attribute be sent to the
name} send-community
neighbor at this IP address.
5.
set comm-list list-num delete
(Optional) Remove communities from the community attribute
of an inbound or outbound update that match a standard or
extended community list specified by a route map.
6.
exit
Return to global configuration mode.
7.
ip bgp-community new-format
(Optional) Display and parse BGP communities in the format
AA:NN.
A BGP community is displayed in a two-part format 2 bytes
long. The Cisco default community format is in the format
NNAA. In the most recent RFC for BGP, a community takes the
form AA:NN, where the first part is the AS number and the
second part is a 2-byte number.
8.
end
Return to privileged EXEC mode.
9.
show ip bgp community
Verify the configuration.
10.
copy running-config
(Optional) Save your entries in the configuration file.
startup-config
EXAMPLE
In the following example, a standard community list is configured that permits routes from network 10 in autonomous
system 50000:
Router(config)# ip community-list 1 permit 50000:10
In the following router configuration mode example, the router belongs to autonomous system 109 and is configured to
send the communities attribute to its neighbor at IP address 172.16.70.23:
Switch(config)# router bgp 109
Switch(config-router)# neighbor 172.16.70.23 send-community
In the following example, a router that uses the 32-bit number community format is upgraded to use the AA:NN format:
Switch(config)# ip bgp-community new-format
The following sample output shows how BGP community numbers are displayed when the ip bgp-community
new-format command is enabled:
Switch# show ip bgp 10.0.0.0
BGP routing table entry for 10.0.0.0/8, version 4
Paths: (2 available, best #2, table Default-IP-Routing-Table)
Advertised to non peer-group peers:
10.0.33.35
904
Configuring IP Unicast Routing
Configuring BGP
35
10.0.33.35 from 10.0.33.35 (192.168.3.3)
Origin incomplete, metric 10, localpref 100, valid, external
Community: 1:1
Local
0.0.0.0 from 0.0.0.0 (10.0.33.34)
Origin incomplete, metric 0, localpref 100, weight 32768, valid, sourced, best
Configuring BGP Neighbors and Peer Groups
Often many BGP neighbors are configured with the same update policies (that is, the same outbound route maps,
distribute lists, filter lists, update source, and so on). Neighbors with the same update policies can be grouped into peer
groups to simplify configuration and to make updating more efficient. When you have configured many peers, we
recommend this approach.
To configure a BGP peer group, you create the peer group, assign options to the peer group, and add neighbors as peer
group members. You configure the peer group by using the neighbor router configuration commands. By default, peer
group members inherit all the configuration options of the peer group, including the remote-as (if configured), version,
update-source, out-route-map, out-filter-list, out-dist-list, minimum-advertisement-interval, and next-hop-self. All
peer group members also inherit changes made to the peer group. Members can also be configured to override the
options that do not affect outbound updates.
To assign configuration options to an individual neighbor, specify any of these router configuration commands by using
the neighbor IP address. To assign the options to a peer group, specify any of the commands by using the peer group
name. You can disable a BGP peer or peer group without removing all the configuration information by using the neighbor
shutdown router configuration command.
BEFORE YOU BEGIN
Enable BGP routing as described in the Enabling BGP Routing, page 892.
905

Configuring IP Unicast Routing
Configuring BGP
DETAILED STEPS
Command
Purpose
1.
configure terminal
Enter global configuration mode.
2.
router bgp autonomous-system
Enter BGP router configuration mode.
3.
neighbor peer-group-name peer-group
Create a BGP peer group.
4.
neighbor ip-address peer-group
Make a BGP neighbor a member of the peer group.
peer-group-name
5.
neighbor {ip-address | peer-group-name}
Specify a BGP neighbor. If a peer group is not configured
remote-as number
with a remote-as number, use this command to create
peer groups containing EBGP neighbors. The range is 1
to 65535.
6.
neighbor {ip-address | peer-group-name}
(Optional) Associate a description with a neighbor.
description text
7.
neighbor {ip-address | peer-group-name}
(Optional) Allow a BGP speaker (the local router) to send
default-originate [route-map map-name]
the default route 0.0.0.0 to a neighbor for use as a
default route.
8.
neighbor {ip-address | peer-group-name}
(Optional) Specify that the COMMUNITIES attribute be
send-community
sent to the neighbor at this IP address.
9.
neighbor {ip-address | peer-group-name}
(Optional) Allow internal BGP sessions to use any
update-source interface
operational interface for TCP connections.
10.
neighbor {ip-address | peer-group-name}
(Optional) Allow BGP sessions, even when the neighbor
ebgp-multihop
is not on a directly connected segment. The multihop
session is not established if the only route to the
multihop peer’s address is the default route (0.0.0.0).
11.
neighbor {ip-address | peer-group-name}
(Optional) Specify an AS number to use as the local AS.
local-as number
The range is 1 to 65535.
12.
neighbor {ip-address | peer-group-name}
(Optional) Set the minimum interval between sending
advertisement-interval seconds
BGP routing updates.
13.
neighbor {ip-address | peer-group-name}
(Optional) Control how many prefixes can be received
maximum-prefix maximum [threshold]
from a neighbor. The range is 1 to 4294967295. The
threshold (optional) is the percentage of maximum at
which a warning message is generated. The default is
75 percent.
14.
neighbor {ip-address | peer-group-name}
(Optional) Disable next-hop processing on the BGP
next-hop-self
updates to a neighbor.
15.
neighbor {ip-address | peer-group-name}
(Optional) Set MD5 authentication on a TCP connection
password string
to a BGP peer. The same password must be configured
on both BGP peers, or the connection between them is
not made.
16.
neighbor {ip-address | peer-group-name}
(Optional) Apply a route map to incoming or outgoing
route-map map-name {in | out}
routes.
17.
neighbor {ip-address | peer-group-name}
(Optional) Specify that the COMMUNITIES attribute be
send-community
sent to the neighbor at this IP address.
906