Seat Mii. Service Manual - part 7


  Index      Seat     Seat Mii. Service Manual


Search            copyright infringement  


Content      ..     5      6      7      8     ..


Seat Mii. Service Manual - part 7


-------------------------------------------------------------------------------------------------------------------------------------------------------------
Opening and closing

The rear lid is also locked by a central lock-

ing.

If the vehicle rear lid is locked or unlocked

using the 

 button, when it is closed once

more it will lock automatically.

A closed but not locked rear lid will lock au-

tomatically at a speed above about 9 km/h
(6 mph).

Locking the rear lid with the vehicle mechan-
ical key
Locking is only possible when the rear lid is
correctly and fully closed.

Insert the vehicle key into the lock cylinder

of the driver door and turn the key 

in a clock-

wise direction 

››› 

page 94

.

WARNING

Unsuitable or careless closing and locking of
the rear lid could cause serious injuries.

Never leave the vehicle unattended, or al-

low children to play inside or around the vehi-
cle without supervision, especially if the rear
lid is open. Children could enter the luggage
compartment, close the rear lid and become
trapped. A locked vehicle can be subjected to
extremely high and low temperatures, de-
pending on the time of year, thus causing se-
rious injuries/illness and even death.

Note

Before closing the rear lid, make sure that the
key has not been left inside the luggage com-
partment.

Electric windows

Opening and closing the electric win-
dows

Read the additional information carefully

››› 

page 11

WARNING

Careless use of the electric windows can
cause serious injury.

Only operate the electric windows when

nobody is in the way.

Never leave children or disabled people

alone in the vehicle if the doors are to be
locked. The windows cannot be opened in
case of an emergency.

Always take all the keys with you whenever

you leave the vehicle. After turning off the ig-
nition, the windows can be opened and
closed for a short time using the buttons on
the door as long as the driver door or passen-
ger side door is not open.

CAUTION

When the windows are open, rain can enter
the vehicle, dampening the interior equip-
ment and causing damage to the vehicle.

Side-opening rear windows

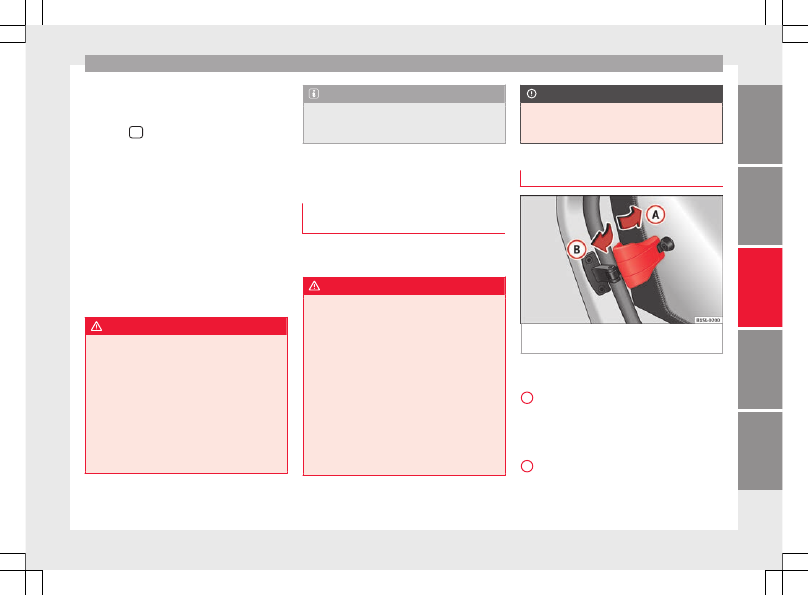
Fig. 108 

Lever to open and close the rear win-

dow

Opening
Pull the release lever in the direction of arrow

A

 and press outward until the lever engag-

es.

Closing
Pull the release lever in the direction of arrow

B

 and then press the lever backward until it

engages.

101

Tec

hnic

al

 d

at

a

Adv

ic

e

Oper

ation

Emer

genc

ie

s

Saf

ety

-------------------------------------------------------------------------------------------------------------------------------------------------------------

-------------------------------------------------------------------------------------------------------------------------------------------------------------

Operation

Sliding/tilting electric panor-
amic sunroof

Opening and closing the panoramic
sunroof

Read the additional information carefully

››› 

page 11

The sliding/tilting sunroof only works when
switched on. After switching off, it is still pos-
sible to open or close the sliding/tilting sun-
roof during a short space of time provided
that neither the driver nor passenger door is
opened.

All operations are interrupted when the rotary
knob is actuated.

If it were not possible to close the sliding/tilt-
ing sunroof electrically, it would need to be
closed manually. It is not possible to do an
emergency close of the sliding/tilting sun-
roof without removing components of the ve-
hicle. In such a case, obtain professional as-
sistance.

Sliding blind
With the roof grab handle situated in the rear
part of the roof opening, it is possible to
move the sliding blind to the required posi-
tion.

WARNING

If the sliding/tilting electric panoramic sun-
roof is used negligently or without paying
due attention, it can cause serious injury.

The sliding/tilting sunroof should only be

opened or closed when no one is blocking its
path.

After switching off, it is still possible to

open or close the sliding/tilting sunroof dur-
ing a short space of time provided that nei-
ther the driver nor passenger door is opened.

CAUTION

To prevent damage, when there are winter

temperatures any ice or snow that there may
be on the roof of the vehicle must be removed
before opening or raising the sliding/tilting
electric panoramic sunroof.

Before leaving the vehicle or in the case of

heavy rain, the sliding/tilting sunroof must
always be closed. With the sliding/tilting
sunroof open or raised, water can enter the
passenger compartment and can cause con-
siderable damage to the electrical system. As
a result, other damage can occur in the vehi-
cle.

In the case of heavy rain, if the sliding/tilt-

ing sunroof is open, the interior equipment of
the vehicle may get wet, destroying the seat
heating and damaging the electrical system
of the vehicle.

Note

Leaves and other loose objects that land in

the guides of the sliding/tilting sunroof
should be removed periodically by hand or
using a vacuum cleaner.

If the sliding/tilting sunroof does not work

correctly, the anti-trap function will not work
either. In this case, you should take the vehi-
cle to a specialised workshop.

The convenience position permits sufficient

ventilation with a level of sound produced by
low wind.

Anti-trap function of the sliding/tilt-
ing electric panoramic sunroof

The anti-trap function can reduce the risk of
injury when closing the sliding/tilting electric
panoramic sunroof 

››› 

. If the sliding/tilting

sunroof encounters resistance or an obstacle
when closing, it will immediately reopen.

Check why the sliding/tilting sunroof has

not closed.

Try to close it again.

If it is still not possible to close it due to an

obstacle or resistance, it will remain in the
corresponding position. Close it without the
anti-trap function.

102

-------------------------------------------------------------------------------------------------------------------------------------------------------------

-------------------------------------------------------------------------------------------------------------------------------------------------------------

Lights and visibility

Closing the sliding/tilting electric panoramic
sunroof without the anti-trap function

Within about 5 seconds of activating the

anti-trap function, pull knob 

››› 

Fig. 12

5

 until the sliding/tilting sunroof is fully

closed.

As such, the sliding/tilting sunroof will

close without the anti-trap function!

If the sunroof still cannot be closed, visit a

specialised workshop.

If the knob is released during the closing op-
eration, the sliding/tilting electric panoramic
sunroof opens automatically.

WARNING

Closing the sliding/tilting electric panoramic
sunroof without the anti-trap function can re-
sult in serious injury.

The sliding/tilting sunroof should always

be closed carefully.

No person should ever remain in the way of

the sliding/tilting sunroof, especially when
closing without the anti-trap function.

The anti-trap function does not prevent fin-

gers or other parts of the body from becom-
ing trapped against the roof frame and inju-
ries occurring.

Lights and visibility

Lights

Control lamps

It lights up

Rear fog light switched on 

››› 

page 21

.

It lights up

Front fog lights switched on 

››› 

page 21

.

It lights up

Left or right turn signal.

The control lamp flickers twice as fast when a vehicle
turn signal is intermittent. If necessary, check the vehi-
cle's lights.

It lights up

Main beam on or flasher on 

››› 

page 105

.

Several warning and control lamps light up
for a few seconds when the ignition is switch-
ed on, signalling that the function is being
verified. They will switch off after a few sec-
onds.

WARNING

Observe the safety warnings 

››› 

 in On the

instrument panel on page 26

.

Switching lights on and off

Fig. 109 

Next to the steering wheel: diagram

of some of the types of light switch

Read the additional information carefully

››› 

page 21

The legal requirements regarding the use of
vehicle lights in each country must be ob-
served.

The driver is personally responsible for the
correct use and adjustment of the lights in all
situations.

»

103

Tec

hnic

al

 d

at

a

Adv

ic

e

Oper

ation

Emer

genc

ie

s

Saf

ety

-------------------------------------------------------------------------------------------------------------------------------------------------------------

-------------------------------------------------------------------------------------------------------------------------------------------------------------

Operation

Audible warnings to advise the driver that
the lights have not been switched off
If the key is not in the ignition and the driver
door is open, an audible warning signal is
heard in the following cases: this is a remind-
er to turn off the lights.

When the light switch is in position .

When the light switch is in position .

WARNING

The side lights or daytime running lights are
not bright enough to illuminate the road
ahead and to ensure that other road users are
able to see you.

Always use your dipped beam head lights if

it is raining or if visibility is poor.

WARNING

If the headlights are set too high and not
used correctly, there is a risk of dazzling or
distracting other road users. This could result
in a serious accident.

Always make sure that the headlights are

correctly adjusted.

Lights and visibility: functions

Parking light remains on both sides
If when switching off the ignition, the light
control remains in the position  and the ve-

hicle is closed from outside, both headlights,
in addition to the side lights and the rear
lights will light up.

Daytime running lights
The daytime driving light consists of individu-
al lights in the front headlamps.

When the daytime driving light is switched
on, only the individual lights come on 

››› 

.

The daytime lights are turned on each time
the ignition is connected if the light  switch
is in position o. .

WARNING

If the road is not well-lit and the vehicle is
not clearly visible to other drivers, an acci-
dent may occur.

Never use the daytime driving light if the

road is not well-lit as a result of the weather
conditions and poor visibility. The daytime
driving lights are not bright enough to illumi-
nate the road ahead and to ensure that other
road users are able to see you.

The rear lights do not come on with the

daytime driving light. A vehicle which does
not have the rear lights on may not be visible
to other drivers in the darkness, if it is rain-
ing or in conditions of poor visibility.

Note

The headlights, rear lights and turn signals
may mist up temporarily on the inside in cool

or damp weather. This is normal and in no
way effects the useful life of the vehicle light-
ing system.

Automatic dipped beam control *

The automatic dipped beam control is merely
intended as an aid and is not able to recog-
nise all driving situations.

When the light switch is in position , the
vehicle lights and the instrument panel and
switch lighting switch on and off automatical-
ly in the following situations 

››› 

 in Lights

and visibility: functions on page 104

:

Automatic switching
on

Automatic switching
off

The photo sensor detects
darkness, for example,
when driving through a
tunnel.

When adequate lighting is
detected.

The rain sensor detects
rain and activates the
windscreen wipers.

When the windscreen wip-
ers have been inactive for
a few minutes.

WARNING

If the road is not well lit and other road users
cannot see the vehicle well enough or at all,
accidents may occur.

The automatic dipped beam control ()

only switches on the dipped beam when

104

-------------------------------------------------------------------------------------------------------------------------------------------------------------

-------------------------------------------------------------------------------------------------------------------------------------------------------------

Lights and visibility

there are no changes in brightness, and not,
for example when it is foggy.

“Coming Home” and “Leaving Home”
function (exterior guidance lights)

“Coming Home” and “Leaving Home” Func-
tion lights up the closest environment to the
vehicle when increasing and lowering the en-
vironment in case of darkness.

The “Coming Home” function should be con-
nected manually. The “Leaving Home” func-
tion is automatically controlled by a rain and
light sensor.

Activating the “Coming Home function”

Switch the ignition off.

Operate the headlight flashers for approxi-

mately 1 second 

››› 

page 21

.

When the driver’s car door is opened, the
“Coming Home” lighting is connected. The
delay in disconnecting the headlights starts
when the last door or rear lid is closed.

Deactivating the “Coming Home function”

It is automatically disconnected once the

time set for the delay in disconnecting the
lights has lapsed.

OR: it is automatically disconnected if,

30 seconds after having activated the func-

tion, even if any vehicle door or the rear lid is
still open.

OR: turn the light switch to the position .

OR: connect the ignition.

Activating the “Leaving Home function”

Unlock the vehicle (the light switch has to

be in the position  and the rain and light
sensor to detect darkness).

Deactivating the “Leaving Home function”

It is automatically disconnected once the

set time for the delay in disconnecting the
lights has lapsed.

OR: block the vehicle.

OR: turn the light switch to the position .

OR: connect the ignition.

Turn signal and main beam lever

Read the additional information carefully

››› 

page 21

Convenience turn signals
For the convenience turn signals, move the
lever as far as possible upwards or down-
wards and release the lever. The turn signal
will flash 3 times.

The convenience indicators can be deactiva-
ted at a Specialised workshop.

WARNING

Improper or lack of use of the turn signals, or
forgetting to deactivate them can confuse
other road users. This could result in a seri-
ous accident.

Always give warning when you are going to

change lane, overtake or when turning, acti-
vating the turn signal in good time.

As soon as you have finished changing

lane, overtaking or turning, switch the turn
signal off.

WARNING

Incorrect use of the headlights may cause ac-
cidents and serious injury, as the main beam
may distract or dazzle other drivers.

Note

If the convenience turn signals are operat-

ing (three flashes) and the other convenience
turn signals are switched on, the active part
stops flashing and only flashes once in the
new part selected.

The turn signal only works when the igni-

tion is switched on. The hazard warning
lights also work when the ignition is switch-
ed off 

››› 

page 70

.

If any of both turn signals fails, the warning

lamp will start flashing twice faster than nor-
mal.

»

105

Tec

hnic

al

 d

at

a

Adv

ic

e

Oper

ation

Emer

genc

ie

s

Saf

ety

-------------------------------------------------------------------------------------------------------------------------------------------------------------

-------------------------------------------------------------------------------------------------------------------------------------------------------------

Operation

The main beam headlights can only be

switched on if the dipped beam headlights
are already on.

Hazard warning lights

Fig. 110 

Dash panel: Button for switching the

hazard lights warning system on and off.

Read the additional information carefully

››› 

page 21

Always fulfil legal requirements for securing a
broken down vehicle. In a number of coun-
tries it is now obligatory, for example, to turn
on the hazard warning lights and use a re-
flective safety vest 

››› 

page 70

.

If your vehicle breaks down:

Park the vehicle a safe distance from
traffic and on suitable ground 

››› 

.

Turn on the hazard warning lights with
the button 


››› 

Fig. 110

.

1.

2.

Apply the handbrake firmly

››› 

page 137

.

Put the gearbox lever in neutral or the
selector lever in position 

N 

››› 

page 143

.

Switch off the engine and remove the
key from the ignition.
Have all occupants leave the vehicle and
move to safety, for example behind a
guard rail.
When leaving the vehicle, take all keys
with you.
Place an emergency warning triangle to
indicate the position of your vehicle to
other road users.
Allow the engine to cool and check if a
specialist is required.

When being towed with the hazard warning
lights on, a change in direction or traffic lane
can be indicated as usual using the turn sig-
nal lever. The hazard lights will be interrup-
ted temporarily.

If the hazard warning lights are not working,
you must use an alternative method of draw-
ing attention to your vehicle. This method
must comply with traffic legislation.

WARNING

A faulty vehicle in traffic represents a risk of
accident for the driver and for other road
users.

3.

4.

5.

6.

7.

8.

9.

Stop the vehicle safely as soon as possible.

Park the vehicle a safe distance from sur-
rounding traffic to lock all the doors in case of
an emergency. Turn on the hazard warning
lights to warn other road users.

Never leave children or disabled people

alone in the vehicle if the doors are to be
locked. In case of an emergency, passengers
will be trapped inside the vehicle. Individuals
locked in the vehicle can be exposed to very
high or very low temperatures.

WARNING

The components of the exhaust system reach
very high temperatures. This could cause a
fire and considerable damage.

Always park your vehicle so that no part of

the exhaust system can come in contact with
flammable materials (such as dried grass or
fuel).

Note

The vehicle battery will discharge and run

down if the hazard warning lights remain on
for too long (even with the ignition turned
off).

In some vehicles, the brake lights will flash

when braking abruptly at speeds of approxi-
mately 80 km/h (50 mph) to warn vehicles
travelling behind. If braking continues, the
hazard warning lights system will automati-
cally be turned on at a speed of less than ap-
proximately 10 km/h (6 mph). The brake

106

-------------------------------------------------------------------------------------------------------------------------------------------------------------

-------------------------------------------------------------------------------------------------------------------------------------------------------------

Lights and visibility

lights remain lit. Upon accelerating, the haz-
ard warning lights will be automatically
turned off.

Adjusting the headlights

In those countries where vehicles drive on
the other side of the road to the home coun-
try, the asymmetric dipped beam may dazzle
drivers of oncoming vehicles.

For this reason, stickers may be needed to
cover the headlights when driving abroad.
For further information, please refer to a spe-
cialised workshop. SEAT recommends visiting
a technical service.

Note

The use of stickers to cover headlights is only
permitted over a short period. To modify the
direction of the headlamps more permanent-
ly, please take the vehicle to a specialised
workshop. SEAT recommends taking your car
in for technical service.

Headlight range control, lighting of
the instrument panel and controls

Fig. 111 

Next to the steering wheel: Head-

light range control

Headlamp height adjustment
The headlight range control 

››› 

Fig. 111

 is

modified according to the value of the head-
light beam and the vehicle load status. This
offers the driver optimum visibility and the
headlights do not dazzle oncoming drivers

››› 

.

The headlights can only be adjusted when
the dipped beam is switched on.

To reset, turn switch 

››› 

Fig. 111

:

Value

Vehicle load status

a)

Two front occupants, luggage compart-
ment empty

To reset, turn switch 

››› 

Fig. 111

:

Value

Vehicle load status

a)

1

All seats occupied, luggage compartment
empty

2

All seats occupied, luggage compartment
full

3

Driver only, luggage compartment full

a)

If the vehicle load does not correspond to those shown in the

table, it is possible to select intermediary positions.

Instrument and switch lighting
When the side lights or dipped beam head-
lights are switched on, the lighting for instru-
ments and controls lights up at a constant
brightness.

WARNING

Heavy objects in the back of vehicle may
cause headlight dazzle and distract other
drivers. This could result in a serious acci-
dent.

Adjust the light beam to the vehicle load

status so that it does not blind other drivers.

Luggage compartment light

The light is activated when the rear lid is
open, even when the ignition and lights are
turned off. For this reason, ensure that the
rear lid is always closed.

107

Tec

hnic

al

 d

at

a

Adv

ic

e

Oper

ation

Emer

genc

ie

s

Saf

ety

-------------------------------------------------------------------------------------------------------------------------------------------------------------

-------------------------------------------------------------------------------------------------------------------------------------------------------------

Operation

Visibility

Sun visors

Fig. 112 

Sun visor

Options for adjusting driver and front pas-
senger sun visors:

Lower the sun visor towards the wind-

screen.

The sun visor can be pulled out of its

mounting and turned towards the door.

Swing the sun visor towards the door, lon-

gitudinally backwards.

Vanity mirror*
There may be a vanity mirror in the folded
sun visor on the passenger side and a card-
holder in the driver sun visor.

WARNING

Folded sun blinds can reduce visibility.

Always roll or fold sun blinds and visors

away when not in use.

Heat-insulating glass windscreen

Fig. 113 

Windscreen with reflective infrared

and metal coating and small window (red sur-
face)

The heat-insulating windscreens include a re-
flective infrared coating. The section above
the rear vision mirror has been left uncoated
(communication window) to allow electric
components from the accessories shop to
operate correctly 

››› 

Fig. 113

.

CAUTION

When the uncoated surface is covered or has
a sticker on the interior or exterior, malfunc-

tions in the electronic components may oc-
cur. Never cover the uncoated surface on the
interior or exterior.

Windscreen wiper and window
wiper systems

Window wiper lever

Read the additional information carefully

››› 

page 22

WARNING

Water from the windscreen washer water bot-
tle may freeze on the windscreen if it does
not contain enough anti-freeze, reducing for-
ward visibility.

In winter, ensure the windscreen washer

contains enough anti-freeze.

In cold conditions, you should not use the

wash/wipe system unless you have warmed
the windscreen with the ventilation system.
The antifreeze could freeze on the windscreen
and reduce visibility.

WARNING

Worn or dirty wiper blades reduce visibility
and increase the risk of accident and serious
injury.

108

-------------------------------------------------------------------------------------------------------------------------------------------------------------

-------------------------------------------------------------------------------------------------------------------------------------------------------------

Lights and visibility

Always replace damaged or worn blades or

blades which do not clean the windscreen
correctly.

CAUTION

In icy conditions, always check that the wiper
blades are not frozen to the glass before us-
ing the wipers for the first time. In cold
weather, it may help to leave the vehicle
parked with the wipers in service position

››› 

page 45

.

CAUTION

If the ignition is switched off while the wind-
screen wipers are on, the windscreen wipers
carry on wiping at the same level when the
ignition is switched back on. Ice, snow and
other obstacles may damage the windscreen
wiper and the respective motor.

If necessary, remove snow and ice from the

windscreen wipers before starting your jour-
ney.

Carefully lift the frozen windscreen wipers

from the glass. SEAT recommends a de-icer
spray for this operation.

Note

The windscreen wipers will only work when

the ignition is switched on.

The interval wipe speed varies according to

the vehicle speed. The faster the vehicle is

moving, the more often the windscreen is
cleaned.

The rear wiper is automatically switched on

when the windscreen wiper is on and the car
is in reverse gear.

Functions of the windscreen wiper

Windscreen wiper performance in different sit-
uations

If the vehicle is at a
standstill

The activated position provision-
ally changes to the previous posi-
tion.

For intermittent wip-
ers

Intervals between wipes depend
on the vehicle's speed. The high-
er the vehicle speed the shorter
the intervals.

Note

The wiper will try to wipe away any obstacles
that are on the windscreen. The wiper will
stop moving if the obstacle blocks its path.
Remove the obstacle and switch the wiper
back on again.

Rain and light sensor

Fig. 114 

Windscreen wiper lever: setting rain

sensor 

1

.

Fig. 115 

Reference surface of the rain sensor.

When it is activated, the rain and light sensor
automatically controls the intervals of the
windscreen wiper depending on the intensity
of the precipitation.

»

109

Tec

hnic

al

 d

at

a

Adv

ic

e

Oper

ation

Emer

genc

ie

s

Saf

ety

-------------------------------------------------------------------------------------------------------------------------------------------------------------

-------------------------------------------------------------------------------------------------------------------------------------------------------------

Operation

When the rain and light sensor is deactiva-
ted, the duration of the intervals is set to
fixed levels.

Activating and deactivating the rain and
light sensor
Press the lever to the desired position.

››› 

Fig. 114

:

Position 

A

 - The rain and light sensor is

deactivated.

Position 

B

 - The rain and light sensor is

activated and the automatic wipe shall occur,
if necessary.

When the ignition is disconnected and con-
nects again, the rain and light sensor re-
mains activated and starts operating again
when the windscreen wiper lever is in posi-
tion 

B

 and the vehicle is travelling at more

than 4 km/h (2 mph).

Setting the sensitivity level of the rain and
light sensor
The sensitivity of the rain and light sensor
can automatically be set with switc

1

 loca-

ted on the windscreen wiper lever 

››› 

.

Moving the switch to the right: highly sen-

sitive.

Moving the switch to the left: less sensi-

tive.

Malfunction of the rain and light sensor
Some examples of possible causes of mal-
functions and mistaken readings in the area
of reference surface
 

››› 

Fig. 115 

1

 of the rain

and light sensor:

Windscreen wiper blades in poor condi-

tion: the presence of a film or strips of water
due to the poor condition of the wiper blades
can lead to the windscreen blade function
possibly being prolonged, or the wipe inter-
vals may get shorter or the wipe may happen
to be quick and continuous.

Insects: the impact of gnats/mosquitoes

on the windscreen can lead to the wind-
screen wiper operation starting up.

Salt traces: in winter it is possible that the

windscreen wipers may run longer than usual
due to the presence of salt traces on the al-
most dry windscreen.

Dirt: the presence of dry dust, wax, protec-

tive films (lotus effect), remnant of detergent
(from the car wash tunnel), etc., on the wind-
screen can possibly lead to the rain and light
sensor reacting in a more sensitive way, later,
slower, or that it may not react at all.

Cracked windscreen: the impact of a stone

may make the windscreen wipers to carry out
a wipe cycle if the rain and light sensor is ac-
tivated. Subsequently, the sensor detects
that the reference surface has been reduced
and adapts. The behaviour of the sensor acti-

vation can vary based on the size of the im-
pact.

Clean the reference surface of rain and light
sensor 

1

 regularly and check that the wind-

screen wiper blades are not damaged.

CAUTION

The rain and light sensor may not always de-
tect the precipitation accurately enough and
connect the windscreen wipers properly.

If necessary, connect the wipers manually

and appropriately when water on the wind-
screen obstructs visibility.

Note

It is recommended using a windscreen clean-
ing product that may contain alcohol to re-
move the remnant of wax or polish.

110

-------------------------------------------------------------------------------------------------------------------------------------------------------------

-------------------------------------------------------------------------------------------------------------------------------------------------------------

Lights and visibility

Mirror

Interior rear vision mirror

Fig. 116 

Manual anti-dazzle function for rear

vision mirror

The driver should always adjust the rear vi-
sion mirror to permit adequate visibility
through the rear window.

Manual anti-dazzle function for interior rear
vision mirror

Basic position: point the lever at the bot-

tom of the mirror forwards.

Pull the lever to the back to select the anti-

dazzle function 

››› 

Fig. 116

.

Exterior mirrors

Fig. 117 

In the front doors: button to adjust

the mechanical exterior rear vision mirror

Fig. 118 

In the driver door: rotary control for

the exterior electric mirrors

Read the additional information carefully

››› 

page 13

Adjust the exterior mirrors by pressing the
adjust button 

››› 

Fig. 117

 or the rotary con-

trol* 

››› 

Fig. 118

.

Folding in the exterior mirrors and returning
them to their original position is possible
through a mechanical system. Carefully fold
the exterior rear vision mirror casing towards
the side window or pull it away from the win-
dow until it clicks into place.

WARNING

Fold and unfold the exterior mirror, taking
care to avoid injuries.

Only fold or unfold the exterior mirror when

there is no-one in the way of the mirror.

When moving the mirror, take care not to

trap fingers between the mirror and the mir-
ror bracket.

WARNING

Failure to correctly estimate the distance of
the vehicle behind could lead to serious acci-
dent.

Rear-view convex or aspheric mirrors in-

crease the field of vision, however objects ap-
pear smaller and further away in the mirrors.

The use of these mirrors to estimate the

distance to the next vehicle when changing
lane is imprecise and could result in serious
accident.

If possible, use the rear vision mirror to es-

timate distances to vehicles behind you or in
other circumstances.

Make sure that the rear visibility is ade-

quate.

»

111

Tec

hnic

al

 d

at

a

Adv

ic

e

Oper

ation

Emer

genc

ie

s

Saf

ety

-------------------------------------------------------------------------------------------------------------------------------------------------------------

-------------------------------------------------------------------------------------------------------------------------------------------------------------

Operation

For the sake of the environment

The exterior mirror heating should be switch-
ed off when it is no longer needed. Other-
wise, it is an unnecessary fuel waste.

Note

In the event of a fault, the electric exterior
mirrors can be adjusted manually by pressing
the edge of the mirror surface.

Seats and head restraints

Adjusting the seat and head re-
straints

Manual front seat adjustment

Read the additional information carefully

››› 

page 12

WARNING

The safe driving chapter contains important
information, tips, suggestions and warnings
that you should read and observe for your
own safety and the safety of your passengers

››› 

page 48

.

WARNING

Adjust the front seats only when the vehi-

cle is stationary. Failure to follow this instruc-
tion could result in an accident.

Be careful when adjusting the seat height.

Careless or uncontrolled adjustment can
cause injuries.

The front seat backrests must not be re-

clined for driving. Otherwise, seat belts and
the airbag system might not protect as they
should in case of an accident, increasing risk
of injury.

Removing and fitting the rear head re-
straints

Fig. 119 

Removing the rear head restraint

The rear seats are equipped with a head re-
straint.

Removing the rear head restraint.

Unlock the seat backrest and fold it forward

››› 

page 123

.

Push the head restraint up as far as it will

go 

››› 

.

Pull the head restraint out of the fitting

without releasing the button 

››› 

Fig. 119 

1

.

Fold the backrest of the rear seat backward

again until it is engaged.

Safely store the removed head restraints.

Fitting the rear head restraint

Unlock the seat backrest and fold it forward

››› 

page 123

.

112

-------------------------------------------------------------------------------------------------------------------------------------------------------------

-------------------------------------------------------------------------------------------------------------------------------------------------------------

Seats and head restraints

Insert the head restraint into the guides on

the seat backrest.

Push the head restraint down as far as it

will go while pressing button 

1

.

Fold the backrest of the rear seat backward

again until it is engaged.

Adjust the head restraint to the correct po-

sition 

››› 

page 51

.

WARNING

Travelling with the head restraints removed
or improperly adjusted increases the risk of
severe or fatal injuries in the event of acci-
dents and sudden braking or manoeuvres.

Always fit and adjust the head restraint

properly whenever a person is occupying a
seat.

Refit any removed head restraints immedi-

ately so that passengers are properly protec-
ted.

CAUTION

When removing and fitting the head restraint,
make sure it does not hit the headliner of the
vehicle or the front seat backrest. Otherwise,
the interior roof and other parts of the vehicle
could be damaged.

Seat functions

Seat heating*

Fig. 120 

In the centre console: Front seats

heating switch

With the engine connected, the seat cushion
and the backrests can be heated electrically.

Switching on: Press the button 

 or 

 the

top part of the centre console. Seat heating
functions at maximum output. All of the con-
trol lamps are turned on.

Adjust: Press the button repeatedly 

 or 

even setting the desired level.

Switching off: Press the button 

 or 

 as

many times as need be until no control lamp
is lit on the button.

When the seat heating is at maximum level,
after approx. 15 minutes have lapsed, the
first level is automatically set.

Cases in which the seat heating should not
be connected
If any of the following conditions are encoun-
tered, do not connect the seat heating:

The seat is not occupied.

The seat is covered with a covering.

A child seat is installed on the seat.

The seat cushion is damp or wet.

The outdoor or passenger compartment

temperature is greater than +25 °C (77 °F).

WARNING

Those persons whose tolerance to pain or
temperature is affected by taking medication
or by any type of paralysis or chronic illness
(i.e. diabetes) may sustain burns on the
shoulder, backside or legs. These burns take
considerable time to heal up or do not man-
age to heal up completely. If you have any
questions concerning your health status, con-
sult a doctor.

Those persons who may have a limited tol-

erance to pain or temperature must never use
the seat heating.

WARNING

If the upholstery were to get soaked, the seat
heating could stop running correctly and
might also increase the risk for burns to be
caused.

»

113

Tec

hnic

al

 d

at

a

Adv

ic

e

Oper

ation

Emer

genc

ie

s

Saf

ety

-------------------------------------------------------------------------------------------------------------------------------------------------------------

-------------------------------------------------------------------------------------------------------------------------------------------------------------

Operation

Prior to using the seat heating, be certain

that the seat cushion is dry.

Avoid sitting down with damp or wet cloth-

ing.

Do not place damp or wet objects or gar-

ments on top of the seat.

Do not spill liquids on the seat.

CAUTION

To avoid damaging the heating compo-

nents, please refrain from kneeling on the
seats or applying excessive pressure to a sin-
gle point of the seat cushion and backrest.

If liquids are spilled, sharps objects are left

or insulating materials are placed (such as a
covering or child seat), this can manage to
damage the seat heating.

In any odour were noted, disconnect the

seat heating immediately and have the unit
inspected by a specialised workshop.

For the sake of the environment

The seat heating must only remain connected
when it is necessary. Otherwise, it incurs an
unnecessary waste of fuel.

Transport and practical
equipment

Transporting objects

Introduction

Always transport heavy loads in the luggage
compartment and place the seat backs in a
vertical position. Never overload the vehicle.
Both the carrying capacity as well as the dis-
tribution of the load in the vehicle affect driv-
ing behaviour and braking ability 

››› 

.

WARNING

Unsecured or incorrectly secured objects can
cause serious injury in case of a sudden ma-
noeuvring or breaking or in case of an acci-
dent. This is especially true when objects are
struck by a detonating airbag and fired
through the vehicle interior. To reduce the
risks, please note the following:

Secure all objects in the vehicle. Always

keep equipment and heavy objects in the lug-
gage compartment.

Always secure objects with suitable rope or

slings so that they cannot enter the deploy-
ment areas around the frontal or side airbags
in case of sudden braking or an accident.

Always ensure that objects inside the vehi-

cle cannot move into the deployment area of
the bags while driving.

While driving, always keep object compart-

ments closed.

Remove all objects from the front passen-

ger seat when it is folded down. When the
seat backrest is folded down, it presses on
small and light objects and these are detec-
ted by the weight sensor on the seat; this
sends false information to the airbag control
unit.

While the backrest of the front passenger

seat is folded, the frontal airbag must remain
disconnected and the PASSENGER AIRBAG
OFF 
 light on.

Objects secured in the vehicle should never

be placed in such a way as to make passen-
gers sit in an incorrect position.

If secured objects occupy a seat, this seat

should not be occupied or used by anyone.

WARNING

The driving behaviour and braking ability
change when transporting heavy and large
objects.

Adjust your speed and driving style to visi-

bility, road, traffic and weather conditions.

Accelerate gently and carefully.

Avoid sudden braking and manoeuvres.

Brake early.

114

-------------------------------------------------------------------------------------------------------------------------------------------------------------

-------------------------------------------------------------------------------------------------------------------------------------------------------------

Transport and practical equipment

Transporting the load

Secure all objects in the vehicle

Distribute the load throughout the vehicle

and on the roof as uniformly as possible.

Transport heavy objects as far forward as

possible in the luggage compartment and
lock the seat backs in the vertical position.

Check the headlight adjustment

››› 

page 103

.

Use the suitable tyre pressure according to

the load being transported. Read the tyre in-
flation information label 

››› 

page 199

.

CAUTION

Objects on the shelf could chafe against the
wires of the heating element in the heated
rear window and cause damage.

Note

Please refer to the notes on loading the roof
carrier 

››› 

page 127

.

Driving with the rear lid open

Driving with the rear lid open creates an addi-
tional risk. Secure all objects and secure the
rear lid correctly and take all measures possi-
ble to reduce toxic gases from entering the
vehicle.

WARNING

Driving with the rear lid unlocked or open
could cause serious injuries.

Always drive with the rear lid closed.

Secure all objects in the vehicle. Loose

items could fall out of the vehicle and injure
other road users or damage other vehicles.

Drive particularly carefully and think

ahead.

Avoid sudden manoeuvres and braking giv-

en that this could cause an uncontrolled
movement of the open rear lid.

When transporting objects that protrude

out of the luggage compartment, indicate
them suitably. Observe legal requirements.

If objects must project out of the luggage

compartment, the rear lid must never be used
to “secure” or “attach” objects.

If a baggage rack is fitted on the rear lid, it

should be removed before travelling with the
rear lid open.

WARNING

Toxic gases may enter the vehicle interior
when the rear lid is open. This could cause
loss of consciousness, carbon monoxide poi-
soning, serious injury and accidents.

To avoid toxic gases entering the vehicle al-

ways drive with the rear lid closed.

In exceptional circumstances, if you must

drive with the rear lid open, observe the fol-

lowing to reduce the entry of toxic gases in-
side the vehicle:

Close all windows.

Disable air recirculation mode.

Open all of the air outlets on the instru-
ment panel.

Switch on the blower to maximum.

CAUTION

An open boot hatch changes the length and
height of the vehicle.

Driving a loaded vehicle

For the best handling when driving a loaded
vehicle, note the following:

Secure all objects 

››› 

page 115

.

Accelerate gently and carefully.

Avoid sudden braking and manoeuvres.

Brake early.

If necessary, read the instructions for driv-

ing with a roof carrier system 

››› 

page 127

.

WARNING

A sliding load could considerably affect the
stability and safety of the vehicle resulting in
an accident with serious consequences.

Secure loads correctly so they do not move.

»

115

Tec

hnic

al

 d

at

a

Adv

ic

e

Oper

ation

Emer

genc

ie

s

Saf

ety

-------------------------------------------------------------------------------------------------------------------------------------------------------------

-------------------------------------------------------------------------------------------------------------------------------------------------------------

Operation

When transporting heavy objects, use suit-

able ropes or straps.

Lock the seat backs in vertical position.

Practical equipment

Introduction

Storage compartments must only be used to
store light or small objects.

WARNING

In the event of sudden braking movements or
turns, loose objects may be thrown around
the vehicle interior. This could cause serious
injuries to passengers and cause the driver to
lose control of the vehicle.

Do not transport animals or place hard,

heavy or sharp objects inside the vehicle in:
open storage compartments, dash panel, rear
shelf, items of clothing or bags.

While driving, always keep object compart-

ments closed.

WARNING

Objects falling into the driver's footwell could
prevent use of the pedals. This could lead the
driver to lose control of the vehicle, increas-
ing the risk of a serious accident.

Make sure the pedals can be used at all

times, with no objects rolling underneath
them.

The floor mat should always be secured to

the floor.

Never place other mats or rugs on top of

the original mat supplied by the factory.

Make sure that no objects can fall into the

driver's footwell while the vehicle is in mo-
tion.

CAUTION

Objects on the shelf could chafe against

the wires of the heating element in the heat-
ed rear window and cause damage.

Do not keep temperature-sensitive objects,

food or medicines inside the vehicle. Heat
and cold could damage them or render them
useless.

Light-transparent objects placed inside the

vehicle, such as lenses, magnifying glasses
or transparent suction caps on the windows,
may concentrate the sun's rays and cause
damage to the vehicle.

Note

The ventilating slits between the heated rear
window and the rear shelf must not be cov-
ered so that used air can escape from the ve-
hicle.

Storage compartment on the driver
side

Fig. 121 

On the driver side: storage compart-

ment

There may be a storage compartment on the
driver side.

116

-------------------------------------------------------------------------------------------------------------------------------------------------------------


Content      ..     5      6      7      8     ..