Seat Mii. Service Manual - part 8


  Index      Seat     Seat Mii. Service Manual


Search            copyright infringement  


Content      ..     6      7      8      9     ..


Seat Mii. Service Manual - part 8


-------------------------------------------------------------------------------------------------------------------------------------------------------------

Transport and practical equipment

Compartment on the centre console
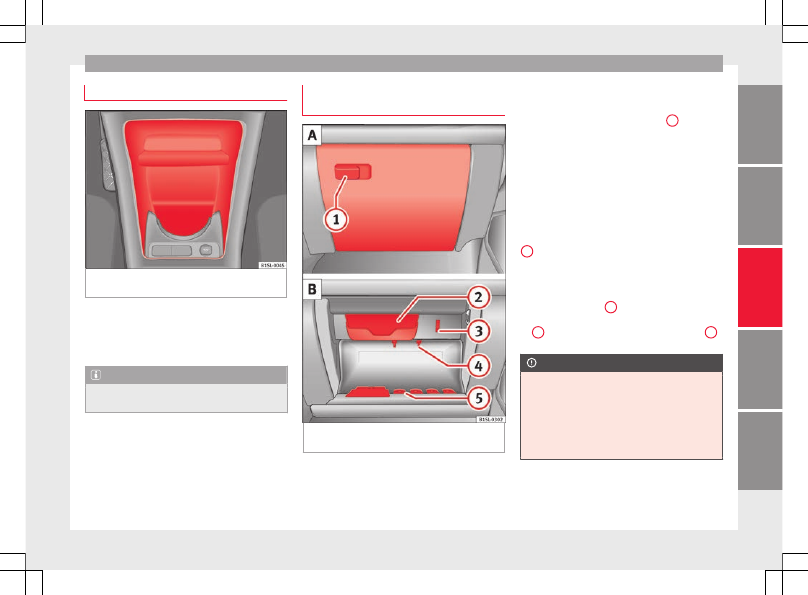
Fig. 122 

In the front part of the centre con-

sole: storage compartment

The storage compartment 

››› 

Fig. 122

 may be

used as a drink holder 

››› 

page 120

 or as an

ashtray* 

››› 

page 120

 or to store small ob-

jects.

Note

A 12 volt electrical socket 

››› 

page 121

 can be

found in the storage compartment.

Storage compartment with cover on
the passenger side*

Fig. 123 

Storage compartment with cover on

the passenger side

There may be a storage compartment with
cover on the passenger side.

Opening and closing the storage compart-
ment cover
Pull the lever to open 

››› 

Fig. 123 

1

.

To close, press the cover upwards until it
clicks into place.

Sunglasses storage compartment.
Sunglasses can be stored in the passenger
side storage compartment.

The sunglasses storage compartment is in
the upper area of the storage compartment

2

.

Supports
Next to the eyeglass storage compartment is
a notebook holder 

3

 and in the interior of

the storage compartment there is a pen hold-
er 

4

, a map storage area and a coin tray 

5

.

CAUTION

For structural reasons, some model versions
will have gaps behind the glove compartment
into which small objects may fall. This could
lead to strange noises and damage to the ve-
hicle. Therefore, do not store small objects in
the glove compartment, apart from those
stored in the spaces provided.

117

Tec

hnic

al

 d

at

a

Adv

ic

e

Oper

ation

Emer

genc

ie

s

Saf

ety

-------------------------------------------------------------------------------------------------------------------------------------------------------------

-------------------------------------------------------------------------------------------------------------------------------------------------------------

Operation

Bag support*

Fig. 124 

Storage on front passenger side:

folding hook.

On the opening lever of the glove compart-
ment on the passenger side there is a folding
hook 

››› 

Fig. 124

 for hanging small items of

luggage, e.g. bags, etc.

CAUTION

The maximum weight for the hook is 1.5

kg.

With the hook folded forward, it automati-

cally draws up when the compartment is
opened.

We recommend removing hanging bags

from the hook before opening the glove com-
partment.

Open storage compartment on the
passenger side*

Fig. 125 

Open storage compartment on the

passenger side

There may be an open storage compartment
on the passenger side.

Support

In the open glove compartment there is a
hook for bags 

››› 

Fig. 125 

1

.

Storage compartment in the back of
the centre console

Fig. 126 

In the back part of the centre con-

sole: storage compartment

The drink holder at the back of the centre
console can be used as a storage compart-
ment.

118

-------------------------------------------------------------------------------------------------------------------------------------------------------------

-------------------------------------------------------------------------------------------------------------------------------------------------------------

Transport and practical equipment

Other storage compartments

Fig. 127 

In front of the rear seats: storage

compartment

Fig. 128 

In the centre pillars: coat hooks

Coat hooks
The centre pillars contain garment hooks

››› 

Fig. 128

 (arrow).

Other storage compartments:

In the front door trims 

››› 

page 86

.

In front of the rear seats 

››› 

Fig. 127

.

Rear shelf for light items of clothing*.

Bag hook in the luggage compartment

››› 

page 123

.

In the upper part of the centre console, in-

stead of the radio 

››› 

Fig. 94


11

.

WARNING

Clothing hung on the coat hooks could re-
strict the driver's view and lead to serious ac-
cidents.

Hang the clothes from the hooks so that

driver's view is not restricted.

The coat hook is suitable for light items of

clothing. Never place heavy, hard or sharp
objects in the bags.

Drink holders

The drink holders are in the open storage
compartments in the driver and passenger
doors.

WARNING

Improper use of the drink holders can cause
injury.

Do not place containers with hot drinks in a

drink holder. During sudden braking or driv-
ing manoeuvres, the hot drink could be spil-
led and lead to scalding.

Ensure that no bottles or other object are

dropped in the driver footwell, as they could
get under the pedals and obstruct their work-
ing.

Never place heavy containers, food or other

heavy objects in the drink holder. In the
event of an accident, these heavy objects
could be “thrown around” the vehicle interior
and cause serious injuries.

WARNING

Closed bottles inside the vehicle could ex-
plode or crack due to the heat or the cold.

Never leave a closed bottle in the vehicle if

the inside temperature is too high or too low.

CAUTION

Do not leave open drinks containers in the
drink holders when the vehicle is in motion.
They could spill during braking, for example,
and cause damage to the vehicle and the
electrical system.

119

Tec

hnic

al

 d

at

a

Adv

ic

e

Oper

ation

Emer

genc

ie

s

Saf

ety

-------------------------------------------------------------------------------------------------------------------------------------------------------------

-------------------------------------------------------------------------------------------------------------------------------------------------------------

Operation

Centre console drink holders

Fig. 129 

In the front part of the centre con-

sole: drink holder

Fig. 130 

In the back part of the centre con-

sole: drink holder

There are drink holders in the front and rear
parts of the centre console.

Securing the drink container in the front
drink holder
Fold the drink holder 

››› 

Fig. 129

 forward.

Place the drink container in the drink holder
so that it is securely surrounded.

Ashtray*

Fig. 131 

In the front part of the centre con-

sole: opening the ashtray.

Opening and closing the ashtray
To open, lift the lid of the ashtray in the direc-
tion of the arrow 

››› 

Fig. 131

.

To close, push the ashtray lid down.

Emptying the ashtray

Remove the ashtray from the storage com-

partment lifting it up.

After emptying the ashtray, insert it into the

drink holder from above.

WARNING

Incorrect use of the ashtray may cause a fire
or burns and other serious injuries.

Never put paper or other flammable objects

in the ashtray.

Cigarette lighter*

Fig. 132 

In the front part of the centre con-

sole: lighter

Push the button on the cigarette lighter in-

ward with the ignition on 

››› 

Fig. 132

.

Wait for the lighter to pop out slightly.

Pull out the cigarette lighter and light the

cigarette on the glowing coil 

››› 

.

Replace the cigarette lighter in its insert.

120

-------------------------------------------------------------------------------------------------------------------------------------------------------------

-------------------------------------------------------------------------------------------------------------------------------------------------------------

Transport and practical equipment

WARNING

Undue use of the cigarette lighter may cause
a fire or burns and other serious injuries.

The cigarette lighter must only be used to

light cigarettes or similar.

Never leave children unsupervised in the

vehicle. The cigarette lighter can be used
when the ignition is switched on.

Note

The cigarette lighter can also be used with
the 12 Volt socket.

Power socket*

Fig. 133 

Front centre console: 12 Volt socket

in the storage compartment

Electrical equipment can be connected to the
socket in the vehicle.

All connected appliances should be in per-
fect working order without any faults.

Maximum power consumption

Power sock-
et

Maximum power consumption

12 Volts

120 Watts

The maximum capacity of the socket must
not be exceeded. The power consumption is
indicated on the rating plate of each appli-
ance.

Where 2 or more appliances are connected at
the same time, the total rating of all the con-
nected devices must never exceed 190 Watts

››› 

.

12 volt power socket
The 12 volt socket is found in the storage
compartment at the front of the centre con-
sole 

››› 

Fig. 133

 and only functions when the

ignition is switched on.

Using electrical appliances with the engine
stopped and the ignition switched on will
drain the battery. Therefore, electrical devi-
ces connected to the power socket can only
be used when the engine is running.

To prevent voltage variations from causing
damage, switch off the electrical device con-
nected to the 12 Volt power socket before

switching the ignition on or off and before
starting the engine.

WARNING

Improper use of the socket or electrical devi-
ces could lead to a fire and cause serious in-
juries.

Never leave children unsupervised in the

vehicle. The socket and equipment connected
to it can be used when the ignition is switch-
ed on.

Should a connected electrical device over-

heat, switch it off and unplug it immediately.

CAUTION

Always follow the operating instructions for

the appliances to be connected!

Never exceed the maximum power rating as

this could damage the vehicle's general elec-
trical system.

12 volt power socket:

Only use accessories with approved elec-
tromagnetic compatibility according to
current regulations.

Never power the socket.

CAUTION

To avoid damage to the vehicle's electrical

system, never connect equipment that gener-
ates electrical current, such as solar panels
or battery chargers, to the 12 volt power

»

121

Tec

hnic

al

 d

at

a

Adv

ic

e

Oper

ation

Emer

genc

ie

s

Saf

ety

-------------------------------------------------------------------------------------------------------------------------------------------------------------

-------------------------------------------------------------------------------------------------------------------------------------------------------------

Operation

sockets in order to charge the vehicle's
battery.

Only use accessories with approved elec-

tromagnetic compatibility according to cur-
rent regulations.

To avoid damage due to voltage variations,

switch off all devices connected to the 12 V
socket before switching the ignition on or off
and before starting the engine.

Never connect an appliance to the 12 volt

power socket that consumes more than the
power indicated in watts. Exceeding the max-
imum power absorption could damage the ve-
hicle's electrical system.

For the sake of the environment

Do not leave the engine running when the ve-
hicle is at a standstill.

Note

Using devices with the engine stopped and

the ignition switched on will drain the bat-
tery.

Unshielded equipment can cause interfer-

ence on the radio equipment and the vehi-
cle's electrical system.

Interference can occur on the radio's AM

waveband if electrical appliances are used
near the aerial.

Portable Smartphone base

Fig. 134 

Assemble the universal base and the

link arm.

Fig. 135 

In the centre console: Close the gap

for the holder of the infotainment system.

Dismantle the Smartphone

Hold the Smartphone firmly with one hand.

Press release button 

››› 

Fig. 135


5

 until

the upper arm of the universal base comes
loose.

Remove the Smartphone and, in such case,

loosen the electrical connectors.

Mount the Smartphone

In such case, assemble the Smartphone

holder 

››› 

.

Connect the Smartphone.

Place the Smartphone into the lower

mountings. To set the lower mountings,
press button 

››› 

Fig. 135


4

.

Press the upper arm of the universal base

until the Smartphone remains firmly in place.

Dismount the holder

In such case, dismantle the Smartphone.

Hold the universal base 

››› 

Fig. 134


3

 and

press the release button 

››› 

Fig. 134


4

.

Move the universal base to the right, in the

opposite direction of the arrow, and disman-
tle it.

Hold support arm 

››› 

Fig. 135


1

 and press

release 

››› 

Fig. 135


4

 in the direction of the

arrow.

Remove the support arm from the dash

panel in an upwards direction.

122

-------------------------------------------------------------------------------------------------------------------------------------------------------------

-------------------------------------------------------------------------------------------------------------------------------------------------------------

Transport and practical equipment

Mount the holder

Insert universal base 

››› 

Fig. 134


3

 into

sockets 

2

 of the support arm 

1

.

Move the universal base sideways in the di-

rection of lock 

4

 until it clicks into

place. 

››› 

.

Place support arm 

››› 

Fig. 135


1

 in retain-

ing lever 

››› 

Fig. 135


3

 from above and press

it downwards until you hear that is locked

››› 

.

WARNING

If the Smartphone is not secured or is incor-
rectly secured in the vehicle, it could be
thrown though the passenger compartment
during a sudden driving or braking manoeu-
vre, just like in the event of an accident and
lead to injuries.

The infotainment support system mus be

mounted securely in the corresponding space
of the dash panel.

The infotainment system must always be

well secured in its support or kept safely in
the vehicle.

CAUTION

If the lean and the angle of visibility are set
up incorrectly, the Smartphone can be dam-
aged.

When performing the set-up, move the

Smartphone carefully and not beyond its lim-
its.

CAUTION

At very high and very low temperatures, func-
tioning of the Smartphone can be adversely
affected or the device itself can be damaged.

Always take the Smartphone with you

when you leave the vehicle to protect it from
excessively high or low temperatures, as well
as from intense solar radiation.

CAUTION

Humidity can damage the existing electrical
connectors in the dash panel for the Smart-
phone.

Do not clean the Smartphone holder while

wet. Only use a dry cloth.

Note

SEAT recommends always taking your Smart-
phone when you leave the vehicle so as to
avoid possible theft.

Luggage compartment

Introduction

Always transport heavy loads in the luggage
compartment and place the seat backs in a
vertical position. Never overload the vehicle.
Both the carrying capacity as well as the dis-
tribution of the load in the vehicle have ef-

fects on the driving behaviour and braking
ability 

››› 

.

WARNING

When the vehicle is not in use or being
watched, always lock the doors and the rear
lid to reduce the risk of serious injury or
death.

Do not leave children unwatched, especial-

ly when the boot is open. Children could
climb into the luggage compartment, close
the rear lid from inside and be unable to es-
cape themselves. This could lead to serious
injury or death.

Never allow children to play in or around

the vehicle.

Never transport people in the luggage com-

partment.

WARNING

Unsecured or incorrectly secured objects can
cause serious injury in case of a sudden ma-
noeuvring or breaking or in case of an acci-
dent. This is especially true when objects are
struck by a detonating airbag and fired
through the vehicle interior. To reduce the
risks, please note the following:

Secure all objects in the vehicle. Always

place equipment and heavy objects in the
boot.

Always secure objects to the fastening

rings with suitable rope or straps to prevent
them from being thrown around the interior

»

123

Tec

hnic

al

 d

at

a

Adv

ic

e

Oper

ation

Emer

genc

ie

s

Saf

ety

-------------------------------------------------------------------------------------------------------------------------------------------------------------

-------------------------------------------------------------------------------------------------------------------------------------------------------------

Operation

and moving to the airbag deployment area in
the event of sudden movements or accidents.

While driving, always keep object compart-

ments closed.

Do not place hard, heavy or sharp objects

inside the vehicle interior, in open storage
compartments, the rear shelf or on the dash
panel.

Remove hard, heavy and sharp objects from

clothes and pockets inside the vehicle and
store securely.

WARNING

The transport of heavy object changes vehi-
cle handling and increases braking distance.
Heavy loads that have not been stored or se-
cured correctly could cause loss of control
and result in serious injury.

Vehicle handling changes when transport-

ing heavy objects due to a change in the cen-
tre of gravity.

Distribute the load as uniformly and as low

down on the vehicle as possible.

Store heavy objects in the luggage com-

partment as far from the rear axle as possi-
ble.

CAUTION

Hard objects on the rear shelf could chafe
against the wires of the heating element in
the heated rear window and cause damage.

Note

The ventilating slits between the heated rear
window and the rear shelf must not be cov-
ered so that used air can escape from the ve-
hicle.

Folding and lifting up the rear seat
bench backrest

Fig. 136 

Rear seat: unlock button 

A

; red

marking 

B

The rear seat backrest can be folded forward
to extend the luggage compartment.

Folding the rear seat backrest forwards

Push the head restraint down as far as it

will go or remove it if necessary 

››› 

page 48

and store it in a safe place.

Pull the unlock switch 

››› 

Fig. 136 

A

 for-

wards whilst simultaneously lifting the rear
seat backrest.

The rear seat backrest is not engaged when

the red marking of the button 

B

 is visible.

If the rear seat backrest is folded, people

(including children) are not permitted to trav-
el in the rear folded seats.

Folding up the rear seat backrest

Lift back the backrest of the rear seat and

push it firmly into the lock until it clicks se-
curely into place 

››› 

.

The red marking on the unlock button 

B

must not be seen.

Make sure that the backrest of the rear seat

is securely locked in position so that the seat
belts can provide proper protection in the
rear seats.

If necessary, reinstall and readjust the head

restraints 

››› 

page 112

.

WARNING

Folding and lifting the backrests of the rear
seats carelessly without paying attention
could cause serious injury.

Never fold or lift the seats while driving.

Do no trap or damage seat belts when rais-

ing the seat backrest.

124

-------------------------------------------------------------------------------------------------------------------------------------------------------------

-------------------------------------------------------------------------------------------------------------------------------------------------------------

Transport and practical equipment

Keep hands, fingers, feet and other limbs

away from the range of the rear seat backr-
ests when folding and lifting them.

All seat backrests must engage correctly for

the seat belts on the rear seats to work prop-
erly. When the backrest of an occupied seat is
not correctly locked in place, the passenger
can be thrust forward with the rear seat back-
rest in case of sudden braking, sudden ma-
noeuvres or an accident.

A red signal on the button 

B

 warns that

the backrest is not engaged. Always check to
make sure that the red mark is not visible
when the backrest of the rear seat is in the
upright position.

No seat must be occupied if the backrest of

the rear seat is folded or not correctly engag-
ed.

CAUTION

Before folding the rear seat backrest, adjust
the front seats so that neither the head re-
straint or backrest hit them when folded. If
necessary, remove the head restraints

››› 

page 112

 and store them safely.

Luggage compartment shelf*

Fig. 137 

In the luggage compartment: remov-

ing and installing the rear shelf

You may put light items of clothing on the
rear shelf. Check that the rear view is not limi-
ted.

Removing the shelf

Unhook the loops 

››› 

Fig. 137


B

 from

housings 

A

.

Extract the cover from slot 

C

, upwards and

then pull outwards.

WARNING

Unsecured or incorrectly secured objects or
animals on the rear shelf could cause serious
injuries in case of a sudden manoeuvre, sud-
den braking or an accident.

Do not leave hard, heavy or sharp objects

(loose or in bags) on the rear shelf.

Never transport animals on the rear shelf.

Never drive with the rear shelf raised. Al-

ways lower it or remove it before the journey.

CAUTION

To prevent the rear shelf from being dam-
aged:

Always check that the side supports are

firmly engaged.

Regulate the height of the load in the lug-

gage compartment to ensure the rear shelf
does not press down on the load with the rear
lid closed.

125

Tec

hnic

al

 d

at

a

Adv

ic

e

Oper

ation

Emer

genc

ie

s

Saf

ety

-------------------------------------------------------------------------------------------------------------------------------------------------------------

-------------------------------------------------------------------------------------------------------------------------------------------------------------

Operation

Luggage compartment variable floor

Fig. 138 

A: open the boot variable floor. B:

raised boot variable floor.

Fig. 139 

C: extend the boot downward. D: ex-

tend the boot forward.

Raise and lower the boot floor

To raise the floor, raise handle

››› 

Fig. 138 

1

 in the direction of the arrow

and pull from the floor all the way up

››› 

Fig. 138


B.

To lower it, guide the floor downward.

Extend the boot downward

Raise the boot floor and push it downward

in the rail 

››› 

Fig. 139


C (arrows)

Place the variable floor over the floor lining.

If necessary, fold the backrest of the rear

seat forward 

››› 

page 124

.

Extending the luggage compartment forward

Disassemble the luggage compartment tray

››› 

page 125

.

Disassemble the rear headrests 

››› 

page 48

.

Fold the backrest of the rear seat forward

››› 

page 124

.

If necessary, expand the boot downward.

CAUTION

Do not let the luggage compartment floor fall
when closing it. Always carefully guide it
downward in a controlled manner. Otherwise,
the lining and the floor of the boot could be
damaged.

Class N1 (commercial) vehicles

For safe vehicle operation, the electrical sys-
tem must work perfectly. Special attention
should be paid so it is not damaged during
adjustment, loading and unloading of trans-
ported objects.

Fastening rings*

In the front part of the luggage compartment,
there may be fastening rings to secure the
luggage.

In order to use the fastening rings, they must
be lifted beforehand.

126

-------------------------------------------------------------------------------------------------------------------------------------------------------------

-------------------------------------------------------------------------------------------------------------------------------------------------------------

Transport and practical equipment

WARNING

If unsuitable or damaged belts or retaining
straps are used, they may break in the event
of braking or an accident. Objects could then
be launched across the passenger compart-
ment and cause serious or fatal injuries.

It is important to always use belts or retain-

ing straps that are suitable and in a good
condition.

Belts and retaining straps should be se-

curely fastened to the fastening rings.

Objects in the luggage compartment that

are unsecured could move suddenly and mod-
ify the handling of the vehicle.

Small light objects should also be fixed in

place.

A child seat should never be secured with

the fastening rings.

Note

The maximum tensile load that the fasten-

ing rings can support is 3.5 kN.

Belts and securing systems for the appro-

priate load can be obtained from specialised
dealerships. SEAT recommends visiting a
SEAT dealership for this.

Retaining hooks

Fig. 140 

In the luggage compartment: retain-

ing hooks

There may be hooks in the upper left and
right part of the luggage compartment.

WARNING

Never use these hooks to secure objects. In
case of sudden braking or an accident, they
could rupture.

CAUTION

The hooks can support a maximum of 2.5 kg
each.

Roof carrier

Introduction

The vehicle roof has been designed to opti-
mise aerodynamics. For this reason, conven-
tional roof carrier systems cannot be secured
to the water drains.

Given that the water drains have been incor-
porated into the roof for aerodynamic rea-
sons, only the SEAT approved basic supports
and roof carrier systems can be used.

When the roof carrier system should be re-
moved:

When they are not used.

When the vehicle is being washed in a car

wash.

When the vehicle height exceeds the maxi-

mum height, for example, in some garages.

WARNING

The risk of an accident is increased by trans-
porting heavy or bulky loads on the roof,
which affects the car's handling by shifting
the centre of gravity and increasing suscepti-
bility to cross winds.

Always secure loads correctly with suitable

and undamaged attachment rope or straps.

Large, heavy, wide and flat loads negatively

affect the vehicle aerodynamics, centre of
gravity and handling.

»

127

Tec

hnic

al

 d

at

a

Adv

ic

e

Oper

ation

Emer

genc

ie

s

Saf

ety

-------------------------------------------------------------------------------------------------------------------------------------------------------------

-------------------------------------------------------------------------------------------------------------------------------------------------------------

Operation

Avoid brusque manoeuvres and sudden

braking.

Adjust your speed and driving style to visi-

bility, road, traffic and weather conditions.

CAUTION

Always remove the roof carrier system from

the roof before entering a car wash.

The height of your vehicle is changed by

the installation of the roof carrier and the
load secured on it. Compare the vehicle
height with the passage height, for example
in underground car parks or for garage doors.

The roof antenna and the range of the rear

lid should not be affected by the roof carrier
system or the load being transported.

Take extra care not to let the hatch strike

the roof load when opening.

For the sake of the environment

The vehicle uses more fuel when the roof car-
rier system is fitted.

Fastening the base supports and the
roof carrier system

Fig. 141 

Attachment points for the basic sup-

ports and the roof carrier system in two-door
vehicles.

Fig. 142 

Attachment points for the basic sup-

ports and the roof carrier system in four-door
vehicles.

The mounts are the basis of a complete roof
carrier system. Special fixtures must be add-
ed in order to safely transport luggage, bicy-

cles, skis, surf boards or boats on the roof.
The suitable accessories can be acquired at
SEAT dealerships.

Securing the base supports and roof carrier
system
The roof carrier system must always be instal-
led exactly according to the instructions pro-
vided.

Two-door vehicles: the holes and marks indi-
cating the fitting points for base front sup-
ports are in the lower half of the roof struts

››› 

Fig. 141

 (enlarged left image). The holes

and marks are only seen with the door open.
The fitting marks for base rear supports are in
the upper half of the windows 

››› 

Fig. 141

 (en-

larged right image).

Four-door vehicles: the holes or marks indi-
cating the fitting points for base supports are
in the lower half of the roof struts and can on-
ly be seen with the door open 

››› 

Fig. 142

.

The base support should 

only be fitted to the

points indicated in the diagram .

WARNING

If the base supports and the roof carrier sys-
tem are incorrectly fitted or used in an unsuit-
able manner, the entire system could break
free causing accident and injury.

Always take the manufacturer assembly in-

structions into account.

128

-------------------------------------------------------------------------------------------------------------------------------------------------------------

-------------------------------------------------------------------------------------------------------------------------------------------------------------

Transport and practical equipment

Only use base supports and roof carrier

systems that are not damaged and are cor-
rectly fitted.

The base support should only be fitted to

the points indicated in the diagram

››› 

Fig. 141

.

Secure the base supports and roof carrier

system correctly.

Check the screws and attachments before

driving and after a short distance. During
each long journey, check the attachments
during every break.

Always fit the roof carrier system correctly

for wheels, skis and surfboards, etc.

Never modify or repair the basic supports

or roof carrier system.

Note

Read and take into account the instructions
included with the roof carrier system fitted
and keep them in the vehicle.

Loading the roof carrier

Loads can only be correctly secured when the
roof carrier system is correctly fitted 

››› 

.

Maximum authorised roof load
The maximum authorised roof load is 

50 kg.

The roof load includes the weight of the base

support, the roof carrier system and the load
being transported 

››› 

.

Always check the weight of the base support,
the roof carrier system and the weight of the
load to be transported and, if necessary,
weigh them. Never exceed the maximum au-
thorised roof load.

If you are using a roof carrier with a lower
weight rating, you cannot transport the maxi-
mum roof load. Do not exceed the maximum
weight limit for the roof carrier given in the
fitting instructions.

Distributing a load
Uniformly distribute loads and secure them
correctly 

››› 

.

Check attachments
After fitting the base supports and the roof
carrier system, always check the attachments
after a short trip and at regular intervals.

WARNING

Exceeding the maximum authorised roof load
can result in accidents and/or vehicle dam-
age.

Never surpass the maximum authorised

weight for the roof, the maximum authorised
weight on the axles and the total maximum
authorised weight of the vehicle.

Never exceed the capacity of the roof carri-

er system even if this is less than the maxi-
mum authorised roof load.

Secure heavy items as far forward as possi-

ble and distribute the vehicle load uniformly.

WARNING

Loose and incorrectly secured loads can fall
from the roof carrier system causing acci-
dents and injury.

Always use suitable ropes and straps in

good condition.

Always secure loads correctly.

129

Tec

hnic

al

 d

at

a

Adv

ic

e

Oper

ation

Emer

genc

ie

s

Saf

ety

-------------------------------------------------------------------------------------------------------------------------------------------------------------

-------------------------------------------------------------------------------------------------------------------------------------------------------------

Operation

Air conditioning

Heating, ventilation and cool-
ing

Introduction

Read the additional information carefully

››› 

page 27

One of the following systems can be installed
in the vehicle:

Heating and fresh air system

Manual air conditioning

Climatronic

The 

heating and fresh air system heats and

ventilates the passenger compartment. The
heating and fresh air system cannot cool.

The 

manual air conditioning and the Clima-

tronic cool and dehumidify the air. Its opti-
mum output is achieved with the windows
and the glass sunroof closed. In case of con-
siderable heat build-up in the passenger
compartment, ventilating this compartment
can accelerate the cooling process.

Display of active functions
The luminous diodes (LED) that light up on
the rotary regulators and on the buttons that
indicate that the corresponding function is
activated.

In the case of the Climatronic, the functions
that are activated are shown on the control
panel display.

WARNING

When visibility through the windows is poor,
the risk of accidents or collisions taking place
is increased, which can lead to serious inju-
ries.

To obtain good visibility, keep the windows

free of ice, snow and frost.

Set the heating, the air conditioner and the

rear window defroster so that the windows do
not mist over.

Only put the car in gear when there is good

visibility through the windows.

Do not use the air recirculation for a long

time period. With the cooling disconnected
and the air recirculation connected, the win-
dows can quickly mist over and seriously ob-
struct visibility.

Disconnect the air recirculation whenever it

is not needed.

WARNING

Stale air can quickly bring about fatigue for
the driver and reduce his/her capacity to con-
centrate, which could lead to collisions, acci-
dents and serious injuries.

Never disconnect the blower for an exten-

ded time or never leave the air recirculation
disconnected for an extended time, since in

the meantime, no outside fresh air shall enter
the passenger compartment.

CAUTION

If the air conditioner does not work, discon-
nect it immediately together with the defrost-
ing/demisting function (in the case of manual
air conditioning) and have the system
checked out by a specialised workshop. In
this way, other damage can be avoided.

CAUTION

To avoid damage to the rear window defrost-
er, under no circumstances should you stick
any adhesives on the electrical filaments of
the interior side of this defroster.

Air recirculation

In air recirculation mode, no fresh air enters
the vehicle interior.

To connect the air recirculation, move the
regulator towards the right  or press the
button 

.

To disconnect the air recirculation, move the
regulator towards the left  or press the but-
ton again 


››› 

.

130

-------------------------------------------------------------------------------------------------------------------------------------------------------------

-------------------------------------------------------------------------------------------------------------------------------------------------------------

Air conditioning

WARNING

Stale air can quickly bring about fatigue for
the driver and reduce his/her capacity to con-
centrate, which could lead to collisions, acci-
dents and serious injuries.

Never use the air recirculation for an exten-

ded time, since in the meantime, no outside
fresh air shall enter the passenger compart-
ment.

With the cooling disconnected and the air

recirculation connected, the windows can

quickly mist over and seriously obstruct visi-
bility.

Disconnect the air recirculation whenever it

is not needed.

CAUTION

Do not smoke when the air recirculation is
connected in vehicles with an air conditioner.
Smoke taken in could settle in the cooling
system vaporiser and on the dust and pollen
filter, therefore leading to permanently un-
pleasant odours.

Note

Climatronic: When the reverse gear is en-

gaged, the air recirculation is briefly connec-
ted to avoid exhaust gas from entering the
passenger compartment.

Whenever the outside temperature is very

high, it is essential to connect the manual air
recirculation mode briefly so that the passen-
ger compartment may cool down more quick-
ly.

Air vents

Fig. 143 

On the dash panel: air vents

To obtain heating output, sufficient cooling
and ventilation in the passenger compart-
ment, the air vents must remain open.

Key to the 

Fig. 143

:

Adjustable air vents With the blades of
the vents you can open and shut the
vents, as well as set the direction in
which you may wish the air to come out.
So that the air may reach the windows as

1

expeditiously as possible, open the cor-
responding vent and turn the defrost-
ing/demisting position, where it shall
gather.

»

131

Tec

hnic

al

 d

at

a

Adv

ic

e

Oper

ation

Emer

genc

ie

s

Saf

ety

-------------------------------------------------------------------------------------------------------------------------------------------------------------

-------------------------------------------------------------------------------------------------------------------------------------------------------------

Operation

Non-adjustable air vents

There are no air vents in the foot well and in
the rear area of the passenger compartment.

2

CAUTION

Never place food, medicines or other temper-
ature-sensitive objects close to the air vents.
Food, medicines and other objects sensitive

to heat or cold may be damaged or made un-
suitable for use by the air coming from the
vents.

Application tips and instructions for use

Fig. 144 

At the top of the centre console: Clima-

tronic controls

The following application tips and instruc-
tions of use shall assist you to use the sys-
tems correctly.

Reasons for which the cooling is automati-
cally disconnected or cannot be connected

The engine is not running.

The fan is switched off.

The air conditioner fuse is burnt out.

The ambient temperature is less than ap-

proximately +3 °C (+38 °F).

The cooling system compressor has been

temporarily disconnected due to the exces-
sive temperature of the engine coolant.

Another fault in the vehicle. Turn to a speci-

alised workshop and have the former check
the air conditioning system.

Settings for optimum visibility

Keep the air intake slots in front of the

windscreen clear of snow, ice or leaves to en-
sure heating or cooling are not impaired, and
to prevent the windows from misting over.

So that the air may circulate throughout the

passenger compartment from the front area
to the rear one, leave the ventilation slots un-
cluttered in the rear area of the boot.

The maximum possible heating output and

fastest possible elimination of ice on the win-
dows shall be reached when the engine cool-
ant is at operating temperature.

132

-------------------------------------------------------------------------------------------------------------------------------------------------------------


Content      ..     6      7      8      9     ..