Ferrari 575M Maranello (2003 year). Manual - part 4
 

  Index      Ferrari     Ferrari 575M Maranello (2003 year) - manual in english


Search            copyright infringement  


Content      ..     2      3      4      5     ..


Ferrari 575M Maranello (2003 year). Manual - part 4


2

.

26

USO DELLA VETTURA

CONTROLS - RUNNING INSTRUCTIONS

UTILISATION DE LA VOITURE

UTILISACIÓN DEL AUTOMÓVIL

Blocco porte e
apertura dall’interno

Il blocco di entrambe le porte si in-
serisce/disinserisce azionando la
levetta “LOCK” D.

Azionando la maniglia E per aprire
la porta, il cristallo scende a 

“traguar-

do”

. Chiudendo la porta, risale fino

al 

“tamponamento superiore”

.

Azionando la maniglia senza pro-
cedere all’apertura, il cristallo scen-
de a 

“traguardo”

 ma dopo 20 secon-

di, se non si procede all’apertura
della porta, il cristallo risale fino al

“tamponamento superiore”

.

Per aprire la porta occorre quindi ri-
lasciare la maniglia e procedere nuo-
vamente all’azionamento.

Internal door lock and
opening from the inside

The door lock for both doors can be
enabled and disabled using the
small “LOCK” lever D.

When the handle E is used to open
the door, the window will lower to the

“pre-set limit”

. When the door is

closed it will rise to the 

“upper thresh-

old”

.

When the handle is operated with-
out opening the door, the window will
lower to the 

“pre-set limit”

Howev-

er, if the door is not opened within
20 seconds, the window will go back
up to the 

“upper threshold”

.

To open the door, release the han-
dle and then open it once again.

Verrouillage des portes et
déverrouillage de l’intérieur

Le verrouillage des deux portes s’ef-
fectue et s’exclue en actionnant le
levier “LOCK” D.

En actionnant le levier E pour ouvrir
la porte, la vitre descend en 

“butée

inférieure”

. En verrouillant la porte,

elle remonte jusqu’à la 

“butée supé-

rieure”

.

En actionnant le levier sans ouvrir
la porte, la vitre descend jusqu’en

“butée inférieure”

 mais au bout de

20 secondes, si on n’ouvre pas la
porte, la vitre remonte jusqu’en fin
de course supérieure 

“butée supé-

rieure”

.

Pour déverrouiller la porte, il faut
donc relâcher le levier puis l’action-
ner de nouveau.

Bloqueo puertas apertura
del Interior

El bloqueo del cierre de las puerta
se activa/desactiva accionando la
palanquita “LOCK” D.

Accionando la manilla E para abrir
la puerta, la ventanilla desciende
hasta el 

“límite marcado”

. Al cerrar

la puerta, asciende hasta el 

“tope

superior”

.

Accionando la manilla sin llegar a
abrir la puerta, la ventanilla descien-
de hasta el 

“límite marcado” 

pero si

después de 20 segundos no se abre
la puerta, la ventanilla sube hasta
el 

“tope superior”

.

Para abrir la puerta tendrá que sol-
tar la manilla antes de volver a ac-
cionarla.

LOCK

E

D

LOCK

E

D

-------------------------------------------------------------------------------------------------------------------------------------------------------------

2

.

27

USO DELLA VETTURA

CONTROLS - RUNNING INSTRUCTIONS

UTILISATION DE LA VOITURE

UTILISACIÓN DEL AUTOMÓVIL

Segnalazione porte aperte

Ciascuna porta è dotata di una luce
rossa F che ne segnala l’apertura.
Si illumina automaticamente quan-
do la porta è aperta.

Door open signal

Each door is fitted with a red light F
which indicates that it is open. This
light goes on automatically whenev-
er the door is opened.

Signalisation ouverture de portes

Chaque porte est pourvue d’une
lampe rouge F  qui en indique
l’ouverture. Cette lampe s’éclaire
automatiquement quand la porte
s’ouvre.

Señal puertas abiertas

Cada una de las puertas está dota-
da de una luz roja F que señala su
apertura. Se enciende automática-
mente cuando la puerta está abier-
ta.

F

-------------------------------------------------------------------------------------------------------------------------------------------------------------

2

.

28

USO DELLA VETTURA

CONTROLS - RUNNING INSTRUCTIONS

UTILISATION DE LA VOITURE

UTILISACIÓN DEL AUTOMÓVIL

ALZACRISTALLI

Gli alzacristalli elettrici possono es-
sere azionati solo con chiave di av-
viamento ruotata in posizione “II”.

ELECTRIC POWER WINDOWS

The electric power windows can only
be operated when the ignition key
is in position “II”.

LÈVE-GLACES

On ne peut actionner les lève-gla-
ces électriques qu’à l’aide de la clé
de contact en position “II”.

ELEVALUNAS

Los elevalunas eléctricos sólo pue-
den accionarse con la llave de con-
tacto en la posición “II”.

A

B

Elevalunas del conductor

Pulsando el botón A se activa el as-
censo o el descenso de la ventani-
lla. Se permite el funcionamiento
manual (apertura/cierre parcial) o
automático (apertura/cierre comple-
to): la presión breve sobre el botón
A, activa el funcionamiento manual;
mayor intensidad (más de 0,3 se-
gundos) activa el funcionamiento
automático de la ventanilla que se
detiene al final del recorrido o si
aprieta de nuevo el botón.

Lève-glace côté conducteur

En appuyant sur le bouton A, on fait
monter ou descendre la glace. On
peut le faire manuellement (ouver-
ture/fermeture partielle) ou automa-
tiquement (ouverture/fermeture
complète): en appuyant sur le bou-
ton A pendant un court instant, on
active le fonctionnement manuel; si
l’on appuie plus longtemps sur le
bouton (plus de 0.3 secondes), on
active le fonctionnement automati-
que de la glace qui se ferme seule-
ment en fin de course ou en ap-
puyant de nouveau sur le bouton.

Driver’s side power window

If button A is pressed the window
opens or closes. The window can be
operated manually (partial opening/
closing) or automatically (full open-
ing/closing). If button A is pressed
quickly, the manual mode is activat-
ed. If it is pressed for a longer time
(more than 0.3 seconds), the auto-
matic mode is activated and the win-
dow will only stop at the end of the
stroke or if the button is pressed
again.

Alzacristallo lato pilota

Agendo sul pulsante A si attiva la
salita o la discesa del cristallo. È
consentito il funzionamento manua-
le (apertura/chiusura parziale) o au-
tomatico (apertura/chiusura comple-
ta): la pressione sul pulsante A per
un tempo breve, attiva il funziona-
mento manuale; un tempo più lun-
go (superiore a 0,3 secondi) attiva il
funzionamento automatico del cri-
stallo che si ferma solo a fine corsa
o premendo nuovamente il pulsan-
te.

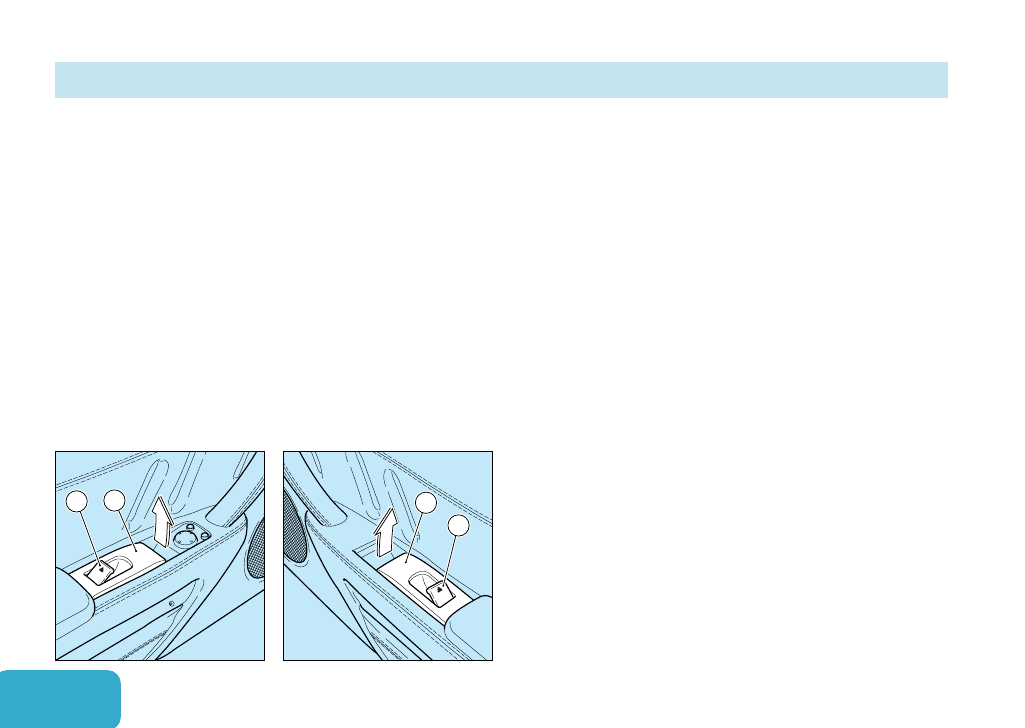
A - Pulsante comando alzacristallo lato pilota; B - Pulsante comando alzacristallo lato passeggero.

A - Driver’s side window switch; B - Passenger’s side  window switch.

A - Bouton côté conducteur; B - Bouton côté passager.

A - Botón de accionamiento del elevalunas del conductor; B - Botón de accionamiento del elevalunas del acompañante.

-------------------------------------------------------------------------------------------------------------------------------------------------------------

2

.

29

USO DELLA VETTURA

CONTROLS - RUNNING INSTRUCTIONS

UTILISATION DE LA VOITURE

UTILISACIÓN DEL AUTOMÓVIL

Alzacristallo lato passeggero

Agendo sul pulsante B si attiva la
salita o discesa del cristallo.

È consentito solamente il funziona-
mento manuale: al rilascio del pul-
sante  B, il cristallo si ferma nella
posizione raggiunta.

Con porta aperta il cristallo può sali-
re fino a 

“traguardo”,

 questo per evi-

tare che la portiera interferisca con
la guarnizione superiore durante la
chiusura.

L’uso improprio degli
alzacristalli elettrici può
essere pericoloso. As-
sicurarsi sempre prima

dell’azionamento che persone o
cose siano a distanza di sicurez-
za.
Fare particolare attenzione duran-
te l’azionamento automatico del-
l’alzacristallo lato pilota.

Per salvaguardare dal-
l’azionamento acciden-
tale degli alzacristalli, il
passeggero rimasto in

vettura, togliere sempre la chia-
ve dal blocchetto di avviamento.

Passenger’s side power window

If button B is pressed, the window
will open or close.

This window only functions manual-
ly: when button B is released the
window will stop in the position
reached.

When the door is open, the window
can only rise as far as the 

“pre-set

limit”

,  in order to prevent the door

from interfering with the upper
weather strip when it is being closed.

Improper use of the
power windows may be
dangerous. Before us-
ing them, always make

sure that people or objects are at
a safe distance.

Take particular care when the
driver’s window is moved auto-
matically.

To protect a passenger
who has been left alone
in the car from uninten-
tionally operating the

windows, always remove the key
from the ignition.

Lève-glace côté passager

En agissant sur le bouton B, on fait
monter ou descendre la glace.

Seule la commande manuelle est
possible: lorsque l’on relâche le bou-
ton B, la glace s’arrête à la position
voulue.

La porte ouverte, la glace peut mon-
ter jusqu’à la 

“butée”

. On évite ainsi

que la porte n’interfère avec le joint
d’encadrement supérieur lors de la
fermeture.

Une mauvaise utilisa-
tion des lève-glaces
électriques peut s’avé-
rer dangereuse. Tou-

jours tenir à distance de sécurité
les personnes ou objets avant de
les actionner.
Faire particulièrement attention
lorsque l’opération de lève-glace
automatique s’effectue côté con-
ducteur.

Pour éviter au passager
de rester dans la voitu-
re pendant toute
manœuvre accidentelle

des lève-glaces, ôter toujours la
clé du bloc de démarrage.

Elevalunas del acompañante

Pulsando el botón  B se activa el
ascenso o el descenso de la venta-
nilla.

Sólo se permite el funcionamiento
manual: al soltar el botón B, la ven-
tanilla se detiene en la posición al-
canzada.

Con la puerta abierta la ventanilla
ha descendido hasta el 

“límite mar-

cado”

, para evitar que tropiece con

la junta superior mientras se cierra.

El uso inadecuado de
los elevalunas puede
resultar peligroso. An-
tes de accionarlos ase-

gúrese siempre que personas u
objetos se encuentren a una dis-
tancia mínima de seguridad.
Preste especial atención durante
el accionamiento automático del
elevalunas del conductor.

Para protegerse del ac-
cionamiento involunta-
rio de los elevalunas, si
el acompañante perma-

nece en el automóvil, extráiga la
llave de contacto.

ATTENZIONE

ATTENZIONE

WARNING!

WARNING!

ATTENTION

ATTENTION

ATENCI

ATENCIÓN

ATTENZIONE

ATTENZIONE

WARNING!

WARNING!

ATTENTION

ATTENTION

ATENCI

ATENCIÓN

-------------------------------------------------------------------------------------------------------------------------------------------------------------

2

.

30

USO DELLA VETTURA

CONTROLS - RUNNING INSTRUCTIONS

UTILISATION DE LA VOITURE

UTILISACIÓN DEL AUTOMÓVIL

LEVE AL VOLANTE

Le luci esterne e gli indicatori di di-
rezione possono funzionare solo con
chiave di avviamento in posizione
“II”.

STEERING WHEEL LEVERS

The headlights and direction indica-
tors can only function when the key
is in the ignition in position “II”.

LEVIERS DE VOLANT

Les feux extérieurs et les clignotants
ne peuvent fonctionner qu’avec la
clé de contact en position “II”.

PALANCAS DEL VOLANTE

La luces de alumbrado y los inter-
mitentes sólo funcionan con la llave
en posición “II”.

External Lights

Position “0”:

Lights deactivated.

Position “1”
(lever turned by one click):

Position lights and number plate
lights on (the relative control lamp
switches on), instrument panel illu-
minated.

Position “2”
(lever turned by two clicks):

Low beams on.

Feux Extérieurs

Position “0”:

Feux éteints.

Position “1”
(levier tourné d’un cran):

Feux de position et feux de plaque
d’immatriculation allumés (le témoin
de contrôle relatif s’allume), tableau
de bord éclairé.

Position “2”
(levier tourné de deux crans):

Feux de croisement allumés.

Luces de alumbrado

Posición “0”:

Luces desconectadas.

Posición “1”  (palanca girada en
la primera posición):

Luces de posición y luces de matrí-
cula encendidas (se encienden los
testigos respectivos), cuadro de ins-
trumentos iluminado.

Posición  “2” (palanca girada en
la segunda posición):

Luces de cruce encendidas.

Luci Esterne

Posizione “0”:

Luci disinserite.

Posizione “1”
(leva ruotata di uno scatto):

Luci di posizione e luci targa acce-
se (si illumina la relativa spia di con-
trollo), quadro strumenti illuminato.

Posizione “2”
(leva ruotata di due scatti):

Luci anabbaglianti accese.

0

1

2

-------------------------------------------------------------------------------------------------------------------------------------------------------------

2

.

31

USO DELLA VETTURA

CONTROLS - RUNNING INSTRUCTIONS

UTILISATION DE LA VOITURE

UTILISACIÓN DEL AUTOMÓVIL

Sulle vetture destinate al CA-
NADA con chiave di avviamen-
to in posizione “II”, le luci di po-
sizione e anabbaglianti sono
sempre accese.

Posizione “3”
(leva spinta in avanti):

Luci abbaglianti accese (si illumina
la relativa spia di controllo).

L’accensione delle luci abbaglianti
può avvenire solo con leva in posi-
zione “2”.

Lampeggio:

Avviene con le luci abbaglianti; si
attiva tirando la leva verso il volante
(la funzione può avvenire con la leva
in ogni posizione).

On vehicles bound for CANA-
DA, when the ignition key is
turned to position “II”, the dip-
ped lights and the low beams
are always switched on.

Position “3”
(lever pushed forward):

high beams on (the relative control
lamp switches on),

The high beams can only be turned
on with the lever in position “2”.

To flash the external lights:

(the high beams must be turned on)
pull the lever towards the steering
wheel (this function can be per-
formed with the lever in any posi-
tion).

Sur les véhicules destinés au
CANADA, lorsque la clé de
contact est sur “II”, les feux de
position et de croisement sont
toujours allumés.

Position “3”
(levier poussé en avant):

Feux de route allumés (le témoin de
contrôle correspondant s’éclaire).

L’éclairage des feux de route peut
s’effectuer uniquement lorsque le
levier est en position “2”.

Appels de phare:

Ils s’effectuent grâce aux feux de
route; on les active en tirant le levier
vers le volant (qu’importe la position
du levier).

En los automóviles destinados
a CANADÁ con la llave de con-
tacto en posición “II”, las luces
de posición y las luces de cru-
ce siempre están encendidas.

Posición “3” (palanca posicio-
nada hacia delante):

Luces de carretera encendidas (se
ilumina el testigo respectivo).

El encendido de las luces de carre-
tera sólo se produce con la palanca
en la posición “2”.

Ráfagas:

Se realizan con las luces de carre-
tera; se producen tirando de la pa-
lanca hacia el volante (funcionan
con la palanca en cualquier posi-
ción).

3

-------------------------------------------------------------------------------------------------------------------------------------------------------------

2

.

32

USO DELLA VETTURA

CONTROLS - RUNNING INSTRUCTIONS

UTILISATION DE LA VOITURE

UTILISACIÓN DEL AUTOMÓVIL

Indicatori di direzione

Gli indicatori di direzione fun-
zionano solo con chiave di ac-
censione in posizione “II”.

Contemporaneamente all’aziona-
mento della leva, nel quadro stru-
menti si illumina ad intermittenza la
relativa spia.

Il ritorno della leva nella posizione
centrale si ottiene riportando il vo-
lante in posizione di marcia rettilinea.

Posizione “A” (leva a riposo):

Indicatori di direzione spenti.

Posizione “B” (leva in alto):

Indicatori lato destro.

Posizione “C” (leva in basso):

Indicatori lato sinistro.

Direction Indicators

The direction indicators only
work when the key in the igni-
tion block is in position “II”.

While the lever is in use the respec-
tive light on the instrument panel will
flash.

The lever will return to the central
position when the steering wheel is
straightened.

Position “A” (lever at rest):

Direction indicators turned off.

Position “B” (lever up):

Right-hand indicator.

Position “C” (lever down):

Left-hand indicator.

Clignotants

Les clignotants ne fonction-
nent que lorsque la clé de con-
tact est en position “II”.

Dès que l’on actionne le levier, les
témoins relatifs clignotent sur le ta-
bleau de bord.

Le levier revient en position centra-
le lorsque l’on tourne le volant pour
effectuer une conduite en ligne droi-
te.

Position “A” (levier au repos):

Clignotants éteints.

Position “B” (levier levé):

Clignotant côté droit.

Position “C” (levier abaissé):

Clignotant côté gauche.

Intermitentes

Los intermitentes sólo funcio-
nan con la llave de contacto en
posición “II”.

Simultáneamente al accionamiento
de la palanca, en el cuadro de ins-
trumentos se ilumina intermitente-
mente el respectivo testigo.

El retorno de la palanca a la posi-
ción central se produce al situar el
volante en posición rectilínea de
marcha.

Posición “A” (palanca en reposo):

Intermitentes apagados.

Posición “B”
(palanca hacia arriba):

Intermitente lado derecho.

Posición “C”
(palanca hacia abajo):

Intermitente lado izquierdo.

A

B

C

-------------------------------------------------------------------------------------------------------------------------------------------------------------

2

.

33

USO DELLA VETTURA

CONTROLS - RUNNING INSTRUCTIONS

UTILISATION DE LA VOITURE

UTILISACIÓN DEL AUTOMÓVIL

0

I

II

Leva di comando
tergi-lavacristallo e lavafari

Funzionano solo con chiave di av-
viamento in posizione “II”. Il lavafa-
ri (opzionale) funziona solo con luci
anabbaglianti accese.

Tergicristallo

Posizione “0”:

Tergicristallo fermo.

Posizione “ ”
(leva abbassata al primo scatto):

Funzionamento intermittente rego-
labile.

Posizione “I”
(leva abbassata al secondo scat-
to):

Funzionamento continuo lento.

Windscreen washer/wipers and
headlight washer lever

The windscreen washer/wipers only
work when the ignition key is in po-
sition  “II”. The headlight washers
(optional) only work with the ignition
key in position “II” and the low beam
lights on.

Windscreen Wiper

Position “0”:

Windscreen wiper still.

Position “ ”
(lever lowered by one click):

Adjustable intermittent mode.

Position “I”
(lever lowered by two clicks):

Slow constant mode.

Levier de commande
essuie/lave-glaces

Ces dispositifs ne fonctionnent que
lorsque la clé de contact est sur la
position “II”. Le lave-phares (option)
fonctionne uniquement avec les feux
de croisement allumés.

.

Essuie-glace

Position “0”:

Essuie-glace à l’arrêt.

Position “ ”
(levier abaissé d’un cran):

Réglage du balayage intermittent

Position “I”
(levier abaissé de deux crans):

Balayage continu lent.

Palanca de mando limpiapara-
brisas y lavafaros

Funcionan sólo con la llave de con-
tacto en posición  “II”. El lavafaros
(opcional) sólo funciona con las lu-
ces de cruce encendidas.

Limpiaparabrisas

Posición “0”:

Limpiaparabrisas apagado.

Posición “ ” (palanca situada en
el primer punto):

Funcionamiento intermitente regula-
ble.

Posición “I” (palanca situada en
el segundo punto):

Funcionamiento lento continuo.

-------------------------------------------------------------------------------------------------------------------------------------------------------------

2

.

34

USO DELLA VETTURA

CONTROLS - RUNNING INSTRUCTIONS

UTILISATION DE LA VOITURE

UTILISACIÓN DEL AUTOMÓVIL

A

Posizione “II”
(leva abbassata al terzo scatto):

Funzionamento continuo veloce.

Lavacristallo

Tirando la leva verso il volante A vie-
ne azionato il lavacristallo e contem-
poraneamente il tergicristallo.

Rilasciando la leva il lavacristallo si
arresta mentre il tergicristallo com-
pirà ancora alcune corse.

Position “II”
(lever lowered by three clicks):

Rapid constant mode.

Windscreen Washer

Pulling the lever towards the steer-
ing wheel A activates the windscreen
washer and the windscreen wiper
simultaneously.

Releasing the lever stops the wind-
screen washer while the windscreen
wiper will continue to work for a few
more strokes.

Position “II”
(levier abaissé au troisième cran):

Balayage continu rapide.

Lave-glace

En poussant le levier vers le volant
A, on actionne l’essuie-glace en
même temps que le lave-glace.

En relâchant le levier, le lave-glaces
s’arrête alors que l’essuie-glace ef-
fectue encore quelques battements.

Posición “II” (palanca situada en
el tercer punto):

Funcionamiento rápido continuo.

Lavacristales

Tirando de la palanca hacia el vo-
lante se acciona el lavacristales y
simultáneamente el limpiaparabri-
sas.

Soltando la palanca el lavacristales
se desactiva mientras el limpiapa-
rabrisas seguirá funcionando unas
pocas veces más.

Regolazione intermittenza:

In posizione “ ”, ruotando la leva
varia la frequenza dell’intermittenza
(senso orario = intermittenza più len-
ta; senso antiorario = intermittenza
più veloce).

Adjusting the intermittence:

In position “ ”, rotating the lever will
vary the intermittence frequency
(clockwise = slower intermittence;
anticlockwise = faster intermittence).

Réglage de l’intermittence:

En position “ ”,lorsqu’on tourne la
bague du levier, on modifie la fré-
quence de l’intermittence (sens des
aiguilles d’une montre = intermitten-
ce plus lente; sens contraire des
aiguilles d’une montre = intermitten-
ce plus rapide).

Regulación de intermitencia:

En posición “ ”, girando la palan-
ca varía la frecuencia de la intermi-
tencia (sentido en el sentido de las
agujas del reloj = intermitencia mas
lenta; en contra del sentido de las
agujas del reloj = intermitencia mas
rápida).

-------------------------------------------------------------------------------------------------------------------------------------------------------------

2

.

35

USO DELLA VETTURA

CONTROLS - RUNNING INSTRUCTIONS

UTILISATION DE LA VOITURE

UTILISACIÓN DEL AUTOMÓVIL

A

Lavafari (opzionale)

Con luci anabbaglianti accese, tiran-
do la leva verso il volante A, vengo-
no azionati i lavafari.

Per ottenere un’azione detergente
più efficace, si consiglia di azionare
i lavafari a velocità inferiore ai 130
km/h.

Head light washer (optional)

With the low beam lights on, pulling
the lever towards the steering wheel
activates the headlight washers.

To obtain a better cleaning action,
we recommend operating the head-
light washers at a speed lower than
80 mph (130 km/h).

Lave-phares (en option)

Avec les feux de croisement allu-
més, en tirant le levier vers le volant
A, les lave-phares sont actionnés.

Pour obtenir une action nettoyante
plus efficace, il est conseillé d’action-
ner les lave-phares à des vitesses
inférieures à 130 km/h.

Lavafaros (opcional)

Con las luces de cruce encendidas,
accionando la palanca hacia el vo-
lante A, se accionan los lavafaros.

Para obtener una acción más eficaz
del detergente, se recomienda ac-
cionar el lavafaros a velocidades
inferiores a 130 km/h.

-------------------------------------------------------------------------------------------------------------------------------------------------------------

2

.

36

USO DELLA VETTURA

CONTROLS - RUNNING INSTRUCTIONS

UTILISATION DE LA VOITURE

UTILISACIÓN DEL AUTOMÓVIL

INTERRUTTORI

DI COMANDO E PULSANTI

CONTROL

SWITCHES BUTTONS

INTERRUPTEURS

DE COMMANDE ET BOUTONS

INTERRUPTORES DE

ACCIONAMIENTO Y BOTONES

Luci di emergenza

Si attivano premendo l’interruttore A.
Entrano contemporaneamente in
funzione, a luce intermittente, tutti gli
indicatori di direzione; il funziona-
mento è indipendente dalla posizio-
ne della chiave di avviamento.

L’inserimento  è segnalato dalla vi-
sualizzazione dell’ideogramma  B
nella multispia e dall’illuminazione
ad intermittenza della spia C e del-
l’interruttore A.

Per disinserirle, premere di nuovo
l’interruttore.

Hazard lights

These are activated by pressing the
switch A. All of the direction indica-
tors start flashing simultaneously;
these lights function with the ignition
key in any position.

Their activation is indicated by an
ideogram  B which appears on the
multi-function display, and by light C
and switch which start to flash

To deactivate them, press the switch
again.

Feux de détresse

On les active en appuyant sur l’in-
terrupteur  A. Tous les clignotants
s’enclenchent simultanément, de
façon intermittente; le fonctionne-
ment ne dépend pas de la position
de la clé de contact.

L’idéogramme  B apparaissant sur
l’afficheur  à fonctions multiples et
l’éclairage intermittent du témoin C
et de l’interrupteur indiquent qu’ils
sont activés.

Pour les désactiver, appuyer de nou-
veau sur l’interrupteur.

Luces de emergencia

Se activan apretando el interruptor
A. Se ponen simultáneamente en
funcionamiento todos los intermiten-
tes, su funcionamiento es indepen-
diente de la posición de la llave de
contacto.

Su activación se señala con la vi-
sualización del grafismo B en la pan-
talla multifunción, el encendido del
testigo de intermitentes C y del inte-
rruptor A.

Para desactivarlas, apriete de nue-
vo el interruptor.

A

B

C

-------------------------------------------------------------------------------------------------------------------------------------------------------------

2

.

37

USO DELLA VETTURA

CONTROLS - RUNNING INSTRUCTIONS

UTILISATION DE LA VOITURE

UTILISACIÓN DEL AUTOMÓVIL

50

˚C

110

170

bar

0

5

10

˚C

60

100

140

Q

Luces de Aparcamiento

Se activan apretando el interruptor
D. Se encienden las luces de posi-
ción; su funcionamiento es indepen-
diente de la posición de la llave de
contacto.

La activación se señala con el en-
cendido del testigo E.

Para desactivarlas, apriete de nue-
vo el interruptor.

Luci di parcheggio

Si attivano premendo l’interruttore D.
Vengono accese le luci di posizio-
ne; il funzionamento è indipendente
dalla posizione della chiave di av-
viamento.

L’inserimento è segnalato dall’illumi-
nazione della spia E.

Per disinserirle, premere di nuovo
l’interruttore.

Feux de stationnement

On les active en appuyant sur l’in-
terrupteur  D. Les feux de position
s’allument; le fonctionnement ne
dépend pas de la position de la clé
de contact.

L’éclairage du témoin indique leur
activation E.

Pour les désactiver, appuyer de nou-
veau sur l’interrupteur.

D

Comando avvisatore acustico

Premendo sui lati delle razze supe-
riori del volante Q, in corrisponden-
za del simbolo delle trombe si azio-
na l’avvisatore acustico.

Horn control

The horn is activated by pressing on
the sides of the upper steering wheel
spokes Q (marked by the horn sym-
bol).

Parking lights

These are activated by pressing the
switch D, thus switching on the po-
sition lights. These function regard-
less of the position of the key in the
ignition block.

Their activation is indicated by light
E.

To deactivate them, press the switch
again.

Commande de l’avertisseur
sonore

En appuyant sur les branches su-
périeures du volant Q, où se trouve
le symbole des trompettes, on ac-
tionne l’avertisseur sonore.

Mando bocina

Apretando los lados de los brazos
superiores del volante Q, respon-
diendo al símbolo de las trompetas
se activa la bocina.

E

-------------------------------------------------------------------------------------------------------------------------------------------------------------

2

.

38

USO DELLA VETTURA

CONTROLS - RUNNING INSTRUCTIONS

UTILISATION DE LA VOITURE

UTILISACIÓN DEL AUTOMÓVIL

Comando esclusione ASR

Premendo il pulsante F è possibile
disattivare il sistema ASR (sempre
inserito all’avviamento); nella multi-
spia compare l’ideogramma “ASR”
G
.

Con il sistema ASR attivo, l’interven-
to dell’antipattinamento è segnalato
dall’ideogramma “ASR ACTIVE” H
nella multispia, visualizzato per un
tempo minimo di 4 secondi.

In condizioni di media o
bassa aderenza (bagna-
to, ghiaccio, sabbia
ecc.), mantenere l’ASR

inserito e non selezionare la fun-
zione SPORT.

Si consiglia comunque, in con-
dizioni di marcia normali, di
mantenere l’ASR inserito.

ASR cut-out control

By pressing button F the ASR sys-
tem (which is always engaged upon
ignition) can be disabled; the ideo-
gram  “ASR”  G will appear on the
multi-function display.

With the ASR system active, the in-
tervention of the anti-skid function is
indicated by the ideogram “ASR
ACTIVE” H 
on the multi-function dis-
play, shown for a minimum of 4 sec-
onds.

In low and medium grip
conditions (when the
road is wet, icy, sandy
etc.), keep the ASR ac-

tivated and do not select the
SPORT function.

However, you are advised to
keep the ASR activated even in
normal conditions.

Commande dexclusion ASR

En appuyant sur le bouton F, on peut
désactiver le système ASR (toujours
activé au démarrage); sur l’afficheur
à fonctions multiples apparaît le si-
gle “ASR” G.

Quand le système ASR est activé,
l’opération anti-patinage est indiqué
par l’idéogramme “ASR ACTIVE” H
sur l’afficheur à fonctions multiples,
et ce pendant au moins 4 secondes.

Dans des conditions
d’adhérence moyenne
ou basse (humidité, gla-
ce, sable, etc…), main-

tenir l’ASR activé et ne pas sélec-
tionner le mode SPORT.

Il est toutefois conseillé de
maintenir l’ASR enclenché,
dans les conditions de marche
normale.

Mando desactivación del ASR

Apretando el botón F se desactiva
el sistema ASR (siempre activo du-
rante el encendido); en la pantalla
multifunción aparece el grafismo
“ASR” G.

Con el sistema ASR activo, la inter-
vención del antideslizamiento se
señala con el grafismo “ASR ACTI-
VE” H 
en la pantalla multifunción,
se visualiza durante al menos 4 se-
gundos.

En situaciones de adhe-
rencia media o baja
(piso mojado, hielo, are-
na etc.), mantenga el

ASR activo y no seleccione la fun-
ción SPORT.

Se recomienda que, en condi-
ciones normales de marcha,
mantenga el ASR activo.

F

G

H

ATTENZIONE

ATTENZIONE

WARNING!

WARNING!

ATTENTION

ATTENTION

ATENCI

ATENCIÓN

-------------------------------------------------------------------------------------------------------------------------------------------------------------

2

.

39

USO DELLA VETTURA

CONTROLS - RUNNING INSTRUCTIONS

UTILISATION DE LA VOITURE

UTILISACIÓN DEL AUTOMÓVIL

La visualizzazione del-
l’ideogramma  “ASR”
con ASR inserito, se-
gnala un’anomalia del

sistema. Rivolgersi alla Rete As-
sistenza Ferrari.

If the “ASR” ideogram
appears on the display
when the ASR is activat-
ed, this indicates a sys-

tem fault. Contact the Ferrari
Service Network.

Quand l’ASR est activé,
l’affichage de l’idéo-
gramme “ASR” signale
un défaut du système.

S’adresser au Réseau D’assistan-
ce Ferrari.

La visualización del
grafismo “ASR” con el
asr activo, señala una
anomalía del sistema.

Diríjase a la Red de Asistencia
Ferrari.

ATTENZIONE

ATTENZIONE

WARNING!

WARNING!

ATTENTION

ATTENTION

ATENCI

ATENCIÓN

Lunotto termico e
sbrinamento retrovisori esterni

Si inseriscono agendo sul pulsante
M. L’attivazione è segnalata dall’il-
luminazione delle spie N e O.

Trascorsi 30 minuti dall’inserimen-
to, questo comando si disinserisce
automaticamente. È comunque con-
sigliabile disinserirlo a disappanna-
mento o sbrinamento avvenuto.

Rear window heater and
rear view mirror defrosting

These are activated with the button
M. The lights N and O indicate that
they are in use.

When these units have been acti-
vated for thirty minutes, they will turn
off automatically. However, you are
advised to disable them as soon as
defogging or defrosting is complete.

Lunette dégivrante et dégivrage
des rétroviseurs extérieurs

On les active en appuyant sur le
bouton M.L’éclairage des témoins N
et indique leur activation.

Leur fonctionnement s’arrête auto-
matiquement au bout de 30 minu-
tes. Il est toutefois conseillé de les
désactiver lorsque le désembuage
et le dégivrage sont terminés.

Luneta térmica y
desempañamiento de los espe-
jos retrovisores exteriores

Se accionan pulsando el botón de
mando M. El accionamiento se indi-
ca mediante la iluminación de los
testigos N y O.

Transcurridos 30 minutos desde el
accionamiento, se desconectan au-
tomáticamente. Aún así, es aconse-
jable desconectarlos una vez finali-
zado el desempañamiento.

M

O

N

-------------------------------------------------------------------------------------------------------------------------------------------------------------

2

.

40

USO DELLA VETTURA

CONTROLS - RUNNING INSTRUCTIONS

UTILISATION DE LA VOITURE

UTILISACIÓN DEL AUTOMÓVIL

K

P

Modalità “SPORT”

Il pilota può variare l’impostazione
in base al tipo di guida desiderato.

• Agendo sull’interruttore K è pos-

sibile attivare o disattivare la mo-
dalità  “SPORT”. L’attivazione  è
segnalata dall’illuminazione della
spia P.

La modalità  “SPORT” privilegia la
guida sportiva in condizioni di alta
aderenza mentre la modalità “nor-
male” 
privilegia anche il comfort di
guida, assicurando stabilità in con-
dizioni di bassa e media aderenza.

Il tipo di assetto della
vettura impone comun-
que al pilota di attener-
si alle regole per una

guida sicura.

“SPORT” Mode

The driver can vary the setting ac-
cording to the type of driving desired.

• By pressing switch K the

SPORT” mode can be either en-
abled or disabled. When on, the
light P indicates that it is in use.

The “SPORT” mode allows the driv-
er to use a racing-type driving style
in high grip conditions, whereas the
normal” mode also permits relaxed
driving and assures stability in me-
dium and high grip conditions.

Using the sport setting
does not mean that
driver can ignore the
normal rules concern-

ing safe driving.

Mode “SPORT”

Le conducteur peut modifier le ré-
glage en fonction de la conduite dé-
sirée.

• En agissant sur l’interrupteur K, il

est possible d’activer ou désacti-
ver le mode “SPORT”. Son acti-
vation est effective quand le té-
moin s’éclaire P.

La fonction “SPORT” privilégie la
conduite sportive en conditions de
haute adhérence alors que la mo-
dalité  “normale”  privilégie  égale-
ment une conduite plus confortable,
en garantissant la stabilité dans les
conditions de basse ou moyenne
adhérence.

Ce type d’assiette de la
voiture contraint toute-
fois le conducteur à res-
pecter les règles de

conduite de sécurité.

Modo “SPORT”

El conductor puede variar el com-
portamiento según el tipo de con-
ducción que desee realizar.

• Actuando sobre el interruptor se

puede activar o desactivar la
modo “SPORT”. Su activación se
señala al encenderse el testigo P.

El modo “SPORT” favorece la con-
ducción deportiva en situaciones de
alta adherencia, mientras que la mo-
dalidad “normal” también favorece
el confort de conducción, aseguran-
do la estabilidad en condiciones de
adherencia media y baja.

De todos modos, se re-
comienda al conductor
atenerse a las normas
para realizar una con-

ducción segura.

ATTENZIONE

ATTENZIONE

WARNING!

WARNING!

ATTENTION

ATTENTION

ATENCI

ATENCIÓN

-------------------------------------------------------------------------------------------------------------------------------------------------------------

2

.

41

USO DELLA VETTURA

CONTROLS - RUNNING INSTRUCTIONS

UTILISATION DE LA VOITURE

UTILISACIÓN DEL AUTOMÓVIL

J

Pulsante calibrazione
pressione pneumatici

Per calibrare il sistema, con chiave
di accensione in posizione “II”, pre-
mere il tasto J vicino alla maniglia di
apertura cofano motore, per un tem-
po compreso tra 4 e 10 secondi:
sulla multispia comparirà l’ideogram-
ma Y.

Il sistema impiega un tempo massi-
mo di 20 minuti, con vettura in mo-
vimento, per la calibrazione.

Se la differenza di pressione tra ruo-
te di uno stesso asse supera 0,4 bar,
il sistema non si calibra.

Se durante la calibrazione il siste-
ma avverte una perdita di pressio-
ne, sulla multispia comparirà l’ideo-
gramma relativo (vedi pag. 4.38).

Tyre pressure setting button

To set the system, with the ignition
key in position “II”, press the key J
located close to the engine compart-
ment lid opening handle for between
4 and 10 seconds: the ideogram Y
will appear on the multi-function dis-
play.

The system takes up to 20 minutes,
with the vehicle in motion, to com-
plete the setting procedure.

If the difference in pressure between
the wheels on any one axle exceeds
0.4 bar, the system setting proce-
dure will not be carried out.

If, during the setting procedure, the
system detects a loss of pressure,
the relevant ideogram appears on
the multi-function display (see on
page 4.38).

Bouton de calibrage
la pression des pneus

Pour calibrer le système, avec la clé
de contact sur la position “II”, ap-
puyer sur la touche J, située à proxi-
mité de la poignée d’ouverture du
capot moteur, pour 4 à 10 secondes :
l’afficheur à fonctions multiples visua-
lisera l’idéogramme Y.

Avec la voiture en mouvement, pour
le calibrage, le système emploie 20
minutes au maximum.

Si la différence de pression entre les
roues du même axe dépasse 0,4 bar,
le système n’effectue pas le calibra-
ge.

Pendant le calibrage, si le système
détecte une chute de pression, l’affi-
cheur à fonctions multiples visualise
l’idéogramme correspondant (voir la
page 4.38).

Botón de regulación de la pre-
sión de los neumáticos

Para regular el sistema, con la llave
de contacto en la posición “II”, pul-
se la tecla J junto a la manilla de
apertura de capó del motor, duran-
te un tiempo comprendido entre 4 y
10 segundos: en la pantalla de tes-
tigos aparecerá el grafismo Y.

El sistema emplea un tiempo máxi-
mo de 20 minutos, con el automóvil
en movimiento, para la regulación.

Si la diferencia de presión entre las
ruedas de un mismo eje es superior
a 0,4 bar, el sistema no se regula.

Si durante la regulación el sistema
advierte una pérdida de presión, en
la pantalla de testigos aparecerá el
grafismo correspondiente (véase
pág. 4.38).

Y

-------------------------------------------------------------------------------------------------------------------------------------------------------------


Content      ..     2      3      4      5     ..