Buick Enclave (2009 year). Manual - part 17


  Index      Buick     Buick Enclave (2009 year) - manual in english


Search            copyright infringement  


Content      ..     15      16      17      18     ..


Buick Enclave (2009 year). Manual - part 17


After loading the trailer, weigh the
trailer and then the tongue,
separately, to see if the weights are
proper. If they aren’t, adjustments
might be made by moving some
items around in the trailer.

Trailering may also be limited by the
vehicle’s ability to carry tongue
weight. Tongue weight cannot cause
the vehicle to exceed the GVWR
(Gross Vehicle Weight Rating) or the
RGAWR (Rear Gross Axle Weight
Rating). The effect of additional
weight may reduce the trailering
capacity more than the total of the
additional weight.

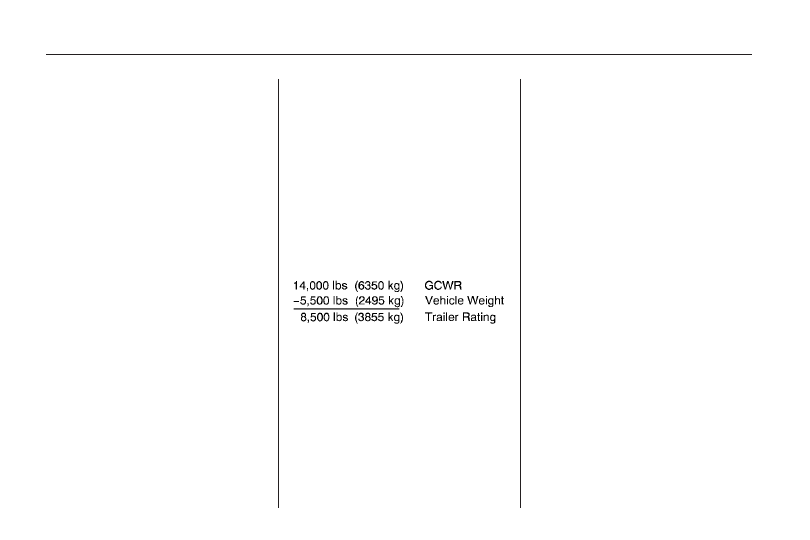
Consider the following example:

A vehicle model base weight is
5,500 lbs (2 495 kg); 2,800 lbs
(1 270 kg) at the front axle and
2,700 lbs (1 225 kg) at the rear axle.
It has a GVWR of 7,200 lbs
(3 266 kg), a RGAWR of 4,000 lbs
(1 814 kg) and a GCWR (Gross
Combination Weight Rating) of
14,000 lbs (6 350 kg). The trailer
rating should be:

Expect tongue weight to be at least
10 percent of trailer weight
(850 lbs (386 kg)) and because the
weight is applied well behind the
rear axle, the effect on the rear axle
is greater than just the weight
itself, as much as 1.5 times as
much. The weight at the rear axle
could be 850 lbs (386 kg) X
1.5 = 1,275 lbs (578 kg). Since the
rear axle already weighs 2,700 lbs
(1 225 kg), adding 1,275 lbs (578 kg)
brings the total to 3,975 lbs
(1 803 kg). This is very close to, but
within the limit for RGAWR as
well. The vehicle is set to trailer up
to 8,500 lbs (3 856 kg).

4-28

Driving Your Vehicle

-------------------------------------------------------------------------------------------------------------------------------------------------------------

If the vehicle has many options and
there is a front seat passenger and
two rear seat passengers with some
luggage and gear in the vehicle as
well. 300 lbs (136 kg) could be
added to the front axle weight and
400 lbs (181 kg) to the rear axle
weight. The vehicle now weighs:

Weight is still below 7,200 lbs
(3 266 kg) and you might think
700 additional pounds (318 kg)
should be subtracted from the
trailering capacity to stay within
GCWR limits. The maximum trailer
would only be 7,800 lbs (3 538 kg).
You may go further and think the
tongue weight should be limited to
less than 1,000 lbs (454 kg) to avoid
exceeding GVWR. But the effect on
the rear axle must still be considered.
Because the rear axle now weighs

3,100 lbs (1 406 kg), 900 lbs
(408 kg) can be put on the rear axle
without exceeding RGAWR. The
effect of tongue weight is about
1.5 times the actual weight. Dividing
the 900 lbs (408 kg) by 1.5 leaves
only 600 lbs (272 kg) of tongue
weight that can be handled. Since
tongue weight is usually at least
10 percent of total loaded trailer
weight, expect that the largest trailer
the vehicle can properly handle is
6,000 lbs (2 721 kg).

It is important that the vehicle
does not exceed any of its
ratings — GCWR, GVWR, RGAWR,
Maximum Trailer Rating or Tongue
Weight. The only way to be sure it is
not exceeding any of these ratings is
to weigh the vehicle and trailer.

Total Weight on the Vehicle’s
Tires

Be sure the vehicle’s tires are
inflated to the upper limit for cold
tires. These numbers can be found
on the Certification/Tire label.
See Loading the Vehicle on

page 4-16. Make sure not to go
over the GVW limit for the vehicle,
including the weight of the trailer
tongue.

Hitches

It is important to have the correct
hitch equipment. Crosswinds,
large trucks going by and rough
roads are a few reasons why
the right hitch is needed. Here are
some rules to follow:

The rear bumper on the vehicle is
not intended for hitches. Do not
attach rental hitches or other
bumper-type hitches to it. Use
only a frame-mounted hitch that
does not attach to the bumper.

Will any holes be made in the
body of the vehicle when the
trailer hitch is installed? If there
are, then be sure to seal the holes
later when the hitch is removed.
If the holes are not sealed, dirt,
water, and deadly carbon
monoxide (CO) from the exhaust
can get into the vehicle. See
Engine Exhaust on page 2-30.

Driving Your Vehicle

4-29

-------------------------------------------------------------------------------------------------------------------------------------------------------------

Safety Chains

Always attach chains between the
vehicle and the trailer. Cross
the safety chains under the tongue
of the trailer to help prevent the
tongue from contacting the road if it
becomes separated from the
hitch. Instructions about safety
chains may be provided by the hitch
manufacturer or by the trailer
manufacturer. Follow the
manufacturer’s recommendation for
attaching safety chains and do
not attach them to the bumper.
Always leave just enough slack so
the rig can turn. Never allow
safety chains to drag on the ground.

Trailer Brakes

A loaded trailer that weighs more
than 1,000 lbs (450 kg) needs
to have its own brake system that is
adequate for the weight of the
trailer. Be sure to read and follow
the instructions for the trailer brakes
so they are installed, adjusted
and maintained properly.

Because the vehicle has antilock
brakes, do not try to tap into
the vehicle’s hydraulic brake system.
If you do, both brake systems will
not work well, or at all.

Driving with a Trailer

Towing a trailer requires a certain
amount of experience. Get to
know the rig before setting out for
the open road. Get acquainted
with the feel of handling and braking
with the added weight of the
trailer. And always keep in mind that
the vehicle you are driving is now
longer and not as responsive as the
vehicle is by itself.

Before starting, check all trailer hitch
parts and attachments, safety
chains, electrical connectors, lamps,
tires and mirror adjustments. If the
trailer has electric brakes, start the
vehicle and trailer moving and then
apply the trailer brake controller by
hand to be sure the brakes are
working. This checks the electrical
connection at the same time.

During the trip, check occasionally
to be sure that the load is secure,
and that the lamps and any
trailer brakes are still working.

Following Distance

Stay at least twice as far behind the
vehicle ahead as you would when
driving the vehicle without a trailer.
This can help to avoid situations that
require heavy braking and sudden
turns.

Passing

More passing distance is needed
when towing a trailer. Because the
rig is longer, it is necessary to go
much farther beyond the passed
vehicle before returning to the lane.

Backing Up

Hold the bottom of the steering wheel
with one hand. Then, to move the
trailer to the left, move that hand to
the left. To move the trailer to the
right, move your hand to the right.
Always back up slowly and, if
possible, have someone guide you.

4-30

Driving Your Vehicle

-------------------------------------------------------------------------------------------------------------------------------------------------------------

Making Turns

Notice: Making very sharp turns
while trailering could cause
the trailer to come in contact with
the vehicle. The vehicle could
be damaged. Avoid making very
sharp turns while trailering.

When turning with a trailer, make
wider turns than normal. Do this so
the trailer won’t strike soft shoulders,
curbs, road signs, trees or other
objects. Avoid jerky or sudden
maneuvers. Signal well in advance.

Turn Signals When Towing a
Trailer

The arrows on the instrument panel
flash whenever signaling a turn
or lane change. Properly hooked up,
the trailer lamps also flash, telling
other drivers the vehicle is turning,
changing lanes or stopping.

When towing a trailer, the arrows on
the instrument panel flash for
turns even if the bulbs on the trailer
are burned out. For this reason
you may think other drivers
are seeing the signal when they are
not. It is important to check
occasionally to be sure the trailer
bulbs are still working.

Driving on Grades

Because of the added load of the
trailer, the vehicle’s engine may
overheat on hot days, when going up
a long or steep grade with a trailer. If
the engine coolant temperature gage
indicates overheating, turn off the air
conditioning to reduce engine load,
pull off the road and stop in a safe
spot. Let the engine run while
parked, preferably on level ground,
with the transmission in P (Park) for
a few minutes before turning the
engine off.

Reduce speed and shift to a lower
gear before starting down a long
or steep downgrade. If the
transmission is not shifted down, the
brakes might have to be used so
much that they would get hot and no
longer work well.

On a long uphill grade, shift down
and reduce the vehicle speed
to around 55 mph (88 km/h) to
reduce the possibility of the engine
and the transmission overheating.

Driving Your Vehicle

4-31

-------------------------------------------------------------------------------------------------------------------------------------------------------------

Tow/Haul Mode

Tow/Haul is a feature that assists
when pulling a heavy trailer or
a large or heavy load. The purpose
of the Tow/Haul mode is to:

Reduce the frequency and
improve the predictability of
transmission shifts when pulling
a heavy trailer or a large or
heavy load.

Provide the same solid shift feel
when pulling a heavy trailer or a
large or heavy load as when
the vehicle is unloaded.

Improve control of vehicle speed
while requiring less throttle pedal
activity when pulling a heavy
trailer or a large or heavy load.

Increase the charging system
voltage to assist in recharging
a battery installed in a trailer.

Press this button located on the
console to turn on and turn off the
Tow/Haul mode.

The Tow/Haul light on the
instrument panel will come on to
indicate that Tow/Haul mode
has been selected.

Tow/Haul may be turned off by
pressing the button again, at which
time the indicator light on the
instrument panel will turn off. The
vehicle will automatically turn
off Tow/Haul every time it is started.

Tow/Haul is designed to be most
effective when the vehicle and
trailer combined weight is at least
75 percent of the vehicle’s Gross
Combined Weight Rating (GCWR).
See Weight of the Trailer later in this

section. Tow/Haul is most useful
under the following driving
conditions:

When pulling a heavy trailer or a
large or heavy load through rolling
terrain.

When pulling a heavy trailer or a
large or heavy load in stop and go
traffic.

When pulling a heavy trailer or
a large or heavy load in busy
parking lots where improved low
speed control of the vehicle is
desired.

Operating the vehicle in Tow/Haul
when lightly loaded or with no trailer
at all will not cause damage.
However, there is no benefit to the
selection of Tow/Haul when the
vehicle is unloaded. Such a selection
when unloaded may result in
unpleasant engine and transmission
driving characteristics and reduced
fuel economy. Tow/Haul is
recommended only when pulling a
heavy trailer or a large or heavy load.

4-32

Driving Your Vehicle

-------------------------------------------------------------------------------------------------------------------------------------------------------------

Parking on Hills

{

CAUTION

Parking the vehicle on a hill with
the trailer attached can be
dangerous. If something goes
wrong, the rig could start to move.
People can be injured, and both
the vehicle and the trailer can be
damaged. When possible, always
park the rig on a flat surface.

If parking the rig on a hill:

1. Press the brake pedal, but do

not shift into P (Park) yet.
Turn the wheels into the curb if
facing downhill or into traffic
if facing uphill.

2. Have someone place chocks

under the trailer wheels.

3. When the wheel chocks are in

place, release the brake pedal
until the chocks absorb the load.

4. Reapply the brake pedal. Then

apply the parking brake and shift
the transmission into P (Park).

5. Release the brake pedal.

Leaving After Parking on a Hill

1. Apply and hold the brake

pedal while you:

start the engine,

shift into a gear, and

release the parking brake.

2. Let up on the brake pedal.

3. Drive slowly until the trailer is

clear of the chocks.

4. Stop and have someone pick up

and store the chocks.

Maintenance When Trailer
Towing

The vehicle needs service more
often when pulling a trailer.
See Scheduled Maintenance on
page 6-3 
for more information.
Things that are especially important
in trailer operation are automatic
transmission fluid, engine oil,
axle lubricant, belts, cooling system
and brake system. It is a good
idea to inspect these before and
during the trip.

Check periodically to see that all
hitch nuts and bolts are tight.

Driving Your Vehicle

4-33

-------------------------------------------------------------------------------------------------------------------------------------------------------------

Trailer Wiring Harness

The vehicle is equipped with the
following wiring harness for towing
a trailer.

Basic Trailer Wiring

The trailer wiring harness, with a
seven-pin connector, is located at
the rear of the vehicle and is tied to
the vehicle’s frame. The harness
connector can be plugged into a
seven-pin universal heavy-duty
trailer connector available through
your dealer/retailer.

The seven-wire harness contains
the following trailer circuits:

Yellow: Left Stop/Turn Signal

Dark Green: Right Stop/Turn
Signal

Brown: Taillamps

Black: Ground

Light Green: Back-up Lamps

Red/Black: Battery Feed

Dark Blue: Trailer Brake*

*The fuse for this circuit is installed
in the underhood electrical center,
but the wires are not connected.
They should be connected by your
dealer/retailer or a qualified
service center.

If the back-up lamp circuit is
not functional, contact your
dealer/retailer.

If a remote (non-vehicle) battery is
being charged, press the Tow/Haul
mode switch located on the center
console near the climate controls.
This will boost the vehicle system
voltage and properly charge the
battery. If the trailer is too light for
Tow/Haul mode, turn on the
headlamps (Non-HID only) as a
second way to boost the vehicle
system and charge the battery.

Engine Cooling When Trailer
Towing

The cooling system may temporarily
overheat during severe operating
conditions. See Engine Overheating
on page 5-20.

4-34

Driving Your Vehicle

-------------------------------------------------------------------------------------------------------------------------------------------------------------

Service and
Appearance Care

Service

Service

...............................5-3

Accessories and

Modifications

.....................5-3

California Proposition 65

Warning

............................5-3

California Perchlorate

Materials Requirements

.....5-4

Doing Your Own

Service Work

....................5-4

Adding Equipment to the

Outside of the Vehicle

......5-4

Fuel

Fuel

....................................5-5

Gasoline Octane

.................5-5

Gasoline Specifications

.......5-5

California Fuel

....................5-5

Additives

.............................5-5

Fuels in Foreign

Countries

..........................5-6

Filling the Tank

...................5-7

Filling a Portable Fuel

Container

..........................5-8

Checking Things Under
the Hood

Checking Things Under

the Hood

..........................5-9

Hood Release

.....................5-9

Engine Compartment

Overview

.........................5-10

Engine Oil

.........................5-11

Engine Oil Life System

.....5-13

Engine Air Cleaner/Filter

....5-14

Automatic Transmission

Fluid

................................5-15

Cooling System

.................5-16

Engine Coolant

.................5-17

Engine Overheating

...........5-20

Overheated Engine

Protection
Operating Mode

..............5-22

Power Steering Fluid

.........5-22

Windshield Washer

Fluid

................................5-23

Brakes

..............................5-24

Battery

..............................5-27

Jump Starting

...................5-28

All-Wheel Drive

All-Wheel Drive

.................5-32

Headlamp Aiming

Headlamp Aiming

..............5-33

Bulb Replacement

Bulb Replacement

.............5-33

High Intensity Discharge

(HID) Lighting

..................5-33

Halogen Bulbs

..................5-34

Taillamps, Turn Signal,

Stoplamps and
Sidemarker Lamps

..........5-34

License Plate Lamp

..........5-35

Replacement Bulbs

...........5-35

Windshield Replacement

Windshield

Replacement

...................5-35

Windshield Wiper Blade
Replacement

Windshield Wiper Blade

Replacement

...................5-36

Tires

Tires

.................................5-36

Tire Sidewall Labeling

.......5-37

Service and Appearance Care

5-1

-------------------------------------------------------------------------------------------------------------------------------------------------------------

Tire Terminology and

Definitions

.......................5-40

Inflation - Tire Pressure

....5-42

Tire Pressure Monitor

System

............................5-44

Tire Pressure Monitor

Operation

........................5-45

Tire Inspection and

Rotation

..........................5-48

When It Is Time for New

Tires

...............................5-50

Buying New Tires

.............5-50

Different Size Tires and

Wheels

............................5-52

Uniform Tire Quality

Grading

...........................5-52

Wheel Alignment and Tire

Balance

...........................5-54

Wheel Replacement

..........5-55

Tire Chains

.......................5-56

If a Tire Goes Flat

............5-56

Tire Sealant and

Compressor Kit

...............5-57

Tire Sealant and

Compressor Kit
Storage

...........................5-70

Changing a Flat Tire

.........5-71

Removing the Spare Tire

and Tools

........................5-72

Removing the Flat Tire

and Installing the
Spare Tire

.......................5-74

Secondary Latch

System

............................5-78

Storing a Flat or Spare

Tire and Tools

.................5-80

Compact Spare Tire

..........5-83

Appearance Care

Interior Cleaning

................5-83

Fabric/Carpet

....................5-85

Leather

.............................5-85

Instrument Panel, Vinyl,

and Other Plastic
Surfaces

..........................5-86

Care of Safety Belts

.........5-86

Weatherstrips

....................5-86

Washing Your Vehicle

.......5-86

Cleaning Exterior Lamps/

Lenses

............................5-87

Finish Care

.......................5-87

Windshield, Backglass,

and Wiper Blades

............5-88

Aluminum or

Chrome-Plated Wheels
and Trim

.........................5-88

Tires

.................................5-89

Sheet Metal Damage

........5-89

Finish Damage

..................5-90

Underbody Maintenance

....5-90

Chemical Paint Spotting

....5-90

Vehicle Identification

Vehicle Identification

Number (VIN)

..................5-90

Service Parts

Identification Label

...........5-91

Electrical System

High Voltage Devices and

Wiring

.............................5-91

Add-On Electrical

Equipment

.......................5-91

Windshield Wiper Fuses

....5-92

Power Windows and

Other Power Options

.......5-92

Fuses and Circuit

Breakers

.........................5-92

Instrument Panel Fuse

Block

...............................5-92

Underhood Fuse Block

......5-94

Capacities and
Specifications

Capacities and

Specifications

..................5-98

5-2

Service and Appearance Care

-------------------------------------------------------------------------------------------------------------------------------------------------------------

Service

For service and parts needs, visit
your dealer/retailer. You will receive
genuine GM parts and GM-trained
and supported service people.

Genuine GM parts have one
of these marks:

Accessories and
Modifications

When non-dealer/non-retailer
accessories are added to the
vehicle, they can affect vehicle
performance and safety, including
such things as airbags, braking,
stability, ride and handling,
emissions systems, aerodynamics,
durability, and electronic systems
like antilock brakes, traction control,
and stability control. Some of
these accessories could even cause
malfunction or damage not
covered by the vehicle warranty.

GM Accessories are designed to
complement and function with other
systems on the vehicle. Your GM
dealer/retailer can accessorize
the vehicle using genuine GM
Accessories. When you go to your
GM dealer/retailer and ask for GM
Accessories, you will know that
GM-trained and supported service
technicians will perform the work
using genuine GM Accessories.

Also, see Adding Equipment to Your
Airbag-Equipped Vehicle 
on
page 1-57
.

California Proposition 65
Warning

Most motor vehicles, including this
one, contain and/or emit chemicals
known to the State of California
to cause cancer and birth defects or
other reproductive harm. Engine
exhaust, many parts and systems
(including some inside the vehicle),
many fluids, and some component
wear by-products contain and/or
emit these chemicals.

Service and Appearance Care

5-3

-------------------------------------------------------------------------------------------------------------------------------------------------------------

California Perchlorate
Materials Requirements

Certain types of automotive
applications, such as airbag
initiators, seat belt pretensioners,
and lithium batteries contained
in remote keyless transmitters, may
contain perchlorate materials.
Special handling may be necessary.
For additional information, see
www.dtsc.ca.gov/hazardouswaste/
perchlorate.

Doing Your Own
Service Work

{

CAUTION

You can be injured and the
vehicle could be damaged if you
try to do service work on a vehicle
without knowing enough about it.

Be sure you have sufficient
knowledge, experience, the
proper replacement parts, and
tools before attempting any
vehicle maintenance task.

Be sure to use the proper
nuts, bolts, and other
fasteners. English and metric
fasteners can be easily
confused. If the wrong
fasteners are used, parts can
later break or fall off. You
could be hurt.

If doing some of your own service
work, use the proper service
manual. It tells you much more
about how to service the vehicle

than this manual can. To order the
proper service manual, see
Service Publications Ordering
Information 
on page 7-13.

This vehicle has an airbag system.
Before attempting to do your
own service work, see Servicing
Your Airbag-Equipped Vehicle
on page 1-56.

Keep a record with all parts receipts
and list the mileage and the date
of any service work performed. See
Maintenance Record on page 6-16.

Adding Equipment to
the Outside of the
Vehicle

Things added to the outside of the
vehicle can affect the airflow
around it. This can cause wind
noise and can affect fuel economy
and windshield washer performance.
Check with your dealer/retailer
before adding equipment to
the outside of the vehicle.

5-4

Service and Appearance Care

-------------------------------------------------------------------------------------------------------------------------------------------------------------

Fuel

Use of the recommended fuel is
an important part of the proper
maintenance of this vehicle. To help
keep the engine clean and maintain
optimum vehicle performance, we
recommend the use of gasoline
advertised as TOP TIER Detergent
Gasoline.

Gasoline Octane

Use regular unleaded gasoline with
a posted octane rating of 87 or
higher. If the octane rating is less
than 87, you might notice an audible
knocking noise when you drive,
commonly referred to as spark
knock. If this occurs, use a gasoline
rated at 87 octane or higher as
soon as possible. If you are using
gasoline rated at 87 octane or higher
and you hear heavy knocking, the
engine needs service.

Gasoline Specifications

At a minimum, gasoline should
meet ASTM specification D 4814
in the United States or CAN/
CGSB-3.5 or 3.511 in Canada.
Some gasolines contain an
octane-enhancing additive called
methylcyclopentadienyl manganese
tricarbonyl (MMT). We recommend
against the use of gasolines
containing MMT. See Additives on
page 5-5 
for additional information.

California Fuel

If the vehicle is certified to meet
California Emissions Standards, it is
designed to operate on fuels that
meet California specifications. See
the underhood emission control
label. If this fuel is not available in
states adopting California emissions
standards, the vehicle will operate
satisfactorily on fuels meeting federal
specifications, but emission control
system performance might be
affected. The malfunction indicator
lamp could turn on and the vehicle

might fail a smog-check test. See
Malfunction Indicator Lamp on
page 3-36
. If this occurs, return to
your authorized dealer/retailer for
diagnosis. If it is determined that the
condition is caused by the type of
fuel used, repairs might not be
covered by the vehicle warranty.

Additives

To provide cleaner air, all gasolines
in the United States are now
required to contain additives that
help prevent engine and fuel system
deposits from forming, allowing
the emission control system to work
properly. In most cases, you
should not have to add anything to
the fuel. However, some gasolines
contain only the minimum amount of
additive required to meet U.S.
Environmental Protection Agency
regulations. To help keep fuel
injectors and intake valves clean, or
if the vehicle experiences problems
due to dirty injectors or valves,
look for gasoline that is advertised
as TOP TIER Detergent Gasoline.

Service and Appearance Care

5-5

-------------------------------------------------------------------------------------------------------------------------------------------------------------

Also, your dealer/retailer has
additives that will help correct and
prevent most deposit-related
problems.

Gasolines containing oxygenates,
such as ethers and ethanol,
and reformulated gasolines might
be available in your area. We
recommend that you use these
gasolines, if they comply with
the specifications described earlier.
However, E85 (85% ethanol)
and other fuels containing more
than 10% ethanol must not be used
in vehicles that were not designed
for those fuels.

Notice: This vehicle was not
designed for fuel that contains
methanol. Do not use fuel
containing methanol. It can
corrode metal parts in the fuel
system and also damage plastic
and rubber parts. That damage
would not be covered under
the vehicle warranty.

Some gasolines that are not
reformulated for low emissions
can contain an octane-enhancing
additive called
methylcyclopentadienyl manganese
tricarbonyl (MMT); ask the
attendant where you buy gasoline
whether the fuel contains MMT. We
recommend against the use of
such gasolines. Fuels containing
MMT can reduce the life of
spark plugs and the performance of
the emission control system
could be affected. The malfunction
indicator lamp might turn on. If
this occurs, return to your
dealer/retailer for service.

Fuels in Foreign
Countries

If you plan on driving in another
country outside the United States or
Canada, the proper fuel might be
hard to find. Never use leaded
gasoline or any other fuel not
recommended in the previous text
on fuel. Costly repairs caused
by use of improper fuel would not
be covered by the vehicle warranty.

To check the fuel availability, ask
an auto club, or contact a major oil
company that does business in
the country where you will be
driving.

5-6

Service and Appearance Care

-------------------------------------------------------------------------------------------------------------------------------------------------------------

Filling the Tank

{

CAUTION

Fuel vapor burns violently and a
fuel fire can cause bad injuries.
To help avoid injuries to you and
others, read and follow all the
instructions on the pump island.
Turn off the engine when you are
refueling. Do not smoke if you are
near fuel or refueling the vehicle.
Do not use cellular phones. Keep
sparks, flames, and smoking
materials away from fuel. Do not
leave the fuel pump unattended
when refueling the vehicle. This is
against the law in some places.
Do not re-enter the vehicle while
pumping fuel. Keep children away
from the fuel pump; never let
children pump fuel.

The tethered fuel cap is located
behind a hinged fuel door on
the driver side of the vehicle.

To open the fuel door, push the
rearward center edge in and release
and it will open.

To remove the fuel cap, turn it
slowly counterclockwise. The fuel
cap has a spring in it; if the cap
is released too soon, it will spring
back to the right.

While refueling, hang the tethered
fuel cap from the hook on the
fuel door.

{

CAUTION

Fuel can spray out on you if you
open the fuel cap too quickly. If
you spill fuel and then something
ignites it, you could be badly
burned. This spray can happen if
the tank is nearly full, and is more
likely in hot weather. Open the
fuel cap slowly and wait for any
hiss noise to stop. Then unscrew
the cap all the way.

Be careful not to spill fuel. Do not top
off or overfill the tank and wait a few
seconds after you have finished
pumping before removing the nozzle.
Clean fuel from painted surfaces as
soon as possible. See Washing Your
Vehicle 
on page 5-86.

Service and Appearance Care

5-7

-------------------------------------------------------------------------------------------------------------------------------------------------------------

When replacing the fuel cap, turn it
clockwise until it clicks. Make
sure the cap is fully installed. The
diagnostic system can determine if
the fuel cap has been left off or
improperly installed. This would
allow fuel to evaporate into
the atmosphere. See Malfunction
Indicator Lamp 
on page 3-36.

If the vehicle has a Driver
Information Center (DIC), the
TIGHTEN GAS CAP message
displays if the fuel cap is not
properly installed.

{

CAUTION

If a fire starts while you are
refueling, do not remove the
nozzle. Shut off the flow of fuel by
shutting off the pump or by
notifying the station attendant.
Leave the area immediately.

Notice: If you need a new fuel
cap, be sure to get the right type.
Your dealer/retailer can get one for
you. If you get the wrong type, it
might not fit properly. This can
cause the malfunction indicator
lamp to light and can damage the
fuel tank and emissions system.
See Malfunction Indicator Lamp
on page 3-36.

Filling a Portable Fuel
Container

{

CAUTION

Never fill a portable fuel container
while it is in the vehicle. Static
electricity discharge from the
container can ignite the fuel
vapor. You can be badly burned

(Continued)

CAUTION

(Continued)

and the vehicle damaged if this
occurs. To help avoid injury to
you and others:

Dispense fuel only into
approved containers.

Do not fill a container while it
is inside a vehicle, in a
vehicle’s trunk, pickup bed, or
on any surface other than the
ground.

Bring the fill nozzle in contact
with the inside of the fill
opening before operating the
nozzle. Contact should be
maintained until the filling is
complete.

Do not smoke while
pumping fuel.

Do not use a cellular phone
while pumping fuel.

5-8

Service and Appearance Care

-------------------------------------------------------------------------------------------------------------------------------------------------------------

Checking Things
Under the Hood

{

CAUTION

An electric fan under the hood can
start up and injure you even when
the engine is not running. Keep
hands, clothing, and tools away
from any underhood electric fan.

{

CAUTION

Things that burn can get on hot
engine parts and start a fire.
These include liquids like fuel, oil,
coolant, brake fluid, windshield
washer and other fluids, and
plastic or rubber. You or others
could be burned. Be careful not to
drop or spill things that will burn
onto a hot engine.

Hood Release

To open the hood:

1. Pull the hood release handle with

this symbol on it. It is located
under the instrument panel on
the driver side of the vehicle.

2. At the front of the vehicle, pull up

on the bottom center of the grille,
and push the secondary hood
release to the left.

3. After the lid has been partially

lifted, a gas strut automatically
lifts and holds the hood in
the fully open position.

Before closing the hood, be sure all
filler caps are on properly.

Pull the hood down to close. Lower
the hood until the lifting pressure of
the strut is reduced. Then allow the
hood to fall and latch into place
under its own weight. Check to make
sure the hood is closed. If the hood
does not fully latch, gently push the
hood down at the front and center
until it is completely latched.

Service and Appearance Care

5-9

-------------------------------------------------------------------------------------------------------------------------------------------------------------


Content      ..     15      16      17      18     ..