Buick Enclave (2009 year). Manual - part 3


  Index      Buick     Buick Enclave (2009 year) - manual in english


Search            copyright infringement  


Content      ..     1      2      3      4      ..


Buick Enclave (2009 year). Manual - part 3


Lower Anchors and
Tethers for Children
(LATCH)

The LATCH system holds a child
restraint during driving or in a crash.
This system is designed to make
installation of a child restraint easier.
The LATCH system uses anchors
in the vehicle and attachments
on the child restraint that are made
for use with the LATCH system.

Make sure that a LATCH-compatible
child restraint is properly installed
using the anchors, or use the
vehicle’s safety belts to secure the
restraint, following the instructions
that came with that restraint,
and also the instructions in this
manual. When installing a
child restraint with a top tether, you
must also use either the lower
anchors or the safety belts to
properly secure the child restraint. A
child restraint must never be
attached using only the top tether
and anchor.

In order to use the LATCH system
in your vehicle, you need a child
restraint that has LATCH
attachments. The child restraint
manufacturer will provide you with
instructions on how to use the
child restraint and its attachments.
The following explains how to attach
a child restraint with these
attachments in your vehicle.

Not all vehicle seating positions or
child restraints have lower anchors
and attachments or top tether
anchors and attachments.
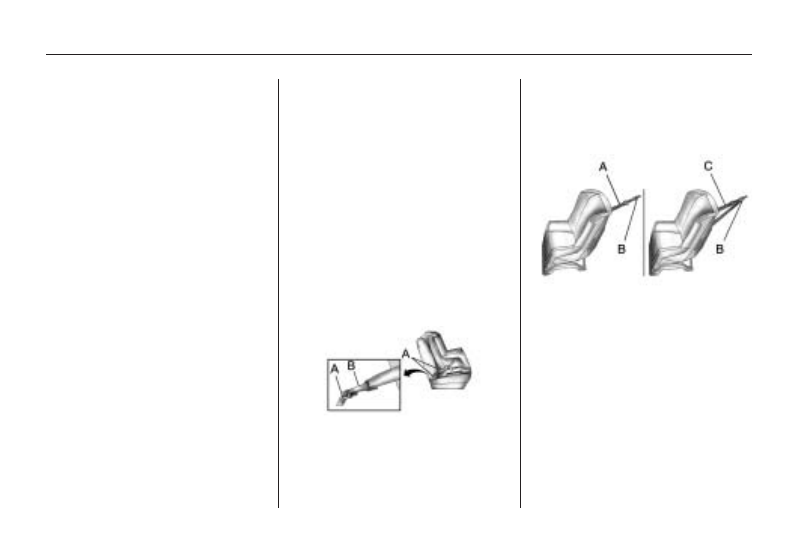
Lower Anchors

Lower anchors (A) are metal bars
built into the vehicle. There are
two lower anchors for each LATCH

seating position that will
accommodate a child restraint with
lower attachments (B).

Top Tether Anchor

A top tether (A, C) anchors the
top of the child restraint to the
vehicle. A top tether anchor is built
into the vehicle. The top tether
attachment (B) on the child restraint
connects to the top tether anchor
in the vehicle in order to reduce the
forward movement and rotation
of the child restraint during driving
or in a crash.

1-34

Seats and Restraint System

-------------------------------------------------------------------------------------------------------------------------------------------------------------

Your child restraint may have a
single tether (A) or a dual tether (C).
Either will have a single
attachment (B) to secure the top
tether to the anchor.

Some child restraints with top
tethers are designed for use with or
without the top tether being
attached. Others require the top
tether always to be attached.
In Canada, the law requires that
forward-facing child restraints have
a top tether, and that the tether
be attached. Be sure to read and
follow the instructions for your
child restraint.

If the child restraint does not have a
top tether, one can be obtained,
in kit form, for many child restraints.
Ask the child restraint manufacturer
whether or not a kit is available.

Lower Anchor and Top Tether
Anchor Locations

i

(Top Tether Anchor): Seating

positions with top tether anchors.

j

(Lower Anchor): Seating positions

with two lower anchors.

i

(Top Tether Anchor): Seating

positions with top tether anchors.

j

(Lower Anchor): Seating positions

with two lower anchors.

Second Row — Bucket

Second Row — 60/40 Bench

Seats and Restraint System

1-35

-------------------------------------------------------------------------------------------------------------------------------------------------------------

i

(Top Tether Anchor): Seating

positions with top tether anchors.

To assist you in locating the lower
anchors, each second row
anchor position has a label, near
the crease between the seatback
and the seat cushion.

To assist you in locating the top
tether anchors, the top tether anchor
symbol is located on the cover or
near the anchor.

The top tether anchors are located
at the bottom rear of the seatback
for each seating position in the
second row. Open the cover
to access the anchors. Be sure to
use an anchor located on the
same side of the vehicle as the
seating position where the
child restraint will be placed.

Third Row

Second Row — Bucket Shown,

Bench Similar

1-36

Seats and Restraint System

-------------------------------------------------------------------------------------------------------------------------------------------------------------

The third row has one top tether
anchor located at the bottom rear of
the center seatback. This anchor
should be used for the center
seating position only. Never install
two top tethers using the same
top tether anchor.

Do not secure a child restraint in a
position without a top tether
anchor if a national or local law
requires that the top tether be
attached, or if the instructions that
come with the child restraint say that
the top tether must be attached.

Accident statistics show that
children are safer if they are
restrained in the rear rather than the
front seat. See Where to Put the
Restraint 
on page 1-32 for additional
information.

Securing a Child Restraint
Designed for the LATCH System

{

CAUTION

If a LATCH-type child restraint is
not attached to anchors, the child
restraint will not be able to protect
the child correctly. In a crash, the
child could be seriously injured or
killed. Install a LATCH-type child
restraint properly using the
anchors, or use the vehicle’s
safety belts to secure the restraint,
following the instructions that came
with the child restraint and the
instructions in this manual.

{

CAUTION

Do not attach more than one child
restraint to a single anchor.
Attaching more than one child
restraint to a single anchor could
cause the anchor or attachment to
come loose or even break during
a crash. A child or others could
be injured. To reduce the risk of
serious or fatal injuries during a
crash, attach only one child
restraint per anchor.

Third Row Seat

Seats and Restraint System

1-37

-------------------------------------------------------------------------------------------------------------------------------------------------------------

{

CAUTION

Children can be seriously injured
or strangled if a shoulder belt is
wrapped around their neck and
the safety belt continues to
tighten. Buckle any unused safety
belts behind the child restraint so
children cannot reach them. Pull
the shoulder belt all the way out
of the retractor to set the lock, if
your vehicle has one, after the
child restraint has been installed.

Notice: Do not let the LATCH
attachments rub against the
vehicle’s safety belts. This may
damage these parts. If necessary,
move buckled safety belts to
avoid rubbing the LATCH
attachments.

Do not fold the empty rear seat
with a safety belt buckled. This
could damage the safety belt or
the seat. Unbuckle and return the
safety belt to its stowed position.

1. Attach and tighten the lower

attachments to the lower
anchors. If the child restraint
does not have lower attachments
or the desired seating position
does not have lower anchors,
secure the child restraint with the
top tether and the safety belts.
Refer to your child restraint
manufacturer instructions and the
instructions in this manual.

1.1. Find the lower anchors for

the desired seating position.

1.2. Recline the seatback to the

full reclined position.

Make sure the second row
bench seatbacks are
aligned at the same angle
before placing the child
restraint on the seat. Make
sure the third row bench
seatbacks are both upright
before placing the child
restraint on the seat.

1.3. Put the child restraint on

the seat.

1.4. Attach and tighten the lower

attachments on the child
restraint to the lower
anchors.

2. If the child restraint manufacturer

recommends that the top tether
be attached, attach and
tighten the top tether to the top
tether anchor, if the vehicle
has one. Refer to the child
restraint instructions and the
following steps:

2.1. Find the top tether anchor.

2.2. If the anchor is covered,

flip open the cover to
expose the anchor.

1-38

Seats and Restraint System

-------------------------------------------------------------------------------------------------------------------------------------------------------------

2.3. Route, attach and tighten

the top tether according to
your child restraint
instructions and the
following instructions:

If the position you are using
does not have a headrest
or head restraint and
you are using a single
tether, route the tether over
the seatback.

If the position you are using
does not have a headrest or
head restraint and you are
using a dual tether, route the
tether over the seatback.

If the position you are using
has a fixed headrest or head
restraint and you are using a
dual tether, route the tether
around the headrest or head
restraint.

Seats and Restraint System

1-39

-------------------------------------------------------------------------------------------------------------------------------------------------------------

If the position you are using
has a fixed headrest or
head restraint and you are
using a single tether,
route the tether over the
headrest or head restraint.

3. Push and pull the child restraint

in different directions to be sure
it is secure.

Securing a Child
Restraint in a Rear Seat
Position

When securing a child restraint in a
rear seating position, study the
instructions that came with the child
restraint to make sure it is
compatible with this vehicle.

If the child restraint has the LATCH
system, see Lower Anchors and
Tethers for Children (LATCH)
on page 1-34 for how and where to
install the child restraint using
LATCH. If a child restraint is secured
in the vehicle using a safety belt
and it uses a top tether, see Lower
Anchors and Tethers for Children
(LATCH) 
on page 1-34 for top tether
anchor locations.

Do not secure a child seat in a
position without a top tether anchor
if a national or local law requires
that the top tether be anchored, or if
the instructions that come with
the child restraint say that the top
strap must be anchored.

In Canada, the law requires that
forward-facing child restraints have
a top tether, and that the tether
be attached.

If the child restraint does not have
the LATCH system, you will be using
the safety belt to secure the child
restraint in this position. Be sure to
follow the instructions that came
with the child restraint. Secure the
child in the child restraint when
and as the instructions say.

If more than one child restraint
needs to be installed in the
rear seat, be sure to read Where to
Put the Restraint 
on page 1-32.

1. Put the child restraint on the seat.

2. Pick up the latch plate, and

run the lap and shoulder portions
of the vehicle’s safety belt
through or around the restraint.
The child restraint instructions
will show you how.

1-40

Seats and Restraint System

-------------------------------------------------------------------------------------------------------------------------------------------------------------

3. Push the latch plate into the

buckle until it clicks.

Position the release button on
the buckle so that the safety belt
could be quickly unbuckled if
necessary.

4. Pull the rest of the shoulder belt

all the way out of the retractor to
set the lock.

5. To tighten the belt, push down

on the child restraint, pull the
shoulder portion of the belt
to tighten the lap portion of the
belt and feed the shoulder
belt back into the retractor. When
installing a forward-facing child
restraint, it may be helpful to use
your knee to push down on
the child restraint as you tighten
the belt.

Seats and Restraint System

1-41

-------------------------------------------------------------------------------------------------------------------------------------------------------------

6. If the child restraint has a top

tether, follow the child restraint
manufacturer’s instructions
regarding the use of the top
tether. See Lower Anchors and
Tethers for Children (LATCH)
on page 1-34 for more
information.

7. Push and pull the child restraint

in different directions to be sure
it is secure.

To remove the child restraint,
unbuckle the vehicle safety belt and
let it return to the stowed position.
If the top tether is attached to a top
tether anchor, disconnect it.

Securing a Child
Restraint in the Right
Front Seat Position

The vehicle has airbags. A rear seat
is a safer place to secure a
forward-facing child restraint. See
Where to Put the Restraint on
page 1-32
.

In addition, the vehicle has a
passenger sensing system which is
designed to turn off the right
front passenger frontal airbag and
seat-mounted side impact airbag
under certain conditions. See
Passenger Sensing System on
page 1-52 
and Passenger Airbag
Status Indicator 
on page 3-31
for more information, including
important safety information.

A label on the sun visor says,
“Never put a rear-facing child seat
in the front.” This is because the risk
to the rear-facing child is so great,
if the airbag deploys.

{

CAUTION

A child in a rear-facing child
restraint can be seriously injured or
killed if the right front passenger
airbag inflates. This is because the
back of the rear-facing child
restraint would be very close to the
inflating airbag. A child in a
forward-facing child restraint can
be seriously injured or killed if the
right front passenger airbag
inflates and the passenger seat is
in a forward position.

Even if the passenger sensing
system has turned off the right
front passenger frontal airbag, no
system is fail-safe. No one can
guarantee that an airbag will not
deploy under some unusual
circumstance, even though it is
turned off.

(Continued)

1-42

Seats and Restraint System

-------------------------------------------------------------------------------------------------------------------------------------------------------------

CAUTION

(Continued)

Secure rear-facing child restraints
in a rear seat, even if the airbag is
off. If you secure a forward-facing
child restraint in the right front seat,
always move the front passenger
seat as far back as it will go. It is
better to secure the child restraint
in a rear seat.

See Passenger Sensing System
on page 1-52 for additional
information.

If the child restraint has the LATCH
system, see Lower Anchors and
Tethers for Children (LATCH)
on page 1-34 for how and where to
install the child restraint using
LATCH. If a child restraint is secured
using a safety belt and it uses a
top tether, see Lower Anchors and
Tethers for Children (LATCH)
on page 1-34 for top tether anchor
locations.

Do not secure a child seat in a
position without a top tether anchor
if a national or local law requires
that the top tether be anchored, or if
the instructions that come with
the child restraint say that the top
strap must be anchored.

In Canada, the law requires that
forward-facing child restraints have
a top tether, and that the tether
be attached.

You will be using the lap-shoulder
belt to secure the child restraint in
this position. Follow the instructions
that came with the child restraint.

1. Move the seat as far back as it

will go before securing the
forward-facing child restraint.

When the passenger sensing
system has turned off the
right front passenger frontal
airbag and seat-mounted side
impact airbag, the off indicator on
the passenger airbag status
indicator should light and stay lit

when the vehicle is started. See
Passenger Airbag Status
Indicator 
on page 3-31.

2. Put the child restraint on

the seat.

3. Pick up the latch plate, and run

the lap and shoulder portions of
the vehicle’s safety belt
through or around the restraint.
The child restraint instructions
will show you how.

4. Push the latch plate into the

buckle until it clicks.

Seats and Restraint System

1-43

-------------------------------------------------------------------------------------------------------------------------------------------------------------

Position the release button on
the buckle so that the safety belt
could be quickly unbuckled if
necessary.

5. Pull the rest of the shoulder belt

all the way out of the retractor to
set the lock.

6. To tighten the belt, push down

on the child restraint, pull the
shoulder portion of the belt to
tighten the lap portion of the belt
and feed the shoulder belt back
into the retractor. When installing
a forward-facing child restraint, it
may be helpful to use your knee
to push down on the child
restraint as you tighten the belt.

7. Push and pull the child restraint

in different directions to be sure
it is secure.

If the airbags are off, the off
indicator in the passenger airbag
status indicator will come on
and stay on when the vehicle is
started.

If a child restraint has been installed
and the on indicator is lit, see “If
the On Indicator is Lit for a
Child Restraint ” under Passenger
Sensing System 
on page 1-52
for more information.

To remove the child restraint,
unbuckle the vehicle safety belt and
let it return to the stowed position.

1-44

Seats and Restraint System

-------------------------------------------------------------------------------------------------------------------------------------------------------------

Airbag System

The vehicle has the following
airbags:

A frontal airbag for the driver.

A frontal airbag for the right front
passenger.

A seat-mounted side impact
airbag for the driver.

A seat-mounted side impact
airbag for the right front
passenger.

A roof-rail airbag for the driver,
passenger seated directly
behind the driver, and the third
row outboard passenger position.

A roof-rail airbag for the right
front passenger, passenger
seated directly behind the right
front passenger, and the third row
outboard passenger position.

All of the airbags in the vehicle will
have the word AIRBAG embossed
in the trim or on an attached
label near the deployment opening.

For frontal airbags, the word
AIRBAG will appear on the middle
part of the steering wheel for
the driver and on the instrument
panel for the right front passenger.

With seat-mounted side impact
airbags, the word AIRBAG
will appear on the side of the
seatback closest to the door.

With roof-rail airbags, the word
AIRBAG will appear along the
headliner or trim.

Airbags are designed to supplement
the protection provided by safety
belts. Even though today’s airbags
are also designed to help reduce
the risk of injury from the force of an
inflating bag, all airbags must
inflate very quickly to do their job.

Here are the most important things
to know about the airbag system:

{

CAUTION

You can be severely injured or
killed in a crash if you are not
wearing your safety belt — even if
you have airbags. Airbags are
designed to work with safety
belts, but do not replace them.
Also, airbags are not designed to
deploy in every crash. In some
crashes safety belts are your only
restraint. See When Should an
Airbag Inflate? 
on page 1-48.

Wearing your safety belt during a
crash helps reduce your chance
of hitting things inside the vehicle
or being ejected from it. Airbags
are “supplemental restraints” to
the safety belts. Everyone in your
vehicle should wear a safety belt
properly — whether or not there is
an airbag for that person.

Seats and Restraint System

1-45

-------------------------------------------------------------------------------------------------------------------------------------------------------------

{

CAUTION

Airbags inflate with great force,
faster than the blink of an eye.
Anyone who is up against, or very
close to, any airbag when it
inflates can be seriously injured or
killed. Do not sit unnecessarily
close to the airbag, as you would
be if you were sitting on the edge
of your seat or leaning forward.
Safety belts help keep you in
position before and during a
crash. Always wear your safety
belt, even with airbags. The driver
should sit as far back as possible
while still maintaining control of
the vehicle.

Occupants should not lean on or
sleep against the door or side
windows in seating positions with
seat-mounted side impact airbags
and/or roof-rail airbags.

{

CAUTION

Children who are up against, or
very close to, any airbag when it
inflates can be seriously injured or
killed. Airbags plus lap-shoulder
belts offer protection for adults
and older children, but not for
young children and infants.
Neither the vehicle’s safety belt
system nor its airbag system is
designed for them. Young children
and infants need the protection
that a child restraint system can
provide. Always secure children
properly in your vehicle. To read
how, see Older Children on
page 1-26 
or Infants and Young
Children 
on page 1-28.

There is an airbag readiness light
on the instrument panel cluster,
which shows the airbag symbol.

The system checks the airbag
electrical system for malfunctions.
The light tells you if there is an
electrical problem. See Airbag
Readiness Light 
on page 3-31 for
more information.

1-46

Seats and Restraint System

-------------------------------------------------------------------------------------------------------------------------------------------------------------

Where Are the Airbags?

The driver frontal airbag is in the
middle of the steering wheel.

The right front passenger frontal
airbag is in the instrument panel on
the passenger side.

The seat-mounted side impact
airbags for the driver and right front
passenger are in the side of the
seatbacks closest to the door.

Driver Side shown, Passenger

Side similar

Seats and Restraint System

1-47

-------------------------------------------------------------------------------------------------------------------------------------------------------------

The roof-rail airbags for the driver,
right front passenger, passengers
behind the driver and right front
passenger, and the third row
outboard passengers are in the
ceiling above the side windows.

{

CAUTION

If something is between an
occupant and an airbag, the
airbag might not inflate properly or
it might force the object into that
person causing severe injury or
even death. The path of an
inflating airbag must be kept
clear. Do not put anything
between an occupant and an
airbag, and do not attach or put
anything on the steering wheel
hub or on or near any other
airbag covering.

Do not use seat accessories that
block the inflation path of a
seat-mounted side impact airbag.

Never secure anything to the roof
of a vehicle with roof-rail airbags
by routing a rope or tie down
through any door or window
opening. If you do, the path of an
inflating roof-rail airbag will be
blocked.

When Should an Airbag
Inflate?

Frontal airbags are designed to
inflate in moderate to severe frontal
or near-frontal crashes to help
reduce the potential for severe
injuries mainly to the driver’s or right
front passenger’s head and chest.
However, they are only designed to
inflate if the impact exceeds a
predetermined deployment
threshold. Deployment thresholds
are used to predict how severe
a crash is likely to be in time for the
airbags to inflate and help restrain
the occupants.

Whether the frontal airbags will or
should deploy is not based on
how fast your vehicle is traveling. It
depends largely on what you hit,
the direction of the impact, and how
quickly your vehicle slows down.

Driver Side shown, Passenger

Side similar

1-48

Seats and Restraint System

-------------------------------------------------------------------------------------------------------------------------------------------------------------

Frontal airbags may inflate at
different crash speeds. For example:

If the vehicle hits a stationary
object, the airbags could
inflate at a different crash
speed than if the vehicle hits a
moving object.

If the vehicle hits an object that
deforms, the airbags could
inflate at a different crash speed
than if the vehicle hits an
object that does not deform.

If the vehicle hits a narrow object
(like a pole), the airbags could
inflate at a different crash speed
than if the vehicle hits a wide
object (like a wall).

If the vehicle goes into an object
at an angle, the airbags could
inflate at a different crash speed
than if the vehicle goes straight
into the object.

Thresholds can also vary with
specific vehicle design.

Frontal airbags are not intended to
inflate during vehicle rollovers, rear
impacts, or in many side impacts.

In addition, the vehicle has
dual-stage frontal airbags.
Dual-stage airbags adjust the
restraint according to crash severity.
The vehicle has electronic frontal
sensors, which help the sensing
system distinguish between a
moderate frontal impact and a more
severe frontal impact. For moderate
frontal impacts, dual-stage airbags
inflate at a level less than full
deployment. For more severe frontal
impacts, full deployment occurs.

The vehicle has seat-mounted side
impact and roof-rail airbags. See
Airbag System on page 1-45.
Seat-mounted side impact and
roof-rail airbags are intended
to inflate in moderate to severe side
crashes. In addition, these roof-rail
airbags are intended to inflate during
a rollover or in a severe frontal
impact. Seat-mounted side impact
and roof-rail airbags will inflate if the
crash severity is above the

system’s designed threshold level.
The threshold level can vary
with specific vehicle design.

Seat-mounted side impact airbags
are not intended to inflate in
frontal impacts, near-frontal impacts,
rollovers, or rear impacts. Roof-rail
airbags are not intended to inflate in
rear impacts. A seat-mounted
side impact airbag is intended to
deploy on the side of the vehicle that
is struck. Both roof-rail airbags
will deploy when either side of the
vehicle is struck, or if the sensing
system predicts that the vehicle
is about to roll over, or in a severe
frontal impact.

In any particular crash, no one can
say whether an airbag should
have inflated simply because of the
damage to a vehicle or because
of what the repair costs were.
For frontal airbags, inflation is
determined by what the vehicle hits,
the angle of the impact, and how
quickly the vehicle slows down. For
seat-mounted side impact and
roof-rail airbags, deployment

Seats and Restraint System

1-49

-------------------------------------------------------------------------------------------------------------------------------------------------------------


Content      ..     1      2      3      4      ..