Vauxhall Zafira (2016 year). Manual - part 14


  Index      Vauxhall     Vauxhall Zafira (2016 year) - manual in english


Search            copyright infringement  


Content      ..     12      13      14      15     ..


Vauxhall Zafira (2016 year). Manual - part 14


-------------------------------------------------------------------------------------------------------------------------------------------------------------
226
Vehicle care
Caution
Caution
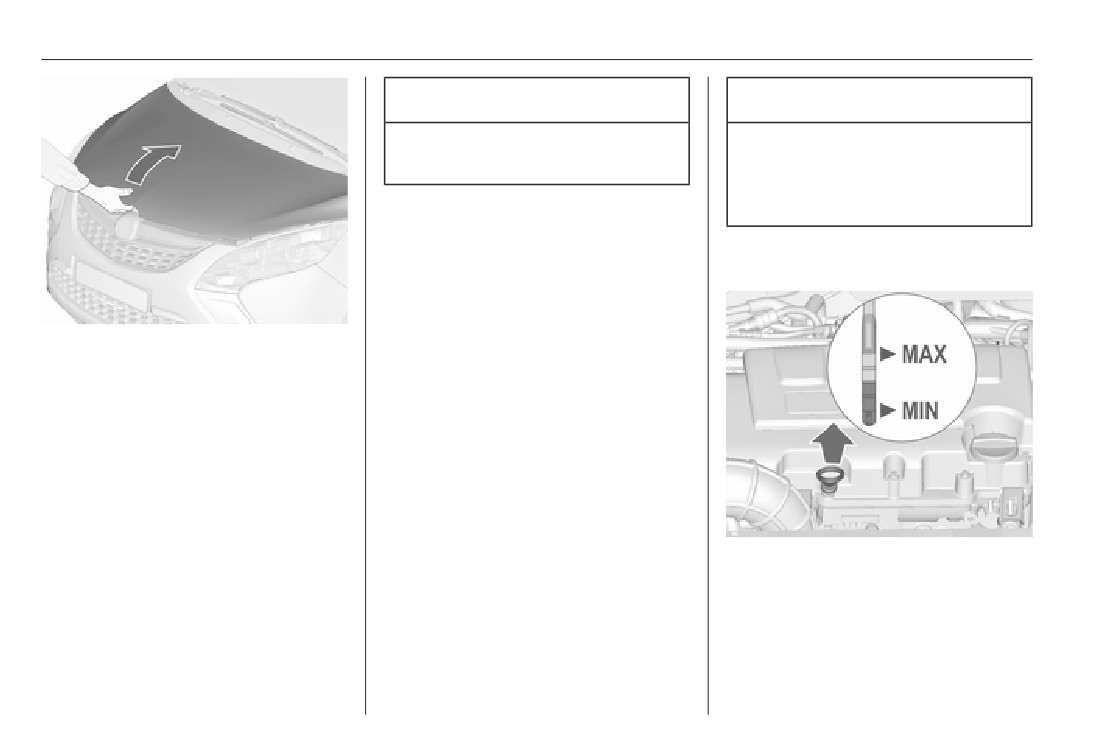
Do not press the bonnet into the
It is the owner's responsibility to
latch, to avoid dents.
maintain the proper level of an
appropriate quality oil in the
engine.
Engine oil
Check the engine oil level manually
Insert dipstick to the stop on the
on a regular basis to prevent damage
handle and make half a turn.
to the engine. Ensure that the correct
specification of oil is used.
Recommended fluids and lubricants
3 270.
Move the safety catch sideways to the
left vehicle side and open the bonnet.
The maximum engine oil
consumption is 0.6 litres per
The bonnet is held open
1000 km.
automatically by a lifter.
Check with the vehicle on a level
If the bonnet is opened during an
surface. The engine must be at
Autostop, the engine will be restarted
operating temperature and switched
automatically for safety reasons.
off for at least five minutes.
Closing
Pull out the dipstick, wipe it clean,
insert it to the stop on the handle, pull
Before closing the bonnet, press the
Different dipsticks are used
out and read the engine oil level.
support into the holder.
depending on engine variant.
Lower the bonnet and allow it to fall
into the latch from a low height
(20-25 cm). Check that the bonnet is
engaged.

-------------------------------------------------------------------------------------------------------------------------------------------------------------

Vehicle care
227
We recommend the use of the same
Caution
grade of engine oil that was used at
last change.
Overfilled engine oil must be
The engine oil level must not exceed
drained or suctioned out.
the MAX mark on the dipstick.
On some engines, a funnel is needed
Capacities 3 286.
to top-up engine oil.
Fit the cap on straight and tighten it.
Engine coolant
The coolant provides freeze
protection down to approx. -28 °C. In
When the engine oil level has
northern countries with very low
dropped to the MIN mark, top-up
temperatures, the factory filled
engine oil.
coolant provides frost protection
down to approx. -37 °C.
Caution
Only use approved antifreeze.
The funnel is located on the right side
storage in the load compartment.
Coolant level
Use the funnel to fill in the engine oil
into the engine oil opening.
Caution
After topping-up, put the funnel into
the plastic bag and stow it in the
Too low a coolant level can cause
storage compartment.
engine damage.

-------------------------------------------------------------------------------------------------------------------------------------------------------------

228
Vehicle care
Engine B16DTH: After starting the
engine, set the heating to warmest
temperature and the fan speed to at
least first level for approx. five
minutes. This will ensure that the air
within the cooling system escapes.
Have the coolant concentration
checked and have the cause of the
coolant loss remedied by a workshop.
Power steering fluid
If the cooling system is cold, the
Power steering fluid level normally
Caution
coolant level should be above the
does not have to be checked. If an
filling line mark. Top-up if the level is
unusual noise sounds during steering
Extremely small amounts of
low.
or the power steering reacts
contamination can cause steering
unusually, seek the assistance of a
system damage and cause it to not
9 Warning
workshop.
work properly. Do not allow
contaminates to contact the fluid
Allow the engine to cool before
side of the reservoir cap/dipstick or
opening the cap. Carefully open
from entering the reservoir.
the cap, relieving the pressure
slowly.
To top-up, use a 1:1 mixture of
approved coolant concentrate mixed
with clean tap water. If no coolant
concentrate is available, use clean
tap water. Install the cap tightly.

-------------------------------------------------------------------------------------------------------------------------------------------------------------

Vehicle care
229
Washer fluid
Brakes
In the event of minimum thickness of
the brake lining, a squealing noise
sounds during braking.
Continued driving is possible but
have the brake lining replaced as
soon as possible.
Once new brake linings are installed,
do not brake unnecessarily hard for
the first few journeys.
Brake fluid
The brake fluid level must be between
the MIN and MAX marks.
Fill with clean water mixed with a
9 Warning
If fluid level is below MIN seek the
suitable quantity of approved
assistance of a workshop.
windscreen washer fluid which
Brake fluid is poisonous and
Brake and clutch fluid 3 270.
contains antifreeze.
corrosive. Avoid contact with eyes,
skin, fabrics and painted surfaces.
Caution
Vehicle battery
The vehicle battery is maintenance-
Only washer fluid with a sufficient
free, provided that the driving profile
antifreeze concentration provides
allows sufficient charging of the
protection at low temperatures or
battery. Short-distance-driving and
a sudden drop in temperature.
frequent engine starts can discharge
the battery. Avoid the use of
unnecessary electrical consumers.

-------------------------------------------------------------------------------------------------------------------------------------------------------------

230
Vehicle care
Replacing the vehicle battery
Notice
Any deviation from the instructions
given in this section may lead to
temporary deactivation of the stop-
start system.
Batteries do not belong in household
When the vehicle battery is being
waste. They must be disposed of at
replaced, please ensure that there
an appropriate recycling collection
are no open ventilation holes in the
point.
vicinity of the positive terminal. If a
Laying up the vehicle for more than
ventilation hole is open in this area, it
four weeks can lead to battery
must be closed off with a dummy cap,
discharge. Disconnect the clamp from
An AGM battery can be identified by
and the ventilation in the vicinity of the
the negative terminal of the vehicle
the label on the battery. We
negative terminal must be opened.
battery.
recommend the use of an original
Only use vehicle batteries that allow
Vauxhall vehicle battery.
Ensure the ignition is switched off
the fuse box to be mounted above the
before connecting or disconnecting
Notice
vehicle battery.
the vehicle battery.
Using an AGM vehicle battery
In vehicles with an AGM (Absorptive
different from the original Vauxhall
The anti-theft alarm siren must be
Glass Mat) battery, make sure to
vehicle battery may result in a lower
deactivated as follows: Switch the
have the battery replaced with
performance of the stop-start
ignition on then off, disconnect the
another AGM battery.
system.
vehicle's battery within 15 seconds.
Vehicle battery discharge protection
We recommend that you have the
3 149.
vehicle battery replaced by a
workshop.
Stop-start system 3 161.

-------------------------------------------------------------------------------------------------------------------------------------------------------------

Vehicle care
231
Charging the vehicle battery
Meaning of symbols:
Wiper blade replacement
No sparks, naked flames or
9 Warning
smoking.
Always shield eyes. Explosive
On vehicles with stop-start
gases can cause blindness or
system, ensure that the charging
injury.
potential does not exceed
Keep the vehicle battery out of
14.6 volts when using a battery
reach of children.
charger. Otherwise the vehicle
battery might be damaged.
The vehicle battery contains
sulphuric acid which could cause
Jump starting 3 262.
blindness or serious burn
injuries.
Warning label
See the Owner's Manual for
further information.
Lift the wiper arm until it stays in the
raised position, press button to
Explosive gas may be present in
disengage the wiper blade and
the vicinity of the vehicle battery.
remove.
Attach the wiper blade slightly angled
Diesel fuel system bleeding
to the wiper arm and push until it
If the tank has been run dry, the diesel
engages.
fuel system must be bled. Switch on
Lower wiper arm carefully.
the ignition three times for
15 seconds at a time. Then crank the
engine for a maximum of
40 seconds. Repeat this process after
no less than five seconds. If the
engine fails to start, seek the
assistance of a workshop.

-------------------------------------------------------------------------------------------------------------------------------------------------------------

232
Vehicle care
Wiper blade on the rear window
Front turn signal (2).
Bulb replacement
Sidelight/Daytime running light (3).
Switch off the ignition and switch off
Low/High beam (1)
the relevant switch or close the doors.
Only hold a new bulb at the base. Do
1. Rotate the cap (1) anticlockwise
not touch the bulb glass with bare
and remove it.
hands.
Use only the same bulb type for
replacement.
Replace headlight bulbs from within
the engine compartment.
Halogen headlights
Lift wiper arm. Disengage wiper blade
as shown in illustration and remove.
Attach the wiper blade slightly angled
to the wiper arm and push until it
engages.
2. Rotate the bulb holder
Lower wiper arm carefully.
anticlockwise to disengage.
Withdraw the bulb holder from the
reflector.
Bi-Halogen headlight (1) with one
bulb for low and high beam.

-------------------------------------------------------------------------------------------------------------------------------------------------------------

Vehicle care
233
Front turn signal (2)
2. Remove the bulb from the socket
by turning anticlockwise.
3. Replace and insert new bulb into
socket by turning clockwise.
4. Insert the bulb socket into the
reflector and turn clockwise.
Sidelight/Daytime running light
(3)
3. Disengage the bulb holder from
the plug connector by pressing
1. Rotate bulb socket (2)
the retaining lug.
anticlockwise to disengage.
4. Replace the bulb and connect
Withdraw the bulb socket from the
bulb holder to the plug connector.
reflector.
5. Insert the bulb holder, engaging
the two lugs into the reflector and
rotate clockwise to secure.
6. Fit the cap and rotate clockwise.
1. Rotate bulb socket (3)
anticlockwise to disengage.
Withdraw the bulb socket from the
reflector.

-------------------------------------------------------------------------------------------------------------------------------------------------------------

234
Vehicle care
Sidelight/Daytime running lights are
Adaptive forward lighting
designed as Light Emitting Diodes
(LEDs) and cannot be replaced.
9 Danger
Corner lighting (1)
Adaptive forward lighting system
uses Xenon headlights.
1. Rotate the cap (1) anticlockwise
and remove it.
Xenon headlights work under
extremely high electrical voltage.
Do not touch. Have bulbs replaced
by a workshop.
Bulbs for front turn signal and
corner lighting can be replaced.
2. Remove the bulb from the socket
by pulling.
3. Replace and insert new bulb into
socket.
4. Insert the bulb socket into the
reflector and turn clockwise.
2. Rotate the bulb holder
anticlockwise to disengage.
Withdraw the bulb holder from the
reflector.
Corner lighting (1).
Front turn signal (2).

-------------------------------------------------------------------------------------------------------------------------------------------------------------

Vehicle care
235
Front turn signal (2)
2. Remove the bulb from the socket
by turning anticlockwise.
3. Replace and insert new bulb into
socket by turning clockwise.
4. Insert the bulb socket into the
reflector and turn clockwise.
Fog lights
The bulbs are accessible from
beneath the vehicle.
3. Disengage the bulb from the plug
connector by pulling.
1. Rotate bulb socket (2)
4. Replace the bulb and connect
anticlockwise to disengage.
bulb holder to the plug connector.
Withdraw the bulb socket from the
5. Insert the bulb holder, engaging
reflector.
the two lugs into the reflector and
rotate clockwise to secure.
6. Fit the cap and rotate clockwise.
1. Remove the outer screws of the
cover, marked by the arrows.

-------------------------------------------------------------------------------------------------------------------------------------------------------------

236
Vehicle care
3. Disengage the bulb socket from
the plug connector by pressing
the retaining lug.
4. Remove and replace the bulb
socket with bulb and attach to the
plug connector.
5. Insert the bulb socket into the
reflector, turn clockwise and
engage.
6. Mount the cover with the screws.
2. Hinge away the cover.
Tail lights
2. Remove the screws, marked by
the arrows.
Turn the bulb socket
anticlockwise and remove it from
the reflector.
1. Hinge out the screw cover.
3. Carefully withdraw the light
assembly from the retaining pins
and remove.

-------------------------------------------------------------------------------------------------------------------------------------------------------------

Vehicle care
237
4. Detach the plug connector from
Reverse lights (4) in the tailgate
the light assembly.
Tail lights with Light Emitting
Diode (LED) for tail and brake light
Only the turn signal light (1) can
1. Open the tailgate and remove the
5. Remove and replace the bulb by
be replaced.
cover.
turning the bulb socket.
Remove and replace the bulb by
Turn signal light (1)
turning the bulb socket.
Tail lights (2)
6. Connect the plug connector to the
Brake light (3)
light assembly.
7. Fit light assembly onto retaining
pins and mount the light assembly
using the screws.
8. Plug in screw cover.

-------------------------------------------------------------------------------------------------------------------------------------------------------------

238
Vehicle care
2. Turn the bulb holder anticlockwise
3. Replace and insert new bulb into
and remove it from the reflector.
the socket by turning clockwise.
4. Insert the bulb socket into the
reflector, turn clockwise and
engage.
Bulb check
Switch on the ignition, operate and
check all lights.
Side turn signal lights
1. Turn the bulb socket
To replace bulb, remove lamp
anticlockwise and remove it from
housing:
the reflector.
3. Remove the bulb from the socket
by pulling.
4. Replace and insert new bulb into
socket.
5. Insert the bulb socket into the
reflector and turn clockwise.
6. Install the cover.
Rear fog light
The bulbs are accessible from
beneath the vehicle.
1. Slide lamp to its left side and
2. Remove the bulb from the socket
remove with its right end.
by turning anticlockwise.

-------------------------------------------------------------------------------------------------------------------------------------------------------------

Vehicle care
239
4. Insert bulb holder and turn
clockwise.
5. Insert left end of the lamp, slide to
the left and insert right end.
Number plate light
2. Turn bulb holder anticlockwise
2. Remove the bulb from the socket
and remove from housing.
by pulling.
3. Replace the bulb and insert it into
the socket.
4. Push the cover into the housing.
Interior lights
1. Insert screwdriver in recess of the
cover, press to the side and
Courtesy lights, reading lights
release spring. Remove cover.
Have bulbs replaced by a workshop.
Load compartment light
Have bulbs replaced by a workshop.
3. Pull bulb from bulb holder and
replace it.

-------------------------------------------------------------------------------------------------------------------------------------------------------------

240
Vehicle care
Instrument panel
Electrical system
illumination
Fuses
Have bulbs replaced by a workshop.
Data on the replacement fuse must
match the data on the defective fuse.
There are three fuse boxes in the
vehicle:
● in the front left of the engine
compartment
● in left-hand drive vehicles, in the
interior behind the storage
compartment, or, in right-hand
There are different kinds of fuses in
drive vehicles, behind the
the vehicle.
glovebox
● behind a cover on the left side of
the load compartment
Before replacing a fuse, turn off the
respective switch and the ignition.

-------------------------------------------------------------------------------------------------------------------------------------------------------------

Vehicle care
241
Depending on the type of fuse, a
Engine compartment fuse
blown fuse can be recognized by its
box
melted wire. Do not replace the fuse
until the cause of the fault has been
remedied.
Some functions are protected by
several fuses.
Fuses may also be inserted without
existence of a function.
Fuse extractor
A fuse extractor may be located in the
Place the fuse extractor on the
fuse box in the engine compartment.
various types of fuse from the top or
side, and withdraw fuse.
The fuse box is in the front left of the
engine compartment.
Disengage the cover and fold it
upwards until it stops. Remove the
cover vertically upwards.

-------------------------------------------------------------------------------------------------------------------------------------------------------------

242
Vehicle care
No. Circuit
No. Circuit
1
Engine control module
16
Starter
2
Lambda sensor
17
Transmission control module
3
Fuel injection/Ignition system
18
Heated rear window
4
Fuel injection/Ignition system
19
Front power windows
5
-
20
Rear power windows
6
Exterior mirror heating/Anti-
21
Rear electrical centre
theft alarm system
22
Left high beam (Halogen)
7
Fan control/Engine control
23
Headlamp washer system
module/Transmission control
module
24
Right low beam (Xenon)
8
Lambda sensor/Engine cooling
25
Left low beam (Xenon)
9
Rear window sensor
26
Front fog lights
10
Battery sensor
27
Diesel fuel heating
11
Tailgate release
28
Stop-start system
12
Adaptive forward lighting/Auto-
29
Electric parking brake
matic light control
30
ABS
13
ABS
31
Adaptive cruise control
14
Rear window wiper
32
Airbag
15
Engine control module


Content      ..     12      13      14      15     ..