Vauxhall Cascada (2016 year). Manual - part 13


  Index      Vauxhall     Vauxhall Cascada (2016 year) - manual in english


Search            copyright infringement  


Content      ..     11      12      13      14     ..


Vauxhall Cascada (2016 year). Manual - part 13


-------------------------------------------------------------------------------------------------------------------------------------------------------------
Vehicle care
209
No. Circuit
rod. Remove tool box and tool bag
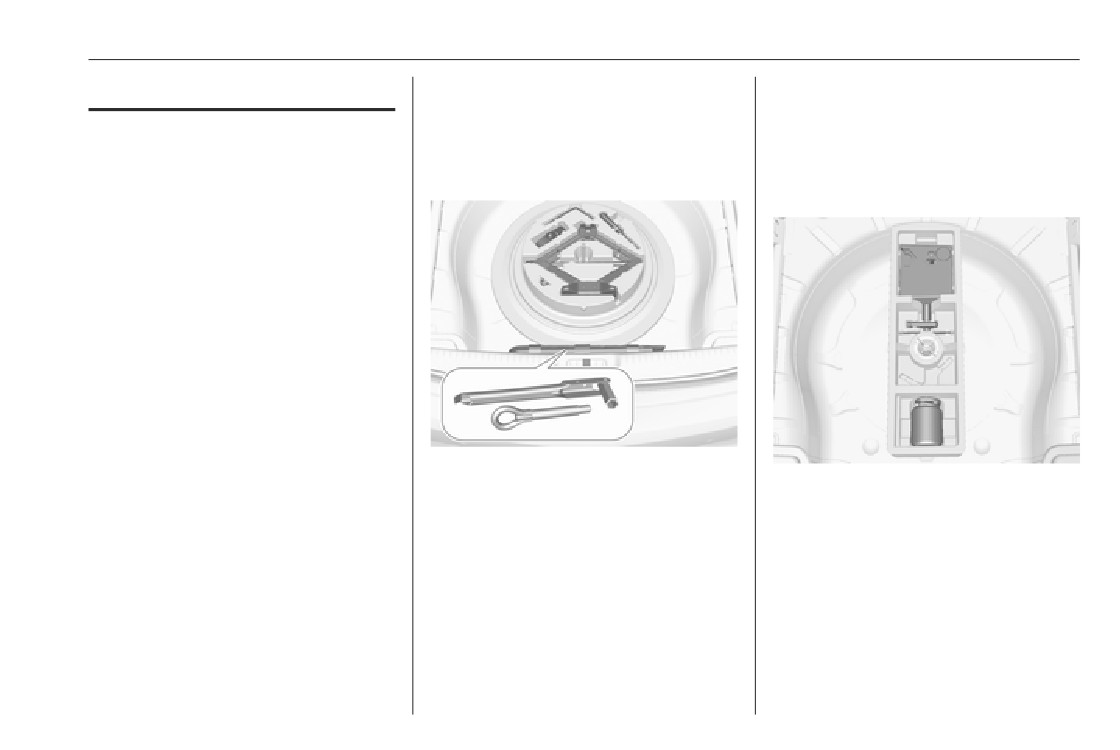
Vehicle tools
tether from the stow rod to access the
29
Hydraulic unit
tools in the bag.
Tools
30
-
Spare wheel 3 222.
Vehicles with spare wheel
31
-
Vehicles with tyre repair kit
32
Flex Ride
Open the load floor cover. The jack,
the tools and a strap for securing a
Some tools and the towing eye are
damaged wheel are in the tool box
located together with the tyre repair
below the spare wheel in the load
kit in a tool box in the load
compartment.
compartment below the floor cover.
The wheel wrench and the towing eye
are in the tool bag located in the spare
wheel well near the tool box. The tool
bag is fixated with a tether to the stow

-------------------------------------------------------------------------------------------------------------------------------------------------------------

210
Vehicle care
Vehicles with tyre repair kit and
Use tyre size 225/55 R17 only as
Wheels and tyres
flat load compartment floor
winter tyres.
On vehicles with Diesel engines, no
Wheels
steel rims and only special, vehicle-
approved alloy wheels are permitted.
On vehicles with Diesel engines no
steel rims and only special, for this
In accordance with country-specific
vehicle approved alloy wheels are
regulations, affix the speed sticker in
permitted.
the driver's field of view.
Tyre condition, wheel condition
Tyre designations
Drive over edges slowly and at right
E.g. 235/55 R 17 99 V
angles if possible. Driving over sharp
edges can cause tyre and wheel
235 : Tyre width, mm
damage. Do not trap tyres on the kerb
55
: Cross-section ratio (tyre height
when parking.
to tyre width), %
Some tools and the towing eye are
R
: Belt type: Radial
located together with the tyre repair
Regularly check the wheels for
RF : Type: RunFlat
kit in a bag, which is fixed at the front
damage. Seek the assistance of a
17
: Wheel diameter, inches
left lashing eye in the load
workshop in the event of damage or
99
: Load index e.g. 99 is
compartment.
unusual wear.
equivalent to 775 kg
V
: Speed code letter
Winter tyres
Speed code letter:
Winter tyres improve driving safety at
Q : up to 100 mph
temperatures below 7 °C and should
S : up to 112 mph
therefore be fitted on all wheels.
T
: up to 118 mph
All tyre sizes are permitted as winter
H : up to 130 mph
tyres 3 247.
V : up to 150 mph
W : up to 168 mph

-------------------------------------------------------------------------------------------------------------------------------------------------------------

Vehicle care
211
Choose a tyre appropriate for the
Caution
maximum speed of your vehicle.
The maximum speed is achievable at
Tyre pressure monitoring system
kerb weight with driver (75 kg) plus
warns only about low tyre pressure
125 kg payload. Optional equipment
condition and does not replace
could reduce the maximum speed of
regular tyre maintenance by the
the vehicle.
driver.
Performance 3 242.
All wheels must be equipped with
Directional tyres
pressure sensors and the tyres must
have the prescribed pressure.
Fit directional tyres such that they roll
in the direction of travel. The rolling
Notice
Press MENU to select the Vehicle
direction is indicated by a symbol
In countries where the tyre pressure
Information MenuX
(e.g. an arrow) on the sidewall.
monitoring system is legally
required, the use of wheels without
pressure sensors will invalidate the
Tyre pressure monitoring
vehicle type approval.
system
The current tyre pressures can be
The tyre pressure monitoring system
shown in the Vehicle Information
checks the pressure of all four tyres
Menu in the Driver Information
once a minute when vehicle speed
Centre.
exceeds a certain limit.
The menu can be selected by the
buttons on the turn signal lever.
Turn the adjuster wheel to select the
tyre pressure monitoring system.

-------------------------------------------------------------------------------------------------------------------------------------------------------------

212
Vehicle care
System status and pressure warnings
If w flashes for 60-90 seconds then
illuminates. For the further three
are displayed by a message
illuminates continuously, there is a
wheels the system remains
indicating the corresponding tyre in
fault in the system. Consult a
operational.
the Driver Information Centre.
workshop.
The use of commercially-available
The system considers the tyre
After inflating, driving may be
liquid tyre repair kits can impair the
temperature for the warnings.
required to update the tyre pressure
function of the system. Factory-
values in the Driver Information
approved repair kits can be used.
Temperature dependency 3 214.
Centre. During this time w may
Operating electronic devices or being
illuminate.
close to facilities using similar wave
If w illuminates at lower temperatures
frequencies could disrupt the tyre
and extinguishes after driving, this
pressure monitoring system.
could be an indicator for approaching
Each time the tyres are replaced, tyre
a low tyre pressure condition. Check
pressure sensors must be
tyre pressure.
dismounted and serviced. For the
Vehicle messages 3 101.
screwed sensor: replace valve core
and sealing ring. For clipped sensor:
If the tyre pressure must be reduced
replace complete valve stem.
or increased, switch off ignition.
Only mount wheels with pressure
Vehicle loading status
sensors, otherwise the tyre pressure
Adjust tyre pressure to load condition
A detected low tyre pressure
will not be displayed and w
according to the tyre information label
condition is indicated by control
illuminates continuously.
or tyre pressure chart 3 247, and
indicator w 3 93.
A spare wheel or temporary spare
select the appropriate setting in the
If w illuminates, stop as soon as
wheel is not equipped with pressure
Tyre load menu in the Driver
possible and inflate the tyres as
sensors. The tyre pressure
Information Centre 3 95. This setting
recommended 3 247.
monitoring system is not operational
is the reference for the tyre pressure
for these tyres. Control indicator w
warnings.

-------------------------------------------------------------------------------------------------------------------------------------------------------------

Vehicle care
213
The menu Tyre Load only appears if
Tyre pressure sensor matching
match all four wheel positions. If it
the vehicle is at a standstill and the
process
takes longer, the matching process
parking brake is applied. On vehicles
stops and must be restarted.
with automatic transmission, the
Each tyre pressure sensor has a
The tyre pressure sensor matching
selector lever must be in P.
unique identification code. The
process is:
identification code must be matched
to a new wheel position after rotating
1. Apply the parking brake.
the wheels or exchanging the
2. Turn the ignition on.
complete wheel set and if one or more
3. On vehicles with automatic
tyre pressure sensors were replaced.
transmission: set the selector
The tyre pressure sensor matching
lever to P.
process should also be performed
On vehicles with manual
after replacing a spare wheel with a
transmission: select neutral.
road wheel containing the tyre
pressure sensor.
4. Use MENU on the turn signal
lever to select the Vehicle
The malfunction light w and the
Information Menu in the Driver
warning message or code should
Information Centre.
extinguish at the next ignition cycle.
Select:
The sensors are matched to the
5. Turn the adjuster wheel to scroll to
wheel positions, using a relearn tool,
the tyre pressure menu.
● Light for comfort pressure up to
in the following order: left side front
3 people
6. Press SET/CLR to begin the
wheel, right side front wheel, right
sensor matching process. A
● Eco for Eco pressure up to
side rear wheel and left side rear
message requesting acceptance
3 people
wheel. The turn signal light at the
of the process should be
● Max for full loading
current active position is illuminated
displayed.
until sensor is matched.
7. Press SET/CLR again to confirm
Consult your workshop for service or
the selection. The horn sounds
to purchase a relearn tool. There are
twice to indicate that the receiver
two minutes to match the first wheel
is in relearn mode.
position, and five minutes overall to

-------------------------------------------------------------------------------------------------------------------------------------------------------------

214
Vehicle care
8. Start with the left side front wheel.
14. Set all four tyres to the
The tyre pressure information label
recommended air pressure level
on the left door frame indicates the
9. Place the relearn tool against the
as indicated on the tyre pressure
original equipment tyres and the
tyre sidewall, near the valve stem.
information label.
correspondent tyre pressures.
Then press the button to activate
the tyre pressure sensor. A horn
15. Ensure the tyre loading status is
The tyre pressure data refers to cold
chirp confirms that the sensor
set according to the selected
tyres. It applies to summer and winter
identification code has been
pressure 3 95.
tyres.
matched to this wheel position.
Always inflate the spare tyre to the
10. Proceed to the right side front
Tyre pressure
pressure specified for full load.
wheel, and repeat the procedure
Check the pressure of cold tyres at
The ECO tyre pressure serves to
in Step 9.
least every 14 days and before any
achieve the smallest amount of fuel
11. Proceed to the right side rear
long journey. Do not forget the spare
consumption possible.
wheel, and repeat the procedure
wheel. This also applies to vehicles
Incorrect tyre pressures will impair
in Step 9.
with tyre pressure monitoring system.
safety, vehicle handling, comfort and
12. Proceed to the left side rear
Unscrew the valve cap.
fuel economy and will increase tyre
wheel, and repeat the procedure
wear.
in Step 9. The horn sounds twice
Tyre pressures differ depending on
to indicate the sensor
various options. For the correct tyre
identification code has been
pressure value, follow the procedure
matched to the left side rear tyre,
below:
and the tyre pressure sensor
1. Identify the engine identifier code.
matching process is no longer
Engine data 3 241.
active.
2. Identify the respective tyre.
13. Turn off the ignition.
The tyre pressure tables show all
possible tyre combinations 3 247.
Tyre pressure 3 247.

-------------------------------------------------------------------------------------------------------------------------------------------------------------

215
Vehicle care
For the tyres approved for your
off ignition. After adjusting tyre
Tread depth
vehicle, refer to the EEC Certificate of
pressure switch on ignition and select
Check tread depth at regular
Conformity provided with your vehicle
the relevant setting on the page Tyre
intervals.
or other national registration
load in the Driver Information Centre
documents.
3 95.
Tyres should be replaced for safety
reasons at a tread depth of 2-3 mm
The driver is responsible for correct
Temperature dependency
(4 mm for winter tyres).
adjustment of tyre pressure.
The tyre pressure depends on the
For safety reasons it is recommended
9 Warning
temperature of the tyre. During
that the tread depth of the tyres on
driving, tyre temperature and
one axle should not vary by more than
If the pressure is too low, this can
pressure increase. Tyre pressure
2 mm.
result in considerable tyre warm-
values provided on the tyre
up and internal damage, leading to
information label and tyre pressure
tread separation and even to tyre
chart are valid for cold tyres, which
blow-out at high speeds.
means at 20 °C.
The pressure increases by nearly
1.5 psi for a 10 °C temperature
9 Warning
increase. This must be considered
when warm tyres are checked.
For specific tyres the
recommended tyre pressure as
The tyre pressure value displayed in
shown in the tyre pressure table
the Driver Information Centre shows
may exceed the maximum tyre
the actual tyre inflation pressure. A
pressure as indicated on the tyre.
cooled down tyre will show a
Never exceed the maximum tyre
decreased value, which does not
The legally permissible minimum
pressure as indicated on the tyre.
indicate an air leak.
tread depth (1.6 mm) has been
reached when the tread has worn
If the tyre pressure must be reduced
down as far as one of the tread wear
or increased on a vehicle with tyre
pressure monitoring system, switch

-------------------------------------------------------------------------------------------------------------------------------------------------------------

216
Vehicle care
indicators (TWI). Their position is
Vehicles with steel wheels: When
9 Warning
indicated by markings on the
using locking wheel nuts, do not
sidewall.
attach wheel covers.
Use of unsuitable tyres or wheels
If there is more wear at the front than
may lead to accidents and will
the rear, swap round front wheels and
invalidate the vehicle type
Tyre chains
rear wheels periodically. Ensure that
approval.
the direction of rotation of the wheels
is the same as before.
Wheel covers
Tyres age, even if they are not used.
Wheel covers and tyres that are
We recommend tyre replacement
factory approved for the respective
every 6 years.
vehicle and comply with all of the
relevant wheel and tyre combination
Changing tyre and wheel
requirements must be used.
size
If the wheel covers and tyres used are
If tyres of a different size than those
not factory approved, the tyres must
fitted at the factory are used, it may be
not have a rim protection ridge.
necessary to reprogramme the
Wheel covers must not impair brake
speedometer as well as the nominal
cooling.
Use tyre chains only on front wheels.
tyre pressure and make other vehicle
Tyre chains are permitted on tyres of
modifications.
9 Warning
size 225/55 R17. Always use fine
After converting to a different tyre
mesh chains that add no more than
size, have the label with tyre
Use of unsuitable tyres or wheel
10 mm to the tyre tread and the
pressures replaced.
covers could lead to sudden
inboard sides (including chain lock).
pressure loss and thereby
accidents.

-------------------------------------------------------------------------------------------------------------------------------------------------------------

Vehicle care
217
On another version, a bag with the
9 Warning
tyre repair kit is fixed at the left rear
lashing eye in the load compartment.
Damage may lead to tyre blowout.
1. Take the tyre repair kit from the
load compartment.
The use of tyre chains is not permitted
on the temporary spare wheel.
2. Remove the compressor.
Tyre repair kit
Minor damage to the tyre tread can be
repaired with the tyre repair kit.
Do not remove foreign bodies from
the tyres.
The tyre repair kit is in a box under the
floor cover in the load compartment.
Tyre damage exceeding 4 mm or that
is at tyre's sidewall cannot be repaired
with the tyre repair kit.
9 Warning
3. Remove the electrical connection
Do not drive faster than 50 mph.
cable and air hose from the
Do not use for a lengthy period.
stowage compartments on the
underside of the compressor.
Steering and handling may be
affected.
If you have a flat tyre:
Apply the parking brake and engage
first gear, reverse gear or P.

-------------------------------------------------------------------------------------------------------------------------------------------------------------

218
Vehicle care
4. Screw the compressor air hose to
6. Unscrew valve cap from defective
10. Set the rocker switch on the
the connection on the sealant
tyre.
compressor to I. The tyre is filled
bottle.
with sealant.
7. Screw the filler hose to the tyre
5. Fit the sealant bottle into the
valve.
11. The compressor pressure gauge
retainer on the compressor.
briefly indicates up to 6 bar whilst
8. The switch on the compressor
the sealant bottle is emptying
Set the compressor near the tyre
must be set to J.
(approx. 30 seconds). Then the
in such a way that the sealant
9. Connect the compressor plug to
pressure starts to drop.
bottle is upright.
the power outlet or cigarette
12. All of the sealant is pumped into
lighter socket.
the tyre. Then the tyre is inflated.
To avoid discharging the vehicle
13. The prescribed tyre pressure
battery, we recommend running
should be obtained within
the engine.
10 minutes. Tyre pressure
3 247. When the correct pressure
is obtained, switch off the
compressor.

-------------------------------------------------------------------------------------------------------------------------------------------------------------

Vehicle care
219
14. Detach the tyre repair kit. Push
catch on bracket to remove
sealant bottle from bracket. Screw
the tyre inflation hose to the free
connection of the sealant bottle.
This prevents sealant from
escaping. Stow tyre repair kit in
load compartment.
15. Remove any excess sealant
using a cloth.
16. Take the label indicating
maximum permitted speed from
If the prescribed tyre pressure is
If tyre pressure is more than
the sealant bottle and affix in the
not obtained within 10 minutes,
1.3 bar, set it to the correct value.
driver's field of view.
remove the tyre repair kit. Move
Repeat the procedure until there
the vehicle one tyre rotation.
17. Continue driving immediately so
is no more loss of pressure.
Reattach the tyre repair kit and
that sealant is evenly distributed
If the tyre pressure has fallen
continue the filling procedure for
in the tyre. After driving approx.
below 1.3 bar, the vehicle must
10 minutes. If the prescribed tyre
6 miles (but no more than
not be used. Seek the assistance
pressure is still not obtained, the
10 minutes), stop and check tyre
of a workshop.
tyre is too badly damaged. Seek
pressure. Screw compressor air
18. Stow away the tyre repair kit in the
the assistance of a workshop.
hose directly onto tyre valve and
load compartment.
compressor when doing this.
Drain excess tyre pressure with
the button over the pressure
indicator.
Do not run the compressor longer
than 10 minutes.

-------------------------------------------------------------------------------------------------------------------------------------------------------------

220
Vehicle care
Notice
● No people or animals may be in
Wheel changing
The driving characteristics of the
the vehicle when it is jacked-up.
Some vehicles are equipped with a
repaired tyre are severely affected,
● Never crawl under a jacked-up
tyre repair kit instead of a spare wheel
therefore have this tyre replaced.
vehicle.
3 217.
If unusual noise is heard or the
● Do not start the vehicle when it is
Make the following preparations and
compressor becomes hot, turn
raised on the jack.
observe the following information:
compressor off for at least
● Clean wheel nuts and thread with
30 minutes.
Park the vehicle on a level, firm
a clean cloth before mounting the
and non-slippery surface. The
The built-in safety valve opens at a
wheel.
front wheels must be in the
pressure of 102 psi.
straight-ahead position.
Note the expiry date of the kit. After
9 Warning
Apply the parking brake and
this date its sealing capability is no
engage first gear, reverse gear or
longer guaranteed. Pay attention to
Do not grease wheel bolt, wheel
P.
storage information on sealant
nut and wheel nut cone.
bottle.
Remove the spare wheel 3 222.
1. Disengage wheel nut caps with a
Replace the used sealant bottle.
Never change more than one
screwdriver and remove. Pull off
Dispose of the bottle as prescribed
wheel at once.
the wheel cover. Vehicle tools
by applicable laws.
Use the jack only to change
3 209.
The compressor and sealant can be
wheels in case of puncture, not
Alloy wheels: Disengage wheel
used from approx. -30 °C.
for seasonal winter or summer
nut caps with a screwdriver and
tyre change.
The adapters supplied can be used
remove. To protect the wheel,
to pump up other items e.g.
The jack is maintenance-free.
place a soft cloth between the
footballs, air mattresses, inflatable
If the ground on which the vehicle
screwdriver and the alloy wheel.
dinghies etc. They are located on the
is standing is soft, a solid board
underside of the compressor. To
(max. 1 cm thick) should be
remove, screw on compressor air
placed under the jack.
hose and withdraw adapter.
Take heavy objects out of the
vehicle before jacking up.

-------------------------------------------------------------------------------------------------------------------------------------------------------------

Vehicle care
221
2. Install the wheel wrench ensuring
that it locates securely and loosen
each wheel nut by half a turn.
The wheels might be protected by
locking wheel nuts. To loosen
these specific nuts first attach the
adapter onto the head of the nut
before installing the wheel
wrench. The adapter is located in
the glovebox.
Alloy wheels with centre wheel
4. Set the jack to the necessary
bolt cap: Disengage centre cap by
height. Position it directly below
inserting and pulling the extractor
the jacking point in a manner that
3 209 in the recess of the brand
prevents it from slipping.
emblem.
3. Ensure the jack is correctly
positioned under the relevant
vehicle jacking point.

-------------------------------------------------------------------------------------------------------------------------------------------------------------

222
Vehicle care
Attach wheel wrench and with the
Have the defective tyre renewed or
jack correctly aligned rotate
repaired as soon as possible.
wrench until wheel is clear of the
ground.
Jacking position for lifting platform
5. Unscrew the wheel nuts.
6. Change the wheel. Spare wheel
3 222.
7. Screw on the wheel nuts.
8. Lower vehicle.
9. Install the wheel wrench ensuring
that it locates securely and tighten
each nut in a crosswise
Front arm position of the lifting
sequence. Tightening torque is
platform at the underbody.
140 Nm.
10. Align the valve hole in the wheel
Spare wheel
cover with the tyre valve before
Rear arm position of the lifting
Some vehicles are equipped with a
installing.
platform centrically under the recess
tyre repair kit instead of a spare
Install wheel nut caps.
of the sill.
wheel.
Install centre cap on alloy wheels.
If mounting a spare wheel, which is
11. Stow the replaced wheel 3 222,
different from the other wheels, this
the vehicle tools 3 209 and the
wheel might be classified as a
adapter for the locking wheel nuts
temporary spare wheel and the
3 68.
corresponding speed limits apply,
even though no label indicates this.
12. Check the tyre pressure of the
Seek the assistance of a workshop to
installed tyre and the wheel nut
check the applicable speed limit.
torque as soon as possible.
The spare wheel has a steel rim.

-------------------------------------------------------------------------------------------------------------------------------------------------------------

Vehicle care
223
Caution
The use of a spare wheel that is
smaller than the other wheels or in
combination with winter tyres
could affect driveability. Have the
defective tyre replaced as soon as
possible.
Removing the spare wheel and
stowing a damaged wheel in the
load compartment
Under the spare wheel there is a
2. Remove the floor cover.
box and a bag with vehicle tools.
The spare wheel is located in the
The tool bag is fixated with a
spare wheel well beneath the floor
tether to the stow rod. Remove
cover.
tool box and tool bag tether from
The spare wheel well is not designed
the stow rod to access the tools in
for other tyre sizes than spare wheel.
the bag. Vehicle tools 3 209.
To remove:
4. Change the damaged wheel
1. Close the soft top and fold in the
3 220 and stow the tools back in
load compartment partition by
the tool box and the bag. Remove
pushing at the loop area upwards
the strap from the box and put
to the inside 3 71.
aside.
5. Attach the tool bag tether to the
stow rod and put the bag in the
3. The spare wheel is secured with a
well. Secure the tool box by
wing nut in the well. Untwist nut,
turning right back the wing nut
remove conus and take out the
with the conus.
spare wheel.

-------------------------------------------------------------------------------------------------------------------------------------------------------------

224
Vehicle care
6. Stow the damaged wheel outside
Stowing the spare wheel back in
up in the well.
the well after replacing the
damaged wheel
1. Close the soft top and fold in the
load compartment partition.
2. Remove floor cover, untwist and
remove wing nut and conus.
3. Stow the tools in the tool box and
the bag.
4. Place spare wheel outside up in
the well.
9. Insert the strap through the
spokes of the wheel as shown in
the illustration.
7. Place the loop end of the strap
through the left rear lashing eye.
10. Mount the hook to the right rear
lashing eye.
8. Place the hook end of the strap
through the loop and pull it until
11. Tighten the strap and secure it
the strap is fastened securely to
using the buckle.
the lashing eye.
12. Deposit the floor cover on the
wheel.
13. If equipped, secure coupling ball
bar in the bag at a lashing eye in
the load compartment.
5. Insert and turn the excentric
14. Fold out the load compartment
conus in the recess of the spare
partition before opening the soft
wheel so that the wheel is
top.

-------------------------------------------------------------------------------------------------------------------------------------------------------------

Vehicle care
225
positioned as far as possible to
The following applies to tyres fitted
could affect driveability. Have the
the front. Secure the wheel by
opposing the rolling direction:
defective tyre replaced as soon as
turning the wing nut clockwise.
possible.
Driveability may be affected.
6. Insert and close floor cover.
Have the defective tyre renewed
Only mount one temporary spare
or repaired as soon as possible
9 Warning
wheel. Do not drive faster than
and fit it instead of the spare
50 mph. Take curves slowly. Do not
wheel.
Storing a jack, a wheel or other
use for a long period of time.
Drive particularly carefully on wet
equipment in the load
If your vehicle gets a flat tyre on the
and snow-covered road
compartment could cause injury if
rear while towing another vehicle,
surfaces.
they are not fixed properly. During
mount the temporary spare wheel in
a sudden stop or a collision, loose
the front and the full tyre in the rear.
equipment could strike someone.
Tyre chains 3 216.
Store jack and tools always in the
respective storage compartments
Spare wheel with directional tyre
and secure them by fixing.
Fit directional tyres such that they roll
Damaged wheel placed in the load
in the direction of travel. The rolling
compartment must always be
direction is indicated by a symbol
secured by the strap.
(e.g. an arrow) on the sidewall.
Temporary spare wheel
Caution
The use of a spare wheel that is
smaller than the other wheels or in
combination with winter tyres


Content      ..     11      12      13      14     ..