Vauxhall Cascada (2016 year). Manual - part 3


  Index      Vauxhall     Vauxhall Cascada (2016 year) - manual in english


Search            copyright infringement  


Content      ..     1      2      3      4      ..


Vauxhall Cascada (2016 year). Manual - part 3


-------------------------------------------------------------------------------------------------------------------------------------------------------------
Keys, doors and windows
39
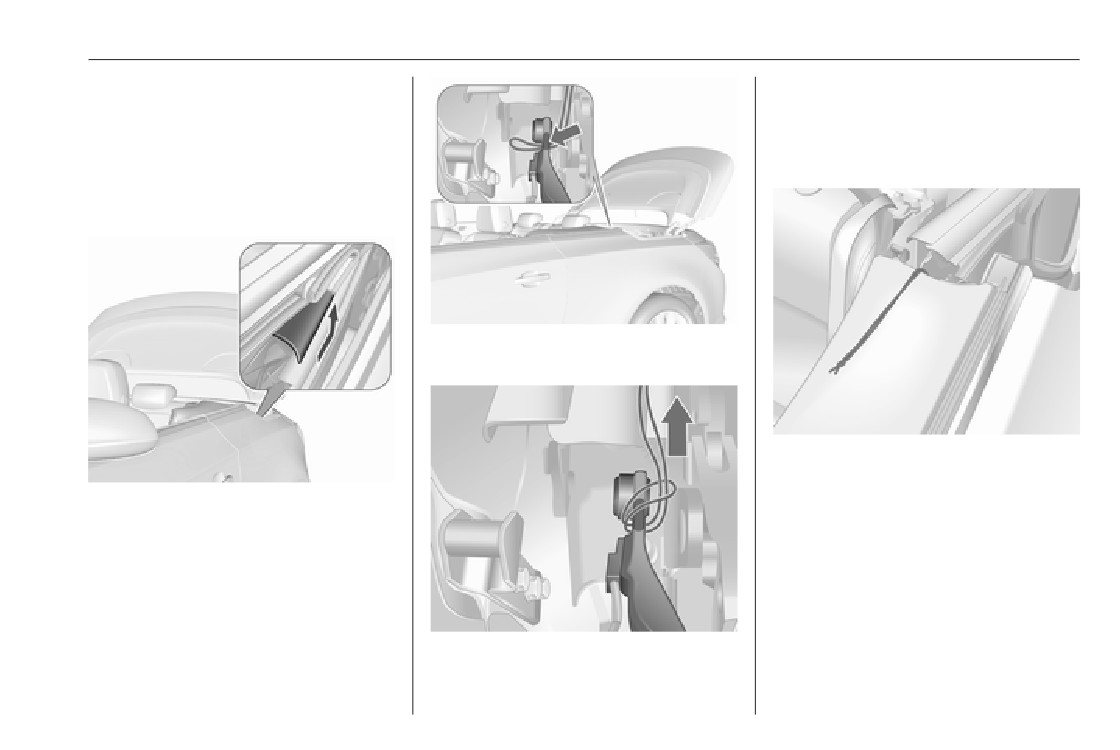
6. Insert the 4 mm Allen key into the
10. Haul in the attached strings
marked position of the flap-drive
around the marked position at the
unit. Turn the Allen key clockwise
hinge on both sides and pull the
all the way to the stop, so that the
end of the string through the loop,
sideways flaps are swivelled in.
as shown in the illustration.
7. Open the soft top lid to its end
position.
9. At the hinges on each side there
are visible marks.
11. Deposit the end of the strings at
the front.
8. Remove plastic covers on both
sides by pushing and sliding
backwards, see illustration.

-------------------------------------------------------------------------------------------------------------------------------------------------------------

40
Keys, doors and windows
14. Remove the small lid in the
windscreen frame trim using a
screwdriver which is inserted in
the recess of the lid.
12. Pull out the soft top by lifting up the
16. Lift up the tension bow (2) of the
front bow (1) and simultaneously
soft top on both sides. Raise up
the tension bow (2) on both sides.
soft top lid by pushing slowly
approx. to the half raised position
and then let it slide into the closed
15. Insert the 6 mm Allen key into the
position.
closure and lock the latch by
turning the Allen key clockwise to
17. Lower the tension bow (2) of the
its end position.
soft top.
Notice
In this position, the vehicle can be
driven to a workshop for soft top
overhaul. The soft top is not
completely waterproof and not
latched at the rear.
To latch the soft top completely,
13. Move the front bow (1) to the
execute the following step.
windscreen frame.

-------------------------------------------------------------------------------------------------------------------------------------------------------------

Keys, doors and windows
41
To install the deflectors, the soft top
Wind deflector
should be opened.
Fitting of the small wind deflector
● Fold down left rear backrest
3 71.
18. Push down firmly each side of the
tension bow. Simultaneously pull
the string with a screwdriver cross
There are two wind deflectors located
in the loop slowly and continuous
in a bag behind the rear seat
to the front. Possibly support
backrests. Fold down the rear
yourself on the door frame with
backrests 3 71, open the Velcro
the other hand. Execute this on
fasteners and move out the bag from
● Remove the cover from the
both sides to latch the soft top at
the recess.
guidance between the rear head
the rear.
● The small wind deflector can be
restraints by sliding sideways to
After the last step, the boot lid can be
placed between the rear head
the left vehicle side.
opened again. Allow the strings to be
restraints.
removed by your workshop.
● The big wind deflector can be
The soft top may not be opened with
placed behind the front seats.
fixed strings.
Do not place any objects on the wind
deflector.

-------------------------------------------------------------------------------------------------------------------------------------------------------------

42
Keys, doors and windows
● Insert the adapter of the deflector
● Extract the four locking pins of
● With the hinges behind the front
with the elevation into the
the deflector: the upper ones leap
seats insert the right side locking
opposite recess of the guidance.
out spring-loaded by turning the
pins in the recesses of the right
pins out of the brackets on both
side trim near the rear seat. Fold
● Slide deflector in the guidance to
sides, the lower ones leap out by
the deflector a little at the centre
the right vehicle side until it
lifting the detents at the sliders on
and insert the left side locking
engages.
both sides.
pins in the recesses of the left
● Raise rear backrest.
side trim. Ensure that all pins are
● Expand the wind deflector.
Remove deflector in reverse order.
properly engaged. Push down
the deflector at the centre.
Fitting of the big wind deflector
● Take the deflector out of the bag.

-------------------------------------------------------------------------------------------------------------------------------------------------------------

Keys, doors and windows
43
Stowing the wind deflector
Rollover protection system
To stow the deflector, move in the
The rollover protection system
rear locking pins by pushing back and
consists of a reinforced windscreen
turning the pins into the brackets.
frame and roll bars under covers
Push back the sliders of the front
behind the rear head restraints.
locking pins until they engage. Swing
in the deflector and stow it in the bag.
● Fold up the upper part to vertical
position.
The rear seats cannot be occupied
when the big wind deflector is
mounted.
The vertical part of the deflector can
In the event of a vehicle rollover,
be folded down when not used.
head-on collision or side impact, the
Wind deflector may remain mounted
Fold down the rear backrests. Align
roll bars deploy upwards
when the soft top is closed.
the hard cover of the bag to the load
automatically within milliseconds.
For removing fold down vertical part
compartment. Position the bag from
They also deploy together with the
of the deflector. Lift up the deflector at
the bottom up at the lateral guide in
front and side airbag systems.
the centre a little and remove it from
the recess of the upper frame. Fix the
Notice
the recesses on both sides.
bag with the Velcro fastener at the
Do not place any objects on the
lashing eyes on both sides. Raise
covers of the roll bars behind the
rear backrests.
head restraints.

-------------------------------------------------------------------------------------------------------------------------------------------------------------

44
Keys, doors and windows
The airbag control indicator v
illuminates if the roll bars have been
deployed.
The system deploys with the soft top
opened or closed.
The soft top must not be operated if
the roll bars have been deployed. A
continuous warning will sound and a
message appears in the Driver
Information Centre if the switch is
actuated.

-------------------------------------------------------------------------------------------------------------------------------------------------------------

Seats, restraints
45
Adjustment
Seats, restraints
Head restraints
Head restraints on front seats
Position
Head restraints
45
Active head restraints
46
9 Warning
Front seats
47
Only drive with the head restraint
Seat position
47
set to the proper position.
Manual seat adjustment
48
Seat folding
50
Power seat adjustment
51
Armrest
53
Heating
53
Ventilating
53
Seat belts
54
Three-point seat belt
55
Height adjustment
Airbag system
57
Press release button, adjust height,
Front airbag system
60
engage.
Side airbag system
61
Airbag deactivation
61
Child restraints
62
Child restraint systems
62
The upper edge of the head restraint
Child restraint installation
should be at upper head level. If this
locations
64
is not possible for extremely tall
ISOFIX child restraint systems . . 67
people, set to highest position, and
Top-tether fastening eyes
67
set to lowest position for small people.

-------------------------------------------------------------------------------------------------------------------------------------------------------------

46
Seats, restraints
Horizontal adjustment
Head restraints on rear seats
Press both catches, pull the head
restraint upwards and remove.
Pull bolster of head restraint forwards
Height adjustment
slowly. It engages in several
Place the head restraint in a net bag
Pull the head restraint upwards and
positions.
and secure the underside of the bag
let engage. To move downwards,
with the Velcro fasteners on the load
To return to its rearmost position, pull
press the catch to release and push
compartment floor. A suitable net bag
fully forwards and release.
the head restraint downwards.
is available at your workshop.
Removal of rear head restraint
E.g. when using a child restraint
Active head restraints
system 3 62.
In the event of a rear-end impact, the
front parts of the active head
restraints are moved slightly
forwards. Thus the head is supported
so that the risk of whiplash injury is
reduced.

-------------------------------------------------------------------------------------------------------------------------------------------------------------

Seats, restraints
47
Notice
Front seats
Approved accessories may only be
attached if the seat is not in use.
Seat position
9 Warning
Only drive with the seat correctly
adjusted.
9 Danger
Do not sit nearer than 25 cm from
Sit with buttocks as far back
the steering wheel, to permit safe
against the backrest as possible.
airbag deployment.
Adjust the distance between the
seat and the pedals so that legs
are slightly angled when pressing
9 Warning
the pedals. Slide the front
passenger seat as far back as
Never adjust seats while driving as
possible.
they could move uncontrollably.
Set seat height high enough to
have a clear field of vision on all
9 Warning
sides and of all display
instruments. There should be at
Never store any objects under the
least one hand of clearance
seats.
between head and the roof
frame. Your thighs should rest
lightly on the seat without
pressing into it.

-------------------------------------------------------------------------------------------------------------------------------------------------------------

48
Seats, restraints
Sit with shoulders as far back
Backrest inclination
Manual seat adjustment
against the backrest as possible.
Drive only with engaged seats and
Set the backrest rake so that it is
backrests.
possible to easily reach the
steering wheel with arms slightly
Longitudinal adjustment
bent. Maintain contact between
shoulders and the backrest when
turning the steering wheel. Do
not angle the backrest too far
back. We recommend a
maximum rake of approx. 25°.
Adjust seat and steering wheel in
a way that the wrist rests on top
of the steering wheel while the
arm is fully extended and
Turn lever to the rear, adjust
shoulders on the backrest.
inclination and release lever. Allow
the backrest to engage audibly.
Adjust the steering wheel 3 77.
Adjust the head restraint 3 45.
Pull handle, slide seat, release
Adjust the thigh support so that
handle. Try to move the seat back and
there is a space approx. two
forth to ensure that the seat is locked
fingers wide between the edge of
in place.
the seat and the hollow of the
knee.
Adjust the lumbar support so that
it supports the natural shape of
the spine.

-------------------------------------------------------------------------------------------------------------------------------------------------------------

Seats, restraints
49
Seat height
Seat inclination
Lumbar support
Lever pumping motion
Adjust lumbar support using the four-
way switch to suit personal
up
: seat higher
up
: front end higher
requirements.
down : seat lower
down : front end lower
Moving support up and down: push
switch up or down.
Increasing and decreasing support:
push switch forwards or backwards.

-------------------------------------------------------------------------------------------------------------------------------------------------------------

50
Seats, restraints
Adjustable thigh support
Caution
9 Warning
When seat height is in highest
When folding up, ensure that the
position, push head restraints
seat is securely locked in position
down and lift up sun visors before
before driving. Failure to do so
folding backrest forwards.
may result in personal injury in the
event of hard braking or collision.
Seat folding on manual operated
seats
When fully engaged the seat will be in
original position again.
Do not operate backrest inclination
lever while backrest is folded forward.
Seat folding on power seats
Pull the lever and slide the thigh
support.
Seat folding
9 Warning
Passengers on rear seats should
take care not to be trapped by the
Lift release lever and fold backrest
adjustment mechanism when the
forwards, then slide seat forwards to
seat moves back to its original
the stop.
position.
To restore, slide the seat backwards
to the stop. Lift backrest to upright
position without operating any lever.
Ensure backrest engages.

-------------------------------------------------------------------------------------------------------------------------------------------------------------

Seats, restraints
51
Lift release lever and fold backrest
disconnected. In this event, close and
Longitudinal adjustment
forwards. The seat slides
open the door or switch on ignition
automatically forwards to the stop.
and operate power adjustment again.
To restore, lift backrest to upright
Overload
position and engage. The seat slides
If the folding function is electrically
automatically backwards to the
overloaded, the power supply is
original position.
automatically cut-off for a short time.
In case the head restraint of the
folded backrest is blocked by the
upper windscreen frame, allow the
Power seat adjustment
seat to move backwards or
downwards slightly 3 51, or set
9 Warning
head restraint to lowest position
3 45.
Care must be taken when
Move switch forwards/backwards.
operating the power seats. There
Safety function
is a risk of injury, particularly for
Seat height
If the power seat encounters
children. Objects could become
resistance while sliding forwards or
trapped.
rearwards, it is immediately stopped
Keep a close watch on the seats
and moved in the opposite direction.
when adjusting them. Vehicle
Notice
passengers should be informed
Do not sit on the seat while seat is
accordingly.
moving.
Power disconnection
If seat remains in forward position
with opened door for more than
10 minutes, power adjustment is

-------------------------------------------------------------------------------------------------------------------------------------------------------------

52
Seats, restraints
Move switch upwards/downwards.
Backrest inclination
Adjust lumbar support using the four-
way switch to suit personal
Seat inclination
requirements.
Moving support up and down: push
switch up or down.
Increasing and decreasing support:
push switch forwards or backwards.
Notice
If the seat setting is electrically
overloaded, the power supply is
automatically cut-off for a short time.
Adjustable thigh support
Turn switch forwards/backwards.
Move front of switch upwards/
Lumbar support
downwards.
Pull the lever and slide the thigh
support.

-------------------------------------------------------------------------------------------------------------------------------------------------------------

Seats, restraints
53
Armrest
Heating
Ventilating
The armrest can be slid forwards by
Adjust heating to the desired setting
Adjust ventilation to the desired
10 cm. Under the armrest there is a
by pressing ß for the respective seat
setting by pressing A for the
storage compartment.
one or more times. The lighting LEDs
respective seat one or more times.
in the button indicate the setting.
Armrest storage 3 70.
The lighting LEDs in the button
Prolonged use of the highest setting
indicate the setting.
for people with sensitive skin is not
Ventilated seats are operational with
recommended.
ignition on.
Seat heating is operational when
Seat ventilation is also operational
engine is running.
during an Autostop.
Seat heating is also operational
Stop-start system 3 138.
during an Autostop.
Stop-start system 3 138.

-------------------------------------------------------------------------------------------------------------------------------------------------------------

54
Seats, restraints
Seat belts are designed to be used by
Seat belts
only one person at a time. Child
restraint system 3 62.
Periodically check all parts of the belt
system for damage, pollution and
proper functionality.
Have damaged components
replaced. After an accident, have the
belts and triggered belt pretensioners
replaced by a workshop.
Notice
Make sure that the belts are not
The presenter comes out when:
damaged by shoes or sharp-edged
objects or are trapped. Prevent dirt
● The respective door is closed
from getting into the belt retractors.
and ignition is switched on.
The seat belts are locked during hard
acceleration or deceleration of the
● The ignition is on and the door is
Seat belt presenter
vehicle holding the occupants in the
closed.
sitting position. Therefore the risk of
The seat belt presenter is a comfort
The presenter retracts when:
injury is considerably reduced.
feature that enables the front
● The respective door is opened
passengers to fasten the seat belts
again.
conveniently by bringing the belts to
9 Warning
the front.
● The key is removed from ignition
switch.
Fasten seat belt before each trip.
● The respective latch plate is
In the event of an accident, people
inserted into the buckle.
not wearing seat belts endanger
their fellow occupants and
themselves.

-------------------------------------------------------------------------------------------------------------------------------------------------------------

Seats, restraints
55
● A timeout of 45 seconds elapsed.
Three-point seat belt
9 Warning
● The vehicle is driven longer than
15 seconds with a speed of more
Fasten
Incorrect handling (e.g. removal or
than 3 mph.
fitting of belts) can trigger the belt
If the seat belt presenter does not
pretensioners.
retract automatically, push it back
slightly.
Deployment of the belt pretensioners
is indicated by continuous illumination
Seat belt reminder
of control indicator v 3 89.
Front seats are equipped with a seat
Triggered belt pretensioners must be
belt reminder, indicated for the driver
replaced by a workshop. Belt
seat as control indicator X in the
pretensioners can only be triggered
tachometer 3 89 and for the
once.
passenger seat in the centre console
Notice
3 86.
Do not affix or install accessories or
other objects that may interfere with
Withdraw the belt from the retractor,
Seat belt force limiters
the operation of the belt
guide it untwisted across the body
On all seats, stress on the body is
pretensioners. Do not make any
and insert the latch plate into the
reduced by the gradual release of the
modifications to belt pretensioner
buckle. Tighten the lap belt regularly
belt during a collision.
components as this will invalidate
whilst driving by pulling the shoulder
the vehicle type approval.
belt.
Seat belt pretensioners
In the event of a head-on or rear-end
collision of a certain severity, all seat
belts are tightened.


Content      ..     1      2      3      4      ..