Saturn Sky (2008 year). Manual - part 16


  Index      Saturn     Saturn Sky (2008 year) - manual in english


Search            copyright infringement  


Content      ..     14      15      16      17     ..


Saturn Sky (2008 year). Manual - part 16


Windshield Wiper Blade
Replacement

Windshield wiper blades should be inspected for wear
and cracking. See Scheduled Maintenance on page 6-4
for more information.

Replacement blades come in different types and are
removed in different ways. For proper type and length,
see Normal Maintenance Replacement Parts on
page 6-14
.

To replace the windshield wiper blade assembly do
the following:

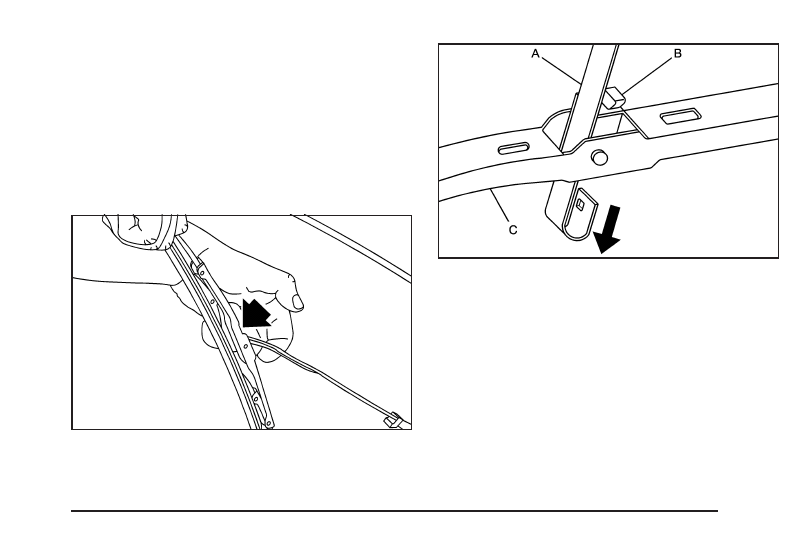
1. Lift the wiper arm away from the windshield.

2. Push the release lever (B) to disengage the hook

and push the wiper arm (A) out of the blade (C).

3. Push the new wiper blade securely on the wiper

arm until you hear the release lever click into
place.

5-49

-------------------------------------------------------------------------------------------------------------------------------------------------------------

Tires

Your new vehicle comes with high-quality tires
made by a leading tire manufacturer. If you ever
have questions about your tire warranty and where
to obtain service, see your vehicle Warranty
booklet for details. For additional information refer
to the tire manufacturer’s booklet included with
your vehicle’s Owner Manual.

{

CAUTION:

Poorly maintained and improperly used
tires are dangerous.

Overloading your vehicle’s tires can
cause overheating as a result of too
much flexing. You could have an
air-out and a serious accident.
See Loading Your Vehicle 
on
page 4-23
.

CAUTION:

(Continued)

CAUTION:

(Continued)

Underinflated tires pose the same
danger as overloaded tires. The
resulting accident could cause serious
injury. Check all tires frequently to
maintain the recommended pressure.
Tire pressure should be checked when
your vehicle’s tires are cold. See
Inflation - Tire Pressure 
on page 5-56.

Overinflated tires are more likely to
be cut, punctured, or broken by a
sudden impact — such as when you
hit a pothole. Keep tires at the
recommended pressure.

Worn, old tires can cause accidents.
If the tire’s tread is badly worn, or if
your vehicle’s tires have been
damaged, replace them.

5-50

-------------------------------------------------------------------------------------------------------------------------------------------------------------

Low-Profile Tires

If your vehicle has P245/45R18 size tires, they are
classified as low-profile tires. These tires are
designed for very responsive driving on wet or dry
pavement. You may also notice more road noise
with low-profile performance tires and that they
tend to wear faster.

Notice: If your vehicle has low-profile tires,
they are more susceptible to damage from road
hazards or curb impact than standard profile
tires. Tire and/or wheel assembly damage
can occur when coming into contact with road
hazards like, potholes, or sharp edged objects,
or when sliding into a curb. Your vehicle
warranty does not cover this type of damage.
Keep tires set to the correct inflation
pressure and, when possible avoid contact
with curbs, potholes, and other road hazards.

Winter Tires

If your vehicle has P245/45R18 size tires, they are
classified as low-profile performance tires. These tires
are designed for very responsive driving on wet or
dry pavement. If you expect to drive on snow or
ice covered roads often, you may want to get winter

tires for your vehicle. The low-profile performance tires
may not offer the traction you would like or the same
level of performance as winter tires on snow or ice
covered roads.

Winter tires, in general, are designed for increased
traction on snow and ice covered roads. With winter
tires, there may be decreased dry road traction,
increased road noise, and shorter tire tread life.
After switching to winter tires, be alert for changes in
vehicle handling and braking.

See your dealer/retailer for details regarding winter tire
availability and proper tire selection. Also, see Buying
New Tires 
on page 5-66.

If you choose to use winter tires:

Use tires of the same brand and tread type on all
four wheel positions.

Use only radial ply tires of the same size, load range,
and speed rating as the original equipment tires.

Winter tires with the same speed rating as your original
equipment tires may not be available for H, V, W, Y,
and ZR speed rated tires. If you choose winter tires with
a lower speed rating, never exceed the tire’s maximum
speed capability.

5-51

-------------------------------------------------------------------------------------------------------------------------------------------------------------

Tire Sidewall Labeling

Useful information about a tire is molded into its
sidewall. The example below shows a typical
passenger (p-metric) tire sidewall.

(A) Tire Size

:

The tire size is a combination of

letters and numbers used to define a particular
tire’s width, height, aspect ratio, construction type,
and service description. See the “Tire Size”
illustration later in this section for more detail.

(B) TPC Spec (Tire Performance Criteria
Specification)

:

Original equipment tires designed

to GM’s specific tire performance criteria have
a TPC specification code molded onto the sidewall.
GM’s TPC specifications meet or exceed all
federal safety guidelines.

(C) DOT (Department of Transportation)

:

The Department of Transportation (DOT) code
indicates that the tire is in compliance with the
U.S. Department of Transportation Motor Vehicle
Safety Standards.

(D) Tire Identification Number (TIN)

:

The letters

and numbers following DOT code are the Tire
Identification Number (TIN). The TIN shows
the manufacturer and plant code, tire size, and
date the tire was manufactured. The TIN is molded
onto both sides of the tire, although only one
side may have the date of manufacture.

(E) Tire Ply Material

:

The type of cord and number

of plies in the sidewall and under the tread.

(F) Uniform Tire Quality Grading (UTQG)

:

Tire manufacturers are required to grade
tires based on three performance factors:
treadwear, traction and temperature resistance.
For more information see Uniform Tire Quality
Grading 
on page 5-68.

Passenger (P-Metric) Tire Example

5-52

-------------------------------------------------------------------------------------------------------------------------------------------------------------

(G) Maximum Cold Inflation Load Limit

:

Maximum load that can be carried and the
maximum pressure needed to support that load.

Tire Size

The following illustration shows an example of a
typical passenger (p-metric) vehicle tire size.

(A) Passenger (P-Metric) Tire

:

The United States

version of a metric tire sizing system. The letter P
as the first character in the tire size means a
passenger vehicle tire engineered to standards set
by the U. S. Tire and Rim Association.

(B) Tire Width

:

The three-digit number indicates

the tire section width in millimeters from sidewall
to sidewall.

(C) Aspect Ratio

:

A two-digit number that

indicates the tire height-to-width measurements.
For example, if the tire size aspect ratio is 60,
as shown in item C of the illustration, it would
mean that the tire’s sidewall is 60 percent as high
as it is wide.

(D) Construction Code

:

A letter code is used to

indicate the type of ply construction in the tire.
The letter R means radial ply construction;
the letter D means diagonal or bias ply
construction; and the letter B means belted-bias
ply construction.

(E) Rim Diameter

:

Diameter of the wheel in

inches.

(F) Service Description

:

These characters

represent the load range and speed rating of the
tire. The load index represents the load carry
capacity a tire is certified to carry. The load index
can range from 1 to 279. The speed rating is
the maximum speed a tire is certified to carry a
load. Speed ratings range from A to Z.

5-53

-------------------------------------------------------------------------------------------------------------------------------------------------------------

Tire Terminology and Definitions

Air Pressure

:

The amount of air inside the

tire pressing outward on each square inch of the
tire. Air pressure is expressed in pounds per
square inch (psi) or kilopascal (kPa).

Accessory Weight

:

This means the combined

weight of optional accessories. Some examples of
optional accessories are, automatic transmission,
power steering, power brakes, power windows,
power seats, and air conditioning.

Aspect Ratio

:

The relationship of a tire’s height

to its width.

Belt

:

A rubber coated layer of cords that is

located between the plies and the tread. Cords
may be made from steel or other reinforcing
materials.

Bead

:

The tire bead contains steel wires wrapped

by steel cords that hold the tire onto the rim.

Bias Ply Tire

:

A pneumatic tire in which the plies

are laid at alternate angles less than 90 degrees
to the centerline of the tread.

Cold Tire Pressure

:

The amount of air pressure in

a tire, measured in pounds per square inch (psi) or
kilopascals (kPa) before a tire has built up heat
from driving. See Inflation - Tire Pressure on
page 5-56
.

Curb Weight

:

The weight of a motor vehicle with

standard and optional equipment including the
maximum capacity of fuel, oil, and coolant,
but without passengers and cargo.

DOT Markings

:

A code molded into the sidewall

of a tire signifying that the tire is in compliance
with the U.S. Department of Transportation (DOT)
motor vehicle safety standards. The DOT code
includes the Tire Identification Number (TIN),
an alphanumeric designator which can also identify
the tire manufacturer, production plant, brand,
and date of production.

GVWR

:

Gross Vehicle Weight Rating.

See Loading Your Vehicle on page 4-23.

GAWR FRT

:

Gross Axle Weight Rating for the

front axle. See Loading Your Vehicle on
page 4-23
.

GAWR RR

:

Gross Axle Weight Rating for the rear

axle. See Loading Your Vehicle on page 4-23.

Intended Outboard Sidewall

:

The side of

an asymmetrical tire, that must always face
outward when mounted on a vehicle.

Kilopascal (kPa)

:

The metric unit for air pressure.

Light Truck (LT-Metric) Tire

:

A tire used on

light duty trucks and some multipurpose passenger
vehicles.

5-54

-------------------------------------------------------------------------------------------------------------------------------------------------------------

Load Index

:

An assigned number ranging from

1 to 279 that corresponds to the load carrying
capacity of a tire.

Maximum Inflation Pressure

:

The maximum air

pressure to which a cold tire can be inflated.
The maximum air pressure is molded onto the
sidewall.

Maximum Load Rating

:

The load rating for a tire

at the maximum permissible inflation pressure
for that tire.

Maximum Loaded Vehicle Weight

:

The sum of

curb weight, accessory weight, vehicle capacity
weight, and production options weight.

Normal Occupant Weight

:

The number of

occupants a vehicle is designed to seat multiplied
by 150 lbs (68 kg). See Loading Your Vehicle
on page 4-23.

Occupant Distribution

:

Designated seating

positions.

Outward Facing Sidewall

:

The side of an

asymmetrical tire that has a particular side that
faces outward when mounted on a vehicle.
The side of the tire that contains a whitewall,
bears white lettering, or bears manufacturer,
brand, and/or model name molding that is higher
or deeper than the same moldings on the other
sidewall of the tire.

Passenger (P-Metric) Tire

:

A tire used on

passenger cars and some light duty trucks and
multipurpose vehicles.
Recommended Inflation Pressure

:

Vehicle

manufacturer’s recommended tire inflation
pressure as shown on the tire placard.
See Inflation - Tire Pressure on page 5-56 and
Loading Your Vehicle on page 4-23.

Radial Ply Tire

:

A pneumatic tire in which the

ply cords that extend to the beads are laid
at 90 degrees to the centerline of the tread.

Rim

:

A metal support for a tire and upon which

the tire beads are seated.

Sidewall

:

The portion of a tire between the tread

and the bead.

Speed Rating

:

An alphanumeric code assigned to

a tire indicating the maximum speed at which a
tire can operate.

Traction

:

The friction between the tire and the

road surface. The amount of grip provided.

Tread

:

The portion of a tire that comes into

contact with the road.

Treadwear Indicators

:

Narrow bands, sometimes

called wear bars, that show across the tread of
a tire when only 1/16 inch (1.6 mm) of tread
remains. See When It Is Time for New Tires on
page 5-65
.

5-55

-------------------------------------------------------------------------------------------------------------------------------------------------------------

UTQGS (Uniform Tire Quality Grading
Standards)

:

A tire information system that

provides consumers with ratings for a tire’s
traction, temperature, and treadwear. Ratings are
determined by tire manufacturers using
government testing procedures. The ratings are
molded into the sidewall of the tire. See Uniform
Tire Quality Grading 
on page 5-68.

Vehicle Capacity Weight

:

The number of

designated seating positions multiplied by
150 lbs (68 kg) plus the rated cargo load.
See Loading Your Vehicle on page 4-23.

Vehicle Maximum Load on the Tire

:

Load on

an individual tire due to curb weight, accessory
weight, occupant weight, and cargo weight.

Vehicle Placard

:

A label permanently attached

to a vehicle showing the vehicle’s capacity
weight and the original equipment tire size and
recommended inflation pressure. See “Tire and
Loading Information Label” under Loading
Your Vehicle 
on page 4-23.

Inflation - Tire Pressure

Tires need the correct amount of air pressure to
operate effectively.

Notice: Do not let anyone tell you that
under-inflation or over-inflation is all right.
It is not. If your tires do not have enough air
(under-inflation), you can get the following:

Too much flexing

Too much heat

Tire overloading

Premature or irregular wear

Poor handling

Reduced fuel economy

If your tires have too much air (over-inflation),
you can get the following:

Unusual wear

Poor handling

Rough ride

Needless damage from road hazards

5-56

-------------------------------------------------------------------------------------------------------------------------------------------------------------

A vehicle specific Tire and Loading Information
label is attached to your vehicle. This label shows
your vehicle’s original equipment tires and the
correct inflation pressures for your tires when they
are cold. The recommended cold tire inflation
pressure, shown on the label, is the minimum
amount of air pressure needed to support
your vehicle’s maximum load carrying capacity.

For additional information regarding how much
weight your vehicle can carry, and an example of
the Tire and Loading Information label, see
Loading Your Vehicle on page 4-23. How you load
your vehicle affects vehicle handling and ride
comfort. Never load your vehicle with more weight
than it was designed to carry.

When to Check

Check your tires once a month or more.

How to Check

Use a good quality pocket-type gage to check
tire pressure. You cannot tell if your tires are
properly inflated simply by looking at them.

Radial tires may look properly inflated even when
they are under-inflated. Check the tire’s inflation
pressure when the tires are cold. Cold means your
vehicle has been sitting for at least three hours
or driven no more than 1 mile (1.6 km).

Remove the valve cap from the tire valve stem.
Press the tire gage firmly onto the valve to
get a pressure measurement. If the cold tire
inflation pressure matches the recommended
pressure on the Tire and Loading Information
label, no further adjustment is necessary. If the
inflation pressure is low, add air until you reach the
recommended amount.

If you overfill the tire, release air by pushing on
the metal stem in the center of the tire valve.
Re-check the tire pressure with the tire gage.

Be sure to put the valve caps back on the valve
stems. They help prevent leaks by keeping out dirt
and moisture.

5-57

-------------------------------------------------------------------------------------------------------------------------------------------------------------

Tire Pressure Monitor System

The Tire Pressure Monitor System (TPMS) uses radio
and sensor technology to check tire pressure levels.
The TPMS sensors monitor the air pressure in
your vehicle’s tires and transmit tire pressure readings
to a receiver located in the vehicle.

Each tire, including the spare (if provided), should be
checked monthly when cold and inflated to the inflation
pressure recommended by the vehicle manufacturer
on the vehicle placard or tire inflation pressure label.
(If your vehicle has tires of a different size than the
size indicated on the vehicle placard or tire inflation
pressure label, you should determine the proper
tire inflation pressure for those tires.)

As an added safety feature, your vehicle has been
equipped with a tire pressure monitoring system (TPMS)
that illuminates a low tire pressure telltale when one
or more of your tires is significantly under-inflated.

Accordingly, when the low tire pressure telltale
illuminates, you should stop and check your tires as
soon as possible, and inflate them to the proper
pressure. Driving on a significantly under-inflated tire
causes the tire to overheat and can lead to tire failure.
Under-inflation also reduces fuel efficiency and tire
tread life, and may affect the vehicle’s handling
and stopping ability.

Please note that the TPMS is not a substitute for proper
tire maintenance, and it is the driver’s responsibility to
maintain correct tire pressure, even if under-inflation
has not reached the level to trigger illumination of
the TPMS low tire pressure telltale.

Your vehicle has also been equipped with a TPMS
malfunction indicator to indicate when the system is not
operating properly. The TPMS malfunction indicator
is combined with the low tire pressure telltale. When the
system detects a malfunction, the telltale will flash
for approximately one minute and then remain
continuously illuminated. This sequence will continue
upon subsequent vehicle start-ups as long as the
malfunction exists.

When the malfunction indicator is illuminated, the
system may not be able to detect or signal low tire
pressure as intended. TPMS malfunctions may occur for
a variety of reasons, including the installation of
replacement or alternate tires or wheels on the vehicle
that prevent the TPMS from functioning properly.
Always check the TPMS malfunction telltale after
replacing one or more tires or wheels on your vehicle to
ensure that the replacement or alternate tires and
wheels allow the TPMS to continue to function properly.

See Tire Pressure Monitor Operation on page 5-59,
for additional information.

5-58

-------------------------------------------------------------------------------------------------------------------------------------------------------------

Federal Communications Commission
(FCC) and Industry and Science
Canada

The Tire Pressure Monitor System (TPMS) operates on
a radio frequency and complies with Part 15 of the
FCC Rules. Operation is subject to the following
two conditions:

1. This device may not cause harmful interference.

2. This device must accept any interference received,

including interference that may cause undesired
operation.

The Tire Pressure Monitor System (TPMS) operates on
a radio frequency and complies with RSS-210 of
Industry and Science Canada. Operation is subject to
the following two conditions:

1. This device may not cause interference.

2. This device must accept any interference received,

including interference that may cause undesired
operation of the device.

Changes or modifications to this system by other than
an authorized service facility could void authorization to
use this equipment.

Tire Pressure Monitor Operation

The Tire Pressure Monitor System (TPMS) is designed
to warn the driver when a low tire pressure condition
exists. TPMS sensors are mounted onto each tire
and wheel assembly. The TPMS sensors monitor the air
pressure in the vehicle’s tires and transmits the tire
pressure readings to a receiver located in the vehicle.

When a low tire pressure
condition is detected, the
TPMS turns on the low tire
pressure warning light
located on the instrument
panel cluster.

At the same time a message to check the pressure in a
specific tire appears on the Driver Information Center
(DIC) display. The low tire pressure warning light and the
DIC warning message come on at each ignition cycle
until the tires are inflated to the correct inflation pressure.

5-59

-------------------------------------------------------------------------------------------------------------------------------------------------------------

Using the DIC, tire pressure levels can be viewed by the
driver. For additional information and details about the
DIC operation and displays see DIC Operation and
Displays 
on page 3-38 and DIC Warnings and Messages
on page 3-41.

The low tire pressure warning light may come on in cool
weather when the vehicle is first started, and then
turn off as you start to drive. This could be an early
indicator that the air pressure in the tire(s) are getting
low and need to be inflated to the proper pressure.

A Tire and Loading Information label shows the size of
your vehicle’s original equipment tires and the correct
inflation pressure for your vehicle’s tires when they are
cold. See Loading Your Vehicle on page 4-23, for an
example of the Tire and Loading Information label and
its location on your vehicle. Also see Inflation - Tire
Pressure 
on page 5-56.

Your vehicle’s TPMS system can warn you about a low
tire pressure condition but it does not replace normal
tire maintenance. See Tire Inspection and Rotation
on page 5-63 and Tires on page 5-50.

Notice: Liquid tire sealants could damage the
Tire Pressure Monitor System (TPMS) sensors.
Sensor damage caused by using a tire sealant is not
covered by your warranty. Do not use liquid tire
sealants.

TPMS Malfunction Light and Message

The TPMS will not function properly if one or more of the
TPMS sensors are missing or inoperable. When the
system detects a malfunction, the low tire warning light
flashes for about one minute and then stays on for
the remainder of the ignition cycle. A DIC warning
message is also displayed. The low tire warning light
and DIC warning message come on at each ignition
cycle until the problem is corrected. Some of the
conditions that can cause the malfunction light and DIC
message to come on are:

The TPMS sensor matching process was started
but not completed or not completed successfully
after rotating the vehicle’s tires. The DIC message
and TPMS malfunction light should go off once
the TPMS sensor matching process is performed
successfully. See “TPMS Sensor Matching Process”
later in this section.

One or more TPMS sensors are missing or
damaged. The DIC message and the TPMS
malfunction light should go off when the TPMS
sensors are installed and the sensor matching
process is performed successfully. See your
dealer/retailer for service.

5-60

-------------------------------------------------------------------------------------------------------------------------------------------------------------

Replacement tires or wheels do not match your
vehicle’s original equipment tires or wheels.
Tires and wheels other than those recommended
for your vehicle could prevent the TPMS from
functioning properly. See Buying New Tires on
page 5-66
.

Operating electronic devices or being near
facilities using radio wave frequencies similar
to the TPMS could cause the TPMS sensors to
malfunction.

If the TPMS is not functioning it cannot detect or
signal a low tire condition. See your dealer/retailer for
service if the TPMS malfunction light and DIC message
comes on and stays on.

TPMS Sensor Matching Process

Each TPMS sensor has a unique identification code.
Any time you replace one or more of the TPMS sensors
or rotate the vehicle’s tires, the identification codes
need to be matched to the new tire/wheel location.
The sensors are matched, to the tire/wheel locations, in
the following order: driver side front tire, passenger
side front tire, passenger side rear tire, and driver side
rear tire using a TPMS diagnostic tool. See your
dealer/retailer for service.

The TPMS sensors can also be matched to each
tire/wheel position by increasing or decreasing the tire’s
air pressure. When increasing the tire’s pressure, do
not exceed the maximum inflation pressure indicated on
the tire’s sidewall. To decrease the tire’s air-pressure
use the pointed end of the valve cap, a pencil-style
air pressure gage, or a key.

You have two minutes to match each tire and wheel
position. If it takes longer than two minutes to match any
tire and wheel position, the matching process stops
and you need to start over.

5-61

-------------------------------------------------------------------------------------------------------------------------------------------------------------

The TPMS matching process is outlined below:

1. Set the parking brake.

2. Turn the ignition switch to ON/RUN with the

engine off.

3. Press and hold the Remote Keyless Entry (RKE)

transmitter’s LOCK and UNLOCK buttons, at the
same time, for about five seconds to start the TPMS
learn mode. The horn sounds twice indicating the
TPMS receiver is ready and in learn mode.

4. Start with the driver side front tire. The driver side

front turn signal also comes on to indicate that
corner’s sensor is ready to be learned.

5. Remove the valve cap from the tire’s valve stem.

Activate the TPMS sensor by increasing or
decreasing the tire’s air pressure for about
eight seconds. The horn chirp, can take up to
30 seconds to sound. It chirps one time and then
all the turn signals flash one time to confirm the
sensor identification code has been matched to
the tire/wheel position.

6. The passenger side front turn signal comes on to

indicate that corner sensor is ready to be learned.
Proceed to the passenger side front tire and
repeat the procedure in Step 5.

7. The passenger side rear turn signal comes on to

indicate that corner sensor is ready to be learned.
Proceed to the passenger side rear tire and
repeat the procedure in Step 5.

8. The driver side rear turn signal comes on to

indicate that corner sensor is ready to be learned.
Proceed to the driver side rear tire, and repeat
the procedure in Step 5.

9. After hearing the single horn chirp for the driver

side rear tire, two additional horn chirps sound to
indicate the tire learning process is done.
Turn the ignition switch to LOCK/OFF.

If no tires are learned after entering the TPMS
learn mode, or if communication with the receiver
stops, or if the time limit has expired, turn the
ignition switch to LOCK/OFF and start over
beginning with Step 2.

10. Set all four tires to the recommended air pressure

level as indicated on the Tire and Loading
Information label.

11. Put the valve caps back on the valve stems.

5-62

-------------------------------------------------------------------------------------------------------------------------------------------------------------

Tire Inspection and Rotation

We recommend that you regularly inspect your
vehicle’s tires for signs of wear or damage.
See When It Is Time for New Tires on page 5-65
for more information.

Tires should be rotated every 5,000 to 8,000 miles
(8 000 to 13 000 km). See Scheduled Maintenance
on page 6-4.

The purpose of a regular tire rotation is to achieve
a uniform wear for all tires on the vehicle. This
will ensure that your vehicle continues to perform
most like it did when the tires were new.

Any time you notice unusual wear, rotate the tires
as soon as possible and check wheel alignment.
Also check for damaged tires or wheels. See
When It Is Time for New Tires on page 5-65 and
Wheel Replacement on page 5-70.

When rotating Goodyear Eagle RSA P245/45R18
non-directional tires, always use the correct
rotation pattern shown here.

Non-Directional Tires

5-63

-------------------------------------------------------------------------------------------------------------------------------------------------------------

If your vehicle has Goodyear Eagle F1-GS1
P245/45R18 size tires, they are directional tires
and must roll in a certain direction for the
best overall performance. The direction is shown
by an arrow on the tire sidewall. Because these
tires are directional, they should be rotated as
shown here. These tires should only be moved
from front to rear and rear to front on the same
side of the vehicle.

After the tires have been rotated, adjust the
front and rear inflation pressures as shown
on the Tire and Loading Information label.
See Inflation - Tire Pressure on page 5-56
and Loading Your Vehicle on page 4-23.

Reset the Tire Pressure monitor System.
See Tire Pressure Monitor Operation on page 5-59.

Make certain that all wheel nuts are properly
tightened. See “Wheel Nut Torque” under
Capacities and Specifications on page 5-99.

{

CAUTION:

Rust or dirt on a wheel, or on the parts to
which it is fastened, can make wheel nuts
become loose after a time. The wheel
could come off and cause a crash. When
you change a wheel, remove any rust or
dirt from places where the wheel attaches
to the vehicle. In an emergency, you can
use a cloth or a paper towel to do this;
but be sure to use a scraper or wire brush
later, if you need to, to get all the rust or
dirt off.

Directional Tires

5-64

-------------------------------------------------------------------------------------------------------------------------------------------------------------


Content      ..     14      15      16      17     ..