Pontiac Aztek (2005 year). Manual - part 23
 

  Index      Pontiac     Pontiac Aztek (2005 year) - manual in english


Search            copyright infringement  


Content      ..     21      22      23      24     ..


Pontiac Aztek (2005 year). Manual - part 23


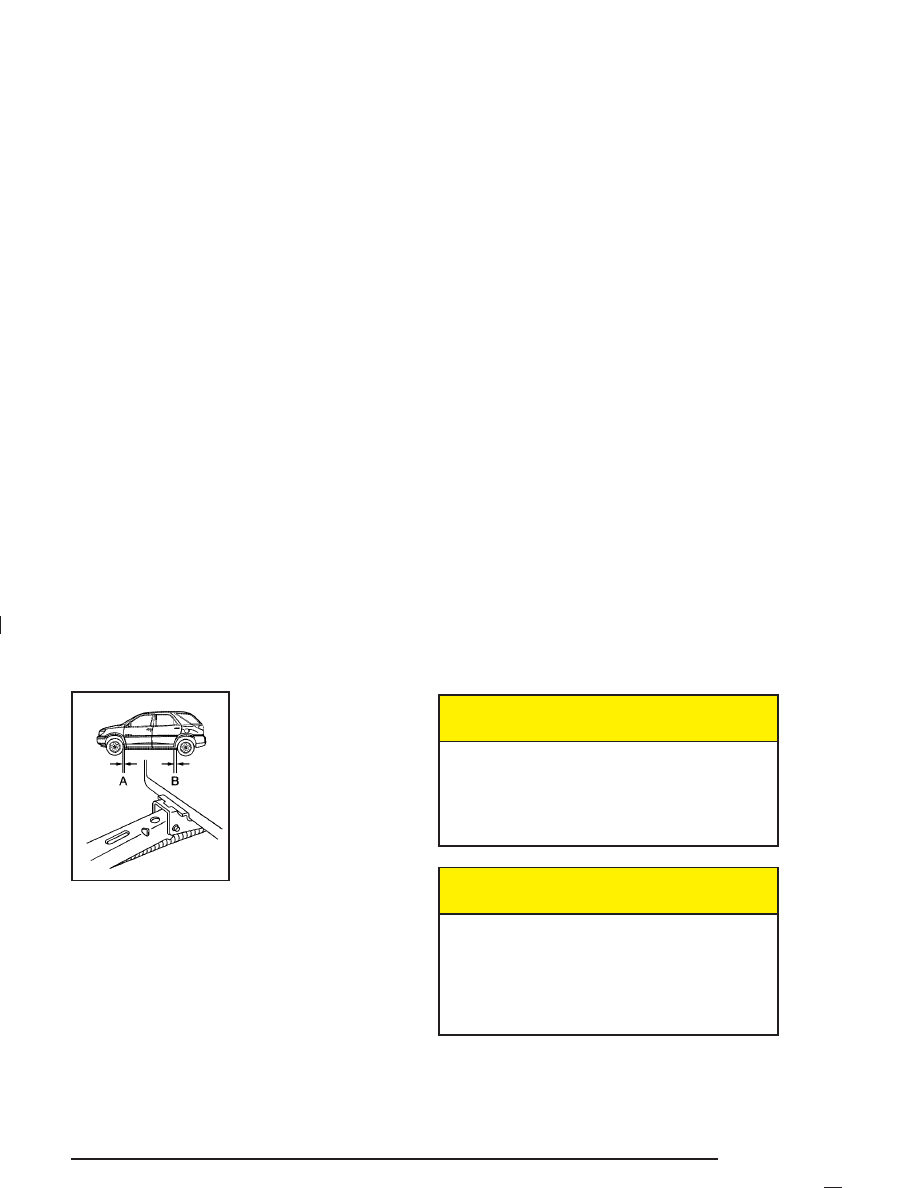
3. Locate the notch (A is

3.0 inches (7.5 cm)
from the front tire
or B is 5.5 inches
(14.0 cm) from the rear
tire) in the frame.
The notch is located
near each wheel in the
vehicle’s body.

Notice: If you use a jack to raise the vehicle
without positioning it correctly, you could damage
your vehicle. When raising your vehicle on a
jack, avoid contact with the rear axle control arms.

4. Position the jack and raise the jack head until it

fits firmly into the notch in the vehicle’s frame
nearest the flat tire.

5. Do not raise the vehicle yet. Put the compact

spare tire near you.

{

CAUTION:

Getting under a vehicle when it is jacked up is
dangerous. If the vehicle slips off the jack you
could be badly injured or killed. Never get
under a vehicle when it is supported only
by a jack.

{

CAUTION:

Raising your vehicle with the jack improperly
positioned can damage the vehicle and even
make the vehicle fall. To help avoid personal
injury and vehicle damage, be sure to fit the
jack lift head into the proper location before
raising the vehicle.

5-79

-------------------------------------------------------------------------------------------------------------------------------------------------------------

6. Attach the folding

wrench to the jack,
and turn the wrench
clockwise to raise
the jack head
3 inches (7.6 cm).

7. Raise the vehicle by turning the folding wrench

clockwise in the jack. Raise the vehicle far
enough off the ground so that there is enough room
for the spare tire to fit under the wheel well.

8. Remove all the wheel nuts and take off the flat tire.

{

CAUTION:

Rust or dirt on the wheel, or on the parts to
which it is fastened, can make the wheel nuts
become loose after a time. The wheel could
come off and cause an accident. When you
change a wheel, remove any rust or dirt from
the places where the wheel attaches to the
vehicle. In an emergency, you can use a cloth
or a paper towel to do this; but be sure to use
a scraper or wire brush later, if you need to,
to get all the rust or dirt off.

9. Remove any rust or dirt

from the wheel bolts,
mounting surfaces
and spare wheel.

5-80

-------------------------------------------------------------------------------------------------------------------------------------------------------------

{

CAUTION:

Never use oil or grease on studs or nuts. If
you do, the nuts might come loose. Your wheel
could fall off, causing a serious accident.

10. Install the spare tire and put the wheel nuts back on

with the rounded end of the nuts toward the wheel.
Tighten each nut by hand until the wheel is held
against the hub.

11. Lower the vehicle by attaching the folding wrench to

the jack and turning the wrench counterclockwise.
Lower the jack completely.

{

CAUTION:

Incorrect wheel nuts or improperly tightened
wheel nuts can cause the wheel to come loose
and even come off. This could lead to an
accident. Be sure to use the correct wheel
nuts. If you have to replace them, be sure to
get new GM original equipment wheel nuts.
Stop somewhere as soon as you can and have
the nuts tightened with a torque wrench to the
proper torque specification. See Capacities
and Specifications 
on page 5-107 for wheel nut
torque specification.

Notice: Improperly tightened wheel nuts can lead
to brake pulsation and rotor damage. To avoid
expensive brake repairs, evenly tighten the wheel
nuts in the proper sequence and to the proper
torque specification. See Capacities and
Specifications 
on page 5-107 for the wheel nut
torque specification.

5-81

-------------------------------------------------------------------------------------------------------------------------------------------------------------

12. Tighten the wheel nuts

firmly in a crisscross
sequence, as shown.

Notice: Wheel covers will not fit on your compact
spare. If you try to put a wheel cover on the compact
spare, you could damage the cover or the spare.

Do not try to put a wheel cover on the compact
spare tire. It will not fit. Store the wheel cover securely
in the rear of the vehicle until you have the flat tire
repaired or replaced.

Secondary Latch System

Your vehicle has an underbody mounted tire hoist
assembly equipped with a secondary latch system. It is
designed to stop the compact spare tire from suddenly
falling off your vehicle if the cable holding the spare
tire is damaged. For the secondary latch to work, the tire
must be stowed with the valve stem pointing down.
See Storing a Flat or Spare Tire and Tools on page 5-85
for instructions on storing the spare tire correctly.

{

CAUTION:

Before beginning this procedure read all the
instructions. Failure to read and follow the
instructions could damage the hoist assembly
and you and others could get hurt. Read and
follow the instructions listed below.

5-82

-------------------------------------------------------------------------------------------------------------------------------------------------------------

To release the spare tire from the secondary latch,
do the following:

{

CAUTION:

Someone standing too close during the
procedure could be injured by the jack.
If the spare tire does not slide off the jack
completely, make sure no one is behind you
or on either side of you as you pull the jack
out from the spare.

1. If the cable is not visible, start this procedure

at Step 3.

2. Turn the wrench counterclockwise until

approximately 6 inches (15 cm) of cable is exposed.

All-wheel-drive Vehicle shown

5-83

-------------------------------------------------------------------------------------------------------------------------------------------------------------

3. Attach the folding wrench to the jack and raise the

jack at least 10 turns.

4. Place the jack under the vehicle, ahead of the rear

bumper. Position the center lift point of the jack
under the center of the spare tire.

5. Turn the folding wrench clockwise to raise the jack

until it lifts the secondary latch spring.

6. Keep raising the jack until the spare tire stops

moving upward and is held firmly in place. This
lets you know that the secondary latch has released
and the spare tire is balancing on the jack.

7. Lower the jack by turning the folding wrench

counterclockwise. Keep lowering the jack until
the spare tire slides off the jack.

Front-wheel-drive Vehicle shown

5-84

-------------------------------------------------------------------------------------------------------------------------------------------------------------

8. Disconnect the wrench from the jack and carefully

remove the jack. Use one hand to push against the
spare tire while firmly pulling the jack out from
under the spare tire with the other hand.

9. Tilt the retainer and slip it through the wheel

opening when the spare tire has been completely
lowered.

10. Turn the wrench clockwise to raise the cable back

up if the cable is hanging.

Have the hoist assembly inspected as soon as you can.
You will not be able to store a spare tire using the
hoist assembly until it has been repaired or replaced.

Storing a Flat or Spare Tire
and Tools

Storing the Flat Tire without a Sliding
Rear Convenience Tray

A. D-Ring

B. Wing Nut

C. J-Hook

D. Valve Stem

E. Full-size Tire

1. Flip up the D-ring located in the rear cargo area.

5-85

-------------------------------------------------------------------------------------------------------------------------------------------------------------

2. Lay the tire in the rear cargo area of the vehicle

with the valve stem up with the center hole of the
tire over the D-ring.

For vehicles with aluminum wheels, remove the
center cap by tapping the back of the cap with the
folding wrench.

3. Remove the J-hook and the wing nut from the back

of the jack access door. Assemble the wing nut and
the J-hook.

4. Install the wing nut and the J-hook to the D-ring

through the center hole of the tire.

5. Tighten the wing nut to secure the tire to the floor.

Push and pull on the tire to make sure the tire is
secure and does not move.

6. Put back all tools as they were stored in the jack

storage compartment. Attach the wrench back to
the jack. Put the jack base on the bracket tab
and sit the jack properly between the two “ears” of
the bracket. Use the bolt to tighten the jack.

7. Put the compartment cover back on, slip the tabs on

the bottom of the cover into the bottom of the cover
opening. Push the cover in place and push down the
tab on the top of the cover so that it rests in the
groove. This secures the cover in place.

Storing the Flat Tire with a Sliding
Rear Convenience Tray

A. D-Ring

B. Sliding Rear

Convenience Tray

C. Wing Nut

D. J-Hook

E. Full-Size Tire

F. Storage Compartment

Cap Hole

5-86

-------------------------------------------------------------------------------------------------------------------------------------------------------------

1. Push the sliding rear tray forward to the stored

position.

2. Open the driver’s side storage compartment door of

the sliding rear tray.

3. Remove the rear cap on the bottom of the storage

compartment and flip the D-ring up.

4. Lay the tire on top of the driver’s side storage

compartment with the valve stem down. Make
sure you can see the D-ring through the center hole
of the tire.

5. Remove the J-hook and the wing nut from the back

of the jack access door. Assemble the wing nut and
the J-hook.

6. Install the wing nut and the J-hook to the D-ring

through the center hole of the tire.

7. Tighten the wing nut to secure the tire to the floor.

8. Push and pull on the tire to make sure the tire

is secure and does not move.

9. Put back all tools as they were stored in the

storage compartment. Attach the wrench back to the
jack. Put the jack base on the bracket tab and sit
the jack properly between the two ears of the
bracket. Use the bolt to tighten the jack.

10. Put the compartment cover back on, slip the tabs on

the bottom of the cover into the bottom of the cover
opening. Push the cover in place and push down the
tab on the top of the cover so that it rests in the
groove. This secures the cover in place.

5-87

-------------------------------------------------------------------------------------------------------------------------------------------------------------

Storing the Spare Tire and Tools

{

CAUTION:

Storing a jack, a tire, or other equipment in the
passenger compartment of the vehicle could
cause injury. In a sudden stop or collision,
loose equipment could strike someone. Store
all these in the proper place.

{

CAUTION:

The underbody-mounted spare tire needs
to be stored with the valve stem pointing
down. If the spare tire is stored with the valve
stem pointing upwards, its secondary latch
won’t work properly and the spare tire could
loosen and suddenly fall from your vehicle.
If this happened when your vehicle was being
driven, the tire might contact a person or
another vehicle, causing injury and, of course,
damage to itself as well. Be sure the
underbody-mounted spare tire is stored with
its valve stem pointing down.

1. Lay the compact spare tire on the ground at the

rear of the vehicle. Position the compact spare
tire so the valve stem is pointed down facing the
rear of the vehicle.

5-88

-------------------------------------------------------------------------------------------------------------------------------------------------------------

2. Lower the cable to the ground. See Removing the

Spare Tire and Tools on page 5-72.

3. Tilt the retainer downward and slip it through the

center hole of the spare tire.

Make sure the retainer is fully seated across the
underside of the wheel.

4. Attach the folding wrench to the hoist shaft.

Use the extension tube if you have the sliding
rear convenience tray.

5. Turn the folding wrench clockwise to lift the

spare tire.

For all-wheel-drive vehicles, when the tire reaches
the stabilizer bar, move the tire over the bar,
then continue to turn the folding wrench clockwise
to lift the spare tire.

6. When the tire is almost in the stored position,

turn the tire so the valve stem is towards the rear
of the vehicle.

This will help when you check and maintain tire
pressure in the spare.

7. Raise the tire fully against the underside of the

vehicle. Continue turning the folding wrench until
you feel more than two clicks. This indicates that the
compact spare tire is secure and the cable is
tight. The spare tire hoist cannot be overtightened.

8. Make sure the tire is stored securely. Push, pull (A),

and then try to turn (B) the tire. If the tire moves,
use the folding wrench to tighten the cable.

5-89

-------------------------------------------------------------------------------------------------------------------------------------------------------------

9. Put back all tools as they were stored in the jack

storage compartment and put the compartment
cover back on.

To put the cover back on, slip the tabs on the
bottom of the cover into the bottom of the cover
opening. Push the cover in place and push down the
tab on the top of the cover so that it rests in the
groove. This secures the cover in place.

When you replace the compact spare with a full-size
tire, reinstall the bolt-on wheel covers or the center cap,
whichever your vehicle has. Tighten them “hand
tight” over the wheel nuts, using the folding wrench.

Compact Spare Tire

Although the compact spare tire was fully inflated when
your vehicle was new, it can lose air after a time.
Check the inflation pressure regularly. It should be
60 psi (420 kPa).

After installing the compact spare on your vehicle, you
should stop as soon as possible and make sure your
spare tire is correctly inflated. The compact spare is
made to perform well at speeds up to 65 mph (105 km/h)
for distances up to 3,000 miles (5 000 km), so you can
finish your trip and have your full-size tire repaired or
replaced where you want. Of course, it’s best to replace
your spare with a full-size tire as soon as you can. Your
spare will last longer and be in good shape in case you
need it again.

Notice: When the compact spare is installed, do
not take your vehicle through an automatic car
wash with guide rails. The compact spare can get
caught on the rails. That can damage the tire
and wheel, and maybe other parts of your vehicle.

Don’t use your compact spare on other vehicles.

And don’t mix your compact spare tire or wheel with
other wheels or tires. They won’t fit. Keep your spare tire
and its wheel together.

Notice: Tire chains will not fit your compact spare.
Using them can damage your vehicle and can
damage the chains too. Do not use tire chains on
your compact spare.

5-90

-------------------------------------------------------------------------------------------------------------------------------------------------------------

All-Wheel Drive

After installing a compact spare tire on a vehicle with
all-wheel drive you will need to drive with light to
moderate acceleration, for 10 seconds, in a straight line.
This action will allow the vehicle to detect the compact
spare tire and disable the all-wheel drive system.
The AWD DISABLE message will come on in the
message center indicating that the all-wheel drive
system is off. You may detect a slight pull during this
time, but this is normal.

Notice: You may damage your vehicle’s all-wheel
drive system if your vehicle is driven for an
extended period with a compact spare tire installed
and the all-wheel drive system in operations. See
All-Wheel Drive (AWD) System 
on page 4-11 for
more information.

Appearance Care

Cleaning products can be hazardous. Some are toxic.
Other cleaning products can burst into flames if a match
is struck near them or if they get on a hot part of the
vehicle. Some are dangerous if their fumes are inhaled in
a closed space. When anything from a container is used
to clean the vehicle, be sure to follow the manufacturer’s
warnings and instructions. Always open the doors or
windows of the vehicle when cleaning the inside.

Never use these to clean the vehicle:

Gasoline

Benzene

Naphtha

Carbon Tetrachloride

Acetone

Paint Thinner

Turpentine

Lacquer Thinner

Nail Polish Remover

They can all be hazardous — some more than
others — and they can all damage the vehicle, too.

5-91

-------------------------------------------------------------------------------------------------------------------------------------------------------------

Do not use any of these products unless this manual
says you can. In many uses, these will damage
the vehicle:

Alcohol

Laundry Soap

Bleach

Reducing Agents

Fabric/Carpet

Use a vacuum cleaner often to get rid of dust and loose
dirt. Wipe vinyl, leather, plastic, and painted surfaces
with a clean, damp cloth.

GM-approved cleaning products can be obtained from
your dealer.

Here are some cleaning tips:

Always read the instructions on the cleaner label.

Clean up stains as soon as you can before they set.

Carefully scrape off any excess stain.

Use a clean cloth or sponge, and change to a clean
area often. A soft brush may be used if stains are
stubborn.

To avoid forming a ring on fabric after spot cleaning,
clean the entire area immediately or it will set.

Most stains can be removed with club soda water.
To clean, use the following instructions:

1. For liquids: blot with a clean, soft, white cloth.

For solids: remove as much as possible and
then vacuum or brush.

2. Apply club soda water to a clean, soft, white cloth.

Do not over-saturate; the cloth should not drip
water.

3. Clean the entire area. Avoid getting the fabric

too wet.

4. Start cleaning from the seams into the stain to

avoid a ring effect.

5. Continue cleaning, using a clean area of the cloth

each time it becomes soiled.

6. When the stain is removed, blot the cleaned area

with another dry, clean, soft, white cloth.

5-92

-------------------------------------------------------------------------------------------------------------------------------------------------------------

Using Cleaner on Fabric

1. First, try the cleaner on an area of the fabric that is

not easily seen to make sure the cleaner does not
affect the color of the fabric.

2. For liquids: blot with a clean, soft, white cloth.

For solids: remove as much as possible and
then vacuum or brush.

3. Spray a small amount of the cleaner onto a clean

soft, white, cloth. Do not apply spray directly to the
fabric.

4. Start cleaning from the seams into the stain to

avoid a ring effect.

5. Continue cleaning, using a clean area of the cloth

each time it becomes soiled.

6. When the stain is removed, blot the cleaned area

with another dry, clean, soft, white cloth.

7. If the cleaner leaves a ring effect, follow up with

the club soda water instructions given earlier in
this section.

Special Fabric Cleaning Problems

Stains caused by such things as catsup, black coffee,
egg, fruit, fruit juice, milk, soft drinks, vomit, urine,
and blood can be removed using the club soda water
instructions given earlier in this section. If an odor lingers
after cleaning vomit or urine, treat the area with a
water and baking soda solution: 1 teaspoon (5 ml) of
baking soda to 1 cup (250 ml) of lukewarm water.
Let dry.

Stains caused by oil and grease can be cleaned with
an approved GM cleaner and a clean, white cloth.

1. Carefully scrape off excess stain.

2. Clean with cool water and allow to dry completely.

3. If a stain remains, follow the “Using Cleaner on

Fabric” instructions described earlier.

Vinyl

Use warm water and a clean cloth.

Rub with a clean, damp cloth to remove dirt.
This may have to be done more than once.

Things like tar, asphalt, and shoe polish will stain if
they are not removed quickly. Use a clean cloth
and vinyl cleaner. See your dealer for this product.

5-93

-------------------------------------------------------------------------------------------------------------------------------------------------------------

Leather

Use a soft cloth with lukewarm water and a mild soap or
saddle soap and wipe dry with a soft cloth. Then, let
the leather dry naturally. Do not use heat to dry.

For stubborn stains, use a leather cleaner.

Never use oils, varnishes, solvent-based or abrasive
cleaners, furniture polish, or shoe polish on leather.

Soiled or stained leather should be cleaned
immediately. If dirt is allowed to work into the finish,
it can harm the leather.

Instrument Panel

Use only mild soap and water to clean the top surfaces
of the instrument panel. Sprays containing silicones
or waxes may cause annoying reflections in the
windshield and even make it difficult to see through the
windshield under certain conditions.

Interior Plastic Components

Use only a mild soap and water solution on a soft cloth
or sponge. Commercial cleaners may affect the
surface finish.

Glass Surfaces

Glass should be cleaned often. GM Glass Cleaner or a
liquid household glass cleaner will remove normal
tobacco smoke and dust films on interior glass. See
Vehicle Care/Appearance Materials on page 5-99.

Notice: If you use abrasive cleaners when cleaning
glass surfaces on your vehicle, you could scratch
the glass and/or cause damage to the rear window
defogger and the integrated radio antenna. When
cleaning the glass on your vehicle, use only a soft
cloth and glass cleaner.

5-94

-------------------------------------------------------------------------------------------------------------------------------------------------------------


Content      ..     21      22      23      24     ..