Genesis G90 (2017 year). Manual - part 14
 

  Index      Genesis     Genesis G90 (2017 year) - manual in english


Search            copyright infringement  


Content      ..     12      13      14      15     ..


Genesis G90 (2017 year). Manual - part 14


3-136

Convenient features of your vehicle

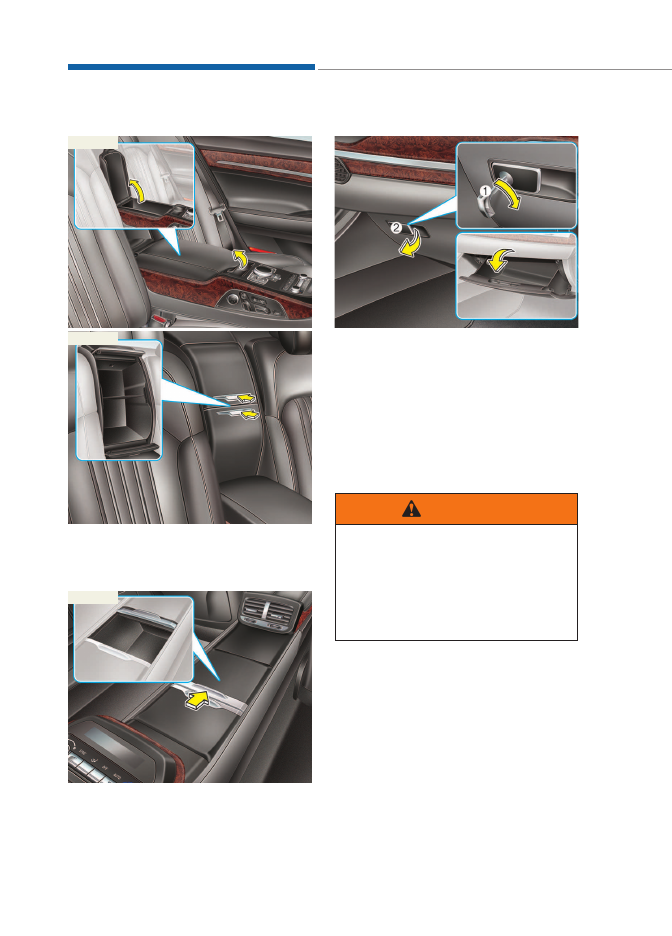
Rear console storage

To open :
Press the button.

To open :
Push the cover forward.

Glove box

The glove box can be locked and
unlocked with the mechanical key
(1).

To open:
Pull the lever (2).
Make sure the glove box is closed
while driving.

OHI046432

Type A

OHI046433

■ 

Type B

OHI046434

■ 

Type C

OHI046435

ALWAYS close the glove box
after use.
An open glove box can cause
serious injury to the passenger
in an accident, even if the pas-
senger is wearing a seat belt.

WARNING

-------------------------------------------------------------------------------------------------------------------------------------------------------------

3-137

03

Sunglass holder (if equipped)

To open:
Press the cover and the holder will
slowly open. Place your sunglasses
in the compartment door with the
lenses facing out.
To close:
Push back into position.
Make sure the sunglass holder is
closed while driving.

Cellular phone holder

To open:
Push the cover.

Items other than a cellular phone
may not fit inside the cellular
phone storage in accordance with
its size or shape. Do not forcefully
push items into the cellular phone
storage and close the cover. It may
damage or distort those items. In
addition, do not forcefully open the
cellular phone storage cover, when
it is jammed with a stored item
inside.

NOTICE

OHI046436

OHI046437

• Do not keep objects except

sunglasses inside the sun-
glass holder. Such objects can
be thrown from the holder in
the event of a sudden stop or
an accident, possibly injuring
the passengers in the vehicle.

• Do not open the sunglass

holder while the vehicle is
moving. The rear view mirror
of the vehicle can be blocked
by an open sunglass holder.

• Do not put the glasses forcibly

into a sunglass holder. It may
cause personal injury if you
try to open it forcibly when the
glasses are jammed.

WARNING

-------------------------------------------------------------------------------------------------------------------------------------------------------------

3-138

Convenient features of your vehicle

Wireless cellular phone charg-
ing system (if equipped)

There are two wireless cellular
phone charging systems both inside
the front console and inside the rear
console. Those are available when
all doors are closed, and when the
Engine Start/Stop button is in the
ACC/ON position.

To charge a cellular phone 

The wireless cellular phone charging
systems charge only the Qi-enabled
cellular phones (     ). Read the label
on the cellular phone accessory
cover or visit your cellular phone
manufacturer’s website to check
whether your cellular phone supports
the Qi technology.

• Front seats 
The wireless charging process starts
when you put a Qi-enabled cellular
phone on the wireless charging unit.

• Rear seats 
The wireless charging process starts
when you fully insert a Qi-enabled
cellular phone over the flipping cover
of the wireless charging unit.

1. Remove other items, including the

smart key, from the wireless
charging unit. If not, the wireless
charging process may be inter-
rupted.

2. The indicator illuminates in orange

during the charging process. The
indicator color changes to green,
when the charging process is
completed.

3. You can turn ON or OFF the wire-

less charging function in the user
settings mode on the instrument
cluster. (For further information,
refer to the “LCD Modes” in this
chapter.) 

OHI046437

Front

OHI046443

■ 

Rear

-------------------------------------------------------------------------------------------------------------------------------------------------------------

3-139

03

Slightly change the cellular phone
position, when the cellular phone is
not being charged. Make sure that
the indicator illuminates in orange.
The indicator color may not change
to green in accordance with the cel-
lular phone type, even though the
charging process is completed. The
indicator blinks in orange for 10 sec-
onds when there is a malfunction
with the wireless charging system. In
this case, temporarily stop the charg-
ing process, and re-attempt to wire-
lessly charge your cellular phone
again.
The system warns you with a mes-
sage on the LCD display when you do
not take out the cellular phone from
the wireless charging unit with the
door open and the Engine Start/Stop
button in the OFF position.

• The wireless cellular phone

charging system may not sup-
port certain cellular phones,
which are not verified for the Qi
specification (

).

• Locate your cell phone well in the

middle of the wireless cellular
phone charging system. Even
when your cell phone locates
slightly to one side, the charging
speed may decrease.

• The wireless charging process

may temporarily stop, when a
smart key function operates (i.e.
starting the engine, opening the
doors, closing the doors).

• For certain cell phones, the indi-

cator color may not change to
green, even when the wireless
charging process is properly
completed.

(Continued)

(Continued)
• The wireless charging process may

temporarily stop, when tempera-
ture abnormally increases inside
the wireless cellular phone charg-
ing system. The wireless charging
process restarts, when tempera-
ture falls to a proper level.

• The wireless charging process

may temporarily stop when there
is any metallic item, such as a
coin, between the wireless cellu-
lar phone charging system and a
cellular phone.

NOTICE

-------------------------------------------------------------------------------------------------------------------------------------------------------------

3-140

Convenient features of your vehicle

IIN

NT

TE

ER

RIIO

OR

R  F

FE

EA

AT

TU

UR

RE

ES

S  

Ashtray (if equipped)

To open cover:
Press the cover and it will slowly open.

To clean the ashtray:
The plastic receptacle should be
removed by lifting the plastic ashtray
receptacle upward and pulling it out.

Cup holder

You can also store cups or small bev-
erage cans inside.

Front seats

Press the button to open the cover.

Rear seats

Press the button to open the cover.

OHI046439L

Putting lit cigarettes or matches
in an ashtray with other com-
bustible materials may cause a
fire.

WARNING

OHI046439

OHI046440

■ Type A

-------------------------------------------------------------------------------------------------------------------------------------------------------------

3-141

03

Pull up the handle to open the cover.

• Keep your drinks sealed while

driving to prevent spilling your
drink. If liquid spills, it may get
into the vehicle's electrical/elec-
tronic system and damage elec-
trical/electronic parts.

• When cleaning spilled liquids,

do not dry the cup holder at high
temperature. This may damage
the chrome part of the cup holder.

NOTICE

OHI046441

• Avoid abrupt starting and

braking when the cup holder
is in use to prevent spilling
your drink. If hot liquid spills,
you could be burned. Such a
burn to the driver could cause
loss of vehicle control result-
ing in an accident.

• Do not place uncovered or

unsecured cups, bottles, cans,
etc., in the cup holder contain-
ing hot liquid while the vehicle
is in motion. Injuries may result
in the event of sudden stop or
collision.

• Only use soft cups in the cup

holders. Hard objects can injure
you in an accident.

WARNING

Keep cans or bottles out of
direct sun light and do not put
them in a hot vehicle. It may
explode.

WARNING

OHI046478

■ Type B

■ Type C

-------------------------------------------------------------------------------------------------------------------------------------------------------------

3-142

Convenient features of your vehicle

Sunvisor

To use a sunvisor, pull it downward.
To use a sunvisor for a side window,
pull it downward, unsnap it from the
bracket (1) and swing it to the side (2).
To use the vanity mirror, pull down the
sunvisor and slide the mirror cover (3).
Adjust the sunvisor forward or back-
ward (4) as needed. Use the ticket
holder (5) to hold tickets.

Information 

Close the vanity mirror cover securely
and return the sunvisor to its original
position after use. 

• Do not put several tickets in the

ticket holder at one time. This
could cause damage to the tick-
et holder.

• Avoid putting a plastic card

such as a credit card in the tick-
et holder located in the outside
of the sunvisor. This could cause
damage to the plastic card.

Rear vanity mirror 

Press the cover to open the rear van-
ity mirror. Push up the cover to close
the rear vanity mirror.

Make sure to close the rear vanity
mirror cover after use. If not, the
rear vanity mirror lamp remains
ON, possibly draining the battery
or damaging the rear vanity mirror.

NOTICE

NOTICE

i

OHI046444

OHI046430

For your safety, do not block your
view when using the sunvisor.

WARNING

-------------------------------------------------------------------------------------------------------------------------------------------------------------

3-143

03

Power outlet (if equipped)

The power outlet is designed to pro-
vide power for mobile telephones or
other devices designed to operate
with vehicle electrical systems. The
devices should draw less than 180
W(Watt) with the engine running.

OHI046446

Front

• Type A

OHI046445

Front

• Type B

OHI046447

Rear

• Type A

OHI046448

Rear

• Type B

Avoid electrical shocks. Do not
place your fingers or foreign
objects (pin, etc.) into a power
outlet or touch the power outlet
with wet hands.

WARNING

-------------------------------------------------------------------------------------------------------------------------------------------------------------

3-144

Convenient features of your vehicle

To prevent damage to the Power
Outlets :
• Use the power outlet only when

the engine is running and
remove the accessory plug after
use. Using the accessory plug
for prolonged periods of time
with the engine off could cause
the battery to discharge.

• Only use 12V electric acces-

sories which are less than 180
W(Watt) in electric capacity.

• Adjust the air-conditioner or

heater to the lowest operating
level when using the power out-
let.

• Close the cover when not in use.
• Some electronic devices can

cause electronic interference
when plugged into a vehicle’s
power outlet. These devices may
cause excessive audio static
and malfunctions in other elec-
tronic systems or devices used
in your vehicle.

• Push the plug in as far as it will

go. If good contact is not made,
the plug may overheat and the
fuse may open.

• Plug in battery equipped electri-

cal/electronic devices with
reverse current protection. The
current from the battery may
flow into the vehicle's electri-
cal/electronic system and cause
system malfunction.

Clock

You can set the clock by using the
DIS Navigation System.
For more information, refer to the
separately supplied manual.

NOTICE

OHI046451

Do not adjust the clock while
driving. You may lose your
steering control and cause an
accident that results in severe
personal injury or death.

WARNING

-------------------------------------------------------------------------------------------------------------------------------------------------------------

3-145

03

Clothes hanger (if equipped)

These hangers are not designed to
hold large or heavy items.

Bag hanger (if equipped)

Pull the strap (1) to hang a bag on
the hook (2). Fold the hook when not
in use.

Floor mat anchor(s) 
(if equipped)

OHI046452L

Type A

OHI046453

■ 

Type B

■ 

Type C

Do not hang other objects
except clothes. In an accident it
may cause vehicle damage or
personal injury.

WARNING

OHI046454N

OHI046474

■ Front

OHI046475

■ Rear

-------------------------------------------------------------------------------------------------------------------------------------------------------------

3-146

Convenient features of your vehicle

ALWAYS use the Floor Mat Anchors
to attach the front floor mats to the
vehicle. The anchors on the front
floor carpet keep the floor mats from
sliding forward.

Rear curtain  

To raise and lower the rear curtain,
press the button.

The rear curtain will be lowered auto-
matically when you shift the shift
lever into R (Reverse) and raised
automatically when you shift the shift
lever from R (Reverse) into P (Park).

The following must be observed
when installing ANY floor mat
to the vehicle.
• Ensure that the floor mats are

securely attached to the vehi-
cle's floor mat anchor(s)
before driving the vehicle.

• Do not use ANY floor mat that

cannot be firmly attached to
the vehicle's floor mat
anchors.

• Do not stack floor mats on top

of one another (e.g. all-weath-
er rubber mat on top of a car-
peted floor mat). Only a single
floor mat should be installed
in each position.

IMPORTANT - Your vehicle was
manufactured with driver's side
floor mat anchors that are
designed to securely hold the
floor mat in place. To avoid any
interference with pedal opera-
tion, Genesis Branded Vehicle
recommends that the Genesis/
HYUNDAI floor mat designed
for use in your vehicle be
installed.

WARNING

OHI046455

■ Front

OHI046456

■ Rear

OHI046457

-------------------------------------------------------------------------------------------------------------------------------------------------------------

3-147

03

After the rear curtain is lowered by
shifting into R (Reverse), if you drive
more than 20 km/h (12 mph) with the
shift lever in D (Drive), the rear cur-
tain will be raised automatically.
The rear curtains may stop operating
in the position and move to the reverse
direction, when its opening/closing
operation is interrupted.

Do not apply excessive force
while operating the rear curtain.
This could cause damage to the
rear curtain.

Rear door window curtain 

You can raise/lower the rear door win-
dow curtain by operating the power
window switches, which is located on
the driver's door and the rear doors.
The switch on the driver’s door also
operates the rear door curtains.

Power window switch (1)  

To operate the rear door window cur-
tain on the right side.

NOTICE

OHI046462L

■ Driver’s window switch

OHI046461L

■ Rear window switch

-------------------------------------------------------------------------------------------------------------------------------------------------------------

3-148

Convenient features of your vehicle

Power window switch (2)  

To operate the rear door window cur-
tain on the left side.

1. Fully close the rear window by

pulling up the power window
switch.

2. Pull up the power window switch

again to move the rear door win-
dow curtain.

3. When you want to open the rear

window with the curtain raised up
you should lower the rear door win-
dow curtain and then open the rear
window by pushing down the power
window switch.

The power window switch on the dri-
ver’s door operates in the same man-
ner.

• If resistance is detected during

upward/downward movement of
the rear door window curtain,
the rear door window curtain
stops moving and then starts to
move in a reverse direction.

• Do not apply excessive external

force on the rear door window
curtain while operating. It may
cause a malfunction.

Luggage net holder

To keep items from shifting in the trunk,
you can use the holders located in the
trunk to attach the luggage net.
Make sure the luggage net is securely
attached to the holders in the trunk.
If necessary, we recommend that
you contact an authorized retailer of
Genesis Branded products to obtain
a luggage net.

NOTICE

OHI046459

Type A

OHI046460L

■ 

Type B

Avoid eye injury. DO NOT over-
stretch the luggage net. ALWAYS
keep your face and body out of
the luggage net’s recoil path. DO
NOT use the luggage net when
the strap has visible signs of
wear or damage.

WARNING

-------------------------------------------------------------------------------------------------------------------------------------------------------------

Multimedia system .......................................................................4-2

AUX, USB and iPod

®

port ..........................................................................4-2

Antenna ..........................................................................................................4-3
Steering wheel audio control....................................................................4-4
DIS navigation system ................................................................................4-5
Bluetooth

®

Wireless Technology hands-free ......................................4-5

4

M

Mu

ullttiim

me

ed

diia

a  ssy

ysstte

em

m

-------------------------------------------------------------------------------------------------------------------------------------------------------------

Detailed information about the multi-
media system is described in a sep-
arately supplied manual.

Information 

• If you install an aftermarket HID

head lamp, your vehicle’s audio and
electronic device may malfunction.

• Prevent chemicals such as perfume,

cosmetic oil, sun cream, hand clean-
er, and air freshener from contact-
ing the interior parts because they
may cause damage or discoloration.

AUX, USB and iPod

®

port

You can use an AUX port to connect
audio devices and USB port to plug in
USB and also in iPod

®

port. (Rear mul-

timedia jack : USB only)

Information 

When using a portable audio device
connected to the power outlet, noise
may occur during playback. If this
happens, use the power source of the
portable audio device. 

iPod

®

is a trademark of Apple Inc.

i

i

M

MU

UL

LT

TIIM

ME

ED

DIIA

A  S

SY

YS

ST

TE

EM

M

4-2

Multimedia system

OHI046438L

Front

OHI046450

Rear (if equipped)

-------------------------------------------------------------------------------------------------------------------------------------------------------------

Antenna

Combination antenna (1) 
(for Europe, if equipped)

The combination fin antenna will
receive the transmit data. (for example :
GPS and DAB signal)

Glass antenna (2)

Your vehicle uses a glass antenna to
receive both AM and FM signals.

• Do not clean the inside of the

rear window glass with a cleaner
or use a scraper to remove for-
eign deposits as this may cause
damage to the antenna ele-
ments.

• Avoid adding metallic coatings

such as Ni, Cd, and so on. These
can degrade the receiving AM
and FM broadcast signals.

• To prevent damage to the rear

glass antenna, never use sharp
instruments or window cleaner
containing abrasives to clean
the window. Clean the inside
surface of the rear glass window
with a piece of soft cloth.

• When putting a sticker on the

inside surface of the rear win-
dow, be careful not to damage to
the rear glass antenna.

• Do not put  sharp instruments

nearby the rear glass antenna.

• Tinted rear window may affect

the proper functioning of the
antenna.

NOTICE

NOTICE

4-3

04

OHI046463

-------------------------------------------------------------------------------------------------------------------------------------------------------------


Content      ..     12      13      14      15     ..