Tractors X60 Series. Manual - part 54
 

  Index      Tractors     Tractors X60 Series - service repair manual 2012 year


Search            


Content   ..  52  53  54  55   ..


Tractors X60 Series. Manual - part 54


215

Maintenance

7

9

1000 HOUR MAIN SERVICE

Change cab air intake filter  

WARNING: Respiratory protection equipment 
and  protective  clothing  appropriate  to  the 
environment that the filter has been in con-
tact with MUST be used during the cleaning 
of the filter.

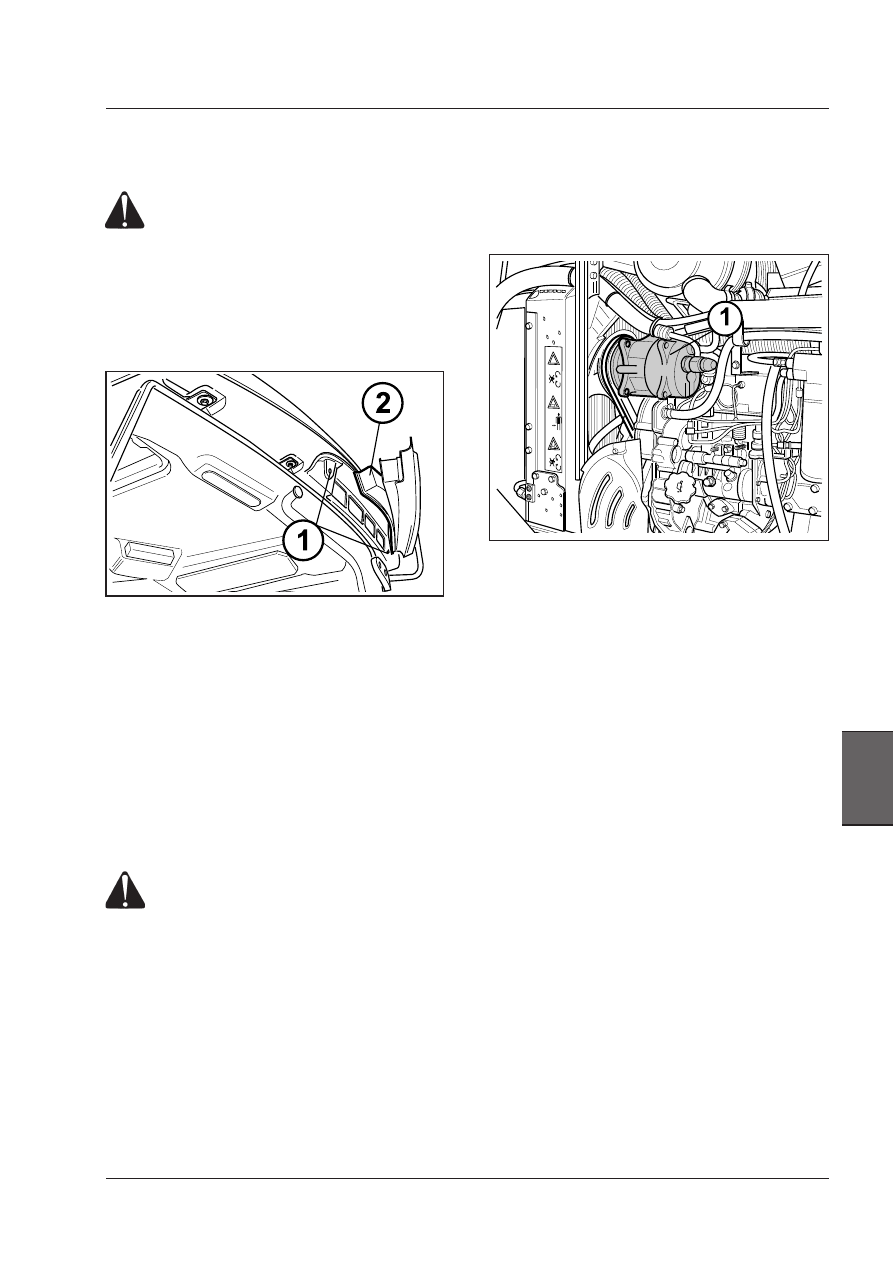
Deluxe cab

OPERATION 1

Remove both knobs (1) fixing the cover.

Remove the filter (2) and clean the filter housing.

IMPORTANT:  The  old  filter  MUST  be  put  into  a  sealed 
container and disposed of in accordance with local regula-
tions. Be responsible for the environment.

OPERATION 2

Install the new filter.
Close the cover and fix it with the knobs.

NOTE: Replace the filter only with original spare parts.

Cab doors

Grease door locks and hinges

AC Compressor

Have the air conditioning system operation checked. Also
check the lubricating oil level in the compressor (1).

WARNING: To open the bonnet, follow the procedure 
indicated under “How to open the bonnet”.

WARNING: Always use specific personal safety devices 
for each operation. Beware of burns caused by hot 
water and engine parts.

 [4.1.n]

WARNING:  See  the  procedure  to  check  and 
clean the cab air intake filter under service 
operations at 100 hours, the notes for the cor-
rect use of the cab filters, and the precautions 
when using dangerous chemicals. 

216

Maintenance

2000 HOUR MAIN SERVICE

CAUTION: If you need to open the bonnet, follow the procedure indicated under “How to open the bonnet”.
WARNING: Always use specific personal safety devices for each operation. 
WARNING:  Maintenance operations must be carried out with the engine off. Check that the gear and the par-
king brake are both engaged and that the ignition key has been removed.
WARNING: Beware of burns caused by hot tractor and engine parts.

 [4.1.n]

Engine coolant change

OPERATION 1
Remove the radiator cap slowly (2).

WARNING: Hot coolant can spray out if the 
coolant recovery reservoir cap or radiator 
cap is removed while system is still hot. DO 
NOT REMOVE THE RADIATOR CAP. To remove 
the  coolant  recovery  reservoir  cap  or  ra-
diator cap, let system cool, turn cap to first 
notch, then wait until all pressure is released. 
Scalding  can  result  from  fast  removal  of 
radiator cap.

OPERATION 2

Put a suitable container under the engine block drain plug
(1) and remove plug.

OPERATION 3

Put a hose on the radiator drain valve (2) and open the
valve (if equipped). Drain coolant into a suitable container.
Otherwise, remove the bottom tube from the radiator and
connect a hose to drain the coolant into a suitable vessel.

IMPORTANT: Dispose of drained coolant responsibly. DO 
NOT pour on the ground or into a drain. Be responsible 
for the environment.

OPERATION 4
Close the radiator drain valve (2) (or fit the removed tube
back  on  again)  and  install  the  drain  plug  (1)  when  the
system is empty.
OPERATION 5
Use a good quality radiator cleaner and fill the system.
Follow the instructions given with the radiator cleaner to
clean the system.
OPERATION 6
Remove  the  engine  block  drain  plug  and  open  the  ra-
diator drain valve (or remove the tube from the bottom).
Flush the system with clean water to remove the radiator
cleaner solution.

IMPORTANT: Allow cleaning solution to drain into suitable 
vessels. Dispose of the cleaning solution responsibly. DO 
NOT pour on the ground or into a drain. Be responsible 
for the environment.

OPERATION 7
Inspect the hoses and fittings for damage and leaks.
OPERATION 8
Install the engine block drain plug, close radiator drain
valve (or fit the removed tube back on again) and remove
the drain hose.
OPERATION 9
Fill the radiator and coolant recovery reservoir using the
following procedure.
- Fit back the plugs 3 and 5.
- Start the engine and run at low idle for approximately
10 minutes.
- Stop the engine and check the coolant level.
Top up, if required, to the MAX mark on the reservoir (4).

217

Maintenance

7

9

2000 HOUR MAIN SERVICE

Fuel system general inspection

Every  2000  hours  of  operation  see  your  Dealer  for  an
inspection of the fuel system and fuel injection nozzles.
Moreover, have the engine checked for tuning-up.

To prevent dirt or water from reaching the injection parts
and  causing  damage  and  decreased  performance,  use
clean fuel, keep the fuel tank full, drain any water from the
fuel primary filter at regular intervals and service the filters.

WARNING: Always use specific personal safety devices 
for each operation. Beware of burns caused by hot 
water and engine parts.

 [4.1.n]

WARNING: Always use specific personal safety devices 
for each operation. Beware of burns caused by hot 
water and engine parts.

 [4.1.n]

Precautions against freezing tem-

peratures

The system is filled with a mixture of water and antifreeze.
Add the proportion of antifreeze given in the following
table.

This mixture can be permanently maintained in the circuit
for 1 year so long as you have not totalized 1000 hours
service during this period. In this case, the mixture must
be changed.

Flush out the system whenever you change from using
pure water to antifreeze mixtures and vice versa.

Degrees C°

- 8°  - 15°  - 25°  - 35°

 20

30

40

50

 Percentage of antifreeze

per volume %

218

Maintenance

Fuel tank 

The fuel tank is cleaned by removing the plug (1).

NOTE : Drain off the sludge when the tank is almost 
empty and only after having placed a suitable vessel 
under the drain plug.

NOTE: Air in the fuel circuit makes it difficult to start the 
engine. If needed, bleed the circuit as described under 
fuel filter service in this section.

2000 HOUR MAIN SERVICE

WARNING: Always use specific personal safety devices 
for each operation. Beware of burns caused by hot 
tractor parts.

 [4.1.n]


Content   ..  52  53  54  55   ..