Tractors X60 Series. Manual - part 46


  Index      Tractors     Tractors X60 Series - service repair manual 2012 year


Search            


Content   ..  44  45  46  47   ..


Tractors X60 Series. Manual - part 46


183

Maintenance

7

50 HOUR MAIN SERVICE

WARNING: To open the bonnet, follow the procedure indicated under “How to open the bonnet”.
WARNING: Always use specific personal safety devices for each operation. Beware of burns caused by hot water 
and engine parts.

 [4.1.n]

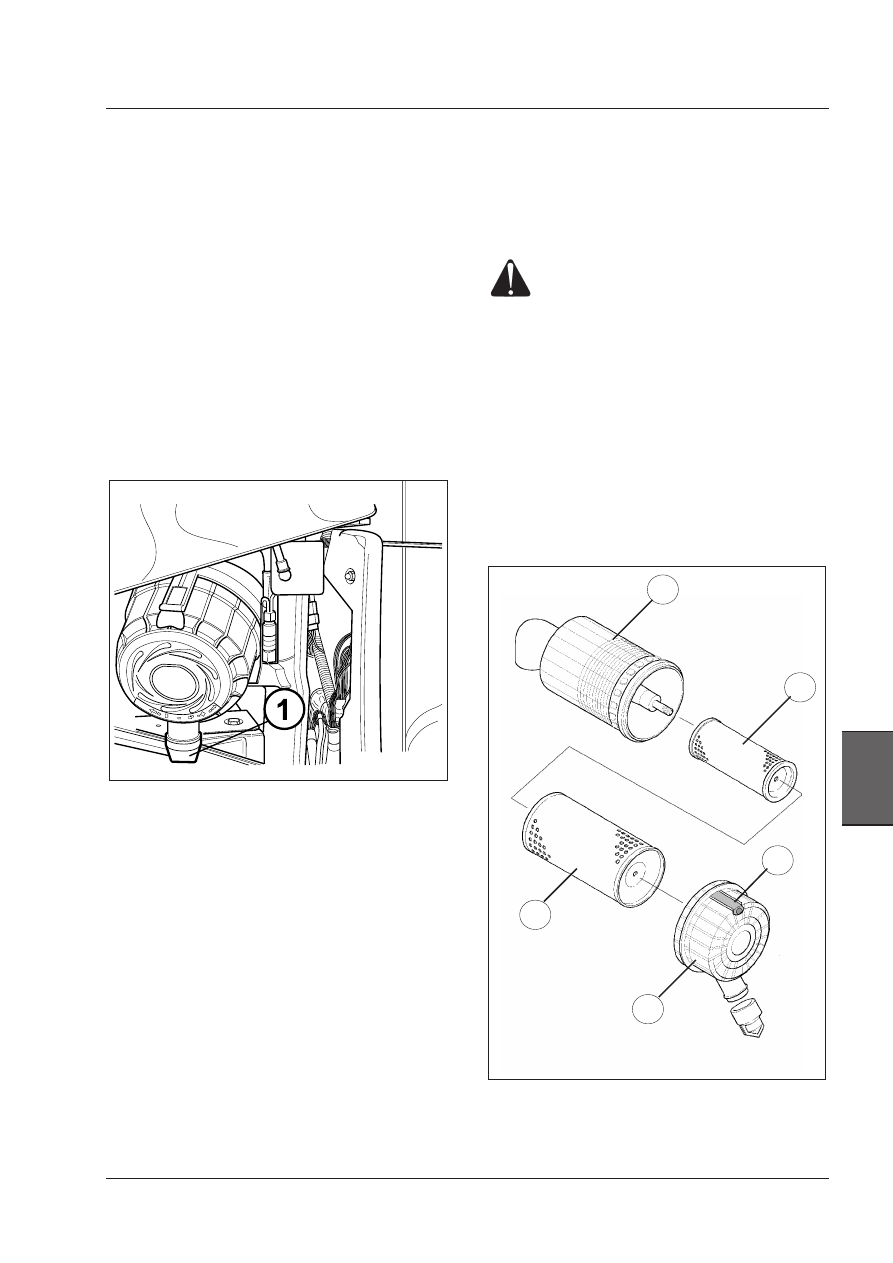
Engine air filter discharge valve

(if equipped).

Discharge  the  dust  deposits  and  sediments  each  day
by pressing the rubber valve (1) on the air filter housing.
Install  a  new  dust  valve  if  damaged,  or  not  operating
correctly.

NOTE: The discharge valve is not available if an auto-
matic dust ejector is fitted.

IMPORTANT: A new rubber dust valve MUST be installed 
every 1000 hours.

Dry air filter outer cartridge

WARNING:  Always  stop  the  engine  before 
demounting the filter elements.

Periodically, remove the cover (2) (Pull out the yellow tab
(1), turn the cover (2) anti-clockwise and remove), take out
the external cartridge (3) from the container (4) and clean
it (this operation should be carried out more frequently
if you work in a very dusty environment or the indicator
on the instrument panel lights up). DO NOT remove the
inner cartridge (4).

See the procedure for disassembling, cleaning and re-
placing of the cartridges of the dry air filter in the Regular
Service at 1000 work hours in this section of the manual.

1

2

5

4

3

184

Maintenance

50 HOUR MAIN SERVICE

Clean cab air recirculation filter

If working in very dusty environment, the cab air recircula-
tion filter should be cleaned either at suitable intervals or
every 50 work hours.

OPERATION 1

Remove the four screws from the recirculation grille.

OPERATION 2

Remove the recirculation grille and the filter.

OPERATION 3
Clean the filter using mild soap and water. Rinse with clear
water and squeeze out the excess.

OPERATION 4
Install the filter in the recirculation grille.

OPERATION 5
Install the grille and filter. Install and tighten the screws.

WARNING: Always use specific personal safety devices 
for each operation. 

185

Maintenance

7

Brake fluid reservoir

At suitable intervals, check the level of the fluid in the
brake reservoir. The reservoir (1) must always be kept full.
Top up only with the correct brake fluid, as indicated in
the Lubricants and Fuels chart.

Bleeding air from the rear brake cir-
cuit

It becomes necessary to bleed the circuit when air enters
owing to lack of oil in the relative reservoir or when the
braking system is serviced.
This operation should be carried out by specialized per-
sonnel. If, however, you decide to do it yourself, proceed
in the following way.

WARNING: See the Lubricants and Fuels chart to re-
place and top up oil in the brake circuit (1).

50 HOUR MAIN SERVICE

WARNING: To open the bonnet, follow the procedure 
indicated under “How to open the bonnet”.

WARNING: Beware of burns caused by hot tractor and 
engine parts.

 [4.1.n]

186

Maintenance

Adjusting the brakes

Rear brakes

Check the efficiency of the braking system regularly.

The braking system must be adjusted when the free travel
of the pedals (A) becomes excessive and the pedals are
near to end of travel.
Proceed in the following way to restore free pedal travel
to its normal value of about 3.5 cm (1.4 in.) (dimension A):

1 -  First  make  sure  that  there  is  no  air  in  the  hydraulic

brake circuit. Bleed if necessary. (The presence of air
in the circuit is normally denoted by a spongy braking
action).

2 -  Jack up the rear wheels of the tractor.

3 -  Make sure that the parking brake is off.

4 -  Free the brake pedals by raising the lock.

5 -  Unscrew the check nut (1). Slowly tighten the adju-

ster nut (2) until you can no longer turn the wheel by
hand.

6 -  Make  a  reference  mark  on  the  adjuster  nut  (2)  and

on the support, then slacken off the adjuster nut by
2 - 2 and 1/4ths of a turn i.e. until the wheel can be
freely turned. Now lock the adjuster with the relative
check nut (1).

7 -  Check  that  the  brake  pedal  has  a  free  travel  of  3.5

cm (1.4 in.) and repeat the adjustment if necessary.

8 -  Repeat the procedure for the other side. Finally, check

that the free travel is the same for both pedals and
that the brakes engage simultaneously on both sides.

9 -  Check  that  the  parking  brake  lever  has  not  been

affected  and  adjust  if  necessary.    The  procedure  is
described here under.

Front brakes

No periodic adjustment is required as the front brakes
are self-regulating.

100 HOUR MAIN SERVICE

WARNING: Always use specific personal safety devices 
for each operation. Beware of burns caused by hot 
tractor parts.

 [4.1.n]


Content   ..  44  45  46  47   ..