Tractors X60 Series. Manual - part 45
 

  Index      Tractors     Tractors X60 Series - service repair manual 2012 year


Search            


Content   ..  43  44  45  46   ..


Tractors X60 Series. Manual - part 45


179

Maintenance

7

10 HOURS OR DAILY SERVICE

Engine oil level 

For the engine, it is necessary to use a detergent oil Sup-
plement 3 as indicated in the Lubricants and Fuels Chart.
Detergent oils contain additives that reduce corrosion, oil
oxidation and deposits and have a high dispersion power
of carbon matters produced by combustion.

WARNING:  The following operations must be carried 
out with the engine off. Check that the gear and the 
parking brake are both engaged and that the ignition 
key has been removed.

Personal safety devices must be worn for the indicated
operations.
Beware of burns caused by hot oil and engine parts.
If required, let the engine idle for the prescribed time to
reach the required temperature to let the oil flow easily.
Then turn off the engine.
If  you  need  to  open  the  bonnet,  follow  the  procedure
indicated under “How to open the bonnet”.

Leave the tractor parked on a flat surface for at least five
minutes  before  checking  the  level,  to  allow  the  oil  to
settle in the sump:

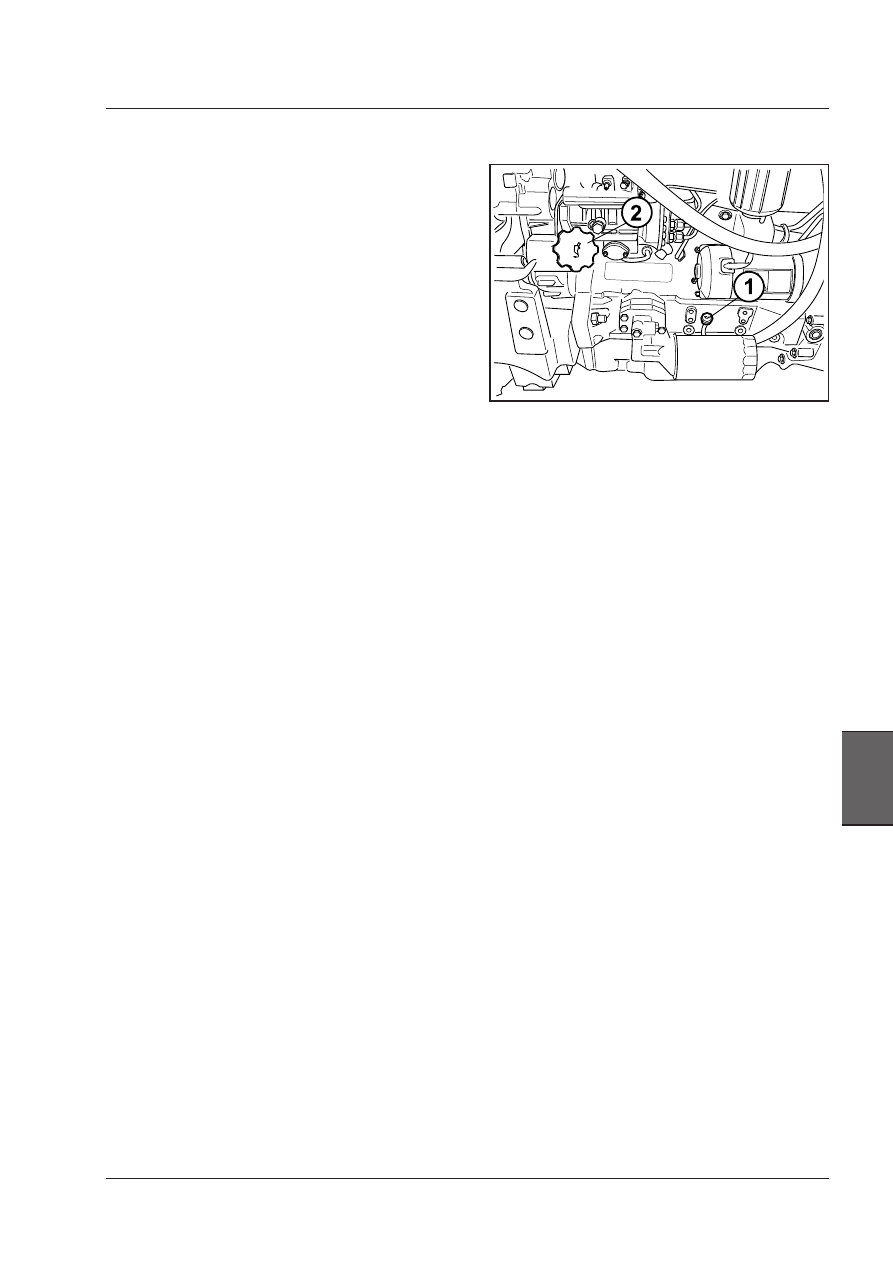
-  take out the dipstick (2), wipe it with a rag and then dip

it into the filler again;

-  wait 10—15 minutes, then remove the dipstick again

and make sure that the oil level reaches and does not
exceed the level marked on it.

-  If necessary, pour additional oil through the filler (1) until

the required MAX level has been reached.

Never fill up to a level higher than the MAX mark on the
dipstick.

CAUTION: Never ever use the engine with the oil level 
below the “MIN” mark.

180

Maintenance

Drain pneumatic trailer brake reser-

voirs (if equipped)

Operate the drain valve plunger under each reservoir to
drain any water which has collected.

WARNING: Always use specific personal safety devices 
for each operation. 

Check windshield washer reservoir 
level

If the fluid level is low fill the reservoir.

WARNING: Always use specific personal safety devices 
for each operation. 

in the following percentages:

Ambient temperature (°C)

-8

-15

-25  -35

Ambient temperature (°F)

-18

-5

-13  -31

Percentage of antifreeze %

20

30

40

50

Quick Reference Guide

10 HOURS OR DAILY SERVICE

Check coolant level

WARNING: Always use specific personal safety devices 
for each operation. Beware of burns caused by hot 
water and engine parts.

Check the coolant level when the coolant is cold and with
the engine stopped. DO NOT REMOVE THE RADIATOR
CAP.

The coolant level must be within the normal cold range
marks (1) on the reservoir. If the level is below the mini-
mum mark, fill the reservoir to the top mark with correct
coolant  mixture  (this  will  depend  upon  market  require-
ments).

WARNING: Hot coolant can spray out if the 
coolant recovery reservoir cap or radiator 
cap is removed while system is still hot. DO 
NOT REMOVE THE RADIATOR CAP. To remove 
the coolant recovery reservoir cap or radia-
tor cap, let system cool, turn cap to first notch, 
then wait until pressure is released. Scalding 
can result from fast removal of radiator cap.

Precautions against freezing temperatures
To prevent ice from forming in the radiator, add specific
products according to the instructions given by the anti-
freeze manufacturer.
Antifreeze also possesses antioxidant and rust-inhibiting
properties and is suitable for all seasons.
The following amounts are indicatively required:

181

Maintenance

7

10 HOURS OR DAILY SERVICE

Drain Fuel/Water Separator

Regularly drain off the water that collects from the 
cock of the water/fuel separator filter (1).

Mechanical engine

During  running-in,  replace  the  fuel  filters  after 

the first 50 work hours. Afterwards, replace the 
fuel filters after every 500 hours service.

The drain plug is located on the bottom of the fuel filter.
Loosen the plug to let any water or sediment drain from
the filter. Tighten the plug after the water has drained.

Electronic engine

The  drain  plug  is  located  on  the  bottom  of  the  fuel
separator  filter.  Loosen  the  plug  to  let  any  water  or
sediment drain from the filter. Tighten the plug after the
water has drained.

IMPORTANT: Dispose of fuel and filters in accordance 
with local regulations. DO NOT drain on the ground, into 
a drain or into a leaky container. Be responsible for the 
environment.

Shift the gear to neutral and engage the parking brake.

WARNING: Always use specific personal safety devices 
for each operation. Beware of burns caused by hot 
water and hot motor parts.

 [4.1.n]

WARNING: To open the bonnet, follow the procedure 
indicated under “How to open the bonnet”.

182

Maintenance

50 HOUR MAIN SERVICE

WARNING: To open the bonnet, follow the procedure indicated under “How to open the bonnet”.
WARNING: Always use specific personal safety devices for each operation. Beware of burns caused by hot water 
and engine parts.

 [4.1.n]

Clean grille screens and radiator 

area 

Clean the grille screens, air conditioning condenser, oil
cooler, fuel cooler, charge cooler (as equipped) and radia-
tor area every 50 hours of operation, or more frequently if
required when operating in dirty conditions.

WARNING: These operations must be carried 
out  when  the  engine  is  cold.  When  hot,  the 
grilles  and  radiator  will  burn  the  hands 
and fingers.

IMPORTANT: Be careful not to bend or damage the fins 
during cleaning. Areas with restricted access should be 
carefully cleaned with compressed air.

IMPORTANT: If you clean using compressed air use an air 
hose with a safety ON/OFF control nozzle and ALWAYS 
WEAR FACE PROTECTION.

WARNING: DO NOT steam clean any air con-
ditioning  system  parts  while  the  system  is 
charged. The heat will cause the refrigerant 
to  rise  to  a  pressure  that  could  cause  the 
system to explode. 

To gain access:

OPERATION 1
Lift the hood, if it is the tilting type.
Remove the hood, if it is the fix type.

OPERATION 2

Loosen the bolts fixing the condenser on both sides of the
oil cooler of the air conditioner condenser (if equipped).

OPERATION 3

Pull forwards the top of the oil cooler or of the air condi-
tioner condenser (if equipped).

Clean as required.

WARNING:  Never  disconnect  any  pipes  or  hoses  in 
the air conditioning system to reach the condenser.

WARNING: If the tractor is to remain unused for a long 
period of time, or if the system is not used, remember 
to allow the air conditioner to operate for about 15 
minutes  each  week.  This  precautionary  measure 
prevents gas from leaking from the compressor.

NOTE: The best results are obtained with a steam 
cleaner that softens up the dirt. Use a lamp to check the 
cleaning between the radiator fins. We recommend a 
daily cleaning when front implements are used, espe-
cially front mower-conditioners.


Content   ..  43  44  45  46   ..