Snowmobile Polaris Touring and WideTrack (2005 year). Manual - part 28


  Index      Snowmobiles / ATV     Snowmobile Polaris Touring and WideTrack - service manual 2005 year


Search            


Content   ..  26  27  28  29   ..


Snowmobile Polaris Touring and WideTrack (2005 year). Manual - part 28


110

MAINTENANCE

General Maintenance

Clutch System

WARNING

If you become aware of higher than normal clutch engagement or

an unusual vibration or shift pattern, see your dealer immediately.

Do not operate the machine until repairs have been made.
All clutch maintenance and repairs must be performed by an

authorized Polaris dealer. Any unauthorized modifications to

clutches, such as adding or removing weights, will void the

warranty.

CAUTION

The bushings in the weights and rollers of Polaris clutches are

made of a material that may be damaged if lubricated. Do not

lubricate clutch bushings.

Periodically inspect the clutch sheaves for damage, wear, or belt

residue. To maintain optimum performance, clean with non-oil based

cleaners such as isopropyl alcohol.

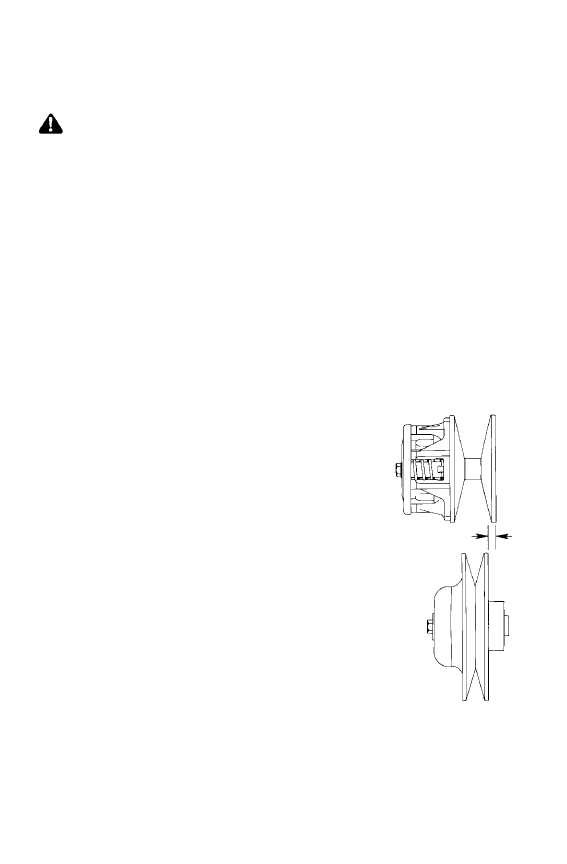
Clutch Alignment and Offset

Clutch center distance and alignment (A) are

crucial to maintaining optimum performance.

See your Owner’s Manual Supplement for the

recommended offset between the drive and

driven clutches with the belt removed.
The drive belt is a very important part of the drive

system. Belt width and length must match the

center distance of the clutches and sheave width of

the drive clutch. For this reason, Polaris

recommends that only O.E.M. belts be used.

Other belts may match the dimensions, but can

drastically change the shift pattern, resulting in

poor performance. See your dealer for service and

adjustments.

NOTE: A worn belt will continue to function, but

will not deliver maximum performance.

Always carry a spare belt in case of an emergency.

A

111

MAINTENANCE

General Maintenance
n

Drive Belt Condition

Periodically check the condition and tension of the drive belt, and

always carry a spare. Inspect the belt for signs of excessive wear:

frayed edges, missing cogs, cracks and excessive looseness. Replace

the belt if any of these conditions exist.
For improved drive-away during extremely cold temperatures, remove

the belt and warm it to room temperature. Reinstall it before starting

the snowmobile.
The following procedures apply to standard, electronic reverse and

TEAM driven clutches.

Drive Belt Removal

1. Be sure the key switch is off and the engine has come to a

complete stop. Apply the brake (or lock the parking brake if

equipped).

2. Open the hood, remove the clutch guard retaining pin and open the

clutch guard.

3. Standard Clutch: Skip to step 4.

TEAM Clutch: Locate the L-wrench in the tool kit and install it

into the open threaded hole in the outer sheave of the clutch.

Rotate the wrench until the sheaves open far enough to remove the

belt.

4. Firmly grasp the belt midway

between the clutches and pull

upward and rearward to remove.

See illustration.

112

MAINTENANCE

General Maintenance

Drive Belt Installation

1. Drop the drive belt over the

drive clutch and pull back the

slack (A).

NOTE: To ensure satisfactory belt

life, install belts so they

operate in the same

direction of rotation by

positioning the

identification numbers so

that you can read them. If

required, separate the

sheaves as outlined in the

belt removal procedures.

2. Turn the driven clutch moveable

sheave clockwise while pushing

inward and forcing the belt

down between the sheaves.

3. Hold the belt down between the

sheaves and roll the bottom portion over the outer clutch sheave

(B). Work the belt to the outer edge of the sheave.

4. Standard Clutch: Skip to step 5.

TEAM Clutch: Rotate the L-wrench to tighten the sheaves.

Remove the wrench and store in the tool kit.

5. Close the clutch guard and reinstall the retaining pin.
6. Close and secure the hood and release the parking brake.

A

B

113

MAINTENANCE

General Maintenance
n

Drive Belt Deflection

Measure belt deflection with both

clutches at rest and in their full

neutral position.
Place a straight edge on the belt (A)

and apply downward pressure while

measuring at point B. This

measurement should be 1 1/4”.

Drive Belt Adjustment

Polaris Standard Reverse Clutch
Belt deflection can be adjusted without removing the clutch from the

jackshaft.
1. Pull the belt into the driven clutch to slightly open the sheaves.
2. Loosen the three bolts on the adjustment cam and turn the cam

counterclockwise to reduce the distance between the sheaves. Do

not rotate past the #1 position.

3. Torque the bolts to 4-6 ft. lbs. (5.4-8 Nm).
TEAM Clutch
1. Loosen the 7/16” jam nut on the belt width adjuster.
2. Using a 1/8” Allen wrench, adjust the threaded set screw as

needed.

NOTE: Turn the set screw in (clockwise) to increase the distance

between the sheaves and out (counterclockwise) to decrease

the distance.

3. Tighten the jam nut.

Clutch Center Distance

See your Owner’s Manual Supplement for recommended center

distance for your machine. If adjustment is necessary, see your dealer.

Due to tolerances in belt length, it may be necessary for your dealer to

make minor adjustments in the driven clutch to achieve correct belt

tension.

A

B


Content   ..  26  27  28  29   ..