Snowmobile Polaris DEEP SNOW (2005 year). Manual - part 13
 

  Index      Snowmobiles / ATV     Snowmobile Polaris DEEP SNOW (TRAIL RMK, 600 RMK, 700 RMK, 800 RMK, 900 RMK, 600 SWITCHBACK, 800 SWITCHBACK) - service manual 2005 year


Search            


Content   ..  11  12  13  14   ..


Snowmobile Polaris DEEP SNOW (2005 year). Manual - part 13


MAINTENANCE

3.8

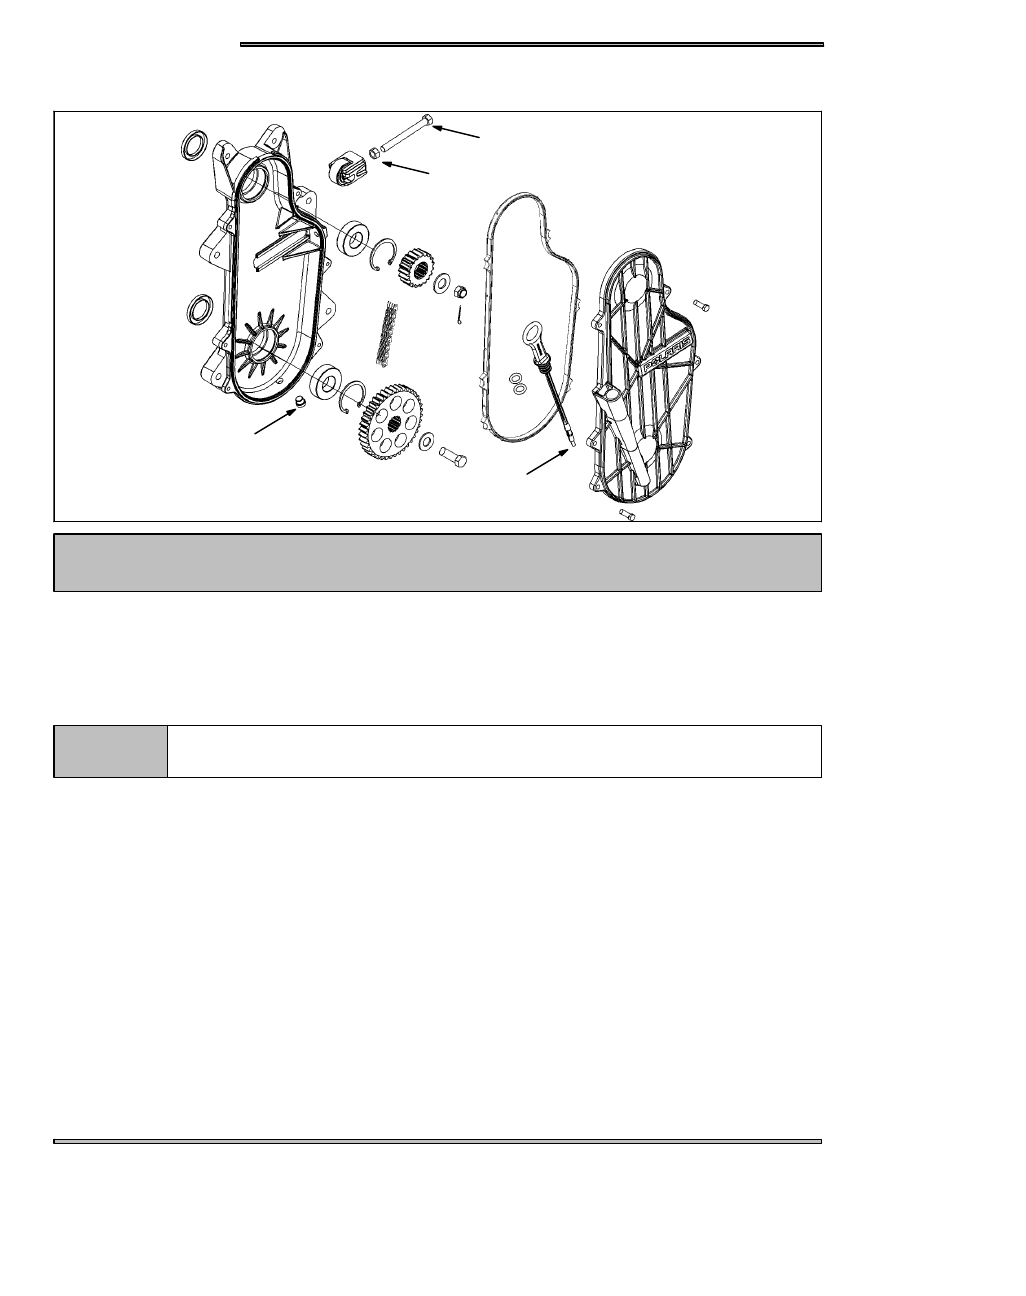
CHAINCASE

Do not mix or use improper types of lubricants in chaincase. Excessive wear to chain, sprockets

and bearings may result.

CAUTION:

The drive chain is continuously immersed in the chaincase oil.

Proper oil level is determined by checking the level on the dipstick with machine placed on a level surface. The oil level should

be between the “safe” marks on the dipstick.

NOTE:

Clean the magnetic plug (E) every 500 miles (800 km) and whenever checking or changing

lubricant. Metal shavings on magnetic plug are signs of normal wear.

The dipstick has a magnet on the end of it. When you check your chaincase oil level for the first time do not be alarmed if you

see small metal shavings. These shavings are common for chaincase break in and the magnet is there to keep the shavings from

floating around.

Add oil through dipstick opening to maintain proper level. Use Polaris chaincase oil. Do not overfill.

DRIVE CHAIN TENSION

1. Elevate rear of machine so track is off floor.
2. Rotate driven clutch counterclockwise to move all chain slack to the tensioner side. Lock the brake lever.
3. Loosen adjuster bolt jam nut (C).
4. Finger tighten adjuster bolt (D) until it can no longer be adjusted by hand.
5. Back off adjuster bolt 1/4 turn.
6. Tighten jam nut while holding adjuster bolt.
7. The chain is now tensioned. Release brake lever lock.

MAINTENANCE

3.9

TRACK

A

Idler shaft bolt torque:

35--40 ft. lbs

(48--55Nm)

B

C

D

E

DANGER

When preforming the following checks and adjustments, stay clear of all moving parts to avoid

serious personal injury.
Never make this maintenance check with the engine running, as serious personal injury can result.

Safely lift and support the rear of the snowmobile off the ground. Rotate the track by hand to check for any possible damage.

To inspect track rods (A), carefully examine the track along the entire length of each rod, bending the track and inspecting for

breakage. The three most common places where breakage occurs are shown in the illustration by the number designation.

If any rod damage is found, the track should be replaced.

DANGER

Broken track rods are a serious hazard, since they can cause a rotating track to come off the ma-

chine. Never operate or rotate a torn or damaged track under power. Serious personal injury or

death may occur.

TRACK ALIGNMENT

Track alignment affects track tension. Misalignment will cause excessive wear to the track, hifax, and the slide rails.

A periodic check should be made to see that the track is centered and running evenly on the slide rails.

NOTE:

If excessive hi--fax wear occurs due to poor snow conditions, additional wheels are available.

1. Safely support the rear of the machine with the track off the ground.
2. Start the engine and apply a small amount of throttle until the track turns slowly at least five complete revolutions. Stop the

engine.

3. Inspect track alignment by carefully looking through the track window (B) to make sure the rails (C) are evenly spaced on

each side. If the track runs to the left, SHUT MACHINE OFF and loosen left locknut and tighten the left adjusting bolt (D). If

the track runs to the right, SHUT MACHINE OFF and loosen right locknut and tighten the right adjusting bolt.

4. After adjustments are complete, be sure to torque idler shaft bolts and tighten locknuts (E). Torque to specification.

MAINTENANCE

3.10

TRACK TENSION

A

B C

DANGER

When performing the following checks and adjustments, stay clear of all moving parts to avoid
serious personal injury.

TRACK TENSION

Track tension is critical for maintaining correct suspension operation.
If the track tension is too loose it may cause the track to slip or “ratchet” on the drive shaft drivers and cause track and rear

suspension durability problems.
If the track is too tight the track will wear down hyfax, reduce top speeds, cause rear suspension vibration and cause track and

rear suspension durability problems.

Suspension

Weight

Measurement Location

Measurement

EDGE / EDGE RMK

Switchbackt / IQ RMK

3/8 - 1/2″ (1 - 1.3 cm)

IQ Fusion

10 lbs (4.54 kg)

16″ ahead of rear idler shaft

1 1/4” -- 1 1/2″

(3.17--3.81 cm)

M--10 / M--10 ACE

7/8” -- 1 1/8”(2.2--2.9 cm)

TRACK TENSION ADJUSTMENT

1. Turn the machine off.
2. Lift the rear of the machine and safely support it off the ground.
3. Place a 10 lb. (4.5 kg) weight on the track at a point approximately 16“ (40.6cm) ahead of the center of the rear idler wheel (A).
4. Check for proper slack between the track clip wear surface and the hi-fax, and at the point where the weight is hanging (A).
5. Loosen rear idler shaft bolts (B) on both sides of the machine.
6. Loosen track adjusting bolt locknuts (C).
7. Tighten or loosen the track adjusting bolts (B) evenly as necessary to obtain the specified track tension.
8. Tighten idler shaft bolts and adjuster bolt locknuts.

NOTE:

Track alignment affects track tension. Misalignment will cause excessive wear to the track and
slide rail. Excessive hyfax wear will appear on units with the track tension set too tight.

MAINTENANCE

3.11

SPARK PLUG

n

An ash white plug with speckles

indicates too lean a mixture for

the operating conditions.

n

If the plug is light to cocoa brown,

the machine is just right.

n

If the plug is wet or very dark, the

fuel is running too rich.

Spark Plug Torque:

12--14 ft.lbs. (17--19nm)

A spark plug with a heat range which is too high may cause engine damage if the engine is oper-

ated in conditions more severe that that for which the spark plug was intended.

CAUTION:

NOTE:

A new engine can cause temporary spark plug fouling even though the heat range is correct, due to the
preservative which has been added during assembly of the engine to combat rust and corrosion.
Avoid prolonged idle speeds, as plug fouling and carbonization will result. Always use resistor type
spark plugs.

The spark plug and its condition is indicative of engine operation. The spark plug firing end condition should be read after the

engine is warmed up and the vehicle is driven at higher speeds. Immediately check the spark plug for correct color.

NORMAL

The insulator tip is gray, tan, or light brown. There will be a few combustion deposits. The electrodes are not burned or eroded.

This indicates the proper type and heat range for the engine and the service

NOTE:

The tip should not be white. A white insulator tip indicates overheating, caused by use of an improper

spark plug or incorrect carburetor adjustments.

WET FOULED

The insulator tip is black. A damp oily film covers the firing end. There may be a carbon layer over the entire nose. Generally,

the electrodes are not worn. General causes are excessive oil, use of non-recommended injection oil, excessive idling, idle too

low or too rich, or weak ignition output.

INSPECTION

Inspect electrodes for wear and carbon buildup. Look for a sharp outer edge with no rounding or erosion of the electrodes.
Clean with electrical contact cleaner or a glass bead spark plug cleaner only.
Measure gap with a wire gauge and adjust to specifications by bending ground electrode carefully.
Coat spark plug threads with a small amount of anti-seize compound.
Install spark plug and torque to 12 -- 14 ft.lbs.


Content   ..  11  12  13  14   ..