CFMoto motorcycle V-Night CF150-2C. Service Manual - part 3
 

  Index      Manuals     CFMoto motorcycle V-Night CF150-2C. Service Manual


Search            copyright infringement  


Content      ..     1      2      3      4      ..


CFMoto motorcycle V-Night CF150-2C. Service Manual - part 3


- 33-

(2)Inspection and Replacement of the Lubricating Oil of the Engine

Function of lubricating oil to the engine: reduce friction, increase sealability, cool parts, clean parts, 
anti-rust and so on.

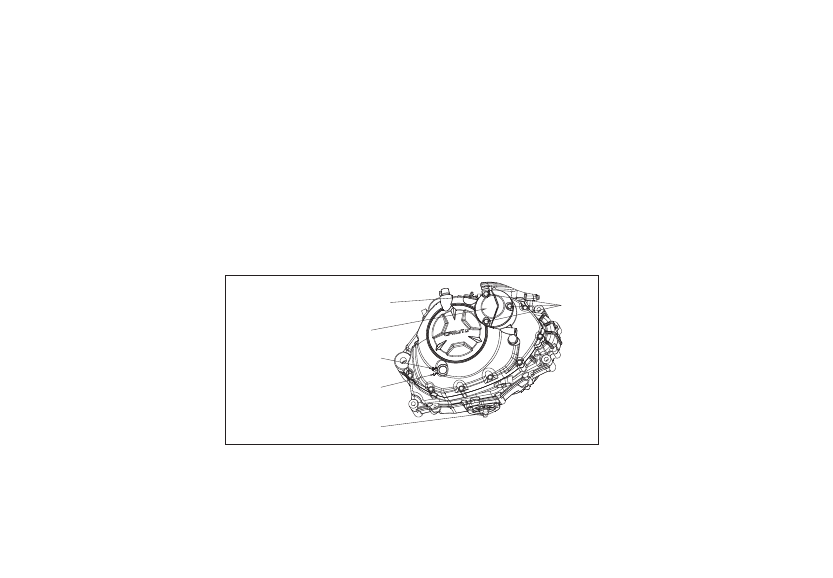
Oil filter screw plug    

3nuts 

Filter cover 

Upper scale line 

Lower scale line 

Figure15   Inspection of the Lubricating Oil

Oil drainage screw bolt 

Lubricating oil with poor quality, long-term use and insufficient lubricating oil quantity and so


on


will


accelerate


engine


parts


wear


and


reduce


engine


service


life

or


even


result


in


excess


temperature


of


the


e

ngine

wear


or


burning


of


the


clutch

reduced


power

abnormal


sound

burning


of


the


lubricating


oil


and


so


on

.

When selecting the lubricating oil

Refer to

Selection of Lubricating Oil

”.


-------------------------------------------------------------------------------------------------------------------------------------------------------------

-3 4-

[Inspection of the Lubricating Oil]

When the lubricating oil is insufficient, the engine will be seriously damaged. 

WARNING

Check the lubricating oil


level


before each  application. 

There is oil window on the right crankcase:
The oil surface should be at the scale line of  the oil window

(

Figure14

).

1

During inspection, the longitudinal plane should be perpendicular to the level ground.

2.


When lubricating oil is insufficient, add moderate engine oil at SAE15W-40/SG


grade


or above until the scale line of the oil window.


3.


Install the screw plug of the oil filler and check oil leakage.

[Change of Lubricating Oil]

1

.

For


the


new


motorcycle


purchased


by


the


user

replace


the


lubricating


oil


according


to


the


standard


of


run-in period

.

2

.

The


replacement


cycle


after


run-in period


is

every


1500 km

. 

3

.

Before change

Stop the engine


after


fully


warming


and


then


drain


the


lubricating


oil


of


the


engine


(

caution: do not be scalded by the hot engine or the lubricating oil

).

4

.

During change

Place


one


empty


oil


box


under


the


engine

unscrew


the


drainage


bolt


and


unscrew


3


nuts


to


take


out


the


filter


cover

spring


and


element

5

.

After oil drainage, it is necessary to clean the drainage bolt and oil filter cover

replace


the


machine


oil


filter


element

check


whether


the


sealing


ring


is


good


and


replace


it


if


it


is


damage

then


install


the


filter


screen

spring

sealing


ring


and


machine


oil


filter


cover

.

6

Add about 1.2L


new


lubricating


oil


from


the


oil


filler

If


replace


the


oil


filter


element


at


the


same


time

it


needs


to


add


1.25 Lunused lubricating oil and install the oil filler screw plug after leakage check.

-------------------------------------------------------------------------------------------------------------------------------------------------------------

- 35-

0.8 ~0.9

mm

Electrode 
gap

Figure16  Spark Plug

3. Selection and Replacement of the Spark Plug

[Selection of the Spark Plug] 

Spark plug model number

CR9EP                        

The user should use the original 

CFMOTO

spark


plug.


[Inspection and Replacement of the Spark Plug]

1

.

Replacement cycle of the spark plug is

every


6000 km

.

2

.

Take down the spark plug cap, remove the dirt around it, dismantle 

the spark plug with the socket wrench in the tool bag and remove the 
carbon deposition and dirt in the spark plug with steel brush.


3

.

Check whether the spark plug is damaged, the electrode gaps is 

burned through and whether the sealing gasket is intact

if


there


is


damage

replace it.


    4.

Use the feeler gauge to check the electrode gap the normal electrode 

gap should be 0.8

0.9mm

.        

5

.

When


installing


the


spark


plug

it


is


necessary


to


first


set


the


screw


thread


on


the


spark


plug


and


fasten it with the spark plug sleeve.

-------------------------------------------------------------------------------------------------------------------------------------------------------------

-3 6-

Air filter element 


Figure17 Location of


the


Air


Filter

(4)Cleaning and Assembly of the Air Filter

Notes: 

1

The air filter element must be maintained regularly

.

If


the


motorcycle


is


operated


under


high


temperature


or


in


dusty


environment

it


is


more


necessary


to


shorten


the


cleaning


or


replacement


cycle


of


the


air


filter


element

;

2

After driving for 2000km

clean


the


air


filter


one


time


at


least

Carefully


check


the


filter


after


driving


for


1000km


and


clean


the


air


filter


element

;

3

.

Replace the filter element when it is too dirty, broken or damaged. Maintain cleanness of the air filter 

can improve working efficiency of the engine and prolong the service life the engine

;

4

.

The motorcycle is foam filter element. The filter element can be cleaned by the non-flammable kerosene 

or cleaning solution

;   

5

During dismantling: open the


seat


cushion

open


the


fuel


tank

disassemble


the


upper


cover


of


the


air


filter

then


the


fastening


screw


of


the


air


filter


and


then


take


out


the


air


filter

6

.

Carry out assemble according to the opposite sequence of disassembling.


Do not let water enter air filter element during 
vehicle cleaning, otherwise the start-up 
performance of the engine will be affected.

-------------------------------------------------------------------------------------------------------------------------------------------------------------

- 37-

(5)Inspection and Adjustment of the Throttle Handle

[Inpsection of Throttle Control Line]


①上调节螺管

②锁紧螺母

③下调节螺管

④锁紧螺母

1.upper adjusting screw 

2 .

locknut


3 .

lower adjusting screw   

4.locknut 

Figure18 Inpsection of Throttle Control Line

1

Check


whether turning the throttle handle at full open to the position of full close is normal and whether 

the limit is reliable

;

2

Check


whether it is flexible to turn the throttle handle at full open to the position of full close

3

Check


whether the throttle control line between the throttle handle and the carburetor is good andflexible.

-------------------------------------------------------------------------------------------------------------------------------------------------------------

-3 8-

[Throttle Lever Adjustment]

Notes:

[Carburetor adjustment]


Idle speed: 1500

±15 0

RPM

 (

when


at


Neutral


gear

)

Notes:

WARNING

1

The free travel of the throttle lever


is

:

2-6mm

;

2

Carry out fine adjustment of


the


upper


adjustment


screw


and


adjust


the


lower


adjusting


screw


to


certain


travel

 (

joint between the throttle valve and the throttle cable

);

3

During fine adjustment, first loosen the locknut

② 

on the upper adjusting screw


and


then


turn the upper 

adjusting screw

 ①

for adjustment

4.


For large range adjustment, loosen the

locknut and adjust the free travel to 2-6mm

.

1. If the routing of the throttle control line is improper, re-install it correctly.
2. If the throttle control line is twisted off, restricted or cannot be returned, replace the control line.

Idle speed has been adjusted properly to best condition before delivery, our users 
don

'

t need to adjust it. Otherwise emission will


be


affected

.

Idle speed cannot be adjusted, especially cannot be adjusted to less than 1300RPM to avoid 
engine fast damage due to insufficient oil supply to cylinder head.

-------------------------------------------------------------------------------------------------------------------------------------------------------------

- 39-


1. Locknut  2.large adjusting screw tube 

3.small adjusting screw tube


4.locknut  5.clutch handle  

Figure19 Check


of


the


Clutch


Control


Line

(6)Clutch Adjustment

The clutch of the vehicle is manual operation

,⑤ 

Clutch handle

:

free travel

:

10

20mm

.

Function of the clutch

Transmit


the


power


of


the


engine


to


the


transmission


and


disconnect


the


power


transmission


of


the


engine


if


necessary

.

When using the clutch handle, the user should fully grasp or release it

avoid to half grasp or realse the 

clutch handle (semi clutch) as


much


as


possible

otherwise


the


clutch


will


be


worn


or


burned

.


Figure18


The


right


Figure


can


carry


out


small


range


adjustment


while


the


left


Figure


can


carry


out


large


range


adjustment

:

-------------------------------------------------------------------------------------------------------------------------------------------------------------

-4 0-

Notes:

1

When the adjusting range is small

first loosen 

locknut, turn

the small adjusting screw tube.If the 

adjusting screw tube is turned as per clockwise, the free travel of the clutch will be increased

if turned 

as per counter-clockwise, the free travel of the clutch will be reduced.
2

When the adjusting


range


is


large

first loosen the 

locknut of the clutch control line on the crankcase


and


then


adjust

large adjusting screw tube. If the 

large adjusting screw tube is turned as


per


clockwise

the


free


travel


of


the


clutch


will


be


increased

if turned as per counter-clockwise, the free travel of the 

clutch will be reduced.
Afteradjusting the clutch, ride for a stretch of road and check whether the clutch will be disconnected.
Replace the clutch if it is overworn or burned

such


replacement


must


be


completed by 

CFMOTO Repair


station

”.

After your self adjustment, if the vehicle fails to reach ideal effect, please send it to the 

CFMOTO Service Station or authorized local dealer

” 

for


adjustment

.

-------------------------------------------------------------------------------------------------------------------------------------------------------------

- 41-

(7)Inspection, Adjustment and Lubrication of the Drive Chains

[Inspection and Lubrication of the Drive Chains]

The drive chain includes many mutually operated parts and its service life depends on good lubrication and 
appropriate adjustment. Negligence of chain maintenance and service will result in premature wear of the 
chains and sprocket wheels. Therefore, regular chain maintenance is necessary.
If the drive chain, small and large sprocket wheels reach their wear limit, it is necessary to replace them.

The inspection procedure is as follows:

1

Switch to the neutral gear and the engine stops

(

take out the key

);

2

Place the fingers on the

drive chain and swing the chain up and down. The normal amplitude range 

is 

:

between 10

20mm

;

3

Check wear


conditions


of


various


chain


links


of


the


drive


chain

If


there


is


missing


or


damage


or


over


wear


or


overlength


of


the


chain


link

replace


such


chain


link

4

Check wear conditions of the large and small sprocket wheels. If the wheel teeth are seriously worn, 

missing or broken, replace


the


wheels.

When lubricating:

1

Clean the drive chain, large and small sprocket wheels and add moderate engine oil to or spray 

lubricating oil on the cleaned drive chain, large and small sprocket wheels.
2

Clean and lubricate one time for driving 500km

;

in the dusty areas, increase such maintenance frequency.

-------------------------------------------------------------------------------------------------------------------------------------------------------------

-4 2-

Figure20


Inspection of the Drive Chains

[Adjustment and Replacement of the Drive Chains]
When adjusting:

When changing:


①驱动链条

②运转方向

③锁紧夹

④大链轮

⑥锁紧螺母

⑦调节刻度

⑤调节螺栓

⑥锁紧螺母

③锁紧夹

②运转方向

⑤调节螺栓

④大链轮

①驱动链条

⑦调节刻度

1.


Drive chain 

2.Running direction

3.Locking clamp

4.Large sprocket wheel

5.Adjusting bolt 

6.Locking nut 

7.Adjusting scale   

1.


Drive chain 

2.Running direction

3.Locking clamp

4.Large sprocket wheel

5.Adjusting bolt 

6.Locking nut 

7.Adjusting scale   

1

Parking


the


motorcycle


with


side


stand


or


main


process stand 

(

matching

), 

switch


to


the


neutral


gear


and


shut


down


the


engine

(

take out the key

).

2

.

Loosen


the


nuts


of


the


rear


axle


and


adjust


the

⑤ 

adjusting nut with the same quantity

;

so that the chain 

has appropriate amplitude 10

20mm

the left and right adjusters at both sides should indiate the same

 ⑦ 

adjusting scale

check the tightness of the chain

then fasten the rear axle nut

fasten the 

adjusting nut.

1

Remove the drive chains 

③ 

locking clamp with nipper plier carefully, take apart the chain link and take 

down the chain

2

Disassemble the large and small sprocket wheels with tool

3

Assemble the large, small sprocket wheels and drive chains in the opposite sequence of disassembling 

and adjust the free travel of the chains

4

When installing the locking clamp, it is necessary to make the open end opposite to the 

② 

running 

direction of the chains.

-------------------------------------------------------------------------------------------------------------------------------------------------------------

- 43-

(8)Inspection and Adjustment of the Front Brake

   [Inspection]

1.Brake disc. 2.Brake caliper  3.Brake hose   4.Master cylinder

Figure21  Inspection of the Front Brake

1

Support up the motorcycle with the side stand and the free travel of the front brake handle is measured 

to be

10~30mm

.

2

Check oil level in the oil cup

check


whether


the


brake


caliper


is


normal

check


whether


the brake oil 

pipeline and the brake oil cup are leaking or have cracks

check


wear


conditions


of


the


brake


disc

.

3

When operating the brake handle, if it feelsof insufficient handle pressure, there is air in thebraking 

system

it


is


necessary


to


exhaust


air


in


the


braking


system


before


use

otherwise


the


braking


performance


will


be


reduced


or


brake


will


be


failed

This


task


shall


be


completed


in

 “

CFMOTO Repair


Station

”.

-------------------------------------------------------------------------------------------------------------------------------------------------------------

-4 4-

[Replacement of Brake Disc and Brake pad]

WARNING

1

When the limit wear thickness of the brake disc reaches 3


mm

it


is


necessary


to


replace


it

;

2

When the limit wear thickness of the brake pad


reaches


1.5mm

it


is


necessary


to


replace


it

;

3

When


repalcing


the


brake


disc

it needs to take out the brake caliper, front wheel and dismantle the 

connecting nuts with the front wheel before replacement

4

When


repalcing


the


brake


pad

Dismantle the brake caliper and loosen the


external brake pad spring on 

the brake caliper before replacement

;

5.  Do not drive the motorcycle immediately after replacement of new brake disc or brake pad

it


is


necessary


to


control

 (

grasp and release

several times of front brake lever


until


the


brake


disc and the brake caliper 

are well engaged.

[Front Brake Light Switch]

1. The front brake switch is installed at the connection between the front brake lever and the

 ④ 

brake pump.

2.


When grasping the front brake lever

the


front


brake


is


switched


on


and


the


brake light


is


on

when


releasing


the


front


brake


lever

the


brake


light


is


off

.

3.


Replace the switch when it is damaged.

1. Add: DOT3 or DOT4 non-petroleum base brake fluid; do not mix use products with 
different brands;
2. The brake fluid is highly corrosive. Do not splash it to the surface of the painted or plastic 
parts;if it is swallowed by accident, force him or her to spit it out;if it touches the eye or 
skin, flush it with large amount of water and seek medical advice;
3. The hydraulic disc brake works under high pressure. To ensure safety and reliability, the 
replacement time of the brake pad and the brake fluid shall not exceed the maintenance 
intervals;
4. When the hydraulic disc brake system needs to be repaired, it can only be repaired by the 
staff of “CFMOTO Service Station or authorized local dealer”.

-------------------------------------------------------------------------------------------------------------------------------------------------------------

- 45-

(9)Inspection and Adjustment of the Rear Brake

Rear brake 

caliper

Rear brake disc

Mounting nut Rear brake switch

.

Figure22 Rear Brake Inspection 

[Inspection]

During inspection

support


up the motorcycle with the side stand and the free travel of the brake pedal is 

measured to be

:

10~30mm

.

1. Measure thickness of brake pad in the rear brake pad.
2. Measure thickness of brake disc.
3

Check


the


fluid


level


of


the


fluid


cup

Check


whether


the


brake


caliper


is


normal

check whether the 

brake hose


and


the


brake


fluid


cup


are


leaking


or


have


cracks

check


wear


conditions


of


the


brake


disc

4

When operating the brake pedal, if the pedal pressure is insufficient, there must be air in the braking 

system

use


the


brake


pedal


after


completely


exhausting


the


air

otherwise

the


braking


performance


will


be


reduced


or


the


braking


will


be


failed

This


task


shall


be


completed


by


the

 “

CFMOTO Service


Station


or


authorized


local


dealer

”.

-------------------------------------------------------------------------------------------------------------------------------------------------------------

-4 6-

[Adjustment and Replacement]   

WARNING

[Adjustment of Rear Brake Lights]

1

It is necessary to replace the brake pad, when limit wear thickness reaches 1.5mm.

2

It is necessary to replace the brake disc, when limit wear thickness reaches 3


mm

;

When replacing the brake disc, it is necessary to dismantle the drive chain

rear axle nut and rear axle, 

rear brake positioning nut and rear wheel and take out the rear brake for replacemnt. This task shall be done 
in the 

CFMOTO Service


Station


or


authorized


local


dealer

”.

1. After adjusting the rear brake system, it is necessary to commission and inspect the 
vehicle;
2. Step on the rear brake pedal several times, release the brake pedal and rotate the rear 
wheel to check whether it can rotate flexibly.
3. After adjusting the rear brake system, confirm that the brake pedal returns flexibly and 
braking force is normal;
4. If adjustment is not in place, please send it to the “CFMOTO Service Station or authorized 
local dealer” for adjustment.

Installation of the rear brake light switch

inside the right rear pedal side stand of the engine

 (

refer to 

Figure21 of Page 43

).

Adjustment method

it turns on too late, turn the mounting nut in counterclockwise.

If it turns on too early, turn the mounting nut in clockwise direction. 

-------------------------------------------------------------------------------------------------------------------------------------------------------------

- 47-

(10)Maintenance of Battery 

Notes 

The user must ensure the storage battery is fully charged, otherwise the battery will be damaged.
It is necessary to check the voltage of the battery with the voltmeter every week if you do not use 
the vehicle frequently. If the voltage of the battery is lower than 12.8V, it is necessary to


charge


the


battery


with


the


charger

 (

consult with


the


CFMOTO


Service


Station


or


authorized


local


dealer

). 

If the motorcycle is not used for over two weeks, it is necessary to charge the battery with the


charger

Do not use automatic quick charger to charge the battery, otherwise the batterty will be 

overloaded or damaged.

Charger 

Contact the dealer for detailed description of the battery.

Charging the battery 

●Dismantle the battery from the


vehicle

refer to dismantling of the battery

Connect the charger lead and ensure that the charging current is 1/10A of the storage battery 

capacity,for example: given capacity is

For

 10

Ah


storage


battery

the


charging


current


is

 1

Ah

.

When the storage battery is installed on the


vehicle

ensure


the


power


of


the


storage


battery


is


full

.

refer to installation of the storage battery

-------------------------------------------------------------------------------------------------------------------------------------------------------------

-4 8-


Figure 23 


Position


of


the


Battery

Battery

:

Negative electrode of the battery 

Positive electrode of the battery 

WARNING

It is forbidden to tear down the seal of the battery, otherwise the battery will be damaged. 
Do not install general battery on this vehicle, otherwise, the electric system do not work 
properly.
1. During charging, the battery will produce inflammable gases. It is necessary to be away 
from spark, naked flame and cigarette end and the battery should also ensure the 
environment is sufficiently ventilated during charging.
2. There is sulfuric acid in the battery. If the skin or eye accidentally touches the electrolyte, 
severe burn can be caused. Therefore, please wear protective clothing and goggles for 
operation.
3. If the skin or eye accidentally touches the electrolyte, wash it with water and seek 
medical advice immediately.
4. Electrolyte belongs to toxic chemicals. If the electrolyte is swallowed accidentally, drink 
a large amount of water or milk, then drink magnesium oxide emulsion or vegetable oil and 
seek medical advice immediately.
5. It is necessary to store the storage battery where the kids cannot reach.

-------------------------------------------------------------------------------------------------------------------------------------------------------------


Content      ..     1      2      3      4      ..