SINUMERIK 840D sl. Basesoftware and operating software. Manual (2019) - page 9
1
Generating user dialogs
Generating commissioning
2
dialogs
SINUMERIK
SINUMERIK 840D sl
Easy XML
Programming Manual
Valid for:
CNC software
version 4.93
12/2019
6FC5397-1DP40-6BA3

Legal information
Warning notice system
This manual contains notices you have to observe in order to ensure your personal safety, as well as to prevent
damage to property. The notices referring to your personal safety are highlighted in the manual by a safety alert
symbol, notices referring only to property damage have no safety alert symbol. These notices shown below are
graded according to the degree of danger.
DANGER
indicates that death or severe personal injury will result if proper precautions are not taken.
WARNING
indicates that death or severe personal injury may result if proper precautions are not taken.
CAUTION
indicates that minor personal injury can result if proper precautions are not taken.
NOTICE
indicates that property damage can result if proper precautions are not taken.
If more than one degree of danger is present, the warning notice representing the highest degree of danger will be
used. A notice warning of injury to persons with a safety alert symbol may also include a warning relating to property
damage.
Qualified Personnel
The product/system described in this documentation may be operated only by personnel qualified for the specific
task in accordance with the relevant documentation, in particular its warning notices and safety instructions. Qualified
personnel are those who, based on their training and experience, are capable of identifying risks and avoiding
potential hazards when working with these products/systems.
Proper use of Siemens products
Note the following:
WARNING
Siemens products may only be used for the applications described in the catalog and in the relevant technical
documentation. If products and components from other manufacturers are used, these must be recommended or
approved by Siemens. Proper transport, storage, installation, assembly, commissioning, operation and
maintenance are required to ensure that the products operate safely and without any problems. The permissible
ambient conditions must be complied with. The information in the relevant documentation must be observed.
Trademarks
All names identified by ® are registered trademarks of Siemens AG. The remaining trademarks in this publication
may be trademarks whose use by third parties for their own purposes could violate the rights of the owner.
Disclaimer of Liability
We have reviewed the contents of this publication to ensure consistency with the hardware and software described.
Since variance cannot be precluded entirely, we cannot guarantee full consistency. However, the information in this
publication is reviewed regularly and any necessary corrections are included in subsequent editions.
Siemens AG
Document order number: 6FC5397-1DP40-6BA3
Digital Industries
Ⓟ 12/2019 Subject to change
All rights reserved
Postfach 48 48
90026 NÜRNBERG
GERMANY
Table of contents
1
Generating user dialogs
7
1.1
Scope of functions
7
1.2
Fundamentals of Configuration
9
1.3
Configuration files
14
1.4
Structure of configuration file
17
1.5
Language dependency
23
1.6
XML diagnostics
24
1.7
XML identifier
26
1.7.1
General structure
26
1.7.2
Instruction/identifier descriptions
27
1.7.3
Color coding
52
1.7.4
Special XML syntax
52
1.7.5
Operators
53
1.7.6
System variables
54
1.7.7
Generating softkey menus and dialog forms
55
1.8
Generating user menus
101
1.8.1
Creating processing cycle forms
101
1.8.2
Substitution characters
104
1.9
Addressing components
105
1.9.1
PLC addressing
105
1.9.2
Addressing NC variables
106
1.9.3
Channel-specific addressing
106
1.9.4
Generating NC/PLC addresses during the runtime
106
1.9.5
Addressing drive components
107
1.9.6
Example: Determine the DO number for the Motor Module
109
1.9.7
Addressing machine and setting data
115
1.9.8
Channel-specific machine data
116
1.9.9
Addressing user data
117
1.10
Predefined functions
118
1.11
Multitouch operation
165
1.11.1
Multitouch function
165
1.11.2
Programming finger gestures
167
1.11.3
Gesture control for graphics
168
1.11.4
Gesture processing
171
1.12
Configuring your own buttons
173
1.12.1
Pushbutton
173
1.12.2
Functions of the pushbutton
175
1.12.2.1
Sub-tags for the pushbutton
175
1.12.2.2
Properties for the pushbutton
177
1.12.2.3
Control variables for the pushbutton
179
Easy XML
Programming Manual, 12/2019, 6FC5397-1DP40-6BA3
3
Table of contents
1.12.3
Switch on/off
183
1.12.4
Functions of the switch
184
1.12.4.1
Properties for the switch
184
1.12.4.2
Control variables for the switch
185
1.12.5
Radio button
187
1.12.6
Checkbox
187
1.12.7
Groupbox
188
1.12.8
Scroll area
189
1.13
Sidescreen application
192
1.13.1
Easy XML in the Sidescreen
192
1.13.2
Integrating Sidescreen dialogs
193
1.13.3
Language and text management
194
1.13.4
Sidescreen components
195
1.13.4.1
Sidescreen element
195
1.13.4.2
Sidescreen widget
196
1.13.4.3
Sidescreen page
198
1.14
Display Manager application
200
1.14.1
Easy XML in the Display Manager
200
1.14.2
Integrating the Customer Area in the Display Manager menu
200
1.14.3
Display Manager widget
202
1.14.4
Display Manager sidescreen page
204
1.15
Dialog selection via PLC hardkeys
206
1.16
Assigning user dialogs to reserved softkeys
209
1.16.1
Defining language-neutral softkey text
210
1.16.2
Assigning an Easy XML area
211
1.16.3
Tag descriptions
215
1.17
Creating language-neutral texts
217
1.18
Project-specific text files
218
1.18.1
Creating project-specific text files
218
1.18.2
Specifying text context
220
1.18.3
Specifying Textfilelist
222
1.19
Restoring the session
223
2
Generating commissioning dialogs
225
2.1
Overview of functions
225
2.2
Configuration in the PLC user program
227
2.3
Display on the user interface
230
2.4
Creating language-dependent texts
231
2.5
User example for a power unit
232
2.6
Script language
234
2.6.1
CONTROL_RESET
237
2.6.2
FILE
237
2.6.3
OPTION_MD
238
2.6.4
PLC_INTERFACE
239
2.6.5
POWER_OFF
240
2.6.6
WAITING
240
Easy XML
4
Programming Manual, 12/2019, 6FC5397-1DP40-6BA3
Table of contents
2.6.7
XML identifiers for the dialog
240
2.6.8
SOFTKEY_OK, SOFTKEY_CANCEL
241
Index
243
Easy XML
Programming Manual, 12/2019, 6FC5397-1DP40-6BA3
5
Table of contents
Easy XML
6
Programming Manual, 12/2019, 6FC5397-1DP40-6BA3
Generating user dialogs
1
1.1
Scope of functions
Overview
The "Generate user dialogs" function offers an open structure and enables the user to develop
customer-specific and application-specific user interfaces in SINUMERIK Operate.
The control system offers an XML-based script language for generating user dialogs.
This script language makes it possible to display machine-specific menus and dialog forms in
the <CUSTOM> operating area in SINUMERIK Operate.
All dialog forms can be designed on a language-neutral basis. In such cases, the system reads
out the texts to be displayed from the accompanying language database.
Use
The defined XML instructions offer the following properties:
1. Display dialogs containing the following elements:
- Softkeys
- Variables
- Texts and Help texts
- Graphics and Help displays
2. Call dialogs by:
- Pressing the (start) softkeys
3. Restructure dialogs dynamically:
- Edit and delete softkeys
- Define and design variable fields
- Insert, exchange, and delete display texts (language-dependent or language-neutral)
- Insert, exchange, and delete graphics
4. Initiate operations in response to the following actions:
- Displaying dialogs
- Inputting values (variables)
- Selecting a softkey
- Exiting dialogs
5. Data exchange between dialogs
Easy XML
Programming Manual, 12/2019, 6FC5397-1DP40-6BA3
7
Generating user dialogs
1.1 Scope of functions
6. Variables
- Read (NC, PLC and user variables)
- Write (NC, PLC and user variables)
- Combine with mathematical, comparison or logic operators
7. Execute functions:
- Subprograms
- File functions
- PI services
8. Apply protection levels according to user classes
The valid elements (tags) for the script language are described in the "XML tags" (Page 26)
section.
Note
The following section "Basic principles of configuration" is not intended as a comprehensive
description of XML (Extensible Markup Language). Please refer to the relevant specialist
literature for additional information.
Easy XML
8
Programming Manual, 12/2019, 6FC5397-1DP40-6BA3
Generating user dialogs
1.2 Fundamentals of Configuration
1.2
Fundamentals of Configuration
Configuration files
The defining data for new user interfaces are stored in configuration files. These files are
automatically interpreted and the result displayed on the screen. Configuration files are not
stored in the software supplied and must first be set up and loaded by the user.
An XML editor or another form of text editor can be used to generate the configuration files.
Note
File names may only contain lowercase letters.
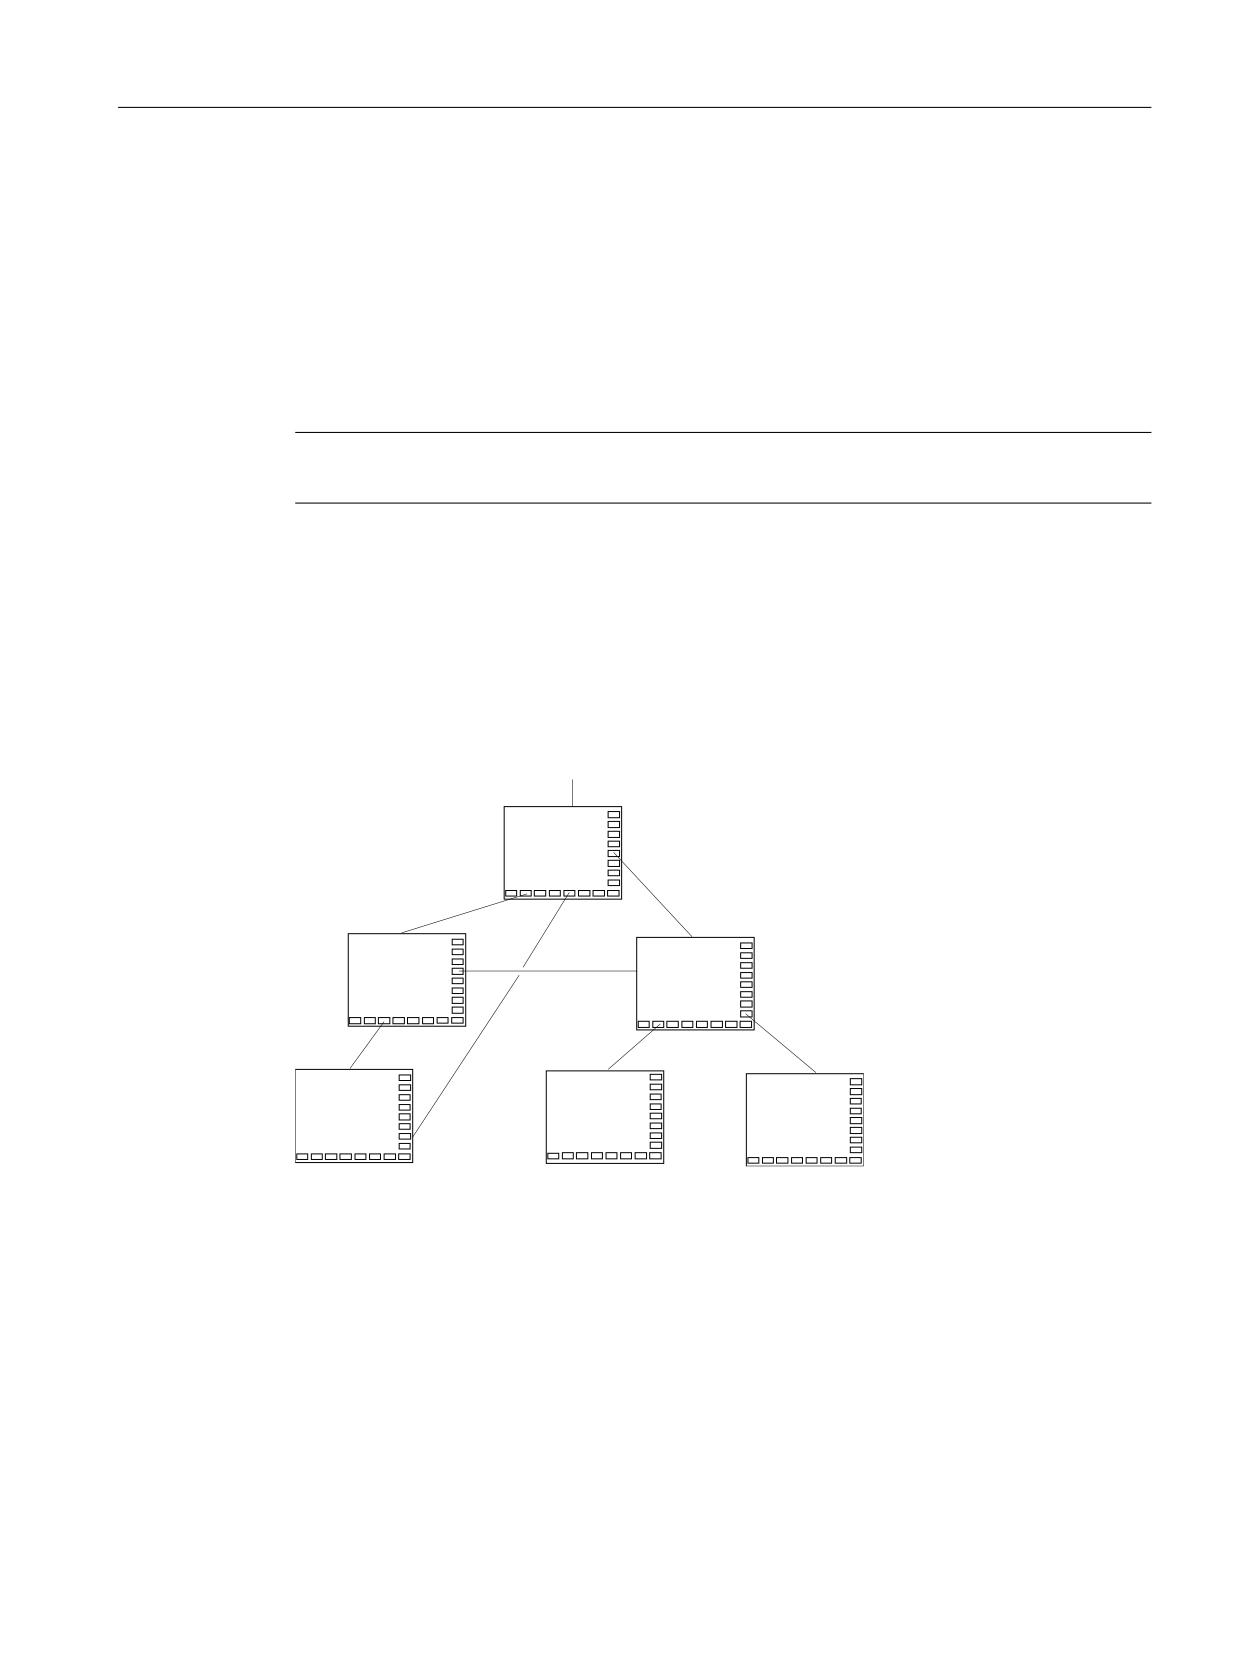
Menu tree principle
Several interlinked dialogs create a menu tree. A link exists if you can switch from one dialog
to another. You can use the newly defined horizontal/vertical softkeys in this dialog to call the
preceding or any other dialog.
Configured start softkeys can be used to create a further menu tree behind the start menu:
6WDUW PHQX
Figure 1-1
Menu tree for user dialogs
Start menu
The start menu is defined by the name "main" in the "xmldial.xml" file. The start menu is used
to initiate your own operating sequences.
You can use the "main" menu to link your own dialogs or additional softkey bars so that they can
be loaded and used for executing additional actions.
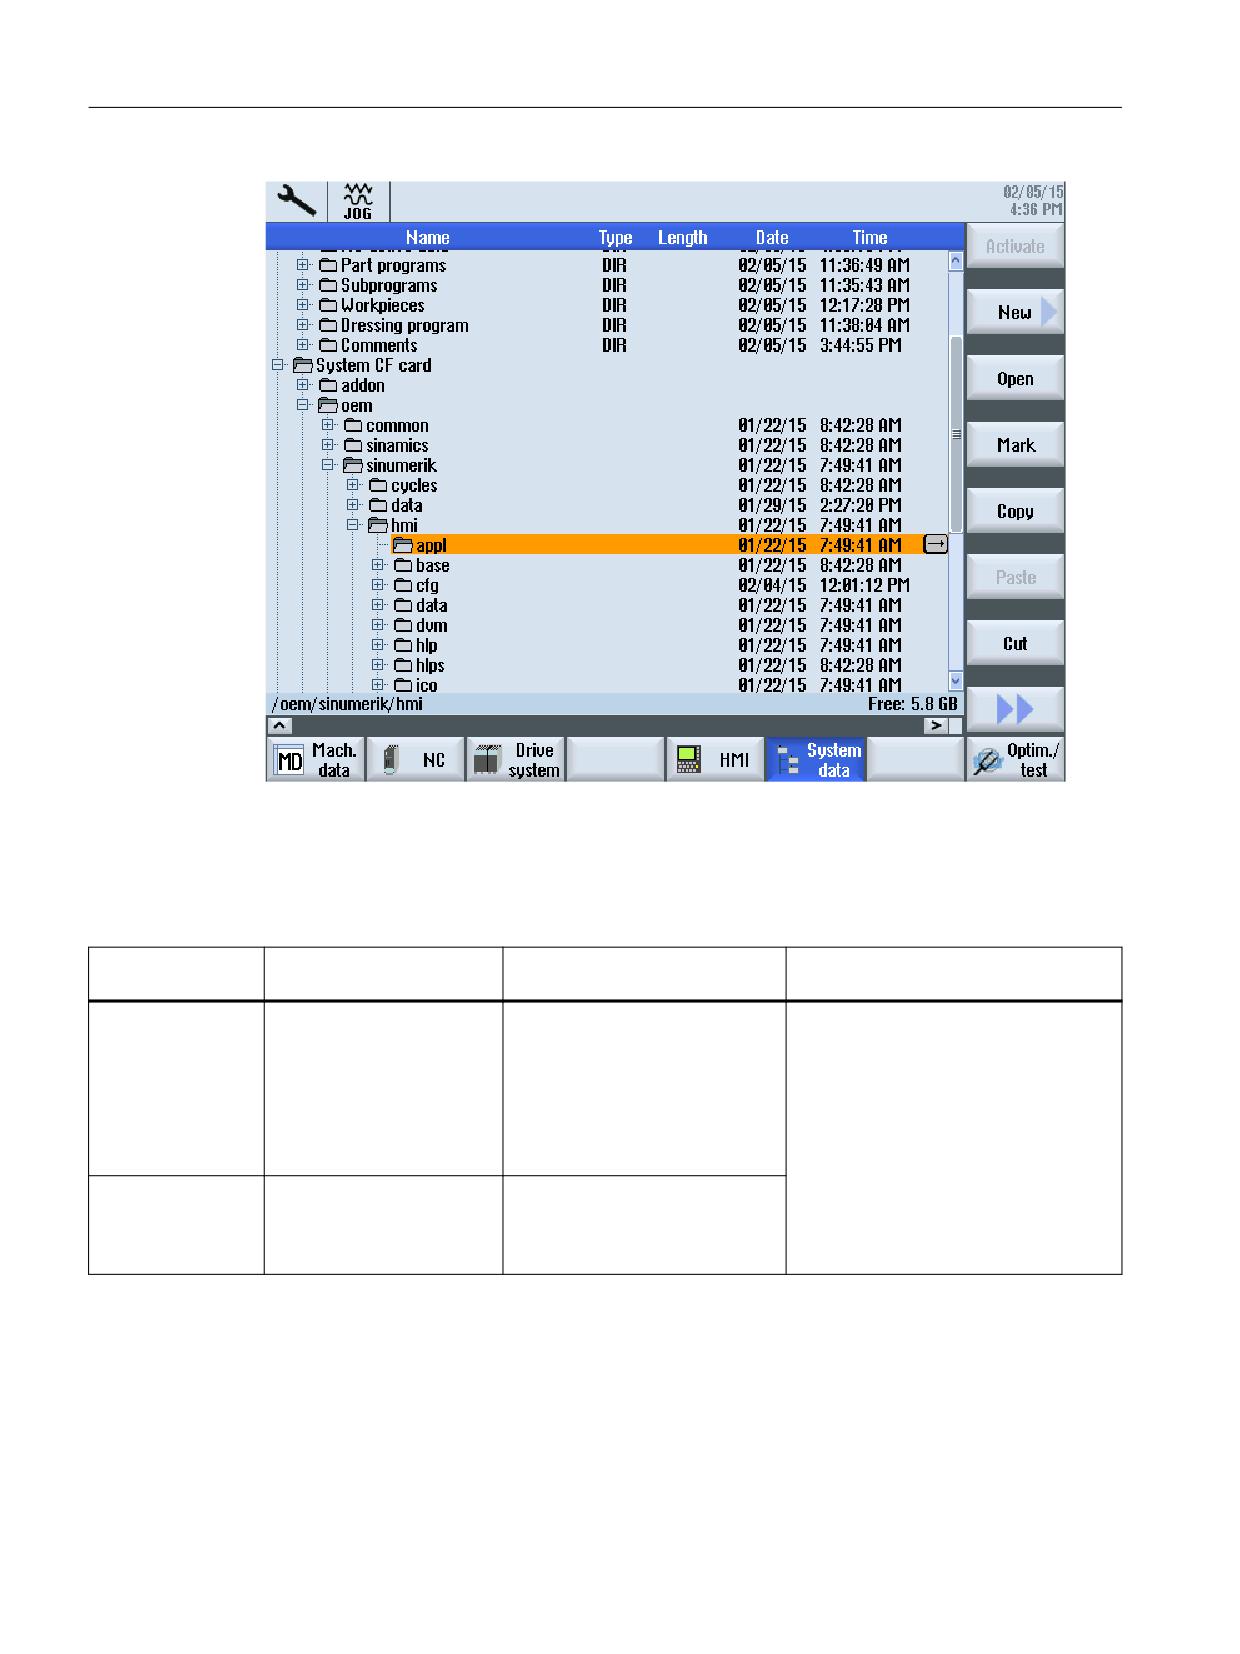
The figure below shows the manufacturer’s folder "System CF-Card/oem/sinumerik/hmi" on
the control.
Easy XML
Programming Manual, 12/2019, 6FC5397-1DP40-6BA3
9
Generating user dialogs
1.2 Fundamentals of Configuration
Figure 1-2
Manufacturer's folder
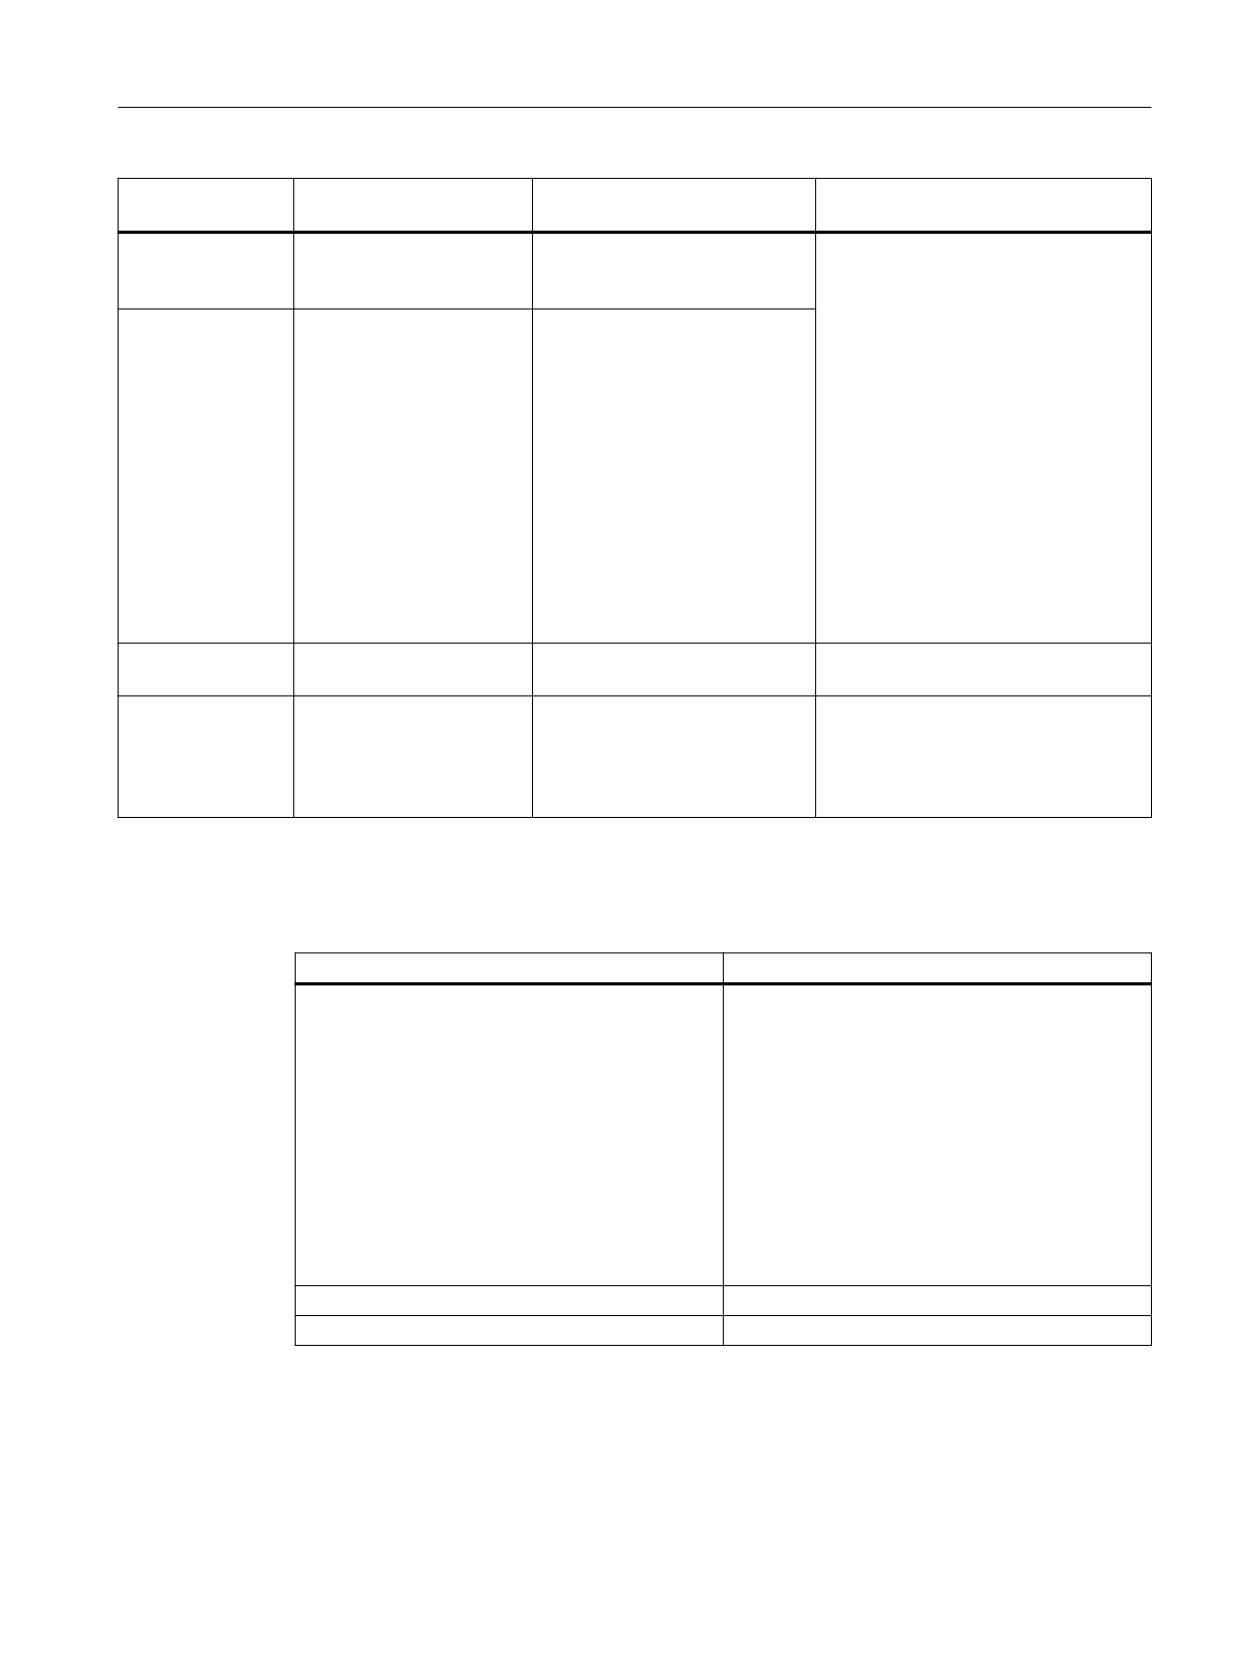
The following files in the manufacturer's folder "System CF-Card/oem/sinumerik/hmi" on the
control are needed to configure user dialogs:
Table 1-1
Files for configuration
File type
Name of the file
Description
Storage location in operating area Set-
up > System data
Script file
"xmldial.xml"
Standard text file
Manufacturer's folder > subdirectory
"appl" for the applications
This script file uses XML tags to
control how the configured soft-
key menus and dialog forms in
SINUMERIK Operate will ap-
pear in the <CUSTOM> operat-
ing area.
Application-specif-
"xxx.xml"
Freely selectable file name. The
ic script file
reference to this name is estab-
lished via the corresponding INI
files.
Easy XML
10
Programming Manual, 12/2019, 6FC5397-1DP40-6BA3
Generating user dialogs
1.2 Fundamentals of Configuration
File type
Name of the file
Description
Storage location in operating area Set-
up > System data
Text file
"oem_xml_screens_xxx.ts"
This text file contains the texts
Manufacturer's folder > subdirectory
for the menus and dialog forms
"lng" for the desired languages
for the individual languages.
User-specific text
"yyy_xxx.ts"
Freely selectable file name. The
file
reference to this name is estab-
lished using the corresponding
attributes at tags DialogGUI,
menu or form. The description is
provided in Chapter "Project-
specific text files (Page 218)".
For Sidescreen or Display Man-
ager applications, the text file
name is derived from the page or
widget name. You can find an
example in Chapter "Language
and text management
(Page 194)".
Bitmaps
The control system supports
Manufacturer's folder > subdirectory
BMP and PNG formats.
"ico"
XML files inserted
E.g. "machine_set-
These files also contain pro-
Manufacturer's folder > subdirectory
in the "xmldial.xml"
tings.xml"
grammed instructions for dis-
"appl" for the applications
control file with the
playing the dialog forms and pa-
"INCLUDE" XML
rameters in SINUMERIK Oper-
tag.
ate.
Easy XML connection points
The following connection points are available for Easy XML scripts:
Hardkey/Softkey
Connection point
Softkey operating menu
Standard script file name "xmldial.xml"
Activated in the file "slamconfig.ini"
Example:
[CustomXML]
TextId=SL_AM_CUSTOM
SidescreenTextId=SL_SIDESCREEN_CUSTO
M
TextFile=slam
TextContext=SlAmAreaMenu
SoftkeyPosition=12
Visible=true
Menu User
Standard script file name "menu_user.xml"
Menu Function
Standard script file name "menu_function.xml"
Easy XML
Programming Manual, 12/2019, 6FC5397-1DP40-6BA3
11
Generating user dialogs
1.2 Fundamentals of Configuration
Hardkey/Softkey
Connection point
PLC hardkey
The script file name relates to the key description.
Example:
KEY50.0 = area:=CustomXML,
dialog:=SlEECustomDialog,
cmdline:="-conf slagmdialog.hmi -
mainModule restore.xml -entry cmc2"
KEY51.0 = area:=CustomXML,
dialog:=SlEECustomDialog,
cmdline:="-conf slagmdialog.hmi -
mainModule activate.xml -entry cmc1"
MMC command
The script file name relates to the NC command
description.
Example:
MMC("XML, XML_ON, TEST.XML,
cmd1","A")
Easy XML
12
Programming Manual, 12/2019, 6FC5397-1DP40-6BA3

Generating user dialogs
1.2 Fundamentals of Configuration
Hardkey/Softkey
Connection point
Reserved softkeys of an operating area
To integrate an OEM application into an operating
area, the appropriate templates are available in
directory
siemens\sinumerik\hmi\template\cfg\
(sl<Bedienbereich>_oem.xml). The XML file be-
longing to the operating area should be copied to
directory
oem\sinumerik\hmi\cfg
and edited as follows:
Function switchToDialog should be programmed
as softkey response. Keywords area with
value CustomXML and dialog with value SlEECus-
tomDialog should be specified as arguments.
Syntax:
<FUNCTION args="-area CustomXML -
dialog SlEECustomDialog -mainModule
<name of the main module> -entry
<menu name>" name="switchToDialog"/>
Example:
Integrating an Easy XML application into the diag-
nostics area:
"dg.xml" was used as script file name. In this file,
menu with name main should be called.
<MENU name="DgGlobalHu">
<ETCLEVEL id="0">
<SOFTKEYGROUP name="GroupEtc">
<SOFTKEY position="7">
<PROPERTY name="textID"
type="QString">DG_SK</PROPERTY>
<PROPERTY name="translationContext"
type="QString">EASY_XML</PROPERTY>
<FUNCTION args="-area CustomXML -
dialog SlEECustomDialog -
mainModuledg.xml -entry main"
name="switchToDialog"/>
</SOFTKEY>
</SOFTKEYGROUP>
</ETCLEVEL>
</MENU>
Sidescreen
The script file name relates to the sidescreen de-
scription of the file "slsidescreen.ini".
Easy Extend softkey
Standard script file name "agm.xml"
Easy XML
Programming Manual, 12/2019, 6FC5397-1DP40-6BA3
13
Generating user dialogs
1.3 Configuration files
1.3
Configuration files
Introduction
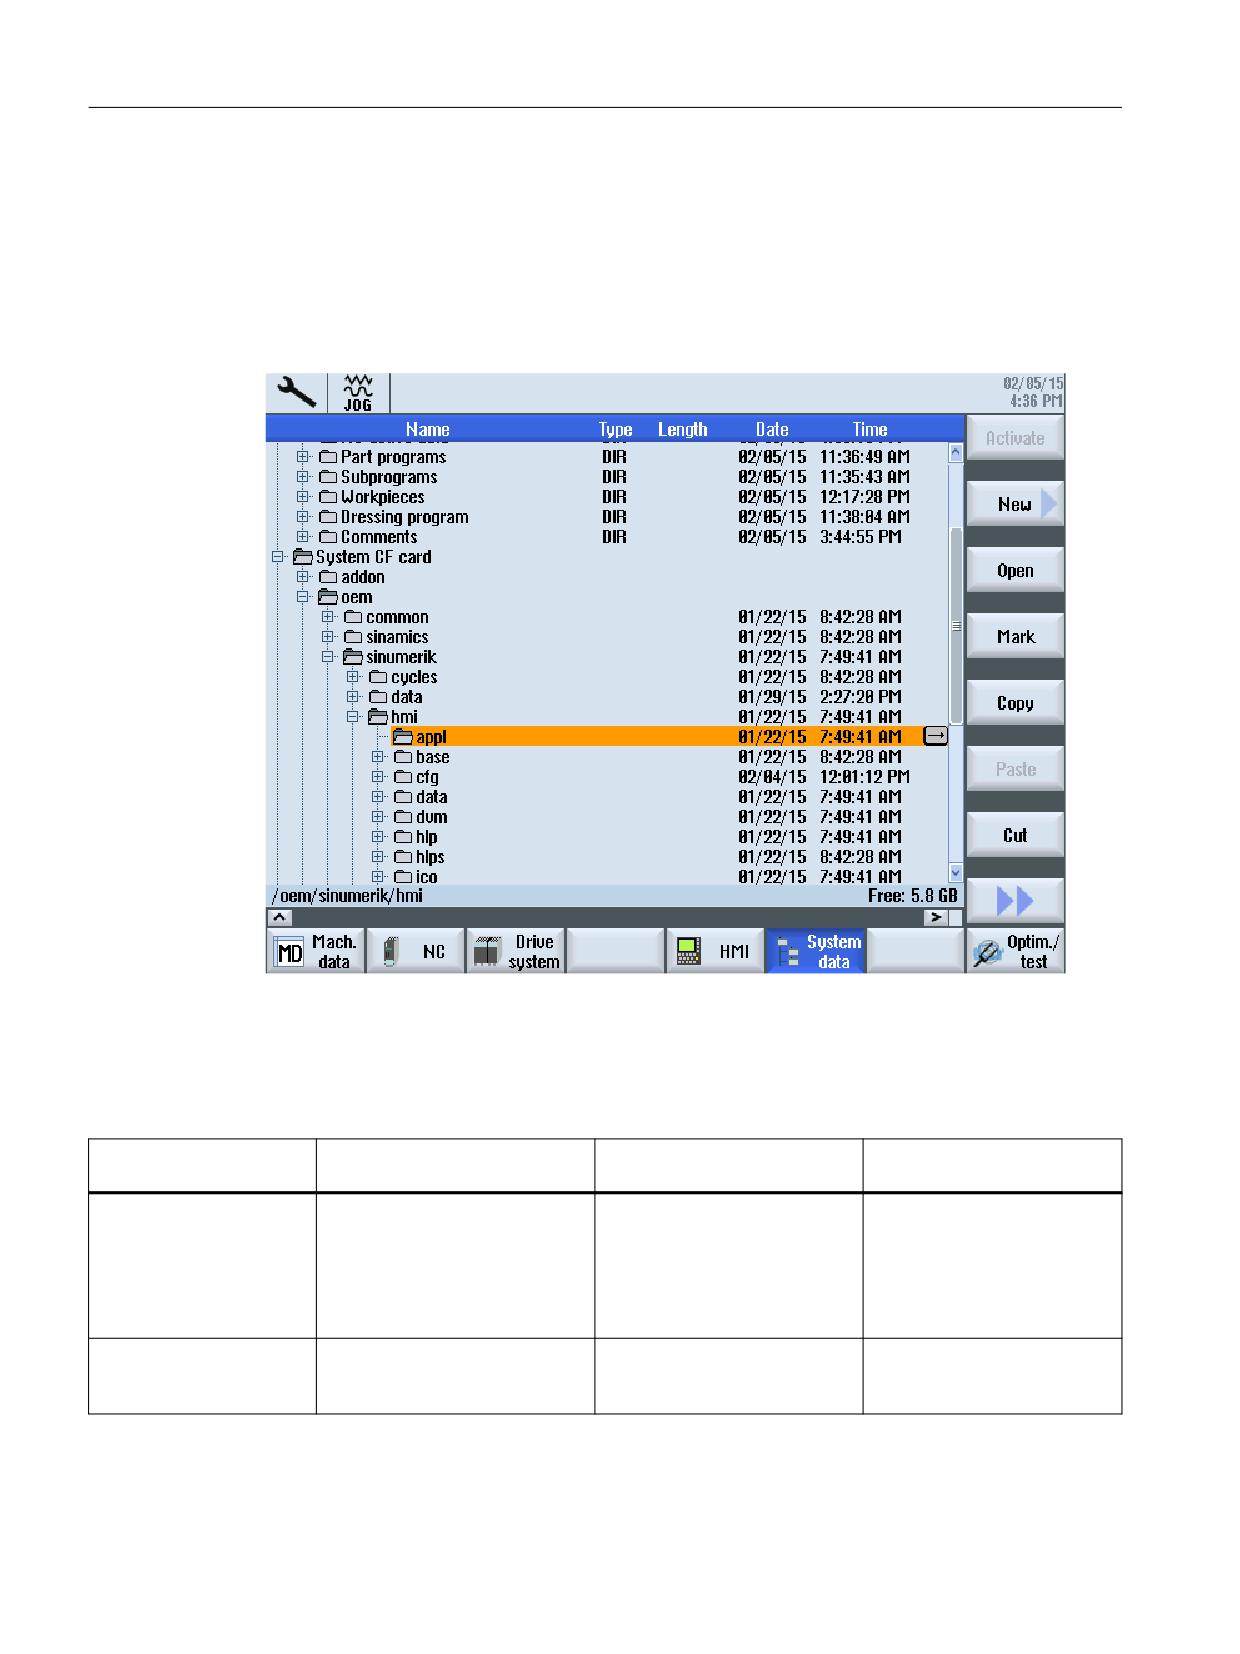
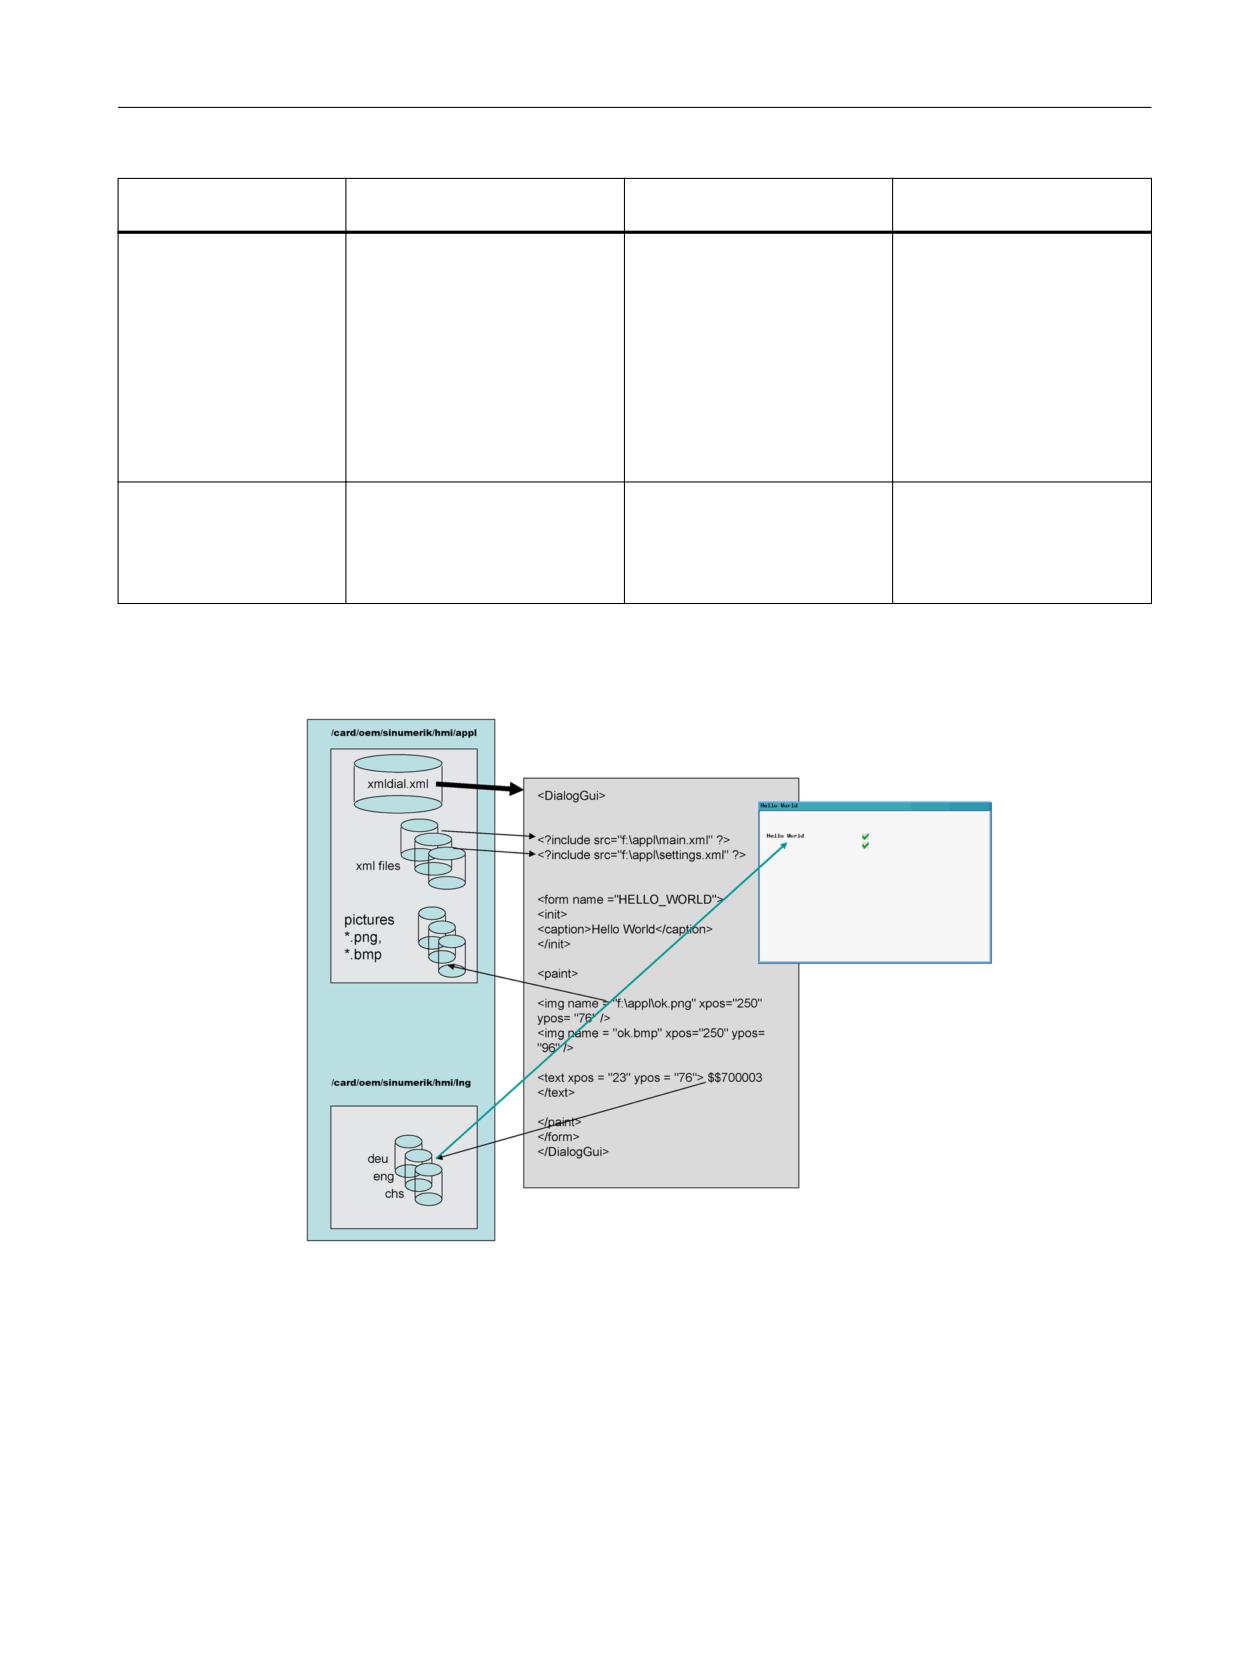
The figure below shows the manufacturer’s folder "System CF-Card/oem/sinumerik/hmi" on
the control.
Figure 1-3
Manufacturer's folder
The following files in the manufacturer's folder "System CF-Card/oem/sinumerik/hmi" on the
control are needed to configure user dialogs:
Table 1-2
Files for configuration
File type
Name of the file
Meaning
Storage location in operating
area Setup > System data
Script file
"xmldial.xml"
This script file uses XML tags
Manufacturer's folder > sub-
to control how the configured
directory "appl" for the appli-
softkey menus and dialog
cations
forms in SINUMERIK Operate
will appear in the <CUSTOM>
operating area.
Text file
"oem_xml_screens_xxx.ts"
This text file contains the texts
Manufacturer's folder > sub-
for the menus and dialog forms
directory "lng" for the lan-
for the individual languages.
guages
Easy XML
14
Programming Manual, 12/2019, 6FC5397-1DP40-6BA3
Generating user dialogs
1.3 Configuration files
File type
Name of the file
Meaning
Storage location in operating
area Setup > System data
Bitmaps
The control system supports
Manufacturer's folder > sub-
BMP and PNG formats.
directory "ico"
The bitmaps are saved in the
subdirectory for the screen
resolution belonging to the
control.
Note: If a path to the bitmap
file is specified, the files can
be stored in this directory di-
rectly.
XML files inserted in the
E.g. "machine_settings.xml"
These files also contain pro-
Manufacturer's folder > sub-
"xmldial.xml" control file
grammed instructions for dis-
directory "appl" for the appli-
with the "INCLUDE" XML
playing the dialog forms and
cations
tag.
parameters in SINUMERIK
Operate.
Dependencies of files for configuring user dialogs
Figure 1-4
Dependencies
Easy XML
Programming Manual, 12/2019, 6FC5397-1DP40-6BA3
15
Generating user dialogs
1.3 Configuration files
Load configuration
As described in the "Storage location in the operating area" column in the previous "Files for
configuration" table, the generated files must be copied to the appropriate subdirectories in the
manufacturer's folder.
Note
As soon as there is a script file "xmldial.xml" in the subdirectory for applications, the user can
start this user dialog in the <CUSTOM> operating area.
After the initial copying process, the HMI must be reset via a "Normal power-up".
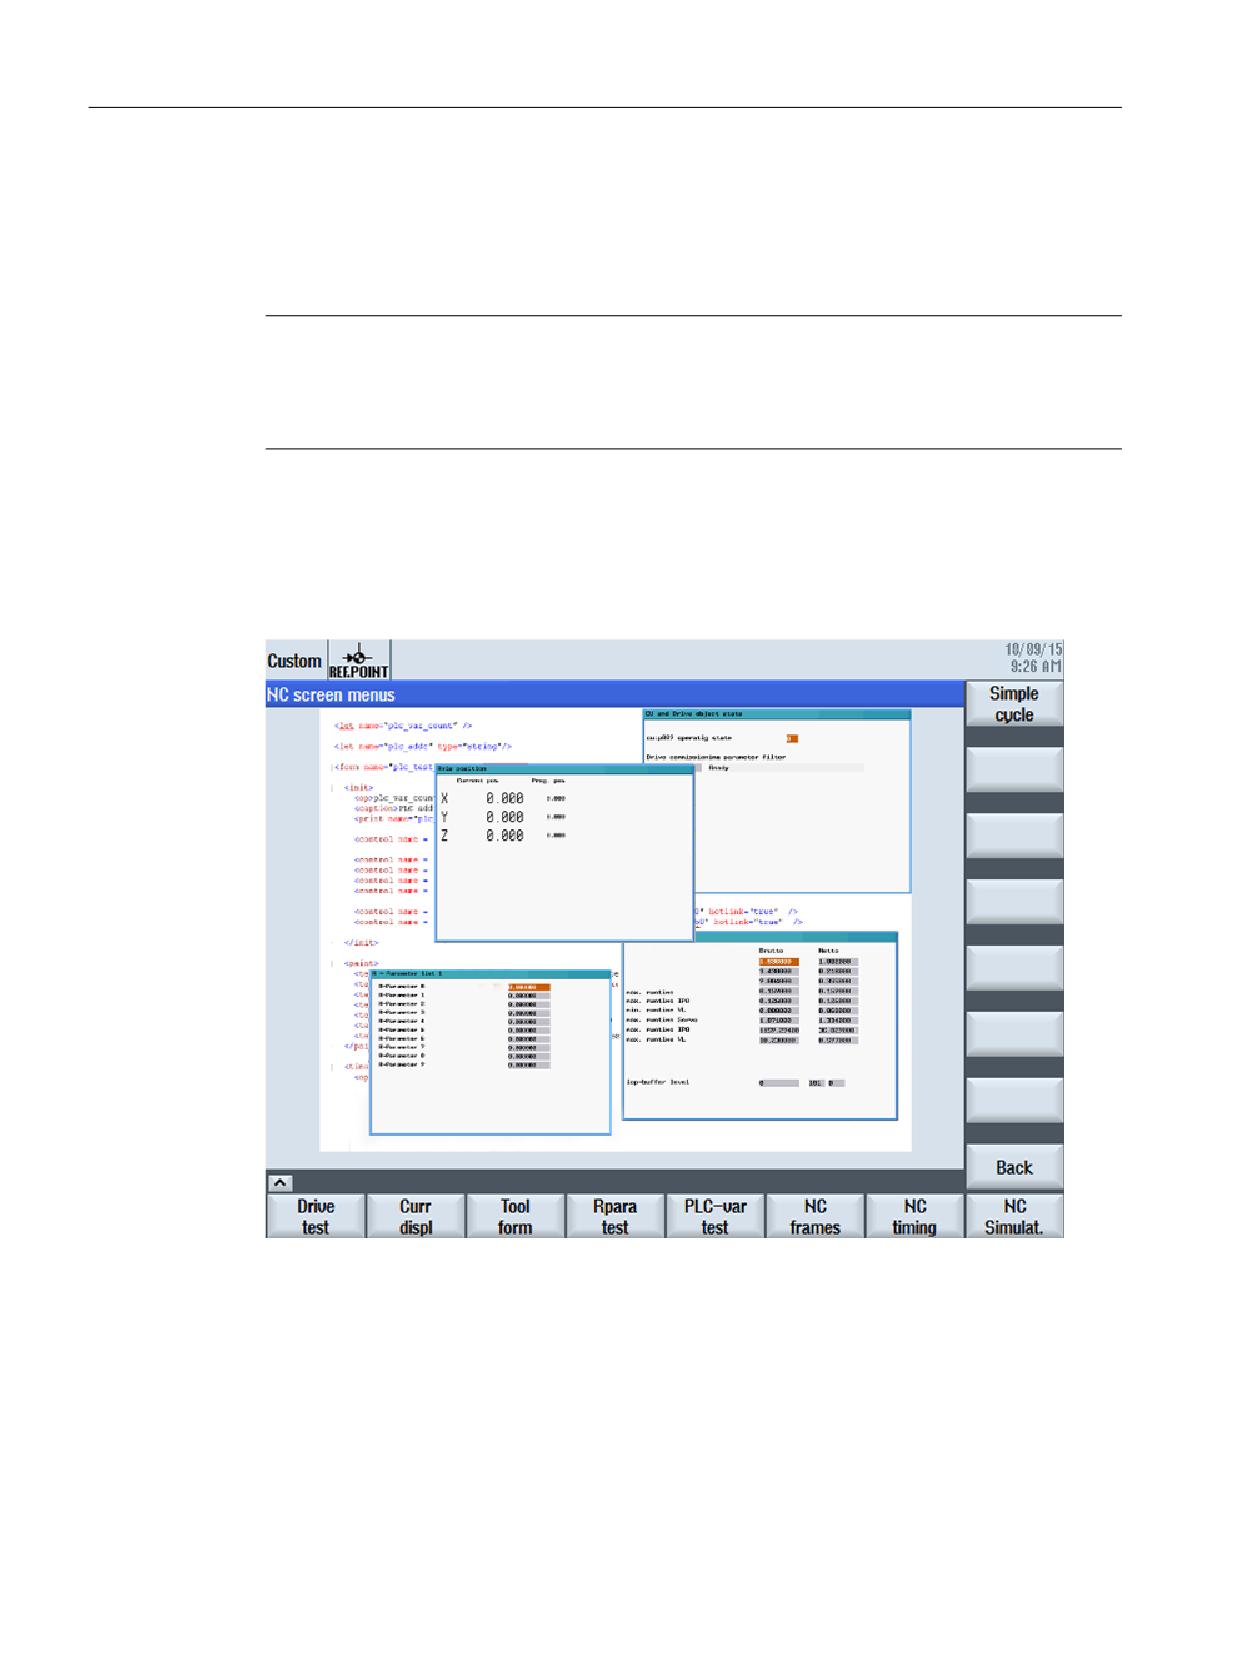
Example of a user dialog in SINUMERIK Operate
The configured softkey menus are displayed when the <CUSTOM> operating area is called.
This enables the user to operate the dialog forms which have been configured.
Figure 1-5
Example of a user dialog in the <CUSTOM> operating area
Further examples are provided in the toolbox.
See also
Predefined functions (Page 118)
Easy XML
16
Programming Manual, 12/2019, 6FC5397-1DP40-6BA3
Generating user dialogs
1.4 Structure of configuration file
1.4
Structure of configuration file
Overview
A configuration file consists of the following elements:
● Description of the "main" start menu with start softkeys
● Definition of the dialogs
● Definition of the variables
● Description of the blocks
● Definition of softkey bars
The following examples show the XML script for the "xmldial.xml" file and the corresponding
screenshots.
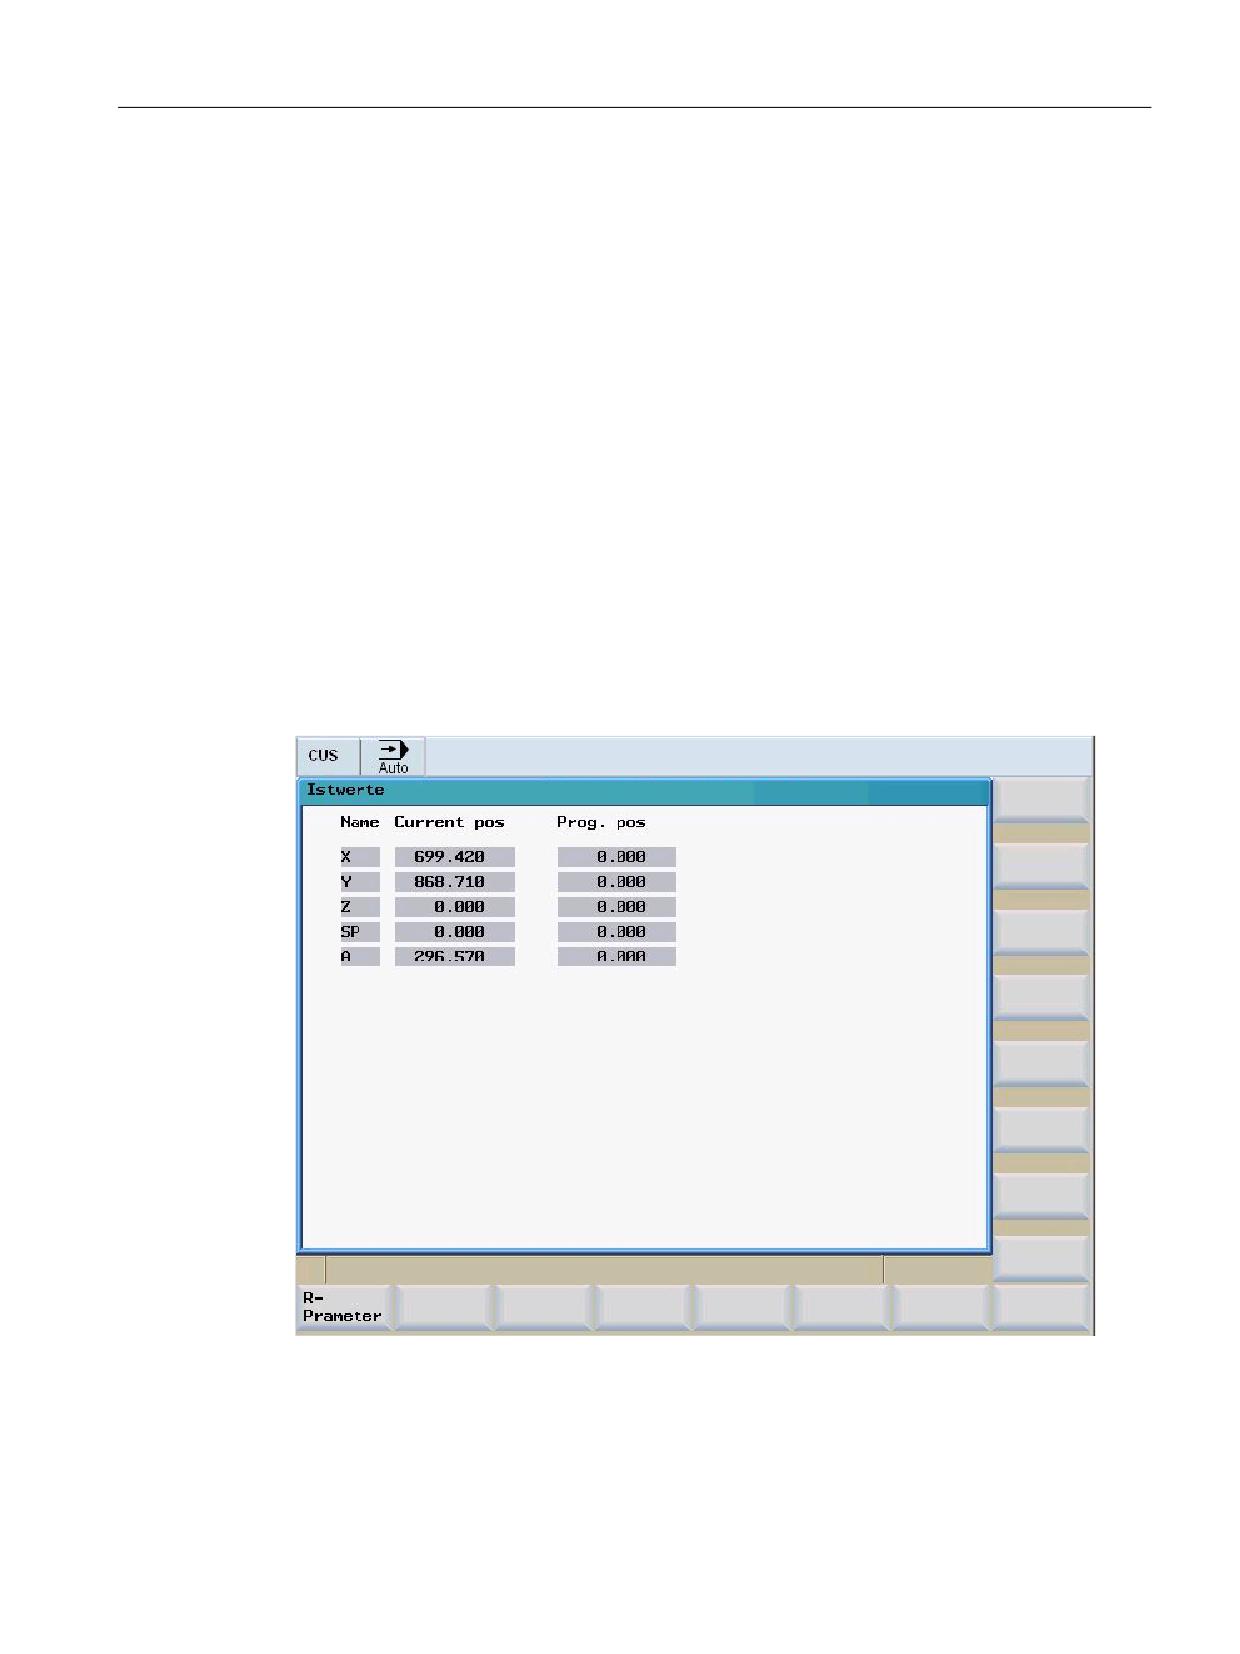
The script contains the dialogs for displaying actual values and residual distances, as well as
an R parameter list.
Dialog form section "Actual values"
Easy XML
Programming Manual, 12/2019, 6FC5397-1DP40-6BA3
17
Generating user dialogs
1.4 Structure of configuration file
xmldial.xml
<DialogGui>
<!--
main menu
It is called by the system software. It starts the application.
The menu tag manages the soft key reactions. One input form can be assigned
to a menu tag.
-->
<menu name = "MAIN">
<OPEN_FORM name = "CURRENT_DISPLAY" />
<softkey POSITION="1">
<caption>R-%nPrameter</caption>
<navigation>MENU_R_PARAMETER</navigation> <!-- opens the menu R parameter --
>
</softkey>
</menu>
<form name = "CURRENT_DISPLAY">
<init>
<caption>Istwerte</caption>
<control name = "label1" xpos = "36" ypos = "56" width = "32"
fieldtype="readonly" refvar="nck/Channel/GeometricAxis/name[0]" />
<control name = "label2" xpos = "36" ypos = "76" width = "32"
fieldtype="readonly" refvar="nck/Channel/GeometricAxis/name[1]" />
<control name = "label3" xpos = "36" ypos = "96" width = "32"
fieldtype="readonly" refvar="nck/Channel/GeometricAxis/name[2]" />
<control name = "label4" xpos = "36" ypos = "116" width = "32"
fieldtype="readonly" refvar="nck/Channel/GeometricAxis/name[3]" />
<control name = "label5" xpos = "36" ypos = "136" width = "32"
fieldtype="readonly" refvar="nck/Channel/GeometricAxis/name[4]" />
<control name = "edit1" xpos = "80" ypos = "56" refvar="nck/Channel/
GeometricAxis/actProgPos[0]" hotlink="true" fieldtype="readonly"
format="%9.3f" time="super fast"/>
<control name = "edit2" xpos = "80" ypos = "76" refvar="nck/Channel/
GeometricAxis/actProgPos[1]" hotlink="true" fieldtype="readonly"
format="%9.3f" time="super fast"/>
<control name = "edit3" xpos = "80" ypos = "96" refvar="nck/Channel/
GeometricAxis/actProgPos[2]" hotlink="true" fieldtype="readonly"
format="%9.3f" time="super fast"/>
<control name = "edit4" xpos = "80" ypos = "116" refvar="nck/Channel/
GeometricAxis/actProgPos[3]" hotlink="true" fieldtype="readonly"
format="%9.3f" time="super fast"/>
<control name = "edit5" xpos = "80" ypos = "136" refvar="nck/Channel/
GeometricAxis/actProgPos[4]" hotlink="true" fieldtype="readonly"
format="%9.3f" time="super fast"/>
Easy XML
18
Programming Manual, 12/2019, 6FC5397-1DP40-6BA3
Generating user dialogs
1.4 Structure of configuration file
xmldial.xml
<control name = "edit11" xpos = "210" ypos = "56" refvar="nck/Channel/
GeometricAxis/progDistToGo[0]" hotlink="true" fieldtype="readonly"
format="%9.3f" time="super fast"/>
<control name = "edit12" xpos = "210" ypos = "76" refvar="nck/Channel/
GeometricAxis/progDistToGo[1]" hotlink="true" fieldtype="readonly"
format="%9.3f" time="super fast"/>
<control name = "edit13" xpos = "210" ypos = "96" refvar="nck/Channel/
GeometricAxis/progDistToGo[2]" hotlink="true" fieldtype="readonly"
format="%9.3f" time="super fast"/>
<control name = "edit14" xpos = "210" ypos = "116" refvar="nck/Channel/
GeometricAxis/progDistToGo[3]" hotlink="true" fieldtype="readonly"
format="%9.3f" time="super fast"/>
<control name = "edit15" xpos = "210" ypos = "136" refvar="nck/Channel/
GeometricAxis/progDistToGo[4]" hotlink="true" fieldtype="readonly"
format="%9.3f" time="super fast"/>
</init>
<paint>
<text xpos= "36" ypos="30">Name</text>
<text xpos= "80" ypos="30">Current pos</text>
<text xpos= "210" ypos="30">Prog. pos</text>
</paint>
</form>
Easy XML
Programming Manual, 12/2019, 6FC5397-1DP40-6BA3
19
Generating user dialogs
1.4 Structure of configuration file
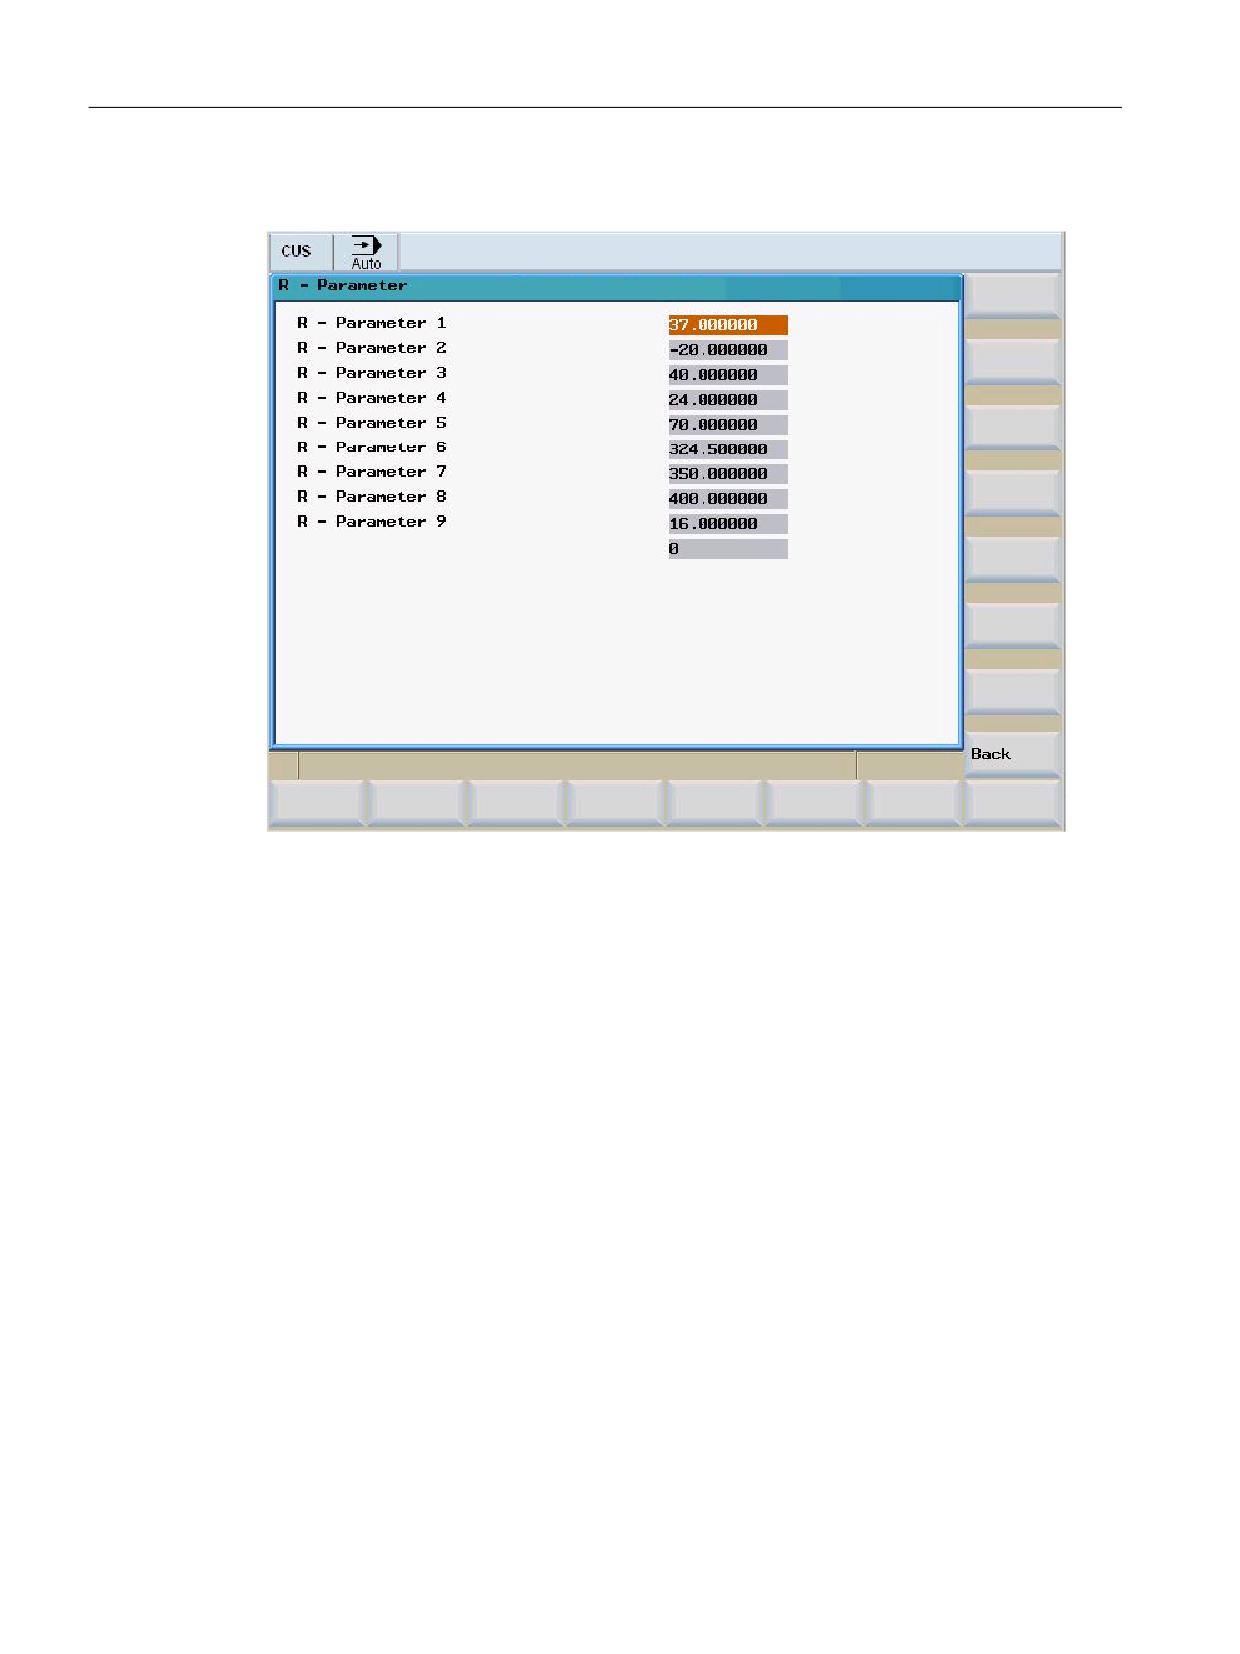
Dialog form section "R Parameters"
Easy XML
20
Programming Manual, 12/2019, 6FC5397-1DP40-6BA3
Generating user dialogs
1.4 Structure of configuration file
xmldial.xml
<!-- ***************************************************************
Menu R- Parameter
-->
<menu name ="MENU_R_PARAMETER">
<OPEN_FORM name = "R-Parameter" />
<softkey POSITION="16">
<caption>Back</caption>
<navigation>MAIN</navigation>
</softkey>
</menu>
<form name = "R-Parameter">
<init>
<DATA_ACCESS type="true" />
<caption>R - Parameter</caption>
<control name = "edit1" xpos = "322" ypos = "34" refvar="nck/Channel/
Parameter/R[1]" />
<control name = "edit2" xpos = "322" ypos = "54" refvar="nck/Channel/
Parameter/R[2]" />
<control name = "edit3" xpos = "322" ypos = "74" refvar="nck/Channel/
Parameter/R[3]" />
<control name = "edit4" xpos = "322" ypos = "94" refvar="nck/Channel/
Parameter/R[4]" />
<control name = "edit5" xpos = "322" ypos = "114" refvar="nck/Channel/
Parameter/R[5]" />
<control name = "edit6" xpos = "322" ypos = "134" refvar="nck/Channel/
Parameter/R[6]" />
<control name = "edit7" xpos = "322" ypos = "154" refvar="nck/Channel/
Parameter/R[7]" />
<control name = "edit8" xpos = "322" ypos = "174" refvar="nck/Channel/
Parameter/R[8]" />
<control name = "edit9" xpos = "322" ypos = "194" refvar="nck/Channel/
Parameter/R[9]" />
<control name = "edit10" xpos = "322" ypos = "214" refvar="nck/Channel/
Parameter/R[10]" />
<control name = "edit10" xpos = "322" ypos = "214" refvar="plc/mb170" />
</init>
<paint>
<text xpos = "23" ypos = "34">R - Parameter 1</text>
<text xpos = "23" ypos = "54">R - Parameter 2</text>
<text xpos = "23" ypos = "74">R - Parameter 3</text>
<text xpos = "23" ypos = "94">R - Parameter 4</text>
<text xpos = "23" ypos = "114">R - Parameter 5</text>
<text xpos = "23" ypos = "134">R - Parameter 6</text>
<text xpos = "23" ypos = "154">R - Parameter 7</text>
<text xpos = "23" ypos = "174">R - Parameter 8</text>
<text xpos = "23" ypos = "194">R - Parameter 9</text>
Easy XML
Programming Manual, 12/2019, 6FC5397-1DP40-6BA3
21
Generating user dialogs
1.4 Structure of configuration file
xmldial.xml
</paint>
</form>
</DialogGui>
Easy XML
22
Programming Manual, 12/2019, 6FC5397-1DP40-6BA3
Generating user dialogs
1.5 Language dependency
1.5
Language dependency
Language-dependent texts are used for:
● Softkey labels
● Headers
● Help texts
● Any other texts
The language-dependent texts are stored in text files.
Note
You will need to perform the following steps when using these text files:
● Make them available in the required languages.
● Transfer them into the relevant language directories of the control system.
Easy XML
Programming Manual, 12/2019, 6FC5397-1DP40-6BA3
23

Generating user dialogs
1.6 XML diagnostics
1.6
XML diagnostics
The system provides the Easy XML diagnostic function for diagnosing and finding script errors.
The use of the diagnostic function checks the XML syntax and runs through all the scripts
belonging to the project. To do this, functions, menus, forms and the existence and validity of
variables are also checked. The errors found are listed.
The Easy XML diagnostics function can be activated either by an attribute in the DialogGui tag
or by Display machine data.
Activate easy XML diagnostics
Example:
<DialogGui diagnose="true" >
…
…
</DialogGui >
or
Display machine data:
MD9113 $MM_EASY_XML_DIAGNOSE
Diagnostics and correction help sup-
port for Easy XML scripts
= 0
No diagnostics active
= 1
Syntax check active
Diagnostics using trace outputs
Trace outputs can be integrated into a script using tag debug. Data is only saved if
attribute debug_msg with the value on is specified in tag DialogGui.
Softkey function overview
Dialog
Softkey
Function
Main menu "EasyXML diagnos-
Start script
The loaded program is started
tics"
directly.
Start check
The syntax check is being star-
ted. All accrued messages can
be seen. Renewed checking is
available.
Easy XML
24
Programming Manual, 12/2019, 6FC5397-1DP40-6BA3
Generating user dialogs
1.6 XML diagnostics
Dialog
Softkey
Function
"Errors" and "Warnings" dialogs
Errors
The result are displayed, sorted
according to errors and warn-
Warnings
ings.
Go to error
If errors or warnings are found,
the softkey is displayed.
The softkey opens the marked
XML file from the error list for ed-
iting. The cursor is automatically
placed on the erroneous row.
Check result
All accrued messages can be
seen.
"Document" dialog
Save
Changes in the XML file are be-
ing saved.
Cancel
The XML file is closed un-
changed. The check result is dis-
played again.
Easy XML
Programming Manual, 12/2019, 6FC5397-1DP40-6BA3
25
Generating user dialogs
1.7 XML identifier
1.7
XML identifier
1.7.1
General structure
Structure and instructions of the script file for dialog configuration
All dialog configurations should be stored in the DialogGui tag.
<DialogGui>
…
</DialogGui>
Example:
<?xml version="1.0" encoding="utf-8"?>
<DialogGui>
…
<FORM name ="Hello_World">
<INIT>
<CAPTION>Hello World</CAPTION>
</INIT>
</FORM>
</DialogGui>
Instructions
The language offers the following instructions for executing conditional instructions and loop
controls:
● For loop
● WHILE loop
● Do while loop
● Conditional processing
● Switch and Case instructions
● Operator controls in a dialog form
● Softkey descriptions
● Define variables
A detailed description of the instructions can be obtained in section "Instruction/identifier
descriptions (Page 27)".
Easy XML
26
Programming Manual, 12/2019, 6FC5397-1DP40-6BA3

Generating user dialogs
1.7 XML identifier
1.7.2
Instruction/identifier descriptions
The following XML tags are defined for generating dialogs and menus, and for executing
program sequences:
Note
Attribute values that are in quotation marks "<...>" should be replaced by the currently used
expressions.
Example:
<DATA_LIST action="read/write/append" id="<list name>">
is programmed as follows:
<DATA_LIST action="read/write/append" id="my datalist">
Tag identifier
Description
BREAK
Conditional cancellation of a loop.
CONTROL
The tag is used to generate control elements. The description is provided in Chapter "Gen-
erating softkey menus and dialog forms (Page 55)".
CONTROL_RESET
The tag enables one or more control components to be restarted.
Syntax:
<CONTROL_RESET resetnc="TRUE" />
Attributes:
● RESETNC = "TRUE"
The NC component is restarted
● RESETDRIVE = "TRUE"
The drive components are restarted.
Easy XML
Programming Manual, 12/2019, 6FC5397-1DP40-6BA3
27
Generating user dialogs
1.7 XML identifier
Tag identifier
Description
CREATE_CYCLE_EVENT
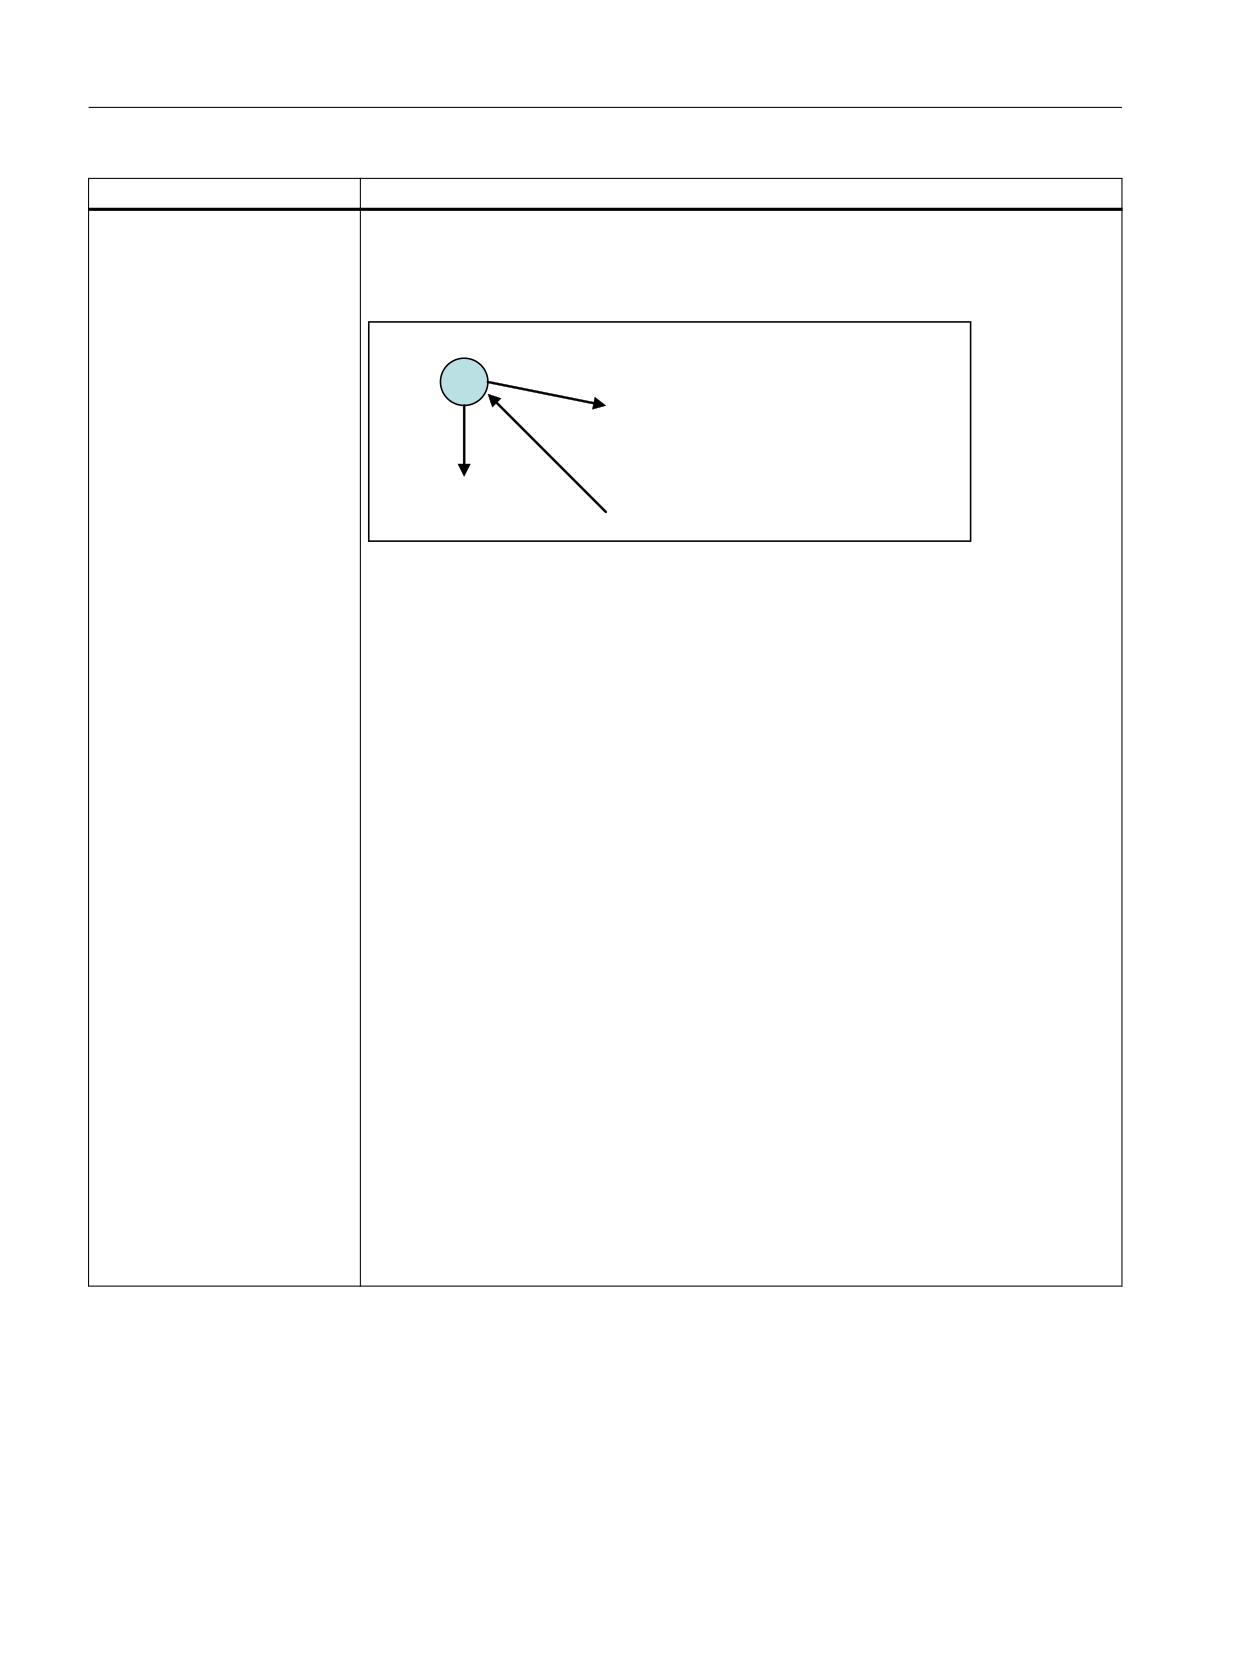
If the parser starts to process the tag CREATE_CYCLE, initially, the message <CRE-
ATE_CYCLE_EVENT sent> is sent to the active form. This message can be used for pre-
paring the cycle parameters, before the parser generates the NC operation from the pa-
rameter list and the generation rule.
&5($7( &<&/( !
&5($7(B&<&/(B(9(17!
3DUDPHWHU
*HQHUDWH F\FOH
&5($7(B&<&/(B(9(17!
Syntax:
<CREATE_CYCLE_EVENT>
…
…
</CREATE_CYCLE_EVENT>
Example:
<SOFTKEY_OK>
…
<CREATE_CYCLE />
…
…
<SOFTKEY_OK>
…
…
<FORM>
<NC_INSTRUCTION>MY_CYCLE($P1, $P2)</ NC_INSTRUCTION >
…
…
<CREATE_CYCLE_EVENT>
<type_cast name="P1" type="int"/>
<OP> P1 = P1 * 150 </OP>
</CREATE_CYCLE_EVENT>
…
…
</FORM>
Easy XML
28
Programming Manual, 12/2019, 6FC5397-1DP40-6BA3
Generating user dialogs
1.7 XML identifier
Tag identifier
Description
DATA
The tag allows writing to NC, PLC, GUD and drive data.
Chapter "Component addressing (Page 105)" describes how addresses are formed.
Attribute:
● name
Variable address
Tag value:
All alphanumeric terms are approved as tag values. If a value is to be written directly from
a local variable, the name of the local variable should be preceded by the $ replacement
operator.
If the content of a local variable is to be written, the variable name should be preceded by the
"$" replacement operator.
Syntax:
<DATA name="<variable name>"> value </DATA>
Example:
<DATA name = "plc/mb170"> 1 </DATA>
…
<LET name = "tempVar"> 7 </LET>
<!- the contents of the local variables "tempVar" are written to
bit memory byte 170 →
<DATA name = "plc/mb170">$tempVar</DATA>
Easy XML
Programming Manual, 12/2019, 6FC5397-1DP40-6BA3
29

Generating user dialogs
1.7 XML identifier
Tag identifier
Description
DATA_LIST
The tag enables the listed drive and machine data to be saved or restored.
Addresses are listed in lines. Chapter "Component addressing (Page 105)" describes how
addresses are formed.
Up to 20 temporary data lists can be created.
Attributes:
● action
read - the values of the listed variables are stored in a temporary memory
append - the values of the listed variables are added to an existing list
write - the backed up values are copied to the relevant machine data
● id
The identifier identifies the temporary memory
Syntax:
<DATA_LIST action="<read/write/append>" id="<list name>">
NC/PLC address compilation
</DATA_LIST>
Example:
<DATA_LIST action ="read" id="<name>">
nck/channel/parameter/r[2]
nck/channel/parameter/r[3]
nck/channel/parameter/r[4]
$MN_USER_DATA_INT[0]
…
</ DATA_LIST>
<DATA_LIST action ="write" id="<name>" />
DIALOGGUI
This tag represents the root tag for the Easy XML function. All of the instructions encom-
passed are edited using the Easy XML parser.
Attributes:
The listed attributes can be optionally specified in order to activate central functions:
● diagnose - value true activates the XML diagnostics
● debug - value "on" - trace messages are saved
Further information is provided in Chapter "XML diagnostics (Page 24)"
● textfile - name of the text file to be used
● textcontext - text context to be used only valid in conjunction with attribute textfile
● textfilelist - allows a list with different text files to be loaded
Further information is provided in Chapter "Project-specific text files (Page 218)"
DIALOGGUI Continued
● restoresession - value true
If the Easy XML project is selected again, the parser opens the menu last selected and
the last selected form. This behavior is retained until the HMI is restarted.
Further information is provided in Chapter "Restoring the session (Page 223)"
DEBUG_MSG
The attribute controls the storage of trace outputs. For a description, see Chapter "Gener-
ating softkey menus and dialog forms (Page 55)" under tag DEBUG.
If the value on is assigned, the parser stores all outputs in one file. This can result in slower
script execution. The value off is set by default.
Easy XML
30
Programming Manual, 12/2019, 6FC5397-1DP40-6BA3

Generating user dialogs
1.7 XML identifier
Tag identifier
Description
DO_WHILE
Do while loop
DO
Instructions
WHILE (Test)
Syntax:
<DO_WHILE>
Instructions
…
<CONDITION>…</CONDITION>
</DO_WHILE>
The Do While loop comprises a block of instructions and a condition. The code in the in-
struction block is executed first, then the condition is applied. If the condition is true, the
function executes the code section again. This is continually repeated until the condition is
false.
Example:
<DO_WHILE>
<DATA name = "PLC/qb11"> 15 </DATA>
<CONDITIION> "plc/ib9" == 0 </CONDITION>
</DO_WHILE>
DYNAMIC_INCLUDE
The tag includes an XML script file.
Contrary to the INCLUDE tag, read-in is first only realized when executing the corresponding
operation.
For large projects, the use of the tag reduces the load time of the customer area and/or the
cycle support. Further, the average level of resources is reduced, as not all of the dialogs are
always called during a session.
Syntax:
<DYNAMIC_INCLUDE src="path name"/>
Example:
<SOFTKEY POSITION="3">
<CAPTION>MY_MENU</CAPTION>
<DYNAMIC_INCLUDE src/>
<NAVIGATION>MY_MENU</NAVIGATION>
</SOFTKEY>
ELSE
Instruction for situations where the condition has not been met (IF, THEN, ELSE)
Easy XML
Programming Manual, 12/2019, 6FC5397-1DP40-6BA3
31

Generating user dialogs
1.7 XML identifier
Tag identifier
Description
FOR
For loop
for (initialization; test; continuation) instruction(s)
Syntax:
<FOR>
<INIT>…</INIT>
<CONDITION>…</CONDITION>
<INCREMENT>…</INCREMENT>
Instructions
…
</FOR>
The For loop is executed as follows:
1. Evaluation of the expression initialization (INIT).
2. Evaluation of the expression test (CONDITION) as a Boolean expression.
If the value is false, the For loop is exited.
3. Execution of the following instructions.
4. Evaluation of the expression continuation (INCREMENT).
5. Continue with 2.
All the variables within the INIT, CONDITION, and INCREMENT branches are declared and
initialized outside the For loop.
Example:
<LET name = "count">0</LET>
<FOR>
<INIT>
<OP> count = 0</OP>
</INIT>
<CONDITION> count <= 7 </CONDITION>
<INCREMENT>
<OP> count = count + 1 </OP>
</INCREMENT>
<OP> "plc/qb10" = 1+ count </OP>
</FOR>
FORM
The tag contains the description of a user dialog. The description is provided in Chapter
"Generating softkey menus and dialog forms (Page 55)".
HMI_RESET
The tag triggers an HMI restart.
Interpretation is stopped after this instruction.
Easy XML
32
Programming Manual, 12/2019, 6FC5397-1DP40-6BA3

Generating user dialogs
1.7 XML identifier
Tag identifier
Description
IF
Conditional instruction (IF, THEN, ELSE)
The THEN and ELSE tags are enclosed in the IF tag.
The condition that is executed in the CONDITION tag follows the IF tag. The further pro-
cessing of the instructions depends upon the result of the operation. If the function result is
true, then the THEN branch is executed and the ELSE branch is skipped. If the result of the
function is false, the parser executes the ELSE branch.
Syntax:
<IF>
<CONDITION> Condition != 7 </CONDITION>
<THEN>
Instruction for the case: Condition fulfilled
</THEN>
<ELSE>
Instruction for the case: Condition not fulfilled
</ELSE>
</IF>
Example:
<IF>
<CONDITION> "plc/mb170" != 7 </CONDITION>
<THEN>
<OP> "plc/mb170" = 7 </OP>
…
</THEN>
<ELSE>
<OP> "plc/mb170" = 2 </OP>
…
</ELSE>
</IF>
IF Continued
If only local variables are used in the condition, then the condition can be specified as
attribute in the IF tag.
Example:
<let name="var1">1</let>
<if condition="var == 1">
<then>
</then>
</if>
Note:
If control variables are used in a condition, then a control variable is assigned data type
integer.
Exceptions:
Controls, type imagebox and multiline, are assigned data type string.
Easy XML
Programming Manual, 12/2019, 6FC5397-1DP40-6BA3
33
Generating user dialogs
1.7 XML identifier
Tag identifier
Description
INCLUDE
The instruction includes an XML description.
(see also DYNAMIC_INCLUDE in this table)
Attribute:
● src
Contains the path name.
Syntax:
<?INCLUDE src="<Path name>" ?>
Easy XML
34
Programming Manual, 12/2019, 6FC5397-1DP40-6BA3
Generating user dialogs
1.7 XML identifier
Tag identifier
Description
LET
The instruction creates a local variable under the specified name.
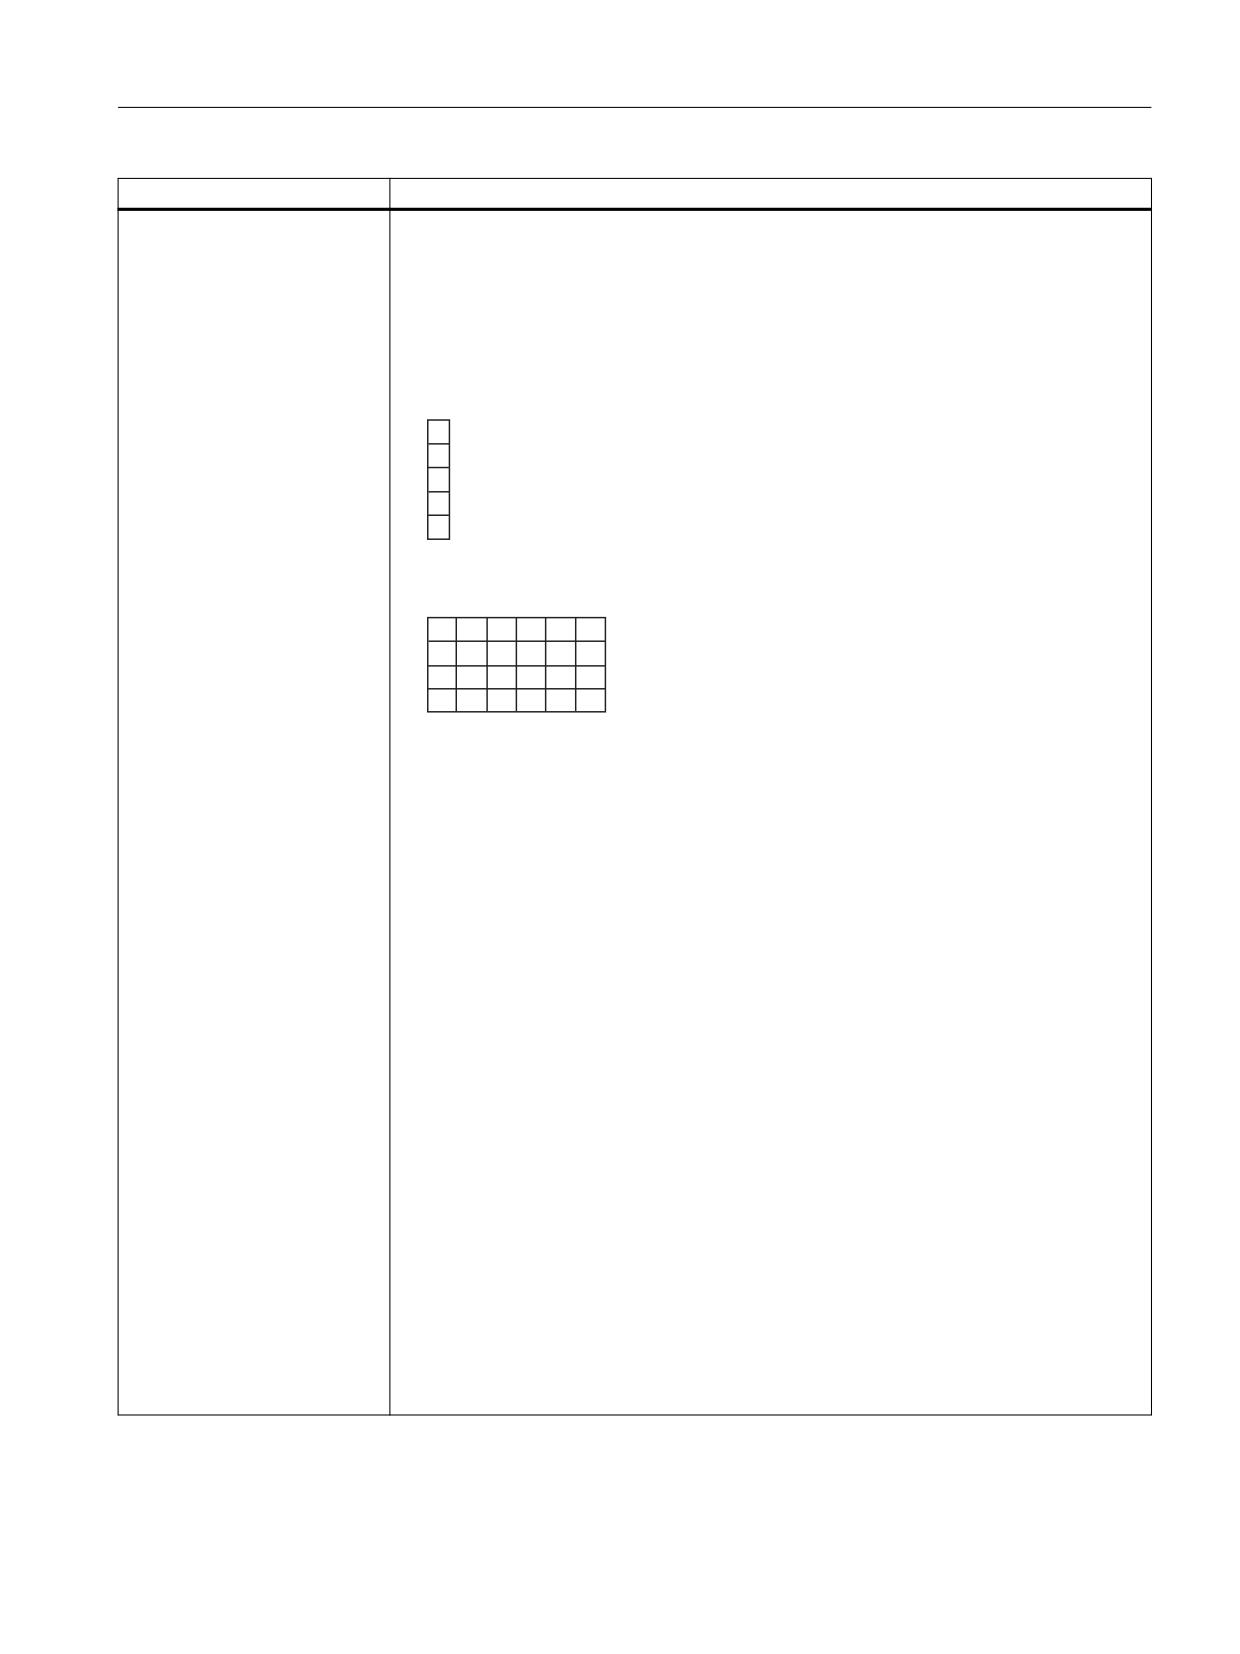
Fields:
Using the attribute dim (dimension) single or two-dimensional fields can be created. The
field index addresses the individual field elements.
For a two-dimensional field, initially the line index is specified and then the column index.
● One-dimensional field:
Indices 0 to 4
● Two-dimensional field:
Index line 0 to 3 and index column 0 to 5
Attributes:
● name
Variable name
● type
The variable type can be an integer (INT), unsigned integer (UINT), double (DOUBLE),
float (FLOAT), string (STRING), or STRUCT. It is also possible to use a structure created
by typedef as a variable type (see tag identifier TYPEDEF). If there is no type instruction
specified, the system creates an integer variable.
<LET name = "VAR1" type = "INT" />
● permanent
If the attribute is set to true, then the variable value is saved permanently. This attribute
is only effective for a global variable.
● poweroff
If the value of the attribute is true, the values are retained until the control is switched off.
Further information is provided in Chapter "Restoring the session (Page 223)"
● dim
The following number of field elements must be specified. For a two-dimensional field,
the second dimension is specified after the first dimension separated by a comma.
A field element is accessed via the field index, which is specified in square brackets after
the variable name.
name[index] or name[row,column]
- One-dimensional field: dim="<Number of elements>"
- Two-dimensional field: dim="<Number of lines>,<number of columns>"
Non-initialized field elements are pre-assigned with "0".
Easy XML
Programming Manual, 12/2019, 6FC5397-1DP40-6BA3
35

Generating user dialogs
1.7 XML identifier
Tag identifier
Description
LET Continued
Example:
One-dimensional field:
<let name="array" dim="10"></let>
Two-dimensional field:
<let name="list_string" dim="10,3" type="string"></let>
Pre-assignment:
A variable can be initialized with a value.
<LET name = "VAR1" type = "INT"> 10 </LET>
If values comprising NC or PLC variables are saved in a local variable, the assignment
operation automatically adapts the format to that of the variables which have been loaded.
● Pre-assignment for a string variable:
Texts containing more than one line can be assigned to a string variable if the formatted
text is transferred as a value. If a line is to end with a line feed <LF> (line feed) , the
characters "\\n" should be added at the end of the line.
<LET name = "text" type = "string"> F4000 G94\\n
G1 X20\\n
Z50\\n
M2\\n
</LET>>
Fields (Arrays):
<let name="list" dim="10,3">
{1,2,3},
{1,20}
</let>
<let name="list_string" dim="10,3" type="string">
{"text 10","text 11"},
{"text 20","text 21"}
</let>
Assignment:
Values made up of the machine data or subroutines can be assigned to a variable using the
assignment operation "=".
A variable remains valid until the end of the higher-level XML block.
Variables which are to be available globally should be created directly after the DialogGUi
tag.
The following must be observed for a dialog box:
● The message processing opens the corresponding tag.
● The tag is closed after the message has been executed.
● All variables within the tag are deleted when closing.
Easy XML
36
Programming Manual, 12/2019, 6FC5397-1DP40-6BA3

Generating user dialogs
1.7 XML identifier
Tag identifier
Description
LET Continued
Variable type struct:
This variable type contains a composition of variables that can be addressed using the
structure name. A structure can contain all variable types and structures.
Within the structure, a variable is declared with the "element" tag. The attributes of the tags
and the initialization correspond to the attributes and initialization of the let instruction.
<let name="name" type="struct">
<element name="<Name>" type="<Variable type>" />
…
…
…
</let>
LET Continued
Access to a variable of the structure is via the structure name and variable name. Both
names are separated by a point operator.
<op>
Structure_name.variable_name = value;
</op>
Example:
<let name="info" type="struct">
<element name="id" type="int" />
<element name="name" type="string" />
<element name="phone" type="string" />
</let>
<op>
info.id = 1;
info.name = _T"my name";
info.phone = _T"0034 45634";
</op>
Initialization of structures:
Structures can be initialized when the variables are created by specifying an initial value for
each structure element. In an array of structures, each structure must be separated from the
others by braces.
Easy XML
Programming Manual, 12/2019, 6FC5397-1DP40-6BA3
37

Generating user dialogs
1.7 XML identifier
Tag identifier
Description
LOCK_OPERATING_AREA
The operating area switchover is locked.
The operating area switchover lock is withdrawn with the UNLOCK_OPERATING_AREA
tag.
Syntax:
<LOCK_OPERATING_AREA />
MSG
The operator component shows the message which is indicated in the tag.
If an alarm number is used, the dialog box displays the text which is saved for the number.
Example:
<MSG text ="my message" />
MSGBOX
The instruction opens a message box whose return value can be used for branching.
Syntax:
<MSGBOX text="<Message>" caption="<caption>" retvalue="<variable
name>" type="<button type>" />
Attributes:
● text
Text
● caption
Header
● retvalue
Name of the variables to which the return value is copied:
1 - OK
0 - CANCEL
● type
Acknowledgment options:
"BTN_OK"
"BTN_CANCEL"
"BTN_OKCANCEL"
If an alarm number is used for the "text" or "caption" attribute, the message box displays the
text which is saved for the number.
Example:
<MSGBOX text="Test message" caption="Information"
retvalue="result" type="BTN_OK" />
Easy XML
38
Programming Manual, 12/2019, 6FC5397-1DP40-6BA3
Generating user dialogs
1.7 XML identifier
Tag identifier
Description
OP
The tag executes the specified operations.
The operations listed in Chapter "Operators (Page 53)" can be executed.
For the purpose of accessing the NC, PLC, and drive data, the complete variable name
should be placed in quotation marks. The "Component addressing" (Page 105) section
contains details on address formation.
PLC: "PLC/MB170"
NC: "NC/Channel/…"
Example:
<LET name = "tmpVar" type="INT"> </LET>
<OP> tmpVar = "plc/mb170" </OP>
<OP> tmpVar = tmpVar *2 </OP>
<OP> "plc/mb170" = tmpVar </OP>
More than one equation can be used within an operation tag. A semicolon marks the end of
the instruction.
Example:
<op>
x = x+1;
y = y+1;
</op>
Character string processing:
The operation instruction is able to process character strings and assign the results to the
string variable specified in the equation.
The identifier _T should be placed at the start as a means of identifying text terms. Format-
ting of variable values is also possible. The identifier _F should be placed at the start of the
formatting regulation, followed by the format instruction. The address is then specified for
the variable.
Example:
<LET name="buffer" type="string"></LET>
…
…
…
<OP> buffer = _T"unformatted value R0= " + "nck/Channel/Parameter/
R[0]" + _T" and " + _T"$$85051" + _T" formatted value R1 " + _F
%9.3f"nck/Channel/Parameter/R[1]" </OP>
Easy XML
Programming Manual, 12/2019, 6FC5397-1DP40-6BA3
39

Generating user dialogs
1.7 XML identifier
Tag identifier
Description
OPERATION
Operation
Instructions can be moved within an equation.
Move left "<<" operator
The << function moves bits to the left. You can specify the value and the number of move
increments directly or with a variable. If the limit of the data format is reached, the bits will be
moved beyond the limit without an error message being issued.
Execution rule
Execution from left to right; '+' and '-' have priority over '<<' and '>>'
Example:
<op> idx = idx << 2 </op>
<op> idx = 3 + idx << 2 </op>
Move right ">>" operator
The >> function moves bits to the right. You can specify the value and the number of move
increments directly or with a variable. If the limit of the data format is reached, the bits will be
moved beyond the limit without an error message being issued.
Execution rule
Execution from left to right; '+' and '-' have priority over '<<' and '>>'
Example:
<op> idx = idx >> 2 </op>
<op> idx = 3+idx >> 2</op>
PASSWORD
This tag is used to unlock additional units for the "EasyExtend" function.
The specified character string is written to the specified reference variable and must be
processed in the PLC user program.
Syntax:
<PASSWORD refVar ="<variable name>" />
Attributes:
● refVar
Name of the reference variable
● text
Specifying an attribute replaces the default text (optional)
Example:
<PASSWORD refvar="plc/mw107" />
Example optional:
<password refVar = "plc/MD108" text="Password" />
POWER_OFF
A message prompts the operator to switch the machine off. The message text is perma-
nently saved in the system.
Easy XML
40
Programming Manual, 12/2019, 6FC5397-1DP40-6BA3
Generating user dialogs
1.7 XML identifier
Tag identifier
Description
PRINT
The tag outputs a text in the dialog line or copies the text to the variable specified.
If the text contains formatting identifiers, the variable values are inserted at the appropriate
places.
Syntax:
<PRINT name="Variable name" text="text %Formatting"> Variable, … </
PRINT>
<PRINT text="text %Formatting"> Variable, … </PRINT>
Attributes:
● name
Name of the variable where the text is to be stored (optional)
● text
Text
Formatting:
The character "%" causes the variable specified as the value to be formatted.
%[Flags] [Width] [.decimal places] type
● Flags:
Optional character for defining output formatting:
- Right-justified or left-justified ("-" for left-justified)
- Add leading zeros ("0")
- Fill with blanks
● Width:
The argument defines the minimum output width for a non-negative number. If the value
to be output has fewer places than the argument defined, the missing spaces are filled
with blanks.
● Decimal places:
With floating-point numbers, the optional parameter defines the number of decimal
places.
● Type:
The type character defines which data formats are transferred for the print instruction.
These characters need to be specified.
- d: Integer value
- f: Floating-point number
- s: String
Easy XML
Programming Manual, 12/2019, 6FC5397-1DP40-6BA3
41

Generating user dialogs
1.7 XML identifier
Tag identifier
Description
PRINT Continued
Values:
Number of variables whose values are to be inserted into the text.
The variable types must match the corresponding type identifier for the formatting instruction
and must be separated from one another with a comma.
Example:
Output of a text in the information line
<PRINT text="Infotext" />
Output of a text with variable formatting
<LET name="trun_dir"></LET>
<PRINT text="M%d">trun_dir</PRINT>
Output of a text in a string variable with variable formatting
<LET name="trun_dir"></LET>
<LET name="str" type="string" ></LET>
<print name="str" text="M%d ">trun_dir</print>
PROGRESS_BAR
The tag opens or closes a progress bar. The bar is displayed below the application window.
Syntax:
<PROGRESS_BAR type="<true/false>"> value </ PROGRESS_BAR>
Attributes:
● type = "TRUE" - opens the progress bar
● type = "FALSE" - closes the progress bar
● min
(optional) - minimum value
● max
(optional) - maximum value
Value:
● Value
Percentage position of the bar
Example:
<PROGRESS_BAR type="true" min="0" max="101" >20< /
PROGRESS_BAR>
<PROGRESS_BAR >50< /
PROGRESS_BAR>
<PROGRESS_BAR type="false" >100< /PROGRESS_BAR>
Easy XML
42
Programming Manual, 12/2019, 6FC5397-1DP40-6BA3

Generating user dialogs
1.7 XML identifier
Tag identifier
Description
SEND_MESSAGE
The tag sends a message with two parameters to the active form, which is processed in the
tag message.
Syntax:
<SEND_MESSAGE>p1, p2</SEND_MESSAGE>
Example:
<SOFTKEY POSITION="3">
<caption>Set%nParameter</caption>
<send_message>1, 0</send_message>
</SOFTKEY>
<FORM>
…
…
<MESSAGE>
<SWITCH>
<CONDITION>$message_par1</CONDITION>
<CASE value="1">
…
…
</CASE>
</SWITCH>
</MESSAGE>
…
…
</FORM>
SHOW_CONTROL
The visibility of a control can be controlled using the tag.
Syntax:
<SHOW_CONTROL name="<name>" type="<type>" />
Attributes:
● name
Name of the control
● type = "TRUE" - control becomes visible
● type = "FALSE" - control becomes invisible (hidden)
Example:
<SHOW_CONTROL name="myEditfield" type="false" />
…
…
<SHOW_CONTROL name="myEditfield" type="true" />
Easy XML
Programming Manual, 12/2019, 6FC5397-1DP40-6BA3
43

Generating user dialogs
1.7 XML identifier
Tag identifier
Description
SLEEP
The tag interrupts script execution for the specified period. The interruption time is obtained
from the transferred value multiplied by the time base of 50 ms.
Syntax:
<SLEEP value="Interruption time" />
Example:
Wait time, 1.5 sec.
<SLEEP value="30" />
STOP
Interpretation is canceled at this point.
SWITCH
The SWITCH instruction describes a multiple choice. A term is evaluated once and com-
pared with a number of constants. If the expression matches the constants, the instructions
are executed within the CASE instruction.
The DEFAULT instruction is executed when none of the constants match the expression.
Syntax:
<SWITCH>
<CONDITION> Value </CONDITION>
<CASE value="<Constant 1>">
Instructions
…
</CASE>
<CASE value="<Constant 2>">
Instructions
…
</CASE>
<DEFAULT>
Instructions
…
</DEFAULT>
</SWITCH>
Easy XML
44
Programming Manual, 12/2019, 6FC5397-1DP40-6BA3

Generating user dialogs
1.7 XML identifier
Tag identifier
Description
SWITCHTOAREA
The SWITCHTOAREA tag changes from the Customer area into the specified operating
area.
The parameter is specified as an attribute value.
Syntax:
<switchToArea name="area" args="argument "/>
Attributes:
name
The following names are declared for the operating areas:
● AreaMachine - Machine
● AreaParameter - Parameters
● AreaProgramEdit - Editor
● AreaProgramManager - Program Manager
● AreaDiagnosis - Diagnostics
● AreaStartup - Setup
args (reserved)
Runtime arguments can be passed to the operating area to activate dialogs.
Example:
<switchToArea name="AreaMachine" />
SWITCHTODYNAMICTAR-
If the previous dialog is defined as a dynamic jump destination, the SWITCHTODYNAMIC-
GET
TARGET tag will activate this dialog and end script execution.
Syntax:
<switchToDynamicTarget />
THEN
Instruction if the condition has been fulfilled (IF, THEN, ELSE)
TYPE_CAST
The tag converts the data type of a local variable.
Syntax:
<type_cast name="variable name" type=" new type" />
Attributes:
● name
Variable name
● type
The new data type is assigned to the variable.
● convert
The new data type is assigned to the variable. The variable value is also converted to the
new data type.
Easy XML
Programming Manual, 12/2019, 6FC5397-1DP40-6BA3
45
Generating user dialogs
1.7 XML identifier
Tag identifier
Description
TYPEDEF
A new identifier for a data type can be defined with this tag. This has the benefit for the
structure definitions that the data type can be defined once and then used as a data type in
a LET instruction.
The identifier and type are expected as attributes.
The parser supports only the specification of structure definitions.
In the type definition, a variable is declared with the "element" tag. The attributes of the tag
correspond to the attributes of the let instruction.
<typedef name="<identifier>" type="struct">
<element name="<name>" type="<variable type>" />
…
…
…
</typedef>
After definition, the identifier can be used as a data type for the LET instruction.
<let name="<variable name>" type="<identifier>"></let>
Example:
<typedef name="my_struct" type="struct">
<element name="id" type="int" />
<element name="name" type="string" />
<element name="phone" type="string" />
</typedef>
<let name="info" type="my_struct"></let>
…
…
<op>
info.id = 1;
info.name = _T"my name";
info.phone= _T"0034 45634";
</op>
Easy XML
46
Programming Manual, 12/2019, 6FC5397-1DP40-6BA3

Generating user dialogs
1.7 XML identifier
Tag identifier
Description
TYPEDEF Continued
Some predefined functions expect variables of structure type RECT, POINT, or SIZE as the
call parameter. These structures are defined in the file struct_def.xml.
RECT:
<typedef name="StructRect" type="struct" >
<element name="left" type="int">0</element>
<element name="top" type="int">0</element>
<element name="right" type="int">0</element>
<element name="bottom" type="int">0</element>
</typedef>
POINT:
<typedef name="StructPoint" type="struct" >
<element name="x" type="int">0</element>
<element name="y" type="int">0</element>
</typedef>
SIZE:
<typedef name="StructSize" type="struct" >
<element name="width" type="int">0</element>
<element name="height" type="int">0</element>
</typedef>
UNLOCK_OPERAT-
Withdrawal of operating area switchover lock
ING_AREA
Syntax:
<UNLOCK_OPERATING_AREA />
WAITING
The tag waits for the component to undergo a hot restart after an NC or drive reset.
Attributes:
● WAITINGFORNC = "TRUE" - the system waits for the NC to restart
● WAITINGFORDRIVE = "TRUE" - the system waits for the drives to restart
Syntax:
<WAITING WAITINGFORNC = "TRUE"/>
Example:
<CONTROL_RESET resetnc = "true" resetdrive = "true"/>
<WAITING waitingfornc = "true" waitingfordrive = "true" />
Easy XML
Programming Manual, 12/2019, 6FC5397-1DP40-6BA3
47

Generating user dialogs
1.7 XML identifier
Tag identifier
Description
WHILE
WHILE loop
WHILE (Test)
Instruction
Syntax:
<WHILE>
<CONDITION>…</CONDITION>
Instructions
…
</WHILE>
The While loop executes a sequence of instructions repeatedly while a condition is met. This
condition is tested before the sequence of instructions is executed.
Example:
<WHILE>
<CONDITION> "plc/ib9" == 0 </CONDITION>
<DATA name = "PLC/qb11"> 15 </DATA>
</WHILE>
XML_PARSER
The "XML_PARSER" tag can be used to parse XML files.
The parser interprets an XML file and calls defined call-back functions. Each call-back func-
tion belongs to a predefined event. The programmer can process the XML data within this
function.
Predefined events:
● start document
The parser opens the document and starts parsing.
● end document
The parser closes the document.
● start element
The parser has found an element and creates a list with all attributes and attribute values.
These lists are forwarded to the call-back function.
● end element
The end of the element has been found.
● characters
The parser forwards all characters of an element.
● error
The parser has detected a syntax error.
When an event occurs, the parser calls the callback function and checks the return value of
the function. If the function returns the value "true", the parser continues the process.
Easy XML
48
Programming Manual, 12/2019, 6FC5397-1DP40-6BA3
Generating user dialogs
1.7 XML identifier
Tag identifier
Description
XML_PARSER Continued
Interfaces
The value of the name attribute contains the path to the XML file.
To assign events to the call-back functions, the following properties must be specified:
Standard
startElementHandler
endElementHandler
charactersHandler
Optional
errorHandler
documentHandler
The value of an attribute defines the name of the call-back function.
Example:
<XML_PARSER name="f:\appl\xml_test.xml">
<!-- standard handler -->
<property startElementHandler="startElementHandler" />
<property endElementHandler="endElementHandler" />
<property charactersHandler="charactersHandler" />
<!-- optional handler -->
<property errorHandler="errorHandler" />
<property documentHandler="documentHandler" />
</XML_PARSER>
Easy XML
Programming Manual, 12/2019, 6FC5397-1DP40-6BA3
49
Generating user dialogs
1.7 XML identifier
Tag identifier
Description
XML_PARSER Continued
The parser also supplies variables so that the call-back functions can access the event data.
startElementHandler:
Function parameters
tag_name
- tag name
num
- number of attributes found
System variables
$xmlAttribute String array with the number of elements indicated by num.
$xmlValue
String array that contains the 0-num attribute value range.
Example:
<function_body name="startElementHandler" return="true"
parameter="tag_name, num">
<print text="attribute name %s"> $xmlAttribute[0]</print>
<print text="attribute value %s"> $xmlValue[0]</print>
</function_body>
endElementHandler:
Function parameters
tag_name
- tag name
Example:
<function_body name="endElementHandler" parameter="tag_name">
<print text="name %s"> tag_name </print>
</function_body>
Easy XML
50
Programming Manual, 12/2019, 6FC5397-1DP40-6BA3
Generating user dialogs
1.7 XML identifier
Tag identifier
Description
XML_PARSER Continued
charactersHandler:
System variables
$xmlCharacters
String with data
$xmlCharactersStart
Always 0
$xmlCharactersLength
Number of bytes
Example:
<function_body name="charactersHandler" return="true" >
<print text="chars %s"> $xmlCharacters </print>
</function_body>
documentHandler:
Function parameters
state
1 start document, 2 end document
errorHandler:
System variables
$xmlErrorString Contains the invalid line (system variable)
Example:
<function_body name="errorHandler" >
<print text="error %s">$xmlErrorString</print>
</function_body>
Call-back result:
$return
If 1 (true), the parser continues parsing the file
Easy XML
Programming Manual, 12/2019, 6FC5397-1DP40-6BA3
51

Generating user dialogs
1.7 XML identifier
1.7.3
Color coding
The color attribute uses the color coding scheme for the HTML language.
In terms of syntax, color specifications consist of the "#" (hash) character and six digits from the
hexadecimal system, with each color represented by two digits.
R - Red
G - Green
B - Blue
#RRGGBB
Example:
color= "#ff0011"
Example colors:
Red
Green
Blue
Yellow
White
Black
#FF0000
#00FF00
#0000FF
#ffff00
#FFFFFF
#000000
1.7.4
Special XML syntax
Characters with special meanings in XML syntax have to be rewritten if they are to be displayed
correctly by a general XML editor.
The following characters are affected:
Character
Notation in XML
<
<
>
>
&
&
"
"
'
'
Easy XML
52
Programming Manual, 12/2019, 6FC5397-1DP40-6BA3

Generating user dialogs
1.7 XML identifier
1.7.5
Operators
The operation instruction processes the following operators:
Operator
Meaning
=
Assignment
==
Equal to
<, <
Less than
>, >
Greater than
<=, <=
Less than or equal to
>=, >=
Greater than or equal to
|
OR operation in bits
||
Logic OR operation
&, &
AND operation in bits
&&, &&
Logic AND operation
+
Addition
-
Subtraction
*
Multiplication
/
Division
!
Not
!=
Not equal to
Operation instructions are processed from left to right. It may make sense to place terms in
parentheses under certain circumstances in order to define the priority for executing subterms.
Easy XML
Programming Manual, 12/2019, 6FC5397-1DP40-6BA3
53

Generating user dialogs
1.7 XML identifier
1.7.6
System variables
System variables are variables available in every script, which are used for exchanging data
between the parser and the script execution.
The following table provides an overview of the tags for which variables are automatically
generated.
Variable name
Meaning
Valid in tag
$actionresult
Signals to the parser, whether
KEY_EVENT
the parser is to process the
event.
$focus_name
Contains the name of the field
FOCUS_IN
which has the input focus
INDEX_CHANGED
$focus_item_data
Contains the numerical value
EDIT_CHANGED
item_data, that was assigned to
the field
$gestureinfo
For finger gestures, the parser
GESTURE_EVENT
provides the gesture information
in the variable and executes the
gesture_event tag.
$return
The variable transports the re-
FUNCTION_BODY
turn value of a subfunction
$message_par1
Contains the call parameters of
MESSAGE
the SEND_MESSAGE function
$message_par2
$xmlAttribute
Contains a list of the tag attrib-
XML_PARSER
utes found
startElementHandler
$xmlValue
Contains a list of the tag values
found
$xmlCharacters
Contains the data flow
XML_PARSER
charactersHandler
$xmlCharactersStart
Contains the start index:
$xmlCharactersLength
Contains the number of charac-
ters stored in the data flow
$mouse_event.type
Structure to transfer the parame-
MOUSE_EVENT
ters of the mouse event
$mouse_event.x
$mouse_event.y
$mouse_event.id
$mouse_event.buttons
$mouse_event.button
Easy XML
54
Programming Manual, 12/2019, 6FC5397-1DP40-6BA3
Generating user dialogs
1.7 XML identifier
1.7.7
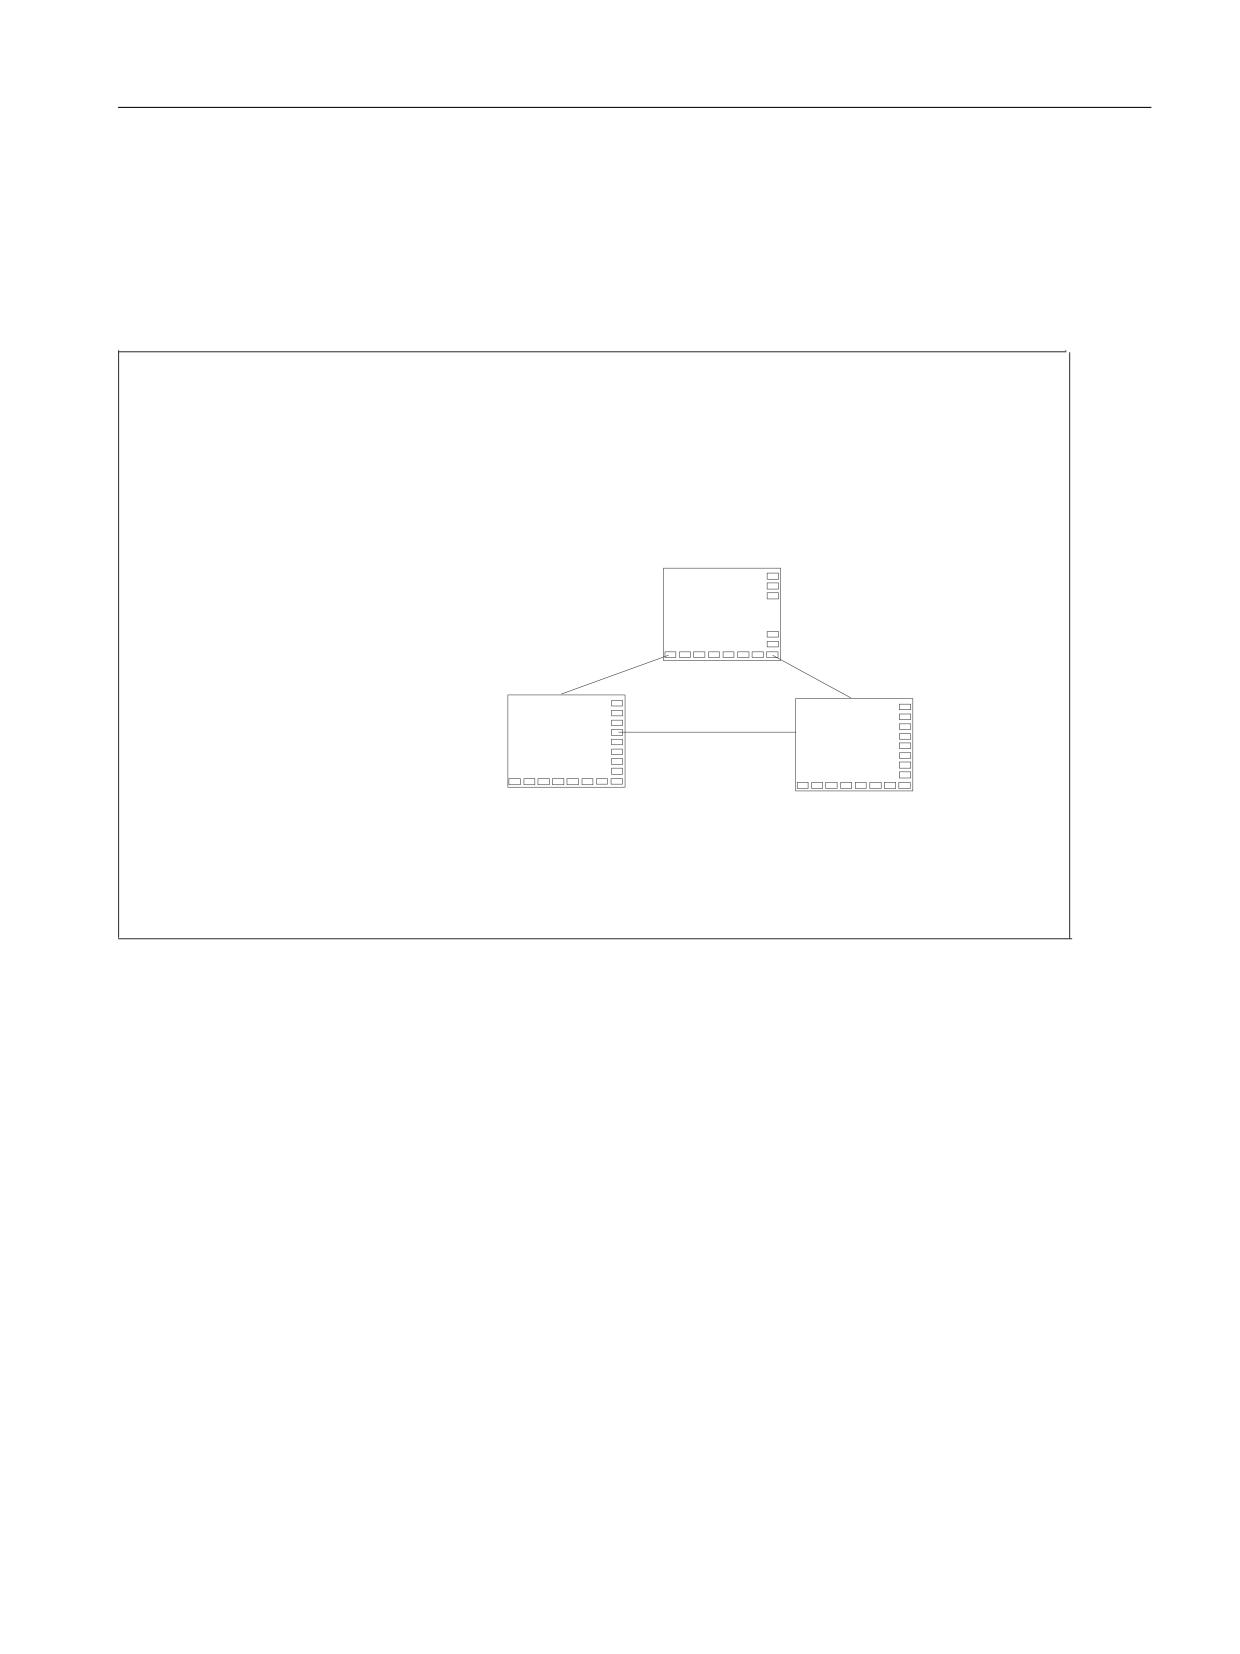
Generating softkey menus and dialog forms
Dialog forms can only be integrated if there is a menu tag with the name "main" in the XML
description. This tag is called by the system after the <CUSTOM> operating area has been
activated. Additional dialog forms can be branched and activation of a dialog box defined within
the tag.
PHQX QDPH
0$,1 !
23(1B)250 QDPH
PDLQ GLDORJXH !
VRIWNH\ 326,7,21
!
FDSWLRQ!VXE PHQX
FDSWLRQ!
QDYLJDWLRQ!VXE PHQX
QDYLJDWLRQ!
VRIWNH\!
PDLQ PHQX
VRIWNH\ 326,7,21
!
FDSWLRQ!VXE PHQX
FDSWLRQ!
PDLQ GLDORJXH
QDYLJDWLRQ!VXE PHQX
QDYLJDWLRQ!
VRIWNH\!
VXE PHQX
VXE PHQX
PHQX!
PHQX QDPH VXE PHQX
!
GLDORJXH
GLDORJXH
23(1B)250 QDPH GLDORJXH
!
PHQX!
PHQX QDPH VXE PHQX
!
23(1B)250 QDPH GLDORJXH ಯ!
PHQX!
Figure 1-6
Menu structure
Easy XML
Programming Manual, 12/2019, 6FC5397-1DP40-6BA3
55

Generating user dialogs
1.7 XML identifier
Tag identifier
Description
FORM
The tag contains the description of a user dialog. The relevant tags are described in the section
on generating menus and dialog forms.
Syntax:
<FORM name="<dialog name>" color="#ff0000">
Attributes:
● color
Background color of the dialog form (color coding, see Chapter "Color coding (Page 52)")
- Default white
● name
Identifier of the form
● type
Permissible value is cycle , which identifies a user cycle screen form
● xpos
X-position of the top left corner of the dialog box (optional)
● ypos
Y position of the top left corner (optional)
● width
Extension in the X direction (in pixels) (optional)
● height
Extension in the Y direction (in pixels) (optional)
FORM Continued
With the AUTOSCALE_CONTENT attribute, you can define how the controls of a form will
behave at different screen resolutions. By default, the controls are automatically adapted to the
screen resolution already set. If you would like to control the positioning and dimensioning
yourself, set value OFF for the attribute in the Form tag.
Attribute:
autoscale_content
Values:
● on
The coordinates of the controls are automatically adapted to the screen resolution (default)
● off
The coordinates of the controls are used unchanged
Example:
<form name="main_form" autoscale_content="off">
…
…
…
</form>
Easy XML
56
Programming Manual, 12/2019, 6FC5397-1DP40-6BA3

Generating user dialogs
1.7 XML identifier
Tag identifier
Description
FORM continued
Attributes:
● textfile
The attribute allows a form-related text file to be specified. As standard text context, the
system uses identifier EASY_XML.
● textcontext
The attribute allows an identifier to be specified for the text context to be used. This attribute
is only valid in conjunction with attribute textfile.
FORM continued
In order to be able to use standard layouts or layouts that are stored in the easyscreen.ini file,
use the attribute LAYOUT. The value that you enter is the name of the layout to be used.
Note:
It is only advisable to change the default settings for popup windows because for these the
calling dialog box is not hidden.
Attribute:
layout
Syntax:
<form name="Name of the form" layout="Name of the layout" >
…
…
</form>
Example:
<form name="form0" layout="slstandardscreenlayout.
SlStandardScreenLayout.LowerForm" >
…
…
</form>
Besides the predefined screen form positions and dimensions, you can also store your own
definitions in the easyscreen.ini file.
Entry in easyscreen.ini:
[640x480]
MyPanel = x:=0, y:=220, width:=340, height:=174
[800x480]
MyPanel = x:=0, y:=220, width:=420, height:=174
Example:
<form name="form0" layout="MyPanel" >
…
…
</form>
Easy XML
Programming Manual, 12/2019, 6FC5397-1DP40-6BA3
57
Generating user dialogs
1.7 XML identifier
Tag identifier
Description
FORM continued
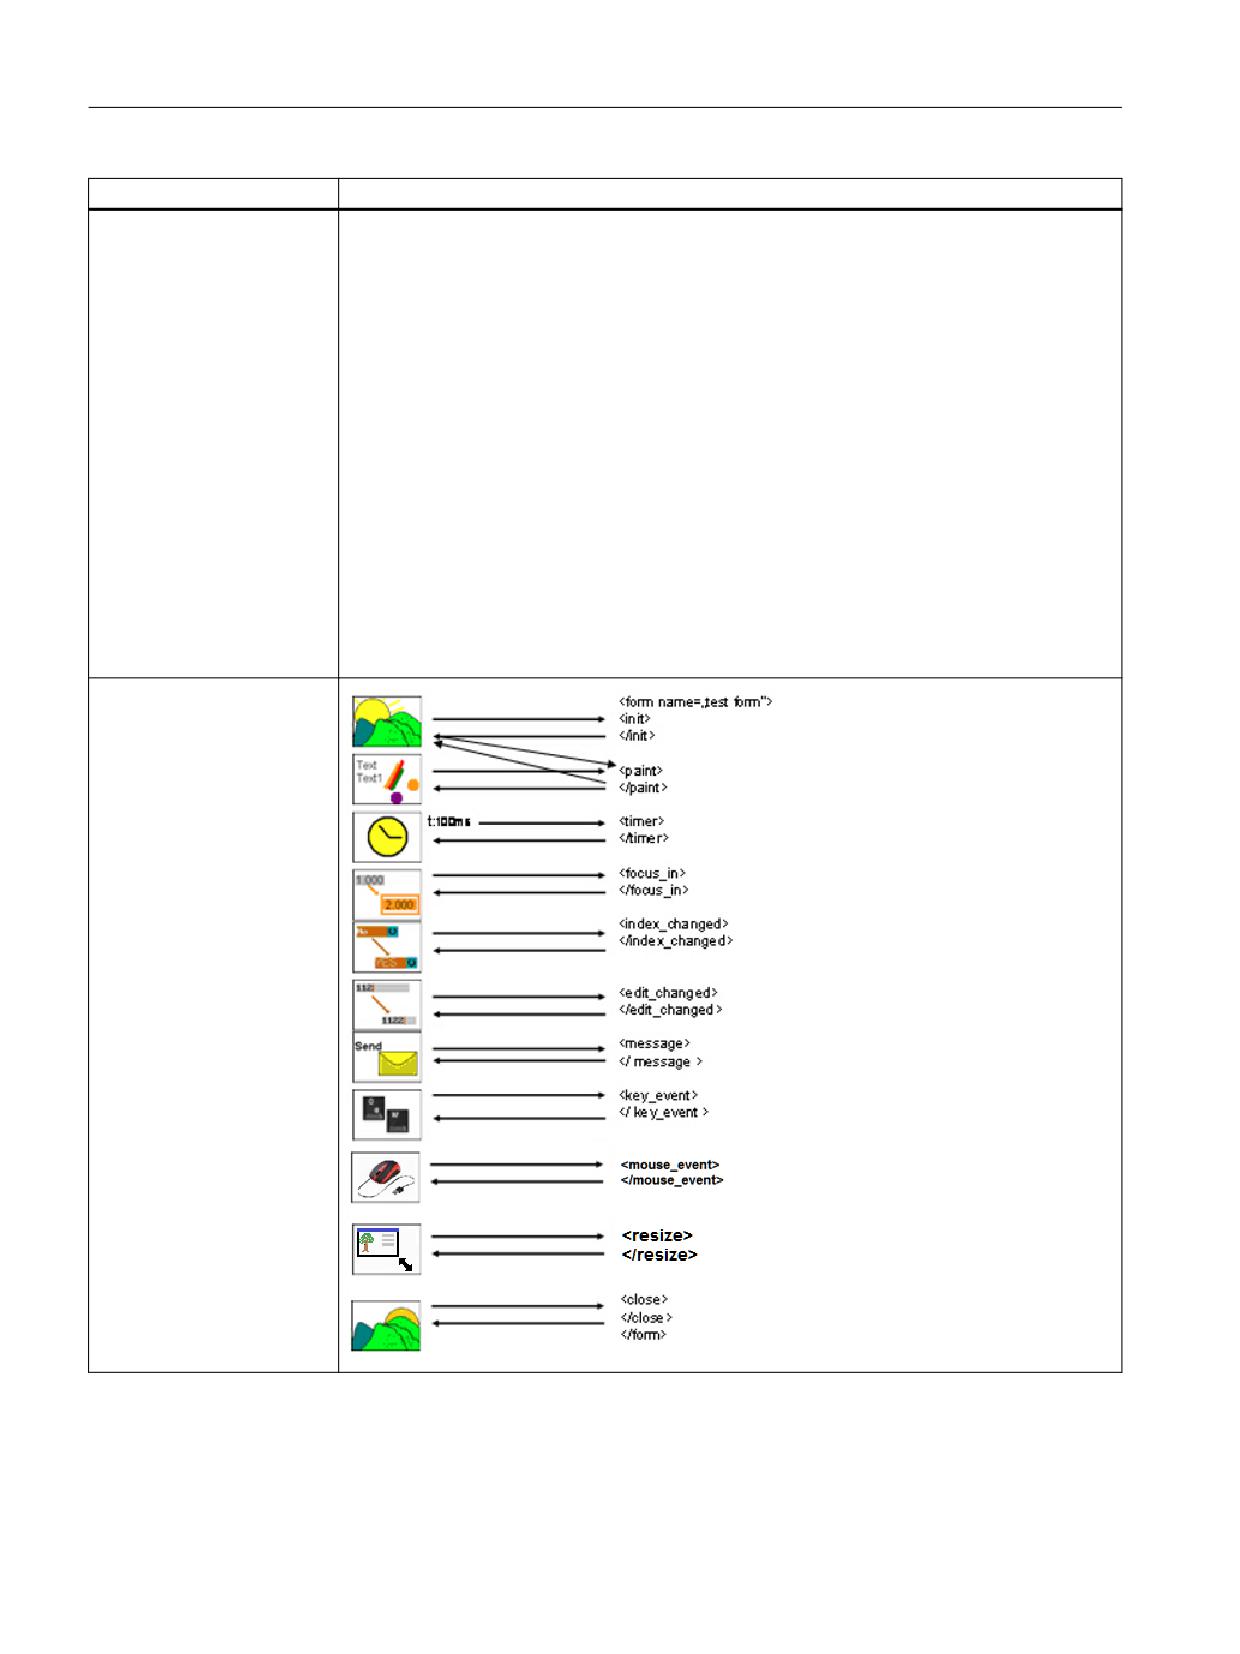
Dialog messages:
● INIT
● PAINT
● TIMER
● CLOSE
● FOCUS_IN
● INDEX_CHANGED
● EDIT_CHANGED
● GESTURE_EVENT
● KEY_EVENT
● MESSAGE
● MOUSE_EVENT
● RESIZE
● CHANNEL_CHANGED
● LANGUAGE_CHANGED
FORM continued
Easy XML
58
Programming Manual, 12/2019, 6FC5397-1DP40-6BA3

Generating user dialogs
1.7 XML identifier
Tag identifier
Description
FORM continued
Syntax:
<FORM name = "<dialog name>" color = "#ff0000">
Example:
<FORM name = "R-Parameter">
<INIT>
<DATA_ACCESS type = "true" />
<CAPTION>R - Parameter</CAPTION>
<CONTROL name = "edit1" xpos = "322" ypos = "34" refvar = "nck/
Channel/Parameter/R[1]" />
<CONTROL name = "edit2" xpos = "322" ypos = "54" refvar = "nck/
Channel/Parameter/R[2]" />
<CONTROL name = "edit3" xpos = "322" ypos = "74"
</INIT>
<PAINT>
<TEXT xpos = "23" ypos = "34">R - Parameter 1</TEXT>
<TEXT xpos = "23" ypos = "54">R - Parameter 2</TEXT>
<TEXT xpos = "23" ypos = "74">R - Parameter 3</TEXT>
</PAINT>
</FORM>
INIT
Dialog box message
The tag is executed immediately after the dialog box is generated. All the input elements and
hotlinks for the dialog form should be created here.
Easy XML
Programming Manual, 12/2019, 6FC5397-1DP40-6BA3
59
Generating user dialogs
1.7 XML identifier
Tag identifier
Description
KEY_EVENT
Dialog message
The tag KEY_EVENT can be integrated in the form to evaluate keyboard events. The system
sends the MF2 keyboard code to the active form if the tag is available in a form. If the varia-
ble $actionresult is not set to zero, the system then subsequently processes the keyboard
event.
The keyboard code is provided in the variable $keycode as an integer value.
Example:
The character entered into the variable exclude_key should be filtered-out of the input stream.
<LET name="stream" type="string"/>
<LET name="exclude_key" type="string"/>
<FORM name = "keytest_form">
<INIT>
<CONTROL name = "p1" xpos = "120" ypos = "84" width ="200"
refvar="stream" hotlink="true" />
<CONTROL name = "p2" xpos = "160" ypos = "104" width ="8"
refvar="exclude_key" hotlink="true" />
</INIT>
<PAINT>
<text xpos = "8" ypos = "84">data stream</text>
<text xpos = "8" ypos = "104">exclude key</text>
</PAINT>
<KEY_EVENT>
<LET name="excl_keycode" type="string"/>
<OP>excl_keycode = exclude_key</OP>
<type_cast name="excl_keycode" type="int" />
<PRINT text="%d %d">$keycode, excl_keycode</PRINT>
<IF>
<CONDITION>$keycode == excl_keycode</CONDITION>
<THEN>
<op> $actionresult = 0</op>
</THEN>
</IF>
</KEY_EVENT>
</FORM>
Easy XML
60
Programming Manual, 12/2019, 6FC5397-1DP40-6BA3