SINUMERIK 840D sl. Basesoftware and operating software. Manual (2019) - page 6
OEM-specific online help
16.8 Example: This is how you create a programming online help
16.8
Example: This is how you create a programming online help
Preconditions
Create the following files:
● Configuration file "prog_help.ini"
[milling]
CYCLE1=cycle1_help.html
CYCLE2=cycle2_help.html#TextAnchor1
CYCLE3=cycle3_help.html
CYCLE4=cycle4_help.html
[turning]
CYCLE3=cycle2_help.html
CYCLE4=cycle3_help.html
● Configuration file for the help book "slhlp.xml" (optional)
<?xml version="1.0" encoding="UTF-8" standalone="yes"?>
<!DOCTYPE CONFIGURATION>
<CONFIGURATION>
<OnlineHelpFiles>
<hmi_prog_help>
<EntriesFile value="hmi_prog_help.xml" type="QString"/>
<DisableIndex value="true" type="bool"/>
</hmi_prog_help>
</OnlineHelpFiles>
</CONFIGURATION>
● Configuration file for the help book "hmi_prog_help.xml" (optional)
<?xml version="1.0" encoding="UTF-8"?>
<HMI_SL_HELP language="en-US">
<BOOK ref="index.html" title="OEM_CYCLES" helpdir="hmi_prog_help">
<ENTRY ref="cycle1_help.html" title="Cycle1"></ENTRY>
<ENTRY ref="cycle2_help.html" title="Cycle2"></ENTRY>
<ENTRY ref="cycle3_help.html" title="Cycle3"></ENTRY>
<ENTRY ref="cycle4_help.html" title="Cycle4"></ENTRY>
<ENTRY ref="cycle_help.html" title="OEM_Cycles"></ENTRY>
</BOOK>
</HMI_SL_HELP>
SINUMERIK Operate
Commissioning Manual, 12/2019, 6FC5397-1DP40-6BA3
347
OEM-specific online help
16.8 Example: This is how you create a programming online help
● Language-dependent file "<prog_help_eng>.ts": this filename is permanently specified.
<?xml version="1.0" encoding="utf-8" standalone="yes"?>
<!DOCTYPE TS>
<TS>
<context>
<name>oem_cycles</name>
<message>
<source>CYCLE1</source>
<translation>short description for cycle 1</translation>
<chars>*</chars>
</message>
<message>
<source>CYCLE2</source>
<translation>short description for cycle 2</translation>
<chars>*</chars>
</message>
<message>
<source>CYCLE3</source>
<translation>short description for cycle 3</translation>
<chars>*</chars>
</message>
</context>
</TS>
Saving help files in the target system
Procedure:
1. Copy the configuration file "prog.ini" to the following directory:
/oem/sinumerik/hmi/cfg
2. Copy the file "slhlp.xml" to the help book in the following directory:
/oem/sinumerik/hmi/cfg
3. Create a directory for the desired language of the online help under the following
path: /oem/sinumerik/hmi/hlp/<lng> and copy the file "hmi_prog_help.xml" to
this directory
Use the specified language code from the list of language codes for file names. The
directory names must be written in lower case.
4. Copy the language-dependent prog_help_<lng>.ts file for the Product Brief to the
following path: /oem/sinumerik/hmi/<lng>/prog_help_<lng>.ts
5. Copy the html files with the description of the OEM cycles to the following directory:
/oem/sinumerik/hmi/hlp/<lng>/hmi_prog_help/cycle<n>_help.html
The settings become effective only after restarting the system.
SINUMERIK Operate
348
Commissioning Manual, 12/2019, 6FC5397-1DP40-6BA3
OEM-specific online help
16.10 Language support for PDF files
16.9
Help files in PDF format
In addition to help files in HTML format, you can also include PDF-format information in the
operating software. Individual PDF helps can be opened with links from the table of contents or
index, or directly from HTML files.
Storing PDF helps
Copy the PDF helps to one of the following directories:
/oem/sinumerik/hmi/hlp/<lng>/<hmi_myhelp>
/user/sinumerik/hmi/hlp/<lng>/<hmi_myhelp>
Including PDF helps
Bind in dialog configurations or configurations of table of contents and indexes with the
extension "pdf" in the same manner as for the "html" extension:
<ENTRY ref="myFile.pdf" title="Help 1">
Create a link from HTML files to the PDF help:
<a href="myFile.pdf">My Help File</a>
Note
It is not possible to select context-sensitive jump labels in the PDF help, select jump labels or
make jumps to other HTML or PDF files.
The search function is possible only within a PDF file. A higher-level search over multiple PDF
helps is not supported.
16.10
Language support for PDF files
For standard languages, SINUMERIK Operate allows the language of open PDF files to be
switched over. If the selected language of the appropriate PDF file is available in operation,
each time the operating language is changed, then the corresponding language version of the
PDF file is automatically loaded.
Note
If the corresponding language version of the PDF file is not available, the English version of the
PDF file opens as standard default language version. If, in this case, the standard default
version is not available or is corrupted, then the last visible PDF file remains active.
Additional information about the standard default languages and language IDs is available in
Chapter "Supported languages (Page 512)".
You have the following options of archiving language-supported PDF files:
SINUMERIK Operate
Commissioning Manual, 12/2019, 6FC5397-1DP40-6BA3
349
OEM-specific online help
16.10 Language support for PDF files
PDF files with language ID in the group directory
Copy the PDF files with language ID into a directory, e.g.:
/card/<home>/<myFolder>/<abc>_eng.pdf
/card/<home>/<myFolder>/<abc>_deu.pdf
/card/<home>/<myFolder>/<abc>_fra.pdf
PDF files in the language directory
Copy the PDF files into a language directory, e.g.:
/card/<home>/<myFolder>/eng/<abc>.pdf
/card/<home>/<myFolder>/deu/<abc>.pdf
/card/<home>/<myFolder>/fra/<abc>.pdf
PDF help in specific language directory
Copy the PDF help files to one of the following directories, e.g.:
/oem/sinumerik/hmi/hlp/eng/<abc>.pdf
/oem/sinumerik/hmi/hlp/deu/<abc>.pdf
or
/user/sinumerik/hmi/hlp/eng/<abc>.pdf
/user/sinumerik/hmi/hlp/deu/<abc>.pdf
SINUMERIK Operate
350
Commissioning Manual, 12/2019, 6FC5397-1DP40-6BA3
SINUMERIK Integrate - AMB, AMC, AMM
17
Requirement
To start the "SINUMERIK Integrate - AMB, AMC, AMM" software, configure a softkey using a
display machine data. To do this you require, as a minimum, authorization for access level 3
(user).
Configuring a softkey
MD9108 $MM_SINUMERIK_INTEGRATE
= 1
The "SINUMERIK integrate" softkey is displayed on the extended user interface bar.
Additional information
Information about the software is available in the
Function Manual SINUMERIK Integrate - AMB, AMC, AMM.
SINUMERIK Operate
Commissioning Manual, 12/2019, 6FC5397-1DP40-6BA3
351
SINUMERIK Integrate - AMB, AMC, AMM
SINUMERIK Operate
352
Commissioning Manual, 12/2019, 6FC5397-1DP40-6BA3

Technologies and cycles
18
18.1
Activating turning/milling/drilling/grinding technologies
The cycles are automatically loaded when the controller boots (Power On).
The configuration is realized using cycle machine data and cycle setting data. In so doing, a
differentiation is made between the following data:
● General cycle machine data
● Channel-specific cycle machine data
● Axis-specific cycle machine data
● General cycle setting data
● Channel-specific cycle setting data
● Axis-specific cycle setting data
Requirement for memory configuration
To ensure that the cycles run correctly, the following standard setting must be checked:
MD28082 $MC_MM_SYSTEM_FRAME_MASK
System frames (SRAM)
Bit 5
System frame for cycles
= 1
Default setting
MD52201 $MCS_TECHNOLOGY_EXTENSION
Technology extension for combined machines
with several technologies
= 1
Additional settings for turning
= 2
Additional settings for turning,
e.g. turnign machine with milling technology
MD52200 $MCS_TECHNOLOGY = 1
MD52201 $MCS_TECHNOLOGY_EXTENSION = 2
Note
Cylindrical and surface grinding are not supported as a technology extension by SINUMERIK
Operate.
SINUMERIK Operate
Commissioning Manual, 12/2019, 6FC5397-1DP40-6BA3
353
Technologies and cycles
18.1 Activating turning/milling/drilling/grinding technologies
Adapting the user interface
The softkey display for the selection of the cycle support in the program editor is set using the
following channel-specific configuration machine data:
MD52200 $MCS_TECHNOLOGY
Technology
= 1
Setting for turning
= 2
Setting for milling
= 3
Setting for the cylindrical grinding technology
= 4
Setting for the surface grinding technology
Additional information
Information about grinding technology is available in:
● Chapter "Grinding (Page 405)"
● Operating Manual Grinding
● Programming Manual NC Programming
● Function Manual Monitoring and Compensating
Configuring the screen display
The screen display can be configured using the following channel-specific machine data:
MD52210 $MCS_FUNCTION_MASK_DISP
Function screen display
Bit 0
Dimension system for programs always in the basic system
Bit 1
Front view when turning in the school coordinate system
Bit 2
Hide "T,S,M" softkey in the JOG area
Bit 3
Generate end of program automatically in MDI (with "Delete blocks" softkey)
Bit 4
Display follow-on tool in the T,F,S window
Bit 5
Hide "MCS " softkey
Bit 6
Hide tool radius/diameter in the T,F,S window
Bit 7
Hide tool lengths in the T,F,S window
Bit 8
Hide tool icon in the T,F,S window
Bit 9
Display "Easy" input selection, see Section ""Easy" input in cycle support"
Bit 10
Do not offer channel in job lists
Bit 11
For WCS, activate the display of the logical spindles
Bit 12
Hide mold making view for G code
SINUMERIK Operate
354
Commissioning Manual, 12/2019, 6FC5397-1DP40-6BA3
Technologies and cycles
18.1 Activating turning/milling/drilling/grinding technologies
Setting the coordinate system
MD52000 $MCS_DISP_COORDINATE_SYSTEM
Position of the coordinate system
= 0
Default setting
With this machine data you adapt the position of the coordinate system of the user interface to the
coordinate system of the machine. In the user interface, all help screens, sequence graphics, simula-
tions, and input fields with circle direction indication change automatically according to the selected
position.
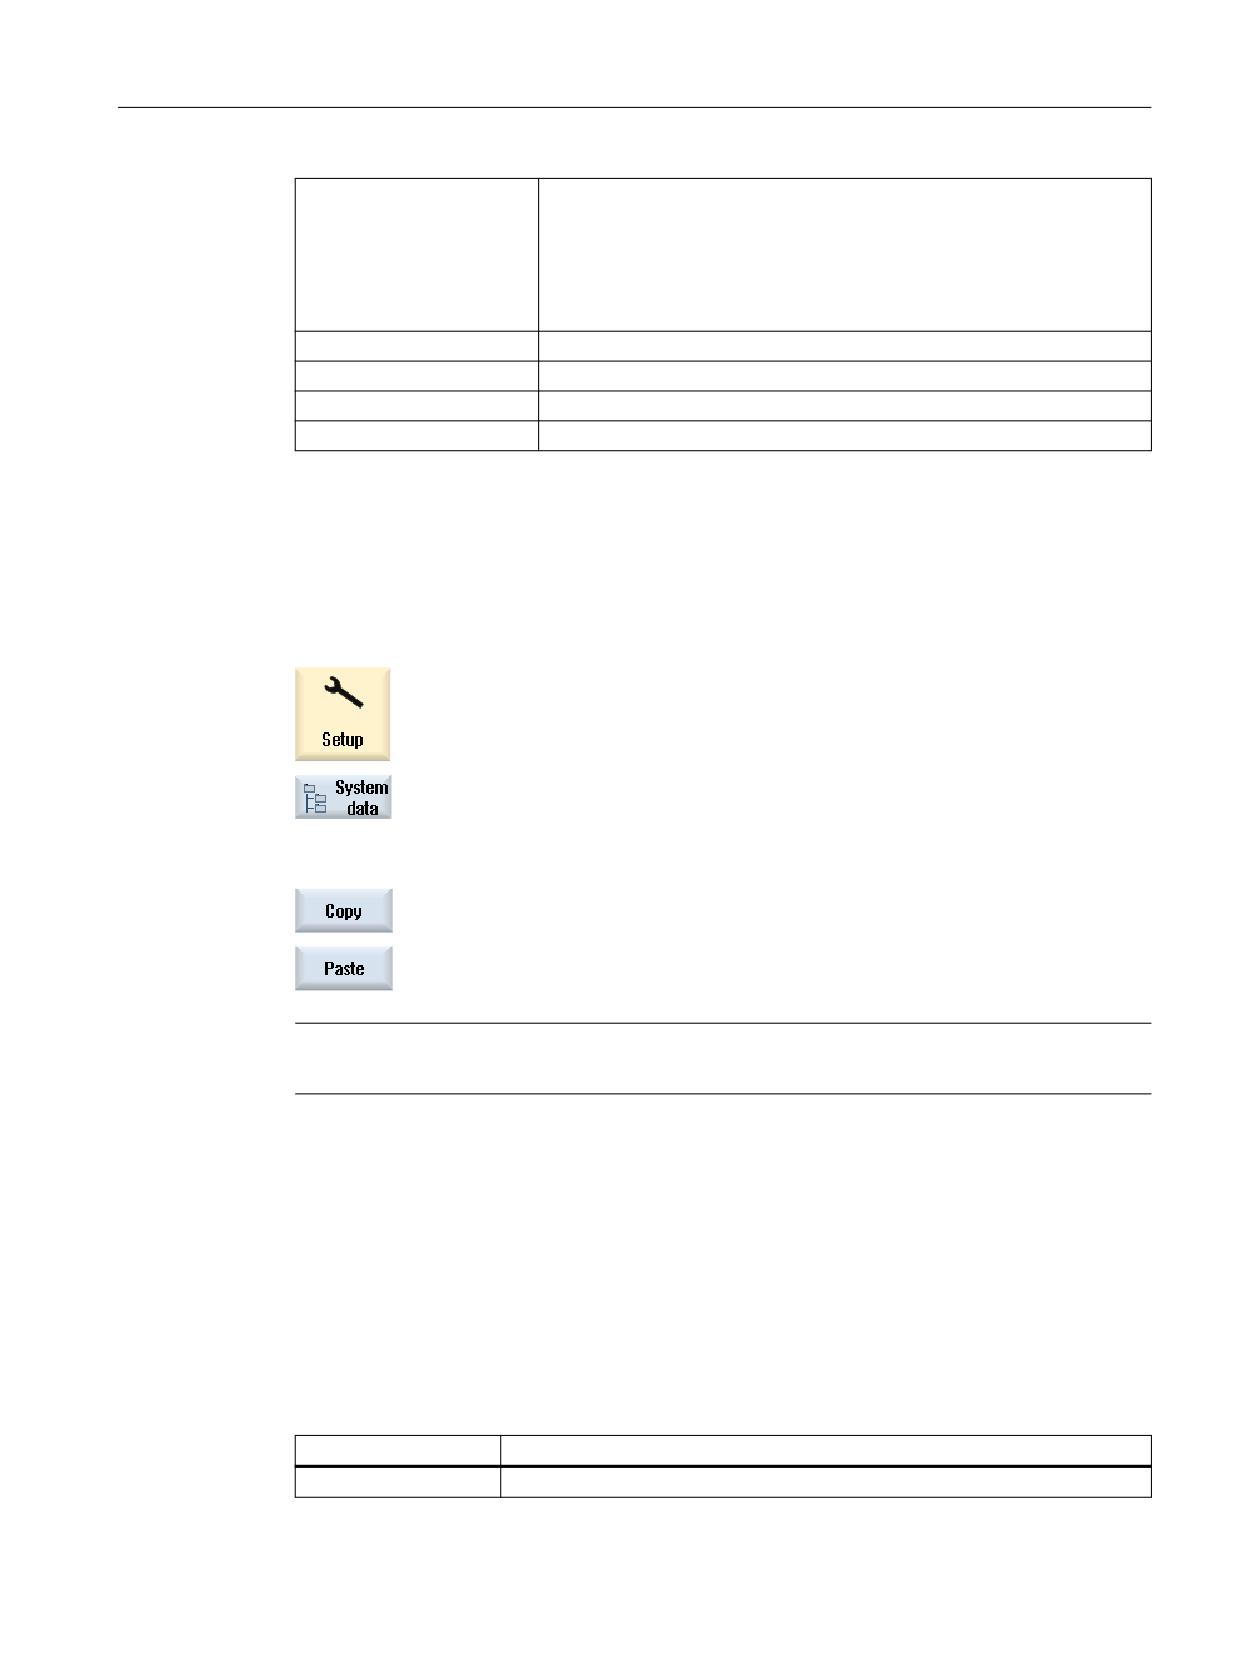
The following settings can be selected for the coordinate system:
=
<
=
<
<
;
;
;
;
=
<
=
=
;
;
=
<
<
;
<
;
=
<
=
;
=
;
=
<
=
<
<
=
;
<
;
;
=
;
=
<
<
<
<
;
=
=
;
<
;
;
<
=
=
=
;
=
<
;
<
<
<
=
;
;
=
=
=
;
<
<
;
=
<
=
;
<
;
;
=
;
<
=
<
<
;
=
<
=
;
;
;
=
<
=
<
<
=
;
<
;
<
=
=
=
;
<
;
;
=
;
<
<
=
=
<
=
;
<
;
;
=
=
<
<
;
<
;
<
=
;
=
;
=
<
=
<
;
<
;
<
=
;
=
SINUMERIK Operate
Commissioning Manual, 12/2019, 6FC5397-1DP40-6BA3
355

Technologies and cycles
18.1 Activating turning/milling/drilling/grinding technologies
Meaning of the axes
MD52206 $MCS_AXIS_USAGE[n]
Meaning of the axes in the channel
[n] channel axis number
= 0
No special meaning
= 1
Tool spindle (rotating tool)
= 2
Auxiliary spindle (rotating tool)
= 3
Main spindle (turning)
= 4
Separate C axis of the main spindle (turning)
= 5
Counterspindle (turning)
= 6
Separate C axis of the counterspindle (turning)
= 7
Linear axis of the counterspindle (turning)
= 8
Tailstock (turning)
= 9
Steady (turning)
= 10
B axis (turning)
= 12
B axis in counterspindle (turning)
= 13
Transverse travel X of the counterspindle (turning)
Defining the direction of rotation
Enter the direction of rotation for the rotary axes that are not configured in a tool holder or a 5-
axis transformation via the following channel-specific machine data.
MD52207 $MCS_USAGE_ATTRIB[n]
Attribute of the axes in the channel
[n] channel axis number
Bit 0
Rotates around 1st geometry axis (for rotation axis)
Bit 1
Rotates around 2nd geometry axis (for rotation axis)
Bit 2
Rotates around 3rd geometry axis (for rotation axis)
Bit 3
Direction of rotation is counter-clockwise (for rotary axis / C axis).
Bit 4
Displayed direction of rotation of the spindle/C axis for the M function M3 is counter-clockwise
Bit 5
Inverts M3 / M4 (for spindles)
This bit must be set analogous to PLC bit DB31, ... DBX17.6!
Bit 6
Display rotary axis as offset target for measurement
Bit 7
List rotary axis in the position pattern
Bit 8
List rotary axis to accept blank (on milling machines)
Bit 9
Spindle is not SPOS-capable
Bit 10
Rotary axis rotates around 1st geometry axis (only for position pattern)
Bit 11
Rotary axis rotates around 2nd geometry axis (only for position pattern)
Bit 12
Rotary axis rotates around 3rd geometry axis (only for position pattern)
SINUMERIK Operate
356
Commissioning Manual, 12/2019, 6FC5397-1DP40-6BA3

Technologies and cycles
18.1 Activating turning/milling/drilling/grinding technologies
"Easy" input in cycle support
You can influence the number of visible input parameters via MD52210
$MCS_FUNCTION_MASK_DISP with bit 9:
● All input parameters are displayed with the default setting bit 9 = 0 for "Complete".
● With the setting bit 9 = 1, you can select "Complete" or "Easy" input parameters in the cycle
support.
If you select the "Easy" input screen for input of the parameters, the values from the following
setting data are used for the invisible parameters (can be adapted machine-specifically):
SD55300 $SCS_EASY_SAFETY_CLEARANCE
Easy input: Safety clearance
= 1
mm
SD55301 $SCS_EASY_DWELL_TIME
Easy input: Dwell time
= 0.6
s
SD55305 $SCS_EASY_DRILL_DEEP_FD1
Easy input: Percentage of 1st deep-hole drill-
ing feedrate
= 90
%
SD55306 $SCS_EASY_DRILL_DEEP_DF
Easy input: Percentage of deep-hole drilling
infeed
= 90
%
SD55307 $SCS_EASY_DRILL_DEEP_V1
Easy input: Min. deep-hole drilling depth infeed
= 1.2
mm
SD55308 $SCS_EASY_DRILL_DEEP_V2
Easy input: Deep-hole drilling retraction dis-
tance
= 1.4
mm
SD55309 $SCS_EASY_THREAD_RETURN_DIST
Easy input: Thread turning return distance
= 2
mm
Note
The specified default values are valid for the metric system and are converted by the NC
automatically on the machine with the inch setting.
SINUMERIK Operate
Commissioning Manual, 12/2019, 6FC5397-1DP40-6BA3
357

Technologies and cycles
18.2 Technology cycles for drilling
Additional settings
MD52005 $MCS_DISP_PLANE_MILL
Plane selection G17, G18, G19
= 0
Milling: Plane selection in the cycle support when programming under "programGUIDE G
code"
= 17
G17 plane (default value)
= 18
G18 plane
= 19
G19 plane
MD52006 $MCS_DISP_PLANE_TURN
Plane selection G17, G18, G19
= 18
G18 plane (permanently set)
MD52212 $MCS_FUNCTION_MASK_TECH
General function screen for all technologies
Bit 0
Enable swivel
= 0
Swivel plane, swivel tool not enabled
= 1
Swivel plane, swivel tool enabled
Bit 1
No optimized travel along software limit switches
= 0
No optimized travel along software limit switches
= 1
Optimized travel along software limit switches
MD52240 $MCS_NAME_TOOL_CHANGE_PROG
Tool change program for G code steps
= Program name
The associated program is called for tool change.
See also
Technology cycles for swiveling (Page 407)
18.2
Technology cycles for drilling
Drilling technology
You can set drilling technology using the following channel-specific configuration machine data
and channel-specific cycle setting data.
MD52216 $MCS_FUNCTION_MASK_DRILL
Drilling function screen form
Bit 0
Tapping cycle CYCLE84, technology input fields
= 0
Hide input fields
= 1
Display input fields
Bit 1
Tapping cycle CYCLE840, technology input fields
= 0
Hide input fields
= 1
Display input fields
SINUMERIK Operate
358
Commissioning Manual, 12/2019, 6FC5397-1DP40-6BA3

Technologies and cycles
18.2 Technology cycles for drilling
SD55216 $SCS_FUNCTION_MASK_DRILL_SET
Drilling function screen form
Bit 1
Boring CYCLE86: Take into account the rotation of the tool plane when positioning the
spindle
Note:
Spindle direction of rotation M3/ M4 and direction of rotation of the rotary axes must be set
according to DIN. For SPOS=0, the tool cutting edge points in the + direction of the 1st axis
of the plane (for G17, to X+).
= 0
Do not take into account the rotation of the tool plane when positioning the spindle (SPOS).
= 1
Take into account the rotation of the tool plane when positioning the spindle (SPOS).
Bit 2
Boring CYCLE86: When positioning the spindle, take into account swiveled table kinematics
(tool carrier)
= 0
When positioning the spindle, do not take into account the components of the swiveled table
kinematics (swiveling with CYCLE800, tool carrier).
Note:
Only the rotary axis of the machine kinematics that rotates the workpiece is taken into ac-
count. In the initial state of the kinematics, this rotary axis must be orientated parallel to the
tool axis.
e.g. rotary axis C rotation around Z (for G17) rotary axis vector of the swivel data set V2xyz
= 0 , 0 , -1.
= 1
When positioning the spindle, take into account the components of the swiveled table kine-
matics (swiveling with CYCLE800, tool carrier).
Bit 3
Tapping CYCLE84: Monitoring of the machine data MD31050 $MA_DRIVE_AX_RATIO_DE-
NOM and MD31060 $MA_DRIVE_AX_RATIO_NUMERA of the spindle
Bit 4
Tapping CYCLE84, set monitoring of the machine data MD31050 $MA_DRIVE_AX_RA-
TIO_DENOM and MD31060 $MA_DRIVE_AX_RATIO_NUMERA of the spindle
= 0
No monitoring
= 1
Monitoring
Bit 6
Boring CYCLE86: Adapt the spindle position to the tool orientation
Tool orientation can be realized using TOOLCARR or TRAORI before the cycle is called.
= 1
Bits 1 and 2 are no longer effective.
Bit 7
Boring CYCLE86: Adapt the direction of retraction travel in the plane to the active mirroring
= 0
Retraction in the plane is realized as programmed.
= 1
When mirroring is active, the direction when retracting in the plane is adapted in the cycle to
the active mirroring.
Tapping (CYCLE84 and CYCLE840)
If the technology screens are hidden using the channel-specific configuration machine data
MD52216 $MCS_FUNCTION_MASK_DRILL, then the settings in the following channel-
specific cycle setting data are effective:
SD55481 $SCS_DRILL_TAPPING_SET_GG12[0]
Setting tapping G group 12:
Block change behavior for exact stop
= 0
Exact stop response as before the cycle call (default value).
= 1
G601
= 2
G602
= 3
G603
SINUMERIK Operate
Commissioning Manual, 12/2019, 6FC5397-1DP40-6BA3
359

Technologies and cycles
18.3 Manufacturer cycles
SD55482 $SCS_DRILL_TAPPING_SET_GG21[0]
Setting tapping G group 21:
Acceleration behavior
= 0
Acceleration behavior as before the cycle call (default value).
= 1
SOFT
= 2
BRISK
= 3
DRIVE
SD55483 $SCS_DRILL_TAPPING_SET_GG24[0]
Setting tapping G group 24:
Precontrol
= 0
Precontrol, the same as before the cycle call (default value).
= 1
FFWON
= 2
FFWOF
Tapping (CYCLE84)
SD55484 $SCS_DRILL_TAPPING_SET_MC[0]
Spindle operation for MCALL
= 0
For MCALL, reactivate spindle operation (default value).
= 1
For MCALL, remain in position controlled spindle operation.
18.3
Manufacturer cycles
18.3.1
Manufacturer cycles
The following cycles are also available in the cycle package for individual adaptation:
CUST_TECHCYC.SPF
Manufacturer cycle for the adaptation of technology cycles.
CUST_782.SPF
Manufacturer cycle for adaptation to determine loading function (CY-
CLE782), see Chapter "Manufacturer cycle CUST_782.SPF (Page 464)".
CUST_800.SPF
Manufacturer cycle for the adaptation of the swivel plane and the swivel
tool functions (CYCLE800), see Chapter "Manufacturer cycle
CUST_800.SPF (Page 438)".
CUST_832.SPF
Manufacturer cycle for the adaptation of the high-speed settings function
(CYCLE832), see Chapter "Manufacturer cycle CUST_832.SPF
(Page 469)".
CUST_MEACYC.SPF
Manufacturer cycle for the adaptation of the measuring functions, see
Chapter "Manufacturer and user cycle CUST_MEACYC.SPF
(Page 475)".
CUST_MEAPROT.SPF
Manufacturer cycle and user cycle for the adaptation of the log form and
content, see Chapter "Manufacturer and user cycle CUST_MEAP-
ROT.SPF (Page 506)".
SINUMERIK Operate
360
Commissioning Manual, 12/2019, 6FC5397-1DP40-6BA3
Technologies and cycles
18.3 Manufacturer cycles
PROG_EVENT.SPF
Standard cycle to support the following functions:
● Block search when milling or turning is activated
● Block search and swivel plane
● Block search and align / advance tool
Note MD52212 $MCS_FUNCTION_MASK_TECH bits 3, 5 and 15 ... 17.
CUST_T
Cycle is used to track the T preparation after SERUPRO.
CUST_M6
Cycle is used to track the tool change after SERUPRO.
CUST_MULTICHAN
Manufacturer cycle for lathes with several channels
CUST_CLAMP
Manufacturer's cycle for clamping elements
Copying manufacturer cycles
Copy the cycle from the NC data/Cycles/Standard cycles directory to the
NC data/Cycles/
User cycles directory before making any changes. Changes for the cycle take effect only in this
directory.
1.
Select the "Start-up" operating area.
2.
Press the "System data" softkey.
3.
Open the directory NC data/Cycles/Standard cycles and select the man-
ufacturer cycles.
4.
Press the "Copy" softkey and open the NC data/Cycles/Manufacturer
cycles directory.
5.
Press the "Paste" softkey.
The cycles are available for you to individually adapt them.
Note
When upgrading the software, please refer to the upgrade instructions.
18.3.2
Prerequisites for the simulation mode
Configuration
If you use feedback signals regarding the machine state, e.g. in CYCPE1MA, for tool change
cycles, measuring cycles or CUST_800, then in the NC program you must link in the following
system variables in order to avoid PLC access. Otherwise, PLC access prevents data
alignment, results in alarms or the simulation being canceled:
System variable
Meaning
$P_SIM
NCK simulation active
SINUMERIK Operate
Commissioning Manual, 12/2019, 6FC5397-1DP40-6BA3
361

Technologies and cycles
18.3 Manufacturer cycles
Example
In the following example, the simulation mode in PROG_EVENT or CYCPE1MA.SPF is
stopped by the PLC access:
N100 REPEAT
N110 UNTIL PLC_VAR <> 0
If you use the system variable $P_SIM, then PLC access in the simulation mode is prevented:
N099 IF NOT $P_SIM
N100 REPEAT
N110 UNTIL PLC_VAR <> 0
N111 ENDIF
18.3.3
Extending the PROG_EVENT standard cycle
If you wish to extend the functionality of the PROG_EVENT, then you must not copy this into the
manufacturer cycles directory, but you must create two new manufacturer cycles. Use the
names CYCPE1MA.SPF or CYCPE_MA.SPF names for the manufacturer cycles.
For the manufacturer cycles CYCPE1MA.SPF or CYCPE_MA.SPF, the corresponding
jump markers are prepared at the beginning and at the end of PROG_EVENT.SPF.
If the CYCPE1MA.SPF and CYCPE_MA.SPF manufacturer cycles are created in the NC, the
program correspondingly branches from PROG_EVENT to the manufacturer cycles.
Procedure
1.
Select the "Start-up" operating area.
2.
Press the "System data" softkey.
3.
Select the directory /NC data/Cycles/Manufacturer cycles
4.
Press the "New" softkey.
The "New G Code Program" window opens.
5.
Assign the name CYCPE1MA or CYCPE_MA.
Only use these names.
6
Press the "OK" softkey.
The cycle has been created and you can now adapt it.
SINUMERIK Operate
362
Commissioning Manual, 12/2019, 6FC5397-1DP40-6BA3
Technologies and cycles
18.3 Manufacturer cycles
18.3.4
Manufacturer cycle for tool change CUST_T and CUST_M6
Function
The two cycles are used to track the T preparation (CUST_T) and the tool change (CUST_M6)
according to SERUPRO. In so doing, depending on the specific tool holder, the following is
output:
● Last programmed change
● Last programmed preparation
Requirement
The cycles can only be used when tool management is active.
Sequence
The two cycles are called in the "SERUPRO-END-ASUB", which also provides the two transfer
parameters.
Parameter
Meaning
_THnr
Tool holder or master spindle number that was programmed for the change or the
preparation.
_MTHnr
Number of the active tool holder or master spindle at the time of programming.
The cycles themselves do not contain and "machine logic". Pure data operations are performed.
The active tool holder or the master spindle is saved.
Using the transfer parameter, the situation at the time of the T or M6 programming is
determined. This situation is established, T and/or M06 output or a branch is made into the
manufacturer cycles. After the output of T and M06 or after returning from the manufacturer
cycles, the tool holder, saved at the beginning, is reactivated.
A change cycle can then only be called without any restriction, if the corresponding queries
such as program test, block search,...exist.
SINUMERIK Operate
Commissioning Manual, 12/2019, 6FC5397-1DP40-6BA3
363
Technologies and cycles
18.3 Manufacturer cycles
T replacement cycle
If a T replacement cycle is being used, then the following note must be observed:
Note
The CUST_T cycle uses the language command TCA (ToolChangeAbsolut) for the T call and
therefore also has the possibility of inserting tools that have been disabled. However, this
language command cannot be substituted.
The following must be observed if working at a machine with T replacement:
● The T preparation cycle must be explicitly called at the specified position.
● If the call is realized using the CUST_T cycle, then the parameter evaluation
($C_TS_PROG, …) is skipped.
Alternatively, the original TCA language command can be reprogrammed.
Additional information
You can find additional information about "SERUPRO and ASUB" in the
Function Manual Basic Functions.
18.3.5
CUST_TECHCYC.SPF manufacturer cycle
Function
For technological cycles, the CUST_TECHCYC cycle is called from ShopMill and ShopTurn
cycles, if the machine builder must make certain adaptations to a specific machine (e.g.
activate specific M commands). For instance, this may be necessary in order to retract or
extend part catchers when cutting off parts on lathes or to position a spindle for clamping (only
in JobShop).
The CUST_TECHCYC.SPF cycle can be used to program and execute the necessary
sequences.
SINUMERIK Operate
364
Commissioning Manual, 12/2019, 6FC5397-1DP40-6BA3

Technologies and cycles
18.3 Manufacturer cycles
Adapt manufacturer cycle CUST_TECHCYC.SPF
You can execute the following actions with the aid of the _MODE parameter:
Marker
Action
_M1
Main spindle:
Changeover to C axis mode
_M2
Changeover to spindle mode
_M3
Clamp C axis
_M4
Release C axis clamping
_M5
Rinse chuck
_M6
Close chuck
_M7
Open chuck when spindle is stationary
_M8
Open chuck when spindle is rotating
_M9
Flush chuck
_M11
Tool spindle:
Changeover to C axis mode
_M12
Changeover to spindle mode
_M13
Clamp C axis
_M14
Release C axis clamping
_M21
Counterspindle:
Changeover to C axis mode
_M22
Changeover to spindle mode
_M23
Clamp C axis
_M24
Release C axis clamping
_M25
Rinse chuck
_M26
Close chuck
_M27
Open chuck when spindle is stationary
_M28
Open chuck when spindle is rotating
_M29
Rinse chuck off
_M30
Position 4th axis after block search (e.g. counterspindle, tailstock, back rest)
_M41
Engage driven tool
_M42
Disengage driven tool
_M61
Changeover to turning
_M62
Changeover to peripheral surface machining C
_M63
Changeover to face machining C
_M64
Changeover to peripheral surface machining Y
_M65
Changeover to face machining Y
_M66
Changeover to face machining B (swivel)
_M67
Deselection of the face machining B (swivel)
_M68
After block search to ST block before swivel
SINUMERIK Operate
Commissioning Manual, 12/2019, 6FC5397-1DP40-6BA3
365

Technologies and cycles
18.3 Manufacturer cycles
Marker
Action
_M100
Drawer:
Position before cut-off
_M101
Open during cut-off
_M102
Close after cut-off
_M103
Cut-off completed
_M110
Tool change
_M111
After end of tool change cycle (with tool change)
_M112
Before tool change on retraction plane
_M113
Before cutting edge reselection
_M114
After end of tool change cycle (without tool change)
_M115
After tool preselection (ShopTurn)
_M116
At tool change point (ShopTurn)
_M117
Before tool change T command
_M120
Definition: Coupling of counterspindle / main spindle
_M121
After COUPOF switch off position control
_M122
Definition: Coupling, main/counterspindle
_M123
After COUPOF switch off position control
_M125
Changeover to main spindle
_M126
Changeover to counterspindle
_M131
Start of program (ShopTurn program)
_M132
End of program header (ShopTurn program)
_M135
End of program loop (ShopTurn program)
_M136
End of program (ShopTurn program)
_M140
Block search
Before tool change
_M141
After tool change
_M142
After tool change (new tool from ShopTurn)
_M150
2-channel stock remov-
Leading channel before Balance Cutting
al:
_M151
Leading channel after Balance Cutting
_M152
Following channel before Balance Cutting
_M153
Following channel after Balance Cutting
_M154
Start machining in the leading channel
_M155
End machining in the leading channel
_M156
Start machining in the following channel
_M157
Start machining in the following channel
_M160
Start multichannel programming
_M170
Start block with spindle
_M171
End block with spindle
SINUMERIK Operate
366
Commissioning Manual, 12/2019, 6FC5397-1DP40-6BA3
Technologies and cycles
18.4 Milling
Marker
Action
_M231
Start of program (ShopMill program)
_M232
End of program header (ShopMill program)
_M235
End of program loop (ShopMill program)
_M236
End of program (ShopMill program)
_M300
Boring CYCLE86
Adapt the spindle to the tool position (SD55216 $SCS_FUNCTION_MASK_DRILL_SET
bit 6 = 1)
For specific machine kinematics, it may be necessary to make an additional adjustment of
the correction angle for the spindle positioning (e.g. intermediate gear at the spindle). The
_M300 mark is run through after the correction angle is calculated. There the correction
angles _MEA_CORR_ANGLE[0] (for the manufacturer) and _MEA_CORR_ANGLE[1]
(system) can be changed, if applicable. For subsequent spindle positioning operations,
both angles act additively in CYCLE86.
18.3.6
CUST_MULTICHAN user cycle
Function
The CUST_MULTICHAN cycle is used for multi-channel programming at lathes. It is called at
the start of the block when programming with blocks.
In the cycle, e.g. the master spindle is set to the spindle specified at the start of the block. The
return value (= 1) can be used to control whether the complete block is skipped.
CUST_MULTICHAN
Parameter
Meaning
_S_NR
Spindle number to which the master spindle is set.
_RET
Return value
= 0
The block is executed corresponding to the run-in mode.
= 1
The entire block is skipped.
18.4
Milling
18.4.1
General
All settings for machine and setting data of the standard cycles are also applicable for milling
under ShopMill and turning under ShopTurn.
SINUMERIK Operate
Commissioning Manual, 12/2019, 6FC5397-1DP40-6BA3
367
Technologies and cycles
18.4 Milling
18.4.2
Technology cycles for milling
Milling function screen
SD52214 $SCS_function_MASK_MILL
Milling function screen
Bit 0
Enable cylinder surface transformation (ShopMill)
Bit 1
List table to accept blank (on milling machines)
(This bit only has to be set, if the machine has a rotary axis and a fixed table for accepting the
blank.)
Bit 2
reserved
Bit 3
Enable machining inside/outside
Bit 4
Enable spindle clamping (C axis)
Bit 5
Enable spindle control of the tool spindle via user interface
Bit 6
Enable spindle control of the main spindle via user interface
SD55214 $SCS_FUNCTION_MASK_MILL_SET
Milling function screen
Bit 0
Basic setting, milling in climbing.
Bit 2
Depth calculation of the milling cycles, with or without safety clearance.
= 0
Depth calculation of the milling cycles is performed between the reference plane + safety
clearance and the depth.
= 1
Depth calculation is performed without including the safety clearance.
Bit 2 is effective in the following milling cycles: CYCLE61, CYCLE71, CYCLE76, CYCLE77,
CYCLE79, CYCLE899, LONGHOLE, SLOT1, SLOT2, POCKET3, POCKET4.
Contour milling (CYCLE63, CYCLE64)
SD55460 $SCS_MILL_CONT_INITIAL_RAD_FIN
Finishing approach circle radius
The radius of the approach circle during the
finishing of contour pockets is affected.
= 0
The radius is selected so that at the starting point the safety clearance to the finishing allow-
ance is maintained (default value).
> 0
The radius is selected so that at the starting point the value of this channel-specific setting data
to the finishing allowance is maintained.
SD55212 $SCS_FUNCTION_MASK_TECH_SET
General function screen for all technologies
= 6
Bit 3
Delete programs generated by contour cycles (CYCLE63, CYCLE64, CYCLE952)
= 0
Generated programs are not deleted (compatibility as before)
= 1
Generated programs are deleted as soon as they have been executed by the calling cycle.
SINUMERIK Operate
368
Commissioning Manual, 12/2019, 6FC5397-1DP40-6BA3
Technologies and cycles
18.4 Milling
Engraving (CYCLE60)
SD55400 $SCS_MILL_ENGRAVE_POINT_RAD
Engraving cycle CYCLE60: Circular arc ra-
dius for generating the "dot" character
= 0
= 0
The "dot" character is produced by a simple linear insertion movement of the tool (default
setting for conventional engraving tools, compatibility).
> 0
The "dot" character is executed as a circle with the radius value from this setting data (setting
for some special tools).
Multiple edge (CYCLE79), circular position pattern (HOLES2), circumferential groove (SLOT2)
SD55230 $SCS_CIRCLE_RAPID_FEED
Rapid feed in mm/min for positioning on a circular path
between the circumferential grooves or the contour
elements.
= 10000
18.4.3
Setting-up ShopMill cycles for milling
Load ShopMill cycles for milling
When the control boots, the ShopMill cycles are automatically loaded into the following
directory: ../siemens/sinumerik/cycles/sm/prog
Setting the coordinate system
MD52000 $MCS_DISP_COORDINATE_SYSTEM
Position of the coordinate system
= 0
Examples:
=0 for vertical milling machines
=16 for horizontal milling machines, boring mill
A detailed description of the MD52000 is provided in Section:
Activating turning/milling/drilling/grinding technologies (Page 353)
For plane selection when milling, appropriately set the following machine data:
MD52005 $MCS_DISP_PLANE_MILL
Plane selection for milling
= 17
= 0
In the cycle support
= 17
G17 (default value)
= 18
G18
= 19
G19
SINUMERIK Operate
Commissioning Manual, 12/2019, 6FC5397-1DP40-6BA3
369
Technologies and cycles
18.4 Milling
Simulation and simultaneous recording
In order that simulation and simultaneous recording are displayed without any errors, set the
machine data as described in the following section:
Setting the technology for simulation (Page 145)
Defining the direction of rotation
In order that the direction of rotation is correctly displayed in the ShopMill user interface, and
when programming ShopMill functions, the correct direction of rotation is executed, you must
make some settings that are coordinated with one another. You must align these settings to the
actual direction of rotation of the axis at the machine.
MD52207 $MCS_USAGE_ATTRIB[n]
Attribute of the axes in the channel
[n] channel axis number
Bit 4
Displayed direction of rotation for M3 is counter-clockwise (for spindles)
Bit 5
Direction of rotation M3 corresponds to rotary axis minus (for spindles)
This bit must be set analog to PLC bit DB31, ... DBX17.6!
Specify other direction of rotation for position pattern
You can specify a position pattern for the tool axis. Rather than Bit 12, you must set Bit10 to
active in the MD52207 so that, for example, the position pattern can be machined on rotary axis
C with an appropriate swivel position.
MD52207 $MCS_USAGE_ATTRIB[n]
Attribute of the axes in the channel
[n] channel axis number
Bit 2
Rotates around 3rd geometry axis (for rotary axes)
Bit 4
Displayed direction of rotation for M3 is counter-clockwise (for spindles)
The viewing direction can be selected. Either from the interior looking out or from outside
looking toward the spindle.
However, the same selection must be made for all spindles.
Bit 5
Direction of rotation for M3 corresponds to rotary axis minus (for spindles)
Bit 6
Display rotary axis as offset target for measuring
Bit 7
Offer rotary axis in position pattern
The orientation of the axis is determined with Bits 0 to 2.
If one of the Bits 10 to 12 is set, they determine the orientation of the axis for position patterns.
Bit 8
Offer rotary axis for blank clamping (on milling machines)
The orientation of the axis is determined with Bits 0 to 2.
Bit 10
Rotary axes turns around the 1st geometry axis (only for position pattern)
Additional channel-specific machine data
MD52216 $MCS_FUNCTION_MASK_DRILL
Drilling function screen form
Bit 2
Tapping also without encoder
The setting depends on whether at the machine the tool spindle is equipped with an encoder.
= 0
Tapping only possible with encoder
SINUMERIK Operate
370
Commissioning Manual, 12/2019, 6FC5397-1DP40-6BA3
Technologies and cycles
18.4 Milling
= 1
Tapping also possible without encoder
Bit 3
Constant cutting speed referred to the diameter of the centering
= 0
Constant cutting speed referred to the diameter of the tool
= 1
Constant cutting speed referred to the diameter of the centering
MD52229 $MCS_ENABLE_QUICK_M_CODES
Enable fast M commands
= 0
Bit 0
Coolant OFF (default value)
Bit 1
Coolant 1 ON
Bit 2
Coolant 2 ON
Bit 3
Coolants 1 and 2 ON
MD52230 $MCS_M_CODE_ALL_COOLANTS_OFF
M code for all coolants Off
= 9
You define the M function to switch off the coolant that is output when the tool is changed.
MD52231 $MCS_M_CODE_COOLANT_1_ON
M code for coolant 1 On
= 8
You define the M function for coolant 1 that is output when the tool is changed.
MD52232 $MCS_M_CODE_COOLANT_2_ON
M code for coolant 2 On
= 7
You define the M function for coolant 2 that is output when the tool is changed.
MD52233 $MCS_M_CODE_COOLANT_1_AND_2_ON
M code for both coolants On
= -1
You define the M function for coolant 1 and 2 that is output when the tool is changed.
MD52281 $MCS_TOOL_MCODE_FUNC_ON[ ]
M code for tool-specific function ON
= -1
M function is not output.
If both M commands of a function "= -1", the corresponding field is not displayed on the
interface.
[0]
M code for tool-specific function 1 ON
[1]
M code for tool-specific function 2 ON
[2]
M code for tool-specific function 3 ON
[3]
M code for tool-specific function 4 ON
MD52282 $MCS_TOOL_MCODE_FUNC_OFF[ ]
M code for tool-specific function OFF
= -1
M function is output.
If both M commands of a function "= -1", the corresponding field is displayed on the interface.
[0]
M code for tool-specific function 1 OFF
[1]
M code for tool-specific function 2 OFF
[2]
M code for tool-specific function 3 OFF
[3]
M code for tool-specific function 4 OFF
SINUMERIK Operate
Commissioning Manual, 12/2019, 6FC5397-1DP40-6BA3
371
Technologies and cycles
18.4 Milling
Channel-specific cycle setting data
SD55212 $SCS_FUNCTION_MASK_TECH_SET
Cross-technology function screen
= 6
Bit 0
Tool preselection active.
The next tool is prepared directly after a tool change.
Note: For a revolver, the setting data must be set to "0".
Bit 1
Automatic calculation of the thread depth for metric threads.
Bit 2
Take the thread diameter and thread depth from the table.
18.4.4
Cylinder surface transformation (TRACYL)
Software option
You require the following software option in order to use this function:
"Transmit and peripheral surface transformation".
Precondition
● There must be at least one rotary axis at the machine.
● The milling tool must be radially oriented to the cylinder to be machined.
Function
The following groove machining operations can be performed with the Cylinder surface
transformation functions:
● Longitudinal grooves on cylindrical bodies
● Transverse grooves on cylindrical objects
● Grooves with any path on cylindrical bodies
The path of the grooves is programmed with reference to the unwrapped, level surface of the
cylinder. Programming can be realized using straight line/circle, drilling or milling cycles or
contour milling (free contour programming).
SINUMERIK Operate
372
Commissioning Manual, 12/2019, 6FC5397-1DP40-6BA3
Technologies and cycles
18.4 Milling
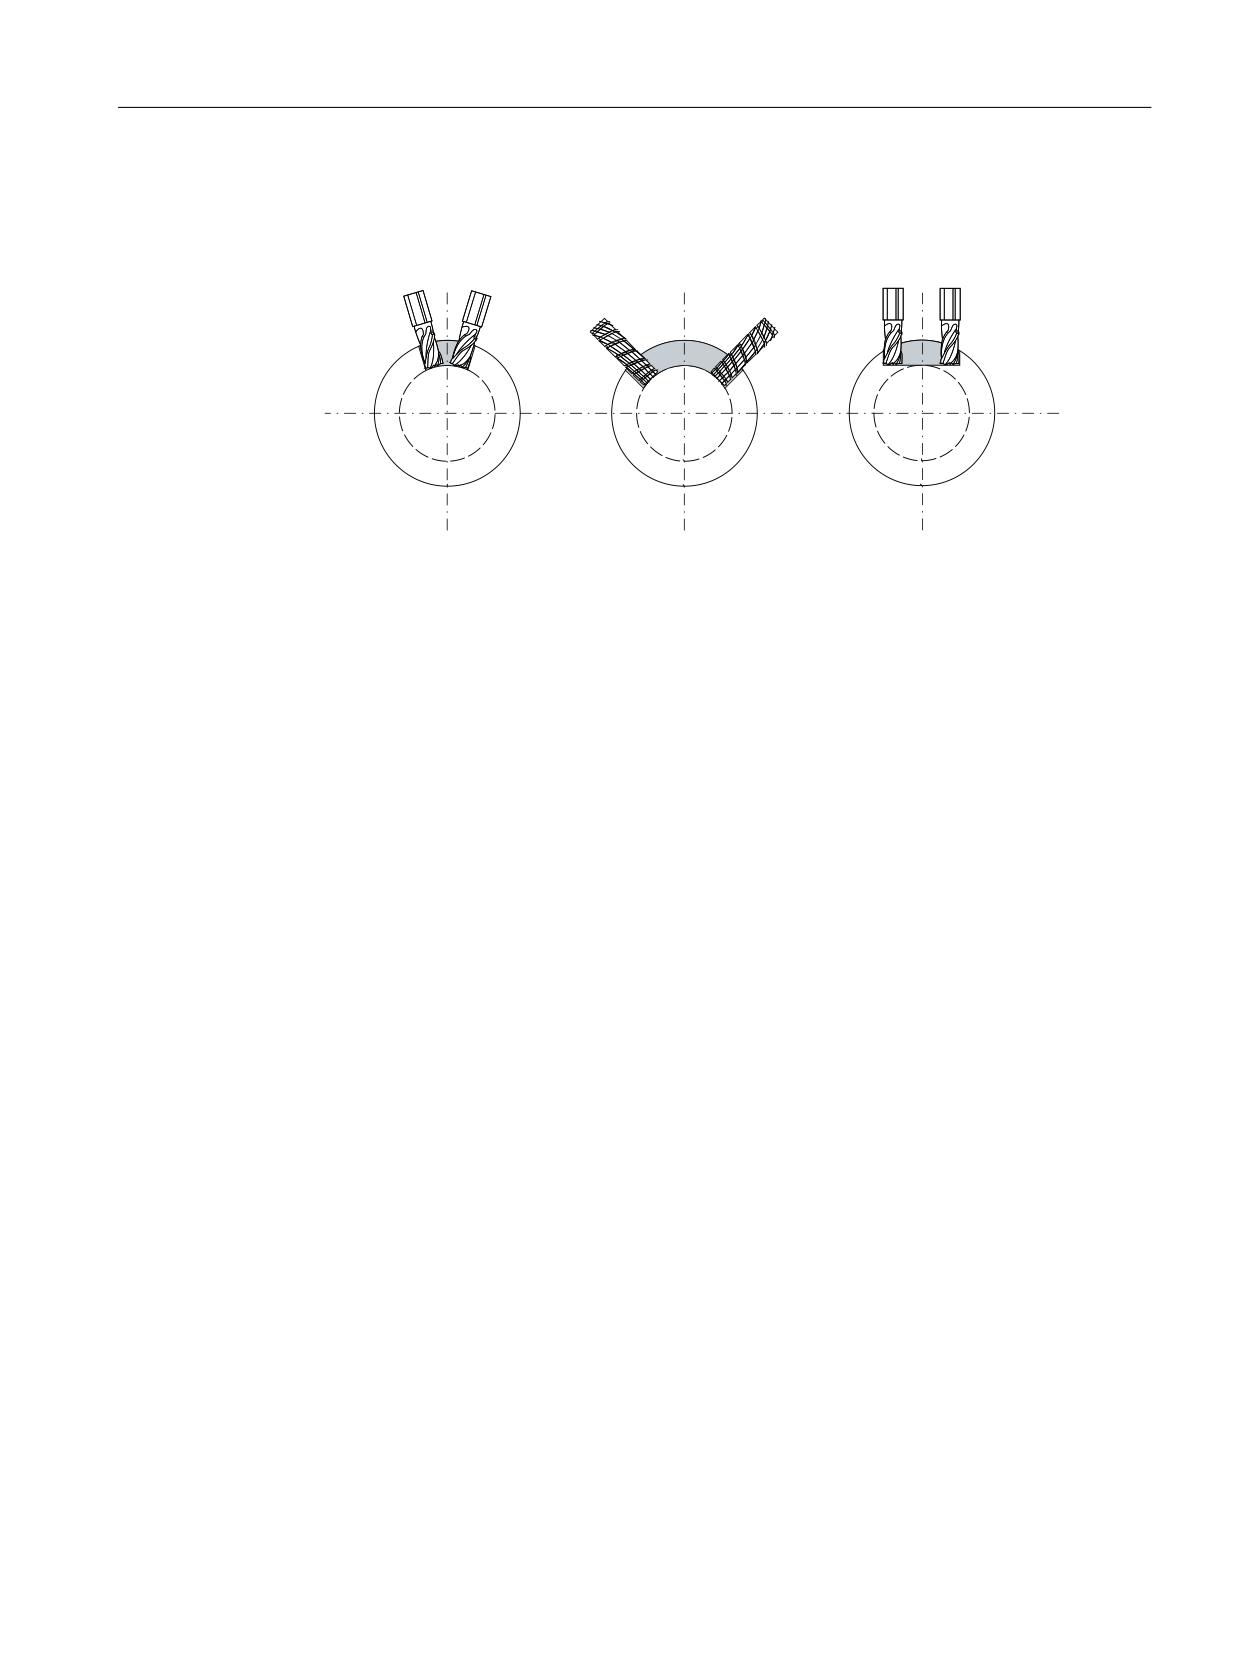
There are two variants of cylinder surface transformation, i.e.
1. with groove side offset (ON)
2. without groove side offset (OFF)
/RQJLWXGLQDO JURRYH
7UDQVYHUVH JURRYH /RQJLWXGLQDO JURRYH ZLWK SDUDOOHO OLPLWDWLRQ
:LWKRXW JURRYH VLGH RIIVHW
:LWK JURRYH VLGH RIIVHW
Figure 18-1
Grooves with and without groove side offset
18.4.5
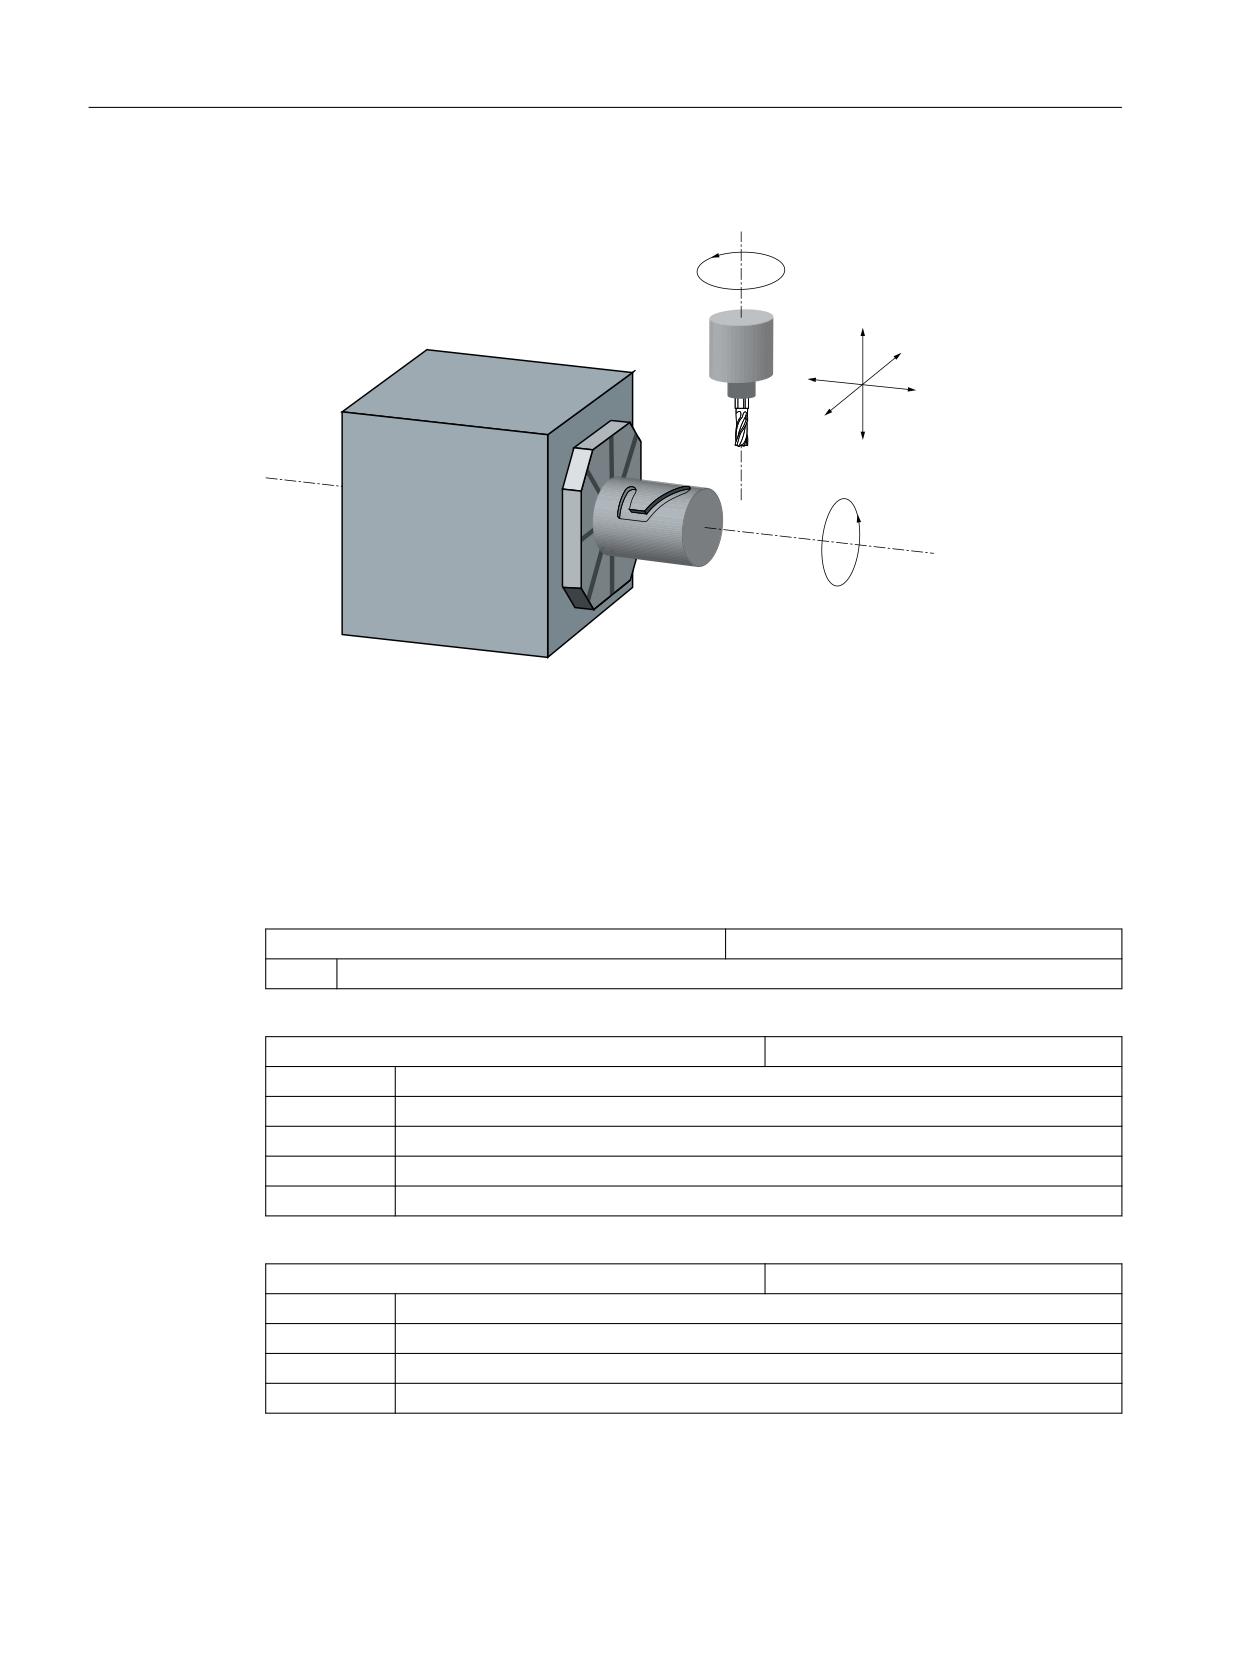
Example: Milling machine with the XYZ-AC axis configuration
Example: Milling machine with the XYZ-AC axis configuration
Example of an axis configuration on the following machine:
SINUMERIK Operate
Commissioning Manual, 12/2019, 6FC5397-1DP40-6BA3
373
Technologies and cycles
18.4 Milling
Axis configuration
&
=
<
;
$
X
1st axis of the machining plane parallel to the rotary axis
Y
2nd axis of the machining plane
Z
Infeed axis (tool axis) perpendicular (radial) to the rotary axis
A
Rotary axis
C
Working spindle
Figure 18-2
Machining slots on a cylinder surface with X-A-Z kinematics
You must configure two data sets with the following machine data for the machine illustrated
above:
MD20070 $MC_AXCONF_MACHAX_USED[4]
Machine axis number valid in channel
= 5
Number of channel axes
MD20080 $MC_AXCONF_CHANAX_NAME_TAB[ ]
Name of channel axis in the channel
[0] = XC
Channel axis XC, corresponds to channel axis 1
[1] = YC
Channel axis YC, corresponds to channel axis 2
[2] = ZC
Channel axis ZC, corresponds to channel axis 3
[3] = A
Channel axis A, corresponds to channel axis 4
[4] = C
Channel axis C, corresponds to channel axis 5
MD28082 $MC_MM_SYSTEMFRAME_MASK
System frames (SRAM)
= 21H
Default setting
Bit 0 = 1
System frame for actual value setting and scratching
Bit 5 = 1
System frame for cycles
Bit 6 = 1
System frame for transformations
SINUMERIK Operate
374
Commissioning Manual, 12/2019, 6FC5397-1DP40-6BA3

Technologies and cycles
18.4 Milling
General settings for the transformation
MD10602 $MN_FRAME_GEOAX_CHANGE_MODE
Frames when switching over geometry
screens
= 1
The actual total frame (zero offsets) is recalculated when switching over geometry axes (se-
lecting - deselecting TRACYL).
Data set for the 1st transformation in the channel
MD24100 $MC_TRAFO_TYPE_1
Definition of transformation 1 in the chan-
nel.
= 512
Transformer type (512 = cylinder surface transformation without groove side offset)
MD24110 $MC_TRAFO_AXES_IN_1
Axis assignment for the 1st transforma-
tion in the channel
[0] = 3
Channel axis: Infeed axis (tool axis) perpendicular (radial) to the rotary axis
Z
[1] = 4
Channel axis: Rotary axis
A
[2] = 1
Channel axis: 1st axis of the machining plane parallel to the rotary axis
X
[3] = 2
Channel axis: 2nd axis of the machining plane
Y
MD24120 $MC_TRAFO_GEOAX_ASSIGN_TAB_1
Assignment of the geometry axes to chan-
nel axes for transformation 1.
[0] = 1
Channel axis: 1st geometry axis
X
[1] = 4
Channel axis: 2nd geometry axis
A
[2] = 3
Channel axis: 3rd geometry axis
Z
MD24800 $MC_TRACYL_ROT_AX_OFFSET_1
= 0
Offset of rotary axis for the 1st TRACYL transformation.
MD24805 $MC_TRACYL_ROT_AX_FRAME_1
= 1
Axial offset of rotary axis for the 1st TRACYL transformation.
MD24810 $MC_TRACYL_ROT_SIGN_IS_PLUS_1
= 1
Sign of the rotary axis for the 1st TRACYL transformation.
MD24820 $MC_TRACYL_BASE_TOOL_1[ ]
[0] = 0
Vector of the base tool for the 1st TRANSMIT transformation in XYZ
[1] = 0
[2] = 0
SINUMERIK Operate
Commissioning Manual, 12/2019, 6FC5397-1DP40-6BA3
375

Technologies and cycles
18.4 Milling
Data set for the 2nd transformation in the channel
MD24200 $MC_TRAFO_TYPE_2
= 513
Transformer type (513 = cylinder surface transformation with groove side offset)
MD24210 $MC_TRAFO_AXES_IN_2
[0] = 3
Channel axis: Infeed axis perpendicular (radial) to rotary axis
Z
[1] = 4
Channel axis: Rotary axis
A
[2] = 1
Channel axis: 1st axis of the machining plane parallel to the rotary axis
X
[3] = 2
Channel axis: 2nd axis of the machining plane
Y
MD24220 $MC_TRAFO_GEOAX_ASSIGN_TAB_2
[0] = 1
Channel axis: 1st geometry axis
X
[1] = 4
Channel axis: 2nd geometry axis
A
[2] = 3
Channel axis: 3rd geometry axis
Z
MD24850 $MC_TRACYL_ROT_AX_OFFSET_2
= 0
Offset of the rotary axis for the 2nd TRACYL transformation
MD24855 $MC_TRACYL_ROT_SIGN_IS_FRAME_2
= 1
Axial offset for the 2nd TRACYL transformation
MD24860 $MC_TRACYL_ROT_SIGN_IS_PLUS_2
= 1
Sign of the rotary axis for the 2nd TRACYL transformation
MD24870 $MC_TRACYL_BASE_TOOL[ ]
[0] = 0
Vector of the base tool for the 2nd TRACYL transformation in XYZ
[1] = 0
[2] = 0
Note
Data sets for transformations
For both data sets, you can use any transformations from all available transformations
(MD24100 $MC_TRAFO_TYPE_1, MD24200 $MC_TRAFO_TYPE_2, etc.). The two data sets
need not be directly next to each other.
However, the 1st data set must always be used for "Cylinder surface transformation without
groove side offset" (= 512) and the 2nd data set for "Cylinder surface transformation with
groove side offset" (=513).
SINUMERIK Operate
376
Commissioning Manual, 12/2019, 6FC5397-1DP40-6BA3
Technologies and cycles
18.4 Milling
18.4.6
ShopMill cycles for multiple clamping
Software options
You require the following software option in order to use this function: "ShopMill/
ShopTurn"
Function
The Multiple clamping function provides optimized tool change over several workpiece
clampings. On the one hand, this reduces downtimes and, on the other, eliminates tool change
times because a tool performs as many machining operations as possible in all clampings
before the next tool change is initiated.
You can either execute the same program several times for the clampings or you can select
different programs. If you are using large-area fixture plates on your machine, you do not have
to set up anything else.
In the case of rotating clamping devices, on the other hand, you must adapt a cycle to match
the features of the clamping device so as to ensure that the next workpiece can be turned to the
machining position after machining of the previous one (or for multiple clamping devices even
while the current workpiece is being machined).
Procedure for setting up
1. Change the CLAMP.SPF cycle which is stored in the cycle/sc/prog/templates_deu or cycle/
sc/prog/templates_eng directory.
2. Copy the cycle into the user or manufacturer directory.
Example
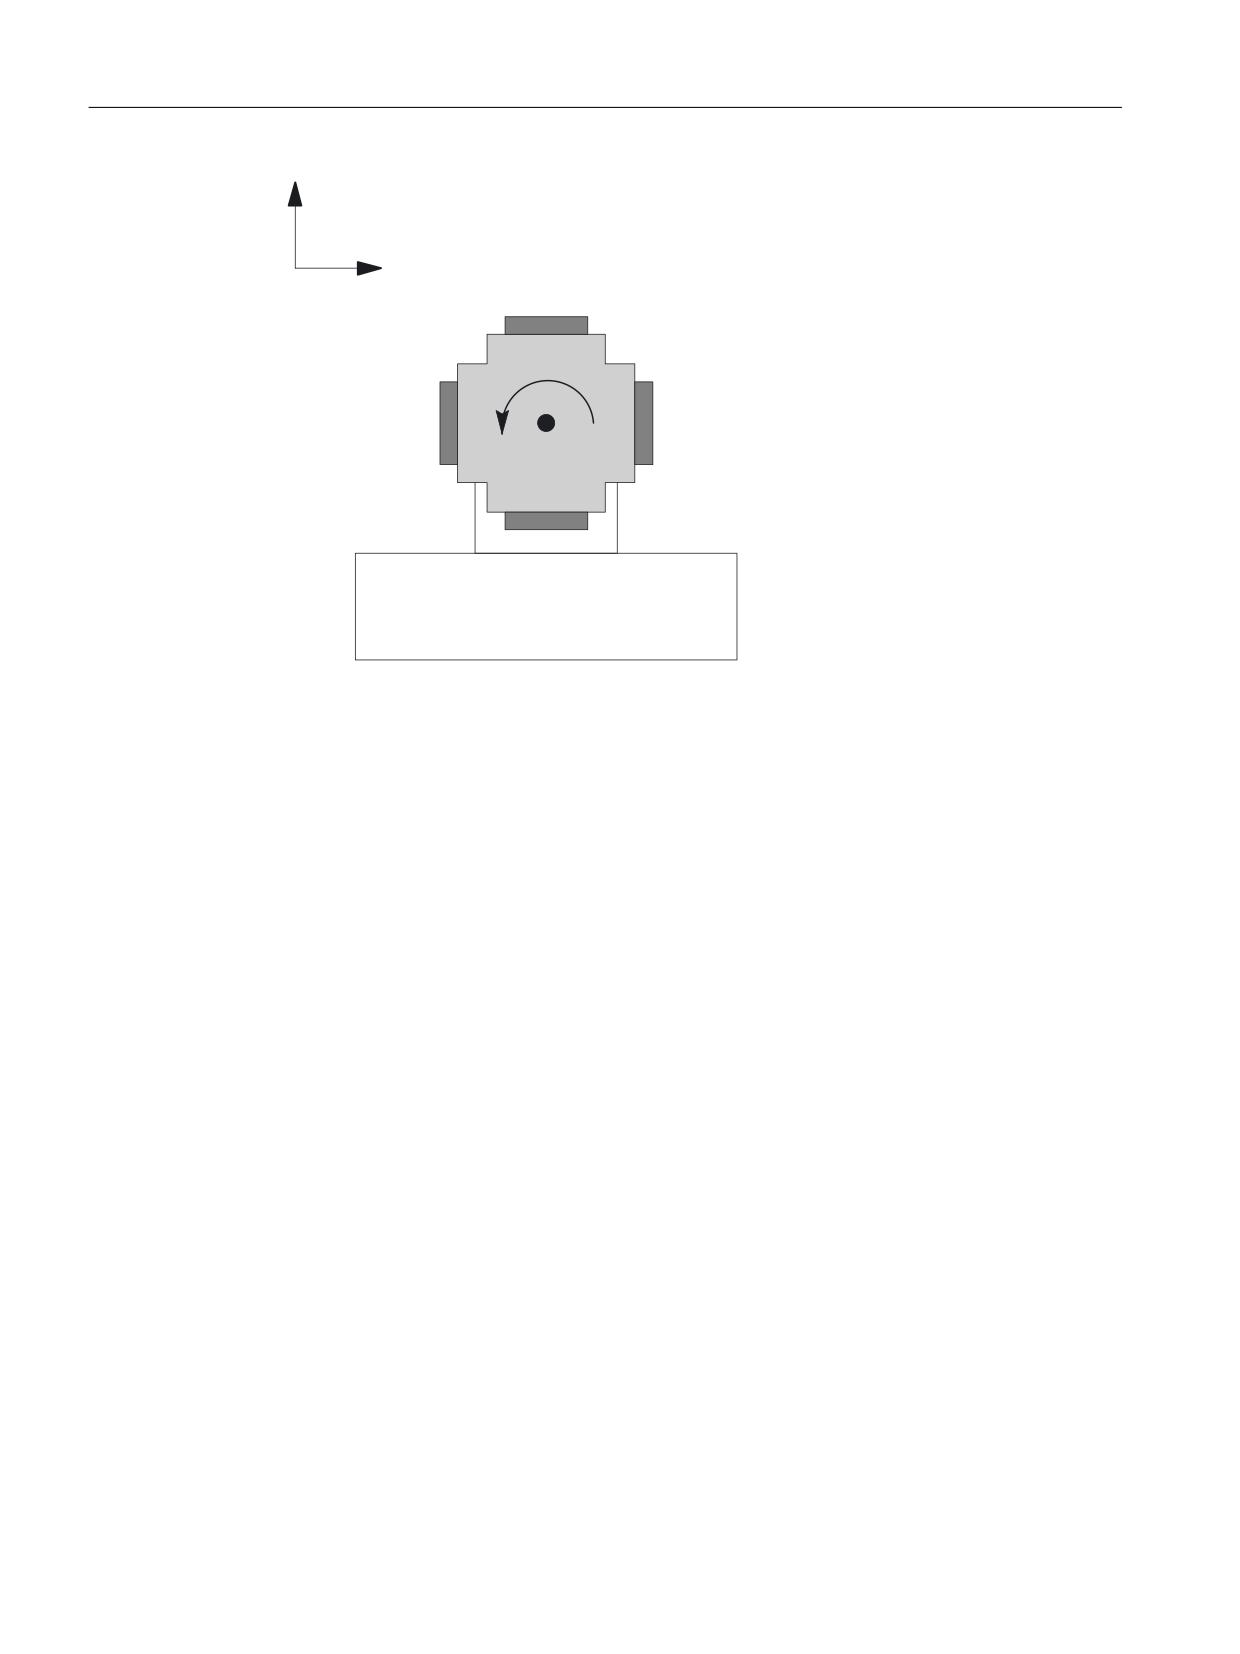
A rotating clamping device (reversible clamping device) is used with four clampings. The
respective clampings can be machined by positioning rotary axis A:
Clamping 1:
A = 0°
Clamping 2:
A = 90°
Clamping 3:
A = 180°
Clamping 4:
A = 270°
SINUMERIK Operate
Commissioning Manual, 12/2019, 6FC5397-1DP40-6BA3
377
Technologies and cycles
18.4 Milling
=
<
&ODPSLQJ
&ODPSLQJ
&ODPSLQJ
5RWDU\ D[LV $
&ODPSLQJ
0DFKLQH WDEOH
Figure 18-3
Rotating clamping device (reversible clamping device)
The cycle CLAMP.SPF must be adapted as follows:
DEF INT _NV ; Auxiliary variable
;------------------------------------
;Adaptation
;
IF _ACT==1
G0 A=DC(0)
ENDIF
;
IF _ACT==2
G0 A=DC(90)
ENDIF
;
IF _ACT==3
G0 A=DC(180)
ENDIF
;
IF _ACT==4
G0 A=DC(270)
ENDIF
SINUMERIK Operate
378
Commissioning Manual, 12/2019, 6FC5397-1DP40-6BA3

Technologies and cycles
18.5 Turning
;
;------------------------------------
_NV=_NPV+_ACT ; Calculate current zero offset
N10 G[8]=_NV ; There must not be a calculation here
RET
18.5
Turning
18.5.1
General
All settings for machine and setting data of the standard cycles are also applicable for milling
under ShopMill and turning under ShopTurn.
18.5.2
Setting up cycles for turning
Setting the coordinate system
MD52000 $MCS_DISP_COORDINATE_SYSTEM
Position of the coordinate system
= 0
Default setting
Examples:
0: Vertical turning machine (carousel-type turning machine)
19: Horizontal turning machine, machining in front of the turning center
34: Horizontal turning machine, machining behind the turning center (inclined bed turning
machine)
A detailed description of MD52000 is given in Section: "Activating turning/milling/drilling/
grinding technologies (Page 353)."
Turning function screen
Enable various functions under the Turning function screen in the following channel-specific
configuration machine data.
MD52218 $MCS_FUNCTION_MASK_TURN
Turning function screen
Bit 0
Enable zoom under manual for tool measurement
Bit 1
Enable part catcher for cut-off
Bit 2
Enable tailstock
Bit 3
Enable spindle control of main spindle via user interface
Bit 4
Enable spindle control of the counterspindle control via user interface
Bit 5
Enable spindle control of the tool spindle via user interface
SINUMERIK Operate
Commissioning Manual, 12/2019, 6FC5397-1DP40-6BA3
379

Technologies and cycles
18.5 Turning
Bit 6
Enable balance cutting for two-channel stock removal
Bit 7
Retraction when cutting along the contour with G1
Bit 8
Enter the spindle chuck data in the program
Bit 9
Additional input of the tailstock data in the program
Bit 10
Enable crowned thread
Bit 12
Deactivate thread synchronization
Bit 13
Cutting along the contour with CYCLE95 (828D programGUIDE without Advanced Tech-
nology
Meaning of the axes
You set the meaning of the axes in machine data MD52206 $MCS_AXIS_USAGE[n].
MD52206 $MCS_AXIS_USAGE[n]
Meaning of the axes in the channel
[n] channel axis number
A detailed description of MD52206 is provided in Chapter "Activating turning/milling/drilling/
grinding technologies (Page 353)
Traversing direction
In order that the user interface and cycles know in which direction the spindles and rotary axes
rotate, the following settings must be made.
You set the direction of rotation of an NC rotary axis via MD32100 $MA_AX_MOTION_DIR.
MD32100 $MA_AX_MOTION_DIR
Traversing direction
-1
Direction reversal
0, 1
No direction reversal
Defining the direction of rotation
In order to ensure that the direction of rotation of the spindle and C axis is correctly displayed
on the user interface and when programming, the correct direction of rotation is executed, you
must make several settings that are coordinated with one another. You must base these
settings on the actual direction of rotation of the spindle/C axis on the machine.
You specify the settings in the following machine data:
MD52207 $MCS_AXIS_USAGE_ATTRIB[n]
Attributes of the axes
[n] channel axis number
Bit 3
Displayed positive direction of rotation is counter-clockwise (for rotary axes)
The view must be from the inside of the machine (operator's view) to the axis of rotation.
Bit 4
Displayed direction of rotation for M3 is counter-clockwise (for spindles)
This bit can be set from the operator's view or according to DIN 66025.
Bit 5
Direction of rotation for M3 corresponds to minus rotary axis (for spindles)
This bit must be set analogous to PLC bit DB31, ... DBX17.6!
SINUMERIK Operate
380
Commissioning Manual, 12/2019, 6FC5397-1DP40-6BA3
Technologies and cycles
18.5 Turning
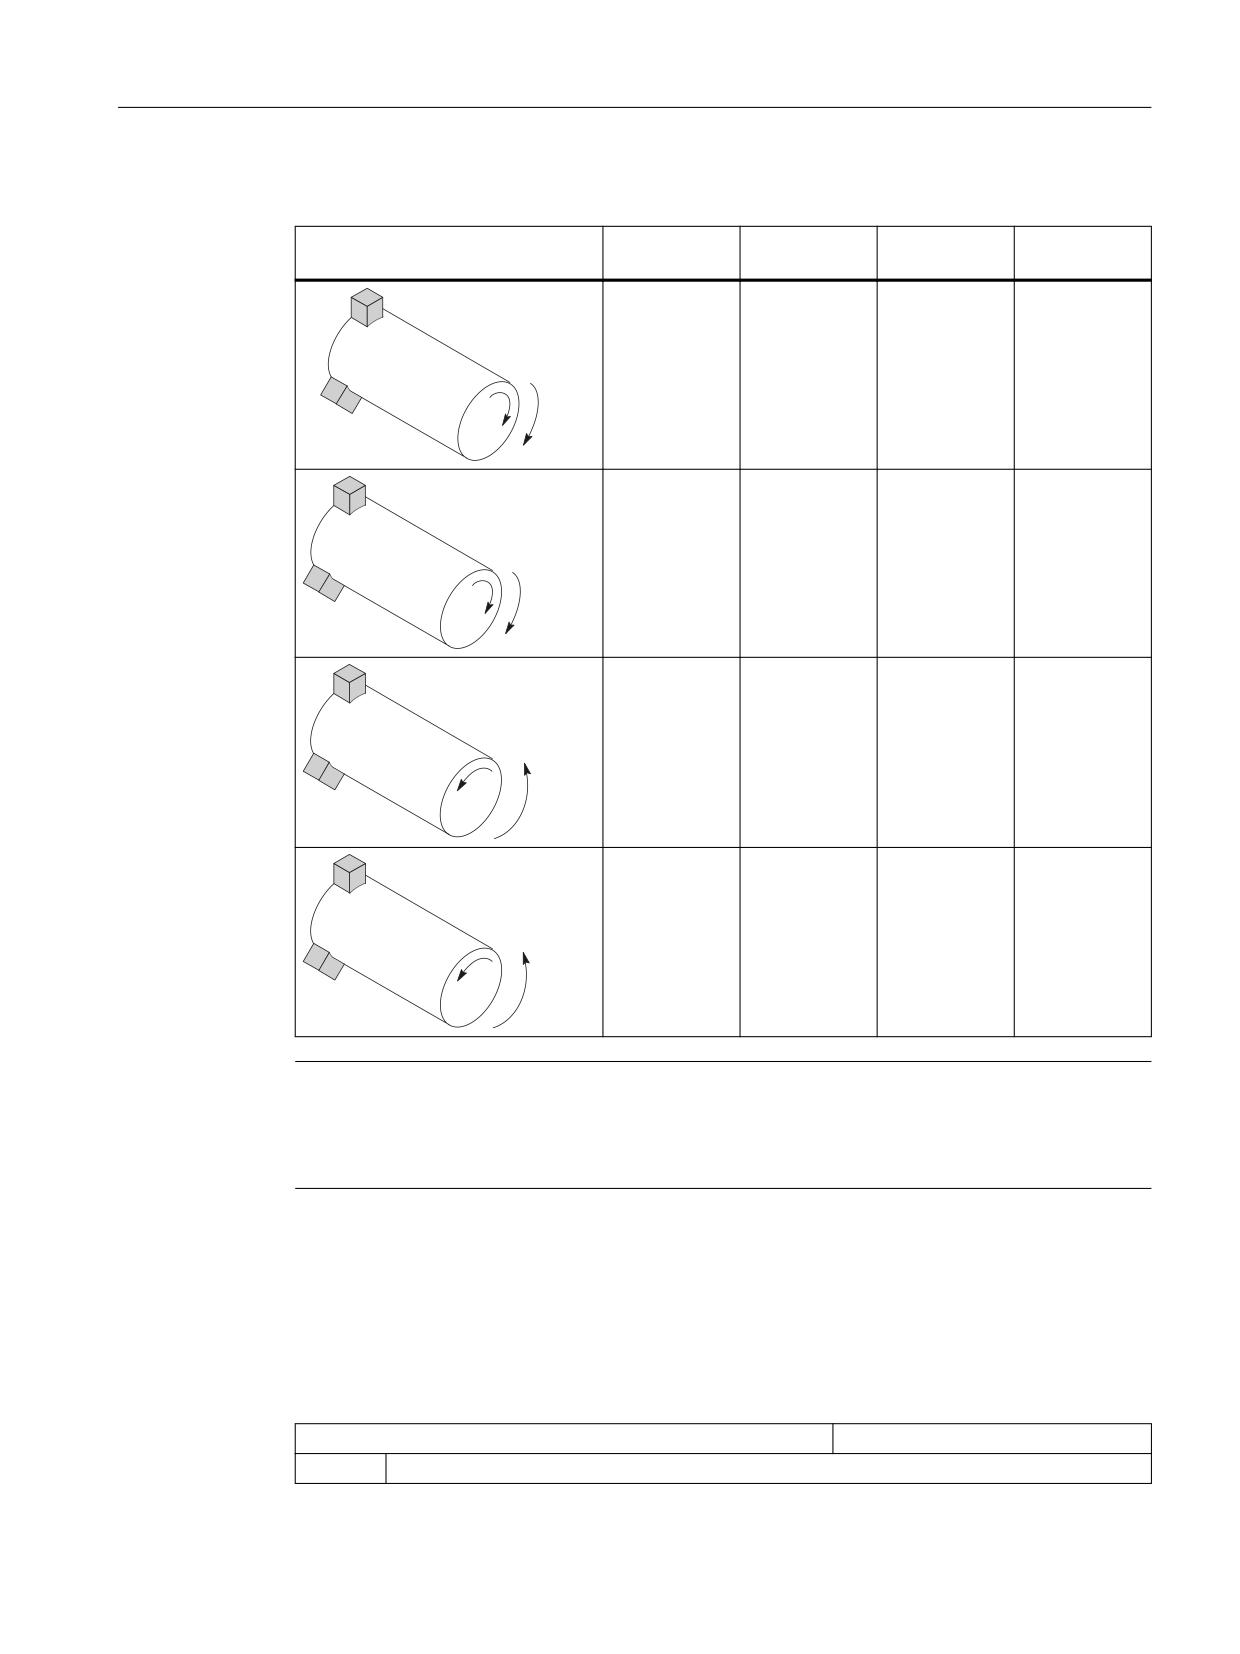
As a result, the following setting options are obtained for the main spindle:
Main spindle direction of rotation
52207[n]
52207[n]
52207[n]
DB31, ...
bit 3 =
bit 4 = *)
bit 5 =
DBX17.6
0
0
0
0
0
&
0
1
1
1
0
&
1
1
0
0
&
0
1
0
1
1
&
0
Note
MD52207[n] bit 4 = *)
Bit 4 can be set from the operator's view (values as specified) or according to DIN ("0" and "1"
are then interchanged).
Dimensions
To define the reference point for moving the counterspindle, you must first communicate the
dimensions of the counterspindle. You can either enter the dimensions in the following axis-
specific cycle machine data or in menu "Parameter" → "Setting data" → "Spindle chuck data".
Changes to the machine data are automatically accepted in the menu and vice versa.
MD53240 $MAS_SPINDLE_PARAMETER[ ]
Spindle chuck data
[0]
Chuck dimensions
SINUMERIK Operate
Commissioning Manual, 12/2019, 6FC5397-1DP40-6BA3
381

Technologies and cycles
18.5 Turning
[1]
Stop dimensions
[2]
Jaw dimensions
MD53241 $MAS_SPINDLE_CHUCK_TYPE[ ]
Spindle jaw type
= 0
Clamping, outer
= 1
Clamping, inner
Additional settings
The M code, e.g. M34 or M1 = 34 for the spindle chuck is defined in the following machine data.
The manufacturer cycle CUST_TECHCYC.SPF also takes the M functions from the following
machine data:
MD52250 $MCS_M_CODE_CHUCK_OPEN[ ]
M code for open chuck with station-
ary spindle
[0]
Main spindle
[1]
Counterspindle
MD52251 $MCS_M_CODE_CHUCK_CLOSE_OPEN_ROT[ ]
M code for open chuck with spindle
rotating
[0]
Main spindle
[1]
Counterspindle
MD52252 $MCS_M_CODE_CHUCK_CLOSE[ ]
M code for close chuck
[0]
Main spindle
[1]
Counterspindle
MD52253 $MCS_M_CODE_TAILSTOCK_FORWARD[ ]
M code for quill forward
[0]
Quill opposite the main spindle
[1]
MD52254 $MCS_M_TAILSTOCK_BACKWARD[ ]
M code for quill back
[0]
Quill opposite the main spindle
[1]
Quill opposite the main spindle
Contour turning (CYCLE952)
SD55212 $SCS_FUNCTION_MASK_TECH_SET
General function screen for all technologies
= 6
Bit 3
Delete programs generated by contour cycles (CYCLE63, CYCLE64, CYCLE952)
= 0
Generated programs are not deleted (compatibility as before)
= 1
Generated programs are deleted as soon as they have been executed by the calling cycle.
SINUMERIK Operate
382
Commissioning Manual, 12/2019, 6FC5397-1DP40-6BA3

Technologies and cycles
18.5 Turning
Rounding the contour
SD55582 $SCS_TURN_CONT_TRACE_ANGLE
Contour turning: Minimum angle for
rounding the contour
= 5
Specifies the angle between the cutting edge and contour, above which for contour turning, the
contour is rounded in order to remove residual material (default value).
SD 55218 $SCCS_FUNCTION_MASK_TURN_SET
Turning function screen
Bit 3
Chamfer in CYCLE930 as chamfer length (CHF)
Bit 4
Retraction from internal machining (CYCLE951)
= 0
Compatibility as before
If, during the cycle, the necessity for tightening is detected at the corner, the tool is retracted
from the internal machining, otherwise it is not.
= 1
Retraction from internal machining is generally in the cutting axis.
18.5.3
Setting-up ShopTurn cycles for turning
MD52210 $MCS_FUNCTION_MASK_DISP
Function screen display
Bit 0 = 1
Dimension system for programs always in the basic system (default setting)
Bit 1 = 1
Face view when turning (default setting)
Bit 4 = 1
Display follow-on tool in the T,F,S window
MD52212 $MCS_FUNCTION_MASK_TECH
Cross-technology function screen
Bit 2
Approach logic for stepped drill
Bit 3
Block search cycle for ShopMill / ShopTurn
= 0
The E__ASUP or F_S_ASUP cycles are not called in the block search cycle
PROG_EVENT.SPF
= 1
The E__ASUP (under ShopMill) or F_S_ASUP (under ShopTurn) cycles are called in the
block search cycle PROG_EVENT.SPF
Bit 4
Approach logic using the cycle
Bit 5
The cycle for SERUPRO (CYCLE207) is called in the block search cycle
PROG_EVENT.SPF.
Bit 3 has no effect when bit 5 is set.
Bit 6
Work offset value WO cannot be entered
Bit 7
Identification of the end of tool lives in the program (ShopMill / ShopTurn)
Bit 8
Manual machine (ShopMill/ShopTurn)
Bit 9
Selection/deselection of the work offset using softkey
Bit 11
Deactivate position check for drilling and milling tools
MD52214 $MCS_FUNCTION_MASK_MILL
Milling function screen
Bit 3
"Inner/rear" machining is enabled in the ShopTurn screens which themselves define the
machining plane.
SINUMERIK Operate
Commissioning Manual, 12/2019, 6FC5397-1DP40-6BA3
383

Technologies and cycles
18.5 Turning
Bit 4
If you have implemented the "Clamp/release spindle" function using the manufacturer
cycle CUST_TECHCYC.SPF, then using this machine data, you can activate the "Clamp/
release spindle" parameter in the drilling and milling screens.
= 0
The "Clamp/release spindle" parameter is not displayed in the drilling and milling screens.
ShopTurn automatically clamps the spindle if it makes sense for the particular machining
operation.
= 1
The "Clamp/release spindle" parameter is displayed in the drilling and milling screens.
You decide for which machining operation the spindle should be clamped.
MD52216 $MCS_FUNCTION_MASK_DRILL
Drilling function screen
Bit 3
Constant cutting speed referred to the diameter of the centering
= 0
Constant cutting speed referred to the diameter of the tool
= 1
Constant cutting speed referred to the diameter of the centering
MD52218 $MCS_FUNCTION_MASK_TURN
Turning function screen
Bit 2
Enable tailstock
Bit 5
Enable spindle control of the tool spindle via user interface
Bit 6
Enable Balance Cutting for two-channel stock removal
MD52229 $MCS_ENABLE_QUICK_M_CODES
Enable fast M commands
= 0
Bit 0
Coolant OFF
Bit 1
Coolant 1 ON
Bit 2
Coolant 2 ON
Bit 3
Coolants 1 and 2 ON
MD52230 $MCS_M_CODE_ALL_COOLANTS_OFF
M code for all coolants off
= 9
This machine data is used to define the M function for switching off the coolant; which is
output when the tool is changed.
MD52231 $MCS_M_CODE_COOLANT_1_ON
M code for coolant 1 on
= 8
This machine data is used to define the M function for coolant 1, which is output when the tool
is changed.
MD52232 $MCS_M_CODE_COOLANT_2_ON
M code for coolant 2 on
= 7
This machine data is used to define the M function for coolant 2, which is output when the tool
is changed.
MD52233 $MCS_M_CODE_COOLANT_1_AND_2_ON
M code for both coolants on
= -1
This machine data is used to define the M function for coolant 1 and 2, which is output when
the tool is changed.
SINUMERIK Operate
384
Commissioning Manual, 12/2019, 6FC5397-1DP40-6BA3

Technologies and cycles
18.5 Turning
SD55505 $SCS_TURN_ROUGH_O_RELEASE_DIST
Retraction distance for stock remov-
al during external machining
= 1
Specifies the distance, by which the tool is retracted from the contour when removing stock
from an outer corner. This does not apply to stock removal at a contour (default value).
= -1
The distance is internally defined.
SD55506 $SCS_TURN_ROUGH_'I_RELEASE_DIST
Retraction distance for stock remov-
al during internal machining
= 0.5
Specifies the distance, by which the tool is retracted from the contour when removing stock
from an internal corner. This does not apply to stock removal at a contour (default value).
= -1
The distance is internally defined.
18.5.4
Setting up a counterspindle
Software option
You require the following software option in order to use the counterspindle on your
machine:
"Generic coupling 'CP-STATIC'" or higher
Function
If your turning machine has a counterspindle, you can machine workpieces using turning,
drilling and milling functions on the front and rear faces without reclamping the workpiece
manually.
Before machining the rear face, the counterspindle must grip the workpiece, pull it out of the
main spindle, and position it at the new machining position.
Meaning of the axes
MD52206 $MCS_AXIS_USAGE[n]
Meaning of the axes in the channel
[n] channel axis number
A detailed description of MD52006 is provided in Chapter "Activating turning/milling/drilling/
grinding technologies (Page 353)".
Traversing direction
In order that the user interface and cycles know in which direction the spindles and rotary axes
rotate, the following settings must be made.
SINUMERIK Operate
Commissioning Manual, 12/2019, 6FC5397-1DP40-6BA3
385
Technologies and cycles
18.5 Turning
You set the direction of rotation of an NC rotary axis via MD32100 $MA_AX_MOTION_DIR.
MD32100 $MA_AX_MOTION_DIR
Traversing direction (not control direction)
-1
Direction reversal
0, 1
No direction reversal
Defining the direction of rotation
You set the directions of rotation for the user interface in the following machine data:
MD52207 $MCS_AXIS_USAGE_ATTRIB[n]
Attributes of the axes in the channel
[n] channel axis number
Bit 3
Displayed positive direction of rotation is counter-clockwise (for rotary axes)
The view must be from the inside of the machine (operator's view) to the axis of rotation.
Bit 4
Displayed direction of rotation for M3 is counter-clockwise (for spindles)
This bit can be set from the operator's view or according to DIN.
Bit 5
Direction of rotation for M3 corresponds to minus rotary axis (for spindles)
This bit must be set analogous to PLC bit DB31, ... DBX17.6!
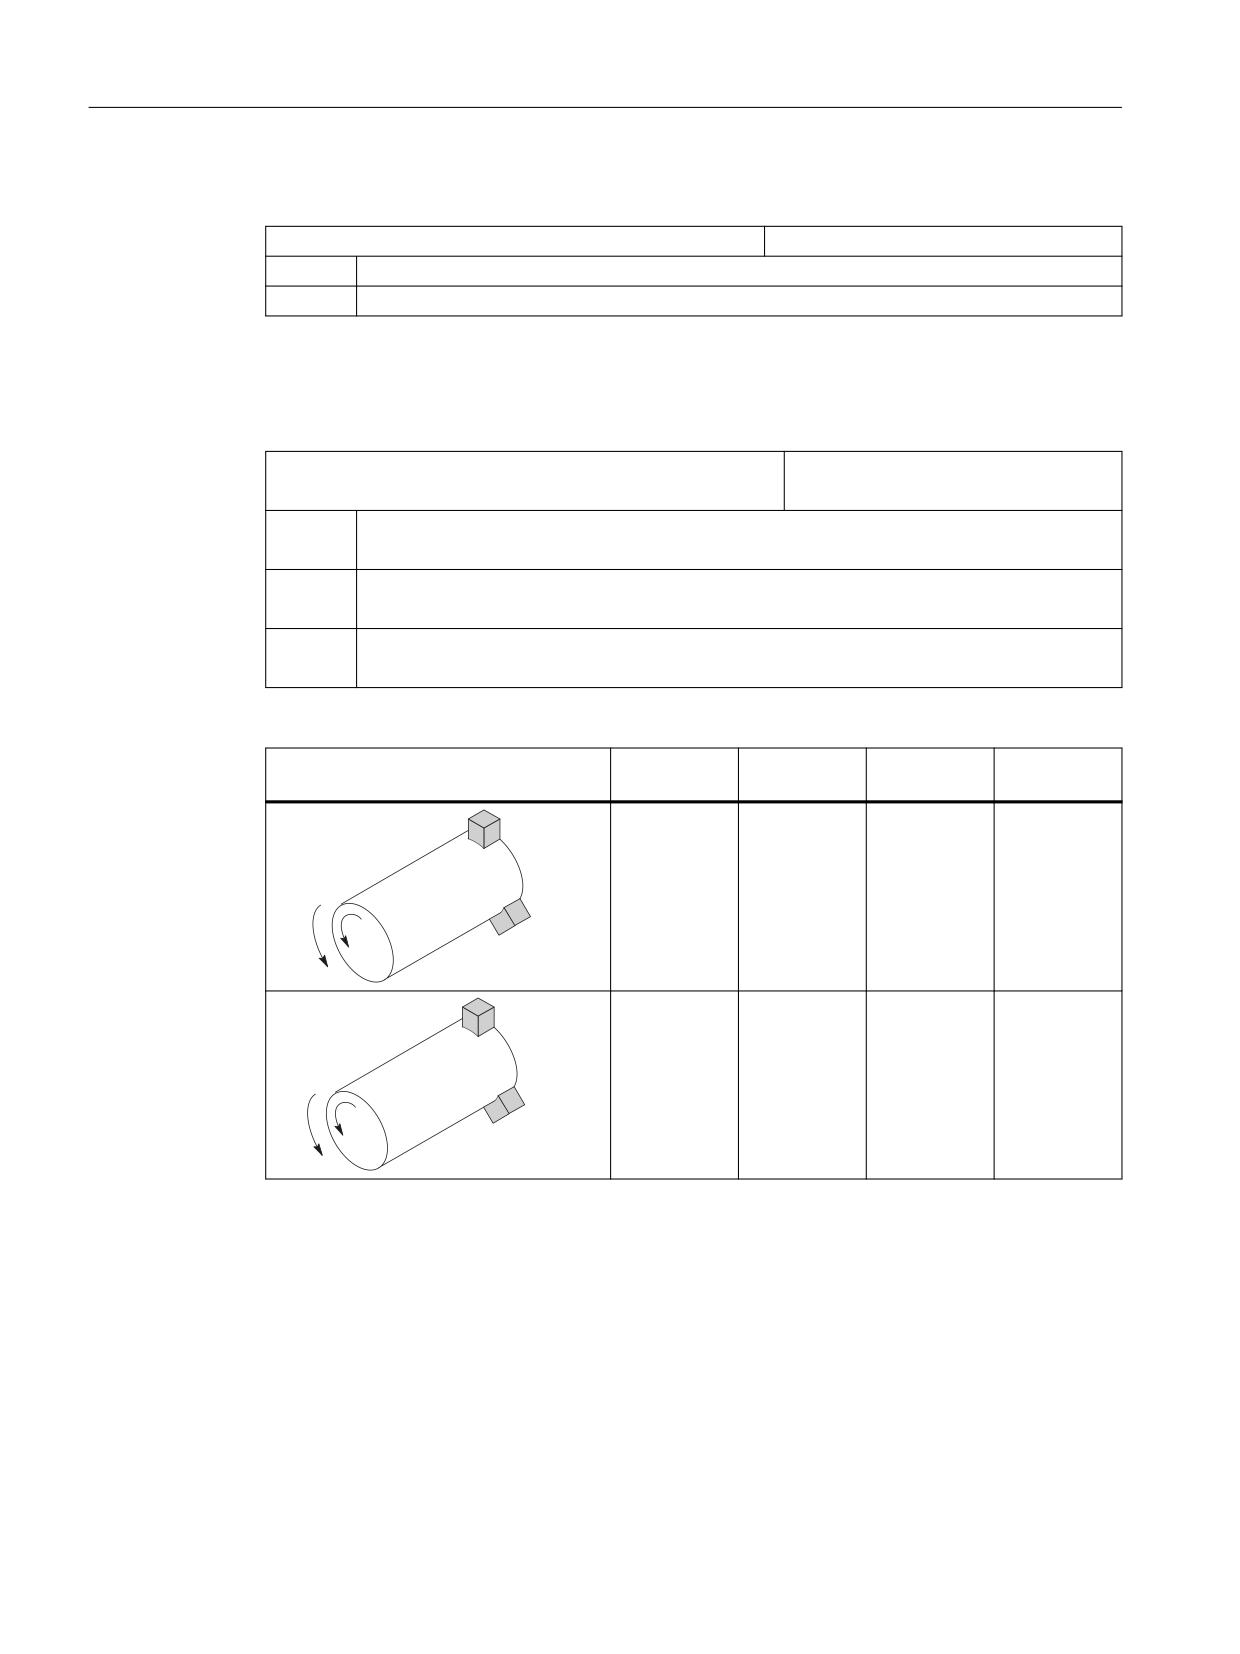
As a result, the following setting options are obtained for the counterspindle:
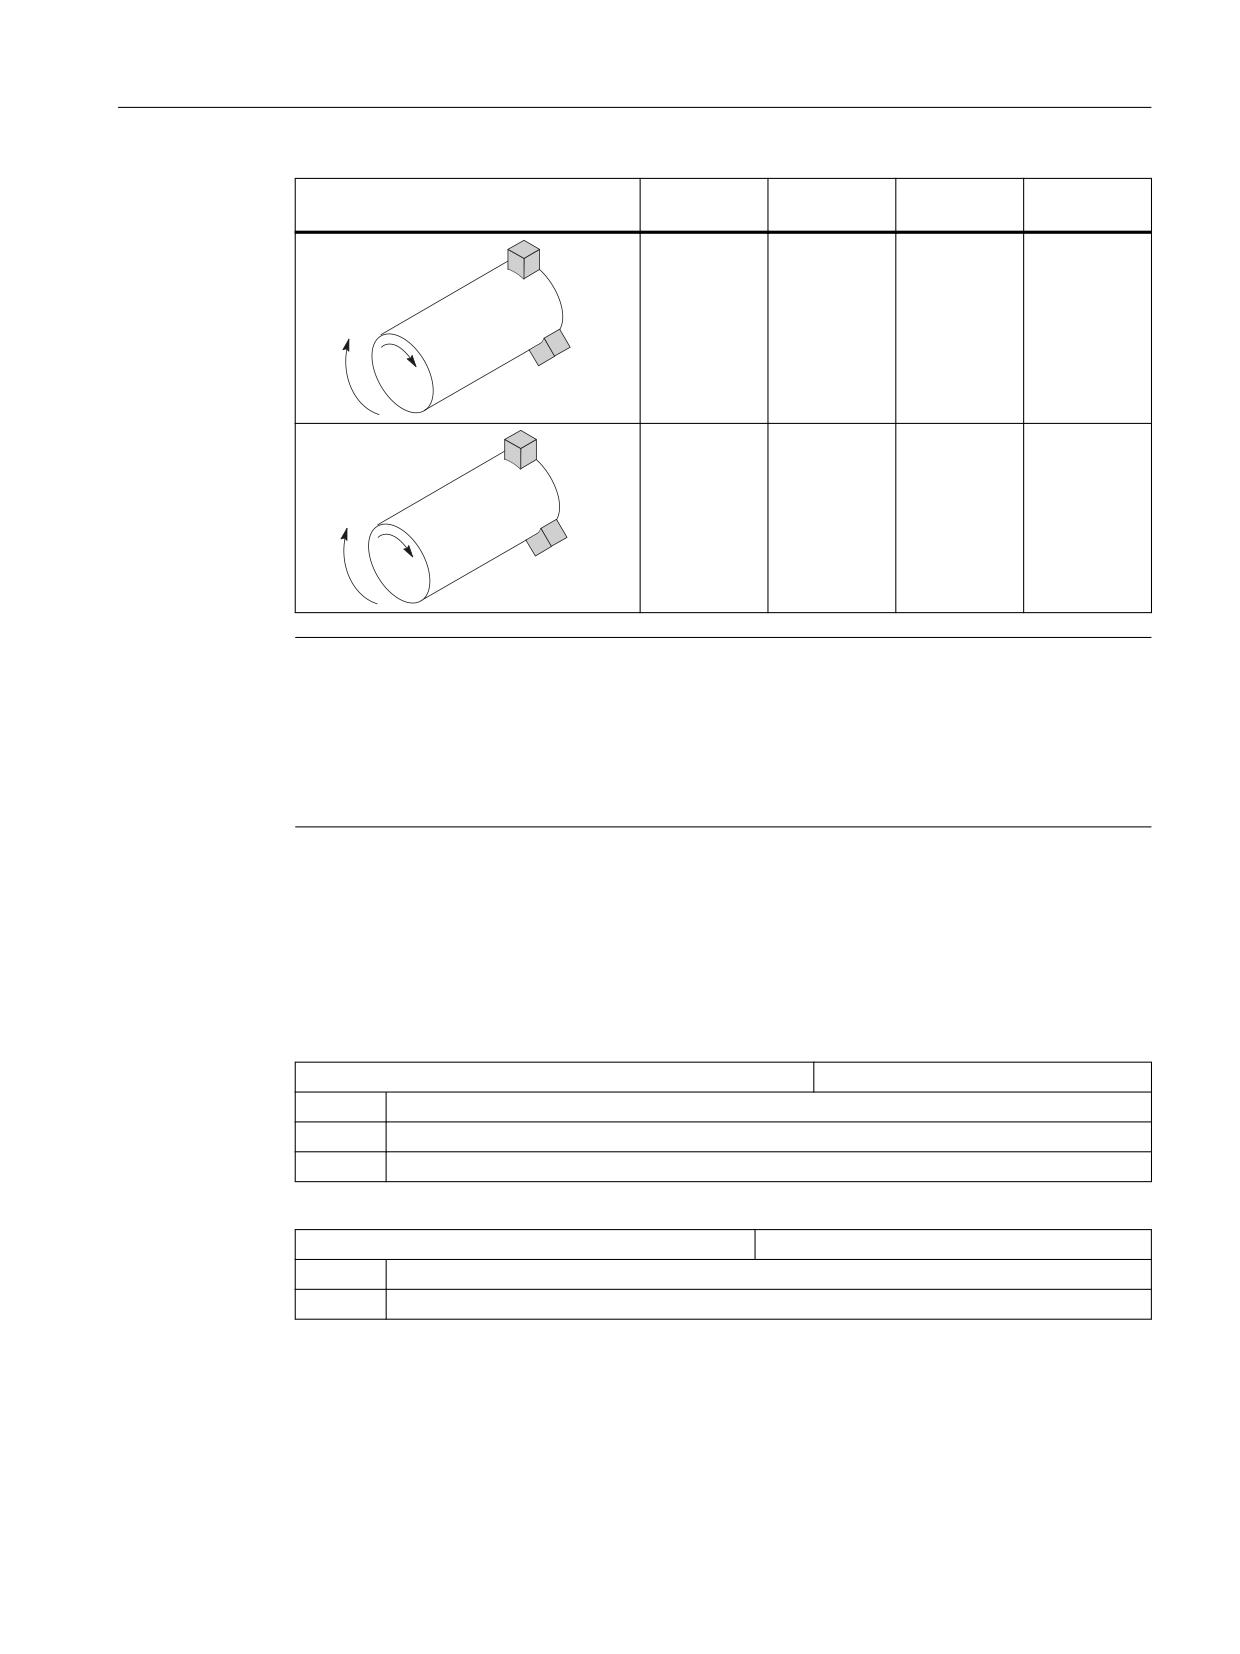
Counterspindle direction of rotation
52207[n]
52207[n]
52207[n]
DB31, ...
bit 3 =
bit 4 = *)
bit 5 =
DBX17.6
1
1
0
0
0
&
1
0
1
1
0
&
SINUMERIK Operate
386
Commissioning Manual, 12/2019, 6FC5397-1DP40-6BA3
Technologies and cycles
18.5 Turning
Counterspindle direction of rotation
52207[n]
52207[n]
52207[n]
DB31, ...
bit 3 =
bit 4 = *)
bit 5 =
DBX17.6
0
0
0
0
&
0
0
1
1
1
0
&
Note
MD52207[n] bit 4 = *)
Bit 4 can be set from the operator's view (values as specified) or according to DIN ("0" and "1"
are then interchanged).
The display must be the same for the main spindle and the counterspindle ("from operator's
view" or "according to DIN").
Dimensions
To define the reference point for moving the counterspindle, you must first announce the
dimensions of the counterspindle. You can either enter the dimensions in the following axis-
specific cycle machine data or in menu "Parameter" → "Setting data" → "Spindle chuck data".
Changes to the machine data are automatically accepted in the menu and vice versa.
MD53240 $MAS_SPINDLE_PARAMETER[ ]
Spindle chuck data
[0]
Chuck dimensions
[1]
Stop dimensions
[2]
Jaw dimensions
MD52241 $MCS_SPINDLE_CHUCK_TYPE
Spindle jaw type
= 0
Clamping, outer
= 1
Clamping, inner
SINUMERIK Operate
Commissioning Manual, 12/2019, 6FC5397-1DP40-6BA3
387

Technologies and cycles
18.5 Turning
18.5.5
Setting up the counterspindle under ShopTurn
Software option
You require the following software option in order to use the counterspindle on your
machine:
"Generic coupling 'CP-STATIC'" or higher
The position to which the counterspindle travels when the program starts is defined in the
following channel-specific cycle setting data:
SD55232 $SCS_SUB_SPINDLE_REL_POS
Retraction position Z for counterspindle
The following channel-specific setting data becomes effective when traveling to the fixed stop:
SD55550 $SCS_TURN_FIXED_STOP_DIST
Distance for travel to fixed stop.
SD55551 $SCS_TURN_FIXED_STOP_FEED
Feedrate for travel to fixed stop.
SD55552 $SCS_TURN_FIXED_STOP_FORCE
Force for travel to fixed stop in %.
Between traveling to the fixed stop and gripping, the counterspindle can retract a short distance
to counteract compressive stress in the workpiece.
SD55553 $SCS_TURN_FIXED_STOP_RETRACTION
Retraction distance before clamping af-
ter fixed stop.
After gripping you can cut off the workpiece. Before doing so, the counterspindle can retract a
short distance with the workpiece to exert tensile stress on the workpiece. This relieves
pressure on the tool when cutting off.
SD55543 $SCS_TURN_PART_OFF_RETRACTION
Retraction distance before cut-off.
After cut-off, you can carry out a cut-off check and for turning, use the "Travel to fixed stop"
function. You can activate/deactivate the cut-off check using the channel-specific cycle setting
data:
SD55540 $SCS_TURN_PART_OFF_CTRL_DIST
Distance for cut-off check.
SD55541 $SCS_TURN_PART_OFF_CTRL_FEED
Feedrate for cut-off check.
SD55542 $SCS_TURN_PART_OFF_CTRL_FORCE
Force for cut-off check in %.
The cut-off is successful when travel to fixed stop fails. The following alarms are output:
Alarm
Alarm text
20091
Axis %1 has not reached the fixed stop.
20094
Axis %1 end stop has been aborted.
You can switch off the alarm display using the following machine data:
MD37050 $MA_FIXED_STOP_ALARM_MASK
Enabling the fixed stop alarms.
= 2
Suppressing alarms 20091 and 20094.
You can set this machine data axis-specifically in the "Machine Data" window in the "Tool zero"
operating area.
SINUMERIK Operate
388
Commissioning Manual, 12/2019, 6FC5397-1DP40-6BA3

Technologies and cycles
18.5 Turning
If, however, the specified force is reached during the cut-off check (i.e. travel to fixed stop is
successful), alarm 61255 "Error during cut-off: Tool break?" is issued.
Note
The "Travel to fixed stop" function can also be used when gripping the spindle (see above). If
travel to fixed stop does not succeed when gripping, an alarm will of course still be issued.
Instead of alarms 20091 and 20094, the alarm 61254 "Error during travel to fixed stop" will be
issued.
Note
MD37050 can also contain values not equal to 2, e.g. 10 = 2 + 8. Make sure that the value 2 is
always contained logically so that the monitoring for travel to fixed stop can be hidden. If
MD37050 does not contain the value 2, the cut-off check is not active.
Machine manufacturer cycle
If you perform one of the following actions, you must adapt the machine manufacturer cycle
CUST_TECHCYC.SPF.
● Switch between spindle and C axis mode for the main spindle or counterspindle.
● Open, close, flush chuck (main spindle / counterspindle).
● Change default settings for the coupling of the main spindle and counterspindle.
Please refer to the following section for the procedure:
Setting-up ShopTurn cycles for turning (Page 383)
18.5.6
Technology cycles for turning
Thread-cutting (CYCLE99)
To correctly machine the thread, it is necessary to set the machine data MD52207
$MCS_AXIS_USAGE_ATTRIB[n] with bit 3, see Chapter: Setting up a counterspindle
(Page 385).
Contour groovingCYCLE930, contour turning CYCLE950, stock removal at corner CYCLE951, contour
turning CYCLE952
SD55500 $SCS_TURN_FIN_FEED_PERCENT
Enter the finishing feedrate for complete ma-
chining, roughing and finishing. The percent-
age of the value corresponds to that entered
under parameter F (feedrate).
= 100
100% finishing feedrate
SINUMERIK Operate
Commissioning Manual, 12/2019, 6FC5397-1DP40-6BA3
389
Technologies and cycles
18.5 Turning
SD55510 $SCS_TURN_GROOVE_DWELL_TIME
Dwell time, which is necessary between
grooving and retracting for grooving technol-
ogy. Tool clearance time during grooving at
the base.
= > 0
Dwell time in seconds
= < 0
Dwell time in spindle revolutions
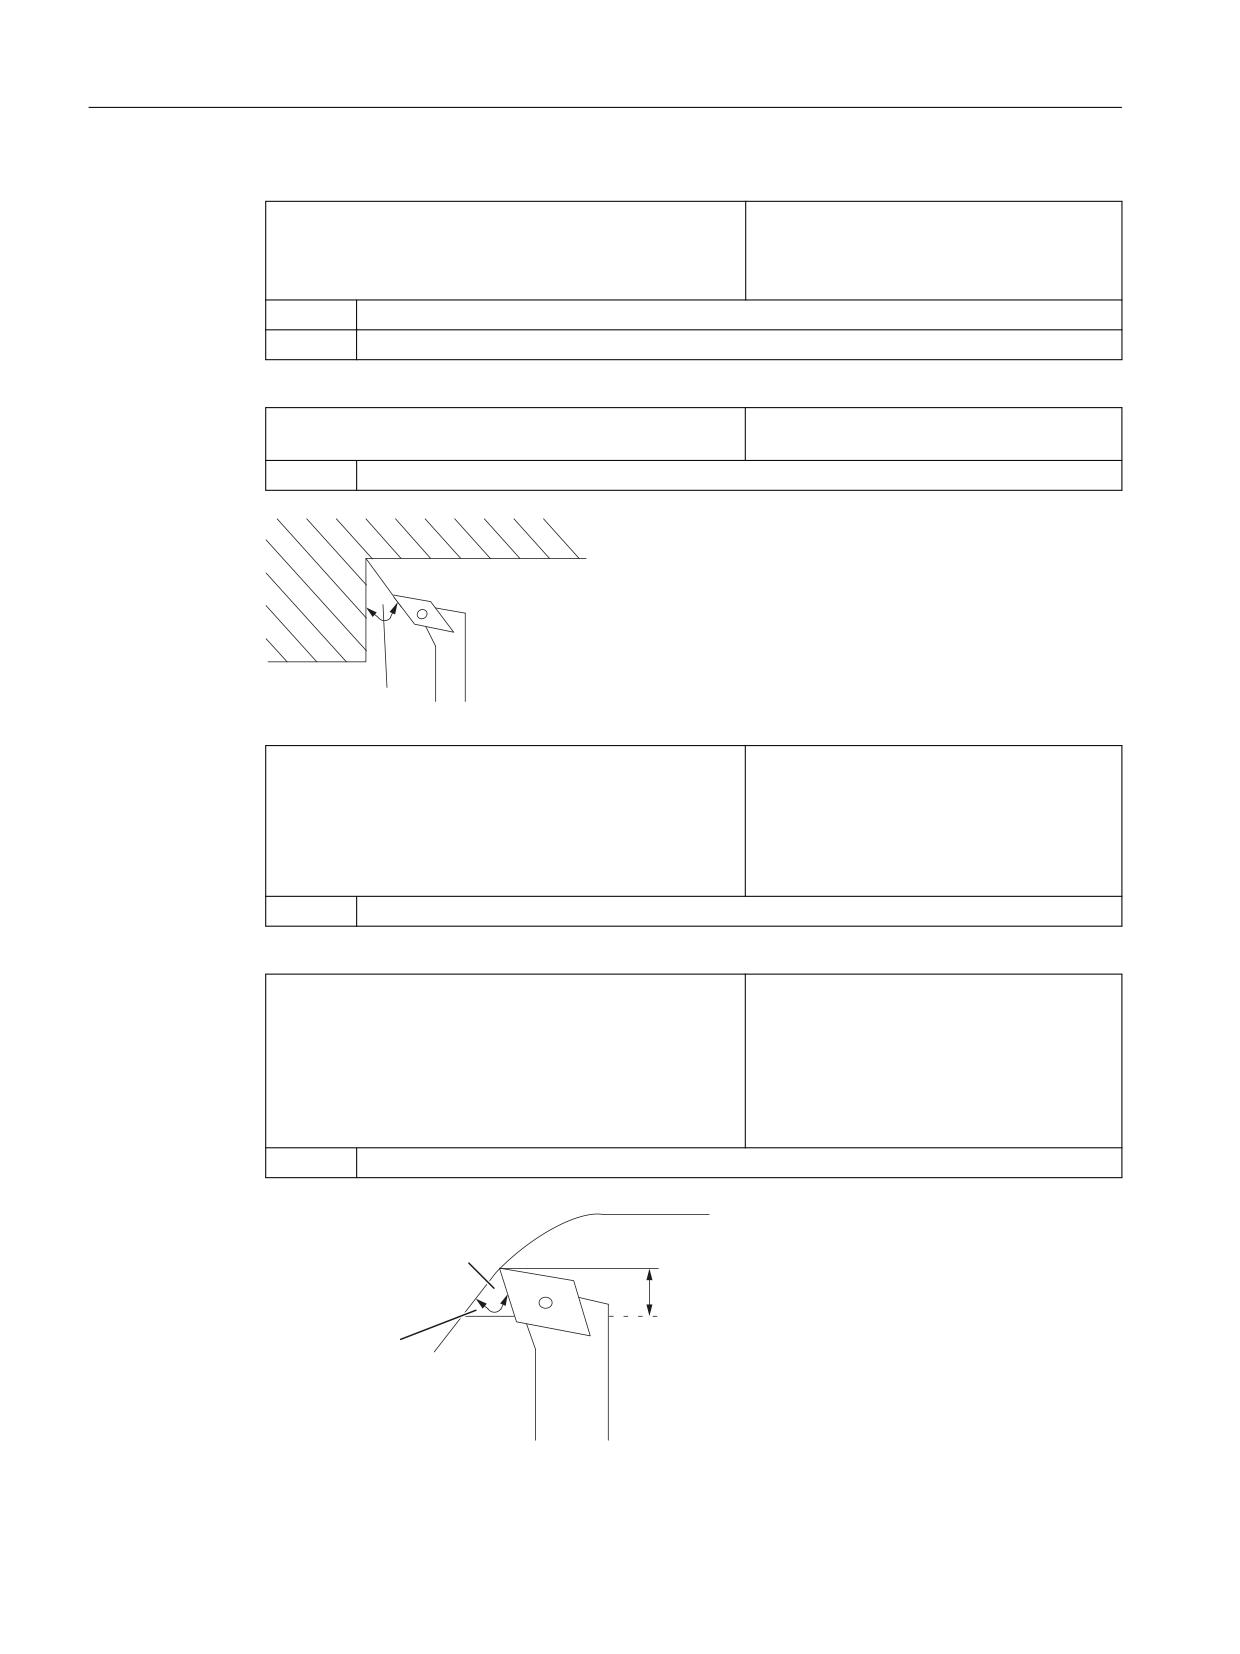
SD55580 $SCS_TURN_CONT_RELEASE_ANGLE
Angle, through which the tool is lifted from
the contour for contour turning, roughing.
= 45
Retraction angle of 45 degrees
Angle
SD55581 $SCS_TURN_CONT_RELEASE_DIST
Amount, by which the tool is lifted when
roughing a contour taking into account the
retraction angle SD55580
$SCS_TURN_CONT_RELEASE_ANGLE.
This also applies to stock removal, grooving
and plunge turning.
= 1
1 mm or 1 inch retraction distance
SD55582 $SCS_TURN_CONT_TRACE_ANGLE
The angle between cutting edge and con-
tour as of which rounding is performed on
the contour during contour turning in order to
remove residual material.
If the angle of the residual material is greater
than that specified in the setting data, the
tool will round the contour.
= 5
5 degree angle
&RQWRXU
$QJOH
&XUUHQW FXWWLQJ GHSWK '
5HVLGXDO PDWHULDO
SINUMERIK Operate
390
Commissioning Manual, 12/2019, 6FC5397-1DP40-6BA3

Technologies and cycles
18.5 Turning
SD55583 $SCS_TURN_CONT_VARIABLE_DEPTH
Percentage of the changing cutting depth
when turning a contour
You can select changing the cutting depth
for stock removal and for removing residual
material.
= 20
20% variable cutting depth
SD55584 $SCS_TURN_CONT_BLANK_OFFSET
Safety clearance when avoiding obstacles,
to avoid collisions during approach or retrac-
tion from the machining.
This also applies to stock removal, grooving
and plunge turning.
= 1
1 mm or 1 inch blank allowance
SD55585 $SCS_TURN_CONT_INTERRUPT_TIME
Time for the feedrate interruption for contour
turning.
This also applies to stock removal, grooving
and plunge turning.
= > 0
Interruption time in seconds
= < 0
Interruption time in revolutions
= 0
No interruption
Note
The channel-specific cycle setting data SD55585 is only evaluated if
SD55586 $SCS_TURN_CONT_INTER_RETRACTION = 0.
SD55586 $SCS_TURN_CONT_INTER_RETRACTION
Retraction distance for contour turning
for feedrate interruption.
This also applies to stock removal,
grooving and plunge turning.
= > 0
Retraction distance at feed interruption
SD55585 $SCS_TURN_CONT_INTERRUPT_TIME has no effect.
= 0
No retraction distance
SINUMERIK Operate
Commissioning Manual, 12/2019, 6FC5397-1DP40-6BA3
391

Technologies and cycles
18.5 Turning
SD55587 $SCS_TURN_CONT_MIN_REST_MAT_AX1
Limit value during contour turning for
removal of residual material in the di-
rection of axis 1 (for G18 Z).
This also applies to residual machining
- stock removal, grooving and plunge
turning.
50
The roughing step for residual machining is not executed, if the material to be removed is less
than 50% of the finishing allowance. The material is only removed when finishing.
Example: If the SD is set to 50% and the final machining allowance is 0.5 mm, any residual material less
than 0.25 mm is not removed with the residual machining - but is removed during finishing. If during a
machining step, less residual material is present than defined in the SD, the error message "No material
present" is issued. This means that this residual material roughing step can be omitted because no
machining is performed.
SD55588 $SCS_TURN_CONT_MIN_REST_MAT_AX2
Limit value during contour turning for
removal of residual material in the di-
rection of axis 2 (for G18 X).
This also applies to residual machining
- stock removal, grooving and plunge
turning.
50
The roughing step for residual machining is not executed, if the material to be removed is less
than 50% of the finishing allowance. The material is only removed when finishing.
As the tool bends during plunge turning, the tool cannot travel right up to the contour during
stock removal. The lateral distance to the last cut by which the next cut is shortened is specified
in the following channel-specific cycle setting data.
SD55595 $SCS_TURN_CONT_TOOL_BEND_RETR
Retraction distance because of tool
bending
0.1
0.1 mm or 0.1 inch retraction distance
SINUMERIK Operate
392
Commissioning Manual, 12/2019, 6FC5397-1DP40-6BA3
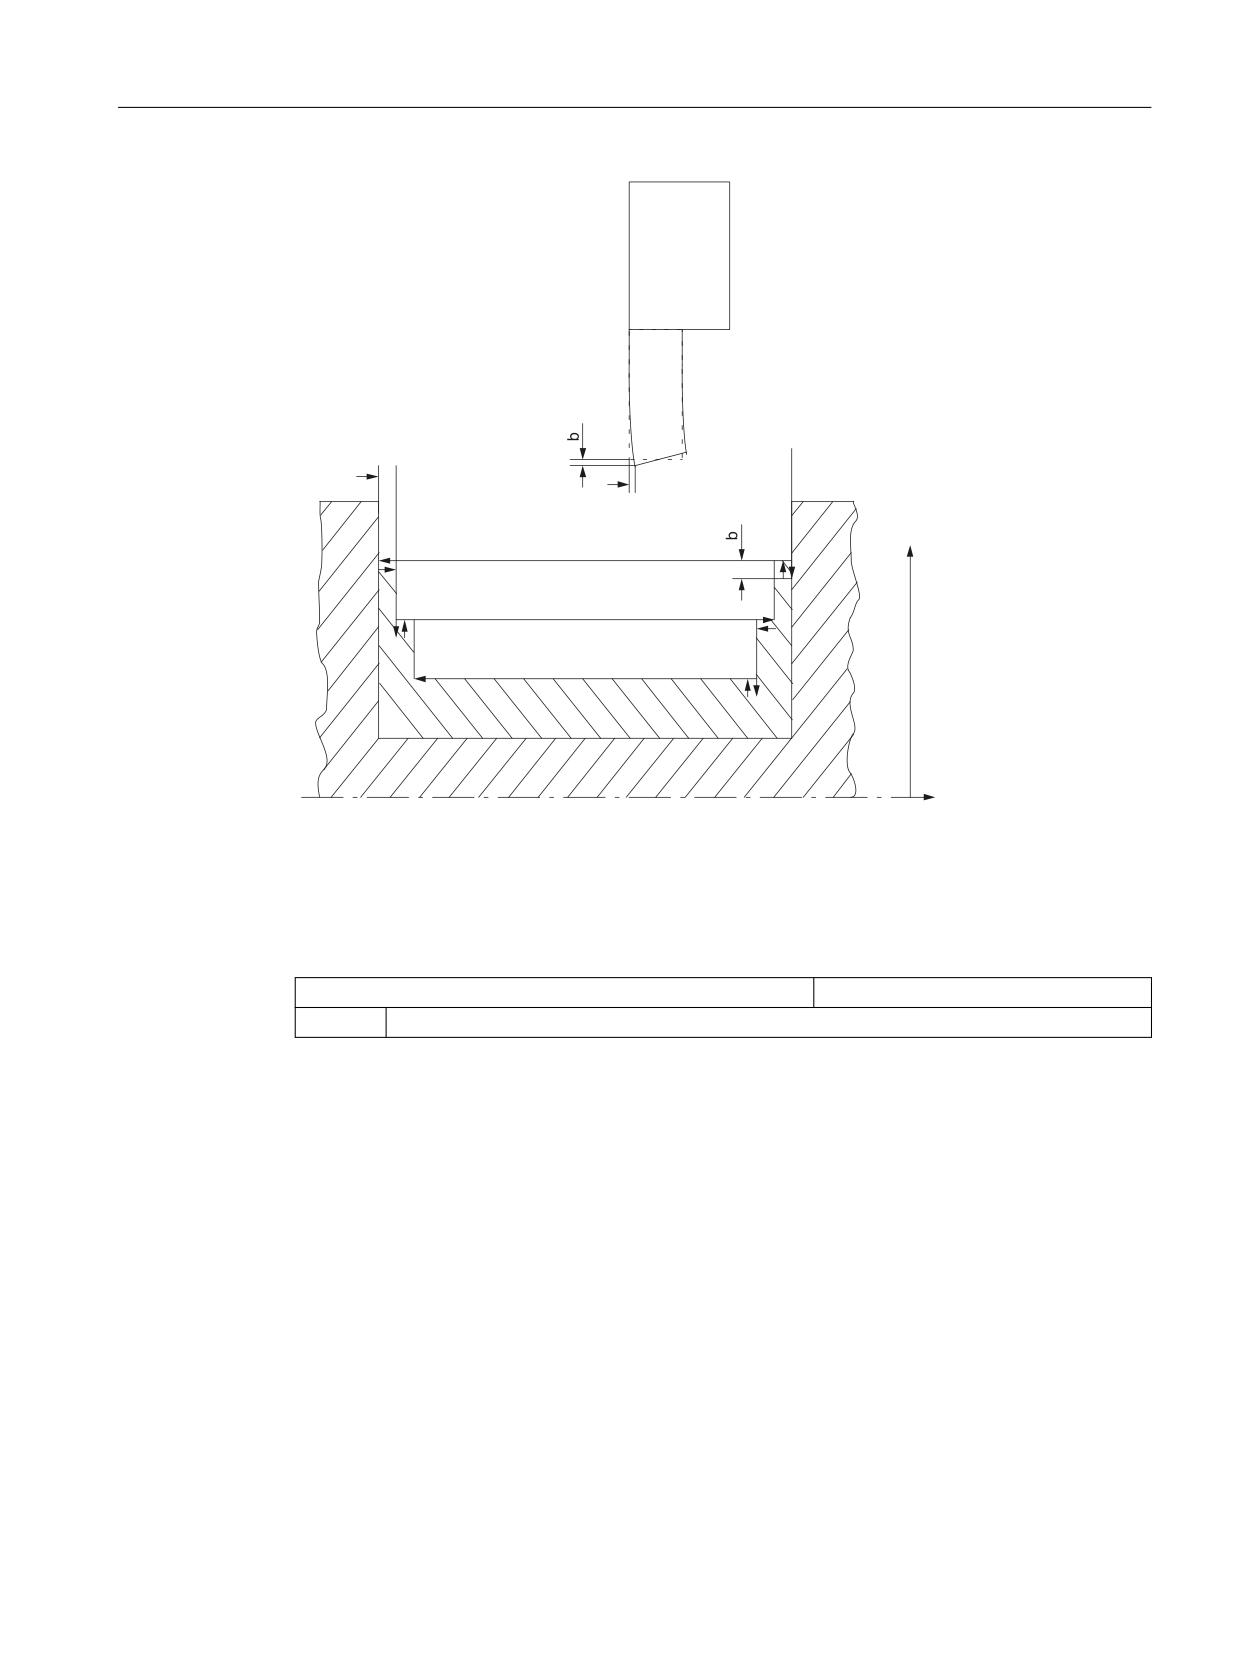
Technologies and cycles
18.5 Turning
a
a
X
Z
a
Distance to the last cut, SD55595
b
Retraction between plunge-cutting and stock removal, SD55596
As the tool bends during plunge turning, the tool would make an excessively deep cut during
stock removal. The retraction distance of the tool between plunge-cutting and stock removal is
specified in the following channel-specific cycle setting data:
SD55596 $SCS_TURN_CONT_TURN_RETRACTION
Retraction depth before turning
= 0.1
0.1 mm or 0.1 inch retraction depth
18.5.7
Axis configuration of a lathe
General configuration
If driven milling tools are available on a lathe, then the following functions can also be set-up on
this machine:
● Cylinder surface transformation (TRACYL) (Page 394)
● End face machining (TRANSMIT) (Page 398)
SINUMERIK Operate
Commissioning Manual, 12/2019, 6FC5397-1DP40-6BA3
393

Technologies and cycles
18.5 Turning
Lathe with X and Z axes, main and tool spindle
For example, for a lathe with X and Z axes, main spindle (C1) and tool spindle (WZ), you can
configure the following channel-specific machine data:
MD20080 $MC_AXCONF_CHANAX_NAME_TAB[ ]
Channel axis name in the channel
[0] = XC
Channel axis XC
[1] = ZC
Channel axis ZC
[2] = C1
Main spindle C1
[3] = WZ
Tool spindle WZ
Lathe with X and Z axes, main and tool spindle and counterspindle
For example, for a lathe with X and Z axes, main spindle (C1), tool spindle (WZ) and
counterspindle (C2), you can configure the following machine data:
MD20080 $MC_AXCONF_CHANAX_NAME_TAB[ ]
Channel axis name in the channel
[0] = XC
Channel axis XC
[1] = ZC
Channel axis ZC
[2] = C1
Main spindle C1
[3] = WZ
Tool spindle WZ
[5] = C2
Counterspindle C2
Lathe with X and Z axes, main and tool spindle and Y axis
For example, for a lathe with X, Z and Y axes, main spindle (C1) and tool spindle (WZ), you can
configure the following machine data:
MD20080 $MC_AXCONF_CHANAX_NAME_TAB[ ]
Channel axis name in the channel
[0] = XC
Channel axis XC
[1] = ZC
Channel axis ZC
[2] = C1
Main spindle C1
[3] = WZ
Tool spindle WZ
[5] = YC
Channel axis YC
18.5.8
Cylinder surface transformation (TRACYL)
Software option
You require the following software option in order to use this function:
"Transmit and peripheral surface transformation"
Function
Using the cylinder surface transformation function (TRACYL), you can machine the peripheral
surface of a turned part.
SINUMERIK Operate
394
Commissioning Manual, 12/2019, 6FC5397-1DP40-6BA3

Technologies and cycles
18.5 Turning
Setting up
General settings for cylinder transformation
MD10602 $MN_FRAME_GEOAX_CHANGE_MODE
Frames when switching over geometry ax-
es.
= 1
The actual total frame (work offsets) and when switching over geometry axes (selecting -
deselecting TRACYL) is recalculated.
MD24040 $MC_FRAME_ADAPT_MODE
Adapting the active frames.
Bit 0 = 1
Rotations in active frames that rotate coordinate axes for which there are no geometry axes,
are deleted from the active frames.
Bit 1 = 1
Shearing angles in active frames are made orthogonal.
Bit 2 = 1
Scaling factors of all geometry axes in the active frames are set to 1.
MD28082 $MC_MM_SYSTEM_FRAME_MASK
Bit 6 = 1
Configuration of the transformation frame for the compensation.
When setting up the functions, you can take the following channel-specific machine data into
account:
MD24300 $MC_TRAFO_TYPE_3
Cylinder surface transformation, main spin-
dle: Transformation 3
= 512
Without groove side offset (without Y axis)
= 513
With groove side offset (with Y axis)
= 514
With or without groove side offset and Y offset
MD24400 $MC_TRAFO_TYPE_4
Cylinder surface transformation, counter-
spindle: Transformation 4
= 512
Without groove side offset (without Y axis)
= 513
With groove side offset (with Y axis)
= 514
With or without groove side offset and Y offset
Note
You must also set up other machine data for each of the individual transformations.
Cylinder surface transformation without groove side offset
MD24300 $MC_TRAFO_TYPE_3
Definition of the 3rd transformation in the
channel.
= 512
TRACYL main spindle.
MD24310 $MC_TRAFO_AXES_IN_3[ ]
Axis assignment for transformation 3.
[0] = 1
Perpendicular to the rotary axis XC
SINUMERIK Operate
Commissioning Manual, 12/2019, 6FC5397-1DP40-6BA3
395

Technologies and cycles
18.5 Turning
[1] = 3
Rotary axis (main spindle) C1
[2] = 2
Parallel to the rotary axis ZC
MD24320 $MC_TRAFO_GEOAX_ASSIGN_TAB_3[ ]
Assignment of geometry axes to channel
axes for transformation 3.
[0] = 1
1st channel axis X
[1] = 3
2nd channel axis Y
[2] = 2
3rd channel axis Z
MD24800 $MC_TRACYL_ROT_AX_OFFSET_1
Offset of the rotary axis for the 1st TRACYL
transformation.
= 0
MD24805 $MC_TRACYL_ROT_AX_FRAME_1
Axial offset of the rotary axis is taken into
account during TRACYL.
= 2
MD24810 $MC_TRACYL_ROT_SIGN_IS_PLUS_1
Sign of the rotary axis for the 1st TRACYL
transformation.
= 1
MD24820 $MC_TRACYL_BASE_TOOL_1[ ]
Vector of the base tool for the 1st TRACYL
transformation.
[0] = 0
[1] = 0
[2] = 0
Setting up cylinder surface transformation under ShopTurn
In addition, set the following channel-specific configuration machine data:
MD52214 $MCS_FUNCTION_MASK_MILL
Milling function screens
Bit 3
Enable "internal / rear" machining in ShopTurn screens that define the machining plane
themselves.
Bit 4
If you have implemented the "Clamp/release spindle" function using the machine manu-
facturer cycle CUST_TECHCYC.SPF, then using this machine data, you can activate the
"Clamp/release spindle" parameter in the drilling and milling screens.
= 0
The "Clamp/release spindle" parameter is not displayed in the drilling and milling screens.
ShopTurn automatically clamps the spindle if it makes sense for the particular machining
operation.
= 1
The "Clamp/release spindle" parameter is displayed in the drilling and milling screens.
The operator decides for which machining operation the spindle should be clamped.
SINUMERIK Operate
396
Commissioning Manual, 12/2019, 6FC5397-1DP40-6BA3

Technologies and cycles
18.5 Turning
Cylinder surface transformation with groove side offset
MD24300 $MC_TRAFO_TYPE_3
Definition of the 3rd transformation in the
channel.
= 513
TRACYL main spindle
MD24310 $MC_TRAFO_AXES_IN_3[ ]
Axis assignment for transformation 3.
[0] = 1
Perpendicular to the rotary axis XC
[1] = 3
Rotary axis (main spindle) C1
[2] = 2
Parallel to the rotary axis ZC
[3] = 6
Parallel to the cylinder surface and perpendicular to the rotary axis ZC
MD24320 $MC_TRAFO_GEOAX_ASSIGN_TAB_3[ ]
Assignment of geometry axes to channel
axes for transformation 3.
[0] = 1
1st channel axis X
[1] = 3
2nd channel axis Y
[2] = 2
3rd channel axis Z
MD24800 $MC_TRACYL_ROT_AX_OFFSET_1
Offset of the rotary axis for the 1st TRACYL
transformation.
= 0
MD24805 $MC_TRACYL_ROT_AX_FRAME_1
Axial offset of the rotary axis is taken into
account during TRACYL.
= 2
MD24810 $MC_TRACYL_ROT_SIGN_IS_PLUS_1
Sign of the rotary axis for the 1st TRACYL
transformation.
= 1
MD24820 $MC_TRACYL_BASE_TOOL_1[ ]
Vector of the base tool for the 1st TRACYL
transformation.
[0] = 0
[1] = 0
[2] = 0
SINUMERIK Operate
Commissioning Manual, 12/2019, 6FC5397-1DP40-6BA3
397

Technologies and cycles
18.5 Turning
18.5.9
End face machining (TRANSMIT)
Software option
You require the following software option in order to use this function:
"Transmit and peripheral surface transformation"
Function
Using the end face machining function (TRANSMIT), you can machine the end face of a turned
part.
Setting up
For general settings for transformations, please refer to Chapter "Cylinder surface
transformation (TRACYL) (Page 394)".
You can make additional settings in the following channel-specific machine data:
MD24100 $MC_TRAFO_TYPE_1
End face machining, main spindle: Trans-
formation 1
= 256
Machining without Y axis
= 257
Machining with Y axis
MD24200 $MC_TRAFO_TYPE_2
End face machining, counterspindle:
Transformation 2
= 256
Machining without Y axis
= 257
Machining with Y axis
MD24110 $MC_TRAFO_AXES_IN_1[ ]
Axis assignment for the 1st transforma-
tion in the channel
[0] = 1
Perpendicular to the rotary axis XC
[1] = 3
Rotary axis (main spindle) C1
[2] = 2
Parallel to the rotary axis ZC
MD24120 $MC_TRAFO_GEOAX_ASSIGN_TAB_1[ ]
Assignment of the geometry axes to chan-
nel axes for transformation 1
[0] = 1
1st channel axis X
[1] = 3
2nd channel axis Y
[2] = 2
3rd channel axis Z
MD24900 $MC_TRANSMIT_ROT_AX_OFFSET_1
= 0
Offset of the rotary axis for the 1st TRANSMIT transformation.
SINUMERIK Operate
398
Commissioning Manual, 12/2019, 6FC5397-1DP40-6BA3

Technologies and cycles
18.5 Turning
MD24905 $MC_TRANSMIT_ROT_AX_FRAME_1
= 2
Axial offset of the rotary axis is taken into account during TRANSMIT 1.
MD24910 $MC_TRANSMIT_ROT_SIGN_IS_PLUS_1
= 0
Sign of the rotary axis for the 1st TRANSMIT transformation.
MD24911 $MC_TRANSMIT_POLE_SIDE_FIX_1
= 1
Limitation of working range in front of/behind the pole, 1st TRANSMIT.
MD24920 $MC_TRANSMIT_BASE_TOOL_1[ ]
Vector of the base tool for the 1st TRANS-
MIT transformation.
[0] = 0
[1] = 0
[2] = 0
TRANSMIT with real Y axis
MD24100 $MC_TRAFO_TYPE_1
= 257
Definition of transformation 1 in the channel: TRANSMIT main spindle.
MD24110 $MC_TRAFO_AXES_IN_1[ ]
Axis assignment for the 1st transforma-
tion in the channel.
[0] = 1
Perpendicular to the rotary axis XC
[1] = 3
Rotary axis C1
[2] = 2
Parallel to the rotary axis ZC
MD24120 $MC_TRAFO_GEOAX_ASSIGN_TAB_1[ ]
Assignment of the geometry axes to chan-
nel axes for transformation 1.
[0] = 1
1st channel axis X
[1] = 3
2nd channel axis Y
[2] = 2
3rd channel axis Z
MD24900 $MC_TRANSMIT_ROT_AX_OFFSET_1
= 0
Offset of the rotary axis for the 1st TRANSMIT transformation.
MD24905 $MC_TRANSMIT_ROT_AX_FRAME_1
= 2
Axial offset of the rotary axis is taken into account during TRANSMIT 1.
SINUMERIK Operate
Commissioning Manual, 12/2019, 6FC5397-1DP40-6BA3
399

Technologies and cycles
18.5 Turning
MD24910 $MC_TRANSMIT_ROT_SIGN_IS_PLUS_1
= 0
Sign of the rotary axis for the 1st TRANSMIT transformation.
MD24911 $MC_TRANSMIT_POLE_SIDE_FIX_1
= 1
Limitation of working range in front of/behind the pole, 1st TRANSMIT.
MD24920 $MC_TRANSMIT_BASE_TOOL_1[ ]
Vector of the base tool for the 1st TRANS-
MIT transformation.
[0] = 0
[1] = 0
[2] = 0
Additional settings for rotary axes
If you want to integrate rotary axes, in addition to the following machine data you also require
MD28082 with bit 6, see Chapter "Cylinder surface transformation (TRACYL) (Page 394)".
MD24906 $MC_TRANSMIT_BASE_TOOL_COMP_1
Compensation of the basic offset in the 1st
transformation frame.
Bit 0
1st geometry axis
Bit 1
2nd geometry axis
Bit 2
3rd geometry axis
MD24956 $MC_TRANSMIT_BASE_TOOL_COMP_2
Compensation of the basic offset in the 2nd
transformation frame.
Bit 0
1st geometry axis
Bit 1
2nd geometry axis
Bit 2
3rd geometry axis
Additional information can be found in Chapter "Clamping a blank (Page 149)".
Face machining under ShopTurn
If you wish to use the face machining function under ShopTurn function, set the following
additional channel-specific configuration machine data:
MD52214 $MCS_FUNCTION_MASK_MILL
Function screens, ShopTurn.
Bit 3
Enable "internal / rear" machining in ShopTurn screens that define the machining plane
themselves.
Bit 4
If you have implemented the "Clamp/release spindle" function using the machine manufac-
turer cycle CUST_TECHCYC.SPF, then using this machine data, you can activate the
"Clamp/release spindle" parameter in the drilling and milling screens.
SINUMERIK Operate
400
Commissioning Manual, 12/2019, 6FC5397-1DP40-6BA3
Technologies and cycles
18.5 Turning
= 0
The "Clamp/release spindle" parameter is not displayed in the drilling and milling screens.
ShopTurn automatically clamps the spindle if it makes sense for the particular machining
operation.
= 1
The "Clamp/release spindle" parameter is displayed in the drilling and milling screens. The
operator decides for which machining operation the spindle should be clamped.
Note
The face end machining is automatically integrated in the cycles, with the exception of the
straight line and circle.
You can select the functions for these two cycles in the "Program" operating area at "Straight
line" and "Circle".
Additional information
You can find additional information about face (end) side machining in the
Function Manual Transformations.
18.5.10
Inclined Y axis (TRAANG)
Software option
You require the following software option in order to use the inclined Y axis function
on your machine:
"Inclined axis"
Function
If your turning machine has an inclined Y axis (i.e. this axis is not perpendicular to axes X and
Z), you can still completely program machining operations in Cartesian coordinates. The
control uses the inclined axis function (TRAANG) to transform the Cartesian coordinates to the
motion of the inclined axis.
Setting up
You still have to set up the inclined axis function (TRAANG) via machine data.
SINUMERIK Operate
Commissioning Manual, 12/2019, 6FC5397-1DP40-6BA3
401

Technologies and cycles
18.5 Turning
Inclined axis under ShopTurn
Please also note the following:
Note
In the user interface, the inclined axis function is automatically integrated in the cycles after
setting up. For machining with inclined axis, in the screen forms of the machining plane, you can
select "Face Y" or "Peripheral surface Y" and enter the Cartesian coordinates.
Additional information
You will find additional information on the inclined Y axis function in:
● Function Manual Transformations
● Programming Manual NC Programming
Example
For example, for a turning machine with X and Z axes and inclined Y axis, main spindle (C) and
tool spindle (WZ), you must configure the following machine data:
MD20050 $MC_AXCONF_GEOAX_ASSIGN_TAB[ ]
Assignment of geometry axis to channel
axis.
[0] = 1
1st real geometry axis X axis.
[1] = 0
2nd real geometry axis Y axis not available.
[2] = 2
3rd real geometry axis Z axis.
MD20110 $MC_RESET_MODE_MASK
Bit 0 = 1
TRAANG is retained after ramp-up.
Bit 7 = 0
MD20112 $MC_START_MODE_MASK
Bit 7 = 1
TRAANG is retained after "Cycle start".
MD20118 $MC_GEOAX_CHANGE_RESET
= 1
Allow automatic geometry axis change.
MD20140 $MC_TRAFO_RESET_VALUE
= 5
TRAANG always active after reset.
MD20144 $MC_TRAFO_MODE_MASK
Bit 0 = 1
TRAANG runs in the backg7round (persistent) and is not shown on the user interface.
SINUMERIK Operate
402
Commissioning Manual, 12/2019, 6FC5397-1DP40-6BA3
Technologies and cycles
18.5 Turning
MD20070 $MC_AXCONF_MACHAX_USED[4]
= 5
Channel axis YC = 5th machine axis.
MD20080 $MC_AXCONF_CHANAX_NAME_TAB[ ]
Name of channel axis in the channel.
[0] = XC
1st channel axis XC
[1] = ZC
2nd channel axis ZC
[2] = C
3rd channel axis C
[3] = WZ
4th channel axis WZ
[4] = YC
5th channel axis YC
Data set for inclined axis:
MD24430 $MC_TRAFO_TYPE_5
= 1024
Transformation 5: TRAANG
MD24432 $MC_TRAFO_AXES_IN_5[ ]
Axis assignment for transformation 5.
[0] = 5
1st transformation axis = channel axis, YC
[1] = 1
2nd transformation axis = channel axis, XC
[2] = 2
3rd transformation axis = channel axis, ZC
MD24434 $MC_TRAFO_GEOAX_ASSIGN_TAB_5[ ]
Assignment of geometry axes to channel
axes for transformation 5.
[0] = 1
1st axis = channel axis XC
[1] = 5
2nd axis = channel axis YC
[2] = 2
3rd axis = channel axis ZC
MD24436 $MC_TRAFO_INCLUDES_TOOL_5
= 0
Tool handling with active 5th transformation.
MD24700 $MC_TRAANG_ANGLE_1
= 55
Angle between 1st and 2nd transformer axis data record for linking (TRACON) of end face
machining on main spindle (TRANSMIT) and inclined axis (TRAANG).
Data set for linking (TRACON) of end face machining on main spindle (TRANSMIT) and
inclined axis (TRAANG):
MD24440 $MC_TRAFO_TYPE_6
= 8192
Type of transformation that is available as sixth in the channel.
MD24444 $MC_TRAFO_GEOAX_ASSIGN_TAB_6[ ]
Assignment of geometry axes to channel
axes for transformation 6.
[0] = 1
1st axis = channel axis XC
SINUMERIK Operate
Commissioning Manual, 12/2019, 6FC5397-1DP40-6BA3
403

Technologies and cycles
18.5 Turning
[1] = 3
2nd axis = channel axis YC
[2] = 2
3rd axis = channel axis ZC
MD24995 $MC_TRACON_CHAIN_1[ ]
Transformation linking
[0] = 1
Number of the TRANSMIT transformation (main spindle) for linking.
[1] = 5
Number of the TRAANG transformation for linking. Data set for linking (TRACON) of
cylinder surface transformation on main spindle (TRACYL) and inclined axis (TRAANG).
Data set for linking (TRACON) of cylinder surface transformation on main spindle (TRACYL)
and inclined axis (TRAANG):
MD24450 $MC_TRAFO_TYPE_7
= 8192
Type of transformation 7 in the TRACON channel.
MD24454 $MC_TRAFO_GEOAX_ASSIGN_TAB_7[ ]
Assignment of geometry axes to channel
axes for transformation 7.
[0] = 1
1st axis = channel axis XC
[1] = 3
2nd axis = channel axis YC
[2] = 2
3rd axis = channel axis ZC
MD24996 $MC_TRACON_CHAIN_2[ ]
Transformation linking
[0] = 3
Number of the TRACYL transformation (main spindle) for linking.
[1] = 5
Number of the TRAANG transformation for linking.
18.5.11
Spindle speed limitation for current program
Speed limits are programmed in the part program. If the part program is applied, the spindle
speed limits are entered in the setting data and saved there after the end of program.
However, if the modified speed limits must not apply after the end of the program, you can
change the property with the following commands in the GUD block of the machine
manufacturer:
Changing spindle speed limits for the current program only
REDEF $SA_SPIND_MAX_VELO_LIMS PRLOC
; maximum spindle speed limit for V
constant (G96)
REDEF $SA_SPIND_MAX_VELO_G26 PRLOC
; maximum spindle speed limit for rpm
(G26)
Additional information
You can find additional information about speed limiting in the
SINUMERIK Operate
404
Commissioning Manual, 12/2019, 6FC5397-1DP40-6BA3
Technologies and cycles
18.6 Grinding
Programming Manual NC Programming.
18.6
Grinding
General
Grinding tools are identified by tool type 400, 410; dressing tools are identified by tool type 490.
The "New tool" function offers these types for selection. The tool list shows the "Grinding disk"
and "Dressing tool" tool types listed according to their tool type. To generate the grinding disk
correction, a tool setter creates a dressing program. Depending on the complexity, the tool
setter makes use of external or internal code generators. This program will be assigned later to
a grinding disk.
Oscillation cycles
These grinding cycles permit the machining of workpieces with grinding machines using two
geometry axes.
The machines type does not exist because the cycles create only an oscillating movement that
can be used as required on every machine.
This requires a SINUMERIK control as well as fast inputs/outputs for the program processing.
The cycles package provides the following cycles:
● CYCLE4071: Longitudinal grinding with infeed at the reversal point
● CYCLE4072: Longitudinal grinding with infeed at the reversal point and measurement
control
● CYCLE4073: Longitudinal grinding with continuous infeed
● CYCLE4074: Longitudinal grinding with continuous infeed and measurement control
● CYCLE4075: Surface grinding with infeed at the reversal point
● CYCLE4077: Surface grinding, plunge grinding with measurement control
● CYCLE4078: Surface grinding with continuous infeed
● CYCLE4079: Surface grinding with intermittent infeed
Oscillation cycles: Activate GUD variables for synchronized actions
MD18661 $MN_MM_NUM_SYNACT_GUD_INT[n]
Number of configurable integer-type
GUD variables
> 0
With the machine data, the individual GUD blocks can be extended by additional channel-
specific parameter areas of the type integer.
[n] is equivalent to the access rights data block
SINUMERIK Operate
Commissioning Manual, 12/2019, 6FC5397-1DP40-6BA3
405

Technologies and cycles
18.6 Grinding
Additional information
You can find additional information about oscillating cycles and GUD variables for
synchronized actions in the:
● Programming Manual NC Programming
● Function Manual Synchronized Actions
Grinding function screen
MD51840 $MNS_GRIND_FUNCTION_MASK
Grinding cycles function screen
Bit 0
Reference point for measuring the dresser/wheel is a work offset
= 0
Deselection of the work offset as reference point
= 1
Selection of the work offset as reference point
MD52840 $MCS_FUNCTION_MASK
Grinding cycles function screen
Bit 7
Retraction when form-truing with G1
= 0
Retraction when form-truing with rapid traverse (G0)
= 1
Retraction when form-truing with feedrate (G1)
Activate and display fit-dependent corrections
Activate fit-dependent corrections
MD18603 $MN_MM_NUM_GLOBAL_G_FRAMES
Number of global grinding frames
(SRAM)
The value corresponds to the number of field elements for the pre-defined field $P_GFR[].
If the value of the data is > 0, then all settable frames are only global. MD28079 is then ignored.
MD28079 $MC_MM_NUM_G_FRAMES
Number of grinding frames (SRAM)
Defines the number of predefined grinding frames.
Display fit-dependent corrections in the operating area "Parameters" → "Work offsets" window:
MD52211 $MCS_FUNCTION_MASK_DISP_ZOA
Function screen Display overview of
work offsets
Bit 22
Display fit-dependent corrections ($P_GFRAME)
Details of disk size
MD52842 $MCS_GRIND_DIAMETER_LENGTH
Number of the tool length for the disk
diameter
= 1
Length 1 is disk diameter
= 2
Length 2 is disk diameter
SINUMERIK Operate
406
Commissioning Manual, 12/2019, 6FC5397-1DP40-6BA3

Technologies and cycles
18.7 Swiveling
MD52843 $MCS_GRIND_WIDTH_LENGTH
Number of the tool length for the disk
width
= 1
Length 1 is disk width
= 2
Length 2 is disk width
Form-truing (CYCLE495)
SD55880 $SCS_GRIND_CONT_RELEASE_ANGLE
Angle of retraction
This setting data is used to specify the angle of retraction from the contour during form-truing.
SD55881 $SCS_GRIND_CONT_RELEASE_DIST
Retraction distance
This setting data is used to specify the distance retracted in both axes during form-truing.
SD55884 $SCS_GRIND_CONT_BLANK_OFFSET
Blank allowance
This setting data is used to specify the distance to the grinding wheel as of which the switch-
over is made from G0 to G1 during form-truing.
18.7
Swiveling
18.7.1
Technology cycles for swiveling
Requirement
The commissioning of the machine kinematics is a mandatory requirement for correct swiveling
functionality (CYCLE800). The vectors of the machine kinematics are stored in the tool
parameters $TC_CARR1 to $TC_CARR65.
Note
The vectors of the machine kinematics can be determined with the "Measure kinematics"
measuring function (CYCLE996).
To activate the swivel function, there must be at least one tool holder that can be oriented
(swivel data set) in the NCK, and the workpiece, tool and rotary table reference system frames
must be activated:
MD18088 $MN_MM_NUM_TOOL_CARRIER
Maximum number of definable tool holders
> 0
SINUMERIK Operate
Commissioning Manual, 12/2019, 6FC5397-1DP40-6BA3
407

Technologies and cycles
18.7 Swiveling
MD28082 $MC_MM_SYSTEM_FRAME_MASK
System frames (SRAM)
= 3DH
Bit 2 = 1
TCARR and PAROT
Bit 3 = 1
TOROT and TOFRAME
Bit 4 = 1
Workpiece reference points
Bit 5 = 1
System frame for cycles
Note
Changing machine data MD18088 and MD28082 causes the buffered memory to be
reorganized.
After changing the machine data, a series start-up file must be generated and downloaded,
otherwise, it can be assumed that data will be lost.
To change machine data, you require the following authorization: Access level 1
(manufacturer).
Additional information
Additional information can be found in:
● File "siemensd.txt" the software supplied (standard cycles)
● Function Manual Tools
● Programming Manual Measuring Cycles
Activating the swivel function
The swivel function is enabled on the user interface via the following channel-machine data:
MD52212 $MCS_FUNCTION_MASK_TECH
General function screen for all technologies
Bit 0 = 1
Enable swivel
Configuring input screens
You can configure the input screen for swiveling using the following channel-specific cycle
setting data. The setting data is effective for all of the declared swivel data sets.
SD55221 $SCS_FUNKTION_MASK_SWIVEL_SET
Function screen, swiveling CYCLE800
Bit 0
Input field "No swiveling"
= 0
Hide
= 1
Display
Bit 1
Select text when retracting "Z, ZY" or "Fixed position 1/2"
= 0
Display text Z = "Z", display text Z, XY = "Z,XY"
= 1
Display text Z = "Fixed point 1", Display text Z, XY = "Fixed point 2".
If you wish to modify the retraction version "Z" or "Z, XY" via the manufacturer cycle
CUST_800.SPF, the neutral text "Fixed point 1" and "Fixed point 2" can be displayed.
SINUMERIK Operate
408
Commissioning Manual, 12/2019, 6FC5397-1DP40-6BA3

Technologies and cycles
18.7 Swiveling
Bit 2
Select, permit "deselection" of the swivel data set
= 0
If deselection is not permitted, the "Swivel data set" (TC) selection field is not displayed in
the "Swivel" input screen.
= 1
Deselection permitted
see also swivel data set parameter $TC_CARR37
HUNDRED MILLIONS position
Bit 3
Displays the active swivel plane under swivel in JOG. The setting in the swivel function
screen acts on all swivel data sets.
Bit 4
Positioning in the basic position (pole position) of the kinematics
= 0
Evaluation of the input values in pole position of the machine kinematics
= 1
Compatibility
Bit 5
Tool alignment absolute or via frame calculation
= 0
Tool alignment via frame calculation (TCOFRY for G18)
= 1
Tool alignment absolute (TCOABS)
For B axis kinematics of a turning machine, the tool spindle can be set in the basic position
of the kinematics, either parallel to Z or to X. Therefore, the function "Align milling tool" is
required for rotary milling machine bit 5 = 1.
Bit 6
Do not list swivel mode "direct" under swivel in JOG
Bit 7
Swivel plane: Direction selection in basic position of the kinematic
= 0
With direction selection + or -, both calculated solutions for the rotary axes are approached
= 1
With direction selection + or -, only one of the calculated solutions for the rotary axes is
approached
Bit 8
Traverse the work offset of the rotary axes of the swivel data set as offset
= 0
Only take the work offset for the rotary axes of the swivel data set into account in the WCS
(compatibility)
= 1
Traverse the work offset of the rotary axes of the swivel data set as offset
Bit 8 is set in conjunction with MD21186.
Bit 9
Swivel data set TC permanently assigned to the tool
= 0
Show number of the swivel data set TC
= 1
Do not show number of the swivel data set TC
The swivel data set is assigned to the tool with parameter SGUD_TC_GNO if technology
MD52200 = 3 is set for cylindrical grinding.
Example:
The machine manufacturer can write the current tool _TC_GNO = $P_TOOLNO into pa-
rameter _TC_GNO in the tool change program L6. As a result, the tool holder will be
updated whenever a tool is changed.
Bit 10
Swivel plane: Show input field "Positioning direction"
= 0
Input field "Positioning direction" is not displayed
= 1
Input field "Positioning direction" is displayed with swivel table and swivel head/table
combinations
The selected positioning direction is stored in GUD _TC_POS_DIR and can be evaluated
in CUST_800:
_TC_POS_DIR = 0: Automatic (shortest path)
_TC_POS_DIR = -1: Direction -
_TC_POS_DIR = +1: Direction +
The function must be implemented by the manufacturer.
Bit 11
Positioning both solutions of AB kinematics
SINUMERIK Operate
Commissioning Manual, 12/2019, 6FC5397-1DP40-6BA3
409

Technologies and cycles
18.7 Swiveling
= 0
Positions only one solution of some swivel angles (compatibility)
= 1
Positions both solutions calculated by the NC
Bit 11 should be set for kinematics = 1 where, in the kinematics basic setting, neither of the
two rotary axes rotates about the tool axis (AB kinematics in tool axis in the Z direction)
Bit 12
Swivel plane, align tool: Reset behavior takes account of rotary axis positions
= 0
Reset condition refers to the final position of the rotary axes of the swivel data set (com-
patibility)
Linear axis identifiers are written into parameters $TC_CARR21/22. On reset (TCOABS),
the tool holder is initialized with the final positions of the rotary axes ($TC_CARR13/14).
= 1
Reset condition refers to the current position of the rotary axes of the swivel data set
The rotary axis names of the swivel data set are written into parameters $TC_CARR21/22.
On reset (TCOABS), the tool holder is initialized with the actual values of the rotary axes.
Bit 13
Activates the extended evaluation of rotations for axis-by-axis swiveling in the pole position
= 0
The rotations when swiveling in the pole position (compatibility) are not evaluated, the
settings of bits 4 and 11 apply
= 1
Extended evaluation of rotations when swiveling in the pole position
Using the following channel-specific setting data, you can set which status the selection "Axis
sequence" assumes in the input screen form "Swivel plane" when actuating softkey "Initial
setting":
SD55423 $SCS_MILL_SWIVEL_RESET_SEQ_AXIS
Swivel initial setting Axis sequence
= 0
X Y Z
= 1
X Z Y
= 2
Y X Z
= 3
Y Z X
= 4
Z X Y
= 5
Z Y X
Additional settings
For the swivel function, set the following machine data as a minimum to the following - although
this deviates from the default value:
MD10602 $MN_FRAME_GEOAX_CHANGE_MODE
= 1
The actual total frame (work offsets) is recalculated when switching over geometry axes
(selecting/deselecting TRAORI).
MD10760 $MN_G53_TOOLCORR
Method of operation with G53, G153 and
SUPA
Bit 0 = 1
If the machine axis/axes are to be retracted before swiveling, see Chapter "Manufacturer
cycle CUST_800.SPF (Page 438)"
MD11450 $MN_SEARCH_RUN_MODE
Settings, block search
Bit 1 = 1
Activate PROG_EVENT.SPF after block search. This means that for a block search, the
rotary axes of the active swivel data set are pre-positioned.
SINUMERIK Operate
410
Commissioning Manual, 12/2019, 6FC5397-1DP40-6BA3
Technologies and cycles
18.7 Swiveling
Declare swivel data sets
For the swivel function, swivel data sets must be created in the NCK and declared in the
following machine data.
MD18088 $MN_MM_NUM_TOOL_CARRIER
Maximum number of definable tool holders
that can be oriented.
Number of swivel data sets
If several channels are declared in the NCU, the number of swivel data sets is split up, taking
MD28085 $MN_MM_LINK_TOA_UNIT into account.
Example 1:
Machine has two channels with different TO units.
Channel 1: MD28085 $MN_MM_LINK_TOA_UNIT= 1
Channel 2: MD28085 $MN_MM_LINK_TOA_UNIT= 2
Three swivel data sets (SDS) are required for each TO unit.
MD18088 = (number of TO units) x (number of SDS per TO unit) = 2 x 3 = 6
Example 2:
Machine has three channels with two different TO units.
Channel 1: MD28085 $MN_MM_LINK_TOA_UNIT= 1
Channel 2: MD28085 $MN_MM_LINK_TOA_UNIT= 2
Channel 3: MD28085 $MN_MM_LINK_TOA_UNIT= 1
One swivel data set (SDS) is required for each TO unit.
MD18088 = (number of TO units) x (number of SDS per TO unit) = 2 x 1 = 2
Using angular tools
Angular tools are created and managed in the NC with tool type 130. The tool lengths are
entered in the tool of tool type 130. If an angular tool is also used on a swiveled machining plane
(CYCLE800), the basic tool orientation must be enabled with
MD18114 $MM_ENABLE_TOOL_ORIENT = 2. This enables a direction vector to be
transferred to the tool in the tool parameters $TC_DPV3[n] to $TC_DPV5[n]. The TOROT
(G17), TOROTY (G18), and TOROTX (G19) commands must be programmed for the tool
change so that the basic tool orientation is updated.
n = internal tool number
MD18114 $MM_ENABLE_TOOL_ORIENT
Assign orientation to cutting edges.
Basic tool orientation
= 0
No basic tool orientation active
= 2
Basic tool orientation active
Used for angular tools and swiveling
SINUMERIK Operate
Commissioning Manual, 12/2019, 6FC5397-1DP40-6BA3
411

Technologies and cycles
18.7 Swiveling
MD20110 $MC_RESET_MODE_MASK
Initial control setting for RESET and end of
part program
Bit 14 = 1
Calculation of the basic and system frames, example: 4041H.
MD20112 $MC_START_MODE_MASK
Basic control setting for START and part
program.
400H
MD20126 $MC_TOOL_CARRIER_RESET_VALUE
Active tool holder at RESET.
= 0
No active tool holder at RESET.
= > 0 (n)
Tool holder with number n active at RESET.
MD20126 is written to in CYCLE800.
CYCLE800() corresponds to deselect tool holder (MD20126 = 0).
MD20150 $MC_GCODE_RESET_VALUES[ ]
Delete position, G group.
[41] = 1
Delete position, G group 42 on TCOABS
[51] = 2
Initial setting of G group 52 on PAROT
[52] = 1
Delete position, G group 53 on TOROTOF
[52] = > 1
Delete position, G group 53 on TOROT, TOROTY or TOROTX
Used for machine kinematics, types "T" and "M".
See parameter $TC_CARR34
Note
If, after a RESET from the NC, a frame must be calculated in the tool direction, then
MD20150 $MC_GCODE_RESET_VALUES[52] can be set to a value > 1.
Applications:
● Machine kinematics with Hirth joint
● Angular tool with basic tool orientation
Note on kinematics (swivel head / mixed kinematics) with Hirth joint:
Depending on the active plane (G17, G18, G19), the TOROT command (or TOROTX,
TOROTY) is programmed in the NCU (G group 53) to calculate the compensating frame for the
Hirth joint in CYCLE800. If the Hirth joint causes the programmed rotation to deviate from the
possible positions of the rotary axes, a $P_TOOLFRAME compensating frame is created for
swivel head and mixed kinematics (see HMI active ZO / details tool reference).
If the compensating frame must be retained after RESET or end of part program, enter the
following value in the channel-specific machine data:
MD20150 $MC_GCODE_RESET_VALUES[52]
Reset behavior of the G groups
= 2
For G17 (TOROT)
= 3
SINUMERIK Operate
412
Commissioning Manual, 12/2019, 6FC5397-1DP40-6BA3

Technologies and cycles
18.7 Swiveling
= 4
For G18 (TOROTY)
= 5
For G19 (TOROTX)
MD20196 $MC_TOCARR_ROTAX_MODE
Rotary axis mode for oriented tool holders
Bit 0 = 1
Swivel data set with a rotary axis
used for a rotary table with C axis
Bit 1 = 1
Swivel data set with two rotary axes
used for standard swiveling
Bit 2
= 1
In a singular position, for which there is an unambiguous solution due to the alignment
of the coordinate axes that are vertical to the orientation, the value 1 is displayed in the
system variable $P_TCSOL as the number of solutions.
= 0
This version is required to ensure compatibility with older software versions. Two sol-
utions are displayed; the angles about the orientation axis differ by 180 degrees.
MD20360 $MC_TOOL_PARAMETER_DEF_MASK
Tool parameter setting
Bit 10 = 1
The orientation vector remains at T0 or D0 (no tool).
Used for machine kinematics, types "T" and "M".
See parameter $TC_CARR34
Bit 19 = 1
The changed orientation vector remains at T0 or D0 (no tool).
Bit 19 acts only with bit 10 = 1.
MD21186 $MC_TOCARR_ROT_OFFSET_FROM_FR
Offset of the rotary axes for an oriented
tool holder from the work offset of the ro-
tary axis.
= 0
In CYCLE800, the WCS is recalculated when there is a value in the work offset (WO) of
the rotary axes.
If values are entered in the work offset of the rotary axes of the active swivel data set,
the basic position of the swivel data set and therefore also the basic position of the WCS
can change.
= 1
A value in the ZO of the rotary axes acts as offset of the oriented tool holder. The Work
remains unchanged.
MD21186 may not be rewritten in a program with call CYCLE800.
The setting MD21186 = 0 is only suitable for a swivel data set in which one of the available
rotary axes rotates exactly around the tool axis. In this way, a useful rotation of the WCS can
be calculated in CYCLE800 when values are entered in the work offset of the rotary axes. For
example, for a swivel table with rotary axis A around X and rotary axis C around Z for a basic
position of the kinematics in G17.
If several swivel data sets are declared per channel, and if machine functions need to be
activated on changeover between swivel heads or tables, an M command can be issued in the
PLC program on switchover to another swivel data set.
MD22530 $MC_TOCARR_CHANGE_M_CODE
M code for swivel data set change
= 0
No swivel data set change
< 0
M code + number of the swivel data set for the swivel data set change
SINUMERIK Operate
Commissioning Manual, 12/2019, 6FC5397-1DP40-6BA3
413
Technologies and cycles
18.7 Swiveling
Example
Number of swivel data sets in channel 1
= 2
MD22530 $MC_TOCARR_CHANGE_M_CODE
= -800
Programming swivel data set 1 (TCARR=1)
= M801
Programming swivel data set 2 (TCARR=2)
= M802
With the output of the M commands, the PLC can limit or invert the spindle speed or clamp or
release the rotary axes, for example.
Setting the workpiece, tool and rotary table reference
Using the following machine data, you can set the workpiece, tool and rotary table reference
system frames or you can influence the behavior of the system frames.
Application: System frames can be active after Reset or Power On, in order to retract a drill from
a swiveled position without causing a collision, for example.
MD24006 $MC_CHSFRAME_RESET_MASK
Active system frames after RESET
Bit 4
System frame workpiece reference
= 0
Not active
= 1
Remains active
MD24007 $MC_CHSFRAME_RESET_CLEAR_MASK
Clear system frames after RESET
Bit 4
System frame workpiece reference
= 0
Do not delete
= 1
Delete
When used for measuring or swiveling in JOG, the workpiece reference must be active at
RESET and not cleared (cascaded measuring).
MD24006 $MC_CHSFRAME_RESET_MASK
Active system frames after RESET
Bit 4 = 1
System frame for workpiece reference remains active after RESET
MD24007 $MC_CHSFRAME_RESET_CLEAR_MASK
Clear system frames after RESET
Bit 2 = 0
Reserved, do not delete TCARR and PAROT
Bit 3 = 0
Reserved, do not delete TOROT and TOFRAME
Bit 4 = 0
Do not clear system frame workpiece reference after RESET
MD24008 $MC_CHSFRAME_POWERON_MASK
Reset system frames after power on.
Bit 2
System frame rotary table reference (PAROT)
= 0
Do not reset
= 1
Reset
Bit 3
System frame tool reference (TOROT,..)
= 0
Do not reset
= 1
Reset
SINUMERIK Operate
414
Commissioning Manual, 12/2019, 6FC5397-1DP40-6BA3

Technologies and cycles
18.7 Swiveling
Bit 4
System frame workpiece reference
= 0
Do not reset
= 1
Reset
MD24080 $MC_USER_FRAME_POWERON_MASK
Settings for settable frames.
Bit 0
= 0
Settable work offset via power on not active.
= 1
Last active settable work offset remains active after power on if
MD20152 $MC_GCODE_RESET_MODE[7] = 1.
Application: Work offset G5xx, including all rotations, should remain active after Power On.
MD28082 $MC_MM_SYSTEM_FRAME_MASK
Setting-up system frames (SRAM)
Bit 2 = 1
Rotary table reference ($P_PARTFRAME)
Bit 3 = 1
Tool reference ($P_TOOLFRAME)
Bit 4 = 1
Workpiece reference ($P_WPFRAME)
MD28083 $MC_MM_SYSTEM_DATAFRAME_MASK
Setting-up data management, system
frames (SRAM)
Bit 2 = 1
Rotary table reference ($P_PARTFRAME)
Bit 3 = 1
Tool reference ($P_TOOLFRAME)
Bit 4 = 1
Workpiece reference ($P_WPFRAME)
MD28085 $MC_MM_LINK_TOA_UNIT
Assigning a TO unit to a channel (SRAM)
If several channels are set-up, then the following can be set in the machine data:
Assignment of the TO units (tools and orientable tool holders) to the NC channel. One TO unit can be
assigned to several channels.
- OR -
Each NC channel is assigned one TO unit.
Axial machine data for the modulo rotary axes of the swivel data set
MD30455 $MA_MISC_FUNCTION_MASK
Axis functions
Bit 0
Modulo rotary axis programming
= 0
Programmed positions must be in the modulo range, otherwise an alarm is triggered (e.g. 0
to 359.999 degrees).
= 1
When positions are programmed outside of the modulo range, no alarms are signaled. The
position is modulo converted internally (e.g. -180 to +180 degrees).
Bit 2
Positioning, rotary axis
= 0
As programmed
= 1
Along the shortest path
Application: With the setting bit 2 = 1, the rotary axis C travels along the shortest path for G90
with DC. For further information, refer to Chapter "Manufacturer cycle CUST_800.SPF
(Page 438)".
SINUMERIK Operate
Commissioning Manual, 12/2019, 6FC5397-1DP40-6BA3
415