SINUMERIK 840D sl. Service - Configuring Commissioning. Manual (2011-2020) - page 43
Technologies and cycles
19.7 Swiveling
MD20110 $MC_RESET_MODE_MASK
Initial control setting for RESET and end of
part program
Bit 14 = 1
Calculation of the basic and system frames, example: 4041H.
MD20112 $MC_START_MODE_MASK
Basic control setting for START and part pro-
gram.
400H
MD20126 $MC_TOOL_CARRIER_RESET_VALUE
Active tool holder at RESET.
= 0
No active tool holder at RESET.
= > 0 (n)
Tool holder with number n active at RESET.
MD20126 is written to in CYCLE800.
CYCLE800() corresponds to deselect tool holder (MD20126 = 0).
MD20150 $MC_GCODE_RESET_VALUES[ ]
Delete position, G group.
[41] = 1
Delete position, G group 42 on TCOABS
[51] = 2
Initial setting of G group 52 on PAROT
[52] = 1
Delete position, G group 53 on TOROTOF
[52] = > 1
Delete position, G group 53 on TOROT, TOROTY or TOROTX
Used for machine kinematics, types "T" and "M".
See parameter $TC_CARR34
Note
If, after a RESET from the NC, a frame must be calculated in the tool direction, then
MD20150 $MC_GCODE_RESET_VALUES[52] can be set to a value > 1.
Applications:
• Machine kinematics with Hirth teeth
• Angular tool with basic tool orientation
Note on kinematics (swivel head / mixed kinematics) with Hirth teeth:
Depending on the active plane (G17, G18, G19), the TOROT command (or TOROTX, TOROTY) is
programmed in the NCU (G group 53) to calculate the compensating frame for the Hirth teeth
in CYCLE800. If the Hirth teeth cause the programmed rotation to deviate from the possible
positions of the rotary axes, a $P_TOOLFRAME compensating frame is created for swivel head
and mixed kinematics (see HMI active ZO / details tool reference).
If the compensating frame must be retained after RESET or end of part program, enter the
following value in the channel-specific machine data:
MD20150 $MC_GCODE_RESET_VALUES[52]
Reset behavior of the G groups
= 2
For G17 (TOROT)
= 3
SINUMERIK Operate
Commissioning Manual, 10/2020, 6FC5397-1DP40-6BA4
429

Technologies and cycles
19.7 Swiveling
= 4
For G18 (TOROTY)
= 5
For G19 (TOROTX)
MD20196 $MC_TOCARR_ROTAX_MODE
Rotary axis mode for oriented tool holders
Bit 0 = 1
Swivel data set with a rotary axis
used for a rotary table with C axis
Bit 1 = 1
Swivel data set with two rotary axes
used for standard swiveling
Bit 2
= 1
In a singular position, for which there is an unambiguous solution due to the alignment
of the coordinate axes that are vertical to the orientation, the value 1 is displayed in the
system variable $P_TCSOL as the number of solutions.
= 0
This version is required to ensure compatibility with older software versions. Two solu-
tions are displayed; the angles about the orientation axis differ by 180 degrees.
MD20360 $MC_TOOL_PARAMETER_DEF_MASK
Tool parameter setting
Bit 10 = 1
The tool portion of an active orientable tool carrier is retained at T0 or D0 (no tool).
Used for machine kinematics, types "T" and "M".
See parameter $TC_CARR34
Bit 19 = 1
A tool's change in orientation caused by an oriented tool holder remains at T0 or D0 (no
tool).
Bit 19 acts only with bit 10 = 1.
MD21186 $MC_TOCARR_ROT_OFFSET_FROM_FR
Offset of the rotary axes for an oriented
tool holder from the work offset of the ro-
tary axis.
= 0
In CYCLE800, the WCS is recalculated when there is a value in the work offset (WO) of the
rotary axes.
If values are entered in the work offset of the rotary axes of the active swivel data set, the
basic position of the swivel data set and therefore also the basic position of the WCS can
change.
= 1
A value in the ZO of the rotary axes acts as offset of the oriented tool holder. The Work
remains unchanged.
MD21186 may not be rewritten in a program with call CYCLE800.
The setting MD21186 = 0 is only suitable for a swivel data set in which one of the available rotary
axes rotates exactly around the tool axis. In this way, a useful rotation of the WCS can be
calculated in CYCLE800 when values are entered in the zero offset of the rotary axes. For
example, for a swivel table with rotary axis A around X and rotary axis C around Z for a basic
position of the kinematics in G17.
SINUMERIK Operate
430
Commissioning Manual, 10/2020, 6FC5397-1DP40-6BA4
Technologies and cycles
19.7 Swiveling
If several swivel data sets are declared per channel, and if machine functions need to be
activated on changeover between swivel heads or tables, an M command can be issued in the
PLC program on switchover to another swivel data set.
MD22530 $MC_TOCARR_CHANGE_M_CODE
M code for swivel data set change
= 0
No swivel data set change
< 0
M code + number of the swivel data set for the swivel data set change
Example
Number of swivel data sets in channel 1
= 2
MD22530 $MC_TOCARR_CHANGE_M_CODE
= -800
Programming swivel data set 1 (TCARR=1)
= M801
Programming swivel data set 2 (TCARR=2)
= M802
With the output of the M commands, the PLC can limit or invert the spindle speed or clamp or
release the rotary axes, for example.
Setting the workpiece, tool and rotary table reference
Using the following machine data, you can set the workpiece, tool and rotary table reference
system frames or you can influence the behavior of the system frames.
Application: System frames can be active after Reset or Power On, in order to retract a drill from
a swiveled position without causing a collision, for example.
MD24006 $MC_CHSFRAME_RESET_MASK
Active system frames after RESET
Bit 4
System frame workpiece reference
= 0
Not active
= 1
Remains active
MD24007 $MC_CHSFRAME_RESET_CLEAR_MASK
Clear system frames after RESET
Bit 4
System frame workpiece reference
= 0
Do not delete
= 1
Delete
When used for measuring or swiveling in JOG, the workpiece reference must be active at RESET
and not cleared (cascaded measuring).
MD24006 $MC_CHSFRAME_RESET_MASK
Active system frames after RESET
Bit 4 = 1
System frame for workpiece reference remains active after RESET
MD24007 $MC_CHSFRAME_RESET_CLEAR_MASK
Clear system frames after RESET
Bit 2 = 0
Reserved, do not delete TCARR and PAROT
Bit 3 = 0
Reserved, do not delete TOROT and TOFRAME
Bit 4 = 0
Do not clear system frame workpiece reference after RESET
SINUMERIK Operate
Commissioning Manual, 10/2020, 6FC5397-1DP40-6BA4
431

Technologies and cycles
19.7 Swiveling
MD24008 $MC_CHSFRAME_POWERON_MASK
Reset system frames after power on.
Bit 2
System frame rotary table reference (PAROT)
= 0
Do not reset
= 1
Reset
Bit 3
System frame tool reference (TOROT,..)
= 0
Do not reset
= 1
Reset
Bit 4
System frame workpiece reference
= 0
Do not reset
= 1
Reset
MD24080 $MC_USER_FRAME_POWERON_MASK
Settings for settable frames.
Bit 0
= 0
Settable work offset via power on not active.
=1
Last active settable work offset remains active after power on if MD20152 $MC_GCODE_RE-
SET_MODE[7] = 1.
Application: Work offset G5xx, including all rotations, should remain active after Power On.
MD28082 $MC_MM_SYSTEM_FRAME_MASK
Setting-up system frames (SRAM)
Bit 2 = 1
Rotary table reference ($P_PARTFRAME)
Bit 3 = 1
Tool reference ($P_TOOLFRAME)
Bit 4 = 1
Workpiece reference ($P_WPFRAME)
MD28083 $MC_MM_SYSTEM_DATAFRAME_MASK
Setting-up data management, system
frames (SRAM)
Bit 2 = 1
Rotary table reference ($P_PARTFRAME)
Bit 3 = 1
Tool reference ($P_TOOLFRAME)
Bit 4 = 1
Workpiece reference ($P_WPFRAME)
Axial machine data for the modulo rotary axes of the swivel data set
MD30455 $MA_MISC_FUNCTION_MASK
Axis functions
Bit 0
Modulo rotary axis programming
= 0
Programmed positions must be in the modulo range, otherwise an alarm is triggered (e.g. 0
to 359.999 degrees).
= 1
When positions are programmed outside of the modulo range, no alarms are signaled. The
position is modulo converted internally (e.g. -180 to +180 degrees).
Bit 2
Positioning, rotary axis
= 0
As programmed
= 1
Along the shortest path
Application: With the setting bit 2 = 1, the rotary axis C travels along the shortest path for G90
with DC. For more information, refer to Chapter "Manufacturer cycle CUST_800.SPF
(Page 471)".
SINUMERIK Operate
432
Commissioning Manual, 10/2020, 6FC5397-1DP40-6BA4

Technologies and cycles
19.7 Swiveling
MD32010 $MA_JOG_VELO_RAPID[AX]
Rapid traverse in JOG
AX = axis name
Rotary and machine axes that should trav-
el for swiveling in JOG.
= 10000
Rapid traverse in JOG mode for swiveling in JOG
SD42980 $SC_TOFRAME_MODE
Setting, frame definition for TOROT, PAROT
= 2000
Swivel (default value)
SD42974 $SC_TOCARR_FINE_CORRECTION
Fine offset TCARR (swivel data set)
= 0
No fine offset of the swivel data set vectors.
= 1
Fine offset of the swivel data set vectors.
The parameters of the swivel data set from $TC_CARR41[n] n…number of the swivel data set
and higher apply.
Swiveling in the JOG mode
Cycle alarms 62186 and 62187 can be hidden or displayed using the following cycle machine
data:
MD55410 $MC_MILL_SWIVEL_ALARM_MASK
Activate fault evaluation CYCLE800
Bit 0
Activates fault 61186
= 0
Hide fault 61186 "Active work offset G%4 and base (base reference) contains rotations"
(default setting).
= 1
Display fault 61186
Bit 1
Activate fault 61187
= 0
Hide fault 61187 "Active base and base reference (G500) contain rotations" (default set-
ting).
= 1
Display fault 61187
19.7.2
CYCLE800 checklist for the identification of the machine kinematics
Note
Identification of the machine kinematics according to DIN 66217 or ISO 841-2001
This checklist does not claim to be complete.
• Do the 3 linear axes of the machine that are active for the transformation form an
orthogonal coordinate system? Geometry axes XYZ
• How many swivel kinematics does the machine have?
Combinations of two (or one) rotary axis and the three linear axes are always formed.
• Which machine components are concerned?
Swivel head, swivel table or swivel head and rotary table.
SINUMERIK Operate
Commissioning Manual, 10/2020, 6FC5397-1DP40-6BA4
433
Technologies and cycles
19.7 Swiveling
• What are the names of the rotary axes of the kinematics?
Manual rotary axes are permitted and do not have to be declared in the NC.
• What is the 1st or 2nd d rotary axis of a swivel data set?
• Is the traversing direction of the linear axes and the rotary axes correct? Right-hand rule
Rule: If the linear axis or the rotary axis moves the workpiece, the direction of motion of the
axis and also the sign of the rotary axis vector change.
• What is the initial setting of the kinematics?
This defines the tool orientation and the plane G17, G18, G19.
• Which rotary axis rotates around which axis of the coordinate system or the machine
axis (axes)?
This defines the rotary axis vectors of the kinematics.
Example 1:
Head kinematics. Rotary axis 2 rotates around axis Y → rotary axis vector V2xyz = 0,1,0
Example 2:
Table kinematics. Rotary axis 1 rotates around axis X → rotary axis vector V1xyz = -1,0,0
19.7.3
Setting up a tool carrier/swivel data set
Defining a tool carrier/swivel data set
You must create a tool carrier (tool holder) for every swivel head, swivel table or each swivel
head/swivel table combination.
Tool carriers can be declared in several channels. A tool carrier can be defined as classic or via the
kinematic chain.
A classic tool carrier comprises the parameters $TC_CARR1[n] to $TC_CARR65[n]
n = number of the tool carrier.
The geometry of the tool carrier based on the kinematic chain comes from the chain. There are
also other descriptive parameters $TC_CARR_KIN...[n] and $TC_CARRxx[n].
If all preconditions from Chapter "Technology cycles for swiveling (Page 423)" are met, you can
assign the tool carrier parameters via the input mask
in the "Setup" → "NC" → "Transformation" operating area.
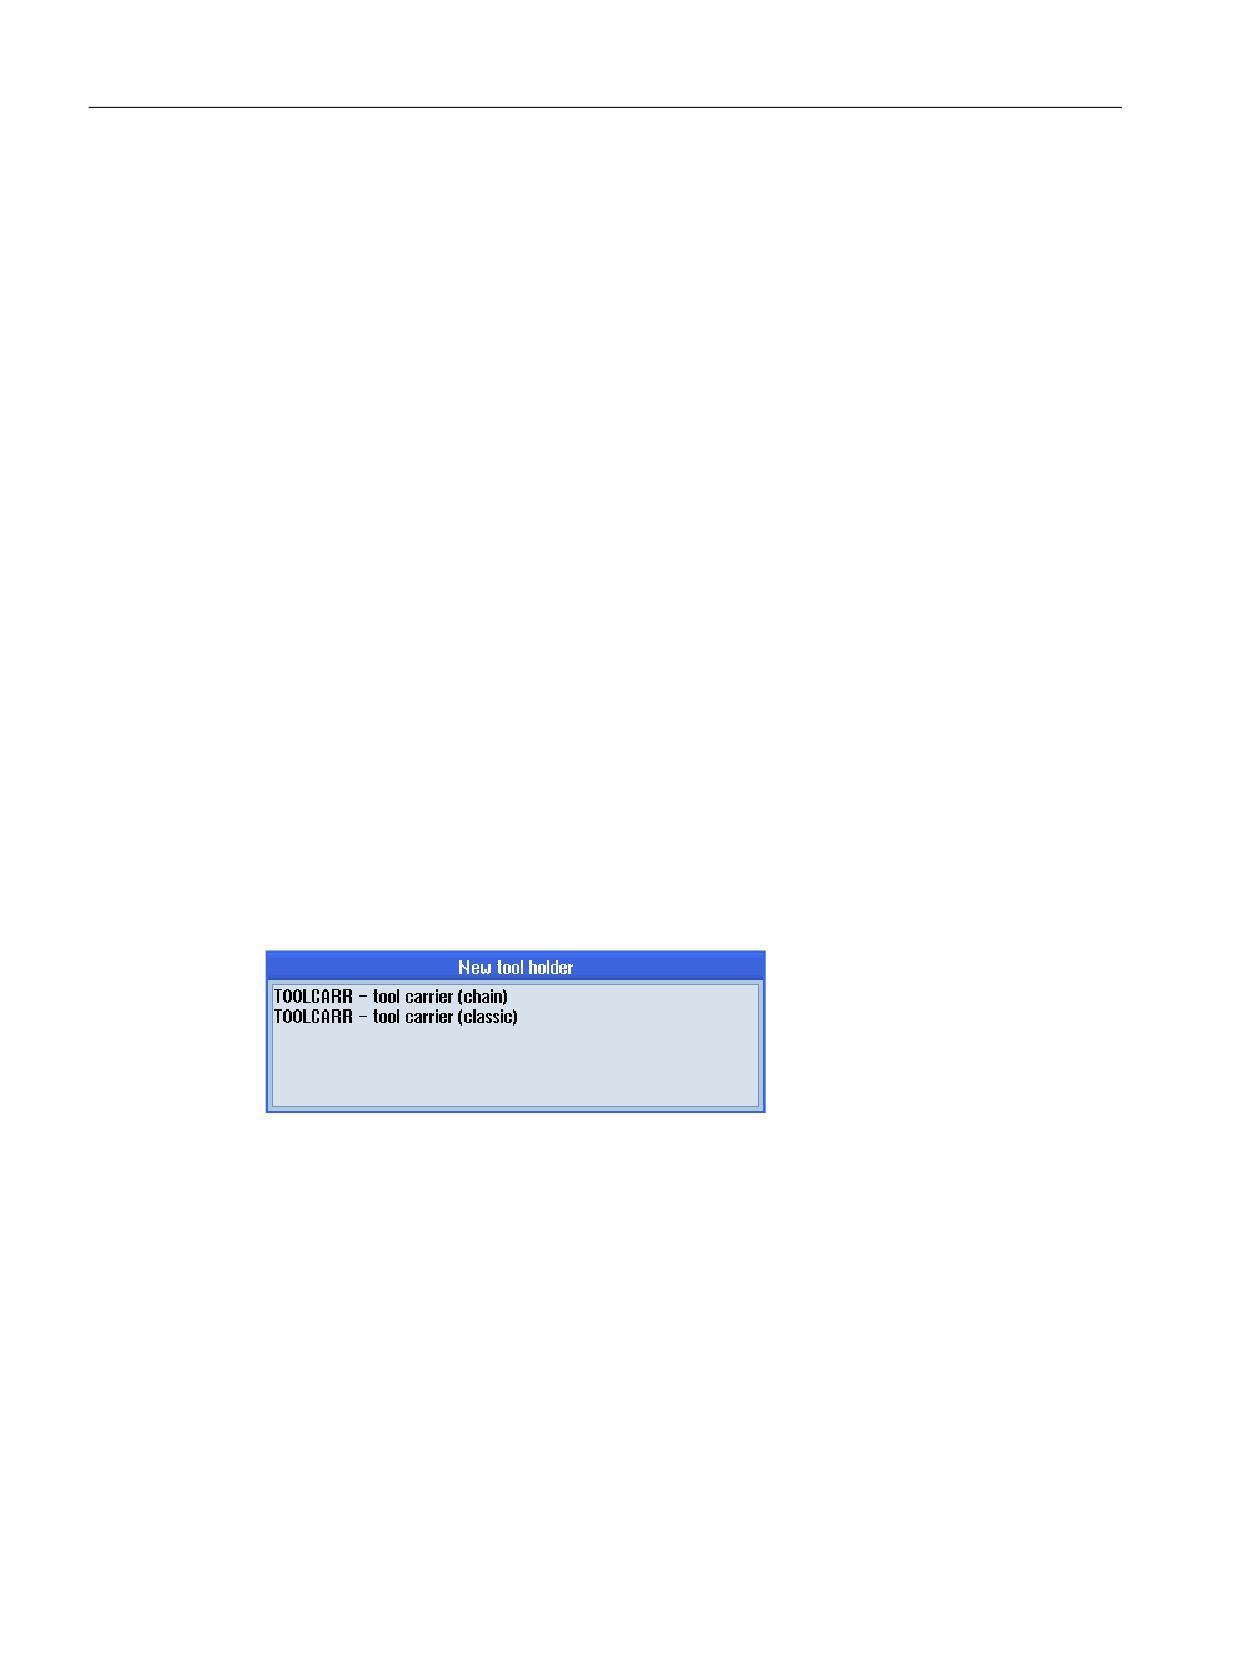
When you create a new tool carrier here, you can choose if the parameters should be assigned
as classic or via the chain.
Programming with appropriate value assignment is also possible in an NC program. The
parameters of the tool carrier are immediately effective after the program has started.
SINUMERIK Operate
434
Commissioning Manual, 10/2020, 6FC5397-1DP40-6BA4
Technologies and cycles
19.7 Swiveling
The following softkeys are assigned to the Swivel function in the "Program" → "Various"
operating area:
Milling technology
Turning technology
"Swivel plane"
"Swivel plane"
"Advance milling tool"
"Swivel tool"
→ "Align turning tool"
→ "Align milling tool"
→ "Advance milling tool"
The "Align turning tool" and "Align milling tool" softkeys are only displayed if the "B-axis
kinematics" function has been activated via $TC_CARR37[n].
More information
More information on setting up the kinematic chain can be found in the
Basic Functions Function Manual.
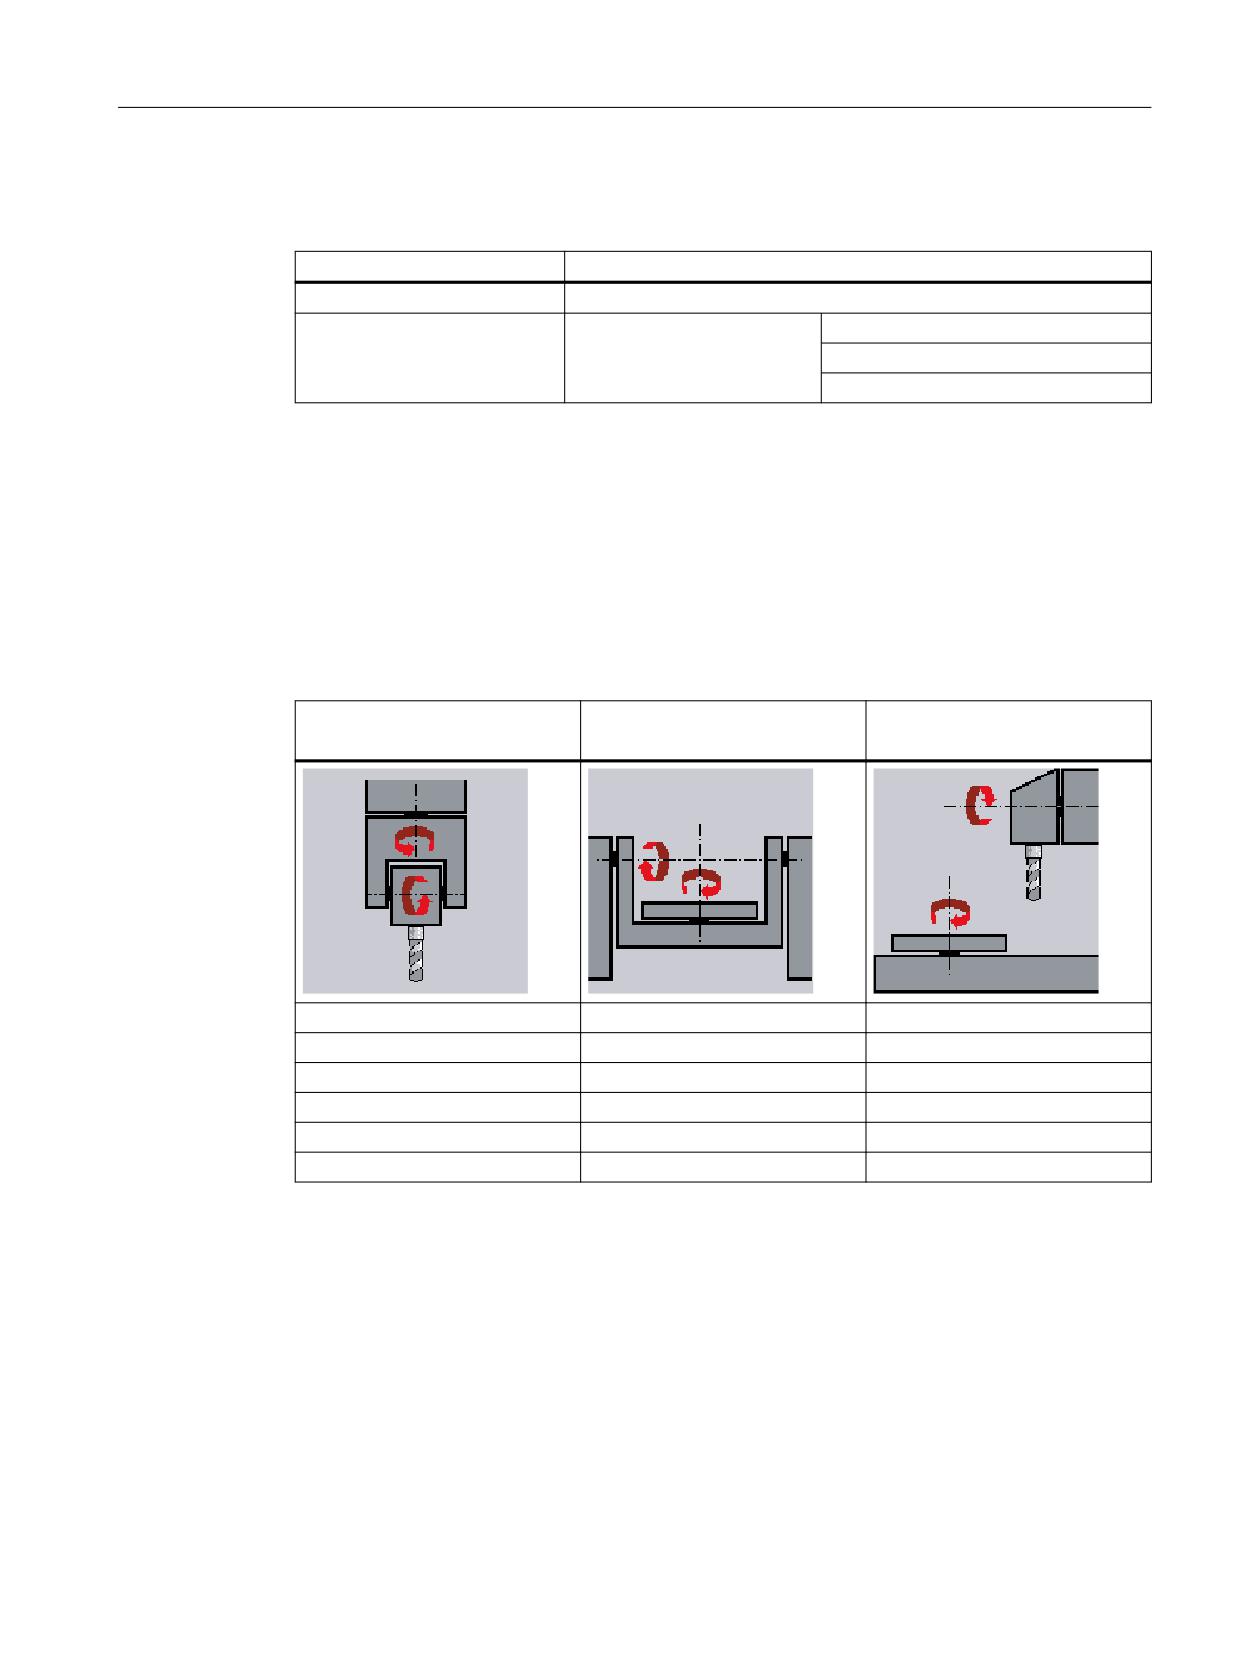
Kinematic types $TC_CARR23[n]
Swivel head (type T)
Swivel table (type P)
Swivel head +
Swivel table (type M)
Offset vector I1
Offset vector I2
Offset vector I1
Rotary axis vector V1
Rotary axis vector V1
Rotary axis vector V1
Offset vector I2
Offset vector I3
Offset vector I2
Rotary axis vector V2
Rotary axis vector V2
Offset vector I3
Offset vector I3
Offset vector I4
Rotary axis vector V2
Offset vector I4
Name of swivel data set
If several swivel data sets are declared in each NC channel, then a name is assigned to each
swivel data set: $TC_CARR34[n]
The name of the swivel data set may only contain characters that are permissible for NC
programming: A...Z, 0...9 and _ !
If multiple NC channels have been set up, note the settings in MD28085. If a TO unit is assigned
to several NC channels, the channel display in the dialog corresponds to the TO unit.
You can find more information in Chapter "Technology cycles for swiveling (Page 423)".
SINUMERIK Operate
Commissioning Manual, 10/2020, 6FC5397-1DP40-6BA4
435

Technologies and cycles
19.7 Swiveling
System variable $TC_CARR37[n]
In order that a value can be displayed in the input/selection boxes of the dialog for swiveling, the
following display versions can be set:
Meaning of the decimal positions
$TC_CARR37[n]
Display variants of the input masks for CYCLE800
Decimal place
Meaning
ONES
Select swivel mode
0 =
Axis-by-axis
1 =
Axis-by-axis + projection angle
2 =
Axis-by-axis + projection angle + solid angle
3 =
Axis-by-axis + direct
4 =
Axis-by-axis + projection angle + direct
5 =
Axis-by-axis + projection angle + solid angle + direct
TENS
Rotary axis 1
0 =
Automatic
1 =
Manual
2 =
Semiautomatic
HUNDREDS
Rotary axis 2
0 =
Automatic
1 =
Manual
2 =
Semiautomatic
THOUSANDS
Selection field direction: Direction selection of the rotary axes
0 =
No display of the direction reference for kinematics that only have
one solution. Direction selection (_DIR) Minus is generated in the
cycle call CYCLE800.
3 =
Direction reference, rotary axis 1, direction selection Minus in the
basic setting of the kinematics.
4 =
Direction reference, rotary axis 2, direction selection Minus in the
basic setting of the kinematics.
5 =
No display of the direction reference for kinematics that only have
one solution. Direction selection (_DIR) Plus is generated in the
cycle call CYCLE800.
8 =
Direction reference, rotary axis 1, direction selection Plus in the
basic setting of the kinematics.
9 =
Direction reference, rotary axis 2, direction selection Plus in the
basic setting of the kinematics.
The values 1, 2, 6 and 7 are not permitted.
TEN THOUSANDS
Selection field, tracking of the tool tip or B axis kinematics
0 =
No display of the tracking of the tool tip input field.
1 =
Tracking of tool tip by means of TRAORI.
2 =
No tracking of tool tip + B axis kinematics turning technology.
HUNDRED THOUSAND
Basic position of the kinematics 1)
SINUMERIK Operate
436
Commissioning Manual, 10/2020, 6FC5397-1DP40-6BA4

Technologies and cycles
19.7 Swiveling
$TC_CARR37[n]
Display variants of the input masks for CYCLE800
Decimal place
Meaning
0 =
Corresponding to the working plane G17, G18 or G19 (compati-
bility)
1 =
Tool axis in the Z direction
3 =
Tool axis in the X direction
ONE MILLION TEN MIL-
Selection field, retraction
LION
00 =
No retraction
01 =
Retraction Z
02 =
Retraction Z, XY
03 =
Retraction Z or Z, XY
04 =
Maximum retraction in tool direction
08 =
Incremental retraction in tool direction
15 =
Retraction Z or Z, XY or
in maximum tool direction or in incremental tool direction
$TC_CARR38[n]
Retraction position X
$TC_CARR39[n]
Retraction position Y
$TC_CARR40[n]
Retraction position Z
HUNDRED MILLION
Swivel data set enabled
Setting swivel data set change
Automatic or manual tool change is only necessary under ShopMill or Shop-
Turn (→ see also: CUST_800.spf, marks _M2 to _M13).
A swivel data set must be "enabled" in every case (value ≥ 4).
0 =
Tool carrier not enabled
4 =
Tool carrier enabled
Automatic swivel data set and tool change
5 =
Tool carrier enabled
Automatic swivel data set change and manual tool change
6 =
Tool carrier enabled
Manual swivel data set change and automatic tool change
7 =
Tool carrier enabled
Manual swivel data set and tool change
Notes on the setting Basic position of the kinematics 1)
For turning machines (1st technology is turning) with a B axis, you can set whether the tool is
oriented toward "-Z" or toward "-X" in the basic position of the kinematics. This setting is taken
into account for "Align tool" and for "Swivel plane".
SINUMERIK Operate
Commissioning Manual, 10/2020, 6FC5397-1DP40-6BA4
437
Technologies and cycles
19.7 Swiveling
Align tool
• For "Align tool", the programming of beta and gamma is machine-independent.
• With the basic position setting "Working plane" or "-Z", beta = 0 also corresponds to this basic
position (compatibility).
• With the basic position setting "-X", the B axis is re-oriented through 90° for beta = 0.
Swivel plane (new swivel plane)
• With the basic position setting "Working plane" or "-Z" and active working plane G17, there
is no new tool orientation for swivel plane to basic position (compatibility).
• With the basic position setting "-X" and active working plane G17, the tool orientation is
rotated 90° around Y for swivel plane to basic position.
Therefore, with the basic position setting "-X", milling is possible in a swiveled plane in different
working planes (G17 or G19).
The following settings and programming is not permitted and results in error messages:
• Swivel plane, basic position -Z and G18 or G19 active
• Swivel plane, basic position -X and G18 active
Retracting the geometry axes before swiveling
Figure 19-4
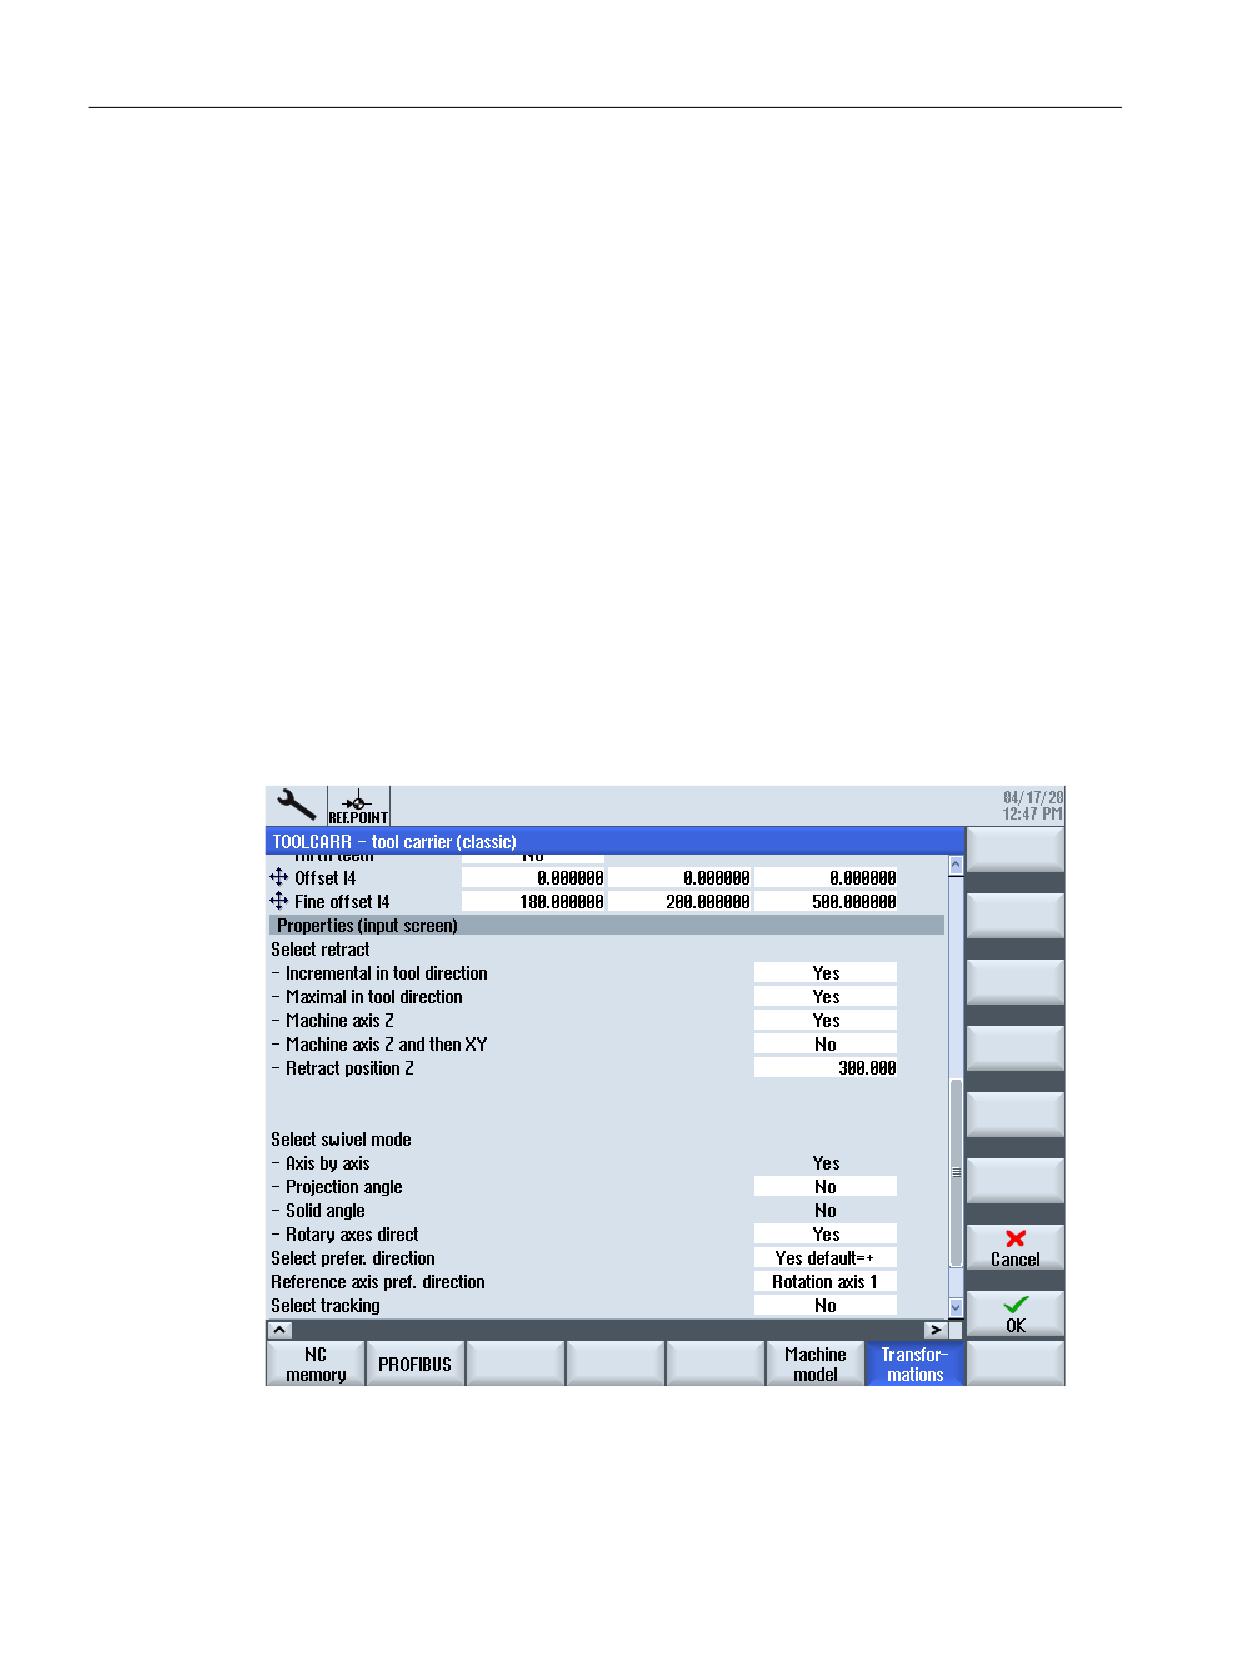
Dialog to select the type of retraction for classic tool carrier
SINUMERIK Operate
438
Commissioning Manual, 10/2020, 6FC5397-1DP40-6BA4
Technologies and cycles
19.7 Swiveling
Select the retraction variant in the input field: This is defined in the ONE MILLION and TEN
MILLION position of the system variable $TC_CARR37[n]:
• Retract axis Z
• Retract axes Z, XY
• Retract in the tool direction, maximum or incremental
NOTICE
Collision avoidance
Make sure that the tool and the workpiece cannot collide during swiveling when the tool axes
move.
Retraction of the axis Z or retraction of the axes Z, XY is implemented as an absolute machine
position to the values of parameters $TC_CARR38[n] to $TC_CARR40[n].
$TC_CARR38[n]
Retraction position X
$TC_CARR39[n]
Retraction position Y
$TC_CARR40[n]
Retraction position Z
The type of retraction is modified in the Manufacturer cycle CUST_800.SPF (Page 471).
Note
Retraction in the tool direction is useful for swivel data sets in which the tool is re-oriented
(swivel head or mixed kinematics). This applies particularly for turning machines with a B axis.
During retraction in "maximum tool direction", traversing is performed until one of the relevant
linear axes reaches the software limit switch.
19.7.4
Setting up the tool carrier based on kinematic chain
You must create a tool carrier for every swivel head, swivel table or each swivel head/swivel table
combination.
Requirement
A kinematic chain is already available or must be created for the machine.
More information
More information is provided in the
Tools Function Manual.
SINUMERIK Operate
Commissioning Manual, 10/2020, 6FC5397-1DP40-6BA4
439
Technologies and cycles
19.7 Swiveling
Creating the tool carrier
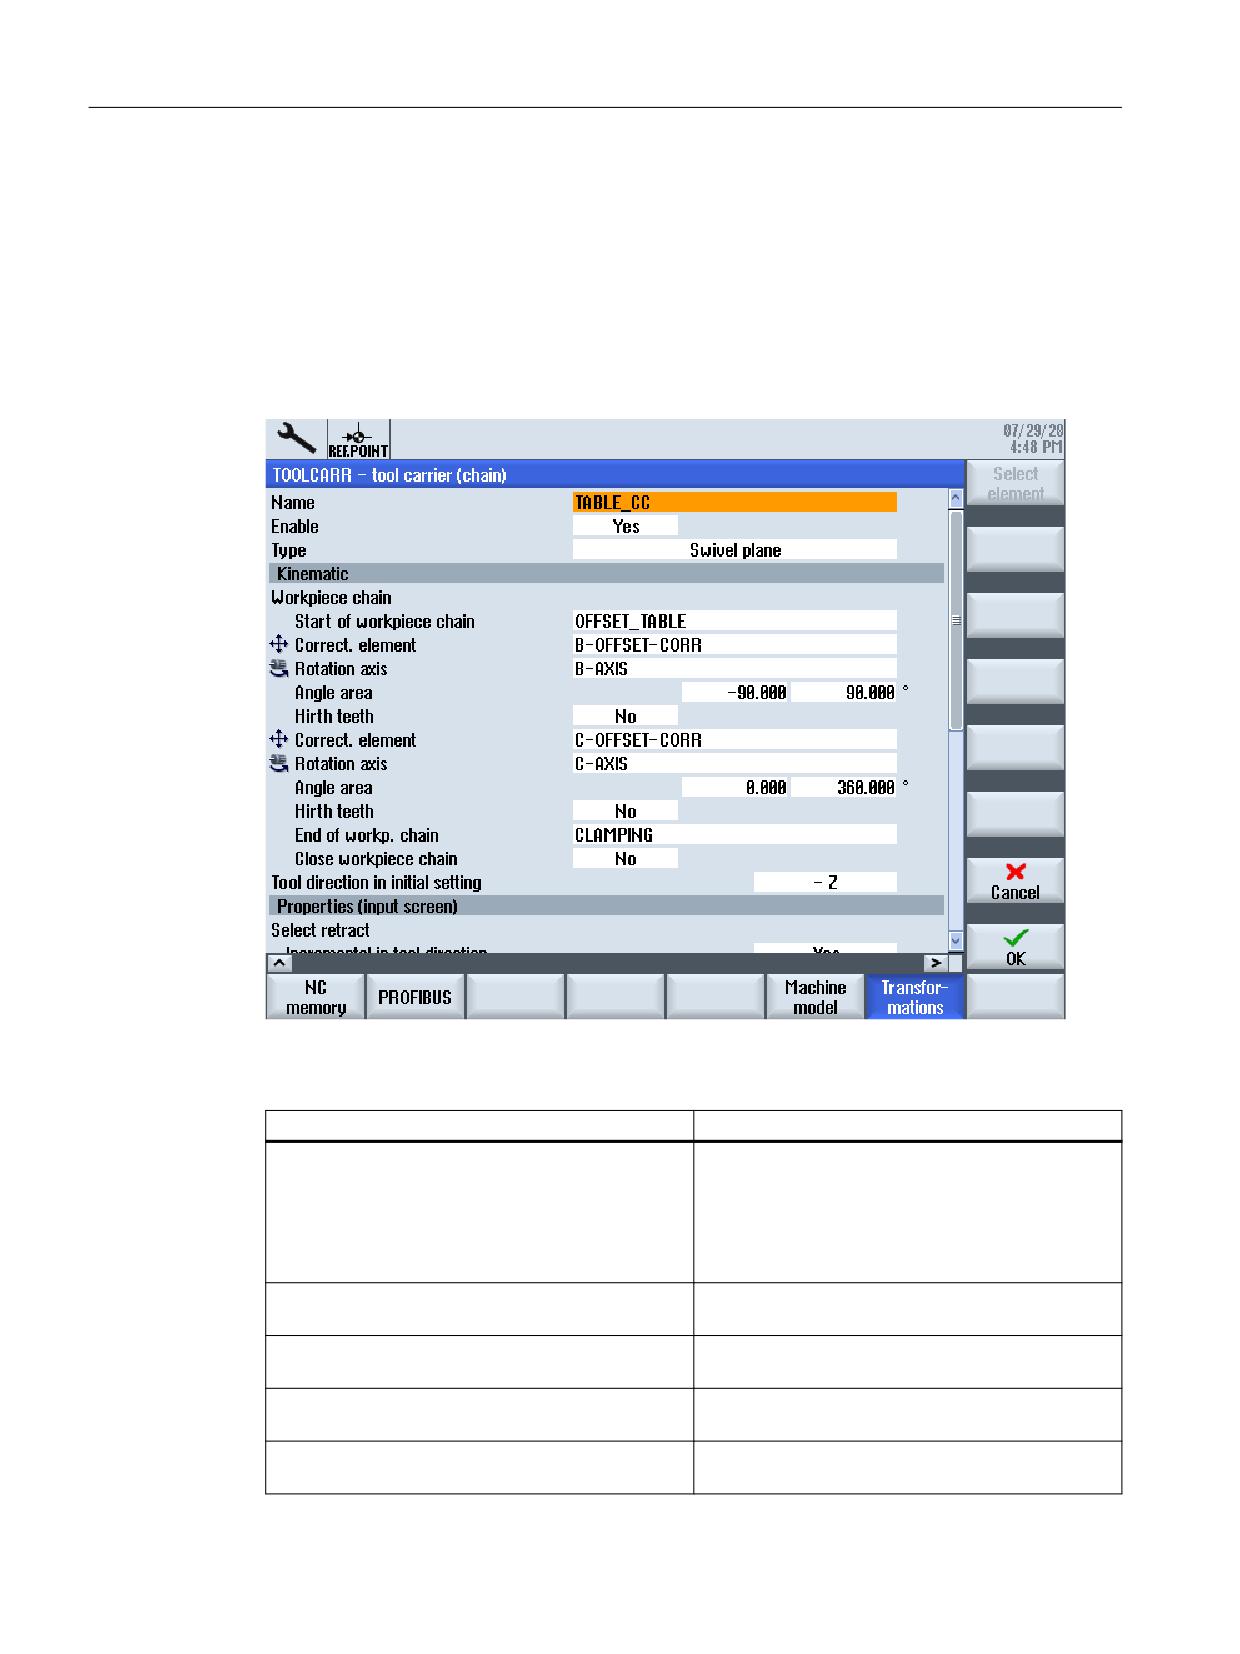
Create the tool carrier via the input mask in the
"Setup" → "NC" → "Transformation" operating area.
In the "New tool holder" dialog you can select the tool carrier on the basis of the chain or using
the classic method.
More information on selection is provided in Chapter: "Setting up a tool carrier/swivel data set
(Page 434)".
Figure 19-5
Tool carrier dialog based on the chain
The following tool data is set using the input mask for tool carrier setup:
Variable name
Meaning
$TC_CARR_KIN_CNTRL[n]
Controls the acceptance of tool carrier geometry
data from kinematic chain elements
Bit 0: Tool carrier using kinematic chain
Bit 1: Close part chain (calculation I4)
Bit 2: Close tool chain (calculation I1)
$TC_CARR_KIN_TOOL_START[n]
Name of the kinematic chain element that forms
the starting point of the tool chain
$TC_CARR_KIN_TOOL_END[n]
Name of the kinematic chain element that forms
the end point of the tool chain
$TC_CARR_KIN_PART_START[n]
Name of the kinematic chain element that forms
the starting point of the tool chain
$TC_CARR_KIN_PART_END[n]
Name of the kinematic chain element that forms
the end point of the part chain
SINUMERIK Operate
440
Commissioning Manual, 10/2020, 6FC5397-1DP40-6BA4

Technologies and cycles
19.7 Swiveling
Variable name
Meaning
$TC_CARR_CORRELEM[n, m]
Name of the kinematic chain element to which cor-
rection can be performed with CYCLE9960
n = number of the tool carrier data set
0 ≤ m ≤ 3
$TC_CARR_KIN_ROTAX_NAME[n, m]
String name of the kinematic chain element that
contains the rotary axis
$TC_CARR23[n]
Kinematic head (T), Table (P), Mixed (M)
$TC_CARR26[n]
Offset Hirth teeth of the rotary axes
$TC_CARR27[n]
$TC_CARR28[n]
Increment Hirth teeth of the rotary axes
$TC_CARR29[n]
$TC_CARR30[n]
Software limit for minimum position of the rotary
axes
$TC_CARR31[n]
$TC_CARR32[n]
Software limits for maximum position of the rotary
axes
$TC_CARR33[n]
$TC_CARR34[n]
Name of the tool carrier
$TC_CARR37[n]
$TC_CARR38[n]
Position for retraction
$TC_CARR39[n]
$TC_CARR40[n]
Rotary axes (axes of rotation)
The input mask of the machine image is opened via the "Select element" softkey, and you can
select the chain element that corresponds to the rotary axis.
The name for the chain element with rotary axis included is contained in the variable
$TC_CARR_KIN_ROTAX_NAME[n, m].
Correction element
The variable $TC_CARR_CORRELEM[n, m] makes reference to the chain element that contains
the kinematic correction if kinematics are measured and corrected via CYCLE9960.
SINUMERIK Operate
Commissioning Manual, 10/2020, 6FC5397-1DP40-6BA4
441
Technologies and cycles
19.7 Swiveling
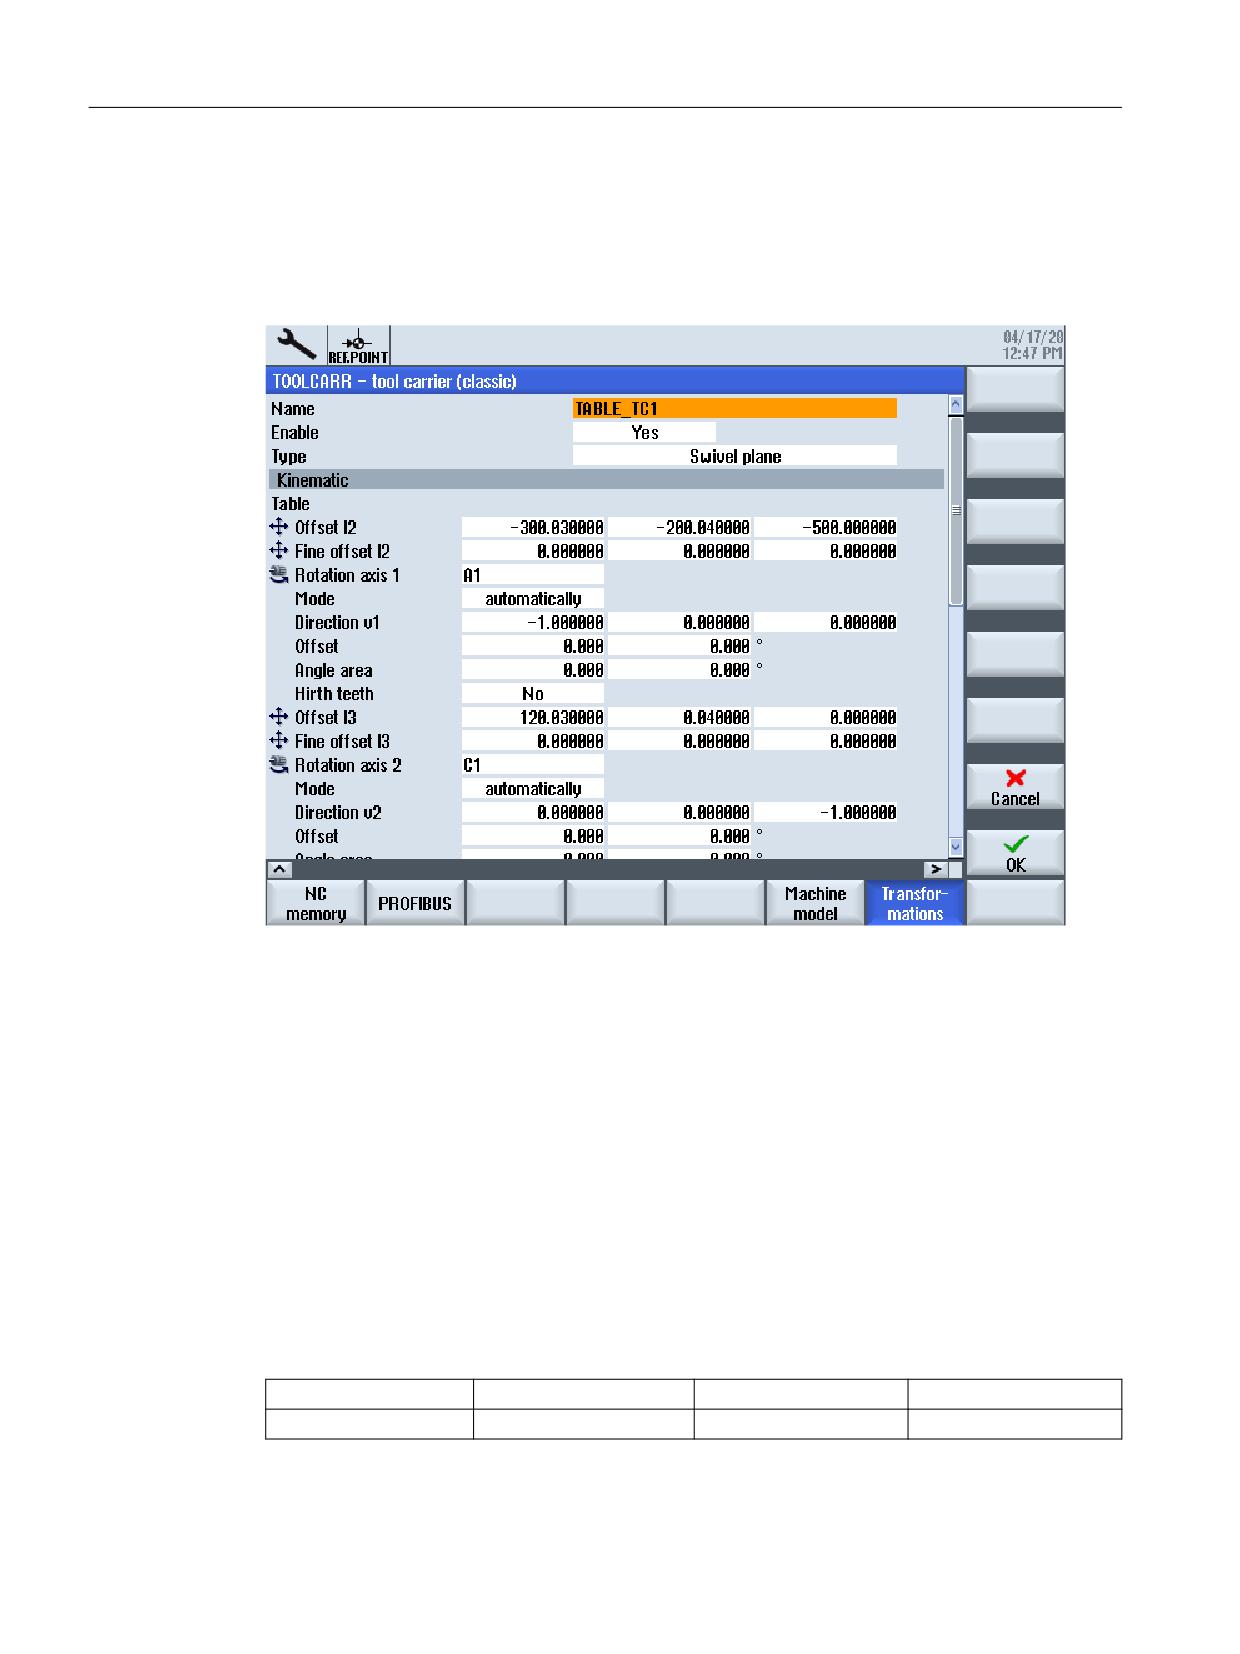
19.7.5
Setting up classic tool carrier swivel data
Name of swivel data set
Figure 19-6
Dialog to input parameters for the swivel data set
Offsets I1 to I4 $TC_CARR1[n] ... $TC_CARR20[n]
The vectors always contain three components, which are the reference to the machine axes (X,
Y, Z). The positions in the kinematic chain are measured by the machine manufacturer; they are
always relevant with respect to a swivel head/swivel table (tool carrier).
Offsets I1 to I4 refer to the non-swiveled state of the rotary axes (basic setting: machine
kinematics). However, be aware that the traversing range in the swivel planes may be restricted.
If machine kinematics are to be implemented with just one rotary axis, this must always be
declared as the 1st rotary axis.
Manually adjustable rotary axes (manual mode) are possible with and without measuring
systems and can be used with "simple machines".
Rotary axes that are positioned by an additional mechanical system, can be declared in the
"Semiautomatic" mode.
$TC_CARR1[n]
$TC_CARR2[n]
$TC_CARR3[n]
Offset I1 xyz
$TC_CARR4[n]
$TC_CARR5[n]
$TC_CARR6[n]
Offset I2 xyz
SINUMERIK Operate
442
Commissioning Manual, 10/2020, 6FC5397-1DP40-6BA4
Technologies and cycles
19.7 Swiveling
$TC_CARR15[n]
$TC_CARR16[n]
$TC_CARR17[n]
Offset I3 xyz
$TC_CARR18[n]
$TC_CARR19[n]
$TC_CARR20[n]
Offset I4 xyz
Example
In a boring mill, the swivel head is positioned by coupling the spindle. In this case, the rotary axes
of the swivel head must be declared as "Semiautomatic". The appropriate machine-specific
cycles are called in CUST_800.SPF.
Machine manufacturer
Follow the machine manufacturer's instructions.
Swivel head
• I3 distance from the tool adapter to the pivot point/intersection of the 2nd rotary axis
• I2 distance from the pivot point/intersection of the 2nd rotary axis to the pivot point/
intersection of the 1st rotary axis
• I1 closure of the I1=-(I2+I3) vector chain, if the swivel head cannot be changed
Swivel table
• I2 distance from the machine reference point to the pivot point/intersection of the 1st rotary
axis
• I3 distance from the pivot point/intersection of the 1st rotary axis to the pivot point/
intersection of the 2nd rotary axis (or to the reference point of the tool adapter)
• I4 closure of the I4=-(I2+I3) vector chain, if the swivel table cannot be changed
Swivel head/swivel table (mixed kinematics)
• I2 distance from the tool adapter to the pivot point/intersection of the 1st rotary axis
• I1 closure of the I1=-I2 vector chain, if the swivel head cannot be changed.
• I3 distance from the machine reference point to the pivot point/intersection of the 2nd rotary
axis (or to the reference point of the tool adapter)
• I4 closure of the I4=-I3 vector chain, if the swivel table cannot be changed.
The offset vectors do not have to point to the pivot point of the rotary axes. The important thing
is that they point to a point on the direction of rotation (intersection).
The sign of the offset vectors (I1 to I4) and the rotary axis vectors (V1, V2) result from the
specifications of the axis directions according to ISO 841-2001 or DIN 66217 (right-hand rule).
In the case of machine kinematics that move the workpiece (rotary table), the axis direction is
reversed.
Direction V1 and V2
$TC_CARR7[n]
$TC_CARR8[n]
$TC_CARR9[n]
Direction vector of the 1st ro-
tary axis
$TC_CARR10[n]
$TC_CARR11[n]
$TC_CARR12[n]
Direction vector of the 2nd ro-
tary axis
SINUMERIK Operate
Commissioning Manual, 10/2020, 6FC5397-1DP40-6BA4
443
Technologies and cycles
19.7 Swiveling
More information
More information on tool offsets or on multiple transformations can be found in:
• Tools Function Manual
• Transformations Function Manual
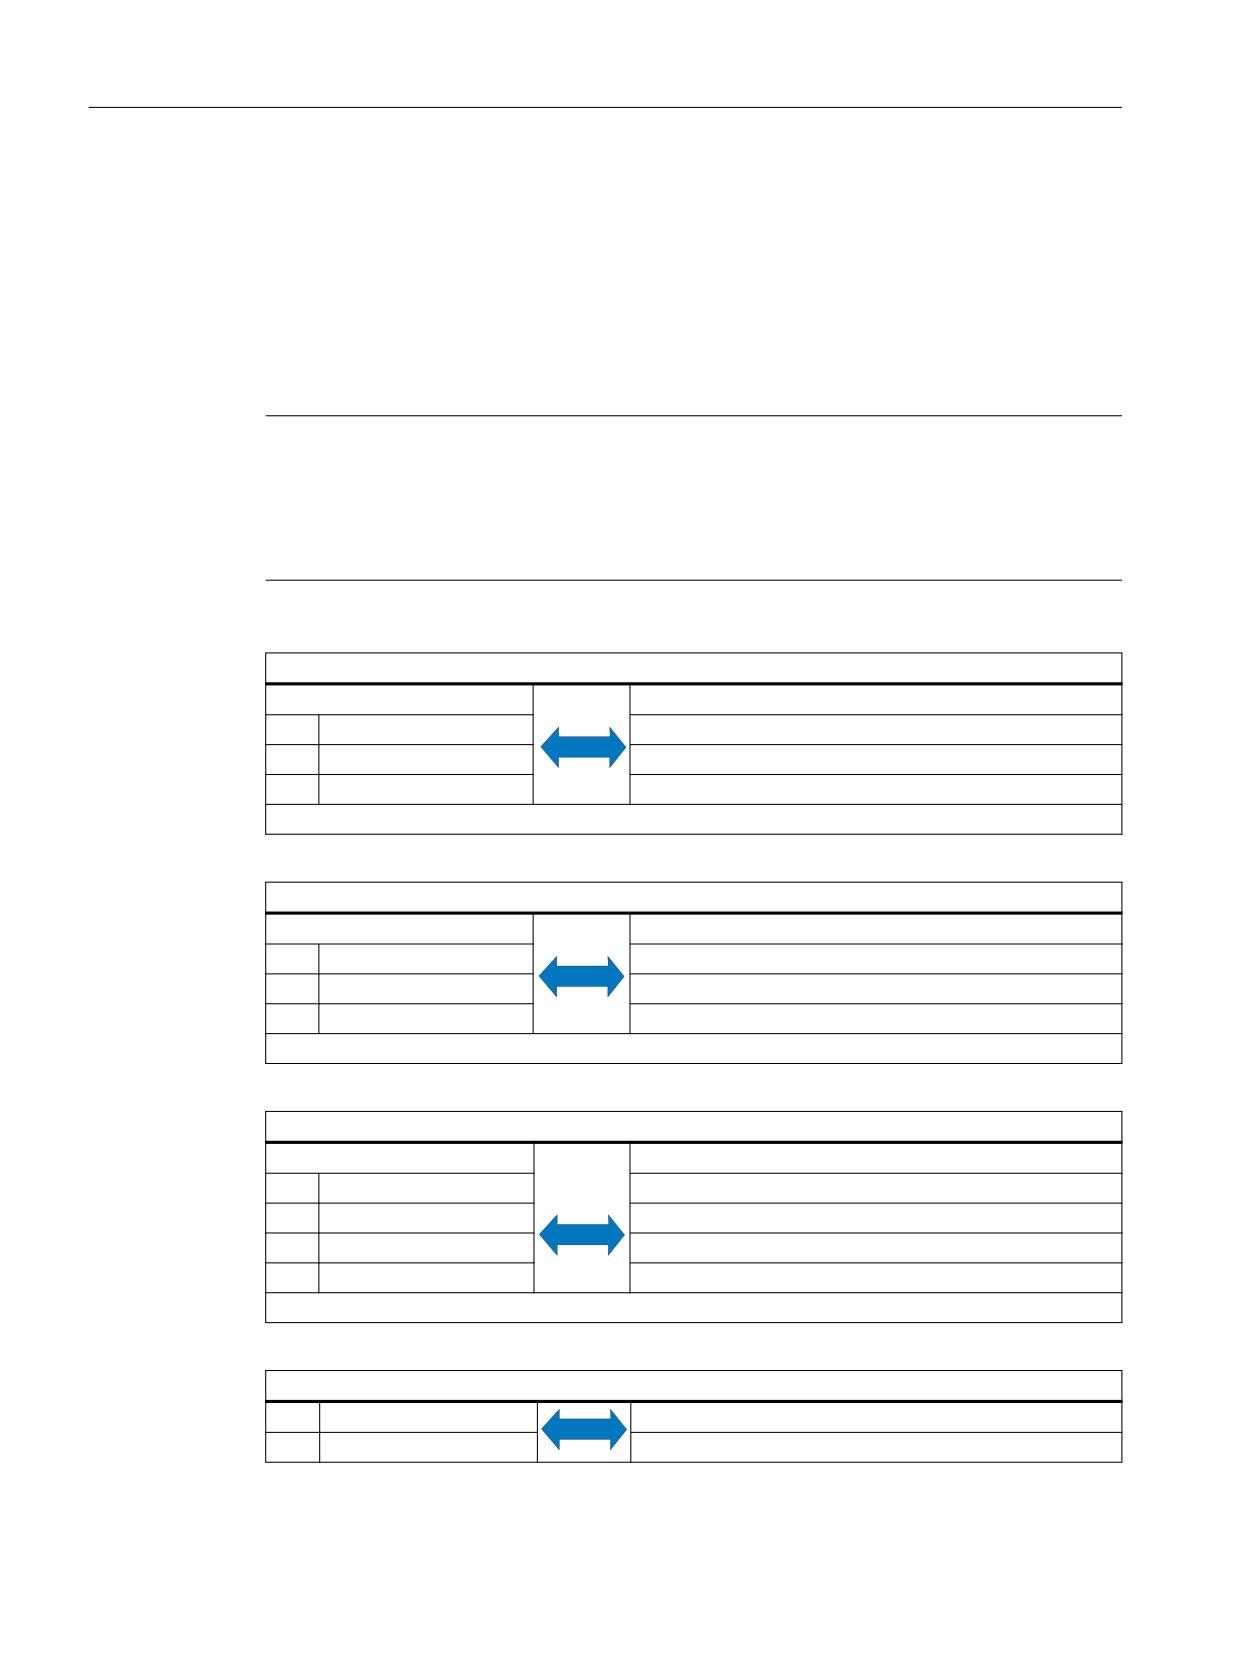
Setting offsets
Note
Interrelation of TOOLCARRIER ⇔ 5-axis transformation (transformer type 24, 40, 56):
For 5-axis transformation, transformer type 72 in MD24100: $MC_TRAFO_TYPE_1 can be used.
In the case of transformer type 72, the vectors of the TOOLCARRIER in MD24582:
$MC_TRAFO5_TCARR_NO_1 are used.
Swivel head (swivel-mounted tool)
$TC_CARR23[n]="T"
MD24100: $MC_TRAFO_TYPE_1=24
I1
$TC_CARR1...3[n]
MD24500: $MC_TRAFO5_PART_OFFSET_1[0...2]
I2
$TC_CARR4...6[n]
MD24560: $MC_TRAFO5_JOINT_OFFSET_1[0...2]
I3
$TC_CARR15...17[n]
MD24550: $MC_TRAFO5_BASE_TOOL_1 [0...2]
Closure of the I1=-(I2+I3) vector chain; for fixed-mounted machine kinematics
Swivel table (swivel-mounted workpiece)
$TC_CARR23[n]="P"
MD24100: $MC_TRAFO_TYPE_1=40
I2
$TC_CARR4...6[n]
MD24550: $MC_TRAFO5_BASE_TOOL_1 [0..2]
I3
$TC_CARR15...17[n]
MD24558: $MC_TRAFO5_JOINT_OFFSET_1 [0...2]
I4
$TC_CARR18...20[n]
MD24500: $MC_TRAFO5_PART_OFFSET_1 [0...2]
Closure of the I4=-(I2+I3) vector chain; for fixed-mounted machine kinematics
Swivel head + swivel table (swivel-mounted tool + workpiece)
$TC_CARR23[n]="M"
MD24100: $MC_TRAFO_TYPE_1=56
I1
$TC_CARR1...3[n]
MD24560: $MC_TRAFO5_JOINT_OFFSET_1 [0...2]
I2
$TC_CARR4...6[n]
MD24550: $MC_TRAFO5_BASE_TOOL_1 [0...2]
I3
$TC_CARR15...17[n]
MD24558: $MC_TRAFO5_JOINT_OFFSET_PART_1[0...2]
I4
$TC_CARR18...20[n]
MD24500: $MC_TRAFO5_PART_OFFSET_1 [0...2]
Closure of the I1=-I2 I4=-I3 vector chain; for fixed-mounted machine kinematics
Rotary axis vectors V1, V2
V1
$TC_CARR7..9[n]
MD24570: $MC_TRAFO5_AXIS1_1[0..2]
V2
$TC_CARR10..12[n]
MD24572: $MC_TRAFO5_AXIS2_1[0..2]
SINUMERIK Operate
444
Commissioning Manual, 10/2020, 6FC5397-1DP40-6BA4
Technologies and cycles
19.7 Swiveling
Fine offsets of offset vectors
Fine offset of the offset vectors is described in the parameters $TC_CARR41[n] to
$TC_CARR60[n].
Assignment of base vectors to the fine offset vectors:
I1 $TC_CARR1..3[n]
to
$TC_CARR41..43[n]
I2 $TC_CARR4..6[n]
to
$TC_CARR44..46[n]
I3 $TC_CARR15..17[n]
to
$TC_CARR55..57[n]
I4 $TC_CARR18..20[n]
to
$TC_CARR58..60[n]
The fine offsets are activated by the following setting data:
SD42974 $SC_TOCARR_FINE_CORRECTION = 1
Fine offset TCARR on/off
= 0
When activating a tool holder that can be oriented, the fine offset values are not taken into
account.
= 1
When activating a tool holder that can be oriented, the fine offset values are taken into
account.
The fine offsets act in addition to the corresponding base vectors when the Swivel function
CYCLE800 or the NC function TCARR=n is called.
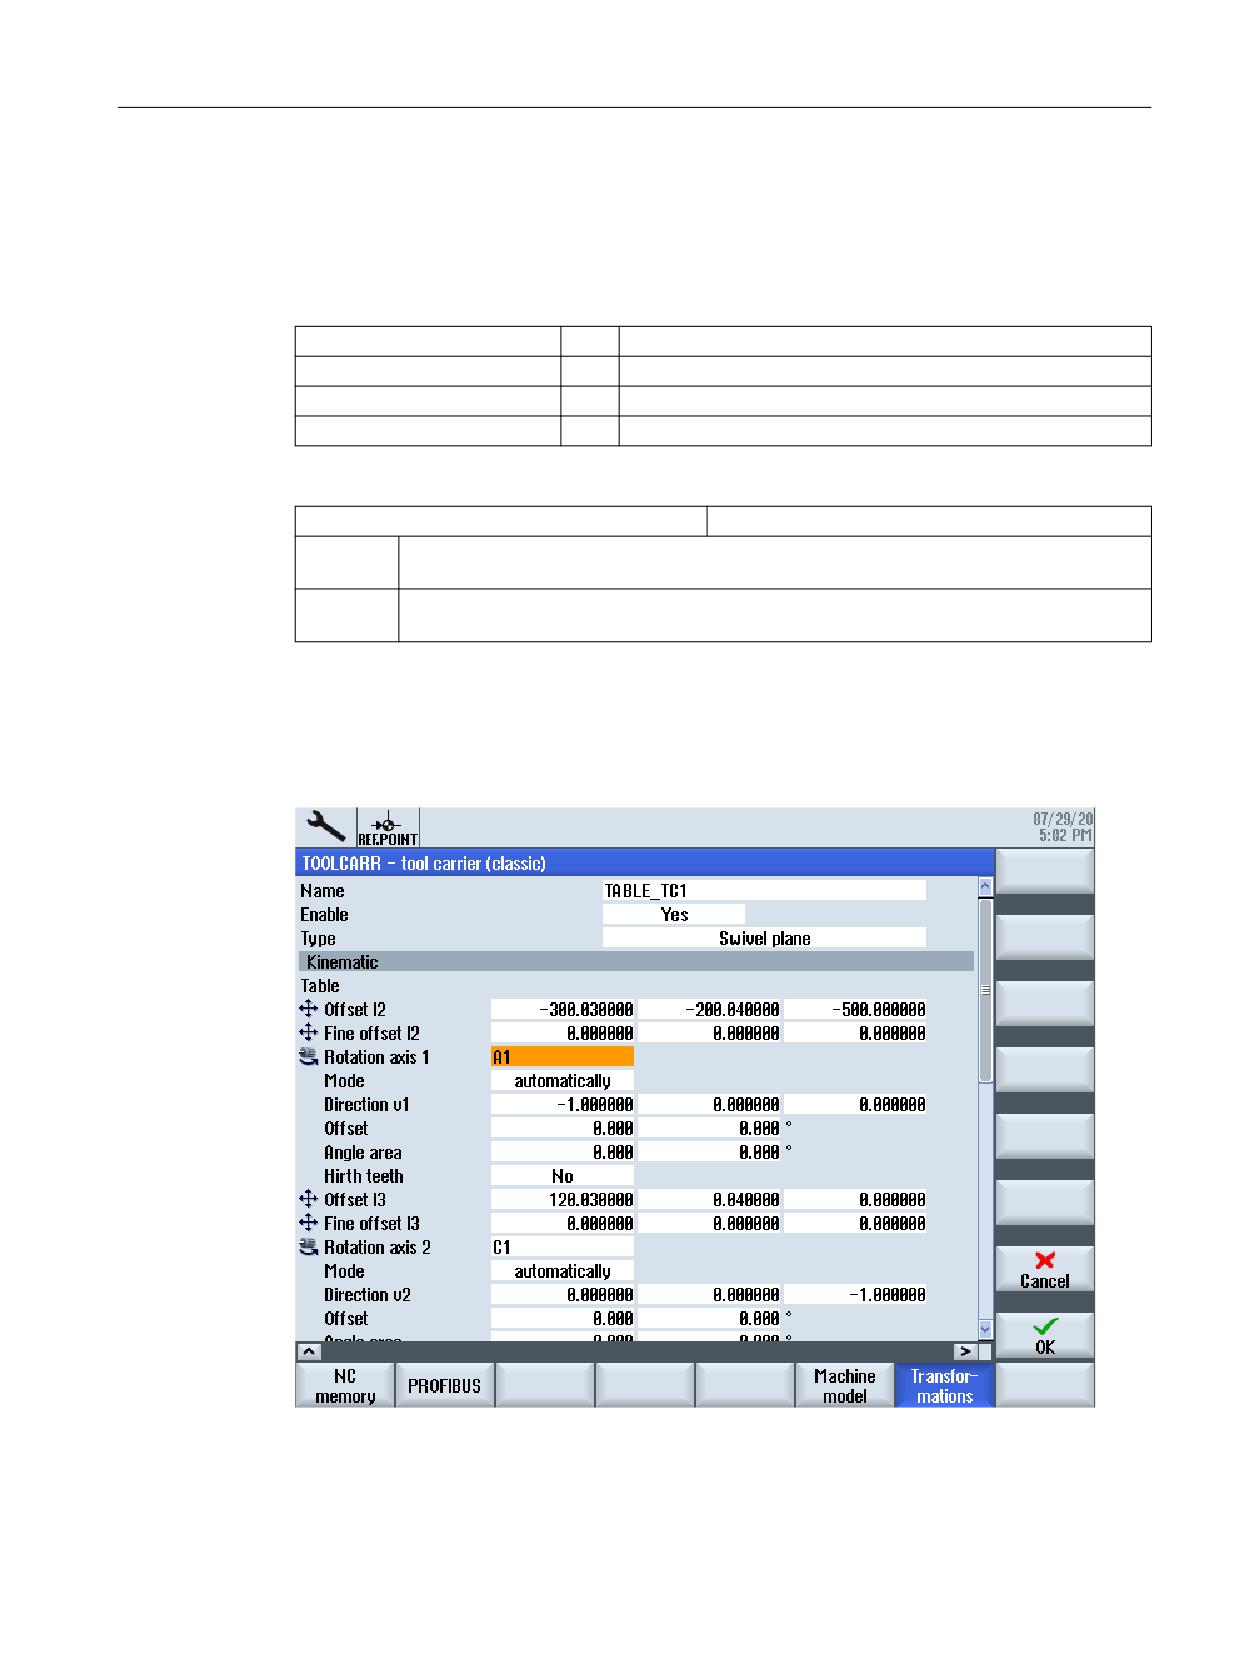
Name of the rotation axes (rotary axes)
Figure 19-7
Dialog to input parameters for the rotary axis
SINUMERIK Operate
Commissioning Manual, 10/2020, 6FC5397-1DP40-6BA4
445
Technologies and cycles
19.7 Swiveling
The following identifiers should be preferably chosen for the names of the rotary axes:
• Rotary axis rotates around machine axis X → A
• Rotary axis rotates around machine axis X → B
• Rotary axis rotates around machine axis Z → C
For automatic rotary axes, the channel names of the corresponding NC rotary axes must be
entered (see $TC_CARR37[n] TENS and HUNDREDS position: Automatic mode). For manual
(manually adjustable) and semiautomatic rotary axes, you can use any axis identifier (up to six
letters or digits).
Manual and semiautomatic rotary axes are not defined in the NC. With manual rotary axes, the
value for the angular range is entered in the dialog box. Semiautomatic rotary axes are moved
mechanically on the machine, e.g. through a coupled spindle. The adaptations for this can be
made in the CUST_800 manufacturer cycle. The value for the angular range must not be
specified, the rotary axis positioning is performed automatically.
Machine manufacturer
Follow the machine manufacturer's instructions.
$TC_CARR35[n]
Name of rotary axis 1
$TC_CARR36[n]
Name of rotary axis 2
19.7.6
Examples of machine kinematics for setting up the classic tool carrier
The following examples are for a classic tool carrier. If the tool carrier is based on a kinematic
chain, the kinematic chain must be set up accordingly:
SINUMERIK Operate
446
Commissioning Manual, 10/2020, 6FC5397-1DP40-6BA4
Technologies and cycles
19.7 Swiveling
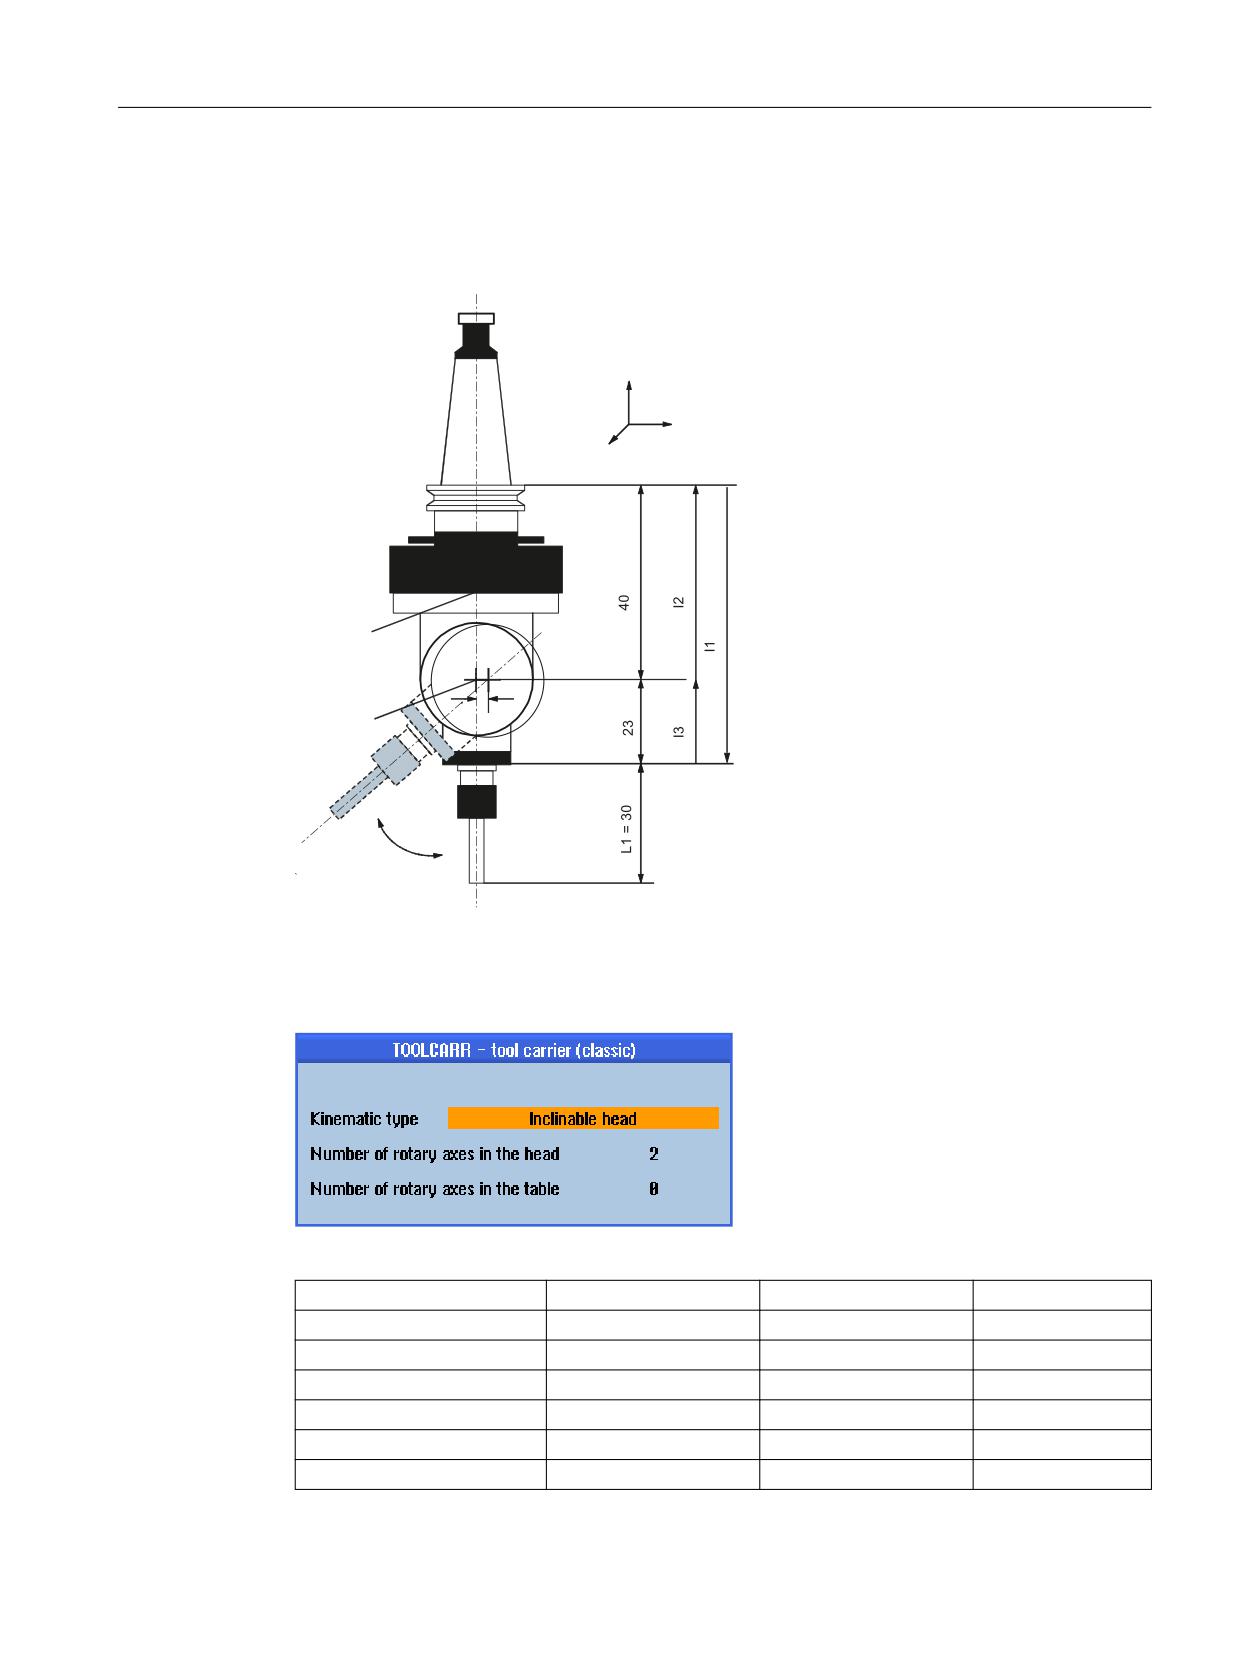
Example 1: Swivel head 1 "HEAD_1"
The vectors in the drawing refer to the initial setting of the kinematics. The drawing is not true
to scale. The swivel head is exchangeable and manually adjustable.
=
<
;
&
$
/ WRRO OHQJWK
C
Rotary axis 1 (manual) rotates about Z.
A
Rotary axis 2 (manual) rotates about X.
Figure 19-8
Exchangeable swivel head with steep taper to hold the spindle
Figure 19-9
Selection of kinematic type
Name
HEAD_1
Enable
Yes
Type
Swivel plane
Offset I1
0.000000
0.030000
-63.000000
Fine offset
0.000000
0.000000
0.000000
Rotation axis 1
C
Mode
Manual
SINUMERIK Operate
Commissioning Manual, 10/2020, 6FC5397-1DP40-6BA4
447

Technologies and cycles
19.7 Swiveling
Direction v1
0.000000
0.000000
0.000000
Offset
0.000°
Angle range
0.000°
360.000°
Hirth teeth
No
Offset I2
0.000000
0.000000
40.000000
Fine offset
0.000000
0.000000
0.000000
Rotation axis 2
A
Mode
Manual
Direction v2
1.000000
0.000000
0.000000
Offset
0.000°
Angle range
-15.000°
100.000°
Hirth teeth
No
Offset I3
0.000000
-0.030000
-23.000000
Fine offset
0.000000
0.000000
0.000000
Properties
Select retract
• Machine axis Z
Yes
• Retract position
200
Select swivel mode
• Axis-by-axis
Yes
Reference axis pref. direction
Rotation axis 2
Select tracking
No
SINUMERIK Operate
448
Commissioning Manual, 10/2020, 6FC5397-1DP40-6BA4
Technologies and cycles
19.7 Swiveling
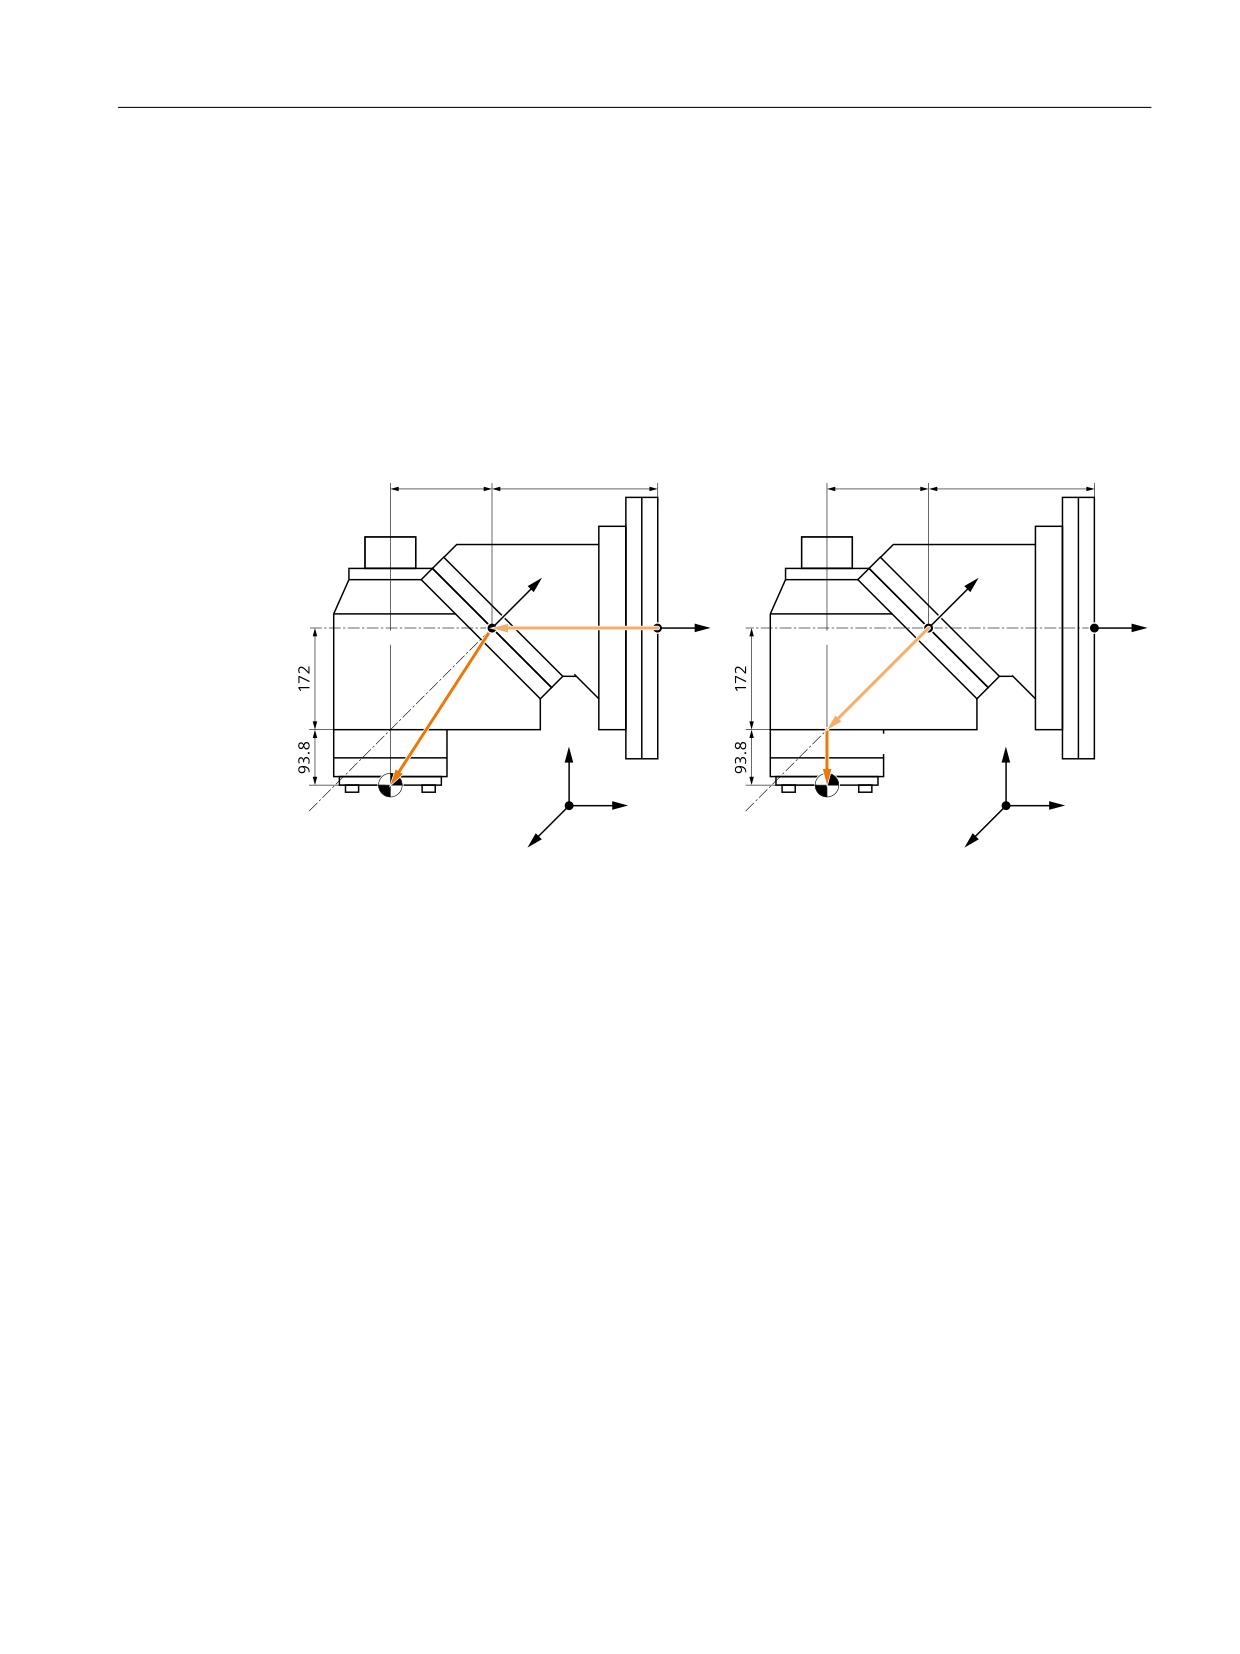
Example 2a: Swivel head 2 "HEAD_2" tool carrier based on kinematic chain
In order to map the kinematics in the machine, we recommend mapping the kinematics as they
actually are with regard to the kinematic chain. The drawing on the left shows how the vectors
are specified to map the kinematics in such a way that reflects how the machine actually is. The
tool carrier starts at the pivot point of the B axis followed by the C_OFFSET up to the actual pivot
point of the C axis with an orientation of (0,1,1). The offset then connects to the reference point
of the tool. However, the tool carrier can also start at the pivot point of the C axis (as is usual with
classic). If the swivel head is firmly attached to the machine and the kinematics are closed, the
result of the description is the same. If there are multiple swivel heads on the machine and the
kinematics are open, the first kinematics description is recommended.
$@"9*4
$@"9*4
$@0''4&5
"YJT PG SPUBUJPO PG
"YJT PG SPUBUJPO PG
#@"9*4
#@"9*4
UIF # BYJ
T
UIF # BYJT
41 @0''4&5
$@0''4&5
;
41 @0''4&5
;
5PPM SFGFSFODF QPJOU
5PPM SFGFSFODF QPJOU
"YJT PG SPUBUJPO PG
:
"YJT PG SPUBUJPO PG
:
UIF $ BYJT
UIF $ BYJT
9
9
Figure 19-10
Swivel head with actual and offset kinematics description
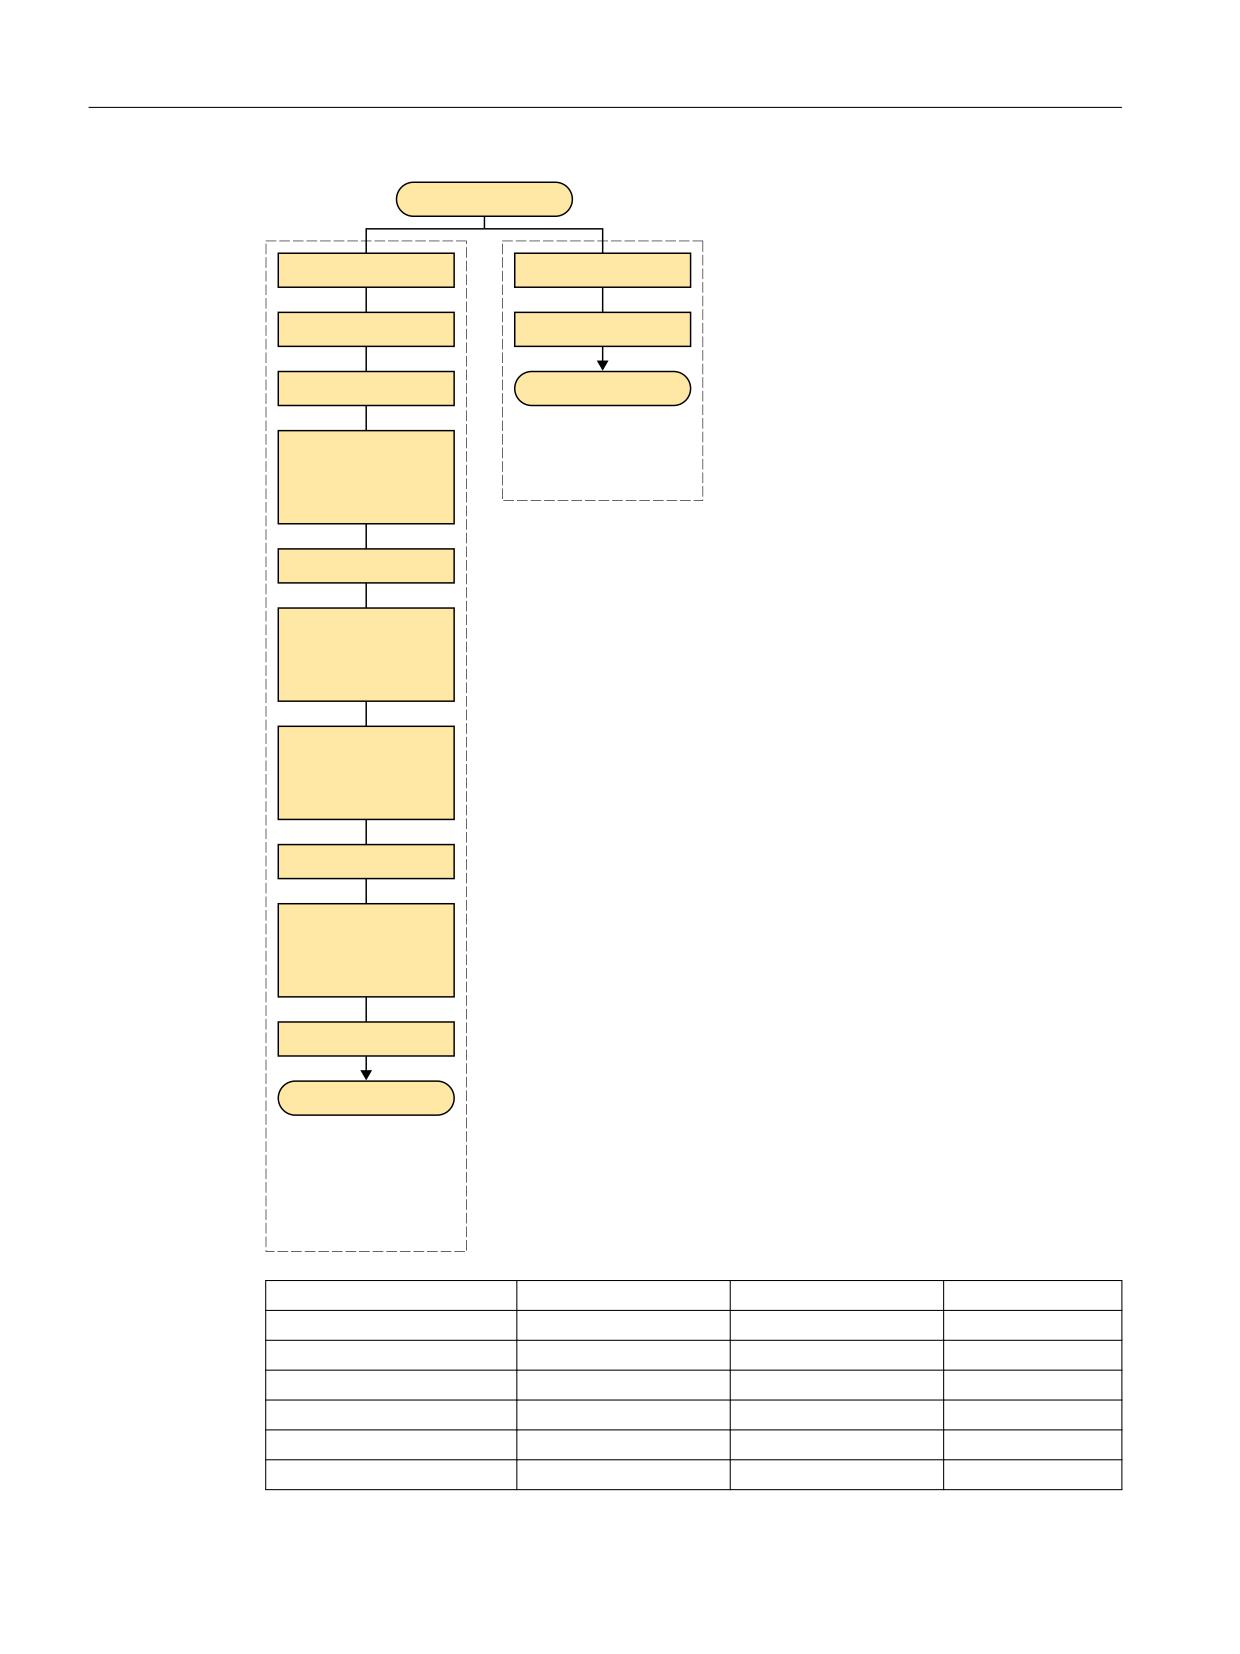
Schematic representation of the chain:
SINUMERIK Operate
Commissioning Manual, 10/2020, 6FC5397-1DP40-6BA4
449
Technologies and cycles
19.7 Swiveling
3005 .,4
:@"9*4
9@"9*4
;@"9*4
5"#-&@0''4&5
#@0''4&5
&/%@1"35@$)"*/
5BCMF DIBJO XJUI MJOFBS
#@"9*4
BYJT 9 XIJDI NPWFT UIF
"YJT PG SPUBUJPO
9
UBCMF
"YJT PG SPUBUJPO :
"YJT PG SPUBUJPO ;
$033@$@0''4&5
$@0''4&5
0TFU 9
0TFU :
0TFU ;
$@"9*4
"YJT PG SPUBUJPO
9
"YJT PG SPUBUJPO :
"YJT PG SPUBUJPO ;
$033@41 @0''4&5
41 @0''4&5
0TFU 9
0TFU :
0TFU ;
41 @"9*4
&/%@500-@$)"*/
)FBE DIBJO XJUI MJOFBS
BYFT : BOE ; XIJDI
NPWF UIF IFBE
LJOFNBUJDT XJUI
SPUBUJPO BYFT # BOE $
Name
HEAD_2
Enable
Yes
Type
Swivel plane
Kinematics
Tool chain
Start of tool chain
Z_AXIS
Rotation axis
B_AXIS
SINUMERIK Operate
450
Commissioning Manual, 10/2020, 6FC5397-1DP40-6BA4

Technologies and cycles
19.7 Swiveling
Angle range
0.000°
360.000°
Hirth teeth
No
Correction element
CORR_C_OFFSET
Rotation axis
C_AXIS
Angle range
-15.000°
100.000°
Hirth teeth
No
Correction element
CORR_SP1_OFFSET
End of tool chain
SP1_OFFSET
Close tool chain
Yes
Properties
Select retract
• Machine axis Z
Yes
• Retract position
200
Select swivel mode
• Axis-by-axis
Yes
Reference axis pref. direction
Rotation axis 2
Select tracking
No
SINUMERIK Operate
Commissioning Manual, 10/2020, 6FC5397-1DP40-6BA4
451
Technologies and cycles
19.7 Swiveling
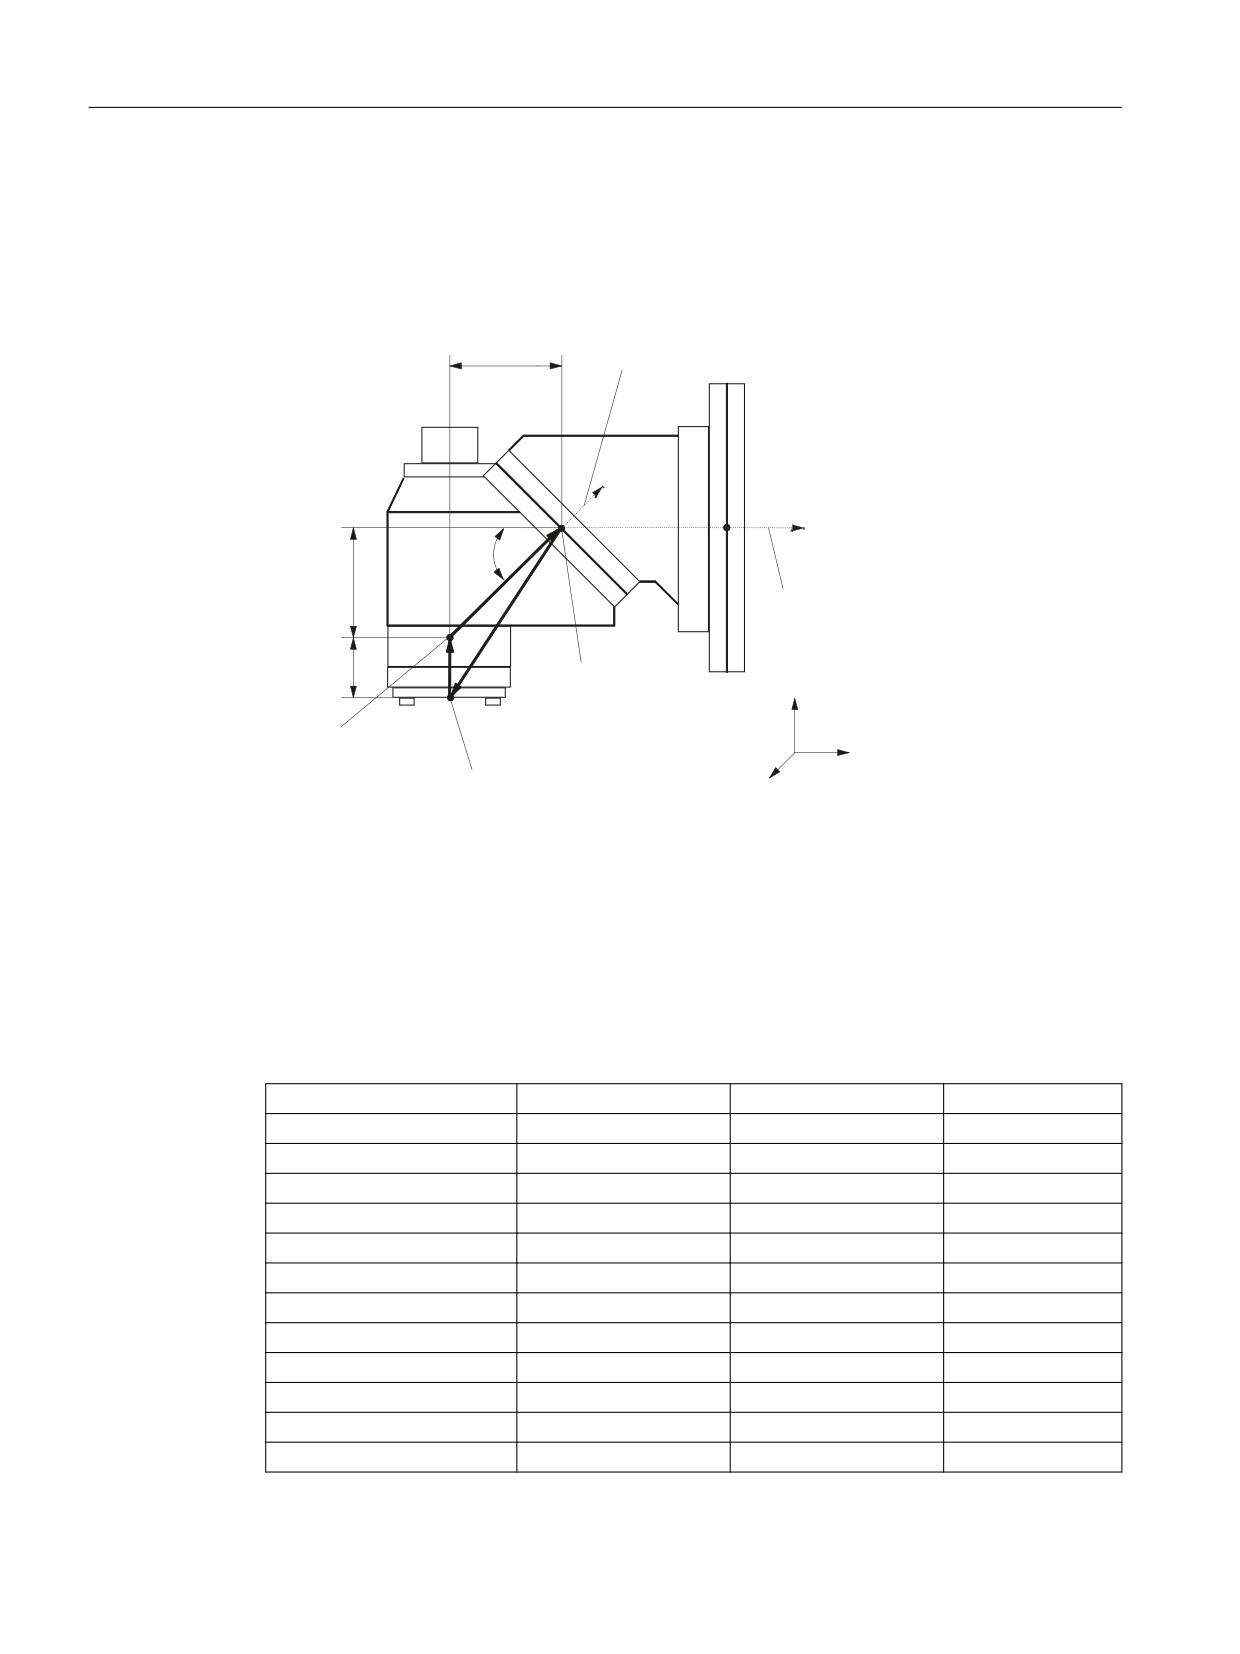
Example 2b: Swivel head 2 "HEAD_2" classic tool carrier
The vectors in the drawing refer to the initial setting of the kinematics. If the swivel head is fixed-
mounted, the vector chain is closed. The reference point of the center of rotation of rotary axes
1 and 2 can be offset on the line of rotation and does not have to coincide with the mechanical
center of rotation.
5RWDU\ D[LV
9
9
JUG
,
,
5RWDU\ D[LV
,
&HQWHU RI URWDWLRQ RI
=
URWDU\ D[LV
&HQWHU RI URWDWLRQ
RI URWDU\ D[LV
<
5HIHUHQFH SRLQW
;
RI WRRO
Direction v1
Rotary axis 1 rotates about Y.
Direction v2
Rotary axis 2 rotates about Y and about Z.
Offset I1
Closure of vector chain with fixed-mounted swivel head, I1 = - (I2 + I3).
Offset I2
The distance between the center of rotation of rotary axis 1 and center of
rotation of rotary axis 2.
Offset I3
The distance between the reference point of the tool and the center of rotation
of rotary axis 2.
Figure 19-11
Cardanic swivel head with Hirth joint, manually adjustable
Name
HEAD_2
Enable
Yes
Type
Swivel plane
Offset I1
0.000000
-172.000000
265.800000
Fine offset I1
0.000000
0.000000
0.000000
Rotation axis 1
B
Mode
Automatic
Direction v1
0.000000
1.000000
0.000000
Offset
0.000°
Angle range
0.000°
360.000°
Hirth teeth
No
Offset I2
0.000000
172.000000
172.000000
Fine offset
0.000000
0.000000
0.000000
SINUMERIK Operate
452
Commissioning Manual, 10/2020, 6FC5397-1DP40-6BA4
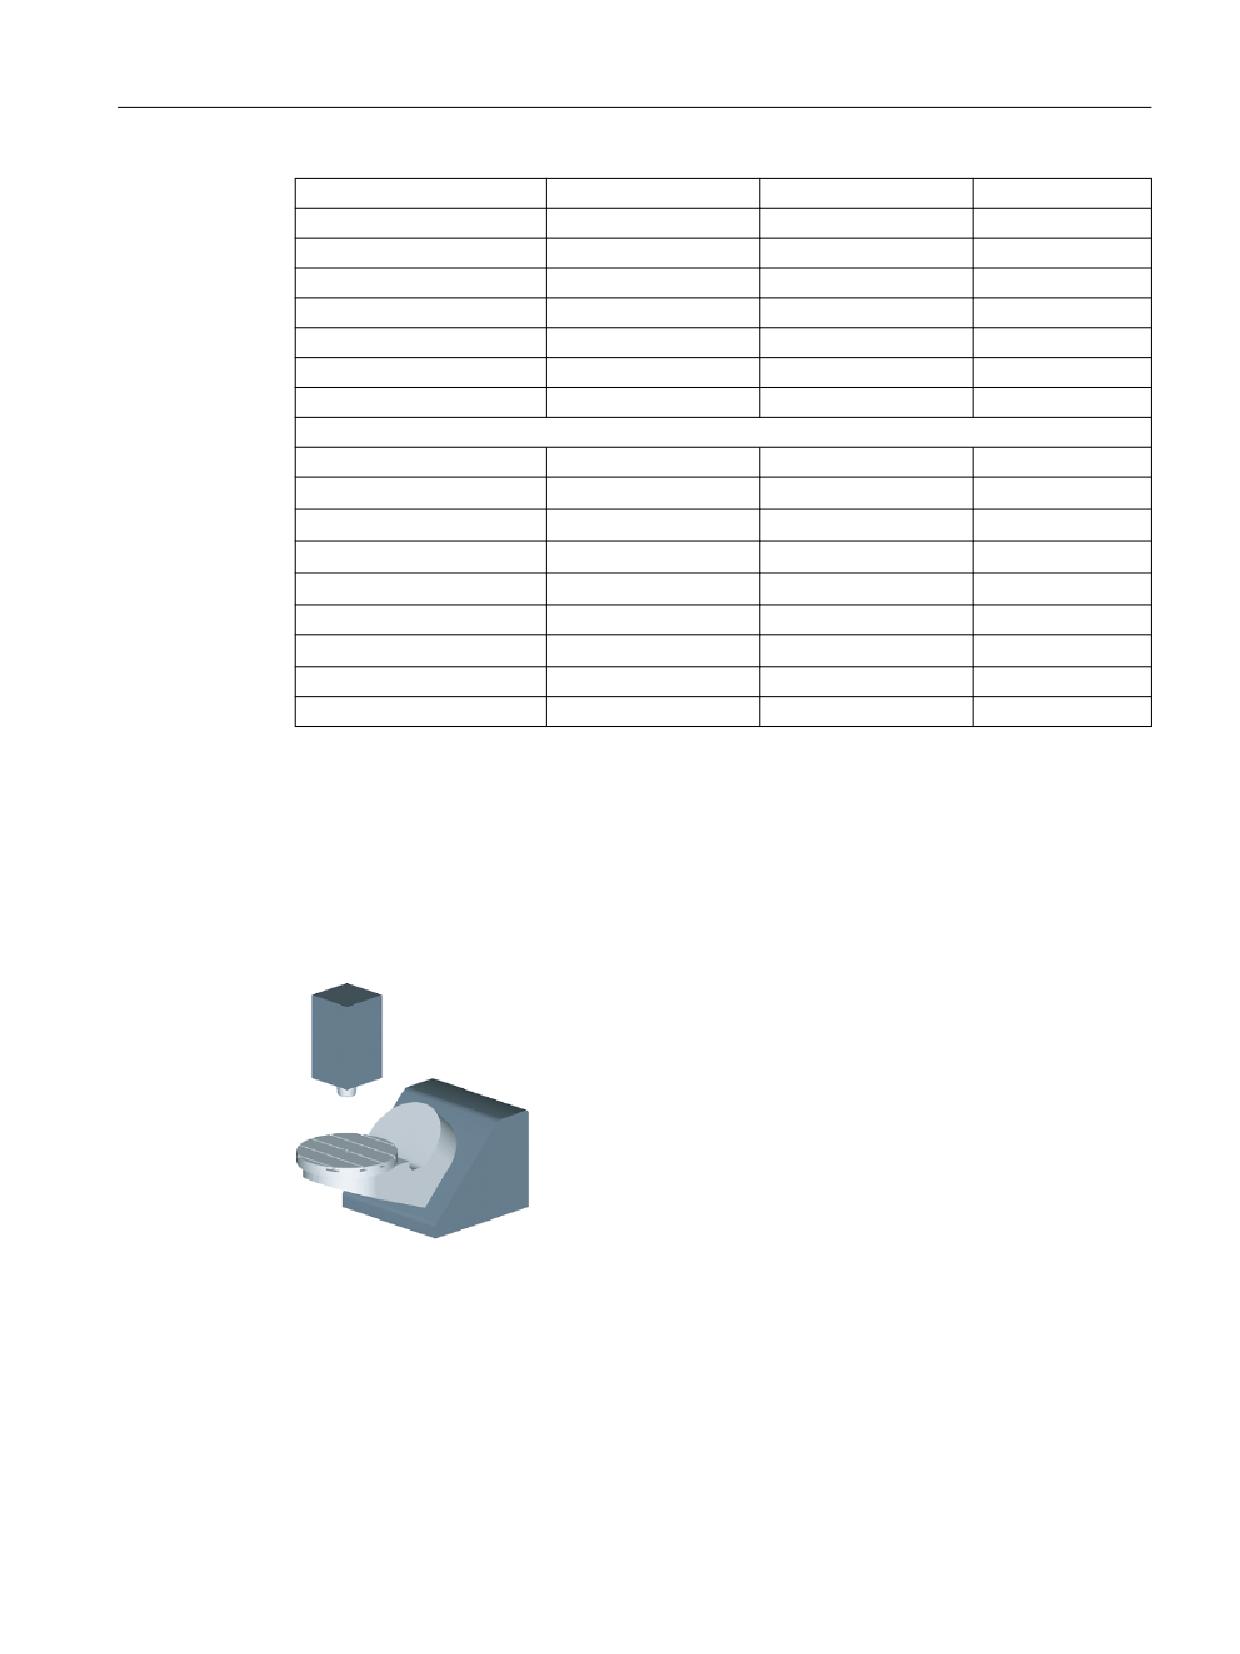
Technologies and cycles
19.7 Swiveling
Rotation axis 2
C
Mode
Automatic
Direction v2
0.000000
-1.000000 1)
1.000000 1)
Offset
0.000°
Angle range
0.000°
180.000°
Hirth teeth
Yes
1°
Offset I3
0.000000
-0.030000
93.800000
Fine offset
0.000000
0.000000
0.000000
Properties
Select retract
• In tool direction, inc.
Yes
• In tool direction, max.
Yes
• Machine axis Z
• Retract position Z
200
Select swivel mode
• Axis-by-axis
Yes
Reference axis pref. direction
Rotation axis 2
Select tracking
No
1) Calculation of rotary axis vector:
V2: 45 degree angle
V2Y = sin(-45) = -0.7071
V2Z = cos(-45) = 0.7071
V2Y and V2Z can be normalized to 1.
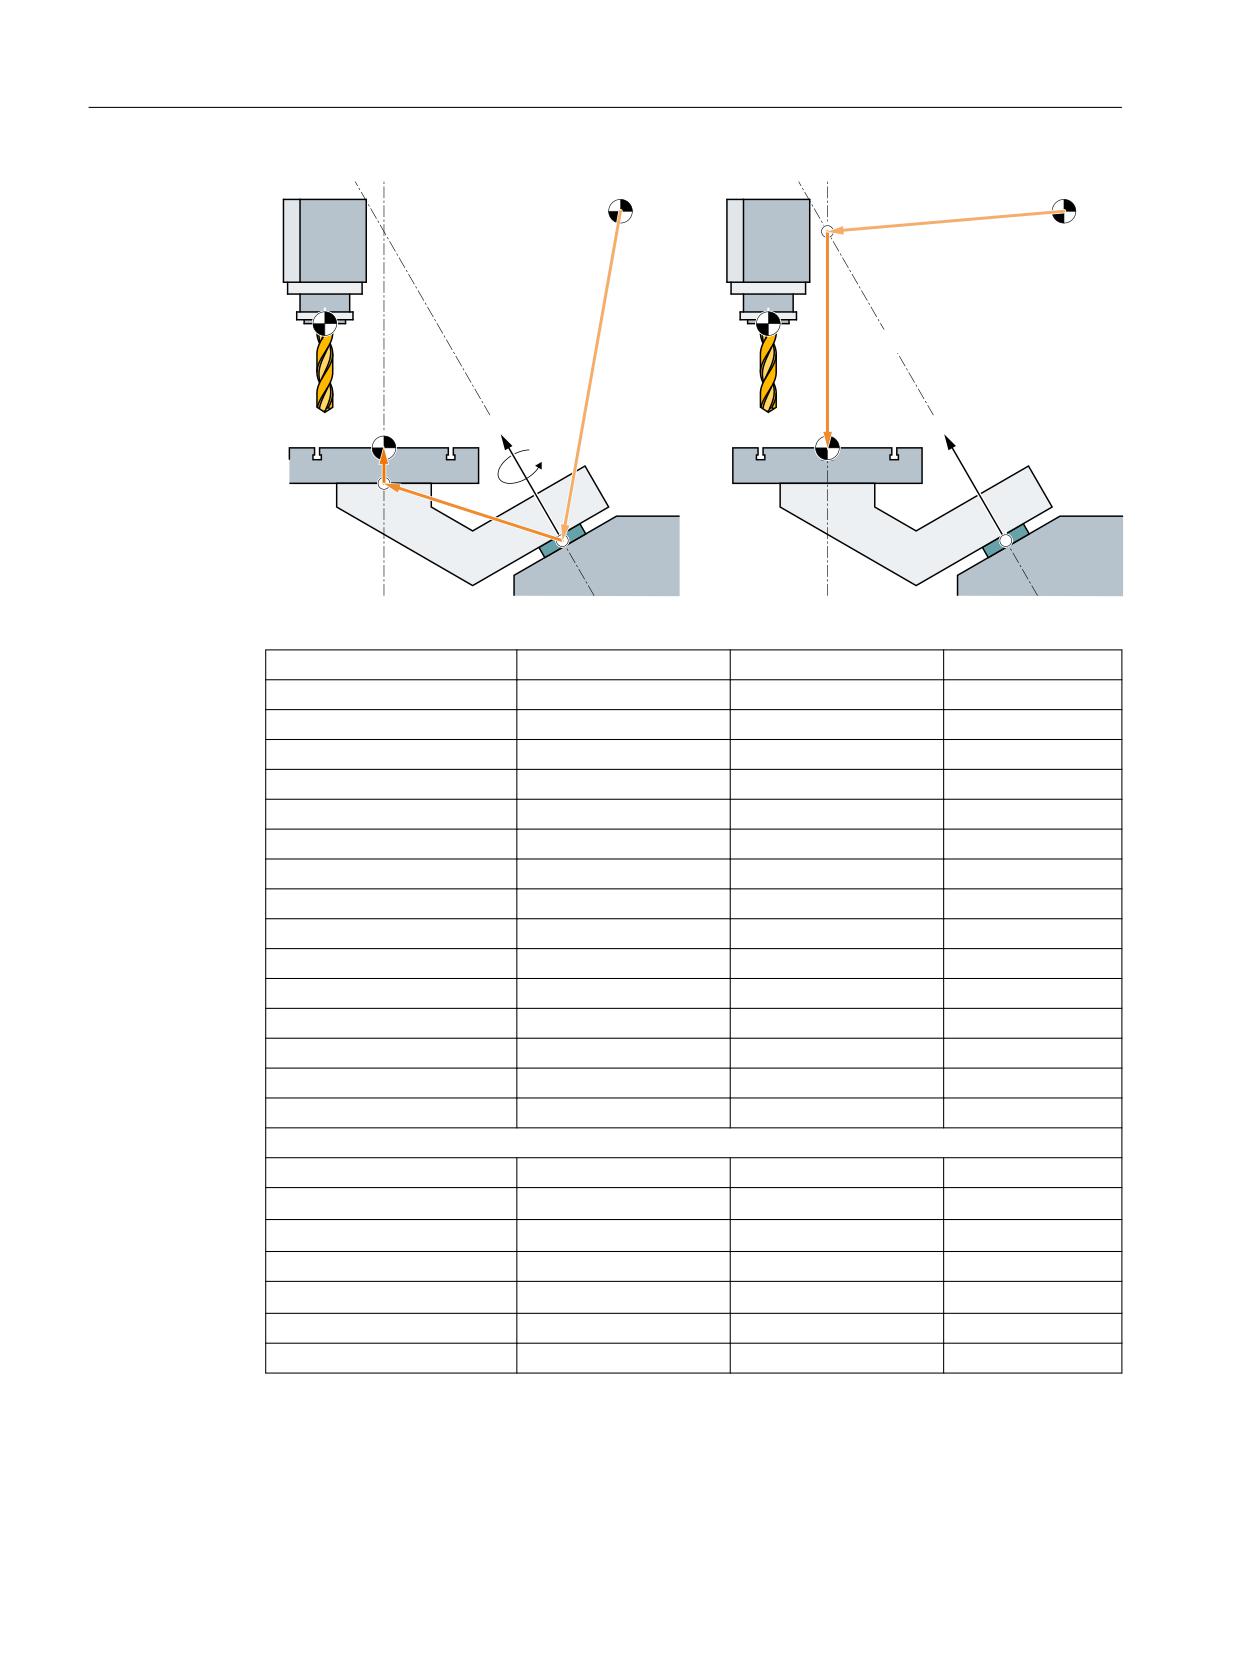
Example 3a: Cardanic table "TABLE_45" TCARR based on kinematic chain
The vectors in the drawing refer to the initial setting of the kinematics. The A_OFFSET vector can
be offset anywhere on the axis of rotation of the A axis.
SINUMERIK Operate
Commissioning Manual, 10/2020, 6FC5397-1DP40-6BA4
453
Technologies and cycles
19.7 Swiveling
"@0''4&5
3005
3005
.,4
.,4
"@0''4&5
$@0''4&5
3FGFSFODF QPJOU PG UIF
3FGFSFODF QPJOU PG UIF
UPPM UBCMF
UPPM UBCMF
5"#-&@0''4&5
$@0''4&5
$@"9*4
"@"9*4
$@"9*4
"@"9*4
Figure 19-12
Vector offset A_OFFSET
Name
TABLE_45
Enable
Yes
Type
Swivel plane
Kinematics
Tool chain
Start of tool chain
Z_AXIS
CORR_A_OFFSET
Rotation axis
A_AXIS
Angle range
0.000°
360.000°
Hirth teeth
No
Correction element
CORR_C_OFFSET
Rotation axis
C_AXIS
Angle range
0.000°
360.000°
Hirth teeth
No
End of tool chain
OFFSET_TABLE
Close tool chain
Yes
Properties
Select retract
• Machine axis Z
Yes
• Retract position
200
Select swivel mode
• Axis-by-axis
Yes
Reference axis pref. direction
Rotation axis 1
Select tracking
No
SINUMERIK Operate
454
Commissioning Manual, 10/2020, 6FC5397-1DP40-6BA4
Technologies and cycles
19.7 Swiveling
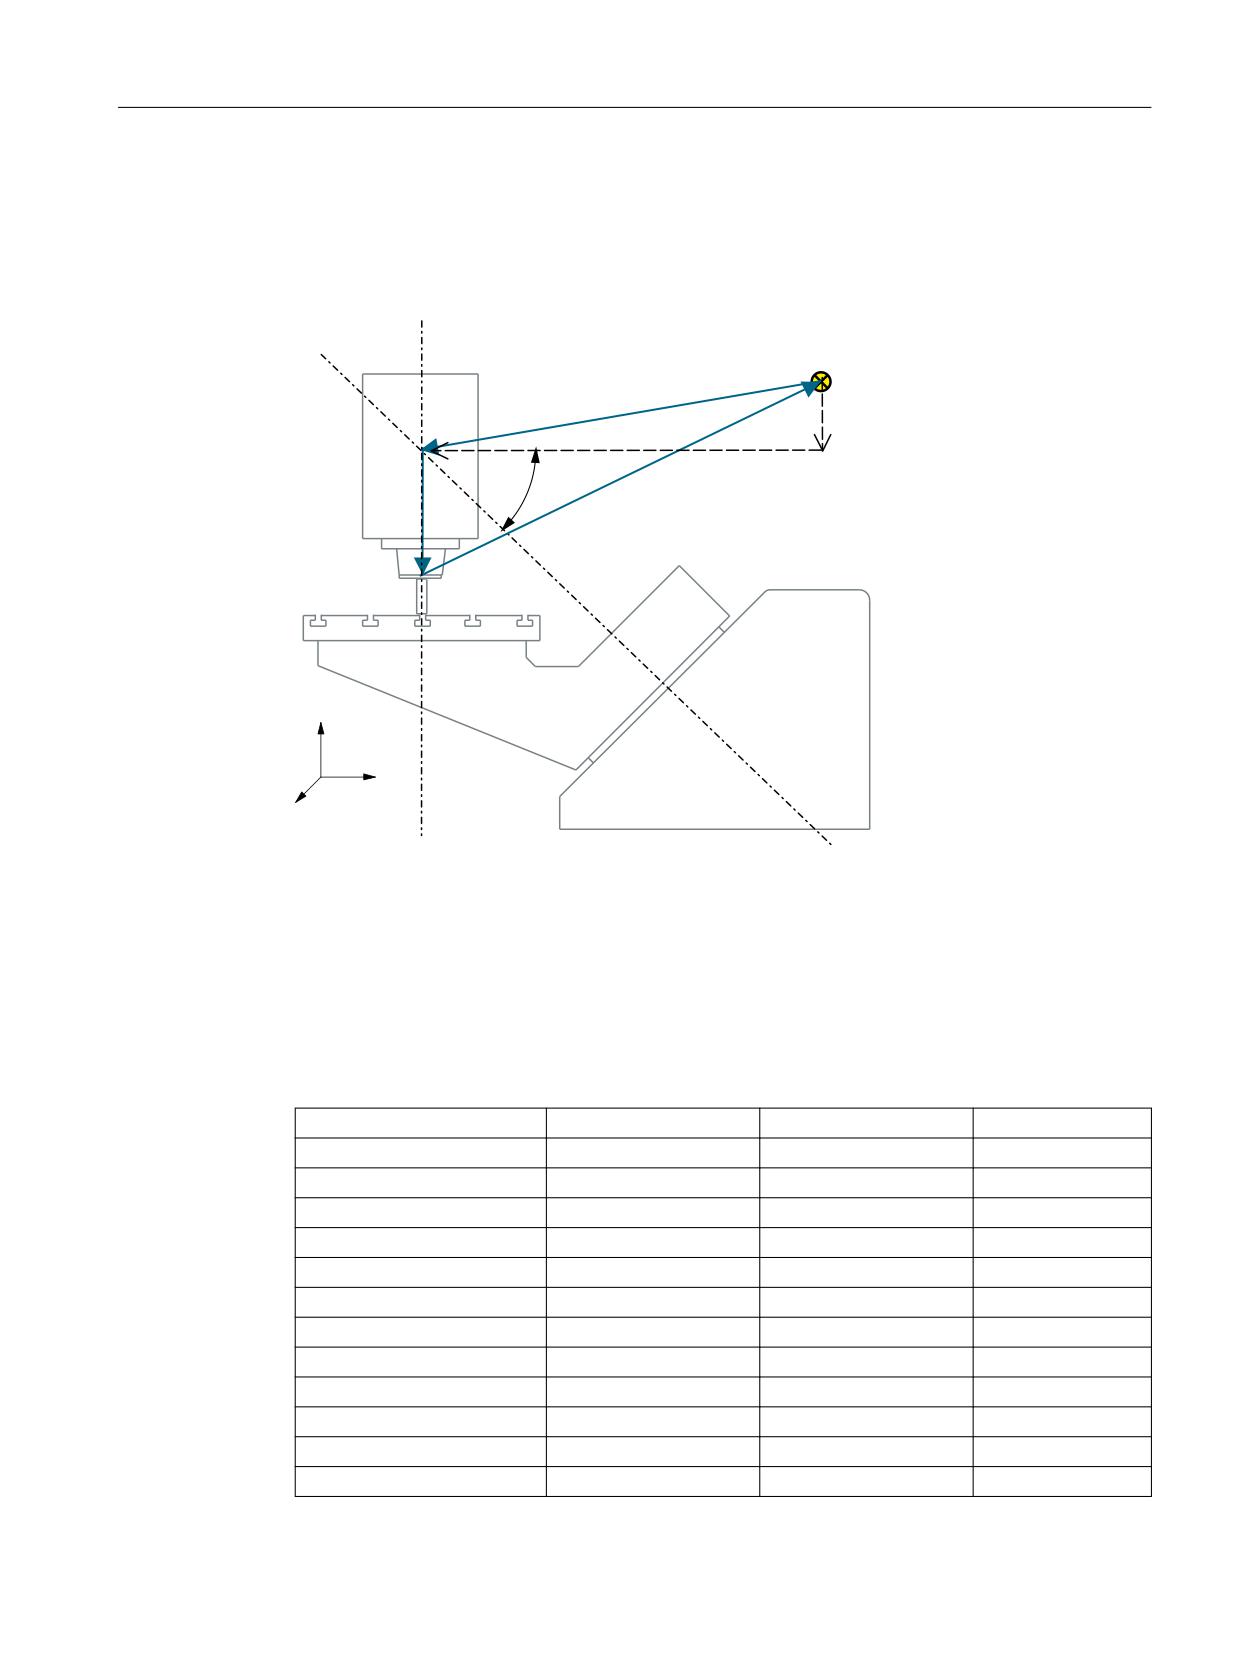
Example 3b: Cardanic table "TABLE_45" classic TCARR
The vectors in the drawing refer to the initial setting of the kinematics. The spindle (tool adapter)
is positioned on a gage block above the top edge of the table/center of the table (rotary axis C).
A measuring rod in the spindle is used to determine the turning center of rotary table C.
5HIHUHQFH SRLQW RI WKH PDFKLQH
0.6 ;
<
=
9
,
,
]
,
\
,
¡
,
]
,
5RWDU\ D[LV &
5RWDU\ D[LV %
=
9
<
;
Direction v1
Rotary axis B rotates around Y and around Z.
Direction v2
Rotary axis C rotates about Z.
Offset I2
The distance from the reference point of the machine to the center of rotation/
intersection of rotary axis 1.
Offset I3
The distance from the center of rotation/intersection of rotary axis 1 to the
center of rotation/intersection of rotary axis 2.
Offset I4
Closure of vector chain, I4 = - (I2 + I3).
Figure 19-13
Side view of the machine
Name
TABLE_45
Enable
Yes
Type
Swivel plane
Kinematics
Table
Offset I2
0.000000
-100.000000
-20.000000
Fine offset I2
0.000000
0.000000
0.000000
Rotation axis 1
B
Mode
Automatic
Direction v1
0.000000
-1.000000 1)
1.000000 1)
Offset
0.000°
Angle range
0.000°
180.000°
Hirth teeth
No
SINUMERIK Operate
Commissioning Manual, 10/2020, 6FC5397-1DP40-6BA4
455
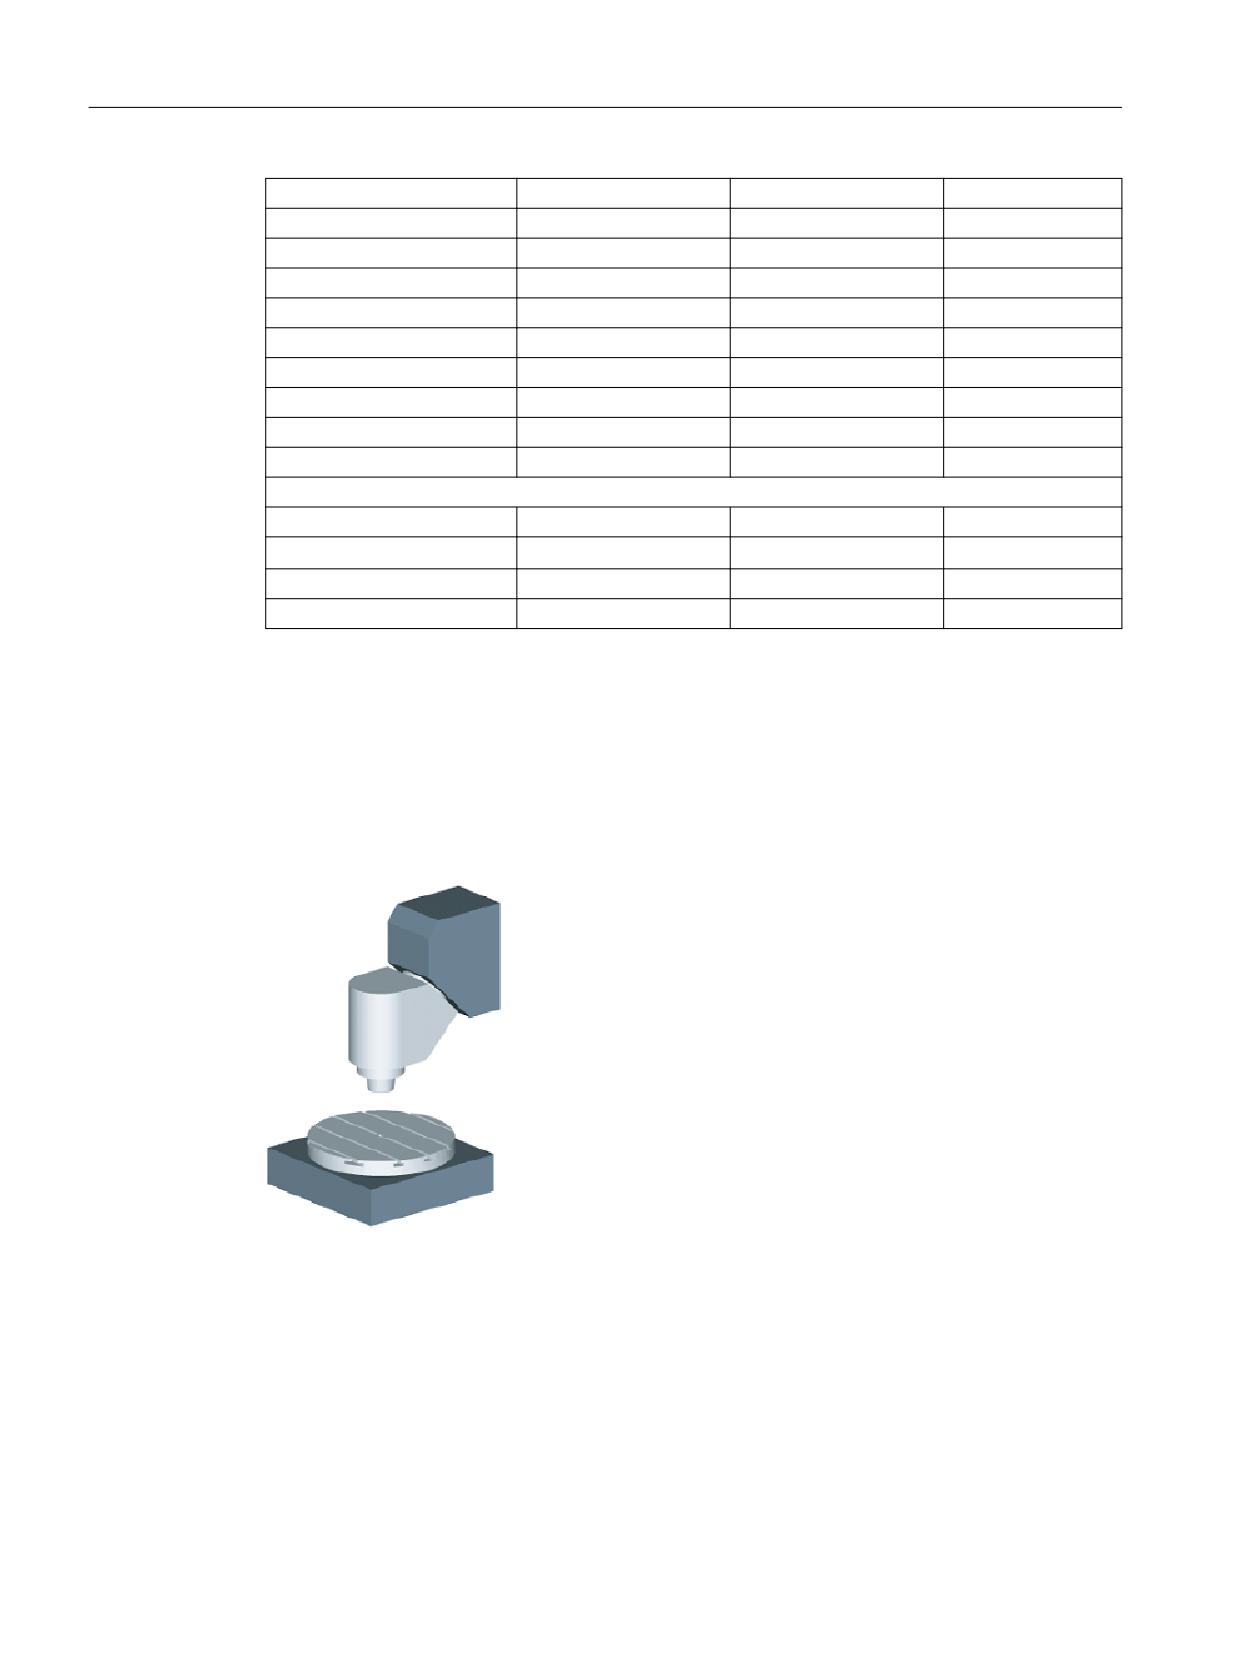
Technologies and cycles
19.7 Swiveling
Offset I3
0.000000
0.000000
-30.000000
Fine offset I3
0.000000
0.000000
0.000000
Rotation axis 2
C
Mode
Automatic
Direction v2
0.000000
0.000000
-1.000000
Offset
0.000°
Angle range
0.000°
360.000°
Hirth teeth
No
Offset I4
-300.000000
100.000000
50.000000
Fine offset I4
0.000000
0.000000
0.000000
Properties
Select swivel mode
• Axis-by-axis
Yes
Reference axis pref. direction
Rotation axis 1
Select tracking
No
1) Calculation of rotary axis vector:
V1: β = -45 degrees
V1Y= sin(-45)= -0.7071
V1Z= cos(-45)= 0.7071
V1Y and V1Z can be normalized to -1 and 1.
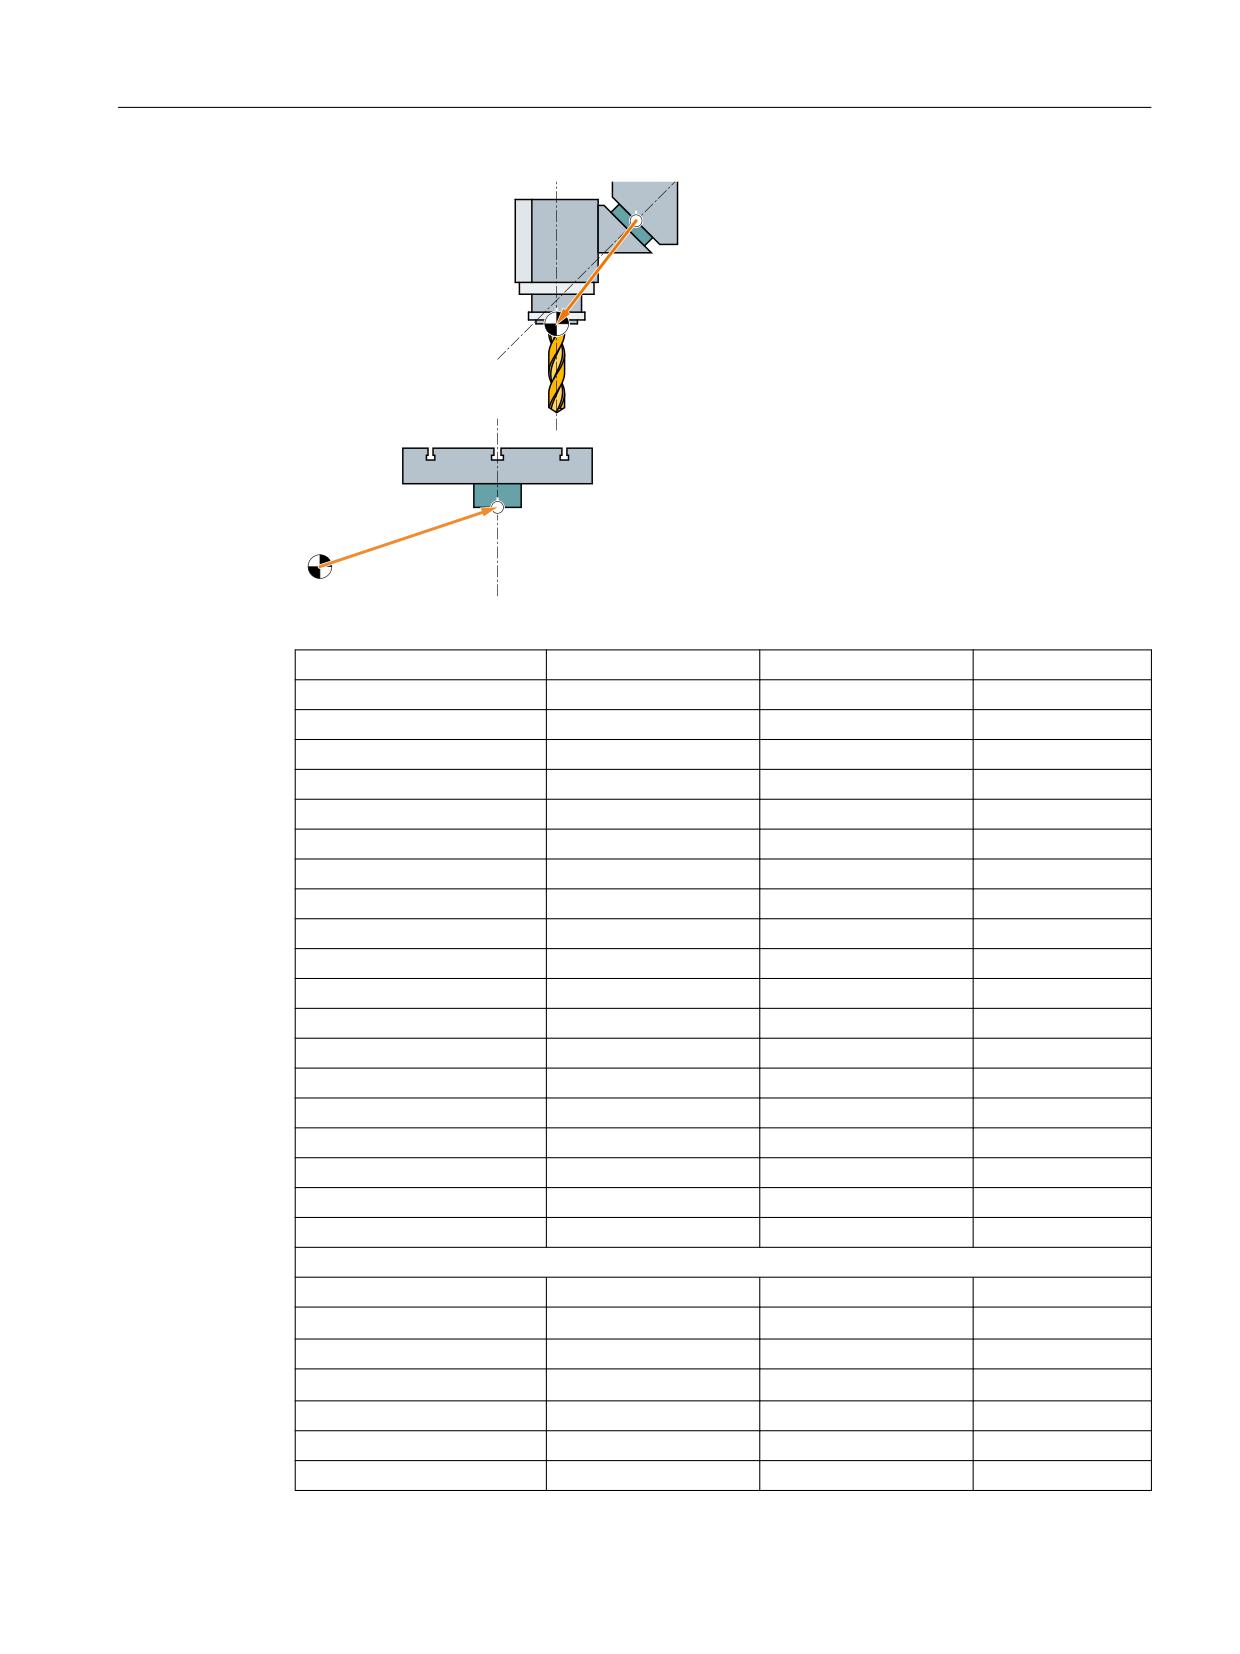
Example 4a: Swivel head/rotary table "MIXED_45" based on kinematic chain
The vectors in the drawing refer to the initial setting of the kinematics. The vector SP1_OFFSET
of the B axis to the reference point of the tool can be offset anywhere on the axis of rotation of
the B axis.
SINUMERIK Operate
456
Commissioning Manual, 10/2020, 6FC5397-1DP40-6BA4
Technologies and cycles
19.7 Swiveling
41 @0''4&5
3FGFSFODF QPJOU PG
#@"9*4
UIF UPPM
41 @"9*4
$@0''4&5
$@"9*4
Figure 19-14
Vector offset SP1_OFFSET
Name
MIXED_45
Enable
Yes
Type
Swivel plane
Kinematics
Tool chain
Start of tool chain
Z_AXIS
Rotation axis
B_AXIS
Angle range
0.000°
180.000°
Hirth teeth
No
Correction element
CORR_SP1_OFFSET
End of tool chain
SP1_AXIS
Close tool chain
Yes
Workpiece chain
Start of workpiece chain
Correction element
CORR_C1_OFFSET
Rotation axis
C_AXIS
Angle range
0.000°
360.000°
Hirth teeth
No
End of workpiece chain
C_AXIS
Close tool chain
Yes
Properties
Select retract
• Machine axis Z
No
Select swivel mode
• Axis-by-axis
Yes
Select prefer. direction
Yes, default=+
Reference axis pref. direction
Rotation axis 1
Select tracking
No
SINUMERIK Operate
Commissioning Manual, 10/2020, 6FC5397-1DP40-6BA4
457
Technologies and cycles
19.7 Swiveling
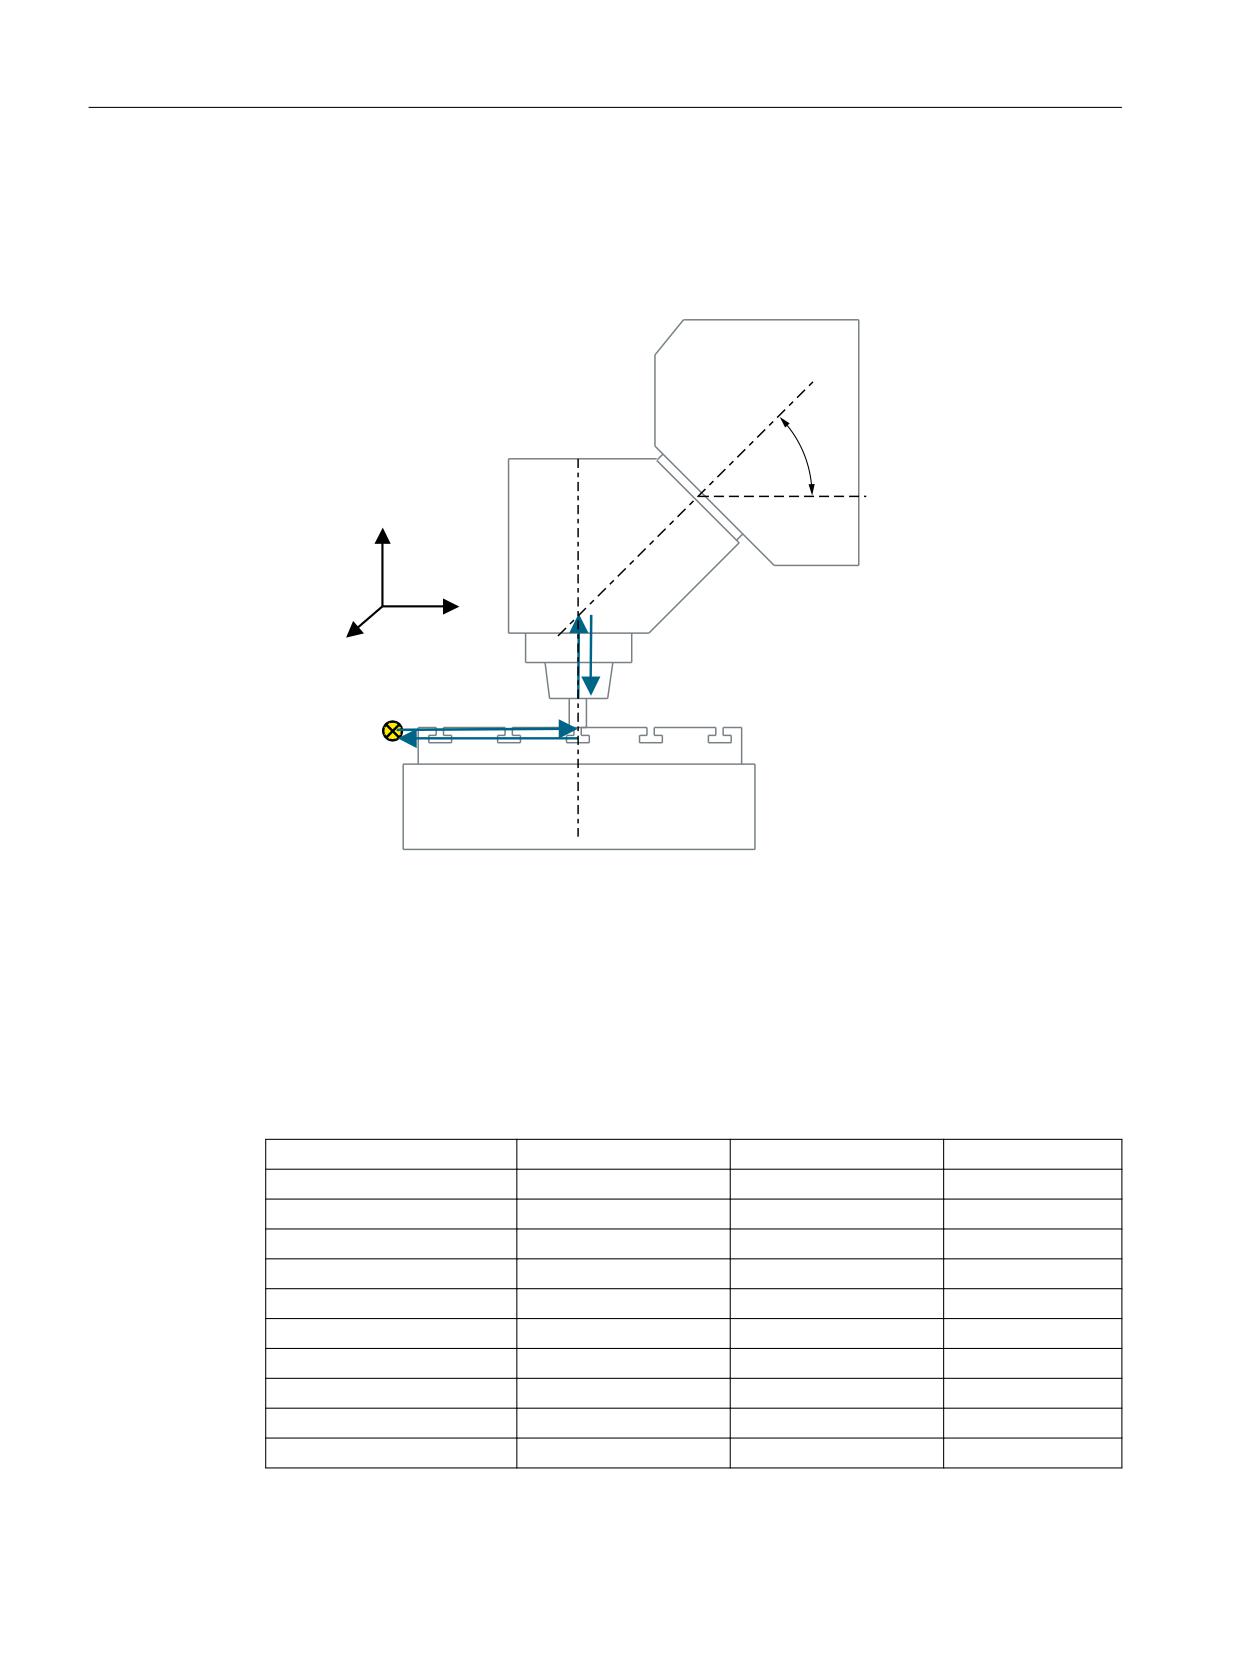
Example 4b: Swivel head/rotary table "MIXED_45" with classic tool carrier
The vectors in the drawing refer to the initial setting of the kinematics. The spindle (tool adapter)
is positioned on a gage block above the top edge of the table/center of the table (rotary axis C).
A measuring rod in the spindle is used to determine the turning center of rotary table C.
9
¡
=
5RWDU\ D[LV %
<
;
O
O
]
O
O
O
O
\
5HIHUHQFH SRLQW RI
O
O
5RWDU\ D[LV &
WKH PDFKLQH
0.6 ;
<
=
9
Direction v1
Rotary axis B rotates around Y and around Z.
Direction v2
Rotary axis C rotates about Z.
Offset I2
The distance from the reference point of the tool adapter to the center of
rotation/intersection of rotary axis 1.
Offset I1
Closure of vector chain, I1 = - I2.
Offset I3
The distance from the reference point of the machine to the center of rotation/
intersection of rotary axis 2.
Offset I4
Closure of vector chain, I4 = - I3.
Figure 19-15
Side view of the machine
Name
MIXED_45
Enable
Yes
Type
Swivel plane
Kinematics
Head
Offset I1
0.000000
0.000000
-30.000000
Fine offset I1
0.000000
0.000000
0.000000
Rotation axis 1
B
Mode
Automatic
Direction v1
0.000000
1.000000 1)
1.000000 1)
Offset
0.000°
SINUMERIK Operate
458
Commissioning Manual, 10/2020, 6FC5397-1DP40-6BA4
Technologies and cycles
19.7 Swiveling
Angle range
0.000°
180.000°
Hirth teeth
No
Offset I2
0.000000
0.000000
30.000000
Fine offset I2
0.000000
0.000000
0.000000
Table
Offset I3
300.000000
150.000000
0.000000
Fine offset I3
0.000000
0.000000
0.000000
Rotation axis 2
C
Mode
Automatic
Direction v2
0.000000
0.000000
-1.000000
Offset
0.000°
Angle range
0.000°
360.000°
Hirth teeth
No
Offset I4
-300.000000
-150.000000
0.000000
Fine offset I4
0.000000
0.000000
0.000000
1) Calculation of rotary axis vector:
V1: β = 45 degrees
V1Y= sin(-45)= -0.7071
V1Z= cos(-45)= 0.7071
V1Y and V1Z can be normalized to 1.
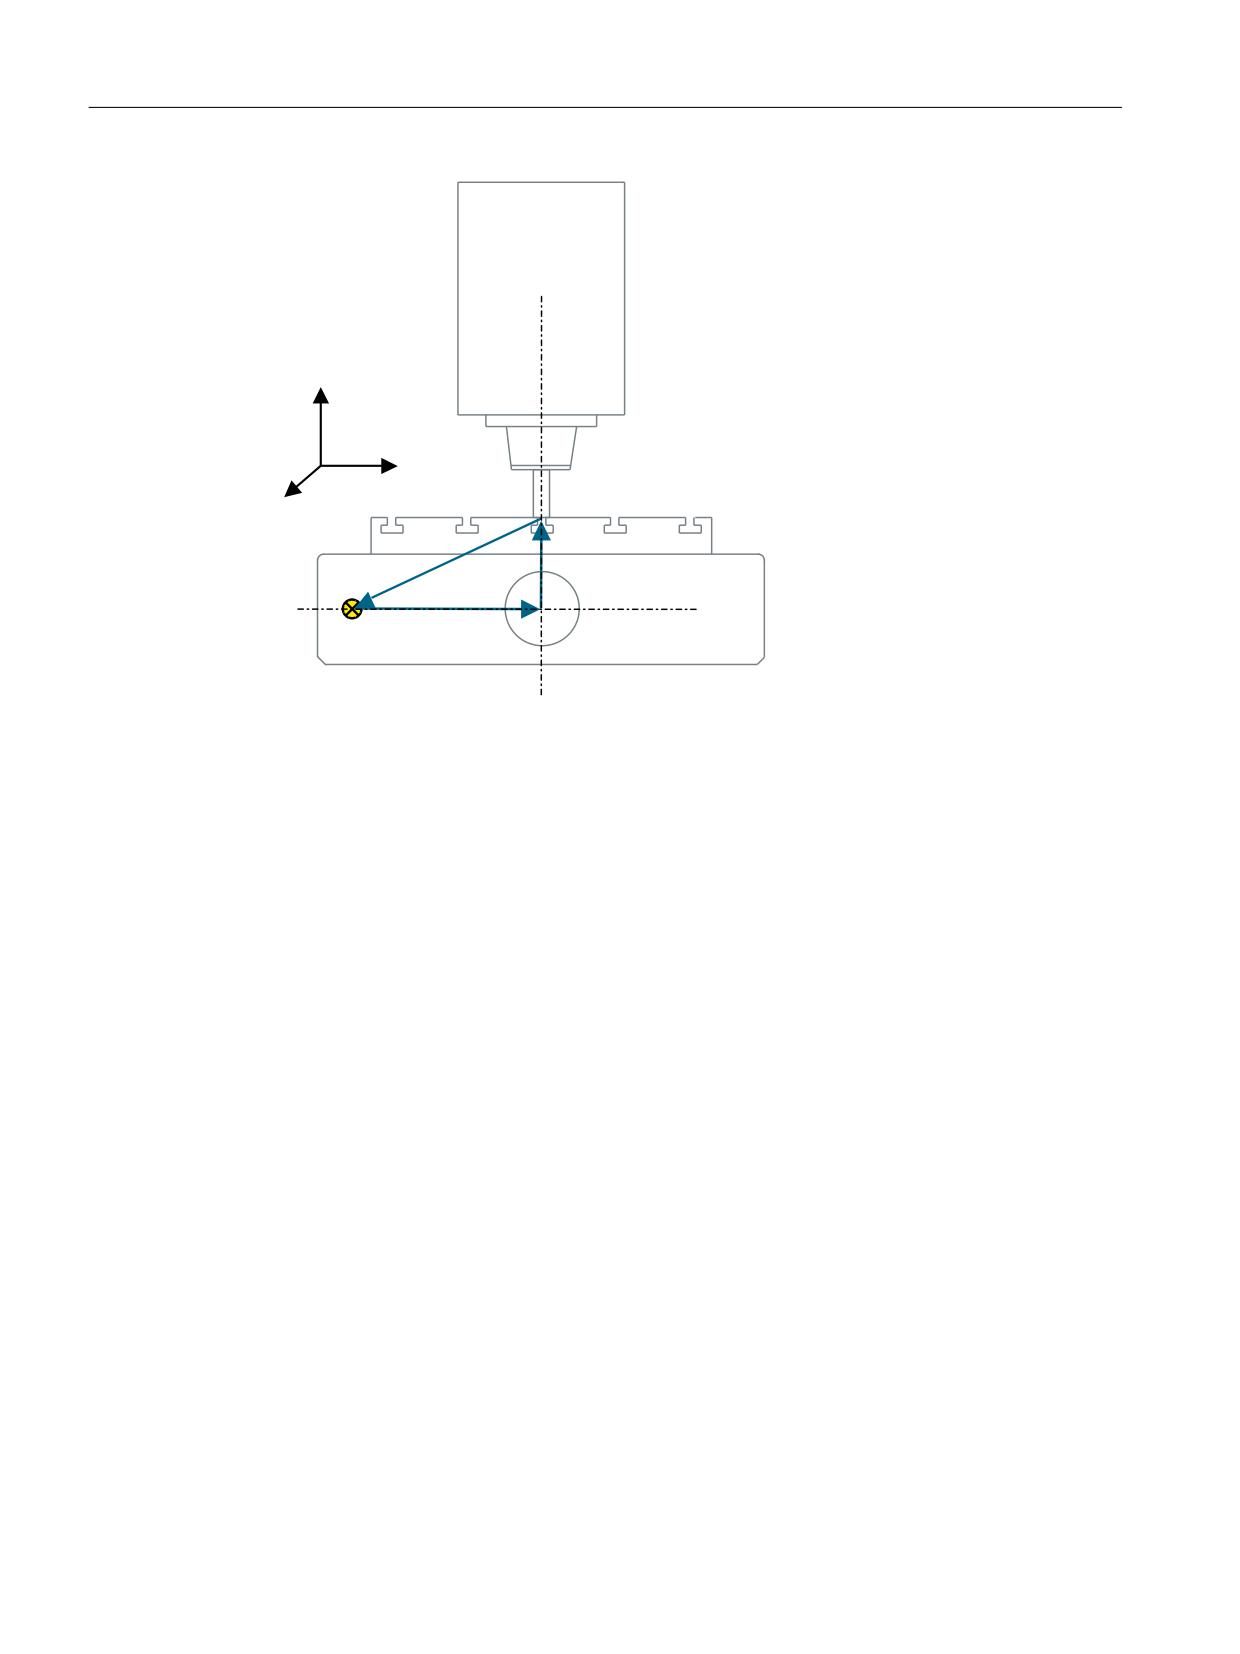
Example 5: Swivel table "Table_5" with classic tool carrier
The vectors in the drawing refer to the initial setting of the kinematics. The spindle (tool adapter)
is positioned on a gage block above the top edge of the table/center of the table (rotary axis C).
A measuring rod in the spindle is used to determine the turning center of rotary table C.
SINUMERIK Operate
Commissioning Manual, 10/2020, 6FC5397-1DP40-6BA4
459
Technologies and cycles
19.7 Swiveling
9
=
<
;
5RWDU\ D[LV &
O
O
O
\
O
O
\
5RWDU\ D[LV $
5HIHUHQFH SRLQW RI
9
WKH PDFKLQH
0.6 ;
<
=
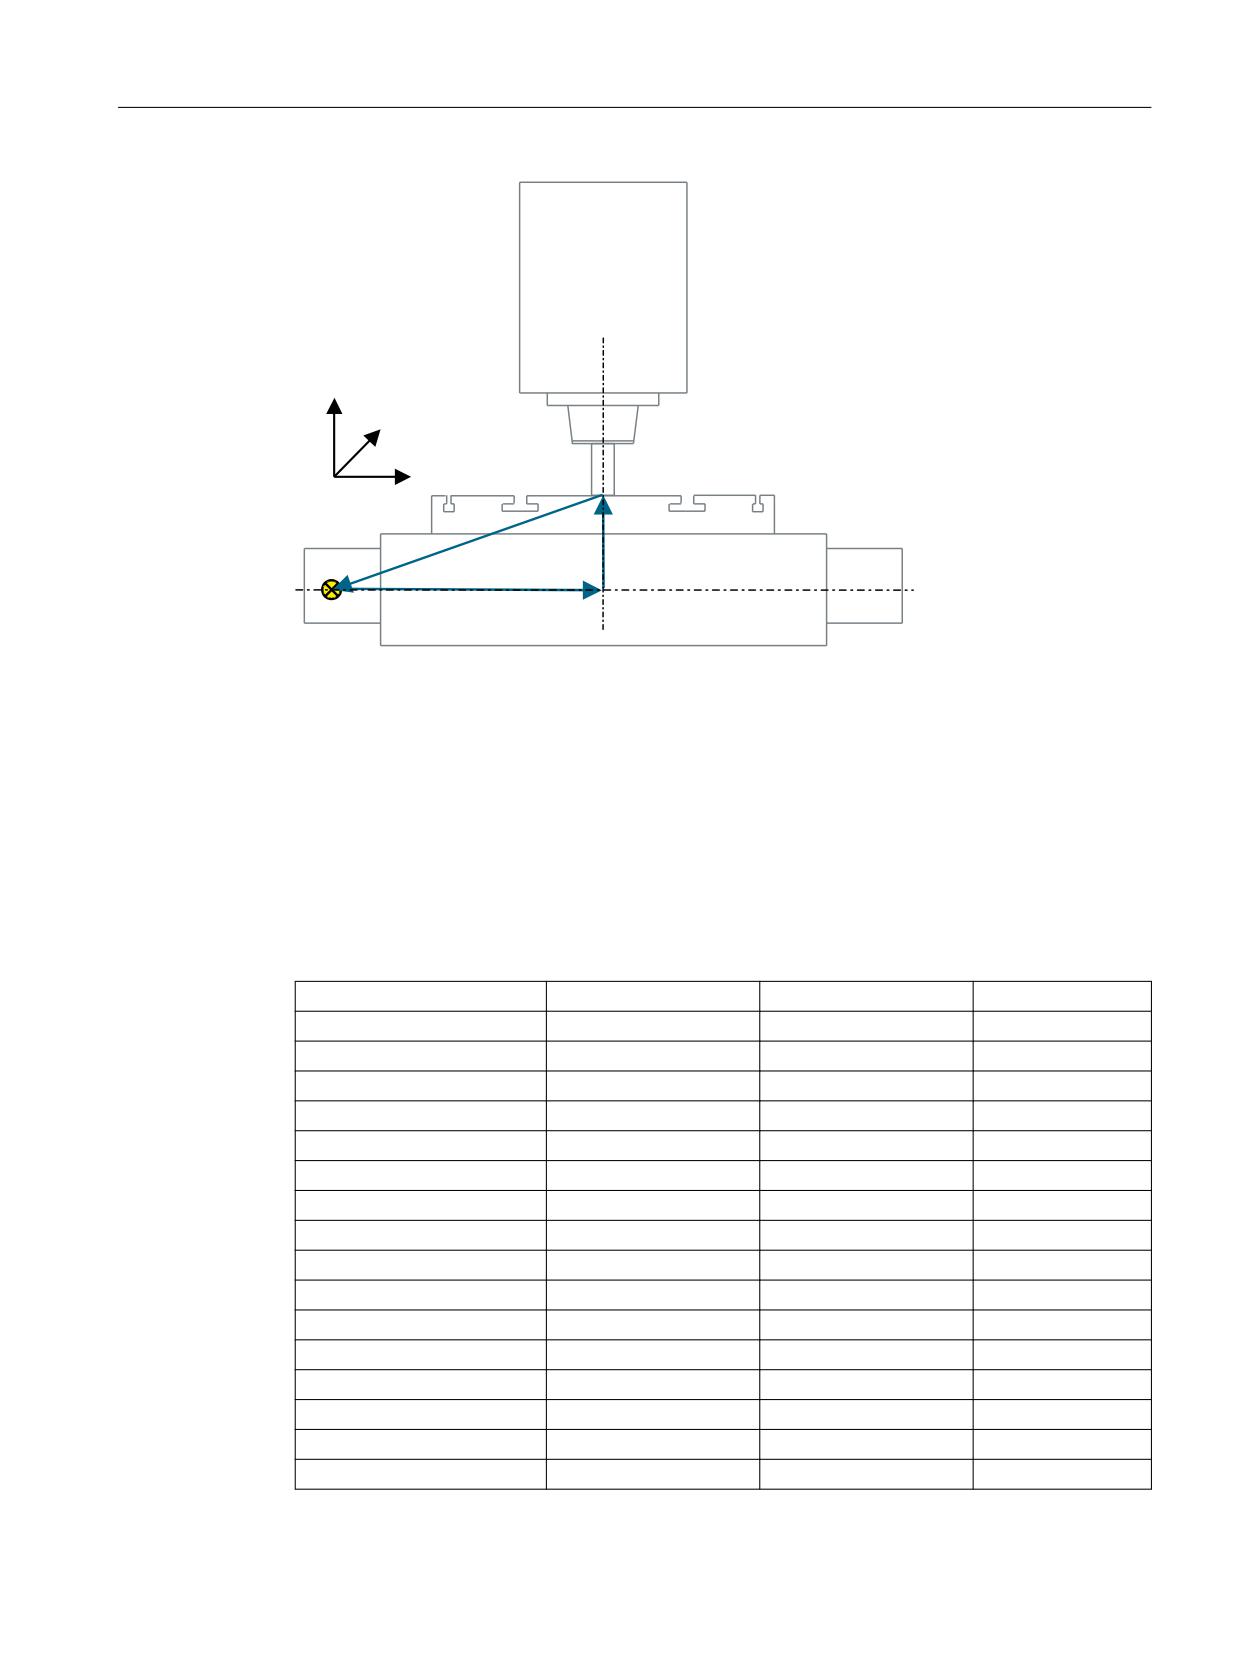
Direction v2
Rotary axis C rotates about Z.
Offset I2
The distance from the reference point of the machine to the center of rotation/
intersection of rotary axis 1.
Offset I3
The distance from the center of rotation of rotary axis 1 to the center of rota-
tion/intersection of rotary axis 2.
Offset I4
Closure of vector chain, I4 = - (I2 + I3).
Figure 19-16
Side view of the machine from the X direction
SINUMERIK Operate
460
Commissioning Manual, 10/2020, 6FC5397-1DP40-6BA4
Technologies and cycles
19.7 Swiveling
9
=
<
;
5RWDU\ D[LV &
O
O
O
O
,
,
O
]
O
O
[
5RWDU\ D[LV $
9
5HIHUHQFH SRLQW RI
WKH PDFKLQH
0.6 ;
<
=
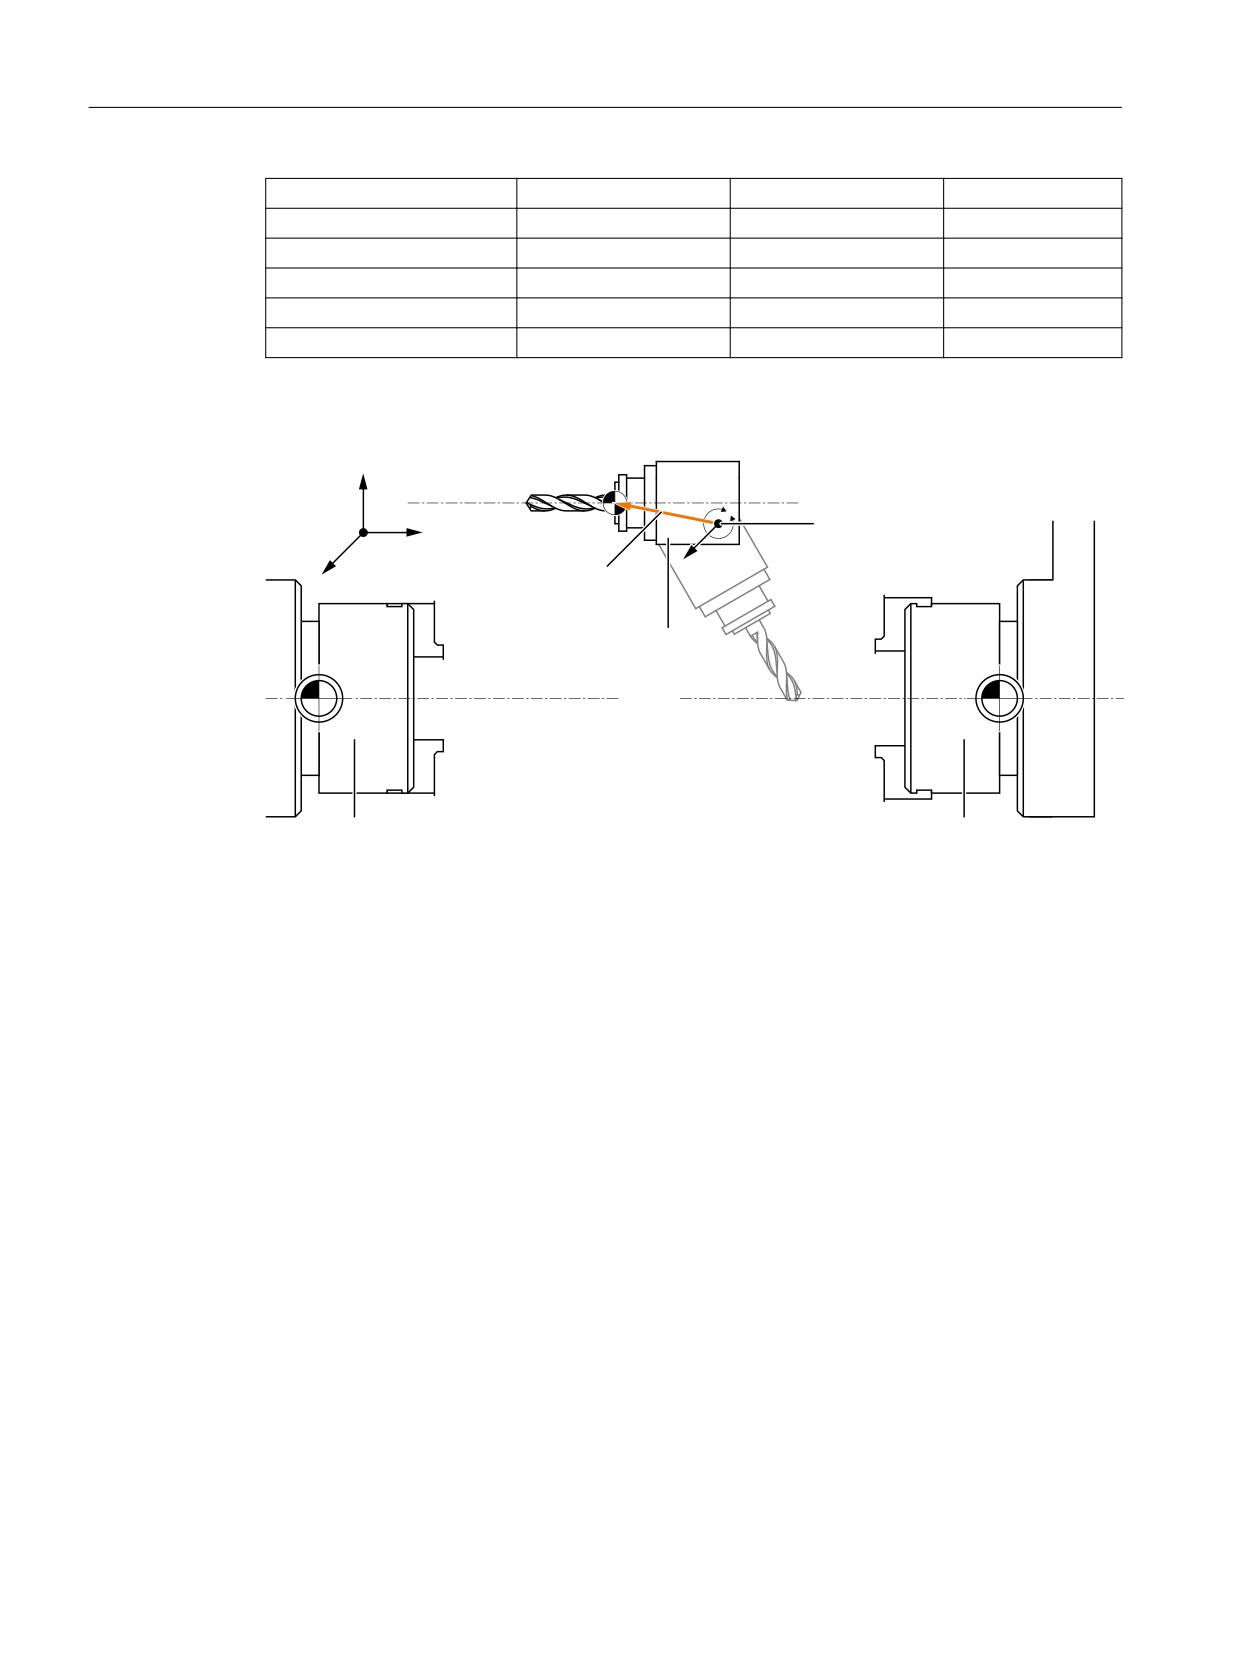
Direction v1
The rotary axis A rotates about X.
Direction v2
Rotary axis C rotates about Z.
Offset I2
The distance from the reference point of the machine to the center of rotation/
intersection of rotary axis 1.
Offset I3
The distance from the center of rotation of rotary axis 1 to the center of rota-
tion/intersection of rotary axis 2.
Offset I4
Closure of vector chain, I4 = - (I2 + I3).
Figure 19-17
Front view of the machine from the Y direction
Name
TABLE_5
Enable
Yes
Type
Swivel plane
Kinematics
Table
Offset I2
260.000000
200.000000
0.000000
Fine offset I2
0.000000
0.000000
0.000000
Rotation axis 1
A
Mode
Automatic
Direction v1
-1.000000
0.000000
0.000000
Offset
0.000°
Angle range
-90.000°
-90.000°
Hirth teeth
No
Offset I3
0.000000
0.020000
20.400000
Fine offset I3
0.000000
0.000000
0.000000
Rotation axis 2
C
Mode
Automatic
SINUMERIK Operate
Commissioning Manual, 10/2020, 6FC5397-1DP40-6BA4
461
Technologies and cycles
19.7 Swiveling
Direction v2
0.000000
0.000000
-1.000000
Offset
0.000°
Angle range
0.000°
360.000°
Hirth teeth
No
Offset I4
-260.000000
-200.020000
-20.400000
Fine offset I4
0.000000
0.000000
0.000000
Example 6a: Setting up a turning machine with B axis (chain)
9
3PUBSZ BYJT $
3PUBSZ BYJT #
#@"9*4
;
$ @0''4&5
:
9
;
5PPM TQJOEMF
3005
.,4
3PUBSZ BYJT $
3PUBSZ BYJT $
.BJO TQJOEMF
$PVOUFSTQJOEMF
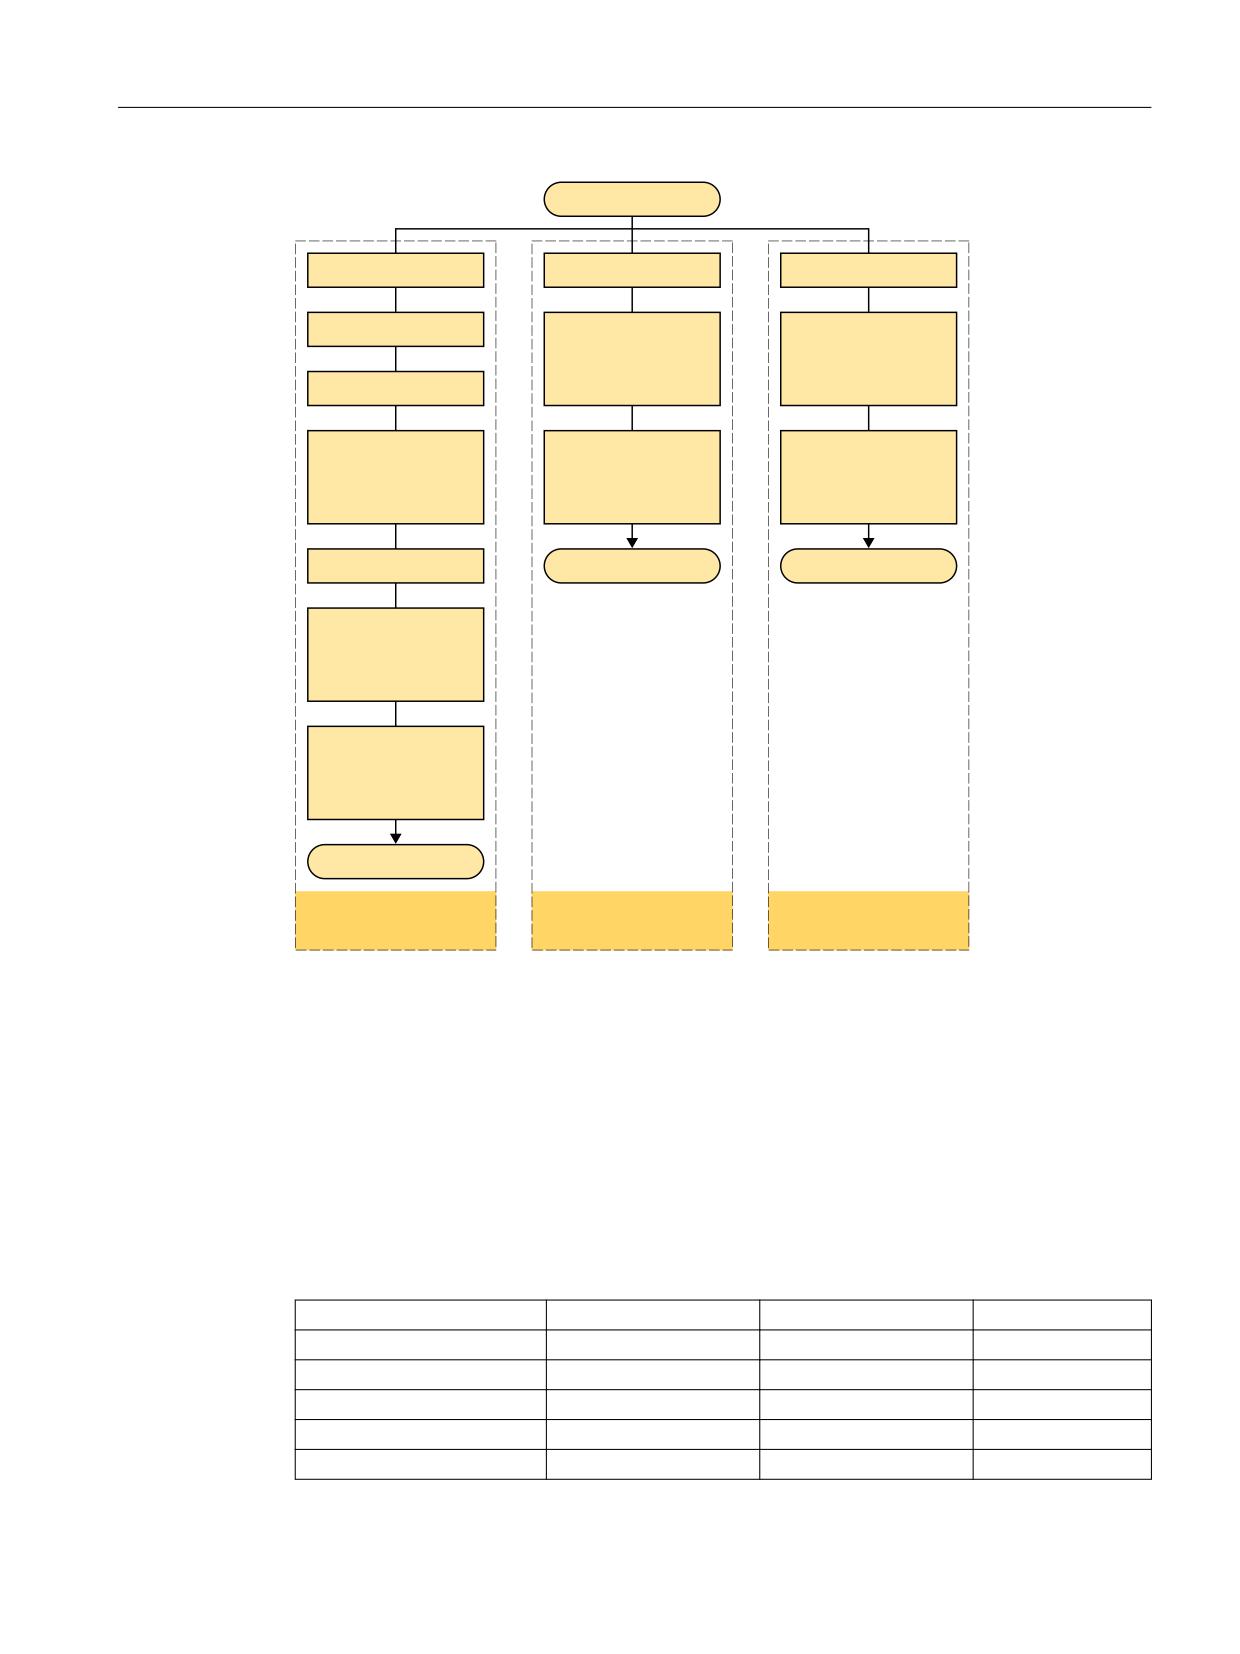
Figure 19-18
Turning machine with B axis
The example below relates to a turning machine with main spindle and counterspindle as well
as B axis in the head.
The first step is to create the kinematic chain for this machine.
Schematic representation of the kinematic chain:
SINUMERIK Operate
462
Commissioning Manual, 10/2020, 6FC5397-1DP40-6BA4
Technologies and cycles
19.7 Swiveling
3005
;@"9*4
$033@$ @0''4&5
; @"9*4
:@"9*4
$ @0''4&5
$ @0''4&5
0TFU 9
0TFU 9
0TFU :
0TFU :
9@"9*4
0TFU ;
0TFU ;
#@"9*4
$ @"9*4
$ @"9*4
"YJT PG SPUBUJPO
9
"YJT PG SPUBUJPO
9
"YJT PG SPUBUJPO
9
"YJT PG SPUBUJPO :
"YJT PG SPUBUJPO :
"YJT PG SPUBUJPO :
"YJT PG SPUBUJPO ;
"YJT PG SPUBUJPO ;
"YJT PG SPUBUJPO ;
$033@$ @0''4&5
&/%@1"35@$)"*/@$
&/%@1"35@$)"*/@$
$ @0''4&5
0TFU 9
0TFU :
0TFU ;
$ @"9*4
"YJT PG SPUBUJPO
9
"YJT PG SPUBUJPO :
"YJT PG SPUBUJPO ;
&/%@500-@$)"*/
5BCMF DIBJO
5BCMF DIBJO
)FBE DIBJO
.BJO TQJOEMF
$PVOUFSTQJOEMF
Figure 19-19
Schematic representation of the chain
Once the machine's kinematic chain has been created, various tool carriers can be created on
this basis.
For turning machines with an additional rotary axis B, the tool can be aligned or swiveled on the
X/Z plane. If the machine has a counterspindle, you can, for example, work with a tool
alternating between the main spindle and counterspindle.
You can create the following tool carriers to use the "Align tool" and "Swivel plane" functions:
Tool carrier 1
For aligning and swiveling tools on the main spindle and counterspindle (Turning, Face Y/C,
Surface Y/C):
Name
Enable
Yes
Type
Align turning tool
Kinematics
Tool chain
Start of tool chain
Z_AXIS
SINUMERIK Operate
Commissioning Manual, 10/2020, 6FC5397-1DP40-6BA4
463

Technologies and cycles
19.7 Swiveling
Rotation axis
B_AXIS
Angle range
-15.000°
195.000°
Hirth teeth
No
Correction element
Rotation axis
C3_AXIS
Angle range
0.000°
360.000°
Hirth teeth
No
Correction element
End of tool chain
SP1_OFFSET
Close tool chain
Yes
Properties
Select retract
• Machine axis Z
No
Select swivel mode
• Axis-by-axis
Yes
Select prefer. direction
Yes, default=+
Reference axis pref. direction
Rotation axis 1
Select tracking
No
When setting up "Align turning tool", the TEN THOUSANDS position in parameter
$TC_CARR37[n] must be set to 2 or 3 in swivel data set 1. This is the reason why in the program
editor "Swivel tool → Align turning tool or milling tool" is listed for tool carrier 1.
For more information, see Chapter "Setting up a tool carrier/swivel data set (Page 434)"
Tool carrier 2
For machining inclined surfaces when milling on the main spindle (face B):
Name
TC_MAIN_SPINDEL
Enable
Yes
Type
Swivel plane
Kinematics
Tool chain
Start of tool chain
Z_AXIS
Rotation axis
B_AXIS
Angle range
-15.000°
195.000°
Hirth teeth
No
Correction element
CORR_C3_OFFSET
End of tool chain
C3_AXIS
Close tool chain
Yes
Workpiece chain
Start of workpiece chain
CORR_C1_OFFSET
Correction element
CORR_C1_OFFSET
Rotation axis
C1_AXIS
Angle range
0.000°
360.000°
Hirth teeth
No
SINUMERIK Operate
464
Commissioning Manual, 10/2020, 6FC5397-1DP40-6BA4

Technologies and cycles
19.7 Swiveling
End of workpiece chain
C1_AXIS
Close workpiece chain
Yes
Properties
Select retract
• Machine axis Z
No
Select swivel mode
• Axis-by-axis
Yes
Select prefer. direction
Yes, default=+
Reference axis pref. direction
Rotation axis 1
Select tracking
No
Tool carrier 3
For machining inclined surfaces when milling on the counterspindle (face B):
Name
TC_SUB_SPINDEL
Enable
Yes
Type
Swivel plane
Kinematics
Tool chain
Start of tool chain
Z_AXIS
Rotation axis
B_AXIS
Angle range
-15.000°
195.000°
Hirth teeth
No
Correction element
CORR_C3_OFFSET
End of tool chain
C3_AXIS
Close tool chain
Yes
Workpiece chain
Start of workpiece chain
CORR_C2_OFFSET
Correction element
CORR_C2_OFFSET
Rotation axis
C2_AXIS
Angle range
0.000°
360.000°
Hirth teeth
No
End of workpiece chain
C2_AXIS
Close workpiece chain
Yes
Properties
Select retract
• Machine axis Z
No
Select swivel mode
• Axis-by-axis
Yes
Select prefer. direction
Yes, default=+
Reference axis pref. direction
Rotation axis 1
Select tracking
No
SINUMERIK Operate
Commissioning Manual, 10/2020, 6FC5397-1DP40-6BA4
465
Technologies and cycles
19.7 Swiveling
The kinematic chain is created once and all requested tool carriers refer to the corresponding
chain elements. If a value in the chain described in kinematic terms has to be changed, this is
immediately effective for all tool carriers.
Example 6b: Setting up a turning machine with B axis (classic)
9
3PUBSZ BYJT $
3PUBSZ BYJT #
;
*
*
*
9
;
:
*
*
5PPM TQJOEMF
3PUBSZ BYJT $
3PUBSZ BYJT $
.BJO TQJOEMF
$PVOUFSTQJOEMF
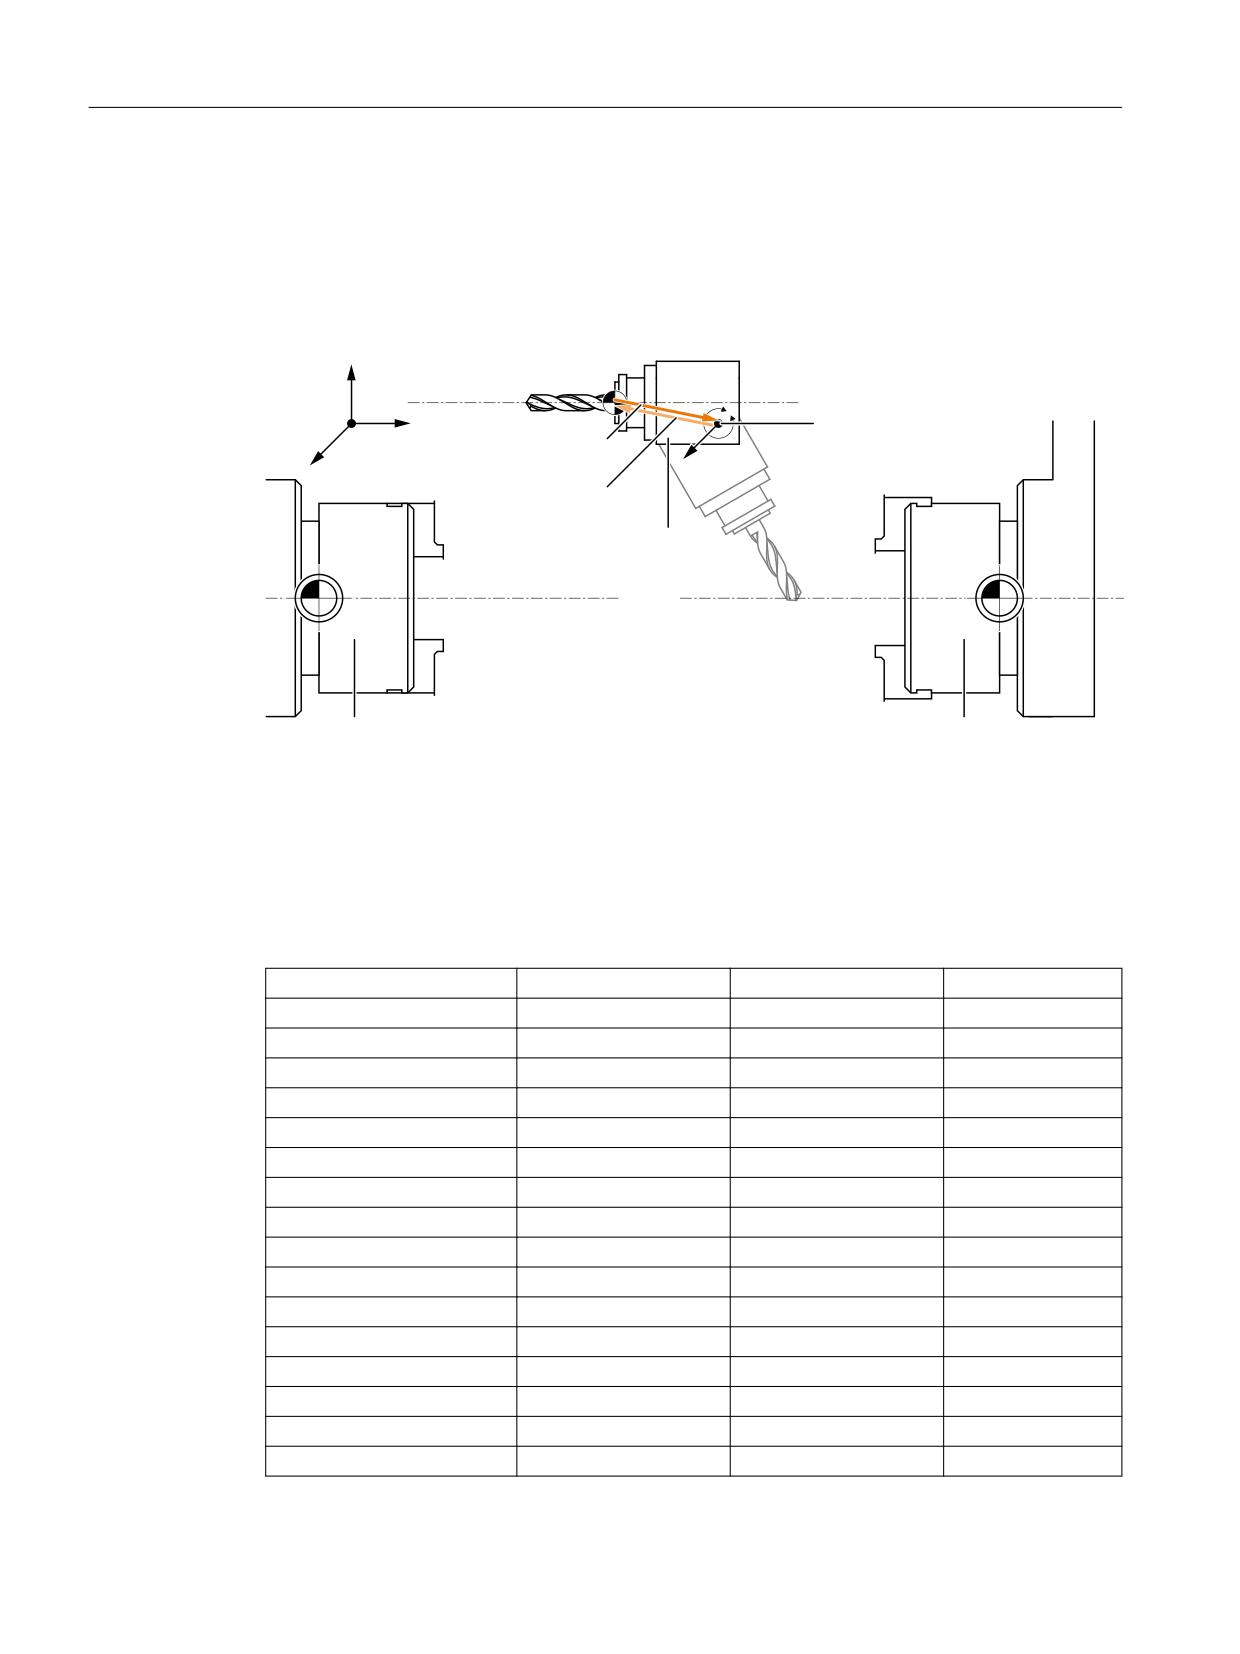
Figure 19-20
Turning machine with B axis
You can also create the following classic tool carriers to use the "Align tool" and "Swivel plane"
functions:
Tool carrier 1
For aligning and swiveling tools on the main spindle and counterspindle (Turning, Face Y/C,
Surface Y/C):
Name
TC_1
Enable
Yes
Type
Align turning tool
Head
Offset I1
-0.010000
0.000000
-75.070000
Fine offset I1
0.000000
0.000000
0.000000
Rotation axis 1
B
Mode
Automatic
Direction v1
0.000000
1.000000
0.000000
Offset
0.000°
Angle range
-15.000°
195.000°
Hirth teeth
No
Offset I2
0.010000
0.000000
75.070000
Fine offset I2
0.000000
0.000000
0.000000
Rotation axis 2
C3
Mode
Automatic
Direction v2
0.000000
0.000000
1.000000
SINUMERIK Operate
466
Commissioning Manual, 10/2020, 6FC5397-1DP40-6BA4

Technologies and cycles
19.7 Swiveling
Offset
0.000°
Angle range
0.000°
360.000°
Hirth teeth
No
Offset I3
0.000000
0.000000
0.000000
Fine offset I3
0.000000
0.000000
0.000000
Tool direction in initial setting
- Z
Properties
Select retract
• In tool direction, inc.
Yes
• In tool direction, max.
Yes
• Machine axis Z
• Retract position Z
200
Select swivel mode
• Axis-by-axis
Yes
Reference axis pref. direction
Rotation axis 2
Select tracking
No
When commissioning the "B-axis kinematics turning technology", the TEN THOUSANDS position
in parameter $TC_CARR37[n] must be set to 2 or 3 in tool carrier 1. This is the reason why in the
program editor "Swivel tool → Align turning tool or milling tool" is listed for tool carrier 1.
More information is provided in Chapter "Setting up a tool carrier/swivel data set (Page 434)"
Tool carrier 2
For machining inclined surfaces when milling on the main spindle (face B):
Name
TC_2
Enable
Yes
Type
Swivel plane
Kinematics
Head
Fine offset I1
0.000000
0.000000
0.000000
Rotation axis 1
B
Mode
Automatic
Direction v1
0.000000
1.000000
1.000000
Offset
0.000°
Angle range
-15.000°
195.000°
Hirth teeth
No
Offset I2
0.010000
0.000000
75.070000
Fine offset I2
0.000000
0.000000
0.000000
Table
Offset I3
0.000000
0.000000
0.000000
Fine offset I3
0.000000
0.000000
0.000000
Rotation axis 2
C1
Mode
Automatic
Direction v2
0.000000
0.000000
-1.000000
SINUMERIK Operate
Commissioning Manual, 10/2020, 6FC5397-1DP40-6BA4
467

Technologies and cycles
19.7 Swiveling
Offset
0.000°
Angle range
0.000°
360.000°
Hirth teeth
No
Offset I4
0.000000
0.000000
0.000000
Fine offset I4
0.000000
0.000000
0.000000
Tool direction in initial setting
- Z
Tool carrier 3
For machining inclined surfaces when milling on the counterspindle (face B):
Name
TC_3
Enable
Yes
Type
Swivel plane
Kinematics
Head
Offset I1
-0.010000
0.000000
-75.070000
Fine offset I1
0.000000
0.000000
0.000000
Rotation axis 1
B
Mode
Automatic
Direction v1
0.000000
1.000000
1.000000
Offset
0.000°
Angle range
-15.000°
195.000°
Hirth teeth
No
Offset I2
0.010000
0.000000
75.070000
Fine offset I2
0.000000
0.000000
0.000000
Table
Offset I3
0.000000
0.000000
0.000000
Fine offset I3
0.000000
0.000000
0.000000
Rotation axis 2
C2
Mode
Automatic
Direction v2
0.000000
0.000000
-1.000000
Offset
0.000°
Angle range
0.000°
360.000°
Hirth teeth
No
Offset I4
0.000000
0.000000
0.000000
Fine offset I4
0.000000
0.000000
0.000000
Tool direction in initial setting
- Z
SINUMERIK Operate
468
Commissioning Manual, 10/2020, 6FC5397-1DP40-6BA4
Technologies and cycles
19.7 Swiveling
Example 7: Configuring a milling machine with B axis for turning
#@"9*4
41 @0''4&5
3FGFSFODF QPJOU PG
UIF UPPM
$@0''4&5
$@"9*4
Figure 19-21
Milling machine with B axis for turning
You can configure a milling machine with a B axis (rotation around Y) so that turning is possible.
To do so, turning technology is set up as an extended technology.
More information is provided in Chapter "Turning on milling machines (Page 481)"
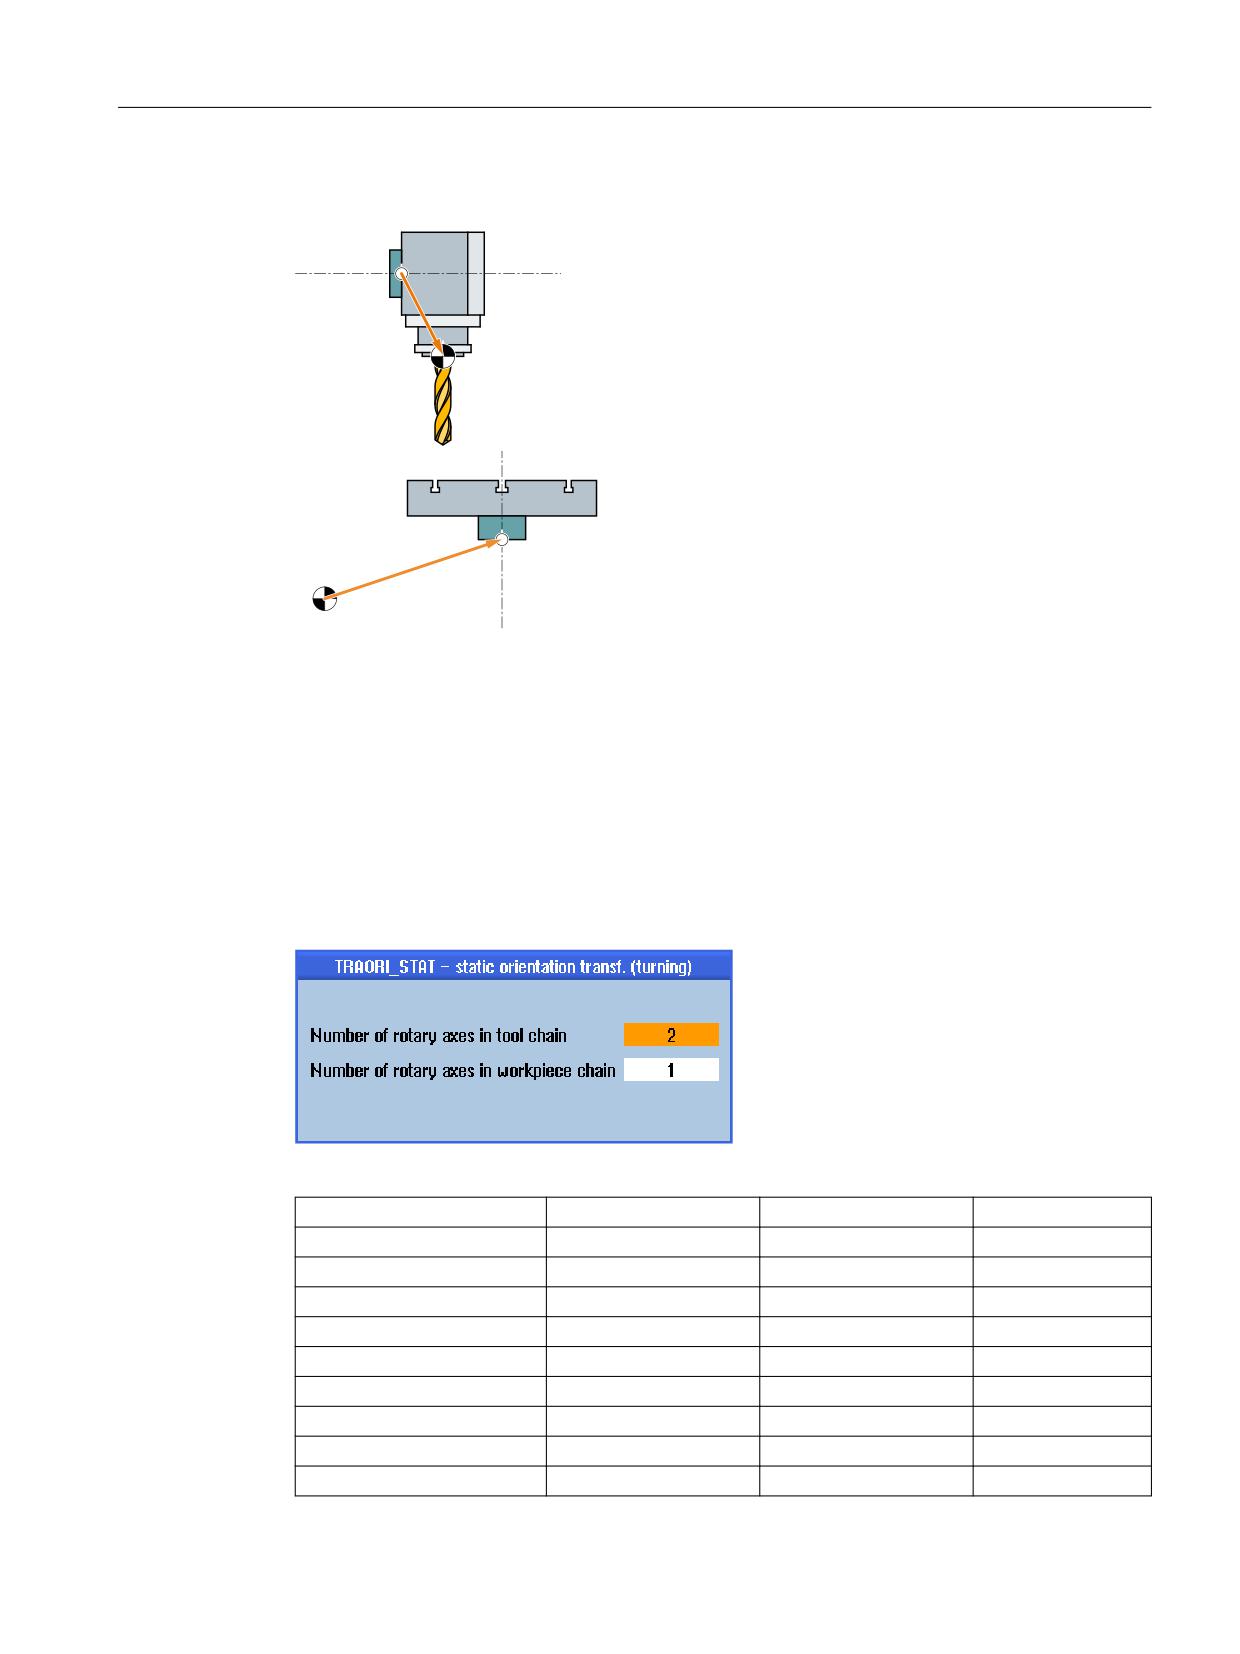
The following example refers to a milling machine with a rotary axis around Y (B), a rotary axis
around Z (C) and a main spindle (SP) in the tool direction Z (G17).
The following static transformation is created to use the "Align tool" functions.
A new transformation with 2 axes of rotation in the head and one in the table is created in the
"Transformations" operating area:
Figure 19-22
TRAORI_STAT dialog
Name
TURN_TRAFO
Assignment to chain
Tool chain
Rotation axis
B_AXIS
Axis of rotation offset
0.000°
Correction element
CORR_SP1_OFFSET
Rotation axis
SP_AXIS
Axis of rotation offset
0.000°
End of tool chain
SP_AXIS
Close tool chain
Auto
SINUMERIK Operate
Commissioning Manual, 10/2020, 6FC5397-1DP40-6BA4
469

Technologies and cycles
19.7 Swiveling
Workpiece chain
Correction element
CORR_C2_OFFSET
Rotation axis
C_AXIS
Axis of rotation offset
0.000°
Hirth teeth
No
End of workpiece chain
C2_AXIS
Close workpiece chain
Auto
Linear axes
Machine axis X
X_AXIS_LIN
Machine axis Y
Y_AXIS_LIN
Machine axis Z
Z_AXIS_LIN
Properties (input mask)
Select retract
• Machine axis Z
No
Select swivel mode
• Axis-by-axis
Yes
Select prefer. direction
Yes, default=+
Reference axis pref. direction
Rotation axis 1
Select tracking
No
Properties (transformation)
Basic tool orientation
Direction vector
0.000
0.000
1.000
Normal vector
0.000
1.000
0.000
The tool carrier can be created as follows for "Swivel plane" on the basis of the kinematic chain
that has been created:
Name
MIX_BC
Enable
Yes
Type
Swivel plane
Kinematics
Tool chain
Start of tool chain
Z_AXIS
Rotation axis
B_AXIS
Angle range
-90.000°
90.000°
Hirth teeth
No
Correction element
CORR_SP_OFFSET
End of tool chain
SP_AXIS
Close tool chain
Yes
Workpiece chain
Start of workpiece chain
CORR_C_OFFSET
Correction element
CORR_C_OFFSET
Rotation axis
C_AXIS
SINUMERIK Operate
470
Commissioning Manual, 10/2020, 6FC5397-1DP40-6BA4

Technologies and cycles
19.7 Swiveling
Angle range
0.000°
360.000°
Hirth teeth
No
End of workpiece chain
C_AXIS
Close workpiece chain
Yes
Properties
Select retract
• Machine axis Z
No
Select swivel mode
• Axis-by-axis
Yes
Select prefer. direction
Yes, default=+
Reference axis pref. direction
Rotation axis 1
Select tracking
Yes
Parameter CUTMOD in CYCLE800
Distinction between calls:
• The CUTMOD NC function is activated when data set 2 is called in the NC program (CYCLE800
align turning tool). This means that the cutting edge position or the tool reference point is
updated corresponding to the tool orientation:
• When calling a swivel data set for rotational operation in the NC program (CYCLE800 align
tool), the CUTMOD NC function is activated. The cutting edge position, tool angle, cut
direction and tool reference point are thus calculated in accordance with the current tool
orientation following the "Align tool" function.
More information
A more detailed description of parameter CUTMOD is provided in the
Tools Function Manual.
19.7.7
Manufacturer cycle CUST_800.SPF
Function
During swiveling, all axis positions are approached using the CUST_800.SPF cycle. The call is
exclusively made from the swivel cycle CYCLE800 or from the cycles
E_TCARR (ShopMill) or F_TCARR (ShopTurn).
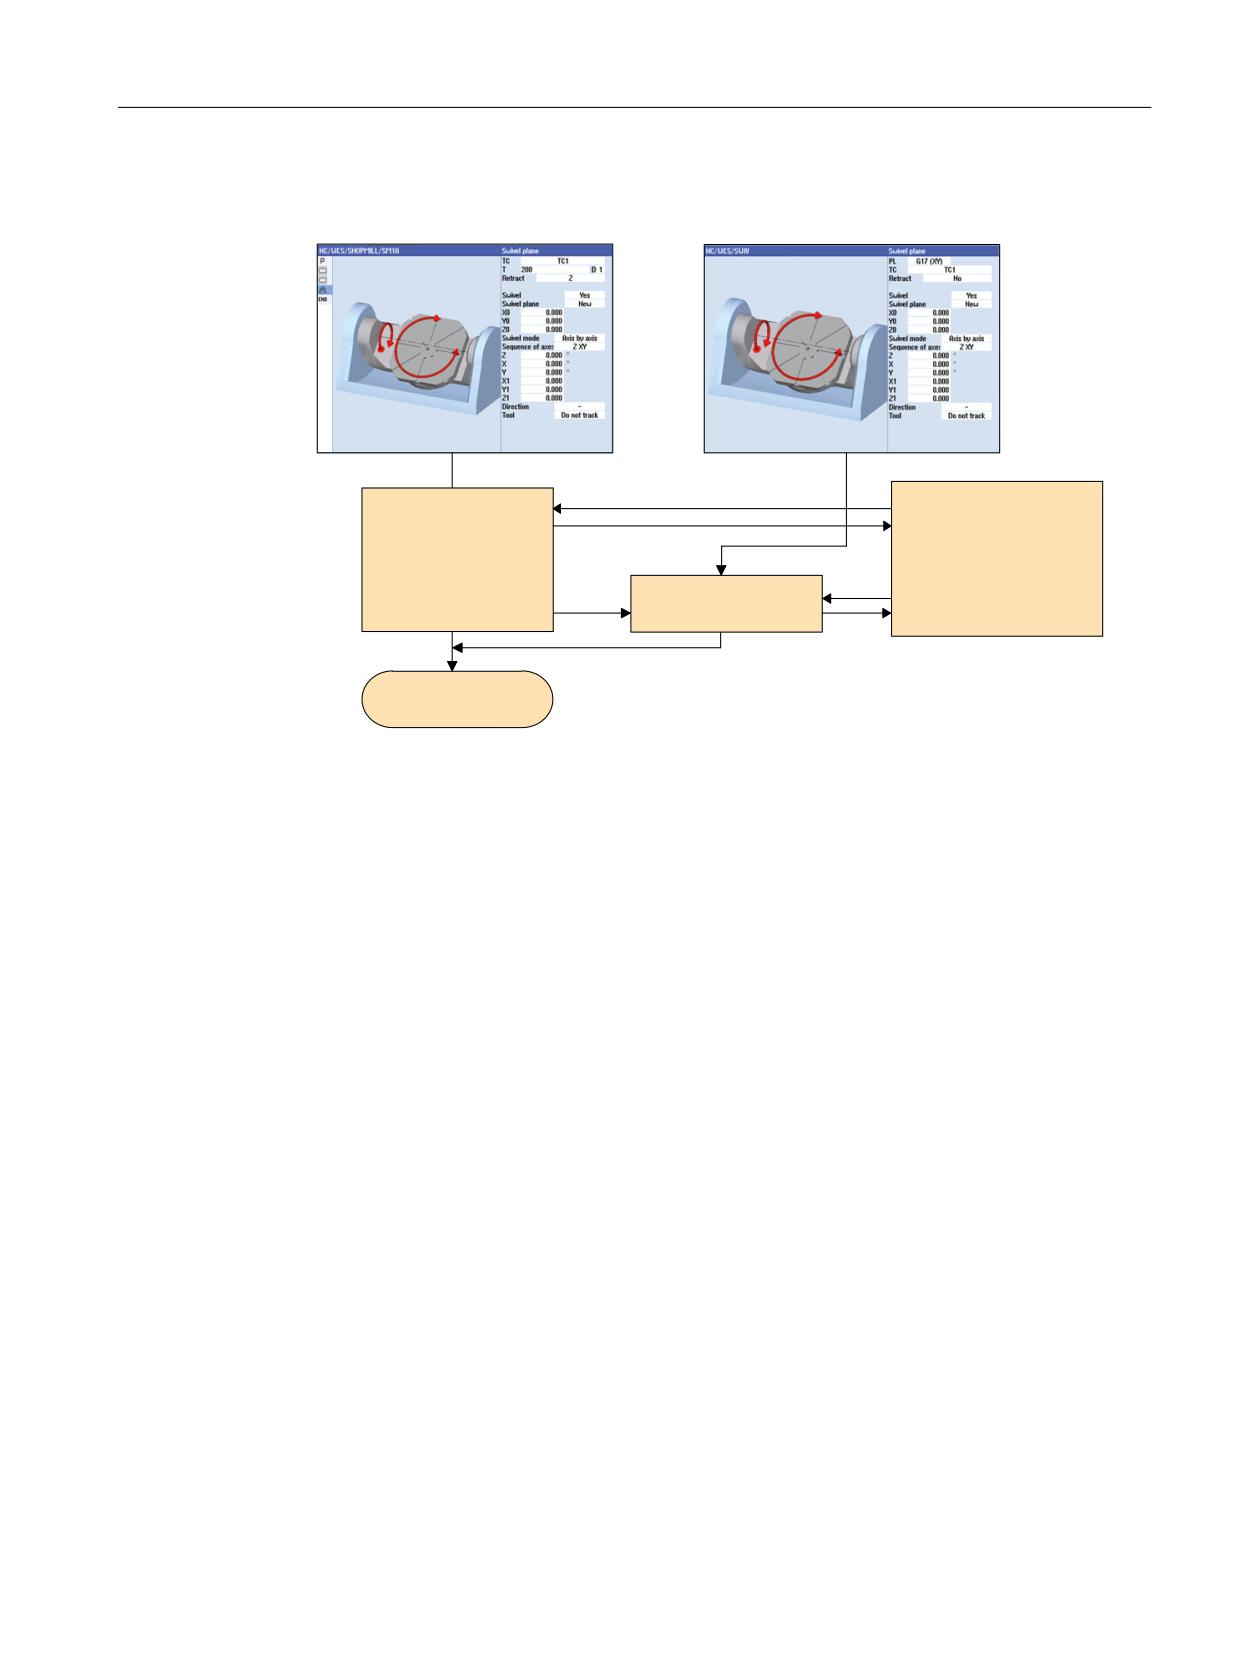
In cycle CUST_800.SPF, the function marks (_M2: to _M59) are prepared and documented. Also
refer to the following "Structogram CYCLE800".
SINUMERIK Operate
Commissioning Manual, 10/2020, 6FC5397-1DP40-6BA4
471
Technologies and cycles
19.7 Swiveling
There are extensions in the CUST_800.SPF cycle for the "Turning on milling machine" function,
see Chapter "Adaptations for CUST_800 (Page 492)".
Note
If you modify the CUST_800, ensure that the G commands of the G groups used are restored at
the end of the CUST_800 (versions S_G_1 to S_G_5!).
Parameter
CUST_800 (INT _MODE, INT _TC1, REAL _A1, REAL _A2, INT _TC2, REAL _T_POS)
_MODE
A jump is made to marks _M2 to _M59
_TC1
Number of the swivel head/table
_A1
Angle of rotary axis 1
_A2
Angle of rotary axis 2
_TC2
Feed evaluation in percent (%) for swiveling in JOG mode and number of the new swivel
head/table when replaced in ShopMill
_T_POS
Incremental position during retraction in the incremental tool direction (see mark _M44,
_M45)
Retract prior to swiveling
If the CUST_800.SPF cycle is not modified, the Z axis (mark _M41) or the Z axis followed by the
X, Y axes (mark _M42) are first traversed in the Machine to the positions when retracting prior
to swiveling. The freely available position values are specified in the system variables
$TC_CARR38[n] to $TC_CARR40[n]. When retracting, the active tool cutting edge is deselected
(D0) and is reselected after retraction.
If retraction in the tool direction has been declared, the tool axis is retracted to the software end
position (maximum in tool direction) or by an incremental distance away from the tool in the
tool direction. The tool lengths are taken into account accordingly.
SINUMERIK Operate
472
Commissioning Manual, 10/2020, 6FC5397-1DP40-6BA4
Technologies and cycles
19.7 Swiveling
6WUXFWXUH FRDUVH RI VZLYHO F\FOHV
,QSXW VFUHHQ IRUP XQGHU 6KRS0LOO 6KRS7XUQ
,QSXW VFUHHQ IRUP IRU &<&/(
VWDQGDUG F\FOH
&867B
63)
/DEHO B0
B0
(B7&$55 63)
)B7&$55 63)
&<&/(
63)
/DEHO B0
B0
(QG RI F\FOH
Figure 19-23
Structure (coarse) of swivel cycles
SINUMERIK Operate
Commissioning Manual, 10/2020, 6FC5397-1DP40-6BA4
473
Technologies and cycles
19.7 Swiveling
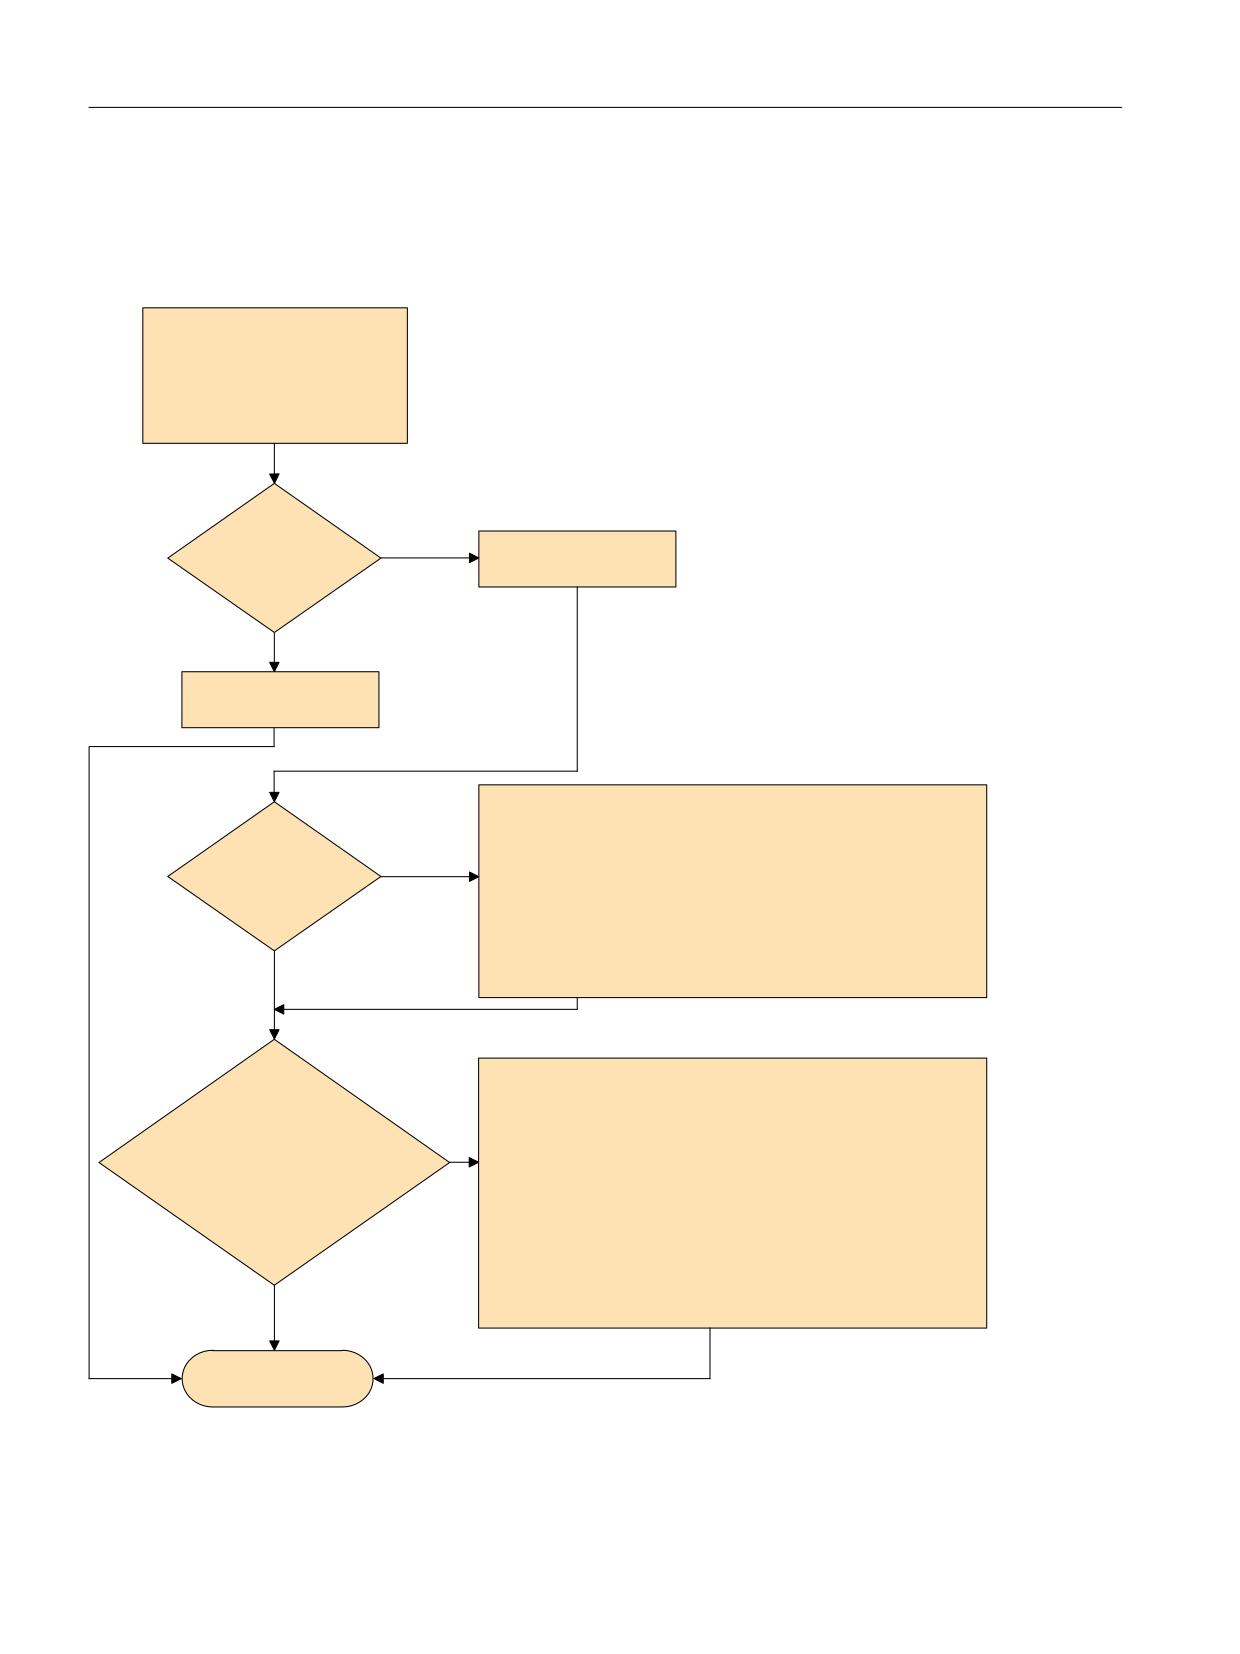
CYCLE800 structured chart
Sequence in AUTOMATIC mode
6WUXFWXUH &<&/(
63)
&867B
63)
,QSXW SDUDPHWHUV
QDPH RI VZLYHO GDWD VHW
PRGH
RIIVHWV
URWDWLRQV
UHWUDFWLRQ
&DOFXODWLRQ RI
,QLW
YDOLG VZLYHO GDWD VHW
/DEHO B0 ,QLW
5HZULWH YHFWRUV
NLQHPDWLF FKDLQ LV SRVVLEOH
IRU H[DPSOH WHPSHUDWXUH FRPSHQVDWLRQ
YHFWRUV RU LQFOXVLRQ RI
6ZLYHO GDWD VHW LQYDOLG
: D[LV LQ GULOOLQJ WRROV
)DXOW PHVVDJHV
$GDSWLQJ WKH UHWUDFWLRQ VWUDWHJ\
/DEHO
B0
= D[LV
B0
= D[LV ;< D[LV
5HWUDFWLRQ
B0
WRRO GLUHFWLRQ PD[
7RRO D[LV
B0
WRRO GLUHFWLRQ LQF
B0
UHWUDFWLRQ RI = D[LV
WR 0&6 IL[HG SRVLWLRQ EHIRUH WRRO DOLJQPHQW
B0
UHWUDFWLRQ RI =
;< D[LV
WR 0&6 IL[HG SRVLWLRQ EHIRUH WRRO DOLJQPHQW
1R UHWUDFWLRQ
7UDYHUVH URWDU\ D[HV IRU 1& D[HV
/DEHO
B0
VZLYHO URWDU\ D[HV
DXWRPDWLFDOO\
FDOFXODWLRQ RI WKH
B0
VZLYHO URWDU\ D[LV DXWRPDWLFDOO\
URWDU\ D[LV DQJOH
URWDU\ D[LV PDQXDOO\ RU VHPLDXWRPDWLFDOO\
GLVSOD\ DQJOH YDOXHV WR EH VHW
PDQXDO URWDU\ D[HV
B0
VZLYHO URWDU\ D[LV DXWRPDWLFDOO\
GHDFWLYDWH D[LV WUDQV
B0
VZLYHO URWDU\ D[LV PDQXDOO\ RU VHPLDXWRPDWLFDOO\
IRUPDWLRQ
B0
VZLYHO URWDU\ D[LV DXWRPDWLFDOO\
URWDU\ D[LV PDQXDOO\ RU VHPLDXWRPDWLFDOO\
B0
VZLYHO URWDU\ D[HV
PDQXDOO\ RU
VHPLDXWRPDWLFDOO\
1R WUDYHUVLQJ
B0
B0
B0
VZLYHO LQ -2* ZLWK 75$25,
RI URWDU\ D[HV
(QG RI F\FOH
Figure 19-24
Structure: CYCLE800.SPF / CUST_800.SPF
SINUMERIK Operate
474
Commissioning Manual, 10/2020, 6FC5397-1DP40-6BA4
Technologies and cycles
19.7 Swiveling
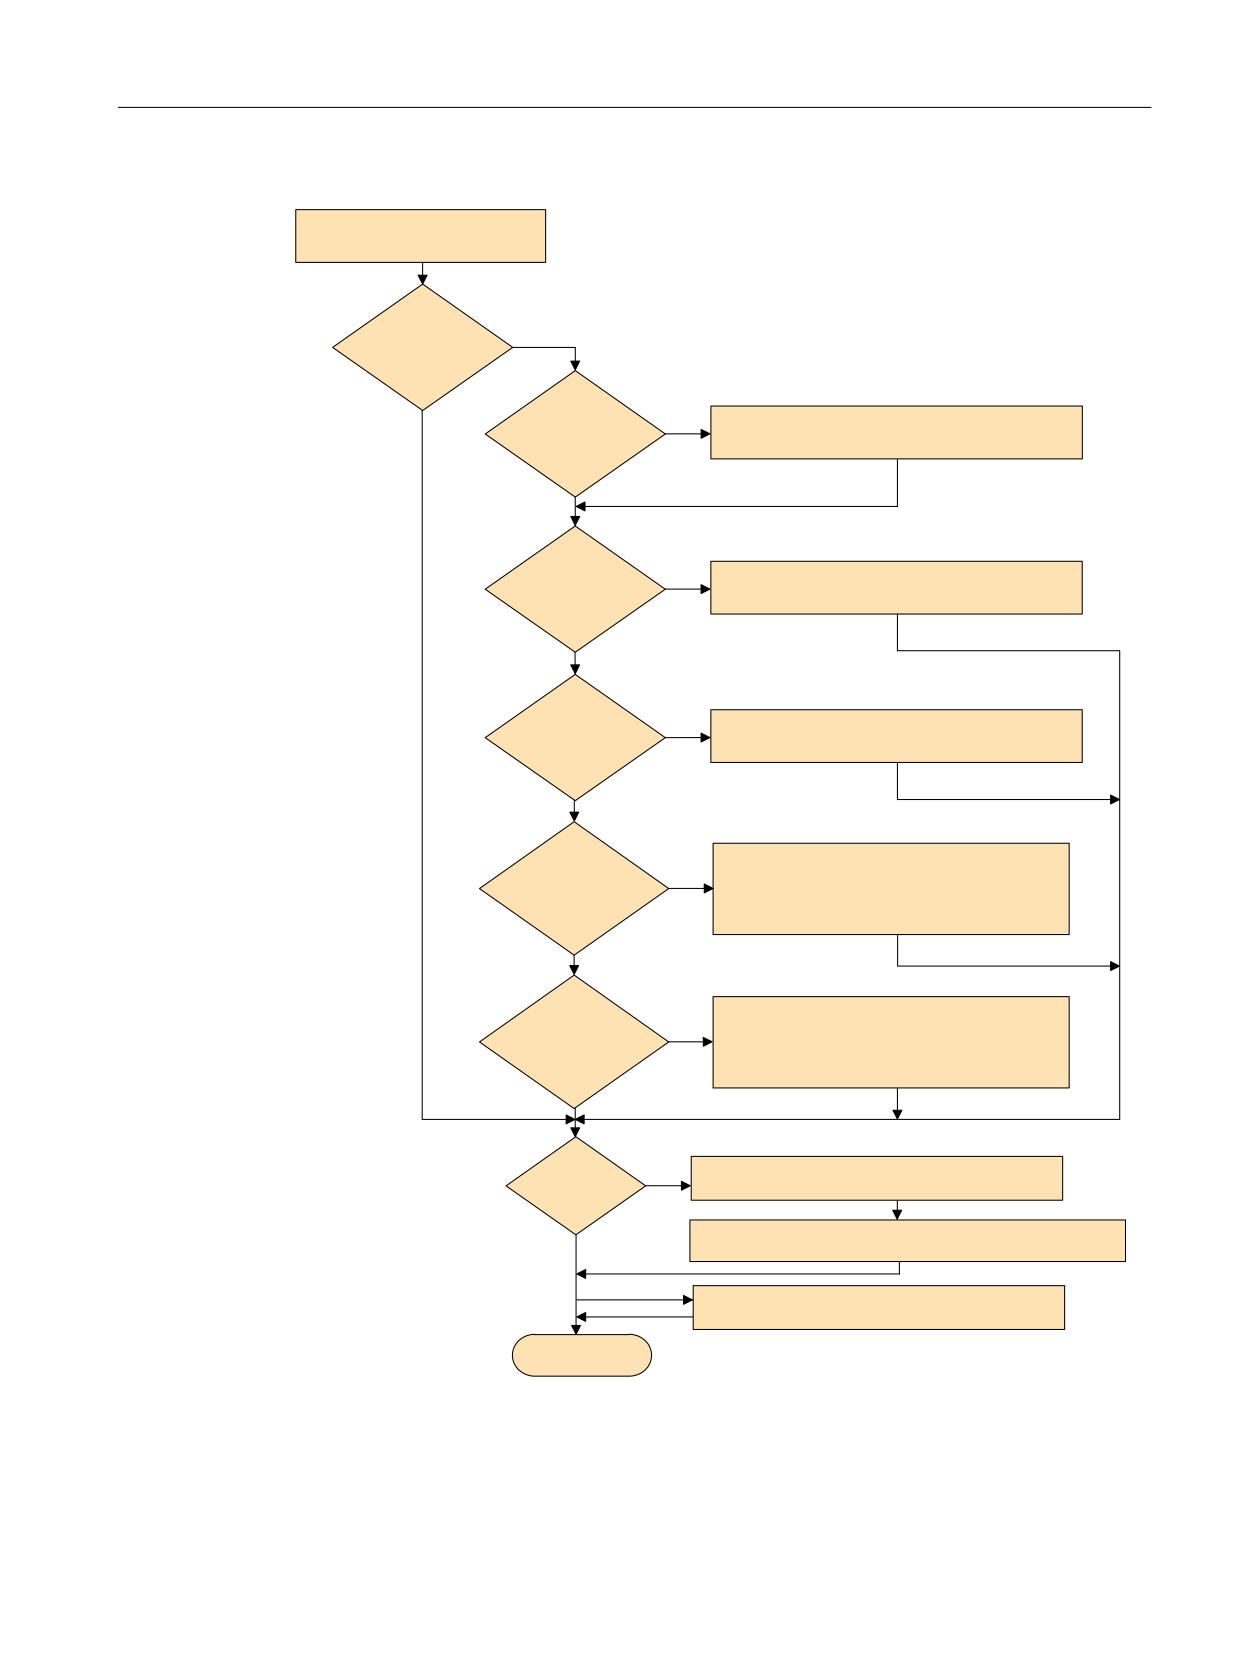
6WUXFWXUH (B7&$55 63) )B7&$55 63)
&867B
63)
7KH IROORZLQJ VWUXFWXUH UHIHUV WR WKH VZLYHO GDWD EORFN FKDQJH DQG WKH
7RRO QDPH
DVVRFLDWHG WRRO FKDQJH XQGHU PLOOLQJ WXUQLQJ
,QSXW GDWD IRU VZLYHOLQJ
6'6
! 6ZLYHO GDWD VHW
\HV
2OG 6'6
1HZ 6'6"
QR
2OG 6'6
\HV
/DEHO B0
&KDQJH PDJD]LQH WRRO
6ZLYHO
B0
&KDQJH PDQXDO WRRO
KHDG"
QR
$XWRPDWLFDOO\
\HV
/DEHO B0
$XWRPDWLFDOO\ FKDQJH
FKDQJH
VZLYHO KHDG WDEOH
6'6 ROG QHZ"
QR
$XWRPDWLFDOO\
\HV
/DEHO B0
0DQXDOO\ FKDQJH
FKDQJH
VZLYHO KHDG WDEOH
6'6 ROG QHZ"
QR
$XWRPDWLFDOO\
/DEHO B0
$XWRPDWLFDOO\ FKDQJH
FKDQJH
\HV
VZLYHO KHDG WDEOH"
6'6 ROG
/DEHO B0
$XWRPDWLFDOO\ FKDQJH
0DQXDOO\ FKDQJH
VZLYHO KHDG WDEOH"
6'6 QHZ"
QR
/DEHO B0
0DQXDOO\ FKDQJH
0DQXDOO\ FKDQJH
\HV
VZLYHO KHDG WDEOH"
6'6 ROG"
/DEHO B0
$XWRPDWLFDOO\ FKDQJH
$XWRPDWLFDOO\ FKDQJH
6'6
VZLYHO KHDG WDEOH"
QHZ"
QR
\HV
/DEHO B0 &KDQJH PDJD]LQH WRRO
7RRO
B0
&KDQJH PDQXDO WRRO
FKDQJH"
/DEHO B0
6ZLYHO DIWHU WRRO FKDQJH
$872
QR
B0
6ZLYHO DIWHU WRRO FKDQJH -2*
/DEHO B0
5HWUDFWLRQ DIWHU VZLYHOLQJ
(QG RI F\FOH
Figure 19-25
Structure: E_TCARR.SPF (F_TCARR.SPF) / CUST_800.SPF
SINUMERIK Operate
Commissioning Manual, 10/2020, 6FC5397-1DP40-6BA4
475
Technologies and cycles
19.7 Swiveling
Note on marks _M2 to _M13
When the swivel data set (SDS) or tool is changed, the linear axes are recovered using the last
retraction mode (modal).
If this behavior is not desired in milling/turning, the corresponding calls must be commented out
with a semicolon (;). The E_SWIV_H or F_SWIV_H cycle is called in milling/turning (see marks
_M2 to _M9) in the CUST_800.SPF manufacturer cycle.
Parameter E_SWIV_H (Par1, Par2, Par3)
• Par1: Number of swivel data set (_TC1)
• Par2: Angle 1st rotary axis
• Par3: Angle 2nd rotary axis
Modification examples
If the rotary axes (swivel head/table) are not to be positioned during swivel data change/tool
change, the call of the E_SWIV_H cycle can be commented out at the relevant marks. If the rotary
axes are to move to a certain position, an angle value can be transferred to parameters Par 2, Par
3.
Note on marks _M14, _M15
Depending on the values of the retraction plane and the programmed swivel plane, it is possible
that the linear axes now also travel the swiveled retraction plane while running up from the
current position to the software limit switches after a block search. To avoid this problem, mark
_M14 in the CUST_800.SPF is called after swiveling. The E_SP_RP(30) cycle preset there runs up
to the milling retraction plane, whereby travel may be along the software limit switches. An
appropriate retraction after block search can be set at mark _M15.
Note on the mark _M16
If for a swivel data set change or when de-selecting the swivel data set, you wish to traverse the
rotary axes to zero, the syntax of the _M16 mark can be modified accordingly, e.g. activate block
N8006 E_SWIV_H(_TC1,0,0).
Note on marks _M20 to _M31
Marks _M20 to _M31 are distinguished by machine kinematics with two rotary axes or one
rotary axis. A distinction is also made between automatic rotary axes (known to the NCU) and
manual (semi-automatic) rotary axes. There is only ever one valid mark for swiveling with the
active swivel data set.
Note on mark _M35
Run through _M35 for block search and a swivel data set with manual rotary axes.
SINUMERIK Operate
476
Commissioning Manual, 10/2020, 6FC5397-1DP40-6BA4
Technologies and cycles
19.7 Swiveling
Note on mark _M40
This mark is called before the calculation and activation of the tool holder function as user
initialization. This makes it possible for special kinematics, to calculate or rewrite the current
vectors of the active swivel data set.
Boring mill application example: For parallel axes, the vector in the Z direction can be updated
with the actual value of the W axis.
A STOPRE is integrated for this mark.
Manufacturers can test as to whether this STOPRE for mark M40 in CUST_800.spf complies with
their functional requirements. In this case, one must weigh up between velocity (without
STOPRE) and functionality for interrupt conditions (RESET) for a swivel plane. This also depends
on the type of machine kinematics.
Note on marks _M41 to _M45 and _M47, _M48
At marks _M41 to _M45, the retraction strategy can be modified before the swiveling of the
rotary axes and at marks _M47 and _M48 before the alignment of the tool.
The retraction to the MCS positions Z or Z, XY is made considering the tool length components
without tool cutter deselection.
Note on marks _M41 and _M42
When retracting in Z or Z, XY with mixed swivel head kinematics, the NC takes account of the
kinematics reference point. If the head is tilted, positions are approached that might deviate
from the values of the retraction position $TC_CARR38 to $TC_CARR40.
If you do not wish to have such behavior, you can deactivate the tool carrier for the marks M41
and M42 when calculating the tool components.
Note
Reactivate the marks M41 and M42 when you have finished.
Example:
IF (_MODE==41)OR(_MODE==42)OR(_MODE==47)OR(_MODE==48)
TCARR=0 ; deactivate tool carrier
TRAFOOF
ENDIF
_M41; Retract axis Z to MCS fixed position
TCARR=_TC1 ; reactivate tool holder
GOTOF _MEND
_M42; Retract axis Z and then the XY axes to MCS fixed position
TCARR=_TC1 ; reactivate tool holder
GOTOF _MEND
SINUMERIK Operate
Commissioning Manual, 10/2020, 6FC5397-1DP40-6BA4
477
Technologies and cycles
19.7 Swiveling
Note on mark _M46
Retraction before swiveling after a block search can be set at mark _M46. Variable _E_VER is 1
if it is a milling technology program.
Note on marks _M57 to _M59
Marks _M57 to _M59 are used for swiveling in JOG mode and active 5-axis transformation
(TRAORI).
Note on "Track tool"
"Track tool" requires that a 5-axis transformation is set up which is equivalent to the
corresponding swivel data set. The programming section for "Track tool" is integrated in the
marks _M20, _M21, _M22 and _M30. The first 5-axis transformation is called with TRAORI(1).
Note on tool change + swivel
In general, the swivel (CYCLE800) and tool change functions for a machine are independent of
each other. Thus, the swiveled work plane can be retained in a technological sequence with
multiple tools, e.g. centering, drilling, tapping.
If the rotary axes of the active swivel data set are involved in the mechanical sequence of the tool
change or have to be retracted, this must be taken into account in the tool change program. After
the tool change, the rotary axis positions are approached as prior to the tool change. If linear
axes (geometry axes) are also involved in the tool change, the rotations in the NC (swivel frame)
must not be deleted. Rather, the linear axes can be positioned as machine axes using the G153
or SUPA commands.
Note on swiveling without active tool compensation
If swiveling the rotary axes without active tool cutting edge (D0) is not possible, then you can
adapt this in cycle CUST_800.SPF:
_M40:
IF ((NOT $P_TOOL) AND _TC1)
LOOP
MSG ("No tool cutting edge active")
M0
STOPRE
ENDLOOP
ENDIF
GOTOF_MEND
SINUMERIK Operate
478
Commissioning Manual, 10/2020, 6FC5397-1DP40-6BA4
Technologies and cycles
19.7 Swiveling
19.7.8
Indirectly programming the name of the swivel data set
Function
The _TC_CHANGE GUD variable defined in the channel is a string with a length of 32. Using this
variable, the user can determine before the CYCLE800 call which swivel data set is called in the
CYCLE800, irrespective of what is programmed in the call itself.
The _TC_CHANGE GUD variable is re-initialized with each RESET. At the end of the CYCLE800, the
variable is also deleted. This means that the variable must be re-described before each new
CYCLE800 call.
The swivel data set is changed in the CYCLE800 following the CUST_800 jump to the _M40
marker. This means that the variable can also be described in the CUST_800.
Programming example
N10 _TC_CHANGE="HEAD_2"
N20 CYCLE800(0,"HEAD_1",100000,57,0,0,0,0,0,0,0,0,0,-1,100,1)
N30 M0 ;* HEAD_2 is active
N40 _TC_CHANGE="HEAD_3"
N50 CYCLE800(0,"HEAD_1",100000,57,0,0,0,0,0,0,0,0,0,-1,100,1)
N60 M0 ;* HEAD_3 is active
N70 CYCLE800(0,"HEAD_1",100000,57,0,0,0,0,0,0,0,0,0,-1,100,1)
N80 M0 ;* HEAD_1 is active
N90 _TC_CHANGE="TABLE_2"
N100 CYCLE800(0,"TABLE_1",100000,57,0,0,0,0,0,0,0,0,0,-1,100,1)
N110 M0 ;* TABLE_2 is active
N120 M2
Note
The _TC_CHANGE variable must be re-described before each new CYCLE800 call.
Programmed restrictions in the CYCLE800
The swivel data set named in _TC_CHANGE is checked for the following properties:
• The swivel data set to be activated must be enabled.
• The following parameters must match the swivel data set selected on the screen:
- $TC_CARR23 (swivel data set type)
- $TC_CARR37 (swivel mode, units digit)
- $TC_CARR37 (selection of follow-up, ten-thousands digit)
- The mode set (Bit 6, 7) on the screen
(axis-by-axis/solid angle/projection angle/direct) to TC_CARR37
SINUMERIK Operate
Commissioning Manual, 10/2020, 6FC5397-1DP40-6BA4
479
Technologies and cycles
19.7 Swiveling
19.7.9
CYCLE9960 workpiece - Measurement of machine kinematic
Function
With the Measure kinematics function, it is possible to calculate the geometric vectors used to
define the 5-axis transformation (TRAORI and TCARR) by measuring the position of the ball in
space.
Measurement essentially involves scanning three to twelve positions of a measuring ball for
each rotary axis with a workpiece probe. The ball positions can be defined in accordance with
user specifications so that they correspond to the geometric ratios on the machine. The only way
of setting the ball positions is to reposition the rotary axis that is to be measured in each case.
Application
The function Measurement of machine kinematic (CYCLE9960) allows the transformation-
related data for kinematics transformations to be determined with included rotary axes TRAORI
and TCARR.
Options:
• Redefinition of swivel data sets or kinematic chain
- Commissioning the machine
- Use of swivel-mounted workholders as TCARR
• Checking of swivel data sets or kinematic chain
- Service following collisions
- Checking the kinematics during the machining process
Kinematics with manual axes (manually adjustable rotary tables, swivel-mounted workholders)
can be measured in the same way as kinematics with NC-controlled rotary axes.
When CYCLE9960 is started, a swivel data set with basic data (for kinematics type) must be
parameterized.
If, in the setting data SD55740 $MNS_MEA_FUNCTION_MASK bit 7 is set, then depending on the
setting, the kinematics can be measured based on the calculated or based on the rotary axis
vectors saved in the swivel data set.
Requirements
The following requirements must be met in order to use CYCLE9960 (measure kinematics):
• SIEMENS measuring cycles package is installed
• Workpiece probe is calibrated
• Calibration ball is mounted
• Tool carrier with orientation capability (MD18088 $MN_MM_NUM_TOOL_CARRIER > 0) or
kinematic chain is set up
SINUMERIK Operate
480
Commissioning Manual, 10/2020, 6FC5397-1DP40-6BA4
Technologies and cycles
19.8 Turning on milling machines
• The basic geometry of the machine (X, Y, Z) is rectangular and referenced
The right angle refers to the workpiece spindle and should be preferably checked using a test
mandrel.
• Defined position of the rotary axes involved in the transformation
• Defined traverse directions in compliance with the standard of all axes involved in the
transformation according to ISO 841-2001 and/or DIN 66217 (righthand rule)
• Defined size of the protocol file (MD11420 $MN_LEN_PROTOCOL_FILE ≥ 20)
Additional information
The precise procedure when measuring and programming CYCLE9960, including examples, is
provided in the
Programming Manual Measuring Cycles.
19.8
Turning on milling machines
You can set up the turning technology as an extended technology on milling machines. The
operating software has all the setting options of a milling machine and a turning machine. For
example, the rotary table can be set at a high speed for the turning of the workpiece. The turning
tool is then clamped in the milling spindle and can be used in various positions.
Machine manufacturer
Please refer to the machine manufacturer's specifications.
19.8.1
Setting up machine data and setting data
Setting up parameters
Machine data
Set the following machine data to set up the technology:
MD10602 $MN_FRAME_GEOAX_CHANGE_MODE
Frames when switching over geometry axes
= 1
The current complete frame is calculated again when the geometry axes are switched over,
and the translations, scalings and mirrorings of the new geometry axes are effective. The
rotations of the old geometry axes are retained.
MD18114 $MN_MM_ENABLE_TOOL_ORIENT
Assign orientation to cutting edges
= 0
The tool orientation function is not active.
SINUMERIK Operate
Commissioning Manual, 10/2020, 6FC5397-1DP40-6BA4
481

Technologies and cycles
19.8 Turning on milling machines
- OR -
= 3
Each tool cutting edge D = m of tool T = n is assigned to the following system parameters:
$TC_DPV[n, m] and $TC_DPV3 - $TC_DPV5
$TC_DPVN3[n, m], $TC_DPVN4[n, m] and $TC_DPVN5[n, m]
Note
If you use angular tools (type 130) with variable tool orientation, you require the setting
MD18114 = 3.
MD51226 $MNS_FUNCTION_MASK_SIM
Simulation function screen
Bit 5 = 1
Turning tool in tool spindle rotatable (for simulation)
MD51781 $MNS_MEA_T_PROBE_THICKNESS
Tool probe thickness for the automatic approach of
turning tools to the probe on milling/turning ma-
chines
= 0
Default value
MD20100 $MC_DIAMETER_AX_DEF
Geometry axis with transverse axis function
=X
The machine data defines a geometry axis as transverse axis.
MD20110 $MC_RESET_MODE_MASK
Definition of control initial setting after reset / end
of part program
Bit 0 = 1
Default value for system
MD20112 $MC_START_MODE_MASK
Definition of the basic control setting after part pro-
gram start
Bit 7 = 0
The current setting for the active transformation is retained.
MD20124 $MC_TOOL_MANAGEMENT_TOOLHOLDER
Tool holder number
= 1
Variable
MD20125 $MC_CUTMOD_ERR
Alarm display for CUTMOD errors
= CFFFH
Display alarms for CUTMOD errors
MD20150 $MC_GCODE_RESET_VALUES[21]
Initial setting of the G groups
= 2
Initial setting of G group 22 on CUT2DF
SINUMERIK Operate
482
Commissioning Manual, 10/2020, 6FC5397-1DP40-6BA4

Technologies and cycles
19.8 Turning on milling machines
MD20150 $MC_GCODE_RESET_VALUES[55]
Initial setting of the G groups
= 3
Initial setting of G group 56 TOWWCS
MD20152 $MC_GCODE_RESET_MODE[21]
Reset behavior of the G groups
= 0
Reset behavior of G group 22
MD20152 $MC_GCODE_RESET_MODE[55]
Reset behavior of the G groups
= 3
Reset behavior of G group 56 TOWWCS
MD20360 $MC_TOOL_PARAMETER_DEF_MASK
Definition of the tool parameters
Bit 17 = 0
With CUTMOD for turning and grinding tools, the cutting edge for the calculation of the
compensation values is not configured in the machining plane.
Bit 18 = 1
With CUTMOD for turning and grinding tools, always use the active plane for turning and
grinding tools.
Bit 22 = 1
Consider tool wear with active kinematic transformation in real time.
MD21203 $MC_LIFTFAST_MODE_MASK
Settings for fast lifting
Bit 0 = 1
This bit activates the monitoring of the direction for LIFTFAST for thread turning.
MD24030 $MC_FRAME_ACS_SET
SZS coordinate system setting
= 1
SZS results from the WCS transformed with the $P_CYCFRAME
MD35040 $MA_SPIND_ACTIVE_AFTER_RESET[ ]
Reset behavior of the spindle
[Tool spindle] = 2
Do not stop tool spindle during jog → spindle is listed in the T,S,M screen
[Turning spindle] = 2
Do not stop turning spindle during jog → spindle is listed in the T,S,M
screen
MD52001 $MCS_DISP_COORDINATE_SYSTEM_2
Definition of the displayed directions in the user
interface for turning operations (variable)
= 0
MD52200 $MCS_TECHNOLOGY
Technology
= 2
Milling
MD52201 $MCS_TECHNOLOGY_EXTENSION
Extended technology
= 1
Turning
SINUMERIK Operate
Commissioning Manual, 10/2020, 6FC5397-1DP40-6BA4
483

Technologies and cycles
19.8 Turning on milling machines
MD52206 $MCS_AXIS_USAGE[ ]
Meaning of the axes in the channel
[Tool spindle] = 1
Tool spindle
[Turning spindle] = 3
Turning spindle
MD52207 $MCS_AXIS_USAGE_ATTRIB[turning spindle]
Attributes of the axes
Bit 8 = 1
Offer rotary axis for blank clamping
MD52212 $MCS_FUNCTION_MASK_TECH
General function screen for all technologies
Bit 10 = 1
Align the turning tool via kinematics transformation
MD52214 $MCS_FUNCTION_MASK_MILL
Milling function screen
Bit 1 = 1
Offer fixed table for blank clamping
Note
Only set bit 1 in MD52214 when a fixed table is used in addition to a rotary table.
MD52780 $MCS_J_MEA_T_PROBE_APPR_MODE
Approach mode for measuring a tool in JOG
= 0
Technology-dependent approaching of the tool probe (default value)
Turning technology: Manual approach
Milling technology: Automatic approach
= 1
Technology-independent approaching of the tool probe
Manual approaching of the tool probe
= 2
Technology-independent approaching of the tool probe
Automatic approaching of the tool probe
MD52242 $MCS_TURN_TOOL_FIXING
Tool adapter for turning tools
= 0
Turning tools in tool spindle
= 1
Turning tools fixed on the tool headstock
= 2
Turning tools in the tool spindle or fixed on the tool headstock
Note
Depending on the set mounting alignment in MD52242, different parameters are available in
the "Align Turning Tool" dialog.
SINUMERIK Operate
484
Commissioning Manual, 10/2020, 6FC5397-1DP40-6BA4

Technologies and cycles
19.8 Turning on milling machines
Setting data
The following setting data is recommended. Set the setting data to set up the technology:
NOTICE
Risk of collision
Value changes of SD42940, SD42942 and SD42950 during the program execution can cause
collisions. Only set the setting data during the commissioning.
SD42935 $SC_WEAR_TRANSFORM
Transformations for tool components
= 1
Orientation for milling tools: Standard
G group 56: Observe or set TOWWCS
SD42940 $SC_TOOL_LENGTH_CONST
Change of tool length components at change of
plane
= 17
L1 = Z, L2 = Y, L3 = X
SD42942 $SC_TOOL_LENGTH_CONST_T
Change of tool length components for turning tools
at change of plane
= 19
L1 = Z, L2 = Y, L3 = X
Note
SD42942 is only evaluated after setting SD42950.
SD42950 $SC_TOOL_LENGTH_TYPE
Assignment of the tool length offset independent
of tool type
= 3
The assignment of the tool length components is performed separately for the turning and
grinding tools (tool types 400 to 599) on the one hand and all other tools (milling tools) on
the other hand.
SD42954 $SC_TOOL_ORI_CONST_M
Change of tool orientation components for milling
tools at change of plane
= 0
Orientation for milling tools: Standard
SD42956 $SC_TOOL_ORI_CONST_T
Change of tool orientation components for turning
tools at change of plane
= 18
Orientation for turning tools: G18
SD42998 $SC_CUTMOD_PLANE_TOL
Difference between tool tip plane and machining
plane
= 5
Maximum permissible difference for gamma of 0° to 180°
SINUMERIK Operate
Commissioning Manual, 10/2020, 6FC5397-1DP40-6BA4
485
Technologies and cycles
19.8 Turning on milling machines
SD42999 $SC_ORISOLH_INCLINE_TOL
Difference between tool tip plane and machining
plane for ORISOLH
= 1
Maximum permissible inclination of the tool tip compared to the G18 plane for "Align tool
directly"
In the following setting data, index [k] stands for the number of the current data field (probe
number -1) of the probe.
SD54633 $SNS_MEA_TP_TYPE[k]
Probe type, cube/disk
= 0
Compatibility (measuring cycles: cube, turning surface shows probe, milling surface shows
disk)
= 3
Cube
SD54648 $SNS_MEA_TPW_TYPE[k]
Probe version
= 0
Compatibility (measuring cycles: cube, turning surface shows probe, milling surface shows
disk)
= 3
Cube
Additional settings
• Set the current zero point in the center point of the turning tool, e.g. via a settable zero offset.
• Change the tool before the "Align turning tool" cycle call.
• Program the tool in the part program for the simulation.
Note
No tool is active after the start of the simulation.
• After the "Align turning tool" cycle call, traverse the tool to Y = 0.
• Limit the maximum speed of the tool spindle, e.g. with the tool change cycle, in order to
avoid too high a speed of the turning tool.
• The turning tools in the tool management are automatically set up by the system. You can
make your own modifications in file sltmmillturnlistconfig.xml, for example, for the OEM tool
list.
19.8.2
Setting up a kinematics transformation
In order to be able to use the turning on milling machines technology, at least one kinematics
transformation must be set up for turning.
Requirement
A kinematic chain is already available for the machine.
SINUMERIK Operate
486
Commissioning Manual, 10/2020, 6FC5397-1DP40-6BA4

Technologies and cycles
19.8 Turning on milling machines
Additional information
Additional information on kinematic elements can be found in the
Operating Manual Universal/Turning/Milling/Grinding
Setting up parameters
Set the following machine data to set up the kinematics transformation technology:
MD18866 $MN_MM_NUM_KIN_TRAFOS
Maximum number of NC transformation objects
≥ 1
This machine data specifies the maximum number of NC transformations that can be de-
fined with kinematic chains (variable).
Setting up system variables
Use the following system variables to set up the kinematics transformation:
System variable
Meaning
$NT_NAME[n]
Name of the transformation that appears on the user interface
$NT_TRAFO_TYPE[n]
Transformation type for turning and milling machines:
TRAORI_STAT
$NT_T_CHAIN_LAST_ELEM[n]
Name of the chain element that describes the end of the chain
in the direction of the tool
$NT_P_CHAIN_LAST_ELEM[n]
Name of the chain element that describes the end of the chain
in the direction of the workpiece
$NT_GEO_AX_NAME[n, 0 - 2]
Names of the chain elements that describe the 1st to 3rd GEO
axis (X, Y, Z)
$NT_ROT_AX_NAME[n, 0 - 2]
Name of the chain element that describes the 1st to 3rd rotary
axes (rotary indexing table, swivel axis, tool spindle)
$NT_IDENT[n, 0 - 2]
Settings to adapt the screen form
$NT_AUX_POS[n, 0 - 2]
Values for retraction in the direction of 1st to 3rd GEO axis (X, Y,
Z) 1)
$NT_CNTRL[n]
Settings to adapt to the machine
n: Number of the transformation data set with n = 1, 2, 3, ... (MD18866 $MN_MM_NUM_KIN_TRAFOS)
1)
See manufacturer cycle CUST_800.SPF markers _M47 and _M48
Meaning of the decimal places of $NT_IDENT[n, 0 - 2]
You can set the following display variants of the input screens for turning on milling machines:
Decimal place
Meaning
ONES
Selection of the alignment
0 =
Beta/gamma
1 =
Beta/gamma + direct alignment (B/SP)
THOUSANDS
Selection field: +/- direction reference of the swivel axis
0 =
No selection on the user interface, always minus
4 =
+/- selection via user interface, default: Minus
SINUMERIK Operate
Commissioning Manual, 10/2020, 6FC5397-1DP40-6BA4
487

Technologies and cycles
19.8 Turning on milling machines
Decimal place
Meaning
5 =
No selection on the user interface, always plus
9 =
+/- selection via user interface, default: Plus
TEN THOUSANDS
Selection box: Correct tool tip when swiveling
2 =
Do not list toggle
3 =
List toggle
ONE MILLION
Selection box: Retraction mode 0X and
TEN MILLION
Selection box: Retraction mode X0 (the permissible retraction modes result from the sum of the
individual values: 0 ... 15)
0 =
No retraction
1 =
Retraction Z 2)
2 =
Retraction Z, XY 2)
4 =
Maximum retraction in tool direction
8 =
Incremental retraction in tool direction
HUNDRED MILLION
Enable data set
4 =
Kinematics active (fixed value)
2)
See system variables $NT_AUX_POS[n,0] to $NT_AUX_POS[n,2]
Meaning of the bits of $NT_CNTRL[n]
You can make the following settings for the machine adaptation:
Bit 0 = 1
Fixed sequence of axes
For easier handling of the data, the sequence of the axes is fixed:
1. Rotary table
2. Swivel axis
3. Tool spindle
Bit 1 = 1
Rotary table is spindle
Bit 2 = 0
Swivel axis is not a spindle
Bit 3 = 0
Tool spindle is not a spindle (during turning)
Bit 4 = 0
1st rotary axis has no Hirth joint (rotary table) 3)
Bit 5 = 0
2nd rotary axis has no Hirth joint (swivel axis) 3)
Bit 6 = 0
3rd rotary axis has no Hirth joint (tool spindle) 3)
3)
It is not permissible that either the 2nd or the 3rd rotary axis has a Hirth joint.
SINUMERIK Operate
488
Commissioning Manual, 10/2020, 6FC5397-1DP40-6BA4
Technologies and cycles
19.8 Turning on milling machines
19.8.3
Behavior at reset and power on
Behavior at reset
Make the following settings so that the kinematics transformation is retained after reset and the
turning tool can be used in JOG mode:
MD20110 $MC_RESET_MODE_MASK
Definition of the basic control setting after reset /
part program end
Bit 7 = 1
The current setting for active transformation is retained after reset / part program end.
Bit 16 = 1
The current setting of the master spindle is retained.
MD20112 $MC_START_MODE_MASK
Definition of the basic control setting after part pro-
gram start
Bit 7 = 0
Start behavior, "active kinematics transformation"
MD20152 $MC_GCODE_RESET_MODE[ ]
Reset behavior of G groups
[5] = 1
The current setting of the 6th G group is also retained after reset / part program end
(G17, ...).
[14] = 1
The current setting of the 15th G group is also retained after reset / part program end
(G94, ...).
[28] = 1
The current setting of the 29th G group is also retained after reset / part program end
(DIAMxxx).
Behavior at power on
In order to retain the kinematics transformation after a power on, you must also make the
following additional settings:
MD20144 $MC_TRAFO_MODE_MASK
Selection of the kinematics transformation func-
tion
Bit 1 = 1
Reselection of the transformation after power-up
MD24008 $MC_CHSFRAME_POWERON_MASK
Reset system frames after power on
Bit 4 = 0
Do not delete workpiece reference points after power on
Note
The CUTMODK function cannot be retained after power on.
19.8.4
Setting the tool clamping angle
If the clamped turning tool is not in the G18 plane at the spindle zero position, the clamping
angle must be set.
SINUMERIK Operate
Commissioning Manual, 10/2020, 6FC5397-1DP40-6BA4
489
Technologies and cycles
19.8 Turning on milling machines
For this, the position of the tool spindle must be entered as a clamping angle at which the tool
is mechanically in the desired position.
Procedure
1.
Select the "Parameter" operating area.
2.
Press the "Tool list" softkey.
The "Tool List" window opens.
3.
Select a suitable turning tool in the list.
4.
Press the "Additional data" softkey.
The "Additional Data - ..." window opens.
The "Additional data" softkey is only active if a turning tool for which the
"Additional Data" window is configured is selected.
5.
Enter the required angle in the "Angle" input field.
Note
The clamping angle is stored in the $TC_DPROT cutting edge parameter.
19.8.5
Setting up the Hirth joint
If the tool spindle or the swivel axis has a Hirth joint with, for example, incrementing of 2.5°
(360°/2.5° = 144 division), you can set up the following:
Settings
MD30505 $MA_HIRTH_IS_ACTIVE
Axis is indexing axis with Hirth joint
= 0
Tool spindle / swivel axis is not a real Hirth axis
MD30330 $MA MODULO RANGE
Size of the modulo range
= 360°
Effective for modulo axis
MD30340 $MA_MODULO_RANGE_START
Start position of the modulo range.
= 0°
MD30501 $MA_INDEX_AX_NUMERATOR
Indexing axis, numerator for equidistant positions
= 360°
Effective for non-modulo axis
SINUMERIK Operate
490
Commissioning Manual, 10/2020, 6FC5397-1DP40-6BA4
Technologies and cycles
19.8 Turning on milling machines
MD30502 $MA_INDEX_AX_DENOMINATOR
Indexing axis, denominator for equidistant posi-
tions
= 144
Defines the value of the denominator for calculation of the distances between two indexing
positions for equidistant positions. For modulo axes, this is therefore the number of in-
dexing positions.
Swivel axis has Hirth joint
$NT_CNTRL[n]
Bit 5 = 1
Swivel axis has a Hirth joint
[n] transformation name
Tool spindle has Hirth joint
$NT_CNTRL[n]
Bit 6 = 1
Tool spindle has a Hirth joint
[n] transformation name
19.8.6
Different coordinate systems for milling and turning
In boring mills, the rotary table usually rotates around the Y axis (B axis). During turning, the
workpiece must rotate around the Z axis (C axis) in the G18 plane. Therefore, different
coordinate systems must be used on this machine for milling and turning.
Settings
Set the appropriate coordinate system via the following channel-specific machine data (values,
for example, for boring mills):
MD52000 $MCS_DISP_COORDINATE_SYSTEM
Position of the coordinate system (variable)
= 16
Y up, Z to the right
MD52001 DISP_COORDINATE_SYSTEM_2
Coordinate system for turning on milling machines
(variable)
= 0
Z up, X to the right
Describe the rotation of the coordinate system as follows at the _M70 marker in the
CUST_800.SPF cycle:
_M70:
; Rotation of the coordinate system for turning
N800703 $P_WPFRAME=$P_WPFRAME:CROT(Y,-90):CROT(X,-90)
SINUMERIK Operate
Commissioning Manual, 10/2020, 6FC5397-1DP40-6BA4
491
Technologies and cycles
19.8 Turning on milling machines
19.8.7
Adaptations for CUST_800
Adapt these markers in the CUST_800.SPF cycle for turning on milling machines:
Function markers
_M40:
; User Init
N800400 SETMS(1)
; Sets tool spindle as main spindle
N800401 DIAMOF
; No transverse axis defined as diameter
programming for milling
GOTOF _MEND
_M47:
; Retract axis Z to MCS fixed position
before tool alignment
GOTOF _MEND
_M48:
; Retract axis Z and then the XY axes to
MCS fixed position before tool alignment
GOTOF _MEND
_M70:
; Alignment tool: Prepare
IF($P_SMODE[1]==1)
; Spindle mode of tool spindle
N800700 SPOS[1]=0
; Tool spindle as rotary axis C
ENDIF
N800701 SETMS(2)
; Sets table as main spindle
N800702 DIAM90
; Transverse axis defined as diameter
programming for turning
GOTO _MEND
_M71:
; Alignment tool: Swivel rotary axis
_AX1=$PC_TRAFO_ROT_CHAN_AX_IN[1]
; Rotary axis B
_AX2=$PC_TRAFO_ROT_CHAN_AX_IN[2]
; Tool spindle
IF(_TC_N_WZ==0)
; No tooltip tracking
N800710 TRAFOOF
ENDIF
SBLON
N800711 G0 G40 G60 G90 AX[_AX1]=_A1 AX[_AX2]=_A2
SBLOF
GOTOF _MEND
_M72:
; Alignment tool: End
GOTOF _MEND
_M75:
; Alignment tool: Deselection
N800750 G17
; Standard plane for milling
SINUMERIK Operate
492
Commissioning Manual, 10/2020, 6FC5397-1DP40-6BA4
Technologies and cycles
19.8 Turning on milling machines
N800751 SETMS(1)
; Sets tool spindle as main spindle
N800752 DIAMOF
; No transverse axis defined as diameter
programming for milling
GOTOF _MEND
SINUMERIK Operate
Commissioning Manual, 10/2020, 6FC5397-1DP40-6BA4
493
Technologies and cycles
19.8 Turning on milling machines
Simplified flow diagrams
During tool retraction, the markers _M44 to _M48 are run through before the rotary axis
positioning in accordance with the retraction variant.
$OLJQ WXUQLQJ WRRO
'HVHOHFW WXUQLQJ
&<&/(
&<&/(
&<&/(
&<&/(
*
75$)22)
75$)22)
GHOHWH
GHOHWH
:3 )UDPH
:3 )UDPH
&867B
&867B
6(706
6(706
',$021
',$02)
*
75$)221
5(7
&<&/(
&867B
RU
&867B
RU
&867B
RU
&867B
5HWUDFWLRQ
&DOFXODWLRQ RI
75$)221
&867B
7UDYHUVH
D[HV
*
7ZLVW
&8702'.
&867B
5(7
SINUMERIK Operate
494
Commissioning Manual, 10/2020, 6FC5397-1DP40-6BA4
Technologies and cycles
19.8 Turning on milling machines
For swiveling with retraction to MCS fixed position, see Chapter "Manufacturer cycle
CUST_800.SPF (Page 471)".
19.8.8
Rotary axis positioning during block search
After a block search, you must position the rotary axis as follows (refer to swivel plane).
Generally, there are two rotary axes (swivel axis and tool spindle):
Procedure
Read out the position value of the rotary axis via the following system variable:
System variable
Meaning
$AC_RETPOINT[axis]
Repositioning point in the ASUB
You position the rotary axis in the CYCPE_MA.SPF user cycle.
Note
So that the old rotary axis position is not swiveled in, start the block search in the G code program
after the block for the turning tool alignment.
For additional information on CYCPE_MA.SPF, see Chapter "Extending the PROG_EVENT
standard cycle (Page 378)".
If you have switched off the kinematics transformation, e.g. for a tool change, you can switch the
transformation on again with the following program extension:
DEF STRING[32] U_TRAFO_NAME
U_TRAFO_NAME=$AC_TRAFO_NAME
TRAFOOF
TRAFOON(U_TRAFO_NAME)
19.8.9
Follow-up for rotary axis positioning after block search
The rotary axes must be positioned after a block search. If the positioning is done with follow-up,
it is possible that the linear axes will reach the software limit switch. To prevent this, the
positioning of the rotary axes is always done without follow-up by default.
Supplement for CYCPE1MA.SPF
If you nevertheless want to position the rotary axes with follow-up, you can supplement the
following in the user cycle CYCPE1MA.SPF for example:
; Position rotary axes "with follow-up":
IF($P_PROG_EVENT==5) ; Block search
SINUMERIK Operate
Commissioning Manual, 10/2020, 6FC5397-1DP40-6BA4
495
Technologies and cycles
19.9 Load-dependent controller setting
IF($PC_TRAFO_TYPE_NAME=="TRAORI_STAT")
IF(($NT_IDENT[($P_TRAFO_PARSET MOD 1000),0] _DEC5)>=2)
_TC_N_WZ=1 ; Correct tool
CUST_800(71,,$AC_RETPOINT[$PC_TRAFO_ROT_CHAN_AX_IN[1]],
$AC_RETPOINT[$PC_TRAFO_ROT_CHAN_AX_IN[2]])
ENDIF
ENDIF
ENDIF
19.9
Load-dependent controller setting
19.9.1
Adapt to load CYCLE782
Function
The workpiece and the clamping influence the dynamic response of the machine due to their
moment of inertia. During axis movements, inaccuracies in workpiece machining can arise.
Using cycle CYCLE782, you can automatically adapt the controller settings of the drive or the
dynamic response parameters of the axes to a specific situation. In this way, you achieve faster
and more accurate machining on the workpiece.
Software option
To use this function, you need the software option:
"Intelligent load adjustment"
Note
If the option "Intelligent load adjustment" is set, bit 20 is activated for MD19321
$ON_TECHNO_FUNCTION_MASK_1 and the softkeys "Adapt to load" and "Adaptation" are
displayed on the input mask.
Configuring the input mask form
Set the load response when opening the input mask using the following channel-specific
machine data:
MD52212 $MCS_FUNCTION_MASK_TECH
General function mask for all technologies
Bit 18
Enable determining the complete load: Axis empty + workpiece
= 0
The selection separately determine load is enabled in cycle CYCLE782. The determined
load value then only refers to the current workpiece. (default)
= 1
The total load is determined in cycle CYCLE782. The determined load value corre-
sponds to the sum of: Axis empty + workpiece.
SINUMERIK Operate
496
Commissioning Manual, 10/2020, 6FC5397-1DP40-6BA4
Technologies and cycles
19.9 Load-dependent controller setting
Further setting
MD53350 $MAS_ILC_BASE_VALUE
Basic inertia of the axis
= 0
(default)
The result for ascertaining loading of the axis without workpiece is stored in this
machine data.
This value must be determined only once when commissioning the machine.
It is required for support of the function Ascertain loading separately with CYCLE782.
Value output for linear axes
Loading can be determined or specified for linear and also for rotary axes. For linear axes, a mass,
and for rotary axes, a moment of inertia is normally displayed in the measurement result display.
For linear axes, however, the value display may differ depending on the drive type, e.g:
Drive of the linear axis
Value
Unit
Spindles or rotary axes
Moment of inertia
kgm2
Rotary via ball screw, linear mo-
Loading
kg
tor or gear
Additional information
Additional information on using CYCLE782 and its program structure is provided under:
• Operating Manual Universal/Turning/Milling/Grinding
• Programming Manual, NC Programming
19.9.2
CYCLE782: Help screens
For support, help screens are integrated in the input mask for cycle CYCLE782.
The help screens are correctly displayed in the input form if the following channel-specific
machine data are set as appropriate for the machine configuration:
MD52206 $MCS_AXIS_USAGE[n]
Meaning of the axes in the channel
MD52207 $MCS_AXIS_USAGE_ATTRIB[n]
Attributes of the axes
You will find a detailed description of MD52206 and MD52207 in Chapters "Setting the
technology for simulation (Page 161)" and "Activating turning/milling/drilling/grinding
technologies (Page 369)".
SINUMERIK Operate
Commissioning Manual, 10/2020, 6FC5397-1DP40-6BA4
497