MC Acadia Owner (2023 year). Manual in english - page 10
 

  Index      Manuals     General Motors MC Acadia Owner (2023 year). Manual in english


Search            copyright infringement  


Content      ..     8      9      10      11     ..


MC Acadia Owner (2023 year). Manual in english - page 10


GMC Acadia/Acadia Denali Owner Manual (GMNA-Localizing-U.S./Canada/

Mexico-16402009) - 2023 - CRC - 3/28/22

Vehicle Care

289

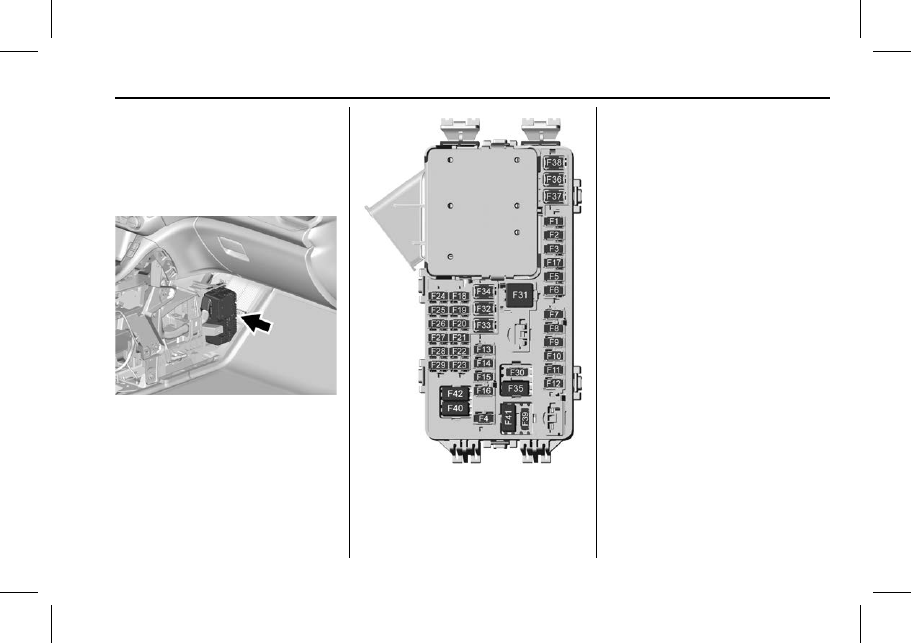
See the fuse block cover for specific fuse
information.

Open the fuse panel door, or remove the
panel from the passenger side by pulling
it out.

See your dealer for additional assistance.

To reinstall the door, push the door back
into its original location.

The vehicle may not be equipped with all of
the fuses, relays, and features shown.

Fuses

Usage

F1

Body Control Module 6

Fuses

Usage

F2

Diagnostic Link/Central
Gateway Module

F3

Electric Steering
Column Lock

F4

F5

Logistics

F6

Heating, Ventilation and
Air Conditioning/
Humidity Sensor

F7

Body Control Module 3

F8

Park Aid/Electronic
Range Select Hybrid

F9

Front Passenger
Heated Seat

F10

Airbag/Seat Belt

F11

F12

Amplifier 2

F13

Body Control Module 7

F14

Driver Heated Seat

F15

Instrument Panel
Switch Bank

F16

Sunroof

OwnersManuals2.com

GMC Acadia/Acadia Denali Owner Manual (GMNA-Localizing-U.S./Canada/

Mexico-16402009) - 2023 - CRC - 3/28/22

290

Vehicle Care

Fuses

Usage

F17

Body Control Module 1

F18

Instrument Cluster/
Heads-Up Display

F19

F20

Rear Seat Entertainment

F21

Body Control Module 4

F22

Infotainment USB Data/
Aux Jack

F23

Body Control Module 2

F24

USB Charger/Wireless
Charging

F25

Park Aid/Electronic
Transmission Range
System

F26

Communication
Integration Module

F27

Video/Night Vision
Module

F28

Heating, Ventilation,
and Air Conditioning
Display

F29

Radio

Fuses

Usage

F30

Steering Wheel
Adjustment Controls

F31

Electronic Brake Control
Module Electric Brake
Booster

F32

DC AC Inverter

F33

Driver Power Seat

F34

Passenger Power Seat

F35

Battery IEC 1 Feed

F36

Electric Power Steering

F37

Rear Seat
Entertainment/USB
Charge/Wireless
Charging Module

F38

Body Control Module 8

F39

Circuit Breakers/

Minifuse

Usage

F40

F41

F42

Auxiliary Power Outlet
(CB)/Lighter (Minifuse)

Rear Compartment Fuse Block

The rear compartment fuse block is behind a
trim panel on the driver side of the rear
storage compartment.

OwnersManuals2.com

GMC Acadia/Acadia Denali Owner Manual (GMNA-Localizing-U.S./Canada/

Mexico-16402009) - 2023 - CRC - 3/28/22

Vehicle Care

291

Remove the side bin, load floor, and foam.
See

Cargo Management System

0

85

.

Remove the trim plate to access the fuse
block.

The label for this fuse block is in the spare
tire area, on the foam under the cargo floor.

See your dealer for additional assistance.

Fuses

Usage

F1

F2

Trailer Battery 1

Fuses

Usage

F3

Driver Seat Belt Motor

F4

Rear Blower

F5

Rear Drive Control

F6

Passenger Seat Belt
Motor

F7

Right Window

F8

Rear Defogger

F9

Left Window

F10

F11

Trailer Reverse

F12

F13

F14

F15

F16

F17

F18

Trailer Module/
Accessory Power
Module Rechargeable
Energy Storage System
Ignition

OwnersManuals2.com

GMC Acadia/Acadia Denali Owner Manual (GMNA-Localizing-U.S./Canada/

Mexico-16402009) - 2023 - CRC - 3/28/22

292

Vehicle Care

Fuses

Usage

F19

Ventilated Seats/Left
Front Heated Seats Run
Crank

F20

F21

Trailer Connector

F22

F23

F24

Passenger Window
Switch

F25

F26

Trailer Brake

F27

Driver Ventilated Seat/
Lumbar

F28

Passive Entry/Passive
Start

F29

F30

Canister Vent

F31

Rechargeable Energy
Storage System

F32

Heated Mirror

F33

F34

Liftgate Module

Fuses

Usage

F35

Fuel System Control
Module/Fuel Tank Zone
Module

F36

Passenger Ventilated
Seat/Lumbar

F37

External Amplifier
Hybrid

F38

Window Module

F39

Rear Closure

F40

Memory Seat Module

F41

Automatic Occupancy
Sensor

F42

Trailer Battery 2

F43

Blower Console

F44

F45

Liftgate Motor

F46

Rear Heated Seats

F47

F48

Glass Break Sensor

F49

F50

Fuses

Usage

F51

F52

Active Dampening
System Module

F53

F54

External Object
Calculating/Side Blind
Zone Alert

F55

F56

Universal Remote
System/Rain Sensor

F57

Theft Deterrent

Circuit Breakers

Usage

CB1

CB2

CB3

Rear Auxiliary Power
Outlet

Relays

Usage

K1

K2

OwnersManuals2.com

GMC Acadia/Acadia Denali Owner Manual (GMNA-Localizing-U.S./Canada/

Mexico-16402009) - 2023 - CRC - 3/28/22

Vehicle Care

293

Wheels and Tires

Tires

Every new GM vehicle has high-quality
tires made by a leading tire
manufacturer. See the warranty manual
for information regarding the tire
warranty and where to get service. For
additional information refer to the tire
manufacturer.

{

Warning

.

Poorly maintained and improperly
used tires are dangerous.

.

Overloading the tires can cause
overheating as a result of too
much flexing. There could be a
blowout and a serious crash. See

Vehicle Load Limits

0

200

.

.

Underinflated tires pose the same
danger as overloaded tires. The
resulting crash could cause serious
injury. Check all tires frequently to

(Continued)

Warning (Continued)

maintain the recommended
pressure. Tire pressure should be
checked when the tires are cold.

.

Overinflated tires are more likely
to be cut, punctured, or broken by
a sudden impact

such as when

hitting a pothole. Keep tires at the
recommended pressure.

.

Worn or old tires can cause a
crash. If the tread is badly worn,
replace them.

.

Replace any tires that have been
damaged by impacts with
potholes, curbs, etc.

.

Improperly repaired tires can cause
a crash. Only your dealer or an
authorized tire service center
should repair, replace, dismount,
and mount the tires.

(Continued)

Warning (Continued)

.

Do not spin the tires in excess of
56 km/h (35 mph) on slippery
surfaces such as snow, mud, ice,
etc. Excessive spinning may cause
the tires to explode.

See

Tire Pressure for High-Speed

Operation

0

300

for inflation pressure

adjustment for high-speed driving.

All-Season Tires

This vehicle may come with all-season tires.
These tires are designed to provide good
overall performance on most road surfaces
and weather conditions. Original equipment
tires designed to GM's specific tire
performance criteria have a TPC specification
code molded onto the sidewall. Original
equipment all-season tires can be identified
by the last two characters of this TPC code,
which will be

MS.

Consider installing winter tires on the
vehicle if frequent driving on snow or
ice-covered roads is expected. All-season tires
provide adequate performance for most
winter driving conditions, but they may not

OwnersManuals2.com

GMC Acadia/Acadia Denali Owner Manual (GMNA-Localizing-U.S./Canada/

Mexico-16402009) - 2023 - CRC - 3/28/22

294

Vehicle Care

offer the same level of traction or
performance as winter tires on snow or
ice-covered roads. See

Winter Tires

0

294

.

Winter Tires

This vehicle was not originally equipped
with winter tires. Winter tires are designed
for increased traction on snow and
ice-covered roads. Consider installing winter
tires on the vehicle if frequent driving on ice
or snow covered roads is expected. See your
dealer for details regarding winter tire
availability and proper tire selection. Also,
see

Buying New Tires

0

307

.

With winter tires, there may be decreased
dry road traction, increased road noise, and
shorter tread life. After changing to winter
tires, be alert for changes in vehicle
handling and braking.

If using winter tires:

.

Use tires of the same brand and tread
type on all four wheel positions.

.

Use only radial ply tires of the same size,
load range, and speed rating as the
original equipment tires.

Winter tires with the same speed rating as
the original equipment tires may not be
available for H, V, W, Y, and ZR speed rated

tires. If winter tires with a lower speed
rating are chosen, never exceed the tire's
maximum speed capability.

Summer Tires

This vehicle may come with 235/55R20 high
performance summer tires. These tires have
a special tread and compound that are
optimized for maximum dry and wet road
performance. This special tread and
compound will have decreased performance
in cold climates, and on ice and snow. It is
recommended that winter tires be installed
on the vehicle if frequent driving at
temperatures below approximately 5 °C
(40 °F) or on ice or snow covered roads is
expected. See

Winter Tires

0

294

.

Caution

High performance summer tires have
rubber compounds that lose flexibility
and may develop surface cracks in the
tread area at temperatures below

7 °C

(20 °F). Always store high performance
summer tires indoors and at
temperatures above

7 °C (20 °F) when

not in use. If the tires have been
subjected to

7 °C (20 °F) or less, let them

(Continued)

Caution (Continued)

warm up in a heated space to at least
5 °C (40 °F) for 24 hours or more before
being installed or driving a vehicle on
which they are installed. Do not apply
heat or blow heated air directly on the
tires. Always inspect tires before use. See

Tire Inspection

0

305

.

All-Terrain Tires

This vehicle may have all-terrain or
mud-terrain tires. These tires provide good
performance on most road surfaces, weather
conditions, and for off-road driving. See

Off-Road Driving

0

194

.

The tread pattern on these tires may wear
more unevenly than other tires. Consider
rotating the tires more frequently than at
12 000 km (7,500 mi) intervals if irregular
wear is noted when the tires are inspected.
See

Tire Inspection

0

305

.

Tire Sidewall Labeling

Useful information about a tire is
molded into its sidewall. The examples
show a typical passenger vehicle tire
and a compact spare tire sidewall.

OwnersManuals2.com

GMC Acadia/Acadia Denali Owner Manual (GMNA-Localizing-U.S./Canada/

Mexico-16402009) - 2023 - CRC - 3/28/22

Vehicle Care

295

Passenger Tire Example

(1) Tire Size

:

The tire size is a

combination of letters and numbers
used to define a particular tire's width,
height, aspect ratio, construction type,
and service description. See the

Tire

Size

illustration in this section.

(2) TPC Spec (Tire Performance Criteria
Specification)

:

Original equipment tires

designed to GM's specific tire
performance criteria have a TPC
specification code molded onto the
sidewall. GM's TPC specifications meet
or exceed all federal safety guidelines.

(3) DOT (Department of
Transportation)

:

The Department of

Transportation (DOT) code indicates that
the tire is in compliance with the U.S.
Department of Transportation Motor
Vehicle Safety Standards.

DOT Tire Date of Manufacture

:

The last

four digits of the TIN indicate the tire
manufactured date. The first two digits
represent the week and the last two
digits, the year. For example, the third
week of the year 2020 would have a
4-digit DOT date of 0320. Week 01 is
the first full week (Sunday through
Saturday) of each year.

(4) Tire Identification Number (TIN)

:

The letters and numbers following the
DOT (Department of Transportation)
code are the Tire Identification Number
(TIN). The TIN shows the manufacturer
and plant code, tire size, and date the
tire was manufactured. The TIN is
molded onto both sides of the tire,
although only one side may have the
date of manufacture.

(5) Tire Ply Material

:

The type of cord

and number of plies in the sidewall and
under the tread.

(6) Uniform Tire Quality Grading
(UTQG)

:

Tire manufacturers are

required to grade tires based on three
performance factors: tread wear,
traction, and temperature resistance.
For more information see

Uniform Tire

Quality Grading

0

308

.

(7) Maximum Cold Inflation Load
Limit

:

Maximum load that can be

carried and the maximum pressure
needed to support that load.

Compact Spare Tire Example

OwnersManuals2.com

GMC Acadia/Acadia Denali Owner Manual (GMNA-Localizing-U.S./Canada/

Mexico-16402009) - 2023 - CRC - 3/28/22

296

Vehicle Care

(1) Tire Ply Material

:

The type of cord

and number of plies in the sidewall and
under the tread.

(2) Temporary Use Only

:

The compact

spare tire or temporary use tire should
not be driven at speeds over 80 km/h
(50 mph). The compact spare tire is for
emergency use when a regular road tire
has lost air and gone flat. If the vehicle
has a compact spare tire, see

Compact

Spare Tire

0

323

and

If a Tire Goes Flat

0

311

.

(3) Tire Identification Number (TIN)

:

The letters and numbers following the
DOT (Department of Transportation)
code are the Tire Identification Number
(TIN). The TIN shows the manufacturer
and plant code, tire size, and date the
tire was manufactured. The TIN is
molded onto both sides of the tire,
although only one side may have the
date of manufacture.

(4) Maximum Cold Inflation Load
Limit

:

Maximum load that can be

carried and the maximum pressure
needed to support that load.

(5) Tire Inflation

:

The temporary use

tire or compact spare tire should be
inflated to 420 kPa (60 psi). For more
information on tire pressure and
inflation see

Tire Pressure

0

299

.

(6) Tire Size

:

A combination of letters

and numbers define a tire's width,
height, aspect ratio, construction type,
and service description. The letter

T

as

the first character in the tire size means
the tire is for temporary use only.

(7) TPC Spec (Tire Performance Criteria
Specification)

:

Original equipment tires

designed to GM's specific tire
performance criteria have a TPC
specification code molded onto the
sidewall. GM's TPC specifications meet
or exceed all federal safety guidelines.

Tire Designations

Tire Size

The example shows a typical passenger
vehicle tire size.

Passenger (P-Metric) Tire

(1) Passenger (P-Metric) Tire

:

The

United States version of a metric tire
sizing system. The letter "P" as the first
character in the tire size means a
passenger vehicle tire engineered to
standards set by the U.S. Tire and Rim
Association.

(2) Tire Width

:

The 3-digit number

indicates the tire section width in
millimeters from sidewall to sidewall.

(3) Aspect Ratio

:

A 2-digit number that

indicates the tire height-to-width
measurements. For example, if the tire
size aspect ratio is 75, as shown in
item (3) of the illustration, it would
mean that the tire's sidewall is
75 percent as high as it is wide.

OwnersManuals2.com

GMC Acadia/Acadia Denali Owner Manual (GMNA-Localizing-U.S./Canada/

Mexico-16402009) - 2023 - CRC - 3/28/22

Vehicle Care

297

(4) Construction Code

:

A letter code is

used to indicate the type of ply
construction in the tire. The letter "R"
means radial ply construction; the letter
"D" means diagonal or bias ply
construction.

(5) Rim Diameter

:

Diameter of the

wheel in inches.

(6) Service Description

:

These

characters represent the load index and
speed rating of the tire. The load index
represents the load carrying capacity a
tire is certified to carry. The speed
rating is the maximum speed a tire is
certified to carry a load.

Tire Terminology and Definitions

Air Pressure

:

The amount of air inside

the tire pressing outward on each
square inch of the tire. Air pressure is
expressed in kPa (kilopascal) or psi
(pounds per square inch).

Aspect Ratio

:

The relationship of a

tire's height to its width.

Belt

:

A rubber coated layer of cords

that is located between the plies and
the tread. Cords may be made from
steel or other reinforcing materials.

Bead

:

The tire bead contains steel

wires wrapped by steel cords that hold
the tire onto the rim.

Bias Ply Tire

:

A pneumatic tire in which

the plies are laid at alternate angles
less than 90 degrees to the centerline
of the tread.

Cold Tire Pressure

:

The amount of air

pressure in a tire, measured in kPa
(kilopascal) or psi (pounds per square
inch) before a tire has built up heat
from driving. See

Tire Pressure

0

299

.

DOT Markings

:

A code molded into the

sidewall of a tire signifying that the tire
is in compliance with the U.S.
Department of Transportation (DOT)
Motor Vehicle Safety Standards. The
DOT code includes the Tire Identification
Number (TIN), an alphanumeric
designator which can also identify the
tire manufacturer, production plant,
brand, and date of production.

GVWR

:

Gross Vehicle Weight Rating.

See

Vehicle Load Limits

0

200

.

GAWR FRT

:

Gross Axle Weight Rating

for the front axle. See

Vehicle Load

Limits

0

200

.

GAWR RR

:

Gross Axle Weight Rating

for the rear axle. See

Vehicle Load

Limits

0

200

.

Intended Outboard Sidewall

:

The side

of an asymmetrical tire, that must
always face outward when mounted on
a vehicle.

Kilopascal (kPa)

:

The metric unit for air

pressure.

Light Truck (LT-Metric) Tire

:

A tire used

on light duty trucks and some
multipurpose passenger vehicles.

Load Index

:

An assigned number

ranging from 1 to 279 that corresponds
to the load carrying capacity of a tire.

Maximum Inflation Pressure

:

The

maximum air pressure to which a cold
tire can be inflated. The maximum air
pressure is molded onto the sidewall.

OwnersManuals2.com

GMC Acadia/Acadia Denali Owner Manual (GMNA-Localizing-U.S./Canada/

Mexico-16402009) - 2023 - CRC - 3/28/22

298

Vehicle Care

Maximum Load Rating

:

The load rating

for a tire at the maximum permissible
inflation pressure for that tire.

Occupant Distribution

:

Designated

seating positions.

Outward Facing Sidewall

:

The side of

an asymmetrical tire that has a
particular side that faces outward when
mounted on a vehicle. The side of the
tire that contains a whitewall, bears
white lettering, or bears manufacturer,
brand, and/or model name molding
that is higher or deeper than the same
moldings on the other sidewall of
the tire.

Passenger (P-Metric) Tire

:

A tire used

on passenger cars and some light duty
trucks and multipurpose vehicles.

Recommended Inflation Pressure

:

Vehicle manufacturer's recommended
tire inflation pressure as shown on the
tire placard. See

Tire Pressure

0

299

and

Vehicle Load Limits

0

200

.

Radial Ply Tire

:

A pneumatic tire in

which the ply cords that extend to the
beads are laid at 90 degrees to the
centerline of the tread.

Rim

:

A metal support for a tire and

upon which the tire beads are seated.

Sidewall

:

The portion of a tire between

the tread and the bead.

Speed Rating

:

An alphanumeric code

assigned to a tire indicating the
maximum speed at which a tire can
operate.

Traction

:

The friction between the tire

and the road surface. The amount of
grip provided.

Tread

:

The portion of a tire that comes

into contact with the road.

Treadwear Indicators

:

Narrow bands,

sometimes called wear bars, that show
across the tread of a tire when only
1.6 mm (1/16 in) of tread remains. See

When It Is Time for New Tires

0

306

.

UTQGS (Uniform Tire Quality Grading
Standards)

:

A tire information system

that provides consumers with ratings
for a tire's traction, temperature, and
treadwear. Ratings are determined by
tire manufacturers using government
testing procedures. The ratings are
molded into the sidewall of the tire.
See

Uniform Tire Quality Grading

0

308

.

Vehicle Capacity Weight

:

The number

of designated seating positions
multiplied by 68 kg (150 lbs) plus the
rated cargo load. See

Vehicle Load

Limits

0

200

.

Vehicle Maximum Load on the Tire

:

Load on an individual tire due to curb
weight, accessory weight, occupant
weight, and cargo weight.

Vehicle Placard

:

A label permanently

attached to a vehicle showing the
vehicle's capacity weight and the
original equipment tire size and
recommended inflation pressure. See

Tire and Loading Information Label

under

Vehicle Load Limits

0

200

.

OwnersManuals2.com

GMC Acadia/Acadia Denali Owner Manual (GMNA-Localizing-U.S./Canada/

Mexico-16402009) - 2023 - CRC - 3/28/22

Vehicle Care

299

Tire Pressure

Tires need the correct amount of air
pressure to operate effectively.

{

Warning

Neither tire underinflation nor
overinflation is good. Underinflated
tires, or tires that do not have
enough air, can result in:

.

Tire overloading and overheating,
which could lead to a blowout

.

Premature or irregular wear

.

Poor handling

.

Reduced fuel economy for

internal combustion engine
vehicles

.

Reduced range for electric vehicles

(Continued)

Warning (Continued)

Overinflated tires, or tires that have
too much air, can result in:

.

Unusual wear

.

Poor handling

.

Rough ride

.

Needless damage from road
hazards

The Tire and Loading Information label
on the vehicle indicates the original
equipment tires and the correct cold
tire inflation pressures. The
recommended pressure is the minimum
air pressure needed to support the
vehicle's maximum load carrying
capacity. See

Vehicle Load Limits

0

200

.

How the vehicle is loaded affects
vehicle handling and ride comfort.
Never load the vehicle with more
weight than it was designed to carry.

When to Check

Check the pressure of the tires once a
month or more. Do not forget the
spare, if the vehicle has one. The
compact spare cold tire pressure should
be at 420 kPa (60 psi). See

Compact

Spare Tire

0

323

.

How to Check

Use a good quality pocket-type gauge
to check tire pressure. Proper tire
inflation cannot be determined by
looking at the tire. Check the tire
inflation pressure when the tires are
cold, meaning the vehicle has not been
driven for at least three hours or no
more than 1.6 km (1 mi).

Remove the valve cap from the tire
valve stem. Press the tire gauge firmly
onto the valve to get a pressure
measurement. If the cold tire inflation
pressure matches the recommended
pressure on the Tire and Loading
Information label, no further adjustment

OwnersManuals2.com

GMC Acadia/Acadia Denali Owner Manual (GMNA-Localizing-U.S./Canada/

Mexico-16402009) - 2023 - CRC - 3/28/22

300

Vehicle Care

is necessary. If the inflation pressure is
low, add air until the recommended
pressure is reached. If the inflation
pressure is high, press on the metal
stem in the center of the tire valve to
release air.

Recheck the tire pressure with the tire
gauge.

Put the valve caps back on the valve
stems to keep out dirt and moisture.
Use only valve caps designed for the
vehicle by GM. TPMS sensors could be
damaged and would not be covered by
the vehicle warranty.

Tire Pressure for High-Speed
Operation

{

Warning

Driving at high speeds, 160 km/h
(100 mph) or higher, puts additional
strain on tires. Sustained high-speed
driving causes excessive heat buildup and
can cause sudden tire failure. This could
cause a crash, and you or others could be
killed. Some high-speed rated tires require
inflation pressure adjustment for
high-speed operation. When speed limits
and road conditions allow the vehicle to
be driven at high speeds, make sure the
tires are rated for high-speed operation,
are in excellent condition, and are set to
the correct cold tire inflation pressure for
the vehicle load.

Vehicles with tire sizes listed in the High
Speed Operation Inflation Pressures table
require inflation pressure adjustment when
driving the vehicle at speeds of 160 km/h
(100 mph) or higher. Set the cold tire
inflation pressure to the corresponding value
in the table for the tire size on the vehicle.

OwnersManuals2.com

GMC Acadia/Acadia Denali Owner Manual (GMNA-Localizing-U.S./Canada/

Mexico-16402009) - 2023 - CRC - 3/28/22

Vehicle Care

301

High Speed Operation Inflation Pressures

Tire Size

Cold Inflation Pressure kPa (psi)

235/65R18

280 kPa (41 psi)

235/55R20

280 kPa (41 psi)

255/65R17

280 kPa (41 psi)

Return the tires to the recommended cold
tire inflation pressure when high-speed
driving has ended. See

Vehicle Load Limits

0

200

and

Tire Pressure

0

299

.

Tire Pressure Monitor System

The Tire Pressure Monitor System (TPMS)
uses radio and sensor technology to check
tire pressure levels. The TPMS sensors
monitor the air pressure in your tires and
transmit tire pressure readings to a receiver
located in the vehicle.

Each tire, including the spare (if provided),
should be checked monthly when cold and
inflated to the inflation pressure
recommended by the vehicle manufacturer
on the vehicle placard or tire inflation
pressure label. (If your vehicle has tires of a
different size than the size indicated on the

vehicle placard or tire inflation pressure
label, you should determine the proper tire
inflation pressure for those tires.)

As an added safety feature, your vehicle has
been equipped with a tire pressure
monitoring system (TPMS) that illuminates a
low tire pressure telltale when one or more
of your tires is significantly under-inflated.

Accordingly, when the low tire pressure
telltale illuminates, you should stop and
check your tires as soon as possible, and
inflate them to the proper pressure. Driving
on a significantly under-inflated tire causes
the tire to overheat and can lead to tire
failure. Under-inflation also reduces energy
efficiency and tire tread life, and may affect
the vehicle's handling and stopping ability.

Please note that the TPMS is not a
substitute for proper tire maintenance, and
it is the driver's responsibility to maintain
correct tire pressure, even if under-inflation
has not reached the level to trigger
illumination of the TPMS low tire pressure
telltale.

Your vehicle has also been equipped with a
TPMS malfunction indicator to indicate when
the system is not operating properly. The
TPMS malfunction indicator is combined
with the low tire pressure telltale. When the
system detects a malfunction, the telltale
will flash for approximately one minute and
then remain continuously illuminated. This
sequence will continue upon subsequent
vehicle start-ups as long as the malfunction
exists.

OwnersManuals2.com

GMC Acadia/Acadia Denali Owner Manual (GMNA-Localizing-U.S./Canada/

Mexico-16402009) - 2023 - CRC - 3/28/22

302

Vehicle Care

When the malfunction indicator is
illuminated, the system may not be able to
detect or signal low tire pressure as
intended. TPMS malfunctions may occur for
a variety of reasons, including the
installation of replacement or alternate tires
or wheels on the vehicle that prevent the
TPMS from functioning properly. Always
check the TPMS malfunction telltale after
replacing one or more tires or wheels on
your vehicle to ensure that the replacement
or alternate tires and wheels allow the
TPMS to continue to function properly.

See

Tire Pressure Monitor Operation

0

302

.

See

Radio Frequency Statement

0

359

or

Radio Frequency Statement

0

359

.

Tire Pressure Monitor Operation

This vehicle may have a Tire Pressure
Monitor System (TPMS). The TPMS is
designed to warn the driver when a low tire
pressure condition exists. TPMS sensors are
mounted onto each tire and wheel
assembly, excluding the spare tire and
wheel assembly. The TPMS sensors monitor
the air pressure in the tires and transmit the
tire pressure readings to a receiver located
in the vehicle.

When a low tire pressure condition is
detected, the TPMS illuminates the low tire
pressure warning light located on the
instrument cluster. If the warning light
comes on, stop as soon as possible and
inflate the tires to the recommended
pressure shown on the Tire and Loading
Information label. See

Vehicle Load Limits

0

200

.

A message to check the pressure in a
specific tire displays in the Driver
Information Center (DIC). The low tire
pressure warning light and the DIC warning
message come on at each ignition cycle
until the tires are inflated to the correct
inflation pressure. Using the DIC, tire
pressure levels can be viewed. For additional
information and details about the DIC
operation and displays see

Driver

Information Center (DIC) (Base Level)

0

114

or

Driver Information Center (DIC) (Midlevel)

0

116

or

Driver Information Center (DIC)

(Uplevel)

0

119

.

The low tire pressure warning light may
come on in cool weather when the vehicle is
first started, and then turn off as the vehicle
is driven. This could be an early indicator
that the air pressure is getting low and
needs to be inflated to the proper pressure.

A Tire and Loading Information label,
attached to your vehicle, shows the size of
the original equipment tires and the correct
inflation pressure for the tires when they
are cold. See

Vehicle Load Limits

0

200

for

an example of the Tire and Loading
Information label and its location. Also see

Tire Pressure

0

299

.

The TPMS can warn about a low tire
pressure condition but it does not replace
normal tire maintenance. See

Tire Inspection

0

305

,

Tire Rotation

0

305

and

Tires

0

293

.

Caution

Tire sealant materials are not all the
same. A non-approved tire sealant could
damage the TPMS sensors. TPMS sensor
damage caused by using an incorrect tire
sealant is not covered by the vehicle
warranty. Always use only the GM
approved tire sealant available through
your dealer or included in the vehicle.

OwnersManuals2.com

GMC Acadia/Acadia Denali Owner Manual (GMNA-Localizing-U.S./Canada/

Mexico-16402009) - 2023 - CRC - 3/28/22

Vehicle Care

303

Factory-installed Tire Inflator Kits use a
GM-approved liquid tire sealant. Using
non-approved tire sealants could damage the
TPMS sensors. See

Tire Sealant and

Compressor Kit

0

312

for information

regarding the inflator kit materials and
instructions.

TPMS Malfunction Light and Message

The TPMS will not function properly if one
or more of the TPMS sensors are missing or
inoperable. When the system detects a
malfunction, the low tire pressure warning
light flashes for about one minute and then
stays on for the remainder of the ignition
cycle. A DIC warning message also displays.
The malfunction light and DIC warning
message come on at each ignition cycle
until the problem is corrected. Some of the
conditions that can cause these to come
on are:

.

One of the road tires has been replaced
with the spare tire. The spare tire does
not have a TPMS sensor. The malfunction
light and DIC message should go off after
the road tire is replaced and the sensor
matching process is performed
successfully. See

TPMS Sensor Matching

Process

later in this section.

.

The TPMS sensor matching process was
not done or not completed successfully
after rotating the tires. The malfunction
light and the DIC message should go off
after successfully completing the sensor
matching process. See "TPMS Sensor
Matching Process" later in this section.

.

One or more TPMS sensors are missing or
damaged. The malfunction light and the
DIC message should go off when the
TPMS sensors are installed and the sensor
matching process is performed
successfully. See your dealer for service.

.

Replacement tires or wheels do not match
the original equipment tires or wheels.
Tires and wheels other than those
recommended could prevent the TPMS
from functioning properly. See

Buying

New Tires

0

307

.

.

Operating electronic devices or being near
facilities using radio wave frequencies
similar to the TPMS could cause the TPMS
sensors to malfunction.

If the TPMS is not functioning properly it
cannot detect or signal a low tire pressure
condition. See your dealer for service if the
TPMS malfunction light and DIC message
come on and stay on.

Tire Fill Alert (If Equipped)

This feature provides visual and audible
alerts outside the vehicle to help when
inflating an underinflated tire to the
recommended cold tire pressure.

When the low tire pressure warning light
comes on:

1. Park the vehicle in a safe, level place.
2. Set the parking brake firmly.
3. Place the vehicle in P (Park).
4. Add air to the tire that is underinflated.

The turn signal lamp will flash.
When the recommended pressure is
reached, the horn sounds once and the
turn signal lamp will stop flashing and
briefly turn solid.

Repeat these steps for all underinflated tires
that have illuminated the low tire pressure
warning light.

{

Warning

Overinflating a tire could cause the tire
to rupture and you or others could be
injured. Do not exceed the maximum

(Continued)

OwnersManuals2.com

GMC Acadia/Acadia Denali Owner Manual (GMNA-Localizing-U.S./Canada/

Mexico-16402009) - 2023 - CRC - 3/28/22

304

Vehicle Care

Warning (Continued)

pressure listed on the tire sidewall. See

Tire Sidewall Labeling

0

294

and

Vehicle Load Limits

0

200

.

If the tire is overinflated by more than
35 kPa (5 psi), the horn will sound multiple
times and the turn signal lamp will continue
to flash for several seconds after filling
stops. To release and correct the pressure,
while the turn signal lamp is still flashing,
briefly press the center of the valve stem.
When the recommended pressure is reached,
the horn sounds once.

If the turn signal lamp does not flash within
15 seconds after starting to inflate the tire,
the tire fill alert has not been activated or is
not working.

If the hazard warning flashers are on, the
tire fill alert visual feedback will not work
properly.

The TPMS will not activate the tire fill alert
properly under the following conditions:

.

There is interference from an external
device or transmitter.

.

The air pressure from the inflation device
is not sufficient to inflate the tire.

.

There is a malfunction in the TPMS.

.

There is a malfunction in the horn or turn
signal lamps.

.

The identification code of the TPMS
sensor is not registered to the system.

.

The battery of the TPMS sensor is low.

If the tire fill alert does not operate due to
TPMS interference, move the vehicle about
1 m (3 ft) back or forward and try again.
If the tire fill alert feature is not working,
use a tire pressure gauge.

TPMS Sensor Matching Process

Each TPMS sensor has a unique
identification code. The identification code
needs to be matched to a new tire/wheel
position after rotating the vehicle

s tires or

replacing one or more of the TPMS sensors.
The TPMS sensor matching process should
also be performed after replacing a spare
tire with a road tire containing the TPMS
sensor. The malfunction light and the DIC
message should go off at the next ignition
cycle. The sensors are matched to the tire/
wheel positions, using a TPMS relearn tool,
in the following order: driver side front tire,
passenger side front tire, passenger side rear
tire, and driver side rear tire. See your
dealer for service or to purchase a relearn

tool. A TPMS relearn tool can also be
purchased. See Tire Pressure Monitor Sensor
Activation Tool at
www.gmtoolsandequipment.com or call
1-800-GM TOOLS (1-800-468-6657).

There are two minutes to match the first
tire/wheel position, and five minutes overall
to match all four tire/wheel positions. If it
takes longer, the matching process stops
and must be restarted.

The TPMS sensor matching process is:

1. Set the parking brake.
2. Place the vehicle in Service Mode. See

Ignition Positions

0

204

.

3. Make sure the Tire Pressure info page

option is turned on. The info pages on
the DIC can be turned on and off
through the Options menu. See

Driver

Information Center (DIC) (Base Level)

0

114

or

Driver Information Center (DIC)

(Midlevel)

0

116

or

Driver Information

Center (DIC) (Uplevel)

0

119

.

4. Use the DIC controls on the right side of

the steering wheel to scroll to the Tire
Pressure screen under the DIC info page.

5. Press and hold

V

in the center of the

DIC controls.

OwnersManuals2.com

GMC Acadia/Acadia Denali Owner Manual (GMNA-Localizing-U.S./Canada/

Mexico-16402009) - 2023 - CRC - 3/28/22

Vehicle Care

305

The horn sounds twice to signal the
receiver is in relearn mode and the TIRE
LEARNING ACTIVE message displays on
the DIC display.

6. Start with the driver side front tire.
7. Place the relearn tool against the tire

sidewall, near the valve stem. Then press
the button to activate the TPMS sensor.
A horn chirp confirms that the sensor
identification code has been matched to
this tire and wheel position.

8. Proceed to the passenger side front tire,

and repeat the procedure in Step 7.

9. Proceed to the passenger side rear tire,

and repeat the procedure in Step 7.

10. Proceed to the driver side rear tire, and

repeat the procedure in Step 7. The horn
sounds two times to indicate the sensor
identification code has been matched to
the driver side rear tire, and the TPMS
sensor matching process is no longer
active. The TIRE LEARNING ACTIVE
message on the DIC display goes off.

11. Turn the vehicle off.
12. Set all four tires to the recommended air

pressure level as indicated on the Tire
and Loading Information label.

Tire Inspection

We recommend that the tires, including
the spare tire, if the vehicle has one, be
inspected for signs of wear or damage
at least once a month.

Replace the tire if:

.

The indicators at three or more
places around the tire can be seen.

.

There is cord or fabric showing
through the tire's rubber.

.

The tread or sidewall is cracked, cut,
or snagged deep enough to show
cord or fabric.

.

The tire has a bump, bulge, or split.

.

The tire has a puncture, cut, or other
damage that cannot be repaired well
because of the size or location of the
damage.

Tire Rotation

Tires should be rotated according to the
interval specified in the Maintenance
Schedule. See

Maintenance Schedule

0

339

.

Tires are rotated to achieve a more
uniform wear for all tires. The first
rotation is the most important.

Anytime unusual wear is noticed, rotate
the tires as soon as possible, check for
proper tire inflation pressure, and check
for damaged tires or wheels. If the
unusual wear continues after the
rotation, check the wheel alignment.
See

When It Is Time for New Tires

0

306

and

Wheel Replacement

0

310

.

Use this rotation pattern when rotating
the tires.

OwnersManuals2.com

GMC Acadia/Acadia Denali Owner Manual (GMNA-Localizing-U.S./Canada/

Mexico-16402009) - 2023 - CRC - 3/28/22

306

Vehicle Care

Do not include the compact spare tire
in the tire rotation.

Adjust the front and rear tires to the
recommended inflation pressure on the
Tire and Loading Information label after
the tires have been rotated. See

Tire

Pressure

0

299

and

Vehicle Load Limits

0

200

.

Reset the Tire Pressure Monitor System.
See

Tire Pressure Monitor Operation

0

302

.

Check that all wheel nuts are properly
tightened. See

Wheel Nut Torque

under

Capacities and Specifications

0

348

and

Removing the Flat Tire and

Installing the Spare Tire

under

Tire

Changing

0

318

.

{

Warning

Rust or dirt on a wheel, or on the
parts to which it is fastened, can
cause wheel nuts to become loose
over time. The wheel could come off
and cause a crash. When changing a
wheel, remove any rust or dirt from

(Continued)

Warning (Continued)

places where the wheel attaches to
the vehicle. In an emergency, a cloth
or paper towel can be used; however,
use a scraper or wire brush later to
remove all rust or dirt.

Lightly coat the inner diameter of the
wheel hub opening with wheel bearing
grease after a wheel change or tire
rotation to prevent corrosion or rust
buildup.

{

Warning

Do not apply grease to the wheel
mounting surface, wheel conical
seats, or the wheel nuts or bolts.
Grease applied to these areas could
cause a wheel to become loose or
come off, resulting in a crash.

When It Is Time for New Tires

Factors, such as maintenance, temperatures,
driving speeds, vehicle loading, and road
conditions affect the wear rate of the tires.

Treadwear indicators are one way to tell
when it is time for new tires. Treadwear
indicators appear when the tires have only
1.6 mm (1/16 in) or less of tread remaining.
See

Tire Inspection

0

305

and

Tire Rotation

0

305

.

The rubber in tires ages over time. This also
applies to the spare tire, if the vehicle has
one, even if it is never used. Multiple factors
including temperatures, loading conditions,
and inflation pressure maintenance affect
how fast aging takes place. GM recommends
that tires, including the spare if equipped,
be replaced after six years, regardless of
tread wear. To identify the age of a tire, use
the tire manufacture date, which is the last
four digits of the DOT Tire Identification

OwnersManuals2.com

GMC Acadia/Acadia Denali Owner Manual (GMNA-Localizing-U.S./Canada/

Mexico-16402009) - 2023 - CRC - 3/28/22

Vehicle Care

307

Number (TIN) molded into one side of the
tire sidewall. The last four digits of the TIN
indicate the tire manufactured date. The
first two digits represent the week and the
last two digits, the year. For example, the
third week of the year 2020 would have a
4-digit DOT date of 0320. Week 01 is the
first full week (Sunday through Saturday) of
each year.

Vehicle Storage

Tires age when stored normally mounted on
a parked vehicle. Park a vehicle that will be
stored for at least a month in a cool, dry,
clean area away from direct sunlight to slow
aging. This area should be free of grease,
gasoline, or other substances that can
deteriorate rubber.

Parking for an extended period can cause
flat spots on the tires that may result in
vibrations while driving. When storing a
vehicle for at least a month, remove the
tires or raise the vehicle to reduce the
weight from the tires.

Buying New Tires

GM has developed and matched specific
tires for the vehicle. The original
equipment tires installed were designed

to meet General Motors Tire
Performance Criteria Specification (TPC
Spec) system rating. When replacement
tires are needed, GM strongly
recommends buying tires with the same
TPC Spec rating.

GM's exclusive TPC Spec system
considers over a dozen critical
specifications that impact the overall
performance of the vehicle, including
brake system performance, ride and
handling, traction control, and tire
pressure monitoring performance. GM's
TPC Spec number is molded onto the
tire's sidewall near the tire size. If the
tires have an all-season tread design,
the TPC Spec number will be followed
by MS for mud and snow. See

Tire

Sidewall Labeling

0

294

for additional

information.

GM recommends replacing worn tires in
complete sets of four. Uniform tread
depth on all tires will help to maintain
the performance of the vehicle. Braking
and handling performance may be
adversely affected if all the tires are not

replaced at the same time. If proper
rotation and maintenance have been
done, all four tires should wear out at
about the same time. However, if it is
necessary to replace only one axle set
of worn tires, place the new tires on
the rear axle. See

Tire Rotation

0

305

.

{

Warning

Tires could explode during improper
service. Attempting to mount or
dismount a tire could cause injury or
death. Only your dealer or authorized
tire service center should mount or
dismount the tires.

{

Warning

Mixing tires of different sizes (other
than those originally installed on the
vehicle), brands, tread patterns,
or types may cause loss of vehicle
control, resulting in a crash or other
vehicle damage. Use the correct size,
brand, and type of tire on all wheels.

OwnersManuals2.com

GMC Acadia/Acadia Denali Owner Manual (GMNA-Localizing-U.S./Canada/

Mexico-16402009) - 2023 - CRC - 3/28/22

308

Vehicle Care

{

Warning

Using bias-ply tires on the vehicle
may cause the wheel rim flanges to
develop cracks after many miles of
driving. A tire and/or wheel could fail
suddenly and cause a crash. Use only
radial-ply tires with the wheels on
the vehicle.

Winter tires with the same speed rating
as the original equipment tires may not
be available for H, V, W, Y and ZR
speed rated tires. Never exceed the
winter tires

maximum speed capability

when using winter tires with a lower
speed rating.

If the vehicle tires must be replaced
with a tire that does not have a TPC
Spec number, make sure they are the
same size, load range, speed rating, and
construction (radial) as the original
tires.

The Tire and Loading Information label
indicates the original equipment tires
on the vehicle. See

Vehicle Load Limits

0

200

.

Different Size Tires and Wheels

If wheels or tires are installed that are a
different size than the original equipment
wheels and tires, vehicle performance,
including its braking, ride and handling
characteristics, stability, and resistance to
rollover may be affected. If the vehicle has
electronic systems such as antilock brakes,
rollover airbags, traction control, electronic
stability control, or All-Wheel Drive, the
performance of these systems can also be
affected.

{

Warning

If different sized wheels are used, there
may not be an acceptable level of
performance and safety if tires not
recommended for those wheels are
selected. This increases the chance of a
crash and serious injury. Only use GM
specific wheel and tire systems developed
for the vehicle, and have them properly
installed by a GM certified technician.

See

Buying New Tires

0

307

and

Accessories and Modifications

0

262

.

Uniform Tire Quality Grading

The following information relates to the
system developed by the United States
National Highway Traffic Safety
Administration (NHTSA), which grades
tires by treadwear, traction, and
temperature performance. This applies
only to vehicles sold in the United
States. The grades are molded on the
sidewalls of most passenger car tires.
The Uniform Tire Quality Grading
(UTQG) system does not apply to deep
tread, winter tires, compact spare tires,
tires with nominal rim diameters of
10 to 12 inches (25 to 30 cm), or to some
limited-production tires.

While the tires available on General
Motors passenger cars and light trucks
may vary with respect to these grades,
they must also conform to federal
safety requirements and additional
General Motors Tire Performance
Criteria (TPC) standards.

OwnersManuals2.com

GMC Acadia/Acadia Denali Owner Manual (GMNA-Localizing-U.S./Canada/

Mexico-16402009) - 2023 - CRC - 3/28/22

Vehicle Care

309

Quality grades can be found where
applicable on the tire sidewall between
tread shoulder and maximum section
width. For example:

Treadwear 200 Traction AA Temperature A

All Passenger Car Tires Must Conform to
Federal Safety Requirements In Addition
To These Grades.

Treadwear

The treadwear grade is a comparative
rating based on the wear rate of the
tire when tested under controlled
conditions on a specified government
test course. For example, a tire graded
150 would wear one and one-half (1

½

)

times as well on the government course
as a tire graded 100. The relative
performance of tires depends upon the
actual conditions of their use, however,
and may depart significantly from the
norm due to variations in driving habits,
service practices and differences in road
characteristics and climate.

Traction

The traction grades, from highest to
lowest, are AA, A, B, and C. Those
grades represent the tire's ability to
stop on wet pavement as measured
under controlled conditions on specified
government test surfaces of asphalt and
concrete. A tire marked C may have
poor traction performance. Warning:
The traction grade assigned to this tire
is based on straight-ahead braking
traction tests, and does not include
acceleration, cornering, hydroplaning,
or peak traction characteristics.

Temperature

The temperature grades are A (the
highest), B, and C, representing the
tire's resistance to the generation of
heat and its ability to dissipate heat
when tested under controlled conditions
on a specified indoor laboratory test
wheel. Sustained high temperature can
cause the material of the tire to
degenerate and reduce tire life, and
excessive temperature can lead to
sudden tire failure. The grade C

corresponds to a level of performance
which all passenger car tires must meet
under the Federal Motor Safety
Standard No. 109. Grades B and A
represent higher levels of performance
on the laboratory test wheel than the
minimum required by law. Warning:
The temperature grade for this tire is
established for a tire that is properly
inflated and not overloaded. Excessive
speed, underinflation, or excessive
loading, either separately or in
combination, can cause heat buildup
and possible tire failure.

Wheel Alignment and Tire
Balance

The tires and wheels were aligned and
balanced at the factory to provide the
longest tire life and best overall
performance. Adjustments to wheel
alignment and tire balancing are not
necessary on a regular basis. Consider an
alignment check if there is unusual tire wear
or the vehicle is significantly pulling to one
side or the other. Some slight pull to the
left or right, depending on the crown of the
road and/or other road surface variations

OwnersManuals2.com

GMC Acadia/Acadia Denali Owner Manual (GMNA-Localizing-U.S./Canada/

Mexico-16402009) - 2023 - CRC - 3/28/22

310

Vehicle Care

such as troughs or ruts, is normal. If the
vehicle is vibrating when driving on a
smooth road, the tires and wheels may
need to be rebalanced. See your dealer for
proper diagnosis.

Wheel Replacement

Replace any wheel that is bent, cracked,
or badly rusted or corroded. If wheel nuts
keep coming loose, the wheel, wheel bolts,
and wheel nuts should be replaced. If the
wheel leaks air, replace it. Some aluminum
wheels can be repaired. See your dealer if
any of these conditions exist.

Your dealer will know the kind of wheel that
is needed.

Each new wheel should have the same
load-carrying capacity, diameter, width,
offset, and be mounted the same way as
the one it replaces.

Replace wheels, wheel bolts, wheel nuts,
or Tire Pressure Monitor System (TPMS)
sensors with new GM original equipment
parts.

{

Warning

Using the wrong replacement wheels,
wheel bolts, or wheel nuts can be
dangerous. It could affect the braking and
handling of the vehicle. Tires can lose air
and cause loss of control, resulting in a
crash. Always use the correct wheel,
wheel bolts, and wheel nuts for
replacement.

{

Warning

Replacing a wheel with a used one is
dangerous. How it has been used or how
far it has been driven may be unknown.
It could fail suddenly and cause a crash.
When replacing wheels, use a new GM
original equipment wheel.

Caution

The wrong wheel can also cause
problems with bearing life, brake cooling,
speedometer or odometer calibration,
headlamp aim, bumper height, vehicle
ground clearance, and tire or tire chain
clearance to the body and chassis.

Tire Chains

{

Warning

If the vehicle has 235/55R20, 245/65R17,
or 255/65R17 size tires, do not use tire
chains. There is not enough clearance.
Tire chains used on a vehicle without the
proper amount of clearance can cause
damage to the brakes, suspension,
or other vehicle parts. The area damaged
by the tire chains could cause loss of
control and a crash. Use another type of
traction device only if its manufacturer
recommends it for the vehicle's tire size
combination and road conditions. Follow
that manufacturer's instructions. To avoid
vehicle damage, drive slow and readjust
or remove the traction device if it
contacts the vehicle. Do not spin the
wheels. If traction devices are used,
install them on the front tires.

Caution

If the vehicle is equipped with a tire size
other than 235/55R20, 245/65R17, or 255/
65R17 use tire chains only where legal

(Continued)

OwnersManuals2.com

GMC Acadia/Acadia Denali Owner Manual (GMNA-Localizing-U.S./Canada/

Mexico-16402009) - 2023 - CRC - 3/28/22

Vehicle Care

311

Caution (Continued)

and only when necessary. Use low profile
chains that add no more than 12 mm
thickness to the tire tread and inner
sidewall. Use chains that are the proper
size for the tires. Install them on the tires
of the front axle. Do not use chains on
the tires of the rear axle. Tighten them
as tightly as possible with the ends
securely fastened. Drive slowly and follow
the chain manufacturer's instructions.
If the chains contact the vehicle, stop and
retighten them. If the contact continues,
slow down until it stops. Driving too fast
or spinning the wheels with chains on
will damage the vehicle.

If a Tire Goes Flat

It is unusual for a tire to blow out while
driving, especially if the tires are maintained
properly. See

Tires

0

293

If air goes out of

a tire, it is much more likely to leak out
slowly. But if there is ever a blowout, here
are a few tips about what to expect and
what to do:

If a front tire fails, the flat tire creates a
drag that pulls the vehicle toward that side.
Take your foot off the accelerator pedal and
grip the steering wheel firmly. Steer to
maintain lane position, and then gently
brake to a stop, well off the road,
if possible.

A rear blowout, particularly on a curve, acts
much like a skid and may require the same
correction as used in a skid. Stop pressing
the accelerator pedal and steer to straighten
the vehicle. It may be very bumpy and
noisy. Gently brake to a stop, well off the
road, if possible.

{

Warning

Driving on a flat tire will cause
permanent damage to the tire.
Re-inflating a tire after it has been driven
on while severely underinflated or flat
may cause a blowout and a serious crash.
Never attempt to re-inflate a tire that has
been driven on while severely
underinflated or flat. Have your dealer or
an authorized tire service center repair or
replace the flat tire as soon as possible.

{

Warning

Lifting a vehicle and getting under it to
do maintenance or repairs is dangerous
without the appropriate safety equipment
and training. If a jack is provided with
the vehicle, it is designed only for
changing a flat tire. If it is used for
anything else, you or others could be
badly injured or killed if the vehicle slips
off the jack. If a jack is provided with the
vehicle, only use it for changing a
flat tire.

If a tire goes flat, avoid further tire and
wheel damage by driving slowly to a level
place, well off the road, if possible. Turn on
the hazard warning flashers. See

Hazard

Warning Flashers

0

131

.

If your vehicle is loaded at or near
maximum cargo capacity, it may be difficult
to fit the jack under the vehicle due to the
environment (shoulder slope, road debris,
etc.). Removal of some weight may improve
the ability to fit the jack under the vehicle
at the correct jacking location.

OwnersManuals2.com

GMC Acadia/Acadia Denali Owner Manual (GMNA-Localizing-U.S./Canada/

Mexico-16402009) - 2023 - CRC - 3/28/22

312

Vehicle Care

{

Warning

Changing a tire can be dangerous. The
vehicle can slip off the jack and roll over
or fall causing injury or death. Find a
level place to change the tire. To help
prevent the vehicle from moving:

1. Set the parking brake firmly.

2. Put the vehicle in P (Park).

3. Turn the vehicle off and do not

restart the vehicle while it is raised.

4. Do not allow passengers to remain

in the vehicle.

5. Place wheel blocks, if equipped, on

both sides of the tire at the opposite
corner of the tire being changed.

This vehicle may come with a jack and spare
tire or a tire sealant and compressor kit. To
use the jacking equipment to change a spare
tire safely, follow the instructions below.
Then see

Tire Changing

0

318

. To use the

tire sealant and compressor kit, see

Tire

Sealant and Compressor Kit

0

312

.

When the vehicle has a flat tire (2), use the
following example as a guide to assist you
in the placement of wheel blocks (1),
if equipped.

1. Wheel Block (If Equipped)
2. Flat Tire

The following information explains how to
repair or change a tire.

Tire Sealant and Compressor Kit

{

Warning

Idling a vehicle in an enclosed area with
poor ventilation is dangerous. Engine
exhaust may enter the vehicle. Engine
exhaust contains carbon monoxide (CO)
which cannot be seen or smelled. It can
cause unconsciousness and even death.

(Continued)

Warning (Continued)

Never run the engine in an enclosed area
that has no fresh air ventilation. For more
information, see

Engine Exhaust

0

210

.

{

Warning

Overinflating a tire could cause the tire
to rupture and you or others could be
injured. Be sure to read and follow the
tire sealant and compressor kit
instructions and inflate the tire to its
recommended pressure. Do not exceed
the recommended pressure.

{

Warning

Storing the tire sealant and compressor
kit or other equipment in the passenger
compartment of the vehicle could cause
injury. In a sudden stop or collision, loose
equipment could strike someone. Store
the tire sealant and compressor kit in its
original location.

OwnersManuals2.com

GMC Acadia/Acadia Denali Owner Manual (GMNA-Localizing-U.S./Canada/

Mexico-16402009) - 2023 - CRC - 3/28/22

Vehicle Care

313

If this vehicle has a tire sealant and
compressor kit, there may not be a spare
tire or tire changing equipment, and on
some vehicles there may not be a place to
store a tire.

The tire sealant and compressor can be used
to temporarily seal punctures up to 6 mm
(0.25 in) in the tread area of the tire. It can
also be used to inflate an underinflated tire.

If the tire has been separated from the
wheel, has damaged sidewalls, or has a
large puncture, the tire is too severely
damaged for the tire sealant and
compressor kit to be effective. See

Roadside

Assistance Program

0

354

.

Read and follow all of the tire sealant and
compressor kit instructions.

The kit includes:

1. Sealant Canister Inlet Valve
2. Sealant/Air Hose
3. Base of Sealant Canister
4. Tire Sealant Canister
5. On/Off Button
6. Slot on Top of Compressor
7. Pressure Deflation Button
8. Pressure Gauge

9. Power Plug
10. Air Only Hose

Tire Sealant

Read and follow the safe handling
instructions on the label adhered to the tire
sealant canister (4).

Check the tire sealant expiration date on the
tire sealant canister. The tire sealant
canister (4) should be replaced before its
expiration date. Replacement tire sealant
canisters are available at your local dealer.

There is only enough sealant to seal one
tire. After usage, the tire sealant canister
must be replaced.

OwnersManuals2.com

GMC Acadia/Acadia Denali Owner Manual (GMNA-Localizing-U.S./Canada/

Mexico-16402009) - 2023 - CRC - 3/28/22

314

Vehicle Care

Using the Tire Sealant and Compressor
Kit to Temporarily Seal and Inflate a
Punctured Tire

When using the tire sealant and compressor
kit during cold temperatures, warm the kit
in a heated environment for five minutes.
This will help to inflate the tire faster.

If a tire goes flat, avoid further tire and
wheel damage by driving slowly to a level
place. Turn on the hazard warning flashers.
See

Hazard Warning Flashers

0

131

.

See

If a Tire Goes Flat

0

311

for other

important safety warnings.

Do not remove any objects that have
penetrated the tire.

1. Remove the tire sealant canister (4) and

compressor from its storage location. See

Storing the Tire Sealant and Compressor
Kit

0

318

.

2. Remove the air only hose (10) and the

power plug (9) from the bottom of the
compressor.

3. Place the compressor on the ground near

the flat tire.

4. Attach the air only hose (10) to the

sealant canister inlet valve (1) by turning
it clockwise until tight.

5. Slide the base of the tire sealant

canister (3) into the slot on the top of
the compressor (6) to hold it upright.
Make sure the tire valve stem is
positioned close to the ground so the
hose will reach it.

6. Remove the valve stem cap from the flat

tire by turning it counterclockwise.

7. Attach the sealant/air hose (2) to the tire

valve stem by turning it clockwise until
tight.

8. Plug the power plug (9) into the

accessory power outlet in the vehicle.
Unplug all items from other accessory
power outlets. See

Power Outlets

0

92

.

OwnersManuals2.com

GMC Acadia/Acadia Denali Owner Manual (GMNA-Localizing-U.S./Canada/

Mexico-16402009) - 2023 - CRC - 3/28/22

Vehicle Care

315

If the vehicle has an accessory power
outlet, do not use the cigarette lighter.
If the vehicle only has a cigarette lighter,
use the cigarette lighter.
Do not pinch the power plug cord in the
door or window.

9. Start the vehicle. The vehicle must be

running while using the air compressor.

10. Press the on/off button (5) to turn the

tire sealant and compressor kit on.
The compressor will inject sealant and air
into the tire.
The pressure gauge (8) will initially show
a high pressure while the compressor
pushes the sealant into the tire. Once
the sealant is completely dispersed into
the tire, the pressure will quickly drop
and start to rise again as the tire inflates
with air only.

11. Inflate the tire to the recommended

inflation pressure using the pressure
gauge (8). The recommended inflation
pressure can be found on the Tire and
Loading Information label. See

Tire

Pressure

0

299

.

The pressure gauge (8) may read higher
than the actual tire pressure while the
compressor is on. Turn the compressor

off to get an accurate pressure reading.
The compressor may be turned on/off
until the correct pressure is reached.

Caution

If the recommended pressure cannot be
reached after approximately 25 minutes,
the vehicle should not be driven farther.
The tire is too severely damaged and the
tire sealant and compressor kit cannot
inflate the tire. Remove the power plug
from the accessory power outlet and
unscrew the inflating hose from the tire
valve. See

Roadside Assistance Program

0

354

.

12. Press the on/off button (5) to turn the

tire sealant and compressor kit off.
The tire is not sealed and will continue
to leak air until the vehicle is driven and
the sealant is distributed in the tire.
Therefore, Steps 13

21 must be done

immediately after Step 12.
Be careful while handling the tire sealant
and compressor kit as it could be warm
after usage.

13. Unplug the power plug (9) from the

accessory power outlet in the vehicle.

14. Turn the sealant/air hose (2)

counterclockwise to remove it from the
tire valve stem.

15. Replace the tire valve stem cap.
16. Remove the tire sealant canister (4) from

the slot on top of the compressor (6).

17. Turn the air only hose (10)

counterclockwise to remove it from the
tire sealant canister inlet valve (1).

18. Turn the sealant/air hose (2) clockwise

onto the sealant canister inlet valve (1)
to prevent sealant leakage.

19. Return the air only hose (10) and power

plug (9) back to their original storage
location.

20. If the flat tire was able to inflate to the

recommended inflation pressure, remove
the maximum speed label from the
sealant canister and place it in a highly
visible location.

OwnersManuals2.com

GMC Acadia/Acadia Denali Owner Manual (GMNA-Localizing-U.S./Canada/

Mexico-16402009) - 2023 - CRC - 3/28/22

316

Vehicle Care

Do not exceed the speed on this label
until the damaged tire is repaired or
replaced.

21. Return the equipment to its original

storage location in the vehicle.

22. Immediately drive the vehicle 8 km

(5 mi) to distribute the sealant in
the tire.

23. Stop at a safe location and check the tire

pressure. Refer to Steps 1

10 under

Using the Tire Sealant and Compressor

Kit without Sealant to Inflate a Tire (Not
Punctured).

If the tire pressure has fallen more than
68 kPa (10 psi) below the recommended
inflation pressure, stop driving the
vehicle. The tire is too severely damaged
and the tire sealant cannot seal the tire.
See

Roadside Assistance Program

0

354

.

If the tire pressure has not dropped
more than 68 kPa (10 psi) from the
recommended inflation pressure, inflate
the tire to the recommended inflation
pressure.

24. Wipe off any sealant from the wheel,

tire, or vehicle.

25. Dispose of the used tire sealant

canister (4) at a local dealer or in
accordance with local state codes and
practices.

26. Replace it with a new canister available

from your dealer.

27. After temporarily sealing a tire using the

tire sealant and compressor kit, take the
vehicle to an authorized dealer within
161 km (100 mi) of driving to have the
tire repaired or replaced.

Using the Tire Sealant and Compressor
Kit without Sealant to Inflate a Tire (Not
Punctured)

The kit includes:

1. Sealant Canister Inlet Valve
2. Sealant/Air Hose
3. Base of Sealant Canister
4. Tire Sealant Canister
5. On/Off Button
6. Slot on Top of Compressor
7. Pressure Deflation Button
8. Pressure Gauge

9. Power Plug
10. Air Only Hose

If a tire goes flat, avoid further tire and
wheel damage by driving slowly to a level
place. Turn on the hazard warning flashers.
See

Hazard Warning Flashers

0

131

.

See

If a Tire Goes Flat

0

311

for other

important safety warnings.

OwnersManuals2.com

GMC Acadia/Acadia Denali Owner Manual (GMNA-Localizing-U.S./Canada/

Mexico-16402009) - 2023 - CRC - 3/28/22

Vehicle Care

317

1. Remove the compressor from its storage

location. See

Storing the Tire Sealant and

Compressor Kit

0

318

.

2. Remove the air only hose (10) and the

power plug (9) from the bottom of the
compressor.

3. Place the compressor on the ground near

the flat tire.
Make sure the tire valve stem is
positioned close to the ground so the
hose will reach it.

4. Remove the valve stem cap from the flat

tire by turning it counterclockwise.

5. Attach the air only hose (10) to the tire

valve stem by turning it clockwise until
tight.

6. Plug the power plug (9) into the

accessory power outlet in the vehicle.
Unplug all items from other accessory
power outlets. See

Power Outlets

0

92

.

If the vehicle has an accessory power
outlet, do not use the cigarette lighter.
If the vehicle only has a cigarette lighter,
use the cigarette lighter.
Do not pinch the power plug cord in the
door or window.

7. Start the vehicle. The vehicle must be

running while using the air compressor.

8. Press the on/off button (5) to turn the

tire sealant and compressor kit on.
The compressor will inflate the tire with
air only.

9. Inflate the tire to the recommended

inflation pressure using the pressure
gauge (8). The recommended inflation
pressure can be found on the Tire and
Loading Information label. See

Tire

Pressure

0

299

.

The pressure gauge (8) may read higher
than the actual tire pressure while the
compressor is on. Turn the compressor
off to get an accurate pressure reading.
The compressor may be turned on/off
until the correct pressure is reached.

Caution

If the recommended pressure cannot be
reached after approximately 25 minutes,
the vehicle should not be driven farther.
The tire is too severely damaged and the
tire sealant and compressor kit cannot
inflate the tire. Remove the power plug
from the accessory power outlet and

(Continued)

Caution (Continued)

unscrew the inflating hose from the tire
valve. See

Roadside Assistance Program

0

354

.

10. Press the on/off button (5) to turn the

tire sealant and compressor kit off.
Be careful while handling the compressor
as it could be warm after usage.

11. Unplug the power plug (9) from the

accessory power outlet in the vehicle.

12. Turn the air only hose (10)

counterclockwise to remove it from the
tire valve stem.

13. Replace the tire valve stem cap.
14. Return the air only hose (10) and power

plug (9) back to their original storage
location.

15. Return the equipment to its original

storage location in the vehicle.

The tire sealant and compressor kit has
accessory adapters located in a
compartment on the bottom of its housing
that can be used to inflate air mattresses,
balls, etc.

OwnersManuals2.com

GMC Acadia/Acadia Denali Owner Manual (GMNA-Localizing-U.S./Canada/

Mexico-16402009) - 2023 - CRC - 3/28/22

318

Vehicle Care

Storing the Tire Sealant and
Compressor Kit

The tire sealant and compressor kit is in a
bag in the rear compartment storage area.

1. Open the liftgate. See

Liftgate

0

18

.

2. Lift the load floor.
3. Remove the cargo management system.

See

Cargo Management System

0

85

.

4. Turn the retainer nut counterclockwise to

remove the tire sealant and compressor
kit bag.

5. Remove the tire sealant and compressor

kit from the bag.

To store the tire sealant and compressor kit,
reverse the steps.

Tire Changing

Removing the Spare Tire and Tools

To access the spare tire and tools:

1. Open the liftgate. See

Liftgate

0

18

.

2. Lift the load floor.
3. Remove the cargo management system.

See

Cargo Management System

0

85

.

OwnersManuals2.com

GMC Acadia/Acadia Denali Owner Manual (GMNA-Localizing-U.S./Canada/

Mexico-16402009) - 2023 - CRC - 3/28/22

Vehicle Care

319

4. Turn the wing nut (3) counterclockwise

to remove the jack (1) and wheel
wrench (2). Place the tool container near
the tire being changed.

5. Remove the spare tire and place it next

to the tire being changed.

Removing the Flat Tire and Installing the
Spare Tire

1. Do a safety check before proceeding. See

If a Tire Goes Flat

0

311

.

2. Turn the wheel wrench counterclockwise

to loosen all the wheel nuts, but do not
remove them yet.

3. Place the jack near the flat tire.

Caution

Make sure that the jack lift head is in the
correct position or you may damage your
vehicle. The repairs would not be covered
by your warranty.

4. Position the jack lift head at the jack

location nearest the flat tire.
The jacking location is indicated by a half
circle notch in the metal flange. The jack
must not be used in any other position.

{

Warning

Getting under a vehicle when it is lifted
on a jack is dangerous. If the vehicle slips
off the jack, you could be badly injured
or killed. Never get under a vehicle when
it is supported only by a jack.

{

Warning

Raising the vehicle with the jack
improperly positioned can damage the
vehicle and even make the vehicle fall. To
help avoid personal injury and vehicle
damage, be sure to fit the jack lift head
into the proper location before raising
the vehicle.

{

Warning

Lifting a vehicle and getting under it to
do maintenance or repairs is dangerous
without the appropriate safety equipment
and training. If a jack is provided with
the vehicle, it is designed only for
changing a flat tire. If it is used for
anything else, you or others could be

(Continued)

OwnersManuals2.com

GMC Acadia/Acadia Denali Owner Manual (GMNA-Localizing-U.S./Canada/

Mexico-16402009) - 2023 - CRC - 3/28/22

320

Vehicle Care

Warning (Continued)

badly injured or killed if the vehicle slips
off the jack. If a jack is provided with the
vehicle, only use it for changing a
flat tire.

Caution

Using a jack to raise the vehicle without
positioning it correctly could damage
your vehicle. When raising your vehicle
on a jack, be sure to position it correctly
under the frame and avoid contact with
the plastic molding.

5. Turn the wheel wrench clockwise to raise

the jack lift head until the slots in the
jack head fit into the metal flange
behind the cut out on the plastic
molding. Do not raise the vehicle yet.

6. Put the compact spare tire near you.
7. Turn the wrench clockwise in the jack to

raise the vehicle. Raise the vehicle far
enough off the ground so that there is
enough room for the spare tire to fit
under the wheel well.

8. Remove all of the wheel nuts.
9. Remove the flat tire.

{

Warning

Rust or dirt on a wheel, or on the
parts to which it is fastened, can
cause wheel nuts to become loose
over time. The wheel could come off
and cause a crash. When changing a
wheel, remove any rust or dirt from
places where the wheel attaches to
the vehicle. In an emergency, a cloth
or paper towel can be used; however,
use a scraper or wire brush later to
remove all rust or dirt.

OwnersManuals2.com


Content      ..     8      9      10      11     ..