MC Acadia Owner (2023 year). Manual in english - page 9
 

  Index      Manuals     General Motors MC Acadia Owner (2023 year). Manual in english


Search            copyright infringement  


Content      ..     7      8      9      10     ..


MC Acadia Owner (2023 year). Manual in english - page 9


GMC Acadia/Acadia Denali Owner Manual (GMNA-Localizing-U.S./Canada/

Mexico-16402009) - 2023 - CRC - 3/29/22

Driving and Operating

257

Trailer Brakes

Loaded trailers over 450 kg (1,000 lb) must
be equipped with brake systems and with
brakes for each axle. Trailer braking
equipment conforming to Canadian
Standards Association (CSA) requirement
CAN3-D313, or its equivalent, is
recommended.

State or local regulations may require
trailers to have their own braking system if
the loaded weight of the trailer exceeds
certain minimums that can vary from state
to state. Read and follow the instructions for
the trailer brakes so they are installed,
adjusted, and maintained properly. Never
attempt to tap into your vehicle's hydraulic
brake system. If you do, both the vehicle
anti-lock brakes and the trailer brakes may
not function, which could result in a crash.

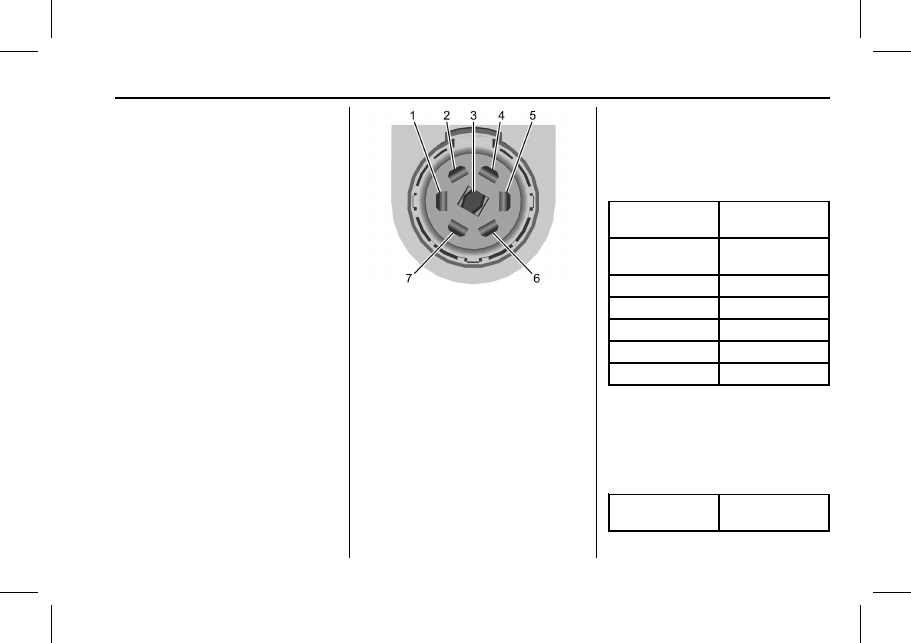
Trailer Wiring Harness

lf equipped, the trailer wiring harness, with
a 7-pin connector is mounted on the trailer
hitch.

1. Left Turn/Brake
2. Tail Lamps
3. Reverse Lamps
4. Battery feed
5. Right Turn/Brake
6. Electric Brakes
7. Ground

If the vehicle is not equipped with a trailer
connector on the trailer hitch, a 7-wire
trailering harness is tied to the vehicles
frame. The harness requires the installation
of a trailer connector, which is available
through your dealer.

Use only a round, seven-wire connector with
flat blade terminals meeting SAE J2863
specifications for proper electrical
connectivity.

The seven-wire harness contains the
following trailer circuits:

Stop/Turn
Signal Left

Yellow/Gray

Stop/Turn Signal
Right

Green/Violet

Tail/Parking Lamps

Gray/Brown

Reverse Lamps

White/Green

Battery Feed

Red/Green

Ground

Black

Electric Trailer Brake Blue

Electric Brake Control Wiring Provisions

If equipped, (4) blunt-cut wires are located
near the driver's feet for an aftermarket
electric trailer brake controller as part of the
trailer wiring package. The harness contains
the following circuits:

Electric Trailer
Brakes

Blue

OwnersManuals2.com

GMC Acadia/Acadia Denali Owner Manual (GMNA-Localizing-U.S./Canada/

Mexico-16402009) - 2023 - CRC - 3/29/22

258

Driving and Operating

Battery Feed

Red/Black or
Red/Blue

Brake Apply Signal

White/Blue

Ground

Black

Refer to the aftermarket electric trailer brake
controller owner's manual to determine wire
color coding of the electric trailer brake
controller. The wire colors on the brake
controller may be different from the vehicle.
It may be necessary to have a technician
connect the 12-volt power to the engine
compartment fuse block. The electric trailer
brake controller should be installed by your
dealer or a qualified service center.

Trailer Lamps

Always check all trailer lamps are working at
the beginning of each trip, and periodically
on longer trips.

Turn Signals When Towing a Trailer

When properly connected, the trailer turn
signals should will illuminate to indicate the
vehicle is turning, changing lanes,
or stopping. When towing a trailer, the
arrows on the instrument cluster will
illuminate even if the trailer is not properly
connected or the bulbs are burned out.

Tow/Haul Mode

For instructions on how to enter Tow/Haul
mode, see

Driver Mode Control

0

220

.

Tow/Haul assists when pulling a heavy
trailer or a large or heavy load.

Tow/Haul Mode is designed to be most
effective when the vehicle and trailer
combined weight is at least 75% of the
vehicle's Gross Combined Weight Rating
(GCWR). See

Weight of the Trailer

under

Trailer Towing

0

252

.

Tow/Haul Mode is most useful when towing
a heavy trailer or carrying a large or
heavy load:

.

through rolling terrain

.

in stop-and-go traffic

.

in busy parking lots

Operating the vehicle in Tow/Haul Mode
when lightly loaded or not towing will not
cause damage; however, it is not
recommended and may result in unpleasant
engine and transmission driving
characteristics and reduced fuel economy.

Trailer Sway Control (TSC)

Vehicles with StabiliTrak/Electronic Stability
Control (ESC) have a Trailer Sway Control
(TSC) feature. Trailer sway is unintended
side-to-side motion of a trailer while towing.
If the vehicle is towing a trailer and the TSC
detects that sway is increasing, the vehicle
brakes are selectively applied at each wheel,
to help reduce excessive trailer sway.
If equipped with the Integrated Trailer Brake
Control (ITBC) system, and the trailer has an
electric brake system, StabiliTrak/ESC may
also apply the trailer brakes.

If TSC is enabled, the Traction Control
System (TCS)/StabiliTrak/ESC warning light
will flash on the instrument cluster. Reduce
vehicle speed by gradually removing your
foot from the accelerator. If trailer sway
continues, StabiliTrak/ESC can reduce engine
torque to help slow the vehicle. TSC will not
function if StabiliTrak/ESC is turned off. See

Traction Control/Electronic Stability Control

0

218

.

OwnersManuals2.com

GMC Acadia/Acadia Denali Owner Manual (GMNA-Localizing-U.S./Canada/

Mexico-16402009) - 2023 - CRC - 3/29/22

Driving and Operating

259

{

Warning

Trailer sway can result in a crash and in
serious injury or death, even if the
vehicle is equipped with TSC.

If the trailer begins to sway, reduce
vehicle speed by gradually removing your
foot from the accelerator. Then pull over
to check the trailer and vehicle to help
correct possible causes, including an
improperly or overloaded trailer,
unrestrained cargo, improper trailer hitch
configuration, or improperly inflated or
incorrect vehicle or trailer tires. See

Towing Equipment

0

255

for trailer

ratings and hitch setup recommendations.

Trailer Tires

Special Trailer (ST) tires differ from vehicle
tires. Trailer tires are designed with stiff
sidewalls to help prevent sway and to
support heavy loads. These features can
make it difficult to determine if the trailer
tire pressures are low only based on a visual
inspection.

Always check all trailer tire pressures before
each trip when the tires are cool. Low trailer
tire pressure is a leading cause of trailer tire
blow-outs.

Trailer tires deteriorate over time. The trailer
tire sidewall will show the week and year
the tire was manufactured. Many trailer tire
manufacturers recommend replacing tires
more than six years old.

Overloading is another leading cause of
trailer tire blow-outs. Never load your trailer
with more weight than the tires are
designed to support. The load rating is
located on the trailer tire sidewall.

Always know the maximum speed rating for
the trailer tires before driving. This may be
significantly lower than the vehicle tire
speed rating. The speed rating may be on
the trailer tire sidewall. If the speed rating is
not shown, the default trailer tire speed
rating is 105 km/h (65 mph).

Conversions and Add-Ons

Add-On Electrical Equipment

{

Warning

The Data Link Connector (DLC) is used
for vehicle service and Emission
Inspection/Maintenance testing. See

Malfunction Indicator Lamp (Check Engine
Light)

0

106

. A device connected to the

DLC

such as an aftermarket fleet or

driver-behavior tracking device

may

interfere with vehicle systems. This could
affect vehicle operation and cause a
crash. Such devices may also access
information stored in the vehicle

s

systems.

Caution

Some electrical equipment can damage
the vehicle or cause components to not
work and would not be covered by the
vehicle warranty. Always check with your
dealer before adding electrical equipment.

OwnersManuals2.com

GMC Acadia/Acadia Denali Owner Manual (GMNA-Localizing-U.S./Canada/

Mexico-16402009) - 2023 - CRC - 3/29/22

260

Driving and Operating

Add-on equipment can drain the vehicle's
12-volt battery, even if the vehicle is not
operating.

The vehicle has an airbag system. Before
attempting to add anything electrical to the
vehicle, see

Servicing the Airbag-Equipped

Vehicle

0

63

and

Adding Equipment to the

Airbag-Equipped Vehicle

0

63

.

OwnersManuals2.com

GMC Acadia/Acadia Denali Owner Manual (GMNA-Localizing-U.S./Canada/

Mexico-16402009) - 2023 - CRC - 3/28/22

Vehicle Care

261

Vehicle Care

General Information

General Information . . . . . . . . . . . . . . . . . . . 262
California Perchlorate Materials

Requirements . . . . . . . . . . . . . . . . . . . . . . . . 262

Accessories and Modifications . . . . . . . . . 262

Vehicle Checks

Doing Your Own Service Work . . . . . . . . 262
Doing Your Own Service Work . . . . . . . . 263
Hood . . . . . . . . . . . . . . . . . . . . . . . . . . . . . . . . . . 263
Engine Compartment Overview . . . . . . . . 265
Engine Oil . . . . . . . . . . . . . . . . . . . . . . . . . . . . . 268
Engine Oil Life System . . . . . . . . . . . . . . . . 270
Automatic Transmission Fluid . . . . . . . . . 270
Engine Air Filter Life System . . . . . . . . . . . 271
Engine Air Cleaner/Filter . . . . . . . . . . . . . . . 271
Cooling System . . . . . . . . . . . . . . . . . . . . . . . . 272
Engine Overheating . . . . . . . . . . . . . . . . . . . 276
Washer Fluid . . . . . . . . . . . . . . . . . . . . . . . . . . 277
Brakes . . . . . . . . . . . . . . . . . . . . . . . . . . . . . . . . . 278
Brake Fluid . . . . . . . . . . . . . . . . . . . . . . . . . . . . 278
Battery - North America . . . . . . . . . . . . . . . 279
All-Wheel Drive . . . . . . . . . . . . . . . . . . . . . . . 280
Park Brake and P (Park) Mechanism

Check . . . . . . . . . . . . . . . . . . . . . . . . . . . . . . . 280

Wiper Blade Replacement . . . . . . . . . . . . . 281
Windshield Replacement . . . . . . . . . . . . . . . 281
Gas Strut(s) . . . . . . . . . . . . . . . . . . . . . . . . . . . 282

Headlamp Aiming

Front Headlamp Aiming . . . . . . . . . . . . . . . 283

Bulb Replacement

Bulb Replacement . . . . . . . . . . . . . . . . . . . . . 283
Halogen Bulbs . . . . . . . . . . . . . . . . . . . . . . . . . 283
LED Lighting . . . . . . . . . . . . . . . . . . . . . . . . . . . 283

Electrical System

Electrical System Overload . . . . . . . . . . . . 283
Fuses and Circuit Breakers . . . . . . . . . . . . . 285
Engine Compartment Fuse Block . . . . . . 285
Instrument Panel Fuse Block . . . . . . . . . . 288
Rear Compartment Fuse Block . . . . . . . . 290

Wheels and Tires

Tires . . . . . . . . . . . . . . . . . . . . . . . . . . . . . . . . . . 293
All-Season Tires . . . . . . . . . . . . . . . . . . . . . . . 293
Winter Tires . . . . . . . . . . . . . . . . . . . . . . . . . . . 294
Summer Tires . . . . . . . . . . . . . . . . . . . . . . . . . 294
All-Terrain Tires . . . . . . . . . . . . . . . . . . . . . . . 294
Tire Sidewall Labeling . . . . . . . . . . . . . . . . . 294
Tire Designations . . . . . . . . . . . . . . . . . . . . . . 296
Tire Terminology and Definitions . . . . . . 297
Tire Pressure . . . . . . . . . . . . . . . . . . . . . . . . . . 299
Tire Pressure for High-Speed

Operation . . . . . . . . . . . . . . . . . . . . . . . . . . . 300

Tire Pressure Monitor System . . . . . . . . . 301
Tire Pressure Monitor Operation . . . . . . 302
Tire Inspection . . . . . . . . . . . . . . . . . . . . . . . . 305
Tire Rotation . . . . . . . . . . . . . . . . . . . . . . . . . . 305

When It Is Time for New Tires . . . . . . . . 306
Buying New Tires . . . . . . . . . . . . . . . . . . . . . 307
Different Size Tires and Wheels . . . . . . . 308
Uniform Tire Quality Grading . . . . . . . . . 308
Wheel Alignment and Tire Balance . . . . 309
Wheel Replacement . . . . . . . . . . . . . . . . . . . 310
Tire Chains . . . . . . . . . . . . . . . . . . . . . . . . . . . . 310
If a Tire Goes Flat . . . . . . . . . . . . . . . . . . . . . . 311
Tire Sealant and Compressor Kit . . . . . . . 312
Storing the Tire Sealant and

Compressor Kit . . . . . . . . . . . . . . . . . . . . . . 318

Tire Changing . . . . . . . . . . . . . . . . . . . . . . . . . . 318
Compact Spare Tire . . . . . . . . . . . . . . . . . . . . 323

Jump Starting

Jump Starting - North America . . . . . . . . 324

Towing the Vehicle

Transporting a Disabled Vehicle . . . . . . . 326
Recreational Vehicle Towing . . . . . . . . . . . 327

Appearance Care

Exterior Care . . . . . . . . . . . . . . . . . . . . . . . . . . 329
Interior Care . . . . . . . . . . . . . . . . . . . . . . . . . . . 333
Floor Mats . . . . . . . . . . . . . . . . . . . . . . . . . . . . 336

OwnersManuals2.com

GMC Acadia/Acadia Denali Owner Manual (GMNA-Localizing-U.S./Canada/

Mexico-16402009) - 2023 - CRC - 3/28/22

262

Vehicle Care

General Information

For service and parts needs, visit your
dealer. You will receive genuine GM parts
and GM-trained and supported service
people.

Genuine GM parts have one of these marks:

California Perchlorate Materials
Requirements

Certain types of automotive applications,
such as airbag initiators, seat belt
pretensioners, and lithium batteries
contained in electronic keys, may contain
perchlorate materials. Perchlorate Material

special handling may apply. See
www.dtsc.ca.gov/hazardouswaste/
perchlorate.

Accessories and Modifications

Adding non-dealer accessories or making
modifications to the vehicle can affect
vehicle performance and safety, including
such things as airbags, braking, stability,
ride and handling, emissions systems,
aerodynamics, durability, Driver Assistance
Systems, and electronic systems like antilock
brakes, traction control, and stability control.
These accessories or modifications could
even cause malfunction or damage not
covered by the vehicle warranty.

Damage to suspension components caused
by modifying vehicle height outside of
factory settings will not be covered by the
vehicle warranty.

Damage to vehicle components resulting
from modifications or the installation or use
of non-GM certified parts, including control
module or software modifications, is not
covered under the terms of the vehicle
warranty and may affect remaining
warranty coverage for affected parts.

GM Accessories are designed to complement
and function with other systems on the
vehicle. See your dealer to accessorize the
vehicle using genuine GM Accessories
installed by a dealer technician.

Also, see

Adding Equipment to the

Airbag-Equipped Vehicle

0

63

.

Vehicle Checks

Doing Your Own Service Work

{

Warning

It can be dangerous to work on your
vehicle if you do not have the proper
knowledge, service manual, tools,
or parts. Always follow owner

s manual

procedures and consult the service
manual for your vehicle before doing any
service work.

If doing some of your own service work, use
the proper service manual. It tells you much
more about how to service the vehicle than
this manual can. To order the proper service
manual, see

Publication Ordering

Information

0

358

.

OwnersManuals2.com

GMC Acadia/Acadia Denali Owner Manual (GMNA-Localizing-U.S./Canada/

Mexico-16402009) - 2023 - CRC - 3/28/22

Vehicle Care

263

This vehicle has an airbag system. Before
attempting to do your own service work,
see

Servicing the Airbag-Equipped Vehicle

0

63

.

If equipped with remote vehicle start, open
the hood before performing any service
work to prevent remote starting the vehicle
accidentally. See

Remote Vehicle Start

0

14

.

Keep a record with all parts receipts and list
the mileage and the date of any service
work performed. See

Maintenance Records

0

346

.

Caution

Even small amounts of contamination can
cause damage to vehicle systems. Do not
allow contaminants to contact the fluids,
reservoir caps, or dipsticks.

Doing Your Own Service Work

{

Warning

It can be dangerous to work on your
vehicle if you do not have the proper
knowledge, service manual, tools,
or parts. Always follow owner

s manual

(Continued)

Warning (Continued)

procedures and consult the service
manual for your vehicle before doing any
service work.

If doing some of your own service work, use
the proper service manual. It tells you much
more about how to service the vehicle than
this manual can.

This vehicle has an airbag system. Before
attempting to do your own service work,
see

Servicing the Airbag-Equipped Vehicle

0

63

.

If equipped with remote vehicle start, open
the hood before performing any service
work to prevent remote starting the vehicle
accidentally. See

Remote Vehicle Start

0

14

.

Keep a record with all parts receipts and list
the mileage and the date of any service
work performed.

Caution

Even small amounts of contamination can
cause damage to vehicle systems. Do not
allow contaminants to contact the fluids,
reservoir caps, or dipsticks.

Hood

{

Warning

For vehicles with auto engine stop/start,
turn the vehicle off before opening the
hood. If the vehicle is on, the engine will
start when the hood is opened. You or
others could be injured.

{

Warning

Components under the hood can get hot
from running the engine. To help avoid
the risk of burning unprotected skin,
never touch these components until they
have cooled, and always use a glove or
towel to avoid direct skin contact.

Clear any snow from the hood before
opening.

OwnersManuals2.com

GMC Acadia/Acadia Denali Owner Manual (GMNA-Localizing-U.S./Canada/

Mexico-16402009) - 2023 - CRC - 3/28/22

264

Vehicle Care

To open the hood:

1. Pull the hood release lever with the

i

symbol. It is on the lower left side

of the instrument panel.

2. Go to the front of the vehicle and locate

the secondary release lever under the
front center of the hood. Push the
secondary hood release lever to the right
to release.

3. After you have partially lifted the hood,

the gas strut system will automatically
lift the hood and hold it in the fully
open position.

To close the hood:

1. Before closing the hood, be sure all filler

caps are on properly, and all tools are
removed.

2. Pull the hood down until the strut

system is no longer holding up the hood.

3. Allow the hood to fall. Check to make

sure the hood is latched completely.
Repeat this process with additional force
if necessary.

{

Warning

Do not drive the vehicle if the hood is
not latched completely. The hood could
open fully, block your vision, and cause a
crash. You or others could be injured.
Always close the hood completely before
driving.

OwnersManuals2.com

GMC Acadia/Acadia Denali Owner Manual (GMNA-Localizing-U.S./Canada/

Mexico-16402009) - 2023 - CRC - 3/28/22

Vehicle Care

265

Engine Compartment Overview

2.0L L4 Turbo Engine

OwnersManuals2.com

GMC Acadia/Acadia Denali Owner Manual (GMNA-Localizing-U.S./Canada/

Mexico-16402009) - 2023 - CRC - 3/28/22

266

Vehicle Care

1.

Engine Air Cleaner/Filter

0

271

.

2. Engine Oil Fill Cap. See

Engine Oil

0

268

.

3. Engine Oil Dipstick. See

Engine Oil

0

268

.

4. Engine Cooling Fan (Out of View). See

Cooling System

0

272

.

5. Brake Fluid Reservoir. See

Brake Fluid

0

278

.

6.

Battery - North America

0

279

.

7. Engine Coolant Surge Tank and Pressure

Cap. See

Cooling System

0

272

.

8. Positive (+) Battery Terminal (Under

Cover). See

Jump Starting - North

America

0

324

.

9. Windshield Washer Fluid Reservoir. See

Washer Fluid

0

277

.

10.

Engine Compartment Fuse Block

0

285

.

11. Remote Negative (-) Battery Terminal.

See

Jump Starting - North America

0

324

.

OwnersManuals2.com

GMC Acadia/Acadia Denali Owner Manual (GMNA-Localizing-U.S./Canada/

Mexico-16402009) - 2023 - CRC - 3/28/22

Vehicle Care

267

3.6L V6 Engine

1.

Engine Air Cleaner/Filter

0

271

.

2. Engine Oil Fill Cap. See

Engine Oil

0

268

.

3. Engine Oil Dipstick. See

Engine Oil

0

268

.

4. Engine Cooling Fan (Out of View). See

Cooling System

0

272

.

5. Windshield Washer Fluid Reservoir. See

Washer Fluid

0

277

.

6. Brake Fluid Reservoir. See

Brake Fluid

0

278

.

7.

Battery - North America

0

279

.

8. Engine Coolant Surge Tank and Pressure

Cap. See

Cooling System

0

272

.

9. Positive (+) Battery Terminal. See

Jump

Starting - North America

0

324

.

10.

Engine Compartment Fuse Block

0

285

.

OwnersManuals2.com

GMC Acadia/Acadia Denali Owner Manual (GMNA-Localizing-U.S./Canada/

Mexico-16402009) - 2023 - CRC - 3/28/22

268

Vehicle Care

11. Remote Negative (-) Battery Terminal.

See

Jump Starting - North America

0

324

.

Engine Oil

To ensure proper engine performance and
long life, careful attention must be paid to
engine oil. Following these simple, but
important steps will help protect your
investment:

.

Use engine oil approved to the proper
specification and of the proper viscosity
grade. See

Selecting the Right Engine

Oil

in this section.

.

Check the engine oil level regularly and
maintain the proper oil level. See

Checking Engine Oil

and

When to Add

Engine Oil

in this section.

.

Change the engine oil at the appropriate
time. See

Engine Oil Life System

0

270

.

.

Always dispose of engine oil properly. See

What to Do with Used Oil

in this

section.

Checking Engine Oil

Check the engine oil level regularly, every
650 km (400 mi), especially prior to a long
trip. The engine oil dipstick handle is a loop.
See

Engine Compartment Overview

0

265

for

the location.

{

Warning

The engine oil dipstick handle may be
hot; it could burn you. Use a towel or
glove to touch the dipstick handle.

If a low oil Driver Information Center (DIC)
message displays, check the oil level.

Follow these guidelines:

.

To get an accurate reading, park the
vehicle on level ground. Check the engine
oil level after the engine has been off for
at least two hours. Checking the engine
oil level on steep grades or too soon after
engine shutoff can result in incorrect
readings. Accuracy improves when
checking a cold engine prior to starting.
Remove the dipstick and check the level.

.

If unable to wait two hours, the engine
must be off for at least 15 minutes if the
engine is warm, or at least 30 minutes if
the engine is not warm. Pull out the
dipstick, wipe it with a clean paper towel
or cloth, then push it back in all the way.
Remove it again, keeping the tip down,
and check the level.

When to Add Engine Oil

2.0L L4 Turbo Engine

3.6L V6 Engine

If the oil is below the cross-hatched area at
the tip of the dipstick and the engine has
been off for at least 15 minutes, add 1 L
(1 qt) of the recommended oil and then
recheck the level. See

Selecting the Right

Engine Oil

later in this section for an

explanation of what kind of oil to use. For
engine oil crankcase capacity, see

Capacities

and Specifications

0

348

.

OwnersManuals2.com

GMC Acadia/Acadia Denali Owner Manual (GMNA-Localizing-U.S./Canada/

Mexico-16402009) - 2023 - CRC - 3/28/22

Vehicle Care

269

Caution

Do not add too much oil. Oil levels above
or below the acceptable operating range
shown on the dipstick are harmful to the
engine. If the oil level is above the
operating range (i.e., the engine has so
much oil that the oil level gets above the
cross-hatched area that shows the proper
operating range), the engine could be
damaged. Drain the excess oil or limit
driving of the vehicle, and seek a service
professional to remove the excess oil.

See

Engine Compartment Overview

0

265

for

the location of the engine oil fill cap.

Add enough oil to put the level somewhere
in the proper operating range. Push the
dipstick all the way back in when through.

Selecting the Right Engine Oil

Selecting the right engine oil depends on
both the proper oil specification and
viscosity grade. See

Recommended Fluids

and Lubricants

0

343

.

Specification

Use full synthetic engine oils that meet the
dexos1 specification. Engine oils that have
been approved by GM as meeting the
dexos1 specification are marked with the
dexos1 approved logo. See
www.gmdexos.com.

Caution

Failure to use the recommended engine
oil or equivalent can result in engine
damage not covered by the vehicle
warranty.

Viscosity Grade

For the 2.0L L4 Turbo engine, use SAE 0W-20
viscosity grade engine oil.

For the 3.6L V6 engine, use SAE 5W-30
viscosity grade engine oil. Cold Temperature
Operation: In an area of extreme cold,
where the temperature falls below

29 °C

(

20 °F), an SAE 0W-30 oil may be used. An

oil of this viscosity grade will provide easier
cold starting for the engine at extremely
low temperatures.

When selecting an oil of the appropriate
viscosity grade, it is recommended to select
an oil of the correct specification. See

Specification

earlier in this section.

Engine Oil Additives/Engine Oil Flushes

Do not add anything to the oil. The
recommended oils meeting the dexos1
specification are all that is needed for good
performance and engine protection.

Engine oil system flushes are not
recommended and could cause engine
damage not covered by the vehicle
warranty.

What to Do with Used Oil

Used engine oil contains certain elements
that can be unhealthy for your skin and
could even cause cancer. Do not let used oil
stay on your skin for very long. Clean your
skin and nails with soap and water, or a
good hand cleaner. Wash or properly
dispose of clothing or rags containing used
engine oil. See the manufacturer's warnings
about the use and disposal of oil products.

OwnersManuals2.com

GMC Acadia/Acadia Denali Owner Manual (GMNA-Localizing-U.S./Canada/

Mexico-16402009) - 2023 - CRC - 3/28/22

270

Vehicle Care

Used oil can be a threat to the environment.
If you change your own oil, be sure to drain
all the oil from the filter before disposal.
Never dispose of oil by putting it in the
trash or pouring it on the ground, into
sewers, or into streams or bodies of water.
Recycle it by taking it to a place that
collects used oil.

Engine Oil Life System

When to Change Engine Oil

This vehicle has a computer system that
indicates when to change the engine oil and
filter. This is based on a combination of
factors which include engine revolutions,
engine temperature, and miles driven. Based
on driving conditions, the mileage at which
an oil change is indicated can vary
considerably. For the oil life system to work
properly, the system must be reset every
time the oil is changed.

When the system has calculated that oil life
has been diminished, it indicates that an oil
change is necessary. A CHANGE ENGINE OIL
SOON message comes on. Change the oil as
soon as possible within the next 1 000 km
(600 mi). It is possible that, if driving under
the best conditions, the oil life system
might indicate that an oil change is not

necessary for up to a year. The engine oil
and filter must be changed at least once a
year and, at this time, the system must be
reset. Your dealer has trained service people
who will perform this work and reset the
system. It is also important to check the oil
regularly over the course of an oil drain
interval and keep it at the proper level.

If the system is ever reset accidentally, the
oil must be changed at 5 000 km (3,000 mi)
since the last oil change. Remember to reset
the oil life system whenever the oil is
changed.

How to Reset the Engine Oil Life System

Reset the system whenever the engine oil is
changed so that the system can calculate
the next engine oil change. To reset the
system:

1. Display the REMAINING OIL LIFE on the

DIC. See

Driver Information Center (DIC)

(Base Level)

0

114

or

Driver Information

Center (DIC) (Midlevel)

0

116

or

Driver Information Center (DIC) (Uplevel)

0

119

.

2. Press and hold

V

on the DIC while the

Oil Life display is active. The oil life will
change to 100%.

If the CHANGE ENGINE OIL SOON message
comes back on when the vehicle is started,
the engine oil life system has not been
reset. Repeat the procedure.

Automatic Transmission Fluid

It is not necessary to check the transmission
fluid level. A transmission fluid leak is the
only reason for fluid loss. If a leak occurs,
take the vehicle to the dealer and have it
repaired as soon as possible.

Change the fluid at the intervals listed in

Maintenance Schedule

0

339

and be sure to

use the transmission fluid listed in

Recommended Fluids and Lubricants

0

343

.

Caution

Use of the incorrect automatic
transmission fluid may damage the
vehicle, and the damage may not be
covered by the vehicle warranty. Always
use the correct automatic transmission
fluid. See

Recommended Fluids and

Lubricants

0

343

.

If you need to check the transmission fluid
level, take the vehicle to your dealer.

OwnersManuals2.com

GMC Acadia/Acadia Denali Owner Manual (GMNA-Localizing-U.S./Canada/

Mexico-16402009) - 2023 - CRC - 3/28/22

Vehicle Care

271

Engine Air Filter Life System

If equipped, this feature provides the engine
air filter

s remaining life and best timing for

a change. The timing to change an engine
air filter depends on driving and
environmental conditions.

When to Change Engine Air Filter

When the Driver Information Center (DIC)
displays a message to replace the engine air
filter at the next oil change, follow this
timing.

When the DIC displays a message to replace
the engine air filter soon, replace the engine
air filter at the earliest convenience.

The system must be reset after the engine
air filter is changed.

If the DIC displays a message to check the
engine air filter system, see your dealer.

How to Reset Engine Air Filter Life
System

To reset:

1. Place the vehicle in P (Park).

2. Display the Air Filter Life on the DIC. See

Driver Information Center (DIC) (Base
Level)

0

114

or

Driver Information Center

(DIC) (Midlevel)

0

116

or

Driver

Information Center (DIC) (Uplevel)

0

119

.

3. Press

p

to move to the Reset/Disable

display area. Select Reset then press

V

.

4. Press

V

to confirm to reset.

Engine Air Cleaner/Filter

The engine air cleaner/filter is in the engine
compartment on the passenger side of the
vehicle. See

Engine Compartment Overview

0

265

for location.

When to Inspect the Engine Air Cleaner/
Filter

If the vehicle is not equipped with the
engine air filter life system, see

Maintenance Schedule

0

339

for intervals on

inspecting and replacing the engine air
cleaner/filter.

If equipped with the engine air filter life
system, see

Engine Air Filter Life System

0

271

.

How to Inspect/Replace the Engine Air
Cleaner/Filter

Do not start the engine or have the engine
running with the engine air cleaner/filter
housing open. Before removing the engine
air cleaner/filter, make sure that the engine
air cleaner/filter housing and nearby
components are free of dirt and debris. Do
not clean the engine air cleaner/filter or
components with water or compressed air.

To inspect or replace the air cleaner/filter:

2.0L L4 Turbo Engine

1. Remove the five screws and lift the cover

out of the assembly.

OwnersManuals2.com

GMC Acadia/Acadia Denali Owner Manual (GMNA-Localizing-U.S./Canada/

Mexico-16402009) - 2023 - CRC - 3/28/22

272

Vehicle Care

{

Warning

If part replacement is necessary, the part
must be replaced with one of the same
part number or with an equivalent part.
Use of a replacement part without the
same fit, form, and function may result
in personal injury or damage to the
vehicle.

2. Inspect or replace the engine air cleaner/

filter.

3. Lower the cover and secure with the five

screws.

4. If equipped, reset the engine air filter life

system after replacing the engine air
filter. See

Engine Air Filter Life System

0

271

.

3.6L V6 Engine

1. Remove the five screws and lift the cover

out of the assembly.

2. Inspect or replace the engine air cleaner/

filter.

3. Lower the cover and secure with the five

screws.

4. If equipped, reset the engine air filter life

system after replacing the engine air
filter. See

Engine Air Filter Life System

0

271

.

{

Warning

Operating the engine with the air
cleaner/filter off can cause you or others
to be burned. Use caution when working
on the engine. Do not start the engine or
drive the vehicle with the air cleaner/
filter off, as flames may be present if the
engine backfires.

Caution

If the air cleaner/filter is off, dirt can
easily get into the engine, which could
damage it. Always have the air cleaner/
filter in place when driving.

Cooling System

The cooling system allows the engine to
maintain the correct working temperature.

OwnersManuals2.com

GMC Acadia/Acadia Denali Owner Manual (GMNA-Localizing-U.S./Canada/

Mexico-16402009) - 2023 - CRC - 3/28/22

Vehicle Care

273

2.0L L4 Engine

1. Engine Cooling Fan (Out of View)
2. Engine Coolant Surge Tank and

Pressure Cap

3.6L V6 Engine

1. Engine Cooling Fan (Out of View)
2. Engine Coolant Surge Tank and

Pressure Cap

{

Warning

An underhood electric fan can start up
even when the engine is not running and
can cause injury. Keep hands, clothing,
and tools away from any underhood
electric fan.

{

Warning

Do not touch heater or radiator hoses,
or other engine parts. They can be very
hot and can burn you. Do not run the
engine if there is a leak; all coolant could
leak out. That could cause an engine fire
and can burn you. Fix any leak before
driving the vehicle.

Engine Coolant

The cooling system in the vehicle is filled
with DEX-COOL engine coolant. This coolant
needs to be checked and replaced at
appropriate intervals. See

Maintenance

Schedule

0

339

.

The following explains the cooling system
and how to check and add coolant when it
is low. If there is a problem with engine
overheating, see

Engine Overheating

0

276

.

What to Use

{

Warning

Do not touch heater or radiator hoses,
or other engine parts. They can be very
hot and can burn you. Do not run the

(Continued)

OwnersManuals2.com

GMC Acadia/Acadia Denali Owner Manual (GMNA-Localizing-U.S./Canada/

Mexico-16402009) - 2023 - CRC - 3/28/22

274

Vehicle Care

Warning (Continued)

engine if there is a leak; all coolant could
leak out. That could cause an engine fire
and can burn you. Fix any leak before
driving the vehicle.

Use a 50/50 mixture of clean, drinkable
water and DEX-COOL coolant. This mixture:

.

Gives freezing protection down to

37 °C

(

34 °F), outside temperature.

.

Gives boiling protection up to 129 °C
(265 °F), engine temperature.

.

Protects against rust and corrosion.

.

Will not damage aluminum parts.

.

Helps keep the proper engine
temperature.

Caution

Do not use anything other than a mix of
DEX-COOL coolant that meets GM
Standard GMW3420 and clean, drinkable
water. Anything else can cause damage
to the engine cooling system and the
vehicle, which would not be covered by
the vehicle warranty.

Never dispose of engine coolant by putting
it in the trash, pouring it on the ground,
or into sewers, streams, or bodies of water.
Have the coolant changed by an authorized
service center, familiar with legal
requirements regarding used coolant
disposal. This will help protect the
environment and your health.

Checking Coolant

The vehicle must be on a level surface when
checking the coolant level.

Check to see if coolant is visible in the
coolant surge tank. If the coolant inside the
coolant surge tank is boiling, do not do
anything else until it cools down. See

Engine

Overheating

0

276

.

The coolant surge tank is located in the
engine compartment on the driver side of
the vehicle. See

Engine Compartment

Overview

0

265

.

{

Warning

Spilling coolant on hot engine parts can
burn you. Coolant contains ethylene
glycol and it will burn if the engine parts
are hot enough.

{

Warning

Steam and scalding liquids from a hot
cooling system are under pressure.
Turning the pressure cap, even a little,
can cause them to come out at high
speed and you could be burned. Never
turn the cap when the cooling system,
including the pressure cap, is hot. Wait
for the cooling system and pressure cap
to cool.

OwnersManuals2.com

GMC Acadia/Acadia Denali Owner Manual (GMNA-Localizing-U.S./Canada/

Mexico-16402009) - 2023 - CRC - 3/28/22

Vehicle Care

275

{

Warning

Plain water, or other liquids such as
alcohol, can boil before the proper
coolant mixture will. With plain water or
the wrong mixture, the engine could get
too hot but there would not be an
overheat warning. The engine could catch
fire and you or others could be burned.

Caution

Failure to follow the specific coolant fill
procedure could cause the engine to
overheat and could cause system
damage. If coolant is not visible in the
surge tank, contact your dealer.

If no problem is found, check to see if
coolant is visible in the coolant surge tank.
If coolant is visible but the coolant level is
not at or above the indicated mark, add a
50/50 mixture of clean, drinkable water and
DEX-COOL coolant. Be sure the cooling
system, including the coolant surge tank
pressure cap, is cool before you do it.

How to Add Coolant to the Coolant
Surge Tank (3.6L V6 Engine Only)

1. Remove the coolant surge tank pressure

cap when the cooling system, including
the coolant surge tank pressure cap and
upper radiator hose, is no longer hot.
Turn the pressure cap slowly
counterclockwise about one-quarter of a
turn. If you hear a hiss, wait for that to
stop. This will allow any pressure still
left to be vented out the discharge hose.

2. Keep turning the pressure cap slowly and

remove it.

3. Fill the coolant surge tank with the

proper mixture to the indicated
level mark.

4. With the coolant surge tank pressure cap

off, start the engine and let it run until
you can feel the upper radiator hose
getting hot. Watch out for the engine
cooling fan.
By this time, the coolant level inside the
coolant surge tank may be lower. If the
level is lower, add more of the proper
mixture to the coolant surge tank until
the level reaches the indicated
level mark.

5. Replace the pressure cap tightly.

OwnersManuals2.com

GMC Acadia/Acadia Denali Owner Manual (GMNA-Localizing-U.S./Canada/

Mexico-16402009) - 2023 - CRC - 3/28/22

276

Vehicle Care

6. Verify coolant level after the engine is

shut off and the coolant is cold.
If necessary, repeat coolant fill procedure
Steps 1

6.

If the coolant still is not at the proper
level when the system cools down again,
see your dealer.

Caution

If the pressure cap is not tightly installed,
coolant loss and engine damage may
occur. Be sure the cap is properly and
tightly secured.

Automatic Coolant Service Fill (2.0L L4
Engine Only)

If equipped, this feature assists in filling and
removing air from the cooling system after
service of components or when coolant is
added after being too low.

To activate the fill and air removal process:

1. With a cold system, disconnect the vent

line from the port near the cap on the
surge tank. Add coolant to the indicated
mark on the surge tank.

2. Reconnect the vent line to the surge

tank and replace the cap on the
surge tank.

3. Connect the vehicle to a battery charger.
4. Put the vehicle in Service Mode. See

Ignition Positions

0

204

.

5. Turn off the air conditioning.
6. Set the parking brake.
7. At the same time, press the accelerator

and the brake for automatic transmission
vehicles for two seconds, then release.

At the end of the cycle, check the coolant
level in the surge tank and add coolant, if it
is low. Turn off the vehicle, allow the Engine
Control Module (ECM) to go to sleep, about
two minutes, and repeat steps 3-7.

Listen for pump activation and movement of
the control valves while watching the level
of the tank. If the tank empties, turn the
ignition off, carefully remove the surge tank
cap, refill to the indicated mark and repeat
steps 3-6. The fill and air removal process
will run for approximately 10 minutes.

Engine Overheating

The vehicle has several indicators to warn of
the engine overheating.

There is an engine coolant temperature
gauge on the instrument cluster. See

Engine

Coolant Temperature Gauge

0

103

The

vehicle may also display a message on the
Driver Information Center (DIC).

If the decision is made not to lift the hood
when this warning appears, get service help
right away. See

Roadside Assistance Program

0

354

.

If the decision is made to lift the hood,
make sure the vehicle is parked on a level
surface. Then check to see if the engine
cooling fan is running. If the engine is
overheating, the fan should be running. If it
is not, do not continue to run the engine.
Have the vehicle serviced.

Caution

Do not run the engine if there is a leak
in the engine cooling system. This can
cause a loss of all coolant and can
damage the system and vehicle. Have
any leaks fixed right away.

OwnersManuals2.com

GMC Acadia/Acadia Denali Owner Manual (GMNA-Localizing-U.S./Canada/

Mexico-16402009) - 2023 - CRC - 3/28/22

Vehicle Care

277

If Steam Is Coming from the Engine
Compartment

{

Warning

Steam and scalding liquids from a hot
cooling system are under pressure.
Turning the pressure cap, even a little,
can cause them to come out at high
speed and you could be burned. Never
turn the cap when the cooling system,
including the pressure cap, is hot. Wait
for the cooling system and pressure cap
to cool.

If No Steam Is Coming from the Engine
Compartment

If an engine overheat warning is displayed
but no steam can be seen or heard, the
problem may not be too serious. Sometimes
the engine can get a little too hot when the
vehicle:

.

Climbs a long hill on a hot day.

.

Stops after high-speed driving.

.

Idles for long periods in traffic.

If the overheat warning is displayed with no
sign of steam:

1. Turn the air conditioning off.

2. Turn the heater on to the highest

temperature and to the highest fan
speed. Open the windows as necessary.

3. When it is safe to do so, pull off the

road, shift to P (Park) or N (Neutral), and
let the engine idle.

If the engine coolant temperature gauge is
no longer in the overheated area, the
vehicle can be driven. Continue to drive the
vehicle slowly for about 10 minutes. Keep a
safe distance from the vehicle in front. If the
warning does not come back on, continue to
drive normally and have the cooling system
checked for proper fill and function.

If the warning continues, pull over, stop, and
park the vehicle right away.

If there is no sign of steam, idle the engine
for three minutes while parked. If the
warning is still displayed, turn off the
engine until it cools down.

Washer Fluid

What to Use

When windshield washer fluid is needed, be
sure to read the manufacturer's instructions
before use. If operating the vehicle in an

area where the temperature may fall below
freezing, use a fluid that has sufficient
protection against freezing.

Adding Washer Fluid

Open the cap with the washer symbol on it.
Add washer fluid until the tank is full. See

Engine Compartment Overview

0

265

for

reservoir location.

Caution

.

Do not use washer fluid that contains
any type of water repellent coating.
This can cause the wiper blades to
chatter or skip.

.

Do not use engine coolant (antifreeze)
in the windshield washer. It can
damage the windshield washer system
and paint.

(Continued)

OwnersManuals2.com

GMC Acadia/Acadia Denali Owner Manual (GMNA-Localizing-U.S./Canada/

Mexico-16402009) - 2023 - CRC - 3/28/22

278

Vehicle Care

Caution (Continued)

.

Do not mix water with ready-to-use
washer fluid. Water can cause the
solution to freeze and damage the
washer fluid tank and other parts of
the washer system.

.

When using concentrated washer fluid,
follow the manufacturer instructions
for adding water.

.

Fill the washer fluid tank only
three-quarters full when it is very cold.
This allows for fluid expansion if
freezing occurs, which could damage
the tank if it is completely full.

Brakes

Disc brake linings have built-in wear
indicators that make a high-pitched warning
sound when the brake linings are worn and
new linings are needed. The sound can come
and go or can be heard all the time when
the vehicle is moving, except when applying
the brake pedal firmly.

{

Warning

The brake wear warning sound means
that soon the brakes will not work well.
That could lead to a crash. When the
brake wear warning sound is heard, have
the vehicle serviced.

Caution

Continuing to drive with worn-out brake
linings could result in costly brake
repairs.

Some driving conditions or climates can
cause a brake squeal when the brakes are
first applied, clearing up following several
applications. This does not mean something
is wrong with the brakes.

Properly torqued wheel nuts are necessary
to help prevent brake pulsation. When tires
are rotated, inspect brake linings for wear
and evenly tighten wheel nuts in the proper
sequence to torque specifications. See

Capacities and Specifications

0

348

.

Brake pads should be replaced as complete
axle sets.

Brake Pedal Travel

See your dealer if the brake pedal does not
return to normal height, or if there is a
rapid increase in pedal travel. This could be
a sign that brake service may be required.

Replacing Brake System Parts

Always replace brake system parts with
new, approved replacement parts. If this is
not done, the brakes may not work
properly. The braking performance can
change in many ways if the wrong brake
parts are installed or if parts are improperly
installed.

Brake Fluid

The brake master cylinder reservoir is filled
with GM approved DOT 4 brake fluid as
indicated on the reservoir cap. See

Engine

Compartment Overview

0

265

for the

location of the reservoir.

OwnersManuals2.com

GMC Acadia/Acadia Denali Owner Manual (GMNA-Localizing-U.S./Canada/

Mexico-16402009) - 2023 - CRC - 3/28/22

Vehicle Care

279

Checking Brake Fluid

With the vehicle in P (Park) on a level
surface, the brake fluid level should be
between the minimum and maximum marks
on the brake fluid reservoir.

There are only two reasons why the brake
fluid level in the reservoir may go down:

.

Normal brake lining wear. When new
linings are installed, the fluid level goes
back up.

.

A fluid leak in the brake hydraulic system.
Have the brake hydraulic system fixed.
With a leak, the brakes will not
work well.

Always clean the brake fluid reservoir cap
and the area around the cap before
removing it.

Do not top off the brake fluid. Adding fluid
does not correct a leak. If fluid is added
when the linings are worn, there will be too
much fluid when new brake linings are
installed. Add or remove fluid, as necessary,
only when work is done on the brake
hydraulic system.

{

Warning

If too much brake fluid is added, it can
spill on the engine and burn, if the
engine is hot enough. You or others could
be burned, and the vehicle could be
damaged. Add brake fluid only when
work is done on the brake hydraulic
system.

When the brake fluid falls to a low level,
the brake warning light comes on. See

Brake

System Warning Light

0

107

.

Brake fluid absorbs water over time which
degrades the effectiveness of the brake fluid.
Replace brake fluid at the specified intervals
to prevent increased stopping distance. See

Maintenance Schedule

0

339

.

What to Add

Use only GM approved DOT 4 brake fluid
from a clean, sealed container. See

Recommended Fluids and Lubricants

0

343

.

{

Warning

The wrong or contaminated brake fluid
could result in damage to the brake
system. This could result in the loss of

(Continued)

Warning (Continued)

braking leading to a possible injury.
Always use the proper GM approved
brake fluid.

Caution

If brake fluid is spilled on the vehicle's
painted surfaces, the paint finish can be
damaged. Immediately wash off any
painted surface.

Battery - North America

The original equipment battery is
maintenance free. Do not remove the cap
and do not add fluid.

Refer to the replacement number shown on
the original battery label when a new
battery is needed. See

Engine Compartment

Overview

0

265

for battery location.

For replacement of the battery, see your
dealer.

The vehicle has an Absorbed Glass Mat
(AGM) 12-volt battery. Installation of a
standard 12-volt battery will result in
reduced 12-volt battery life.

OwnersManuals2.com

GMC Acadia/Acadia Denali Owner Manual (GMNA-Localizing-U.S./Canada/

Mexico-16402009) - 2023 - CRC - 3/28/22

280

Vehicle Care

Some 12-volt battery chargers have an AGM
battery setting on the charger. If available,
use the AGM setting on the charger to limit
charge voltage to 14.8 volts. Follow the
charger manufacturer's instructions.

Stop/Start System

The vehicle has a Stop/Start system to shut
off the engine to help conserve fuel. See

Stop/Start System

0

206

.

{

Warning

WARNING:

Battery posts, terminals and

related accessories can expose you to
chemicals including lead and lead
compounds, which are known to the
State of California to cause cancer and
birth defects or other reproductive harm.
Wash hands after handling. For more
information go to
www.P65Warnings.ca.gov.

See

California Proposition 65 Warning

0

1

.

Vehicle Storage

{

Warning

Batteries have acid that can burn you and
gas that can explode. You can be badly
hurt if you are not careful. Always wear
eye protection. See

Jump Starting - North

America

0

324

for tips on working around

a battery without getting hurt.

Infrequent Usage: Remove the black,
negative (

) cable from the battery to keep

the battery from running down.

Extended Storage: Remove the black,
negative (

) cable from the battery or use a

battery trickle charger.

All-Wheel Drive

Transfer Case

Under normal driving conditions, transfer
case fluid does not require maintenance
unless there is a fluid leak or unusual noise.
If required, have the transfer case serviced
by your dealer.

Park Brake and P (Park)
Mechanism Check

{

Warning

When you are doing this check, the
vehicle could begin to move. You or
others could be injured and property
could be damaged. Make sure there is
room in front of the vehicle in case it
begins to roll. Be ready to apply the
regular brake at once should the vehicle
begin to move.

Park on a fairly steep hill, with the vehicle
facing downhill. Keeping your foot on the
regular brake, set the parking brake.

.

To check the parking brake's holding
ability: With the engine running and the
transmission in N (Neutral), slowly remove
foot pressure from the regular brake
pedal. Do this until the vehicle is held by
the parking brake only.

.

To check the P (Park) mechanism's holding
ability: With the engine running, shift to
P (Park). Then release the parking brake
followed by the regular brake.

Contact your dealer if service is required.

OwnersManuals2.com

GMC Acadia/Acadia Denali Owner Manual (GMNA-Localizing-U.S./Canada/

Mexico-16402009) - 2023 - CRC - 3/28/22

Vehicle Care

281

Wiper Blade Replacement

Windshield wiper blades should be inspected
for wear or cracking.

It is a good idea to clean or replace the
wiper blade assembly on a regular basis or
when worn. For proper windshield wiper
blade length and type, see

Maintenance

Replacement Parts

0

344

.

Caution

Allowing the wiper arm to touch the
windshield when no wiper blade is
installed could damage the windshield.
Any damage that occurs would not be
covered by the vehicle warranty. Do not
allow the wiper arm to touch the
windshield.

Front Wiper Blade Replacement

To replace the wiper blade assembly:

1. Pull the windshield wiper assembly away

from the windshield.

2. Lift up on the latch in the middle of the

wiper blade where the wiper arm
attaches.

3. With the latch open, pull the wiper blade

down toward the windshield far enough
to release it from the J-hooked end of
the wiper arm.

4. Remove the wiper blade.
5. Reverse Steps 1

3 for wiper blade

replacement.

Rear Wiper Blade Replacement

To remove the wiper blade:

1. Lift the wiper arm away from the

window. The rear wiper arm will only lift
off the glass at a small angle to allow

for wiper blade removal. The rear wiper
arm will not lock in a service up position
so care should be taken when replacing
the rear wiper blade.

2. Push the release lever to disengage the

hook and push the wiper arm toward the
center of the vehicle and out of the
blade assembly.

3. Push the new blade assembly securely

on the wiper arm until the release lever
clicks into place.

Windshield Replacement

Driver Assistance Systems

If the windshield needs to be replaced and
the vehicle is equipped with a front camera
sensor for the Driver Assistance Systems, a
GM replacement windshield is
recommended. The replacement windshield
must be installed according to GM
specifications for proper alignment. If it is
not, these systems may not work properly,

OwnersManuals2.com

GMC Acadia/Acadia Denali Owner Manual (GMNA-Localizing-U.S./Canada/

Mexico-16402009) - 2023 - CRC - 3/28/22

282

Vehicle Care

they may display messages, or they may
not work at all. See your dealer for proper
windshield replacement.

Gas Strut(s)

Your vehicle may be equipped with gas
strut(s) to provide assistance in lifting and
holding open the hood/trunk/liftgate system
in full open position.

{

Warning

If the gas struts that hold open the hood,
trunk, and/or liftgate fail, you or others
could be seriously injured. Take the
vehicle to your dealer for service
immediately. Visually inspect the gas
struts for signs of wear, cracks, or other
damage periodically. Check to make sure
the hood/trunk/liftgate is held open with
enough force. If struts are failing to hold
the hood/trunk/liftgate, do not operate.
Have the vehicle serviced.

Caution

Do not apply tape or hang any objects
from gas struts. Also do not push down
or pull on gas struts. This may cause
damage to the vehicle.

See

Maintenance Schedule

0

339

.

Hood

Trunk

Liftgate

OwnersManuals2.com

GMC Acadia/Acadia Denali Owner Manual (GMNA-Localizing-U.S./Canada/

Mexico-16402009) - 2023 - CRC - 3/28/22

Vehicle Care

283

Headlamp Aiming

Front Headlamp Aiming

Headlamp aim has been preset and should
need no further adjustment.

If the vehicle is damaged in a crash, the
headlamp aim may be affected.
If adjustment to the headlamps is necessary,
see your dealer.

Bulb Replacement

For the proper type of replacement bulbs,
or any bulb changing procedure not listed in
this section, contact your dealer.

Caution

Do not replace incandescent bulbs with
aftermarket LED replacement bulbs. This
can cause damage to the vehicle electrical
system.

Halogen Bulbs

{

Warning

Halogen bulbs have pressurized gas inside
and can burst if you drop or scratch the
bulb. You or others could be injured. Be
sure to read and follow the instructions
on the bulb package.

LED Lighting

This vehicle has several LED lamps. For
replacement of any LED lighting assembly,
contact your dealer.

Electrical System

Electrical System Overload

The vehicle has fuses and circuit breakers to
protect against an electrical system
overload.

When the current electrical load is too
heavy, the circuit breaker opens and closes,
protecting the circuit until the current load
returns to normal or the problem is fixed.
This greatly reduces the chance of circuit
overload and fire caused by electrical
problems.

Fuses and circuit breakers protect power
devices in the vehicle.

If there is a problem on the road and a fuse
needs to be replaced, the same amperage
fuse can be borrowed. Choose some feature
of the vehicle that is not needed to use and
replace it as soon as possible.

To check a fuse, look at the band inside the
fuse. If the band is broken or melted,
replace the fuse. Be sure to replace a bad
fuse with a fuse of the identical size and
rating.

OwnersManuals2.com

GMC Acadia/Acadia Denali Owner Manual (GMNA-Localizing-U.S./Canada/

Mexico-16402009) - 2023 - CRC - 3/28/22

284

Vehicle Care

Replacing a Blown Fuse

1. Turn off the vehicle.
2. Locate the fuse puller in the engine

compartment fuse block.

3. Use the fuse puller to remove the fuse

from the top or side, as shown above.

4. If the fuse must be replaced

immediately, borrow a replacement fuse
with the same amperage from the fuse
block. Choose a vehicle feature that is
not needed to safely operate the vehicle.
Repeat Steps 2-3.

5. Insert the replacement fuse into the

empty slot of the blown fuse.

At the next opportunity, see your dealer to
replace the blown fuse.

Headlamp Wiring

An electrical overload may cause the lamps
to go on and off, or in some cases to
remain off. Have the headlamp wiring
checked right away if the lamps go on and
off or remain off.

Windshield Wipers

If the wiper motor overheats due to heavy
snow or ice, the windshield wipers will stop
until the motor cools and will then restart.

Although the circuit is protected from
electrical overload, overload due to heavy
snow or ice may cause wiper linkage
damage. Always clear ice and heavy snow
from the windshield before using the
windshield wipers.

OwnersManuals2.com

GMC Acadia/Acadia Denali Owner Manual (GMNA-Localizing-U.S./Canada/

Mexico-16402009) - 2023 - CRC - 3/28/22

Vehicle Care

285

If the overload is caused by an electrical
problem and not snow or ice, be sure to get
it fixed.

Fuses and Circuit Breakers

The wiring circuits in the vehicle are
protected from short circuits by a
combination of fuses and circuit breakers.
This greatly reduces the chance of damage
caused by electrical problems.

{

Danger

Fuses and circuit breakers are marked
with their ampere rating. Do not exceed
the specified amperage rating when
replacing fuses and circuit breakers. Use
of an oversized fuse or circuit breaker can
result in a vehicle fire. You and others
could be seriously injured or killed.

{

Warning

Installation or use of fuses that do not
meet GM

s original fuse specifications is

dangerous. The fuses could fail, and result
in a fire. You or others could be injured
or killed, and the vehicle could be
damaged.

See

Accessories and Modifications

0

262

and

General Information

0

262

.

To check or replace a blown fuse, see

Electrical System Overload

0

283

.

Engine Compartment Fuse Block

The underhood fuse block is in the engine
compartment, on the driver side of the
vehicle.

Caution

Do not pull the engine compartment fuse
block lever, since it is intended only for
service purposes. If pulled, vehicle
malfunction may occur.

OwnersManuals2.com

GMC Acadia/Acadia Denali Owner Manual (GMNA-Localizing-U.S./Canada/

Mexico-16402009) - 2023 - CRC - 3/28/22

286

Vehicle Care

Caution

Spilling liquid on any electrical
component on the vehicle may damage
it. Always keep the covers on any
electrical component.

To remove the fuse block cover, press the
clips on the cover and lift it straight up.

The vehicle may not be equipped with all of
the fuses, relays, and features shown.

Fuses

Usage

F1

Antilock Brake System

F2

Starter 1

Fuses

Usage

F3

DC DC Transformer 1

F4

OwnersManuals2.com

GMC Acadia/Acadia Denali Owner Manual (GMNA-Localizing-U.S./Canada/

Mexico-16402009) - 2023 - CRC - 3/28/22

Vehicle Care

287

Fuses

Usage

F5

DC DC Transformer 2

F6

Amplifier 1

F7

Front Blower

F8

Starter 3

F9

F10

F11

F12

Front Wiper

F13

Starter 2

F14

LED/Automatic Headlamp
Leveling

F15

Rear Wiper 1

F16

F17

F18

Automatic Headlamp
Leveling Module

F19

F20

F21

F22

Electronic Brake Control
Module

Fuses

Usage

F23

Parking/Trailer Lamps

F24

Right Trailer Stoplamp/
Turnlamp

F25

Steering Column Lock

F26

F27

Left Trailer Stoplamp/
Turnlamp

F28

F29

F30

Washer Pump

F31

F32

F33

Fog Lamps

F34

Horn

F35

F36

Headlamp High-Beam Left

F37

Headlamp High-Beam
Right

F38

Spare

F39

Transmission Control
Module 1/Battery 1

Fuses

Usage

F40

Left Rear Bus Electrical
Center/Ignition

F41

Instrument Cluster

F42

Heating, Ventilation, and
Air Conditioning/Central
Gateway Module Run
Crank

F43

Head-up Display/
Reflective Light Alert
Display

F44

Electronic Brake Control
Module Electric Brake
Booster/Run/Crank

F45

F46

F47

F48

Rear Wiper 2

F49

Interior Rearview Mirror/
Trailer/Rear Heated Seat
Run Crank

F50

Fuel Tank Zone Module
Run Crank

F51

Heated Steering Wheel

OwnersManuals2.com

GMC Acadia/Acadia Denali Owner Manual (GMNA-Localizing-U.S./Canada/

Mexico-16402009) - 2023 - CRC - 3/28/22

288

Vehicle Care

Fuses

Usage

F52

Air Conditioning Clutch

F53

Coolant Pump

F54

F55

F56

Spare

F57

Engine Control Module/
Ignition

F58

Transmission Control
Module/Ignition

F59

Engine Control Module
Battery

F60

F61

O2 Sensor 1/Aeroshutter/
Mass Air Flow Sensor

F62

Engine Control
Module

Odd

F63

O2 Sensor 2

F64

Engine Control
Module

Even

F65

Engine Control Module
Powertrain 1

Fuses

Usage

F66

Engine Control Module
Powertrain 2

F67

Engine Control Module
Powertrain 3

F68

F69

F70

F71

F72

F73

F74

F75

F76

F77

Relays

Usage

K1

Starter 1

K2

Run/Crank

K3

Starter 3

K4

LED/Automatic
Headlamps

Relays

Usage

K5

K6

K7

Engine Control Module

K8

Air Conditioning

K9

K10

Starter 2

Instrument Panel Fuse Block

The instrument panel fuse block is inside the
center console on the passenger side of the
vehicle.

OwnersManuals2.com


Content      ..     7      8      9      10     ..