MC Acadia Owner (2023 year). Manual in english - page 7
 

  Index      Manuals     General Motors MC Acadia Owner (2023 year). Manual in english


Search            copyright infringement  


Content      ..     5      6      7      8     ..


MC Acadia Owner (2023 year). Manual in english - page 7


GMC Acadia/Acadia Denali Owner Manual (GMNA-Localizing-U.S./Canada/

Mexico-16402009) - 2023 - CRC - 3/29/22

Driving and Operating

193

applied. Once the power assist is used up, it
can take longer to stop and the brake pedal
will be harder to push.

Steering

Caution

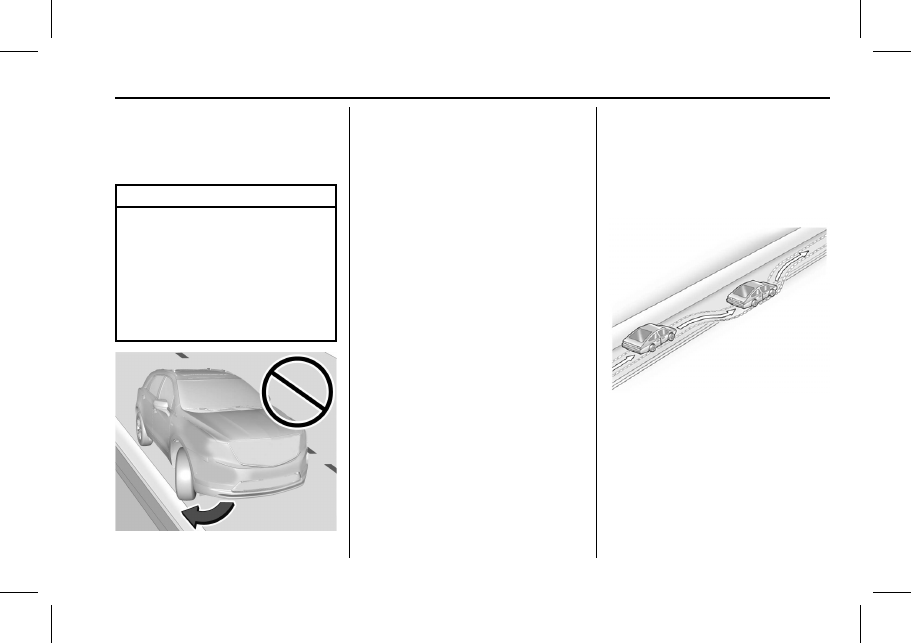
To avoid damage to the steering system,
do not drive over curbs, parking barriers,
or similar objects at speeds greater than
3 km/h (1 mph). Use care when driving
over other objects such as lane dividers
and speed bumps. Damage caused by
misuse of the vehicle is not covered by
the vehicle warranty.

Electric Power Steering

The vehicle is equipped with an electric
power steering system, which reduces the
amount of effort needed to steer the
vehicle. It does not have power steering
fluid. Regular maintenance is not required.

If the vehicle experiences a system
malfunction and loses power steering,
greater steering effort may be required.
Power steering assist also may be reduced if
you turn the steering wheel as far as it can
turn and hold it there with force for an
extended period of time.

See your dealer if there is a problem.

Curve Tips

.

Take curves at a reasonable speed.

.

Reduce speed before entering a curve.

.

Maintain a reasonable steady speed
through the curve.

.

Wait until the vehicle is out of the curve
before accelerating gently into the
straightaway.

Steering in Emergencies

.

There are some situations when steering
around a problem may be more effective
than braking.

.

Holding both sides of the steering wheel
allows you to turn 180 degrees without
removing a hand.

.

The Antilock Brake System (ABS) allows
steering while braking.

Off-Road Recovery

The vehicle's right wheels can drop off the
edge of a road onto the shoulder while
driving. Follow these tips:

1. Ease off the accelerator and then,

if there is nothing in the way, steer the
vehicle so that it straddles the edge of
the pavement.

GMC Acadia/Acadia Denali Owner Manual (GMNA-Localizing-U.S./Canada/

Mexico-16402009) - 2023 - CRC - 3/29/22

194

Driving and Operating

2. Turn the steering wheel about

one-eighth of a turn, until the right front
tire contacts the pavement edge.

3. Turn the steering wheel to go straight

down the roadway.

Loss of Control

Skidding

There are three types of skids that
correspond to the vehicle's three control
systems:

.

Braking Skid

wheels are not rolling.

.

Steering or Cornering Skid

too much

speed or steering in a curve causes tires
to slip and lose cornering force.

.

Acceleration Skid

too much throttle

causes the driving wheels to spin.

Defensive drivers avoid most skids by taking
reasonable care suited to existing conditions,
and by not overdriving those conditions. But
skids are always possible.

If the vehicle starts to slide, follow these
suggestions:

.

Ease your foot off the accelerator pedal
and steer the way you want the vehicle
to go. The vehicle may straighten out. Be
ready for a second skid if it occurs.

.

Slow down and adjust your driving
according to weather conditions. Stopping
distance can be longer and vehicle control
can be affected when traction is reduced
by water, snow, ice, gravel, or other
material on the road. Learn to recognize
warning clues

such as enough water,

ice, or packed snow on the road to make
a mirrored surface

and slow down

when you have any doubt.

.

Try to avoid sudden steering, acceleration,
or braking, including reducing vehicle
speed by shifting to a lower gear. Any
sudden changes could cause the tires to
slide.

Remember: Antilock brakes help avoid only
the braking skid.

Off-Road Driving

All-Wheel Drive (AWD) vehicles can be used
for off-road driving. Vehicles without AWD
and vehicles not equipped with All Terrain
(AT) or On-Off Road (OOR) tires must not be
driven off-road except on a level, solid
surface. To contact the tire manufacturer for
more information about the original
equipment tires, see the warranty manual.

Controlling the vehicle is the key to
successful off-road driving. One of the best
ways to control the vehicle is to control the
speed.

{

Warning

When driving off-road, bouncing and
quick changes in direction can easily
throw you out of position. This could
cause you to lose control and crash. You
and your passengers should always wear
seat belts.

Before Driving Off-Road

.

Have all necessary maintenance and
service work completed.

.

Fuel the vehicle, fill fluid levels, and check
inflation pressure in all tires, including the
spare, if equipped.

.

Read all the information about AWD
vehicles in this manual.

.

Make sure all underbody shields,
if equipped, are properly attached.

.

Know the local laws that apply to off-road
driving.

GMC Acadia/Acadia Denali Owner Manual (GMNA-Localizing-U.S./Canada/

Mexico-16402009) - 2023 - CRC - 3/29/22

Driving and Operating

195

To gain more ground clearance if needed, it
may be necessary to remove the front fascia
lower air dam. However, driving without the
air dam reduces fuel economy.

Caution

Operating the vehicle for extended
periods without the front fascia lower air
dam installed can cause improper airflow
to the engine. Reattach the front fascia
air dam after off-road driving.

Loading the Vehicle for Off-Road Driving

{

Warning

.

Unsecured cargo on the load floor can
be tossed about when driving over
rough terrain. You or your passengers
can be struck by flying objects. Secure
the cargo properly.

.

Keep cargo in the cargo area as far
forward and as low as possible. The
heaviest things should be on the floor,
forward of the rear axle.

.

Heavy loads on the roof raise the
vehicle's center of gravity, making it
more likely to roll over. You can be

(Continued)

Warning (Continued)

seriously or fatally injured if the
vehicle rolls over. Put heavy loads
inside the cargo area, not on the roof.

For more information about loading the
vehicle, see

Vehicle Load Limits

0

200

.

Environmental Concerns

.

Always use established trails, roads, and
areas that have been set aside for public
off-road recreational driving and obey all
posted regulations.

.

Do not damage shrubs, flowers, trees,
or grasses or disturb wildlife.

.

Do not park over things that burn. See

Parking over Things That Burn

0

210

.

Driving on Hills

Driving safely on hills requires good
judgment and an understanding of what the
vehicle can and cannot do.

{

Warning

Many hills are simply too steep for any
vehicle. Driving up hills can cause the
vehicle to stall. Driving down hills can

(Continued)

Warning (Continued)

cause loss of control. Driving across hills
can cause a rollover. You could be injured
or killed. Do not drive on steep hills.

Before driving on a hill, assess the
steepness, traction, and obstructions. If the
terrain ahead cannot be seen, get out of the
vehicle and walk the hill before driving
further.

When driving on hills:

.

Use a low gear and keep a firm grip on
the steering wheel.

.

Maintain a slow speed.

.

When possible, drive straight up or down
the hill.

.

Slow down when approaching the top of
the hill.

{

Warning

Driving to the top of a hill at high speed
can cause a crash. There could be a
drop-off, embankment, cliff, or even
another vehicle. You could be seriously
injured or killed. As you near the top of a
hill, slow down and stay alert.

GMC Acadia/Acadia Denali Owner Manual (GMNA-Localizing-U.S./Canada/

Mexico-16402009) - 2023 - CRC - 3/29/22

196

Driving and Operating

.

Use headlamps even during the day to
make the vehicle more visible.

.

Never go downhill forward or backward
with the transmission in N (Neutral). The
brakes could overheat and you could lose
control.

.

When driving down a hill, keep the
vehicle headed straight down. Use a low
gear because the engine will work with
the brakes to slow the vehicle and help
keep the vehicle under control.

{

Warning

Heavy braking when going down a hill
can cause your brakes to overheat and
fade. This could cause loss of control and
you or others could be injured or killed.
Apply the brakes lightly when descending
a hill and use a low gear to keep vehicle
speed under control.

.

Avoid turns that take the vehicle across
the incline of the hill. Driving across an
incline puts more weight on the downhill
wheels, which could cause a downhill
slide or a rollover.

.

Loose gravel, muddy spots, or even wet
grass can cause the tires to slip sideways,
downhill. If the vehicle slips sideways, it
can hit something and potentially
roll over.

.

Hidden obstacles can make the steepness
of the incline more severe. If a rock is
driven across with the uphill wheels, or if
the downhill wheels drop into a rut or
depression, the vehicle can tilt even more.

.

If an incline must be driven across and
the vehicle starts to slide, turn downhill.
This should help straighten out the
vehicle and prevent side slipping.

If the vehicle stalls on a hill:

1. Apply the brakes to stop the vehicle, and

then apply the parking brake.

2. Shift into P (Park) and then restart the

engine.

.

If driving uphill when the vehicle
stalls, shift to R (Reverse), release the
parking brake, and back
straight down.

.

Never try to turn the vehicle around.
If the hill is steep enough to stall the
vehicle, it is steep enough to cause it
to roll over.

.

If you cannot make it up the hill,
back straight down the hill.

.

Never back down a hill in N (Neutral)
using only the brake.

.

The vehicle can roll backward quickly
and you could lose control.

.

If driving downhill when the vehicle
stalls, shift to a lower gear, release
the parking brake, and drive straight
down the hill.

3. If the vehicle cannot be restarted after

stalling, set the parking brake, shift into
P (Park), and turn the vehicle off.
3.1. Leave the vehicle and seek help.
3.2. Stay clear of the path the vehicle

would take if it rolled downhill.

{

Warning

Getting out of the vehicle on the
downhill side when stopped across an
incline is dangerous. If the vehicle rolls
over, you could be crushed or killed.
Always get out on the uphill side of the
vehicle and stay well clear of the
rollover path.

GMC Acadia/Acadia Denali Owner Manual (GMNA-Localizing-U.S./Canada/

Mexico-16402009) - 2023 - CRC - 3/29/22

Driving and Operating

197

Driving in Mud, Sand, Snow, or Ice

Use a low gear when driving in mud

the

deeper the mud, the lower the gear. Keep
the vehicle moving to avoid getting stuck.

Traction changes when driving on sand. On
loose sand, such as on beaches or sand
dunes, the tires tend to sink into the sand.
This affects steering, accelerating, and
braking. Drive at a reduced speed and avoid
sharp turns or abrupt maneuvers.

Traction is reduced on hard packed snow
and ice and it is easy to lose control. Reduce
vehicle speed when driving on hard packed
snow and ice.

{

Warning

Driving on frozen lakes, ponds, or rivers
can be dangerous. Ice conditions vary
greatly and the vehicle could fall through
the ice; you and your passengers could
drown. Drive your vehicle on safe
surfaces only.

Driving in Water

{

Warning

Driving through rushing water can be
dangerous. Deep water can sweep your
vehicle downstream and you and your
passengers could drown. If it is only
shallow water, it can still wash away the
ground from under your tires. Traction
could be lost, and the vehicle could roll
over. Do not drive through rushing water.

Caution

Do not drive through standing water if it
is deep enough to cover the wheel hubs,
axles, or exhaust pipe. Deep water can
damage the axle and other vehicle parts.

If the standing water is not too deep, drive
through it slowly. At faster speeds, water
can get into the engine and cause it to stall.
Stalling can occur if the exhaust pipe is
under water. Do not turn off the ignition
when driving through water. If the exhaust
pipe is under water, the engine will not
start. When going through water, the brakes
get wet, and it might take longer to stop.
See

Driving on Wet Roads

0

197

.

After Off-Road Driving

Remove any brush or debris that has
collected on the underbody or chassis,
or under the hood. These accumulations can
be a fire hazard.

After operation in mud or sand, have the
brake linings cleaned and checked. These
substances can cause glazing and uneven
braking. Check the body structure, steering,
suspension, wheels, tires, and exhaust
system for damage and check the fuel lines
and cooling system for any leakage.

More frequent maintenance service is
required. See

Maintenance Schedule

0

339

.

Driving on Wet Roads

Rain and wet roads can reduce vehicle
traction and affect your ability to stop and
accelerate. Always drive slower in these
types of driving conditions and avoid driving
through large puddles and deep-standing or
flowing water.

GMC Acadia/Acadia Denali Owner Manual (GMNA-Localizing-U.S./Canada/

Mexico-16402009) - 2023 - CRC - 3/29/22

198

Driving and Operating

{

Warning

Wet brakes can cause crashes. They
might not work as well in a quick stop
and could cause pulling to one side. You
could lose control of the vehicle.

After driving through a large puddle of
water or a car/vehicle wash, lightly apply
the brake pedal until the brakes work
normally.

Flowing or rushing water creates strong
forces. Driving through flowing water
could cause the vehicle to be carried
away. If this happens, you and other
vehicle occupants could drown. Do not
ignore police warnings and be very
cautious about trying to drive through
flowing water.

Hydroplaning

Hydroplaning is dangerous. Water can build
up under the vehicle's tires so they actually
ride on the water. This can happen if the
road is wet enough and you are going fast
enough. When the vehicle is hydroplaning, it
has little or no contact with the road.

There is no hard and fast rule about
hydroplaning. The best advice is to slow
down when the road is wet.

Other Rainy Weather Tips

Besides slowing down, other wet weather
driving tips include:

.

Allow extra following distance.

.

Pass with caution.

.

Keep windshield wiping equipment in
good shape.

.

Keep the windshield washer fluid reservoir
filled.

.

Have good tires with proper tread depth.
See

Tires

0

293

.

.

Turn off cruise control.

.

Activate All-Wheel Drive (AWD) mode. See

Driver Mode Control

0

220

.

Hill and Mountain Roads

Driving on steep hills or through mountains
is different than driving on flat or rolling
terrain. Tips include:

.

Keep the vehicle serviced and in good
shape.

.

Check all fluid levels, brakes, tires, cooling
system, and transmission.

.

Shift to a lower gear when going down
steep or long hills.

{

Warning

Using the brakes to slow the vehicle on a
long downhill slope can cause brake
overheating, can reduce brake
performance, and could result in a loss of
braking. Shift the transmission to a lower
gear to let the engine assist the brakes
on a steep downhill slope.

{

Warning

Coasting downhill in N (Neutral) or with
the ignition off is dangerous. This can
cause overheating of the brakes and loss
of steering assist. Always have the engine
running and the vehicle in gear.

.

Drive at speeds that keep the vehicle in
its own lane. Do not swing wide or cross
the center line.

.

Be alert on top of hills; something could
be in your lane (e.g., stalled car, crash).

.

Pay attention to special road signs (e.g.,
falling rocks area, winding roads, long
grades, passing or no-passing zones) and
take appropriate action.

OwnersManuals2.com

GMC Acadia/Acadia Denali Owner Manual (GMNA-Localizing-U.S./Canada/

Mexico-16402009) - 2023 - CRC - 3/29/22

Driving and Operating

199

Winter Driving

Driving on Snow or Ice

Caution

To avoid damage to the wheels and
brake components, always clear snow and
ice from inside the wheels and
underneath the vehicle before driving.

Snow or ice between the tires and the road
creates less traction or grip, so drive
carefully. Wet ice can occur at about 0 °C
(32 °F) when freezing rain begins to fall.
Avoid driving on wet ice or in freezing rain
until roads can be treated.

For Slippery Road Driving:

.

Accelerate gently. Accelerating too quickly
causes the wheels to spin and makes the
surface under the tires slick.

.

Turn on Traction Control. See

Traction

Control/Electronic Stability Control

0

218

.

.

The Antilock Brake System (ABS) improves
vehicle stability during hard stops, but
the brakes should be applied sooner than
when on dry pavement. See

Antilock

Brake System (ABS)

0

215

.

.

Allow greater following distance and
watch for slippery spots. Icy patches can
occur on otherwise clear roads in shaded
areas. The surface of a curve or an
overpass can remain icy when the
surrounding roads are clear. Avoid sudden
steering maneuvers and braking while
on ice.

.

Turn off cruise control.

.

Select All-Wheel Drive (AWD) Mode for
vehicles equipped with AWD. Select
Snow/Ice Mode for FWD only vehicles.
See

Driver Mode Control

0

220

and

All-Wheel Drive

0

215

.

Blizzard Conditions

Stop the vehicle in a safe place and signal
for help. Stay with the vehicle unless there
is help nearby. If possible, use Roadside
Assistance. See

Roadside Assistance Program

0

354

. To get help and keep everyone in the

vehicle safe:

.

Turn on the hazard warning flashers.

.

Tie a red cloth to an outside mirror.

{

Warning

Snow can trap engine exhaust under the
vehicle. This may cause exhaust gases to
get inside. Engine exhaust contains
carbon monoxide (CO), which cannot be
seen or smelled. It can cause
unconsciousness and even death.

If the vehicle is stuck in snow:

.

Clear snow from the base of the
vehicle, especially any blocking the
exhaust pipe.

.

Open a window about 5 cm (2 in) on
the vehicle side that is away from the
wind, to bring in fresh air.

.

Fully open the air outlets on or under
the instrument panel.

.

Adjust the climate control system to
circulate the air inside the vehicle and
set the fan speed to the highest
setting. See

Climate Control Systems.

For more information about CO, see

Engine Exhaust

0

210

.

OwnersManuals2.com

GMC Acadia/Acadia Denali Owner Manual (GMNA-Localizing-U.S./Canada/

Mexico-16402009) - 2023 - CRC - 3/29/22

200

Driving and Operating

To save fuel, run the engine for short
periods to warm the vehicle and then shut
the engine off and partially close the
window. Moving about to keep warm also
helps.

If it takes time for help to arrive, when
running the engine, push the accelerator
pedal slightly so the engine runs faster than
the idle speed. This keeps the battery
charged to restart the vehicle and to signal
for help with the headlamps. Do this as
little as possible, to save fuel.

If the Vehicle Is Stuck

Slowly and cautiously spin the wheels to
free the vehicle when stuck in sand, mud,
ice, or snow.

If stuck too severely for the traction system
to free the vehicle, turn the traction system
off and use the rocking method. See

Traction Control/Electronic Stability Control

0

218

.

{

Warning

If the vehicle's tires spin at high speed,
they can explode, and you or others
could be injured. The vehicle can

(Continued)

Warning (Continued)

overheat, causing an engine compartment
fire or other damage. Spin the wheels as
little as possible and avoid going above
56 km/h (35 mph).

For All-Wheel Drive (AWD), select Off-Road
or AWD mode. See

Driver Mode Control

0

220

and

All-Wheel Drive

0

215

.

Rocking the Vehicle to Get it Out

Turn the steering wheel left and right to
clear the area around the front wheels. Turn
off any traction system. Shift back and forth
between R (Reverse) and a low forward gear,
spinning the wheels as little as possible. To
prevent transmission wear, wait until the
wheels stop spinning before shifting gears.
Release the accelerator pedal while shifting,
and press lightly on the accelerator pedal
when the transmission is in gear. Slowly
spinning the wheels in the forward and
reverse directions causes a rocking motion
that could free the vehicle. If that does not
get the vehicle out after a few tries, it
might need to be towed out. If the vehicle
does need to be towed out, see

Transporting

a Disabled Vehicle

0

326

.

Vehicle Load Limits

It is very important to know how much
weight the vehicle can carry. This
weight is called the vehicle capacity
weight and includes the weight of all
occupants, cargo, and all
nonfactory-installed options. Two labels
on the vehicle may show how much
weight it may properly carry, the Tire
and Loading Information label and the
Certification/Tire label.

{

Warning

Do not load the vehicle any heavier
than the Gross Vehicle Weight Rating
(GVWR), or either the maximum
front or rear Gross Axle Weight
Rating (GAWR). This can cause
systems to break and change the
way the vehicle handles. This could
cause loss of control and a crash.
Overloading can also reduce stopping
performance, damage the tires, and
shorten the life of the vehicle.

OwnersManuals2.com

GMC Acadia/Acadia Denali Owner Manual (GMNA-Localizing-U.S./Canada/

Mexico-16402009) - 2023 - CRC - 3/29/22

Driving and Operating

201

Tire and Loading Information Label

Example Label

A vehicle-specific Tire and Loading
Information label is attached to the
center pillar (B-pillar). The tire and
loading information label shows the
number of occupant seating
positions (1), and the maximum vehicle
capacity weight (2) in kilograms and
pounds.

The Tire and Loading Information label
also shows the size of the original
equipment tires (3) and the
recommended cold tire inflation

pressures (4). For more information on
tires and inflation see

Tires

0

293

and

Tire Pressure

0

299

.

There is also important loading
information on the vehicle Certification/
Tire label. It may show the Gross
Vehicle Weight Rating (GVWR) and the
Gross Axle Weight Rating (GAWR) for
the front and rear axle. See

Certification/Tire Label

later in this

section.

Steps for Determining Correct Load Limit

1.

Locate the statement "The combined
weight of occupants and cargo
should never exceed XXX kg or
XXX lbs." on your vehicle

s placard.

2.

Determine the combined weight of
the driver and passengers that will
be riding in your vehicle.

3.

Subtract the combined weight of the
driver and passengers from XXX kg
or XXX lbs.

4.

The resulting figure equals the
available amount of cargo and
luggage load capacity. For example,

if the "XXX" amount equals 1400 lbs.
and there will be five 150 lb
passengers in your vehicle, the
amount of available cargo and
luggage load capacity is 650 lbs.
(1400-750 (5 x 150) = 650 lbs.)

5.

Determine the combined weight of
luggage and cargo being loaded on
the vehicle. That weight may not
safely exceed the available cargo and
luggage load capacity calculated in
Step 4.

6.

If your vehicle will be towing a
trailer, load from your trailer will be
transferred to your vehicle. Consult
this manual to determine how this
reduces the available cargo and
luggage load capacity of your
vehicle.

See

Trailer Towing

0

252

for important

information on towing a trailer, towing
safety rules and trailering tips.

OwnersManuals2.com

GMC Acadia/Acadia Denali Owner Manual (GMNA-Localizing-U.S./Canada/

Mexico-16402009) - 2023 - CRC - 3/29/22

202

Driving and Operating

Example 1

1.

Vehicle Capacity Weight for
Example 1 = 453 kg (1,000 lbs).

2.

Subtract Occupant Weight @
68 kg (150 lbs) × 2 = 136 kg
(300 lbs).

3.

Available Occupant and Cargo
Weight = 317 kg (700 lbs).

Example 2

1.

Vehicle Capacity Weight for
Example 2 = 453 kg (1,000 lbs).

2.

Subtract Occupant Weight @
68 kg (150 lbs) × 5 = 340 kg
(750 lbs).

3.

Available Cargo Weight = 113 kg
(250 lbs).

Example 3

1.

Vehicle Capacity Weight for
Example 3 = 453 kg (1,000 lbs).

2.

Subtract Occupant Weight @ 91 kg
(200 lbs) × 5 = 453 kg (1,000 lbs).

3.

Available Cargo Weight =
0 kg (0 lbs).

Refer to the vehicle's tire and loading
information label for specific
information about the vehicle's capacity
weight and seating positions. The
combined weight of the driver,
passengers, and cargo should never
exceed the vehicle's capacity weight.

OwnersManuals2.com

GMC Acadia/Acadia Denali Owner Manual (GMNA-Localizing-U.S./Canada/

Mexico-16402009) - 2023 - CRC - 3/29/22

Driving and Operating

203

Certification/Tire Label

Label Example

A vehicle-specific Certification/Tire label
is attached to the center pillar (B-pillar).

The label may show the size of the
vehicle's original tires and the inflation
pressures needed to obtain the gross
weight capacity of the vehicle. The label
shows the gross weight capacity of the
vehicle. This is called the Gross Vehicle
Weight Rating (GVWR). The GVWR
includes the weight of the vehicle, all
occupants, fuel, and cargo.

The Certification/Tire label may also
show the maximum weights for the
front and rear axles, called the Gross
Axle Weight Rating (GAWR). To find out
the actual loads on the front and rear
axles, weigh the vehicle at a weigh
station. Your dealer can help with this.
Be sure to spread the load equally on
both sides of the centerline.

Caution

Overloading the vehicle may cause
damage. Repairs would not be covered by
the vehicle warranty. Do not overload the
vehicle.

{

Warning

Things inside the vehicle can strike
and injure people in a sudden stop or
turn, or in a crash.

.

Put things in the cargo area of the
vehicle. In the cargo area, put
them as far forward as possible.
Try to spread the weight evenly.

(Continued)

Warning (Continued)

.

Never stack heavier things, like
suitcases, inside the vehicle so
that some of them are above the
tops of the seats.

.

Do not leave an unsecured child
restraint in the vehicle.

.

Secure loose items in the vehicle.

.

Do not leave a seat folded down
unless needed.

Starting and Operating

New Vehicle Break-In

Caution

The vehicle does not need an elaborate
break-in. But it will perform better in the
long run if you follow these guidelines:

.

Do not drive at any one constant
speed, fast or slow, for the first
800 km (500 mi). Do not make
full-throttle starts. Avoid downshifting
to brake or slow the vehicle.

(Continued)

OwnersManuals2.com

GMC Acadia/Acadia Denali Owner Manual (GMNA-Localizing-U.S./Canada/

Mexico-16402009) - 2023 - CRC - 3/29/22

204

Driving and Operating

Caution (Continued)

.

Avoid making hard stops for the first
300 km (200 mi) or so. During this
time the new brake linings are not yet
broken in. Hard stops with new linings
can mean premature wear and earlier
replacement. Follow this breaking-in
guideline every time you get new
brake linings.

.

Do not tow a trailer during break-in.
See

Trailer Towing

0

252

for the trailer

towing capabilities of the vehicle and
more information.

Following break-in, engine speed and load
can be gradually increased.

On new vehicles, the various mechanical and
electrical systems experience a

break-in

period during the first 6 400 km (4,000 mi)
of routine driving. As the vehicle is driven,
the mechanical systems adjust to provide
optimal fuel economy and transmission shift
performance.

Electrical systems will adapt and calibrate
during the break-in period. A one-time
occurrence of clicks and similar vehicle
noises is normal during this process.

Normal driving charges the vehicle

s battery

to achieve the best operation of the vehicle,
including fuel economy and the Stop/Start
System. See

Stop/Start System

0

206

.

Ignition Positions

The vehicle has an electronic keyless ignition
with pushbutton start.

The remote key must be in the vehicle for
the system to operate. If the pushbutton
start is not working, the vehicle may be
near a strong radio antenna signal causing
interference to the remote key system. See

Remote Key Operation

0

7

.

To shift out of P (Park), the vehicle must be
on and the brake pedal must be applied.

Stopping the Engine/LOCK/OFF (No Indicator
Lights) :

When the vehicle is stopped, press

ENGINE START/STOP once to turn the
engine off.

If the vehicle is in P (Park), the ignition will
turn off, and Retained Accessory Power (RAP)
will remain active. See

Retained Accessory

Power (RAP)

0

208

.

If the vehicle is in R (Reverse), D (Drive) or
L (Low), the vehicle will shift to P (Park), the
ignition will turn off, and Retained Accessory
Power (RAP) will remain active. If the vehicle
is in N (Neutral), the ignition will return to
accessory mode and display the message
SHIFT TO PARK in the Driver Information
Center (DIC). When the vehicle is shifted
into P (Park), the ignition will turn off.

Do not turn the engine off when the vehicle
is moving. This will cause a loss of power
assist in the brake and steering systems and
disable the airbags.

If the vehicle must be shut off in an
emergency:

1. Brake using a firm and steady pressure.

Do not pump the brakes repeatedly. This
may deplete power assist, requiring
increased brake pedal force.

OwnersManuals2.com

GMC Acadia/Acadia Denali Owner Manual (GMNA-Localizing-U.S./Canada/

Mexico-16402009) - 2023 - CRC - 3/29/22

Driving and Operating

205

2. Shift the vehicle to N (Neutral). This can

be done while the vehicle is moving.
After shifting to N (Neutral), firmly apply
the brakes and steer the vehicle to a
safe location.

3. Come to a complete stop and shift to

P (Park).

4. Set the parking brake. See

Electric

Parking Brake

0

216

. And press ENGINE

START/STOP to turn the vehicle off.

{

Warning

Turning off the vehicle while moving may
cause loss of power assist in the brake
and steering systems and disable the
airbags. While driving, only shut the
vehicle off in an emergency.

If the vehicle cannot be pulled over, and
must be shut off while driving, press and
hold ENGINE START/STOP for longer than
two seconds, or press twice in five seconds.

Accessory Mode (Amber Indicator Light) :

This mode allows some electrical accessories
to be used when the engine is off.

With the ignition off, pressing the button
one time without the brake pedal applied
will place the ignition system in
accessory mode.

The ignition will switch from accessory
mode to off after five minutes to prevent
battery rundown.

ON/RUN/START (Green Indicator Light) :

This

mode is for driving and starting. With the
ignition off, and the brake pedal applied,
pressing the button once will place the
ignition system in ON/RUN/START. Once
engine cranking begins, release the button.
Engine cranking will continue until the
engine starts. See

Starting the Engine

0

205

.

The ignition will then remain in ON/RUN.

Service Mode

This power mode is available for service and
diagnostics, and to verify the proper
operation of the malfunction indicator lamp
as may be required for emission inspection
purposes. With the vehicle off, and the
brake pedal not applied, pressing and
holding the button for more than
five seconds will place the vehicle in Service
Mode. The instruments and audio systems
will operate as they do in ON/RUN, but the

vehicle will not be able to be driven. The
engine will not start in Service Mode. Press
the button again to turn the vehicle off.

Starting the Engine

Shift the vehicle into P (Park) or N (Neutral).
To restart the engine when the vehicle is
already moving, use N (Neutral) only.

Caution

Do not try to shift to P (Park) if the
vehicle is moving. If you do, you could
damage the transmission. Shift to P (Park)
only when the vehicle is stopped.

Caution

If you add electrical parts or accessories,
you could change the way the engine
operates. Any resulting damage would
not be covered by the vehicle warranty.
See

Add-On Electrical Equipment

0

259

.

Starting Procedure

1. With the Keyless Access system, the

remote key must be in the vehicle. Press
ENGINE START/STOP with the brake pedal
applied. When the engine begins
cranking, let go of the button.

OwnersManuals2.com

GMC Acadia/Acadia Denali Owner Manual (GMNA-Localizing-U.S./Canada/

Mexico-16402009) - 2023 - CRC - 3/29/22

206

Driving and Operating

The idle speed will go down as the
engine gets warm. Do not race the
engine immediately after starting it.
If the remote key is not in the vehicle,
if there is interference, or if the remote
key battery is low, the Driver
Information Center (DIC) will display a
message.

Caution

Cranking the engine for long periods of
time, by trying to start the engine
immediately after cranking has ended,
can overheat and damage the cranking
motor, and drain the battery. Wait at
least 15 seconds between each try, to let
the cranking motor cool down.

2. If the engine does not start after five to

10 seconds, especially in very cold
weather (below

18 °C or 0 °F), it could

be flooded with too much gasoline. Try
pushing the accelerator pedal all the way
to the floor and holding it there as you
press ENGINE START/STOP, for up to a
maximum of 15 seconds. Wait at least
15 seconds between each try, to allow
the cranking motor to cool down. When
the engine starts, let go of the button

and the accelerator. If the vehicle starts
briefly but then stops again, do the
same thing. This clears the extra gasoline
from the engine. Do not race the engine
immediately after starting it. Operate
the engine and transmission gently until
the oil warms up and lubricates all
moving parts.

Stop/Start System

The Stop/Start system will shut off the
engine to help conserve fuel. It has
components designed for the increased
number of starts.

{

Warning

The automatic engine Stop/Start feature
causes the engine to shut off while the
vehicle is still on. Do not exit the vehicle
before shifting to P (Park). The vehicle
may restart and move unexpectedly.
Always shift to P (Park), and then turn
the ignition off before exiting the vehicle.

Auto Engine Stop/Start

When the brakes are applied and the vehicle
is at a complete stop, the engine may turn
off. When stopped, the tachometer displays
AUTO STOP. See

Tachometer

0

101

. When

the brake pedal is released or the
accelerator pedal is pressed, the engine will
restart.

To maintain vehicle performance, other
conditions may cause the engine to
automatically restart before the brake pedal
is released.

Auto Stops may not occur and/or auto
restarts may occur because:

.

The climate control settings require the
engine to be running to cool or heat the
vehicle interior.

.

The vehicle battery needs to charge.

.

The vehicle battery has recently been
disconnected.

.

Minimum vehicle speed has not been
reached since the last Auto Stop

.

The accelerator pedal is pressed.

.

The engine or transmission is not at the
required operating temperature.

.

The outside temperature is not in the
required operating range.

.

The transmission is shifted out of
D (Drive) to any gear other than P (Park).

.

Certain driver modes have been selected.
See

Driver Mode Control

0

220

.

.

The vehicle is on a steep hill or grade.

OwnersManuals2.com

GMC Acadia/Acadia Denali Owner Manual (GMNA-Localizing-U.S./Canada/

Mexico-16402009) - 2023 - CRC - 3/29/22

Driving and Operating

207

.

The driver door has been opened or driver
seat belt has been unbuckled.

.

The hood has been opened.

.

The Auto Stop has reached the maximum
allowed time.

Auto Stop/Start Disable Switch

The automatic engine Stop/Start feature can
be disabled and enabled by pressing

h

.

Auto Stop/Start is enabled each time you
start the vehicle.

When the

h

indicator is illuminated, the

system is enabled.

Engine Heater

The engine heater can provide easier
starting and better fuel economy during
engine warm-up in cold weather conditions
at or below

18 °C (0 °F). Vehicles with an

engine heater should be plugged in at least
four hours before starting. An internal
thermostat in the plug-end of the cord may
exist, which will prevent engine heater
operation at temperatures above

18 °C (0 °F).

{

Warning

Do not plug in the engine block heater
while the vehicle is parked in a garage or
under a carport. Property damage or
personal injury may result. Always park
the vehicle in a clear open area away
from buildings or structures.

To Use the Engine Heater

1. Turn off the engine.

2. Check the heater cord for damage. If it is

damaged, do not use it. See your dealer
for a replacement. Inspect the cord for
damage yearly.

Base model shown

OwnersManuals2.com

GMC Acadia/Acadia Denali Owner Manual (GMNA-Localizing-U.S./Canada/

Mexico-16402009) - 2023 - CRC - 3/29/22

208

Driving and Operating

3. Remove the engine heater connector

cover by gently prying with a flat
blade tool.

4. Plug the heater cord into the connector

in the front fascia.

5. Plug the cord into a grounded 110-volt

AC outlet that is protected by a ground
fault detection function.

{

Warning

Improper use of the heater cord or an
extension cord can damage the cord and
may result in overheating and fire.

.

Plug the cord into a three-prong
electrical utility receptacle that is
protected by a ground fault detection
function. An ungrounded outlet could
cause an electric shock.

.

Use a weatherproof, heavy-duty,
15 amp-rated extension cord if needed.
Failure to use the recommended
extension cord in good operating
condition, or using a damaged heater
or extension cord, could make it
overheat and cause a fire, property
damage, electric shock, and injury.

.

Do not operate the vehicle with the
heater cord permanently attached to
the vehicle. Possible heater cord and
thermostat damage could occur.

.

While in use, do not let the heater
cord touch vehicle parts or sharp
edges.

.

Before starting the vehicle, unplug the
cord. Keep the cord away from any
moving parts.

6. Before starting the engine, be sure to

unplug and store the cord.

7. Install the engine heater connector cover.

The length of time the heater should remain
plugged in depends on several factors. Ask a
dealer in the area where you will be parking
the vehicle for the best advice on this.

Retained Accessory Power (RAP)

When the vehicle is turned from on to off,
the following features (if equipped) will
continue to function for up to 10 minutes,
or until the driver door is opened. These
features will also work when the vehicle is
on or in accessory mode:

.

Infotainment System

.

Power Windows (during RAP this
functionality will be lost when any door
is opened)

.

Sunroof (during RAP this functionality will
be lost when any door is opened)

.

Auxiliary Power Outlet

.

Audio System

.

OnStar System

OwnersManuals2.com

GMC Acadia/Acadia Denali Owner Manual (GMNA-Localizing-U.S./Canada/

Mexico-16402009) - 2023 - CRC - 3/29/22

Driving and Operating

209

Shifting Into Park

{

Warning

It can be dangerous to get out of the
vehicle if the vehicle is not in P (Park)
with the parking brake set. The vehicle
can roll. If you have left the engine
running, the vehicle can move suddenly.
You or others could be injured. To be
sure the vehicle will not move, even
when you are on fairly level ground, use
the steps that follow. If you are pulling a
trailer, see

Driving Characteristics and

Towing Tips

0

249

.

To shift into P (Park):

1. Hold the brake pedal down and set the

parking brake. See

Electric Parking Brake

0

216

.

2. Press the P (Park) switch on the center

console.

3. Press ENGINE START/STOP to turn the

engine off.

If the vehicle is shifted into P (Park) on a
hill, the electric parking brake (EPB) may
apply automatically. The driver may not be

able to release the EPB using the EPB
switch. It should automatically release when
the vehicle is shifted out of P (Park).

Leaving the Vehicle with the Engine
Running

{

Warning

It can be dangerous to leave the vehicle
with the engine running. It could
overheat and catch fire.

It is dangerous to get out of the vehicle
if the vehicle is not in P (Park) with the
parking brake set. The vehicle can roll.

Do not leave the vehicle when the engine
is running. If you have left the engine
running, the vehicle can move suddenly.
You or others could be injured. To be
sure the vehicle will not move, even
when you are on fairly level ground,
always set the parking brake and shift
the vehicle to P (Park). See

Shifting Into

Park

0

209

If you are towing a trailer,

see

Driving Characteristics and Towing

Tips

0

249

.

If you have to leave the vehicle with the
engine running, the vehicle must be in
P (Park) with the parking brake set.

Confirm that the vehicle is in P (Park).

Torque Lock

Torque lock is when the weight of the
vehicle puts too much force on the parking
pawl in the transmission. This happens when
parking on a hill and shifting the
transmission into P (Park) is not done
properly and then it is difficult to shift out
of P (Park). To prevent torque lock, set the
parking brake and then shift into P (Park). To
find out how, see

Shifting Into Park

listed

previously.

On certain steep grades, the transmission
will automatically set the parking brake to
prevent torque lock.

If torque lock does occur, the vehicle may
need to be pushed uphill by another vehicle
to relieve the parking pawl pressure, so you
can shift out of P (Park).

Shifting out of Park

This vehicle is equipped with an electronic
transmission. If the vehicle has an
uncharged battery or a battery with low

OwnersManuals2.com

GMC Acadia/Acadia Denali Owner Manual (GMNA-Localizing-U.S./Canada/

Mexico-16402009) - 2023 - CRC - 3/29/22

210

Driving and Operating

voltage, try charging or jump starting the
battery. See

Jump Starting - North America

0

324

.

To shift out of P (Park):

1. Ensure the engine is running.
2. Apply the brake pedal.
3. Press or pull the desired shift switch on

the center stack.

The P indicator will turn white and the gear
indicator will turn red when the vehicle is
no longer in P (Park).

If the vehicle cannot shift from P (Park), a
Driver Information Center (DIC) message will
be displayed. Check that the ignitionis on,
the engine is running, and the brake pedal
is applied when you are attempting to shift
out of P (Park). If all of these are met but
the vehicle will not shift out of P (Park), see
your dealer for service.

Parking over Things That Burn

{

Warning

Things that can burn could touch hot
exhaust parts under the vehicle and
ignite. Do not park over papers, leaves,
dry grass, or other things that can burn.

Active Fuel Management

This vehicle's engine may be equipped with
Active Fuel Management, which allows the
engine to operate on either all of its
cylinders, or in reduced cylinder operation
mode, depending on the driving conditions.

When less power is required, such as
cruising at a constant vehicle speed, the
system will operate in reduced cylinder
operation mode, allowing the vehicle to
achieve better fuel economy. When greater
power demands are required, such as
accelerating from a stop, passing,
or merging onto a freeway, the system will
maintain full-cylinder operation.

If the vehicle has an Active Fuel
Management indicator, see Driver
Information Center (DIC) for more
information on using this display.

Extended Parking

It is best not to park with the vehicle
running. If the vehicle is left running, be
sure it will not move and there is adequate
ventilation.

See

Shifting Into Park

0

209

and

Engine Exhaust

0

210

.

If the vehicle is left parked and running with
the remote key outside the vehicle, it will
continue to run for up to 15 minutes.

If the vehicle is left parked and running with
the remote key inside the vehicle, it will
continue to run for up to 30 minutes.

The vehicle could turn off sooner if it is
parked on a hill, due to lack of
available fuel.

The timer will reset if the vehicle is taken
out of P (Park) while it is running.

Engine Exhaust

{

Warning

Engine exhaust contains carbon monoxide
(CO), which cannot be seen or smelled.
Exposure to CO can cause
unconsciousness and even death.

Exhaust may enter the vehicle if:

.

The vehicle idles in areas with poor
ventilation (parking garages, tunnels,
deep snow that may block underbody
airflow or tail pipes).

.

The exhaust smells or sounds strange
or different.

(Continued)

OwnersManuals2.com

GMC Acadia/Acadia Denali Owner Manual (GMNA-Localizing-U.S./Canada/

Mexico-16402009) - 2023 - CRC - 3/29/22

Driving and Operating

211

Warning (Continued)

.

The exhaust system leaks due to
corrosion or damage.

.

The vehicle exhaust system has been
modified, damaged, or improperly
repaired.

.

There are holes or openings in the
vehicle body from damage or
aftermarket modifications that are not
completely sealed.

If unusual fumes are detected or if it is
suspected that exhaust is coming into the
vehicle:

.

Drive it only with the windows
completely down.

.

Have the vehicle repaired immediately.

Never park the vehicle with the engine
running in an enclosed area such as a
garage or a building that has no fresh air
ventilation.

Running the Vehicle While Parked

It is better not to park with the engine
running.

If the vehicle is left with the engine running,
follow the proper steps to be sure the
vehicle will not move. See

Shifting Into Park

0

209

and

Engine Exhaust

0

210

.

If parking on a hill and pulling a trailer, see

Driving Characteristics and Towing Tips

0

249

.

Automatic Transmission

The shift switches are on the center stack.
The selected gear position will illuminate red
on the shift switch, while all others will be
displayed in white. If the shift is not

immediate, as in very cold conditions, the
indicator on the shift switch may flash until
it is fully engaged.

The transmission does not operate when the
vehicle is off.

If the vehicle is in accessory mode, the
transmission can be shifted into P (Park).

If ENGINE START/STOP is pressed twice while
at a relatively high speed, the engine will
turn off and the transmission will
automatically shift to N (Neutral). Once the
vehicle is stopped, P (Park) can be selected.

P :

This position locks the drive wheels. Use

P (Park) when starting the vehicle to ensure
the vehicle does not move.

{

Warning

It is dangerous to get out of the vehicle
if the transmission is not in P (Park) with
the parking brake set. The vehicle
can roll.

Do not leave the vehicle when the engine
is running. If the engine has been left
running, the vehicle can move suddenly.
You or others could be injured. To be
sure the vehicle will not move, even

(Continued)

OwnersManuals2.com

GMC Acadia/Acadia Denali Owner Manual (GMNA-Localizing-U.S./Canada/

Mexico-16402009) - 2023 - CRC - 3/29/22

212

Driving and Operating

Warning (Continued)

when on fairly level ground, always set
the parking brake and place the
transmission into P (Park). See

Shifting

Into Park

0

209

and

Driving Characteristics and Towing Tips

0

249

.

This vehicle is equipped with an
electronically controlled transmission. The
R (Reverse) and D (Drive) shift switches are
designed to prevent inadvertent shifting out
of P (Park) unless the ignition is on, and the
brake pedal is applied.

When the vehicle is stopped, press ENGINE
START/STOP to turn off the vehicle. The
transmission will shift to P (Park)
automatically.

The vehicle will not shift into P (Park) if it is
moving too fast. Stop the vehicle and shift
into P (Park).

To shift in and out of P (Park), see

Shifting

Into Park

0

209

and

Shifting out of Park

0

209

.

R :

Use this gear to back up.

If the vehicle is shifted from either
R (Reverse) to D (Drive), or D (Drive) to
R (Reverse) while the speed is too high, the
vehicle will shift to N (Neutral). Reduce the
vehicle speed and try the shift again.

To shift into R (Reverse):

1. Bring the vehicle to a complete stop.
2. Pull the R (Reverse) switch on the center

stack.

To shift out of R (Reverse):

1. Bring the vehicle to a complete stop.
2. Shift to the desired gear.

At low vehicle speeds, R (Reverse) can be
used to rock the vehicle back and forth to
get out of snow, ice, or sand without
damaging the transmission. See

If the

Vehicle Is Stuck

0

200

.

N :

In this position, the engine does not

connect with the wheels. To restart the
engine when the vehicle is already moving,
use N (Neutral) only.

{

Warning

Shifting into a drive gear while the
engine is running at high speed is
dangerous. Unless your foot is firmly on

(Continued)

Warning (Continued)

the brake pedal, the vehicle could move
very rapidly. You could lose control and
hit people or objects. Do not shift into a
drive gear while the engine is running at
high speed.

Caution

Shifting out of P (Park) or N (Neutral) with
the engine running at high speed may
damage the transmission. The repairs
would not be covered by the vehicle
warranty. Be sure the engine is not
running at high speed when shifting the
vehicle.

Caution

The vehicle is not designed to stay in
N (Neutral) for extended periods of time.
It will automatically shift into P (Park).

To shift into N (Neutral), press the
N (Neutral) switch until the N indicator
displays.

OwnersManuals2.com

GMC Acadia/Acadia Denali Owner Manual (GMNA-Localizing-U.S./Canada/

Mexico-16402009) - 2023 - CRC - 3/29/22

Driving and Operating

213

To shift out of N (Neutral):

1. Bring the vehicle to a complete stop.
2. Shift to the desired gear.

Car Wash Mode

This vehicle includes a Car Wash Mode that
allows the vehicle to remain in N (Neutral)
for use in automatic car washes.

Car Wash Mode is not to be used for vehicle
towing. If the vehicle needs to be towed,
see

Transporting a Disabled Vehicle

0

326

.

Caution

The vehicle is not designed to stay in
N (Neutral) for extended periods of time.
It will automatically shift into P (Park) if
left in Car Wash Mode.

Car Wash Mode (Engine Off

Driver in

Vehicle)

To place the vehicle in N (Neutral) with the
engine off and the vehicle occupied:

1. Drive to the entrance of the car wash.
2. Apply the brake pedal.
3. Shift to N (Neutral).
4. Turn off the engine and release the

brake pedal.

5. The indicator should continue to show N.

If it does not, start the engine and
repeat Steps 2

4.

6. The vehicle is now ready for the

car wash.

Car Wash Mode (Engine Off

Driver out of

Vehicle)

To place the vehicle in N (Neutral) with the
engine off and the vehicle unoccupied:

1. Drive to the entrance of the car wash.
2. Apply the brake pedal.
3. Open the door.
4. Shift to N (Neutral).
5. Turn off the engine and release the

brake pedal.

6. The indicator should continue to show N.

If it does not, start the engine and
repeat Steps 2

5.

7. Exit the vehicle and close the door. The

vehicle is now ready for the car wash.

8. The vehicle may automatically shift to

P (Park) upon re-entry.

Car Wash Mode (Engine On

Driver in

Vehicle)

To place the vehicle in N (Neutral) with the
engine on and the vehicle occupied:

1. Drive to the entrance of the car wash.
2. Apply the brake pedal.
3. Shift to N (Neutral).
4. Release the brake pedal. The vehicle is

now ready for the car wash.

Car Wash Mode (Engine On

Driver out of

Vehicle)

To place the vehicle in N (Neutral) with the
engine on and the vehicle unoccupied:

1. Drive to the entrance of the car wash.
2. Apply the brake pedal.
3. Open the door.
4. Shift to N (Neutral), then release the

brake pedal.

5. The indicator should continue to show N.

If it does not, repeat Steps 2

4.

6. Exit the vehicle and close the door. The

vehicle is now ready for the car wash.

7. The vehicle may automatically shift to

P (Park) upon re-entry.

Caution

A transmission hot message may display
if the automatic transmission fluid is too
hot. Driving under this condition can

(Continued)

OwnersManuals2.com

GMC Acadia/Acadia Denali Owner Manual (GMNA-Localizing-U.S./Canada/

Mexico-16402009) - 2023 - CRC - 3/29/22

214

Driving and Operating

Caution (Continued)

damage the vehicle. Stop and idle the
engine to cool the automatic
transmission fluid. This message clears
when the transmission fluid has cooled
sufficiently.

D :

This position is for normal driving.

If more power is needed for passing, press
the accelerator pedal down.

To shift into D (Drive):

1. Bring the vehicle to a complete stop.
2. Pull the D (Drive) switch on the center

stack.

To shift out of D (Drive):

1. Bring the vehicle to a complete stop.
2. Shift to the desired gear.

Downshifting the transmission in slippery
road conditions could result in skidding. See

Skidding

under

Loss of Control

0

194

.

Caution

Spinning the tires or holding the vehicle
in one place on a hill using only the
accelerator pedal may damage the
transmission. The repair will not be
covered by the vehicle warranty. If the
vehicle is stuck, do not spin the tires.
When stopping on a hill, use the brakes
to hold the vehicle in place.

If equipped with the 2.0L L4 engine, engine
speeds may be increased while driving at
highway speeds while the engine is still
warming up.

L :

This position gives you access to gear

ranges. This provides more engine braking
but lower fuel economy than D (Drive). You
can use it on very steep hills, or in deep
snow or mud. See

Manual Mode

0

214

.

Manual Mode

Electronic Range Select (ERS) Mode

ERS or manual mode allows for the selection
of the range of gear positions. Use this
mode when driving downhill or towing a
trailer to limit the top gear and vehicle
speed. The shift position indicator within the
Driver Information Center (DIC) will display a
number next to the L indicating the highest
available gear under manual mode and the
driving conditions when manual mode was
selected.

To use this feature:

1. With the vehicle in D (Drive), press the

L (Low) button.

OwnersManuals2.com

GMC Acadia/Acadia Denali Owner Manual (GMNA-Localizing-U.S./Canada/

Mexico-16402009) - 2023 - CRC - 3/29/22

Driving and Operating

215

2. Press the plus or minus button on the

center stack to increase or decrease the
gear range available.

When shifting to L (Low), the transmission
will shift to a preset lower gear range. For
this preset range, the highest gear available
is displayed next to the L in the DIC. See

Driver Information Center (DIC) (Base Level)

0

114

or

Driver Information Center (DIC)

(Midlevel)

0

116

or

Driver Information Center

(DIC) (Uplevel)

0

119

. All gears below that

number are available to use. For example,
when 4 (Fourth) is shown next to the L,
1 (First) through 4 (Fourth) gears are shifted
automatically. To shift to 5 (Fifth) gear, press
the + (Plus) button or shift into D (Drive).

L (Low) will prevent shifting to a lower gear
range if the engine speed is too high.
If vehicle speed is not reduced within the
time allowed, the lower gear range shift will
not be completed. Slow the vehicle, then
press the

(Minus) button to the desired

lower gear range.

While using ERS, cruise control can be used.

Drive Systems

All-Wheel Drive

Vehicles with this feature can operate in
AWD Mode.

Vehicles with this feature can operate in
All-Wheel Drive (AWD) Mode.

Turn the knob to

4

to select AWD.

See

Driver Mode Control

0

220

.

When operated in two-wheel drive, the
vehicle will deliver power to the front
wheels only and may provide better fuel
economy.

When using a compact spare tire on an
AWD vehicle, the system automatically
detects the compact spare and reduces AWD
performance to protect the system. To
restore full AWD operation and prevent
excessive wear on the system, replace the
compact spare with a full-size tire as soon as
possible. See

Compact Spare Tire

0

323

.

Brakes

Electric Brake Boost

Vehicles equipped with electric brake boost
have hydraulic brake circuits that are
electronically controlled when the brake
pedal is applied during normal operation.
The system performs routine tests and turns
off within a few minutes after the vehicle is
turned off. Noise may be heard during this
time. If the brake pedal is pressed during
the tests or when the electric brake boost
system is off, a noticeable change in pedal
force and travel may be felt. This is normal.

Antilock Brake System (ABS)

The Antilock Brake System (ABS) helps
prevent a braking skid and maintain steering
while braking hard.

OwnersManuals2.com

GMC Acadia/Acadia Denali Owner Manual (GMNA-Localizing-U.S./Canada/

Mexico-16402009) - 2023 - CRC - 3/29/22

216

Driving and Operating

ABS performs a system check when the
vehicle is first driven. A momentary motor
or clicking noise may be heard while this
test is going on, and the brake pedal may
move slightly. This is normal.

If there is a problem with ABS, this warning
light stays on. See

Antilock Brake System

(ABS) Warning Light

0

109

.

ABS does not change the time needed to
get a foot on the brake pedal and does not
always decrease stopping distance. If you
get too close to the vehicle ahead, there will
not be enough time to apply the brakes if
that vehicle suddenly slows or stops. Always
leave enough room ahead to stop, even
with ABS.

Using ABS

Do not pump the brakes. Just hold the brake
pedal down firmly. Hearing or feeling ABS
operate is normal.

Braking in Emergencies

ABS allows steering and braking at the same
time. In many emergencies, steering can
help even more than braking.

Electric Parking Brake

The Electric Parking Brake (EPB) can always
be applied, even if the vehicle is off. In case
of insufficient electrical power, the EPB
cannot be applied or released. To prevent
draining the battery, avoid unnecessary
repeated cycles of the EPB.

The system has a red parking brake status
light and an amber service parking brake
warning light. See

Electric Parking Brake

Light

0

108

and

Service Electric Parking Brake Light (Uplevel
and Midlevel Cluster Only)

0

108

There are

also parking brake-related Driver Information
Center (DIC) messages.

Before leaving the vehicle, check the red
parking brake status light to ensure that the
parking brake is applied.

EPB Apply

To apply the EPB:

1. Be sure the vehicle is at a complete stop.
2. Press the EPB switch momentarily.

The red parking brake status light will flash
and then stay on once the EPB is fully
applied. If the red parking brake status light
flashes continuously, then the EPB is only
partially applied or there is a problem with
the EPB. A DIC message will display. Release
the EPB and try to apply it again. If the
light does not come on, or keeps flashing,
have the vehicle serviced. Do not drive the
vehicle if the red parking brake status light
is flashing. See your dealer.

If the amber service parking brake warning
light is on, press the EPB switch. Continue to
hold the switch until the red parking brake

OwnersManuals2.com

GMC Acadia/Acadia Denali Owner Manual (GMNA-Localizing-U.S./Canada/

Mexico-16402009) - 2023 - CRC - 3/29/22

Driving and Operating

217

status light remains on. If the amber service
parking brake warning light is on, see your
dealer.

If the EPB is applied while the vehicle is
moving, the vehicle will decelerate as long
as the switch is pressed. If the switch is
pressed until the vehicle comes to a stop,
the EPB will remain applied.

The vehicle may automatically apply the EPB
in some situations when the vehicle is not
moving. This is normal, and is done to
periodically check the correct operation of
the EPB system, or at the request of other
safety functions that utilize the EPB.

If the EPB fails to apply, block the rear
wheels to prevent vehicle movement.

EPB Release

To release the EPB:

1. Turn the ignition on or to ACC/

ACCESSORY.

2. Apply and hold the brake pedal.
3. Press the EPB switch momentarily.

The EPB is released when the red parking
brake status light is off.

If the amber service parking brake warning
light is on, release the EPB by pressing and
holding the EPB switch. Continue to hold the
switch until the red parking brake status
light is off. If either light stays on after
release is attempted, see your dealer.

Caution

Driving with the parking brake on can
overheat the brake system and cause
premature wear or damage to brake
system parts. Make sure that the parking
brake is fully released and the brake
warning light is off before driving.

If you are towing a trailer and parking on a
hill, see

Driving Characteristics and Towing

Tips

0

249

.

Automatic EPB Release

The EPB will automatically release if the
vehicle is running, placed into gear, and an
attempt is made to drive away. Avoid rapid
acceleration when the EPB is applied, to
preserve parking brake lining life.

Brake Assist

Brake Assist detects rapid brake pedal
applications due to emergency braking
situations and provides additional braking to
activate the Antilock Brake System (ABS) if
the brake pedal is not pushed hard enough
to activate ABS normally. Minor noise, brake
pedal pulsation, and/or pedal movement
during this time may occur. Continue to
apply the brake pedal as the driving
situation dictates. Brake Assist disengages
when the brake pedal is released.

Hill Start Assist (HSA)

{

Warning

Do not rely on the HSA feature. HSA does
not replace the need to pay attention
and drive safely. You may not hear or
feel alerts or warnings provided by this
system. Failure to use proper care when
driving may result in injury, death,
or vehicle damage. See

Defensive Driving

0

192

.

When the vehicle is stopped on a grade, Hill
Start Assist (HSA) prevents the vehicle from
rolling in an unintended direction during the
transition from brake pedal release to

OwnersManuals2.com

GMC Acadia/Acadia Denali Owner Manual (GMNA-Localizing-U.S./Canada/

Mexico-16402009) - 2023 - CRC - 3/29/22

218

Driving and Operating

accelerator pedal apply. The brakes release
when the accelerator pedal is applied. If the
accelerator pedal is not applied within a few
minutes, the Electric Parking Brake will
apply. The brakes may also release under
other conditions. Do not rely on HSA to hold
the vehicle.

HSA is available when the vehicle is facing
uphill in a forward gear, or when facing
downhill in R (Reverse). The vehicle must
come to a complete stop on a grade for HSA
to activate.

Ride Control Systems

Traction Control/Electronic
Stability Control

System Operation

The vehicle has a Traction Control System
(TCS) and StabiliTrak/Electronic Stability
Control (ESC), an electronic stability control
system. These systems help limit wheel spin
and assist the driver in maintaining control,
especially on slippery road conditions.

TCS activates if it senses that any of the
drive wheels are spinning or beginning to
lose traction. When this happens, TCS

applies the brakes to the spinning wheels
and reduces engine power to limit
wheel spin.

StabiliTrak/ESC activates when the vehicle
senses a difference between the intended
path and the direction the vehicle is actually
traveling. StabiliTrak/ESC selectively applies
braking pressure to any one of the vehicle
wheel brakes to assist the driver in keeping
the vehicle on the intended path.

If cruise control is being used and TCS or
StabiliTrak/ESC begins to limit wheel spin,
cruise control will disengage. Cruise control
may be turned back on when road
conditions allow. TCS and StabiliTrak/ESC will
automatically turn on when cruise control
is set.

Both systems come on automatically when
the vehicle is started and begins to move.
The systems may be heard or felt while
they are operating or while performing
diagnostic checks. This is normal and does
not mean there is a problem with the
vehicle.

It is recommended to leave both systems on
for normal driving conditions, but it may be
necessary to turn TCS off if the vehicle gets

stuck in sand, mud, ice, or snow. See

If the

Vehicle Is Stuck

0

200

and

Turning the

Systems Off and On

later in this section.

The indicator light for both systems is in the
instrument cluster. This light:

.

Will flash when TCS is limiting wheel spin

.

Will flash when StabiliTrak/ESC is
activated

.

Will turn on and stay on when either
system is not working

.

May flash when ABS is active

If either system fails to turn on or to
activate, a message may display in the
Driver Information Center (DIC), and

d

comes on and stays on to indicate that the
system is inactive and is not assisting the
driver in maintaining control. The vehicle is
safe to drive, but driving should be adjusted
accordingly.

If

d

comes on and stays on:

1. Stop the vehicle.

OwnersManuals2.com

GMC Acadia/Acadia Denali Owner Manual (GMNA-Localizing-U.S./Canada/

Mexico-16402009) - 2023 - CRC - 3/29/22

Driving and Operating

219

2. Turn the engine off and wait 15 seconds.
3. Start the engine.
4. Drive the vehicle.

If

d

comes on and stays on, the vehicle

may need more time to diagnose the
problem. If the condition persists, see your
dealer.

Turning the Systems Off and On

Caution

Do not repeatedly brake or accelerate
heavily when TCS is off. The vehicle
driveline could be damaged.

To turn off only TCS, press and release

g

.

The Traction Off light

i

displays in the

instrument cluster and a DIC message may
display.

To turn TCS on again, press and release

g

.

The Traction Off light

i

displayed in the

instrument cluster will turn off.

If TCS is limiting wheel spin when

g

is

pressed, the system will not turn off until
the wheels stop spinning.

To turn off both TCS and StabiliTrak/ESC,
press and hold

g

until the Traction Off light

i

and StabiliTrak/ESC OFF light

g

come on

and stay on in the instrument cluster. A DIC
message may display.

To turn TCS and StabiliTrak/ESC on again,
press and release

g

. The Traction Off light

i

and StabiliTrak/ESC OFF light

g

in the

instrument cluster turn off.

StabiliTrak will automatically turn on if the
vehicle exceeds 56 km/h (35 mph). Traction
control will remain off.

Adding accessories can affect the vehicle
performance. See

Accessories and

Modifications

0

262

.

Hill Descent Control (HDC)

If equipped, HDC can be used when driving
downhill. It sets and maintains vehicle speed
while descending a very steep incline in a
forward or reverse gear.

The HDC switch is on the center console.

Press

5

to enable or disable HDC. Vehicle

speed must be below 50 km/h (31 mph).

A blinking HDC light indicates the system is
actively applying the brakes to maintain
vehicle speed.

HDC can maintain vehicle speeds between
3

22 km/h (2

14 mph) on an incline greater

than or equal to a 10% grade.

When HDC is activated, the initial HDC
speed is set to the current driving speed.
It can be increased or decreased by pressing
the RES+ or SET

steering wheel controls or

by applying the accelerator or brake pedal.
This adjusted speed becomes the new set
speed.

OwnersManuals2.com

GMC Acadia/Acadia Denali Owner Manual (GMNA-Localizing-U.S./Canada/

Mexico-16402009) - 2023 - CRC - 3/29/22

220

Driving and Operating

HDC will remain enabled between 22

60 km/h (14

37 mph); however vehicle

speed cannot be set or maintained in this
range. It will automatically disable if the
vehicle speed is above 80 km/h (50 mph) or
above 60 km/h (37 mph) for at least
30 seconds. Press

5

again to re-enable HDC.

Driver Mode Control

If equipped, the Driver Mode Control has the
following Modes: Tour (FWD), Sport,
All-Wheel Drive (AWD), Snow, Tow/Haul, and
Off-Road. Rotate the Driver Mode Control
knob on the center console to make a mode
selection. Continue turning the knob through
the available modes. The selected mode

s

icon will light up on the knob and there
may be additional messages in the Driver
Information Center (DIC) and indicators in
the instrument cluster.

If the vehicle is in Tour (FWD) or AWD, it
will stay in that mode through future ON/
OFF cycles. If the vehicle is in any other
mode, it will revert back to Tour (FWD)
when the vehicle is restarted.

Driver Mode Control Knob (AWD)

Driver Mode Control Knob (FWD)

5

or

q

Tour (FWD) :

Vehicle is in Tour

(FWD) mode. Use this mode during normal
driving conditions. See

Driving for Better Fuel

Economy

0

191

Tour (FWD) Mode operates

in Front-Wheel Drive to improve fuel
economy.

8

Sport :

Sport mode improves vehicle

handling and acceleration on dry pavement.
When active, Sport mode modifies steering
efforts, transmission shifting, and suspension
tuning (when equipped). For AWD vehicles,
choosing Sport mode also engages
AWD mode.

The Performance Algorithm Liftfoot (PAL)
feature is enabled in Sport mode. PAL allows
the transmission to hold the current gear
after a quick release of a heavily applied
accelerator pedal. This provides greater
engine braking and enhanced vehicle control.

4

AWD (AWD Only) :

AWD mode

provides drive torque to all four wheels.
Select AWD to improve traction and control
on slippery road surfaces, such as gravel,
sand, wet pavement, snow, and ice. When in
AWD mode, the AWD mode indicator will be
on. The AWD mode will stay selected until
the mode is changed.

OwnersManuals2.com

GMC Acadia/Acadia Denali Owner Manual (GMNA-Localizing-U.S./Canada/

Mexico-16402009) - 2023 - CRC - 3/29/22

Driving and Operating

221

AWD is active in AWD, Sport and Off-Road
Modes.

6

Snow/Ice (FWD Only) :

Snow/Ice mode

improves vehicle acceleration on snow and
ice covered roads.

_

Tow/Haul :

This feature can assist

when towing a heavy load. Use this mode
to assist in maintaining desired vehicle
speeds when driving on downhill grades by
using the engine and transmission. When
active, Tow/Haul mode modifies
transmission shifting, suspension tuning,
steering effort, and Trailer Sway Control. For
AWD vehicles, choosing Tow/Haul mode also
engages AWD. See

Driving Characteristics

and Towing Tips

0

249

.

Automatic Engine Grade Braking

Automatic Engine Grade Braking assists
when driving downhill. It maintains vehicle
speed by automatically implementing a shift
pattern that uses the engine and the
transmission to slow the vehicle. The system
will automatically command downshifts to
reduce vehicle speed. The normal shift
pattern will return once the vehicle is on a
low grade or when the accelerator pedal is
pressed.

While in the Electronic Range Select (ERS)
mode, grade braking is deactivated, allowing
the driver to select a range and limiting the
highest gear available. Grade braking is
available for normal driving and in Tow/
Haul mode.

See

Automatic Transmission

0

211

.

7

Off-Road (AWD Only) :

Use this mode

for off-road recreational driving. When
active, Off-Road mode modifies accelerator
pedal response, ABS, TCS, steering effort,
suspension tuning, and the StabiliTrak/ESC
system. Choosing Off-Road mode also
engages AWD mode. For more information
on Off-Road mode, see

Off-Road Driving

0

194

.

Cruise Control

{

Warning

Cruise control can be dangerous where
you cannot drive safely at a steady
speed. Do not use cruise control on
winding roads or in heavy traffic.

(Continued)

Warning (Continued)

Cruise control can be dangerous on
slippery roads. On such roads, fast
changes in tire traction can cause
excessive wheel slip, and you could lose
control. Do not use cruise control on
slippery roads.

With cruise control, a speed of about
40 km/h (25 mph) or more can be
maintained without keeping your foot on
the accelerator. Cruise control does not work
at speeds below about 40 km/h (25 mph).

If the StabiliTrak/Electronic Stability Control
(ESC) system begins to limit wheel spin
while using cruise control, the cruise control
automatically disengages. See

Traction

Control/Electronic Stability Control

0

218

. If a

collision alert occurs when cruise control is
activated, cruise control is disengaged. See

Forward Collision Alert (FCA) System

0

237

.

When road conditions allow the cruise
control to be safely used, cruise control can
be turned back on.

Turning off the TCS or StabiliTrak/ESC
system will disengage the cruise control.

If the brakes are applied, cruise control
disengages.

OwnersManuals2.com

GMC Acadia/Acadia Denali Owner Manual (GMNA-Localizing-U.S./Canada/

Mexico-16402009) - 2023 - CRC - 3/29/22

222

Driving and Operating

J

:

Press to turn the system on and off.

A white indicator appears in the instrument
cluster when cruise is turned on.

RES+ :

If there is a set speed in memory,

press briefly to resume to that speed or
press and hold to accelerate. If the cruise
control is already active, use to increase
vehicle speed.

SET

:

Press briefly to set the speed and

activate cruise control. If the cruise control is
already active, use to decrease vehicle
speed.

*

:

Press to disengage cruise control

without erasing the set speed from memory.

Setting Cruise Control

If

J

is on when not in use, SET

or RES+

could get pressed and go into cruise when
not desired. Keep

J

off when cruise is not

being used.

1. Press

J

.

2. Get up to the desired speed.
3. Press and release SET

. The desired set

speed briefly appears in the instrument
cluster.

4. Remove your foot from the accelerator.

When the cruise control has been set to the
desired speed, a green cruise control
indicator appears on the instrument cluster.

Resuming a Set Speed

If the cruise control is set at a desired speed
and then the brakes are applied or

*

is

pressed, the cruise control is disengaged
without erasing the set speed from memory.

Once the vehicle speed reaches about
40 km/h (25 mph) or more, press RES+
briefly. The vehicle returns to the previous
set speed.

Increasing Speed While Using Cruise Control

If the cruise control system is already
activated:

.

Press and hold RES+ up until the desired
speed is reached, then release it.

.

To increase vehicle speed in small
increments, briefly press RES+. For each
press, the vehicle goes about 1 km/h
(1 mph) faster.

The speedometer reading can be displayed
in either English or metric units. See

Instrument Cluster (Base Level and Midlevel)

0

96

or

Instrument Cluster (Uplevel)

0

99

The

increment value used depends on the units
displayed.

Reducing Speed While Using Cruise Control

If the cruise control system is already
activated:

.

Press and hold SET

until the desired

lower speed is reached, then release it.

.

To decrease the vehicle speed in small
increments, briefly press SET

. For each

press, the vehicle goes about 1 km/h
(1 mph) slower.

OwnersManuals2.com

GMC Acadia/Acadia Denali Owner Manual (GMNA-Localizing-U.S./Canada/

Mexico-16402009) - 2023 - CRC - 3/29/22

Driving and Operating

223

The speedometer reading can be displayed
in either English or metric units. See

Instrument Cluster (Base Level and Midlevel)

0

96

or

Instrument Cluster (Uplevel)

0

99

.

The increment value used depends on the
units displayed.

Passing Another Vehicle While Using Cruise
Control

Use the accelerator pedal to increase the
vehicle speed. When you take your foot off
the pedal, the vehicle will slow down to the
previous set cruise speed.

While pressing the accelerator pedal or
shortly following the release to override
cruise, briefly applying SET

will result in

cruise set to the current vehicle speed.

Using Cruise Control on Hills

How well the cruise control will work on
hills depends upon the vehicle speed, load,
and the steepness of the hills. When going
up steep hills, you might have to step on
the accelerator pedal to maintain your
speed. When going downhill, you may have
to brake or shift to a lower gear to keep
your speed down. If the brake pedal is
applied, cruise control disengages.

Ending Cruise Control

There are four ways to end cruise control:

.

Step lightly on the brake pedal.

.

Press

*

.

.

Shift the transmission to N (Neutral).

.

Press

J

.

Erasing Speed Memory

The cruise control set speed is erased from
memory if

J

is pressed or if the ignition is

turned off.

Adaptive Cruise Control
(Advanced)

If equipped with Adaptive Cruise Control
(ACC), it allows the driver to select the
cruise control set speed and following gap.
Read this entire section before using this
system. The following gap is the following
time between your vehicle and a vehicle
detected directly ahead in your path,
moving in the same direction. If no vehicle
is detected in your path, ACC works like
regular cruise control. ACC uses camera and
radar sensors. See

Radio Frequency

Statement

0

359

or

Radio Frequency Statement

0

359

.

If a vehicle is detected in your path, ACC can
apply acceleration or limited, moderate
braking to maintain the selected following
gap. To disengage ACC, apply the brake.
If ACC is controlling your vehicle speed
when the Traction Control System (TCS) or
StabiliTrak/Electronic Stability Control (ESC)
system activates, the ACC may automatically
disengage. See

Traction Control/Electronic

Stability Control

0

218

When road

conditions allow ACC to be safely used, the
ACC can be turned back on.

Disabling the TCS or StabiliTrak/ESC system
will disengage and prevent engagement
of ACC.

ACC can reduce the need for you to
frequently brake and accelerate, especially
when used on expressways, freeways, and
interstate highways. When used on other
roads, you may need to take over the
control of braking or acceleration more
often.

{

Warning

ACC has limited braking ability and may
not have time to slow the vehicle down
enough to avoid a collision with another
vehicle you are following. This can occur

(Continued)

OwnersManuals2.com

GMC Acadia/Acadia Denali Owner Manual (GMNA-Localizing-U.S./Canada/

Mexico-16402009) - 2023 - CRC - 3/29/22

224

Driving and Operating

Warning (Continued)

when vehicles suddenly slow or stop
ahead, or enter your lane. Also see

Alerting the Driver

in this section.

Complete attention is always required
while driving and you should be ready to
take action and apply the brakes. See

Defensive Driving

0

192

.

{

Warning

ACC will not detect or brake for children,
pedestrians, animals, or other objects.

Do not use ACC when:

.

On winding and hilly roads or when
the sensors are blocked by snow, ice,
or dirt. The system may not detect a
vehicle ahead. Keep the entire front of
the vehicle clean.

.

Visibility is low, such as in fog, rain,
or snow conditions. ACC performance
is limited under these conditions.

.

On slippery roads where fast changes
in tire traction can cause excessive
wheel slip.

J

:

Press to turn the system on or off. The

indicator turns white on the instrument
cluster when ACC is turned on.

RES+ :

Press briefly to resume the previous

set speed or to increase vehicle speed if ACC
is already activated. To increase speed by
1 km/h (1 mph), briefly press RES+. To
increase speed to the next 5 km/h (5 mph)
mark on the speedometer, press and hold
RES+, then release.

SET

:

Press briefly to set the speed and

activate ACC or to decrease vehicle speed if
ACC is already activated. To decrease speed
by 1 km/h (1 mph), briefly press SET

. To

decrease speed to the next 5 km/h (5 mph)
mark on the speedometer, press and hold
SET

, then release.

*

:

Press to disengage ACC without erasing

the selected set speed.

[

:

Press to select a following gap time

(or distance) setting for ACC of Far, Medium,
or Near.

Switching Between ACC and Regular Cruise
Control

To switch between ACC and regular cruise
control, press and hold

*

. A Driver

Information Display (DIC) message displays.
See

Vehicle Messages

0

124

.

ACC Indicator

Regular Cruise Control

Indicator

When ACC is engaged, a green

]

indicator

will be lit on the instrument cluster. When
the regular cruise control is engaged, a
green

J

indicator will be lit on the

instrument cluster.

OwnersManuals2.com


Content      ..     5      6      7      8     ..