MC Acadia Owner (2023 year). Manual in english - page 3
 

  Index      Manuals     General Motors MC Acadia Owner (2023 year). Manual in english


Search            copyright infringement  


Content      ..     1      2      3      4      ..


MC Acadia Owner (2023 year). Manual in english - page 3


GMC Acadia/Acadia Denali Owner Manual (GMNA-Localizing-U.S./Canada/

Mexico-16402009) - 2023 - CRC - 3/28/22

Seats and Restraints

65

.

Buckle the lap-shoulder belt. Does the
shoulder belt rest on the shoulder? If yes,
continue. If no, try using the rear seat
belt comfort guide, if available. See

Rear

Seat Belt Comfort Guides

under

Lap-Shoulder Belt

0

50

If a comfort guide

is not available, or if the shoulder belt
still does not rest on the shoulder, then
return to the booster seat.

.

Does the lap belt fit low and snug on the
hips, touching the thighs? If yes, continue.
If no, return to the booster seat.

.

Can proper seat belt fit be maintained for
the length of the trip? If yes, continue.
If no, return to the booster seat.

Q: What is the proper way to wear seat

belts?

A:

An older child should wear a lap-shoulder
belt and get the additional restraint a
shoulder belt can provide. The shoulder
belt should not cross the face or neck.
The lap belt should fit snugly below the
hips, just touching the top of the thighs.
This applies belt force to the child's
pelvic bones in a crash. It should never
be worn over the abdomen, which could
cause severe or even fatal internal
injuries in a crash.

Also see

Rear Seat Belt Comfort Guides

under

Lap-Shoulder Belt

0

50

.

According to accident statistics, children are
safer when properly restrained in a rear
seating position.

In a crash, children who are not buckled up
can strike other people who are buckled up,
or can be thrown out of the vehicle. Older
children need to use seat belts properly.

{

Warning

Never allow more than one child to wear
the same seat belt. The seat belt cannot
properly spread the impact forces. In a
crash, they can be crushed together and
seriously injured. A seat belt must be
used by only one person at a time.

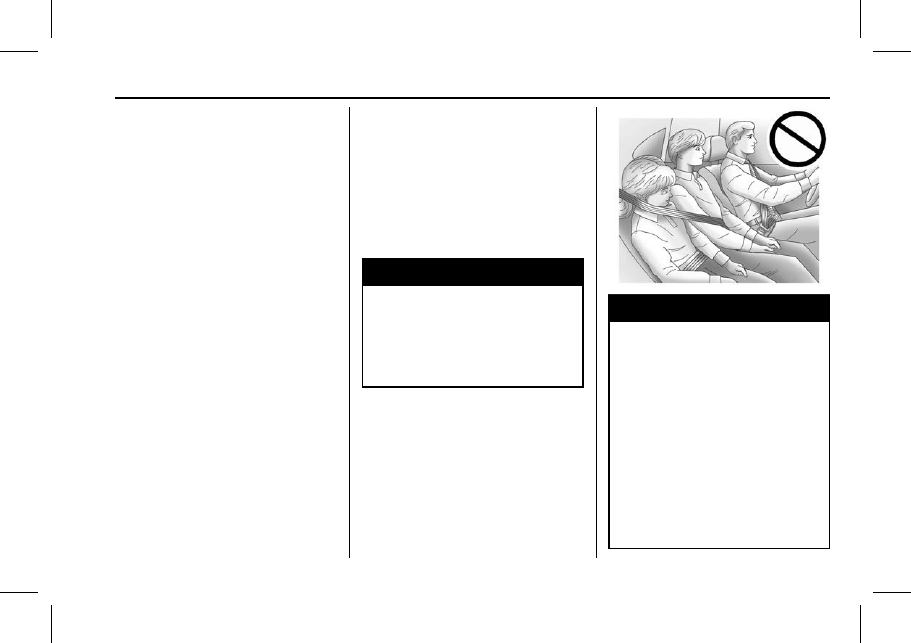
{

Warning

Never allow a child to wear the seat belt
shoulder belt under both arms or behind
their back. A child can be seriously
injured by not wearing the lap-shoulder
belt properly. In a crash, the child would
not be restrained by the shoulder belt.
The child could move too far forward
increasing the chance of head and neck
injury. The child might also slide under
the lap belt. The belt force would then be
applied right on the abdomen. That could
cause serious or fatal injuries. The
shoulder belt should go over the shoulder
and across the chest.
GMC Acadia/Acadia Denali Owner Manual (GMNA-Localizing-U.S./Canada/

Mexico-16402009) - 2023 - CRC - 3/28/22

66

Seats and Restraints

Infants and Young Children

Everyone in a vehicle needs protection! This
includes infants and all other children.
Neither the distance traveled nor the age
and size of the traveler changes the need,
for everyone, to use safety restraints. In
fact, the law in every state in the United
States and in every Canadian province says
children up to some age must be restrained
while in a vehicle.

{

Warning

Children can be seriously injured or killed
if the shoulder belt is worn behind their
back, under their legs, or wrapped around

(Continued)

Warning (Continued)

their neck. The shoulder belt can tighten
but cannot be loosened if it is locked. The
shoulder belt locks when it is pulled all
the way out of the retractor. It unlocks
when the shoulder belt is allowed to go
all the way back into the retractor, but it
cannot do this if it is wrapped around the
child. Never leave children unattended in
a vehicle and never allow children to
improperly wear, or play with, the seat
belts.

Every time infants and young children ride
in vehicles, they should have the protection
provided by appropriate child restraints.
Neither the vehicle

s seat belt system nor its

airbag system is designed for them.

Children who are not restrained properly can
strike other people, or can be thrown out of
the vehicle.

{

Warning

Never hold an infant or a child while
riding in a vehicle. Due to crash forces, an
infant or a child will become so heavy it

(Continued)

Warning (Continued)

is not possible to hold it during a crash.
For example, in a crash at only
40 km/h (25 mph), a 5.5 kg (12 lb) infant
will suddenly become a 110 kg (240 lb)
force on a person's arms. An infant or
child should be secured in an appropriate
child restraint.

{

Warning

Children who are up against, or very
close to, any airbag when it inflates can
be seriously injured or killed. Never put a

(Continued)

GMC Acadia/Acadia Denali Owner Manual (GMNA-Localizing-U.S./Canada/

Mexico-16402009) - 2023 - CRC - 3/28/22

Seats and Restraints

67

Warning (Continued)

rear-facing child restraint in the front
passenger seat. Secure a rear-facing child
restraint in a rear seat.

It is also better to secure a forward-facing
child restraint in a rear seat. If a
forward-facing child restraint must be
secured in the front passenger seat,
always move the front passenger seat as
far back as it will go.

If a child restraint is installed in the
second row center seat, move the second
row seat to the rearward position,
whenever possible, to minimize contact
with the front center airbag.

Child restraints are devices used to restrain,
seat, or position children in the vehicle and
are sometimes called child seats or car seats.

There are three basic types of child
restraints:

.

Forward-facing child restraints

.

Rear-facing child restraints

.

Belt-positioning booster seats

The proper child restraint for your child
depends on their size, weight, and age, and
also on whether the child restraint is
compatible with the vehicle in which it will
be used.

For each type of child restraint, there are
many different models available. When
purchasing a child restraint, be sure it is

designed to be used in a motor vehicle and
is designed by a genuine child restraint
manufacturer. If it is, the child restraint will
have a label saying that it meets federal
motor vehicle safety standards.

The instruction manual that is provided with
the child restraint states the weight and
height limitations for that particular child
restraint. In addition, there are many kinds
of child restraints available for children with
special needs.

{

Warning

To reduce the risk of neck and head
injury in a crash, infants and toddlers
should be secured in a rear-facing child
restraint until age two, or until they
reach the maximum height and weight
limits of their child restraint.

{

Warning

A young child's hip bones are still so
small that the vehicle seat belt may not
remain low on the hip bones, as it
should. Instead, it may settle up around
the child's abdomen. In a crash, the belt

(Continued)

GMC Acadia/Acadia Denali Owner Manual (GMNA-Localizing-U.S./Canada/

Mexico-16402009) - 2023 - CRC - 3/28/22

68

Seats and Restraints

Warning (Continued)

would apply force on a body area that is
unprotected by any bony structure. This
alone could cause serious or fatal injuries.
To reduce the risk of serious or fatal
injuries during a crash, young children
should always be secured in an
appropriate child restraint.

Child Restraint Systems

Rear-Facing Infant Restraint

A rear-facing child restraint provides
restraint with the seating surface against
the back of the infant.

The harness system holds the infant in place
and, in a crash, acts to keep the infant
positioned in the restraint.

Forward-Facing Child Restraint

A forward-facing child restraint provides
restraint for the child's body with the
harness.

Booster Seats

A belt-positioning booster seat is used for
children who have outgrown their
forward-facing child restraint. Boosters are
designed to improve the fit of the vehicle's
seat belt system until the child is large
enough for the vehicle seat belts to fit
properly without a booster seat. See the
seat belt fit test in

Older Children

0

64

.

GMC Acadia/Acadia Denali Owner Manual (GMNA-Localizing-U.S./Canada/

Mexico-16402009) - 2023 - CRC - 3/28/22

Seats and Restraints

69

Securing an Add-On Child Restraint in
the Vehicle

{

Warning

A child can be seriously injured or killed
in a crash if the child restraint is not
properly secured in the vehicle. Secure
the child restraint properly in the vehicle
using the vehicle seat belt or LATCH
system, following the instructions that
came with that child restraint and the
instructions in this manual.

To help reduce the chance of injury, the
child restraint must be secured in the
vehicle. Child restraints must be secured in
vehicle seats by lap belts or the lap belt
portion of a lap-shoulder belt, or by the
LATCH system. See

Lower Anchors and

Tethers for Children (LATCH System)

0

71

for

more information. Never use a seat belt
extender when installing a child restraint.
Never use non-regulated aftermarket anchors
or attachments to secure a child restraint.
Children can be endangered in a crash if the
child restraint is not properly secured in the
vehicle.

When securing an add-on child restraint,
refer to the following:

1. Instruction labels provided on the child

restraint

2. Instruction manual provided with the

child restraint

3. This vehicle owner's manual

The child restraint instructions are
important, so if they are not available,
obtain a replacement copy from the
manufacturer.

Keep in mind that an unsecured child
restraint can move around in a collision or
sudden stop and injure people in the vehicle.
Be sure to properly secure any child
restraint in the vehicle

even when no

child is in it.

In some areas Certified Child Passenger
Safety Technicians (CPSTs) are available to
inspect and demonstrate how to correctly
use and install child restraints. In the U.S.,
refer to the National Highway Traffic Safety
Administration (NHTSA) website to locate
the nearest child safety seat inspection
station. For CPST availability in Canada,
check with Transport Canada or the
Provincial Ministry of Transportation office.

Securing the Child Within the Child
Restraint

{

Warning

A child can be seriously injured or killed
in a crash if the child is not properly
secured in the child restraint. Secure the
child properly following the instructions
that came with that child restraint.

Where to Put the Restraint

According to accident statistics, children and
infants are safer when properly restrained in
an appropriate child restraint secured in a
rear seating position.

Whenever possible, children aged 12 and
under should be secured in a rear seating
position.

The vehicle is equipped with a front center
airbag in the inboard side of the driver seat.
Even with a front center airbag, a child
restraint can be installed in any second row
seating position.

Never put a rear-facing child restraint in the
front. This is because the risk to the
rear-facing child is so great if the airbag
deploys.

GMC Acadia/Acadia Denali Owner Manual (GMNA-Localizing-U.S./Canada/

Mexico-16402009) - 2023 - CRC - 3/28/22

70

Seats and Restraints

{

Warning

A child in a rear-facing child restraint can
be seriously injured or killed if the front
passenger airbag inflates. This is because
the back of the rear-facing child restraint
would be very close to the inflating
airbag. A child in a forward-facing child
restraint can be seriously injured or killed
if the front passenger airbag inflates and
the passenger seat is in a forward
position.

Even if the passenger sensing system has
turned off the front passenger frontal
airbag, no system is fail-safe. No one can
guarantee that an airbag will not deploy
under some unusual circumstance, even
though it is turned off.

Secure rear-facing child restraints in a
rear seat, even if the airbag is off. If you
secure a forward-facing child restraint in
the front seat, always move the front
passenger seat as far back as it will go.
It is better to secure the child restraint in
a rear seat.

(Continued)

Warning (Continued)

See

Passenger Sensing System

0

59

for

additional information.

If a child restraint is installed in a second
row center seat, move the second row
seat to the rearward position, whenever
possible, to minimize contact with the
front center airbag.

When securing a child restraint with the
seat belts in a rear seat position, study the
instructions that came with the child
restraint to make sure it is compatible with
this vehicle.

Child restraints and booster seats vary
considerably in size, and some may fit in
certain seating positions better than others.
Do not install a child restraint in any rear
seating position where it cannot be installed
securely.

Depending on where you place the child
restraint and the size of the child restraint,
you may not be able to access adjacent seat
belts or LATCH anchors for additional
passengers or child restraints. Adjacent

seating positions should not be used if the
child restraint prevents access to or
interferes with the routing of the seat belt.

The seat in front of an installed child
restraint should be adjusted to ensure
proper installation according to the child
restraint manual.

When installing a child restraint in an
adjustable second row seating position, the
seat should be adjusted fore or aft to ensure
proper installation according to the child
restraint manual. If the seat is able to
recline, the seat back should be positioned
to its full upright position before installing a
child restraint.

Wherever a child restraint is installed, be
sure to follow the instructions that came
with the child restraint and secure the child
restraint properly.

Keep in mind that an unsecured child
restraint can move around in a collision or
sudden stop and injure people in the vehicle.
Be sure to properly secure any child
restraint in the vehicle

even when no

child is in it.

GMC Acadia/Acadia Denali Owner Manual (GMNA-Localizing-U.S./Canada/

Mexico-16402009) - 2023 - CRC - 3/28/22

Seats and Restraints

71

Lower Anchors and Tethers for
Children (LATCH System)

The LATCH system secures a child restraint
during driving or in a crash. LATCH
attachments on the child restraint are used
to attach the child restraint to the anchors
in the vehicle. This system is designed to
make installation of a child restraint easier.

In order to use the LATCH system in your
vehicle, you need a child restraint that has
LATCH attachments. LATCH-compatible
rear-facing and forward-facing child seats can
be properly installed using either the LATCH
anchors or the vehicle

s seat belts. Do not

use both the seat belts and the LATCH
anchorage system to secure a rear-facing or
forward-facing child restraint.

Booster seats use the vehicle

s seat belts to

secure the child and the booster seat. If the
manufacturer recommends that the booster
seat be secured with the LATCH system, this
can be done as long as the booster seat can
be positioned properly and there is no
interference with the proper positioning of
the lap-shoulder belt on the child.

Make sure to follow the instructions that
came with the child restraint, and also the
instructions in this manual.

When installing a child restraint with a top
tether, you must also use either the lower
anchors or the seat belts to properly secure
the child restraint. A child restraint must
never be installed using only the top tether.

For a forward-facing 5-pt harness child
restraint where the combined weight of the
child and restraint are up to 29.5 kg (65 lb),
use either the lower LATCH anchorages with
the top tether anchorage, or the seat belt
with the top tether anchorage. Where the
combined weight of the child and restraint
are greater than 29.5 kg (65 lb), use the seat
belt with the top tether anchorage only.

GMC Acadia/Acadia Denali Owner Manual (GMNA-Localizing-U.S./Canada/

Mexico-16402009) - 2023 - CRC - 3/28/22

72

Seats and Restraints

Recommended Methods for Attaching Child Restraints

Restraint Type

Combined Weight of
the Child + Child
Restraint

Use Only Approved Attachment Methods Shown with an X

LATCH

Lower

Anchors Only

Seat Belt Only

LATCH

Lower

Anchors and Top
Tether Anchor

Seat Belt and Top
Tether Anchor

Rear-Facing Child
Restraint

Up to 29.5 kg (65 lb)

X

X

Rear-Facing Child
Restraint

Greater than
29.5 kg (65 lb)

X

Forward-Facing Child
Restraint

Up to 29.5 kg (65 lb)

X

X

Forward-Facing Child
Restraint

Greater than
29.5 kg (65 lb)

X

See

Securing Child Restraints (With the Seat

Belt in the Rear Seat)

0

78

or

Securing Child Restraints (With the Seat Belt
in the Front Seat)

0

80

.

Child restraints built after March 2014 are
labeled with the maximum child weight,
with which the LATCH system can be used
for installing the child restraint.

The following explains how to attach a child
restraint with these attachments in the
vehicle.

Not all vehicle seating positions have lower
anchors. In this case, the seat belt must be
used (with top tether where available) to
secure the child restraint. See

Securing Child

Restraints (With the Seat Belt in the Rear
Seat)

0

78

or

Securing Child Restraints (With the Seat Belt
in the Front Seat)

0

80

.

GMC Acadia/Acadia Denali Owner Manual (GMNA-Localizing-U.S./Canada/

Mexico-16402009) - 2023 - CRC - 3/28/22

Seats and Restraints

73

Lower Anchors

Lower anchors (1) are metal bars built into
the vehicle. There are two lower anchors for
each LATCH seating position that will
accommodate a child restraint with lower
attachments (2).

Top Tether Anchor

A top tether (3, 4) is used to secure the top
of the child restraint to the vehicle. A top
tether anchor is built into the vehicle. The
top tether attachment hook (2) on the child
restraint connects to the top tether anchor
in the vehicle in order to reduce the forward
movement and rotation of the child restraint
during driving or in the event of a crash.

The child restraint may have a single
tether (3) or a dual tether (4). Either will
have a single attachment hook (2) to secure
the top tether to the anchor.

Some child restraints with a top tether are
designed for use with or without the top
tether being attached. Others require the

top tether always to be attached. In Canada,
the law requires that forward-facing child
restraints have a top tether, and that the
tether be attached. Be sure to read and
follow the instructions for your child
restraint.

Lower Anchor and Top Tether Anchor
Locations

Second Row

Bucket

I

:

Seating positions with top tether

anchors.

H

:

Seating positions with two lower

anchors.

GMC Acadia/Acadia Denali Owner Manual (GMNA-Localizing-U.S./Canada/

Mexico-16402009) - 2023 - CRC - 3/28/22

74

Seats and Restraints

Second Row

60/40 Bench

I

:

Seating positions with top tether

anchors.

H

:

Seating positions with two lower

anchors.

Third Row

I

:

Seating positions with top tether

anchors.

To assist in locating the lower anchors, each
second row anchor position has a label, near
the crease between the seatback and the
seat cushion.

To assist in locating the top tether anchors,
the top tether anchor symbol is near the
anchor.

Second Row

Bucket Shown, Bench Similar

The top tether anchors are at the bottom
rear of the seatback for each seating
position in the second row.

Be sure to use an anchor located directly
behind the seating position where the child
restraint will be placed.

GMC Acadia/Acadia Denali Owner Manual (GMNA-Localizing-U.S./Canada/

Mexico-16402009) - 2023 - CRC - 3/28/22

Seats and Restraints

75

Third Row

The top tether anchors are on the rear of
the seatback for each seating position in the
third row. Be sure to use an anchor located
directly behind the seating position where
the child restraint will be placed.

For models with a cargo cover, the top
tether anchors are on the back of the rear
seatbacks. Remove the cargo cover before
installing the top tether. The cargo cover
should remain off while the top tether is in
use. Be sure to use an anchor directly
behind the seating position where the child
restraint will be placed.

Do not secure a child restraint in a position
without a top tether anchor if a national or
local law requires that the top tether be
attached, or if the instructions that come
with the child restraint say that the top
tether must be attached.

According to accident statistics, children and
infants are safer when properly restrained in
a child restraint system or infant restraint
system secured in a rear seating position.
See

Where to Put the Restraint

0

69

for

additional information.

Securing a Child Restraint Designed for
the LATCH System

{

Warning

A child could be seriously injured or killed
in a crash if the child restraint is not
properly attached to the vehicle using
either the LATCH anchors or the vehicle
seat belt. Follow the instructions that
came with the child restraint and the
instructions in this manual.

{

Warning

To reduce the risk of serious or fatal
injuries during a crash, do not attach
more than one child restraint to a single
anchor. Attaching more than one child
restraint to a single anchor could cause
the anchor or attachment to come loose
or even break during a crash. A child or
others could be injured.

{

Warning

Children can be seriously injured or
strangled if a shoulder belt is wrapped
around their neck. The shoulder belt can
tighten but cannot be loosened if it is
locked. The shoulder belt locks when it is
pulled all the way out of the retractor.
It unlocks when the shoulder belt is
allowed to go all the way back into the
retractor, but it cannot do this if it is
wrapped around a child

s neck. If the

shoulder belt is locked and tightened
around a child

s neck, the only way to

loosen the belt is to cut it.

(Continued)

GMC Acadia/Acadia Denali Owner Manual (GMNA-Localizing-U.S./Canada/

Mexico-16402009) - 2023 - CRC - 3/28/22

76

Seats and Restraints

Warning (Continued)

Buckle any unused seat belts behind the
child restraint so children cannot reach
them. Pull the shoulder belt all the way
out of the retractor to set the lock, and
tighten the belt behind the child restraint
after the child restraint has been
installed.

Caution

Do not let the LATCH attachments rub
against the vehicle

s seat belts. This may

damage these parts. If necessary, move
buckled seat belts to avoid rubbing the
LATCH attachments.

Do not fold the rear seatback when the
seat is occupied. Do not fold the empty
rear seat with a seat belt buckled. This
could damage the seat belt or the seat.
Unbuckle and return the seat belt to its
stowed position, before folding the seat.

The vehicle is equipped with a front center
airbag in the inboard side of the driver seat.
Even with a front center airbag, a child
restraint can be installed in any second row
seating position. If a child restraint is

installed in a second row center seat, move
the second row seat to the rearward
position, whenever possible, to minimize
contact with the front center airbag.

If you need to secure more than one child
restraint in the rear seat, see

Where to Put

the Restraint

0

69

.

1. Attach and tighten the lower

attachments to the lower anchors. If the
child restraint does not have lower
attachments or the desired seating
position does not have lower anchors,
secure the child restraint with the top
tether and the seat belt. Refer to the
child restraint manufacturer instructions
and the instructions in this manual.
1.1. Find the lower anchors for the

desired seating position.

1.2. To access the lower anchors in the

second row, it may help to recline
the seatback.
Third row seatbacks must be
upright before placing the child
restraint on the seat.

1.3. Put the child restraint on the seat.
1.4. Attach and tighten the lower

attachments on the child restraint
to the lower anchors.

If necessary, adjust the angle of the
second row seatback to achieve a
tight installation. Make sure the
second row bench seatbacks are
aligned at the same angle.

2. If the child restraint manufacturer

recommends that the top tether be
attached, adjust the top tether to its full
length and attach it to the anchor. Refer
to the child restraint instructions and the
following steps:
2.1. Find the top tether anchor.
2.2. Route, attach, and tighten the top

tether according to your child
restraint instructions and the
following instructions:

GMC Acadia/Acadia Denali Owner Manual (GMNA-Localizing-U.S./Canada/

Mexico-16402009) - 2023 - CRC - 3/28/22

Seats and Restraints

77

If the position you are using does
not have a headrest or head
restraint and you are using a single
tether, route the tether over the
seatback.

If the position you are using does
not have a headrest or head
restraint and you are using a dual
tether, route the tether over the
seatback.

If the position you are using has an
adjustable headrest or head
restraint, adjust it accordingly to
allow proper fitment. If you are
using a dual tether, route the
tether around the headrest or head
restraint posts.
If the child restraint is installed next
to a center seat, make sure the top
tether does not interfere with the
center seating position shoulder
belt/retractor. If it does, find
another suitable seating position to
install the child restraint.

If the position you are using has an
adjustable headrest or head
restraint, adjust it accordingly to
allow proper fitment. If you are

using a single tether, route the
tether in between the headrest or
head restraint posts.

If the position you are using has a
fixed headrest or head restraint and
you are using a dual tether, route
the tether around the headrest or
head restraint.
If the child restraint is installed next
to a center seat, make sure the top
tether does not interfere with the
center seating position shoulder
belt/retractor. If it does, find
another suitable seating position to
install the child restraint.

GMC Acadia/Acadia Denali Owner Manual (GMNA-Localizing-U.S./Canada/

Mexico-16402009) - 2023 - CRC - 3/28/22

78

Seats and Restraints

If the position you are using has a
fixed headrest or head restraint and
you are using a single tether, route
the tether around the inboard or
outboard side of the headrest or
head restraint.

3. Before placing a child in the child

restraint, make sure it is securely held in
place. To check, grasp the child restraint
at the LATCH path and attempt to move
it side to side and back and forth. There
should be no more than 2.5 cm (1 in) of
movement, for proper installation.

Replacing LATCH System Parts
After a Crash

{

Warning

A crash can damage the LATCH system in
the vehicle. A damaged LATCH system
may not properly secure the child
restraint, resulting in serious injury or
even death in a crash. To help make sure
the LATCH system is working properly
after a crash, see your dealer to have the
system inspected and any necessary
replacements made as soon as possible.

If the vehicle has the LATCH system and it
was being used during a crash, new LATCH
system parts may be needed.

New parts and repairs may be necessary
even if the LATCH system was not being
used at the time of the crash.

Securing Child Restraints (With
the Seat Belt in the Rear Seat)

The vehicle is equipped with a front center
airbag in the inboard side of the driver seat.
Even with a front center airbag, a child
restraint can be installed in any second row
seating position. If you install a child

restraint in a second row center seat, move
the second row seat to the rearward
position, whenever possible, to minimize
contact with the front center airbag.

When securing a child restraint with the
seat belts in a rear seat position, study the
instructions that came with the child
restraint to make sure it is compatible with
this vehicle.

If the child restraint has the LATCH system,
see

Lower Anchors and Tethers for Children

(LATCH System)

0

71

for how and where to

install the child restraint using LATCH. If a
child restraint is secured in the vehicle using
a seat belt and it uses a top tether, see

Lower Anchors and Tethers for Children
(LATCH System)

0

71

for top tether anchor

locations.

Do not secure a child seat in a position
without a top tether anchor if a national or
local law requires that the top tether be
anchored, or if the instructions that come
with the child restraint say that the top
tether must be anchored.

In Canada, the law requires that
forward-facing child restraints have a top
tether, and that the tether be attached.

GMC Acadia/Acadia Denali Owner Manual (GMNA-Localizing-U.S./Canada/

Mexico-16402009) - 2023 - CRC - 3/28/22

Seats and Restraints

79

If the child restraint or vehicle seat position
does not have the LATCH system, you will
be using the seat belt to secure the child
restraint. Be sure to follow the instructions
that came with the child restraint.

If more than one child restraint needs to be
installed in the rear seat, be sure to read

Where to Put the Restraint

0

69

.

1. Put the child restraint on the seat.
2. Pick up the latch plate and run the lap

and shoulder portions of the vehicle seat
belt through, or around, the child
restraint. Ensure the seat belt webbing is
routed as directly as possible and is not
caught on seat handles or plastic trim.
The child restraint instructions will show
you how.

3. Push the latch plate into the buckle until

it clicks.
Position the release button on the
buckle, away from the child restraint, so
that the seat belt could be quickly
unbuckled if necessary.
There must not be direct contact of the
child restraint to the push button.

4. Pull the shoulder belt all the way out of

the retractor to set the lock. When the
retractor lock is set, the belt can be
tightened but not pulled out of the
retractor.

GMC Acadia/Acadia Denali Owner Manual (GMNA-Localizing-U.S./Canada/

Mexico-16402009) - 2023 - CRC - 3/28/22

80

Seats and Restraints

5. To tighten the belt, push down on the

child restraint, pull the shoulder portion
of the belt to tighten the lap portion of
the belt, and feed the shoulder belt back
into the retractor. When installing a
forward-facing child restraint, it may be
helpful to use your knee to push down
on the child restraint as you tighten
the belt.
Try to pull the belt out of the retractor
to make sure the retractor is locked.
If the retractor is not locked, repeat
Steps 4 and 5.

6. If the child restraint has a top tether,

follow the child restraint manufacturer's
instructions regarding the use of the top
tether. See

Lower Anchors and Tethers

for Children (LATCH System)

0

71

.

7. Before placing a child in the child

restraint, make sure it is securely held in
place. To check, grasp the child restraint
at the seat belt path and attempt to
move it side to side and back and forth.
When the child restraint is properly
installed, there should be no more than
2.5 cm (1 in) of movement.

To remove the child restraint, unbuckle the
vehicle seat belt and let it return to the
stowed position. If the top tether is attached
to a top tether anchor, disconnect it.

Securing Child Restraints (With
the Seat Belt in the Front Seat)

This vehicle has airbags. A rear seat is a
safer place to secure a forward-facing child
restraint. See

Where to Put the Restraint

0

69

.

In addition, the vehicle has a passenger
sensing system which is designed to turn off
the front outboard passenger frontal airbag

under certain conditions. See

Passenger

Sensing System

0

59

and

Passenger Airbag Status Indicator

0

105

for

more information, including important
safety information.

Never put a rear-facing child seat in the
front. This is because the risk to the
rear-facing child is so great, if the airbag
deploys.

{

Warning

A child in a rear-facing child restraint can
be seriously injured or killed if the front
outboard passenger frontal airbag
inflates. This is because the back of the
rear-facing child restraint would be very
close to the inflating airbag. A child in a
forward-facing child restraint can be
seriously injured or killed if the front
outboard passenger frontal airbag inflates
and the passenger seat is in a forward
position.

Even if the passenger sensing system has
turned off the front outboard passenger
frontal airbag, no system is fail-safe. No

(Continued)

GMC Acadia/Acadia Denali Owner Manual (GMNA-Localizing-U.S./Canada/

Mexico-16402009) - 2023 - CRC - 3/28/22

Seats and Restraints

81

Warning (Continued)

one can guarantee that an airbag will not
deploy under some unusual circumstance,
even though it is turned off.

Secure rear-facing child restraints in a
rear seat, even if the airbag is off. If you
secure a forward-facing child restraint in
the front outboard passenger seat,
always move the seat as far back as it
will go. It is better to secure the child
restraint in a rear seat.

See

Passenger Sensing System

0

59

for

additional information.

If the child restraint uses a top tether, see

Lower Anchors and Tethers for Children
(LATCH System)

0

71

for top tether anchor

locations.

Do not secure a child seat in a position
without a top tether anchor if a national or
local law requires that the top tether be
anchored, or if the instructions that come
with the child restraint say that the top
tether must be anchored.

In Canada, the law requires that
forward-facing child restraints have a top
tether, and that the tether be attached.

When using the lap-shoulder belt to secure
the child restraint in this position, follow the
instructions that came with the child
restraint and the following instructions:

1. Move the seat as far back as it will go

before securing the forward-facing child
restraint. Move the seat upward or the
seatback to an upright position,
if needed, to get a tight installation of
the child restraint.
There must be finger clearance between
the push button and the child restraint.
When the passenger sensing system has
turned off the front outboard passenger
frontal airbag, the OFF indicator on the
passenger airbag status indicator should
light and stay lit when you start the
vehicle. See

Passenger Airbag Status

Indicator

0

105

.

2. Put the child restraint on the seat.
3. Pick up the latch plate and run the lap

and shoulder portions of the vehicle seat
belt through or around the restraint.
Ensure the seat belt webbing is routed
as direct as possible and is not caught
on seat handles or plastic trim. The child
restraint instructions will show you how.

Tilt the latch plate to adjust the belt if
needed.

4. Push the latch plate into the buckle until

it clicks.

GMC Acadia/Acadia Denali Owner Manual (GMNA-Localizing-U.S./Canada/

Mexico-16402009) - 2023 - CRC - 3/28/22

82

Seats and Restraints

Position the release button on the
buckle, away from the child restraint, so
that the seat belt could be quickly
unbuckled if necessary.

5. Pull the shoulder belt all the way out of

the retractor to set the lock. When the
retractor lock is set, the belt can be
tightened but not pulled out of the
retractor.

6. To tighten the belt, push down on the

child restraint, pull the shoulder portion
of the belt to tighten the lap portion of
the belt, and feed the shoulder belt back
into the retractor.
There must be finger clearance between
the push button and the child restraint.
If there is not clearance between the
buckle push button and the child
restraint, move the seat upward and
repeat prior installation steps. Otherwise
secure the child restraint in a rear seat.
When installing a forward-facing child
restraint, it may be helpful to use your
knee to push down on the child restraint
as you tighten the belt.

Try to pull the belt out of the retractor
to make sure the retractor is locked.
If the retractor is not locked, repeat
Steps 5 and 6.

7. Before placing a child in the child

restraint, make sure it is securely held in
place. To check, grasp the child restraint
at the seat belt path and attempt to
move it side to side and back and forth.
When the child restraint is properly
installed, there should be no more than
2.5 cm (1 in) of movement.

If the airbag is off, the OFF indicator in the
passenger airbag status indicator will come
on and stay on when the vehicle is started.

If a child restraint has been installed and
the ON indicator is lit, see

If the On

Indicator Is Lit for a Child Restraint

under

Passenger Sensing System

0

59

.

To remove the child restraint, unbuckle the
vehicle seat belt and let it return to the
stowed position.

GMC Acadia/Acadia Denali Owner Manual (GMNA-Localizing-U.S./Canada/

Mexico-16402009) - 2023 - CRC - 3/28/22

Storage

83

Storage

Storage Compartments

Storage Compartments . . . . . . . . . . . . . . . . . 83
Glove Box . . . . . . . . . . . . . . . . . . . . . . . . . . . . . . 83
Sunglasses Storage . . . . . . . . . . . . . . . . . . . . . 83
Armrest Storage . . . . . . . . . . . . . . . . . . . . . . . . 83
Rear Storage . . . . . . . . . . . . . . . . . . . . . . . . . . . 84
Center Console Storage . . . . . . . . . . . . . . . . . 84

Additional Storage Features

Cargo Tie-Downs . . . . . . . . . . . . . . . . . . . . . . . 85
Cargo Management System . . . . . . . . . . . . 85

Roof Rack System

Roof Rack System . . . . . . . . . . . . . . . . . . . . . . 87

Storage Compartments

{

Warning

Do not store heavy or sharp objects in
storage compartments. In a crash, these
objects may cause the cover to open and
could result in injury.

Glove Box

Lift up on the glove box lever to open it.

Sunglasses Storage

If equipped, sunglasses storage is on the
overhead console. Press the fixed button on
the cover and release to access.

Armrest Storage

If equipped, the rear seat armrest may have
cupholders. Pull the armrest down to access
the cupholders.

GMC Acadia/Acadia Denali Owner Manual (GMNA-Localizing-U.S./Canada/

Mexico-16402009) - 2023 - CRC - 3/28/22

84

Storage

Rear Storage

There is storage in the floor of the rear
cargo area. Lift the handle to access the
removable cargo management system.

Center Console Storage

The SD card is used for navigation. Do not
remove the card from the holder.

The center console has storage under the
armrest. Pull up the latch and lift to open.

The center console also has the following:

.

A forward bin

.

An open or covered storage bin on the
back of the console

The back center console has a storage bin.
Pull the handle down to access.

GMC Acadia/Acadia Denali Owner Manual (GMNA-Localizing-U.S./Canada/

Mexico-16402009) - 2023 - CRC - 3/28/22

Storage

85

Additional Storage Features

Cargo Tie-Downs

Two cargo tie-downs are located in the rear
compartment of the vehicle. The tie-downs
can be used to secure small loads.

Cargo Management System

Tray Option

Lift the load floor to access the cargo
management system.

The cargo management system is used to
organize storage in the cargo area.

Cargo Management System Tray
Removal

To access the spare tire or the tire sealant
and compressor kit, the cargo management
system tray must be removed.

GMC Acadia/Acadia Denali Owner Manual (GMNA-Localizing-U.S./Canada/

Mexico-16402009) - 2023 - CRC - 3/28/22

86

Storage

1. Turn the right side wing nut to remove.
2. Remove the strap.

Make sure the strap is secure after
service or reinstalling the cargo
management system.

3. Turn the left side wing nut to remove.
4. Remove the small storage bin.

5. Unsnap the hinges on the load floor

from the cargo management system.

6. Pull up to remove the load floor.
7. Lift up on both sides to remove the

cargo management system to access the
spare tire.

GMC Acadia/Acadia Denali Owner Manual (GMNA-Localizing-U.S./Canada/

Mexico-16402009) - 2023 - CRC - 3/28/22

Storage

87

All Terrain

The rear trays do not need to be removed
to access the spare tire.

Roof Rack System

The vehicle may be equipped with side-rails
for a roof rack system. Cargo must be
secured with properly installed cross rails
and other accessories designed to carry
cargo. These can be purchased from your
dealer.

{

Warning

Before driving and occasionally during a
trip, check that cargo is securely fastened,
rests evenly between the cross rails and
does not block the vehicle's lamps or
windows. Never load cargo directly on
the roof of the vehicle or allow cargo to
hang over the rear or sides of the vehicle.
Never load cargo without first properly
installing cross rails and other accessories
designed to carry cargo. Personal injury,
death or damage to the vehicle or other
property may occur.

If driving for a long distance, on rough
roads, or at high speeds, occasionally stop
the vehicle to make sure the cargo remains
in its place.

Cargo Weight Limits

Do not exceed the maximum cargo weight
for the roof rack system, including the
weight of the cross rails and any other
accessories used to carry the cargo such as
bike racks or roof boxes. The maximum
cargo weight that can be loaded onto the
roof rack system is 100 kg (220 lb) or the

weight designated in the instructions that
came with the cross rails or other roof rack
accessories, whichever is less.

{

Warning

Never load the roof rack with more
weight than specified in this section.
Loading cargo on the roof rack will make
the vehicle's center of gravity higher. To
avoid losing control of the vehicle, avoid
overloading, high speeds, sudden starts,
sharp turns, sudden braking, or abrupt
maneuvers when carrying cargo on the
roof rack.

The weight of any cargo carried on the roof
rack system must be included in calculating
the loaded weight of the vehicle. Do not
exceed the maximum vehicle capacity when
loading the vehicle, including cargo carried
on the roof rack system and passengers
and cargo carried in the vehicle. For more
information on vehicle capacity and loading,
see

Vehicle Load Limits

0

200

.

GMC Acadia/Acadia Denali Owner Manual (GMNA-Localizing-U.S./Canada/

Mexico-16402009) - 2023 - CRC - 3/28/22

88

Instruments and Controls

Instruments and Controls

Controls

Steering Wheel Adjustment . . . . . . . . . . . . 89
Heated Steering Wheel . . . . . . . . . . . . . . . . . 89
Horn . . . . . . . . . . . . . . . . . . . . . . . . . . . . . . . . . . . 90
Windshield Wiper/Washer . . . . . . . . . . . . . 90
Rear Window Wiper/Washer . . . . . . . . . . . 91
Compass . . . . . . . . . . . . . . . . . . . . . . . . . . . . . . . 92
Clock . . . . . . . . . . . . . . . . . . . . . . . . . . . . . . . . . . . 92
Power Outlets . . . . . . . . . . . . . . . . . . . . . . . . . . 92
Wireless Charging . . . . . . . . . . . . . . . . . . . . . . 93

Warning Lights, Gauges, and Indicators

Warning Lights, Gauges, and

Indicators . . . . . . . . . . . . . . . . . . . . . . . . . . . . . 95

Instrument Cluster (Base Level and

Midlevel) . . . . . . . . . . . . . . . . . . . . . . . . . . . . . 96

Instrument Cluster (Uplevel) . . . . . . . . . . . 99
Speedometer . . . . . . . . . . . . . . . . . . . . . . . . . . 101
Odometer . . . . . . . . . . . . . . . . . . . . . . . . . . . . . . 101
Trip Odometer . . . . . . . . . . . . . . . . . . . . . . . . . 101
Tachometer . . . . . . . . . . . . . . . . . . . . . . . . . . . . 101
Fuel Gauge . . . . . . . . . . . . . . . . . . . . . . . . . . . . 101
Engine Oil Temperature Gauge

(Uplevel only) . . . . . . . . . . . . . . . . . . . . . . . 102

Engine Coolant Temperature Gauge . . . 103
Voltmeter Gauge (Uplevel only) . . . . . . . 103
Seat Belt Reminders . . . . . . . . . . . . . . . . . . . 104
Airbag Readiness Light . . . . . . . . . . . . . . . . 104

Passenger Airbag Status Indicator . . . . . 105
Charging System Light . . . . . . . . . . . . . . . . 106
Malfunction Indicator Lamp (Check

Engine Light) . . . . . . . . . . . . . . . . . . . . . . . . 106

Brake System Warning Light . . . . . . . . . . 107
Electric Parking Brake Light . . . . . . . . . . . . 108
Service Electric Parking Brake Light

(Uplevel and Midlevel
Cluster Only) . . . . . . . . . . . . . . . . . . . . . . . . 108

Antilock Brake System (ABS) Warning

Light . . . . . . . . . . . . . . . . . . . . . . . . . . . . . . . . 109

Gear Shifting Light . . . . . . . . . . . . . . . . . . . . 109
Hill Descent Control Light . . . . . . . . . . . . . 109
Lane Keep Assist (LKA) Light . . . . . . . . . . . 109
Vehicle Ahead Indicator . . . . . . . . . . . . . . . . 110
Pedestrian Ahead Indicator . . . . . . . . . . . . 110
Traction Off Light . . . . . . . . . . . . . . . . . . . . . . 110
StabiliTrak OFF Light . . . . . . . . . . . . . . . . . . . 110
Traction Control System (TCS)/StabiliTrak

Light . . . . . . . . . . . . . . . . . . . . . . . . . . . . . . . . . . 111

Engine Coolant Temperature Warning

Light . . . . . . . . . . . . . . . . . . . . . . . . . . . . . . . . . . 111

Driver Mode Control Light . . . . . . . . . . . . . . 111
Tire Pressure Light . . . . . . . . . . . . . . . . . . . . . 112
Engine Oil Pressure Light . . . . . . . . . . . . . . . 112
Low Fuel Warning Light . . . . . . . . . . . . . . . . 113
Security Light . . . . . . . . . . . . . . . . . . . . . . . . . . 113
High-Beam On Light . . . . . . . . . . . . . . . . . . . . 113
Front Fog Lamp Light . . . . . . . . . . . . . . . . . . 113
Lamps On Reminder . . . . . . . . . . . . . . . . . . . 114

Cruise Control Light . . . . . . . . . . . . . . . . . . . . 114
Door Ajar Light . . . . . . . . . . . . . . . . . . . . . . . . 114

Information Displays

Driver Information Center (DIC) (Base

Level) . . . . . . . . . . . . . . . . . . . . . . . . . . . . . . . . 114

Driver Information Center (DIC)

(Midlevel) . . . . . . . . . . . . . . . . . . . . . . . . . . . . 116

Driver Information Center (DIC)

(Uplevel) . . . . . . . . . . . . . . . . . . . . . . . . . . . . . 119

Head-Up Display (HUD) . . . . . . . . . . . . . . . . 121

Vehicle Messages

Vehicle Messages . . . . . . . . . . . . . . . . . . . . . . 124
Engine Power Messages . . . . . . . . . . . . . . . 125
Vehicle Speed Messages . . . . . . . . . . . . . . . 125

Universal Remote System

Universal Remote System . . . . . . . . . . . . . . 125
Universal Remote System

Programming . . . . . . . . . . . . . . . . . . . . . . . . 125

Universal Remote System Operation . . . 127

GMC Acadia/Acadia Denali Owner Manual (GMNA-Localizing-U.S./Canada/

Mexico-16402009) - 2023 - CRC - 3/28/22

Instruments and Controls

89

Controls

Steering Wheel Adjustment

To adjust the steering wheel:

1. Pull the lever down.
2. Move the steering wheel up or down.
3. Pull or push the steering wheel closer or

away from you.

4. Pull the lever up to lock the wheel in

place.

Do not adjust the steering wheel while
driving.

Power Tilt and Telescoping Steering Wheel

To adjust the power tilt and telescoping
steering wheel, if equipped:

Press the control to move the steering
wheel up and down or forward and
rearward.

Do not adjust the steering wheel while
driving.

Heated Steering Wheel

(

:

If equipped, press to turn it on or off.

An indicator light next to the button
displays when the feature is turned on.

The steering wheel takes about
three minutes to start heating.

Automatic Heated Steering Wheel

If equipped with remote start, the heated
steering wheel will turn on automatically
during a remote start along with the heated
seats when it is cold outside. The heated
steering wheel indicator light may not
come on.

GMC Acadia/Acadia Denali Owner Manual (GMNA-Localizing-U.S./Canada/

Mexico-16402009) - 2023 - CRC - 3/28/22

90

Instruments and Controls

If equipped with auto heated seats, the
heated steering wheel will turn on when the
auto heated seat is activated. The heated
steering wheel indicator will display the
state of the steering wheel heat.

See

Heated and Ventilated Front Seats

0

42

.

To turn this feature on or off, select Settings
> Vehicle > Comfort and Convenience >
Heated Steering Wheel > Select ON or OFF.

Horn

Press

a

on the steering wheel pad to

sound the horn.

Windshield Wiper/Washer

With the ignition on or in ACC/ACCESSORY,
move the windshield wiper lever to select
the wiper speed.

HI :

Use for fast wipes.

LO :

Use for slow wipes.

INT :

Move the windshield wiper lever to

INT. Turn the band up for more frequent
wipes or down for less frequent wipes.

OFF :

Use to turn the wipers off.

1X :

For a single wipe, briefly move the

wiper lever down. For several wipes, hold
the wiper lever down.

f

:

Pull the windshield wiper lever

toward you to spray windshield washer fluid
and activate the windshield wipers. The
wipers will continue until the lever is
released or the maximum wash time is
reached. When the windshield wiper lever is
released, additional wipes may occur
depending on how long the windshield
washer had been activated. See

Washer

Fluid

0

277

for information on filling the

windshield washer fluid reservoir.

{

Warning

In freezing weather, do not use the
washer until the windshield is warmed.
Otherwise the washer fluid can form ice
on the windshield, blocking your vision.

{

Warning

Before driving the vehicle, always clear
snow and ice from the hood, windshield,
washer nozzles, roof, and rear of the
vehicle, including all lamps and windows.
Reduced visibility from snow and ice
buildup could lead to a crash.

Clear snow and ice from the wiper blades
and windshield before using them. If frozen
to the windshield, carefully loosen or thaw
them. Damaged blades should be replaced.
See

Wiper Blade Replacement

0

281

.

Heavy snow or ice can overload the wiper
motor. See

Electrical System Overload

0

283

.

Wiper Parking

If the ignition is turned off while the wipers
are on LO, HI, or INT, they will
immediately stop.

GMC Acadia/Acadia Denali Owner Manual (GMNA-Localizing-U.S./Canada/

Mexico-16402009) - 2023 - CRC - 3/28/22

Instruments and Controls

91

If the windshield wiper lever is then moved
to OFF before the driver door is opened or
within 10 minutes, the wipers will restart
and move to the base of the windshield.

If the ignition is turned off while the wipers
are performing wipes due to windshield
washing, the wipers continue to run until
they reach the base of the windshield.

Rear Window Wiper/Washer

The rear window wiper/washer controls are
on the end of the windshield wiper lever.

Turn the controls to adjust the setting.

OFF :

Turns the wiper off.

INT :

Turns on the rear wiper with a delay

between wipes.

ON :

Turns on the rear wiper.

1

:

Push the windshield wiper lever

forward to spray washer fluid on the rear
window. The wipers will clear the rear
window and either stop or return to your
preset speed. For more washer cycles, press
and hold the lever.

The rear window wiper/washer will not
operate if the liftgate is open or ajar. If the
liftgate is opened while the rear wiper is on,
the wiper returns to the parked position and
stops.

Rear Wiper Arm Assembly Protection

When using an automatic car wash, move
the rear wiper control to OFF to disable the
rear wiper. In some vehicles, if the
transmission is in N (Neutral) and the
vehicle speed is very slow, the rear wiper
will automatically park.

The wiper operations return to normal when
the transmission is no longer in N (Neutral)
or the vehicle speed has increased.

Reverse Gear Wipes

If the rear wiper control is off, the rear
wiper will automatically operate
continuously when the vehicle is in
R (Reverse) and the front windshield wiper is
performing low or high speed wipes. If the
rear wiper control is off, the vehicle is in

R (Reverse), and the front windshield wiper
is performing interval wipes, then the rear
wiper automatically performs interval wipes.

This feature can be turned on or off. Go to
Settings > Vehicle > Comfort and
Convenience > Reverse Gear Wipes > Select
ON or OFF.

The windshield washer reservoir is used for
the windshield and the rear window. Check
the fluid level in the reservoir if either
washer is not working. See

Washer Fluid

0

277

.

Rear Camera Washer

If equipped, push the windshield wiper lever
forward to spray washer fluid on the rear
camera lens. The lever returns to its starting
position when released. See

Rear Camera

Mirror

0

28

.

GMC Acadia/Acadia Denali Owner Manual (GMNA-Localizing-U.S./Canada/

Mexico-16402009) - 2023 - CRC - 3/28/22

92

Instruments and Controls

Compass

The vehicle may have a compass display on
the Driver Information Center (DIC). The
compass receives its heading and other
information from the Global Positioning
System (GPS) antenna, StabiliTrak/Electronic
Stability Control (ESC), and vehicle speed
information.

The compass system is designed to operate
for a certain number of miles or degrees of
turn before needing a signal from the GPS
satellites. When the compass display shows
CAL, drive the vehicle for a short distance in
an open area where it can receive a GPS
signal. The compass system will
automatically determine when a GPS signal
is restored and provide a heading again.

Clock

Set the time and date using the
infotainment system. See "Time/Date" under

Settings

0

170

.

Power Outlets

Power Outlets 12 Volt Direct Current

The vehicle has two 12-volt outlets that can
be used to plug in electrical equipment, such
as a cell phone or MP3 player.

The power outlets are located:

.

On the center stack below the climate
controls.

.

In the rear cargo area.

Lift the cover to access the outlet and
replace when not in use.

{

Warning

Power is always supplied to the rear
cargo power outlet. Do not leave
electrical equipment plugged in when the
vehicle is not in use because the vehicle
could catch fire and cause injury or
death.

Caution

Leaving electrical equipment plugged in
for an extended period of time while the
ignition is off will drain the battery.
Always unplug electrical equipment when
not in use and do not plug in equipment
that exceeds the maximum 15 amp
rating.

Certain accessory plugs may not be
compatible with the accessory power outlet
and could overload vehicle and adapter
fuses. If a problem is experienced, see your
dealer.

When adding electrical equipment, be sure
to follow the proper installation instructions
included with the equipment. See

Add-On

Electrical Equipment

0

259

.

Caution

Hanging heavy equipment from the
power outlet can cause damage not
covered by the vehicle warranty. The
power outlets are designed for accessory
power plugs only, such as cell phone
charge cords.

Power Outlet 110V/120V Alternating
Current

If equipped with this power outlet it can be
used to plug in electrical equipment that
uses a maximum limit of 150 watts.

GMC Acadia/Acadia Denali Owner Manual (GMNA-Localizing-U.S./Canada/

Mexico-16402009) - 2023 - CRC - 3/28/22

Instruments and Controls

93

The power outlet is on the rear of the
center console.

An indicator light on the outlet turns on to
show it is in use. The light comes on when
the ignition is on, equipment requiring less
than 150 watts is plugged into the outlet,
and no system fault is detected.

The indicator light does not come on when
the ignition is off or if the equipment is not
fully seated into the outlet.

If equipment is connected using more than
150 watts or a system fault is detected, a
protection circuit shuts off the power supply
and the indicator light turns off. To reset
the circuit, unplug the item and plug it back
in or turn the Retained Accessory Power

(RAP) off and then back on. See

Retained

Accessory Power (RAP)

0

208

. The power

restarts when equipment using 150 watts or
less is plugged into the outlet and a system
fault is not detected.

The power outlet is not designed for and
may not work properly, if the following are
plugged in:

.

Equipment with high initial peak wattage,
such as compressor-driven refrigerators
and electric power tools

.

Other equipment requiring an extremely
stable power supply, such as
microcomputer-controlled electric blankets
and touch sensor lamps

.

Medical equipment

Wireless Charging

If equipped and enabled, the vehicle has
wireless charging in the storage bin at the
front of the floor console. The system
operates at 145 kHz and wirelessly charges
one Qi compatible smartphone. The power
output of the system is capable of charging
at a rate up to 3 amp (15 W), as requested
by the compatible smartphone. See

Radio

Frequency Statement

0

359

or

Radio Frequency Statement

0

359

.

{

Warning

Wireless charging may affect the
operation of an implanted pacemaker or
other medical devices. If you have one, it
is recommended to consult with your
doctor before using the wireless charging
system.

The vehicle must be on, in ACC/ACCESSORY,
or Retained Accessory Power (RAP) must be
active. The wireless charging feature may
not correctly indicate charging when the
vehicle is in RAP, during a Bluetooth phone
call, or when phone projection (e.g. Apple
CarPlay / Android Auto) is active. See

Retained Accessory Power (RAP)

0

208

.

The operating temperature is

40 °C (

40 °F)

to 85 °C (185 °F) for the charging system and
0 °C (32 °F) to 35 °C (95 °F) for the phone.
A charging stopped alert may be displayed
on the infotainment screen, if the wireless
charger or smartphone are outside of
normal operating temperature. Charging will
automatically resume when a normal
operating temperature is reached.

GMC Acadia/Acadia Denali Owner Manual (GMNA-Localizing-U.S./Canada/

Mexico-16402009) - 2023 - CRC - 3/28/22

94

Instruments and Controls

{

Warning

Remove all objects from the charger
before charging your compatible
smartphone. Objects, such as coins, keys,
rings, paper clips, or cards, between the
smartphone and charger may become
very hot.

On the rare occasion that the charging
system does not detect an object, and
the object gets wedged between the
smartphone and charger, remove the
smartphone and allow the object to cool
before removing it from the charger, to
prevent burns.

To charge a compatible smartphone:

1. Confirm the smartphone is capable of

wireless charging.

2. Remove all objects from the charging

pad. The system may not charge if there
are any objects between the smartphone
and charger.

3. Place the smartphone face up against

the rear of the charger.
To maximize the charge rate, ensure the
smartphone is fully seated and centered
in the holder with nothing under it.
A thick smartphone case may prevent
the charger from working, or reduce the
charging performance. See your dealer
for additional information.

4. A green

]

will appear on the

infotainment display, next to the phone
icon. This indicates that the smartphone
is detected.

5. If a smartphone is placed on the charger

and

]

turns off or turns yellow, remove

the smartphone and any objects from
the pad. Turn the smartphone
180 degrees and wait a few seconds
before placing/aligning it on the pad
again.

6. If a smartphone is placed on the charger

and

]

turns red, the charger and/or the

smartphone is overheated. Remove the
smartphone and any objects from the
charger in order to cool the system.

The smartphone may become warm during
charging. This is normal. In warmer
temperatures, the speed of charging may be
reduced.

For vehicles with wireless phone projection,
the smartphone may overheat during
wireless charging. The smartphone may slow
down, stop charging, or shut down to
protect the battery. The phone may need to
be removed from its case to prevent
overheating. The

]

may flash while the

phone is cooling down enough for wireless
charging to automatically resume. This is
normal. Individual phone performance
may vary.

Software Acknowledgements

Certain Wireless Charging Module product
from LG Electronics, Inc. ("LGE") contains the
open source software detailed below. Refer
to the indicated open source licenses (as are
included following this notice) for the terms
and conditions of their use.

GMC Acadia/Acadia Denali Owner Manual (GMNA-Localizing-U.S./Canada/

Mexico-16402009) - 2023 - CRC - 3/28/22

Instruments and Controls

95

OSS Notice Information

To obtain the source code that is
contained in this product, please visit
https://opensource.lge.com. In addition to
the source code, all referred license terms,
warranty disclaimers and copyright notices
are available for download. LG Electronics
will also provide open source code to you
on CD-ROM for a charge covering the cost of
performing such distribution (such as the
cost of media, shipping, and handling) upon
email request to opensource@lge.com. This
offer is valid for three (3) years from the
date on which you purchased the product.

Freescale-WCT library

Redistribution and use in source and binary
forms, with or without modification, are
permitted provided that the following
conditions are met:

1. Redistributions of source code must

retain the above copyright notice, this
list of conditions and the following
disclaimer.

2. Redistributions in binary form must

reproduce the above copyright notice,
this list of conditions and the following

disclaimer in the documentation and/or
other materials provided with the
distribution.

3. Neither the name of the copyright holder

nor the names of its contributors may be
used to endorse or promote products
derived from this software without
specific prior written permission.

THIS SOFTWARE IS PROVIDED BY THE
COPYRIGHT HOLDERS AND CONTRIBUTORS
"AS IS" AND ANY EXPRESS OR IMPLIED
WARRANTIES, INCLUDING, BUT NOT LIMITED
TO, THE IMPLIED WARRANTIES OF
MERCHANTABILITY AND FITNESS FOR A
PARTICULAR PURPOSE ARE DISCLAIMED. IN
NO EVENT SHALL THE COPYRIGHT HOLDER
OR CONTRIBUTORS BE LIABLE FOR ANY
DIRECT, INDIRECT, INCIDENTAL, SPECIAL,
EXEMPLARY, OR CONSEQUENTIAL DAMAGES
(INCLUDING, BUT NOT LIMITED TO,
PROCUREMENT OF SUBSTITUTE GOODS OR
SERVICES; LOSS OF USE, DATA, OR PROFITS;
OR BUSINESS INTERRUPTION) HOWEVER
CAUSED AND ON ANY THEORY OF LIABILITY,
WHETHER IN CONTRACT, STRICT LIABILITY, OR
TORT (INCLUDING NEGLIGENCE OR
OTHERWISE) ARISING IN ANY WAY OUT OF
THE USE OF THIS SOFTWARE, EVEN IF
ADVISED OF THE POSSIBILITY OF SUCH
DAMAGE.

Warning Lights, Gauges, and
Indicators

Warning lights and gauges can signal that
something is wrong before it becomes
serious enough to cause an expensive repair
or replacement. Paying attention to the
warning lights and gauges could prevent
injury.

Some warning lights come on briefly when
the engine is started to indicate they are
working. When one of the warning lights
comes on and stays on while driving,
or when one of the gauges shows there
may be a problem, check the section that
explains what to do. Waiting to do repairs
can be costly and even dangerous.

GMC Acadia/Acadia Denali Owner Manual (GMNA-Localizing-U.S./Canada/

Mexico-16402009) - 2023 - CRC - 3/28/22

96

Instruments and Controls

Instrument Cluster (Base Level and Midlevel)

English Base Level and Midlevel Shown, Metric Similar

1.

Fuel Gauge

0

101

2.

Engine Coolant Temperature Gauge

0

103

3.

Speedometer

0

101

4.

Driver Information Center (DIC) (Base
Level)

0

114

or

Driver Information Center (DIC)
(Midlevel)

0

116

or

Driver Information Center (DIC)
(Uplevel)

0

119

5.

Tachometer

0

101

Base Level Cluster Menu

There is an interactive display area in the
center of the instrument cluster.

Use the right steering wheel control to open
and scroll through the different items and
displays.

Press

o

to access the cluster applications.

Use

w

or

x

through the list of available

applications. Not all applications will be
available on all vehicles.

.

Info App. This is where the selected Driver
Information Center (DIC) displays can be
viewed. See

Driver Information Center

(DIC) (Base Level)

0

114

or


Content      ..     1      2      3      4      ..