FM 3-05.70 Field Manual Survival (17 May 2002) - page 12
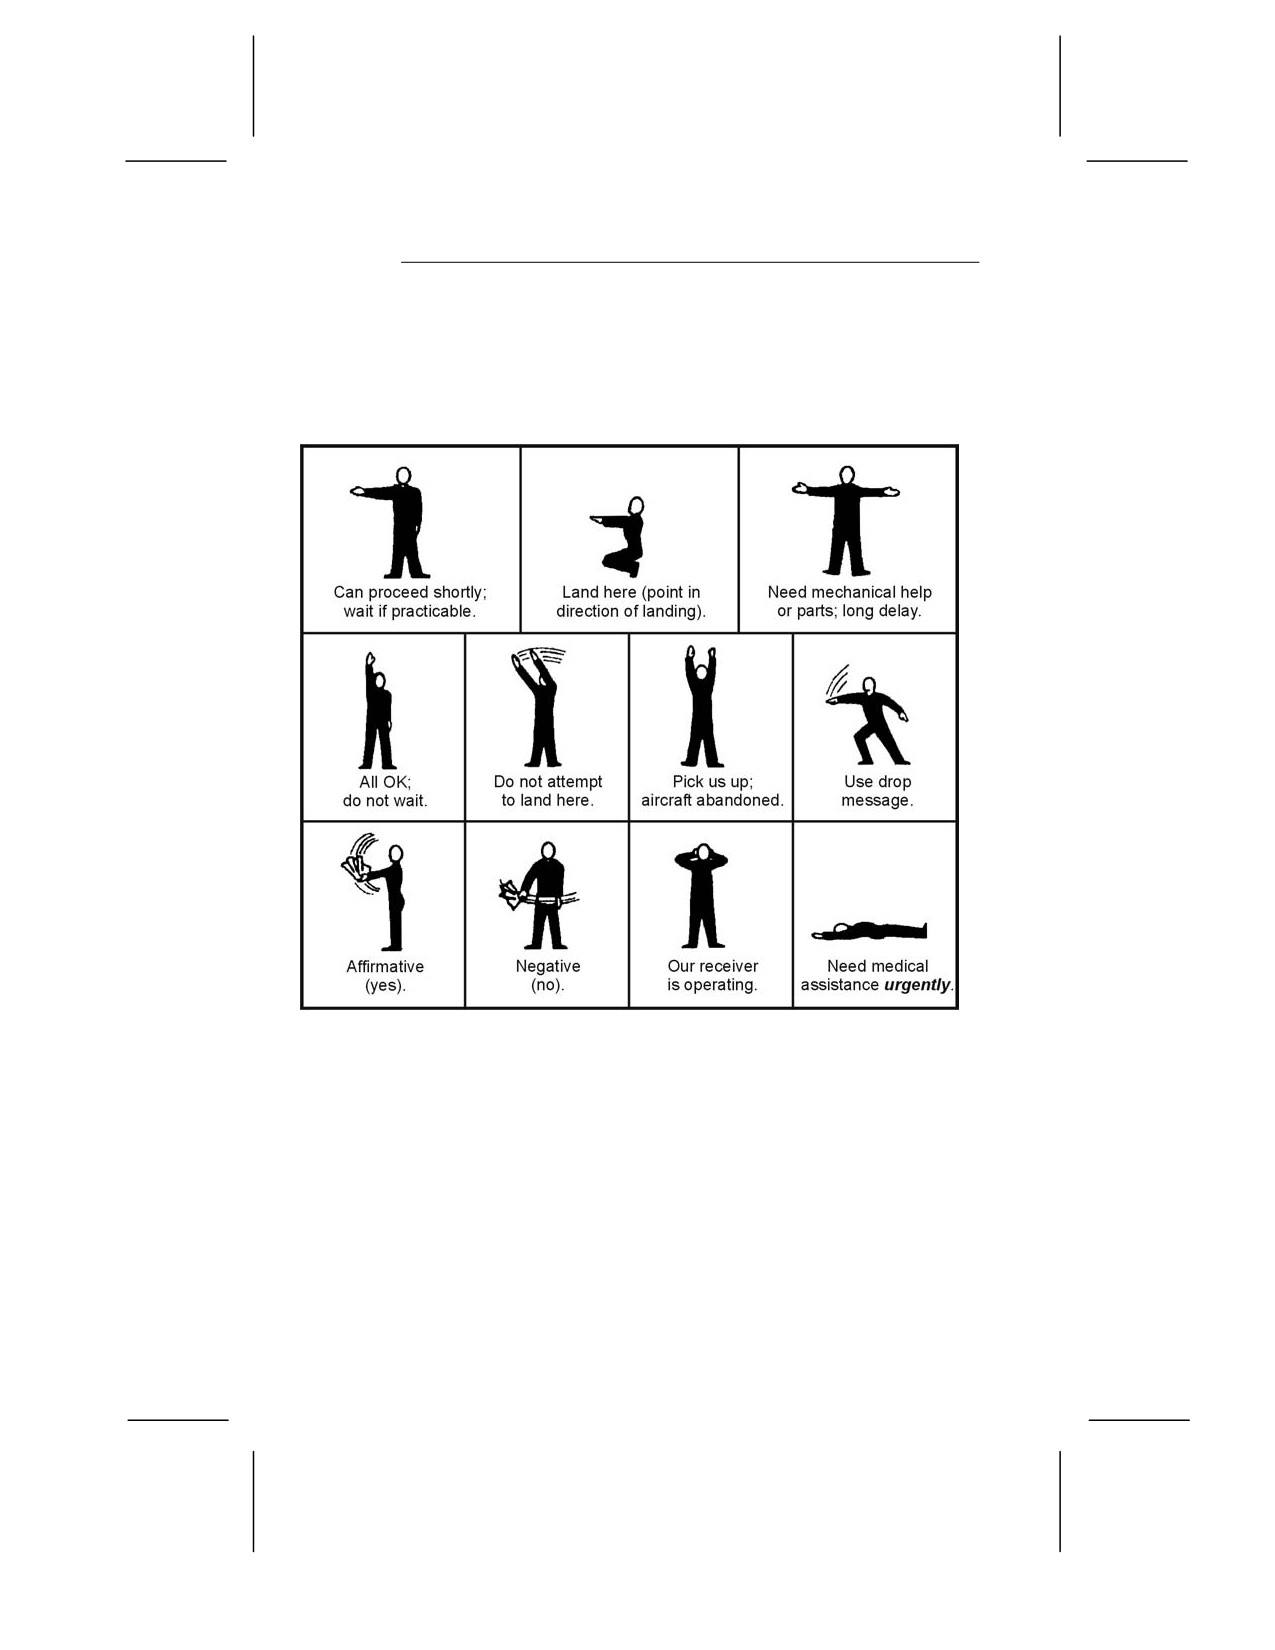
BODY SIGNALS
19-40. When an aircraft is close enough for the pilot to see
you clearly, use body movements or positions (Figure 19-7) to
convey a message.
Figure 19-7. Body Signals
PANEL SIGNALS
19-41. If you have a life raft cover or sail, or a suitable substitute
such as a space blanket or combat casualty blanket, use the
symbols shown in Figure 19-8, page 19-15, to convey a message.
19-14
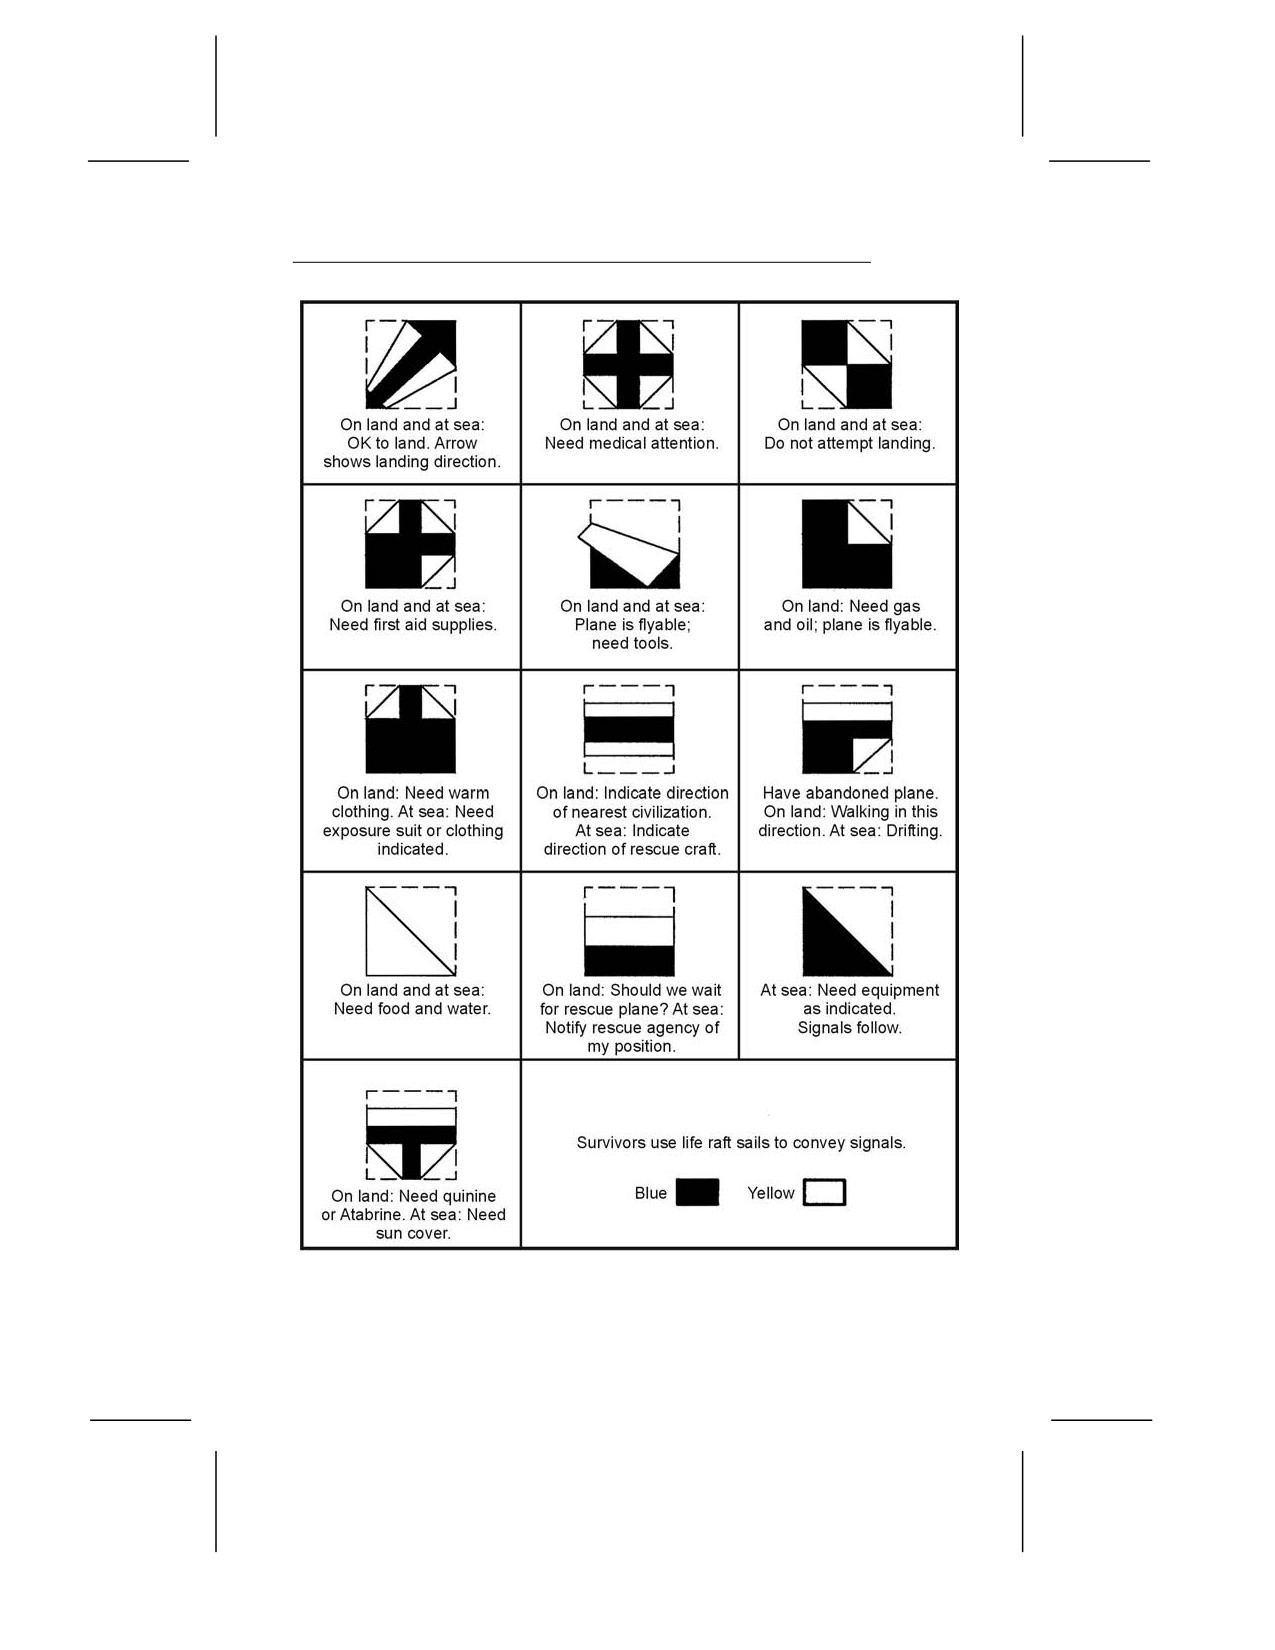
Figure 19-8. Panel Signals
19-15
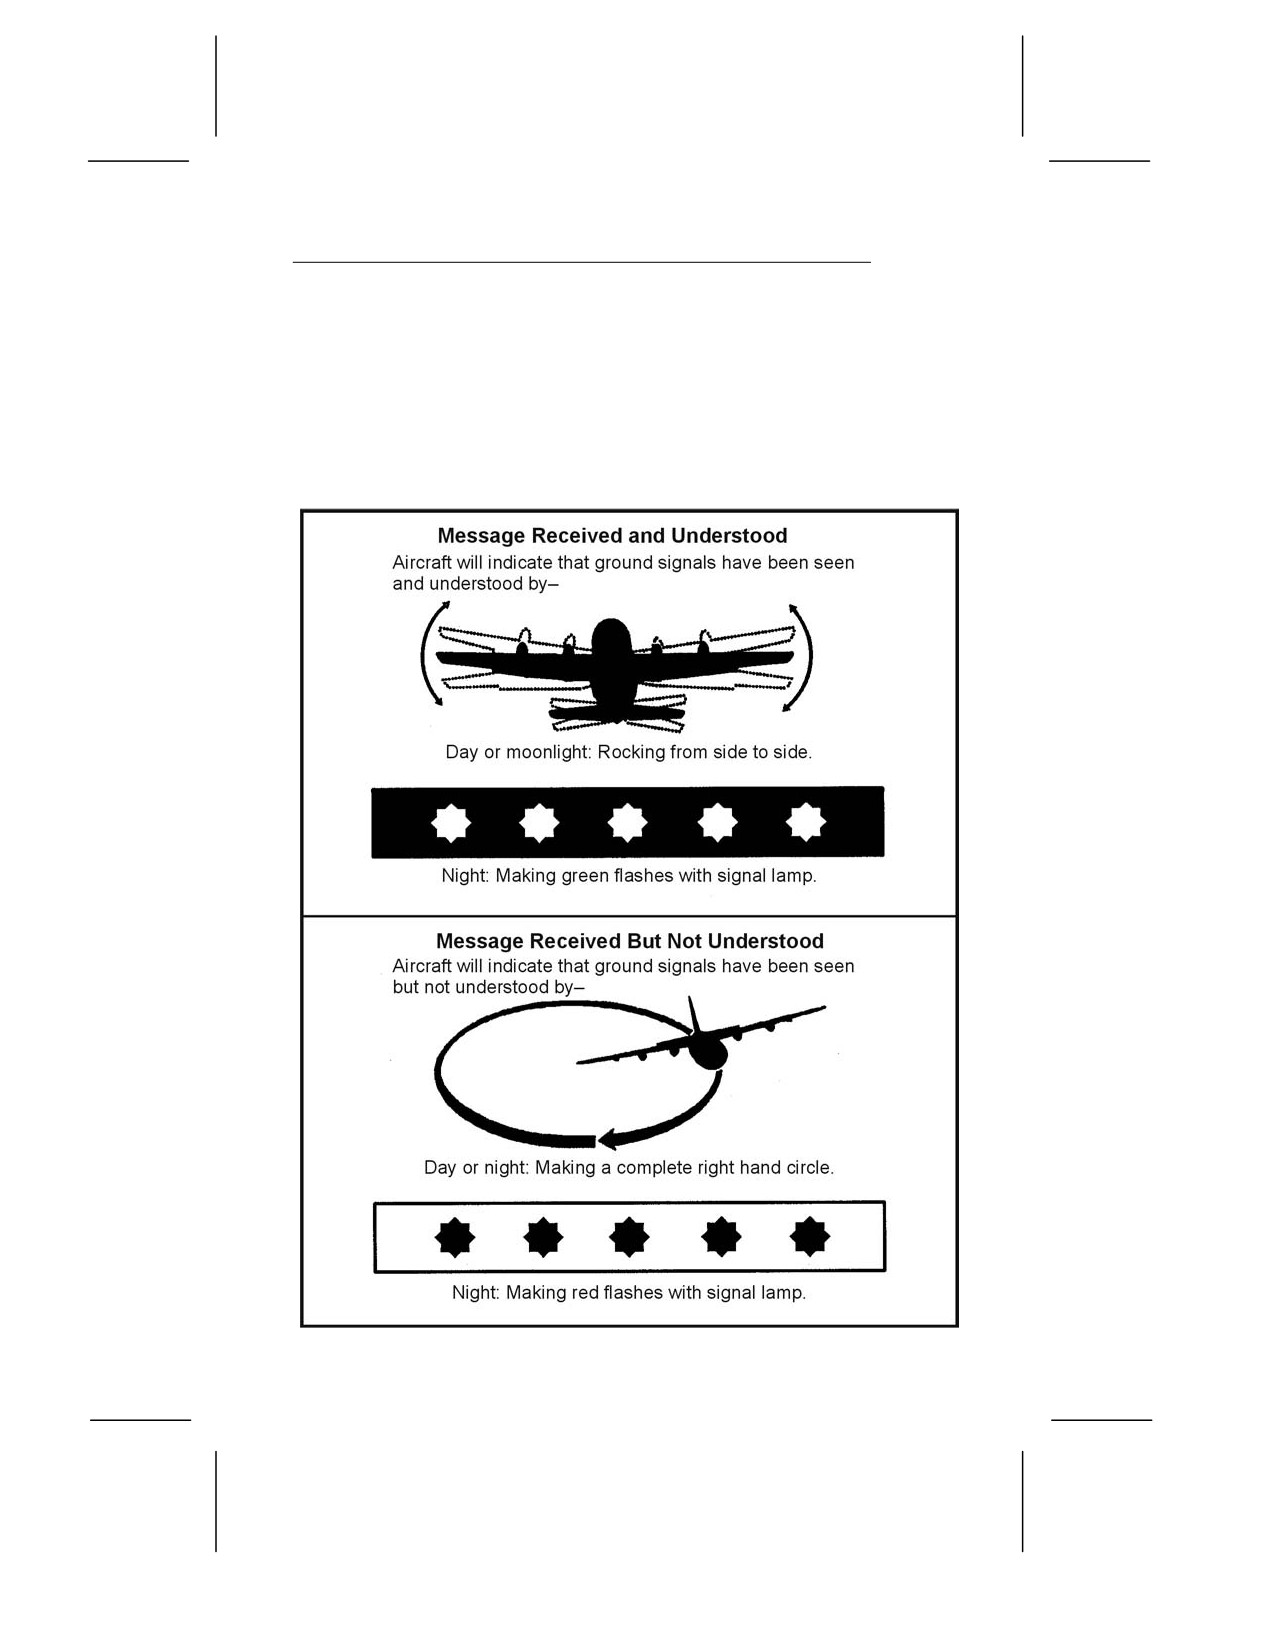
AIRCRAFT ACKNOWLEDGMENTS
19-42. Once the pilot of a fixed-wing aircraft has sighted you, he
will normally indicate he has seen you by flying low, moving the
plane, and flashing lights as shown in Figure 19-9, page 19-17. Be
ready to relay other messages to the pilot once he acknowledges
that he received and understood your first message. Use a radio,
if possible, to relay further messages. If no radio is available, use
the codes covered in the previous paragraphs.
AIRCRAFT VECTORING PROCEDURES
19-43. To establish initial contact, use beacon for 15 seconds, use
voice for 15 seconds (Mayday, Mayday, Mayday—this is call sign),
then listen for 15 seconds. When you contact a friendly aircraft
with a radio, guide the pilot to your location. Use the following
general format to guide the pilot:
• Call sign (if any).
• Name.
• Location (clock direction and distance from aircraft to your
location).
• Enemy disposition and location.
• Number of people needing to be rescued.
• Available landing sites.
• Any remarks such as medical aid or other specific types of
help needed immediately.
• Give any guidance or steering corrections to the pilot from
their perspective to remove any chance of error. For
example, if the aircraft needs to turn left to pass over your
position, tell the pilot to steer left. As he begins to come
close to the correct heading, tell him to “roll out.” Continue
to make corrections as necessary to align the aircraft with
you. Give the pilot estimates of distance from you as
well, and be prepared to give a countdown to your position.
Example: “You are one mile out… one-half mile out…
you’ll be over my position in ten seconds, nine, eight,
seven, six, five, four, three, two, one, mark.” This
will aid the pilot in estimating your range over the
plane’s nose. Remember that pilots may not be able to
19-16
see straight down, only out in front of them at an angle
depending on the aircraft design.
19-44. Simply because you have made contact with rescuers
does not mean you are safe. Follow instructions and continue
to use sound survival and evasion techniques until you are
actually rescued.
19-17
Chapter 20
Survival Movement In Hostile Areas
The “rescue at any cost” philosophy of previous
conflicts is not likely to be possible in future
conflicts. Our potential adversaries have made
great progress in air defense measures and radio
direction finder
(RDF) techniques. We must
assume that U.S. military forces trapped behind
enemy lines in future conflicts may not
experience quick recovery by friendly elements.
Soldiers may have to move for extended times
and distances to places less threatening to the
recovery forces. The soldier will not likely know
the type of recovery to expect. Each situation and
the available resources determine the type of
recovery possible. Since no one can be absolutely
sure until the recovery effort begins, soldiers
facing a potential cutoff from friendly forces
should be familiar with all the possible types of
recovery, their related problems, and their
responsibilities
to
the recovery effort.
Preparation and training can improve the
chances of success.
PHASES OF PLANNING
20-1. Preparation is a requirement for all missions.
When
planning, you must consider how to avoid capture and return to
your unit. Evasion plans must be prepared in conjunction with
unit standing operating procedures
(SOPs) and current joint
doctrine. You must also consider any courses of action (COAs)
that you or your unit will take.
EVASION PLAN OF ACTION
20-2. Successful evasion is dependent on effective prior planning.
The responsibility ultimately rests on the individual concerned.
Sound evasion planning should incorporate intelligence
20-1
briefings—selected areas for evasion; area intelligence
descriptions; E&R area studies; survival, evasion, resistance, and
escape (SERE) guides and bulletins; isolated personnel reports;
and an evasion plan of action (EPA).
20-3. The study and research needed to develop the EPA will
make you aware of the current situation in your mission area.
Your EPA will let recovery forces know your probable actions
should you have to move to avoid capture.
20-4. You should start preparing even before premission
planning. Portions of the EPA are the unit SOP. Include the EPA
in your training. Planning starts in your daily training.
20-5. The EPA is your entire plan for your return to friendly
control. It consists of five paragraphs written in the operation
order format. You can take most of Paragraph I—Situation, with
you on the mission. Appendix I contains the EPA format and
indicates what portion of the EPA you can take on the mission.
20-6. A comprehensive EPA is a valuable asset to the soldier
trapped behind enemy lines attempting to avoid capture. To
complete Paragraph I, know your unit’s assigned area or
concentrate on potential mission areas of the world. Many open or
closed sources contain the information you need to complete an
EPA. Open sources may include newspapers, magazines, country
or area handbooks, area studies, television, radio, internet,
persons familiar with the area, and libraries. Use caution with
open source information; it may be unreliable. Closed sources
may include area studies, area assessments, SERE contingency
guides, SECRET Internet Protocol Router Network, various
classified field manuals, and intelligence reports.
20-7. Prepare your EPA in three phases. During your normal
training, prepare Paragraph I—Situation. Prepare Paragraphs II,
III, IV, and V during your premission planning. After deployment
into an area, continually update your EPA based on situation or
mission changes and intelligence updates.
20-8. The EPA is a guide. You may add or delete certain portions
based on the mission. The EPA may be a recovery force’s only
means of determining your location and intentions after you start
to evade. It is an essential tool for your survival and return to
friendly control.
20-2
STANDING OPERATING PROCEDURES
20-9. Your unit SOPs are valuable tools that will help you plan
your EPA. When faced with a dangerous situation requiring
immediate action, it is not the time to discuss options; it is the
time to act. Many of the techniques used during small unit
movement can be carried over to fit requirements for moving and
returning to friendly control. Items from the SOP should include,
but are not limited to—
• Movement team size (three to four persons per team).
• Team communications (technical and nontechnical).
• Essential equipment.
• Actions at danger areas.
• Signaling techniques.
• Immediate action drills.
• Linkup procedures.
• Helicopter recovery devices and procedures.
• Security procedures during movement and at hide sites.
• Rally points.
20-10. Rehearsals work effectively for reinforcing these SOP skills
and also provide opportunities for evaluation and improvement.
NOTIFICATION TO MOVE AND AVOID CAPTURE
20-11. An isolated unit has several general COAs it can take to
avoid the capture of the group or individuals. These COAs are not
courses the commander can choose instead of his original mission.
He cannot arbitrarily abandon the assigned mission. Rather, he
may adopt these COAs after completing his mission when his unit
cannot complete its assigned mission (because of combat power
losses) or when he receives orders to extract his unit from its
current position. If such actions are not possible, the commander
may decide to have the unit try to move to avoid capture and
return to friendly control. In either case, as long as there is
communication with higher headquarters, that headquarters will
make the decision.
20-12. If the unit commander loses contact with higher
headquarters, he must make the decision to move or wait. He
20-3
bases his decision on many factors, including the mission, rations
and ammunition on hand, casualties, the chance of relief by
friendly forces, and the tactical situation. The commander of an
isolated unit faces other questions. What COA will inflict
maximum damage on the enemy? What COA will assist in
completing the higher headquarters’ overall mission?
20-13. Movement teams conduct the execution portion of the plan
when notified by higher headquarters or, if there is no contact
with higher headquarters, when the highest ranking person
decides that the situation requires the unit to try to escape
capture or destruction. Movement team leaders receive their
notification through prebriefed signals. Once the signal to try to
avoid capture is given, it must be passed rapidly to all personnel.
Notify higher headquarters, if possible. If unable to communicate
with higher headquarters, leaders must recognize that organized
resistance has ended, and that organizational control has ceased.
Command and control is now at the movement team or individual
level and is returned to higher organizational control only after
reaching friendly lines.
EXECUTION
20-14. Upon notification to avoid capture, all movement team
members will try to link up at the initial evasion point (IEP). This
point is where team members rally and actually begin their
evasion. Tentatively select the IEP during your planning phase
through a map reconnaissance. Once on the ground, the team
verifies this location or selects a better one. All team members
must know its location. The IEP should be easy to locate and
occupy for a minimum amount of time.
20-15. Once the team has rallied at the IEP, it must—
• Give first aid.
• Inventory its equipment (decide what to abandon, destroy,
or take along).
• Apply camouflage.
• Make sure everyone knows the tentative hide locations.
• Ensure everyone knows the primary and alternate routes
and rally points en route to the hide locations.
20-4
• Always maintain security.
• Split the team into smaller elements. The ideal element
should have two to three members; however, it could
include more depending on team equipment and
experience.
20-16. The movement portion of returning to friendly control is
the most dangerous as you are now most vulnerable. It is usually
better to move at night because of the concealment darkness
offers. Exceptions to such movement would be when moving
through hazardous terrain or dense vegetation
(for example,
jungle or mountainous terrain). When moving, avoid the following
even if it takes more time and energy to bypass:
• Obstacles and barriers.
• Roads and trails.
• Inhabited areas.
• Waterways and bridges.
• Natural lines of drift.
• Man-made structures.
• All civilian and military personnel.
20-17. Movement in enemy-held territory is a very slow and
deliberate process. The slower you move and the more careful you
are, the better. Your best security will be using your senses. Use
your eyes and ears to detect people before they detect you. Make
frequent listening halts. In daylight, observe a section of your
route before you move along it. The distance you travel before you
hide will depend on the enemy situation, your health, the terrain,
the availability of cover and concealment for hiding, and the
amount of darkness left. See Chapter 22 for more movement and
countertracking techniques.
20-18. Once you have moved into the area in which you want to
hide (hide area), select a hide site. Keep the word BLISS in mind
when selecting a hide site:
• B-Blends in with the surroundings.
• L-Low in silhouette.
• I-Irregular in shape.
20-5
• S-Small in size.
• S-Secluded.
20-19. Avoid the use of existing buildings or shelters. Usually,
your best option will be to crawl into the thickest vegetation you
can find. Construct any type of shelter within the hide area only
in cold weather and desert environments. If you build a shelter,
follow the BLISS formula.
HIDE SITE ACTIVITIES
20-20. After you have located your hide site, do not move straight
into it. Use a buttonhook or other deceptive technique to move to
a position outside of the hide site. Conduct a listening halt before
moving individually into the hide site. Be careful not to disturb or
cut any vegetation. Once you have occupied the hide site, limit
your activities to maintaining security, resting, camouflaging, and
planning your next moves.
20-21. Maintain your security through visual scanning and
listening. Upon detection of the enemy, the security personnel
alert all personnel, even if the team’s plan is to stay hidden and
not move upon sighting the enemy. Take this action so that
everyone is aware of the danger and ready to react.
20-22. If any team member leaves the team, give him a five-point
contingency plan. It should include—Who is going? Where are
they going? How long will they be gone? What to do if they are
hit or don’t return on time? Where to go if anyone is hit?
20-23. It is extremely important to stay healthy and alert when
trying to avoid capture. Take every opportunity to rest, but do not
sacrifice security. Rotate security so that all members of your
movement team can rest. Treat all injuries, no matter how minor.
Loss of your health will mean loss of your ability to continue to
avoid capture.
20-24. Camouflage is an important aspect of both moving and
securing a hide site. Always use a buddy system to ensure that
camouflage is complete. Ensure that team members blend with
the hide site. Use natural or man-made materials. If you add any
additional camouflage material to the hide site, do not cut
vegetation in the immediate area.
20-6
20-25. Plan your next actions while at the hide site. Start your
planning process immediately upon occupying the hide site.
Inform all team members of their current location and designate
an alternate hide site location. Once this is done, start planning
for the team’s next movement.
20-26. Planning the team’s movement begins with a map
reconnaissance. Choose the next hide area first. Then choose a
primary and an alternate route to the hide area. In choosing the
routes, do not use straight lines. Use one or two radical changes
in direction. Pick the routes that offer the best cover and
concealment, the fewest obstacles, and the least likelihood of
contact with humans. There should be locations along the route
where the team can get water. To aid team navigation, use
azimuths, distances, checkpoints or steering marks, and
corridors. Plan rally points and rendezvous points at intervals
along the route.
20-27. Other planning considerations may fall under what the
team already has in the team SOP. Examples are immediate
action drills, actions on sighting the enemy, and hand-and-arm
signals.
20-28. Once planning is complete, ensure everyone knows and
memorizes the entire plan. The team members should know the
distances and azimuths for the entire route to the next hide area.
They should study the map and know the various terrain they
will be moving across so that they can move without using the
map.
20-29. Do not occupy a hide site for more than 24 hours. In most
situations, hide during the day and move at night. Limit your
actions in the hide site to those discussed above. Once in the hide
site, restrict all movement to less than 45 centimeters (18 inches)
above the ground. Do not build fires or prepare food. Smoke and
food odors will reveal your location. Before leaving the hide site,
sterilize it to prevent tracking.
HOLE-UP AREAS
20-30. After moving and hiding for several days, usually three or
four, you or the movement team will have to move into a hole-up
area. This is an area where you can rest, recuperate, and get and
prepare food. Choose an area near a water source. You then have
20-7
a place to get water, to place fishing devices, and to trap game.
Since waterways are a line of communication, locate your hide
site well away from the water.
20-31. The hole-up area should offer plenty of cover and
concealment for movement in and around the area. Always
maintain security while in the hole-up area. Always man the
hole-up area. Actions in the hole-up area are the same as in the
hide site, except that you can move away from the hole-up area to
get and prepare food. While in the hole-up area, you can—
• Select and occupy the next hide site (remember you are
still in a dangerous situation; this is not a friendly area).
• Reconnoiter the area for resources and potential concealed
movement routes to the alternate hide site.
• Gather food
(nuts, berries, vegetables). When moving
around the area for food, maintain security and avoid
leaving tracks or other signs. When setting traps and
snares, keep them well-camouflaged and in areas where
people are not likely to discover them. Remember, the local
population sometimes heavily travels trails near water
sources.
• Get water from sources within the hide area. Be careful
not to leave tracks of signs along the banks of water
sources when getting water. Moving on hard rocks or logs
along the banks to get water will reduce the signs you
leave.
• Set clandestine fishing devices, such as stakeouts, below
the surface of the water to avoid detection.
• Locate a fire site well away from the hide site. Use this site
to prepare food or boil water. Camouflage and sterilize the
fire site after each use. Be careful that smoke and light
from the fire does not compromise the hole-up area.
20-32. While in the hole-up area, security is still your primary
concern. Designate team members to perform specific tasks. To
limit movement around the area, you may have a two-man team
perform more than one task. For example, the team getting water
could also set the fishing devices. Do not occupy the hole-up area
longer than 72 hours.
20-8
RETURN TO FRIENDLY CONTROL
20-33. Establishing contact with friendly lines or patrols is the
most crucial part of movement and return to friendly control. All
your patience, planning, and hardships will be in vain if you do
not exercise caution when contacting friendly frontline forces.
Friendly patrols have killed personnel operating behind enemy
lines because they did not make contact properly. Most of the
casualties could have been avoided if caution had been exercised
and a few simple procedures followed. The normal tendency is to
throw caution to the wind when in sight of friendly forces. You
must overcome this tendency and understand that linkup is a
very sensitive situation.
BORDER CROSSINGS
20-34. If you have made your way to a friendly or neutral country,
use the following procedures to cross the border and link up with
friendly forces on the other side:
• Occupy a hide site on the near side of the border and send
a team out to reconnoiter the potential crossing site.
• Surveil the crossing site for at least 24 hours, depending on
the enemy situation.
• Make a sketch of the site, taking note of terrain, obstacles,
guard routines and rotations, and any sensor devices or
trip wires. Once the reconnaissance is complete, the team
moves to the hide site, briefs the rest of the team, and
plans to cross the border at night.
• After crossing the border, set up a hide site on the far side
of the border and try to locate friendly positions. Do not
reveal your presence.
• Depending on the size of your movement team, have two
men surveil the potential linkup site with friendly forces
until satisfied that the personnel are indeed friendly.
• Make contact with the friendly forces during daylight.
Personnel chosen to make contact should be unarmed,
have no equipment, and have positive identification readily
available. The person who actually makes the linkup
should be someone who looks least like the enemy.
20-9
• During the actual contact, have only one person make the
contact. The other person provides the security and
observes the link-up area from a safe distance. The
observer should be far enough away so that he can warn
the rest of the movement team if something goes wrong.
• Wait until the party he is contacting looks in his direction
so that he does not surprise the contact. He stands up from
behind cover, with hands overhead and states that he is an
American. After this, he follows any instructions given
him. He avoids answering any tactical questions and does
not give any indication that there are other team members.
• Reveal that there are other personnel with him only after
verifying his identity and satisfying himself he has made
contact with friendly forces.
20-35. Language problems or difficulties confirming identities
may arise. The movement team should maintain security, be
patient, and have a contingency plan.
NOTE: If you are moving to a neutral country, you are
surrendering to that power and become a detained person.
LINKUP AT THE FORWARD EDGE OF THE BATTLE AREA
OR FORWARD LINE OF OWN TROOPS
20-36. If caught between friendly and enemy forces and there is
heavy fighting in the area, you may choose to hide and let the
friendly lines pass over you. If overrun by friendly forces, you may
try to link up from their rear during daylight hours. If overrun by
enemy forces, you may move further to the enemy rear, try to
move to the forward edge of the battle area or forward line of own
troops during a lull in the fighting, or move to another area along
the front.
20-37. The actual linkup will be done as for linkup during a
border crossing. The only difference is that you must be more
careful on the initial contact. Frontline personnel are more likely
to shoot first and ask questions later, especially in areas of heavy
fighting. You should be near or behind cover before trying to
make contact.
20-10
LINKUP WITH FRIENDLY PATROLS
20-38. If friendly lines are a circular perimeter or an isolated
camp, for example, any direction you approach from will be
considered enemy territory. You do not have the option of moving
behind the lines and trying to link up. This move makes the
linkup extremely dangerous. One option you have is to place the
perimeter under observation and wait for a friendly patrol to
move out in your direction, providing a chance for a linkup. You
may also occupy a position outside of the perimeter and call out to
get the attention of the friendly forces. Ideally, display anything
that is white while making contact. If nothing else is available,
use any article of clothing. The idea is to draw attention while
staying behind cover. Once you have drawn attention to your
signal and called out, follow instructions given to you.
20-39. Be constantly on the alert for friendly patrols because
these provide a means for return to friendly control. Find a
concealed position that allows you maximum visual coverage of
the area. Try to memorize every terrain feature so that, if
necessary, you can infiltrate to friendly positions under the cover
of darkness. Remember, trying to infiltrate in darkness is
extremely dangerous.
20-40. Because of the missions of combat and reconnaissance
patrols and where they are operating, making contact can be
dangerous. If you decide not to make contact, you can observe
their route and approach friendly lines at about the same
location. Such observation will enable you to avoid mines and
booby traps.
20-41. Once you have spotted a patrol, remain in position and, if
possible, allow the patrol to move toward you. When the patrol is
25 to 50 meters (83 to 165 feet) from your position, signal them
and call out a greeting that is clearly and unmistakably of
American origin.
20-42. If you have nothing white, an article of clothing will suffice
to draw attention. If the distance is greater than 50 meters (165
feet), a reconnaissance patrol may avoid contact and bypass your
position. If the distance is less than 25 meters (83 feet), a patrol
member may react instantly by firing a fatal shot.
20-11
20-43. It is crucial, at the time of contact, that there is enough
light for the patrol to identify you as an American.
20-44. Whatever linkup technique you decide to use, use extreme
caution. From the perspective of the friendly patrol or friendly
personnel occupying a perimeter, you are hostile until they make
positive identification.
20-12
Chapter 21
Camouflage
In a survival situation, especially in a hostile
environment, you may find it necessary to
camouflage yourself, your equipment, and your
movement. Effective camouflage may mean the
difference between survival and capture by the
enemy. Camouflage and movement techniques,
such as stalking, will also help you get animals
or game for food using primitive weapons and
skills.
PERSONAL CAMOUFLAGE
21-1. When camouflaging yourself, consider that certain shapes
are particular to humans. The enemy will look for these shapes.
The shape of a hat, helmet, or black boots can give you away.
Even animals know and run from the shape of a human
silhouette. Break up your outline by placing small amounts of
vegetation from the surrounding area in your uniform,
equipment, and headgear. Try to reduce any shine from skin or
equipment. Blend in with the surrounding colors and simulate
the texture of your surroundings.
SHAPE AND OUTLINE
21-2. Change the outline of weapons and equipment by tying
vegetation or strips of cloth onto them. Make sure the added
camouflage does not hinder the equipment’s operation. When
hiding, cover yourself and your equipment with leaves, grass, or
other local debris. Conceal any signaling devices you have
prepared, but keep them ready for use.
COLOR AND TEXTURE
21-3. Each area of the world and each climatic condition
(arctic/winter, temperate/jungle, or swamp/desert) has color
patterns and textures that are natural for that area. While color
is self-explanatory, texture defines the surface characteristics of
something when looking at it. For example, surface textures may
21-1
be smooth, rough, rocky, leafy, or many other possible
combinations. Use color and texture together to camouflage
yourself effectively. It makes little sense to cover yourself with
dead, brown vegetation in the middle of a large grassy field.
Similarly, it would be useless to camouflage yourself with green
grass in the middle of a desert or rocky area.
21-4. To hide and camouflage movement in any specific area of
the world, you must take on the color and texture of the
immediate surroundings. Use natural or man-made materials to
camouflage yourself. A few examples include camouflage paint,
charcoal from burned paper or wood, mud, grass, leaves, strips of
cloth or burlap, pine boughs, and camouflaged uniforms.
21-5. Cover all areas of exposed skin, including face, hands, neck,
and ears. Use camouflage paint, charcoal, or mud to camouflage
yourself. Cover areas that stick out more and catch more light
(forehead, nose, cheekbones, chin, and ears) with a darker color.
Cover other areas, particularly recessed or shaded areas (around
the eyes and under the chin), with lighter colors. Be sure to use
an irregular pattern. Attach vegetation from the area or strips of
cloth of the proper color to clothing and equipment. If you use
vegetation, replace it as it wilts. As you move through an area, be
alert to the color changes and modify your camouflage colors as
necessary.
21-6. Figure 21-1 gives a general idea of how to apply camouflage
for various areas and climates. Use appropriate colors for your
surroundings. The blotches or slashes will help to simulate
texture.
Area
Method
Temperature deciduous forest
Blotches
Coniferous forest
Broad slash
Jungle
Broad slash
Desert
Slash
Arctic
Blotches
Grass or open area
Slash
Figure 21-1. Camouflage Methods for Specific Areas
21-2
SHINE
21-7. As skin gets oily, it becomes shiny. Equipment with worn-
off paint is also shiny. Even painted objects, if smooth, may shine.
Glass objects such as mirrors, glasses, binoculars, and telescopes
shine. You must cover these glass objects when not in use.
Anything that shines will automatically attract attention and will
give away your location.
21-8. Whenever possible, wash oily skin and reapply camouflage.
Skin oil will wash off camouflage, so reapply it frequently. If you
must wear glasses, camouflage them by applying a thin layer of
dust to the outside of the lenses. This layer of dust will reduce the
reflection of light. Cover shiny spots on equipment by painting,
covering with mud, or wrapping with cloth or tape. Pay particular
attention to covering boot eyelets, buckles on equipment, watches
and jewelry, zippers, and uniform insignia. Carry a signal mirror
in its designed pouch or in a pocket with the mirror portion facing
your body.
SHADOW
21-9. When hiding or traveling, stay in the deepest part of the
shadows. The outer edges of the shadows are lighter and the
deeper parts are darker. Remember, if you are in an area where
there is plenty of vegetation, keep as much vegetation between
you and a potential enemy as possible. This action will make it
very hard for the enemy to see you as the vegetation will partially
mask you from his view. Forcing an enemy to look through many
layers of masking vegetation will fatigue his eyes very quickly.
21-10. When traveling, especially in built-up areas at night, be
aware of where you cast your shadow. It may extend out around
the corner of a building and give away your position. Also, if you
are in a dark shadow and there is a light source to one side, an
enemy on the other side can see your silhouette against the light.
MOVEMENT
21-11. Movement, especially fast movement, attracts attention. If
possible, avoid movement in the presence of an enemy. If capture
appears imminent in your present location and you must move,
move away slowly, making as little noise as possible. By moving
slowly in a survival situation, you decrease the chance of
21-3
detection and conserve energy that you may need for long-term
survival or long-distance evasion.
21-12. When moving past obstacles, avoid going over them. If you
must climb over an obstacle, keep your body level with its top to
avoid silhouetting yourself. Do not silhouette yourself against the
skyline when crossing hills or ridges. When you are moving, you
will have difficulty detecting the movement of others. Stop
frequently, listen, and look around slowly to detect signs of hostile
movement.
NOISE
21-13. Noise attracts attention, especially if there is a sequence of
loud noises such as several snapping twigs. If possible, avoid
making any noise. Slow your pace as much as necessary to avoid
making noise when moving around or away from possible threats.
21-14. Use background noises to cover the noise of your
movement. Sounds of aircraft, trucks, generators, strong winds,
and people talking will cover some or all the sounds produced by
your movement. Rain will mask a lot of movement noise, but it
also reduces your ability to detect potential enemy noise.
SCENT
21-15. Whether hunting animals or avoiding the enemy, it is
always wise to camouflage the scent associated with humans.
Start by washing yourself and your clothes without using soap.
This washing method removes soap and body odors. Avoiding
strong smelling foods, such as garlic, helps reduce body odors. Do
not use tobacco products, candy, gum, or cosmetics.
21-16. You can use aromatic herbs or plants to wash yourself and
your clothing, to rub on your body and clothing, or to chew on to
camouflage your breath. Pine needles, mint, or any similar
aromatic plant will help camouflage your scent from both animals
and humans. Standing in smoke from a fire can help mask your
scent from animals. While animals are afraid of fresh smoke from
a fire, older smoke scents are normal smells after forest fires and
do not scare them.
21-17. While traveling, use your sense of smell to help you find or
avoid humans. Pay attention to smells associated with humans,
such as fire, cigarettes, gasoline, oil, soap, and food. Such smells
21-4
may alert you to their presence long before you can see or hear
them, depending on wind speed and direction. Note the wind’s
direction and, when possible, approach from or skirt around on
the downwind side when nearing humans or animals.
METHODS OF STALKING
21-18. Sometimes you need to move, undetected, to or from a location.
You need more than just camouflage to make these moves
successfully. The ability to stalk or move without making any sudden
quick movement or loud noise is essential to avoiding detection.
Always pick your route carefully to keep you concealed; use trenches,
slight rises in terrain, thick vegetation for concealment. Avoid lateral
movement to the observer unless you have good concealment,
otherwise stalk straight in toward the observer.
21-19. You must practice stalking if it is to be effective. Use the
following techniques when practicing.
UPRIGHT STALKING
21-20. Take steps about half your normal stride when stalking in
the upright position. Such strides help you to maintain your
balance. You should be able to stop at any point in that movement
and hold that position as long as necessary. Curl the toes up out
of the way when stepping down so the outside edge of the ball of
the foot touches the ground. Feel for sticks and twigs that may
snap when you place your weight on them. If you start to step on
one, lift your foot and move it. After making contact with the
outside edge of the ball of your foot, roll to the inside ball of your
foot, place your heel down, followed by your toes. Then gradually
shift your weight forward to the front foot. Lift the back foot to
about knee height and start the process over again.
21-21. Keep your hands and arms close to your body and avoid
waving them about or hitting vegetation. When moving in a
crouch, you gain extra support by placing your hands on your
knees. One step usually takes 1 minute to complete, but the time
it takes will depend on the situation.
CRAWLING
21-22. Crawl on your hands and knees when the vegetation is too
low to allow you to walk upright without being seen. Move one
21-5
limb at a time and be sure to set it down softly, feeling for
anything that may snap and make noise. Be careful that your
toes and heels do not catch on vegetation.
PRONE STAKING
21-23. To stalk in the prone position, you do a low, modified push-
up on your hands and toes, moving yourself forward slightly, and
then lowering yourself again slowly. Avoid dragging and scraping
along the ground as this makes excessive noise and leaves large
trails for trackers to follow.
ANIMAL STALKING
21-24. Before stalking an animal, select the best route. If the
animal is moving, you will need an intercepting route. Pick a
route that puts objects between you and the animal to conceal
your movement from it. By positioning yourself in this way, you
will be able to move faster, until you pass that object. Some
objects such as large rocks and trees may totally conceal you, and
others such as small bushes and grass may only partially conceal
you. Pick the route that offers the best concealment and requires
the least amount of effort.
21-25. Keep your eyes on the animal and stop when it looks your
way or turns its ears your way, especially if it suspects your
presence. As you get close, squint your eyes slightly to conceal
both the light-dark contrast of the whites of the eyes and any
shine from your eyes. Keep your mouth closed so that the animal
does not see the whiteness or shine of your teeth.
ANTITRACKING
21-26. Along with camouflage of your body, you need to
camouflage your movement from visual trackers. Antitracking
techniques should be used; countertracking techniques are of
little use to the evader, as they would pinpoint his location or
route. During movement this can be accomplished by using the
following methods:
• Restore vegetation—Use a stick to lift the vegetation you
crushed down during movement through it. This can slow
you down and it is hard to tell if you are being effective.
21-6
•
Brush out tracks—Use a tree branch to brush or pat out
tracks in open ground. This is effective in concealing the
number in the party, but leaves obvious signs in itself.
•
Use hard or stony ground—Using this type of terrain
minimizes the signs you leave slowing the visual tracker.
•
Make abrupt direction changes—Using this technique
combined with the use of hard or stony ground can be very
effective in slowing the visual tracker as it will be much
harder to detect the direction change.
•
Use well-used paths—Although the use of paths is not
advisable, there may be times you can use them to your
advantage. For example, if you have been in an area long
enough to surveil the path to determine the traffic
patterns, you could use the path prior to a farmer moving a
heard of cows down the path, eliminating your sign.
•
Use foot coverings—They can assist in aging or virtually
eliminating your signs. Examples include sandbags, rags,
old socks, or commercial foot coverings made from
imitation sheepskin (these seem to work the best).
•
Change footgear—Use this method in an area such as hard
or stony ground. Vary the tread pattern.
•
Use custom footgear—Militaries generally have a standard
issue footgear, although with the world economy, this is
changing. If you know that the area you are working in has
a standard issue footgear, you may want to acquire a pair
or have that tread pattern put on your boots.
•
Walk backwards—This can be useful at times but there
are pitfalls to avoid. Avoid turning your foot out. When you
look over your left shoulder your left foot tends to turn
outward and visa versa. Avoid dragging dirt backwards.
Try to place your footfalls so that the toe indention is
deeper than your heel indention to give the appearance of
moving forward.
•
Confuse the start point—Whatever the point on the ground
you start your evasion, try to confuse it by walking
numerous cloverleaf patterns out of and back into it before
you leave on your initial route (this can assist in delaying
dog trackers also).
21-7
• Use streams, lakes, waterways—This is a judgement call
on your part. Ask yourself: Is the stream moving in the
direction you need to go? Is it fast or slow moving water?
Will it put you that much farther ahead of the trackers?
(Note: You will leave more signs upon exiting the water.)
• Crossing roads or paths with the traffic pattern—When
crossing roads or paths try to cross with the direction of
travel, not perpendicular, this will assist in your tracks
blending into normal traffic patterns and making them
harder to follow.
• Careful placement of footfalls leaving little heel or toe
dig—Try to leave as little sign as possible. Last but not
least, always vary your techniques so as not to educate the
tracker as to what to look for if he loses the track!
ANTIDOG TRACKING
21-27. When trying to elude dog trackers always remember you
are trying to beat the handler not the dog! Whatever you do, it
should be done to either tire the handler or decrease the handler’s
confidence in his dog. Some techniques to use against dog tracker
teams are as follows:
• Open ground—Although this is a danger area, if the wind
is high it will blow the scent to vegetated areas; thus the
team will not be directly on your tracks and it will slow the
team’s progression.
• Thick terrain—Using a zigzag pattern of movement will
slow and tire the handler and possibly decrease the
handler’s confidence.
• Hard or stony ground—In high winds or high
temperatures these areas will dissipate your scent quicker,
increasing the chance of the dog losing the track.
• Crowded places—If the dog is not scent-specific trained,
and you move through an area where many other people
have recently been he may lose the track.
• Freshly plowed or fertilized fields—The dog may lose the
track in these areas due to the overpowering scent of fresh
dirt and human or animal manure used as fertilizer (do not
rely too much on this theory).
21-8
• Speed—Try to maintain a constant speed. Try not to run.
Running increases the scent, due to more soil and
vegetation disturbance and more body odor from sweat or
adrenaline.
• Transportation—Using a vehicle will greatly increase your
time and distance but you could still be tracked; however,
it would be at a much slower pace.
21-9
Chapter 22
Contact With People
Some of the best and most frequently given
advice, when dealing with the local population, is
for you to accept, respect, and adapt to their
ways. Thus, “When in Rome, do as the Romans
do.” This is excellent advice, but there are
several considerations involved in putting this
advice into practice.
CONTACT WITH LOCAL PEOPLE
22-1. You must give serious consideration to dealing with the
local people. Do they have a primitive culture? Are they farmers,
fishermen, friendly people, or enemy? In a survival situation,
“cross-cultural communication” can vary radically from area to
area and from people to people. It may mean interaction with
people of an extremely primitive culture or contact with people
who have a relatively modern culture. A culture is identified by
standards of behavior that its members consider proper and
acceptable but may or may not conform to your idea of what is
proper. No matter who these people are, you can expect they will
have laws, social and economic values, and political and religious
beliefs that may be radically different from yours. Before
deploying into your area of operations, study these different
cultural aspects. Prior study and preparation will help you make
or avoid contact if you have to deal with the local population.
22-2. People will be friendly, unfriendly, or they will choose to
ignore you. Their attitude may be unknown. If the people are
known to be friendly, try to keep them friendly through your
courtesy and respect for their religion, politics, social customs,
habits, and all other aspects of their culture. If the people are
known to be enemies or are unknowns, make every effort to avoid
any contact and leave no sign of your presence. A basic knowledge
of the daily habits of the local people will be essential in this
attempt. If, after careful observation, you determine that an
unknown people are friendly, you may contact them if you
absolutely need their help.
22-1
22-3. Usually, you have little to fear and much to gain from
cautious and respectful contact with local people of friendly or
neutral countries. If you become familiar with the local customs,
display common decency, and most important, show respect for
their customs, you should be able to avoid trouble and possibly
gain needed help. To make contact, wait until only one person is
near and, if possible, let that person make the initial approach.
Most people will be willing to help if you appear to be in need.
However, local political attitudes, instruction, or propaganda
efforts may change the attitudes of otherwise friendly people.
Conversely, in unfriendly countries, many people, especially in
remote areas, may feel animosity toward their politicians and
may be friendlier toward you.
22-4. The key to successful contact with local people is to be
friendly, courteous, and patient. Displaying fear, showing
weapons, and making sudden or threatening movements can
cause a local person to fear you. Such actions can prompt a hostile
response. When attempting a contact, smile as often as you can.
Many local people are shy and seem unapproachable, or they may
ignore you. Approach them slowly and do not rush your contact.
SURVIVAL BEHAVIOR
22-5. Use salt, tobacco, silver money, and similar items discreetly
when trading with local people. Paper money is well-known
worldwide. Do not overpay; it may lead to embarrassment and
even danger. Always treat people with respect. Do not bully them
or laugh at them.
22-6. Using sign language or acting out needs or questions can be
very effective. Many people are used to such language and
communicate using nonverbal sign language. Try to learn a few
words and phrases of the local language in and around your
potential area of operations. Trying to speak someone’s language
is one of the best ways to show respect for his culture. Since
English is widely used, some of the local people may understand a
few words of English.
22-7. Some areas may be taboo. They range from religious or
sacred places to diseased or danger areas. In some areas, certain
animals must not be killed. Learn the rules and follow them.
Watch and learn as much as possible. Such actions will help to
22-2
strengthen relations and provide new knowledge and skills that
may be very important later. Seek advice on local hazards and find
out from friendly people where the hostile people are. Always
remember that people frequently insist that other people are
hostile, simply because they do not understand different cultures
and distant people. The people they can usually trust are their
immediate neighbors—much the same as in our own neighborhood.
22-8. Frequently, local people, like ourselves, will suffer from
contagious diseases. Build a separate shelter, if possible, and avoid
physical contact without giving the impression of doing so. Personally
prepare your food and drink, if you can do so without giving offense.
Frequently, the local people will accept the use of
“personal or
religious custom” as an explanation for isolationist behavior.
22-9. Barter, or trading, is common in more primitive societies.
Hard coin is usually good, whether for its exchange value or as
jewelry or trinkets. In isolated areas, matches, tobacco, salt, razor
blades, empty containers, or cloth may be worth more than any
form of money.
22-10. Be very cautious when touching people. Many people
consider “touching” taboo and such actions may be dangerous.
Avoid sexual contact.
22-11. Hospitality among some people is such a strong cultural
trait that they may seriously reduce their own supplies to feed a
stranger. Accept what they offer and share it equally with all
present. Eat in the same way they eat and, most important, try to
eat all they offer.
22-12. If you make any promises, keep them. Respect personal
property and local customs and manners, even if they seem odd.
Make some kind of payment for food and supplies. Respect
privacy. Do not enter a house unless invited.
CHANGES TO POLITICAL ALLEGIANCE
22-13. In today’s world of fast-paced international politics,
political attitudes and commitments within nations are subject to
rapid change. The population of many countries, especially
politically hostile countries, must not be considered friendly just
because they do not demonstrate open hostility. Unless briefed to
the contrary, avoid all contact with such people.
22-3
Chapter 23
Survival In Man-Made Hazards
Nuclear, chemical, and biological (NBC) weapons
have become potential realities on any modern
battlespace. Recent experience in Afghanistan,
Cambodia, and other areas of conflict has proved
the use of chemical and biological weapons (such as
mycotoxins). The warfighting doctrine of the North
Atlantic Treaty Organization and former Warsaw
Pact nations addresses the use of both nuclear and
chemical weapons. The potential use of these
weapons intensifies the problems of survival
because of the serious dangers posed by either
radioactive fallout or contamination produced by
persistent biological or chemical agents.
You must use special precautions if you expect to
survive in these man-made hazards. If you are
subjected to any of the effects of nuclear, chemical,
or biological warfare, the survival procedures
recommended in this chapter may save your life.
This chapter presents some background
information on each type of hazard so you may
better understand the true nature of the hazard.
Awareness of the hazards, knowledge of this
chapter, and application of common sense can keep
you alive.
THE NUCLEAR ENVIRONMENT
23-1. Prepare yourself to survive in a nuclear environment. Make
sure you know what to expect and how to react to a nuclear
hazard.
EFFECTS OF NUCLEAR WEAPONS
23-2. The effects of nuclear weapons are classified as either
initial or residual. Initial effects occur in the immediate area of
23-1
the explosion and are hazardous in the first minute after the
explosion. Residual effects can last for days or years and cause
death. The principal initial effects are blast and radiation.
Blast
23-3. Blast is the brief and rapid movement of air away from
the explosion’s center and the pressure accompanying this
movement. Strong winds accompany the blast. Blast hurls debris
and personnel, collapses lungs, ruptures eardrums, collapses
structures and positions, and causes immediate death or injury
with its crushing effect.
Thermal Radiation
23-4. This effect is the heat and light radiation a nuclear
explosion’s fireball emits. Light radiation consists of both visible
light and ultraviolet and infrared light. Thermal radiation
produces extensive fires, skin burns, and flash blindness.
Nuclear Radiation
23-5. Nuclear radiation breaks down into two categories. The
effects can be initial radiation and residual radiation.
23-6. Initial nuclear radiation consists of intense gamma rays
and neutrons produced during the first minute after the
explosion. This radiation causes extensive damage to cells
throughout the body. Radiation damage may cause headaches,
nausea, vomiting, diarrhea, and even death, depending on the
radiation dose received. The major problem in protecting yourself
against the initial radiation’s effects is that you may have
received a lethal or incapacitating dose before taking any
protective action. Personnel exposed to lethal amounts of initial
radiation may well have been killed or fatally injured by blast or
thermal radiation.
23-7. Residual radiation consists of all radiation produced after 1
minute from the explosion. It has more effect on you than initial
radiation. A discussion of residual radiation takes place in a
subsequent paragraph.
23-2