FM 3-05.70 Field Manual Survival (17 May 2002) - page 9
blindness are a sensation of grit in the eyes, pain in and over the
eyes that increases with eyeball movement, red and teary eyes,
and a headache that intensifies with continued exposure to light.
Prolonged exposure to these rays can result in permanent eye
damage. To treat snow blindness, bandage your eyes until the
symptoms disappear.
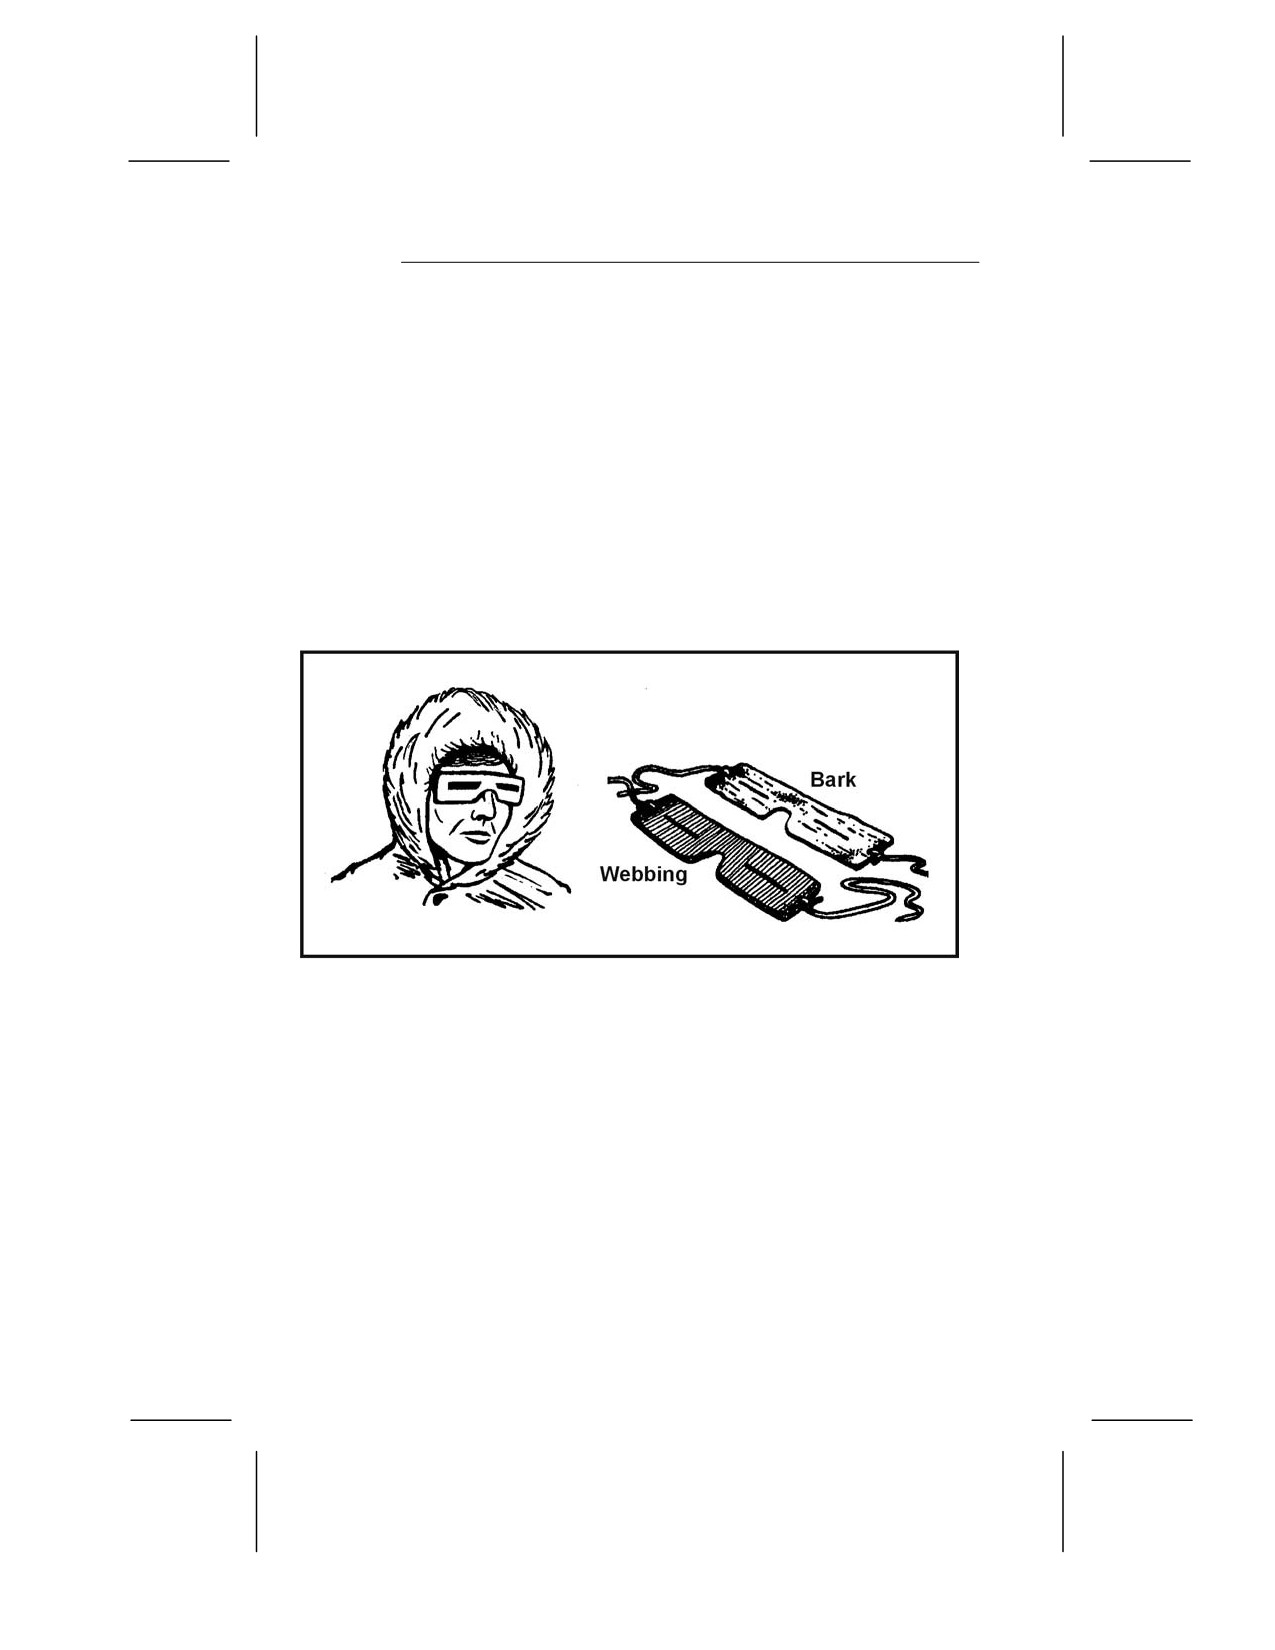
15-39. You can prevent snow blindness by wearing sunglasses. If
you don’t have sunglasses, improvise. Cut slits in a piece of
cardboard, thin wood, tree bark, or other available material
(Figure 15-3). Putting soot under your eyes will help reduce shine
and glare.
Figure 15-3. Improvised Sunglasses
CONSTIPATION
15-40. It is very important to relieve yourself when needed. Do
not delay because of the cold condition. Delaying relieving
yourself because of the cold, eating dehydrated foods, drinking too
little liquid, and irregular eating habits can cause you to become
constipated. Although not disabling, constipation can cause some
discomfort. Increase your fluid intake to at least 2 liters above
your normal 2 to 3 liters daily intake and, if available, eat fruit
and other foods that will loosen the stool.
INSECT BITES
15-12
15-41. Insect bites can become infected through constant
scratching. Flies can carry various disease-producing germs. To
prevent insect bites, use insect repellent and netting and wear
proper clothing. See Chapter 11 for information on insect bites
and Chapter 4 for treatment.
SHELTERS
15-42. Your environment and the equipment you carry with you
will determine the type of shelter you can build. You can build
shelters in wooded areas, open country, and barren areas.
Wooded areas usually provide the best location, while barren
areas have only snow as building material. Wooded areas provide
timber for shelter construction, wood for fire, concealment from
observation, and protection from the wind.
NOTE: In extreme cold, do not use metal, such as an aircraft
fuselage, for shelter. The metal will conduct away from the
shelter what little heat you can generate.
15-43. Shelters made from ice or snow usually require tools such
as ice axes or saws. You must also expend much time and energy
to build such a shelter. Be sure to ventilate an enclosed shelter,
especially if you intend to build a fire in it. Always block a
shelter’s entrance, if possible, to keep the heat in and the wind
out. Use a rucksack or snow block. Construct a shelter no larger
than needed. This will reduce the amount of space to heat. A fatal
error in cold weather shelter construction is making the shelter so
large that it steals body heat rather than helps save it.
15-44. Never sleep directly on the ground. Lay down some pine
boughs, grass, or other insulating material to keep the ground
from absorbing your body heat.
15-45. Never fall asleep without turning out your stove or lamp.
Carbon monoxide poisoning can result from a fire burning in an
unventilated shelter. Carbon monoxide is a great danger. It is
colorless and odorless. Any time you have an open flame, it may
generate carbon monoxide. Always check your ventilation. Even in
a ventilated shelter, incomplete combustion can cause carbon
monoxide poisoning. Usually, there are no symptoms.
Unconsciousness and death can occur without warning.
Sometimes, however, pressure at the temples, burning of the eyes,
15-13
headache, pounding pulse, drowsiness, or nausea may occur. The
one characteristic, visible sign of carbon monoxide poisoning is a
cherry red coloring in the tissues of the lips, mouth, and inside of
the eyelids. Get into fresh air at once if you have any of these
symptoms.
15-46. There are several types of field-expedient shelters you can
quickly build or employ. Many use snow for insulation.
SNOW CAVE SHELTER
15-47. The snow cave shelter (Figure 15-4, page 15-15) is a most
effective dwelling because of the insulating qualities of snow.
Remember that it takes time and energy to build and that you
will get wet while building it. First, you need to find a drift about
3 meters (10 feet) deep into which you can dig. While building this
shelter, keep the roof arched for strength and to allow melted
snow to drain down the sides. Build the sleeping platform higher
than the entrance. Separate the sleeping platform from the snow
cave’s walls or dig a small trench between the platform and the
wall. This platform will prevent the melting snow from wetting
you and your equipment. This construction is especially
important if you have a good source of heat in the snow cave.
Ensure the roof is high enough so that you can sit up on the
sleeping platform. Block the entrance with a snow block or other
material and use the lower entrance area for cooking. The walls
and ceiling should be at least 30 centimeters (1 foot) thick. Install
a ventilation shaft. If you do not have a drift large enough to build
a snow cave, you can make a variation of it by piling snow into a
mound large enough to dig out.
15-14
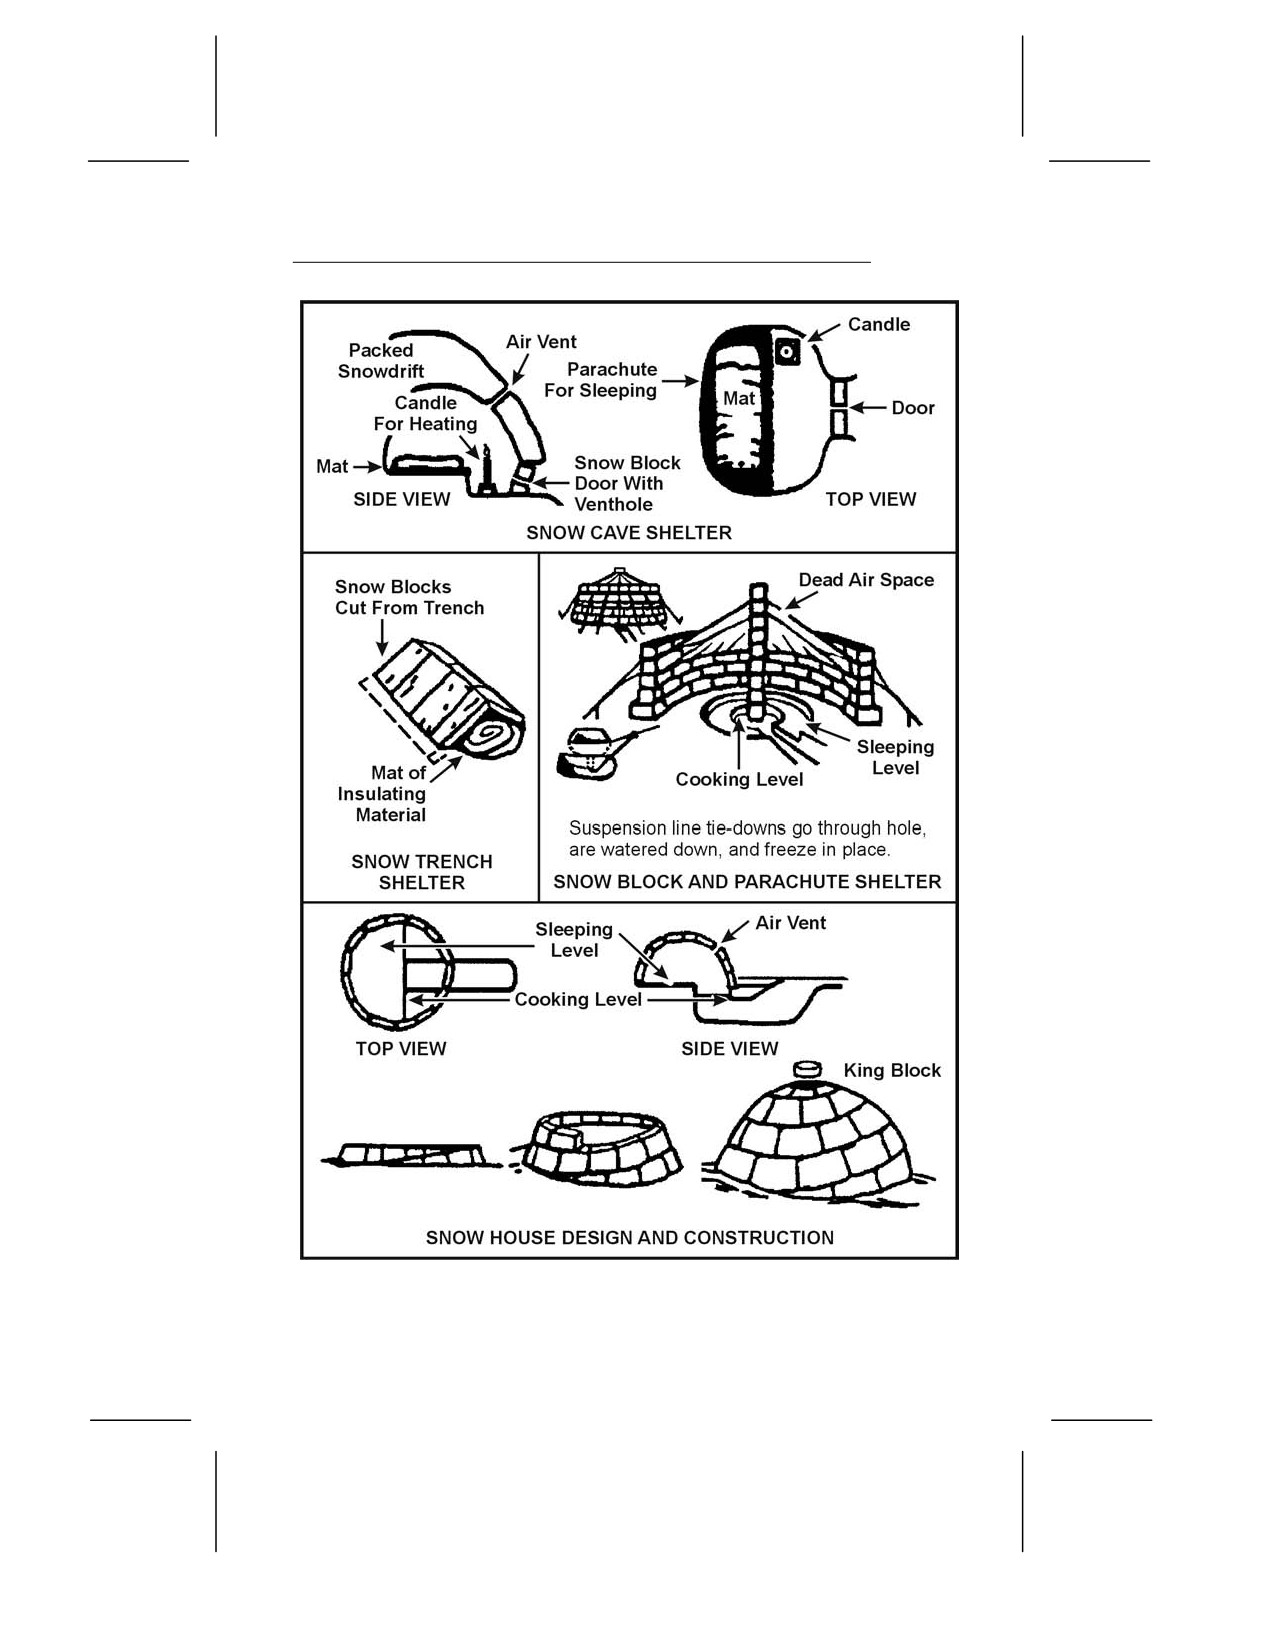
Figure 15-4. Snow Dwellings
15-15
SNOW TRENCH SHELTER
15-48. The idea behind this shelter (Figure 15-4, page 15-15) is to
get you below the snow and wind level and use the snow’s
insulating qualities. If you are in an area of compacted snow, cut
snow blocks and use them as overhead cover. If not, you can use a
poncho or other material. Build only one entrance and use a snow
block or rucksack as a door.
SNOW BLOCK AND PARACHUTE SHELTER
15-49. Use snow blocks for the sides and parachute material for
overhead cover (Figure 15-4, page 15-15). If snowfall is heavy, you
will have to clear snow from the top at regular intervals to
prevent the collapse of the parachute material.
SNOW HOUSE OR IGLOO
15-50. In certain areas, the natives frequently use this type of
shelter (Figure 15-4, page 15-15) as hunting and fishing shelters.
They are efficient shelters but require some practice to make
them properly. Also, you must be in an area that is suitable for
cutting snow blocks and have the equipment to cut them (snow
saw or knife).
LEAN-TO SHELTER
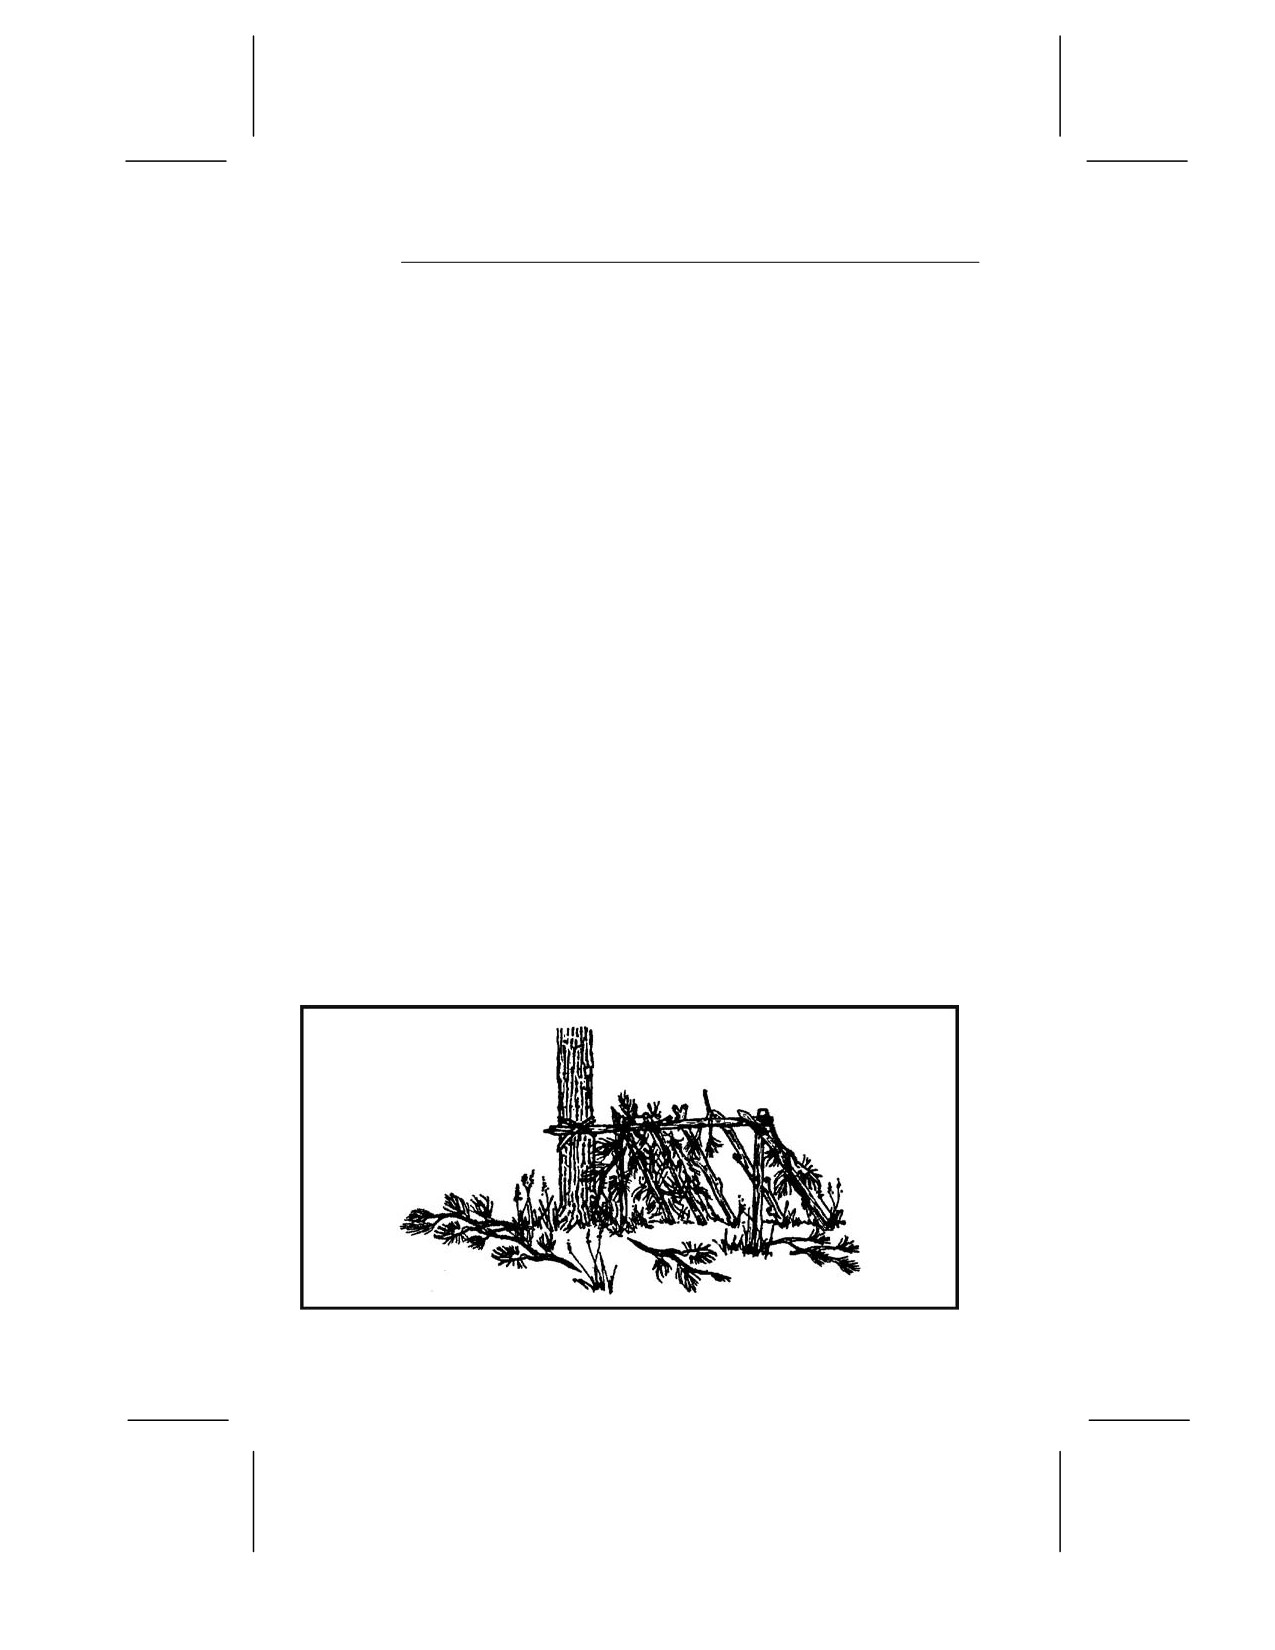
15-51. Construct this shelter in the same manner as for other
environments. However, pile snow around the sides for insulation
(Figure 15-5).
15-16
FALLEN TREE SHELTER
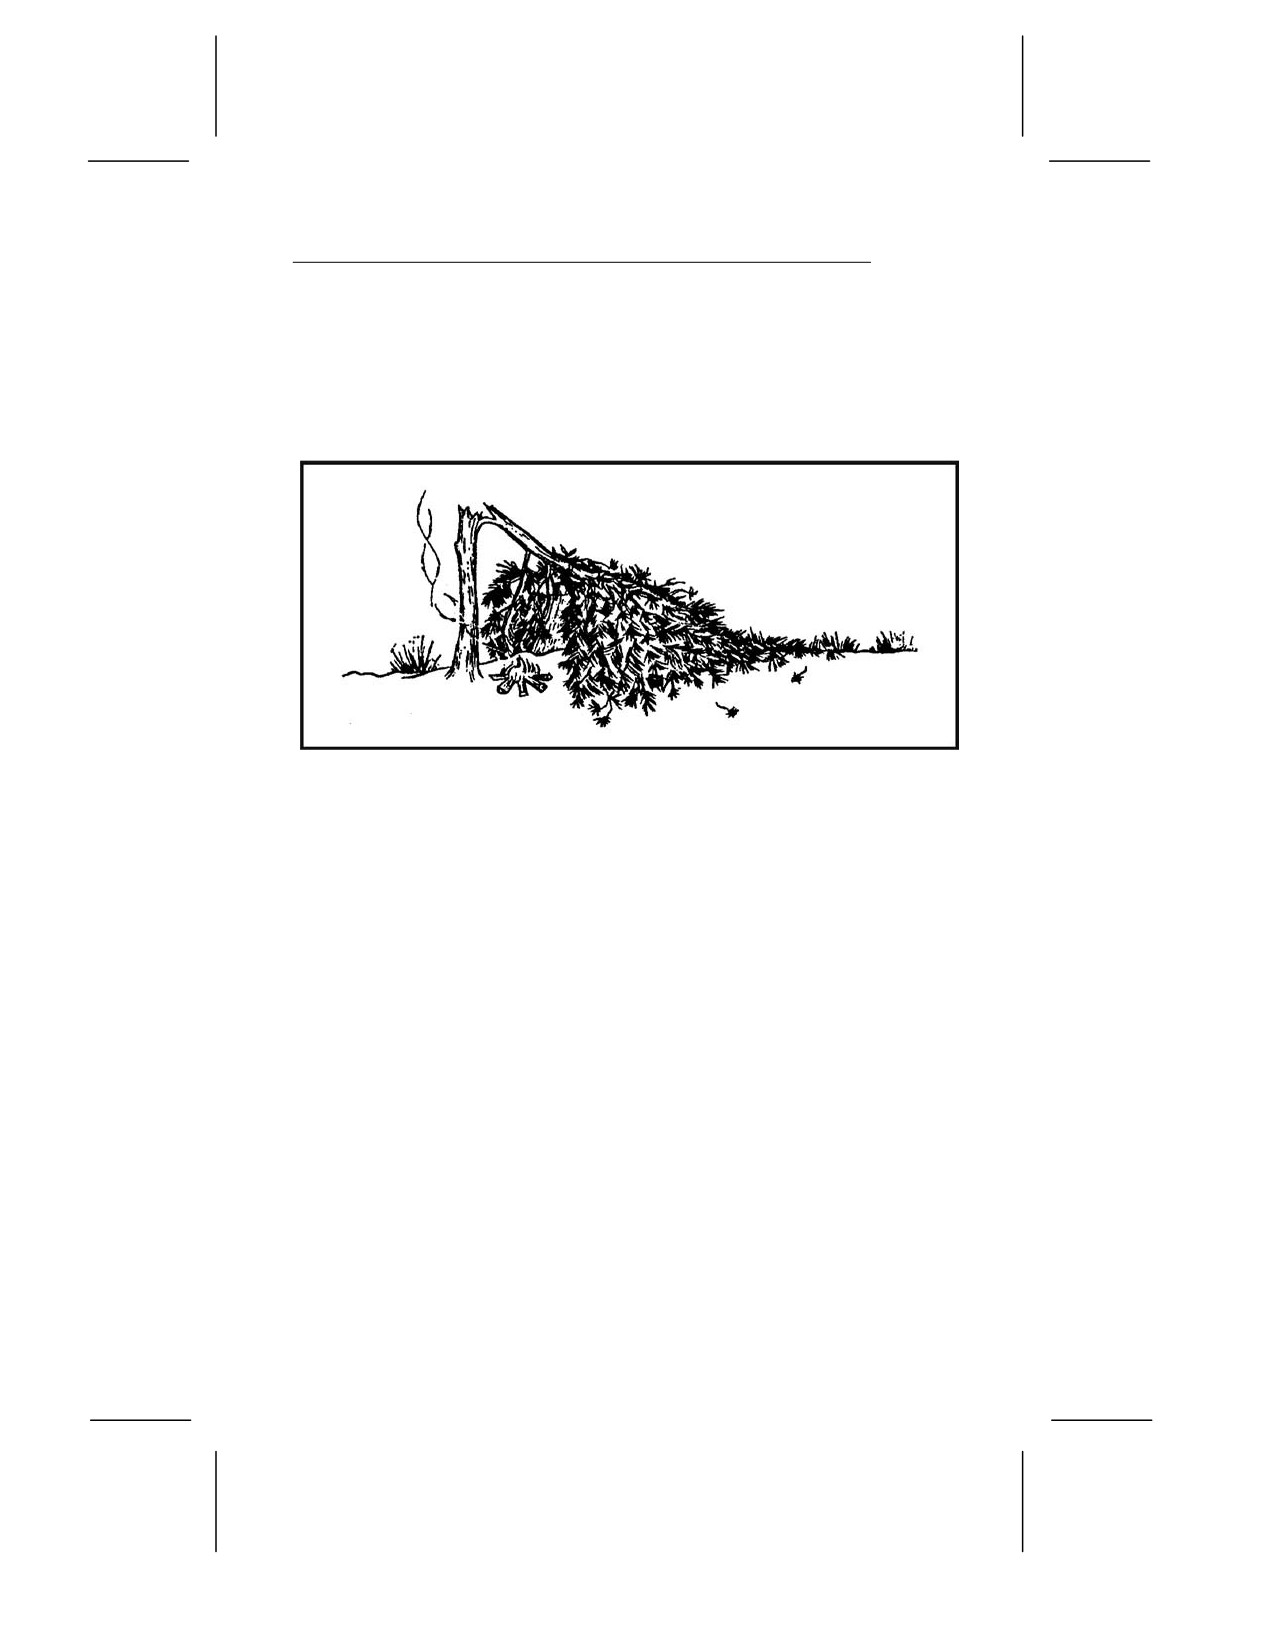
15-52. To build this shelter, find a fallen tree and dig out the
snow underneath it (Figure 15-6). The snow will not be deep
under the tree. If you must remove branches from the inside, use
them to line the floor.
Figure 15-6. Fallen Tree as Shelter
TREE-PIT SHELTER
15-53. Dig snow out from under a suitable large tree. It will not
be as deep near the base of the tree. Use the cut branches to line
the shelter. Use a ground sheet as overhead cover to prevent snow
from falling off the tree into the shelter. If built properly, you can
have 360-degree visibility (Chapter 5, Figure 5-12, page 5-18).
20-MAN LIFE RAFT
15-54. This raft is the standard overwater raft on U.S. Air Force
aircraft. You can use it as a shelter. Do not let large amounts of
snow build up on the overhead protection. If placed in an open
area, it also serves as a good signal to overhead aircraft.
FIRE
15-55. Fire is especially important in cold weather. It not only
provides a means to prepare food, but also to get warm and to
melt snow or ice for water. It also provides you with a significant
psychological boost by making you feel a little more secure in
your situation.
15-17
15-56. Use the techniques described in Chapter 7 to build and
light your fire. If you are in enemy territory, remember that the
smoke, smell, and light from your fire may reveal your location.
Light reflects from surrounding trees or rocks, making even
indirect light a source of danger. Smoke tends to go straight up in
cold, calm weather, making it a beacon during the day, but
helping to conceal the smell at night. In warmer weather,
especially in a wooded area, smoke tends to hug the ground,
making it less visible in the day, but making its odor spread.
15-57. If you are in enemy territory, cut low tree boughs rather
than the entire tree for firewood. Fallen trees are easily seen from
the air.
15-58. All wood will burn, but some types of wood create more
smoke than others. For instance, coniferous trees that contain
resin and tar create more and darker smoke than deciduous trees.
15-59. There are few materials to use for fuel in the high
mountainous regions of the arctic. You may find some grasses and
moss, but very little. The lower the elevation, the more fuel
available. You may find some scrub willow and small, stunted spruce
trees above the tree line. On sea ice, fuels are seemingly nonexistent.
Driftwood or fats may be the only fuels available to a survivor on the
barren coastlines in the arctic and subarctic regions.
15-60. Abundant fuels within the tree line are as follows:
• Spruce trees are common in the interior regions. As a
conifer, spruce makes a lot of smoke when burned in the
spring and summer months. However, it burns almost
smoke-free in late fall and winter.
• The tamarack tree is also a conifer. It is the only tree of the
pine family that loses its needles in the fall. Without its
needles, it looks like a dead spruce, but it has many
knobby buds and cones on its bare branches. When
burning, tamarack wood makes a lot of smoke and is
excellent for signaling purposes.
• Birch trees are deciduous and the wood burns hot and fast,
as if soaked with oil or kerosene. Most birches grow near
streams and lakes, but occasionally you will find a few on
higher ground and away from water.
15-18
• Willow and alder grow in arctic regions, normally in marsh
areas or near lakes and streams. These woods burn hot
and fast without much smoke.
15-61. Dried moss, grass, and scrub willow are other materials
you can use for fuel. These are usually plentiful near streams in
tundras (open, treeless plains). By bundling or twisting grasses or
other scrub vegetation to form a large, solid mass, you will have a
slower burning, more productive fuel.
15-62. If fuel or oil is available from a wrecked vehicle or downed
aircraft, use it for fuel. Leave the fuel in the tank for storage,
drawing on the supply only as you need it. Oil congeals in
extremely cold temperatures, therefore, drain it from the vehicle
or aircraft while still warm if there is no danger of explosion or
fire. If you have no container, let the oil drain onto the snow or
ice. Scoop up the fuel as you need it.
CAUTION
Do not expose flesh to petroleum, oil, and lubricants in
extremely cold temperatures. The liquid state of these
products is deceptive in that it can cause frostbite.
15-63. Some plastic products, such as MRE spoons, helmet visors,
visor housings, and foam rubber will ignite quickly from a
burning match. They will also burn long enough to help start a
fire. For example, a plastic spoon will burn for about 10 minutes.
15-64. In cold weather regions, there are some hazards in using
fires, whether to keep warm or to cook. For example—
• Fires have been known to burn underground, resurfacing
nearby. Therefore, do not build a fire too close to a shelter.
• In snow shelters, excessive heat will melt the insulating
layer of snow that may also be your camouflage.
• A fire inside a shelter lacking adequate ventilation can
result in carbon monoxide poisoning.
• A person trying to get warm or to dry clothes may become
careless and burn or scorch his clothing and equipment.
15-19
• Melting overhead snow may get you wet, bury you and
your equipment, and possibly extinguish your fire.
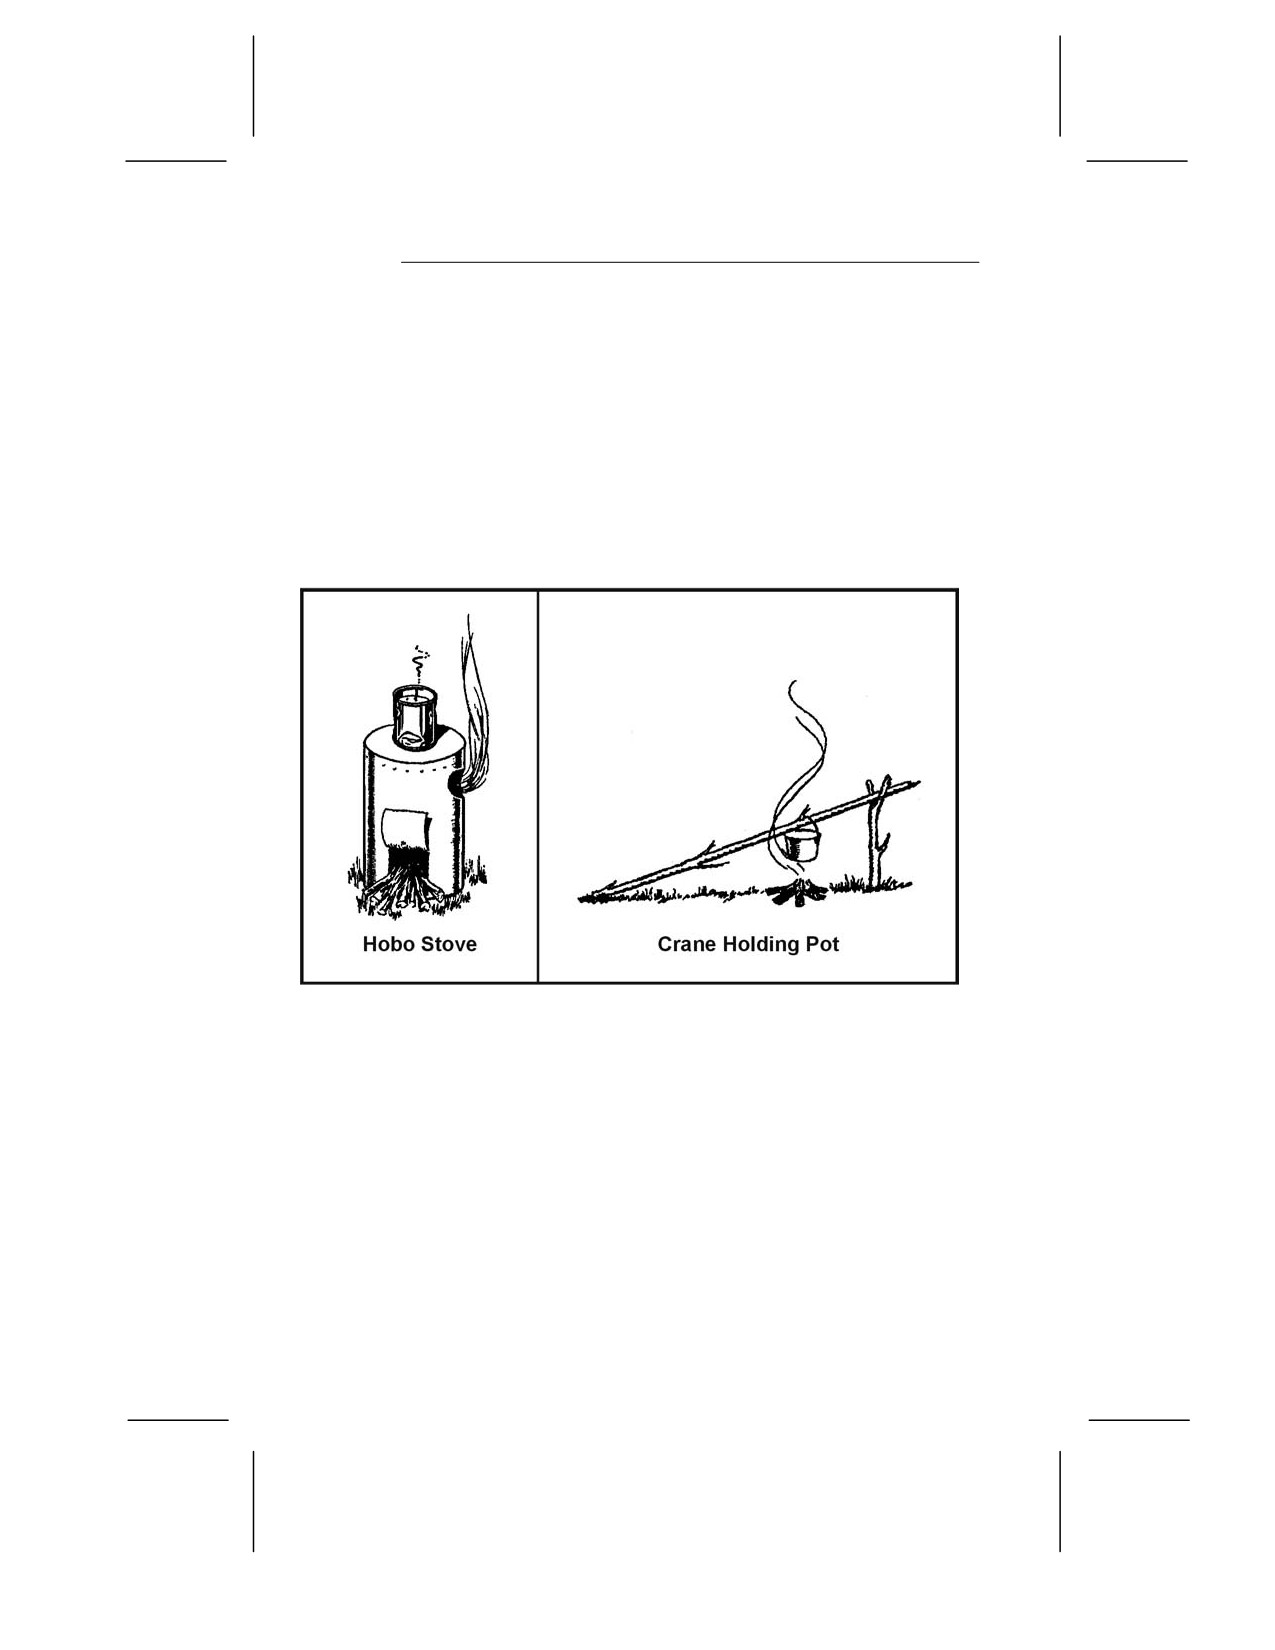
15-65. In general, a small fire and some type of stove is the best
combination for cooking purposes. A hobo stove (Figure 15-7) is
particularly suitable to the arctic. It is easy to make out of a tin
can, and it conserves fuel. A bed of hot coals provides the best
cooking heat. Coals from a crisscross fire will settle uniformly.
Make this type of fire by crisscrossing the firewood. A simple
crane propped on a forked stick will hold a cooking container over
a fire.
Figure 15-7. Cooking Fire and Stove
15-66. For heating purposes, a single candle provides enough heat
to warm an enclosed shelter. A small fire about the size of a man’s
hand is ideal for use in enemy territory. It requires very little
fuel, yet it generates considerable warmth and is hot enough to
warm liquids.
WATER
15-67. There are many sources of water in the arctic and
subarctic. Your location and the season of the year will determine
where and how you obtain water.
15-20
15-68. Water sources in arctic and subarctic regions are more
sanitary than in other regions due to the climatic and
environmental conditions. However, always purify the water
before drinking it. During the summer months, the best natural
sources of water are freshwater lakes, streams, ponds, rivers, and
springs. Water from ponds or lakes may be slightly stagnant but
still usable. Running water in streams, rivers, and bubbling
springs is usually fresh and suitable for drinking.
15-69. The brownish surface water found in a tundra during the
summer is a good source of water. However, you may have to
filter the water before purifying it.
15-70. You can melt freshwater ice and snow for water.
Completely melt both before putting them in your mouth. Trying
to melt ice or snow in your mouth takes away body heat and may
cause internal cold injuries. If on or near pack ice in the sea, you
can use old sea ice to melt for water. In time, sea ice loses its
salinity. You can identify this ice by its rounded corners and
bluish color.
15-71. You can use body heat to melt snow. Place the snow in a
water bag and place the bag between your layers of clothing. This
is a slow process, but you can use it on the move or when you
have no fire.
NOTE: Do not waste fuel to melt ice or snow when drinkable
water is available from other sources.
15-72. When ice is available, melt it rather than snow. One cup of
ice yields more water than one cup of snow. Ice also takes less
time to melt. You can melt ice or snow in a water bag, MRE ration
bag, tin can, or improvised container by placing the container
near a fire. Begin with a small amount of ice or snow in the
container and, as it turns to water, add more ice or snow.
15-73. Another way to melt ice or snow is by putting it in a bag
made from porous material and suspending the bag near the fire.
Place a container under the bag to catch the water.
15-74. During cold weather, avoid drinking a lot of liquid before
going to bed. Crawling out of a warm sleeping bag at night to
relieve yourself means less rest and more exposure to the cold.
15-21
15-75. Once you have water, keep it next to you to prevent
refreezing. Also, do not fill your canteen completely. Allowing the
water to slosh around will help keep it from freezing.
FOOD
15-76. There are several sources of food in the arctic and
subarctic regions. The type of food—fish, animal, fowl, or plant—
and the ease in obtaining it depend on the time of the year and
your location.
FISH
15-77. During the summer months, you can easily get fish and
other water life from coastal waters, streams, rivers, and lakes.
Use the techniques described in Chapter 8 to catch fish.
15-78. The North Atlantic and North Pacific coastal waters are
rich in seafood. You can easily find crawfish, snails, clams,
oysters, and king crab. In areas where there is a great difference
between the high and low tidewater levels, you can easily find
shellfish at low tide. Dig in the sand on the tidal flats. Look in
tidal pools and on offshore reefs. In areas where there is a small
difference between the high- and low-tide water levels, storm
waves often wash shellfish onto the beaches.
15-79. The eggs of the spiny sea urchin that lives in the waters
around the Aleutian Islands and southern Alaska are excellent
food. Look for the sea urchins in tidal pools. Break the shell by
placing it between two stones. The eggs are bright yellow in color.
15-80. Most northern fish and fish eggs are edible. Exceptions are
the meat of the arctic shark and the eggs of the sculpins.
15-81. The bivalves, such as clams and mussels, are usually more
palatable than spiral-shelled seafood, such as snails.
15-82. The sea cucumber is another edible sea animal. Inside its
body are five long white muscles that taste much like clam meat.
15-22
WARNING
The black mussel, a common mollusk of the far
north, may be poisonous in any season. Toxins
sometimes found in the mussel’s tissue are as
dangerous as strychnine.
15-83. In early summer, smelt spawn in the beach surf.
Sometimes you can scoop them up with your hands.
15-84. You can often find herring eggs on the seaweed in
midsummer. Kelp, the long ribbonlike seaweed, and other smaller
seaweeds that grow among offshore rocks are also edible.
SEA ICE ANIMALS
15-85. You find polar bears in practically all arctic coastal
regions, but rarely inland. Avoid them if possible. They are the
most dangerous of all bears. They are tireless, clever hunters with
good sight and an extraordinary sense of smell. If you must kill
one for food, approach it cautiously. Aim for the brain; a bullet
elsewhere will rarely kill one. Always cook polar bear meat before
eating it.
CAUTION
Do not eat polar bear liver as it contains a toxic
concentration of vitamin A.
15-86. Earless seal meat is some of the best meat available.
However, you need considerable skill to get close enough to an
earless seal to kill it. In spring, seals often bask on the ice beside
their breathing holes. They raise their heads about every 30
seconds, however, to look for their enemy, the polar bear.
15-87. To approach a seal, do as the Eskimos do—stay downwind
from it, cautiously moving closer while it sleeps. If it moves, stop
and imitate its movements by lying flat on the ice, raising your
head up and down, and wriggling your body slightly. Approach
the seal with your body sideways to it and your arms close to your
15-23
body so that you look as much like another seal as possible. The
ice at the edge of the breathing hole is usually smooth and at an
incline, so the least movement of the seal may cause it to slide
into the water. Therefore, try to get within 22 to 45 meters (73 to
148 feet) of the seal and kill it instantly (aim for the brain). Try to
reach the seal before it slips into the water. In winter, a dead seal
will usually float, but it is difficult to retrieve from the water.
15-88. Keep the seal blubber and skin from coming into contact with
any scratch or broken skin you may have. You could get “spekk-
finger,” a reaction that causes the hands to become badly swollen.
15-89. Keep in mind that where there are seals, there are usually
polar bears, and polar bears have stalked and killed seal hunters.
15-90. You can find porcupines in southern subarctic regions
where there are trees. Porcupines feed on bark; if you find tree
limbs stripped bare, you are likely to find porcupines in the area.
15-91. Ptarmigans, owls, Canadian jays, grouse, and ravens are
the only birds that remain in the arctic during the winter. They
are scarce north of the tree line. Ptarmigans and owls are as good
for food as any game bird. Ravens are too thin to be worth the
effort it takes to catch them. Ptarmigans, which change color to
blend with their surroundings, are hard to spot. Rock ptarmigans
travel in pairs and you can easily approach them. Willow
ptarmigans live among willow clumps in bottomlands. They
gather in large flocks and you can easily snare them. During the
summer months, all arctic birds have a 2- to 3-week molting
period during which they cannot fly and are easy to catch. Use
one of the techniques described in Chapter 8 to catch them.
15-92. Skin and butcher game (Chapter 8) while it is still warm.
If you do not have time to skin the game, at least remove its
entrails, musk glands, and genitals before storing. If time allows,
cut the meat into usable pieces and freeze each separately so that
you can use the pieces as needed. Leave the fat on all animals
except seals. During the winter, game freezes quickly if left in the
open. During the summer, you can store it in underground
ice holes.
15-24
PLANTS
15-93. Although tundras support a variety of plants during the
warm months, all are small when compared to similar plants in
warmer climates. For instance, the arctic willow and birch are
shrubs rather than trees. Appendix B consists of plant foods and
descriptions that are found in arctic and subarctic regions.
15-94. There are some plants growing in arctic and subarctic
regions that are poisonous if eaten (Appendix C). Use the plants
that you know are edible. When in doubt, follow the Universal
Edibility Test in Chapter 9, Figure 9-5, page 9-7.
TRAVEL
15-95. You will face many obstacles if your survival situation is in
an arctic or subarctic region. Your location and the time of the
year will determine the types of obstacles and the inherent
dangers. You should—
• Avoid traveling during a blizzard.
• Take care when crossing thin ice. Distribute your weight
by lying flat and crawling.
• Cross streams when the water level is lowest. Normal
freezing and thawing action may cause a stream level to
vary as much as 2 to 2.5 meters (7 to 8 feet) per day. This
variance may occur any time during the day, depending on
the distance from a glacier, the temperature, and the
terrain. Consider this variation in water level when
selecting a campsite near a stream.
• Consider the clear arctic air. It makes estimating distance
difficult. You more frequently underestimate than
overestimate distances.
• Avoid travel in
“whiteout” conditions. The lack of
contrasting colors makes it impossible to judge the nature
of the terrain.
• Always cross a snow bridge at right angles to the obstacle
it crosses. Find the strongest part of the bridge by poking
ahead of you with a pole or ice axe. Distribute your weight
by crawling or by wearing snowshoes or skis.
15-25
• Make camp early so that you have plenty of time to build a
shelter.
• Consider frozen or unfrozen rivers as avenues of travel.
However, some rivers that appear frozen may have soft,
open areas that make travel very difficult or may not allow
walking, skiing, or sledding.
• Use snowshoes if you are traveling over snow-covered
terrain. Snow 30 or more centimeters (12 inches or more)
deep makes traveling difficult. If you do not have
snowshoes, make a pair using willow, strips of cloth,
leather, or other suitable material.
15-96. It is almost impossible to travel in deep snow without
snowshoes or skis. Traveling by foot leaves a well-marked trail for
any pursuers to follow. If you must travel in deep snow, avoid
snow-covered streams. The snow, which acts as an insulator, may
have prevented ice from forming over the water. In hilly terrain,
avoid areas where avalanches appear possible. Travel in the early
morning in areas where there is danger of avalanches. On ridges,
snow gathers on the lee side in overhanging piles called cornices.
These often extend far out from the ridge and may break loose if
stepped on.
WEATHER SIGNS
15-97. In most situations you can determine the effects that
weather can have on basic survival needs. Several good indicators
of climatic changes include the following:
WIND
15-98. You can determine wind direction by dropping grass or a
few leaves or by watching the treetops. Once you determine the
wind direction, you can predict the type of weather that is
imminent. Rapidly shifting winds indicate an unsettled
atmosphere and a likely change in the weather.
CLOUDS
15-99. Clouds come in a variety of shapes and patterns. A general
knowledge of clouds and the atmospheric conditions they indicate
15-26
can help you predict the weather. Appendix H explains cloud
formations in more detail.
SMOKE
15-100. Smoke rising in a thin vertical column indicates fair
weather. Low rising or “flattened out” smoke indicates stormy
weather.
BIRDS AND INSECTS
15-101. Birds and insects fly lower to the ground than normal in
heavy, moisture-laden air. Such flight indicates that rain is likely.
Most insect activity increases before a storm, but bee activity
increases before fair weather.
LOW-PRESSURE FRONT
15-102. Slow-moving or imperceptible winds and heavy, humid
air often indicate a low-pressure front. Such a front promises bad
weather that will probably linger for several days. You can
“smell” and “hear” this front. The sluggish, humid air makes
wilderness odors more pronounced than during high-pressure
conditions. In addition, sounds are sharper and carry farther in
low-pressure conditions than high-pressure conditions.
15-27
Chapter 16
Sea Survival
Sea survival is perhaps the most difficult survival
situation. Short- or long-term survival depends
upon rations, equipment available, and your
ingenuity. You must be resourceful to survive.
Water covers about
75 percent of the earth’s
surface, with about 70 percent being oceans and
seas. You can assume that you will sometime
cross vast expanses of water. There is always the
chance that the plane or ship you are on will
become crippled by such hazards as storms,
collision, fire, or war.
THE OPEN SEA
16-1. As a survivor on the open sea, you will face waves and wind.
You may also face extreme heat or cold. To keep these
environmental hazards from becoming serious problems, take
precautionary measures as soon as possible. Use the available
resources to protect yourself from the elements and from heat or
extreme cold and humidity.
16-2. Protecting yourself from the elements meets only one of
your basic needs. You must also be able to obtain water and food.
Satisfying these basic needs will help prevent serious physical
and psychological problems. However, you must also know how to
treat health problems that may arise.
PRECAUTIONARY MEASURES
16-3. Your survival at sea depends upon your—
• Knowledge of and ability to use the available survival
equipment.
• Special skills and ability to cope with the hazards
you face.
• Will to live.
16-1
16-4. When you board a ship or aircraft, find out what survival
equipment is on board, where it is stowed, and what it contains.
For instance, how many life preservers and lifeboats or rafts are
on board? Where are they located? What type of survival
equipment do they have? How much food, water, and medicine do
they contain? How many people can be supported? Also, if you are
responsible for other personnel on board, make sure you know
where they are and they know where you are.
DOWN AT SEA
16-5. If your aircraft goes down at sea, take the following actions.
Whether you are in the water or in a raft, you should—
• Get clear and upwind of the aircraft as soon as possible,
but stay in the vicinity until the aircraft sinks.
• Get clear of fuel-covered water in case the fuel ignites.
• Try to find other survivors.
16-6. A search for survivors usually takes place around the entire
area of and near the crash site. Missing personnel may be
unconscious and floating low in the water. Figure 16-1, page 16-3,
illustrates three rescue procedures.
16-7. The best technique for rescuing personnel from the water is
to throw them a life preserver attached to a line (A). Another is to
send a swimmer (rescuer) from the raft with a line attached to a
flotation device that will support the rescuer’s weight (B). This
device will help conserve a rescuer’s energy while recovering the
survivor. The least acceptable technique is to send an attached
swimmer without flotation devices to retrieve a survivor (C). In
all cases, the rescuer wears a life preserver. A rescuer should not
underestimate the strength of a panic-stricken person in the
water. A careful approach can prevent injury to the rescuer.
16-8. When the rescuer approaches a survivor in trouble from
behind, there is little danger the survivor will kick, scratch, or
grab him. The rescuer swims to a point directly behind the
survivor and grasps the life preserver’s backstrap. The rescuer
uses the sidestroke to drag the survivor to the raft.
16-2
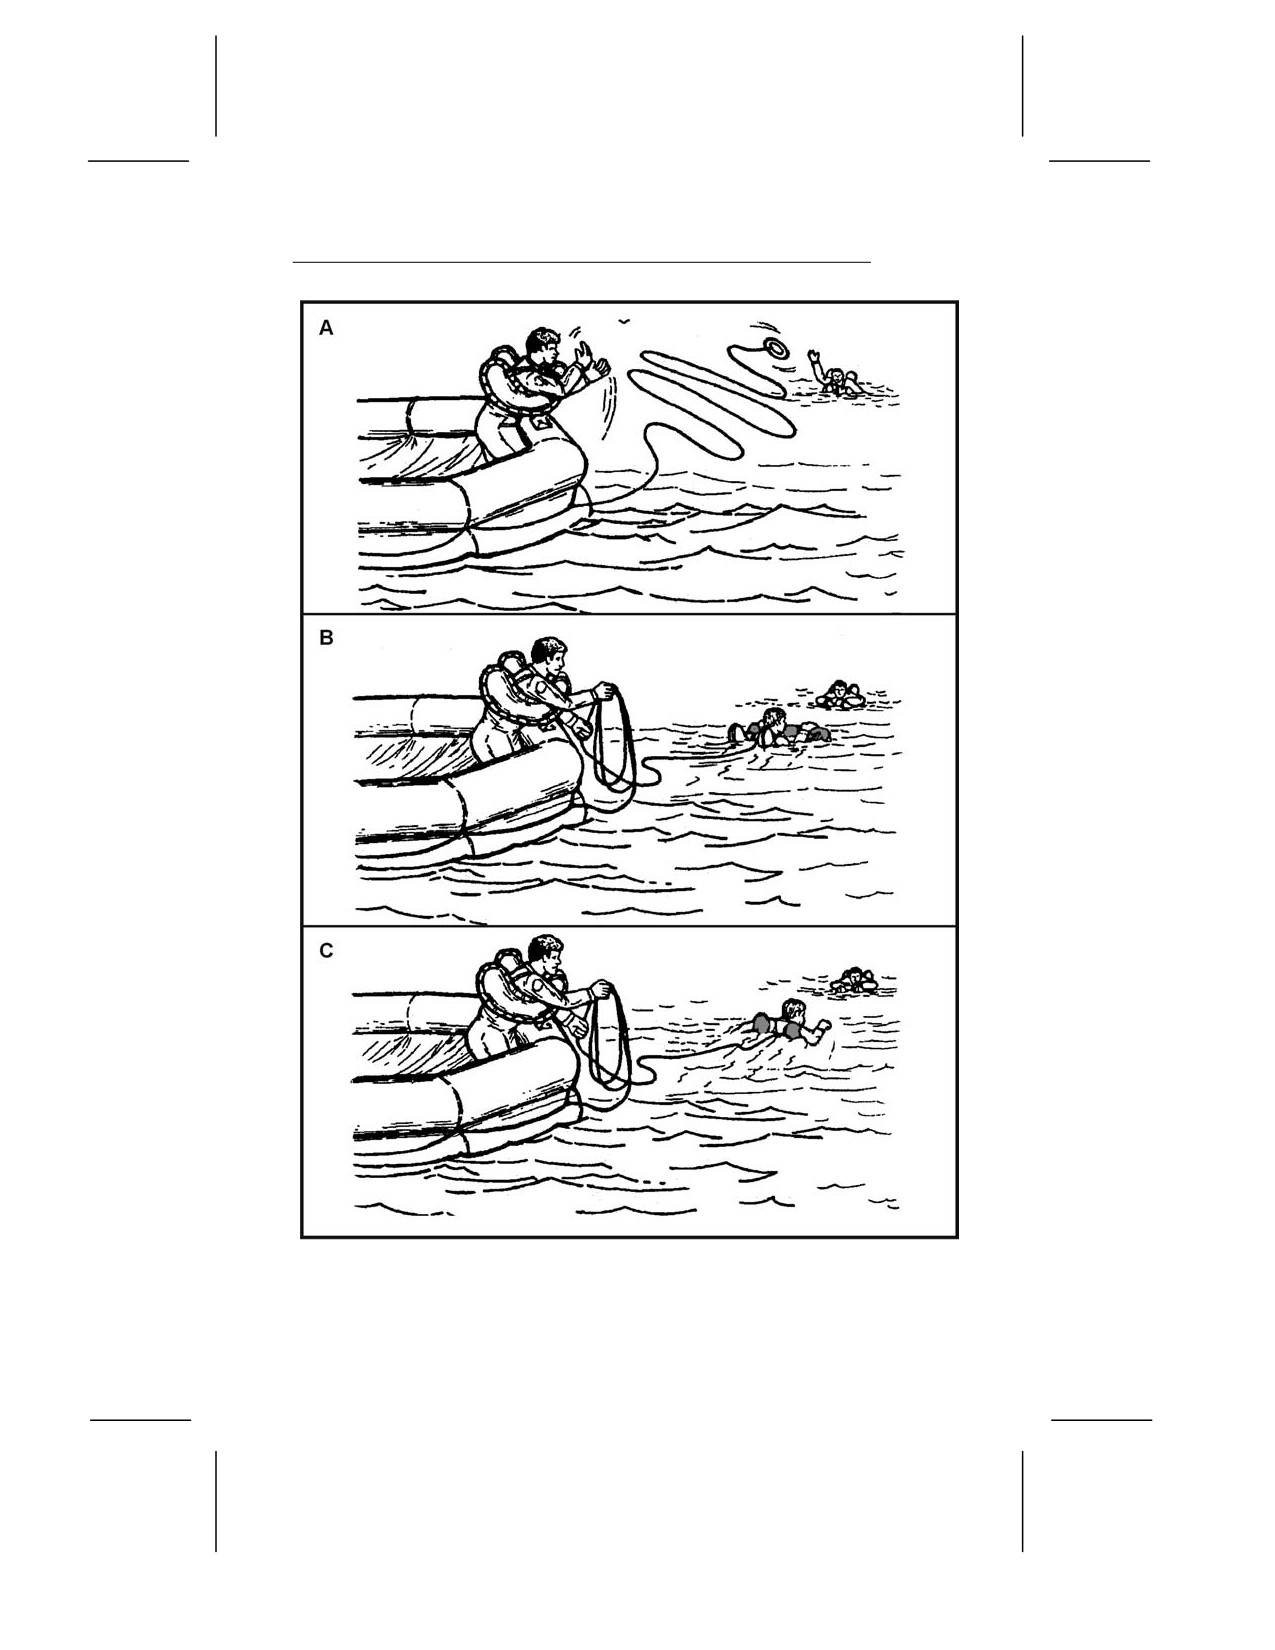
Figure 16-1. Rescue From Water
16-3
16-9. If you are in the water, make your way to a raft. If no rafts
are available, try to find a large piece of floating debris to cling to.
Relax; a person who knows how to relax in ocean water is in very
little danger of drowning. The body’s natural buoyancy will keep
at least the top of the head above water, but some movement is
needed to keep the face above water.
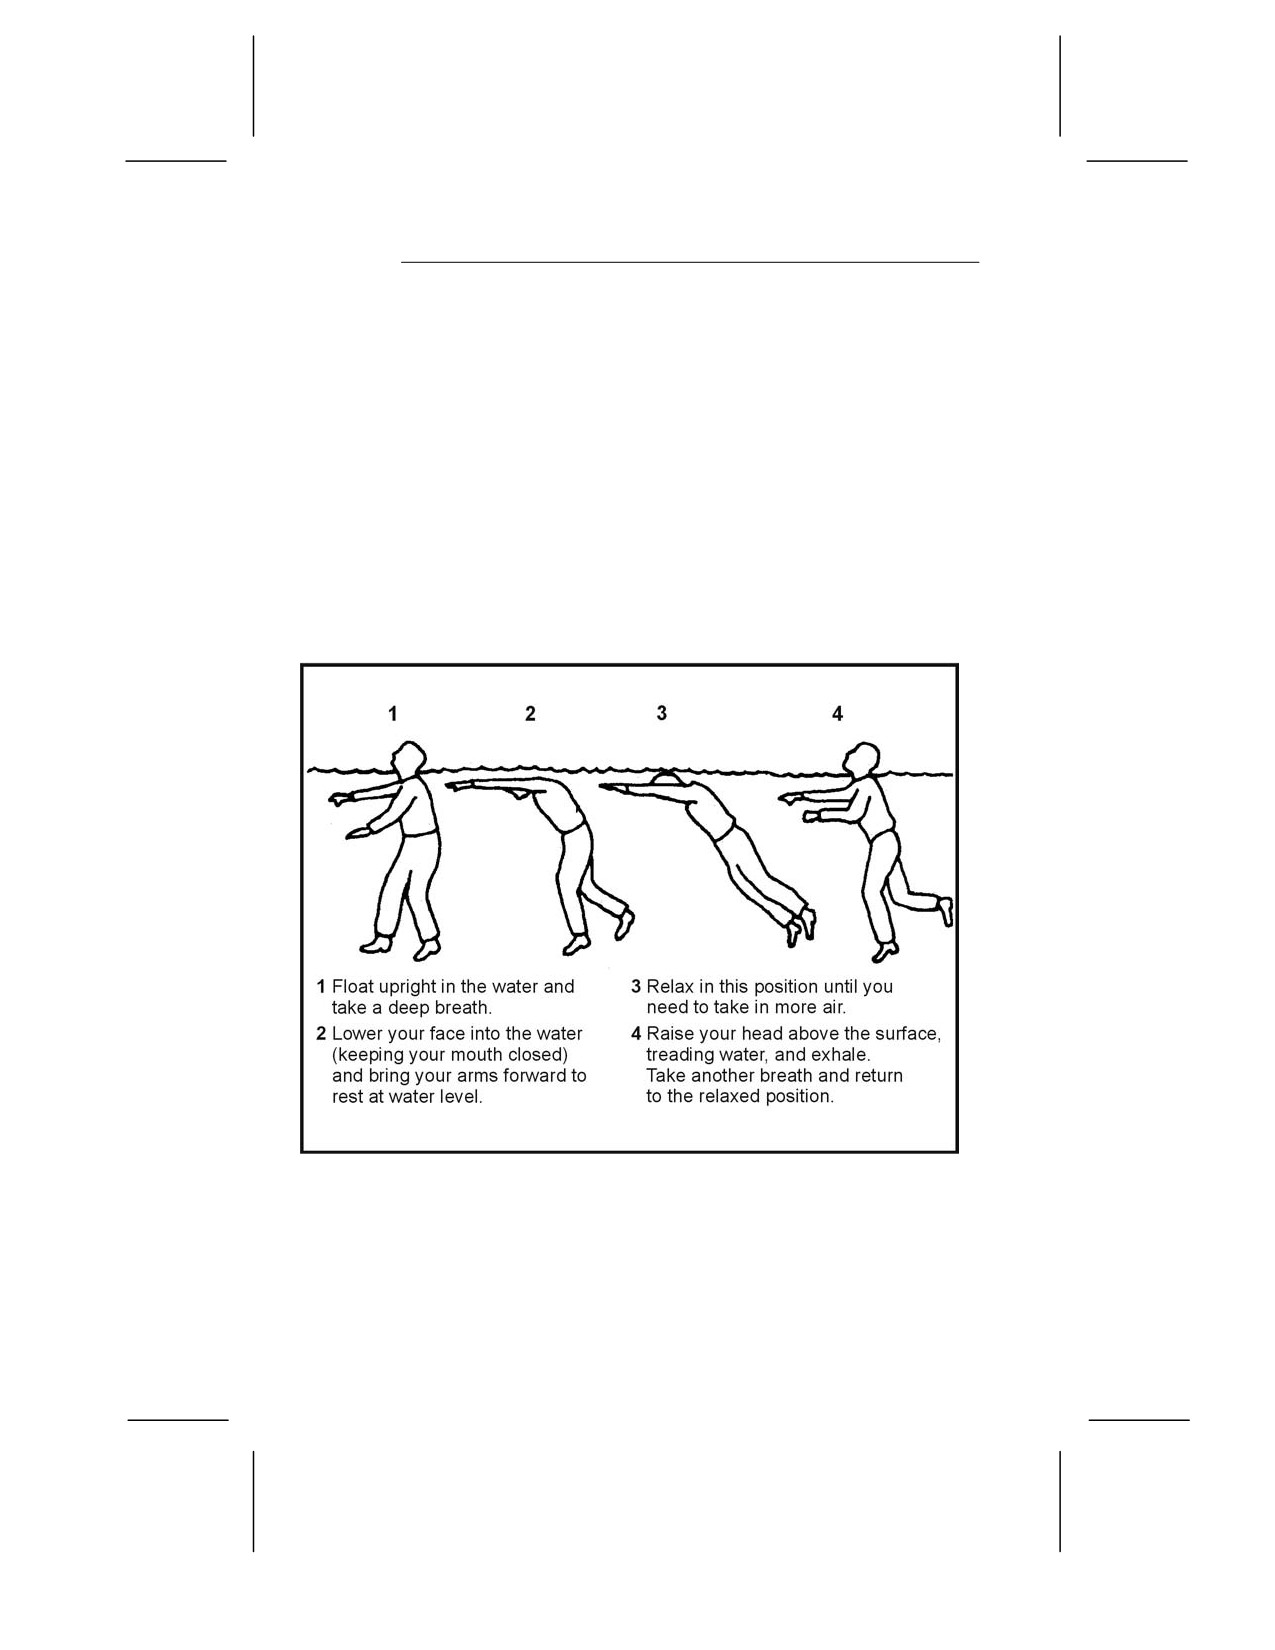
16-10. Floating on your back takes the least energy. Lie on your
back in the water, spread your arms and legs, and arch your back.
By controlling your breathing in and out, your face will always be
out of the water and you may even sleep in this position for short
periods. Your head will be partially submerged, but your face will
be above water. If you cannot float on your back or if the sea is too
rough, float facedown in the water as shown in Figure 16-2.
Figure 16-2. Floating Position
16-4
16-11. The following are the best swimming strokes during a
survival situation:
• Dog paddle. This stroke is excellent when clothed or
wearing a life jacket. Although slow in speed, it requires
very little energy.
• Breaststroke. Use this stroke to swim underwater, through
oil or debris, or in rough seas. It is probably the best stroke
for long-range swimming: it allows you to conserve your
energy and maintain a reasonable speed.
• Sidestroke. It is a good relief stroke because you use only
one arm to maintain momentum and buoyancy.
• Backstroke. This stroke is also an excellent relief stroke. It
relieves the muscles that you use for other strokes. Use it
if an underwater explosion is likely.
16-12. If you are in an area where surface oil is burning—
• Discard your shoes and buoyant life preserver.
NOTE: If you have an uninflated life preserver, keep it.
• Cover your nose, mouth, and eyes and quickly go
underwater.
• Swim underwater as far as possible before surfacing to
breathe.
• Before surfacing to breathe and while still underwater, use
your hands to push burning fluid away from the area
where you wish to surface. Once an area is clear of burning
liquid, you can surface and take a few breaths. Try to face
downwind before inhaling.
• Submerge feet first and continue as above until clear of the
flames.
16-13. If you are in oil-covered water that is free of fire, hold your
head high to keep the oil out of your eyes. Attach your life
preserver to your wrist and then use it as a raft.
16-14. If you have a life preserver, you can stay afloat for an
indefinite period. In this case, use the “Heat Escaping Lessening
Posture (HELP)” body position (Figure 16-3, page 16-6). Remain
still and assume the fetal position to help you retain body heat.
16-5
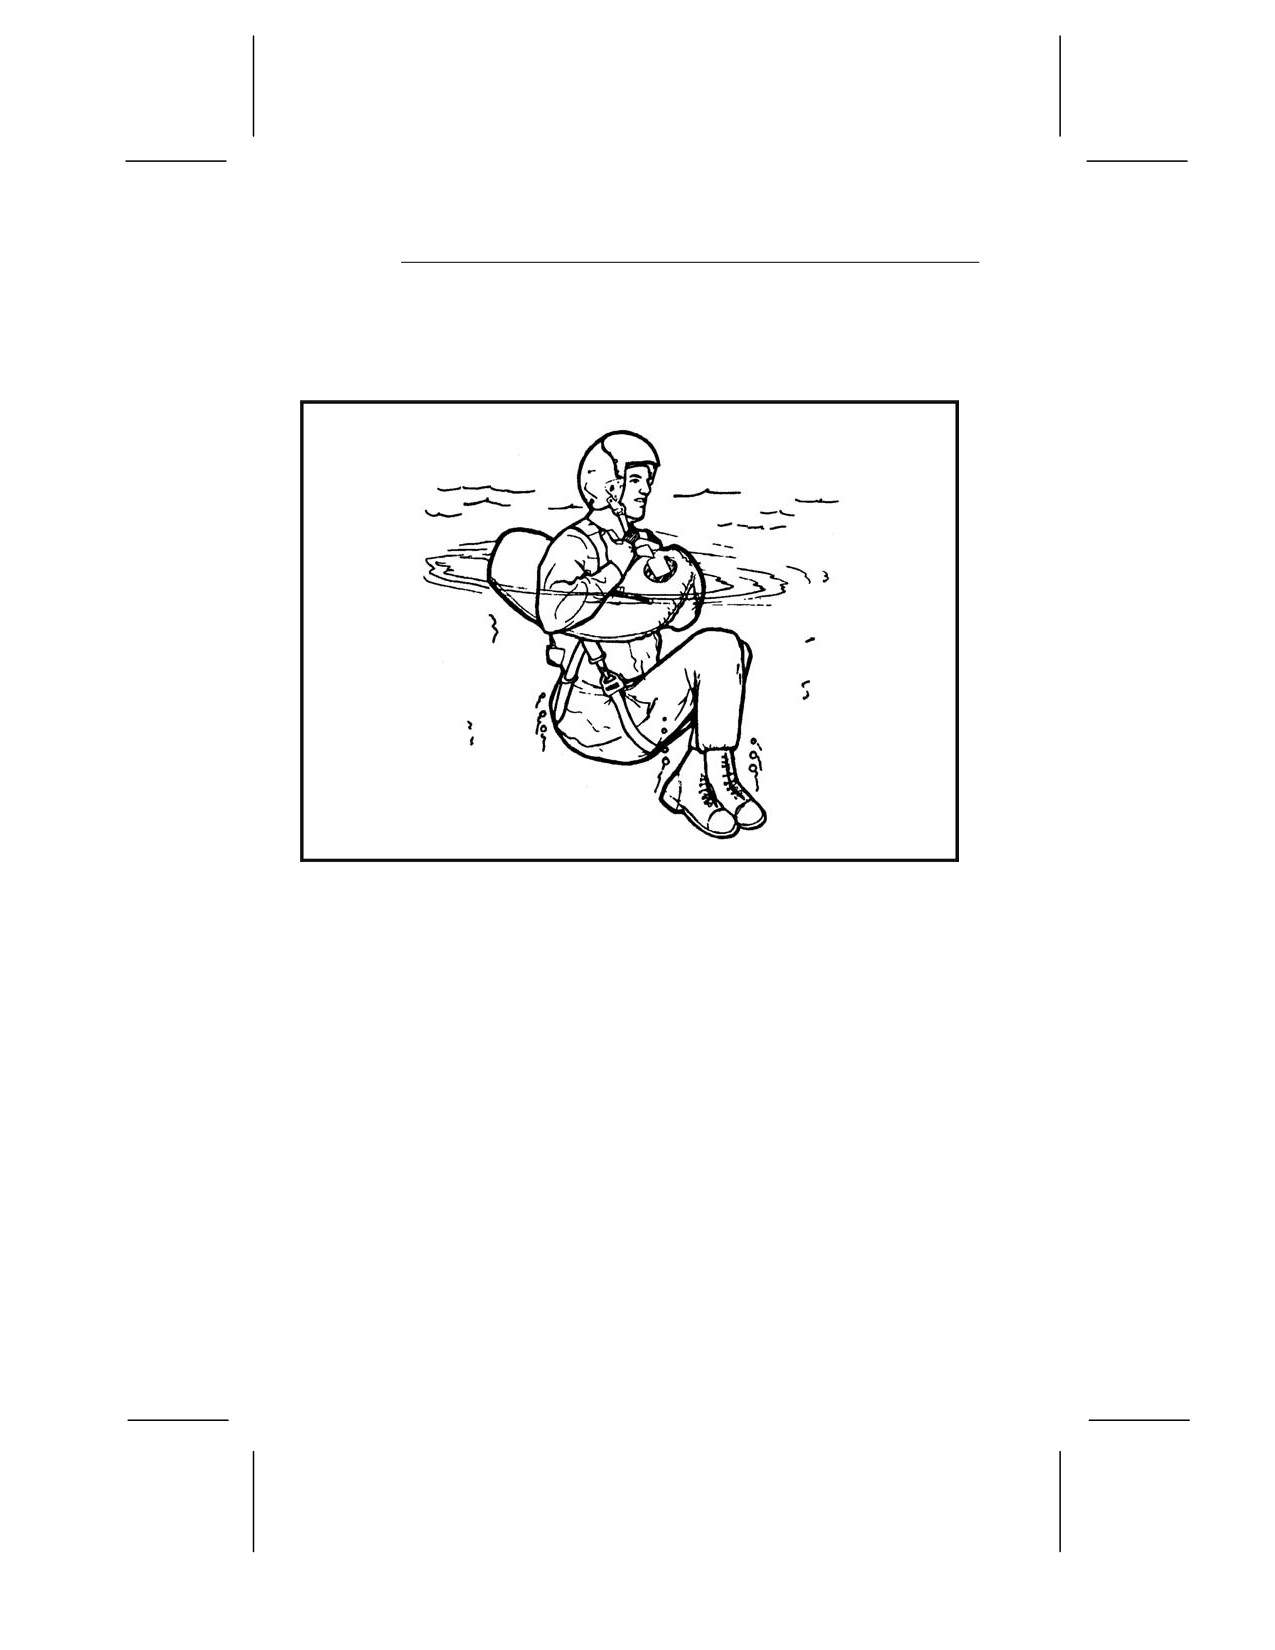
You lose about 50 percent of your body heat through your head.
Therefore, keep your head out of the water. Other areas of high
heat loss are the neck, the sides, and the groin.
Figure 16-3. HELP Position
16-15. If you are in a raft (also see Raft Procedures, page 16-12)—
• Check the physical condition of all on board. Give first aid
if necessary. Take seasickness pills if available. The best
way to take these pills is to place them under the tongue
and let them dissolve. There are also suppositories or
injections against seasickness. Vomiting, whether from
seasickness or other causes, increases the danger of
dehydration.
• Try to salvage all floating equipment—rations; canteens,
thermos jugs, and other containers; clothing; seat cushions;
parachutes; and anything else that will be useful to you.
Secure the salvaged items in or to your raft. Make sure the
items have no sharp edges that can puncture the raft.
• If there are other rafts, lash the rafts together so they are
about 7.5 meters (25 feet) apart. Be ready to draw them
16-6
closer together if you see or hear an aircraft. It is easier for
an aircrew to spot rafts that are close together rather than
scattered.
•
Remember, rescue at sea is a cooperative effort. Use all
available visual or electronic signaling devices to signal
and make contact with rescuers. For example, raise a flag
or reflecting material on an oar as high as possible to
attract attention.
•
Locate the emergency radio and get it into operation.
Operating instructions are on it. Use the emergency
transceiver only when friendly aircraft are likely to be in
the area.
•
Have other signaling devices ready for instant use. If you
are in enemy territory, avoid using a signaling device that
will alert the enemy. However, if your situation is
desperate, you may have to signal the enemy for rescue if
you are to survive.
•
Check the raft for inflation, leaks, and points of possible
chafing. Make sure the main buoyancy chambers are firm
(well rounded) but not overly tight (Figure 16-4, page 16-8).
Check inflation regularly. Air expands with heat; therefore,
on hot days, release some air and add air when the
weather cools.
•
Decontaminate the raft of all fuel. Petroleum will weaken
its surfaces and break down its glued joints.
•
Throw out the sea anchor, or improvise a drag from the
raft’s case, a bailing bucket, or a roll of clothing. A sea
anchor helps you stay close to your ditching site, making it
easier for searchers to find you if you have relayed your
location. Without a sea anchor, your raft may drift over
160 kilometers (96 miles) in a day, making it much harder
to find you. You can adjust the sea anchor to act as a drag
to slow down the rate of travel with the current, or as a
means to travel with the current. You make this
adjustment by opening or closing the sea anchor’s apex.
When open, the sea anchor (Figure 16-5, page 16-8) acts as
a drag that keeps you in the general area. When closed, it
forms a pocket for the current to strike and propels the raft
in the current’s direction.
16-7
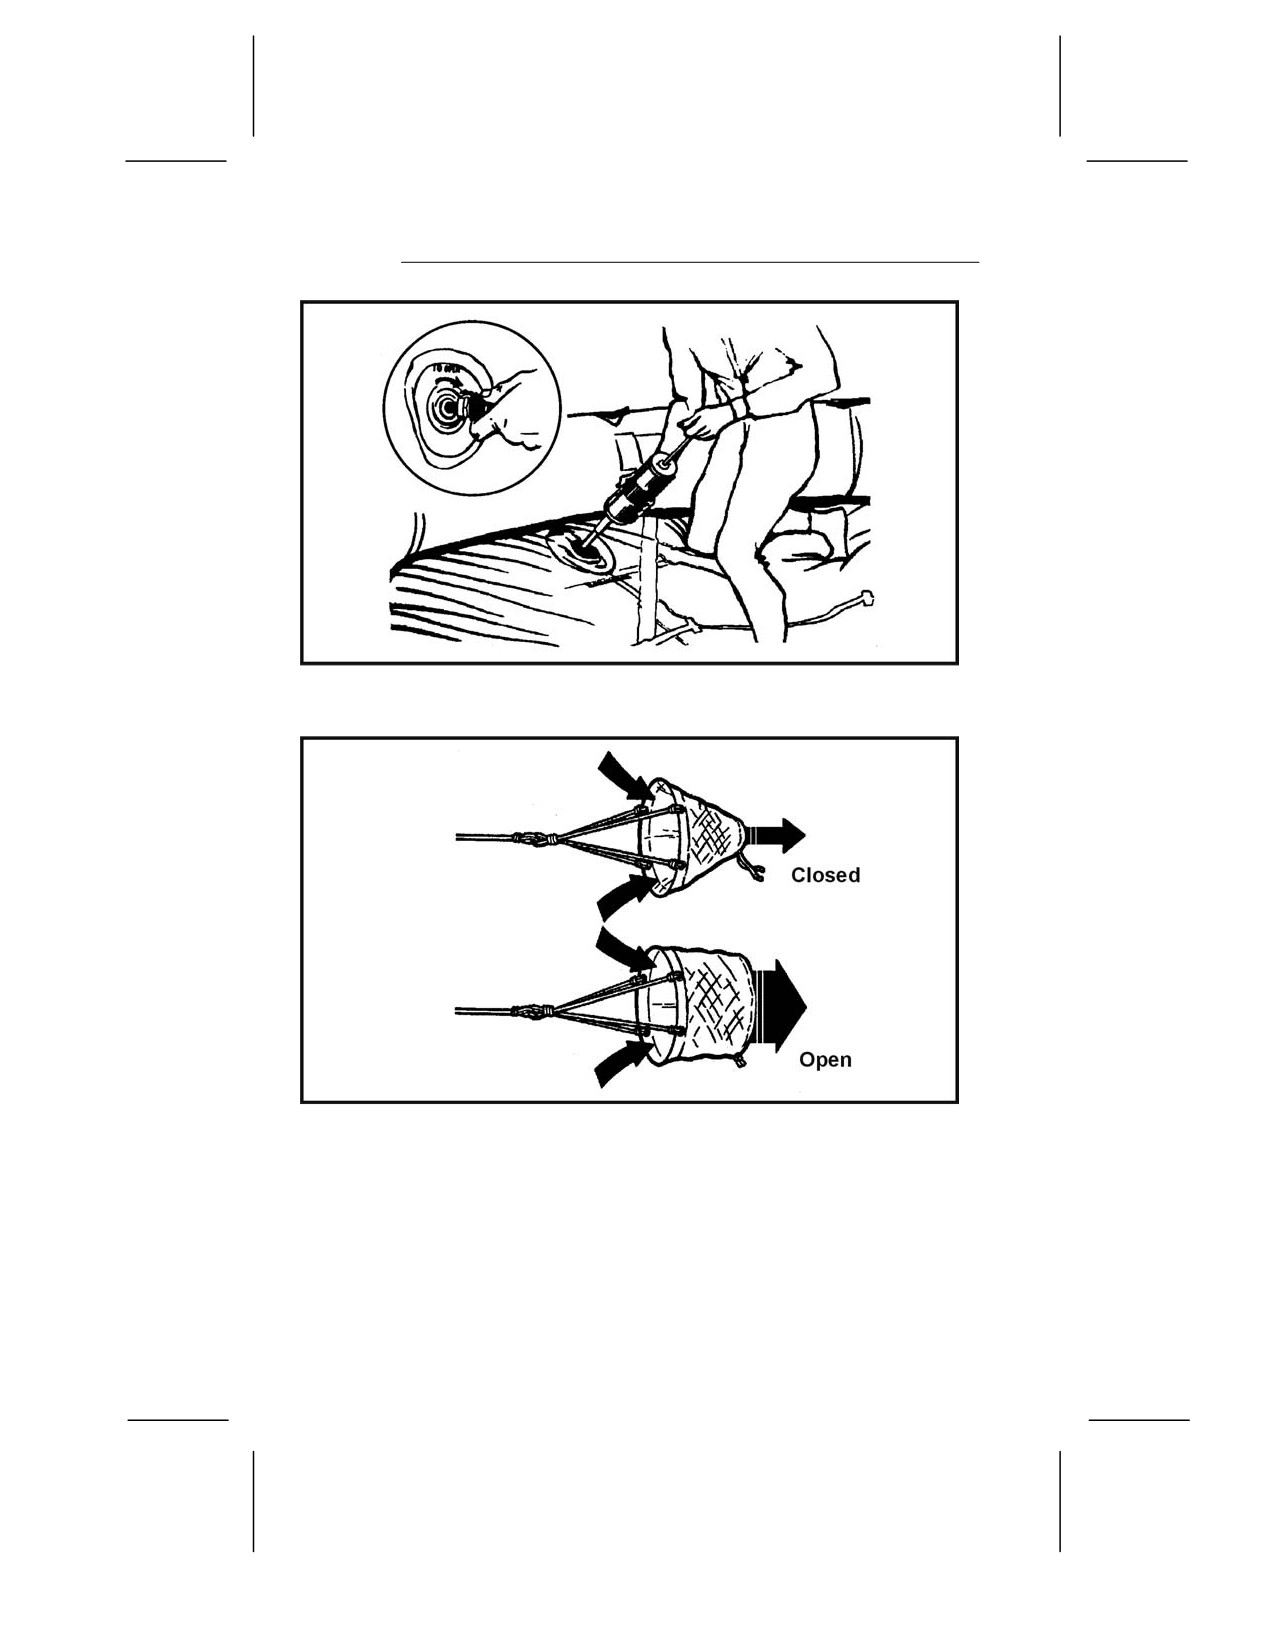
Figure 16-4. Inflating the Raft
Figure 16-5. Sea Anchor
16-8
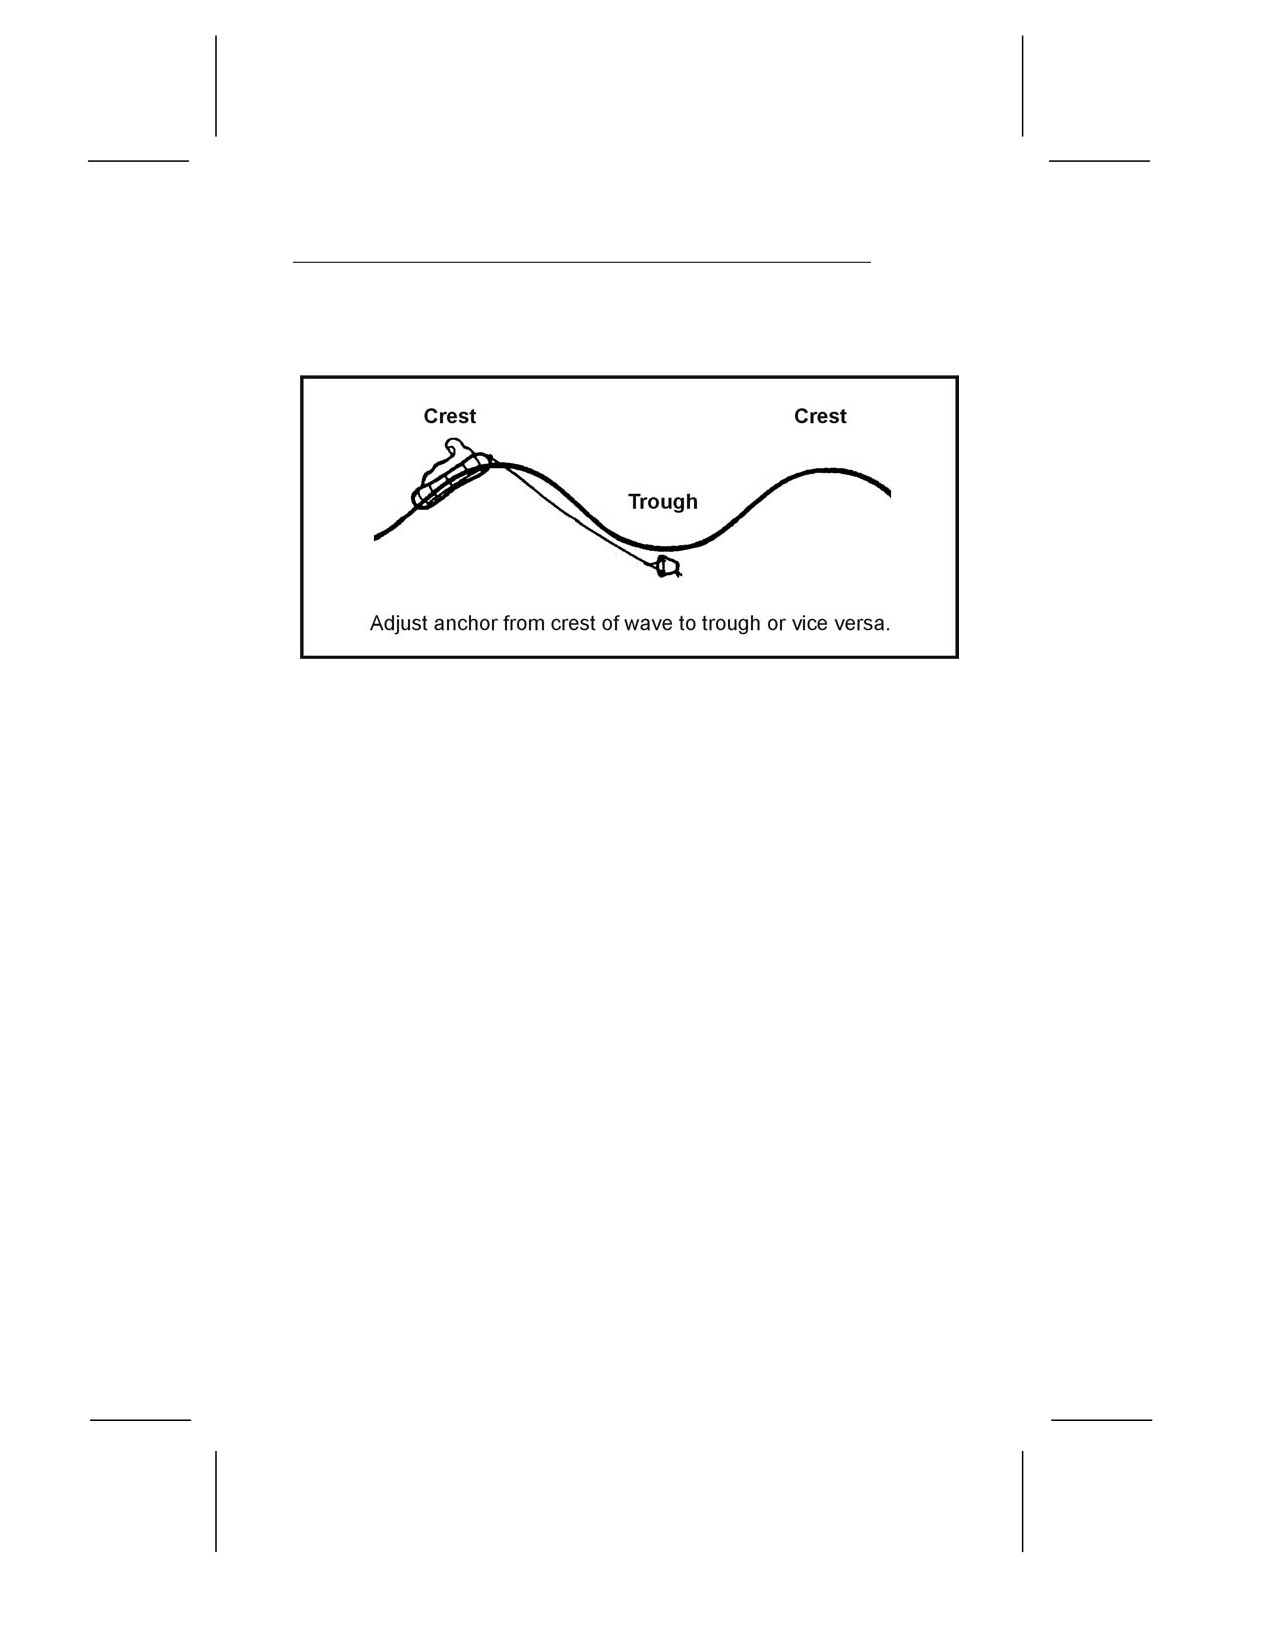
16-16. Also adjust the sea anchor so that when the raft is on the
wave’s crest, the sea anchor is in the wave’s trough (Figure 16-6).
Figure 16-6. Deployment of the Sea Anchor
• Wrap the sea anchor rope with cloth to prevent its chafing
the raft. The anchor also helps to keep the raft headed into
the wind and waves.
• In stormy water, rig the spray and windshield at once. In a
25-man raft, keep the canopy erected at all times. Keep
your raft as dry as possible. Keep it properly balanced. All
personnel should stay seated, the heaviest one in the
center.
• Calmly consider all aspects of your situation and
determine what you and your companions must do to
survive. Inventory all equipment, food, and water.
Waterproof items that salt water may affect. These include
compasses, watches, sextant, matches, and lighters. Ration
food and water.
• Assign a duty position to each person or assign teams, for
example, water collectors, food collectors, lookouts, radio
operators, signalers, and water bailers.
NOTE: Lookout duty should not exceed 2 hours. Keep in mind
and remind others that cooperation is one of the keys to survival.
• Keep a log. Record the navigator’s last fix, the time of
ditching, the names and physical condition of personnel,
and the ration schedule. Also record the winds, weather,
16-9
direction of swells, times of sunrise and sunset, and other
navigational data.
• If you are down in unfriendly waters, take special security
measures to avoid detection. Do not travel in the daytime.
Throw out the sea anchor and wait for nightfall before
paddling or hoisting sail. Keep low in the raft; stay covered
with the blue side of the camouflage cloth up. Be sure a
passing ship or aircraft is friendly or neutral before trying
to attract its attention. If the enemy detects you and you
are close to capture, destroy the logbook, radio, navigation
equipment, maps, signaling equipment, and firearms.
Jump overboard and submerge if the enemy starts
strafing.
• Decide whether to stay in position or to travel. Ask
yourself, “How much information was signaled before the
accident? Is your position known to rescuers? Do you know
it yourself? Is the weather favorable for a search? Are
other ships or aircraft likely to pass your present position?
How many days supply of food and water do you have?”
COLD WEATHER CONSIDERATIONS
16-17. If you are in a cold climate—
• Put on an antiexposure suit. If unavailable, put on any
extra clothing available. Keep clothes loose and
comfortable.
• Take care not to snag the raft with shoes or sharp objects.
Keep the repair kit where you can readily reach it.
• Rig a windbreak, spray shield, and canopy.
• Try to keep the floor of the raft dry. Cover it with canvas or
cloth for insulation.
• Huddle with others to keep warm, moving enough to keep
the blood circulating. Spread an extra tarpaulin, sail, or
parachute over the group.
• Give extra rations, if available, to men suffering from
exposure to cold.
16-10
16-18. The greatest threat you face when submerged in cold water
is death due to hypothermia. The average ocean temperature
around the world is only 11 degrees C (51 degrees F). However, do
not be fooled by warm water—hypothermia can even occur in 27-
degree C (80-degree F) water. When you are immersed in cold
water, hypothermia occurs rapidly due to the decreased
insulating quality of wet clothing and the result of water
displacing the layer of still air that normally surrounds the body.
The rate of heat exchange in water is about 25 times greater than
it is in air of the same temperature. Figure
16-7 lists life
expectancy times for immersion in water.
Water Temperature
Time
21.0-15.5 degrees C (70-60 degrees F)
12 hours
15.5-10.0 degrees C (60-50 degrees F)
6 hours
10.0-4.5 degrees C (50-40 degrees F)
1 hour
4.5 degrees C (40 degrees F) and below
Less than 1 hour
NOTE: Wearing an antiexposure suit may increase these times up to a
maximum of 24 hours.
Figure 16-7. Life Expectancy Times for Immersion in Water
16-19. Your best protection against the effects of cold water is to
get into the life raft, stay dry, and insulate your body from the
cold surface of the bottom of the raft. If these actions are not
possible, wearing an antiexposure suit will extend your life
expectancy considerably. Remember, keep your head and neck out
of the water and well insulated from the cold water’s effects when
the temperature is below 19 degrees C (66 degrees F). Wearing
life preservers increases the predicted survival time as body
position in the water increases the chance of survival.
HOT WEATHER CONSIDERATIONS
16-20. If you are in a hot climate—
• Rig a sunshade or canopy. Leave enough space for
ventilation.
• Cover your skin, where possible, to protect it from
sunburn. Use sunburn cream, if available, on all exposed
16-11
skin. Your eyelids, the back of your ears, and the skin
under your chin sunburn easily.
RAFT PROCEDURES
16-21. Most of the rafts in the U.S. Army and Air Force
inventories can satisfy the needs for personal protection, mode of
travel, and evasion and camouflage.
NOTE: Before boarding any raft, remove and tether (attach)
your life preserver to yourself or the raft. Ensure there are no
other metallic or sharp objects on your clothing or equipment that
could damage the raft. After boarding the raft, don your life
preserver again.
16-22. For all rafts, remember the five As. These are the first
things you should do if you are the first person into the raft:
• Air-Check that all chambers are inflated and that all
inflation valves are closed and equalization tube clamps
(found on the 25-, 35-, and 46-man rafts) are clamped off
when fully inflated.
• Assistance-Assist others into the raft. Remove all
puncture-producing items from pockets and move flotation
devices to the rear of the body. Use proper boarding
techniques; for example, the boarding loop on the seven-
man raft and the boarding ramps on the 25-, 35-, and 46-
man rafts.
• Anchor-Ensure the sea anchor is properly deployed. It can
be found 180 degrees away from the equalization tube on
the 25-, 35-, and 46-man rafts.
• Accessory bag-Locate the accessory bag. It will be tethered
to the raft between the smooth side of the CO2 bottle and
the closest boarding ramp.
• Assessment-Assess the situation and keep a positive
mental attitude.
One-Man Raft
16-23. The one-man raft has a main cell inflation. If the CO2
bottle should malfunction or if the raft develops a leak, you can
inflate it by mouth.
16-12
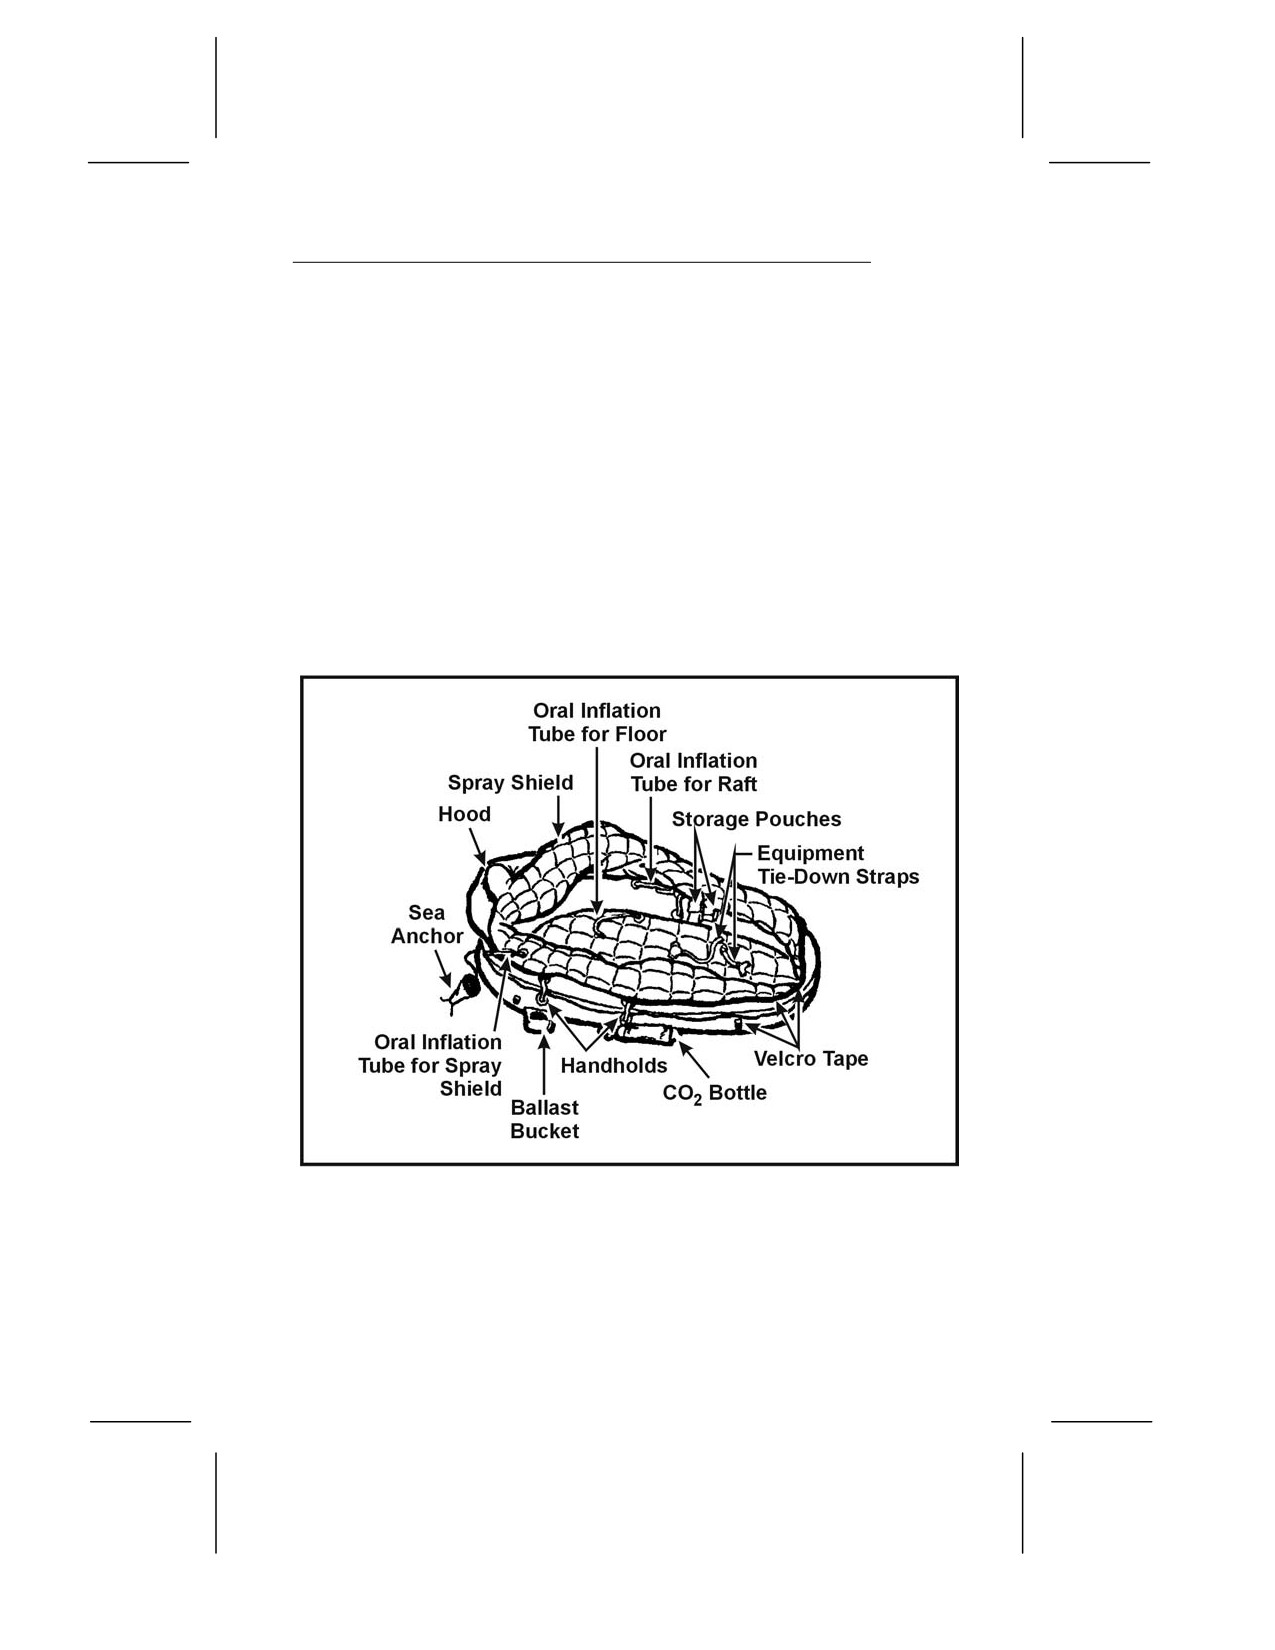
16-24. The spray shield acts as a shelter from the cold, wind, and
water. In some cases, this shield serves as insulation. The raft’s
insulated bottom limits the conduction of cold thereby protecting
you from hypothermia (Figure 16-8).
16-25. You can travel more effectively by inflating or deflating the
raft to take advantage of the wind or current. You can use the
spray shield as a sail while the ballast buckets serve to increase
drag in the water. You may use the sea anchor to control the
raft’s speed and direction.
16-26. There are rafts developed for use in tactical areas that are
black. These rafts blend with the sea’s background. You can
further modify these rafts for evasion by partially deflating them
to obtain a lower profile.
Figure 16-8. One-Man Raft With Spray Shield
16-27. A lanyard connects the one-man raft to a parachutist
(survivor) landing in the water. You (the survivor) inflate it upon
landing. You do not swim to the raft, but pull it to you via the
lanyard. The raft may hit the water upside down, but you can
16-13
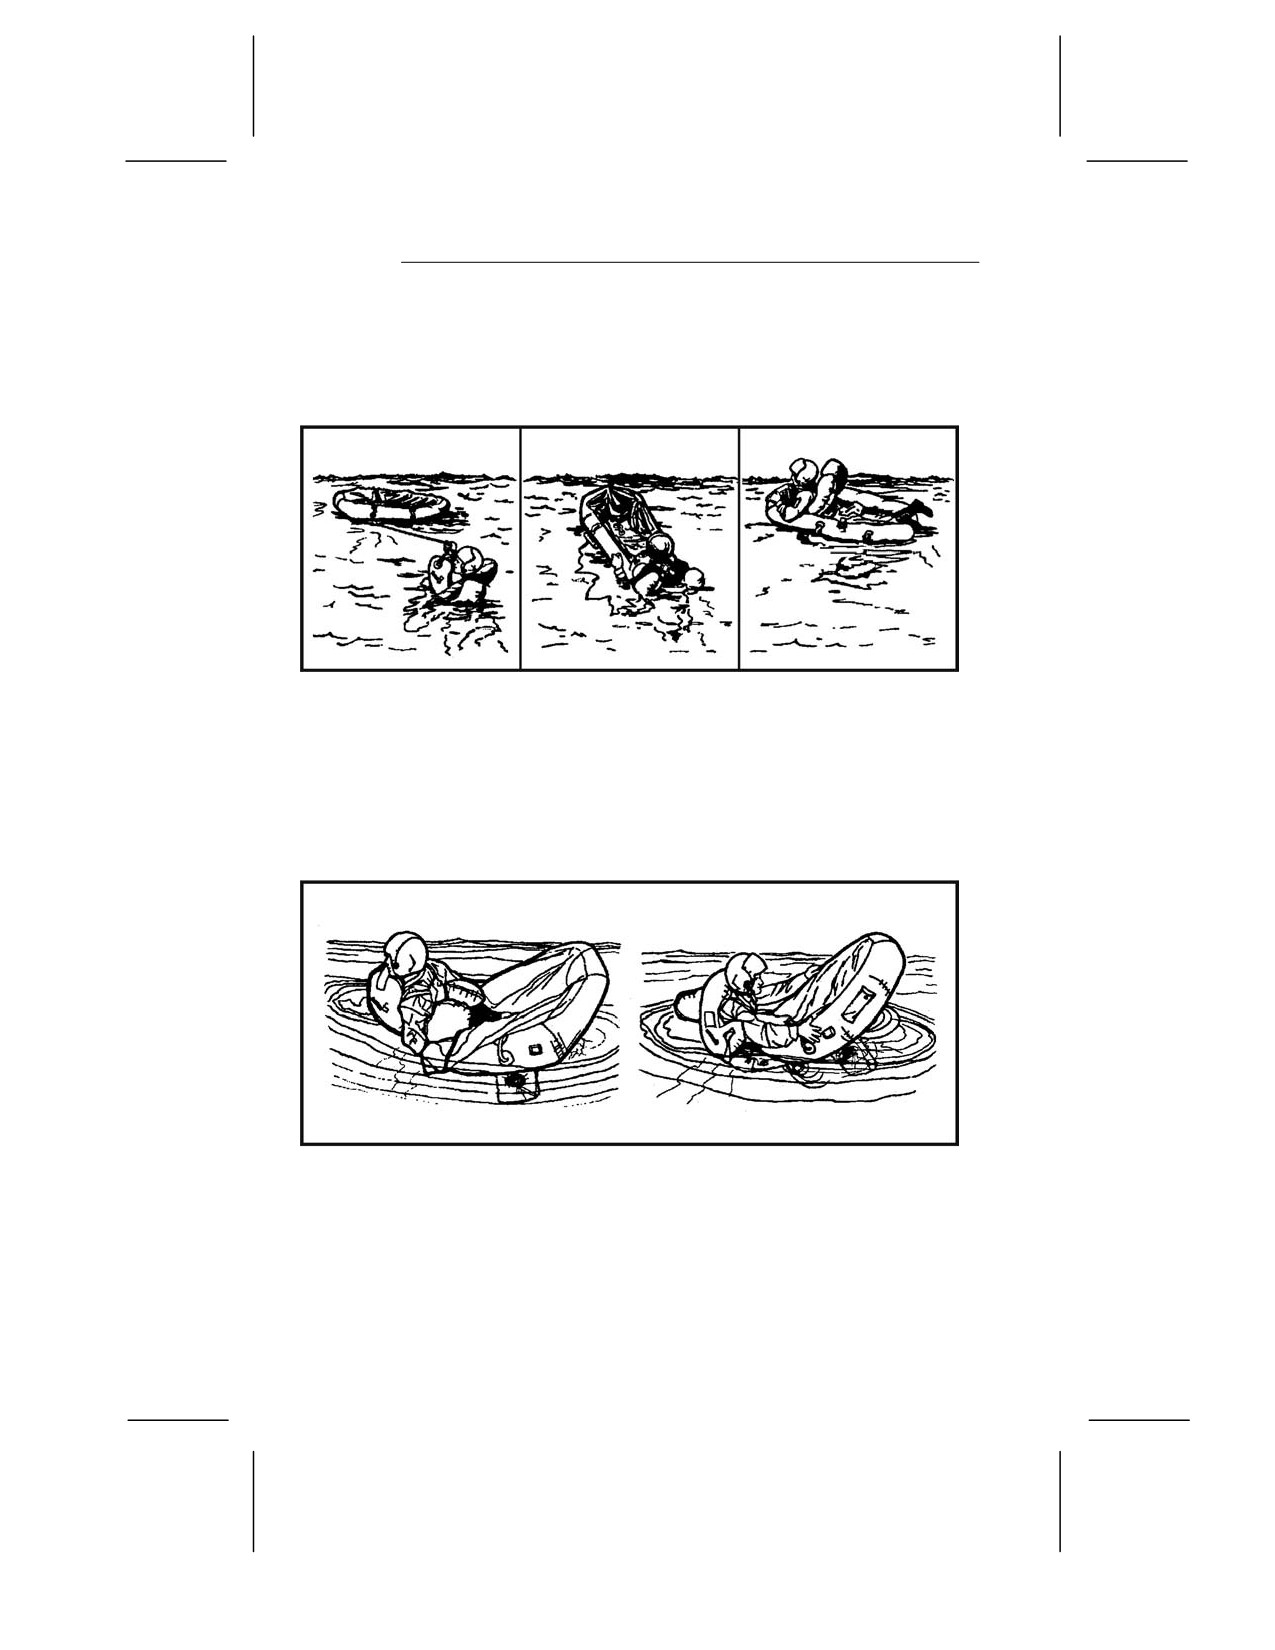
right it by approaching the side to which the bottle is attached
and flipping the raft over. The spray shield must be in the raft to
expose the boarding handles. Follow the five As outlined under
raft procedures above when boarding the raft (Figure 16-9).
Figure 16-9. Boarding the One-Man Raft
16-28. If you have an arm injury, the best way to board is by
turning your back to the small end of the raft, pushing the raft
under your buttocks, and lying back. Another way to board the
raft is to push down on its small end until one knee is inside and
lie forward (Figure 16-10).
Figure 16-10. Other Methods of Boarding the One-Man Raft
16-29. In rough seas, it may be easier for you to grasp the small
end of the raft and, in a prone position, to kick and pull yourself
into the raft. When you are lying face down in the raft, deploy and
adjust the sea anchor. To sit upright, you may have to disconnect
one side of the seat kit and roll to that side. Then you adjust the
16-14