SANY Crawler Hydraulic Excavator (SY195C9, SY205C9, SY215C9, SY225C9). Shop Manual (2013) - page 4
Shop Safety
2.2.5 Jacking Up the Machine
Ɣ If you will be working under the machine
always use approved jack stands that will
support the weight of the machine you are
working on.
Ɣ Never rely on the hydraulics of the ma-
chine or a hydraulic jack to support the
machine during repairs.
Ɣ Always lower the work equipment to the
ground and check the stability of the ma-
chine before going under the machine.
2.2.6 Electrical Dangers
Ɣ When testing electrical circuits, always be
aware of what you will be checking in these
systems. High voltage or high amp circuits
could damage your equipment or cause a
spark, explosion or possible fire.
Ɣ Before performing any repairs or testing on
an electrical system be sure of the system
voltage dangers. Always check the circuit
to be sure it is off before performing any
repairs.
Ɣ When working around flammable liquids or
explosive systems, use only approved anti-
explosion proof work lamps. Non-approved
work lamps can cause an explosion or fire.
2-9
Shop Safety
2.2.7 Removing Attachments
Ɣ If you will be removing large heavy attach-
ments from the machine, always be sure to
use the correct lifting equipment rated for
the capacity of the load you will be lifting.
Ɣ After the attachment or part has been
removed, store it where it cannot fall or
move. Always be sure what you are stor-
ing is sitting stable on a stable surface and
clear of all walkways or fire exits.
2.2.8 Cleaning the Machine
Ɣ Always use high-pressure hot water and
mild, nonflammable grease-cutting soaps
or cleaning agents to clean the machine
parts. Never use flammable or caustic
cleaning agents.
Ɣ Never use high-pressure steam cleaners
to clean the machine. Steam cleaners will
damage the paint, hoses or electrical sys-
tem.
Ɣ Never pressure-wash or flood the inside of
an operator cab. This will damage sensi-
tive electrical components.
2.2.9 Using the Correct Tools
Ɣ Always use the proper authorized tools for
the job. Using tools that are not authorized,
incorrect for the job, defective or damaged
could cause serious injury.
Ɣ Keep all tools in good condition, learn the
correct way to use them.
2-10
Shop Safety
Ɣ Before starting the work, thoroughly check
the tools, machine, forklift, crane, service
car, etc.
Ɣ Keep your tools clean, and when the job is
complete, take inventory of the tools you
were using to be sure no tools were left in
the machine.
Ɣ Always put shop tools back in there proper
storage location when finished.
Ɣ If welding repairs are needed, always have
a trained, experienced or certified welder
carry out the work.
2.2.10 Hoisting a Load
If you will be lifting parts or components that
weigh more than 35 lbs (16 kg), it is important
to follow some basic rules.
Ɣ Always use the appropriate lifting equip-
ment such as hoist, crane, forklift etc. to
handle a loads if possible.
Ɣ Be sure the lifting equipment is in good
condition and rated for the load you are
about to lift.
Ɣ If straps are to be used, ensure they are in
good condition and rated for the load to be
lifted with them.
Ɣ If you must lift the load by hand, keep your
back straight and parallel with the load,
and lift the load using your leg muscles to
avoid back injuries. Always ask for a lifting
assistant.
2-11
Shop Safety
2.2.11 Appropriate Working Apparel
Improper or loose clothing, casual dress cloth-
ing, jewelry, incorrect shoes or long hair can
result in possible injury.
Make a list of the types of clothing that are not
allowed in the shop area. Go over the list with
personnel before they start a job.
2.2.12 Safety Partners
No one should be allowed to perform work
operations in any shop alone. It should be a
general shop safety rule for a minimum of two
people in the shop area at all times when work
procedures are performed. A person alone in
the shop might not be able to get emergency
help in the event of a shop accident.
When working together always maintain clear
contact with each other at all times to avoid
the occurrence of unexpected incidents.
When carrying out any operation with two or
more workers, always agree on the operating
procedures and signals before starting.
2-12
Shop Safety
2.2.13 Two people when engine run-
ning
In order to prevent injury, do not perform the
service while the engine is running. If the ser-
vice must be performed while the engine is
running, operate only when two people are on
the spot and follow the regulations below:
Ɣ Always have one operator sit on the op-
eration seat and be ready to turn off the
engine at any time. All the operators must
keep in touch with each other.
Ɣ Set the safety lock control lever to the lock
position.
Ɣ Do not touch any control lever. If some
control lever must be operated, send signal
to other people and warn them to transfer
to safe place quickly.
Ɣ Do not drop or insert the tools and other
objects into the fan or fan belt, or the parts
will be broken or thrown out.
2.2.14 Driving Pins
When using a hammer to drive pins, metal
particles may fly off. This may lead to serious
eye injuries. Always do the following:
Ɣ Always wear a face shield or goggles when
striking a metal object with a metal ham-
mer.
Ɣ Before performing any of these proce-
dures, be sure all personnel are clear of
your work area.
Ɣ If possible, avoid using a steel hammer to
drive a component or pins in place. Dam-
age to the component may result. Always
use a soft or non-ferrous hammer to drive
a component or a pin.
2-13
Shop Safety
2.2.15 Aligning Parts or Components
Ɣ Be careful when installing or aligning parts
or components.
Ɣ Avoid using your fingers or hands to posi-
tion holes or part mating surfaces, serious
injury could result if your hand or fingers
should get ought between the surfaces.
Ɣ Always use tools to align a part or compo-
nent to avoid any finger or hand injuries.
2.2.16 Fire Extinguisher and Emer-
gency Exits
Ɣ It is important to know where all emergen-
cy exits and fire extinguishing equipment
are located if a fire should occur in the
shop.
Ɣ Before preparing for work, take time and
walk around the shop to make a mental
note of where all exits and fire equipment
are located. If you are performing repairs
in the field, always have a fire extinguisher
handy and within reach.
Ɣ If you do not know how to use a fire extin-
guisher contact someone who can instruct
you in the proper use of this equipment.
2.2.17 Personal Protective Equipment
If your shop specifies the use of safety equip-
ment, OSHA requires this equipment to be
used when on the shop floor or in the area
where this equipment is required.
Never allow personnel in the shop area with-
out the proper personnel protective equipment
even for a moment.
Always keep personnel protective equipment
in good condition and replace them as re-
quired.
2-14
Shop Safety
2.2.18 Running the Machine
Run the machine during repair procedures
ONLY if directed to do so in this shop manual.
If the machine must be run when making re-
pairs, it is important to follow some basic safe-
ty rules.
Ɣ
Always be aware of rotating components.
Ɣ
During repair operations while the engine
is running, one worker must remain in the
operator seat of the machine with clear
contact between the person performing the
repairs on the machine at all times.
Ɣ
If equipped, all lock levers must be in the
LOCK position or the parking brake must
be in the PARK position.
Ɣ
The person in the cab must never touch
any controls. If a control lever must be op-
erated, always maintain a clear view to the
person doing the repair and signal them
when you are about to move the control le-
ver.
Ɣ
Be aware of hot surfaces. During running
operations, most surfaces will be hot, and
some surfaces will be extremely hot. If
necessary, use personnel protective equip-
ment when working around high tempera-
ture surfaces.
Ɣ Keep in mind that during running opera-
tions, hydraulic systems, cooling systems
and fuel systems will be under extremely
high pressure and at high temperatures.
Ɣ Always use caution when working on or
near these systems.
2-15
Shop Safety
2.2.19 Accumulator
If the machine is equipped with an accumula-
tor charged with high-pressure nitrogen gas, it
is important to follow these basic precautions.
Ɣ Do not disassemble the accumulator.
Ɣ Never expose the accumulator to high heat
or open flames.
Ɣ Never weld on the accumulator.
Ɣ Never drill or cut on the accumulator.
Ɣ Never strike the accumulator.
Ɣ Use only nitrogen gas to charge the ac-
cumulator. Unapproved gases could be
explosive.
2.2.20 Adding Fluids to a System
If it should be necessary to add fluids to a
system during running operations, always be
aware that these systems may be hot and un-
der high pressure.
Before adding fluids, shut the machine down
and allow the systems to cool down to outdoor
ambient temperatures before removing any
caps. Failure to do so may result in serious
burns or a sudden loss of fluid.
2-16
Shop Safety
2.2.21 Track Recoil Springs
If you are making repairs to a machine
equipped with tracks, always be aware of the
dangers involved with track recoil springs. This
spring is under extreme pressure at all times.
If it is disassembled by mistake, the spring
may fly out and cause serious injury or death.
Be careful when removing or installing tracks
on track-type machines. When removing the
master track link the track system may sepa-
rate suddenly and cause possible injury.
Always stand clear of the track travel path
when separating the master link section of the
track.
2.2.22 High-Pressure Fluid Lines
Always keep in mind that these systems are
under high pressure. When inspecting or re-
placing piping or hoses, always check to be
sure the pressure in the system has been
relieved before proceeding. Working on a sys-
tem still under pressure could lead to serious
injury, always do as follows:
Ɣ If you will be removing a line or component
with fluid in the system, always cap and
seal the opening to avoid leakage or sys-
tem contamination.
Ɣ Never carry out inspections or replace
items while the system is under pressure.
Ɣ Never use any part of your body to check
or feel for leaks. Always wear safety
glasses and leather gloves when checking
for leaks and use a piece of wood or card-
board when checking for leaks from small
holes.
Ɣ If high pressure fluids should penetrate
your skin or get into your eyes, seek medi-
cal attention immediately.
Shop Safety
2.2.23 Safe Work Preparations
Before starting any repairs, be sure the ma-
chine is sitting on a level stable surface.
Lower all the work equipment to a safe and
stable position on the ground. Turn the engine
OFF and neutralize the work equipment con-
trols by rotating them to the left and right (joy-
stick control) or moving them back and forth
(lever control). This function will relieve system
pressure.
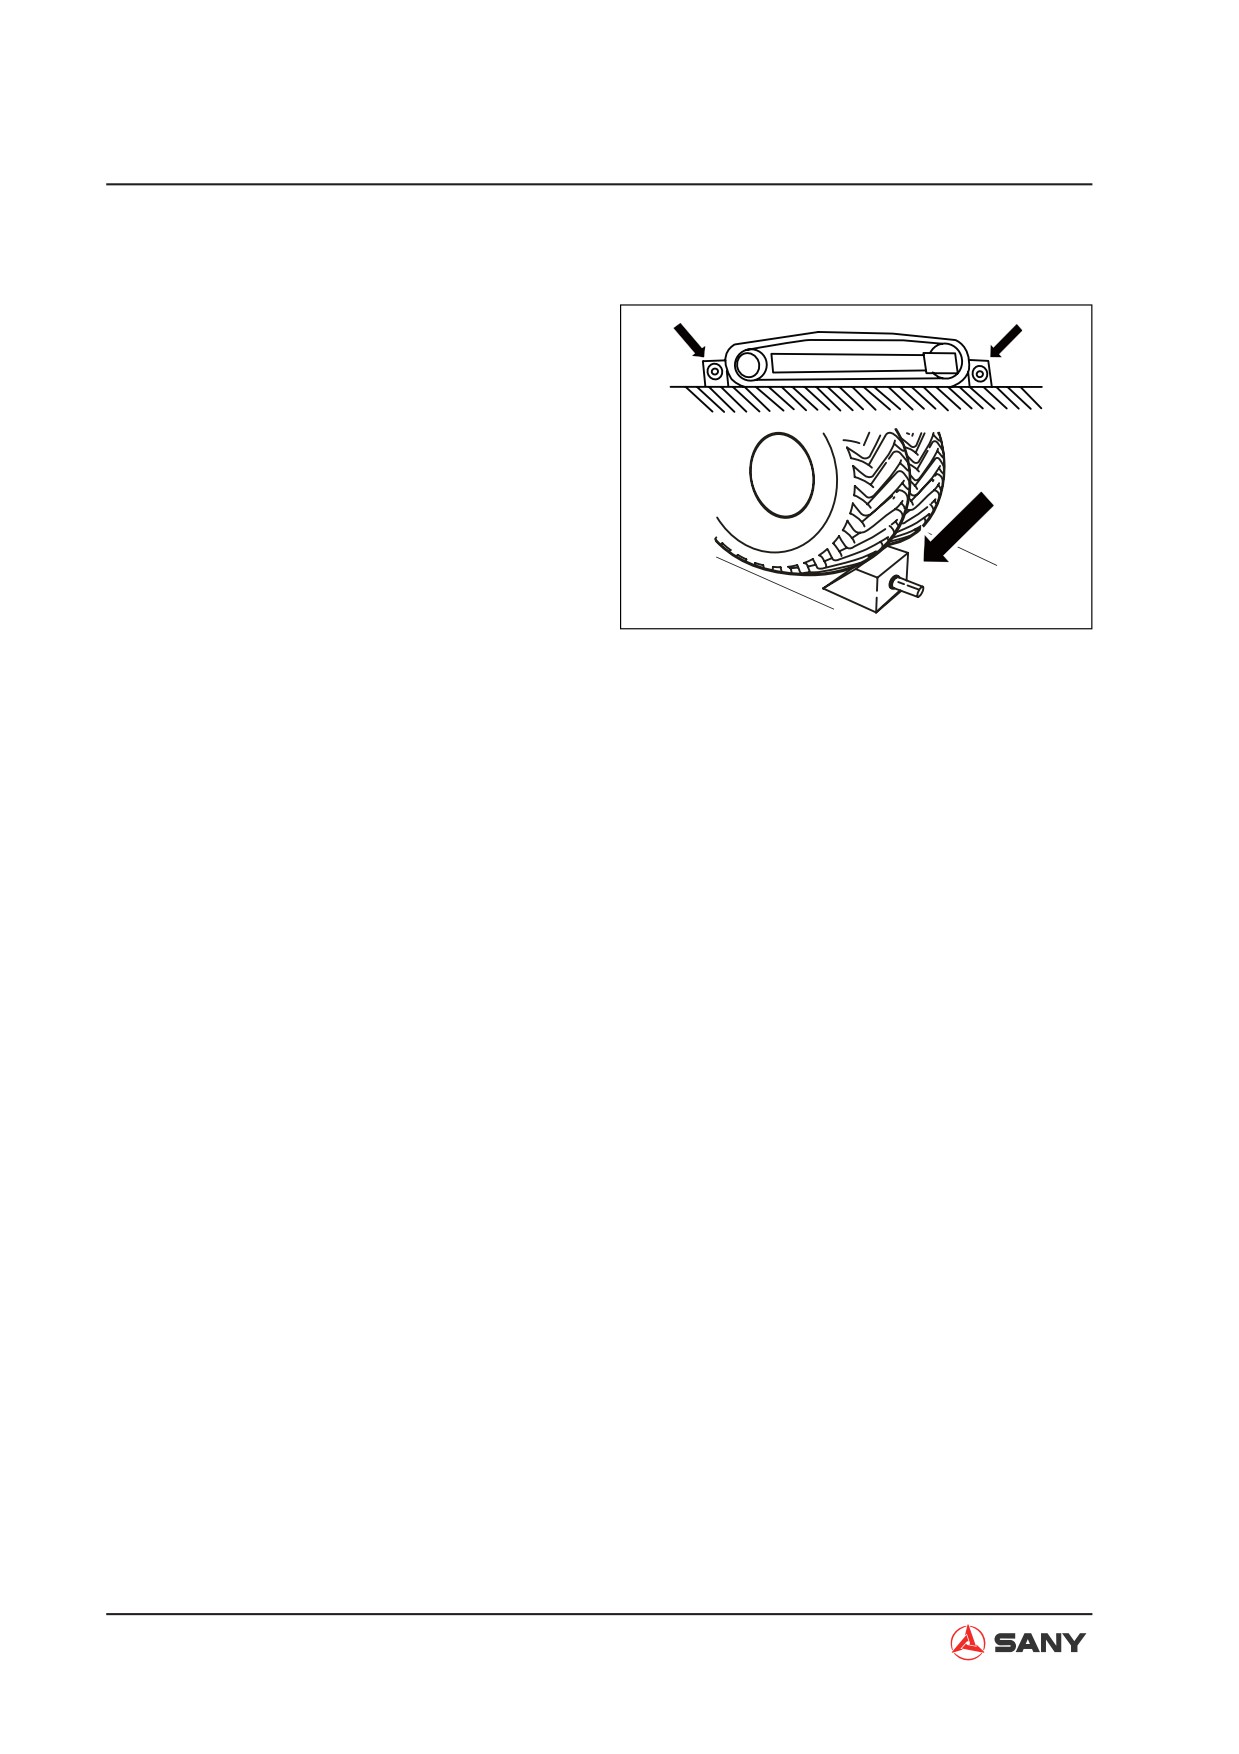
Block the tracks (if equipped) or wheels (if
CA13082115
equipped) with chocks to prevent the machine
from moving.
If equipped, set the hydraulic lock lever in the
LOCKED position. If equipped, set the parking
brake in the PARK position.
Be sure all personnel and equipment is clear
of your work area and you can be seen by all
working personnel especially if performing re-
pairs in the field.
2-18
Shop Safety
2.2.24 Mounting and Dismounting
It is important to follow these procedures when
mounting or dismounting the equipment:
Ɣ
Use all hand-holds and step plates on your
equipment.
Ɣ
Never jump off or onto the equipment.
Ɣ
Wipe off any oil, grease, or mud from your
shoes, rails, steps or platforms before get-
ting on the equipment; always keep these
areas clean and in good condition.
Ɣ
Never get on or off moving equipment.
These actions may lead to serious injury.
Always bring the equipment to a full stop
and turn the engine OFF.
Ɣ
When getting on or off the equipment,
always face the equipment and maintain
a three-point contact (both feet and one
hand or one foot and both hands) with the
handrails, steps and platforms to ensure
that you support yourself correctly.
Ɣ
Never climb on areas of the machine that
are not designated walk areas.
Ɣ
Never climb on or off the machine with
tools, parts or similar objects in your
hands.
Ɣ
Never use machine controls or non-spec-
ified points on the equipment to get on or
off the machine.
Ɣ
Use all hand-holds when on the machine.
2-19
Shop Safety
2.2.25 Battery Hazards
Working around batteries always poses a haz-
ard, especially if the battery has been in ser-
vice for a long period of time.
Listed below are some basic precautions to
be aware of when servicing or working around
batteries.
Ɣ Always wear personal protective equip-
ment when working around batteries.
Ɣ Battery gasses are extremely explosive.
When opening a battery compartment, al-
ways allow ample time for the gasses to
escape before servicing the battery.
Ɣ When working with batteries, always work
in a wellventilated area.
Ɣ If the battery is corroded, flush the area
with a baking soda and warm water mix.
Ɣ If battery acid should get on your skin or in
your eyes, flush the area immediately with
fresh water and seek medical attention.
2-20
Shop Safety
2.2.26 Jump-Start Safety
When using jumper cables to start the ma-
chine, connect the positive (+) jumper first,
then the negative (-) jumper to a remote loca-
tion on the chassis away from the battery.
CAUTION
Never use a welder or a machine with a
higher voltage system to jump-start the
machine. Doing so may damage the ma-
chine’s electrical system or cause an unex-
pected explosion or fire resulting in minor
or major injury.
2.2.27 Disconnecting the System
Power
Before starting any repair operations, remove
the battery leads from the battery or set the
main disconnect on the machine in the OFF
position.
For the location of the machine main electri-
cal disconnect switch, refer to the machines
Safety, Operation & Maintenance Manual for
location and procedures.
If the battery must be disconnected, remove
the negative (-) terminal clamp first then re-
move the positive (+) clamp last.
When reconnecting the battery, be sure every
electrical system switch is in the OFF position,
connect the positive clamp (+) first, then the
negative clamp(-) last.
2-21
Shop Safety
2.2.28 Lockout/tagout
Due to the size and complexity of this ma-
chine, Lockout and Tagout procedures may
be required by your company to ensure the
safety of yourself and others involved in the
repair process of the machine. While work
is in progress, all power sources must be
disabled, locked and tagged with a warning
label. Lockout/Tagout procedure establishes
the minimum requirements used to isolate all
power sources from potentially hazardous en-
ergy, and to ensure that the machine is “locked
out and tagged out” before anyone performs
repairs on the machine.
2.2.29 Sequence of Procedures
Only authorized employees performing repairs
on the machine shall perform Lockout/Tagout
in accordance with this procedure listed below.
If the employee performing repairs to the ma-
chine is issued
a lock and key, the employee shall not share
the lock or key with other employees until all
repair procedures are complete and the ma-
chine is ready to put back into service.
The following steps shall be performed in the
sequence listed when the equipment is to be
either locked-out or tagged-out for repair.
2-22
Shop Safety
Locking out of service
1. Notify all employees who may be poten-
tially affected by the repair process on the
machine.
2. Secure the machine in a safe position. If
DANGER
equipped, set the parking brake or hydrau-
lic lock lever in the PARK or LOCKED posi-
DO NOT OPERATE
tion.
When this is not being used,
3. Identify, remove or disconnect all power
keep it in the storage compartment.
or energy sources and be sure to install a
Lockout/Tagout device on them. If the ma-
CA13082120
chine is equipped with a Maintenance Alert
Tag, attach this tag to the machine con-
trols.
4. Be sure all employees involved in the re-
pairs have installed there lock on the pow-
er source before performing any repairs.
Once an employee has completed there
repair procedure, they must remove there
lock and not access the machine in any
manor.
Returning to service
1. The authorized person who performed the
Lock out/Tagout procedure shall check the
area around the machine to ensure that no
one is exposed to any hazard before start-
up.
2. The authorized person who performed
the Lock out/Tagout shall ensure that
all guards have been reinstalled to their
proper place, all tools and equipment have
been removed and all locks are removed.
3. The authorized person who performed the
Lock out/Tagout shall verify that all controls
are in the neutral or “off” position and all
personnel are aware of the time the ma-
chine will be back in service.
2-23
Shop Safety
4. Remove the Lockout/Tagout equipment
and any additional alert equipment and re-
energize the machine for return to service.
2.2.30 Chemical hazard
Exposure to hazardous chemicals pose a
serious danger if released or mishandled.
Handling hazardous materials often releases
substances that could pose a hazard. Tempo-
rary implication or possible residual injury may
result unless proper precautions are observed
while working with these materials. All work-
ers involved in handling hazardous materi-
als should use approved personal protective
equipment and follow all environmental safety
regulations.
2.2.31 Material Safety Data Sheets
(MSDS)
Material Safety Data Sheet (MSDS) informa-
tion relating to the materials the workers could
be exposed to.
Ɣ MSDS data sheets provide both workers
and emergency personnel with the proper
procedures for handling or working with a
particular substance. Information includes
physical data, health effects, first aid, re-
activity, storage, disposal and protective
equipment required.
Ɣ Be sure all personnel involved are familiar
with all MSDS-related information as it re-
lates to the hazardous materials they could
be exposed to. Keep MSDS data sheets
handy in site of all employees and emer-
gency personnel where they can be easily
accessed.
Ɣ Never handle hazardous materials with-
out the proper MSDS information. Always
verify the data on the MSDS sheet before
handling any hazardous materials.
2-24
Shop Safety
2.3 Precautions for sling work
and giving signals
1.
Only one appointed worker is allowed to
give signals and co-workers must commu-
nicate with each other frequently. The ap-
pointed signal person must give specified
signals clearly at a place where he is seen
well from the operator's seat and where he
can see the working condition easily. The
signal person must always stand in front of
the load and guide the operator safely.
Ɣ Do not stand under the load.
Ɣ Do not step on the load.
2.
Check the slings before starting sling work.
3.
Always wear gloves during sling work.
(Wear leather gloves, if available.)
4.
Measure the weight of the load by the eye
and check its center of gravity.
5.
Use proper sling according to the weight of
the load and method of slinging. If too thick
wire ropes are used to sling a light load,
the load may slip and fall.
6.
Do not sling a load with 1 wire rope alone.
If it is slung so, it may rotate and may slip
out of the rope. Install 2 or more wire ropes
symmetrically.
7.
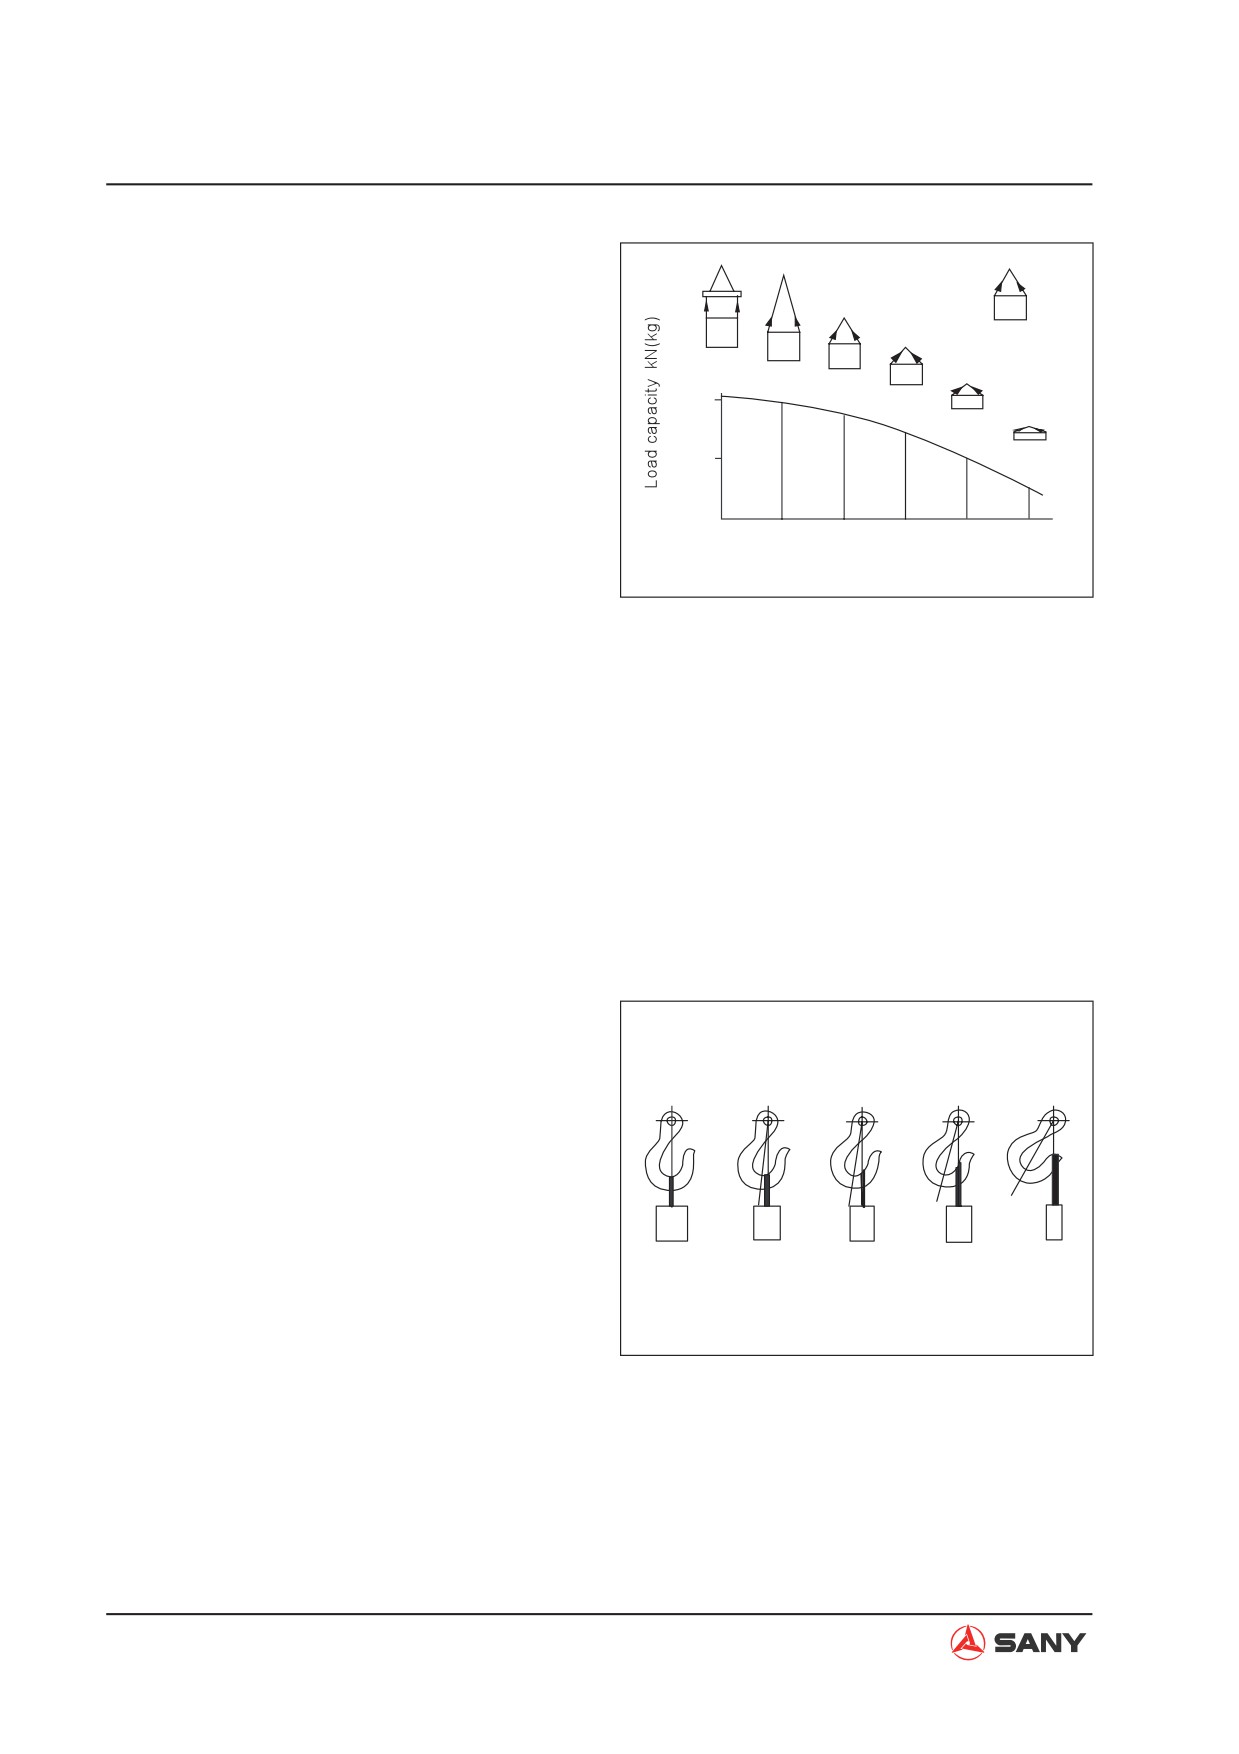
Limit the hanging angle to 60°, as a rule.
Do not sling a heavy load with ropes form-
ing a wide hanging angle from the hook.
2-25
Shop Safety
When hoisting a load with 2 or more ropes,
the force subjected to each rope will in-
crease with the hanging angle. The table
kN
below shows the variation of allowable
kg
19.6
load in kN {kg} when hoisting is made with
2000
18.6
16.7
1900
1700
13.7
2 ropes, each of which is allowed to sling
19.6
1400
2000
9.8
up to 9.8 kN {1,000 kg} vertically, at various
1000
4.9
hanging angles. When the 2 ropes sling a
9.8
500
1000
load vertically, up to 19.6 kN {2,000 kg} of
total weight can be suspended. This weight
30
60
90
120
150
is reduced to 9.8 kN {1,000 kg} when the 2
Hanging angle (Deg.)
ropes make a hanging angle of 120°. If the
ZX215-1000001
2 ropes sling a 19.6 kN {2,000 kg} load at
a lifting angle of 150°, each of them is sub-
jected to a force as large as 39.2 kN {4,000
kg}.
8.
When installing wire ropes to an angular
load, apply softeners to protect the wire
ropes. If the load is slippery, apply proper
material to prevent the wire rope from slip-
ping.
9.
Use the specified eyebolts and fix wire
ropes, chains, etc. to them with shackles,
etc.
10. Apply wire ropes to the middle portion of
the hook.
Ɣ Slinging near the tip of the hook may
cause the rope to slip off the hook dur-
ing hoisting. The hook has the maxi-
mum strength at the middle portion.
11. Do not use twisted or kinked wire ropes.
100%
88%
79%
71%
41%
12. When lifting up a load, observe the follow-
ing.
ZX215-1000002
2-26
Shop Safety
Ɣ Wind in the crane slowly until wire
ropes are stretched. When settling the
wire ropes with the hand, do not grasp
them but press them from above. If
you grasp them, your fingers may be
caught.
Ɣ After the wire ropes are stretched, stop
the crane and check the condition of
the slung load, wire ropes, and soft-
ener.
Ɣ If the load is unstable or the wire rope
or chains are twisted, lower the load
and lift it up again.
Ɣ Do not lift up the load slantingly.
13. When lowering a load, observe the follow-
ing.
Ɣ When lowering a load, stop it temporar-
ily at 30 cm above the floor, and then
lower it slowly.
Ɣ Check that the load is stable, and then
remove the sling.
Ɣ Remove kinks and dirt from the wire
ropes and chains used for the sling
work, and put them in the specified
place.
2-27
Shop Safety
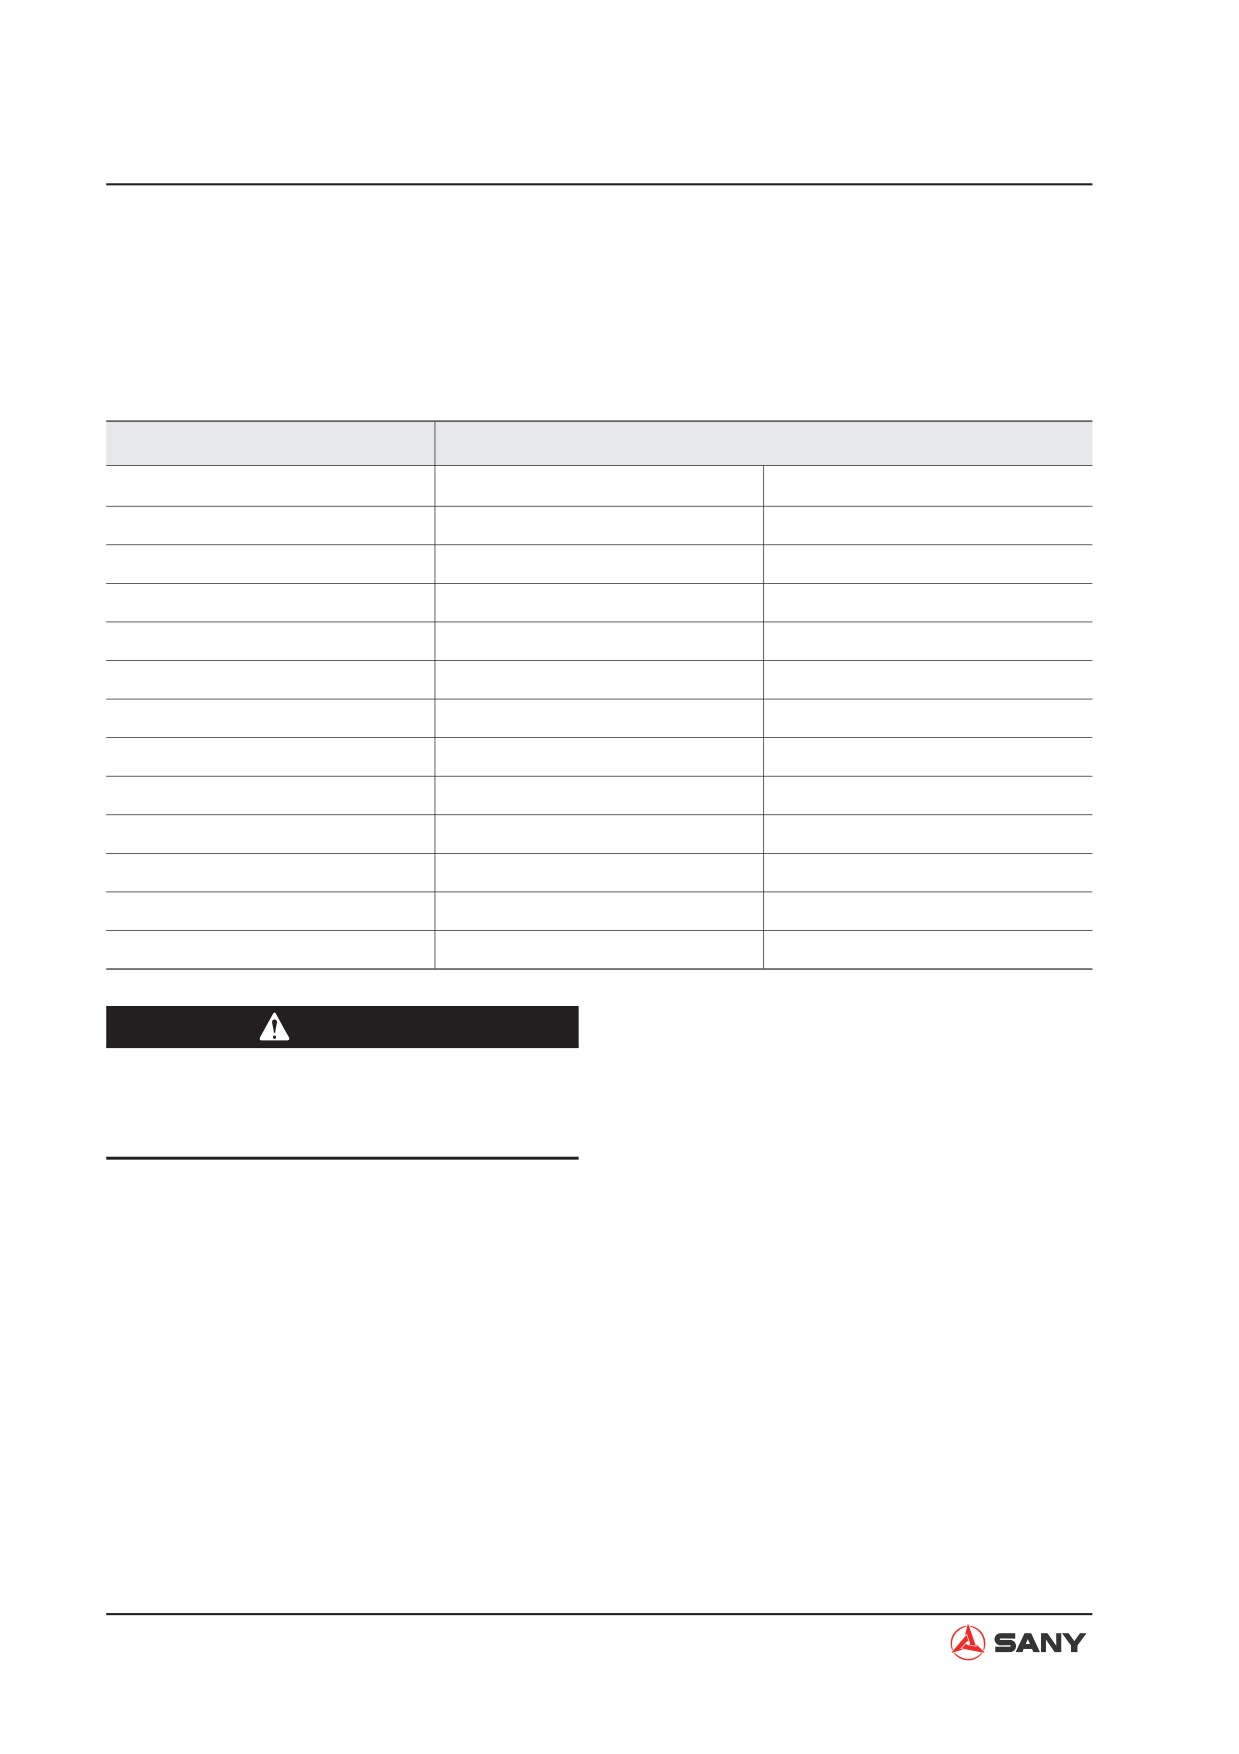
Selecting wire ropes
Select adequate ropes as per the weight of parts to be hoisted, referring to the table below.
Wire ropes
(Standard “Z” twist ropes without galvanizing)
Nominal Diameter of Rope
Allowable Load
mm
kN
Ton
10
9.8
1.0
11.5
13.7
1.4
12.5
15.7
1.6
14
21.6
2.2
16
27.5
2.8
18
35.5
3.6
20
43.1
4.4
22.4
54.9
5.6
30
98.1
10.0
40
176.5
18.0
50
274.6
28.0
60
392.2
40.0
CAUTION
Ɣ
The allowable load is one-sixth of the
breaking strength of the rope used
(Safety coefficient: 6).
2-28