HNC-08M CNC SYSTEM CNC Milling System. Operation Manual (V1.22 2011/01) - page 2
3.4.1 Saving a Breakpoint
After a running program is feed hold, if you select [BRPT], the system will enter
into the program breakpoint interface. Then, if select
[SVBP], the system will
automatically store the current breakpoint information in the relevant breakpoint file and
replace the previous breakpoint file of this program saved before.
A filename of the breakpoint stored is determined according to the program’s filename,
that is, the name is the program’s filename that the postfix substituted to “.BPT”. For
example, if a program’s filename is “TEST.NC” , then the breakpoint’s filename will be
“TEST. BPT” .
3.4.2 Resuming a Breakpoint
Switch to the screen of breakpoint management: <AUTO> → [\] → [PROG] →
[BRPT], as figure 3-11 shown.
Sequence of resuming a saved breakpoint:
1) Turn to the screen of breakpoint management;
2) Use the [↑]、[↓] or [PageUp]、[PageDown] keys to select an target breakpoint file;
3) Press the [BRES] key. If the breakpoint file is effective, the system will load the file
and resume the breakpoint.
If The spindle is in the rotation state when saving the breakpoint, the spindle will
rotate automatically when resuming the breakpoint. Otherwise, all other auxiliary
functions should be turned on manually.
24
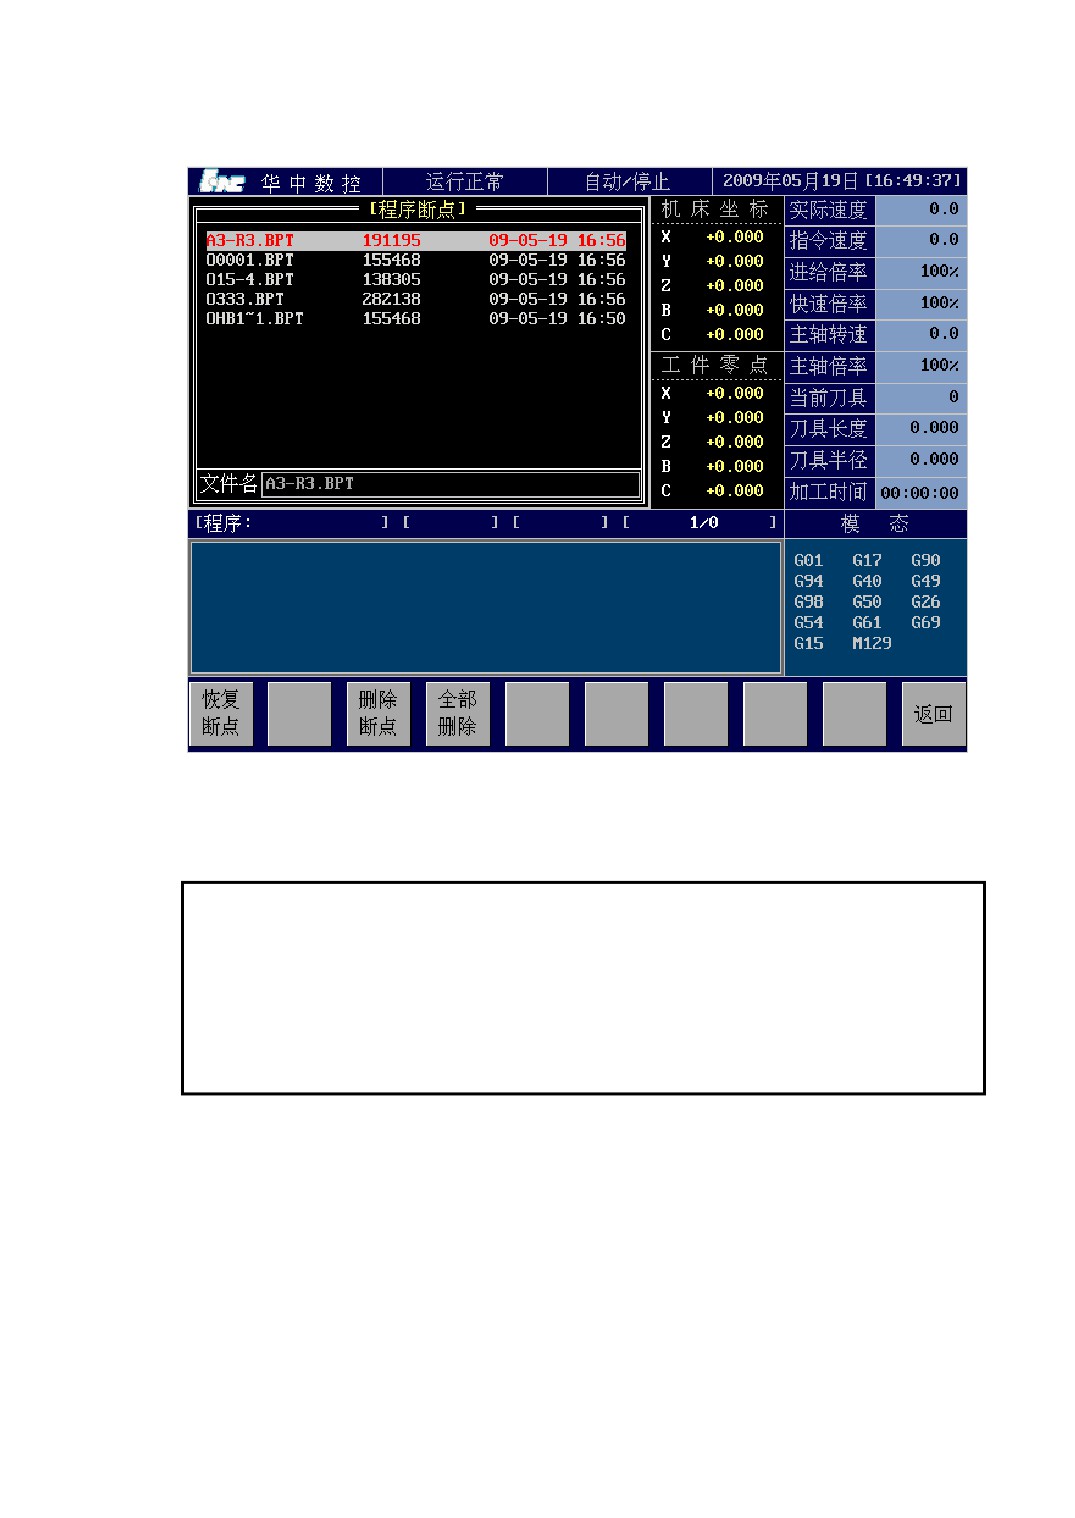
Figure 3-11 Program Breakpoint
Note:
If the machining parameters
(such as tool length compensation, tool radius
compensation, workpiece coordinate origin etc.) are changed after saved the
breakpoint, you can’t resume the breakpoint from the breakpoint file which saved
before changed to machining, or else, it won’t work normally.
3.5 Debugging a Program
1、 Single Block Operation
Press <SGSG> key before or during the automatic operation, then the indicator
light of the key is on, it is in the single block state, that means the tool executes a single
block of program and then stops. At the time, the indicator light of <CYCL> key is on,
25
and the <FDHD> is off. Press <CYCL> key again, the tool executes the next single
block. When the indicator light of <SGSG> is off, it is in the continuous operation mode,
which means it doesn’t execute pause between blocks until the end of program.
Pressing the <SGSG> key will be able to switch to the other between single block
operation and continuous operation.
2、 Optional Block Skip
Press <JMSG> key before or during the automatic operation, then the indicator
light of the key is on, which means optional block skip is in force. At that time, the
blocks which contains a slash “\” in front will be jumped(non-execution). When the
indicator light of <SGSG> is off, the optional block skip function is ineffective, that is,
the tool executes every block even though it contains a slash “\” in front.
Pressing < JMSG > key will be able to switch the optional block skip function
between effective and ineffective.
Note:
The sign of optional block skip is a slash “\”, not the division sign “/” which is
used for division function in this system.
3、 Machine Tool Lock
Press <MLCK> key before automatic operation (in automatic but non-running
state). then the indicator light of the key is on, it is in simulation operation state, that
means executing the program, refreshing coordinates and displaying tool-path are
normal, but each axis’s actual position of machine tool keep still. It is usually used to see
the program’s operation to examine the correctness of program by tool-path displayed
and axis’s change.
Pressing < MLCK > key will be able to switch the machine tool lock function
between effective and ineffective.
26
Note:
Opening or closing the machine tool lock function must be in the program stop
state, or else, maybe the machine tool won’t work normally (this limitation is
guaranteed by the PLC program).
4、 Z-Axis Lock
Press <ZLCK> key before automatic operation (in automatic but non-running state).
then the indicator light of the key is on, it is in Z-axis’s simulation operation state, that
means executing the program, refreshing coordinates and displaying tool-path are
normal, but the Z-axis’s actual position of machine tool keep still.
Pressing < ZLCK > key will be able to switch the Z-axis lock function between
effective and ineffective.
5、 Dry Run
Press < DRUN > key before or during the automatic operation, then the indicator
light of the key is on, which means dry run is in force. During the program operation ,
the feedrate specified by the F codes in the program is ineffective, the feedrate is
specified by the parameter P2003, the feedrate override is also effective. When the
indicator light of < DRUN > is off, the function is ineffective, the feedrate specified by
the F codes in the program.
Pressing < DRUN > key will be able to switch the dry run function between
effective and ineffective.
Note:
1、 If this function is effective, the feedrate set by the parameter P2003 is always the
feed each minute (G94) even though specified each rotation(G95) in the program.
2、 Because of interpolation device’s forward-looking control function, it needs some
delay time to come into force when you switch to dry run during the execution.
6、 Handwheel Debugging
Opening or closing the handwheel debugging function is determined by the control
signal (G15.6) of PLC. When the G15.6 is high level, the fuction is open; when it’s low
27
level, the fuction is close. If the handwheel debugging functionis is open, the keys of
feedrate override and rapid traverse speed override on the system panel are ineffective
during the execution. At that time, those override are generated by the speed which
controls the speed of machine tool’s operation by turning the handle.
If you stop the handle turning, the generated override is 0.
3.6 Handwheel Interruption
Open or close the handwheel interruption function by the control signal (G15.6) of
PLC.
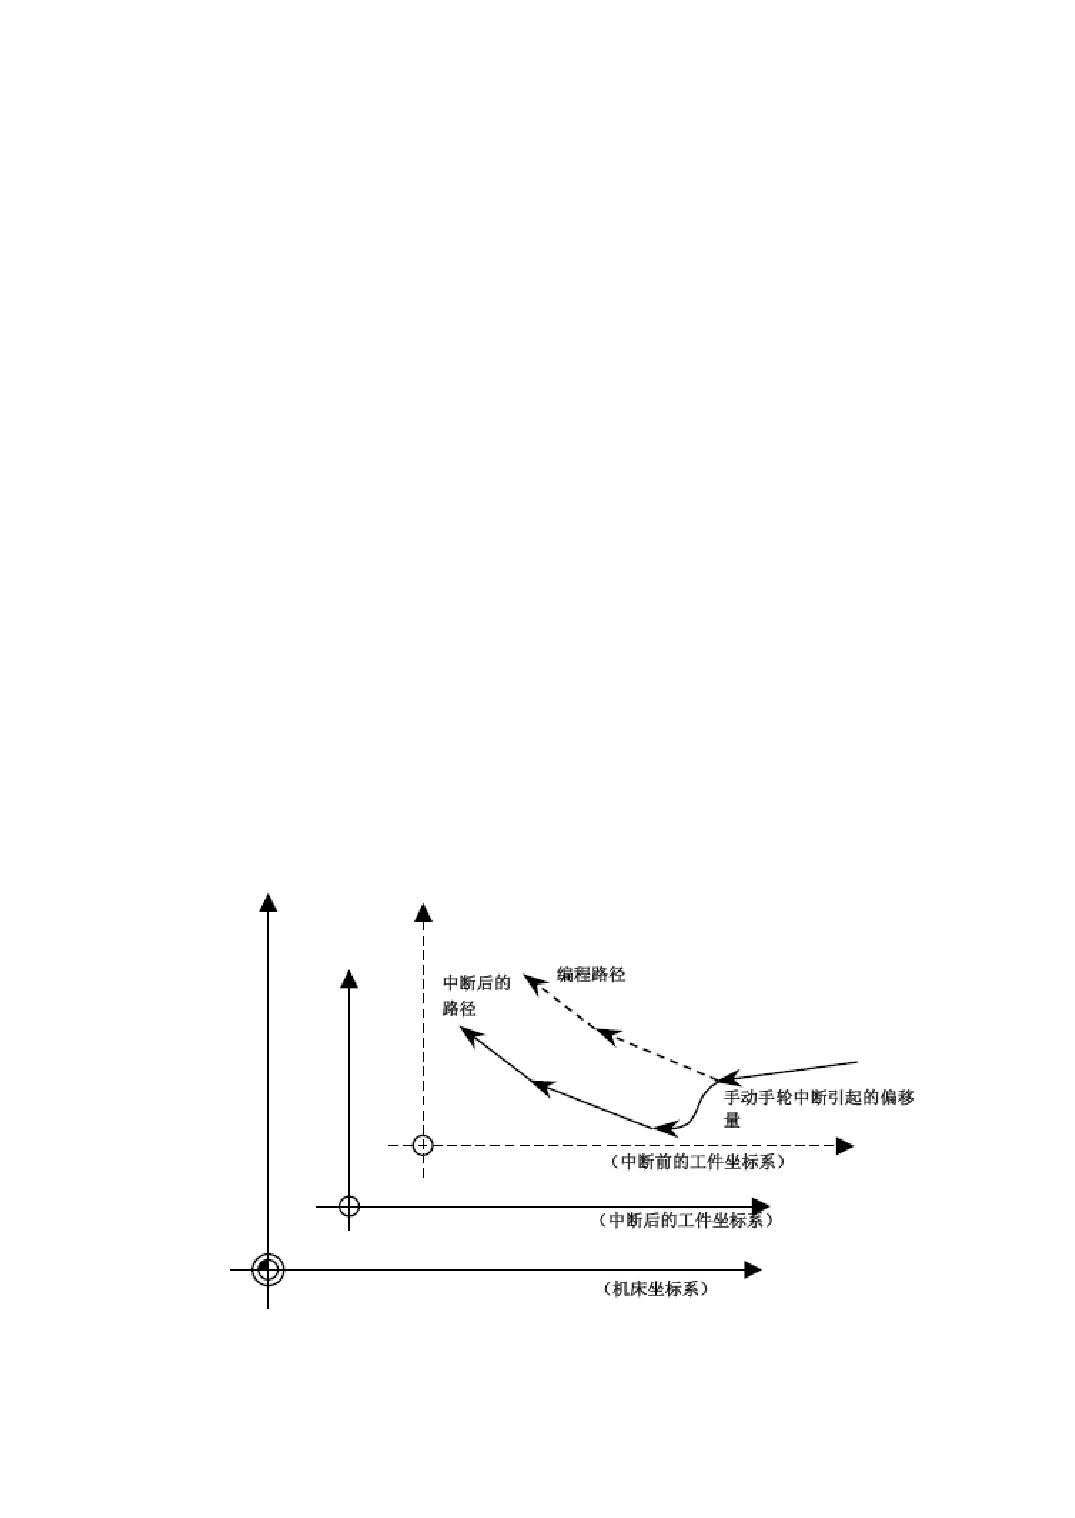
When the interruption function is open, the value of turning the handle is added to
the current axis’s movement in real time during the execution. The addition implements
by the excursion of workpiece coordinate zero, that means the handle increment is
directly added to the workpiece zero of the current axis.
The amount of interrupt which caused by handwheel interruption will make the
workpiece coordinate system and local coordinate system offset. Therefore, although the
machine tool’s movement has changed, the coordinate value of workpiece coordinate
system and local coordinate system remain the same.
Only change the selected workpiece coordinate system in the current program, the
others remain the same.
Figure 3-5 Handwheel Interruption
28
After executing the handwheel interruption function, the offset which added to the
workpiece zero is volatile, it will be lost when the electricity goes off. In order to
reserving the offset, you need to save the workpiece zero by the following methods:
1) Pressing [SCRD] → [WRST] keys can save the offset coordinate zero;
2) If you switch the automatic mode to others, system will save the offset coordinate
zero by itself;
3) If you press <CYCL> to rerun the program, system will save the offset coordinate
zero by itself;
3.7 DNC
The functions of DNC include: 1)Transferring a File;
2)On-line operation.
Accomplish the functions of DNC by cooperating with the communication software
at the computer port. The direction of the software should be consulted for the user
manual.
3.7.1 Transferring a File
Operation of the CNC port: <AUTO> →[\] → [DNC] → [FLTF]
After that, system shows the DNC window as the figure 3-13, the information about
transferring a file includes:
1) Summation Received: shows the summation of file sizes received since entering
into the window.
2) The Last Received: shows the sizes of the file which is the last received.
3) Summation Sent: shows the summation of file sizes sent since entering into the
window.
4) The Last Sent: shows the sizes of the file which is the last sent.
Switch the CNC port to the DNC mode when transferring a file. After the window of
DNC is showed, you can transfer files by the communication software at the computer
port.
29
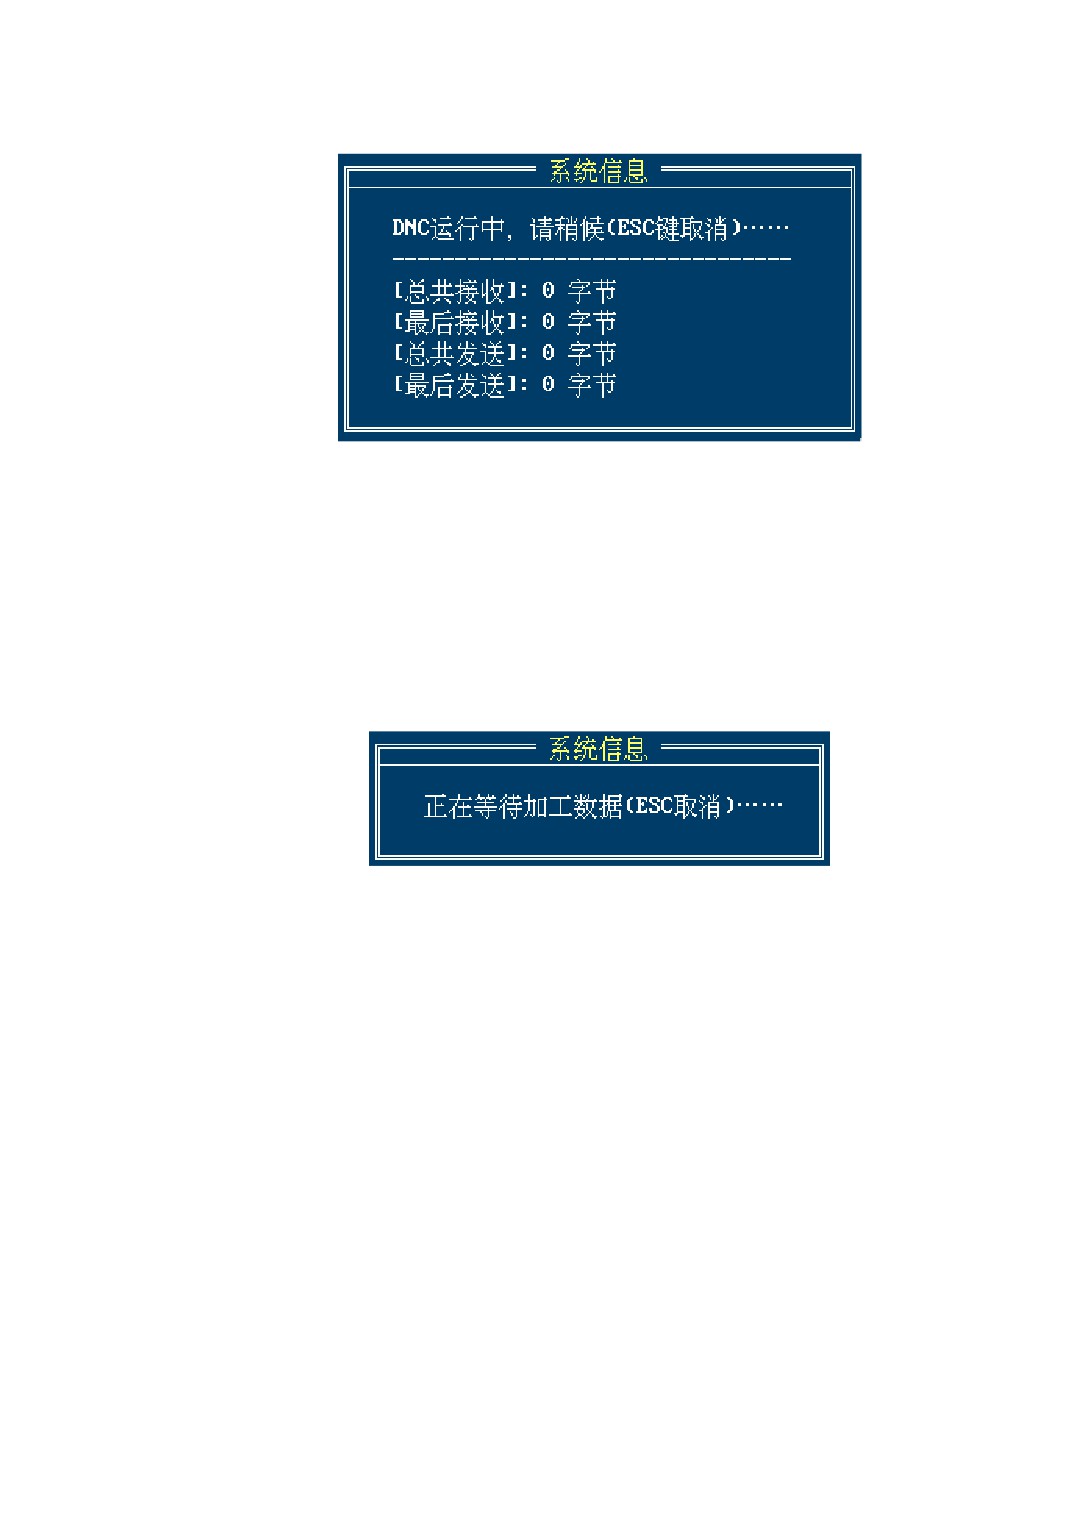
Figure 3-13 Transferring a File Of DNC
3.7.2 On-Line Operation
Operation of the CNC port: <AUTO> →[\] → [DNC] → [WONL]
After that, system shows the waiting window as the figure 3-14.
Figure 3-14 Waiting For On-Line Operation
Switch the CNC port to the the on-line operation mode when doing on-line operation.
After the waiting window is showed, you can do on-line operation at the computer port .
When the CNC receive a full buffer of DNC, the system will switch to the feed hold
state of on-line operation by itself. Then press <CYCL> key to run the on-line program.
The size of the DNC’s on-line operation buffer is set by the parameter P0192.
3.7.3 DNC Setting
Method of operation: <AUTO> →[\] → [DNC] → [WONL]
After that, system enters into the DNC setting window as the figure 3-15.
If the DNC is base on internet transmission, the parameters which need to set include:
30
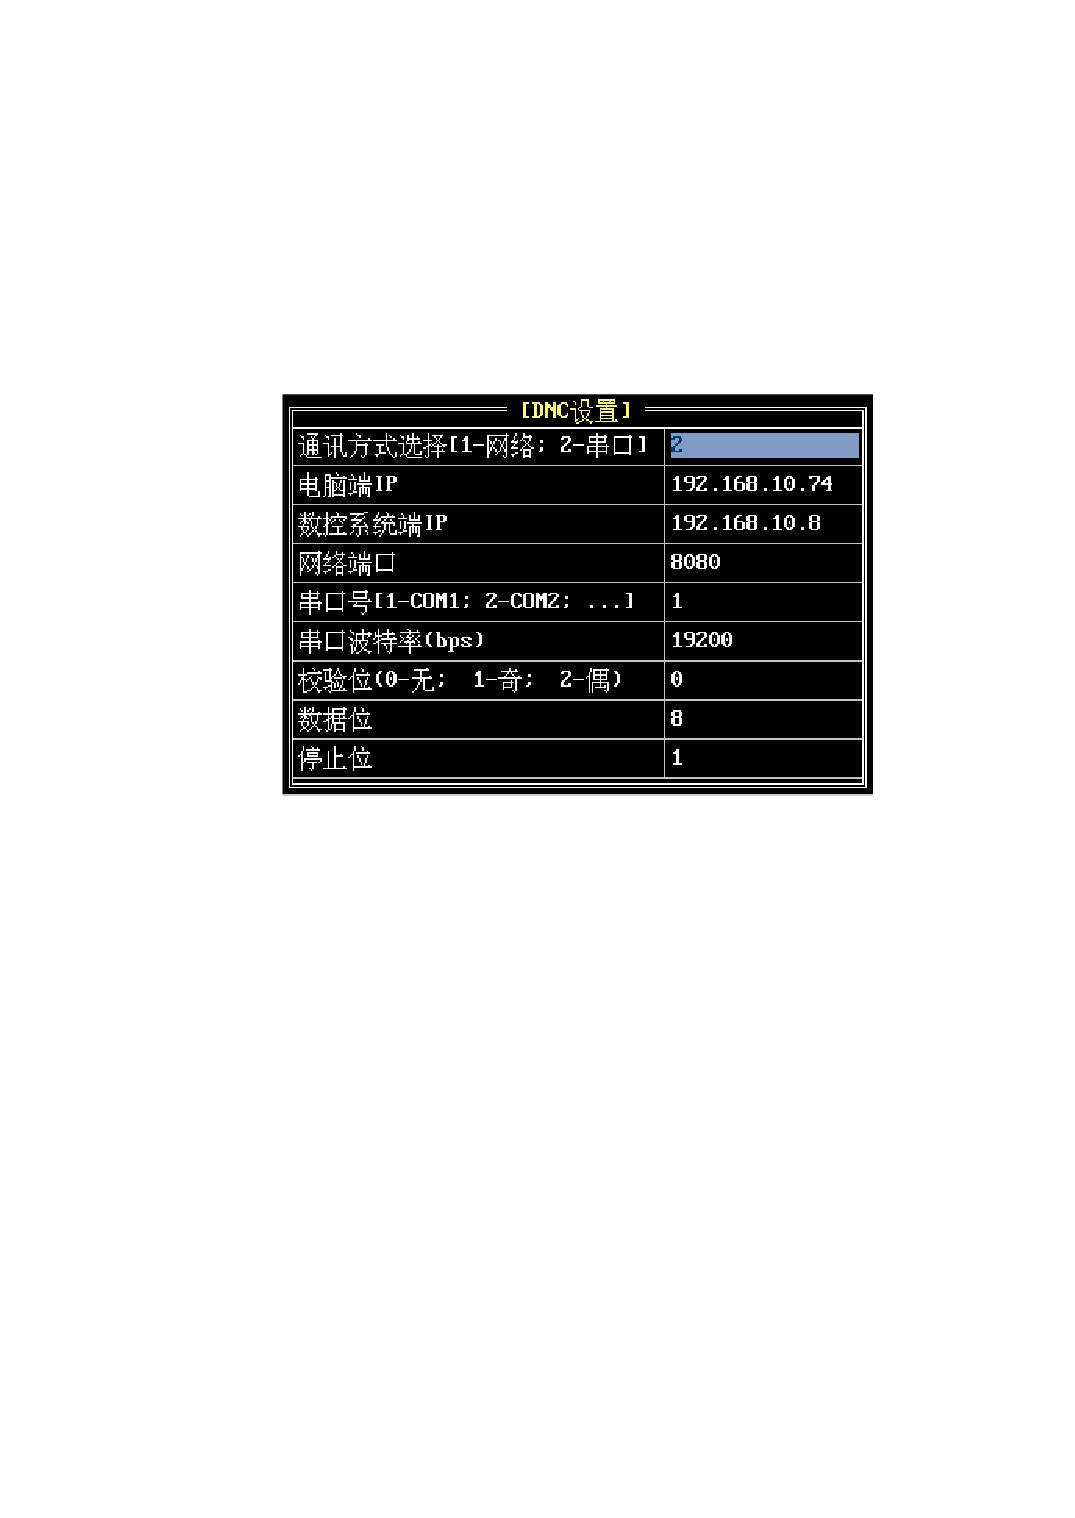
communication mode, the computer port’s IP, the CNC port’s IP, network port, the others
do not matter.
If the DNC is base on serial port transfer, the parameters which need to set include:
communication mode, serial port number, serial port baud rate, parity bit, data bit, stop
bit, the others do not matter.
The DNC parameters setting at the CNC port should be the same as the computer port.
Figure 3-15 DNC setting
3.8 MDI Operation
Method of operation : <AUTO> → [\] → [MDI]
To execute the operation, system must be in the stop mode.
3.8.1 MDI code input format
The format of MDI command is the same as that of G code, so you can refer to the
programming manual. However, the input MDI command should note the following two
points:
1) The input is a single segment instruction, the ending sign ‘;’ can be ignored;
2) The input is a multiple segment instruction, the ending sign ‘;’ is required
between two segments, but it can be ignored when coming to the last segment
31
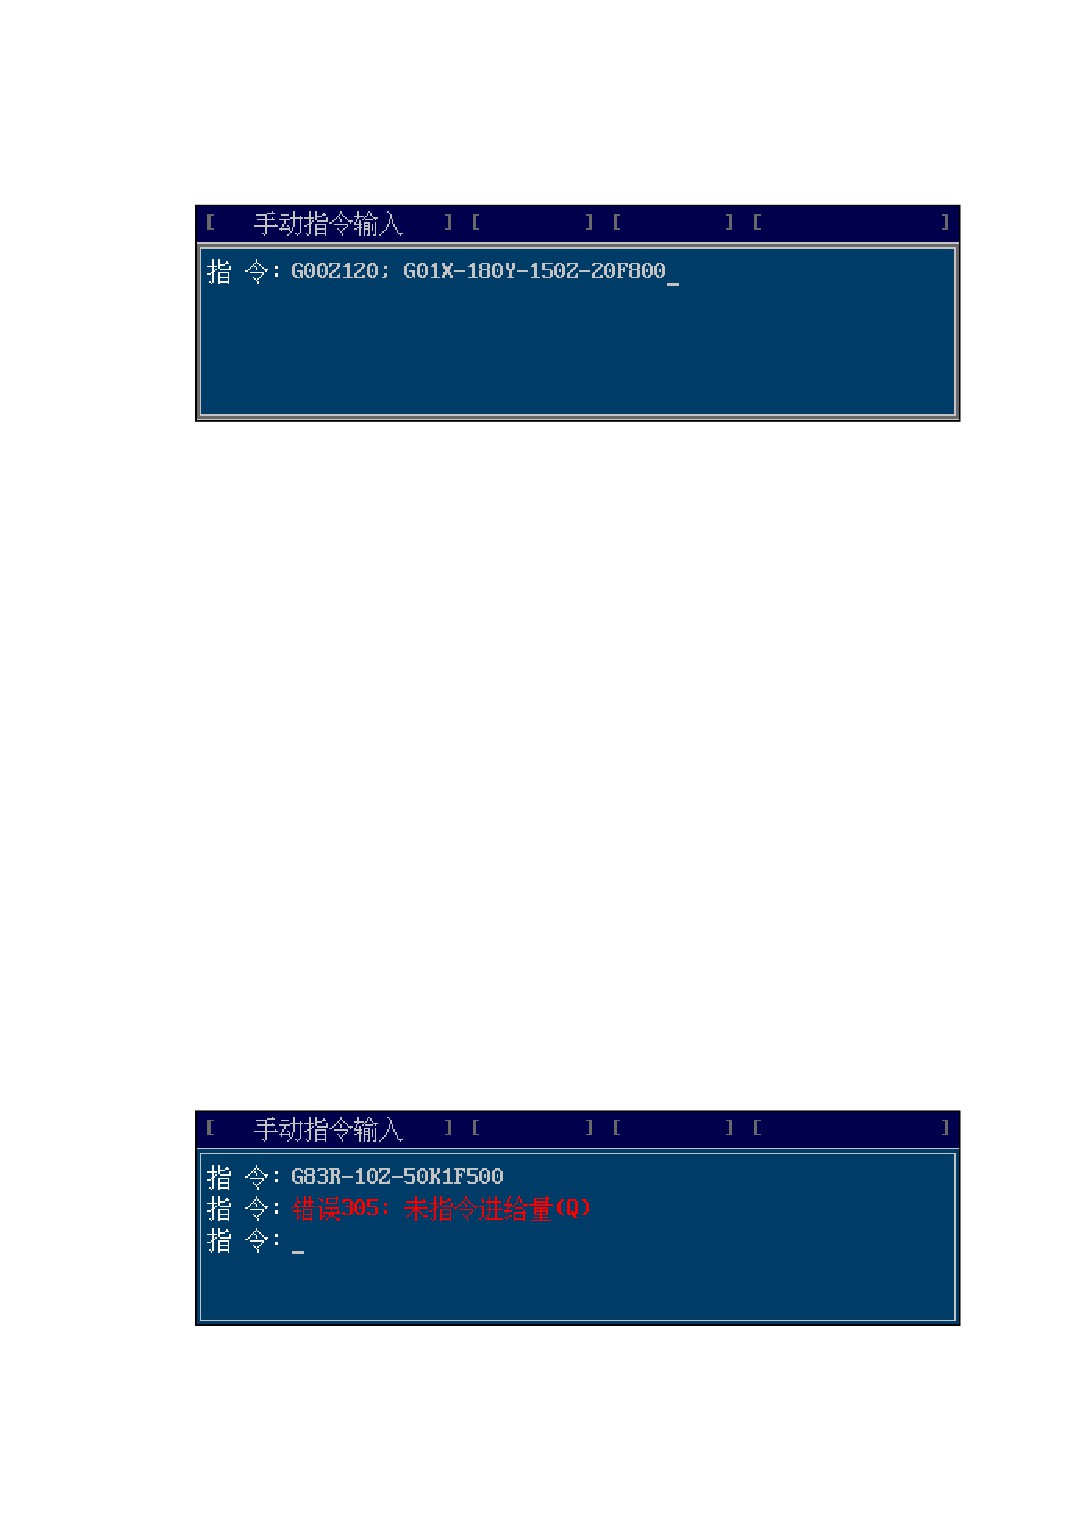
(as figure 3-16 shown).
Figure 3-16 Input for multiple segment instruction
3.8.2 Sequence of MDI Operation
When the cursor of the MDI instruction input window twinkles, the state of manual
instruction input is activated and then you can input MDI command to the window.
Sequence of MDI operation is as follows:
1) Switch to the AUTO mode;
2) Press < MDI > key to switch to the MDI instruction execution mode;
3) Input a command into the MDI window and press the <Enter> key to confirm the
input. Then system will verify the command. If there is no errors displayed, which
indicates the input command has been through the syntax checking and can be
executed. If system shows some errors which means the input command is incorrect,
you need input again. The system state of reporting error is as figure 3-17 shown
“error NO. 305: no feedrate specified (Q)”, the NO. 305 is the sequence number of
the error, which you can depend on to see the programming manual about the
mistake details;
4) Press <CYCL> key to execute the MDI command.
Figure 3-17 MDI command’s syntax error
32
Note:
1) After input a MDI command, you should press <Enter> key to send the code to
the code buffer to wait for executing, or else, it will not be executed even though
you press <CYCL> key.
2) The instruction buffer’s size is fit for one instruction. The last input command can
automatically cover the previous input command.
3.8.3 Suspending/Recovering/Terminating a Command
If a MDI command pauses during the execution, the command’s execution state and
the data buffer are stored still, so it can be resumed to execute. But if a MDI command is
terminated, the command’s execution state and the data buffer will be cleared, and it
can’t be resumed to execute.
1、Suspending a Command
You can press <FDHD> key to make the operation pause in the process of executing a
MDI command at any time.
2、Recovering a Command
In the command pause state, you can continue these operations as follows:
1) Press <CYCL> key again to resumed to execute the previous command.
2) After input a new command and confirm the input, the previous command will
be covered, then press <CYCL> key again to execute the new command.
3) exit from the MDI mode.
3、Terminating a Command
A command will be terminated if any one of the following operations takes place:
1) After a command paused, exit from the MDI mode or switch to other operation
mode.
2) After a command paused, input a new command, then the old command will be
terminated automatically. The new command input is subject to the <Enter> key,
that means after input a command, pressing the <Enter> key indicates the new
command has been input(the old command will be terminated even though the
new one has syntax errors).
33
Note:
After input a MDI command and press <Enter> key, then if system doesn’t indicate
syntax errors, that the command has been accepted and stored in the instruction
buffer. So pressing <CYCL> will execute this command before it is terminated.
34
4 Managing a Program
4.1 Classification Of Program File
The program of this system refers to can be divided into four kinds as follows:
1) System Program: the programs which are stored in the system’s internal
storage.
2) External Program: the programs which are stored in U disk or removable
disk. The name of the external storage is set by the parameter P0012.
3) Network Program: the programs which are mapped to the NC port from the
computer’s port by network mapping.
4) Online Program: the programs which are received from the DNC server when
online machining.
5) Extended Program:the programs which are written for implementing some
motion’s sequence. The names of extended program are 9000~9999, these
names are used for the extended program, the other programs can not use.
The type of program is determined by its storage position and form, when the
storage position or form is changed, the type of the program will change accordingly. For
example, when copy a external program into the system’s internal storage, the type of
this program is changed from external program to system program.
4.2 Editing a Program File
Before edit a program file, you should load the program at first. Only the program
which has been loaded to memory can be edited.
editing a program file needs customer class or above power, or it isn’t available.
4.2.1 Opening a Program File
Two kinds of situations for opening a program file:
1、 Opening an existing program file:
35
1) Load the needed editing file to memory ( method of operation refer to 3.1);
2) Switch to the full screen for editing. Method of operation: <AUTO> → [\] →
[PROG] → [PEDT]
2、 Creating a new program file
Method of operation: <AUTO> → [\] → [PROG] → [NFIL]
After these operations, input a filename of the new program in the pop-up dialog
and press <Enter> key to confirm, then system will automatically switch to the full
screen for editing of creating a new program.
The new program’s name couldn’t conflict with the existing program name, or
else some errors occur.
the length of program name is the 8.3 format. That is, the length of main name is
no more than eight characters, the length of extension is no more than three characters.
The 9000~9999 names are used for the extended program, if the new program
name is between 9000~9999, the system will prompt that the newly-built program is an
extended program. The newly-built extended program will be stored in the extended
program catalog of CNC.
After opening(or creating) a program file, system will switch to the full screen for
editing in which you can edit or modify the open program, as figure 4-1 shown.
The content is shown on the top of the editing window includes:
1) Program Name: the filename of the current open program;
2) Program Type: If the open program is from the system’s internal storage, it will
display “[System Program]”; if the open program is from the external storage, it will
display “[External Program]”; if the open program is an extended program, it will
display “[Extended Program]”;
3) Current Row: The serial number of row in the file which the cursor is located at and
the total number of rows.
4) Current Column: The serial number of column which the cursor is located at.
36
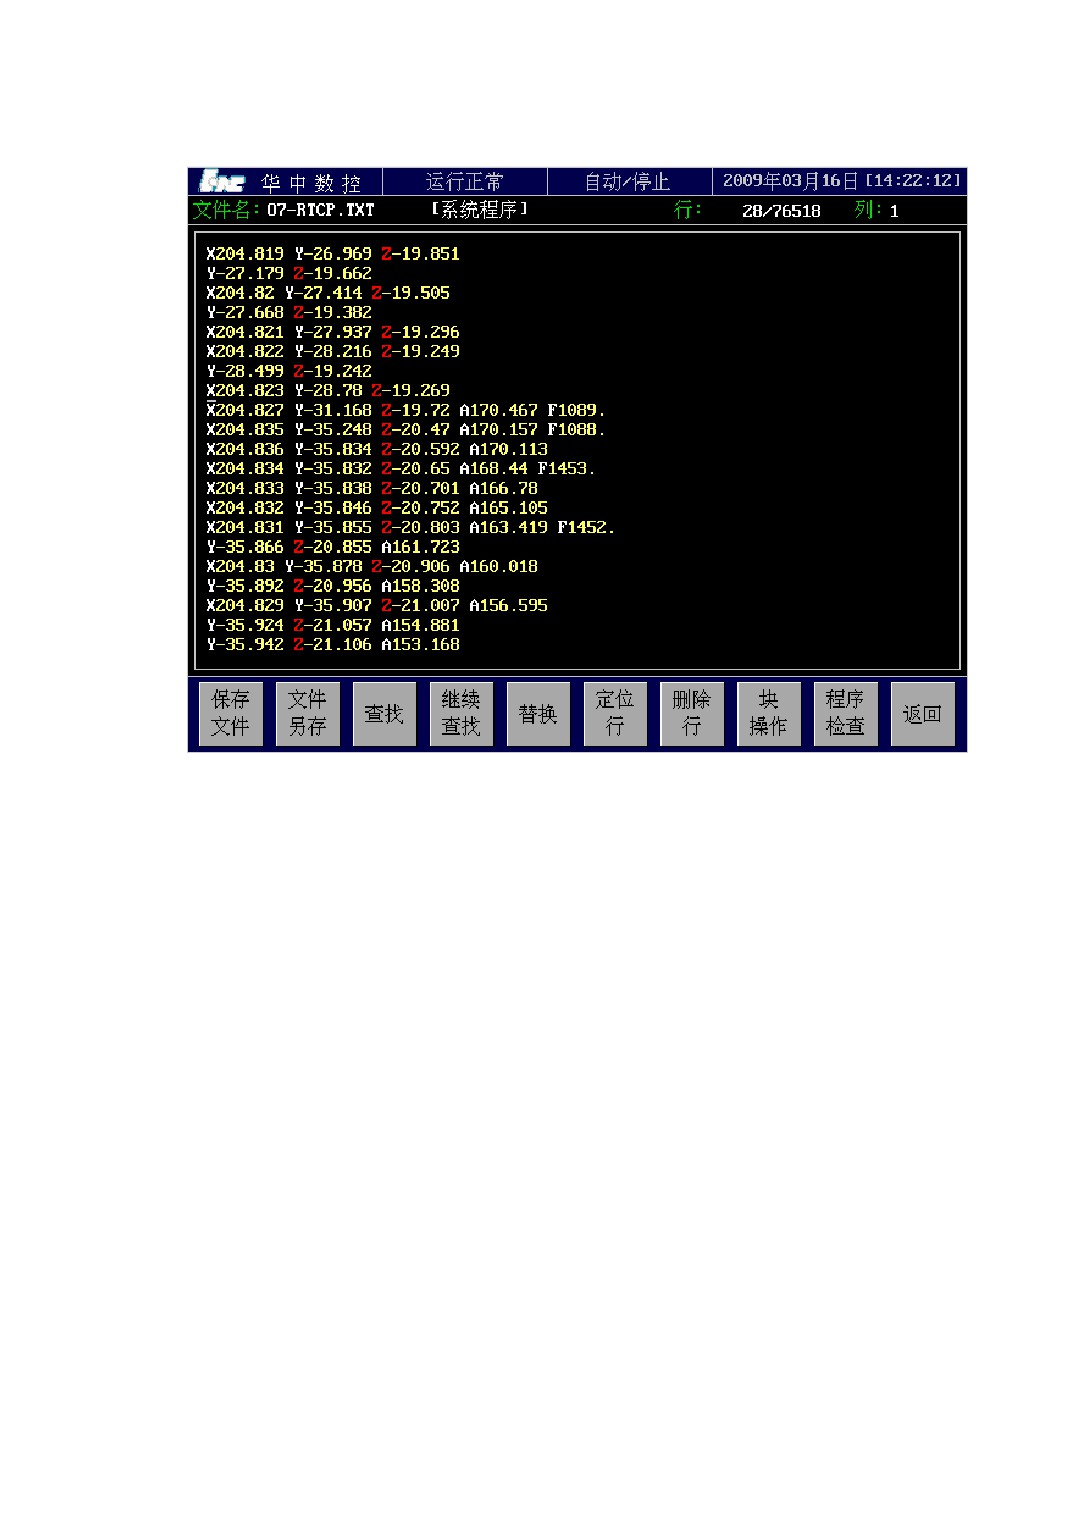
Figure 4-1 The Full Screen For Editing
4.2.2 Saving a File
Saving a program file means write a file into the program storage for permanent
conservation. It will not vanish even though power is off.
If the open program which is in the system’s internal storage (system program) or
extended program, then it will save the program in the corresponding catalogue of the
internal storage; if the open program is in the external storage (external program), then it
will save the program in the corresponding catalogue of the external storage.
As figure 4-2 shown, shows a progress bar in the process of saving.
37
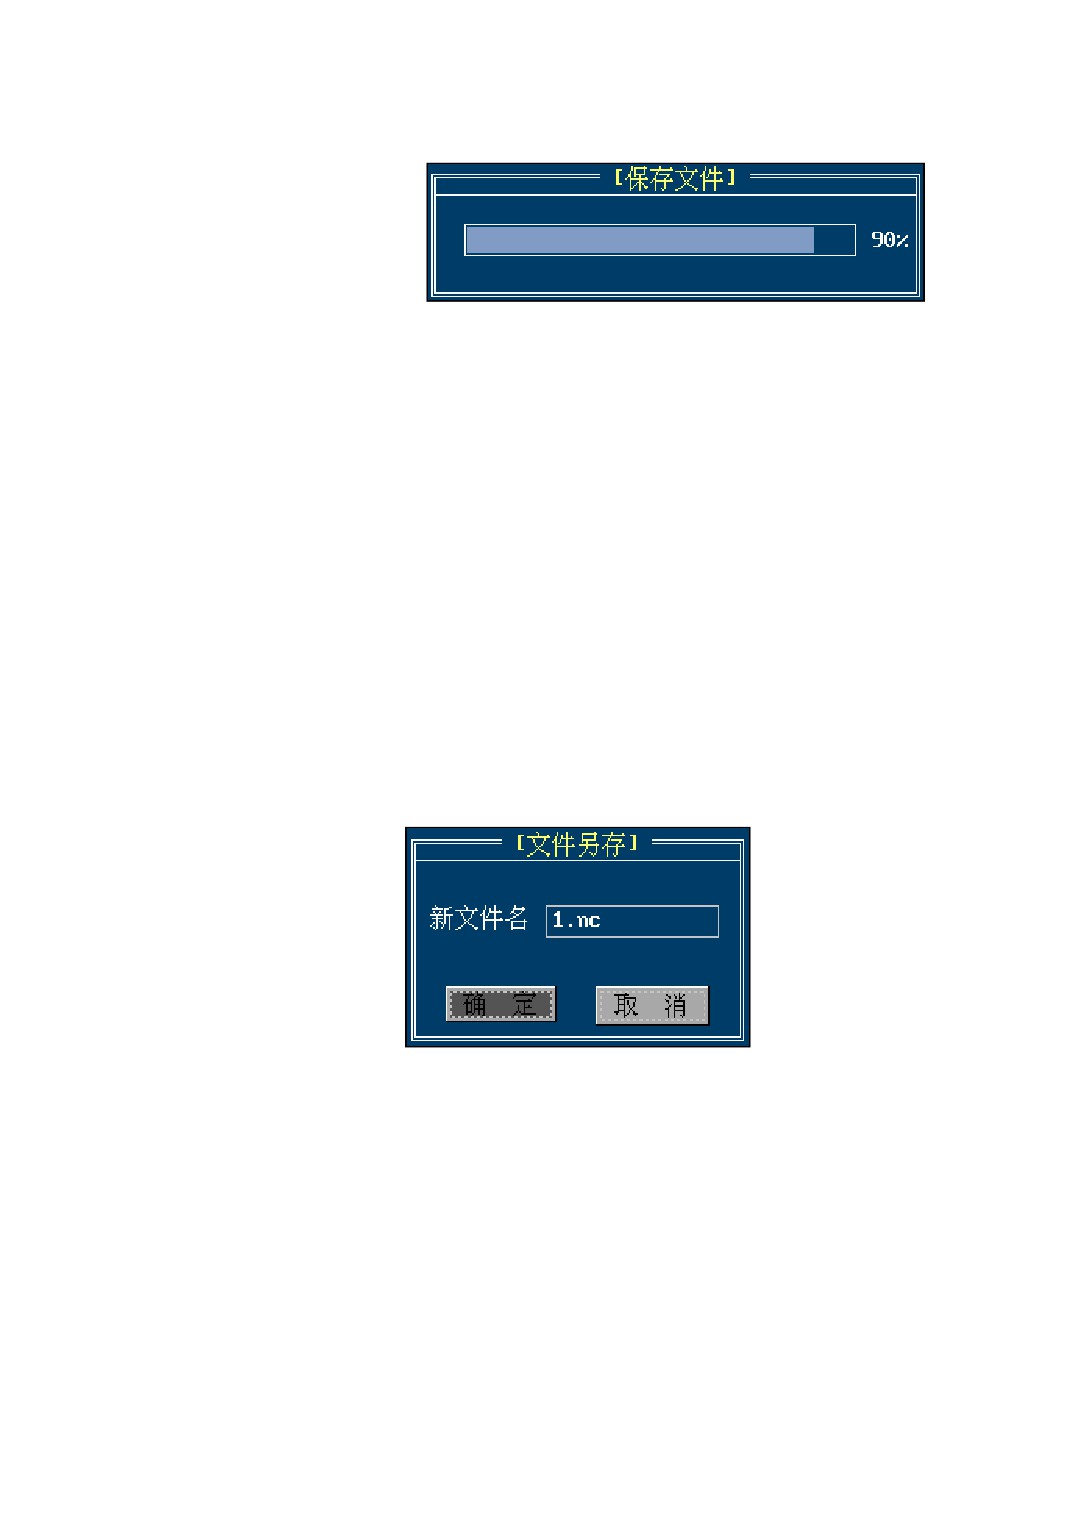
Figure 4-2 A progress bar for saving a file
4.2.3 Saving a File As
Saving a file as is saving a file too, the difference is that when “save a file”, the
filename doesn’t be changed, the file is saved as the old name. But when “save a file as”,
the file is saved as a new file, and the old file still remains.
If the open file has been modified, saving the file as just saves the modification in a
new file, the old file remains the same.
Operation sequence of saving a file as:
1) Press the system menu [SVAS] in the full screen for editing, it will pop up a dialog
as figure 4-3 shown.
Figure 4-1
a Dialog For Saving a File As
2) Input a new filename in the pop-up dialog, press [Enter] key to confirm the input;
3) If the input filename doesn’t conflict with the other filename, saving a file as is
finished; or else, if the filename conflict, it will pop up a dialog as figure 4-4 shown.
38
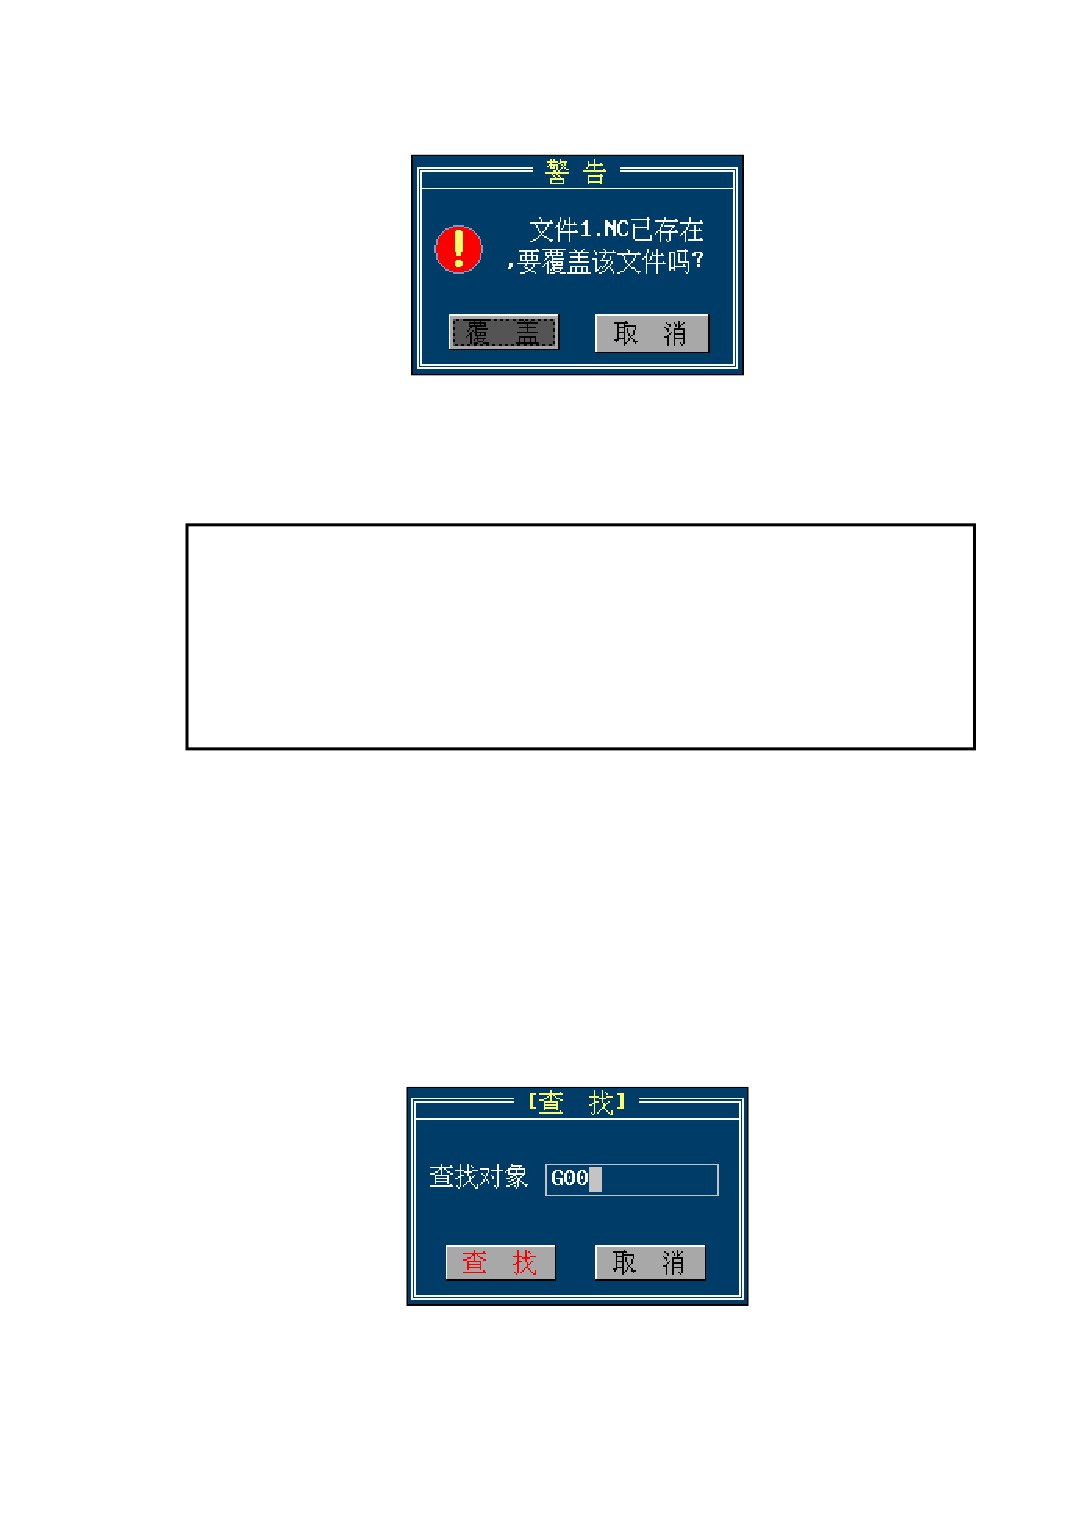
Figure 4-2
Filename Conflict
4) If you want to cover with the existing file, press [Enter]key to confirm; or else press
[Esc] key to cancel saving a file as and repeat;
Note:
If the program has been modified in the editing window and then you select not
saving, the program file in the program storage will still retain the file before
changed, but the memory program has been changed. So if you want to excute the file
before you changed it, you need re-load the program again.
4.2.4 Finding/ Finding on
The search operation can find a specified character string in an open file. The
character string search distinguishes capital and small letters, which are different.
It searches backward from the current cursor position. Operation sequence:
1) Press the system menu [PFND] in the full screen for editing, it will pop up a input
box as figure 4-5 shown.
Figure 4-5 Input Box For Finding
2) Input the character string for finding in the pop-up input box. Emphasizing the
39

capital and lower case letters.
3) Press <Enter> key to confirm input. Then a window will search the input character
string backward from the current cursor position. During the searching, it will show
a hint dialog as figure 4-6 shown, and then press <Esc> key will cancel search.
Figure 4-6 Finding a Character String
4) if finding the specified string, the system will locate the current cursor in back of the
string and select the string, or else, if not finding by searching the entire file, it will
pop up a hint box in the title bar to indicate that the finding is failure.
After the first finding operation, system will save the searched character string what
you input. So if you want to finding the same string in back of file, you can use [PFON]
key without inputing the search string again.The “Finding on” operation will keep on
searching backward from the current cursor position for the string you input last time.
4.2.5 Replacing
It is used to find the source character string in file and replace it with the new string.
Both of them are input by the user. The replacing operation is applied to the whole file.
That is after executing a replacing operation, all the source string in file will be replaced.
Replacing operation distinguishes capital letters and small letters. Operation sequence:
1) Locate the cursor at the position from which you want to start searching;
2) Press <RPLA> key in the full screen for editing. it will pop up a input box as figure
4-7 shown.
40
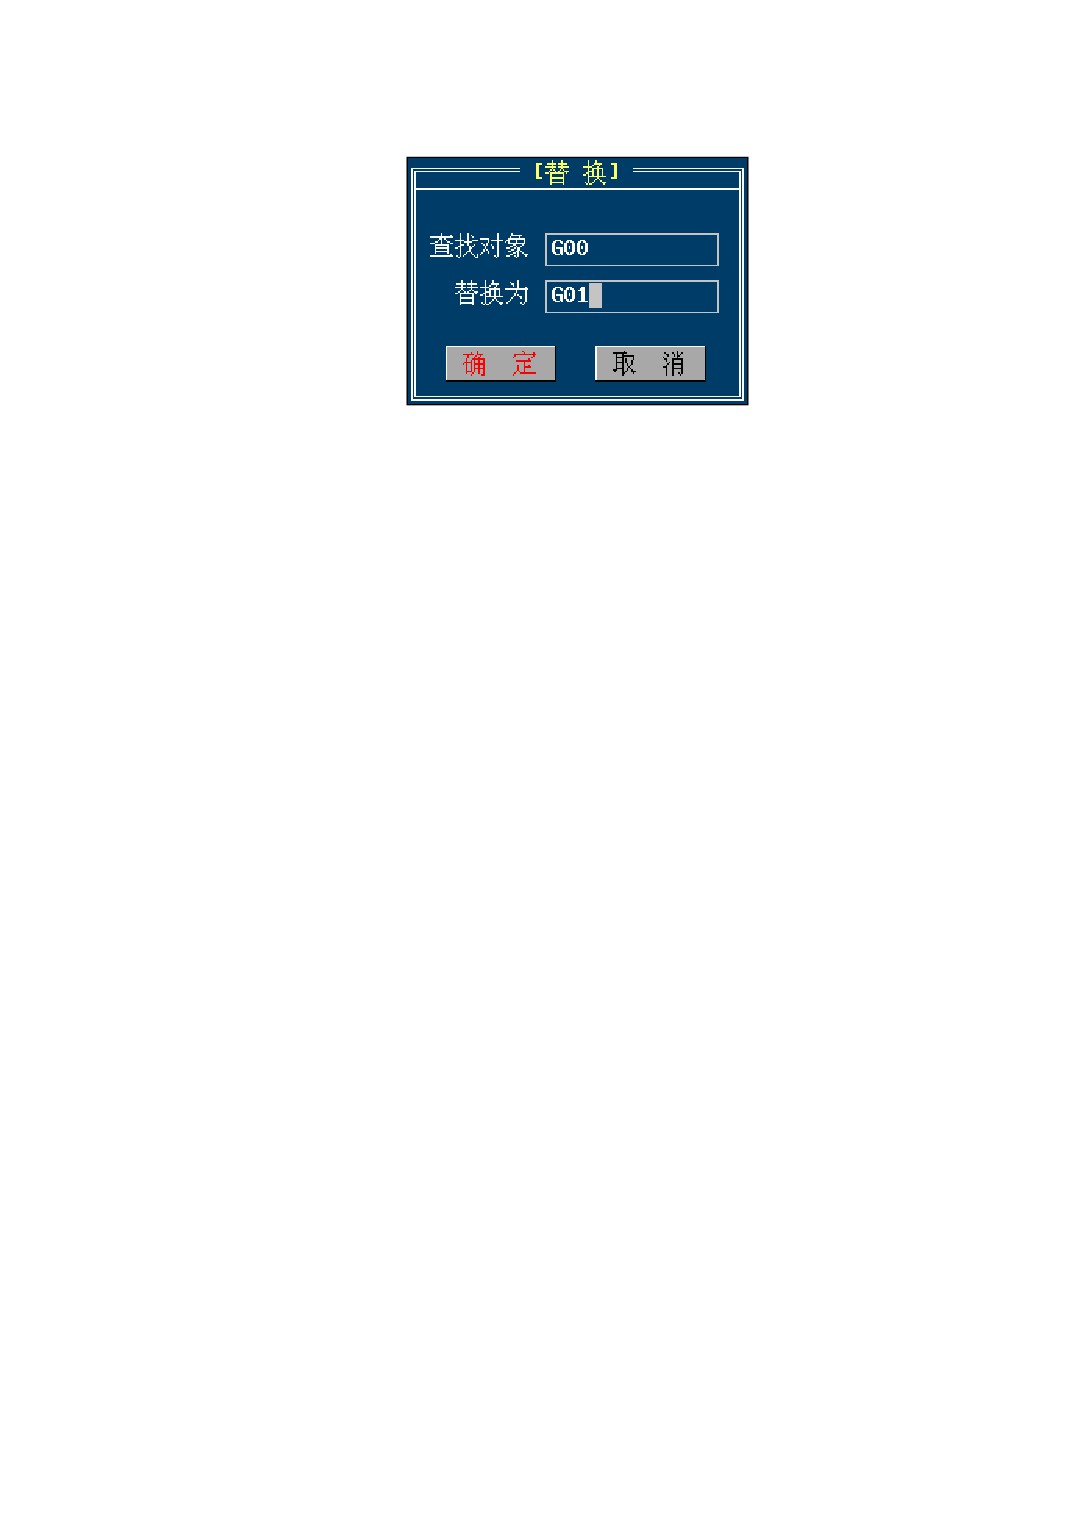
Figure 4-7 Input Box for Replacing
3) Input the search target string (the string will be replaced) and new character string in
the pop-up input box. Emphasizing the capital and lower case letters.
4) Press <Enter> key to confirm the input. Then a window will replace the specified
string backward from the current cursor position. During the replacing, press <Esc>
key will cancel this operation.
4.2.6 Block Operation
The program block means a continuous character string unit in the program. The
program block’s position is determined by block header(the beginning of the block) and
block tail(the end of the block).
The defined program block is shown as figure 4-8.
41
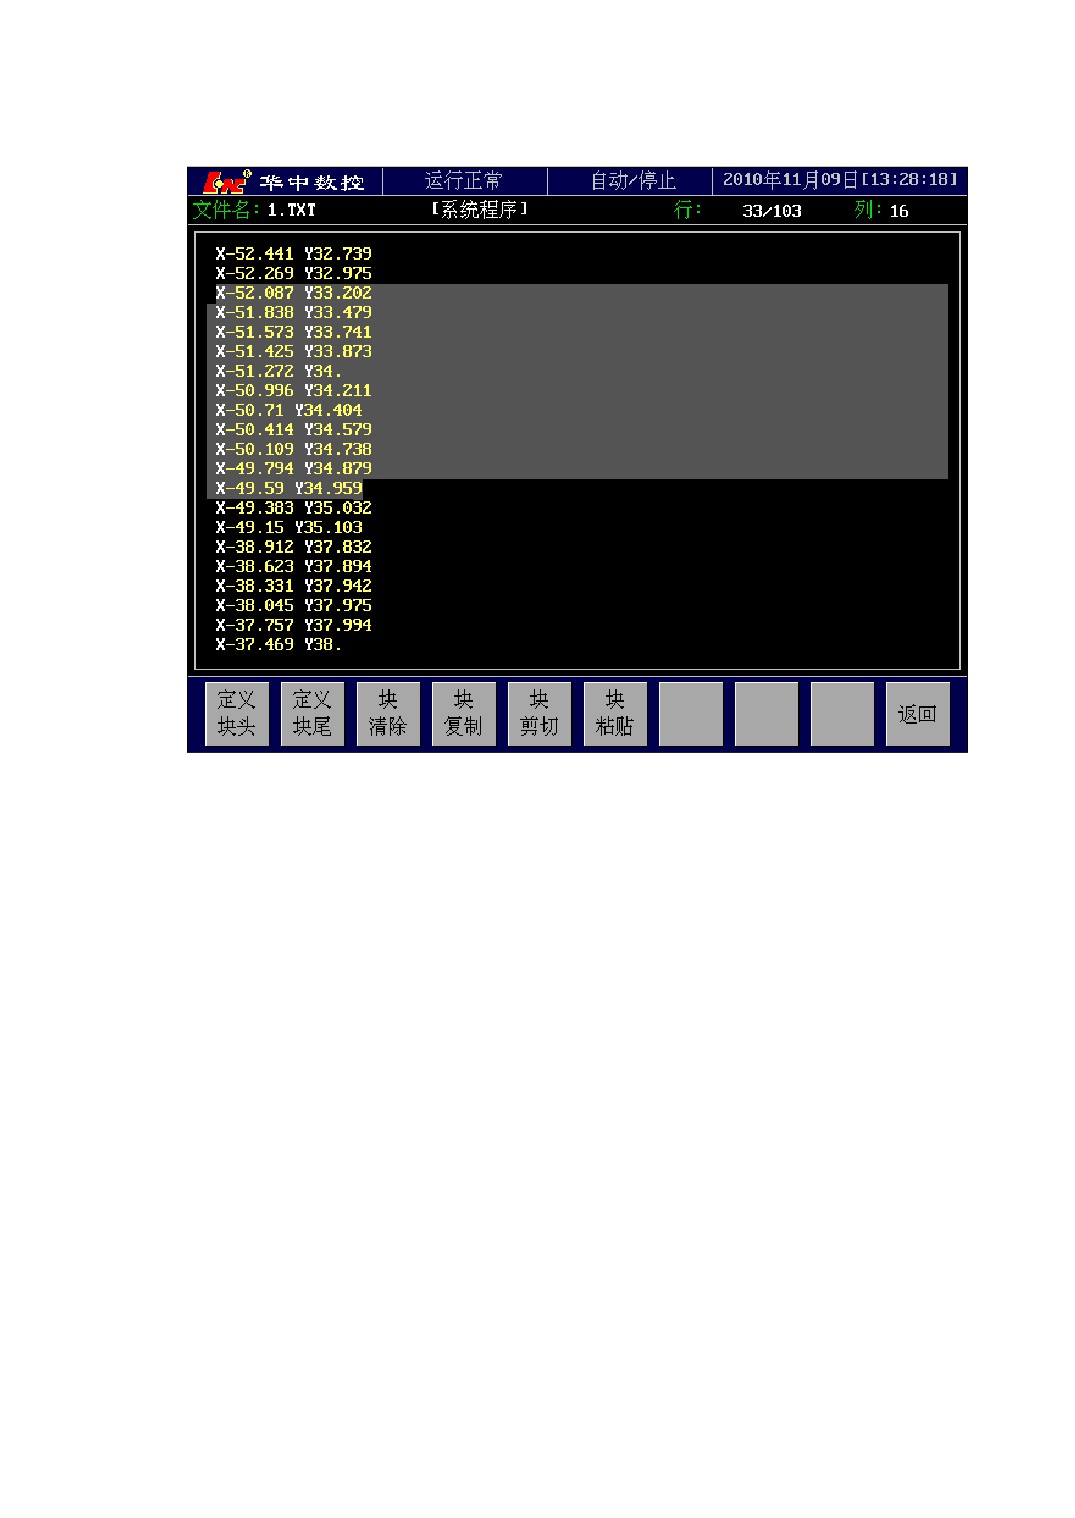
Figure 4-3
The Defined Program Block
The program blcok operation includes some kinds as follows:
1)
[Define a Header Block]
Define the cunrrent cursor position as the beginning of the program block.
2)
[Define a Tail Block]
Define the cunrrent cursor position as the end of the program block.
3)
[Clean Out a Block]
Clean out the defined program block, but don’t clean out the paste buffer.
4)
[Copy a Block]
Copy the defined program block to the paste buffer. After that, you can use the paste
operation to insert the copy block into the specified position in file.
5)
[Cut a Block]
Copy the defined program block to the paste buffer. It is different from copying a
block, cutting a block will remove the block from the file. You can use the paste
42
operation to insert the cut block into the specified position in file.
6)
[Paste a Block]
Insert the program block of the paste buffer into the cunrrent cursor position. The
paste operation don’t clean out the content of paste buffer. So you can continuously
use the paste operation to insert the same block into the different position in file.
4.3 Managing a Program File
The object of the program file management can be a system program, an external
program or an extended program. The operation of the management includes:
1) Delete a Program File;
2) Copy a Program File;
3) Backup a Program File;
4) Rename a Program File;
5) Sort a Program File;
The method of entering into the program management window:
<AUTO> → [\] → [PROG] → [PMAN]
43
4.3.1 The Window Of Program Management
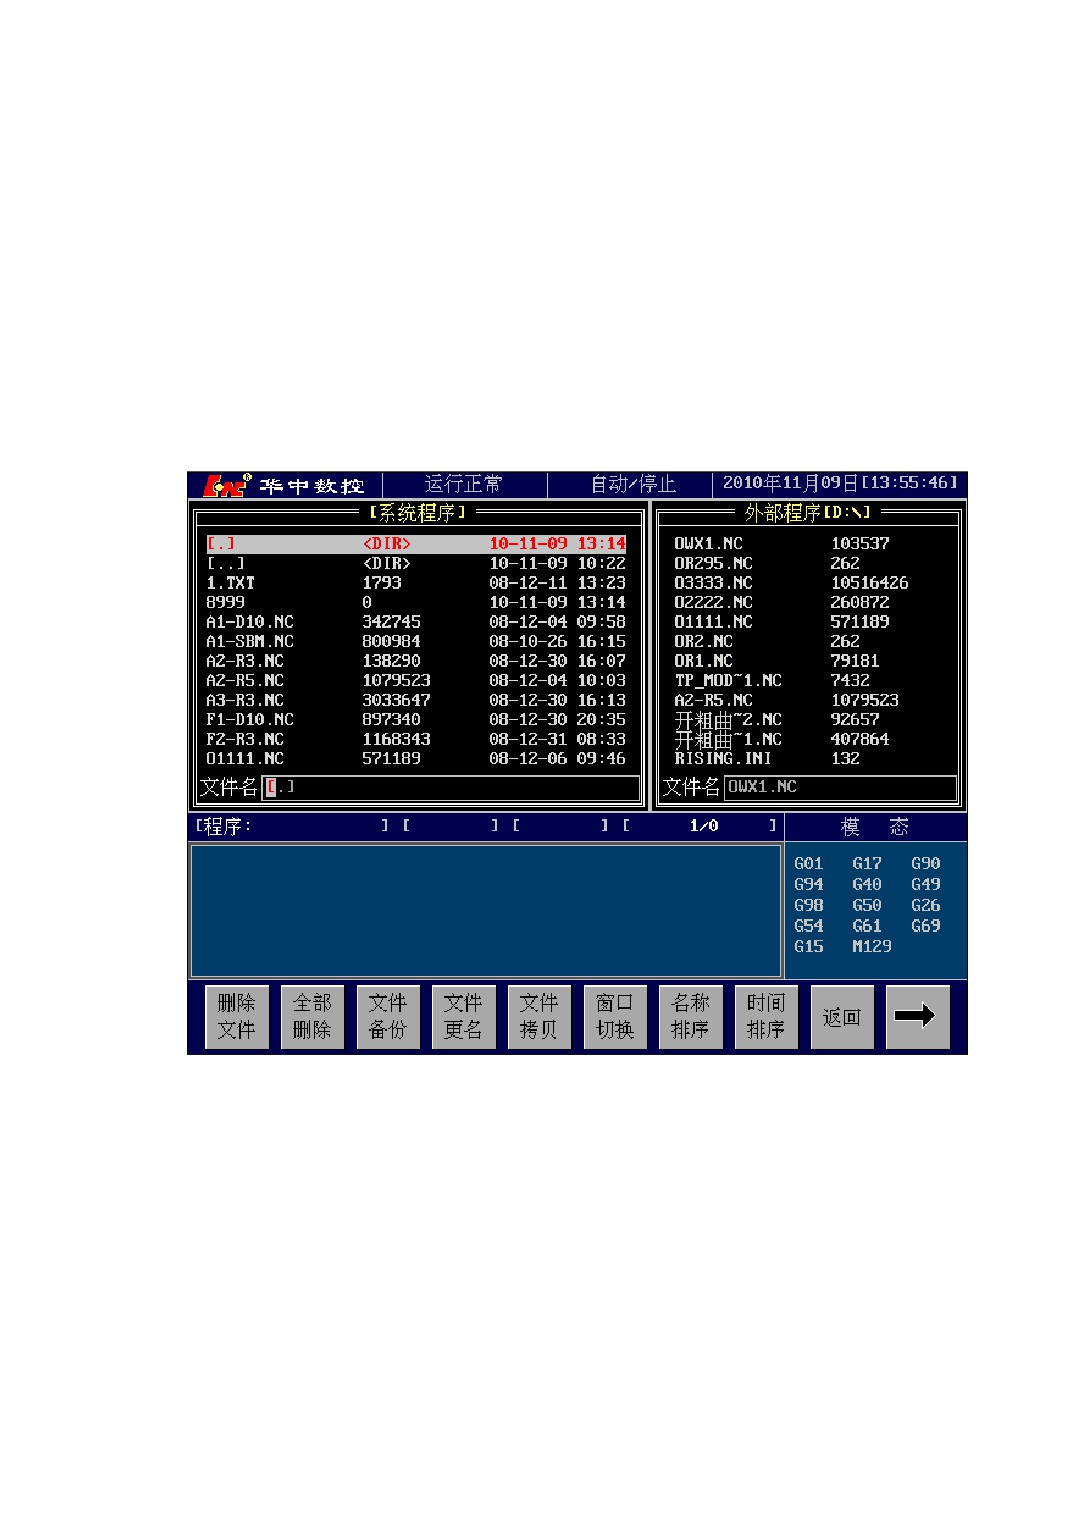
If the system has connected the external storage, it will open “System Program” and
“External System” windows after entering into the program management interface, as
figure 4-9 shown.
The operable window can be switched each other between system program window
and external program window by pressing [WSWC] menu key.
Figure 4-4 The Program Management Interface Of System And External Program
44
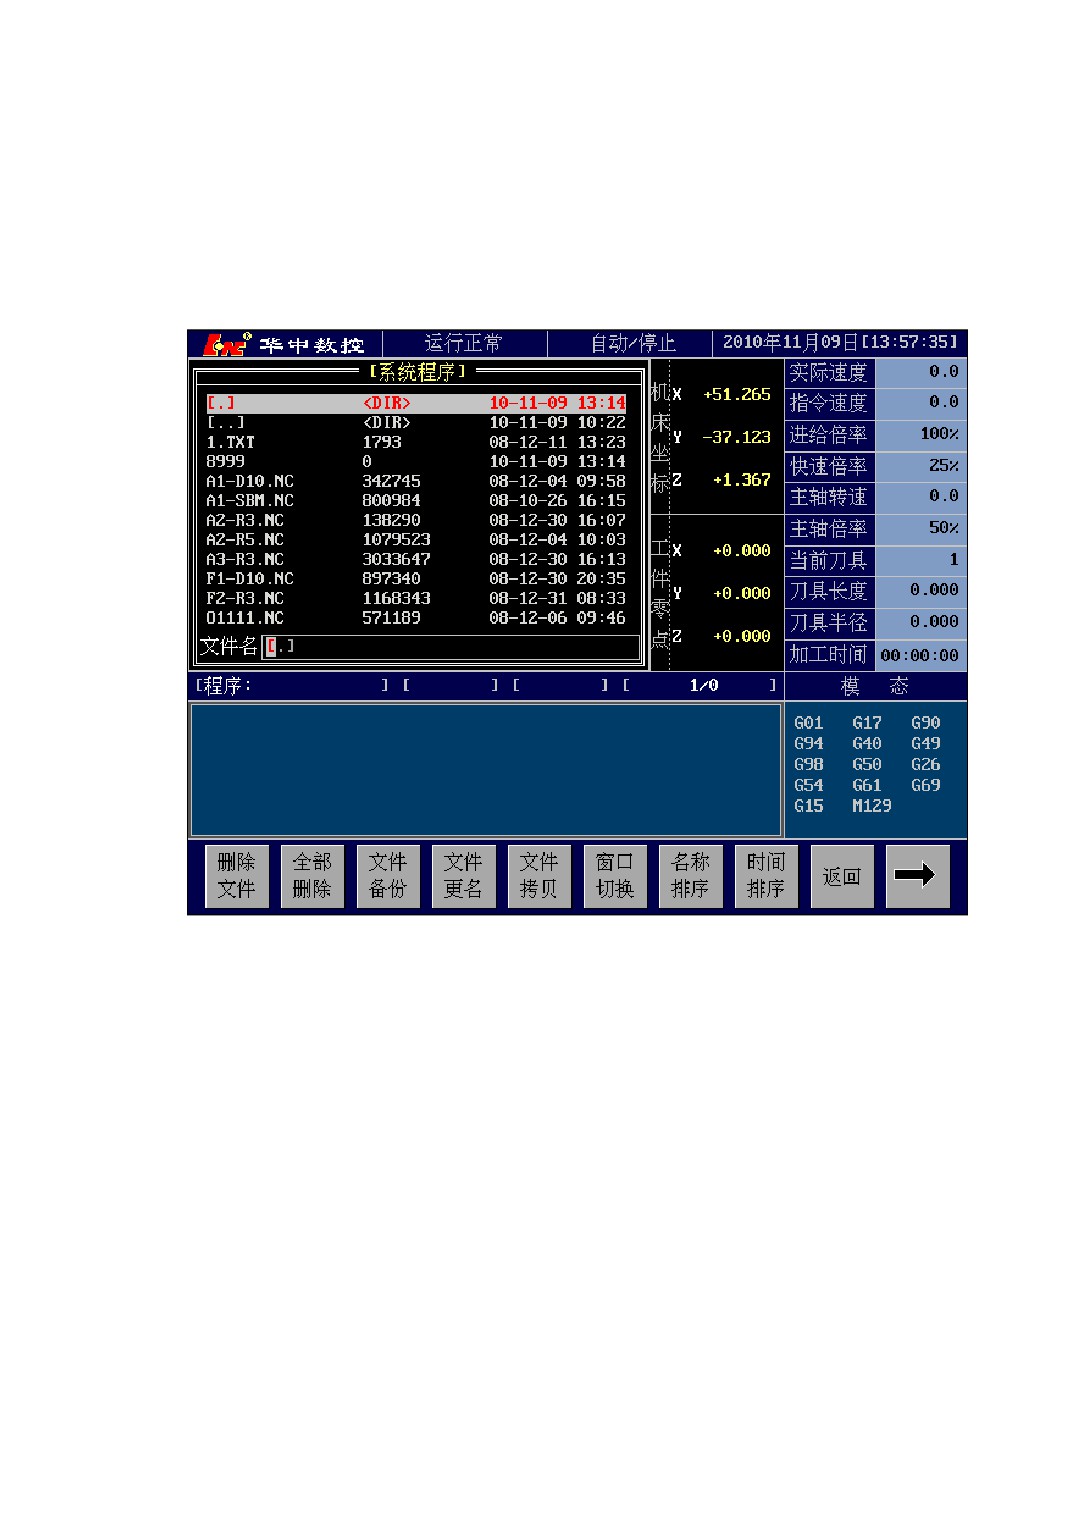
If the system can’t connect the external storage or the parameter P0012 of the
external storage is set incorrectly, it will only open “System Program” window after
entering into the program management interface, as figure 4-10 shown.
Figure 4-5 The Program Management Interface Of System Program
45
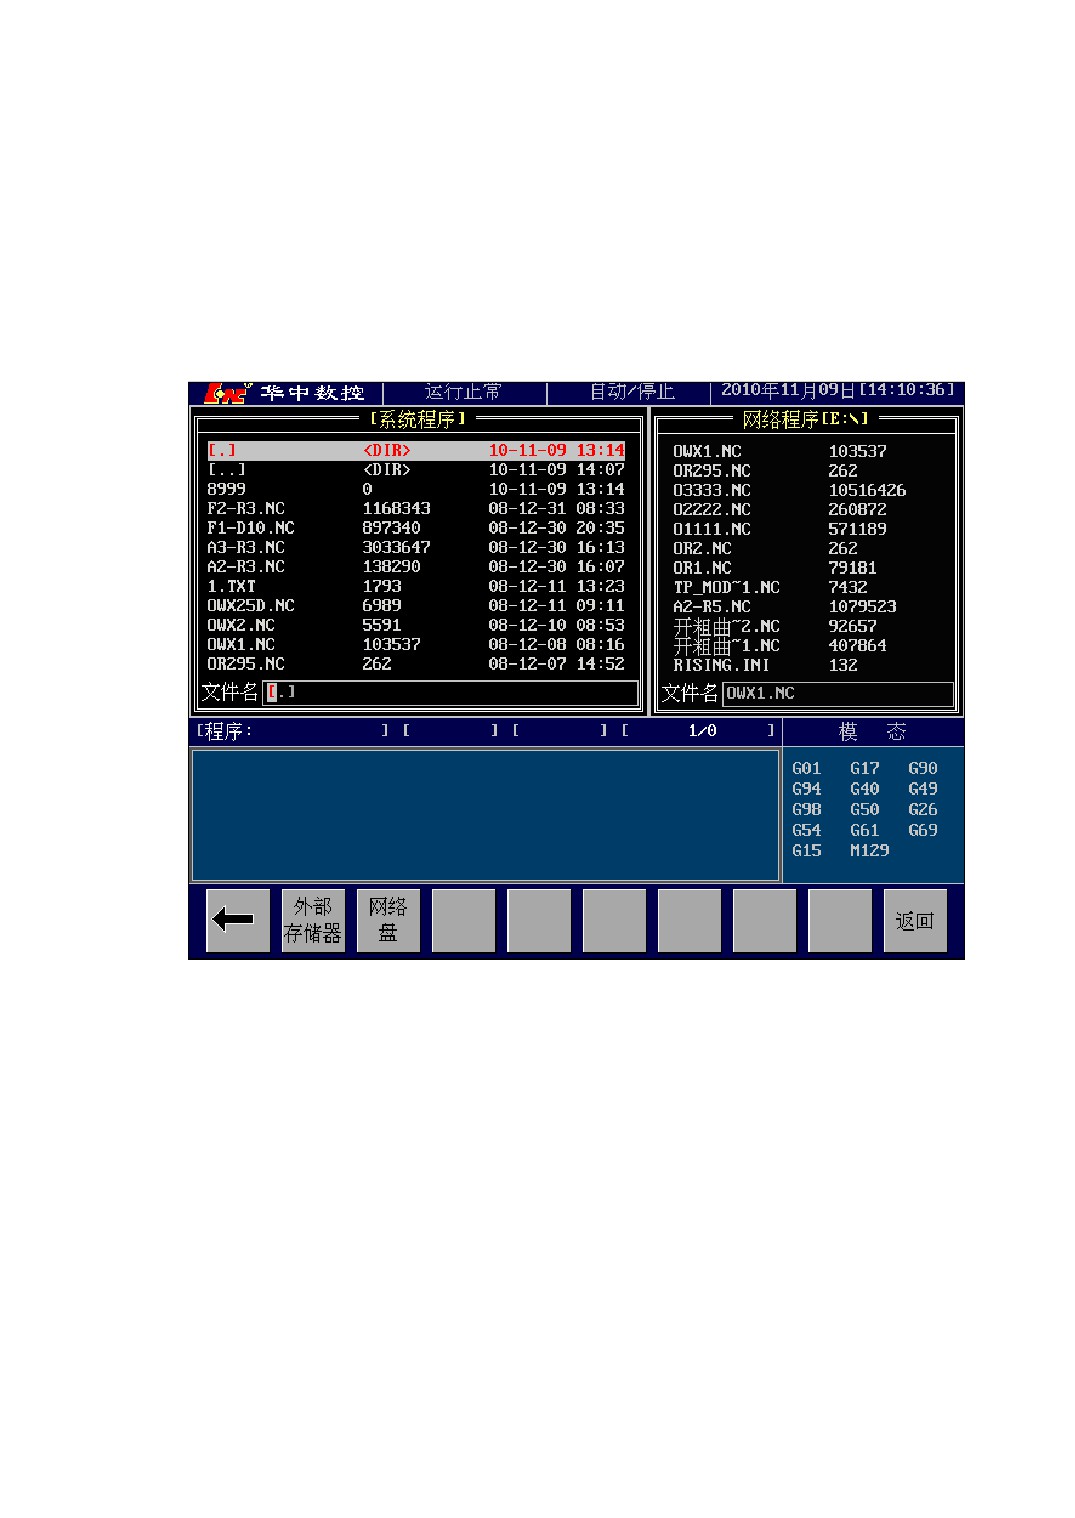
If there is a network disk, the system can open the network disk window.You can
operate the program in the network disk. Method of opening as follows:<AUTO> →[\]
→ [PROG] → [PMAN] → [→] → [NDSK]
the program management interface of network program is as figure 4-11 shown.
The operable window can be switched each other between system program window
and network program window by pressing [WSWC] menu key.
Figure 4-6 The Program Management Interface Of System And Network Program
4.3.2 Delete a Program File
It is used to delete an existed file from a program storage in the current operable
window. This deletion is permanent deletion, and cannot be retrieved after deletion.
Sequence of deleting a program file:
1) Switch to the program management interface;
2) Select a operable program list window (use [WSWC] key to switch);
46
3) Use the [↑]、[↓] or [PageUp]、[PageDown] keys to select an existing program file in
the program list or direct input the program filename what you want to delete.
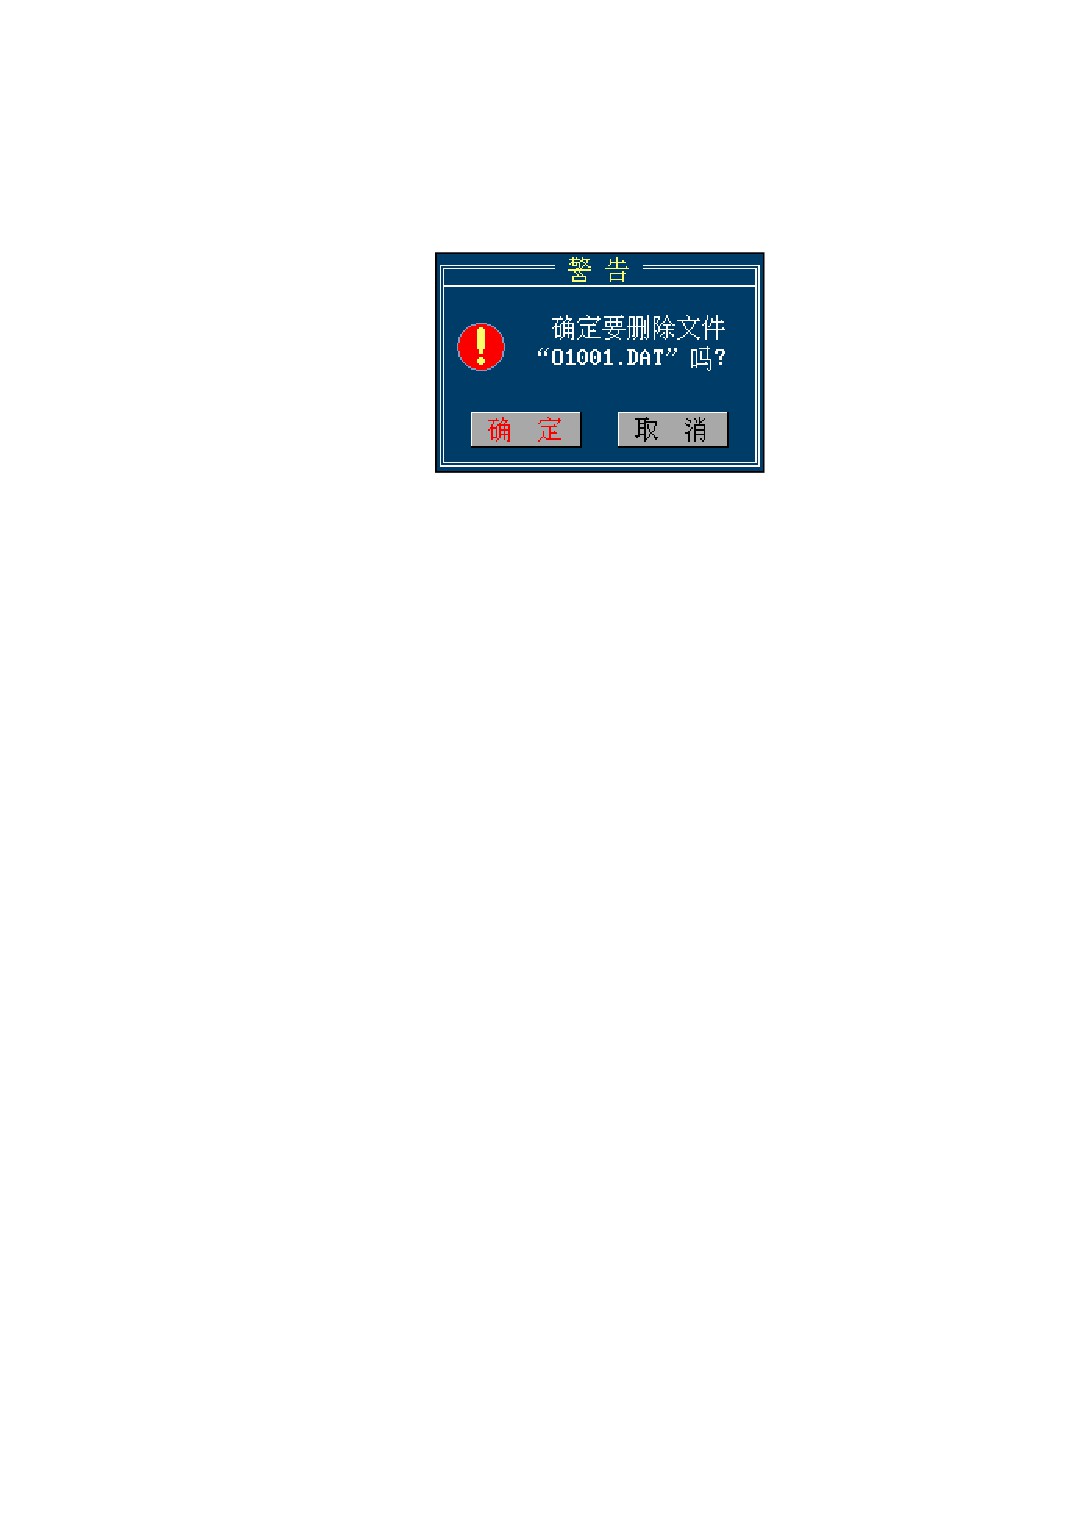
4) Press <FDEL> key, then it will pop up a dialog, as figure 4-12 shown.
Figure 4-12 File Delete Confirmation
5) Check up whether the filename in the dialog is the file you want to delete, press
<Enter> key to confirm, then the file deletion is finish; or else, press <Esc> key to
cancel the deletion and repeat.
4.3.3 Copy a Program File
The program file copy needs two windows to operate. They may be “System
Program”and “External Program”interface or “System Program”and “Network Program”
interface.
When the system is in “System Program”and “External Program”interface, as
Figure 4-9 shown, pressing [FCPY] menu key can copy the program which the current
cursor selects into the other window. The window which the current cursor is in can be
switched each other between “System Program”and “External Program” window by
pressing [WSWC] menu key.
When the system is in “System Program”and “Network Program”interface, as
Figure 4-11 shown, pressing [FCPY] menu key can copy the program which the current
cursor selects into the other window. The window which the current cursor is in can be
switched each other between “System Program”and “Network Program” window by
pressing [WSWC] menu key.
The [FCPY] and [WSWC] menus are used for copying a program file:
1)
[WSWC]
The program list window includes system program list window and external program
list window. When one list window of them has the cursor display, the window is
47
operable. Pressing < WSWC > key in succession can switch to the other between them.
2)
[FCPY]
It is used to complete the operation of copying a program, includes: a) output a
program from the internal storage to the external storage or network disk; b) input a
program from the external storage to the internal storage. Which operation is completion
depends on the current operable window. That is: If the current operable window is the
system program list window, this menu complete the a) operation. If the current operable
window is the external program or network disk list window, this menu complete the b)
operation.
Operation sequence of the program file copy (take input file operation of external
storage for example):
1)
Save the program file which needs to copy into the internal storage in the external
storage, and connect the external storage with the USB interface.
2)
Switch the CNC to the program management interface;
3)
If the interface doesn’t show the external program list window, which means system
doesn’t detect the external storage. Check the external storage is connected well and
restart the CNC system. If the window appears already, continue the next operation;
4)
Press [WSWC] key to switch the current operable window to the external program
list window (Let the external program list window has the cursor display);
5)
Reach the directory where the program is;
6)
Use [↑]、[↓] or [PageUp]、[PageDown] keys to select the program file to copy into;
7)
Press [FCPY] menu to copy the file into the internal storage.
The sequence of output operation is similar to the sequence above. Note that the
output file is stored in the path what the external storage displays.
4.3.4 Backup a Program File
File’s Backup means copy an existing file which the cursor selects in the current
operable window, and store in the program storage which the original file is located in as
a different filename. The backup operation sequence is:
1) Select a operable program list window (use [WSWC] key to switch it);
2) Use the [↑]、[↓] or [PageUp]、[PageDown] keys to select an existing program file in
the program list or direct input the program filename what you want to backup;
48
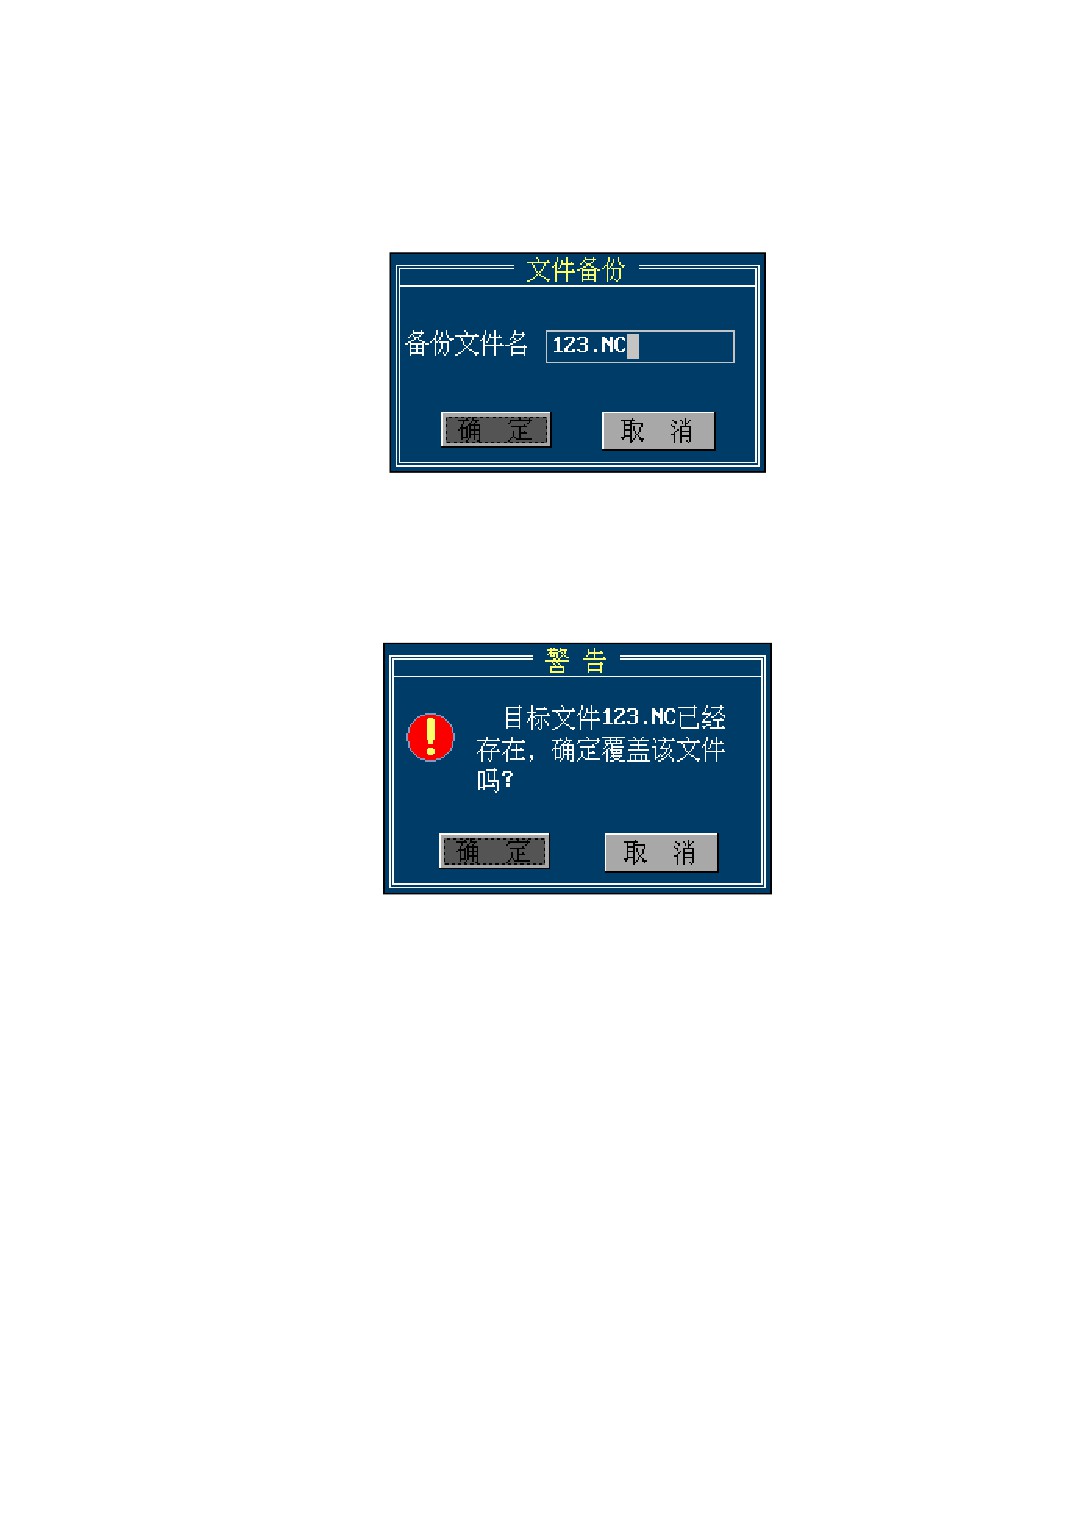
3) Press <FBKP> key, then it will pop up a dialog to clue to inputing filename of the
backup, as figure 4-13 shown;
Figure 4-7
Input The Filename Of Backup
4) Input the filename of backup in the pop-up dialog, press <Enter> key to confirm. If
the input name isn’t repetition, the file backup is finish;or else, if the input backup
filename already exists, it will pop up a dialog, as figure 4-14 shown;
Figure 4-8
The Backup Filename’s Conflict
5) If you want to cover with the existing file, press [Enter] key to confirm, the file
backup is finish; or else, press [Esc] key to cancel the backup;
4.3.5 Rename a Program File
Renaming files means change the program file which the cursor selects in the
current operable window for a new filename. Renaming a file just change the name of
the file rather than copy the file, this is the difference from the file backup.
The file’s renaming operation sequence is:
1) Select a operable program list window (use [WSWC] key to switch it);
2) Use the [↑]、[↓] or [PageUp]、[PageDown] keys to select an existing program file in
49
the program list or direct input the program filename what you want to rename;
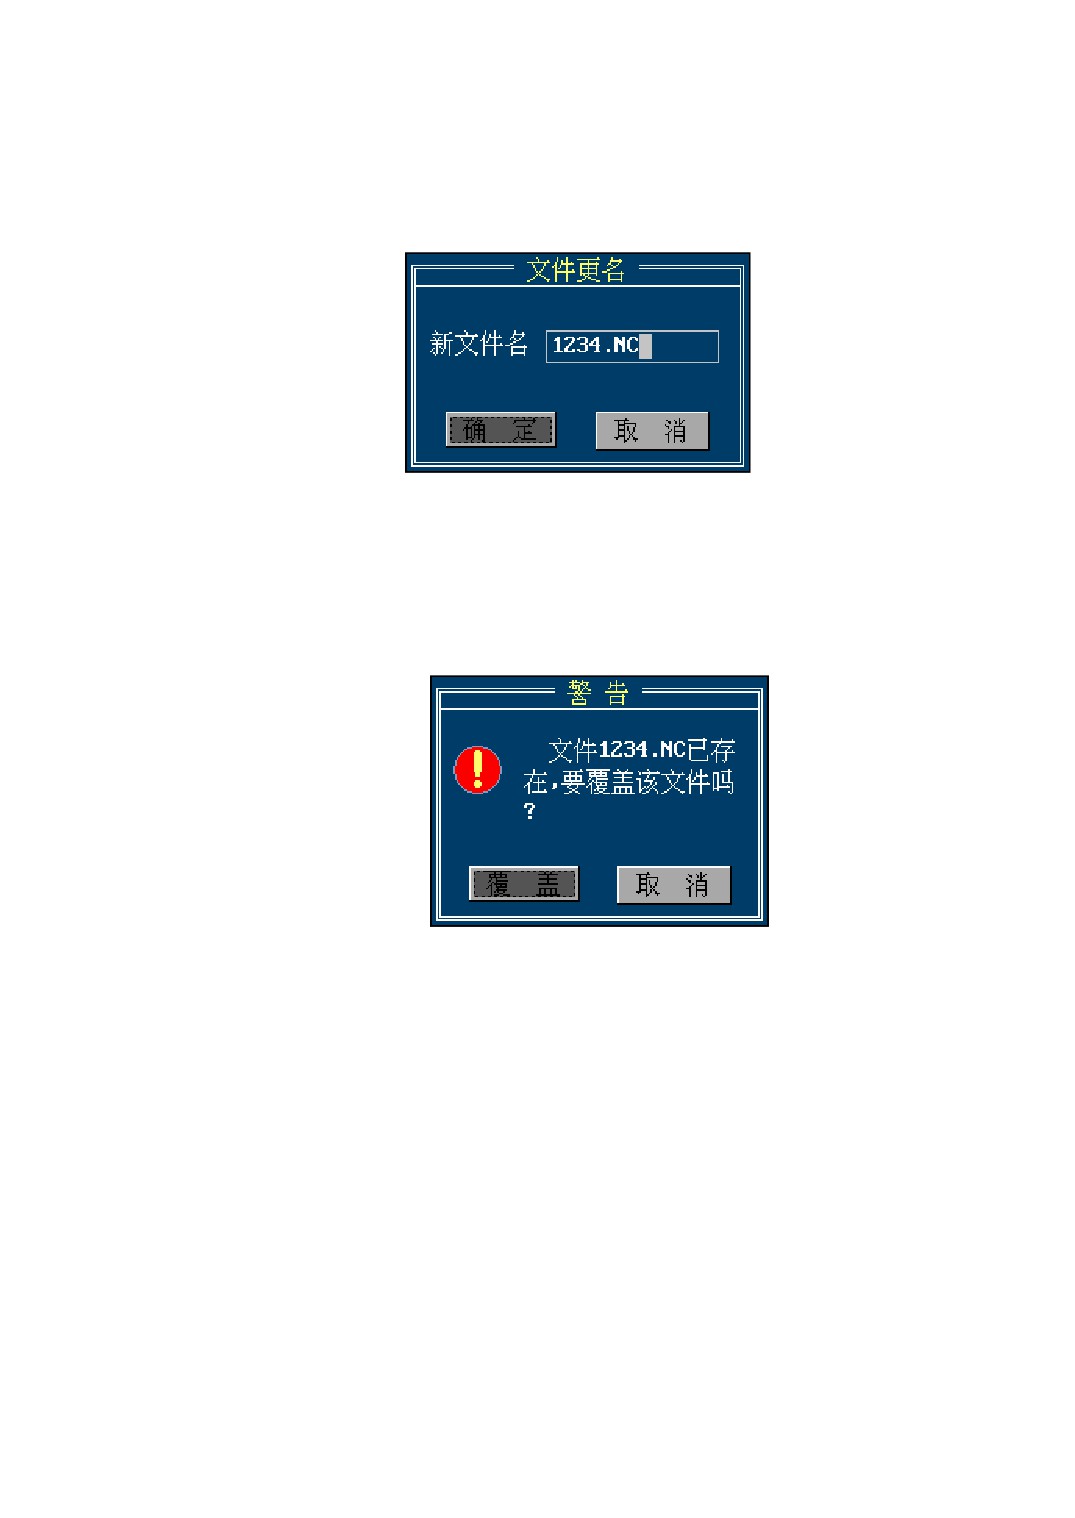
3) Press <FREN> key, then it will pop up a dialog, as figure 4-15 shown;
Figure 4-9
a Dialog for Renaming a File
4) Input a new filename in the pop-up dialog, press <Enter> key to confirm the input.
If the input name isn’t repetition, renaming the file is finish;or else, it will pop up a
dialog, as figure 4-16 shown.
Figure 4-10 Conflict Of Renaming a File
5) If you want to cover with the existing file, press [Enter] key to confirm, Renaming
the file is finish; or else, press [Esc] key to cancel the renaming.
4.3.6 Sort a Program File
Sorting Files means sort program files in the current operable program list window
by Pressing [NSRT] or [TSRT] menu. When enter into the program list window, the
system acquiescently sorts by time, the file of which last modification time is close to
current time will sort in the above, followed by the farther.
50
1) Press [NSRT] menu
Sort by the order of program filename’s ASCII code in the current operable program
list window. The small of default filename’s ASCII code sorts in front, followed by the
larger of ASCII code. Repeatedly press [NSRT] menu, the sequence will reverse.
2) Press [TSRT] menu
Sort by the order of program file’s last modification time in the current operable
program list window. The file of which last modification time is close to current time
acquiescently sorts in the above, followed by the farther. Repeatedly press [TSRT] menu,
the sequence will reverse.
51
5 Graphics Display
5.1 Summarize
Graphics display draws the tool path in the screen by the form of graphics
simulation. The simulation graphics can be used to check the machining track and
machining chape. According to machining position’s change and observational
demand, you can operate up moving, down moving, left moving, right moving and
view points shifting, graphics zoom etc. The graphics function can be used to simulate
the tool’s motion trail, and examine the program’s validity by observing whether the
motion trail is the same as the design path or not.
5.2 Enter the Graphics Simulation Interface
Machine positon’s display interface is divided into coordinate window, graphics
window and speed curve window. The coordinate window is divided into workpiece
coordinate window, remanent feed and relative coordinate window; The graphics
window is divided into XYZ space graphics,XY plane graphics,YZ plane graphics and
XZ plane graphics; The speed curve window can display the curve of speed and
acceleration.
Press [VSWT] key can switch to the other among the seven interface, the graphics
simulation interface is shown asFigure 5-1.
In the displayed graphics of machining track,the red line is the track of rapid
traverse (G00), the green line is the track of tool feed (G01), and the tool’s axis is
displayed by yellow.
Note that, the tool’s track which is displayed in the graphics window is in the
workpiece coordinate system. So, if you change the workpiece coordinate system’s
zero(namely change workpiece coordinate system) in the same machining program, then
the two workpiece coordinate system which are before and after change will be mapped
to the same coordinate system in the graphics window.
52
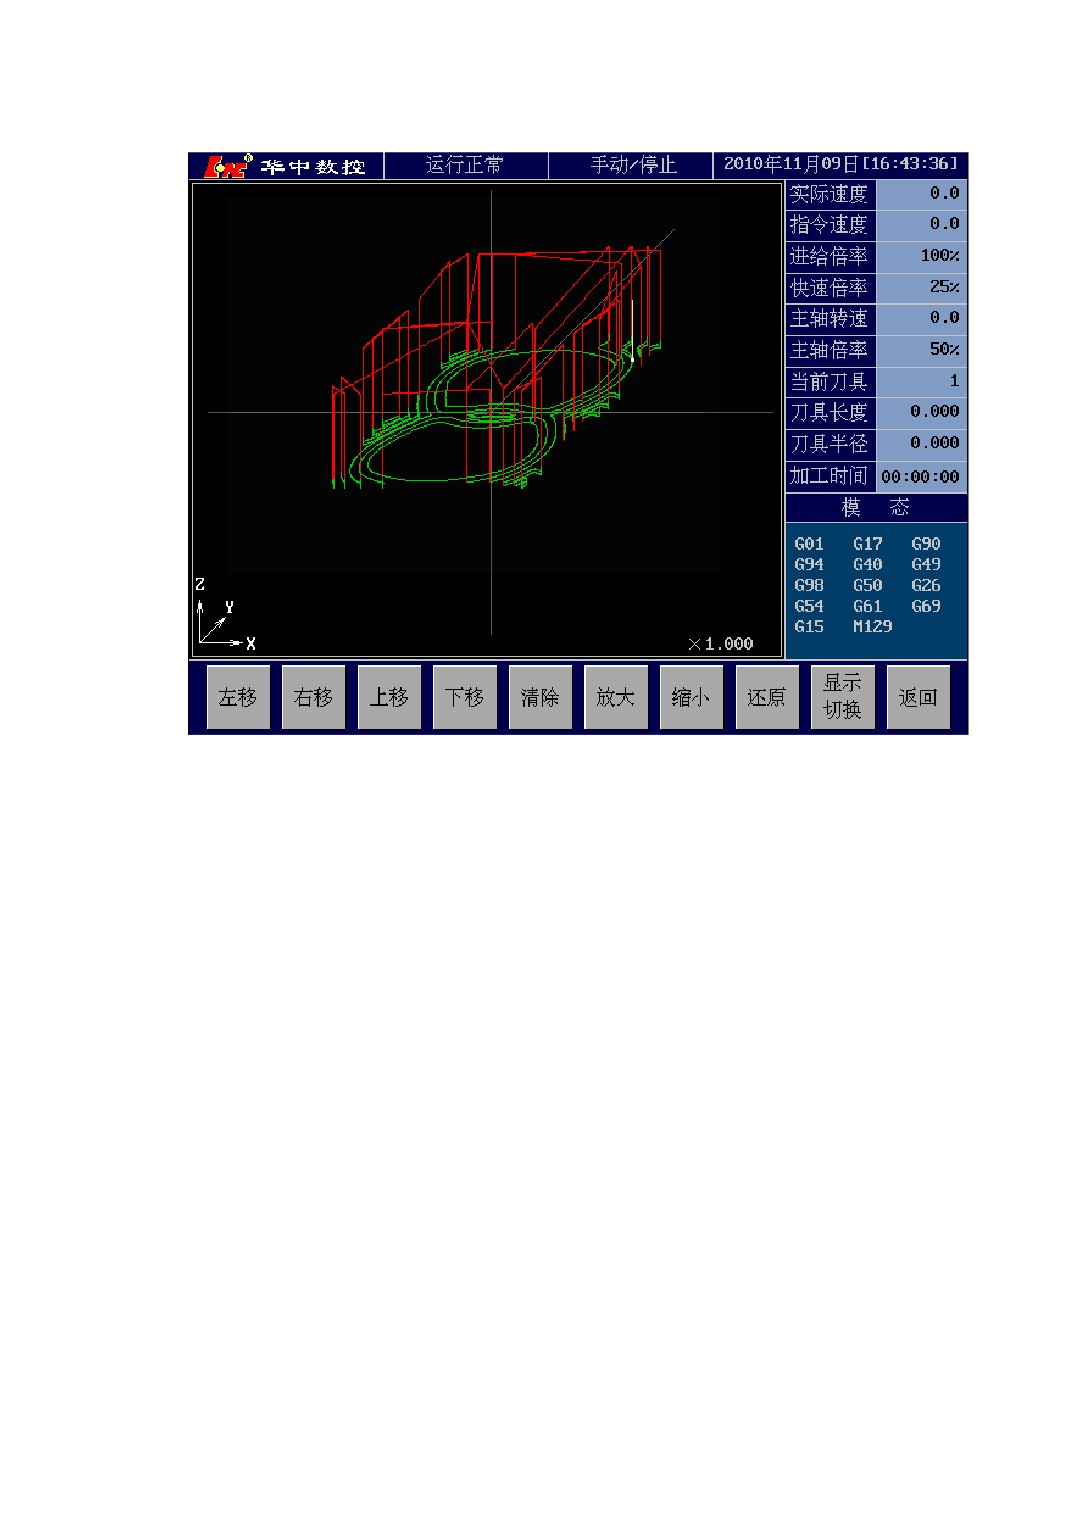
Figure 5-1 Graphics Simulation Interface
5.3 Graphics Operation
In the graphics simulation interface, there are the following system menus:
[LMOV]: Move the graphics in the window left. If the simulation graphics goes beyond
the right of graphics window, you can press [LMOV] menu to move the
graphics left to let the outside parts be visible.
[RMOV]: Move the window graphics left.
[UMOV]: Move the window graphics up.
[DMOV]: Move the window graphics down.
[CLER] : Clear the display graphics in the window.
[ZMUP]: Augment the zoom coefficient of the display graphics in the window.
[ZMDW]: Minish the zoom coefficient of the display graphics in the window.
[ZORG] :Restore the display multiple of the display graphics in the window to 1.
53