Kawasaki Motorcycle Ninja ZX-6R / Ninja ZX-6R ABS. Service Manual (2013 year) - page 4
 

  Index      Manuals     Kawasaki Motorcycle Ninja ZX-6R / Ninja ZX-6R ABS. Service Manual (2013 year)


Search            copyright infringement  


Content      ..     2      3      4      5     ..


Kawasaki Motorcycle Ninja ZX-6R / Ninja ZX-6R ABS. Service Manual (2013 year) - page 4


PERIODIC MAINTENANCE 2-61

Periodic Maintenance Procedures

Spark Plug Replacement

Remove the stick coils (see Stick Coil Removal in the
Electrical System chapter).

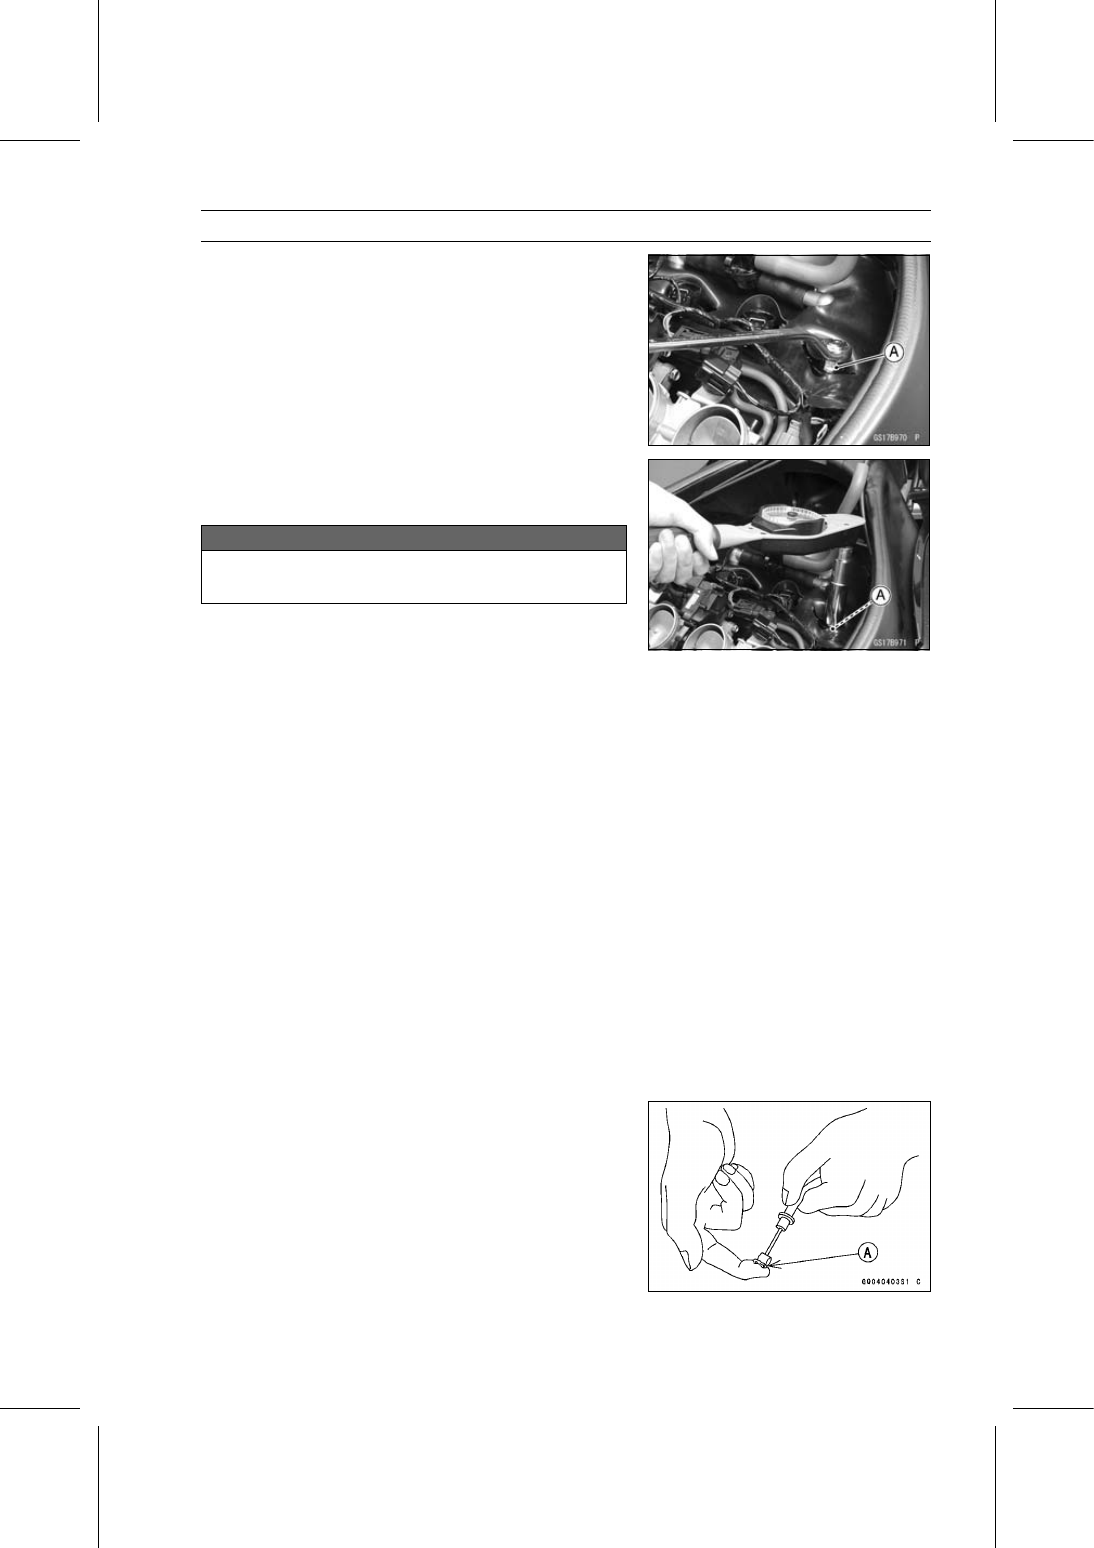
Remove the spark plugs using the 16 mm (0.63 in.) plug
wrench [A] vertically.

Replace the spark plugs with new ones.

Standard Spark Plug

Type:

NGK CR9E

Insert the spark plug vertically into the spark plug hole
with the spark plug installed in the plug wrench [A], and
finger-tighten it first.

NOTICE

If tightening the spark plug with the wrench in-
clined, the insulator of the spark plug may break.

Tighten:

Torque - Spark Plugs: 13 N·m (1.3 kgf·m, 115 in·lb)

Install the stick coils (see Stick Coil Installation in the Elec-
trical System chapter).

After installation, be sure the stick coils are installed se-
curely by pulling up them lightly.

Others

Chassis Parts Lubrication

Before lubricating each part, clean off any rusty spots with
rust remover and wipe off any grease, oil, dirt, or grime.

Lubricate the points listed below with indicated lubricant.

NOTE

Whenever the vehicle has been operated under
wet or rainy conditions, or especially after using a
high-pressure water spray, perform the general lubri-
cation.

Pivots: Lubricate with Grease.

Brake Lever
Brake Pedal
Clutch Lever
Rear Master Cylinder Push Rod Joint Pin
Sidestand

Points: Lubricate with Grease.

Clutch Inner Cable Upper and Lower Ends [A]
Throttle Inner Cable Upper and Lower Ends

2-62 PERIODIC MAINTENANCE

Periodic Maintenance Procedures

Cables: Lubricate with Rust Inhibitor.

Clutch Cable
Throttle Cables

Lubricate the cables by seeping the oil between the cable
and housing.

The cable may be lubricated by using a commercially
available pressure cable lubricator with an aerosol cable
lubricant.

With the cable disconnected at both ends, the inner cable
should move freely [A] within the cable housing.
If cable movement is not free after lubricating, if the cable
is frayed [B], or if the cable housing is kinked [C], replace
the cable.

Condition of Bolts, Nuts and Fasteners Tightness
Inspection

Check the tightness of the bolts and nuts listed here. Also,
check to see that each cotter pin is in place and in good
condition.

NOTE

For the engine fasteners, check the tightness of them
when the engine is cold (at room temperature).

If there are loose fasteners, retighten them to the spec-
ified torque following the specified tightening sequence.
Refer to the appropriate chapter for torque specifications.
If torque specifications are not in the appropriate chapter,
see the Standard Torque Table. For each fastener, first
loosen it by 1/2 turn, then tighten it.
If cotter pins are damaged, replace them with new ones.

PERIODIC MAINTENANCE 2-63

Periodic Maintenance Procedures

Bolt, Nut and Fastener to be checked

Engine:

Clutch Lever Pivot Bolt Locknut
Engine Mounting Bolts and Nuts
Exhaust Pipe Clamp Bolt
Exhaust Pipe Holder Nuts
Muffler Body Clamp Bolt
Muffler Body Mounting Bolt
Premuffler Chamber Bracket Bolt
Premuffler Chamber Mounting Bolt
Radiator Bolts

Wheels:

Front Axle Clamp Bolts
Front Axle
Rear Axle Nut
Rear Axle Nut Cotter Pin

Brakes:

Brake Lever Pivot Bolt Locknut
Brake Pedal Bolt
Caliper Mounting Bolts
Front Master Cylinder Clamp Bolts
Rear Master Cylinder Mounting Bolts
Rear Master Cylinder Push Rod Joint Cotter Pin

Suspension:

Front Fork Clamp Bolts
Rear Shock Absorber Nuts
Swingarm Pivot Shaft Nut
Tie-Rod Nuts
Rocker Arm Nut

Steering:

Handlebar Clamp Bolts
Steering Stem Head Bolt

Others:

Footpeg Bracket Bolts
Front Fender Mounting Bolts
Rear Frame Bolts
Sidestand Bolt
Sidestand Bracket Bolts

FUEL SYSTEM (DFI) 3-1

3

Fuel System (DFI)

Table of Contents

Exploded View...................................

3-2

DFI System........................................

3-8

DFI Parts Location.............................

3-18

Specifications ....................................

3-22

Special Tools and Sealant .................

3-23

DFI Servicing Precautions .................

3-24

DFI Servicing Precautions ..............

3-24

Troubleshooting the DFI System .......

3-26

Outline ............................................

3-26

Inquiries to Rider.............................

3-30

DFI System Troubleshooting Guide ..

3-33

Warning Indicator Light (LED) ...........

3-38

Yellow Engine Warning/Red

Warning Indicator Light (LED)
Inspection..................................

3-38

ECU ...................................................

3-39

ECU Identification ........................

3-39

ECU Removal ..............................

3-39

ECU Installation ...........................

3-40

ECU Power Supply Inspection.....

3-41

CAN Communication Line .................

3-44

CAN Communication Line

Resistance Inspection ...............

3-44

DFI Power Source .............................

3-46

ECU Fuse Removal .....................

3-46

ECU Fuse Installation ..................

3-46

ECU Fuse Inspection ...................

3-46

ECU Main Relay

Removal/Installation..................

3-46

ECU Main Relay Inspection .........

3-46

Fuel Line............................................

3-47

Fuel Pressure Inspection .............

3-47

Fuel Flow Rate Inspection ...........

3-48

Fuel Pump .........................................

3-50

Fuel Pump Removal ....................

3-50

Fuel Pump Installation .................

3-51

Fuel Pump Operation Inspection .

3-51

Fuel Pump Operating Voltage

Inspection..................................

3-52

Pressure Regulator Removal.......

3-53

Fuel Filter Cleaning......................

3-53

Fuel Injectors .....................................

3-55

Fuel Injector Removal/Installation

3-55

Fuel Injector Audible Inspection...

3-55

Fuel Injector Resistance

Inspection..................................

3-55

Fuel Injector Power Source

Voltage Inspection.....................

3-56

Fuel Injector Output Voltage

Inspection..................................

3-57

Fuel Injector Fuel Line Inspection

3-58

Throttle Grip and Cables ...................

3-61

Free Play Inspection ....................

3-61

Free Play Adjustment...................

3-61

Cable Installation .........................

3-61

Cable Lubrication .........................

3-61

Throttle Body Assy ............................

3-62

Idle Speed Inspection ..................

3-62

Synchronization Inspection/Ad-

justment.....................................

3-62

Throttle Body Assy Removal........

3-62

Throttle Body Assy Installation.....

3-63

Throttle Body Assy Disassembly .

3-64

Throttle Body Assy Assembly ......

3-65

Air Cleaner.........................................

3-66

Air Cleaner Element

Removal/Installation..................

3-66

Air Cleaner Element Inspection ...

3-66

Air Cleaner Oil Draining ...............

3-66

Air Cleaner Housing Removal......

3-66

Air Cleaner Housing Installation...

3-67

Air Cleaner Housing Disassembly

3-68

Air Cleaner Housing Assembly ....

3-68

Air Line ..............................................

3-70

Air Intake Duct Removal ..............

3-70

Air Intake Duct Installation ...........

3-70

Air Intake Duct Disassembly ........

3-70

Air Intake Duct Assembly.............

3-71

Fuel Tank ...........................................

3-72

Fuel Tank Removal ......................

3-72

Fuel Tank Installation ...................

3-74

Fuel Tank and Cap Inspection .....

3-76

Fuel Tank Cleaning ......................

3-76

Evaporative Emission Control System

(CAL Model)....................................

3-77

Parts Removal/Installation ...........

3-77

Hose Inspection ...........................

3-77

Purge Valve Inspection ................

3-77

Canister Inspection .....................

3-77

3-2 FUEL SYSTEM (DFI)

Exploded View

FUEL SYSTEM (DFI) 3-3

Exploded View

Torque

No.

Fastener

N·m

kgf·m

ft·lb

Remarks

1

Air Cleaner Housing Assembly Screws

1.2

0.12

11 in·lb

2

Air Intake Duct Assembly Screws

1.5

0.15

13 in·lb

3

Air Intake Duct Mounting Bolts

9.8

1.0

87 in·lb

L

4

Air Cleaner Housing Clamp Bolts

2.0

0.20

18 in·lb

5. Immobilizer System Equipped Models
L: Apply a non-permanent locking agent.

R: Replacement Parts

3-4 FUEL SYSTEM (DFI)

Exploded View

FUEL SYSTEM (DFI) 3-5

Exploded View

Torque

No.

Fastener

N·m

kgf·m

ft·lb

Remarks

1

Intake Air Temperature Sensor Screw

1.2

0.12

11 in·lb

2

Throttle Case Screws

3.5

0.36

31 in·lb

3

Throttle Cable Holder Plate Bolt

3.9

0.40

35 in·lb

L

4

Throttle Body Assy Holder Bolts

12

1.2

106 in·lb

L

5

Throttle Body Assy Holder Clamp Bolts

2.9

0.30

26 in·lb

6

Delivery Pipe Assy Mounting Screws

3.43

0.35

30 in·lb

CL: Apply cable lubricant.

EO: Apply engine oil.

G: Apply grease.

L: Apply a non-permanent locking agent.

R: Replacement Parts

LG: Apply liquid gasket.

3-6 FUEL SYSTEM (DFI)

Exploded View

FUEL SYSTEM (DFI) 3-7

Exploded View

Torque

No.

Fastener

N·m

kgf·m

ft·lb

Remarks

1

Crankshaft Sensor Bolts

5.9

0.60

52 in·lb

2

Water Temperature Sensor

12

1.2

106 in·lb

3

Exhaust Butterfly Valve Actuator Mounting Screws

4.3

0.44

38 in·lb

4

Exhaust Butterfly Valve Actuator Pulley Bolt

4.9

0.50

43 in·lb

5

Fuel Pump Bolts

9.8

1.0

87 in·lb

L, S

6

Gear Position Switch Screws

2.9

0.30

26 in·lb

L

7

Oxygen Sensor (Equipped Models)

25

2.5

18

8. Other than CAL Model
9. CAL Model

10. ECU Guard (GB WVTA (FULL H) and WVTA (78.2 H) Models)

G: Apply grease.

L: Apply a non-permanent locking agent.

R: Replacement Parts

S: Follow the specified tightening sequence.

3-8 FUEL SYSTEM (DFI)

DFI System

DFI System

FUEL SYSTEM (DFI) 3-9

DFI System

1. ECU
2. Battery 12 V 8 Ah
3. Intake Air Temperature Sensor
4. Subthrottle Valve Actuator
5. Subthrottle Sensor
6. Fuel Injectors
7. Delivery Pipe Assy
8. Vehicle-down Sensor
9. Fuel Filter

10. Pressure Regulator

11. Fuel Pump

12. Oxygen Sensor (Equipped Models)
13. Exhaust Butterfly Valve Actuator
14. Intake Air Pressure Sensor #1
15. Intake Air Pressure Sensor #2
16. Main Throttle Sensor
17. Crankshaft Sensor
18. Water Temperature Sensor
19. Gear Position Switch
20. Wheel Rotation Sensors
21. Air Flow
22. Fuel Flow

3-10 FUEL SYSTEM (DFI)

DFI System

DFI System Wiring Diagram

FUEL SYSTEM (DFI) 3-11

DFI System

Part Names

1. ECU
2. Joint Connector C
3. Rear Wheel Rotation Sensor
4. Exhaust Butterfly Valve Actuator
5. Immobilizer (Equipped Models)/Kawasaki Diagnostic System Connector
6. Frame Ground 2
7. Frame Ground 3
8. Frame Ground 1
9. Engine Ground

10. Battery 12 V 8 Ah

11. Starter Relay

12. Main Fuse 30 A
13. ECU Fuse 15 A
14. Fuel Pump
15. Relay Box
16. Fuel Pump Relay
17. ECU Main Relay
18. Fuse Box 1
19. Ignition Fuse 15 A
20. Meter Unit
21. Yellow Engine Warning Indicator Light (LED)
22. Joint Connector E
23. Front Wheel Rotation Sensor
24. Immobilizer Antenna (Equipped Models)
25. Immobilizer Amplifier (Equipped Models)
26. Ignition Switch
27. Engine Stop Switch
28. Starter Button
29. Air Switching Valve
30. Spark Plugs
31. Stick Coil #1, #2, #3, #4
32. Intake Air Temperature Sensor
33. Crankshaft Sensor
34. Fuel Injector #1
35. Fuel Injector #2
36. Fuel Injector #3
37. Fuel Injector #4
38. Subthrottle Valve Actuator
39. Main Throttle Sensor
40. Water-proof Joint 1
41. Water-proof Joint 2
42. Subthrottle Sensor
43. Intake Air Pressure Sensor #2
44. Intake Air Pressure Sensor #1
45. Water Temperature Sensor
46. Gear Position Switch
47. Oxygen Sensor (Equipped Models)
48. Vehicle-down Sensor
49. Joint Connector D

3-12 FUEL SYSTEM (DFI)

DFI System

DFI System Wiring Diagram (KIBS Equipped Models)

FUEL SYSTEM (DFI) 3-13

DFI System

Part Names

1. ECU
2. Joint Connector C
3. Rear Wheel Rotation Sensor
4. Exhaust Butterfly Valve Actuator
5. Immobilizer (Equipped Models)/Kawasaki Diagnostic System Connector
6. Frame Ground 2
7. Frame Ground 3
8. Frame Ground 1
9. Engine Ground

10. Battery 12 V 8 Ah

11. Starter Relay

12. Main Fuse 30 A
13. ECU Fuse 15 A
14. Fuel Pump
15. KIBS Hydraulic Unit
16. Relay Box
17. Fuel Pump Relay
18. ECU Main Relay
19. Fuse Box 1
20. Ignition Fuse 15 A
21. Meter Unit
22. Yellow Engine Warning Indicator Light (LED)
23. Joint Connector E
24. Front Wheel Rotation Sensor
25. Immobilizer Antenna (Equipped Models)
26. Immobilizer Amplifier (Equipped Models)
27. Ignition Switch
28. Engine Stop Switch
29. Starter Button
30. Air Switching Valve
31. Spark Plugs
32. Stick Coil #1, #2, #3, #4
33. Intake Air Temperature Sensor
34. Crankshaft Sensor
35. Fuel Injector #1
36. Fuel Injector #2
37. Fuel Injector #3
38. Fuel Injector #4
39. Subthrottle Valve Actuator
40. Main Throttle Sensor
41. Water-proof Joint 1
42. Water-proof Joint 2
43. Subthrottle Sensor
44. Intake Air Pressure Sensor #2
45. Intake Air Pressure Sensor #1
46. Water Temperature Sensor
47. Gear Position Switch
48. Oxygen Sensor (Equipped Models)
49. Vehicle-down Sensor
50. Joint Connector D

3-14 FUEL SYSTEM (DFI)

DFI System

Color Codes:

BK: Black

BL: Blue

BR: Brown

CH: Chocolate

DG: Dark Green

G: Green

GY: Gray

LB: Light Blue

LG: Light Green

O: Orange

P: Pink

PU: Purple

R: Red

V: Violet

W: White

Y: Yellow

FUEL SYSTEM (DFI) 3-15

DFI System

This page intentionally left blank.

3-16 FUEL SYSTEM (DFI)

DFI System

Terminal Numbers of ECU Connectors

Terminal Names

1. Subthrottle Valve Actuator: P/BL
2. Exhaust Butterfly Valve Actuator (+): W/BL
3. Exhaust Butterfly Valve Actuator Sensor: GY
4. Power Supply to Sensors: BL
5. Fuel Pump Relay: BR/Y
6. Power Supply to ECU (from Battery): BR/W
7. Power Supply to ECU (from Battery): W/BK
8. Power Supply to Wheel Rotation Sensors (ZX636E Model): W/Y

Unused (ZX636F Model)

9. Rear Wheel Rotation Sensor Signal (ZX636E Model): R/Y

Unused (ZX636F Model)

10. Front Wheel Rotation Sensor Signal (ZX636E Model): G/Y

Unused (ZX636F Model)

11. Immobilizer Amplifier (Equipped Models): V

12. Subthrottle Valve Actuator: Y/BK
13. Exhaust Butterfly Valve Actuator (–): W/R
14. Unused
15. Unused
16. Intake Air Temperature Sensor: R/BK
17. Intake Air Pressure Sensor #2: G/W
18. Intake Air Pressure Sensor #1: Y/BL
19. Vehicle-down Sensor: Y/G
20. Rear Wheel Rotation Sensor Signal (ZX636F Model): R/Y

Unused (ZX636E Model)

21. Front Wheel Rotation Sensor Signal (ZX636F Model): G/Y

Unused (ZX636E Model)

22. Immobilizer Amplifier (Equipped Models): P/BK
23. Subthrottle Valve Actuator: BK/O
24. Subthrottle Valve Actuator: G
25. Unused
26. Unused
27. Main Throttle Sensor: Y/W
28. Subthrottle Sensor: BL/W
29. Gear Position Switch: G/R

FUEL SYSTEM (DFI) 3-17

DFI System

30. Water Temperature Sensor: W/G
31. External Communication Line (Immobilizer System (Equipped Models)/*KDS): LG/BK
32. Unused
33. Oxygen Sensor (Equipped Models): BL/Y
34. Starter Button: R/BK
35. Ground for Exhaust Butterfly Valve Actuator: P
36. CAN Communication Line (Low): LB
37. CAN Communication Line (High): GY/BL
38. Ground for Control System: BK/BL
39. Ground for Fuel System: BK/Y
40. Fuel Injector #3: BL/O
41. Fuel Injector #2: BL/R
42. Fuel Injector #1: BL/BK
43. Stick Coil #4: BK/G
44. Stick Coil #1: BK
45. Starter Lockout Switch: R/G
46. Sidestand Switch: G/BK
47. Unused
48. External Communication Line (Immobilizer System (Equipped Models)/*KDS): GY/W
49. Ground for Sensors: G
50. Radiator Fan Relay: Y/BL
51. Oxygen Sensor Heater (Equipped Models): P/BK
52. Unused
53. Unused
54. Fuel Injector #4: BL/G
55. Stick Coil #2: BK/R
56. Engine Stop Switch: R
57. Unused
58. Unused
59. Crankshaft Sensor (–): Y/BK
60. Crankshaft Sensor (+): Y
61. Purge Valve (CAL Model): R/Y
62. Air Switching Valve: R/BL
63. Unused
64. Unused
65. Ground for Ignition System: BK/Y
66. Stick Coil #3: BK/O

*: KDS (Kawasaki Diagnostic System)

3-18 FUEL SYSTEM (DFI)

DFI Parts Location

Main Throttle Sensor [A]
Subthrottle Sensor [B]
Subthrottle Valve Actuator [C]
Intake Air Pressure Sensor #2 [D]
Stick Coils #1, #2, #3, #4 [E]
Air Switching Valve [F]
Intake Air Pressure Sensor #1 [G]

Water Temperature Sensor [A]
Fuel Injectors #1, #2, #3, #4 [B]

Battery 12 V 8 Ah [A]
Exhaust Butterfly Valve Actuator [B]

Main Fuse 30 A [A]
ECU Fuse 15 A [B]

ECU [A]
Relay Box [B] (Fuel Pump Relay, Radiator Fan Relay)

FUEL SYSTEM (DFI) 3-19

DFI Parts Location

Vehicle-down Sensor [A]
Immobilizer (Equipped Models)/Kawasaki Diagnostic
System Connector [B]

Fuel Pump [A]

Intake Air Temperature Sensor [A]

Crankshaft Sensor [A]

Gear Position Switch [A]

3-20 FUEL SYSTEM (DFI)

DFI Parts Location

Fuse Box 1 [A]

Ignition Key [A] (Transponder, Immobilizer System
Equipped Models)
Immobilizer Antenna [B] (Equipped Models)
Ignition Switch [C]
Yellow Engine Warning Indicator Light (LED) [D]

Immobilizer Amplifier [A] (Equipped Models)

Oxygen Sensor [A] (Equipped Models)

Front Wheel Rotation Sensor [A]

FUEL SYSTEM (DFI) 3-21

DFI Parts Location

Rear Wheel Rotation Sensor [A]

Purge Valve [A] (CAL Model)

3-22 FUEL SYSTEM (DFI)

Specifications

Item

Standard

Digital Fuel Injection System

Idle Speed

1 300 ±50 r/min (rpm)

Throttle Body Assy:

Throttle Valve

Dual throttle valve

Bore

38 mm (1.5 in.)

Throttle Body Vacuum

33.4 ±1.33 kPa (251 ±10 mmHg)

Bypass Screws (Turn Out)

0

2 1/2 (for reference)

ECU:

Make

DENSO

Type

Digital memory type, with built in IC igniter, sealed
with resin

Fuel Pressure (High Pressure Line)

294 kPa (3.0 kgf/cm², 43 psi) with engine idling

Fuel Pump:

Type

Wesco pump

Discharge

50 mL (1.7 US oz.) or more for 3 seconds

Fuel Injectors:

Type

EAT289

Nozzle Type

Fine atomizing type with 8 holes

Resistance

About 11.7

12.3

at 20°C (68°F)

CAN Communication Line:

Resistance

118

122

at ECU connector

Throttle Grip and Cables

Throttle Grip Free Play

2

3 mm (0.08

0.12 in.)

Air Cleaner

Element

Viscous paper element

FUEL SYSTEM (DFI) 3-23

Special Tools and Sealant

Oil Pressure Gauge, 5 kgf/cm²:
57001-125

Hand Tester:
57001-1394

Needle Adapter Set:
57001-1457

Extension Tube:
57001-1578

Fuel Pressure Gauge Adapter:
57001-1593

Fuel Hose:
57001-1607

Measuring Adapter:
57001-1700

Liquid Gasket, TB1211:
56019-120

3-24 FUEL SYSTEM (DFI)

DFI Servicing Precautions

DFI Servicing Precautions

There are a number of important precautions that should

be followed servicing the DFI system.

This DFI system is designed to be used with a 12 V sealed
battery as its power source. Do not use any other battery
except for a 12 V sealed battery as a power source.

Do not reverse the battery cable connections. This will
damage the ECU.

To prevent damage to the DFI parts, do not disconnect the
battery cables or any other electrical connections when
the ignition switch is on or while the engine is running.

Take care not to short the leads that are directly con-
nected to the battery positive (+) terminal to the chassis
ground.

When charging, remove the battery from the motorcycle.
This is to prevent ECU damage by excessive voltage.

Whenever the DFI electrical connections are to be dis-
connected, first turn off the ignition switch, and disconnect
the battery (–) terminal. Do not pull the lead, only the con-
nector. Conversely, make sure that all the DFI electrical
connections are firmly reconnected before starting the en-
gine.

Connect these connectors until they click [A].

Do not turn the ignition switch on while any of the DFI
electrical connectors are disconnected. The ECU memo-
rizes service codes.

Do not spray water on the electrical parts, DFI parts, con-
nectors, leads and wiring.

If a transceiver is installed on the motorcycle, make sure
that the operation of the DFI system is not influenced by
electric wave radiated from the antenna. Check operation
of the system with the engine at idle. Locate the antenna
as far as possible away from the ECU.

When any fuel hose is disconnected, do not turn on the
ignition switch. Otherwise, the fuel pump will operate and
fuel will spout from the fuel hose.

Do not operate the fuel pump if the pump is completely
dry. This is to prevent pump seizure.

Before removing the fuel system parts, blow the outer sur-
faces of these parts clean with compressed air.

When any fuel hose is disconnected, fuel may spout out
by residual pressure in the fuel line. Cover the hose joint
with a piece of clean cloth to prevent fuel spillage.

When installing the fuel hoses, avoid sharp bending, kink-
ing, flattening or twisting, and run the fuel hoses with a
minimum of bending so that the fuel flow will not be ob-
structed.

Run the hoses according to Cable, Wire, and Hose Rout-
ing section in the Appendix chapter.

To prevent corrosion and deposits in the fuel system, do
not add to fuel any fuel antifreeze chemicals.

FUEL SYSTEM (DFI) 3-25

DFI Servicing Precautions

If the motorcycle is not properly handled, the high pres-
sure inside the fuel line can cause fuel to leak or the hose
to burst. Remove the fuel tank (see Fuel Tank Removal)
and check the fuel hose [A].
Replace the fuel hose if any fraying, cracks or bulges are
noticed.

To maintain the correct fuel/air mixture (F/A), there must
be no intake air leaks in the DFI system. Be sure to install
the oil filler plug [A] after filling the engine oil.

Torque - Oil Filler Plug: Hand-tighten

3-26 FUEL SYSTEM (DFI)

Troubleshooting the DFI System

Outline

When a problem occurs with DFI system, the yellow en-

gine warning indicator light (LED) [A] goes on to alert the
rider.

For models equipped with an immobilizer system, the red

warning indicator light (LED) [A] and immobilizer warning
symbol [B] blink, when a problem occurs in the system.

With the engine stopped and turned in the self-diagnosis

mode, the service code [A] is displayed on the LCD (Liquid
Crystal Display) by the number of two digits.

If the problem is with the following parts, the ECU can

not recognize these problem. Therefore, the yellow engine
warning indicator light (LED) does not go on, and service
code is not displayed.

Fuel Pump
Fuel Pump Relay
Fuel Injectors
Stick Coil Secondary Wiring and Ground Wiring
ECU Main Relay

FUEL SYSTEM (DFI) 3-27

Troubleshooting the DFI System

When the service code [A] is displayed, for first ask the

rider about the conditions [B] of trouble, and then start to
determine the cause [C] of problem.

As a pre-diagnosis inspection, check the ECU for ground

and power supply, the fuel line for no fuel leaks, and for
correct pressure. The pre-diagnosis items are not indicated
by the yellow engine warning indicator light (LED).

Don’t rely solely on the DFI self-diagnosis function, use

common sense.

Even when the DFI system is operating normally, the yel-

low engine warning indicator light (LED) goes on may be
displayed under strong electrical interference. Additional
measures are not required. Turn the ignition switch off to
stop the indicator light.

If the yellow engine warning indicator light (LED) of the

motorcycle brought in for repair still goes on, check the ser-
vice code.

When the repair has been done, the yellow engine warn-

ing indicator light (LED) goes off. But the service codes
stored in memory of the ECU are not erased to preserve
the problem history. The problem history can be referred
using the KDS (Kawasaki Diagnostic System) when solv-
ing unstable problems.

When the motorcycle is down, the vehicle-down sensor

operates and the ECU shuts off the fuel pump relay, fuel
injectors and ignition system. The ignition switch is left on. If
the starter button is pushed, the electric starter turns but the
engine does not start. When the starter button is pushed,
the yellow engine warning indicator light (LED) blinks but
the service code is not displayed. To start the engine again,
raise the motorcycle, turn the ignition switch off, and then
on.

Much of the DFI system troubleshooting work consists

of confirming continuity of the wiring. The DFI parts are
assembled and adjusted with precision, and it is impossible
to disassemble or repair them.

3-28 FUEL SYSTEM (DFI)

Troubleshooting the DFI System

When checking the DFI parts, use a digital meter which
can be read two decimal place voltage or resistance.

The DFI part connectors [A] have seals [B], including the
ECU. When measuring the input or output voltage with the
connector joined, use the needle adapter set [C]. Insert
the needle adapter inside the seal until the needle adapter
reaches the terminal.

Special Tool - Needle Adapter Set: 57001-1457

NOTICE

Insert the needle adapter straight along the terminal
in the connector to prevent short-circuit between
terminals.

Make sure that measuring points are correct in the con-
nector, noting the position of the lock [D] and the lead
color before measurement. Do not reverse connections
of a digital meter.

Be careful not to short-circuit the leads of the DFI or elec-
trical system parts by contact between adapters.

Turn the ignition switch on and measure the voltage with
the connector joined.

NOTICE

Incorrect, reverse connection or short circuit by
needle adapters could damage the DFI or electrical
system parts.

After measurement, remove the needle adapters and ap-
ply silicone sealant to the seals [A] of the connector [B]
for waterproofing.

Sealant - Liquid Gasket, TB1211: 56019-120

Always check battery condition before replacing the DFI
parts. A fully charged battery is a must for conducting
accurate tests of the DFI system.

Trouble may involve one or in some cases all items.
Never replace a defective part without determining what
CAUSED the problem. If the problem was caused by
some other item or items, they too must be repaired or
replaced, or the new replacement part will soon fail again.

Measure the coil winding resistance when the DFI part is
cold (at room temperature).

Make sure all connectors in the circuit are clean and tight,
and examine wires for signs of burning, fraying, short,
etc. Deteriorated wires and bad connections can cause
reappearance of problems and unstable operation of the
DFI system.
If any wiring is deteriorated, replace the wiring.


Content      ..     2      3      4      5     ..