Kawasaki Ninja ZX-12R Motorcycle. Service Manual (2002-2005 year) - page 13
 

  Index      Manuals     Kawasaki Ninja ZX-12R Motorcycle. Service Manual (2002-2005 year)


Search            copyright infringement  


Content      ..     11      12      13      14     ..


Kawasaki Ninja ZX-12R Motorcycle. Service Manual (2002-2005 year) - page 13


10-8 WHEELS/TIRES

Wheels (Rims)

Wheel Inspection

Raise the front/rear wheel off the ground.

Special Tool - Jack: 57001-1238

Spin the wheel lightly, and check for roughness or binding.
If roughness or binding is found, replace the hub bearings.

Inspect the wheel for small cracks, dents, bending, or
warp.
If there is any damage to the wheel, replace the wheel.

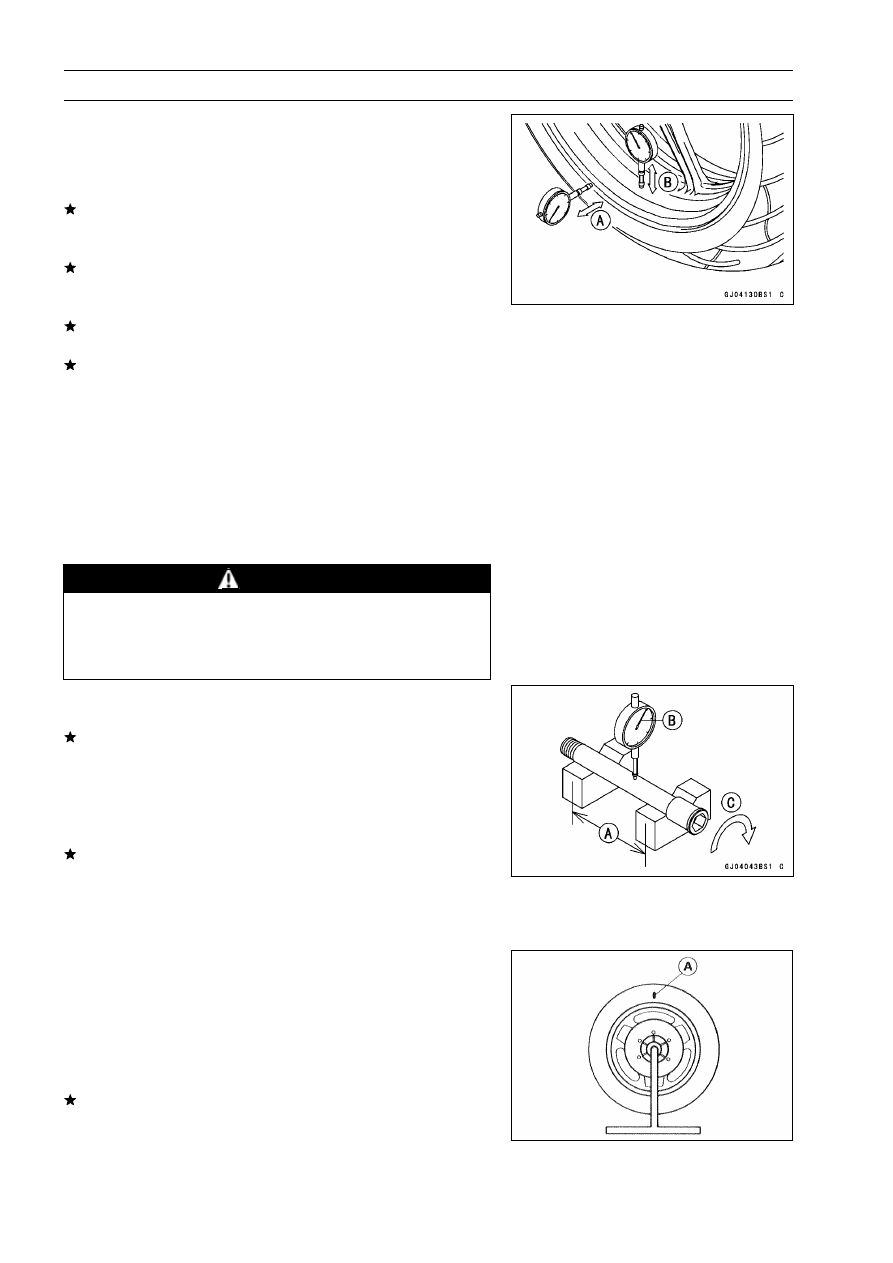
Measure the rim runout, radial [B] and axial [A], with a dial
gauge.
If rim runout exceeds the service limit, check the hub bear-
ings.
If the problem is not due to the bearings, replace the
wheel.

Rim Runout

Standard:

Axial

TIR 0.5 mm (0.02 in.) or less

Radial

TIR 0.8 mm (0.03 in.) or less

Service Limit:

Axial

TIR 1.0 mm (0.04 in.)

Radial

TIR 1.0 mm (0.04 in.)

WARNING

Never attempt to repair a damaged wheel. If there
is any damage besides wheel bearings, the wheel
must be replaced to insure safe operational condi-
tion.

Axle Inspection

Visually inspect the front and rear axle for damages.
If the axle is damaged or bent, replace it.

Place the axle in V blocks that are 100 mm (3.94 in.) [A]
apart, and set a dial gauge [B] on the axle at a point
halfway between the blocks. Turn [C] the axle to mea-
sure the runout. The difference between the highest and
lowest dial readings is the amount of runout.
If axle runout exceeds the service limit, replace the axle.

Axle Runout/100 mm (3.94 in.)

Standard:

0.05 mm (0.002 in.) or less

Service Limit:

0.2 mm (0.008 in.)

Balance Inspection

Remove the wheel.

Support the wheel so that it can be spun freely.

Spin the wheel lightly, and mark [A] the wheel at the top
when the wheel stops.

Repeat this procedure several times. If the wheel stops
of its own accord in various positions, it is well balanced.
If the wheel always stops in one position, adjust the wheel
balance.

WHEELS/TIRES 10-9

Wheels (Rims)

Balance Adjustment

If the wheel always stops in one position, provisionally
attach a balance weight [A] on the rim at the marking using
adhesive tape.

Rotate the wheel 1/4 turn [B], and see whether or not the
wheel stops in this position. If it does, the correct balance
weight is being used.
If the wheel rotates and the weight goes up, replace the
weight with the next heavier size. If the wheel rotates and
the weight goes down, replace the weight with the next
lighter size. Repeat these steps until the wheel remains
at rest after being rotated 1/4 turn.

Rotate the wheel another 1/4 turn and then another 1/4
turn to see if the wheel is correctly balanced.

Repeat the entire procedure as many times as necessary
to achieve correct wheel balance.

Permanently install the balance weight.

Balance Weight

Part Number

Weight

41075-1014

10 g (0.35 oz)

41075-1015

20 g (0.71 oz)

41075-1016

30 g (1.06 oz)

Balance Weight Removal

(a) When the tire is not on the rim.

Push [A] the blade portion toward the outside with a reg-
ular tip screw driver, and slip the weight off the rim flange.

Discard the used balance weight.

(b) When the tire is on the rim.

Pry [A] the balance weight off the rim flange using a reg-
ular tip screw driver as shown in the figure.

Insert a tip of the screw driver between the tire bead [B]
and weight blade [C] until the end of the tip reaches the
end of the weight blade.

Push the driver grip toward the tire so that the balance
weight slips off the rim flange.

Discard the used balance weight.

10-10 WHEELS/TIRES

Wheels (Rims)

Balance Weight Installation

Check if the weight portion has any play on the blade-and
-clip plate.
If it does, discard it.

WARNING

If the balance weight has any play on the rim flange,
the blade and/or clip have been stretched. Replace
the loose balance weight.
Do not reuse used balance weight.
Unbalanced wheels can create an unsafe riding
condition.

Lubricate the balance weight blade, tire bead, and rim
flange with a soap and water solution or rubber lubricant.
This helps the balance weight slip onto the rim flange.

CAUTION

Do not lubricate the tire bead with engine oil or pe-
troleum distillates because they will deteriorate the
tire.

Install the balance weight on the rim.

Slip the weight on the rim flange by pushing or lightly ham-
mering the weight in the direction shown in the figure.

Check that the blade and weight seat fully on the rim
flange, and that the clip is hooked over the rim ridge and
reaches rim flat portion.

Installing Balance Weight

(a) Press or lightly hammer the weight in

(b) Installation completed.

WHEELS/TIRES 10-11

Wheels (Rims)

When required total weight exceeds 20 g (0.71 oz), install
balance weight at both sides of rim flange as shown.

Weight Selection

Required Total

Weight

One Side [A]

Other Side [B]

20 g (0.71 oz)

10 g (0.35 oz)

10 g (0.35 oz)

30 g (1.06 oz)

20 g (0.71 oz)

10 g (0.35 oz)

40 g (1.41 oz)

20 g (0.71 oz)

20 g (0.71 oz)

50 g (1.76 oz)

30 g (1.06 oz)

20 g (0.71 oz)

60 g (2.12 oz)

30 g (1.06 oz)

30 g (1.06 oz)

70 g (2.47 oz)

20 g + 20 g

(0.71 oz + 0.71 oz)

30 g (1.06 oz)

80 g (2.82 oz)

20 g + 20 g

(0.71 oz + 0.71 oz)

20 g + 20 g

(0.71 oz + 0.71 oz)

90 g (3.17 oz)

20 g + 30 g

(0.71 oz + 1.06 oz)

20 g + 20 g

(0.71 oz + 0.71 oz)

10-12 WHEELS/TIRES

Tires

Air Pressure Inspection/Adjustment

Measure the tire air pressure with an air pressure gauge
[A] when the tires are cold (that is, when the motorcycle
has not been ridden more than a mile during the past 3
hours).
Adjust the tire air pressure according to the specifications
if necessary.

Air Pressure (when cold)

Front:

Up to 182 kg (401 lb)

290 kPa (2.90 kgf/cm², 42 psi)

Rear:

Up to 182 kg (401 lb)

290 kPa (2.90 kgf/cm², 42 psi)

Install the air valve cap certainly after air pressure inspec-
tion.

Torque - Air Valve Cap: 0.15 N·m (0.015 kgf·m, 1.3 in·lb)

Tire Inspection

Refer to the Tire Inspection in the Periodic Maintenance
chapter.

Tire Removal

Remove:

Wheel (see Front Wheel Removal, Rear Wheel Re-
moval)
Disc(s) (see Brakes chapter)
Valve Core (let out the air)

To maintain wheel balance, mark the air valve position on
the tire with chalk so that the tire can be reinstalled in the
same position.

Chalk Mark or Yellow Mark [A]
Air Valve [B]
Align [C]

Lubricate the tire beads and rim flanges on both sides with
soap and water solution or rubber lubricant. This helps
the tire beads slip off the rim flanges.

CAUTION

Never lubricate with engine oil or petroleum distil-
lates because they will deteriorate the tire.

Remove the tire from the rim using a commercially avail-
able tire changer.

NOTE

The tires cannot be removed with hand tools because
they fit the rims too tightly.

WHEELS/TIRES 10-13

Tires

Tire Installation

WARNING

Use the same manufacturer’s tires on both front and
rear wheels.

Inspect the rim and tire, and replace them if necessary.

Clean the sealing surfaces of the rim and tire, and smooth
the sealing surfaces of the rim with a fine emery cloth if
necessary.

Remove the air valve and discard it.

CAUTION

Replace the air valve whenever the tire is replaced.
Do not reuse the air valve.

Install a new air valve in the rim.

Remove the valve cap, lubricate the stem seal with soap
and water solution or rubber lubricant, and pull the valve
stem [A] through the rim from the inside out until it snaps
into place.

CAUTION

Do not use engine oil or petroleum distillates to lu-
bricate the stem because they will deteriorate the
rubber.

The air valve is shown in the figure.

Valve Cap [A]
Valve Core [B]
Valve Seal [C]
Valve Stem [D]
Valve Seat [E]
Valve Opened [F]

Apply soap and water solution, or rubber lubricant to the
rim flange and tire beads.

Check the tire rotation mark on the front and rear tires and
install them on the rim accordingly.

NOTE

The direction of the tire rotation [A] is shown by an arrow
[B] on the tire sidewall.

10-14 WHEELS/TIRES

Tires

Position the tire on the rim so that the air valve [A] is at
the tire balance mark [B] (the chalk mark made during
removal, or the yellow paint mark on a new tire).

Install the tire on the rim using a suitable commercially
available tire changer.

Lubricate the tire beads and rim flanges with soap and wa-
ter solution or rubber lubricant to help seat the tire beads
in the sealing surfaces of the rim while inflating the tire.

Center the rim in the tire beads, and inflate the tire with
compressed air until the tire beads seat in the sealing
surfaces.

WARNING

Be sure to install the valve core whenever inflating
the tire, and do not inflate the tire to more than 400
kPa (4.0 kgf/cm², 57 psi). Overinflation can explode
the tire with possibility of injury and loss of life.

Check to see that the rim lines [A] on both sides of the tire
sidewalls are parallel with the rim flanges.
If the rim flanges and tire sidewall rim lines are not parallel,
remove the valve core.

Lubricate the rim flanges and tire beads.

Install the valve core and inflate the tire again

After the tire beads seat in the rim flanges, check for air
leaks.

Inflate the tire slightly above standard inflation.

Use soap and water solution or submerge the tire, and
check for bubbles that would indicate leakage.

Adjust the air pressure to the specified pressure.

Install the air valve cap.

Install the brake disc(s) so that the disc rotation mark
aligns with the tire rotation.

Apply a non-permanent locking agent, and tighten the
brake disc bolts.

Torque - Brake Disc Bolts: 27 N·m (2.8 kgf·m, 20 ft·lb)

Adjust the wheel balance.

WARNING

Check and balance the wheel when a tire is replaced
with a new one.
New tires are slippery and may cause loss of control
and injury.
A break-in period of 160 km (100 miles) is necessary
to establish normal tire traction. During break-in,
avoid sudden and maximum braking and accelera-
tion, and hard cornering.

WHEELS/TIRES 10-15

Tires

Repair

Currently two types of repair for tubeless tires have come

into wide use. One type is called a temporary (external) re-
pair which can be carried out without removing the tire from
the rim, and the other type is called permanent (internal)
repair which requires tire removal. It is generally under-
stood that higher running durability is obtained by perma-
nent (internal) repairs than by temporary (external) ones.
Also, permanent (internal) repairs have the advantage of
permitting a thorough examination for secondary damage
not visible from external inspection of the tire. For these
reasons, Kawasaki does not recommend temporary (exter-
nal) repair. Only appropriate permanent (internal) repairs
are recommended. Repair methods may vary slightly from
make to make. Follow the repair methods indicated by the
manufacturer of the repair tools and materials so that safe
results can be obtained.

10-16 WHEELS/TIRES

Hub Bearings

Hub Bearing Removal

Remove the wheel, and take out the following.

Collars
Coupling (Out of rear hub)
Grease Seals
Circlip

Special Tool - Inside Circlip Pliers: 57001-143

Take the bearings [A] out of the hub.

CAUTION

Do not lay the wheel on the ground with the disc
facing down. This can damage or warp the disc.
Please blocks under the wheel so that the disc does
not touch the ground.

Special Tools - Bearing Remover Head, 25 ×

28: 57001

-1346 [C]

Bearing Remover Shaft, 13: 57001-1377

[B]

Hub Bearing Installation

Before installing the wheel bearings, blow any dirt or for-
eign particles out of the hub with compressed air to pre-
vent contamination of the bearings.

Replace the bearings with new ones.

Press in each right the bearing [A] until they are bottomed.

Special Tool - Bearing Driver Set: 57001-1129 [B]

NOTE

Install the bearings so that the marked side faces out.

Replace the circlips with new ones.

Special Tool - Inside Circlip Pliers: 57001-143

Replace the grease seals with new ones.

Press in the grease seals [A] so that the seal surface flush
[B] with the end of the hole.

Apply high temperature grease to the grease seal lips.

Special Tool - Bearing Driver Set: 57001-1129 [C]

Hub Bearing Inspection

NOTE

It is not necessary to remove any bearings for inspec-
tion. If any bearings are removed, they will need to be
replaced with new ones.

Spin [A] it by hand to check its condition.
If it is noisy, does not spin smoothly, or has any rough
spots, it must be replaced.

Examine the bearing seal [B] for tears or leakage.
If the seal is torn or is leaking, replace the bearing.

FINAL DRIVE 11-1

11

Final Drive

Table of Contents

Exploded View........................................................................................................................

11-2

Specifications .........................................................................................................................

11-3

Drive Chain.............................................................................................................................

11-4

Slack Inspection................................................................................................................

11-4

Slack Adjustment ..............................................................................................................

11-4

Wheel Alignment Inspection Adjustment ..........................................................................

11-4

Drive Chain Wear Inspection ............................................................................................

11-4

Lubrication ........................................................................................................................

11-4

Drive Chain Removal ........................................................................................................

11-4

Drive Chain Installation .....................................................................................................

11-4

Sprocket, Coupling .................................................................................................................

11-5

Engine Sprocket Removal ................................................................................................

11-5

Engine Sprocket Installation .............................................................................................

11-5

Rear Sprocket Removal....................................................................................................

11-6

Rear Sprocket Installation.................................................................................................

11-6

Sprocket Wear Inspection.................................................................................................

11-6

Rear Sprocket Warp Inspection ........................................................................................

11-7

Coupling Bearing Removal ...............................................................................................

11-7

Coupling Bearing Installation ............................................................................................

11-7

Coupling Installation..........................................................................................................

11-8

Coupling Bearing Inspection and Lubrication ...................................................................

11-8

Damper Inspection............................................................................................................

11-8

11-2 FINAL DRIVE

Exploded View

T1: 12 N·m (1.2 kgf·m, 106 in·lb)
T2: 59 N·m (6.0 kgf·m, 44 ft·lb)
T3: 127 N·m (13 kgf·m, 94 ft·lb)

G: Apply grease.

HO: Apply heavy oil.

L: Apply a non-permanent locking agent.

MO: Apply molybdenum disulfide oil solution.

R: Replacement Parts

FINAL DRIVE 11-3

Specifications

Item

Standard

Service Limit

Drive Chain

Chain Slack

25

35 mm (0.98

1.4 in.)

– – –

Rollers Distance

Less than 6 mm (0.236 in.)

6.2 mm (0.244 in.)

20-link Length

317.5

318.2 mm (12.50

12.53 in.)

323 mm (12.7 in.)

Standard Chain:

Make

DAIDO

– – –

Type

DID50ZVM3GC&B, Endless

– – –

Link

116 links

– – –

Sprockets

Rear Sprocket Warp

0.4 mm (0.02 in.) or less

0.5 mm (0.02 in.)

Special Tools - Inside Circlip Pliers: 57001-143

Bearing Driver Set: 57001-1129

11-4 FINAL DRIVE

Drive Chain

Slack Inspection

Refer to the Drive Chain Inspection in the Periodic Main-
tenance chapter.

Slack Adjustment

Refer to the Drive Chain Inspection in the Periodic Main-
tenance chapter.

Wheel Alignment Inspection Adjustment

Refer to the Drive Chain Inspection in the Periodic Main-
tenance chapter.

Drive Chain Wear Inspection

Refer to the Drive Chain Wear Inspection in the Periodic
Maintenance chapter.

Lubrication

Refer to the Drive Chain Lubrication in the Periodic Main-
tenance chapter.

Drive Chain Removal

Remove:

Rear Wheel (see Wheels/Tires chapter)
Chain Cover Screws [A]
Chain Cover [B]
Brake Hose Clamp Screw [C] and Bolts [D]
Swingarm (see Suspension chapter)
Engine Sprocket Cover (see this chapter)

Disengage the drive chain [A] from the engine sprocket
[B], and take it off the chassis.

Drive Chain Installation

Engage the drive chain to the engine sprocket.

Install:

Swingarm (see Suspension chapter)
Rear Wheel (see Wheels/Tires chapter)
Engine Sprocket Cover (see Engine Sprocket Installa-
tion)
Chain Cover

Adjust the chain slack after installing the chain (see Drive
Chain Inspection in the Periodic Maintenance chapter).

FINAL DRIVE 11-5

Sprocket, Coupling

Engine Sprocket Removal

Remove:

Engine Sprocket Cover Bolts [A]
Engine Sprocket Cover [C]

Chain guide bolt [B] need not to be removed for engine
sprocket cover removal.

Flatten out the bended washer [A].

Remove the engine sprocket nut [B] and washer.

NOTE

When loosening the engine sprocket nut, hold the rear
brake on.

Raise the rear wheel off the ground with the stand (see
Wheels/Tires chapter).

Loosen the drive chain (see Drive Chain Inspection in the
Periodic Maintenance chapter).

Remove the drive chain from the rear sprocket toward the
right.

Disengage the drive chain [A] from the engine sprocket
[B].

Pull the engine sprocket off the output shaft [C].

Engine Sprocket Installation

Replace the sprocket washer and axle cotter pin.

Install the engine sprocket.

Apply molybdenum disulfide oil solution to the threads of
the output shaft, and to the seating surface of the engine
sprocket nut and washer.

After torquing the engine sprocket nut, bend the one side
of the washer over the nut.

NOTE

Tighten the nut while applying the rear brake.

Torque - Engine Sprocket Nut: 127 N·m (13 kgf·m, 94 ft·lb)

11-6 FINAL DRIVE

Sprocket, Coupling

Install the engine sprocket cover.

Apply a non-permanent locking agent to the chain guide
mounting bolt [A] if it is removed.

Torque - Engine Sprocket Cover Bolts: 12 N·m (1.2 kgf·m,

106 in·lb)

Adjust the drive chain slack after installing the sprocket
(see Drive Chain Inspection in the Periodic Maintenance
chapter).

Rear Sprocket Removal

Remove the rear wheel (see Wheels/Tires chapter).

CAUTION

Do not lay the wheel on the ground with the disc
facing down. This can damage or warp the disc.
Place blocks under the wheel so that the disc does
not touch the ground.

Remove the rear sprocket nuts [A].

Remove the rear sprocket [B].

Rear Sprocket Installation

Install the sprocket facing the tooth number marking [A]
outward.

Tighten the rear sprocket nuts.

Torque - Rear Sprocket Nuts: 59 N·m (6.0 kgf·m, 44 ft·lb)

Install the rear wheel (see Wheels/Tires chapter).

Sprocket Wear Inspection

Visually inspect the engine and rear sprocket teeth for
wear and damage.
If the teeth are worn as illustrated, replace the sprocket,
and inspect the drive chain wear (see Drive Chain Wear
Inspection).

Worn Tooth (Engine Sprocket) [A]
Worn Tooth (Rear Sprocket) [B]
Direction of Rotation [C]

NOTE

If a sprocket requires replacement, the chain is proba-
bly worn also. When replacing a sprocket, inspect the
chain

FINAL DRIVE 11-7

Sprocket, Coupling

Rear Sprocket Warp Inspection

Raise the rear wheel off the ground (see Wheels/Tires
chapter) so that it will turn freely.

Set a dial gauge [A] against the rear sprocket [B] near the
teeth as shown, and rotate [C] the rear wheel to measure
the sprocket runout (warp). The difference between the
highest and lowest dial gauge readings is the amount of
runout (warp).
If the runout exceeds the service limit, replace the rear
sprocket.

Rear Sprocket Warp

Standard:

0.4 mm (0.02 in.) or less

Service Limit:

0.5 mm (0.02 in.)

Coupling Bearing Removal

Remove the rear wheel (see Wheels/Tires chapter).

Remove:

Coupling
Grease Seal
Circlip [A]

Special Tool - Inside Circlip Pliers: 57001-143 [B]

Remove the bearing [A] by tapping from the wheel side.

Special Tool - Bearing Driver Set: 57001-1129 [B]

Coupling Bearing Installation

Replace the bearing with a new one.

Press in the bearing [A] until it is bottomed.

Special Tool - Bearing Driver Set: 57001-1129 [B]

Pack the bearing with high temperature grease.

Replace the circlip with a new one.

Special Tool - Inside Circlip Pliers: 57001-143

11-8 FINAL DRIVE

Sprocket, Coupling

Replace the grease seal with a new one.

Press in the grease seal so that the seal surface is flush
with the end of the hole.

Apply high temperature grease to the grease seal lips.

Special Tool - Bearing Driver Set: 57001-1129 [A]

Coupling Installation

Grease the following and install the coupling.

Coupling Grease Seal [A]
Coupling Internal Surface [B]
Ball Bearing [C]

Coupling Bearing Inspection and Lubrication

NOTE

It is not necessary to remove the coupling bearing for
inspection and lubrication. If the bearing is removed, it
will need to be replaced with a new one.

Wash the bearing with a high flash-point solvent, dry it
(do not spin it while it is dry), and oil it. Spin it by hand to
check its condition.
If it is noisy, does not spin smoothly, or has any rough
spots, it must be replaced.

Pack the bearing with good quality bearing grease. Turn
the bearing around by hand a few times to make sure the
grease is distributed uniformly inside the bearing.

Damper Inspection

Remove the rear wheel coupling, and inspect the rubber
dampers [A].

Replace the damper if it appears damaged or deterio-
rated.

BRAKES 12-1

12

Brakes

Table of Contents

Exploded View...................................

12-2

Specifications ....................................

12-8

Brake Pedal.......................................

12-9

Brake Lever Position Adjustment.

12-9

Brake Pedal Position Adjustment.

12-9

Brake Lever, Brake Pedal..................

12-10

Brake Pedal Removal ..................

12-10

Brake Pedal Installation ...............

12-10

Calipers .............................................

12-11

Front Caliper Removal .................

12-11

Rear Caliper Removal..................

12-11

Caliper Installation .......................

12-11

Front Caliper Disassembly...........

12-12

Front Caliper Assembly................

12-13

Rear Caliper Disassembly ...........

12-14

Rear Caliper Assembly ................

12-15

Caliper Fluid Seal Damage ..........

12-16

Caliper Dust Seal Damage ..........

12-16

Caliper Piston and Cylinder

Damage.....................................

12-16

Brake Pads ........................................

12-17

Front Brake Pad Removal

(ZX1200-B1/B2) ........................

12-17

Front Brake Pad Removal

(ZX1200-B3

)...........................

12-17

Front Brake Pad Installation

(ZX1200-B1/B2) ........................

12-18

Front Brake Pad Installation

(ZX1200-B3

)...........................

12-18

Rear Brake Pad Removal ............

12-18

Rear Brake Pad Installation .........

12-19

Brake Pad Lining Wear ................

12-19

Master Cylinder .................................

12-20

Front Master Cylinder Removal ...

12-20

Front Master Cylinder Installation

12-20

Rear Master Cylinder Removal....

12-21

Rear Master Cylinder Installation.

12-21

Front Master Cylinder

Disassembly..............................

12-21

Rear Master Cylinder

Disassembly..............................

12-22

Master Cylinder Assembly ...........

12-22

Master Cylinder Inspection (Visual

Inspection).................................

12-23

Brake Discs .......................................

12-24

Brake Disc Removal ....................

12-24

Brake Disc Installation .................

12-24

Brake Disc Wear ..........................

12-24

Brake Disc Warp ..........................

12-24

Brake Fluid ........................................

12-25

Brake Fluid Level Inspection........

12-25

Brake Fluid Change .....................

12-25

Bleeding the Brake Line...............

12-25

Brake Hoses ......................................

12-28

Brake Hose Removal/Installation.

12-28

Brake Hose Inspection.................

12-28

12-2 BRAKES

Exploded View

ZX1200-B1/B2

BRAKES 12-3

Exploded View

Torque

No.

Fastener

N·m

kgf·m

ft·lb

Remarks

1

Bleed Valve

7.8

0.80

69 in·lb

2

Brake Hose Banjo Bolts

34

3.5

25

3

Brake Lever Pivot Bolt

1.2

0.12

11 in·lb

Si

4

Brake Lever Pivot Bolt Locknut

6.0

0.60

52 in·lb

5

Front Reservoir Cap Screws

1.5

0.15

13 in·lb

6

Front Master Cylinder Clamp Bolts

8.8

0.90

78 in·lb

S

7

Front Caliper Mounting Bolts

34

3.5

25

8

Front Caliper Assembly Bolts

21

2.1

15

9

Brake Disc Mounting Bolts

27

2.8

20

L

10

Front Brake Pad Spring Bolts

3.0

0.30

27 in·lb

11

Front Brake Light Switch Screws

1.2

0.12

11 in·lb

B: Apply brake fluid.

L: Apply a non-permanent locking agent.

R: Replacement Parts

S: Follow the specific tightening sequence.

Si: Apply silicone grease (ex. PBC grease).

12-4 BRAKES

Exploded View

ZX1200-B3

BRAKES 12-5

Exploded View

Torque

No.

Fastener

N·m

kgf·m

ft·lb

Remarks

1

Bleed Valve

7.8

0.80

69 in·lb

2

Brake Hose Banjo Bolts

34

3.5

25

3

Brake Lever Pivot Bolt

1.2

0.12

11 in·lb

Si

4

Brake Lever Pivot Bolt Locknut

6.0

0.60

52 in·lb

5

Front Reservoir Cap Screws

1.5

0.15

13 in·lb

6

Front Master Cylinder Clamp Bolts

8.8

0.90

78 in·lb

S

7

Front Caliper Mounting Bolts

34

3.5

25

8

Front Caliper Assembly Bolts

21

2.1

15

9

Brake Disc Mounting Bolts

27

2.8

20

L

10

Front Brake Pad Pins

15

1.5

11

11

Front Brake Light Switch Screws

1.2

0.12

11 in·lb

B: Apply brake fluid.

L: Apply a non-permanent locking agent.

R: Replacement Parts

S: Follow the specific tightening sequence.

Si: Apply silicone grease (ex. PBC grease).

12-6 BRAKES

Exploded View

BRAKES 12-7

Exploded View

Torque

No.

Fastener

N·m

kgf·m

ft·lb

Remarks

1

Bleed Valve

7.8

0.80

69 in·lb

2

Brake Hose Banjo Bolts

34

3.5

25

3

Brake Pedal Mounting Bolt

8.8

0.90

78 in·lb

4

Rear Master Cylinder Push Rod Locknut

18

1.8

13

5

Rear Master Cylinder Mounting Bolts

25

2.5

18

6

Rear Caliper Mounting Bolts

25

2.5

18

7

Rear Caliper Assembly Bolts

30

3.0

22

8

Brake Disc Mounting Bolts

27

2.8

20

L

B: Apply brake fluid.

G: Apply grease.

L: Apply a non-permanent locking agent.

R: Replacement Parts

Si: Apply silicone grease (ex. PBC grease).

12-8 BRAKES

Specifications

Item

Standard

Service Limit

Brake Lever, Brake Pedal

Brake Lever Position

5-way adjustable (to suit rider)

– – –

Brake Lever Free Play

Non-adjustable

– – –

Pedal Free Play

Non-adjustable

– – –

Pedal Position

About 43 mm (1.7 in.) below footpeg top

– – –

Brake Fluid

Grade

DOT4

– – –

Brake Pads

Lining Thickness:

Front

4 mm (0.12 in.)

1 mm (0.04 in.)

Rear

4 mm (0.12 in.)

1 mm (0.04 in.)

Brake Discs

Thickness:

ZX1200-B1/B2

Front

4.8

5.1 mm (0.19

0.20 in.)

4.5 mm (0.18 in.)

Rear

5.8

6.0 mm (0.23

0.24 in.)

5.0 mm (0.20 in.)

ZX1200-B3

Front

5.8

6.2 mm (0.23

0.24 in.)

5.5 mm (0.22 in.)

Rear

5.9

6.1 mm (0.23

0.24 in.)

5.0 mm (0.20 in.)

Runout

0.15 mm (0.0059 in.) or less

0.3 mm (0.01 in.)

Special Tools - Inside Circlip Pliers: 57001-143

Jack: 57001-1238

BRAKES 12-9

Brake Pedal

Brake Lever Position Adjustment

The brake lever is adjustable to five positions to suit the

rider.

Push the lever forward and turn the adjuster [A] to align
the number with the arrow mark [B].

The distance from the grip to the lever is maximum at
Number 1 and minimum at Number 5.

Brake Pedal Position Adjustment

Check that the brake pedal [A] is in the correct position.

Footpeg [B]

Pedal Position [C]

Standard:

About 43 mm (1.7 in.) below top of
footpeg

If it is incorrect, adjust the brake pedal position.

NOTE

Usually it is not necessary to adjust the pedal position,
but always adjust it when the master cylinder is disas-
sembled or pedal position is incorrect.

Unscrew the bolts [A] and remove the guard bracket [B].

Reinstall the bolts with master cylinder.

Measure the length indicated in the figure.

Length [A]

Standard:

67 ±1 mm (2.64 ±0.04 in.)

If it is specified length, the brake pedal may be deformed
or incorrectly installed.
If it is not within the specified length, adjust the push rod
in the master cylinder as following.

Loosen the push rod locknut [A].

Turn the hex head [B] of the push rod [C] to obtain the
specified length [D].

Tighten the locknut.

Torque - Rear Master Cylinder Push Rod Locknut: 18 N·m

(1.8 kgf·m, 13 ft·lb)

Install the master cylinder guard with master cylinder as-
sembly.

Torque - Rear Master Cylinder Mounting Bolts: 25 N·m (2.5

kgf·m, 18 ft·lb)

Check the brake light switch operation (see Electrical Sys-
tem chapter).

12-10 BRAKES

Brake Lever, Brake Pedal

Brake Pedal Removal

Remove:

Right Front Footpeg Holder Bolts [A]
Rear Master Cylinder Mounting Bolts [B]

Remove:

Cotter Pin [A]
Joint Pin [B] (see Rear Master Cylinder Removal)

Remove the rear brake light switch spring [C].

Remove the return spring [D].

Remove the mounting bolt [E] and take out the brake
pedal [F].

Brake Pedal Installation

Apply high-temperature grease to the pivot shaft [A] and
install the washer [B] and pedal [C].

Torque - Brake Pedal Mounting Bolt: 8.8 N·m (0.90 kgf·m,

78 in·lb)

Hook the return spring and brake light switch spring.

Apply high-temeprature grease to the joint pin, insert it to
the brake pedal and master cylinder.

Insert the cotter pin and spread its ends.

Replace the cotter pin with a new one.

Install the footpeg holder assembly to the frame.

Torque - Right Front Footpeg Holder Bolts: 25 N·m (2.5

kgf·m, 18 ft·lb)

Install the rear master cylinder (see Rear Master Cylinder
Installation).

Torque - Rear Master Cylinder Mounting Bolts: 25 N·m (2.5

kgf·m, 18 ft·lb)

Check the brake pedal position (see Brake Pedal Position
Inspection).

BRAKES 12-11

Calipers

Front Caliper Removal

Remove the reflectors (for the US and Canadian models).

Loosen the banjo bolt [A] at the brake hose lower end,
and tighten it loosely.

Unscrew the caliper mounting bolts [B], and detach the
caliper [C] from the disc.

CAUTION

Do not loosen the caliper assembly bolts [D]. Take
out only the caliper mounting bolts for caliper re-
moval. Loosening the caliper assembly bolts will
cause brake fluid leakage.

Unscrew the banjo bolt and remove the brake hose [E]
from the caliper (see Brake Hose Removal/Installation).

ZX1200-B1/B2 [F]
ZX1200-B3 [G]

CAUTION

Immediately wash away any brake fluid that spills.

Rear Caliper Removal

Loosen the banjo bolt [A] at the brake hose lower end,
and tighten it loosely.

Unscrew the caliper mounting bolts [B], and detach the
caliper [C] from the disc.

Unscrew the banjo bolt and remove the brake hose [D]
from the caliper (see Brake Hose Removal/Installation).

CAUTION

Immediately wash away any brake fluid that spills.

Caliper Installation

Install the caliper and brake hose lower end.

Replace the washers on each side of hose fitting with new
ones.

Tighten the caliper mounting bolts and banjo bolt.

Torque - Front Caliper Mounting Bolts: 34 N·m (3.5 kgf·m,

25 ft·lb)

Rear Caliper Mounting Bolts: 25 N·m (2.5 kgf·m,

18 ft·lb)

Brake Hose Banjo Bolt: 34 N·m (3.5 kgf·m, 25 ft·lb)

Check the fluid level in the brake reservoirs.

Bleed the brake line (see Bleeding the Brake Line).

Check the brake for good braking power, no brake drag,
and no fluid leakage.

WARNING

Do not attempt to drive the motorcycle until a full
brake lever or pedal is obtained by pumping the
brake lever or pedal until the pads are against the
disc. The brakes will not function on the first appli-
cation of the lever or pedal if this is not done.

12-12 BRAKES

Calipers

Front Caliper Disassembly

Remove the pad spring and brake pads (see this chapter).

Loosen the front caliper assembly bolts [A] and front
caliper banjo bolt [B] and tighten them loosely.

Remove the front caliper [C] and banjo bolt.

Remove the front caliper assembly bolts and split the front
caliper.

Remove the O-rings.

For ZX1200-B3 model

; note the following.

Loosen the front caliper pad pins [A] and banjo bolt [B]
and tighten them loosely.

Remove the caliper of other side.

Loosen the caliper assembly bolts [A].

Remove:

Front Caliper (see Front Caliper Removal)
Brake Pad
Front Caliper Assembly Bolts
O-rings

Using compressed air, remove the pistons. One way to
remove the pistons is as follows.

Install a rubber gasket [A] and a wooden board [B] more
than 10 mm (0.40 in.) thick on the caliper half, and fas-
ten them together with a suitable bolt and nut as shown.
Leave one of the oil passages [C] open.

Lightly apply compressed air [D] to the oil passage until
the pistons hit the rubber gasket. Block the hose joint
opening [E] during this operation if the caliper half has
the opening.

Bolt and Nut [F]
Oil Passage Sealed by Rubber Gasket [G]
Push down [H]

BRAKES 12-13

Calipers

WARNING

To avoid serious injury, never place your fingers or
palm in front of the piston. If you apply compressed
air into the caliper, the piston may crush your hand
or fingers.

Pull out the pistons by hand.

Remove the dust seals [A] and fluid seals [B].

Remove the bleed valve [C] and rubber cap [D].

Repeat the previous step to remove the pistons from the
other side of the caliper body.

For ZX1200-B3 model

; as shown in the figure.

NOTE

If compressed air is not available, do as follows for both
calipers coincidentally, with the brake hose connected
to the caliper.

Prepare a container for brake fluid, and perform the
work above it.

Remove the spring and pads (see Front Brake Pad Re-
moval).

Pump the brake lever until the pistons come out of the
cylinders, and then disassemble the caliper.

Front Caliper Assembly

Clean the caliper parts except for the pads.

CAUTION

For cleaning the parts, use only disc brake fluid,
isopropyl alcohol, or ethyl alcohol.

Install the bleed valve and rubber cap.

Torque - Bleed Valve: 7.8 N·m (0.80 kgf·m, 69 in·lb)

Replace the fluid seals [A] with new ones.

Apply brake fluid to the fluid seals, and install them into
the cylinders by hand.

Replace the dust seals [B] with new ones if they are dam-
aged.

Apply brake fluid to the dust seals, and install them into
the cylinders by hand.

12-14 BRAKES

Calipers

Replace the O-rings [A] if they are damaged.

Apply brake fluid to the outside of the pistons, and push
them into each cylinder by hand.

Be sure to install the O-rings.

Tighten the caliper assembly bolts.

Torque - Front Caliper Assembly Bolts: 21 N·m (2.1 kgf·m,

15 ft·lb)

For ZX1200-B3 model

; as shown in the figure.

Torque - Front Caliper Assembly Bolt: 21 N·m (2.1 kgf·m,

15 ft·lb)

Install the pads (see Front Brake Pad Installation).

Wipe up any spilled brake fluid on the caliper with wet
cloth.

Install the front calipers (see Front Caliper Installation).

Rear Caliper Disassembly

Loosen the banjo bolt [A] and rear caliper assembly bolts
[B], and tighten them loosely.

Remove:

Rear Caliper (see Rear Caliper Removal)
Brake Pads (see Rear Brake Pad Removal)
Rear Caliper Assembly Bolts
O-rings

Remove the pistons, dust seals and fluid seals as same
as front caliper disassembly.

Piston Completes [A]
Dust Seals [B]
Fluid Seals [C]
O-rings [D]
Caliper Body [E]
Caliper Assembly Bolts [F]
Bleed Valves [G]
Rubber Caps [H]

WARNING

To avoid serious injury, never place your fingers or
palm in rear of the piston. If you apply compressed
air into the caliper, the piston may crush your hand
of fingers.

BRAKES 12-15

Calipers

Rear Caliper Assembly

Clean the caliper parts except for the pads.

CAUTION

For cleaning the parts, use only disc brake fluid,
isopropyl alcohol, or ethyl alcohol.

Install the bleed valve and rubber cap.

Torque - Bleed Valve: 7.8 N·m (0.80 kgf·m, 69 in·lb)

Replace the fluid seal [A] with a new one.

Apply brake fluid to the fluid seal, and install it into the
cylinder by hand.

Replace the dust seal [B] with a new one if it is damaged.

Apply brake fluid to the dust seal, and install it into the
cylinder by hand.

Replace the O-ring [A] if it is damaged.

Apply brake fluid to the outside of the piston, and push it
into the cylinder by hand.

Install the piston insulator.

Tighten the caliper assembly bolts.

Torque - Rear Caliper Assembly Bolts: 30 N·m (3.0 kgf·m,

22 ft·lb)

Install the pads (see Rear Brake Pad Installation).

Wipe up any spilled brake fluid on the caliper with wet
cloth.

Install the rear caliper (see Rear Caliper Installation).


Content      ..     11      12      13      14     ..