Kawasaki ZZR 1400, ZZR1400 ABS, Ninja ZX-14 Motorcycle. Service Manual (2006-2007 year) - page 4
8-6 ENGINE REMOVAL/INSTALLATION
Engine Removal/Installation
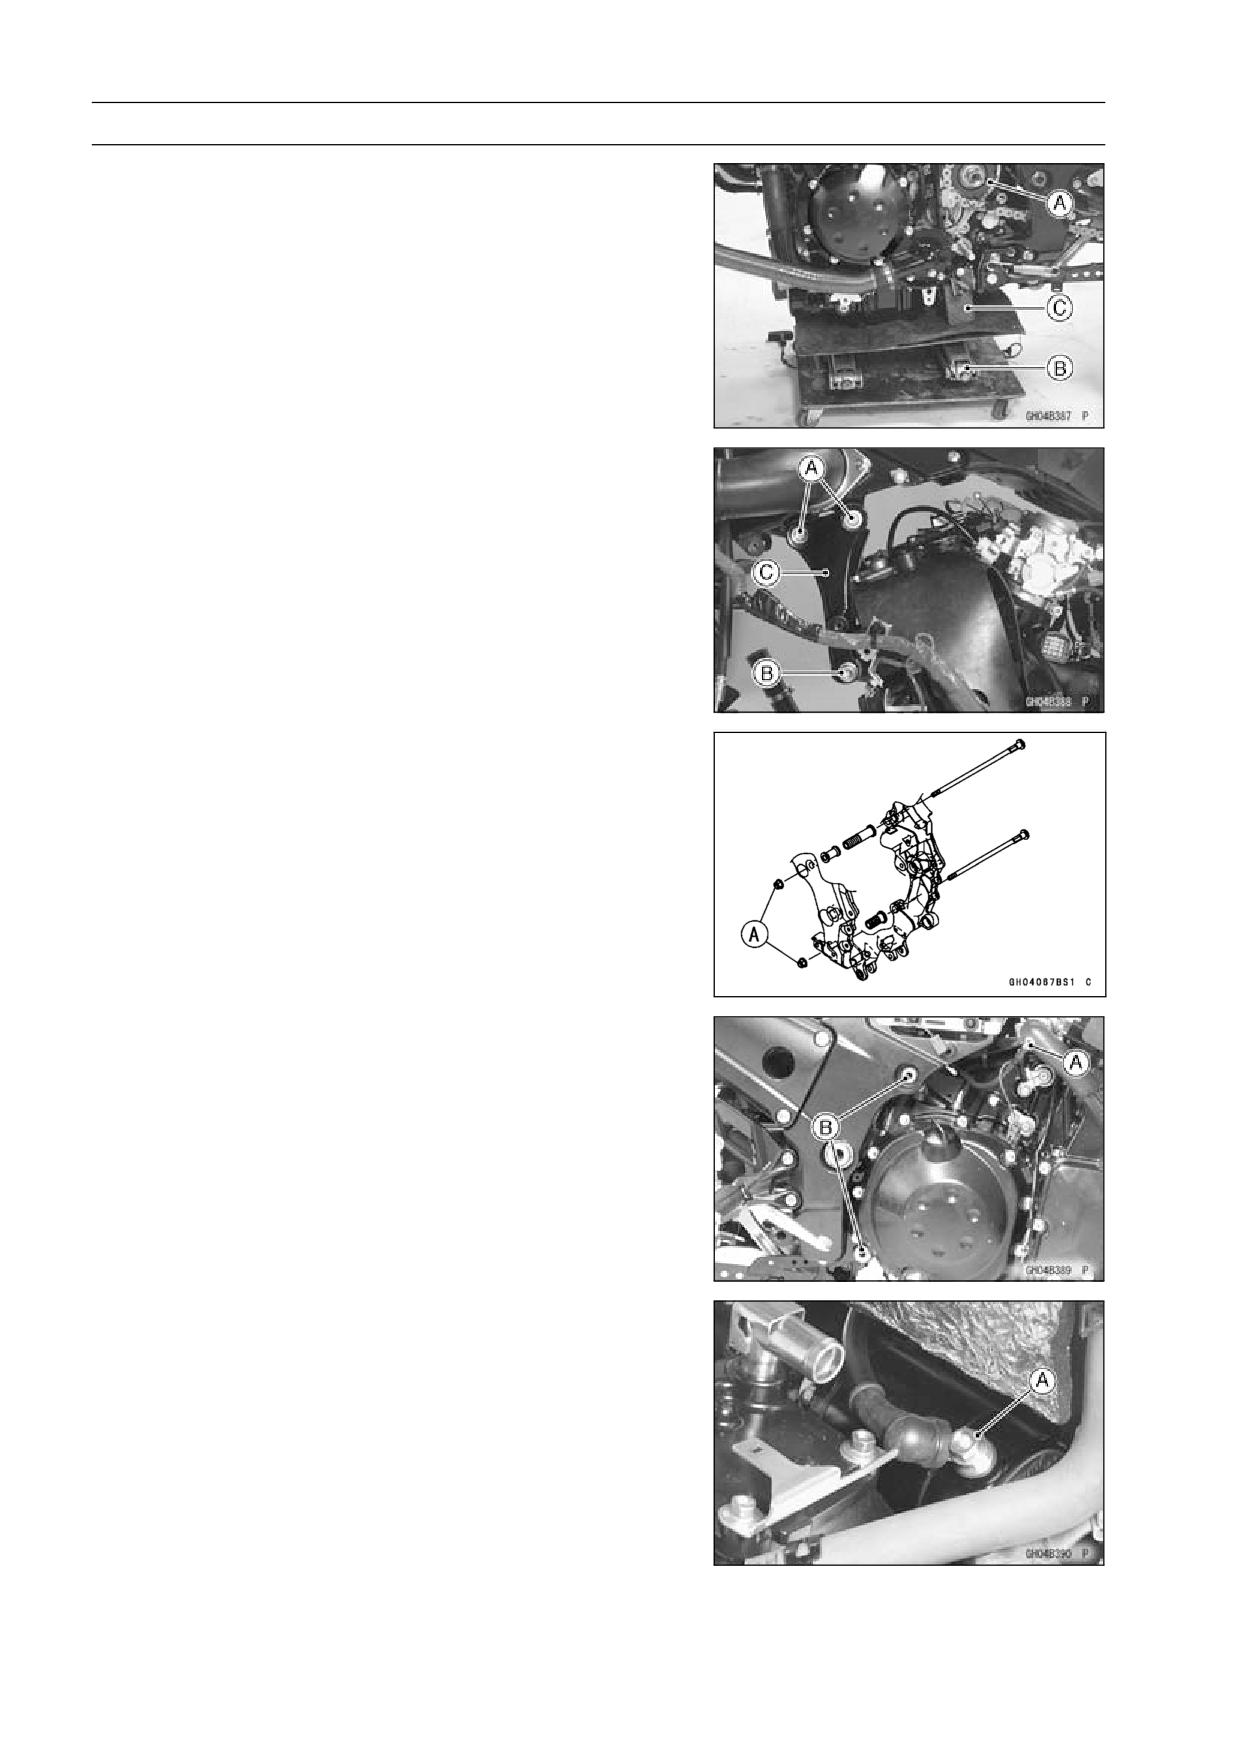
• Remove the engine sprocket [A] (see Engine Sprocket
Removal in the Final Drive chapter).
• Support the engine with a suitable stand [B].
○Put a plank [C] onto the suitable stand for engine balance.
• Remove:
Engine Bracket Bolts [A]
Front Engine Mounting Bolts [B]
Engine Bracket [C]
• Remove:
Engine Mounting Nuts [A]
• Disconnect the engine ground terminal [A].
• Using a hexagon wrench, turn the engine mounting bolts
[B] clockwise to make the gap between the engine and
frame.
• Remove the drive chain from the output shaft.
• Remove the starter motor cable terminal nut [A].
• Using the stand, take out the engine.
Engine Installation
• Support the engine with a suitable stand.
○Put a plank onto the suitable stand for engine balance.
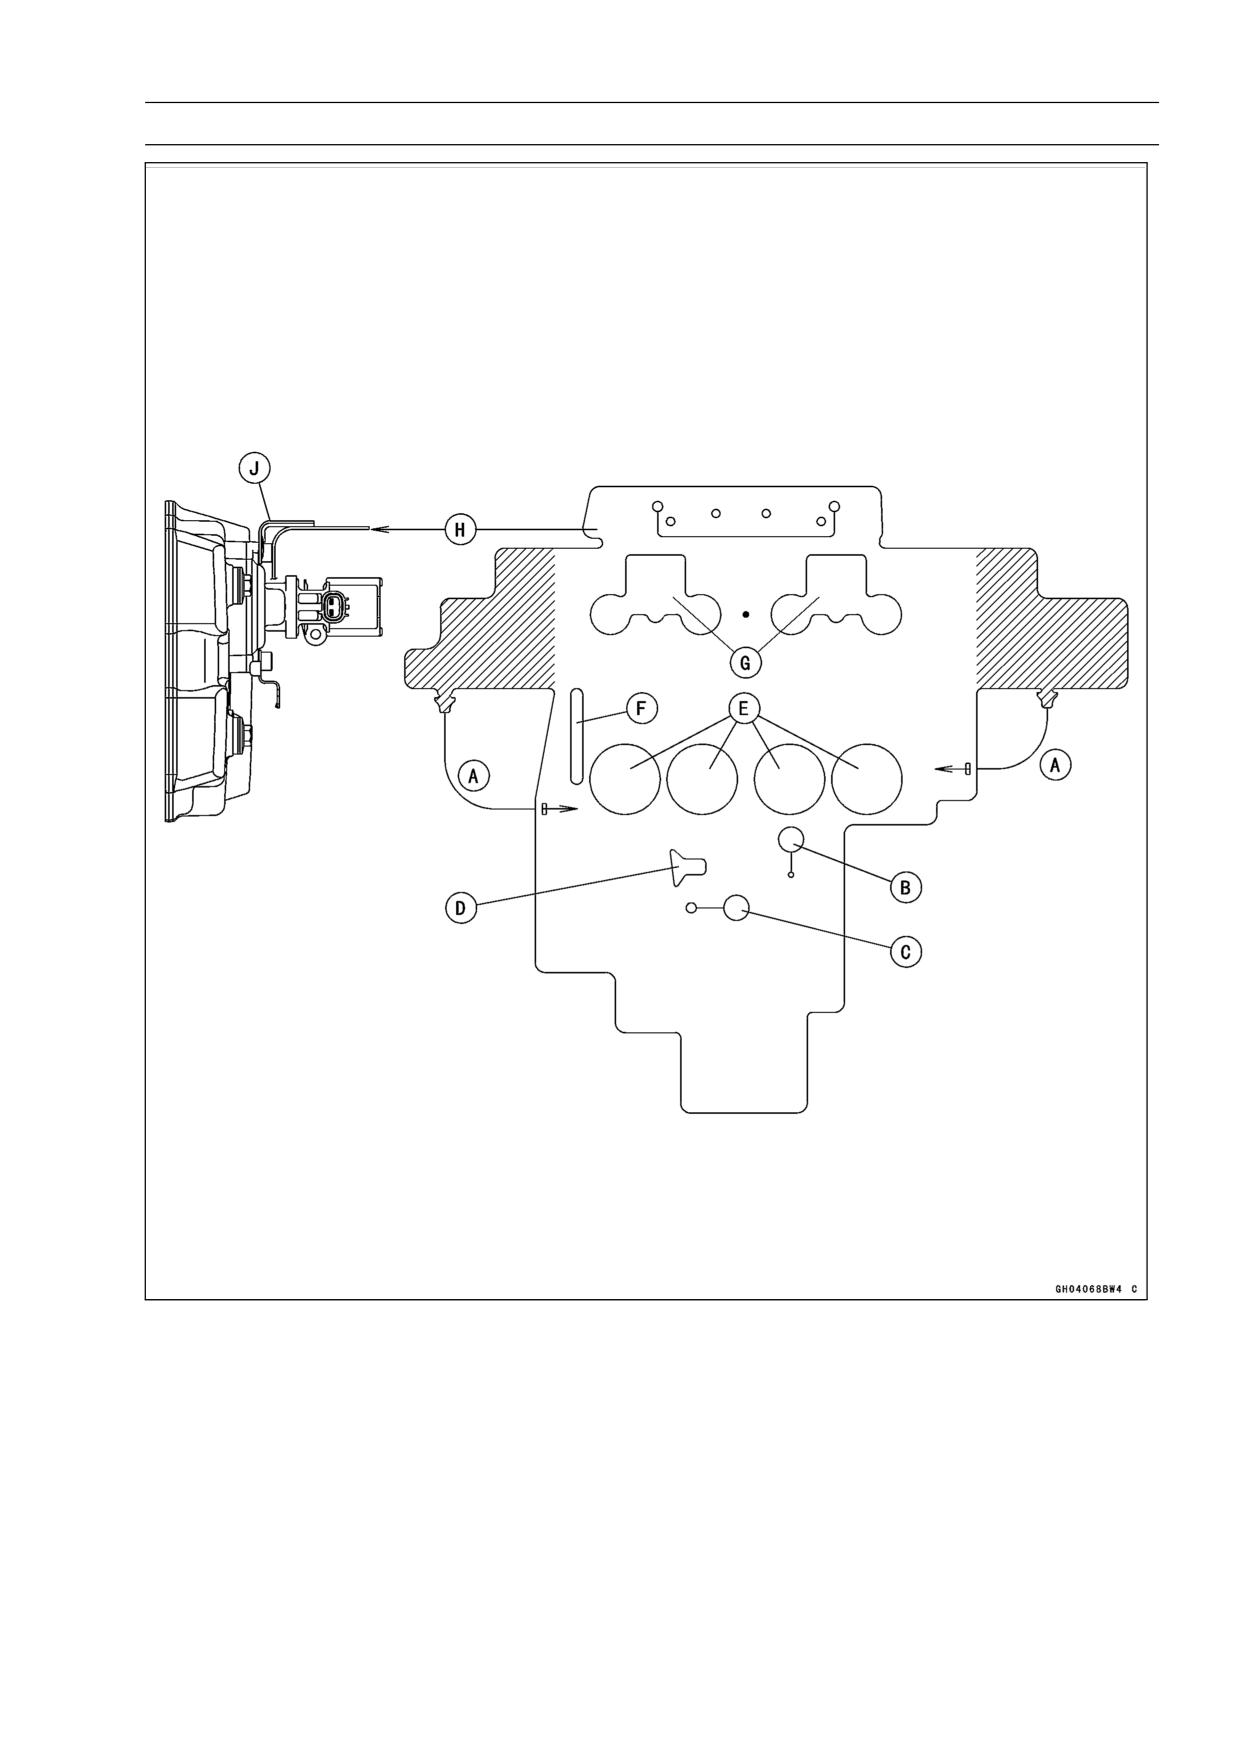
• Install the heat insulation rubber plate.
ENGINE REMOVAL/INSTALLATION 8-7
Engine Removal/Installation
A: After installation, set the projection in the hole.
B: To Water Temperature Sensor
C: To Breather Hose
D: To Throttle Body Subharness Bracket
E: To throttle Body Holder
F: To Throttle Pulley
G: To Air Suction Valve and Stick Coils
H: Only put the heat insulation rubber plate on the cylinder head cover.
J: Bracket on Air Suction Valve Cover
8-8 ENGINE REMOVAL/INSTALLATION
Engine Removal/Installation
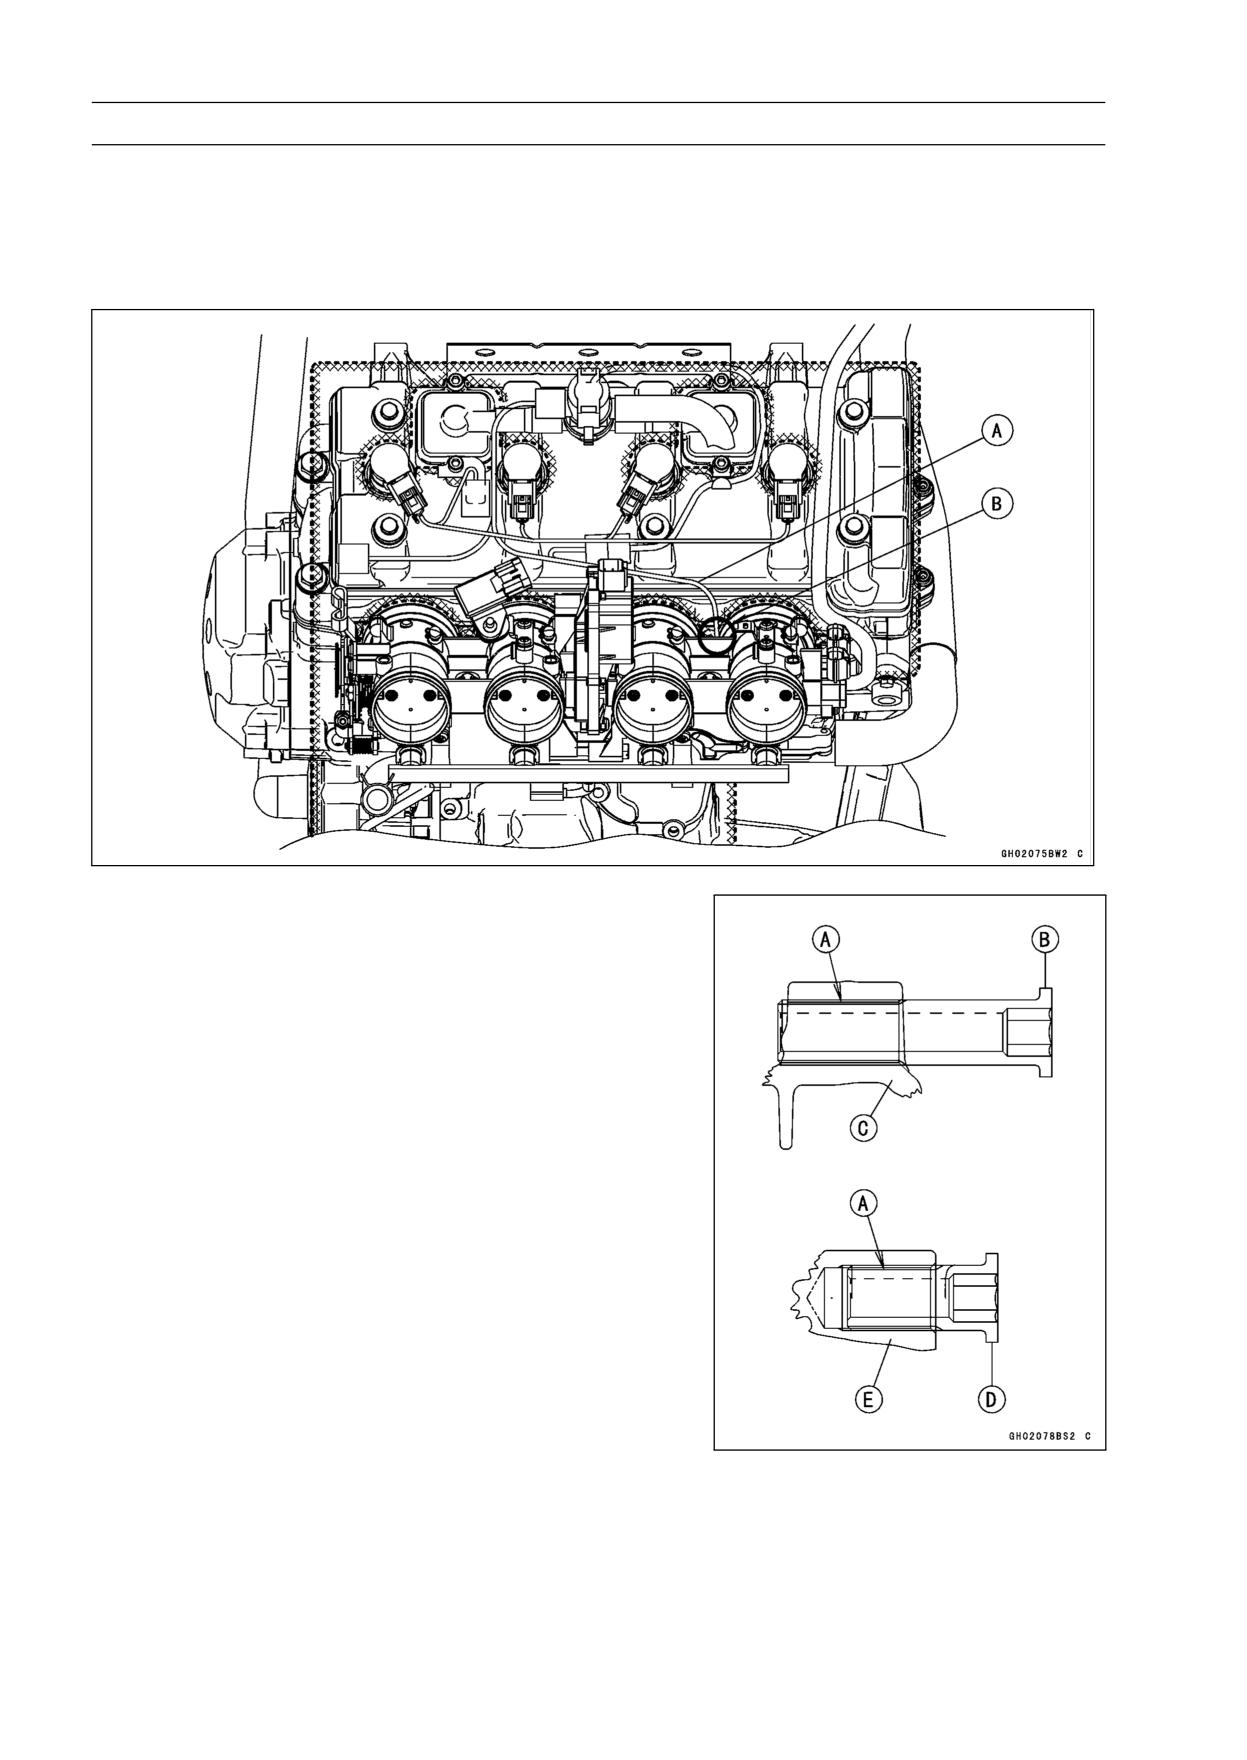
• Before installing the engine. Confirm the routing of the
water temperature sensor lead [A].
○Run [B] the water temperature sensor lead between the
#3 and #4 cylinder and connect the water temperature
sensor body.
• Install the engine mounting bolts and nuts, following the
specified installing sequence.
○Apply molybdenum disulfide grease [A] to the thread of
adjusting collars.
○First, tighten the adjusting collars fully by hand.
Upper Adjusting Collar [B]
Upper Crankcase [C]
Lower Adjusting Collar [D]
Lower Crankcase [E]
ENGINE REMOVAL/INSTALLATION 8-9
Engine Removal/Installation
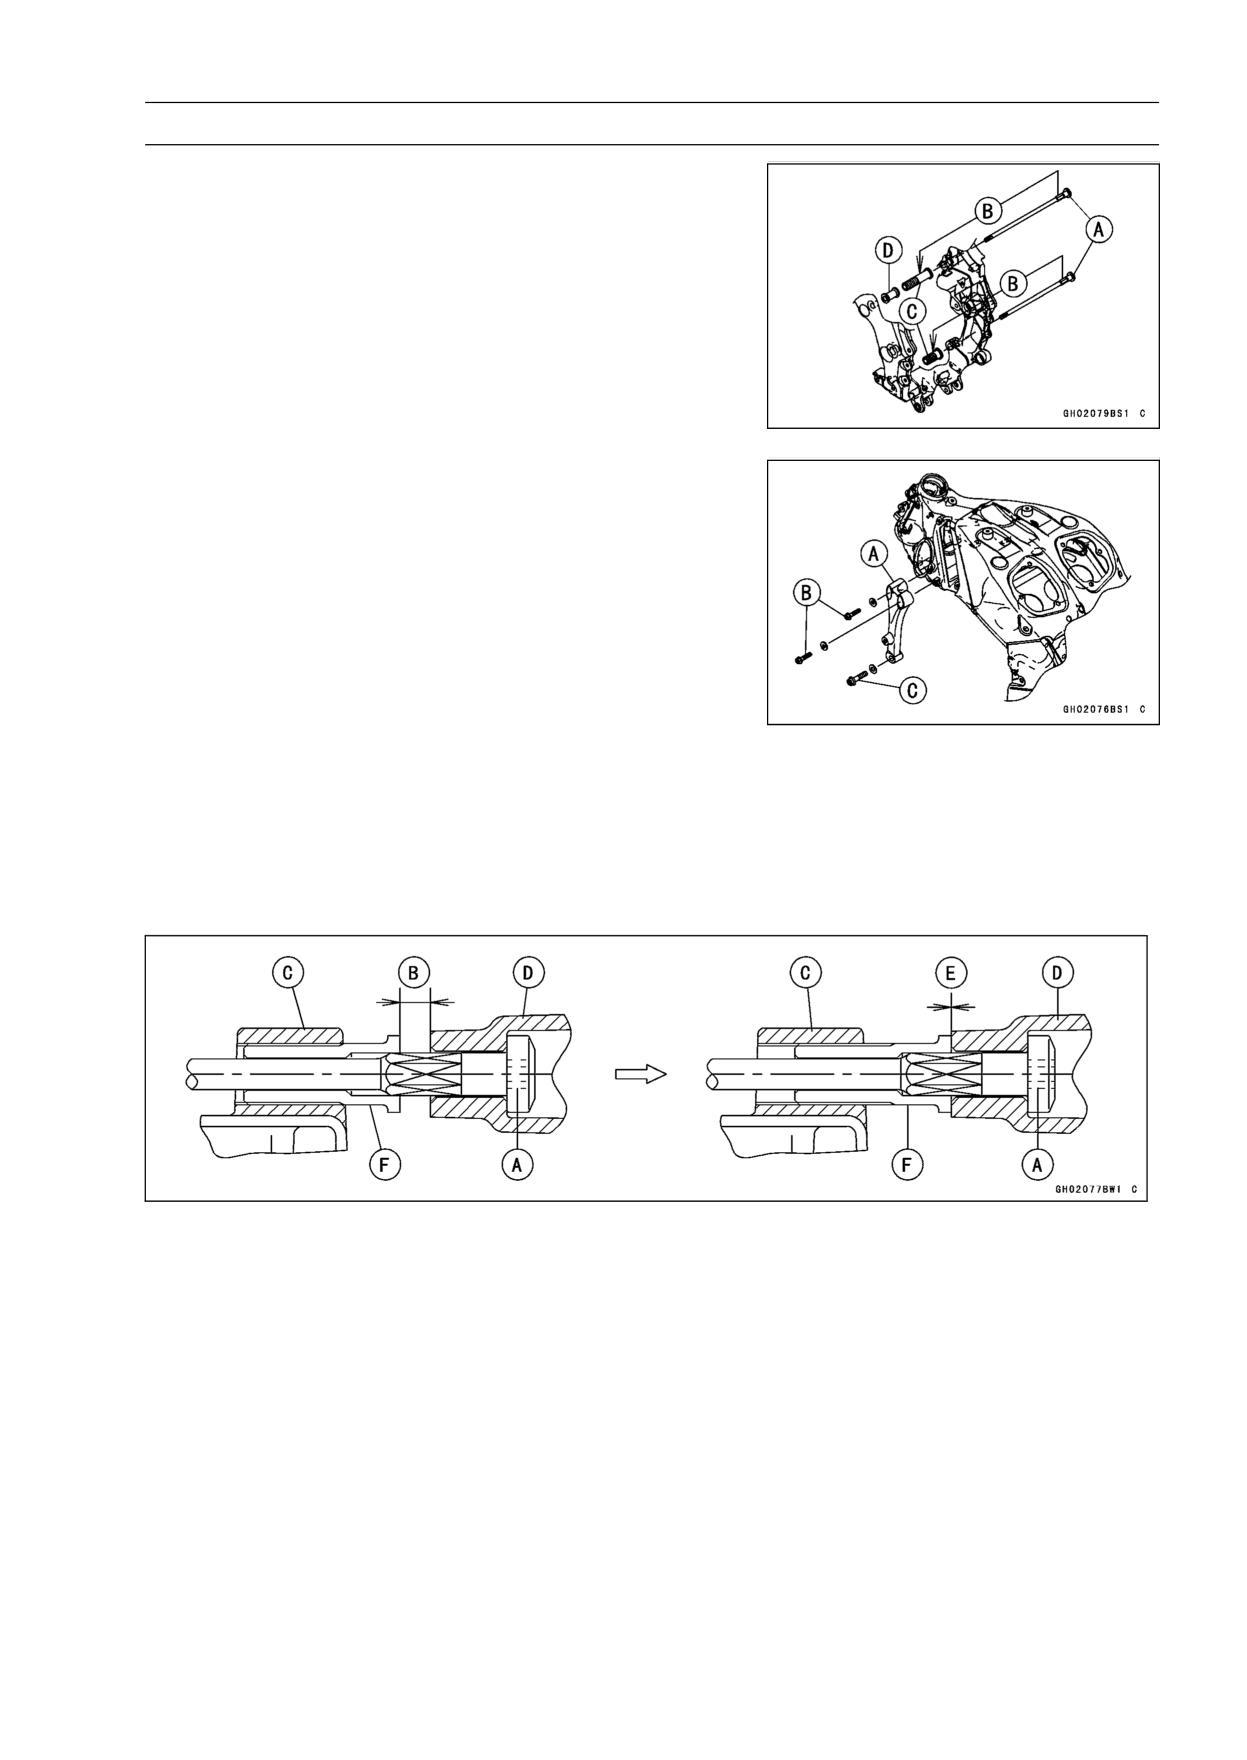
○Secondly, insert the mounting bolts [A] until they fit [B] in
the adjusting collars [C].
○Be sure that the collar [D] is in position.
NOTE
○Replace the following bolts with new bolts pre-coated
with locking agent.
Engine Bracket Bolts (P/No. 92153-1724)
Front Engine Mounting Bolts (P/No. 92153-1723)
Subframe Bolts (P/No. 92153-1722)
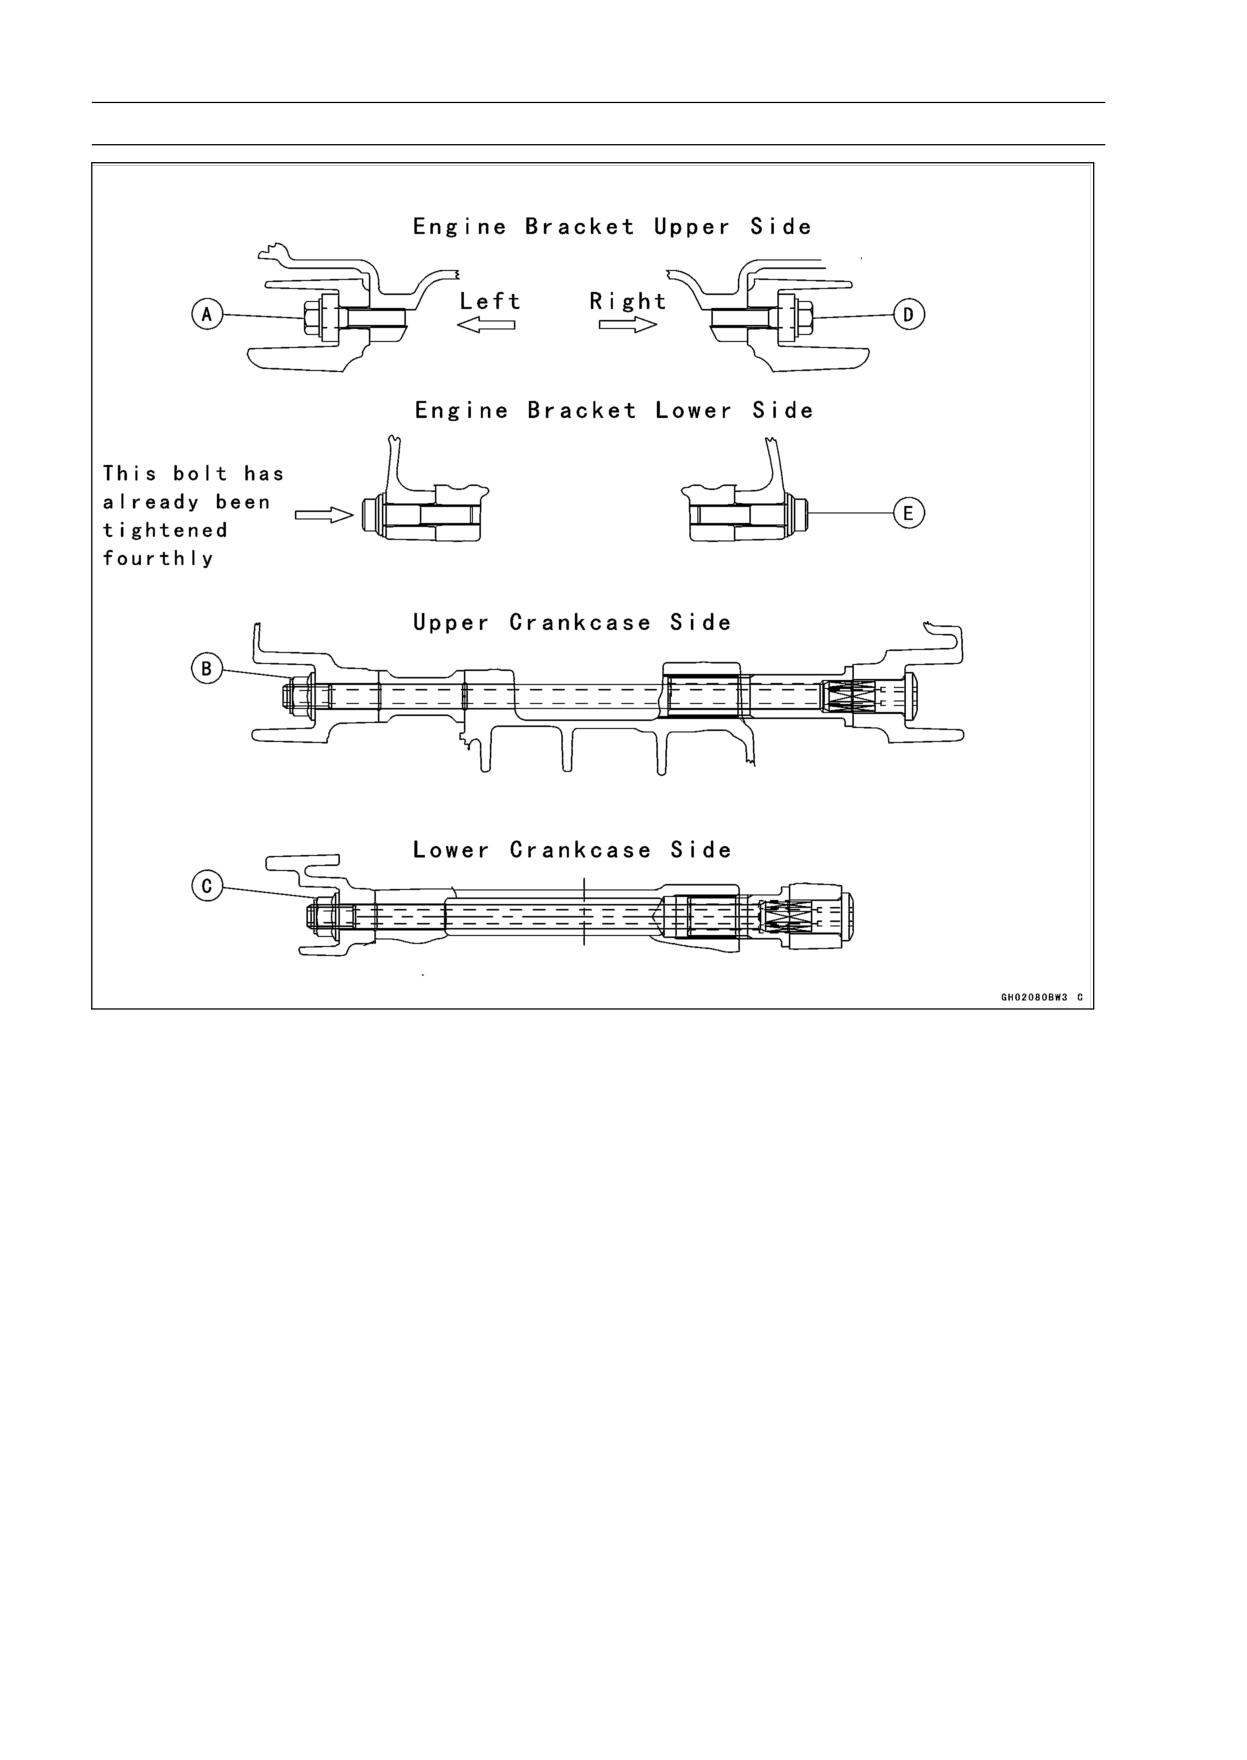
○Thirdly, install the left engine bracket [A] and temporally
tighten the left engine bracket bolts [B].
○Fourthly, tighten the left front engine mounting bolt [C].
○Fourthly, turn the mounting bolts [A] counterclockwise
with specified torque until the clearance [B] between the
crankcase [C] and swingarm [D] comes to zero mm [E].
Adjusting Collars [F]
Torque - Adjusting Collars: 25 N·m (2.5 kgf·m, 18 ft·lb)
○Do not exceed the specified torque of adjusting collars.
8-10 ENGINE REMOVAL/INSTALLATION
Engine Removal/Installation
○Fifthly, tighten the left engine bracket bolts [A].
○Sixthly, tighten the upper engine mounting nut [B] and
then the lower engine mounting nut [C].
○Seventhly, install the right engine bracket and tighten the
right engine bracket bolts [D] and the right front engine
mounting bolt [E].
○Torque:
Torque - Engine Mounting Nut (M12): 59 N·m (6.0 kgf·m, 44
ft·lb)
NOTE
○Hold the upper and lower engine mounting bolts with an
Allen wrench, and torque them.
○Torque:
Torque - Engine Bracket Bolts (M8): 25 N·m (2.5 kgf·m, 18
ft·lb)
Front Engine Mounting Bolts (M10): 59 N·m (6.0
kgf·m, 44 ft·lb)
ENGINE REMOVAL/INSTALLATION 8-11
Engine Removal/Installation
• Run the leads, cable and hoses correctly (see Cable,
Wire, and Hose Routing section in the Appendix chap-
ter).
• Install the removed parts (see appropriate chapters).
• Adjust:
Throttle Cables (see Throttle Control System Inspection
in the Periodic Maintenance chapter)
Drive Chain (see Drive Chain Slack Inspection in the
Periodic Maintenance chapter)
• Fill the engine with engine oil (see Engine Oil Change in
the Periodic Maintenance chapter).
• Fill the engine with coolant and bleed the air from the cool-
ing system (see Coolant Change in the Periodic Mainte-
nance chapter).
CRANKSHAFT/TRANSMISSION 9-1
Crankshaft/Transmission
Table of Contents
Exploded View
9-2
Rear Balancer Removal
9-31
Specifications
9-6
Rear Balancer Installation
9-32
Special Tools and Sealants
9-9
Balancer Adjustment
9-34
Crankcase Splitting
9-10
Balancer Damper Inspection
9-34
Crankcase Splitting
9-10
Starter Motor Clutch and Torque
Crankcase Assembly
9-11
Limiter
9-35
Crankshaft and Connecting Rods
9-15
Starter Motor Clutch Removal
9-35
Crankshaft Removal
9-15
Starter Motor Clutch Installation...
9-35
Crankshaft Installation
9-15
Starter Motor Clutch Disassembly
9-35
Connecting Rod Removal
9-16
Starter Motor Clutch Assembly
9-36
Connecting Rod Installation
9-16
Starter Clutch Inspection
9-36
Crankshaft/Connecting Rod
Torque Limiter Removal
9-36
Cleaning
9-19
Torque Limiter Installation
9-37
Connecting Rod Bend
9-19
Transmission
9-38
Connecting Rod Twist
9-20
Shift Pedal Removal
9-38
Connecting Rod Big End Side
Shift Pedal Installation
9-38
Clearance
9-20
External Shift Mechanism
9
Connecting Rod Big End Bearing
Removal
9-38
Insert/Crankpin Wear
9-20
External Shift Mechanism
Crankshaft Side Clearance
9-22
Installation
9-39
Crankshaft Runout
9-23
External Shift Mechanism
Crankshaft Main Bearing
Inspection
9-39
Insert/Journal Wear
9-23
Transmission Shaft Removal
9-39
Pistons
9-26
Transmission Shaft Installation
9-40
Piston Removal
9-26
Transmission Shaft Disassembly.
9-40
Piston Installation
9-27
Transmission Shaft Assembly
9-41
Cylinder Wear (Upper
Shift Drum and Fork Removal
9-44
Crankcase)
9-28
Shift Drum and Fork Installation...
9-44
Piston Wear
9-28
Shift Drum Disassembly
9-44
Piston Ring, Piston Ring Groove
Shift Drum Assembly
9-44
Wear
9-28
Shift Fork Bending
9-45
Piston Ring Groove Width
9-29
Shift Fork/Gear Groove Wear
9-45
Piston Ring Thickness
9-29
Shift Fork Guide Pin/Drum
Piston Ring End Gap
9-29
Groove Wear
9-45
Balancer
9-30
Gear Dog and Gear Dog Hole
Front Balancer Removal
9-30
Damage
9-45
Front Balancer Installation
9-30
9-2 CRANKSHAFT/TRANSMISSION
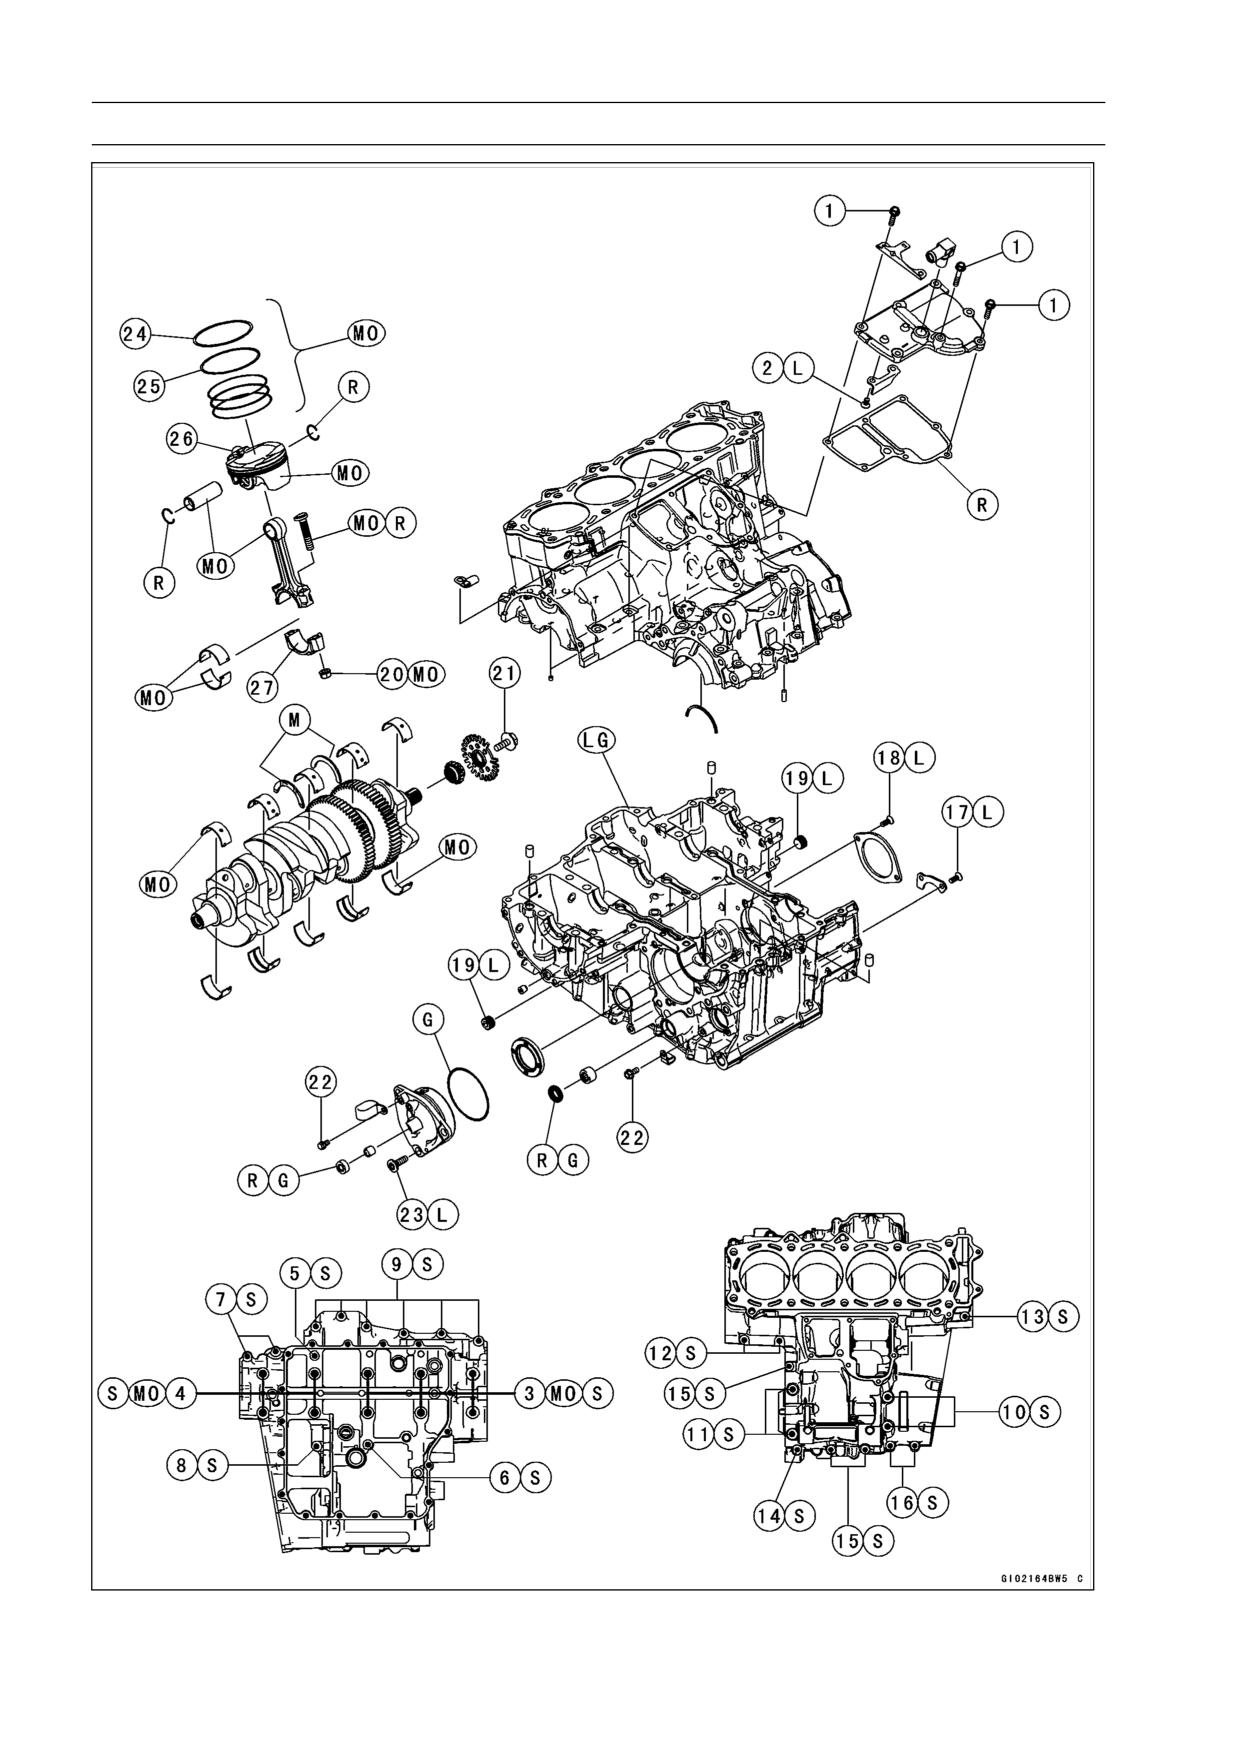
Exploded View
CRANKSHAFT/TRANSMISSION 9-3
Exploded View
Torque
No.
Fastener
Remarks
N·m
kgf·m
ft·lb
1
Breather Cover Bolts
9.8
1.0
87 in·lb
2
Breather Plate Screws
9.8
1.0
87 in·lb
L
3
Crankcase Bolts (M10, L = 90 mm)
47
4.8
35
MO, S
4
Crankcase Bolts (M10, L = 120 mm)
47
4.8
35
MO, S
5
Crankcase Bolt (M7, L = 110 mm)
20
2.0
15
S
6
Crankcase Bolt (M7, L = 85 mm)
20
2.0
15
S
7
Crankcase Bolts (M7, L = 60 mm)
20
2.0
15
S
8
Crankcase Bolt (M7, L = 50 mm)
20
2.0
15
S
9
Crankcase Bolts (M7, L = 45 mm)
20
2.0
15
S
10
Crankcase Bolts (M8, L = 80 mm)
27
2.8
20
S
11
Crankcase Bolts (M8, L = 70 mm)
27
2.8
20
S
12
Crankcase Bolts (M7, L = 65 mm)
20
2.0
15
S
13
Crankcase Bolt (M6, L = 65 mm)
12
1.2
106 in·lb
S
14
Crankcase Bolt (M6, L = 50 mm)
12
1.2
106 in·lb
S
15
Crankcase Bolts (M6, L = 40 mm)
12
1.2
106 in·lb
S
16
Crankcase Bolts (M6, L = 25 mm)
12
1.2
106 in·lb
S
17
Shift Drum Bearing Holder Screws
4.9
0.50
43 in·lb
L
18
Bearing Position Plate Screws
4.9
0.50
43 in·lb
L
19
Oil Passage Plug
20
2.0
15
L
20
Connecting Rod Big End Nuts
see the text
←
←
←
21
Timing Rotor Bolt
39
4.0
29
22
Gear Position Switch Lead Clamp Bolt
9.8
1.0
87 in·lb
23
Drive Shaft Cover Bolts
25
2.5
18
L
24. "R" marked side faces up.
25. "RN" marked side faces up.
26. Hollow mark faces forward.
27. Do not apply any grease or oil.
G: Apply grease.
L: Apply a non-permanent locking agent.
LG: Apply liquid gasket (Kawasaki Bond: 92104-1064).
M: Apply molybdenum disulfide grease.
MO: Apply molybdenum disulfide oil.
(mixture of engine oil and molybdenum disulfide grease in a weight ratio is 10 : 1)
R: Replacement Parts
S: Follow the specified tightening sequence.
9-4 CRANKSHAFT/TRANSMISSION
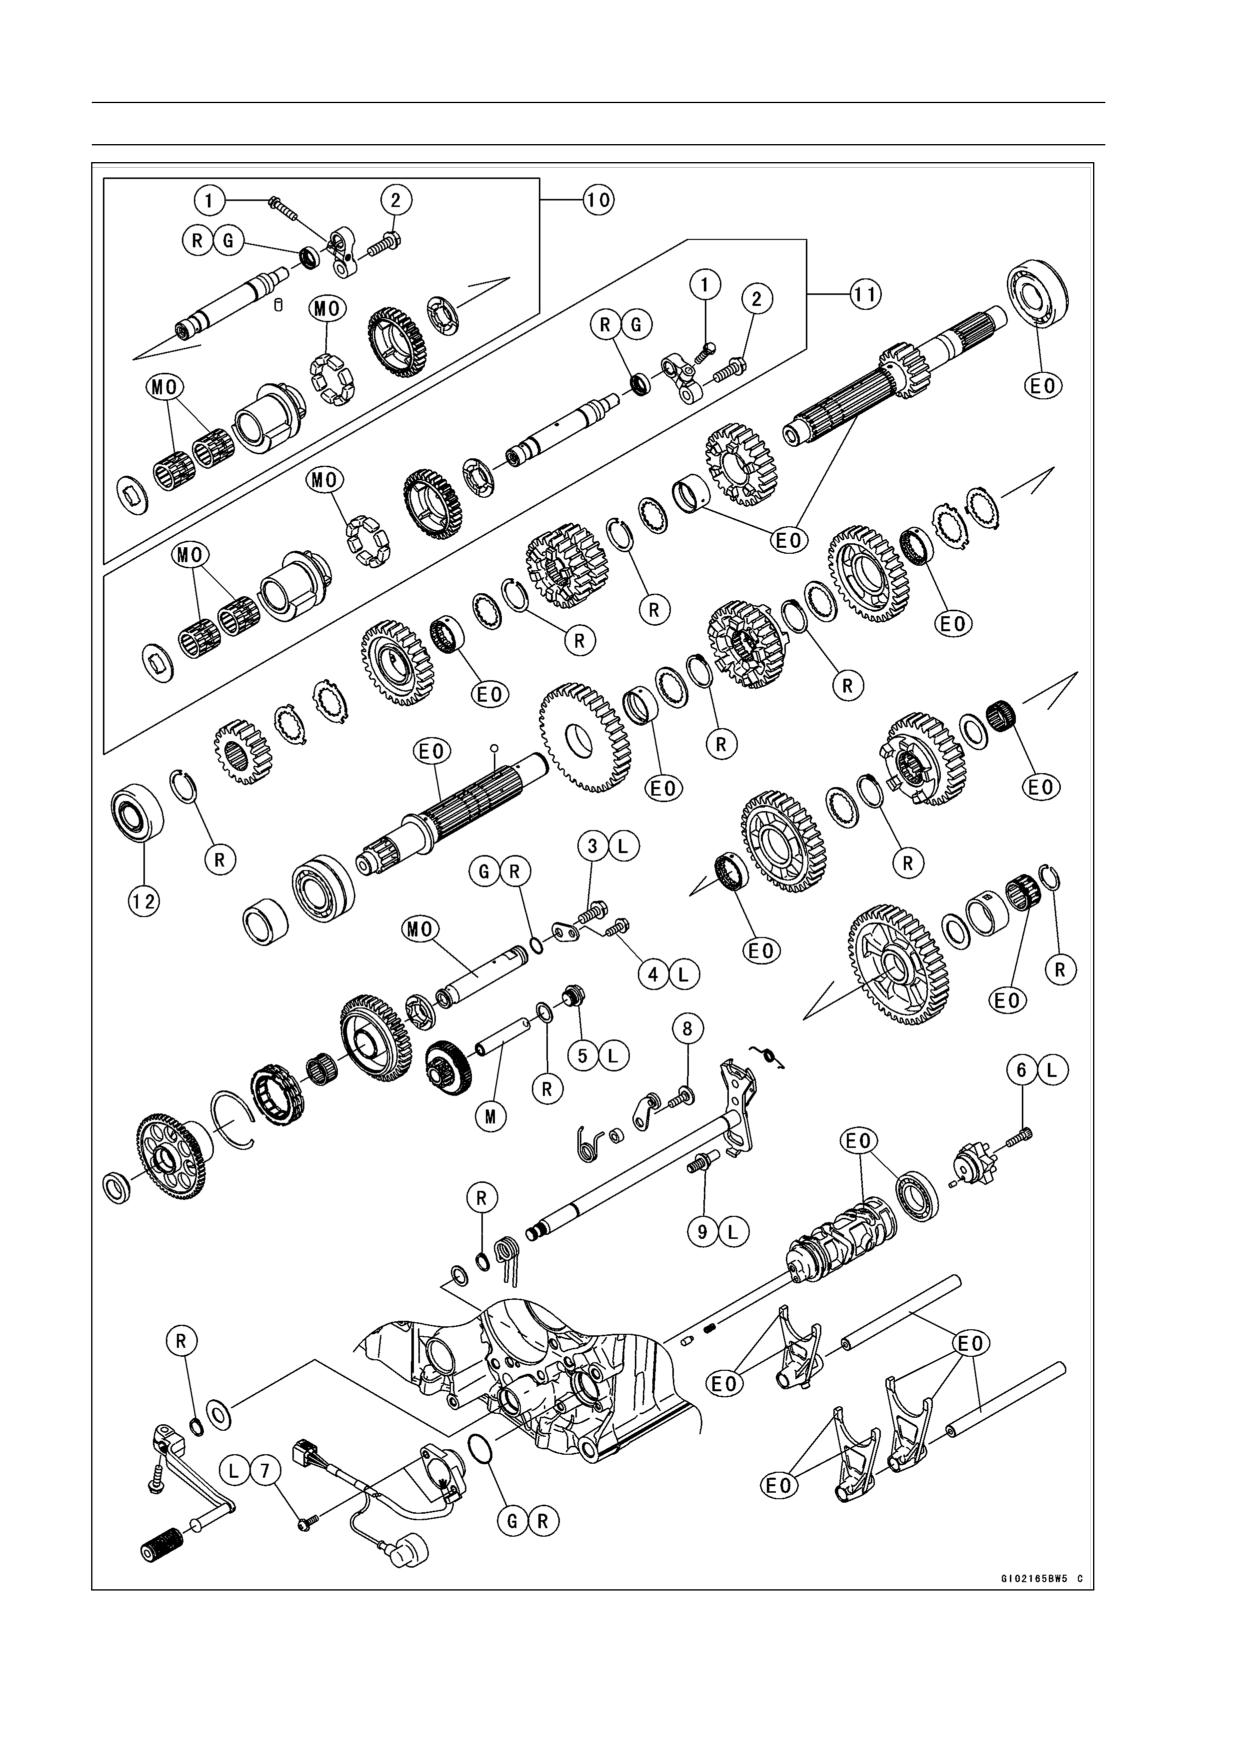
Exploded View
CRANKSHAFT/TRANSMISSION 9-5
Exploded View
Torque
No.
Fastener
Remarks
N·m
kgf·m
ft·lb
1
Balancer Shaft Clamp Bolts
9.8
1.0
87 in·lb
2
Balancer Shaft Clamp Lever Bolts
25
2.5
18
3
Starter Clutch Shaft Bolt
9.8
1.0
87 in·lb
L
4
Starter Clutch Shaft Plate Bolt
9.8
1.0
87 in·lb
L
5
Torque Limiter Bolt
25
2.5
18
L
6
Shift Drum Cam Holder Bolt
12
1.2
106 in·lb
L
7
Gear Position Switch Screws
2.9
0.30
26 in·lb
L
8
Gear Positioning Lever Bolt
12
1.2
106 in·lb
9
Shift Shaft Return Spring Pin
29
3.0
21
L
10. Front Balancer
11. Rear Balancer
12. Install the bearing into the drive shaft cover so that the shield side faces in.
EO: Apply engine oil.
M: Apply molybdenum disulfide grease.
MO: Apply molybdenum disulfide oil.
(mixture of engine oil and molybdenum disulfide grease in a weight ratio is 10 : 1)
G: Apply grease.
L: Apply a non-permanent locking agent.
R: Replacement Parts
9-6 CRANKSHAFT/TRANSMISSION
Specifications
Item
Standard
Service Limit
Crankcase, Crankshaft, Connecting
Rods
Connecting Rod Bend
- - -
TIR 0.2/100 mm
(0.008/3.94 in.)
Connecting Rod Twist
- - -
TIR 0.2/100 mm
(0.008/3.94 in.)
Connecting Rod Big End Side
0.13 ∼ 0.38 mm
0.58 mm
Clearance
(0.0051 ∼ 0.0150 in.)
(0.023 in.)
Connecting Rod Big End Bearing
0.048 ∼ 0.086 mm
0.12 mm
Insert/crankpin Clearance
(0.0019 ∼ 0.0034 in.)
(0.0047 in.)
Crankpin Diameter:
37.984 ∼ 38.000 mm
37.97 mm
(1.4954 ∼ 1.4961 in.)
(1.4949 in.)
Marking
None
37.984 ∼ 37.992 mm
- - -
(1.4954 ∼ 1.4957 in.)
○
37.993 ∼ 38.000 mm
- - -
(1.4958 ∼ 1.4961 in.)
Connecting Rod Big End Inside
41.000 ∼ 41.016 mm
- - -
Diameter:
(1.6142 ∼ 1.6148 in.)
Marking
41.000 ∼ 41.008 mm
- - -
None
(1.6142 ∼ 1.6145 in.)
41.009 ∼ 41.016 mm
- - -
○
(1.6145 ∼ 1.6148 in.)
Connecting Rod Big End Bearing
Insert Thickness:
Brown
1.475 ∼ 1.480 mm
- - -
(0.05807 ∼ 0.05827 in.)
Black
1.480 ∼ 1.485 mm
- - -
(0.05827 ∼ 0.05846 in.)
Blue
1.485 ∼ 1.490 mm
- - -
(0.05846 ∼ 0.05866 in.)
Connecting Rod Bolt Stretch:
(Usable Range)
New Connecting Rod
0.25 ∼ 0.34 mm
- - -
(0.0098 ∼ 0.0134 in.)
Used Connecting Rod
0.25 ∼ 0.34 mm
- - -
(0.0098 ∼ 0.0134 in.)
Crankshaft Side Clearance
0.05 ∼ 0.24 mm
0.30 mm
(0.0020 ∼ 0.0094 in.)
(0.0118 in.)
Crankshaft Runout
TIR 0.03 mm (0.0012 in.) or less
TIR 0.08 mm
(0.0031 in.)
Crankshaft Main Bearing Insert/journal
0.031 ∼ 0.063 mm
0.09 mm
Clearance
(0.0012 ∼ 0.0025 in.)
(0.0035 in.)
Crankshaft Main Journal Diameter:
37.984 ∼ 38.000 mm
37.96 mm
(1.4954 ∼ 1.4961 in.)
(1.4945 in.)
Marking
None
37.984 ∼ 37.992 mm
- - -
(1.4954 ∼ 1.4957 in.)
1
37.993 ∼ 38.000 mm
- - -
(1.4958 ∼ 1.4961 in.)
Crankcase Main Bearing Inside
41.000 ∼ 41.016 mm
- - -
Diameter:
(1.6142 ∼ 1.6148 in.)
CRANKSHAFT/TRANSMISSION 9-7
Specifications
Item
Standard
Service Limit
Marking
○
41.000 ∼ 41.008 mm
- - -
(1.6142 ∼ 1.6145 in.)
None
41.009 ∼ 41.016 mm
- - -
(1.6145 ∼ 1.6148 in.)
Crankshaft Main Bearing Insert
Thickness:
Brown
1.490 ∼ 1.494 mm
- - -
(0.0587 ∼ 0.0588 in.)
Black
1.494 ∼ 1.498 mm
- - -
(0.0588 ∼ 0.0590 in.)
Blue
1.498 ∼ 1.502 mm
- - -
(0.0590 ∼ 0.0591 in.)
Pistons
Cylinder (Upper Crankcase) Inside
83.994 ∼ 84.006 mm
84.10 mm
Diameter
(3.3068 ∼ 3.3073 in.)
(3.3110 in.)
Piston Diameter
83.959 ∼ 83.974 mm
83.81 mm
(3.3055 ∼ 3.3061 in.)
(3.2996 in.)
Piston/Cylinder Clearance
0.020 ∼ 0.047 mm
- - -
(0.0008 ∼ 0.0019 in.)
Piston Ring/Groove Clearance:
Top
0.03 ∼ 0.07 mm
0.17 mm
(0.0012 ∼ 0.0028 in.)
(0.0067 in.)
Second
0.02 ∼ 0.06 mm
0.16 mm
(0.0008 ∼ 0.0024 in.)
(0.0063 in.)
Piston Ring Groove Width:
Top
0.92 ∼ 0.94 mm
1.02 mm
(0.0362 ∼ 0.0370 in.)
(0.040 in.)
Second
1.01 ∼ 1.03 mm
1.11 mm
(0.0398 ∼ 0.0406 in.)
(0.044 in.)
Piston Ring Thickness:
Top
0.87 ∼ 0.89 mm
0.80 mm
(0.0343 ∼ 0.0350 in.)
(0.032 in.)
Second
0.97 ∼ 0.99 mm
0.90 mm
(0.0382 ∼ 0.0390 in.)
(0.035 in.)
Piston Ring End Gap:
Top
0.20 ∼ 0.30 mm
0.6 mm
(0.0079 ∼ 0.0118 in.)
(0.024 in.)
Second
0.40 ∼ 0.55 mm
0.8 mm
(0.0157 ∼ 0.0217 in.)
(0.031 in.)
Transmission
Shift Fork Ear Thickness
5.74 ∼ 6.00 mm
5.6 mm
(0.2260 ∼ 0.2362 in.)
(0.220 in.)
Gear Groove Width
6.05 ∼ 6.15 mm
6.25 mm
(0.238 ∼ 0.242 in.)
(0.246 in.)
Shift Fork Guide Pin Diameter
6.9 ∼ 7.0 mm
6.8 mm
(0.272 ∼ 0.276 in.)
(0.268 in.)
Shift Drum Groove Width
7.05 ∼ 7.20 mm
7.3 mm
(0.278 ∼ 0.283 in.)
(0.287 in.)
9-8 CRANKSHAFT/TRANSMISSION
Specifications
Connecting Rod Big End Bearing Insert Selection
Con-rod Big End Bore
Crankpin Diameter
Bearing Insert
Diameter Marking
Marking
Size Color
Part Number
None
○
Brown
92139-0131
None
None
Black
92139-0130
○
○
○
None
Blue
92139-0129
Crankshaft Main Bearing Insert Selection
Crankcase Main
Crankshaft Main
Bearing Insert
Bearing Inside
Journal Diameter
Size Color
Part Number
Journal Nos.
Diameter Marking
Marking
92139-0134
1, 3, 5
○
1
Brown
92139-0137
2, 4
None
1
92139-0133
1, 3, 5
Black
○
None
92139-0136
2, 4
92139-0132
1, 3, 5
None
None
Blue
92139-0135
2, 4
CRANKSHAFT/TRANSMISSION 9-9
Special Tools and Sealants
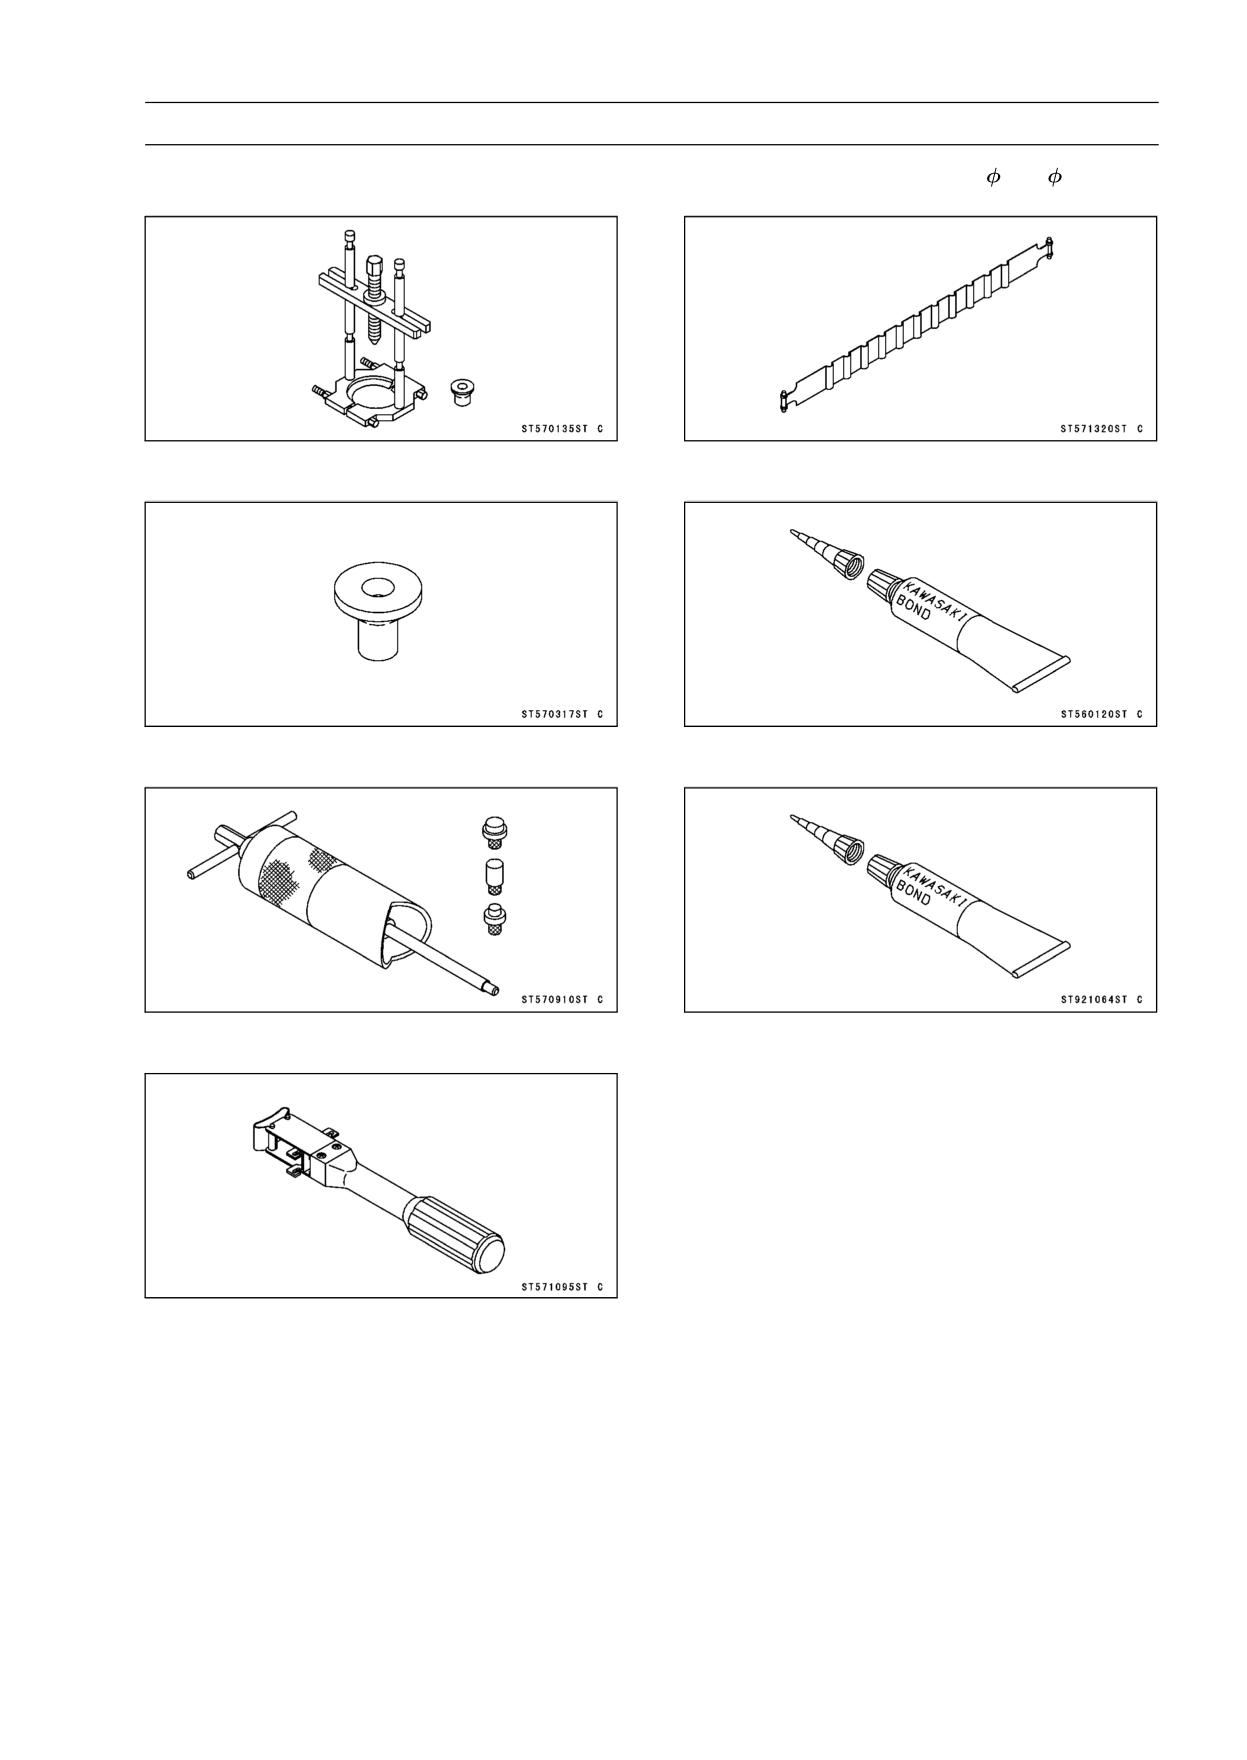
Bearing Puller:
Piston Ring Compressor Belt,
80 ∼
91:
57001-135
57001-1320
Bearing Puller Adapter:
Kawasaki Bond (Silicone Sealant):
57001-317
56019-120
Piston Pin Puller Assembly:
Kawasaki Bond:
57001-910
92104-1064
Piston Ring Compressor Grip:
57001-1095
9-10 CRANKSHAFT/TRANSMISSION
Crankcase Splitting
Crankcase Splitting
• Remove the engine (see Engine Removal/Installation in
the Engine Removal/Installation chapter).
• Set the engine on a clean surface and hold the engine
steady while parts are being removed.
• Remove:
Clutch (see Clutch Removal in the Clutch chapter)
Starter Motor (see Starter Motor Removal in the Electri-
cal System chapter)
Oil Pump (see Oil Pump Removal in the Engine Lubri-
cation System chapter)
Alternator Rotor (see Alternator Rotor Removal in the
Electrical System chapter)
Oil Cooler (see Oil Cooler Removal in the Engine Lubri-
cation System chapter)
Oil Pan (see Oil Pan Removal in the Engine Lubrication
System chapter)
External Shift Mechanism (see External Shift Mecha-
nism Removal)
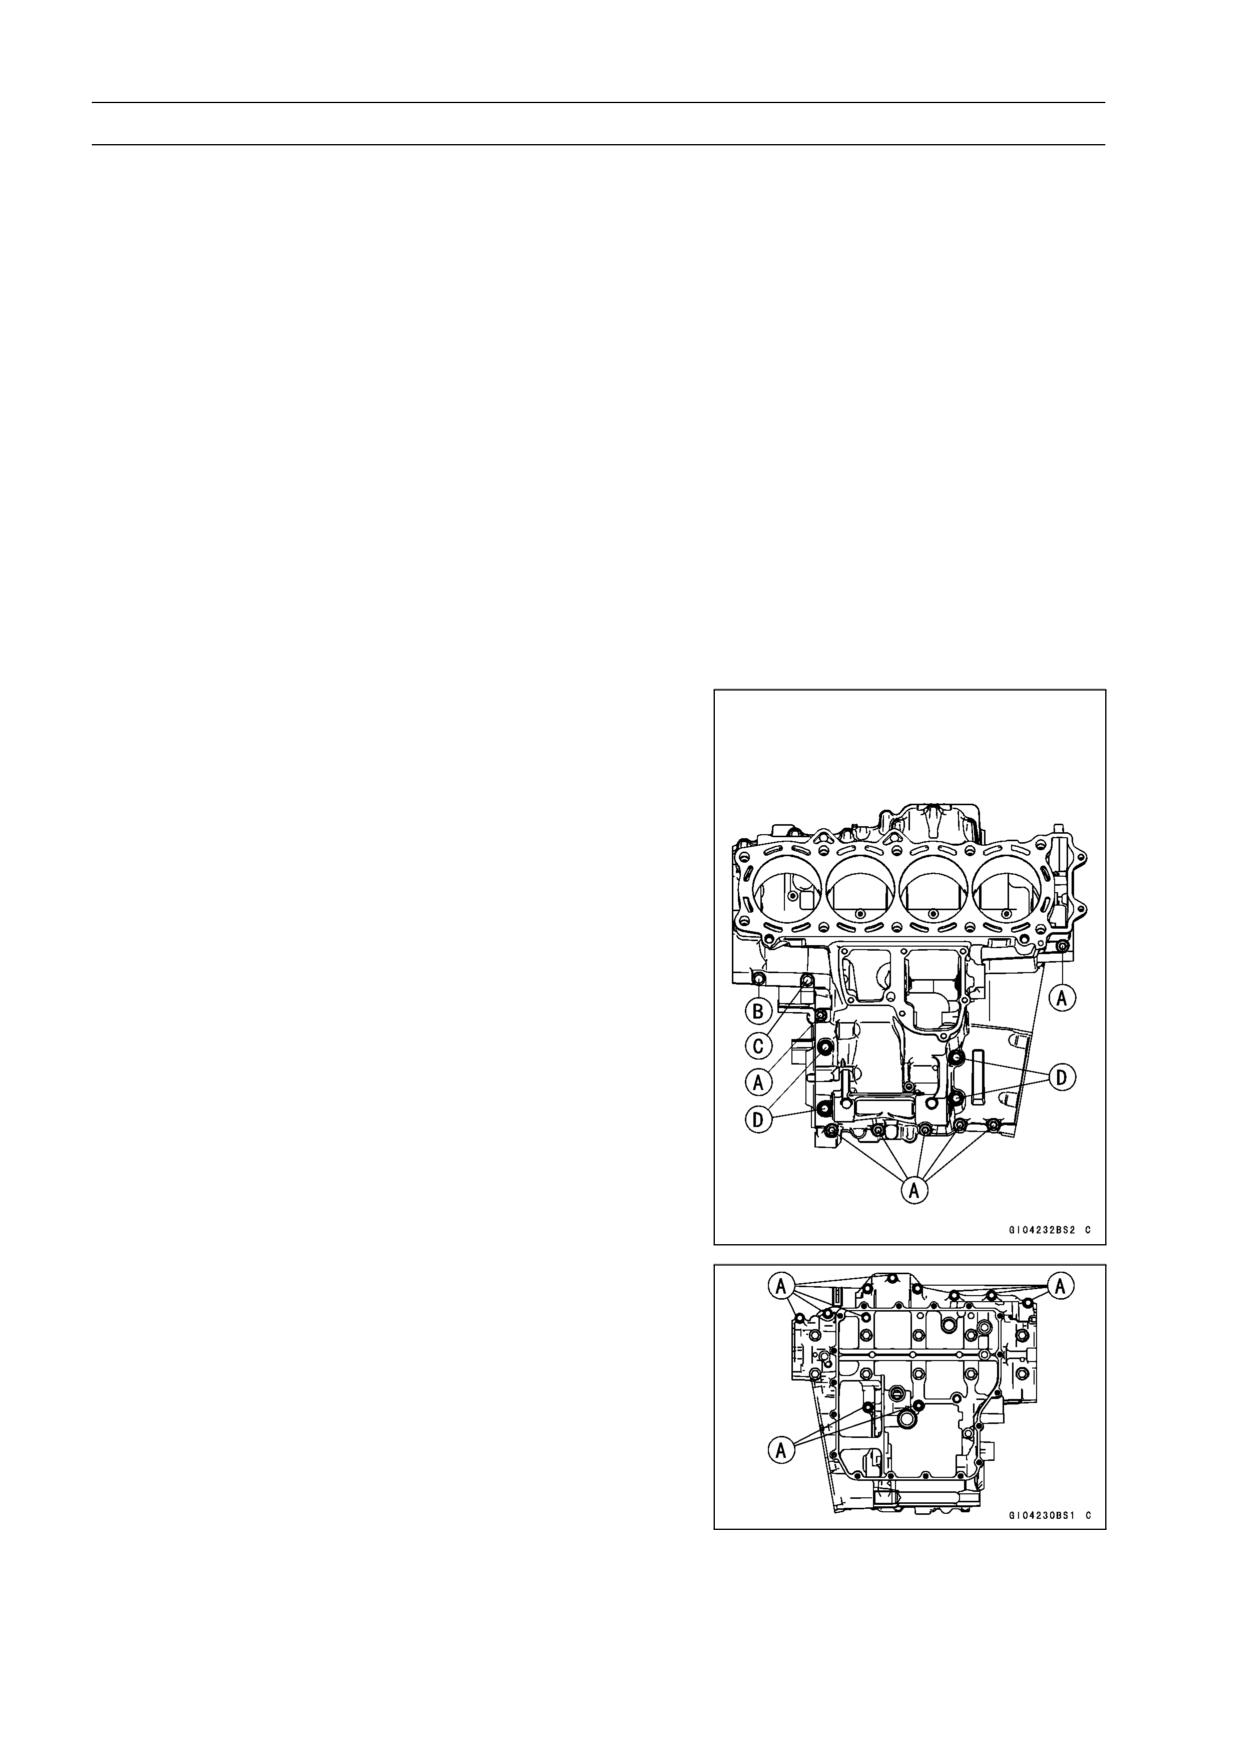
• Remove the upper crankcase bolts.
○First loosen the M6 bolts.
M6 Bolts [A]
M7 Bolt [B]
M7 Bolt with Clamp [C]
M8 Bolts with Washers [D]
• Remove the lower crankcase bolts.
○First loosen the M7 bolts [A].
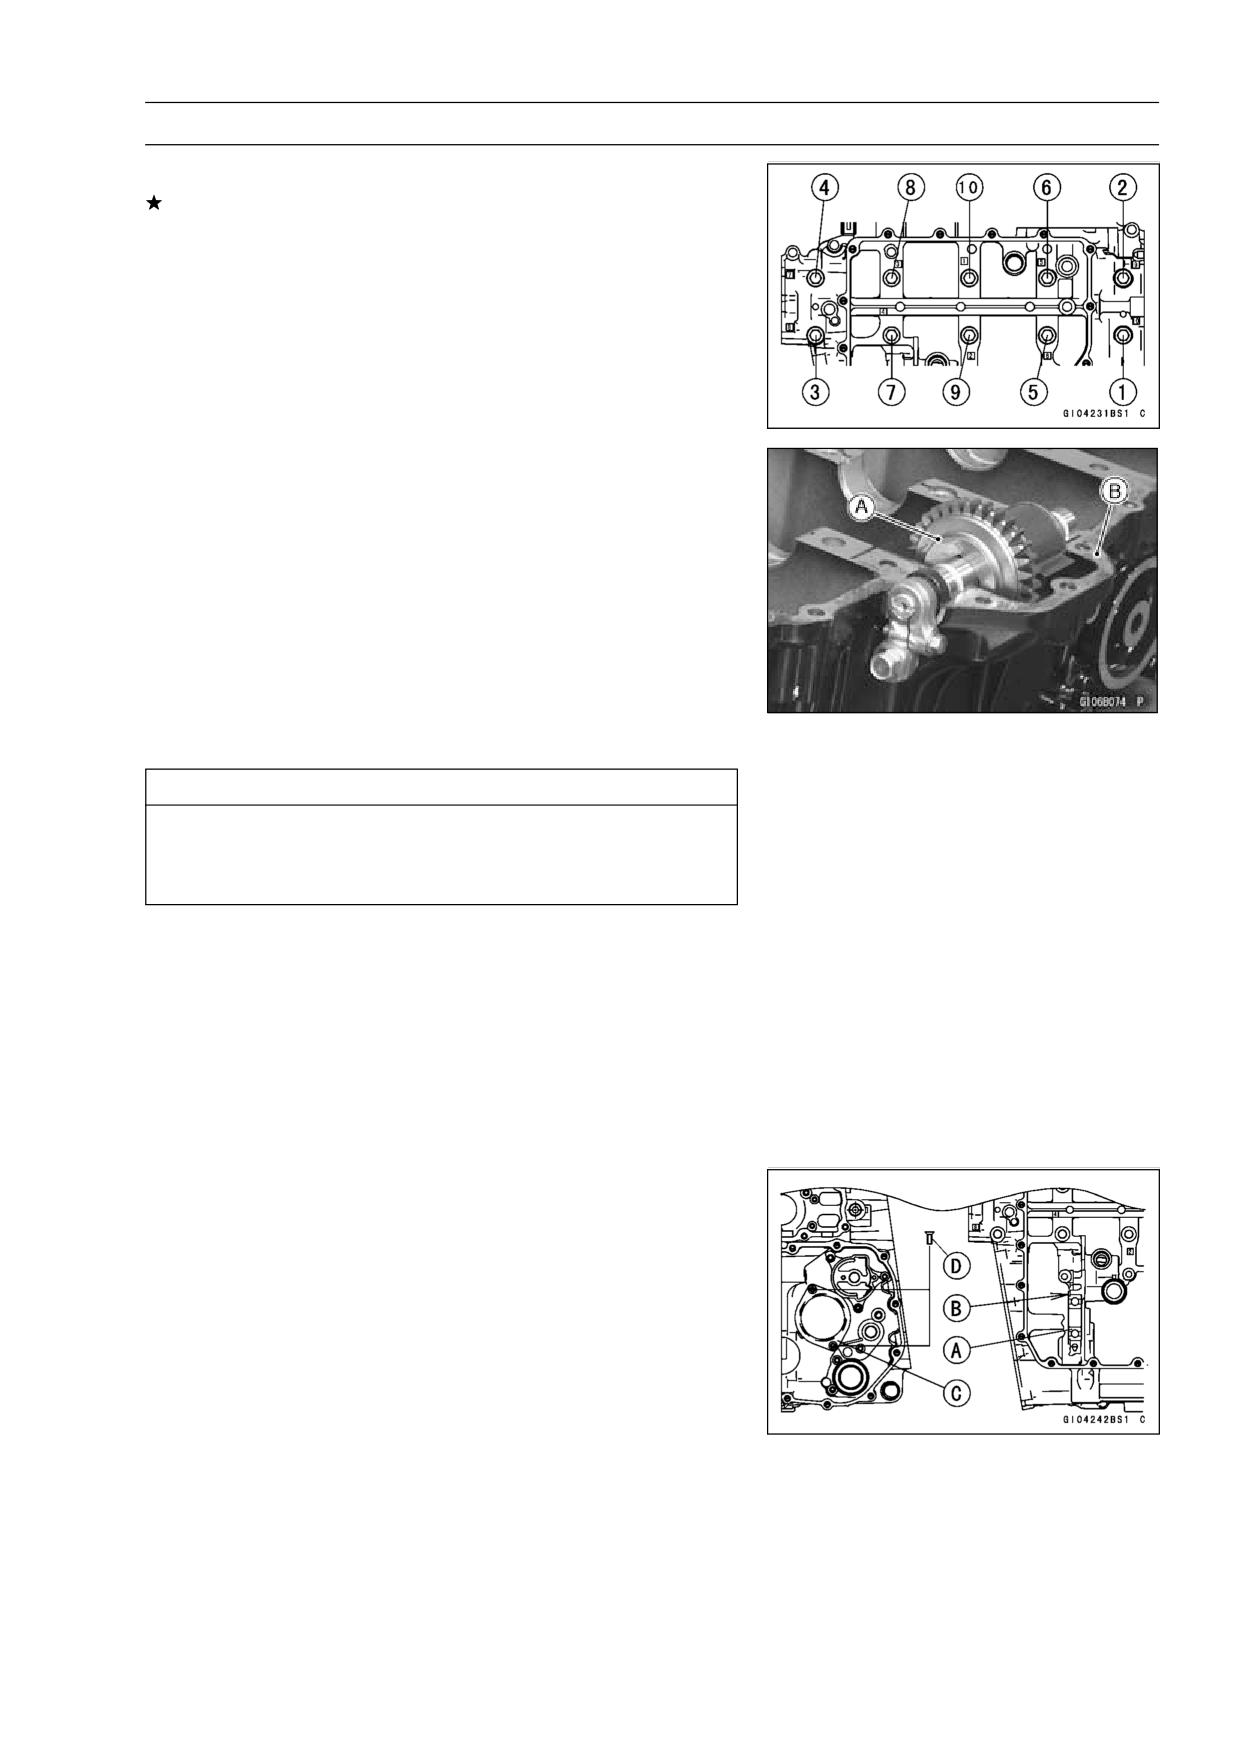
CRANKSHAFT/TRANSMISSION 9-11
Crankcase Splitting
○Next, loosen the M10 Bolts [1∼10] (sequence numbers).
If the crankshaft is to be removed, remove the pistons
(see Piston Removal).
• Tap lightly around the crankcase mating surface with a
plastic mallet, and split the crankcase. Take care not to
damage the crankcase.
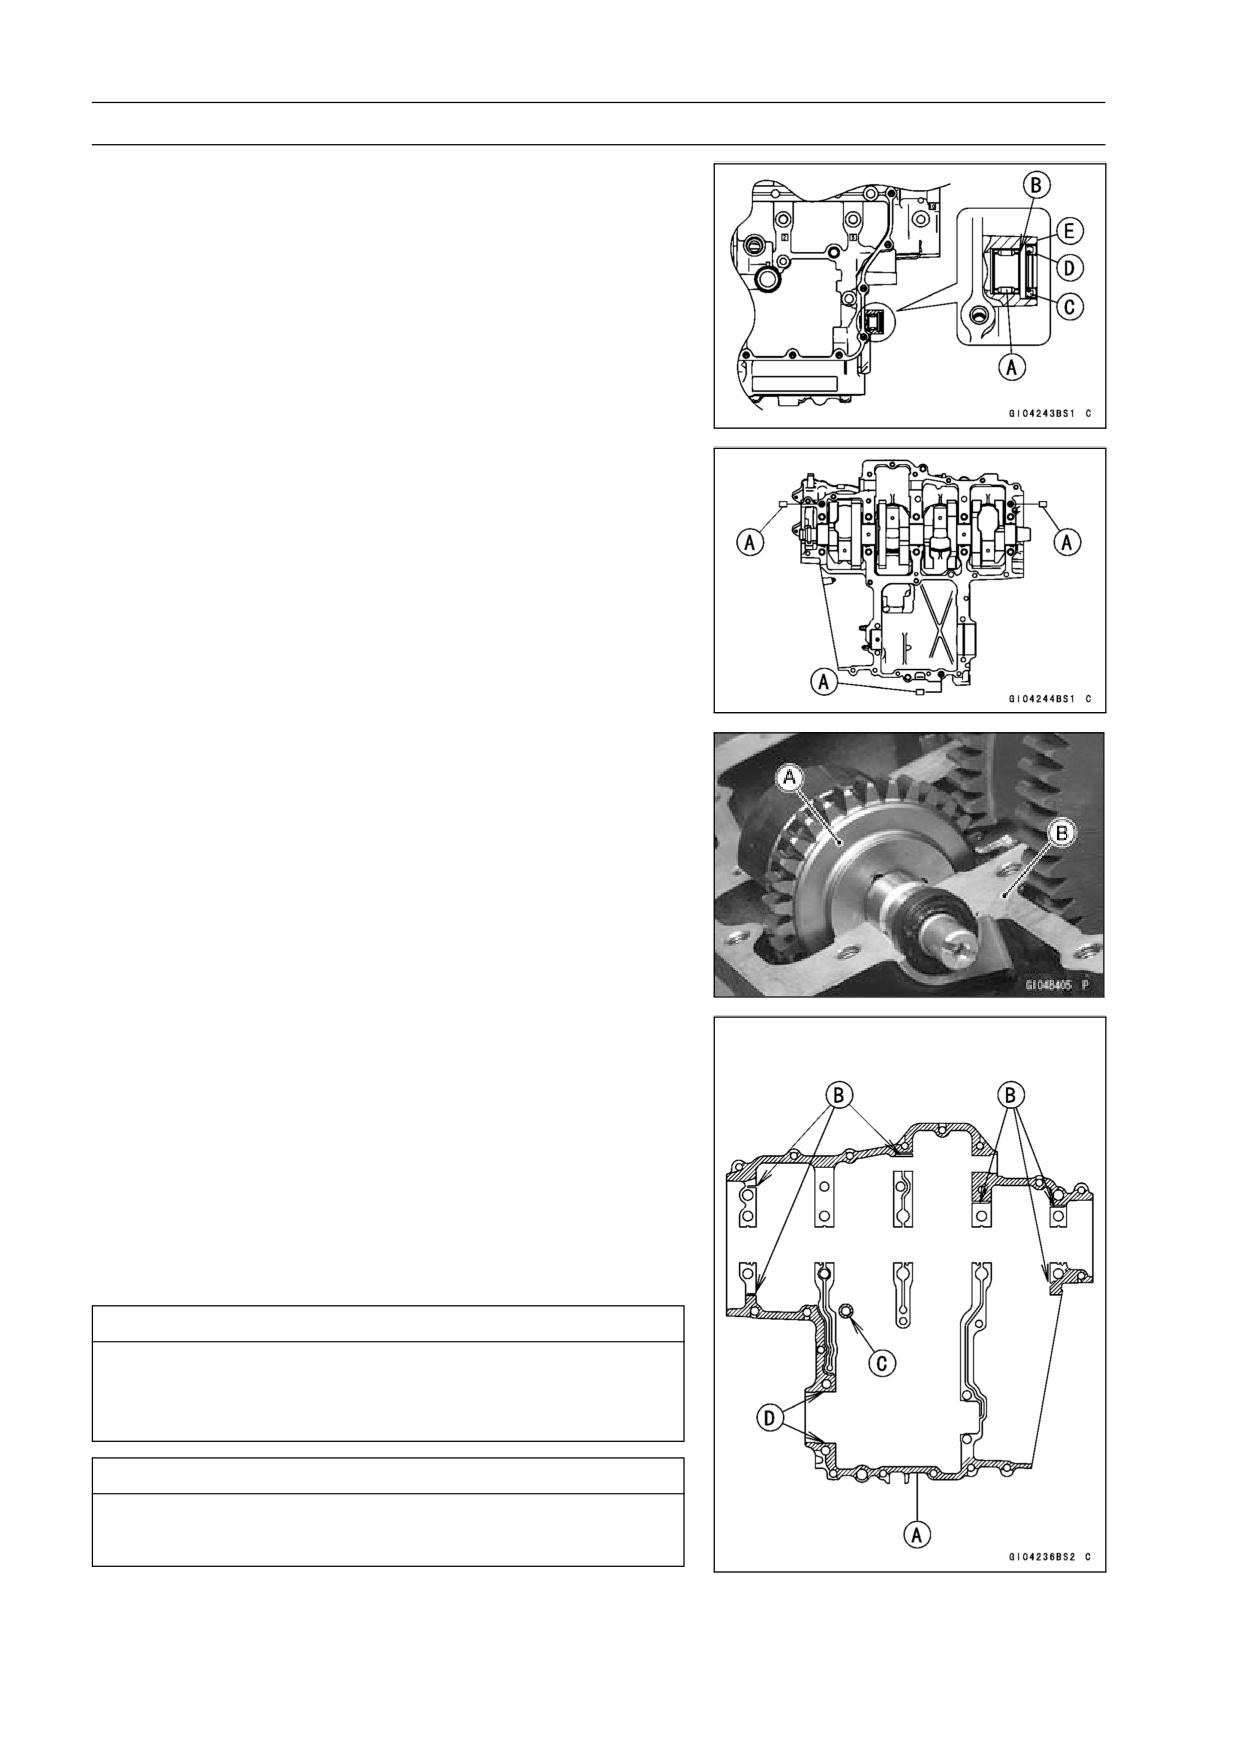
• Remove the front balancer [A] on the lower crankcase half
[B] (see Front Balancer Removal).
Crankcase Assembly
CAUTION
The upper and lower crankcase halves are ma-
chined at the factory in the assembled state, so the
crankcase halves must be replaced as a set.
NOTE
○When replacing the crankcase halves, install the
thrust washers (t = 2.5 mm, 0.0984 in.) on the upper
crankcase half.
• With a high-flash point solvent, clean off the mating sur-
faces of the crankcase halves and wipe dry.
• Using compressed air, blow out the oil passages in the
crankcase halves.
• Install the new drive shaft bearing [A] so that its stepped
side [B] faces as shown using a press.
• Install the bearing plate [C] with the screws [D].
○Apply a non-permanent locking agent to the bearing plate
screw and tighten them.
Torque - Bearing Position Plate Screws:
4.9
N·m (0.50
kgf·m, 43 in·lb)
9-12 CRANKSHAFT/TRANSMISSION
Crankcase Splitting
• Install the new needle bearing [A] for the shift shaft so that
its marked side [B] faces as shown, using a press.
• Install the new oil seal [C] so that its surface [D] is flush
with the surface of the crankcase [E].
• Install:
Crankshaft, Pistons and Connecting Rods
Transmission Shaft and Gears
Dowel Pins [A]
• Install the front balancer [A] on the upper crankcase half
[B] (see Balancer Installation).
• Before fitting the lower case on the upper case, check the
following.
○Check to see that the shift drum and transmission gears
are in the neutral position.
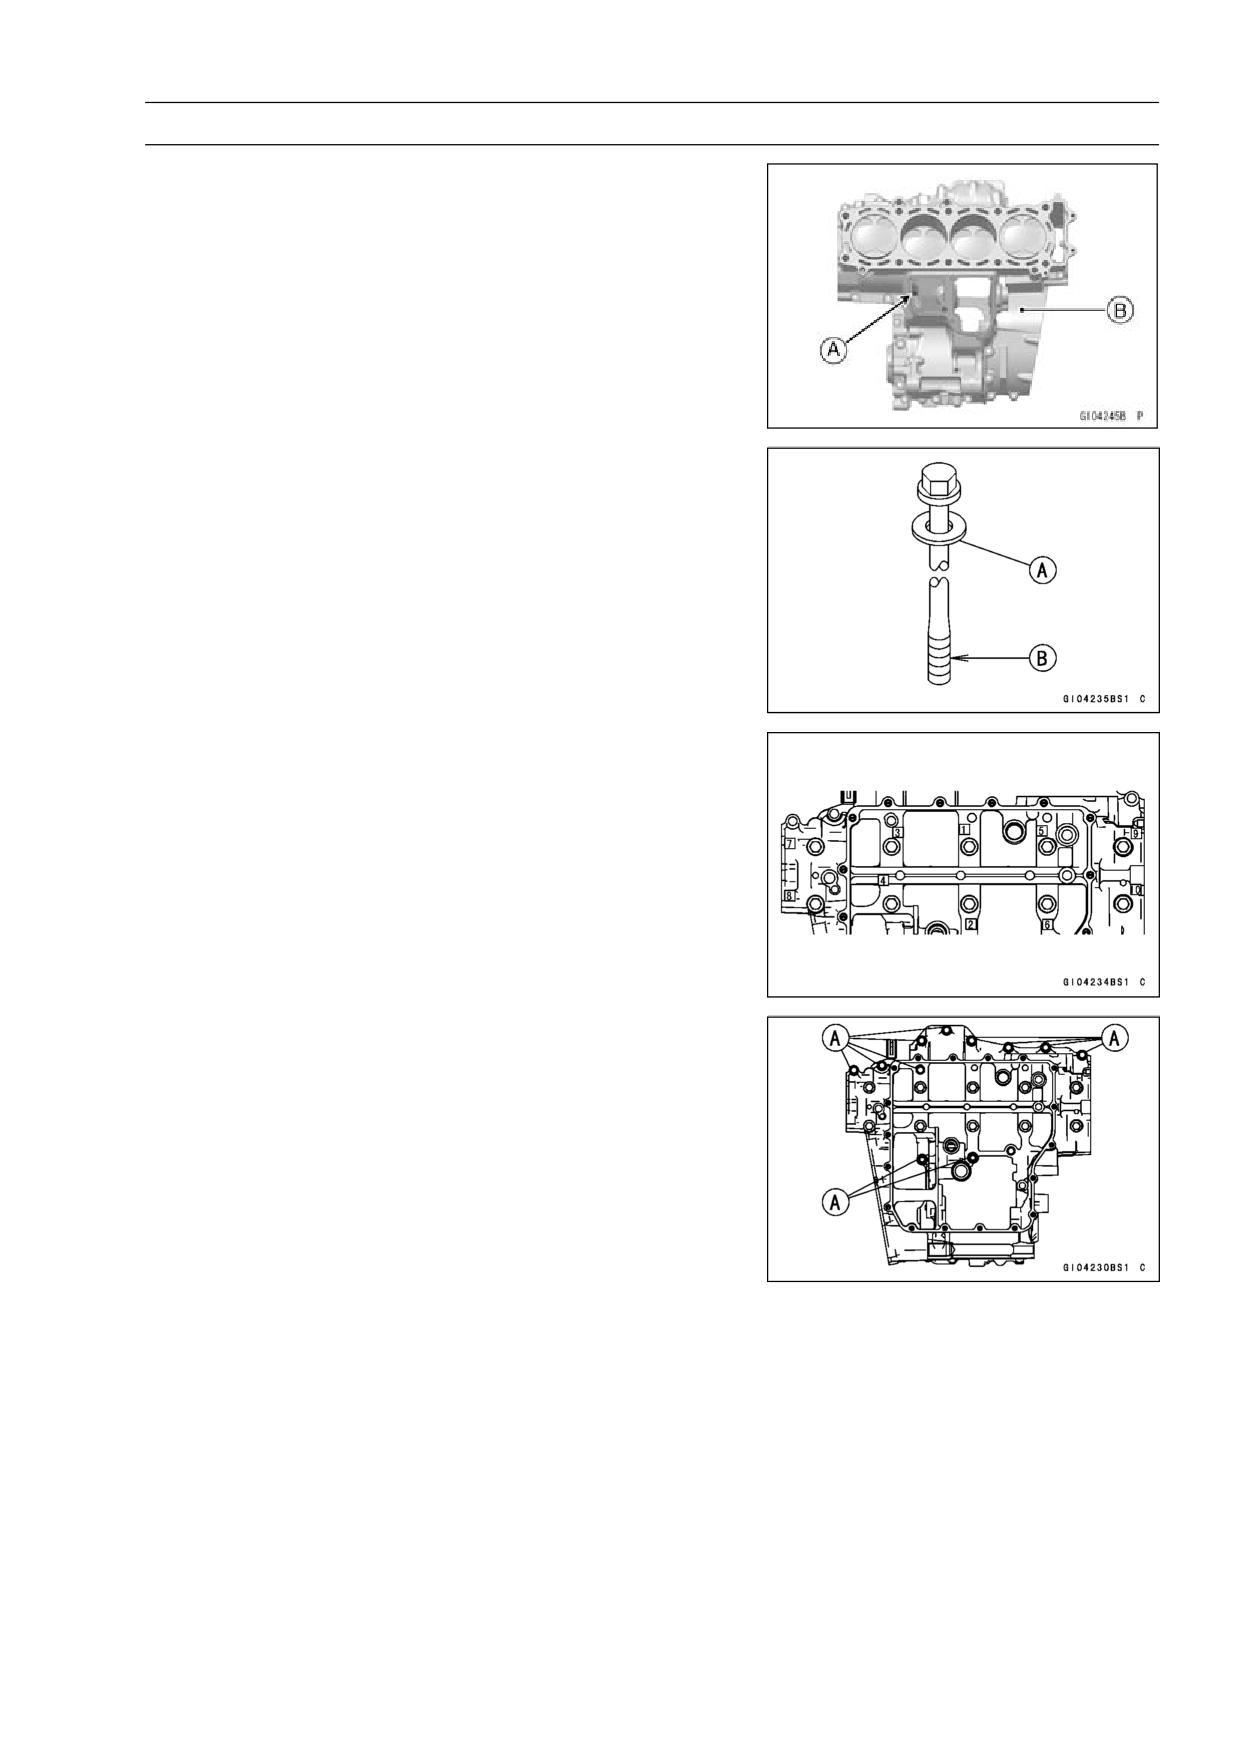
• Apply liquid gasket [A] to the mating surface of the lower
crankcase half.
Sealant - Kawasaki Bond: 92104-1064
NOTE
○Aster tightening the crankcase bolts, wipe up the liquid
gasket seeping out the output shaft bearing hole [D].
○Make the application finish within 20 minutes when
the liquid gasket to the mating surface of the lower
crankcase half is applied.
CAUTION
Do not apply liquid gasket to the grooves [B] inside
from the crankshaft main bearing inserts, and bal-
ancer bearing.
CAUTION
Do not plug the inside of breather hole [C] with liq-
uid gasket.
CRANKSHAFT/TRANSMISSION 9-13
Crankcase Splitting
• Fit the lower crankcase half to the upper crankcase half.
• Be sure that the breather hole [A] on the upper crankcase
[B] is not plugged with liquid gasket.
• The M10 bolts have washers, replace them with new
ones.
• Apply molybdenum disulfide oil solution to the seating sur-
faces [A] of the washers and the threads [B] of the M10
bolts.
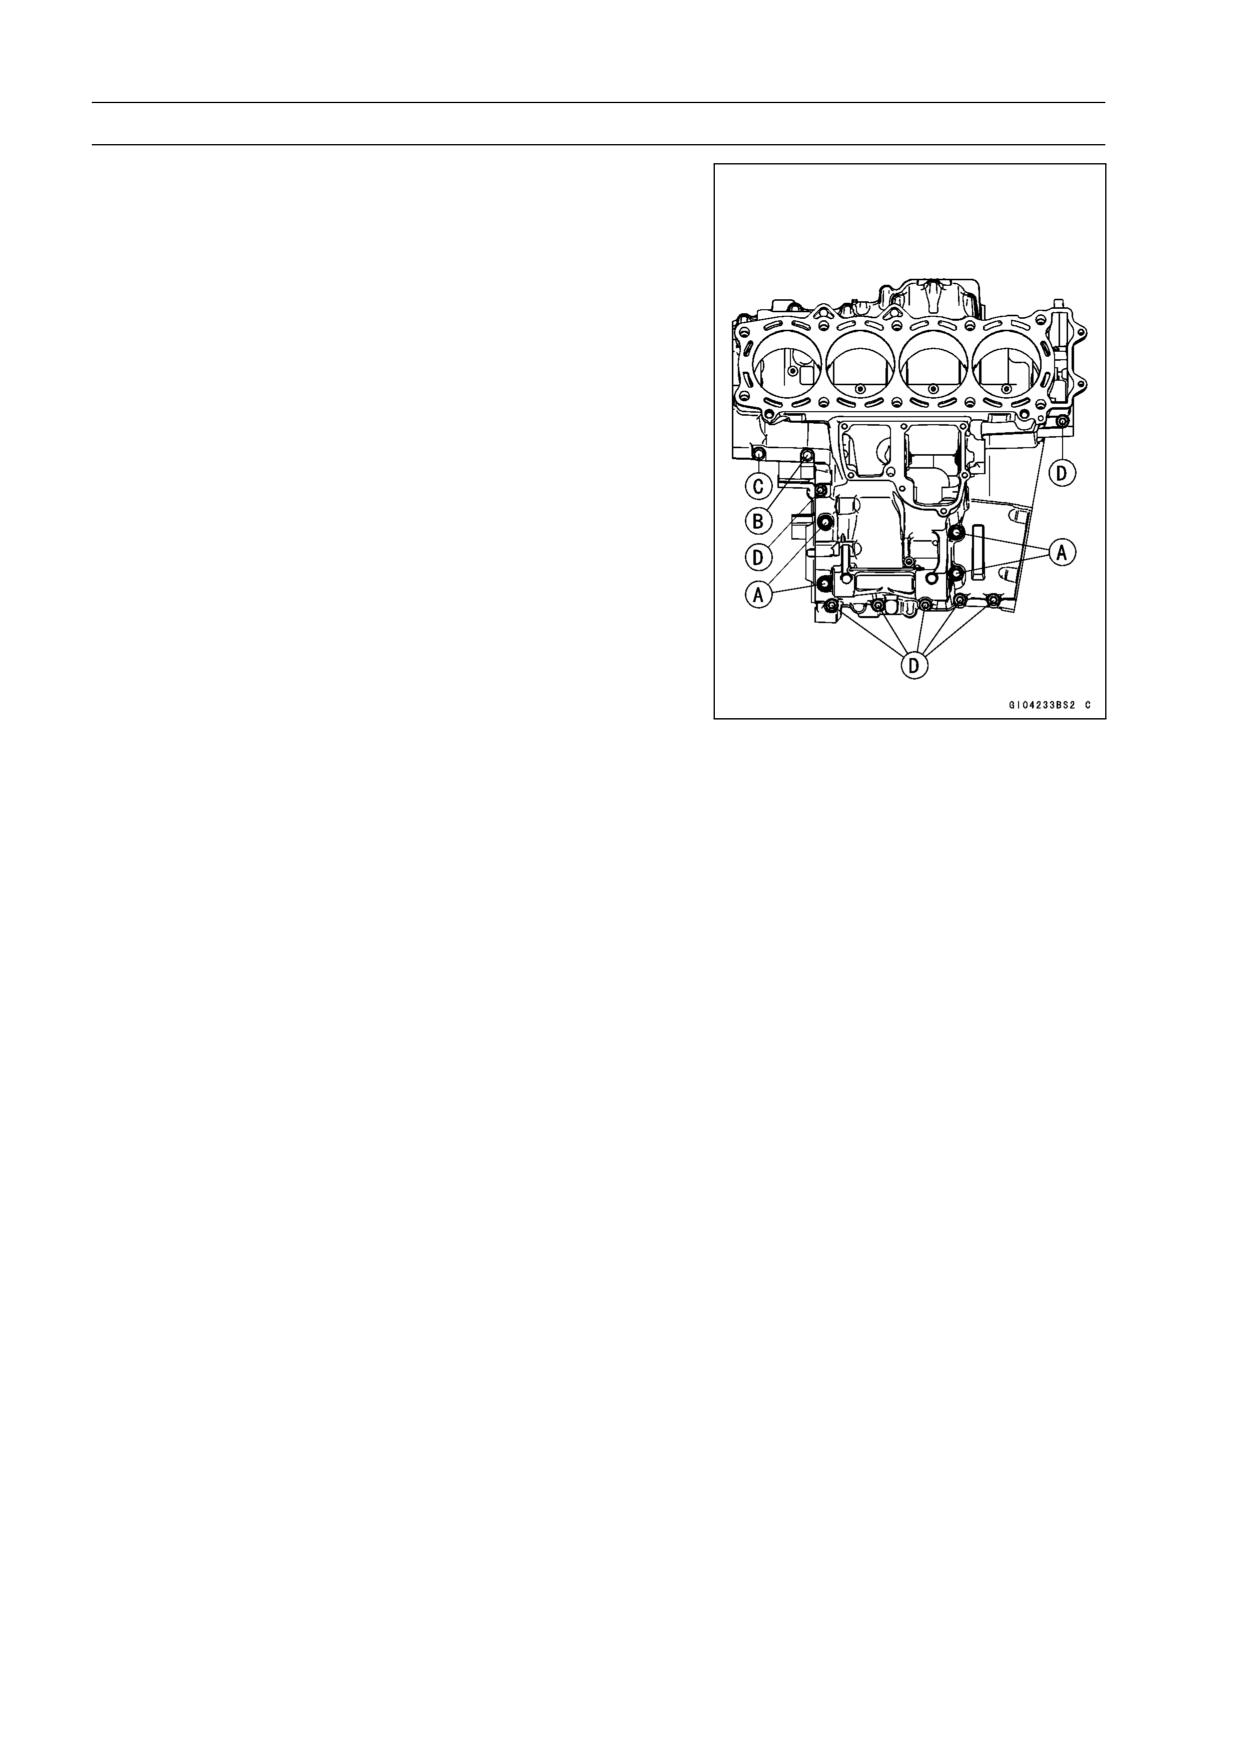
• Tighten the lower crankcase bolts using the following
steps.
○Following the sequence numbers on the lower crankcase
half, tighten the M10 bolts [1 ∼ 10] with washers.
Torque - Crankcase Bolts (M10): 47 N·m (4.8 kgf·m, 35 ft·lb)
○Tighten the M7 bolts [A].
Torque - Crankcase Bolts (M7): 20 N·m (2.0 kgf·m, 15 ft·lb)
9-14 CRANKSHAFT/TRANSMISSION
Crankcase Splitting
• Tighten the upper crankcase bolts in the order listed.
○The M8 bolts have washers, replace them with new ones.
○Tighten:
M8 Bolts with Washers [A]
M7 Bolt with the clamp [B]
M7 Bolt [C]
M6 Bolts [D]
Torque - Crankcase Bolts (M8): 27 N·m (2.8 kgf·m, 20 ft·lb)
Crankcase Bolts (M7): 20 N·m (2.0 kgf·m, 15 ft·lb)
Crankcase Bolts (M6): 12 N·m (1.2 kgf·m, 106 in·lb)
• After tightening all crankcase bolts, check the following
items.
○Crankshaft and transmission shafts turn freely.
○While spinning the output shaft, gears shift smoothly from
the 1st to neutral, and neutral to 1st.
CRANKSHAFT/TRANSMISSION 9-15
Crankshaft and Connecting Rods
Crankshaft Removal
• Split the crankcase (see Crankcase Splitting).
• Remove the crankshaft (see Connecting Rod Removal).
Crankshaft Installation
CAUTION
If the crankshaft, bearing inserts, or crankcase
halves are replaced with new ones, select the bear-
ing inserts and check clearance with a plastigage
(press gauge) before assembling engine to be sure
the correct bearing inserts are installed.
NOTE
○When replacing the crankcase halves, install the
thrust washers (t = 2.5 mm, 0.0984 in.) on the upper
crankcase half.
• Apply molybdenum disulfide oil solution to the crankshaft
main bearing inserts.
• Follow the next procedure to insert the thrust washers on
the upper crankcase half, after installing connecting rod
on the crankshaft (see Connecting Rod Installation).
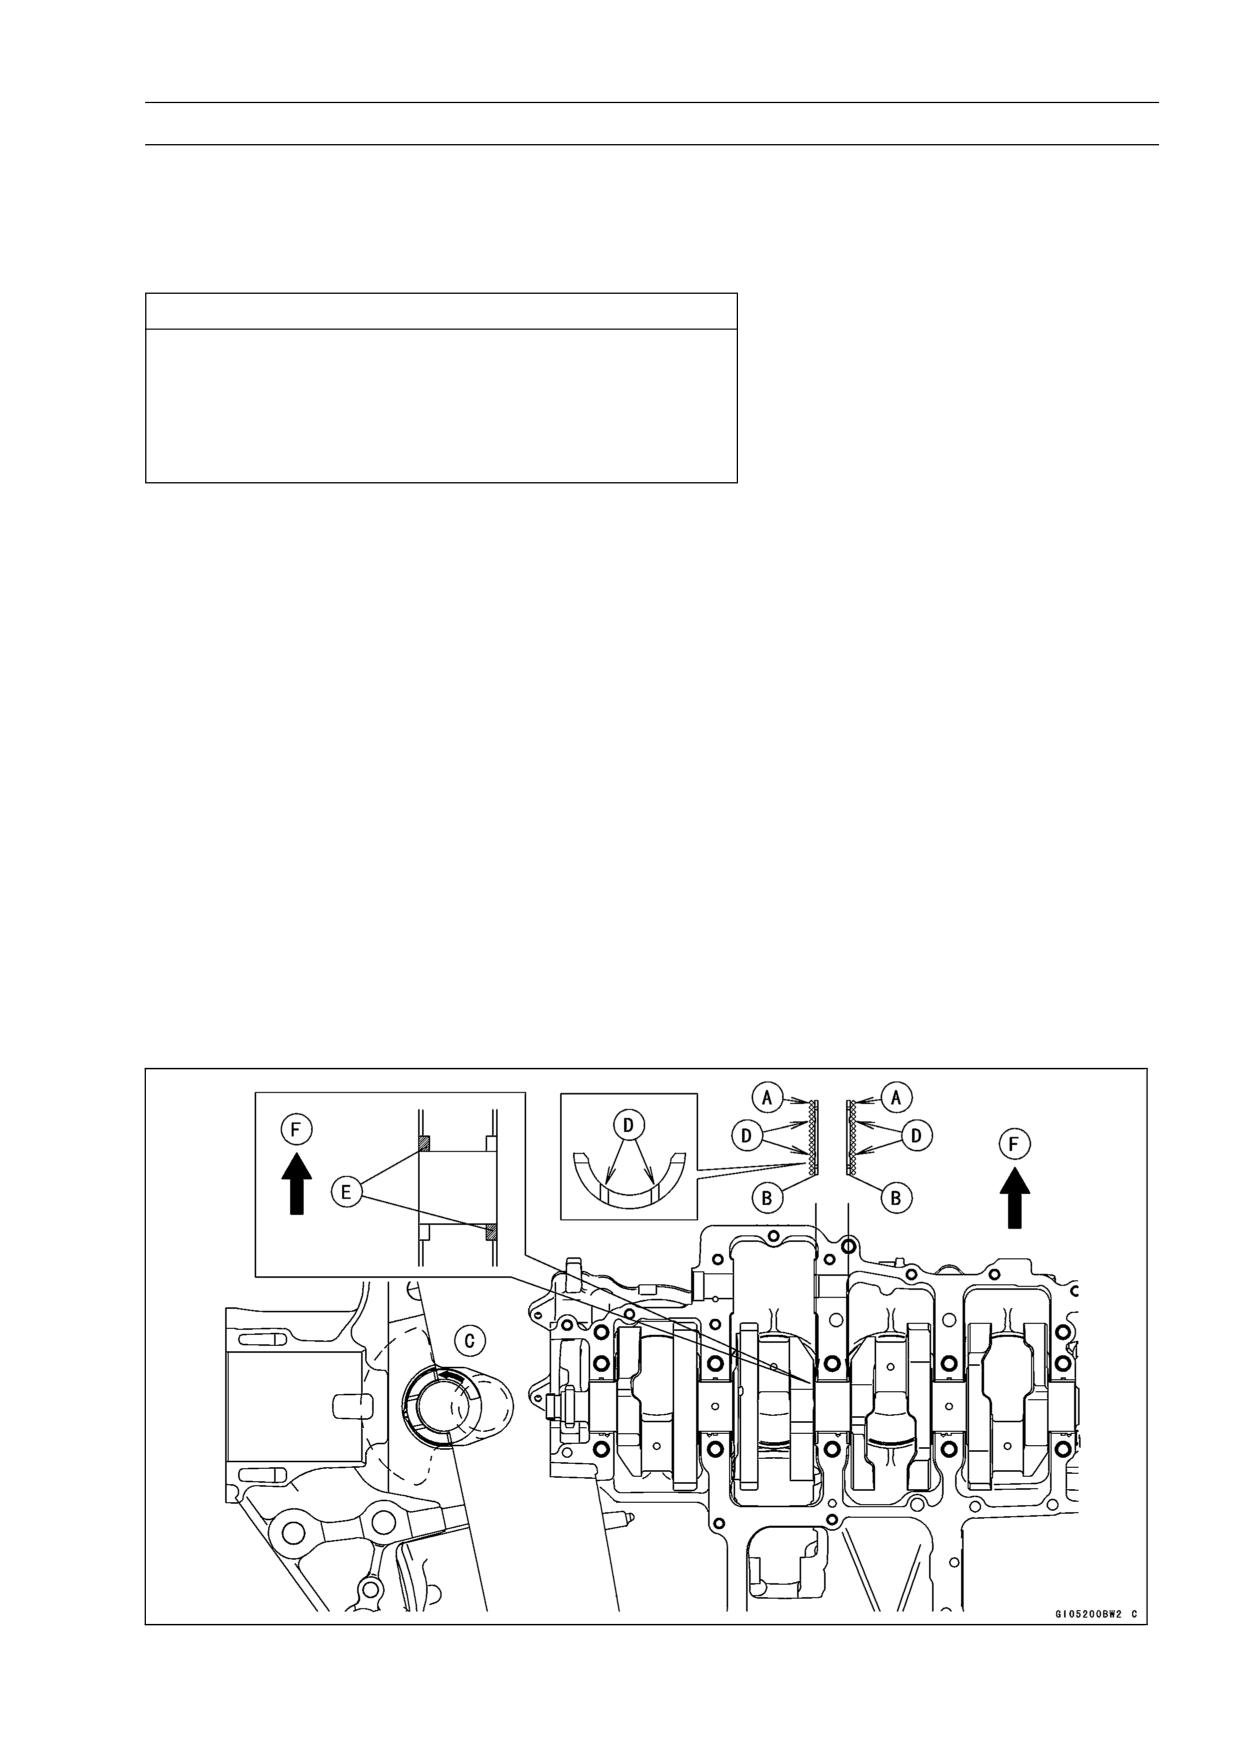
• Apply molybdenum disulfide grease to the outside sur-
faces [A] of both thrust washers [B].
• Slide [C] one thrust washer into the upper crankcase half.
• Move the crankshaft to the left or right and then slide the
other washer into the upper crankcase half.
NOTE
○Slide the thrust washers so that the oil grooves [D] face
outward. Make sure that the blue-painted edges [E] are
positioned as shown in figure.
Front [F]
9-16 CRANKSHAFT/TRANSMISSION
Crankshaft and Connecting Rods
Connecting Rod Removal
• Split the crankcase (see Crankcase Splitting).
• Remove the connecting rod nuts [A].
• Remove the crankshaft.
NOTE
○Mark and record the locations of the connecting rods
and their big end caps so that they can be reassembled
in their original positions.
• Remove the piston (see Piston Removal).
CAUTION
Discard the connecting rod bolts. To prevent dam-
age to the crankpin surfaces, do not allow the con-
necting rod bolts to bump against the crankpins.
Connecting Rod Installation
CAUTION
To minimize vibration, the connecting rods should
have the same weight mark.
Big End Cap [A]
Connecting Rod [B]
Weight Mark, Alphabet [C]
Diameter Mark [D]: “○” or no mark
CAUTION
If the connecting rods, big end bearing inserts, or
crankshaft are replaced with new ones, select the
bearing insert and check clearance with a plasti-
gage (press gauge) before assembling engine to be
sure the correct bearing inserts are installed.
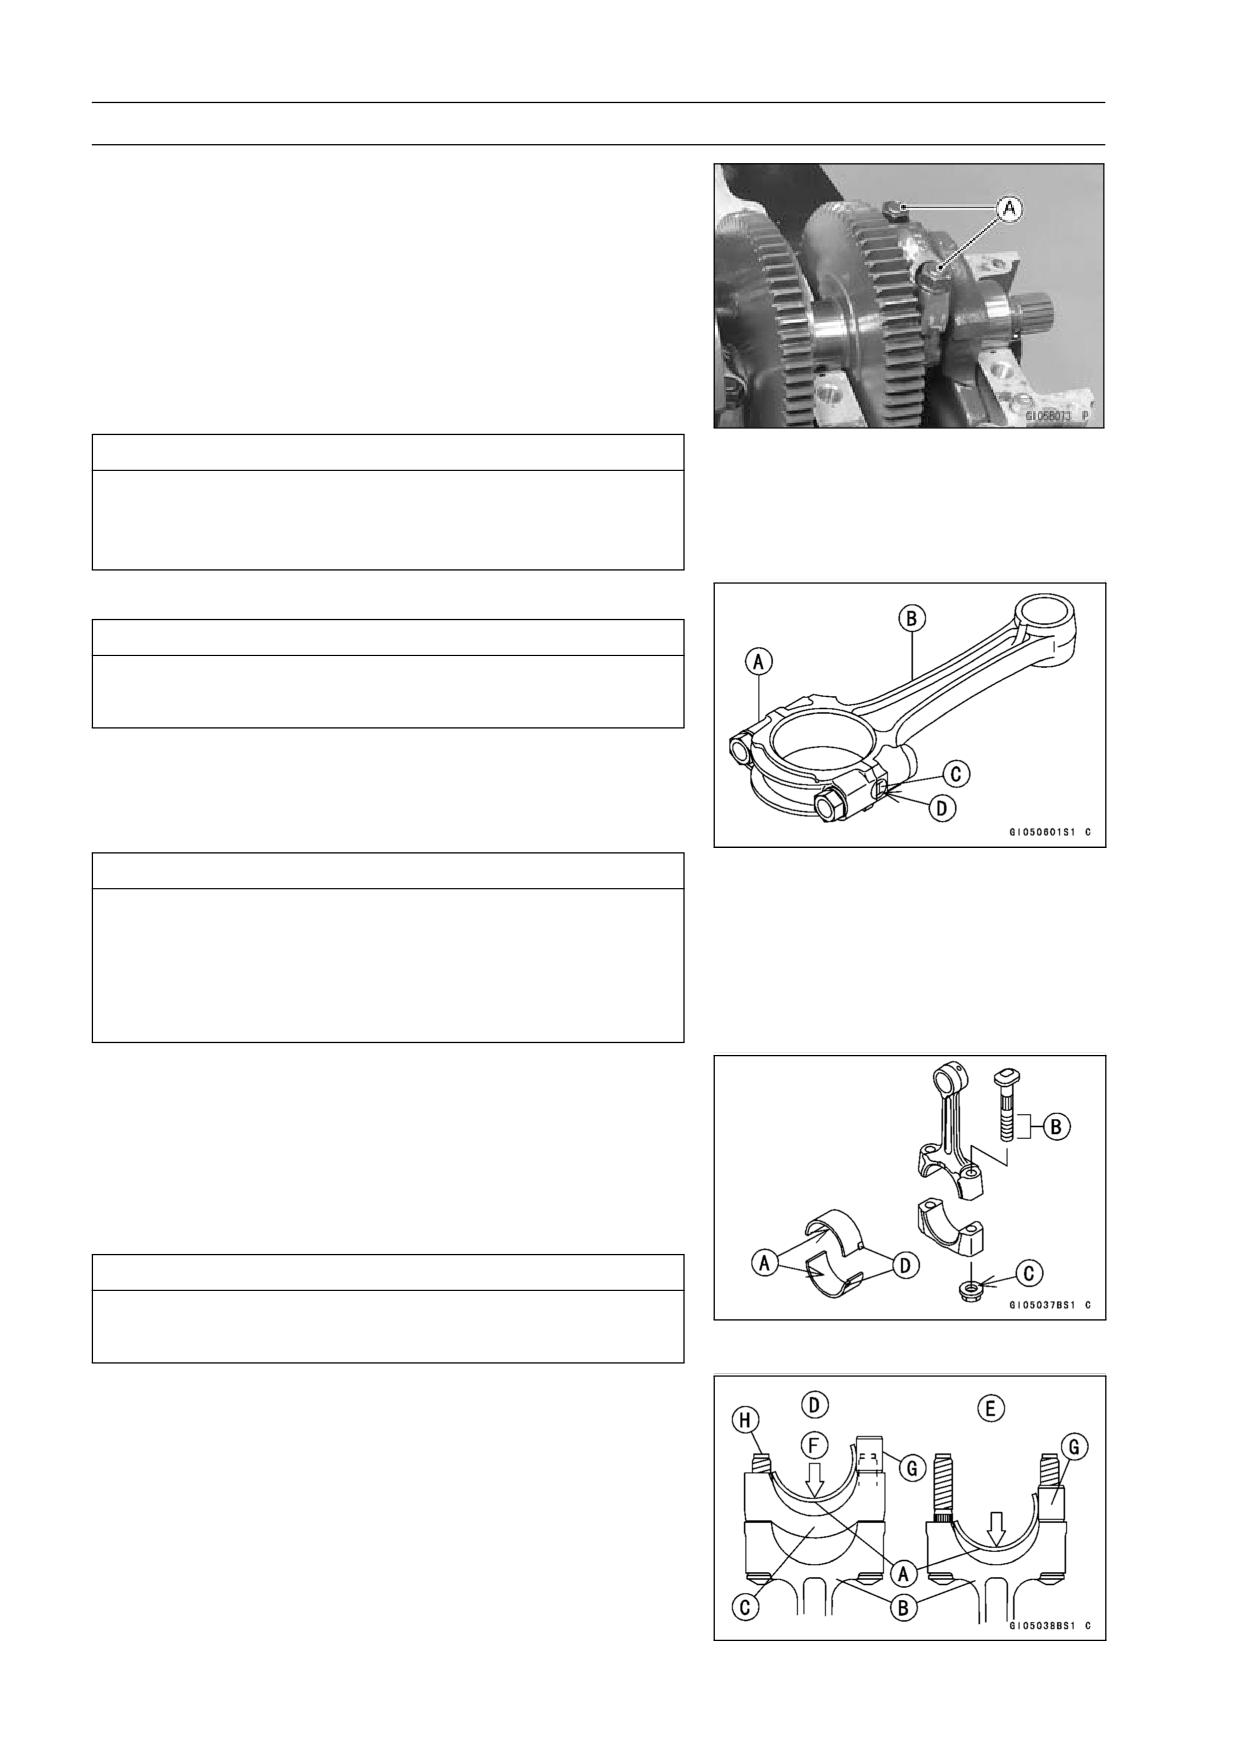
• Apply molybdenum disulfide oil to the inner surface of the
upper and lower bearing inserts [A].
• Apply molybdenum disulfide oil to the threads [B] and
seating surface [C] of the connecting rod nuts.
• Install the inserts so that their nails [D] are on the same
side and fit them into the recess of the connecting rod and
cap.
CAUTION
Wrong application of oil and grease could cause
bearing damage.
○When installing the inserts [A], be careful not to damage
the insert surface with the edge of the connecting rod [B]
or the cap [C]. One way to install inserts is as follows.
Installation [D] to Cap
Installation [E] to Connecting Rod
Push [F]
Spare Dowel Pin [G]
Connecting Rod Bolts [H]
• Remove debris and clean the surface of inserts.
• Install the cap on the connecting rod, aligning the weight
and diameter marks.
CRANKSHAFT/TRANSMISSION 9-17
Crankshaft and Connecting Rods
• Install the crankshaft (see Crankshaft Installation).
• Install each connecting rod on its original crankpin.
○The connecting rod big end is bolted using the “plastic
region fastening method”.
○This method precisely achieves the needed clamping
force without exceeding it unnecessarily, allowing the
use of thinner, lighter bolts further decreasing connecting
rod weight.
○There are two types of the plastic region fastening. One is
a bolt length measurement method and other is a rotation
angle method. Observe one of the following two, but the
bolt length measurement method is preferable because
this is a more reliable way to tighten the big end nuts.
CAUTION
The connecting rod bolts are designed to stretch
when tightened. Never reuse the connecting rod
bolts. See the table below for correct bolt and nut
usage.
CAUTION
Be careful not to overtighten the nuts.
The bolts must be positioned on the seating surface
correctly to prevent the bolt heads from hitting the
crankcase.
(1) Bolt Length Measurement Method
• Be sure to clean the bolts, nuts, and connecting rods
thoroughly with a high-flash point solvent, because the
new connecting rods, bolts, and nuts are treated with an
anti-rust solution.
WARNING
Clean the bolts, nuts, and connecting rods in a well
-ventilated area, and take care that there is no spark
or flame anywhere near the working area. This in-
cludes any appliance with a pilot light. Because of
the danger of highly flammable liquids, do not use
gasoline or low-flash point solvents to clean them.
CAUTION
Immediately dry the bolts and nuts with com-
pressed air after cleaning.
Clean and dry the bolts and nuts completely.
9-18 CRANKSHAFT/TRANSMISSION
Crankshaft and Connecting Rods
• Install new bolts in reused connecting rods.
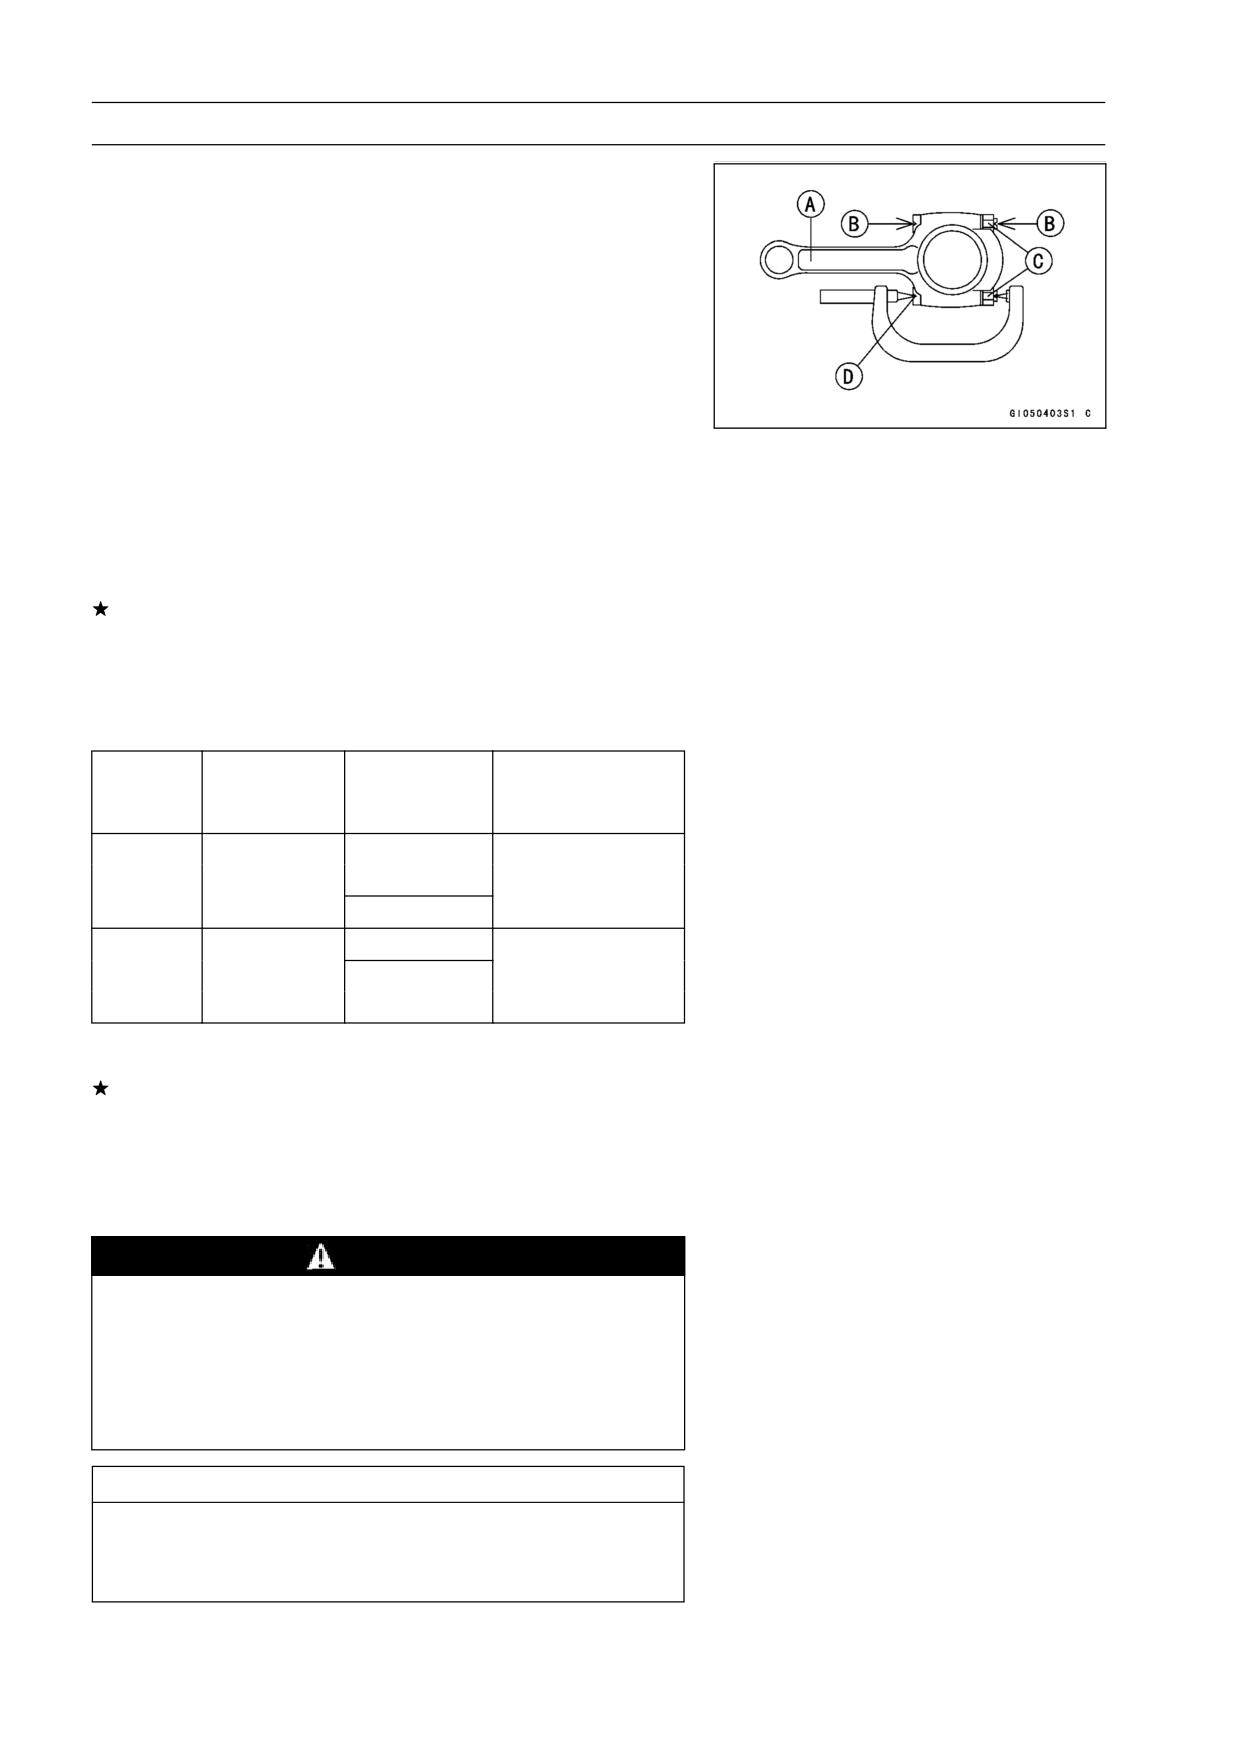
• Dent both bolt head and bolt tip with a punch as shown.
• Before tightening, use a point micrometer to measure the
length of new connecting rod bolts and record the values
to find the bolt stretch.
Connecting Rod [A]
Dent here with a punch [B].
Nuts [C]
Fit micrometer pins into dents [D].
• Apply a small amount of molybdenum disulfide oil to the
following.
Threads of Nuts and Bolts
Seating Surfaces of Nuts and Connecting rods
• Tighten the big end nuts until the bolt elongation reaches
the length specified in the table.
• Check the length of the connecting rod bolts.
If the stretch is more than the usable range, the bolt has
stretched too much. An overelongated bolt may break in
use.
Bolt Length after
Bolt Length before
-
= Bolt Stretch
tightening
tightening
Connect-
Usable Range of
ing Rod
Bolt
Nut
Connecting Rod
Assy
Bolt Stretch
Use the bolts
Attached to
0.25 ∼ 0.34 mm
New
attached to
new con-rod
(0.0098 ∼ 0.0134
new con-rod.
in.)
New
Used
Replace the
0.25 ∼ 0.34 mm
Used
bolts with new
(0.0098 ∼ 0.0134
New
ones.
in.)
(2) Rotation Angle Method
If you don’t have a point micrometer, you may tighten the
nuts using the “Rotation Angle Method”.
• Be sure to clean the bolts, nuts and connecting rods thor-
oughly with a high-flash point solvent, because the new
connecting rods, bolts and nuts are treated with an anti
-rust solution.
WARNING
Clean the bolts, nuts and connecting rods in a well
-ventilated area, and take care that there is no spark
or flame anywhere near the working area. This in-
cludes any appliance with a pilot light. Because of
the danger or highly flammable liquids, do not use
gasoline or low-flash point solvents to clean them.
CAUTION
Immediately dry the bolts and nuts with com-
pressed air after cleaning.
Clean and dry the bolts and nuts completely.
CRANKSHAFT/TRANSMISSION 9-19
Crankshaft and Connecting Rods
• Install new bolts in reused connecting rods.
• Apply a small amount of molybdenum disulfide oil to the
following.
Threads [A] of Nuts and Bolts
Seating Surfaces [B] of Nuts and Connecting Rods
• First, tighten the nuts to the specified torque. See the
table below.
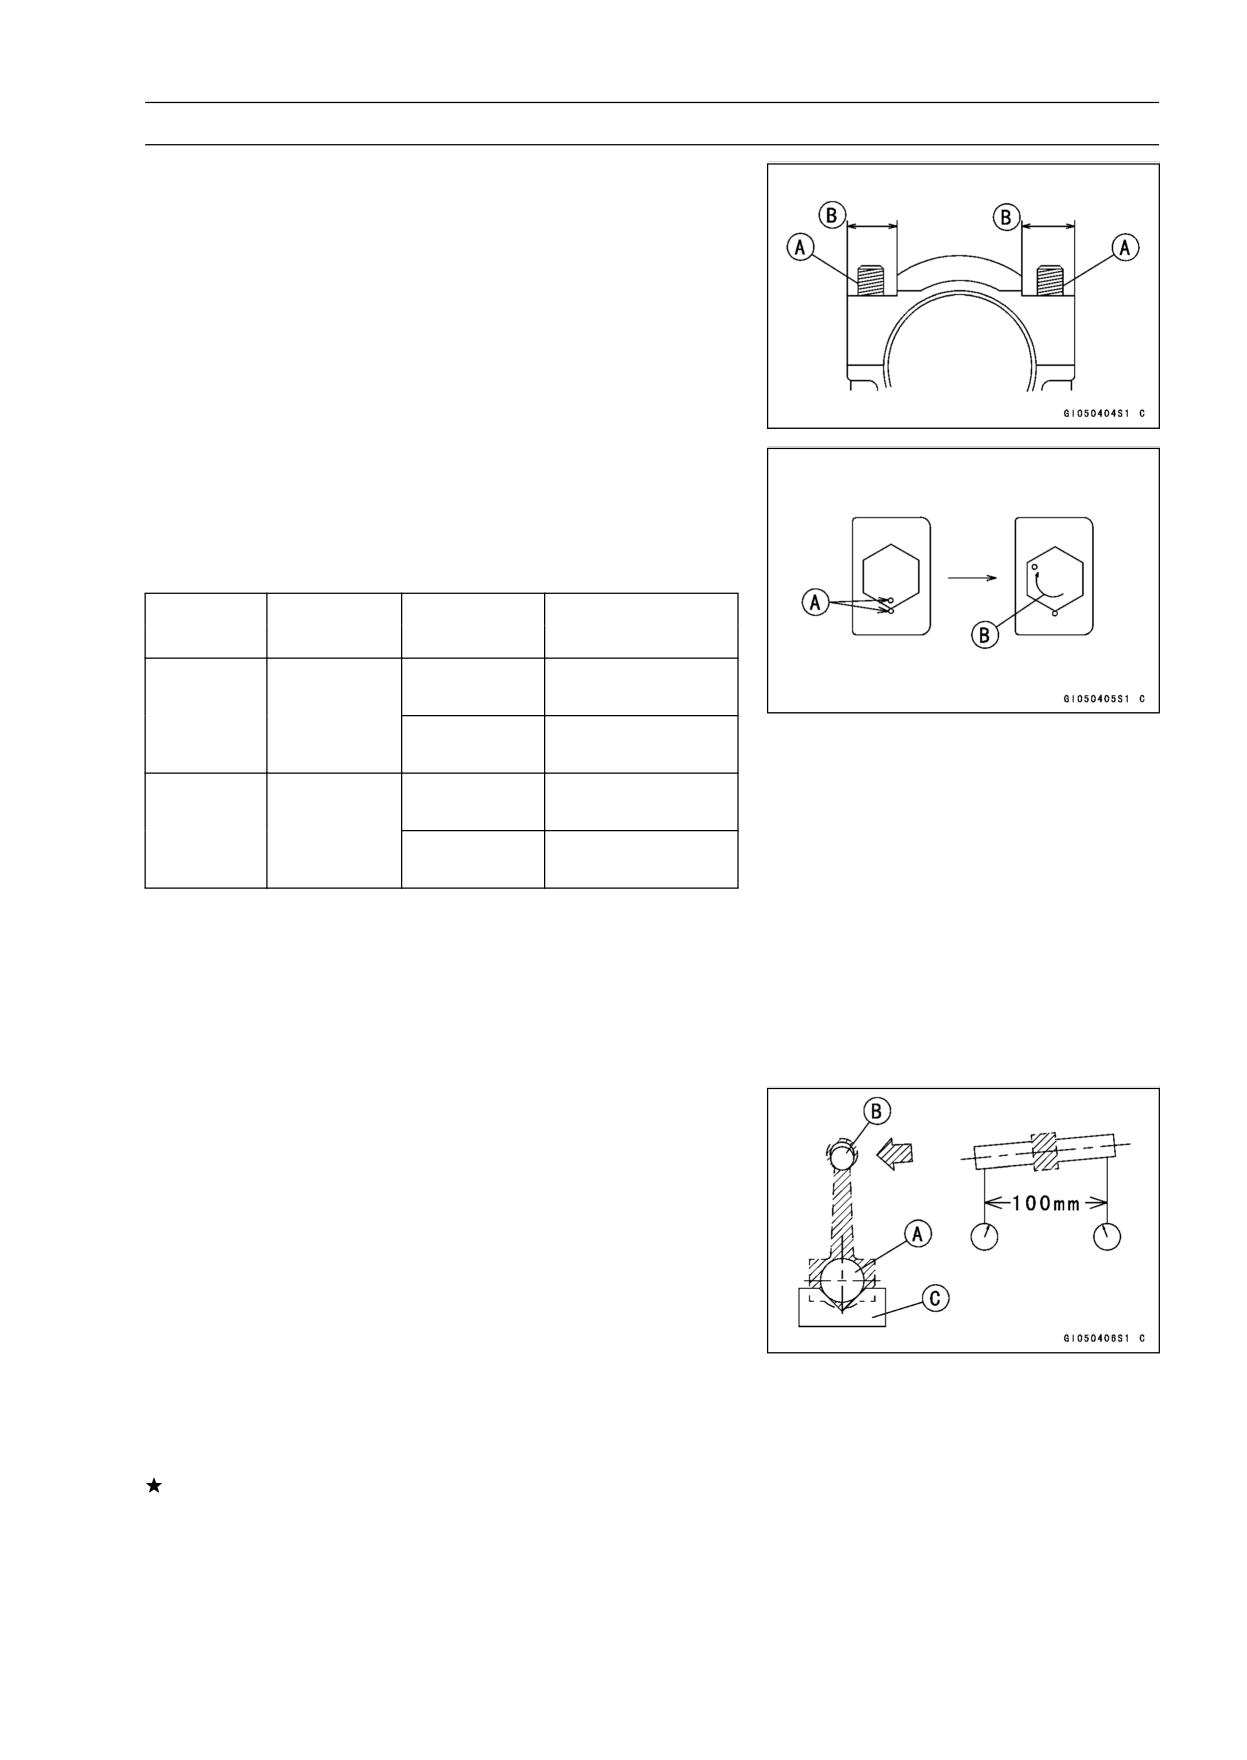
• Next, tighten the nuts 120° ± 5°.
○Mark [A] the connecting rod big end caps and nuts so that
nuts can be turned 120° [B] properly.
Connecting
Torque + Angle
Bolt
Nut
Rod Assy
N·m (kgf·m, ft·lb)
Attached to
21.6 (2.2, 16) +
Use the boltsnewcon-rod
120°
New
attached to
21.6 (2.2, 16) +
new con-rod.
New
120°
21.6 (2.2, 16) +
Replace the
Used
120°
Used
bolts with
21.6 (2.2, 16) +
new ones
New
120°
Crankshaft/Connecting Rod Cleaning
• After removing the connecting rods from the crankshaft,
clean them with a high-flash point solvent.
• Blow the crankshaft oil passages with compressed air to
remove any foreign particles or residue that may have
accumulated in the passages.
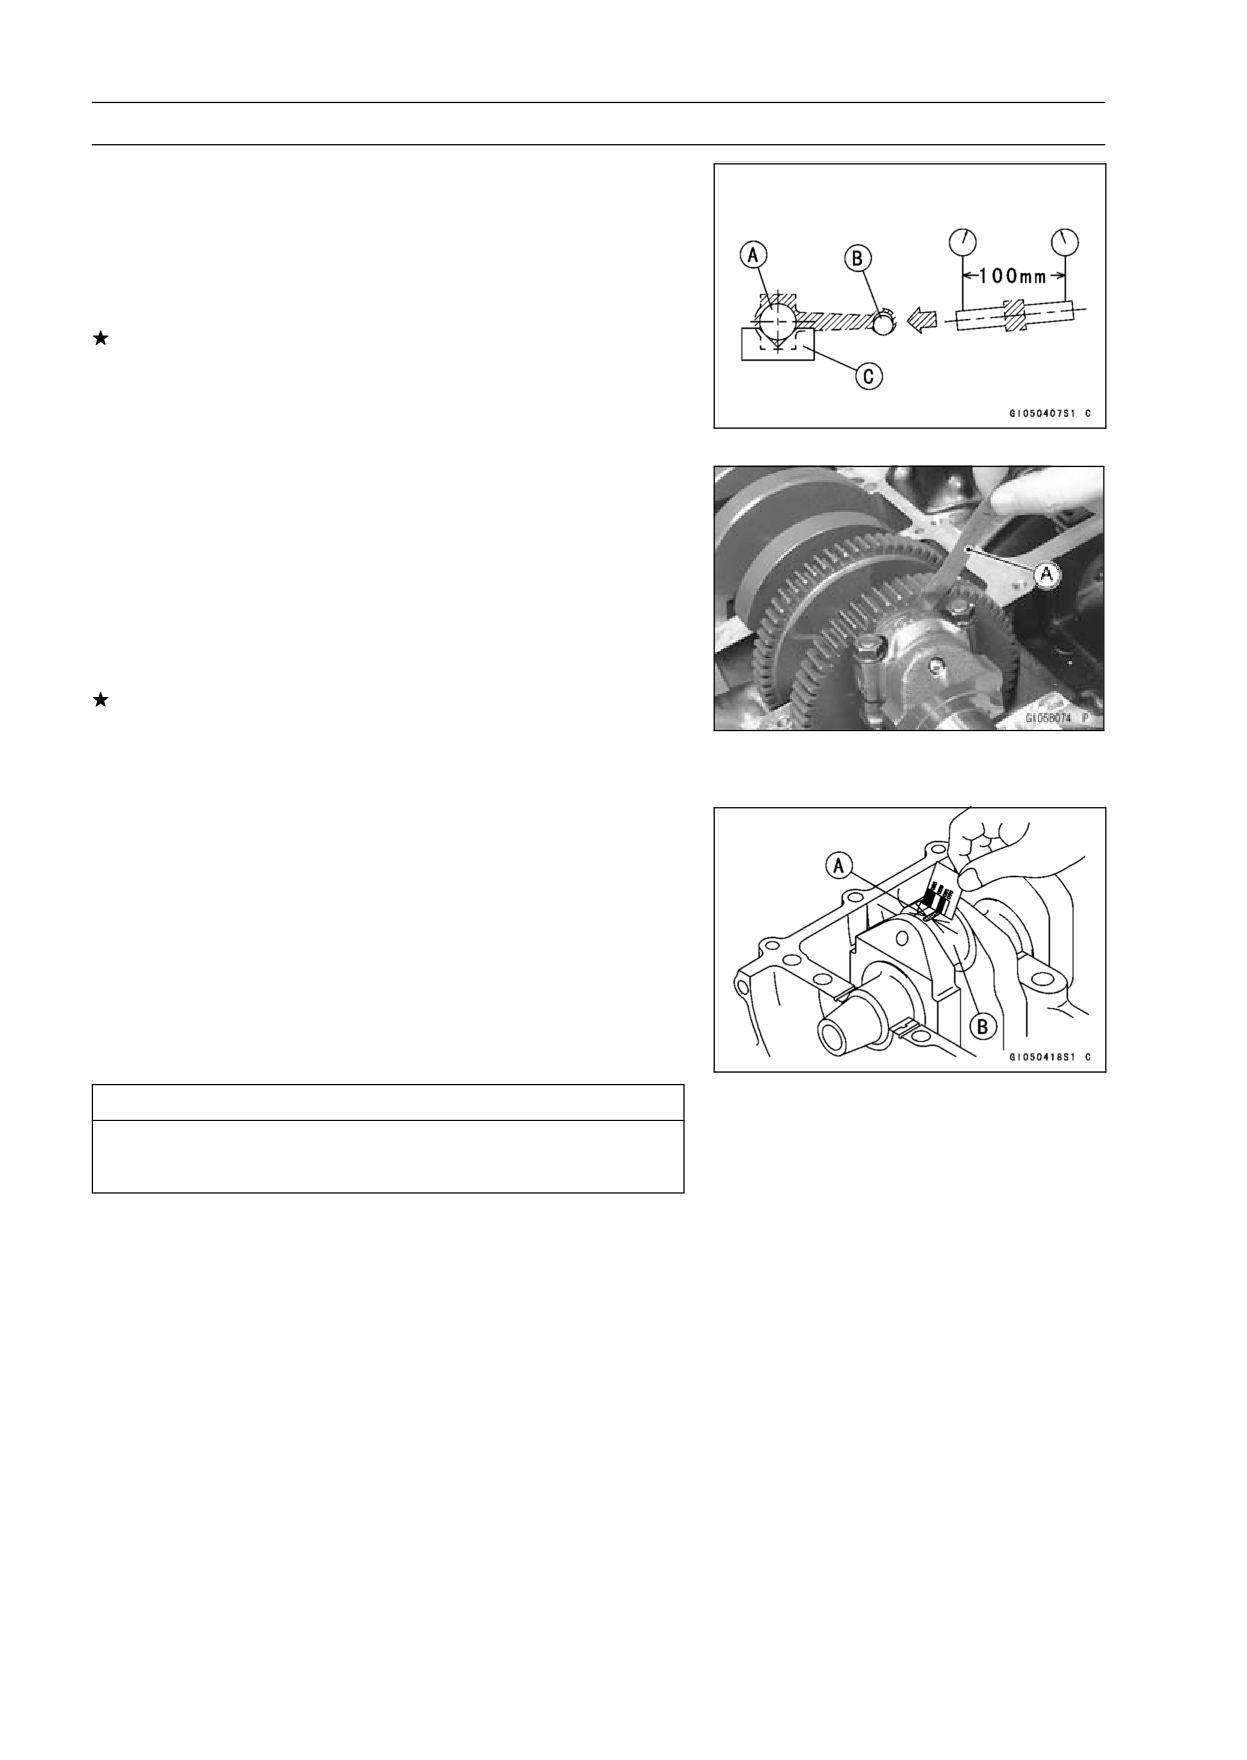
Connecting Rod Bend
• Remove the connecting rod big end bearing inserts, and
reinstall the connecting rod big end cap.
• Select an arbor [A] of the same diameter as the connect-
ing rod big end, and insert the arbor through the connect-
ing rod big end.
• Select an arbor of the same diameter as the piston pin
and at least 100 mm (3.94 in.) long, and insert the arbor
[B] through the connecting rod small end.
• On a surface plate, set the big-end arbor on V block [C].
• With the connecting rod held vertically, use a height
gauge to measure the difference in the height of the
arbor above the surface plate over a 100 mm (3.94 in.)
length to determine the amount of connecting rod bend.
If connecting rod bend exceeds the service limit, the con-
necting rod must be replaced.
Connecting Rod Bend
Service Limit: TIR 0.2/100 mm (0.008/3.94 in.)
9-20 CRANKSHAFT/TRANSMISSION
Crankshaft and Connecting Rods
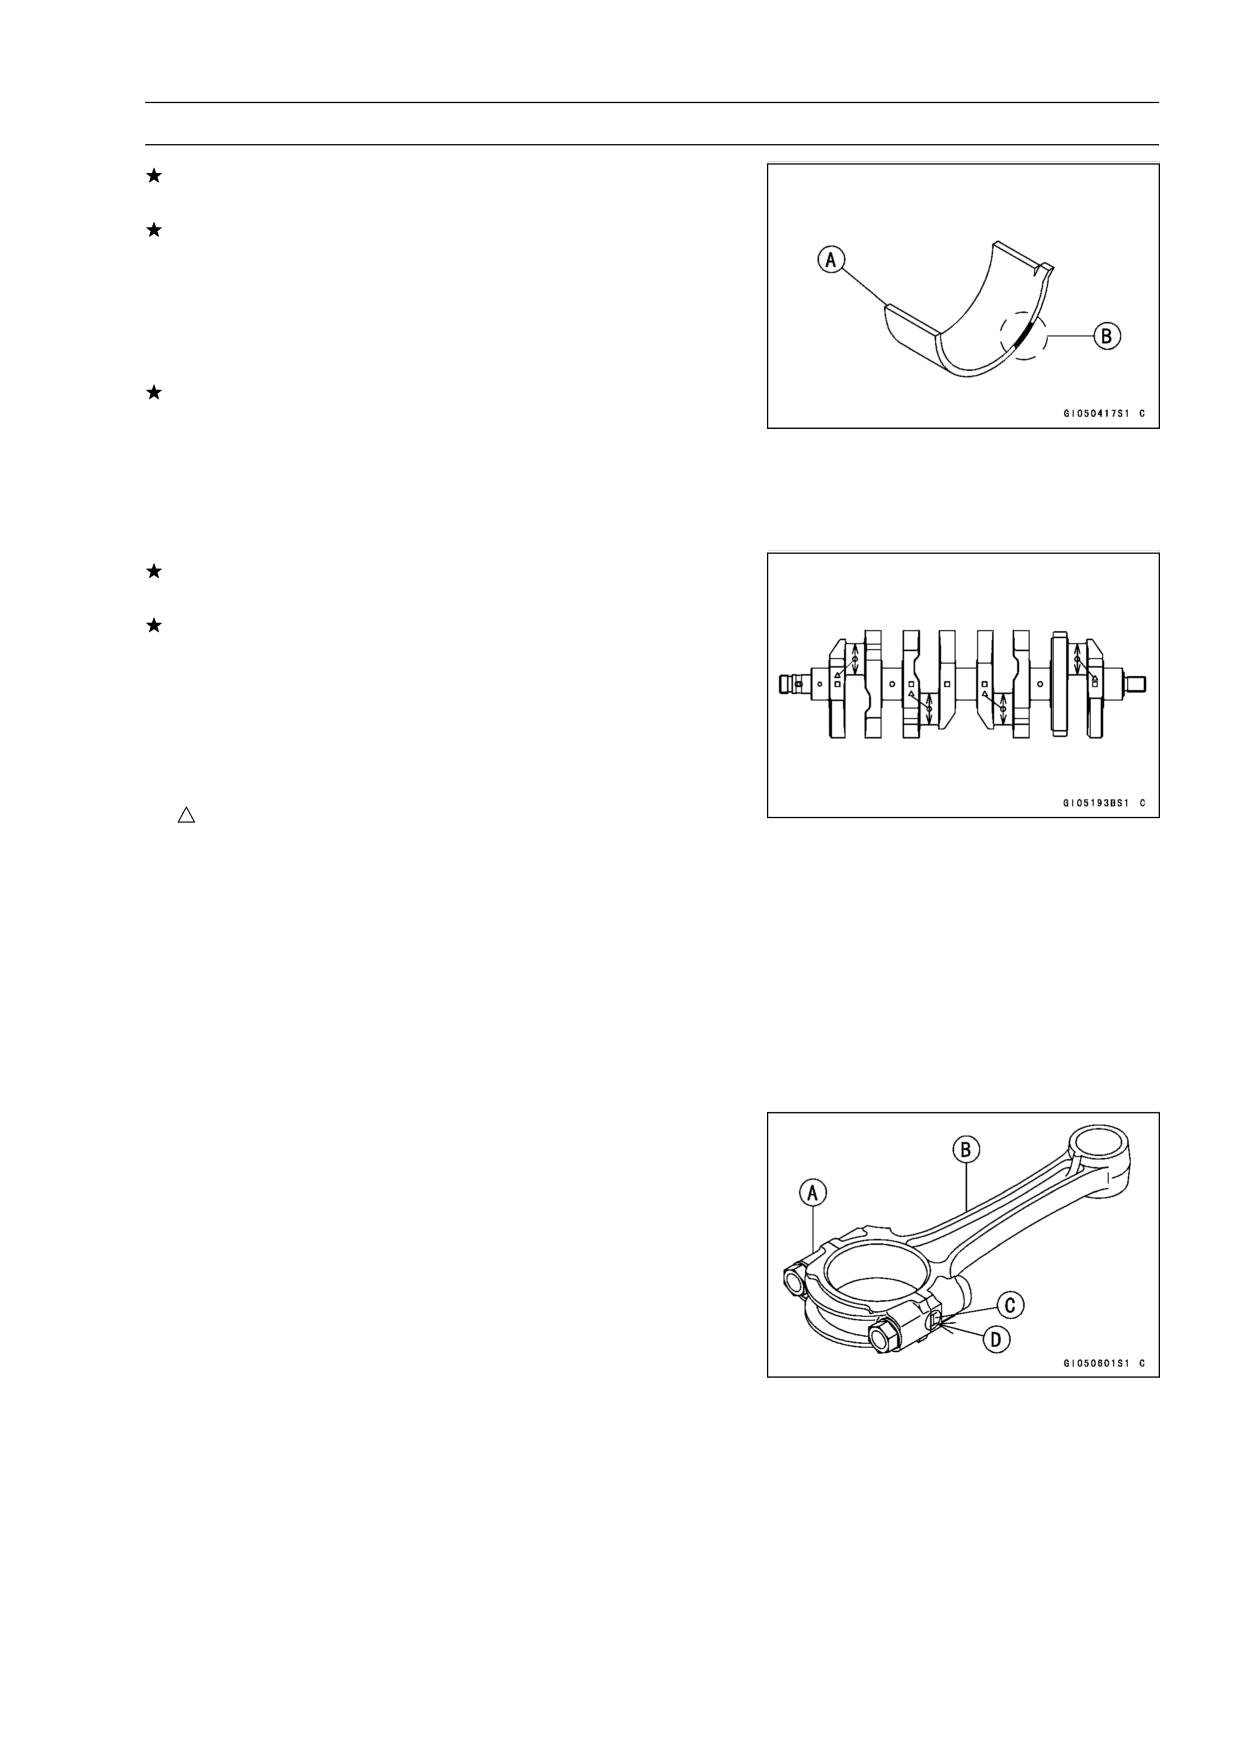
Connecting Rod Twist
• With the big-end arbor [A] still on V block [C], hold the
connecting rod horizontally and measure the amount that
the arbor [B] varies from being paralleled with the surface
plate over a 100 mm (3.94 in.) length of the arbor to de-
termine the amount of connecting rod twist.
If connecting rod twist exceeds the service limit, the con-
necting rod must be replaced.
Connecting Rod Twist
Service Limit: TIR 0.2/100 mm (0.008/3.94 in.)
Connecting Rod Big End Side Clearance
• Measure connecting rod big end side clearance.
○Insert a thickness gauge [A] between the big end and ei-
ther crank web to determine clearance.
Connecting Rod Big End Side Clearance
Standard:
0.13 ∼ 0.38 mm (0.0051 ∼ 0.0150 in.)
Service Limit:
0.58 mm (0.023 in.)
If the clearance exceeds the service limit, replace the con-
necting rod with new one and then check clearance again.
If clearance is too large after connecting rod replacement,
the crankshaft also must be replaced.
Connecting Rod Big End Bearing Insert/Crankpin
Wear
• Measure the bearing insert/crankpin [B] clearance with
plastigage [A].
• Tighten the big end nuts to the specified torque (see Con-
necting Rod Installation).
NOTE
○Do not move the connecting rod and crankshaft during
clearance measurement.
CAUTION
After measurement, replace the connecting rod
bolts.
Connecting Rod Big End Bearing Insert/Crankpin
Clearance
Standard:
0.048 ∼ 0.086 mm (0.0019 ∼ 0.0034 in.)
Service Limit:
0.12 mm (0.0047 in.)
CRANKSHAFT/TRANSMISSION 9-21
Crankshaft and Connecting Rods
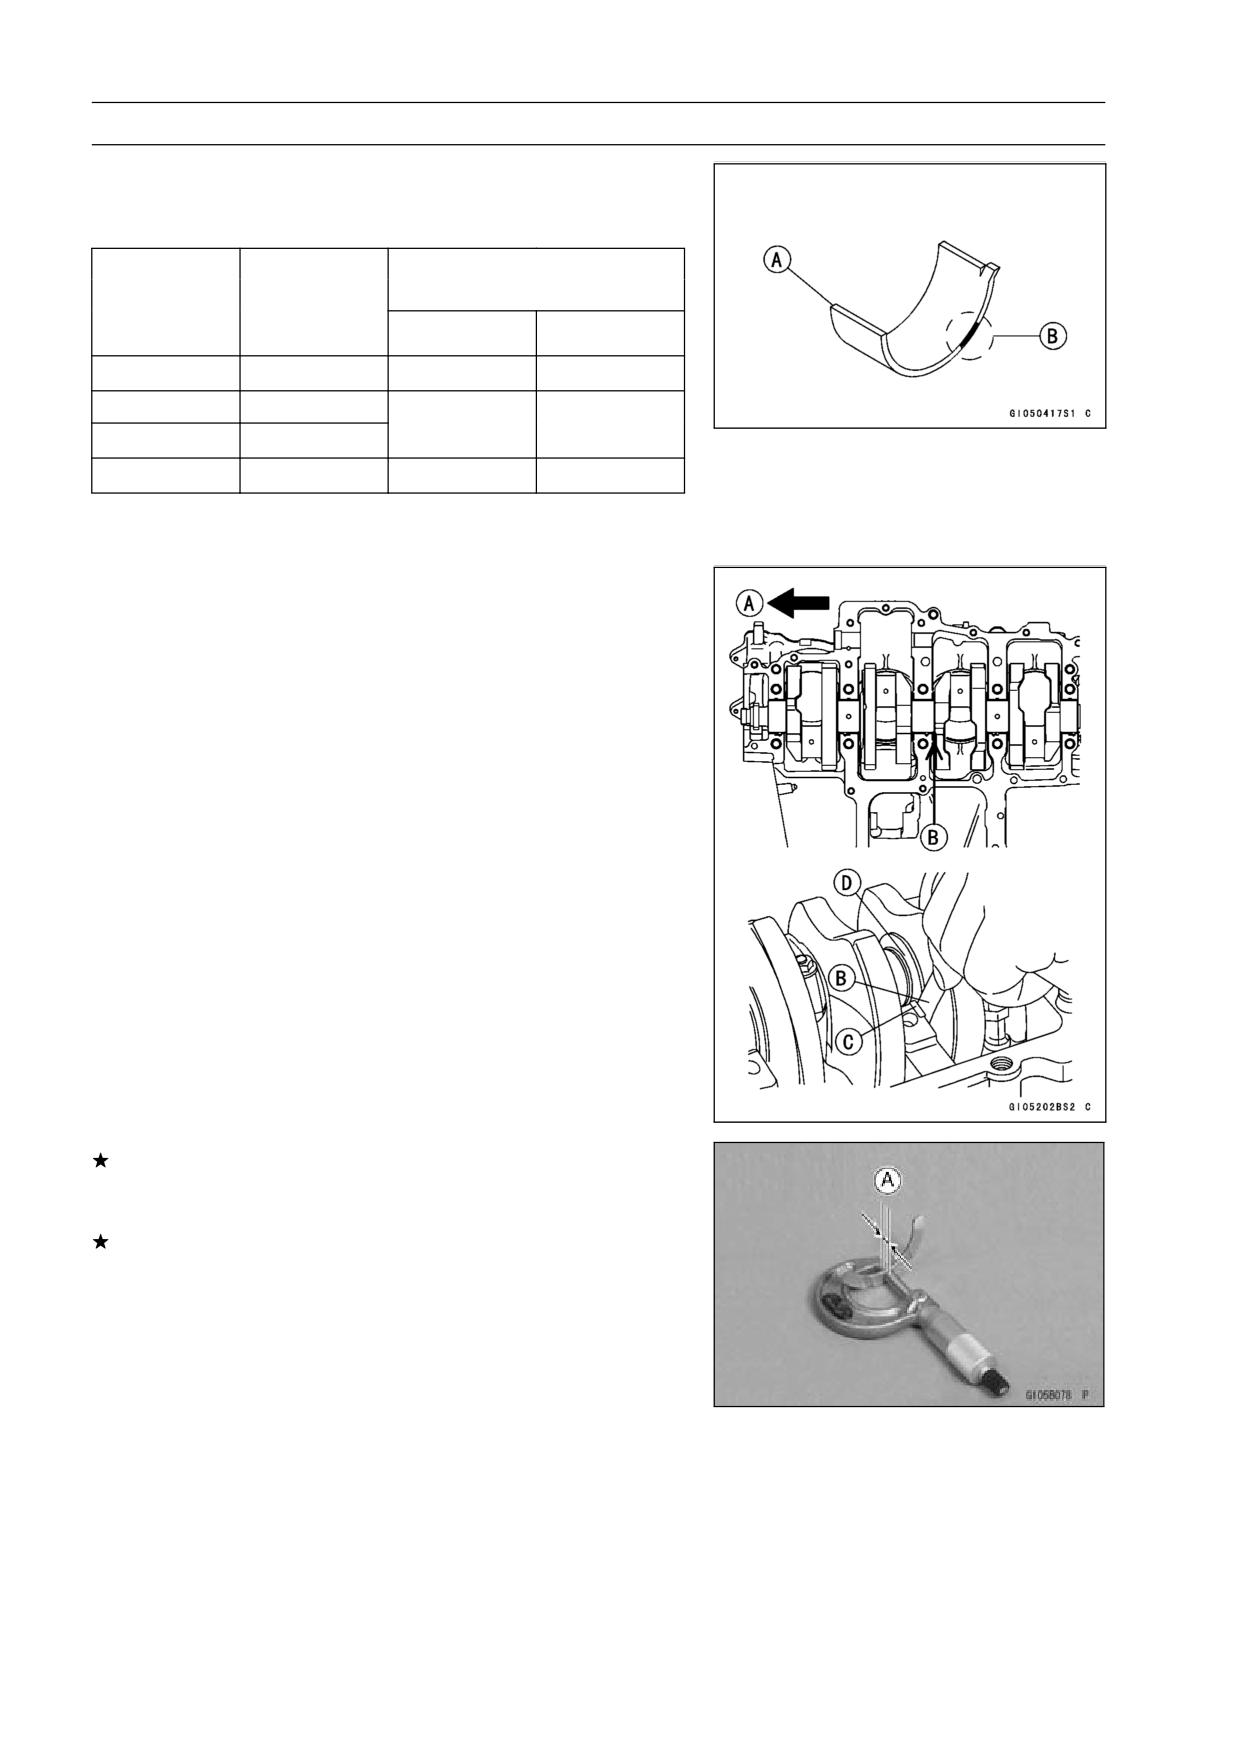
If the clearance is within the standard, no bearing replace-
ment is required.
If the clearance is between 0.087 mm (0.0034 in.) and
the service limit (0.12 mm, 0.0047 in.), replace the bear-
ing inserts [A] with inserts painted blue [B]. Check in-
sert/crankpin clearance with the plastigage. The clear-
ance may exceed the standard slightly, but it must not be
less than the minimum in order to avoid bearing seizure.
If the clearance exceeds the service limit, measure the
diameter of the crankpins.
Crankpin Diameter
Standard:
37.984 ∼ 38.000 mm (1.4954 ∼ 1.4961 in.)
Service Limit:
37.97 mm (1.4949 in.)
If any crankpin has worn past the service limit, replace the
crankshaft with a new one.
If the measured crankpin diameters are not less than the
service limit, but do not coincide with the original diameter
markings on the crankshaft, make new marks on it.
Crankpin Diameter Marks
None
37.984 ∼ 37.992 mm (1.4954 ∼ 1.4957 in.)
○
37.993 ∼ 38.000 mm (1.4958 ∼ 1.4961 in.)
: Crankpin Diameter Marks, "○" or no mark.
• Measure the connecting rod big end inside diameter, and
mark each connecting rod big end in accordance with the
inside diameter.
• Tighten the connecting rod big end nuts to the specified
torque (see Connecting Rod Installation).
NOTE
○The mark already on the big end should almost coincide
with the measurement.
Connecting Rod Big End Inside Diameter Marks
None
41.000 ∼ 41.008 mm (1.6142 ∼ 1.6145 in.)
○
41.009 ∼ 41.016 mm (1.6145 ∼ 1.6148 in.)
Big End Cap [A]
Connecting Rod [B]
Weight Mark, Alphabet [C]
Diameter Mark (Around Weight Mark) [D]: “○” or no
mark
9-22 CRANKSHAFT/TRANSMISSION
Crankshaft and Connecting Rods
• Select the proper bearing insert [A] in accordance with the
combination of the connecting rod and crankshaft coding.
Size Color [B]
Con-rod Big
Crankpin
Bearing Insert
End Inside
Diameter
Diameter
Marking
Size Color
Part Number
Marking
None
○
Brown
92139-0131
None
None
Black
92139-0130
○
○
○
None
Blue
92139-0129
• Install the new inserts in the connecting rod and check
insert/crankpin clearance with the plastigage.
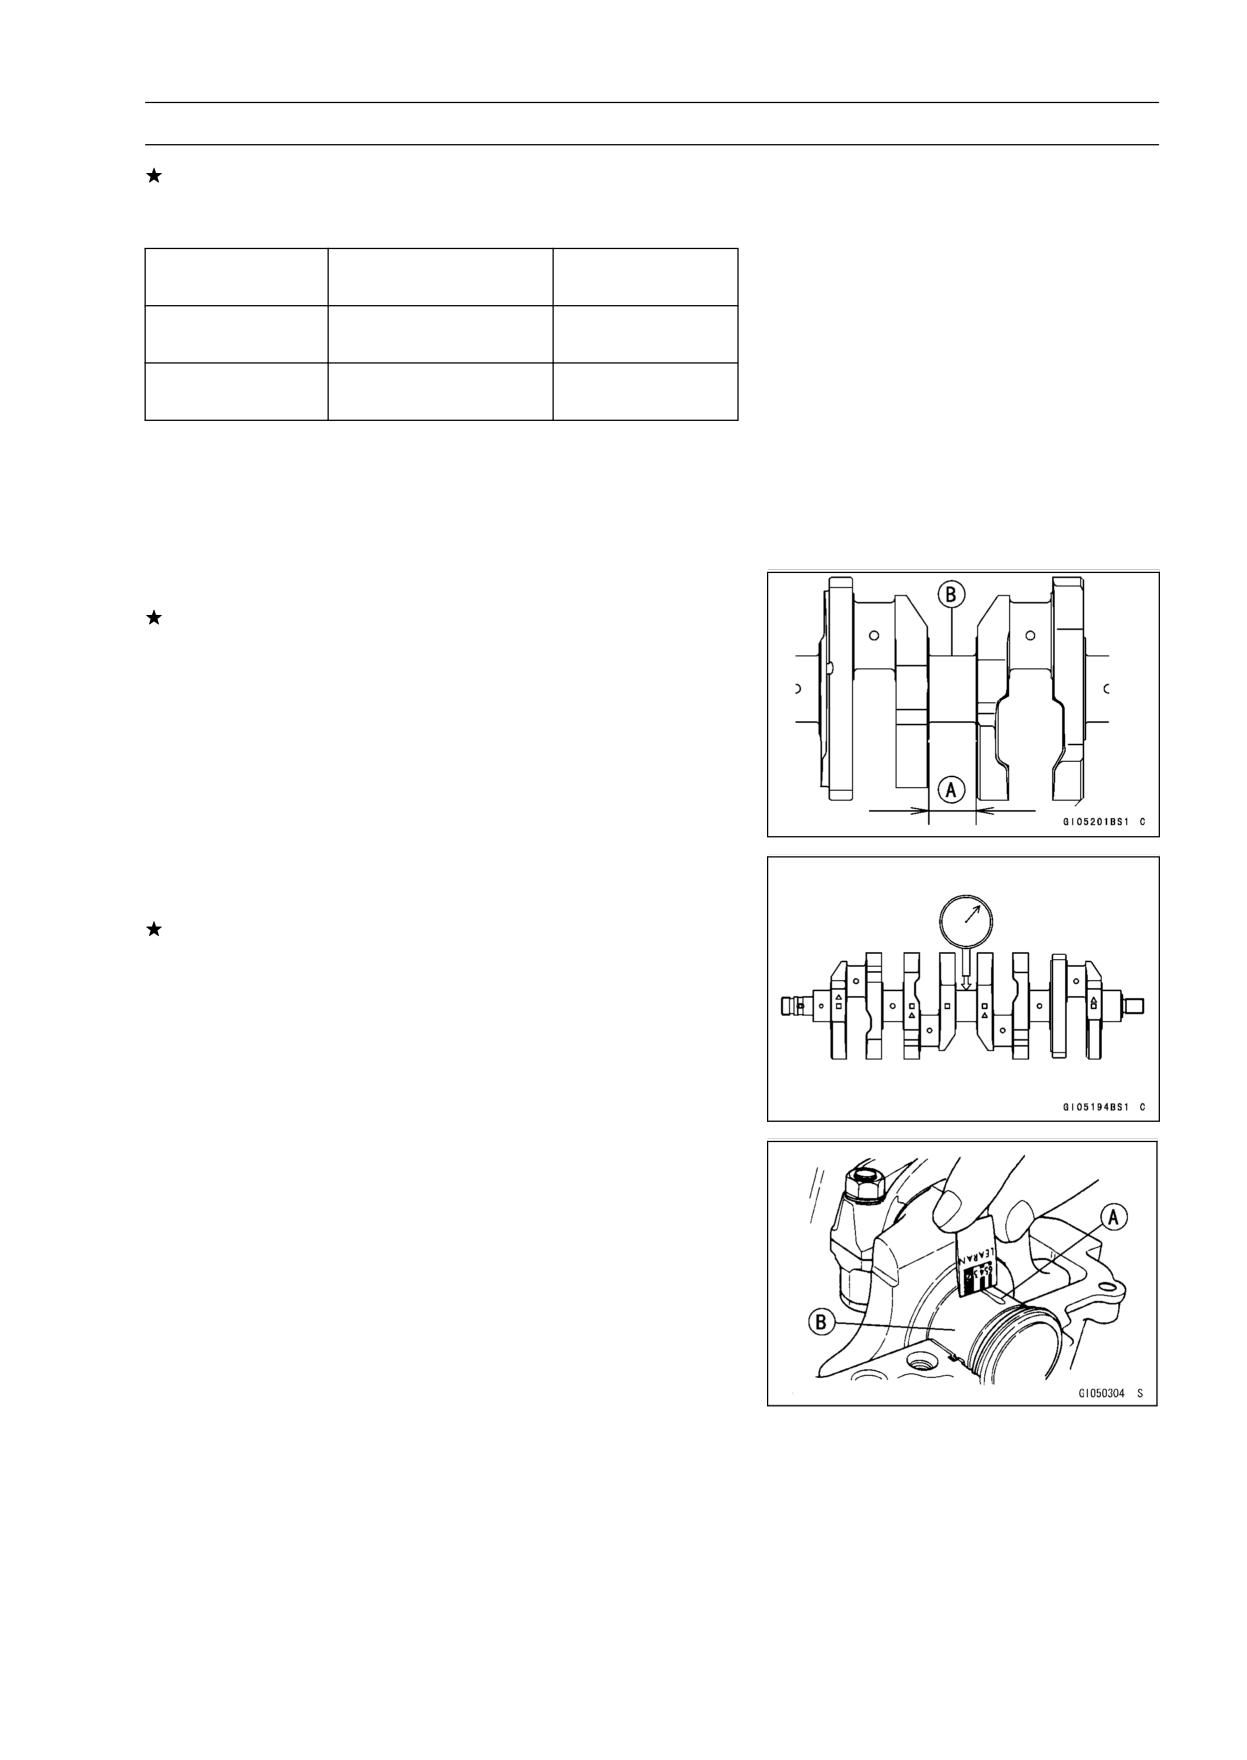
Crankshaft Side Clearance
• Move [A] the crankshaft to the side of the camshaft chain.
• Insert a thickness gauge [B] between the thrust washer
[C] and the crank web [D] at the No. 3 main journal to
determine clearance.
Crankshaft Side Clearance
Standard:
0.05 ~ 0.24 mm (0.0020 ~ 0.0094 in.)
Service Limit:
0.30 mm (0.0118 in.)
If the clearance exceeds the service limit, replace the
thrust washer as a set.
• Measure the width [A] of the both thrust washers.
If the thrust washers (t = 2.5 mm, 0.0984 in.) are installed
on the upper crankcase half, replace them with new thrust
washer (t = 2.5 mm, 0.0984 in.) as a set.
CRANKSHAFT/TRANSMISSION 9-23
Crankshaft and Connecting Rods
If the thrust washers (t = 4.0 mm, 0.1575 in.) are installed
on the upper crankcase half, replace them with new thrust
washer (t = 4.0 mm, 0.1575 in.) as a set.
Thrust Washer
Thickness
Edge Colar
P/No.
2.45 ∼ 2.50 mm
92200-0331
Blue
(0.0965 ∼ 0.0984 in.)
3.95 ∼ 4.00 mm
92200-0332
Blue
(0.1555 ∼ 0.1575 in.)
NOTE
○For the crankcase, only crankcase set (P/No.
14001
-0089) be available as spare parts.
• Check the width of the crankshaft #3 main journal.
• Measure the crankshaft #3 main journal width [A].
If the measurement exceeds the standard, replace the
crankshaft [B].
Crankshaft #3 Main Journal Width
Standard:
27.45 ∼ 27.50 mm (1.0807 ∼ 1.0827 in.)
Crankshaft Runout
• Measure the crankshaft runout.
If the measurement exceeds the service limit, replace the
crankshaft.
Crankshaft Runout
Standard:
TIR 0.03 mm (0.0012 in.) or less
Service Limit: TIR 0.08 mm (0.0031 in.)
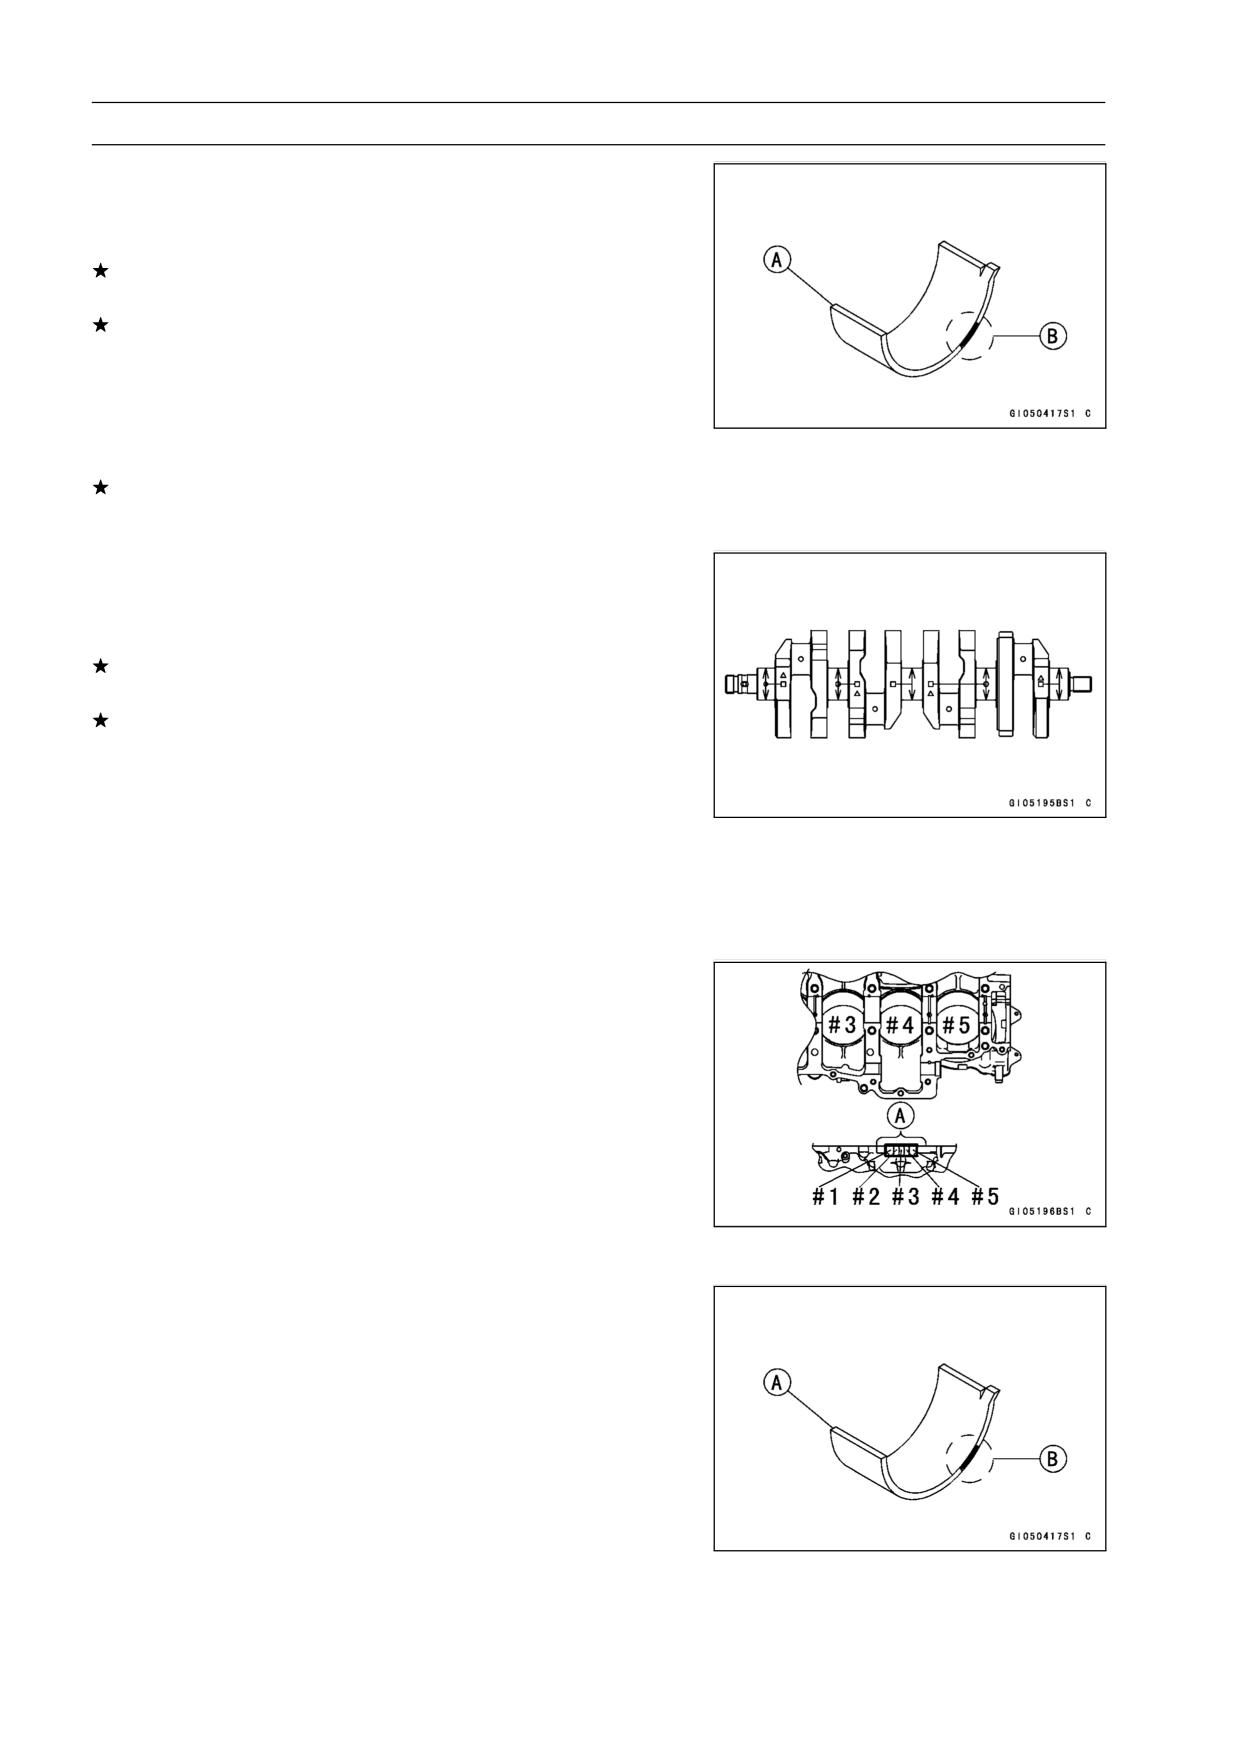
Crankshaft Main Bearing Insert/Journal Wear
• Using a plastigage (press gauge) [A], measure the bear-
ing insert/journal [B] clearance.
NOTE
○Tighten the crankcase bolts to the specified torque (see
Crankcase Assembly).
○Do not turn the crankshaft during clearance measure-
ment.
○Journal clearance less than 0.025 mm (0.00098 in.) can
not be measured by plastigage, however, using genuine
parts maintains the minimum standard clearance.
9-24 CRANKSHAFT/TRANSMISSION
Crankshaft and Connecting Rods
Crankshaft Main Bearing Insert/Journal Clearance
Standard:
0.031 ∼ 0.063 mm (0.0012 ∼ 0.0025 in.)
Service Limit:
0.09 mm (0.0035 in.)
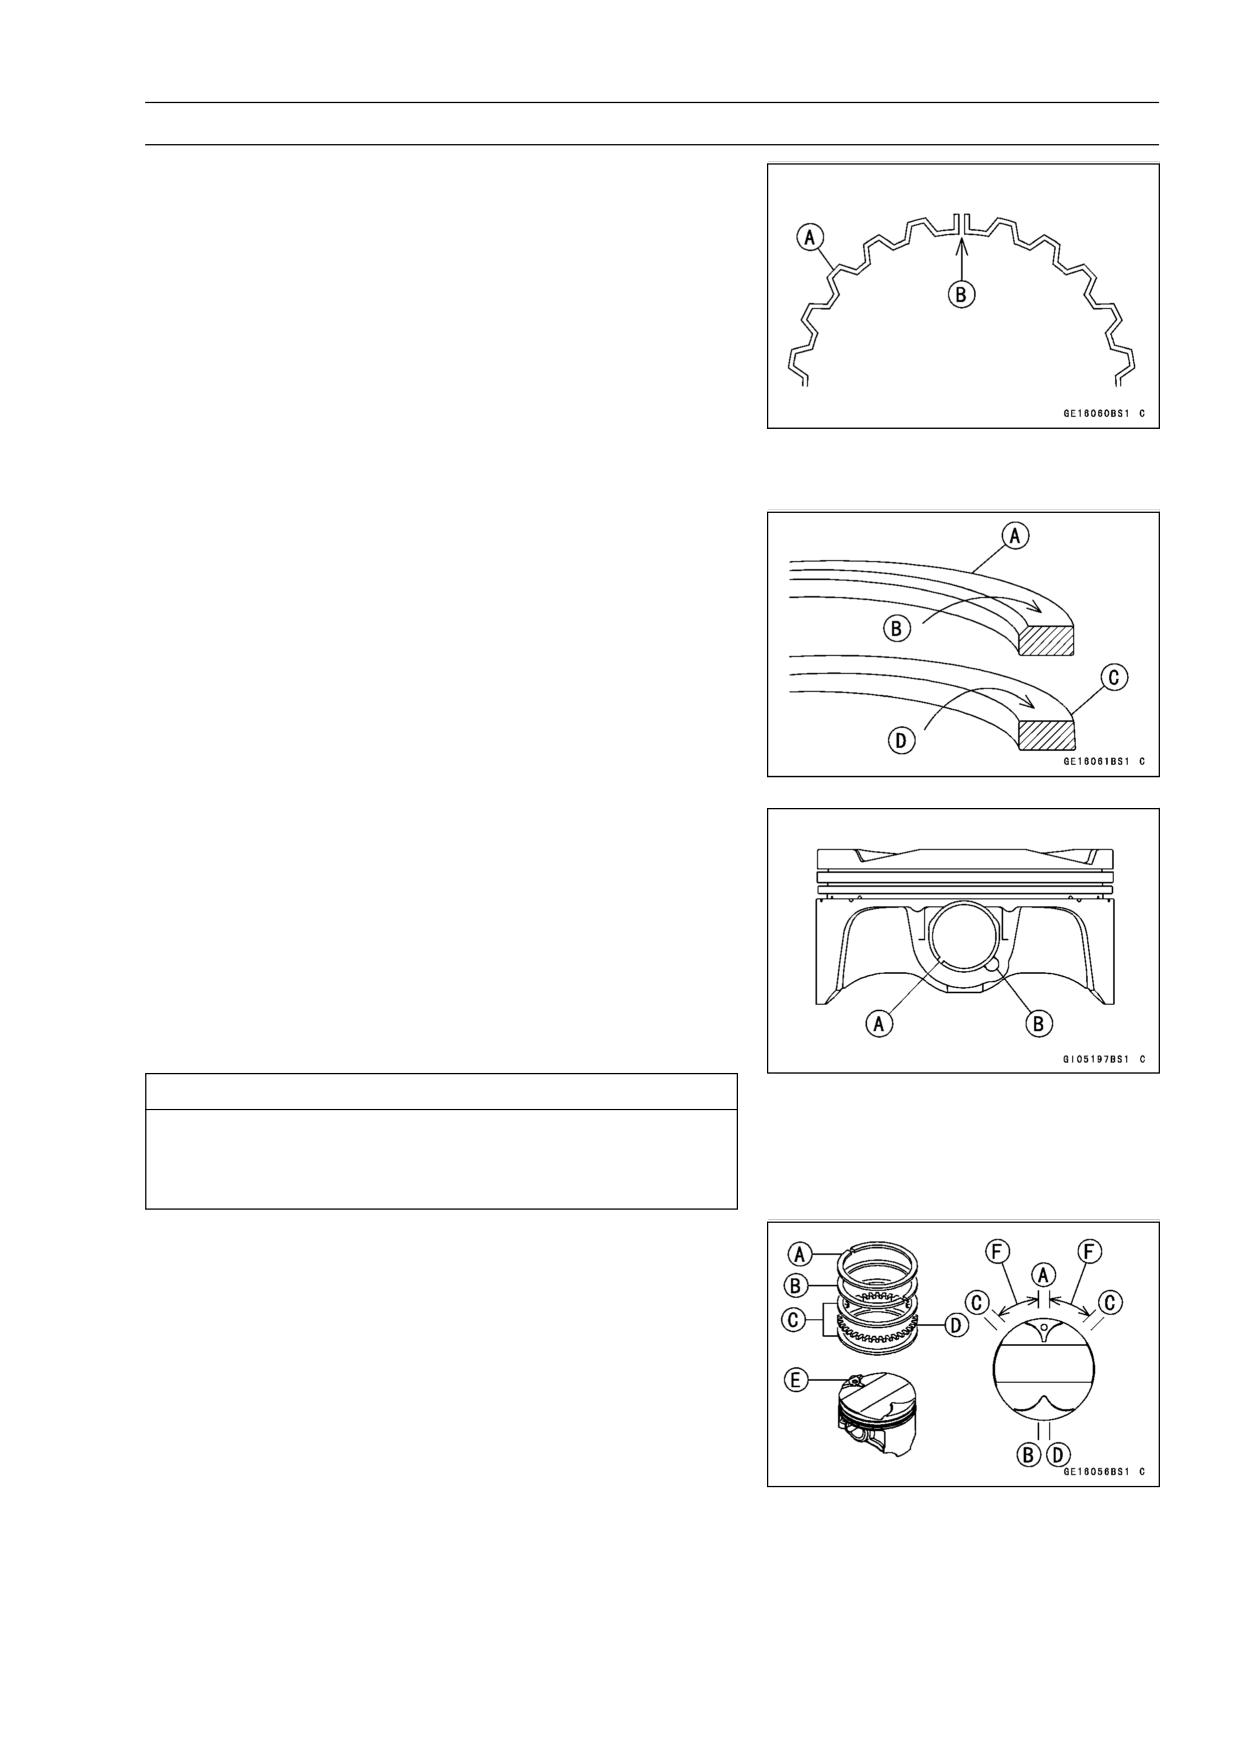
If the clearance is within the standard, no bearing replace-
ment is required.
If the clearance is between 0.064 mm (0.0025 in.) and the
service limit (0.09 mm, 0.0035 in.), replace the bearing in-
serts [A] with inserts painted blue [B]. Check insert/journal
clearance with the plastigage. The clearance may exceed
the standard slightly, but it must not be less than the min-
imum in order to avoid bearing seizure.
If the clearance exceeds the service limit, measure the
diameter of the crankshaft main journal.
Crankshaft Main Journal Diameter
Standard:
37.984 ∼ 38.000 mm (1.4954 ∼ 1.4961 in.)
Service Limit:
37.96 mm (1.4945 in.)
If any journal has worn past the service limit, replace the
crankshaft with a new one.
If the measured journal diameters are not less than the
service limit, but do not coincide with the original diameter
markings on the crankshaft, make new marks on it.
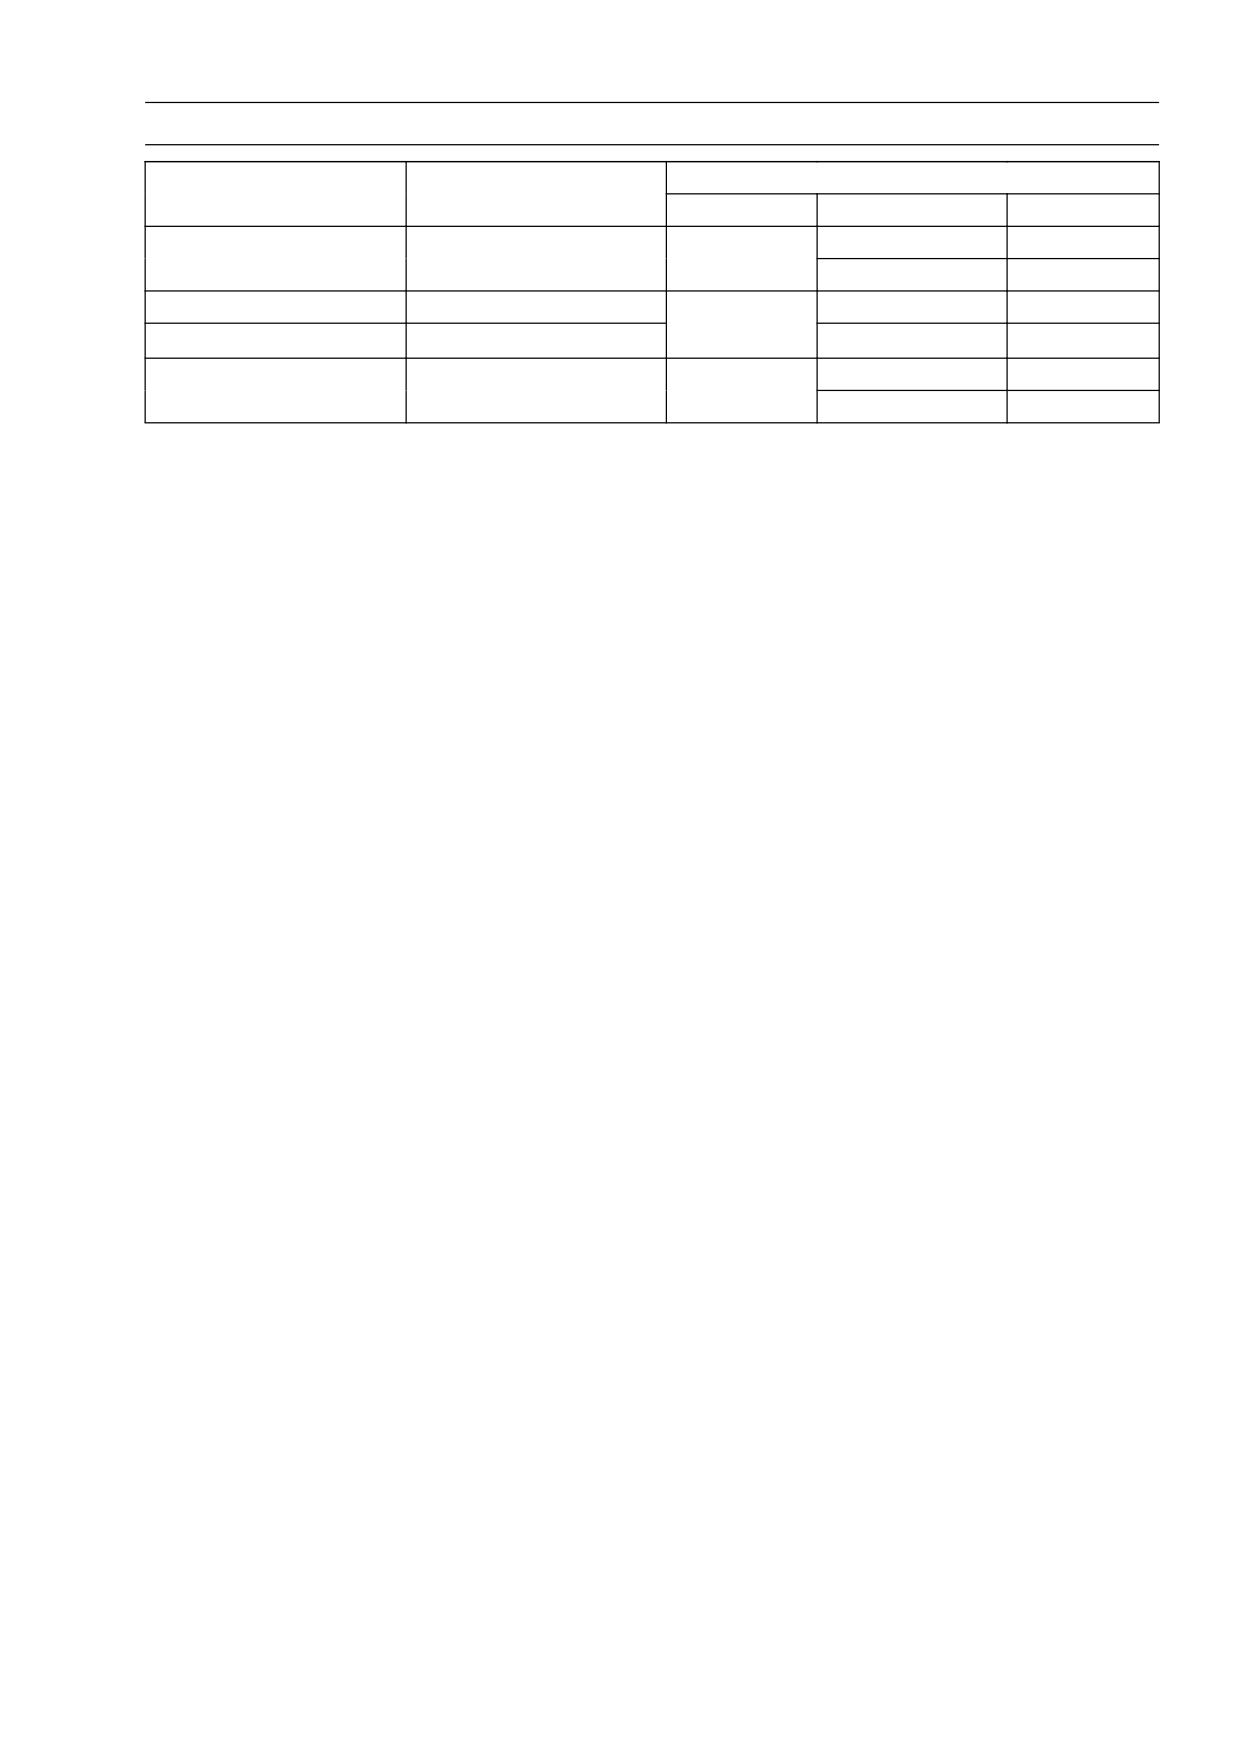
Crankshaft Main Journal Diameter Marks
None
37.984 ∼ 37.992 mm (1.4954 ∼ 1.4957 in.)
1
37.993 ∼ 38.000 mm (1.4958 ∼ 1.4961 in.)
□: Crankshaft Main Journal Diameter Marks, "1" or no
mark.
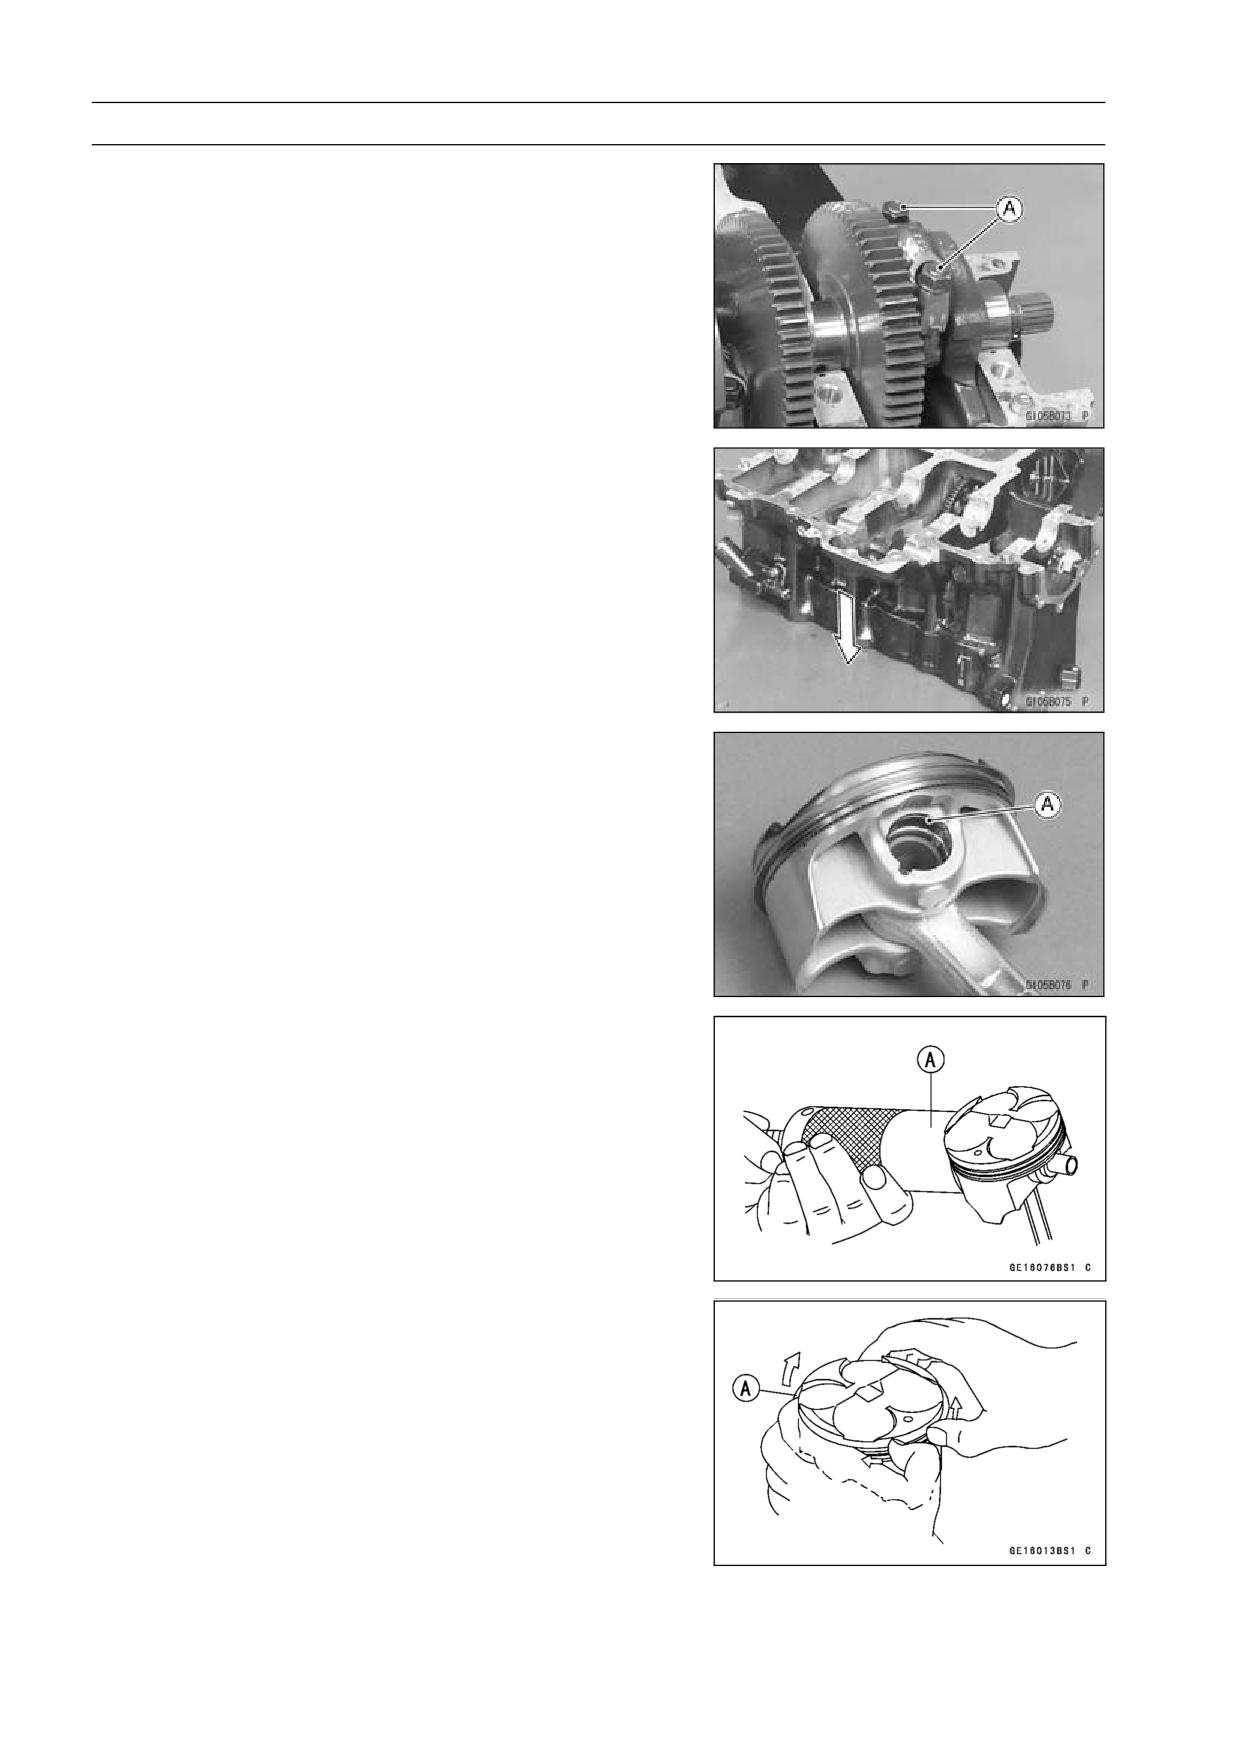
• Measure the main bearing inside diameter, and mark the
upper crankcase half in accordance with the inside diam-
eter.
A: Crankcase Main Bearing Inside Diameter Marks, "○"
mark or no mark.
• Tighten the crankcase bolts to the specified torque (see
Crankcase Assembly).
NOTE
○The mark already on the upper crankcase half should
almost coincide with the measurement.
Crankcase Main Bearing Inside Diameter Marks
○
41.000 ∼ 41.008 mm (1.6142 ∼ 1.6145 in.)
None
41.009 ∼ 41.016 mm (1.6145 ∼ 1.6148 in.)
• Select the proper bearing insert [A] in accordance with the
combination of the crankcase and crankshaft coding.
Size Color [B]
CRANKSHAFT/TRANSMISSION 9-25
Crankshaft and Connecting Rods
Crankcase Main Bearing
Crankshaft Main Journal
Bearing Insert
Inside Diameter Marking
Diameter Marking
Size Color
Part Number
Journal Nos.
92139-0134
1, 3, 5
○
1
Brown
92139-0137
2, 4
None
1
92139-0133
1, 3, 5
Black
○
None
92139-0136
2, 4
92139-0132
1, 3, 5
None
None
Blue
92139-0135
2, 4
• Install the new inserts in the crankcase halves and check
insert/journal clearance with the plastigage.
9-26 CRANKSHAFT/TRANSMISSION
Pistons
Piston Removal
• Split the crankcase (see Crankcase Splitting).
• Remove the connecting rod nuts [A].
• Remove the connecting rod big end caps.
• Remove the crankshaft.
• Remove the piston to the cylinder head side.
• Remove the piston pin snap ring [A].
• Remove the piston pins.
Special Tool - Piston Pin Puller Assembly [A]: 57001-910
• Remove the pistons.
• Carefully spread the ring opening with your thumbs and
then push up on the opposite side of the ring [A] to remove
it.
• Remove the 3-piece oil ring with your thumbs in the same
manner.
CRANKSHAFT/TRANSMISSION 9-27
Pistons
Piston Installation
• Apply molybdenum disulfide oil solution to the oil ring ex-
pander, and install the oil ring expander [A] in the bottom
piston ring groove so the ends [B] butt together.
• Apply molybdenum disulfide oil solution to the oil ring steel
rails, and install the oil ring steel rails, one above the ex-
pander and one below it.
○Spread the rail with your thumbs, but only enough to fit
the rail over the piston.
○Release the rail into the bottom piston ring groove.
NOTE
○The oil ring rails have no “top” or “bottom”.
• Do not mix up the top and second ring.
• Install the top ring [A] so that the "R" mark [B] faces up.
• Install the second ring [C] so that the "RN" mark [D] faces
up.
○Apply molybdenum disulfide oil solution to the piston
rings.
NOTE
○If a new piston is used, use new piston ring.
• Fit a new piston pin snap ring into the side of the piston
so that the ring opening [A] does not coincide with the slit
[B] of the piston pin hole.
○Apply molybdenum disulfide oil solution to the piston pins
and piston journals.
○When installing the piston pin snap ring, compress it only
enough to install it and no more.
CAUTION
Do not reuse snap rings, as removal weakens and
deforms them. They could fall out and score the
cylinder wall.
• The piston ring openings must be positioned as shown in
the figure. The openings of the oil ring steel rails must be
about 30-40° of angle from the opening of the top ring.
Top Ring [A]
Second Ring [B]
Oil Ring Steel Rails [C]
Oil Ring Expander [D]
Hollow [E]
30 ∼ 40° [F]
9-28 CRANKSHAFT/TRANSMISSION
Pistons
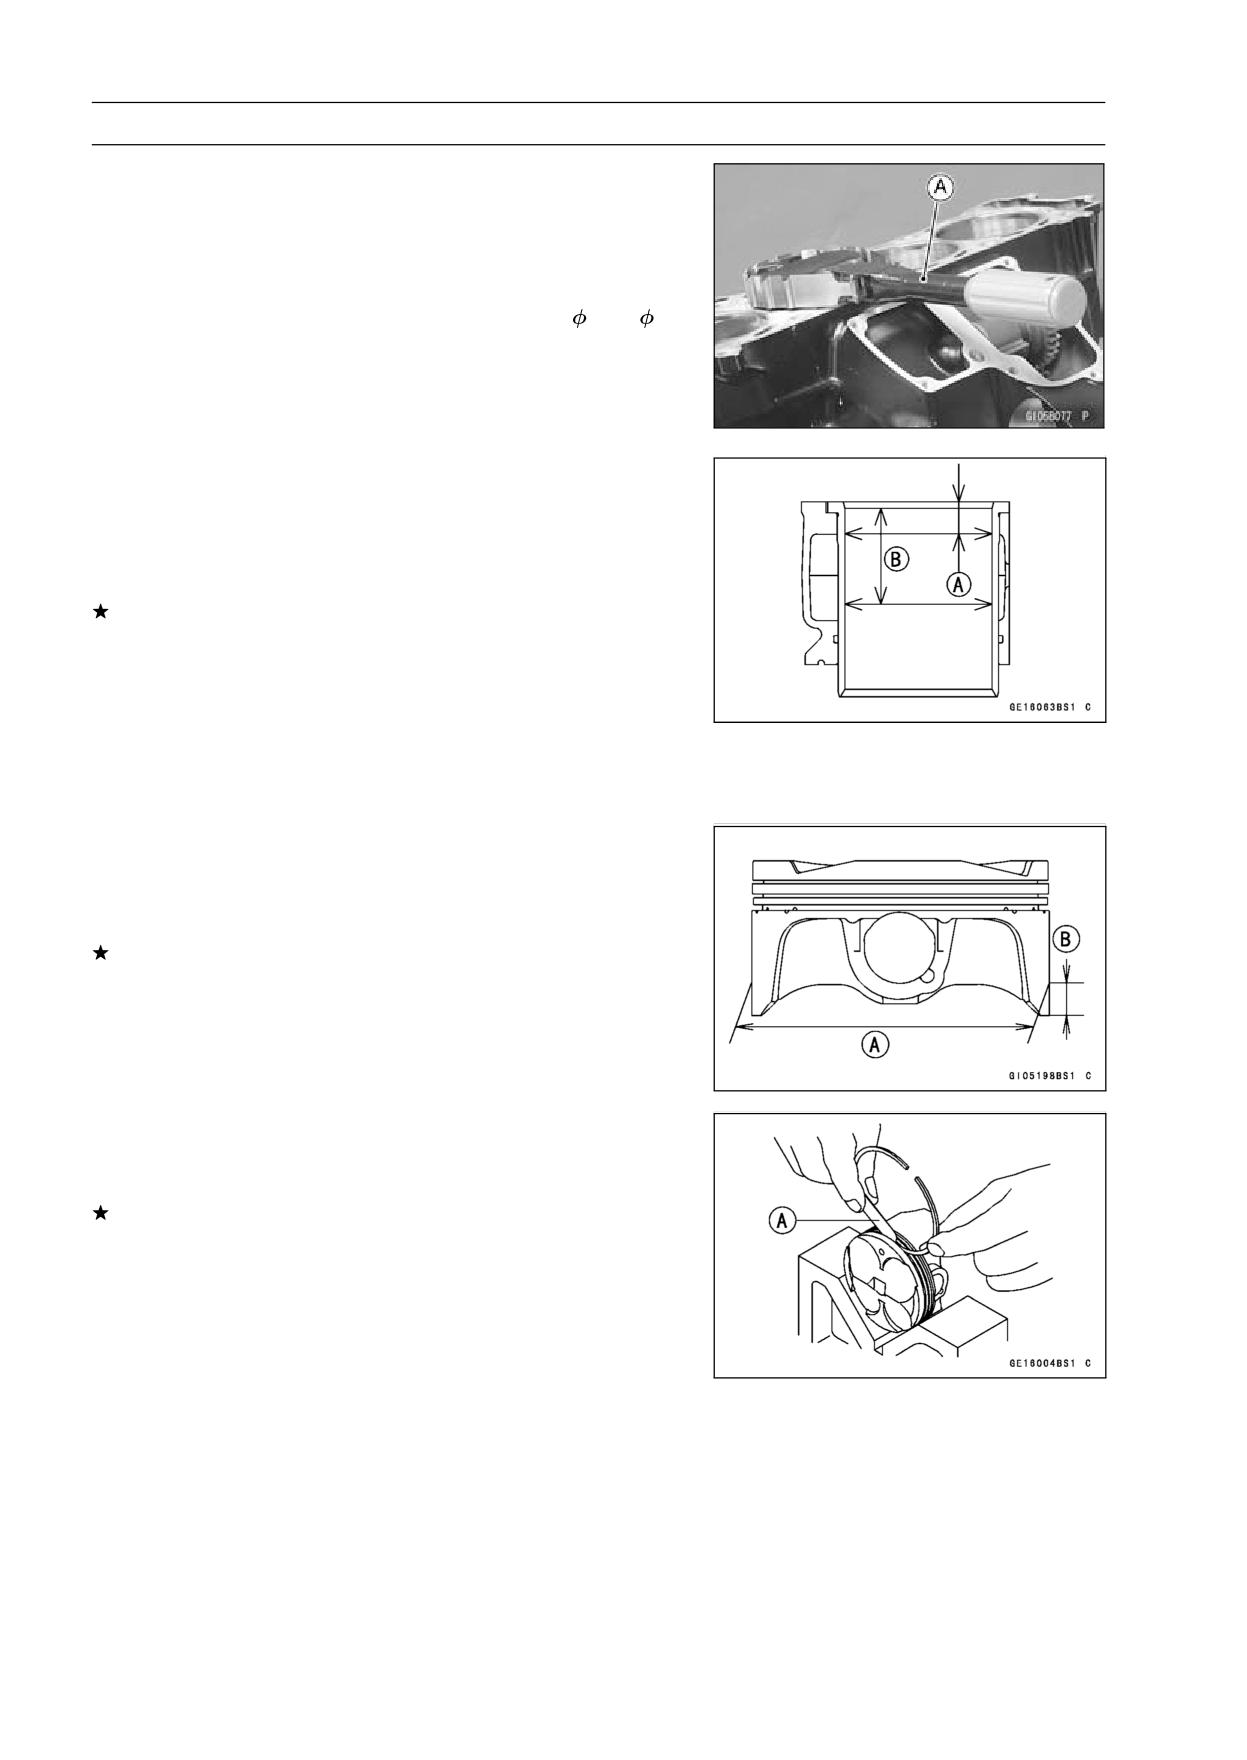
• Install the piston with its marking hollow facing exhaust
side.
• Using the piston ring compressor assy [A] to install the
piston from the cylinder head side.
Special Tools - Piston Ring Compressor Grip: 57001-1095
Piston Ring Compressor Belt,
80 ∼
91:
57001-1320
• Install the crankshaft.
• Install the connecting rod to the crankshaft (see Connect-
ing Rod Installation).
Cylinder Wear (Upper Crankcase)
• Since there is a difference in cylinder wear (upper
crankcase) in different directions, take a side-to-side and
a front-to-back measurement at each of the two locations
(total of four measurements) shown in the figure.
If any of the cylinder inside diameter measurements ex-
ceeds the service limit, replace the crankcase.
10 mm (0.39 in.) [A]
60 mm (2.36 in.) [B]
Cylinder Inside Diameter
Standard:
83.994 ∼ 84.006 mm (3.3068 ∼ 3.3073 in.)
Service Limit:
84.10 mm (3.3110 in.)
Piston Wear
• Measure the outside diameter [A] of each piston 10 mm
(0.39 in.) [B] up from the bottom of the piston at a right
angle to the direction of the piston pin.
If the measurement is under service limit, replace the pis-
ton.
Piston Diameter
Standard:
83.959 ∼ 83.974 mm (3.3055 ∼ 3.3061 in.)
Service Limit:
83.81 mm (3.2996 in.)
Piston Ring, Piston Ring Groove Wear
• Check for uneven groove wear by inspecting the ring seat-
ing.
The rings should fit perfectly parallel to groove surfaces.
If not, replace the piston and all the piston rings.
• With the piston rings in their grooves, make several mea-
surements with a thickness gauge [A] to determine piston
ring/groove clearance.
Piston Ring/Groove Clearance
Standard:
Top
0.03 ∼ 0.07 mm (0.0012 ∼ 0.0028 in.)
Second
0.02 ∼ 0.06 mm (0.0008 ∼ 0.0024 in.)
Service Limit:
Top
0.17 mm (0.0067 in.)
Second
0.16 mm (0.0063 in.)
CRANKSHAFT/TRANSMISSION 9-29
Pistons
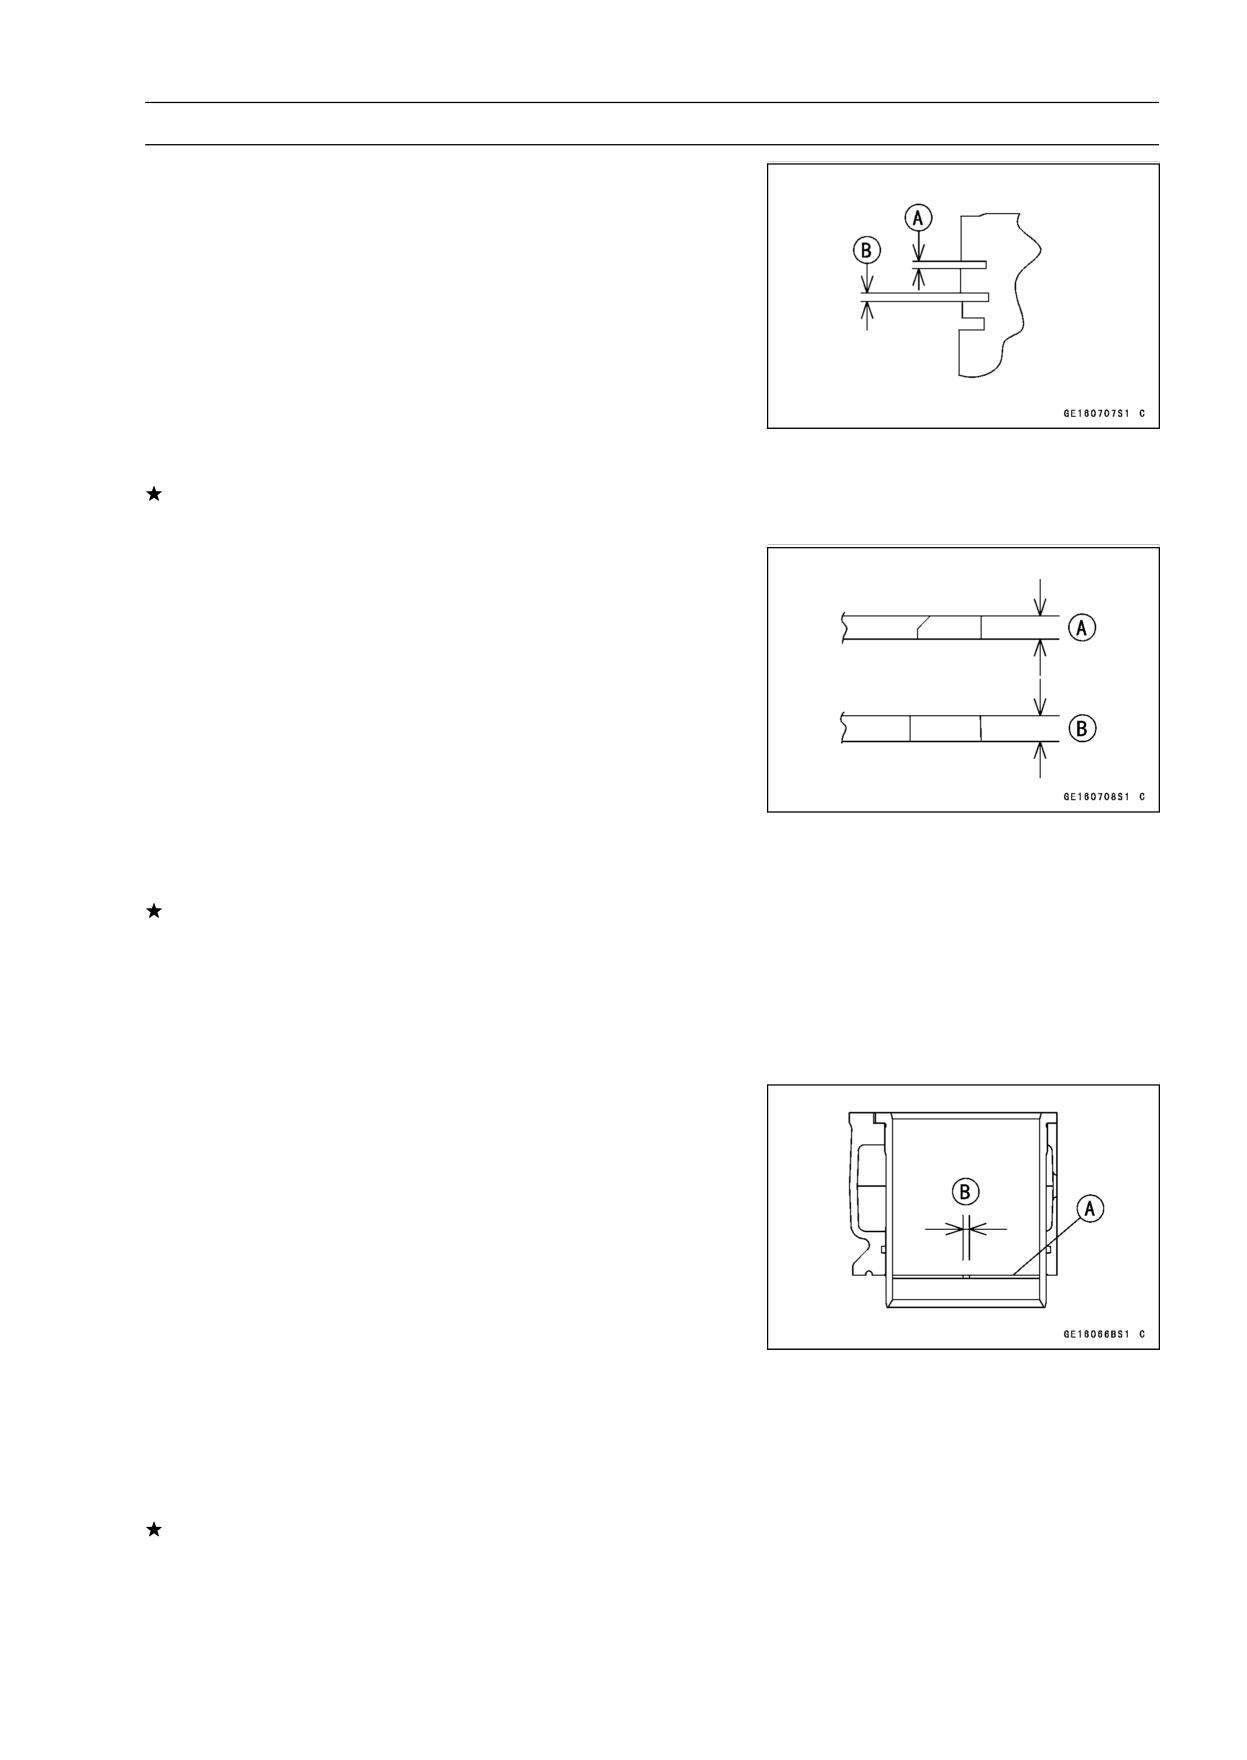
Piston Ring Groove Width
• Measure the piston ring groove width.
○Use a vernier caliper at several points around the piston.
Piston Ring Groove Width
Standard:
Top [A]
0.92 ∼ 0.94 mm (0.0362 ∼ 0.0370 in.)
Second [B]
1.01 ∼ 1.03 mm (0.0398 ∼ 0.0406 in.)
Service Limit:
Top [A]
1.02 mm (0.040 in.)
Second [B]
1.11 mm (0.044 in.)
If the width of any of the two grooves is wider than the
service limit at any point, replace the piston.
Piston Ring Thickness
• Measure the piston ring thickness.
○Use the micrometer to measure at several points around
the ring.
Piston Ring Thickness
Standard:
Top [A]
0.87 ∼ 0.89 mm (0.0343 ∼ 0.0350 in.)
Second [B]
0.97 ∼ 0.99 mm (0.0382 ∼ 0.0390 in.)
Service Limit:
Top [A]
0.80 mm (0.032 in.)
Second [B]
0.90 mm (0.035 in.)
If any of the measurements is less than the service limit
on either of the rings, replace all the rings.
NOTE
○When using new rings in a used piston, check for un-
even groove wear. The rings should fit perfectly parallel
to the groove sides. If not, replace the piston.
Piston Ring End Gap
• Place the piston ring [A] inside the cylinder (upper
crankcase), using the piston to locate the ring squarely
in place. Set it close to the bottom of the cylinder, where
cylinder wear is low.
• Measure the gap [B] between the ends of the ring with a
thickness gauge.
Piston Ring End Gap
Standard:
Top
0.20 ∼ 0.30 mm (0.0079 ∼ 0.0118 in.)
Second
0.40 ∼ 0.55 mm (0.0157 ∼ 0.0217 in.)
Service Limit:
Top
0.6 mm (0.024 in.)
Second
0.8 mm (0.031 in.)
If the end gap of either ring is greater than the service
limit, replace all the rings.
9-30 CRANKSHAFT/TRANSMISSION
Balancer
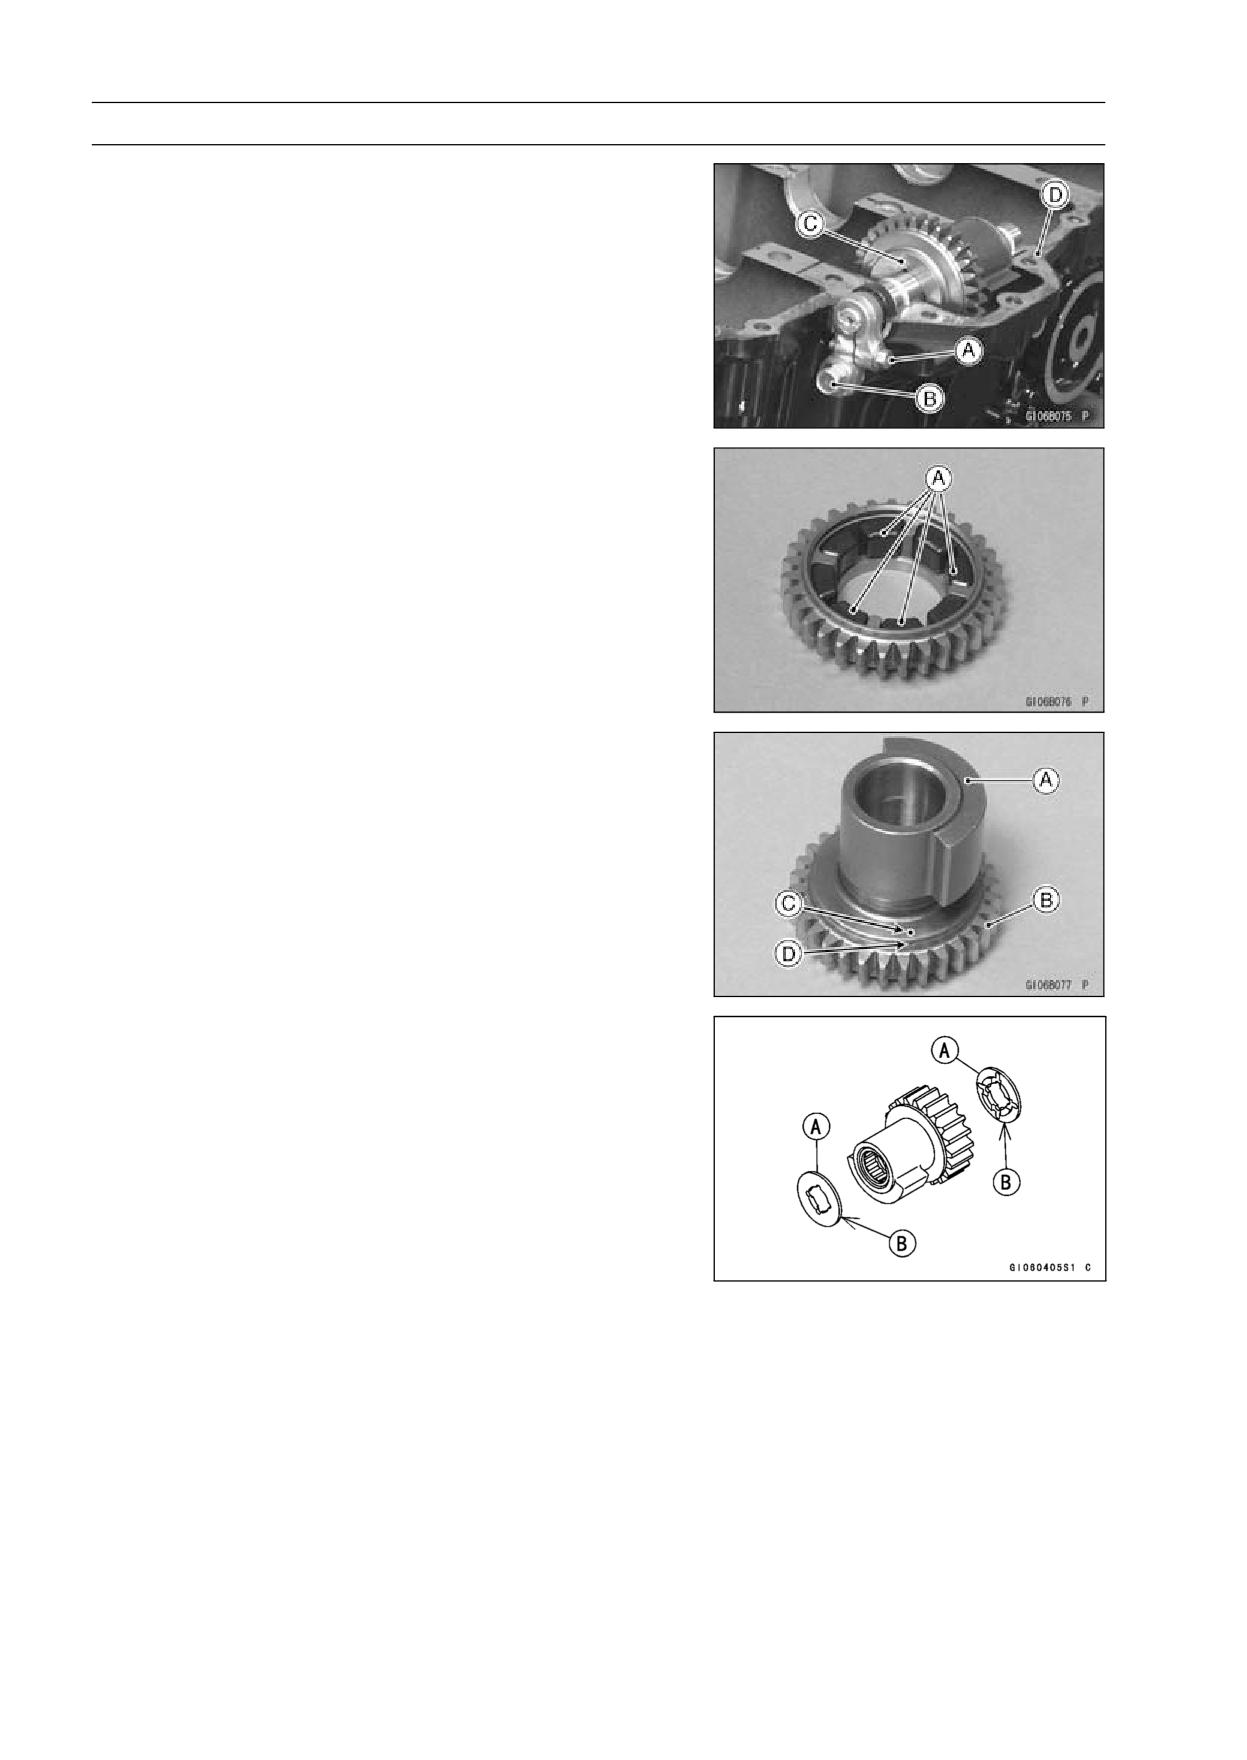
Front Balancer Removal
• Split the crankcase (see Crankcase Splitting).
• Unscrew:
Balancer Shaft Clamp Bolt [A]
Balancer Shaft Clamp Lever Bolt [B]
• Remove the front balancer [C] from the lower crankcase
half [D]
Front Balancer Installation
• Check that the rubber dampers [A] are in place as shown.
• Apply molybdenum disulfide oil solution to the damper
contact portions of the balancer weight.
• Install the balancer weight [A] into the gear [B].
○Align the mark [C] of the balancer weight to the groove
[D] of the gear.
• Apply molybdenum disulfide oil solution to the needle
bearings. Insert the needle bearings.
• Fit the copper washers [A] on both ends of the weight and
gear assembly. The projected sides [B] face inward.
CRANKSHAFT/TRANSMISSION 9-31
Balancer
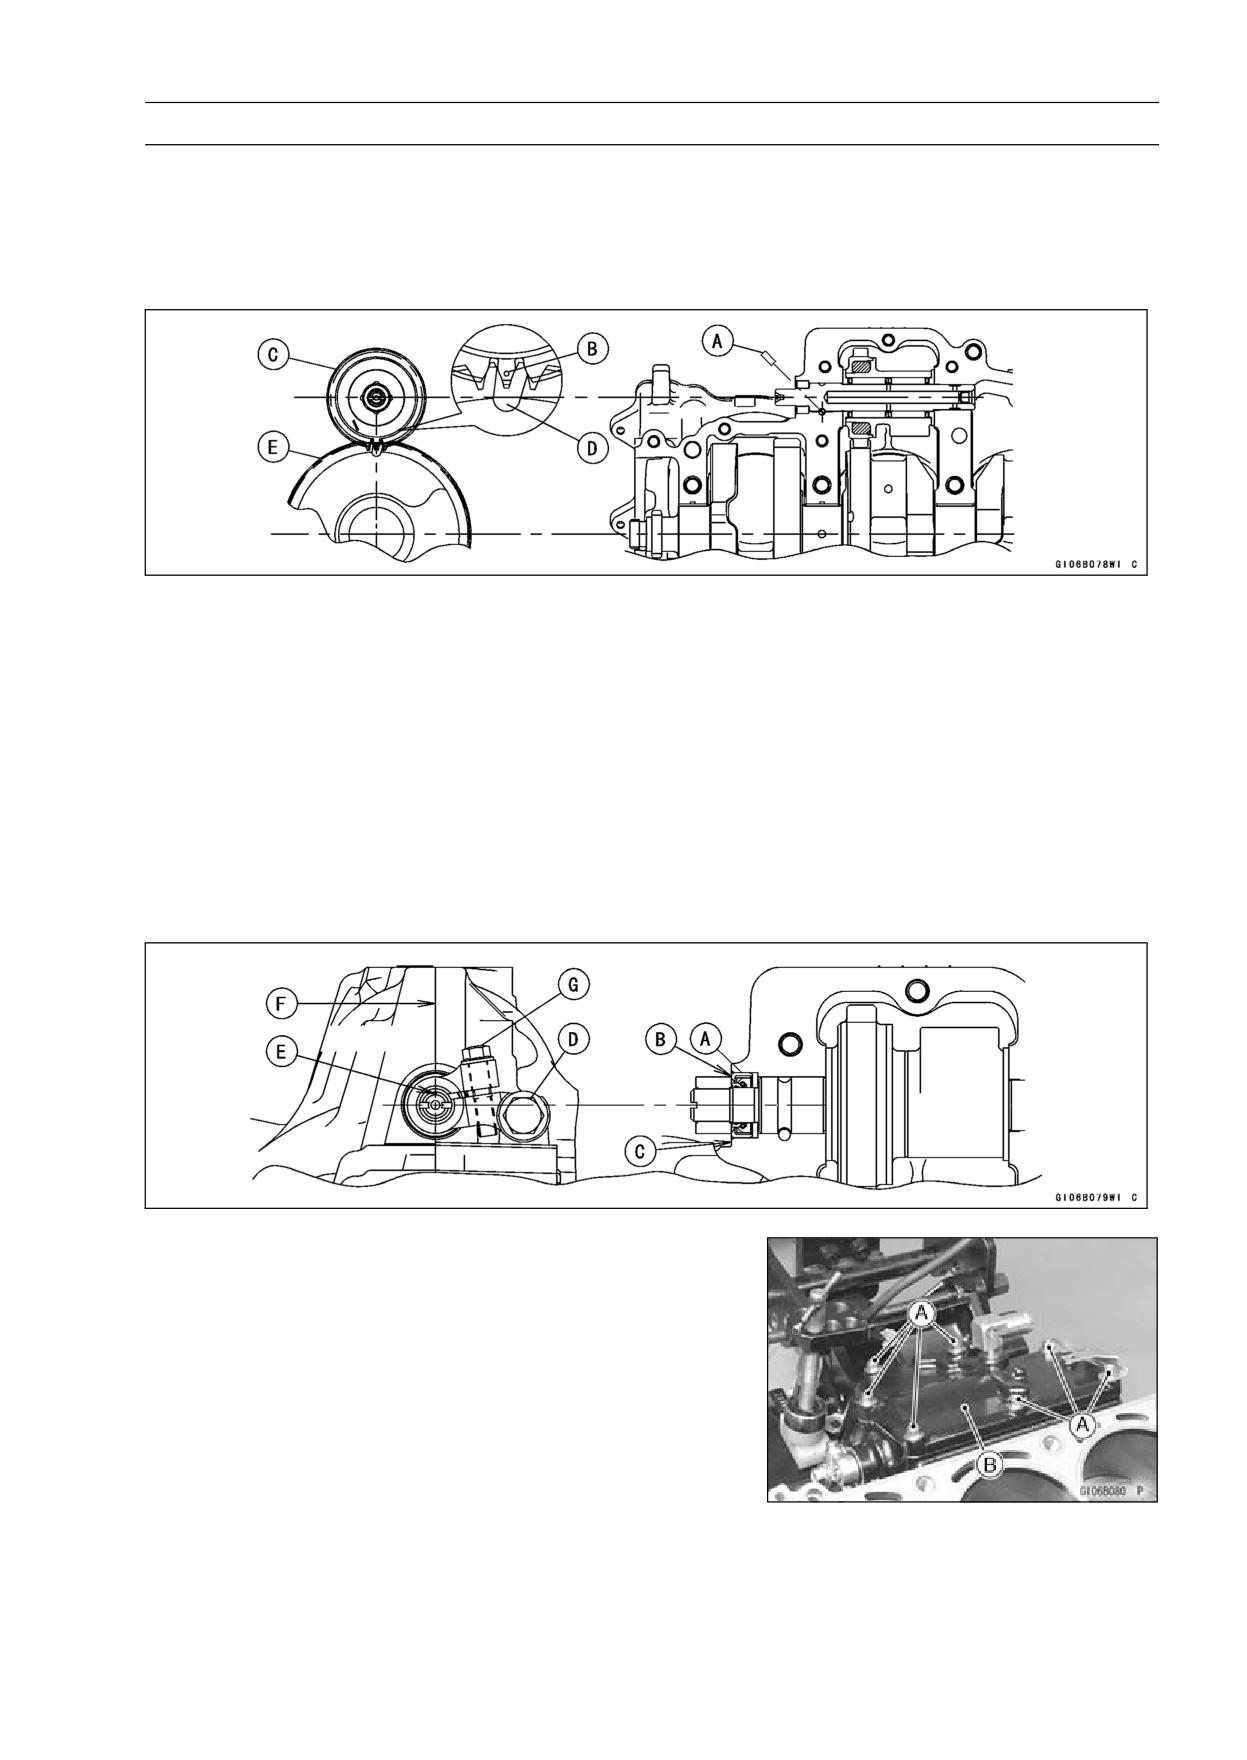
• Position the crankshaft at 2, 3 position TDC.
• Insert the pin [A] as shown.
• Set the front balancer on the upper crankcase half.
○Align the punch mark [B] on the balancer gear [C] with the
mark [D] on the balancer drive gear [E] of crankshaft.
• Assemble the crankcase (see Crankcase Assembly).
• Install the new oil seal [A] so that its surface [B] is flush
with the surface of the crankcase [C].
○Fill the oil seal lips with grease.
• Tighten the balancer shaft clamp lever bolt [D]
Torque - Balancer Shaft Clamp Lever Bolt:
25 N·m (2.5
kgf·m, 18 ft·lb)
• Turn the balancer shaft so that its mark [E] is aligned with
the crankcase mating line [F].
• Tighten the balancer shaft clamp bolt [G]
Torque - Balancer Shaft Clamp Bolt: 9.8 N·m (1.0 kgf·m, 87
in·lb)
Rear Balancer Removal
• Remove the engine (see Engine Removal in the Engine
Removal/Installation chapter).
• Remove:
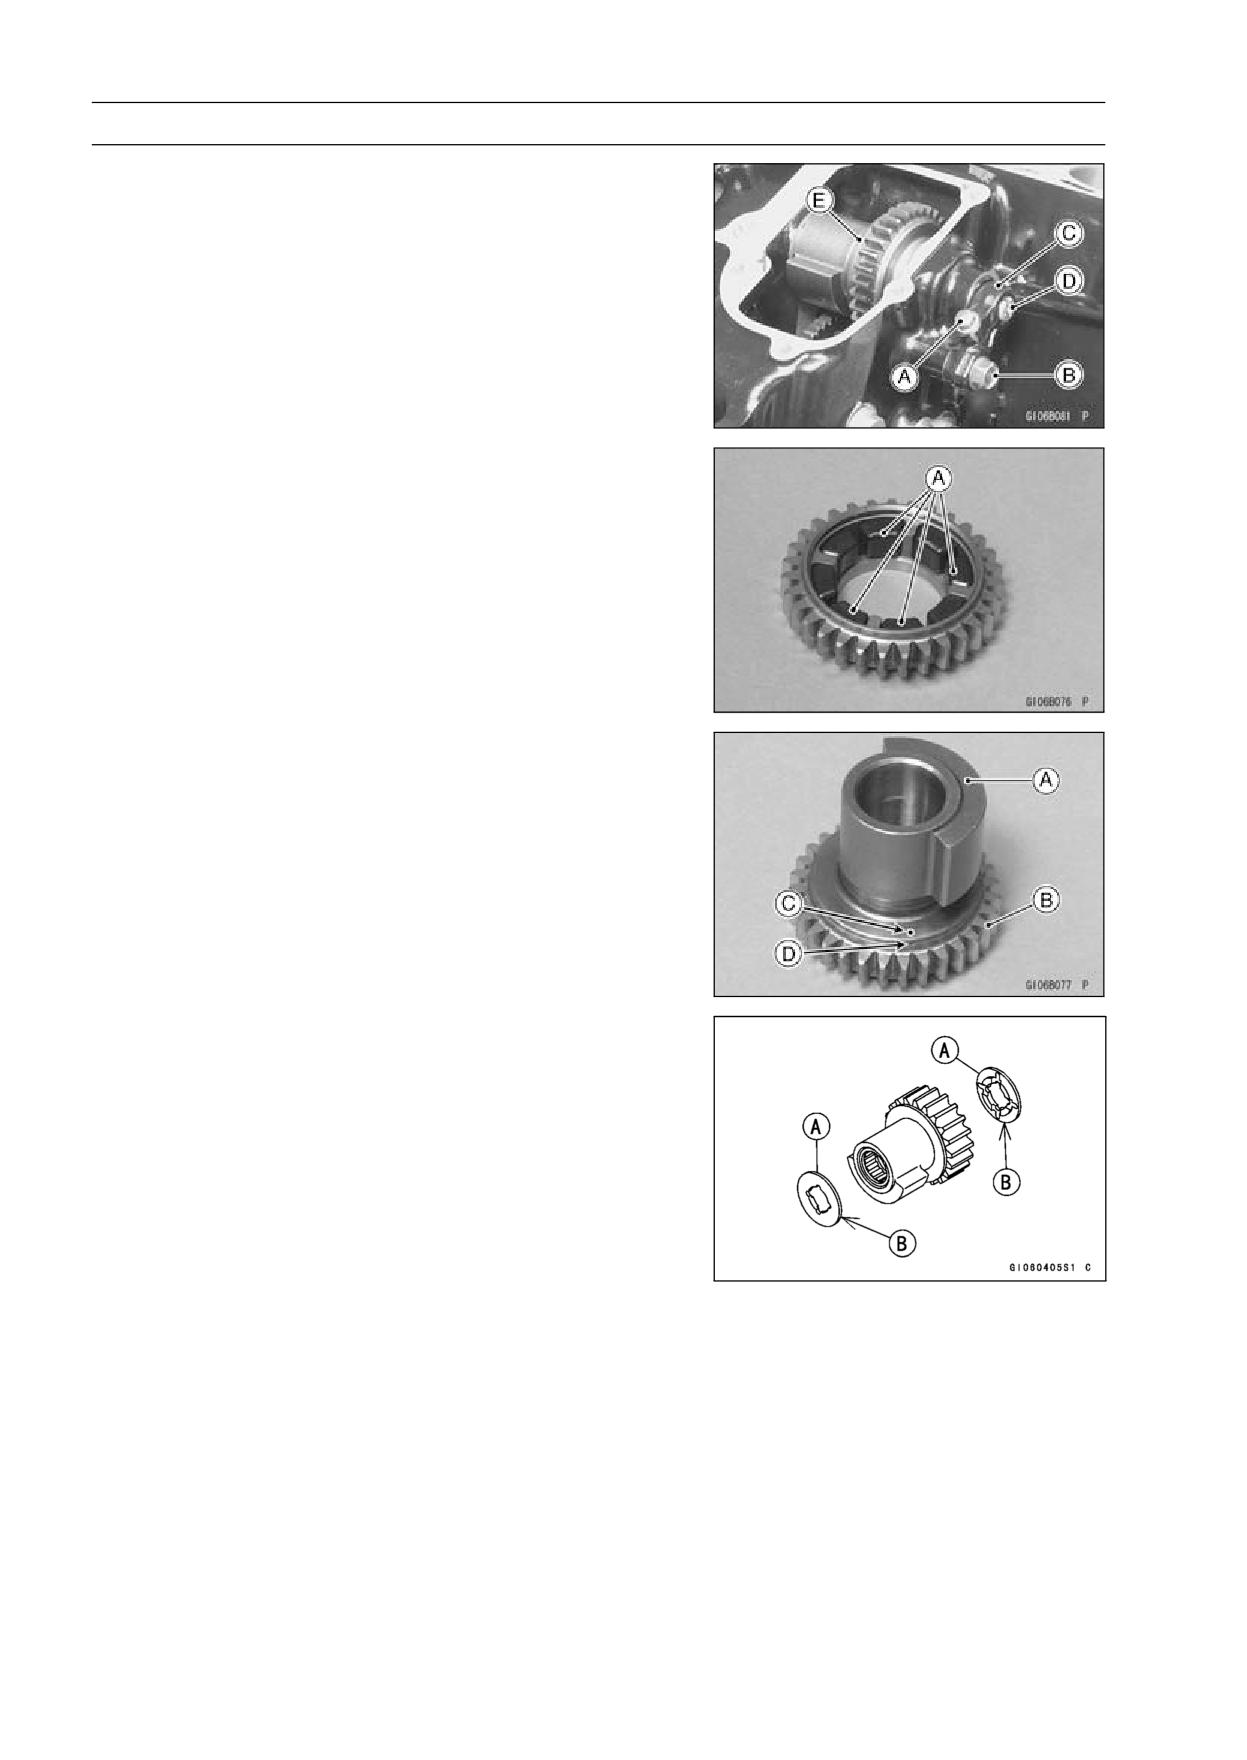
Breather Cover Bolts [A]
Breather Cover [B]
9-32 CRANKSHAFT/TRANSMISSION
Balancer
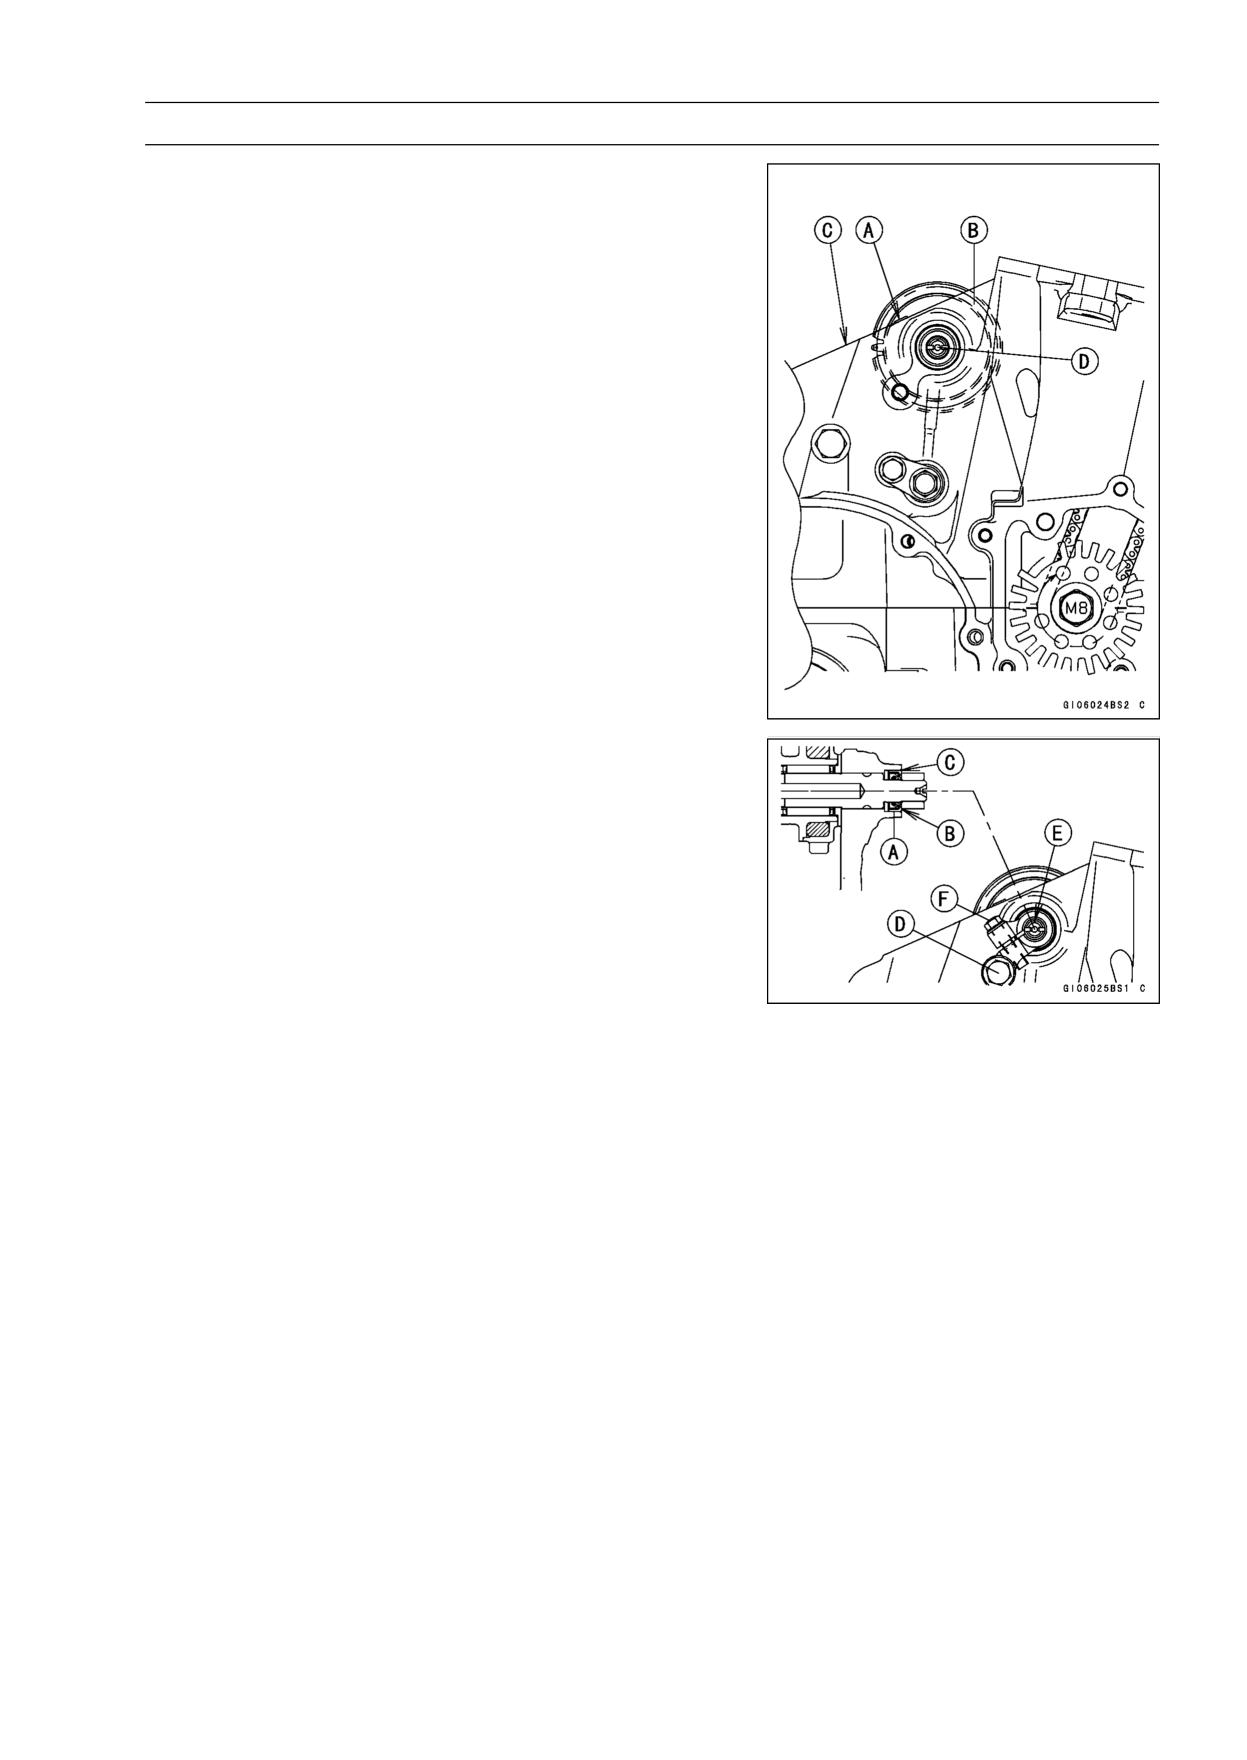
• Unscrew the balancer shaft clamp bolt [A], and balancer
shaft clamp lever bolt [B], and pull off the clamp lever [C].
• Pull the balancer shaft [D] out of the crankcase. The bal-
ancer weight and gear assembly [E] come off with needle
bearings and copper washers.
Rear Balancer Installation
• Check that the rubber dampers [A] are in place as shown.
• Apply molybdenum disulfide oil solution to the damper
contact portions of the balancer weight.
• Install the balancer weight [A] into the gear [B].
○Align the mark [C] of the balancer weight to the groove
[D] of the gear.
• Apply molybdenum disulfide oil solution to the needle
bearings. Insert the needle bearings.
• Fit the copper washers [A] on both ends of the weight and
gear assembly. The projected sides [B] face inward.
CRANKSHAFT/TRANSMISSION 9-33
Balancer
• Position the crankshaft at # 2, 3 position TDC or at # 1, 4
position TDC.
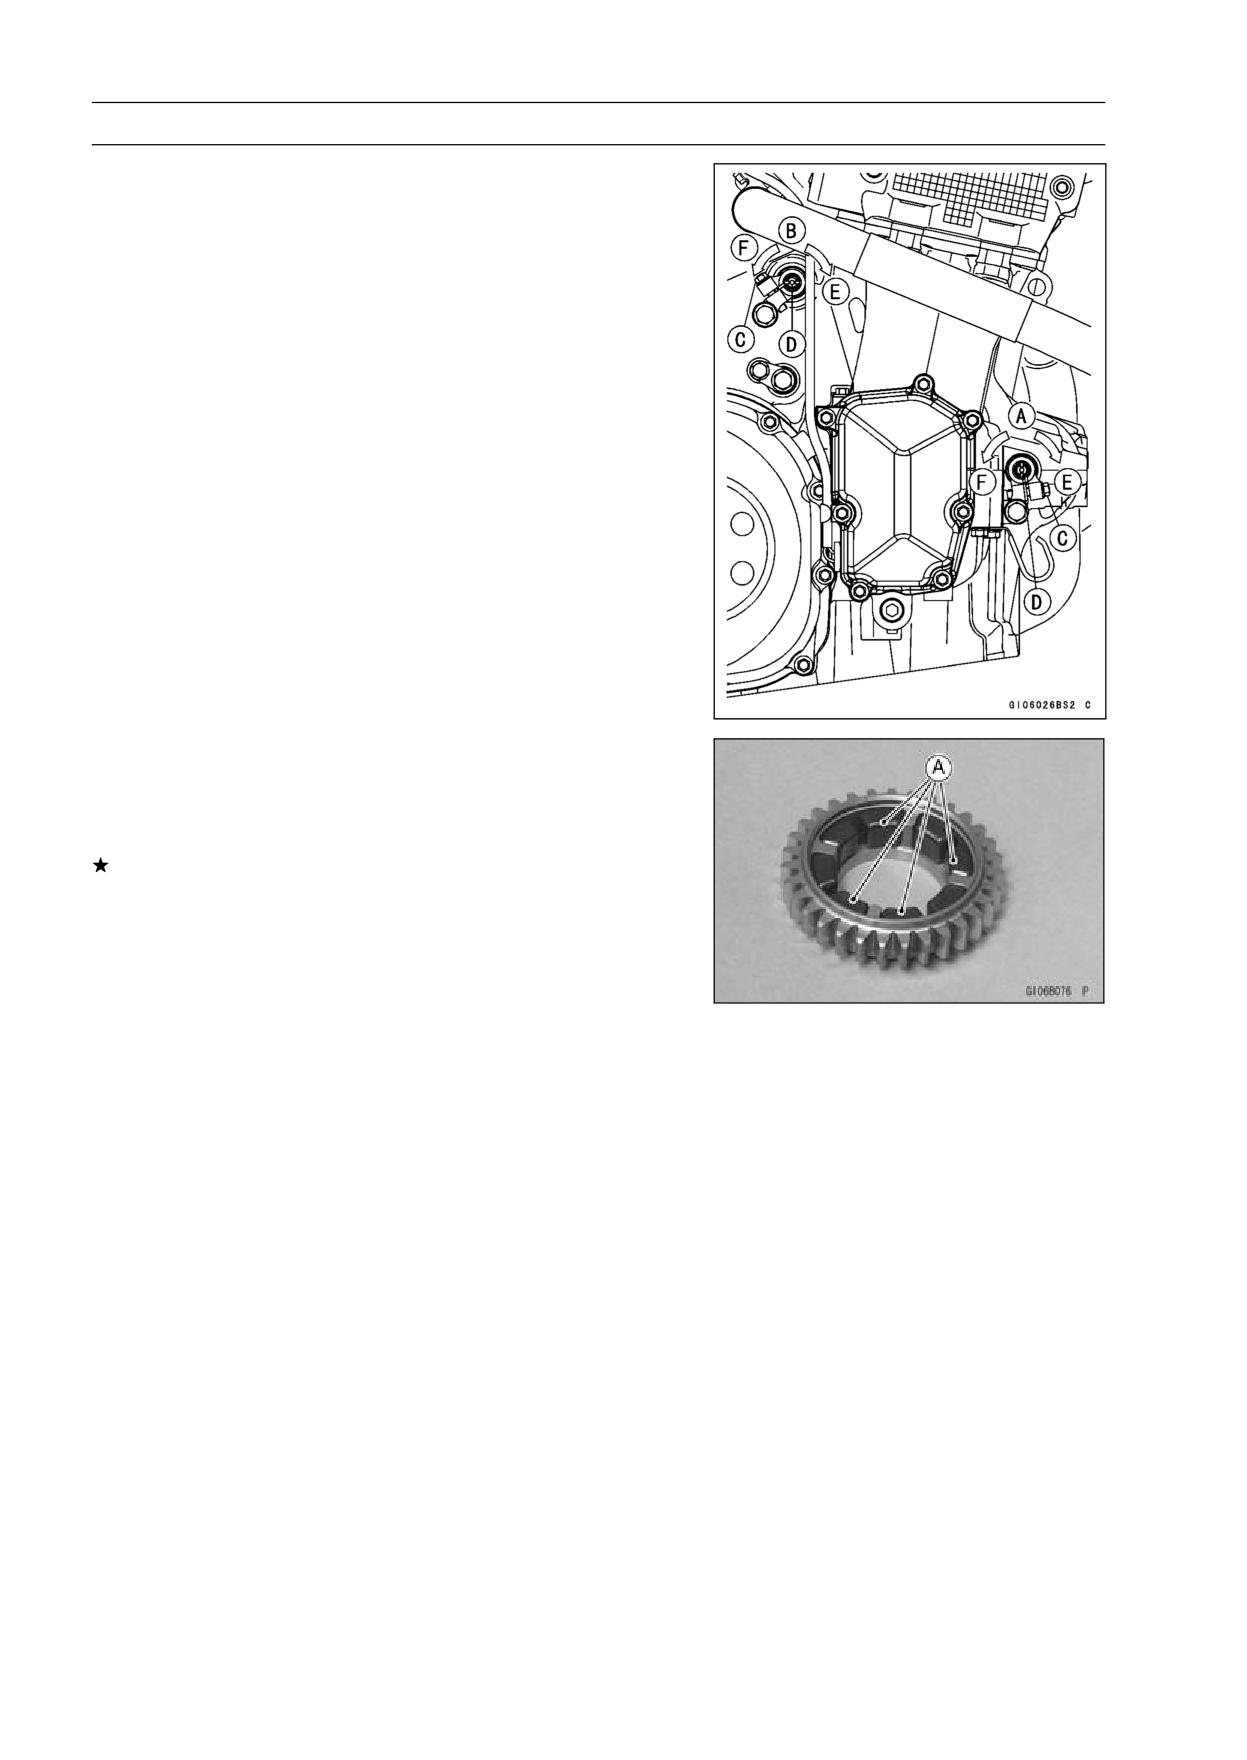
• Aligin the mark [A] on the balancer gear [B] with the mat-
ing surface [C] of the upper crankcase half.
• Install the balancer shaft [D] and then align the balancer
gear with the starter motor clutch gear.
• Install the new oil seal [A] so that its surface [B] is flush
with the surface of crankcase [C].
○Fill the oil seal lips with grease.
• Tighten the balancer shaft clamp lever bolt [D].
Torque - Balancer Shaft Clamp Lever Bolt:
25 N·m (2.5
kgf·m, 18 ft·lb)
• Turn the balancer shaft so that its mark [E] is in position
as shown.
• Tighten the balancer shaft clamp bolt [F].
Torque - Balancer Shaft Clamp Bolt: 9.8 N·m (1.0 kgf·m, 87
in·lb)
9-34 CRANKSHAFT/TRANSMISSION
Balancer
Balancer Adjustment
• First, adjust the front balancer [A], next the rear balancer
[B].
○For the front balancer adjustment, remove the lower fair-
ing (see Lower Fairing Removal in the Frame chapter).
• Start the engine and warm it up thoroughly.
• Adjust the balancer gear backlash with the engine idling.
The amount of backlash can be changed by turning the
balancer shaft which has eccentric journals.
○Start the engine and let it idle.
○Loosen the clamp bolt [C] and turn the balancer shaft
[D] clockwise [E] until the balancer gear makes a whin-
ing sound.
○Turn the shaft counter-clockwise [F] until the balancer
gear whining sound disappears and tighten the clamp
bolt.
Torque - Balancer Shaft Clamp Bolt: 9.8 N·m (1.0 kgf·m, 98
in·lb)
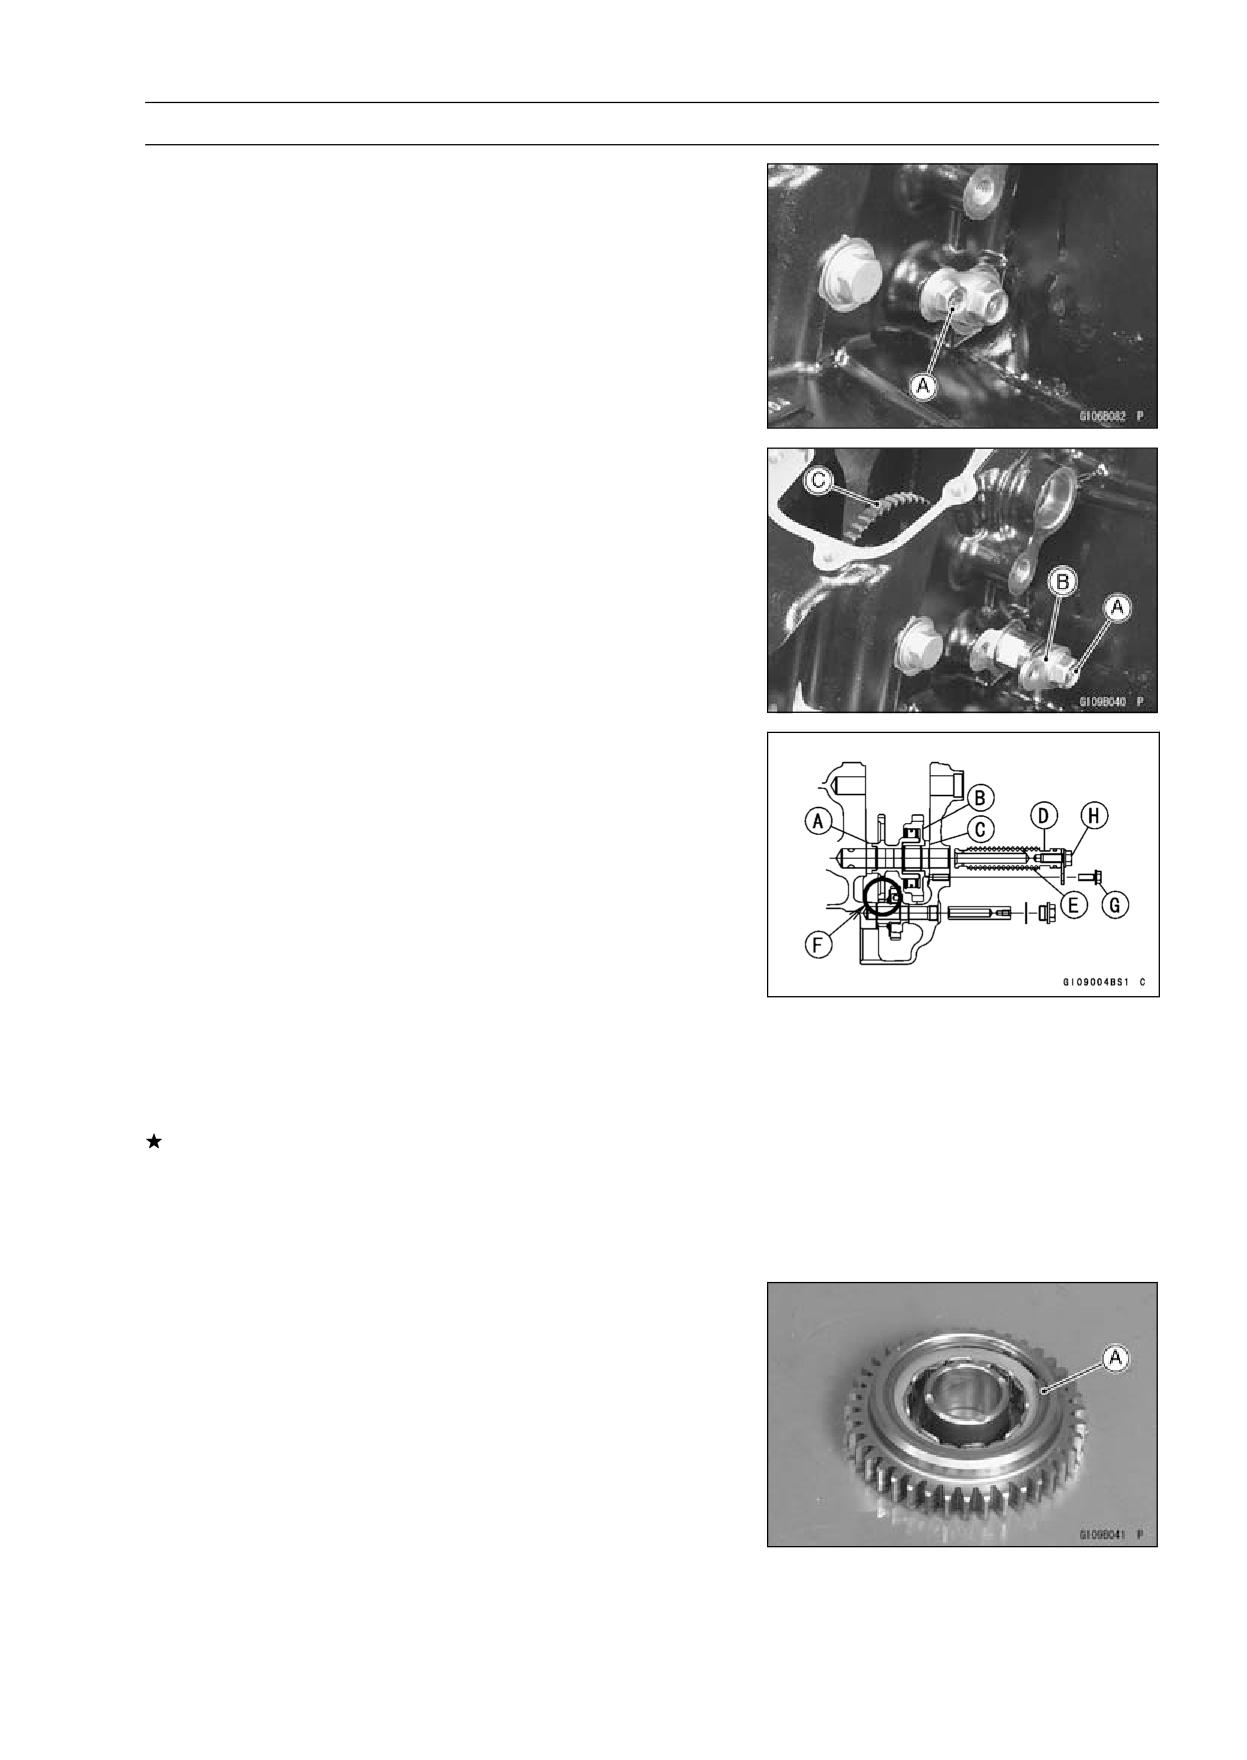
Balancer Damper Inspection
• Remove the balancer and disassemble the weight and
gear assembly.
• Visually inspect the rubber dampers [A].
If they appear damaged or deteriorated, replace them.
CRANKSHAFT/TRANSMISSION 9-35
Starter Motor Clutch and Torque Limiter
Starter Motor Clutch Removal
• Remove the engine (see Engine Removal in the Engine
Removal/Installation chapter).
• Remove the rear balancer (see Rear Balancer Removal).
• Unscrew the starter clutch shaft plate bolt [A].
• Pull the starter clutch shaft bolt [A] with the shaft plate [B]
and starter clutch shaft holding the starter clutch [C].
• Remove the starter clutch.
Starter Motor Clutch Installation
• Install:
Coller (Long) [A]
Starter Motor Clutch [B]
Coller (Short) [C]
Starter Motor Clutch Shaft [D]
○Apply molybdenum disulfide grease [E] to the starter mo-
tor clutch shaft.
• Align [F] the starter motor clutch gear with the torque lim-
iter gear.
• Apply a non-permanent locking agent to the threads of
the starter clutch shaft plate bolt, and tighten it.
Torque - Starter Clutch Shaft Plate Bolt [G]: 9.8 N·m (1.0
kgf·m, 87 in·lb)
If the shaft bolt removed, tighten it.
○Apply a non-permanent locking agent to the threads of
the shaft bolt.
Torque - Starter Clutch Shaft Bolt [H]: 9.8 N·m (1.0 kgf·m,
87 in·lb)
Starter Motor Clutch Disassembly
• Remove the starter motor clutch.
• Pull the driven gear out off from the drive gear.
• Remove:
Flat Washer [A]
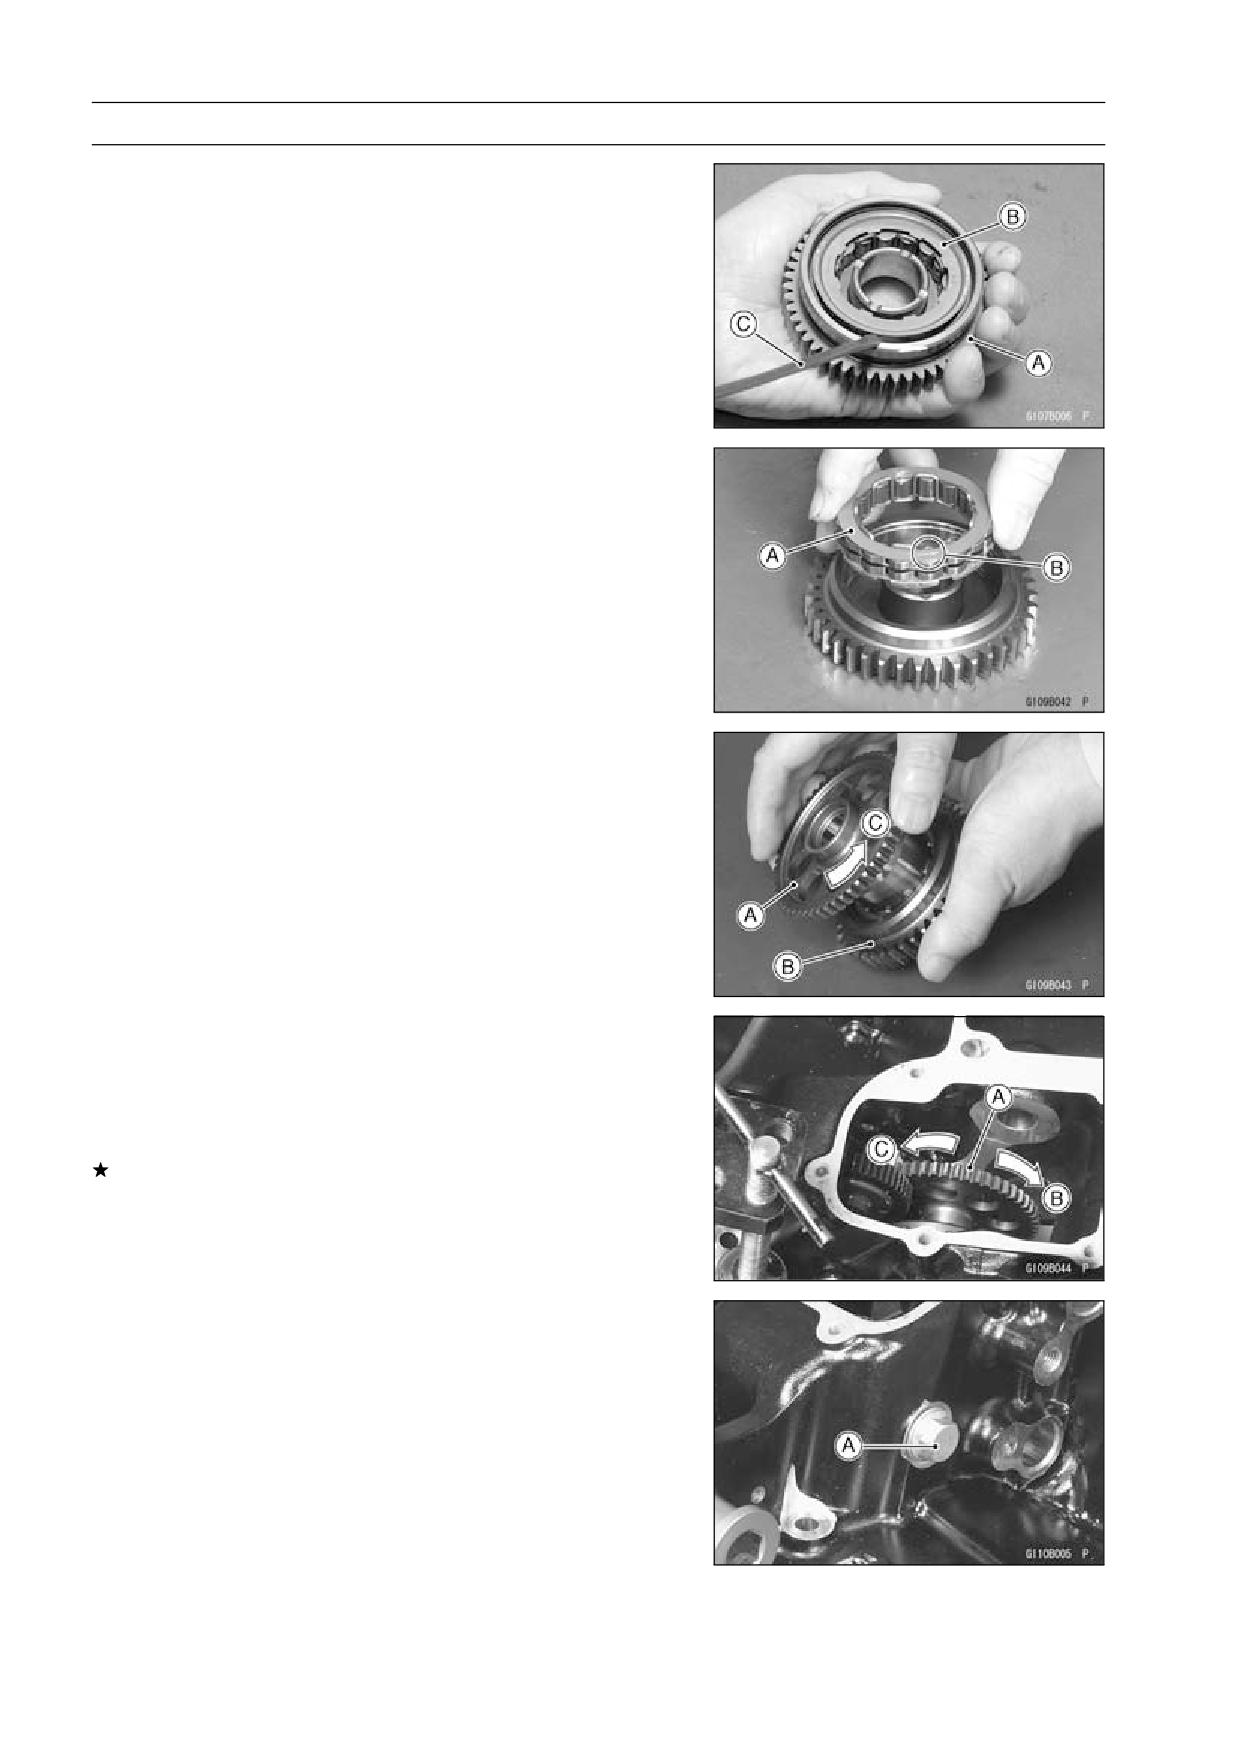
9-36 CRANKSHAFT/TRANSMISSION
Starter Motor Clutch and Torque Limiter
• Holding the drive gear [A] with a hand, take off the one
-way clutch [B] from the gear by using the screw driver
[C].
Starter Motor Clutch Assembly
• Be sure to install the one-way clutch [A] so that its arrow
[B] faces the side of the flat washer.
• Turn in the driven gear [A] to the drive gear [B].
Counterclockwise [C]
Starter Clutch Inspection
• Remove the rear balancer (see Rear Balancer Removal).
• Turn the starter idle gear [A] by hand. When viewed from
the rear side of the engine, the starter idle gear should
turn forward [B] freely, but should not turn backward [C].
If the clutch does not operate as it should or if it makes
noise, disassemble the starter clutch, examine each part
visually, and replace any worn or damaged parts.
Torque Limiter Removal
• Remove:
Rear Balancer (see Rear Balancer Removal)
Starter Motor Clutch (see Starter Motor Clutch Re-
moval).
• Remove the torque limiter bolt [A].
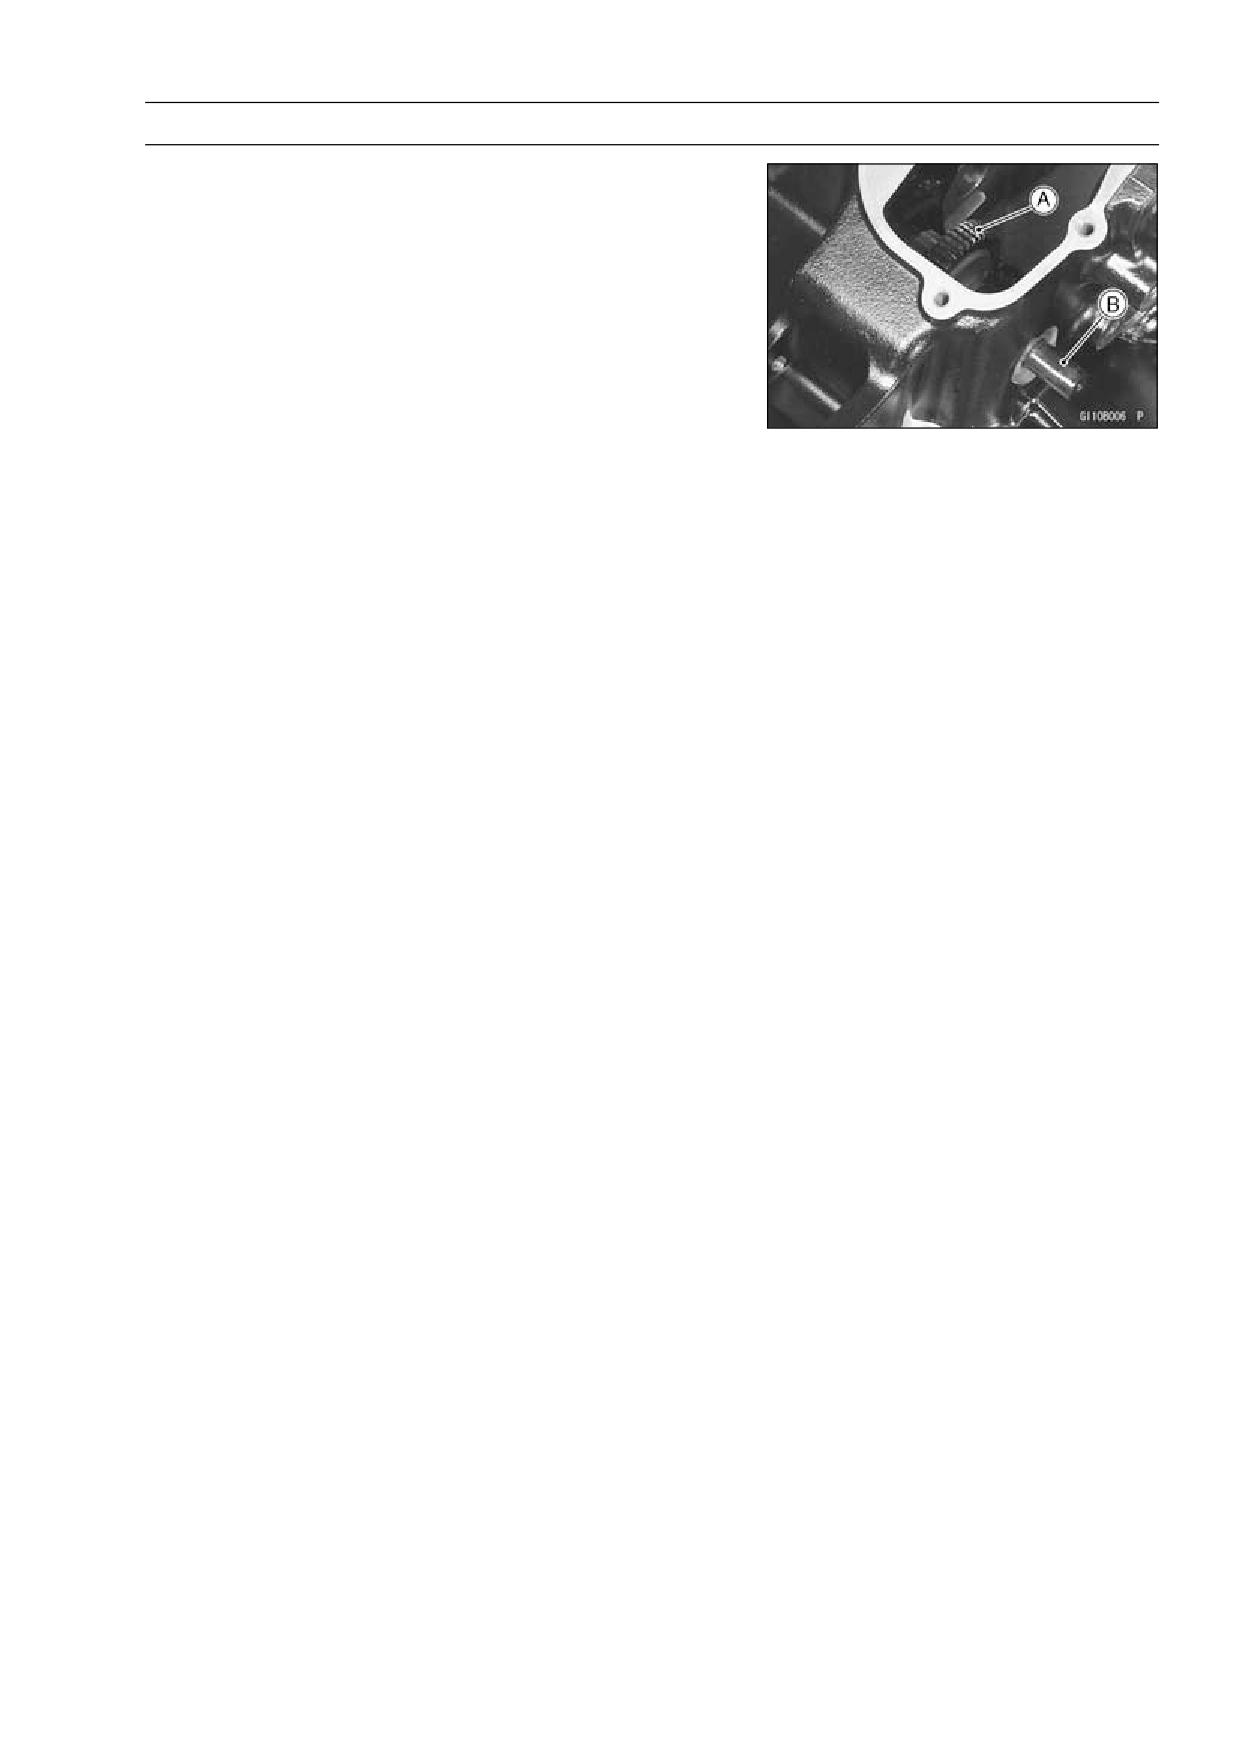
CRANKSHAFT/TRANSMISSION 9-37
Starter Motor Clutch and Torque Limiter
• Holding the torque limiter [A], remove the torque limiter
shaft [B] and the torque limiter.
Torque Limiter Installation
• Replace the O-ring with a new one.
• Apply engine oil to the new O-ring.
• Apply molybdenum disulfide grease to the torque limiter
shaft.
• Install the torque limiter bolt.
○Apply a non-permanent locking agent to the bolt.
Torque - Torque Limiter Bolt: 25 N·m (2.5 kgf·m, 18 ft·lb)
9-38 CRANKSHAFT/TRANSMISSION
Transmission
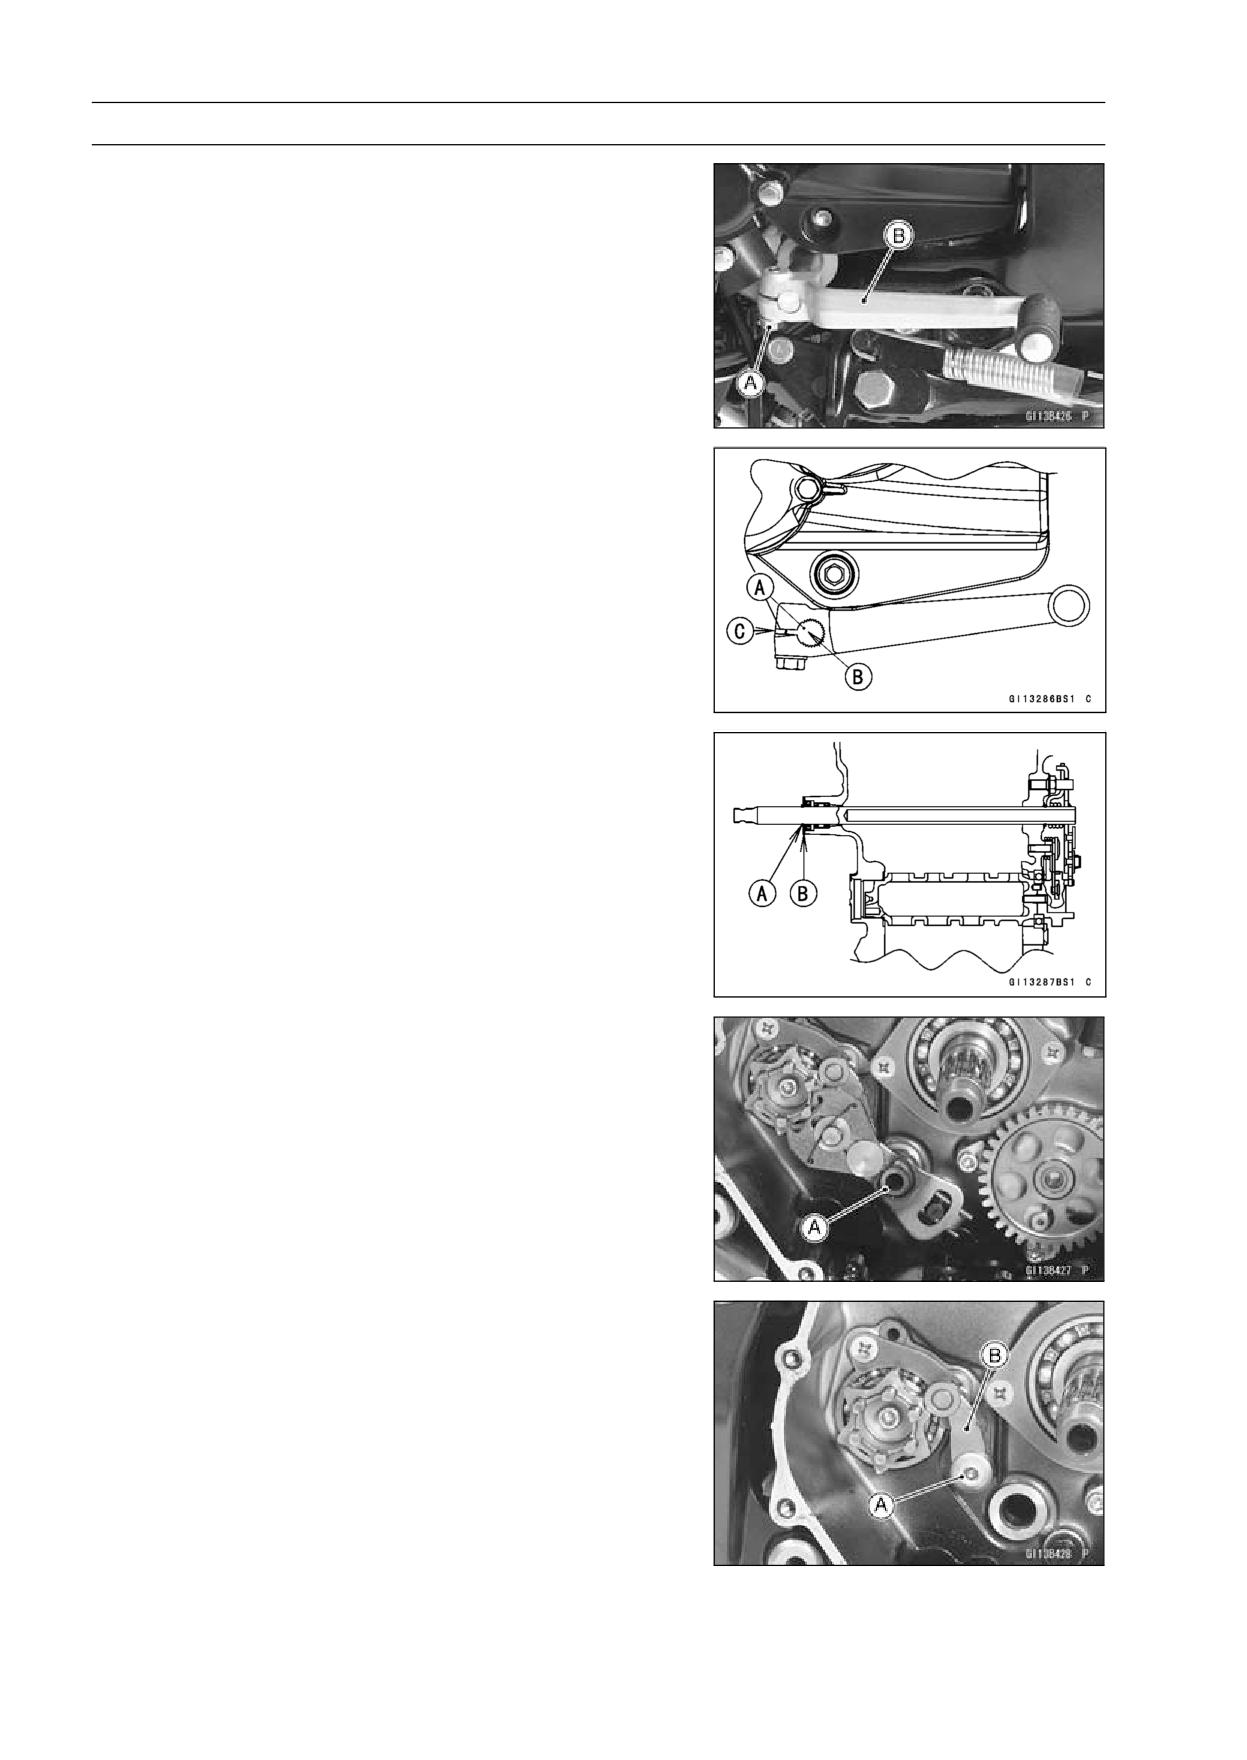
Shift Pedal Removal
• Remove:
Shift Lever Bolt [A]
Shift Lever [B]
Shift Pedal Installation
• Install the shift pedal.
○Align [A] the punch mark [B] on the shift shaft with the
upper surface [C] of shift lever slit.
○Tighten the shift pedal bolt securely.
External Shift Mechanism Removal
• Remove:
Shift Pedal (see Shift Pedal Removal)
Snap Ring [A] and Washer [B]
Clutch (see Clutch Removal in the Clutch chapter)
• Remove the shift shaft assembly [A] while pulling the shift
mechanism arm.
• Remove:
Gear Positioning Lever Bolt [A]
Gear Positioning Lever [B], Collar and Spring
CRANKSHAFT/TRANSMISSION 9-39
Transmission
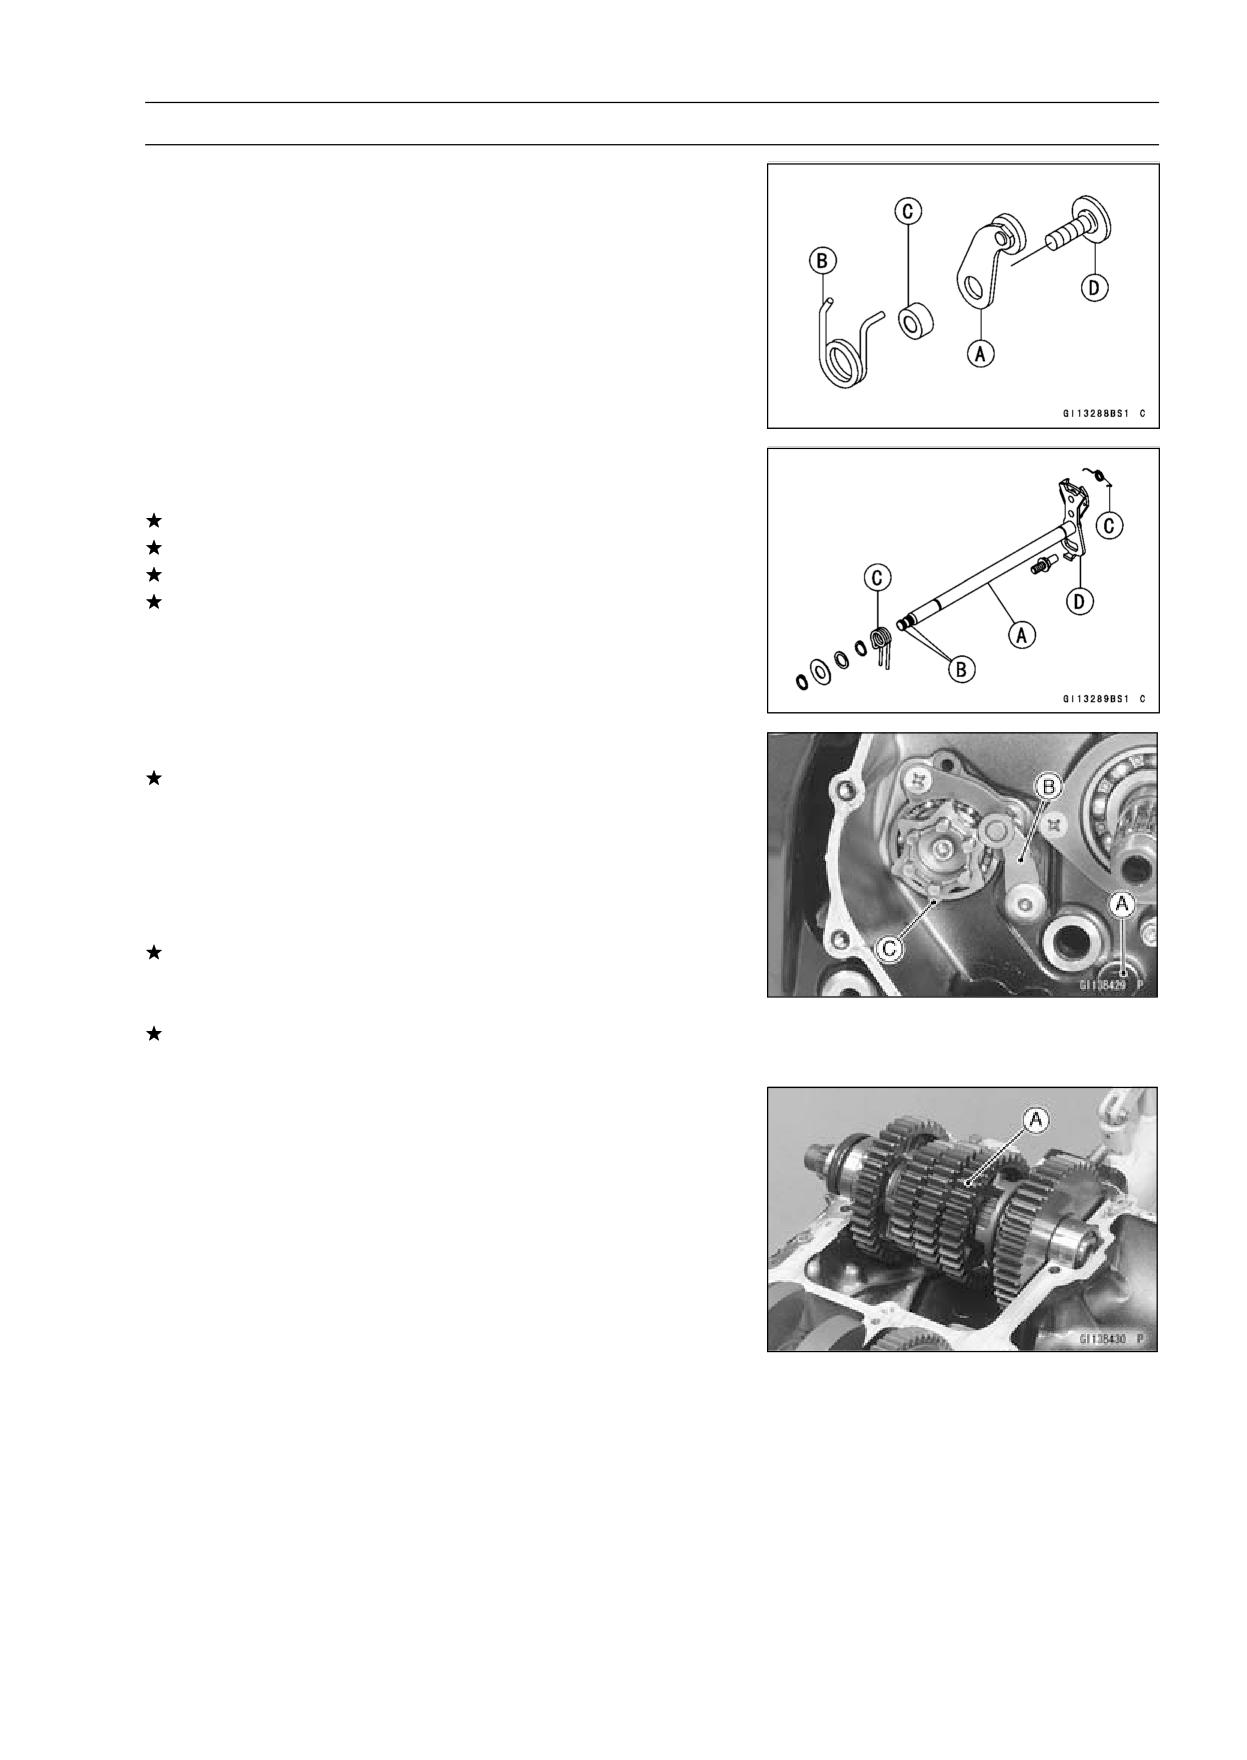
External Shift Mechanism Installation
• Install the gear positioning lever [A] as shown.
Spring [B]
Collar [C]
Bolt [D]
• Tighten:
Torque - Gear Positioning Lever Bolt: 12 N·m (1.2 kgf·m,
106 in·lb)
External Shift Mechanism Inspection
• Examine the shift shaft [A] for any damage.
If the shaft is bent, straighten or replace it.
If the serration [B] are damaged, replace the shaft.
If the springs [C] are damaged in any way, replace them.
If the shift mechanism arm [D] is damaged in any way,
replace the arm.
• Check the return spring pin [A] is not loose.
If it is loose, unscrew it, apply a non-permanent locking
agent to the threads, and tighten it.
Torque - Shift Shaft Return Spring Pin: 29 N·m (3.0 kgf·m,
21 ft·lb)
• Check the gear positioning lever [B] and its spring for
breaks or distortion.
If the lever or spring are damaged in any way, replace
them.
• Visually inspect the shift drum cam [C].
If they are badly worn or if they show any damage, replace
it.
Transmission Shaft Removal
• Split the crankcase (see Crankcase Splitting).
• Remove the output shaft [A].
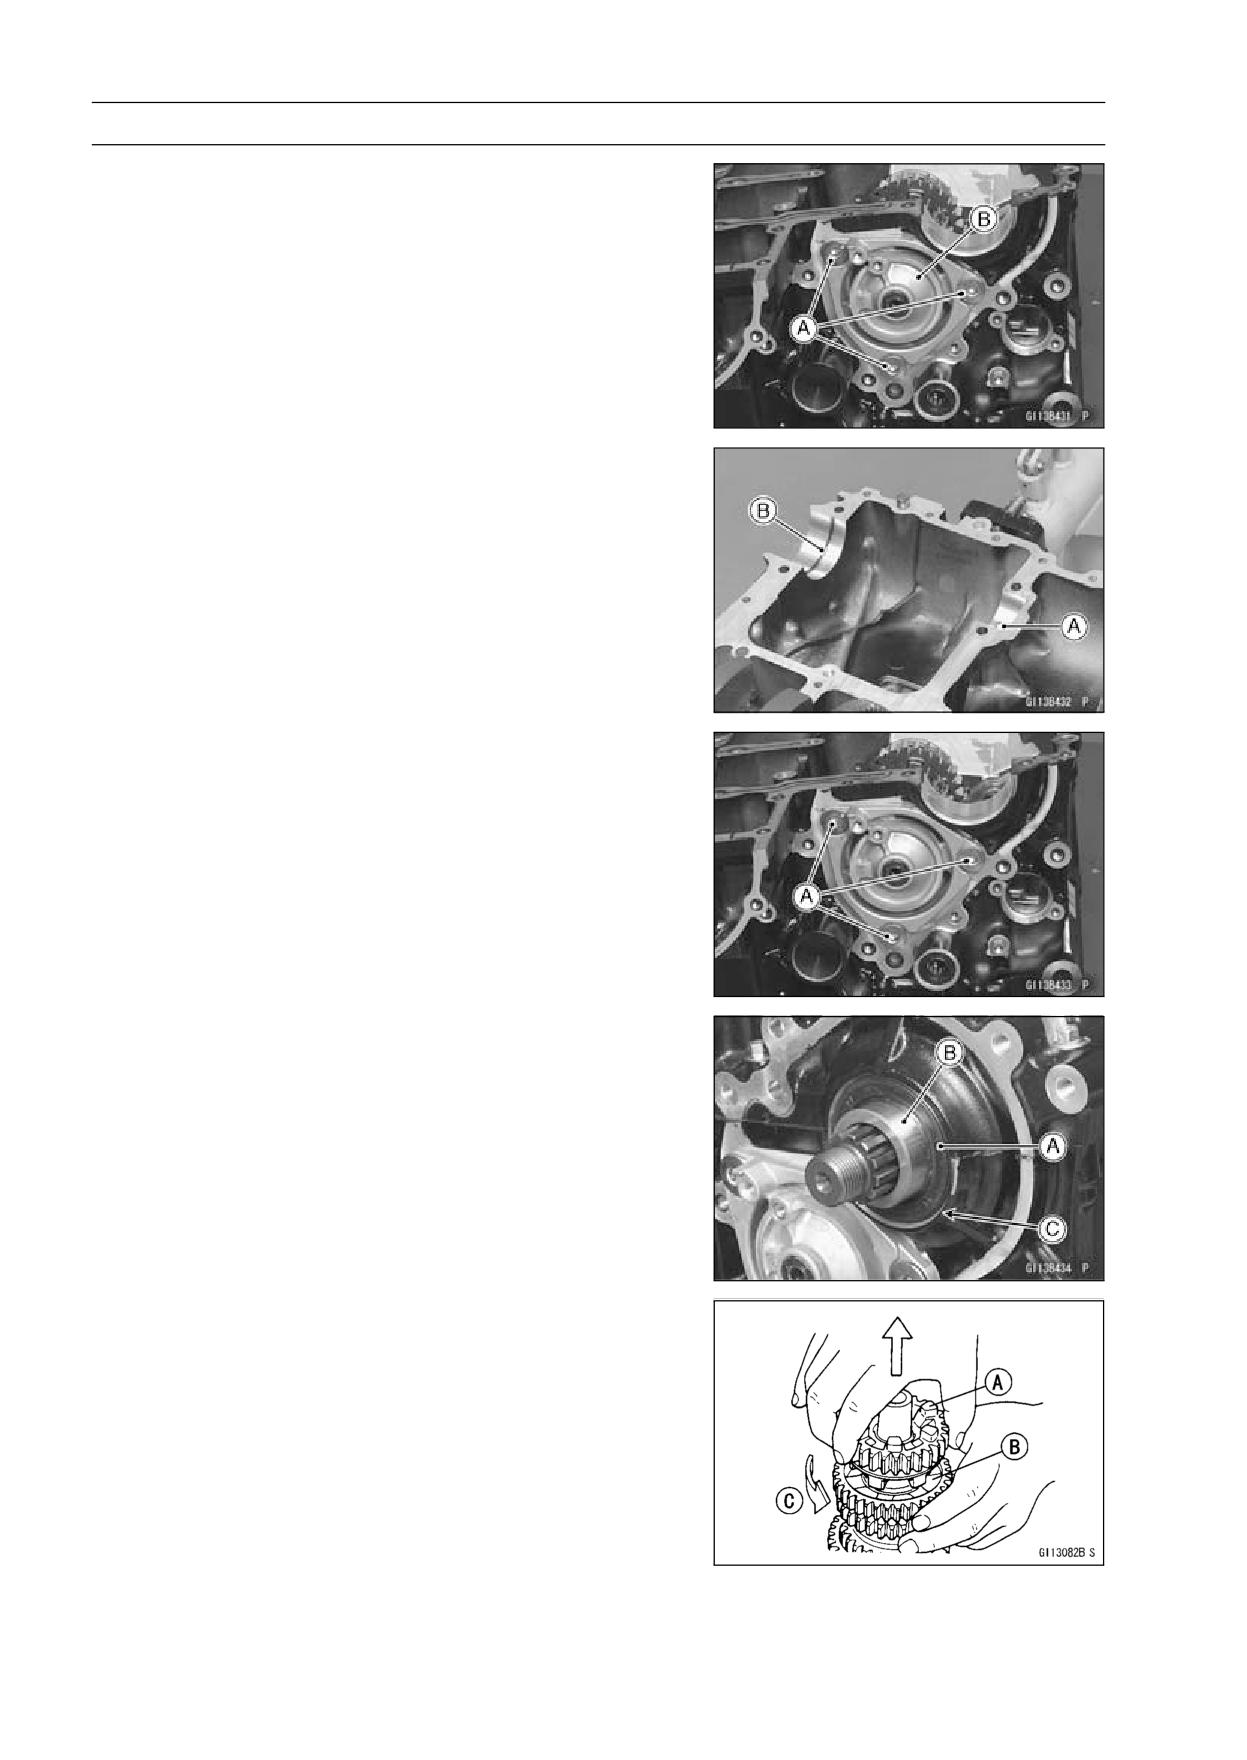
9-40 CRANKSHAFT/TRANSMISSION
Transmission
• Remove the cover bolts [A] and cover [B].
• Remove the shift forks (see Shift Drum and Fork Re-
moval).
• Pull out the drive shaft.
Transmission Shaft Installation
• Check to see that the set pin [A] and set ring [B] are in
place.
• Install the output shaft into the upper crankcase half.
• Apply engine oil to the bearing.
○The bearing set pin and ring must match properly with
the hole or groove in the bearing outer races. When they
are properly matched, there is no clearance between the
crankcase and the bearing outer races.
• Install the drive shaft into the lower crankcase half.
• Apply grease to the O-ring.
• Install the cover.
• Apply a non-permanent locking agent to the drive shaft
cover bolts and tighten them.
Torque - Drive Shaft Cover Bolts [A]: 25 N·m (2.5 kgf·m, 18
ft·lb)
• Assemble the crankcase.
• Press in the oil seal [A] onto collar [B] so that the surface
of the oil seal is flush with the counterbore bottom surface
[C] of the crankcase.
Transmission Shaft Disassembly
• Remove the transmission shafts (see Transmission Shaft
Removal).
• Remove the circlips, disassemble the transmission
shafts.
• The 5th gear [A] on the output shaft has three steel balls
assembled into it for the positive neutral finder mecha-
nism. Remove the 5th gear.
○Set the output shaft in a vertical position holding the 3rd
gear [B].
○Spin the 5th gear quickly [C] and pull it off upward.
CRANKSHAFT/TRANSMISSION 9-41
Transmission
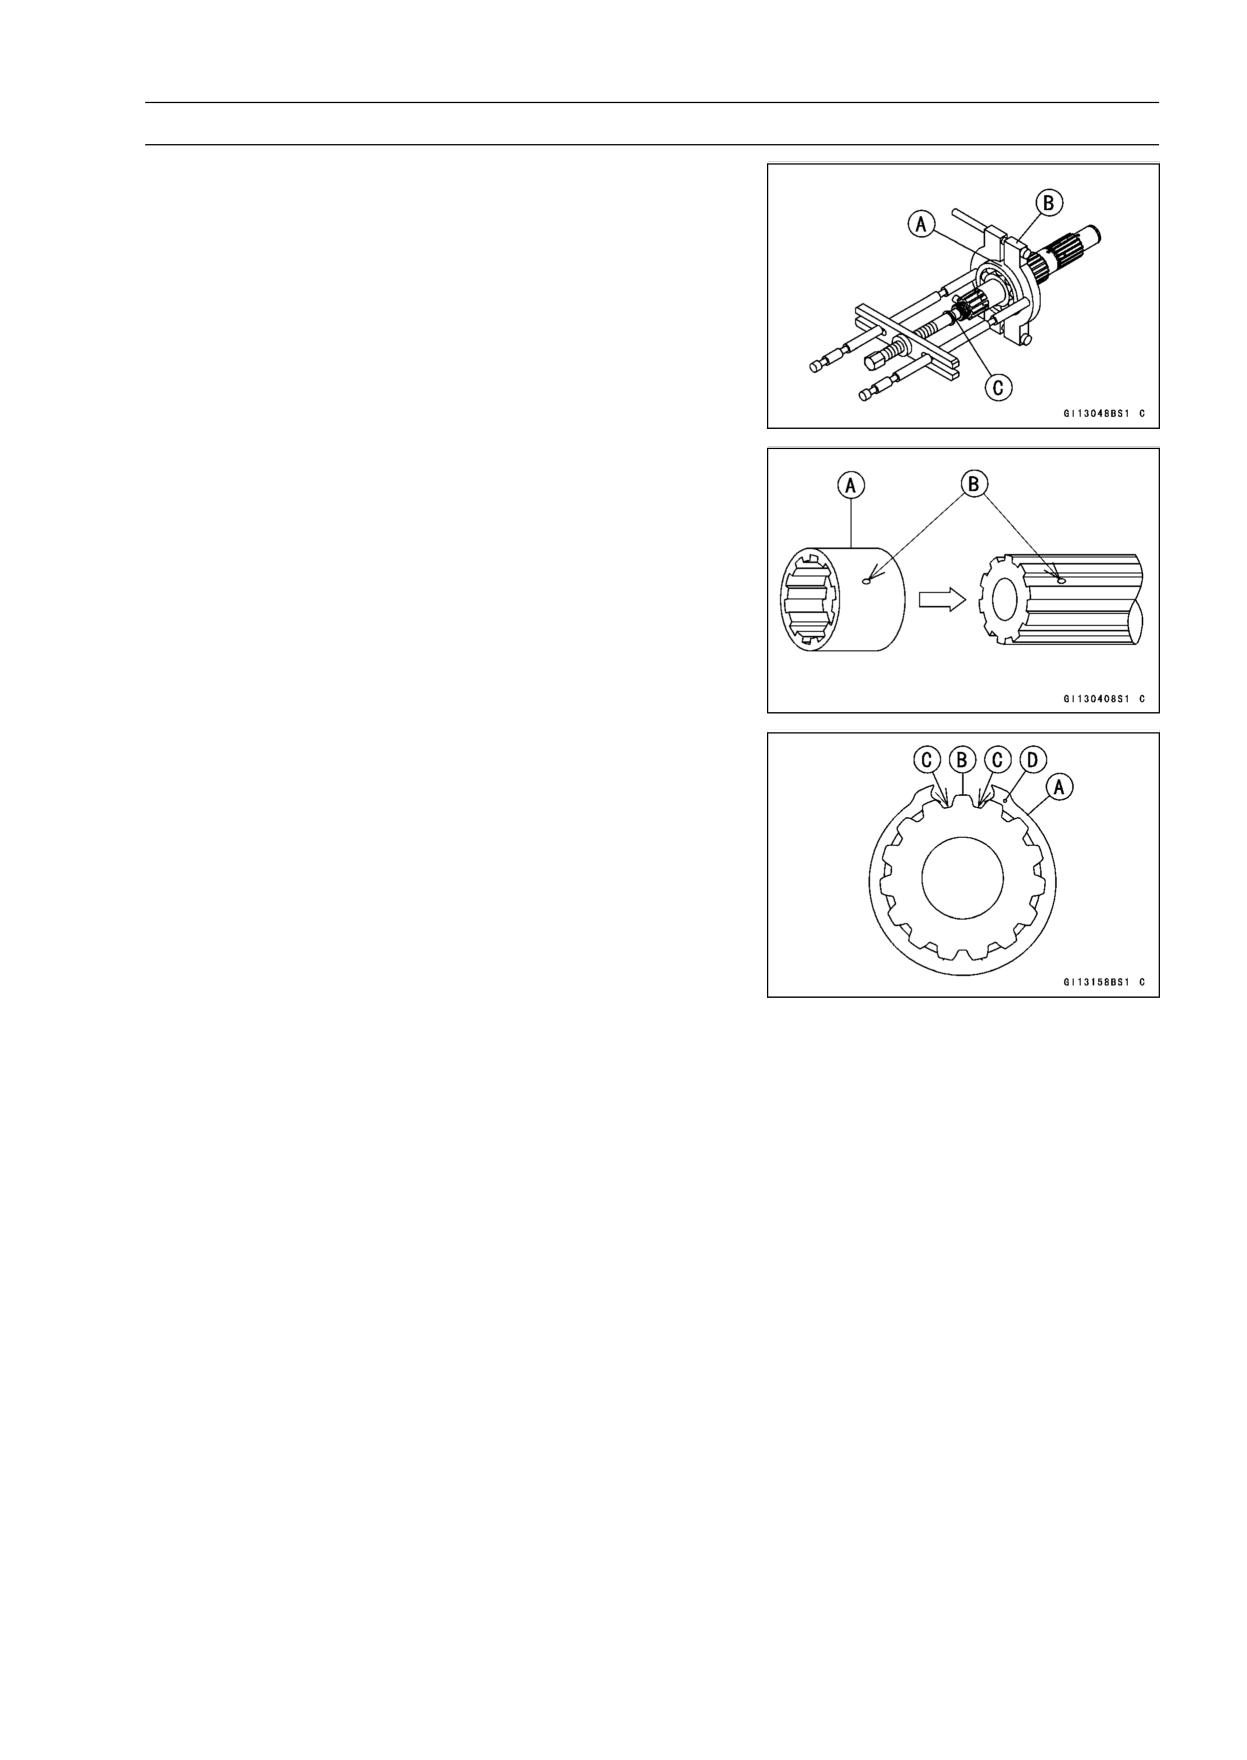
• Remove the ball bearing [A] from each shafts.
Special Tools - Bearing Puller [B]: 57001-135
Bearing Puller Adapter [C]: 57001-317
• Discard the bearing.
Transmission Shaft Assembly
• Apply engine oil to the bushings, ball bearings and shafts.
• Install the gear bushings [A] on the shaft with their holes
[B] aligned.
• Replace any circlips removed with new ones.
• Install the circlips [A] so that the opening [B] of it is aligned
with spline grooves [C].
• Install the circlips so that the mark [D] on them faces to
each gear side.
• The drive shaft gears can be recognized by size: the gear
with the smallest diameter is 1st gear, and the largest one
is 6th gear. Be sure that all parts are put back in the cor-
rect sequence and all circlips and washers are properly in
place.
• Install the 3rd/4th gear onto the drive shaft with their oil
holes aligned.
• Install the 6th gear bushing onto the drive shaft with their
oil holes aligned.
• The output shaft gears can be recognized by size: the
gear with the largest diameter is 1st gear, and the small-
est one is 6th gear. Be sure that all parts are put back
in the correct sequence and all circlips and washers are
properly in place.
• Install the 5th and 6th gears onto the output shaft with
their oil holes aligned.
• Install the 3rd/4th gear bushings onto the output shaft with
their oil holes aligned.
9-42 CRANKSHAFT/TRANSMISSION
Transmission
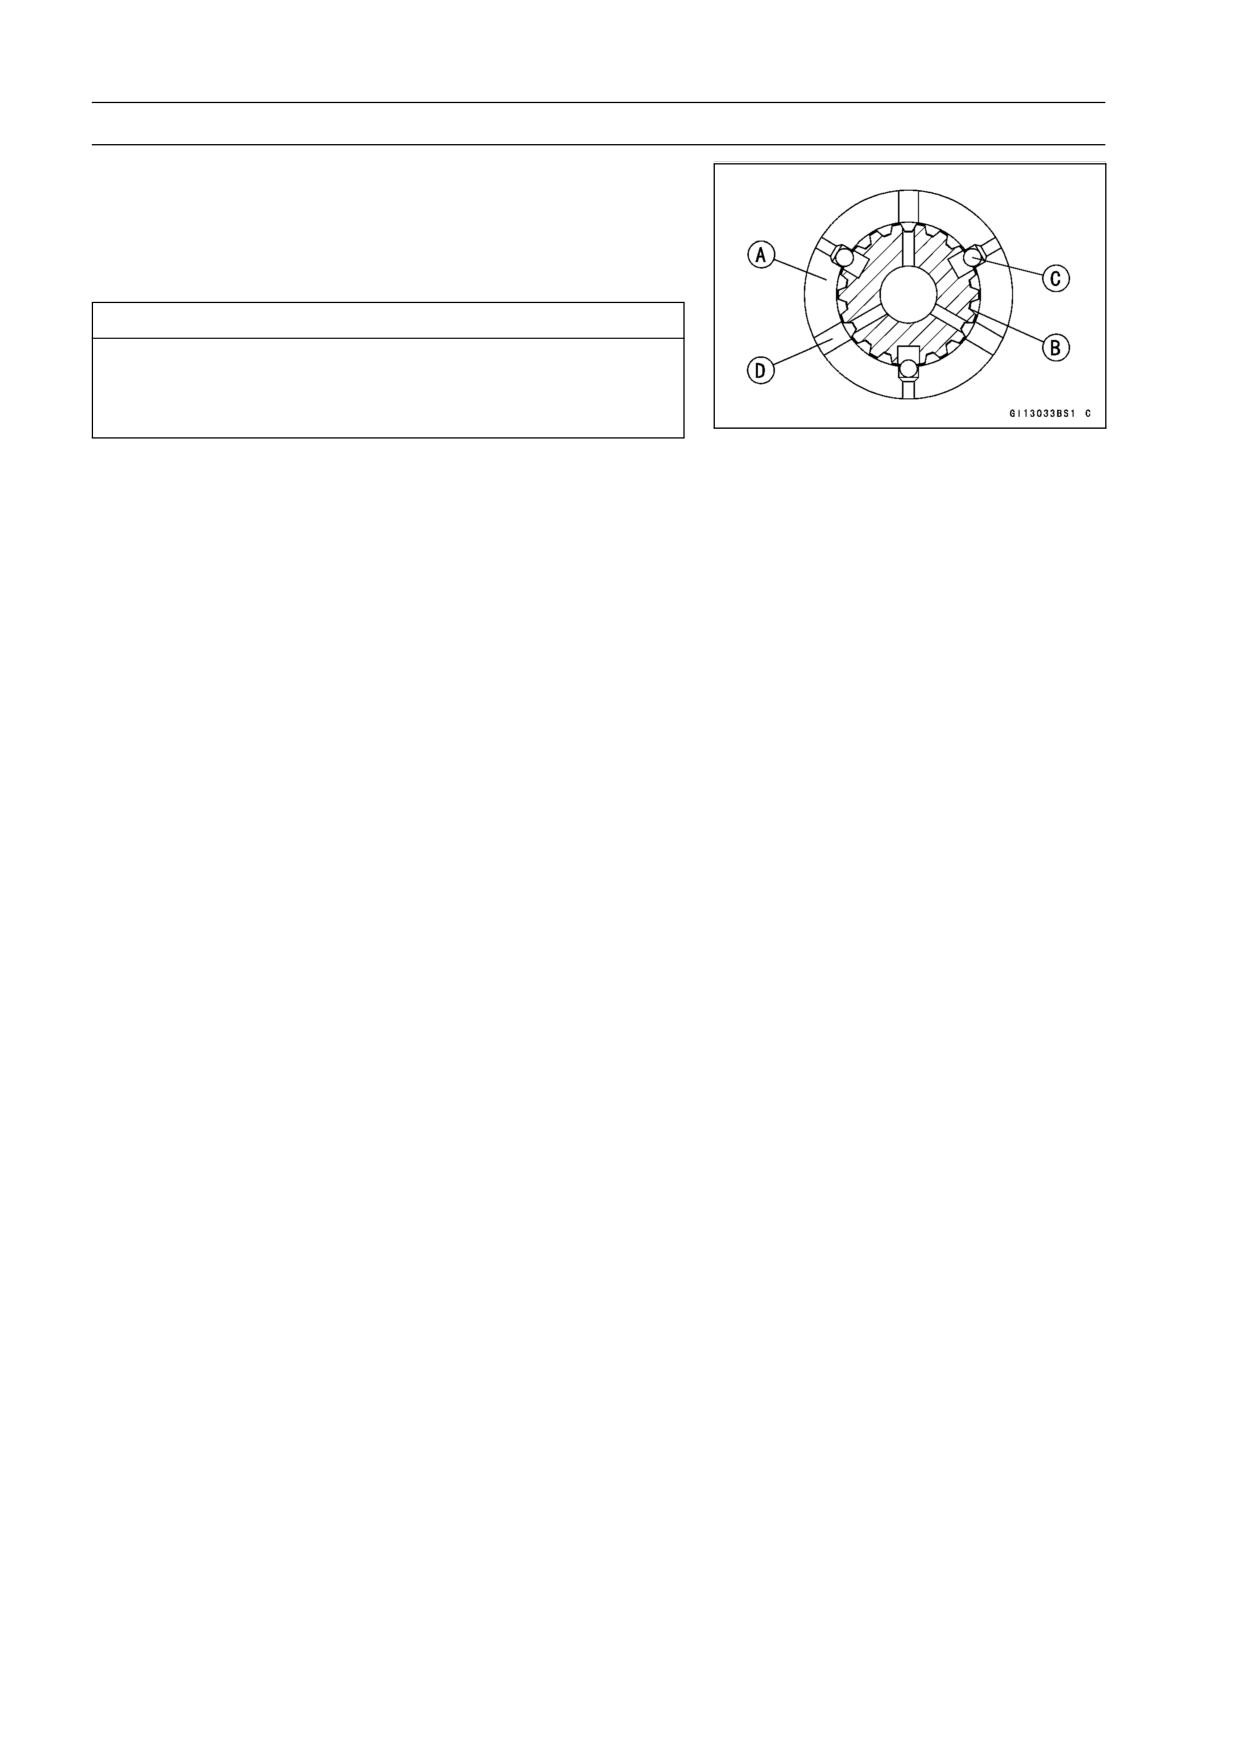
• Fit the steel balls into the 5th gear holes in the output
shaft, aligning three oil holes [D].
5th Gear [A]
Output Shaft [B]
Steel Balls [C]
CAUTION
Do not apply grease to the balls to hold them in
place. This will cause the positive neutral finder
mechanism to malfunction.
○After assembling the 5th gear with steel balls in place on
the output shaft, check the ball-locking effect that the 5th
gear doesn’t come out of the output shaft when moving it
up and down by hand.
• Check that each gear spins or slides freely on the trans-
mission shafts without binding after assembly.
CRANKSHAFT/TRANSMISSION 9-43
Transmission
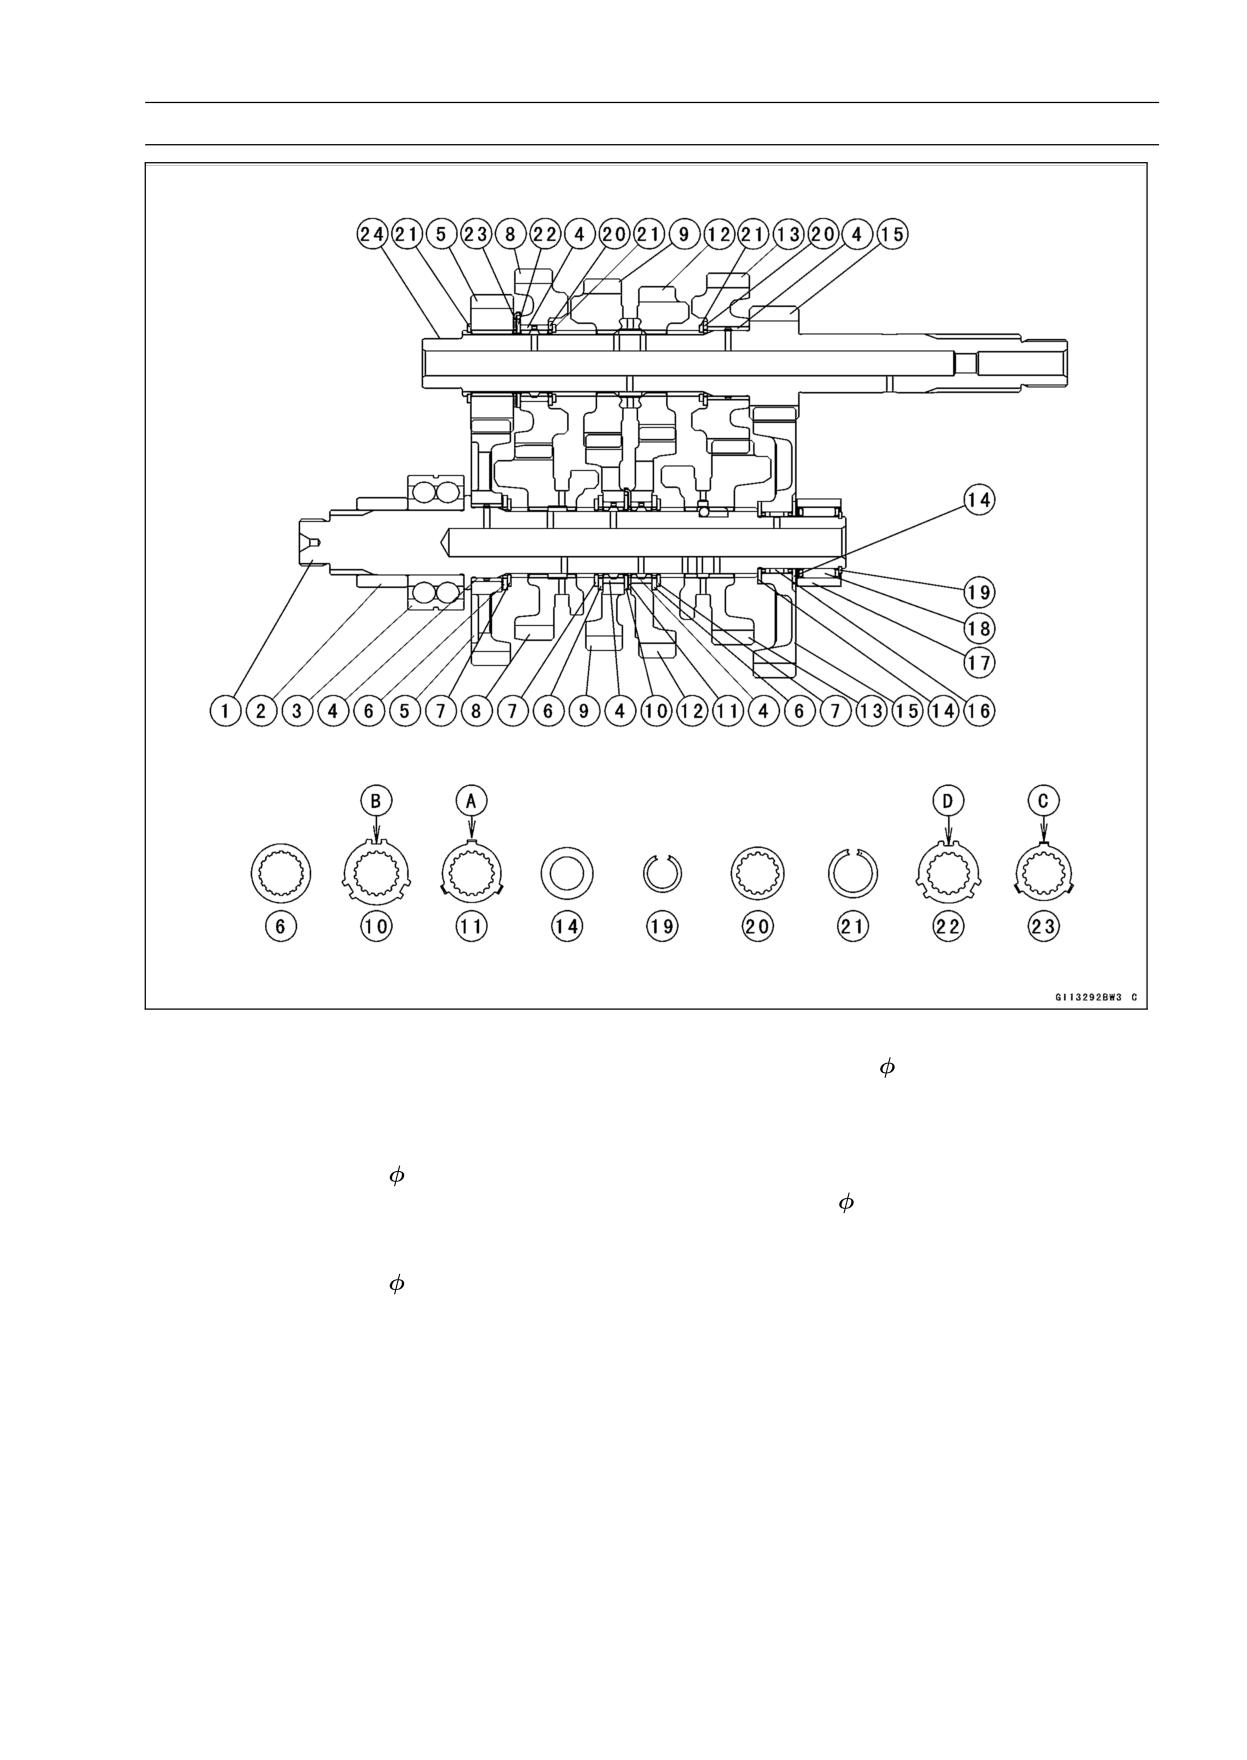
1. Output Shaft
13. 5th Gear
2. Collar
14. Thrust Washer,
35 mm (1.38 in.)
3. Ball Bearing
15. 1st Gear
4. Bushing
16. Needle Bearing
5. 2nd Gear
17. Bearing Outer Race
6. Toothed Washer,
30 mm (1.18 in.)
18. Needle Bearing
7. Circlip
19. Snap Ring,
25.5 mm (1.00 in.)
8. 6th (Top) Gear
20. Toothed Washer, 35.5 mm (1.40 in.)
9. 4th Gear
21. Snap Ring, 33 mm (1.30 in.)
10. Toothed Washer,
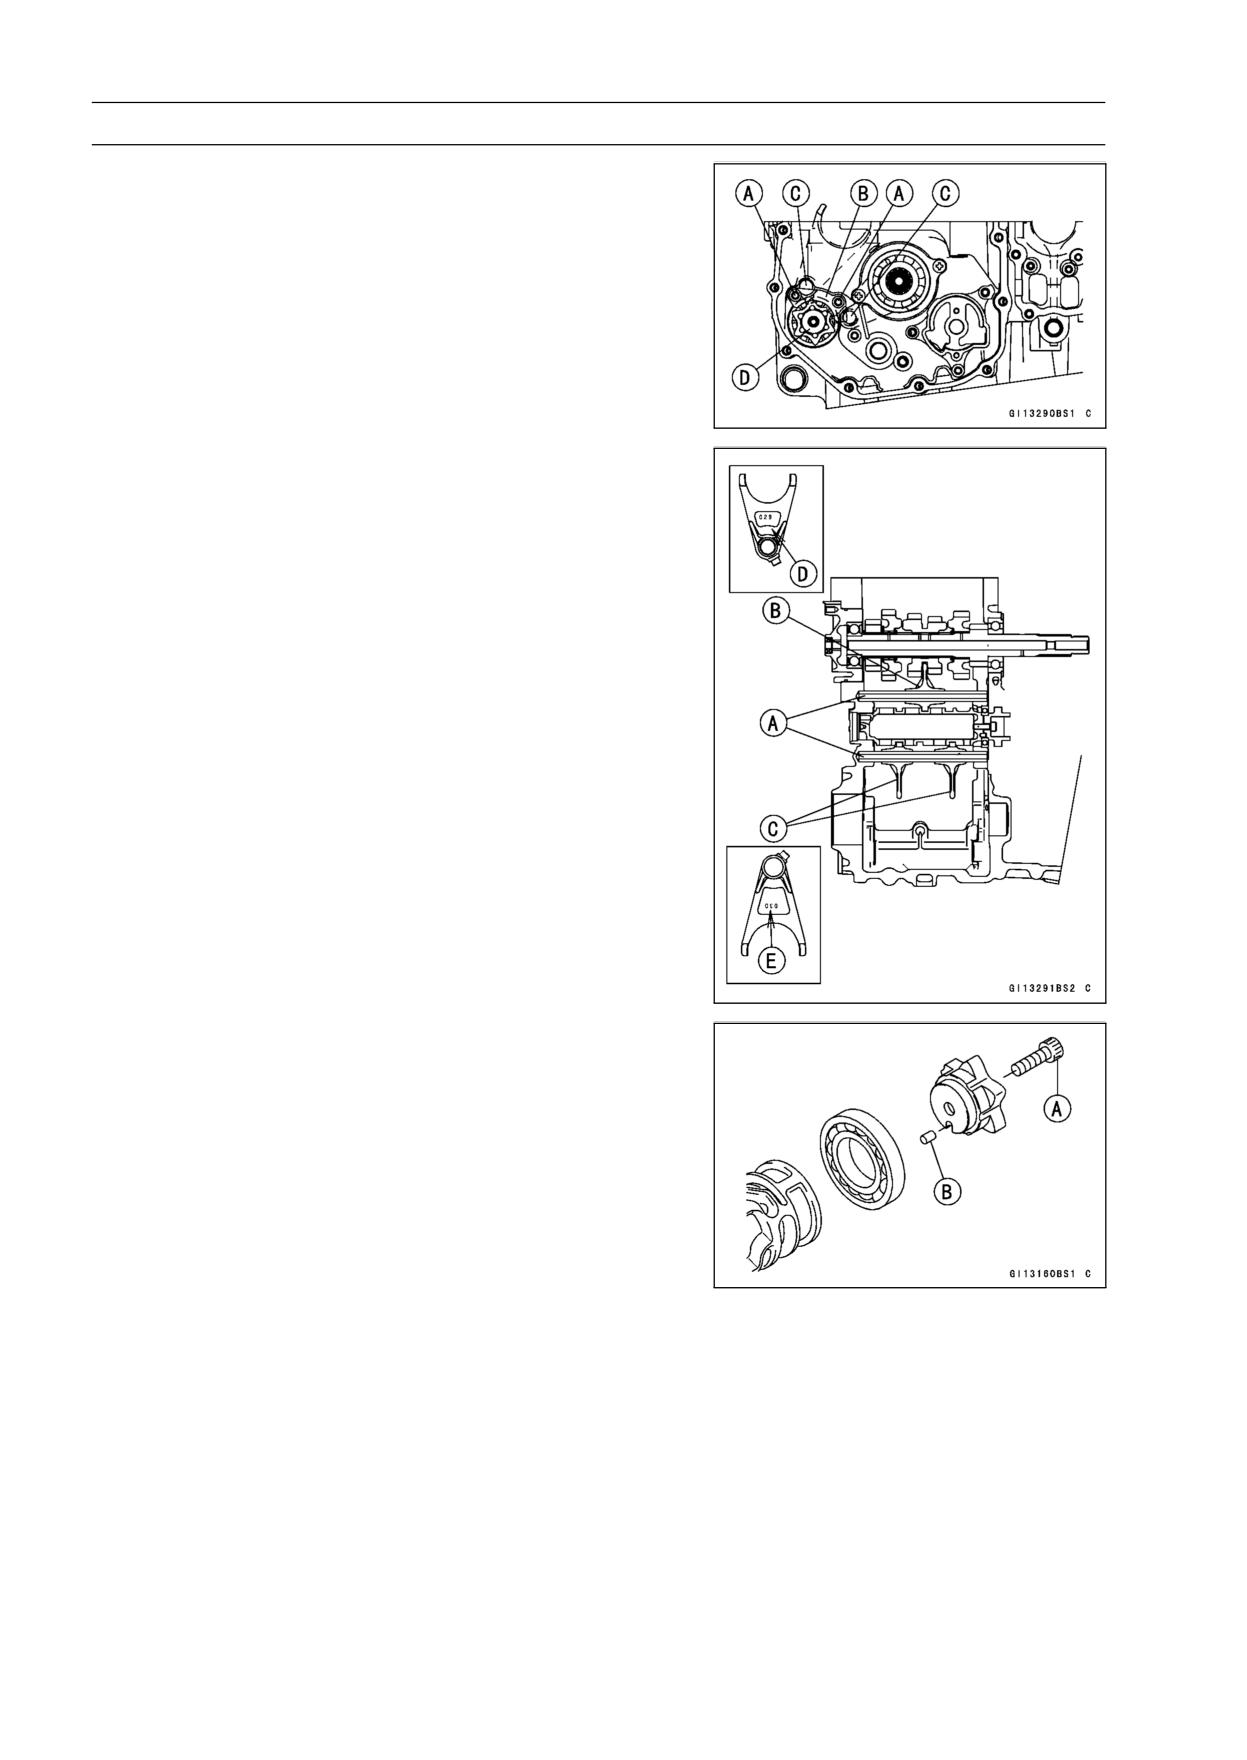
43 mm (1.69 in.)
22. Toothed Washer, 40.5 mm (1.59 in.)
11. Toothed Washer, 39.7 mm (1.56 in.)
23. Toothed Washer, 37 mm (1.46 in.)
12. 3rd Gear
24. Drive Shaft
○When the tangs [A] of the toothed washer [11] shall be assembled, they shall be installed into the
notches [B] of the toothed washer [10].
○When the tangs [C] of the toothed washer [23] shall be assembled, they shall be installed into the
notches [D] of the toothed washer [22].
9-44 CRANKSHAFT/TRANSMISSION
Transmission
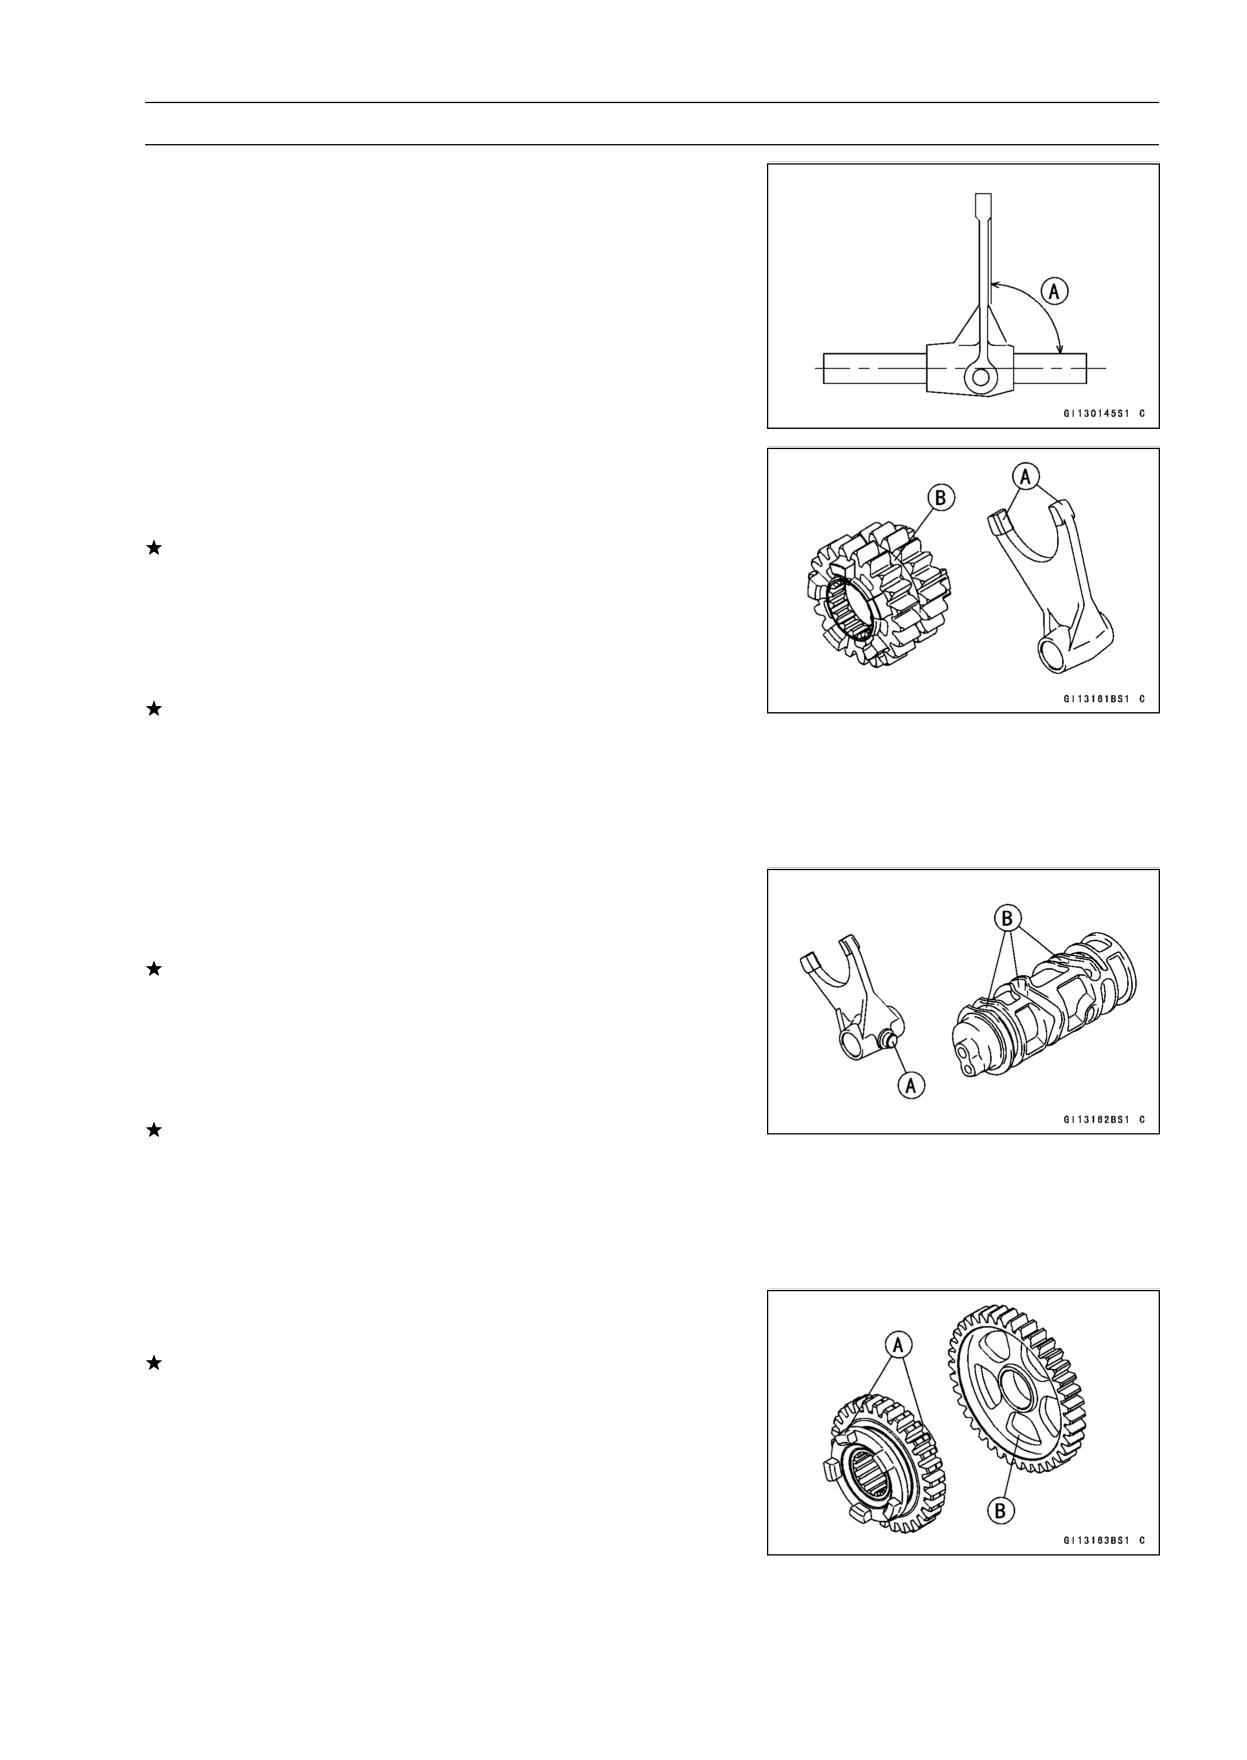
Shift Drum and Fork Removal
• Remove:
Lower Crankcase Half (see Crankcase Splitting)
External Shift Mechanism (see External Shift Mecha-
nism Removal)
Screws [A]
Shift Drum Bearing Holder [B]
• Pull out the shift rods [C], and take off the shift forks.
• Pull out the shift drum [D].
Shift Drum and Fork Installation
• Apply engine oil to the shift drum, forks and rods.
• Install the shift rods [A], noting the groove position.
○Position the one with shortest ears [B] on the drive shaft
and place the pin in the center groove in the shift drum.
○The two forks [C] on the output shaft are identical.
NOTE
○The forks have marks (029 [D], 030 [E]), and position
them so that so that their marks face the engine left side.
• Install the forks as shown.
• Apply a non-permanent locking agent to the threads of
the shift drum bearing holder screws and tighten them.
Torque - Shift Drum Bearing Holder Screws: 4.9 N·m (0.50
kgf·m, 43 in·lb)
Shift Drum Disassembly
• Remove the shift drum (see Shift Drum and Fork Re-
moval).
• While holding the shift drum with a vise, remove the shift
drum cam holder bolt.
Shift Drum Cam Holder Bolt [A]
Dowel Pin [B]
Shift Drum Assembly
• Be sure to install the dowel pin.
• Apply a non-permanent locking agent to the threads of
the shift drum cam holder bolt, and tighten it.
Torque - Shift Drum Cam Holder Bolt: 12 N·m (1.2 kgf·m,
106 in·lb)
CRANKSHAFT/TRANSMISSION 9-45
Transmission
Shift Fork Bending
• Visually inspect the shift forks, and replace any fork that is
bent. A bent fork could cause difficulty in shifting, or allow
the transmission to jump out of gear when under power.
90° [A]
Shift Fork/Gear Groove Wear
• Measure the thickness of the shift fork ears [A], and mea-
sure the width [B] of the gear grooves.
If the thickness of a shift fork ear is less than the service
limit, the shift fork must be replaced.
Shift Fork Ear Thickness
Standard:
5.74 ∼ 6.000 mm (0.2260 ∼ 0.2362 in.)
Service Limit:
5.6 mm (0.220 in.)
If the gear groove is worn over the service limit, the gear
must be replaced.
Gear Groove Width
Standard:
6.05 ∼ 6.15 mm (0.238 ∼ 0.242 in.)
Service Limit:
6.25 mm (0.246 in.)
Shift Fork Guide Pin/Drum Groove Wear
• Measure the diameter of each shift fork guide pin [A], and
measure the width [B] of each shift drum groove.
If the guide pin on any shift fork is less than the service
limit, the fork must be replaced.
Shift Fork Guide Pin Diameter
Standard:
6.9 ∼ 7.0 mm (0.272 ∼ 0.276 in.)
Service Limit:
6.8 mm (0.268 in.)
If any shift drum groove is worn over the service limit, the
drum must be replaced.
Shift Drum Groove Width
Standard:
7.05 ∼ 7.20 mm (0.278 ∼ 0.283 in.)
Service Limit:
7.3 mm (0.287 in.)
Gear Dog and Gear Dog Hole Damage
• Visually inspect the gear dogs [A] and gear dog holes [B].
Replace any damaged gears or gears with excessively
worn dogs or dog holes.
WHEELS/TIRES 10-1
Wheels/Tires
Table of Contents
Exploded View
10-2
Specifications
10-4
Special Tools
10-5
Wheels (Rims)
10-6
Front Wheel Removal
10-6
Front Wheel Installation
10-6
Rear Wheel Removal
10-7
Rear Wheel Installation
10-8
Wheel Inspection
10-10
Axle Inspection
10-10
Balance Inspection
10-11
Balance Adjustment
10-11
Balance Weight Removal
10-11
Balance Weight Installation
10-12
Tires
10-14
Air Pressure Inspection/Adjustment
10-14
Tire Inspection
10-14
Tire Removal
10-14
Tire Installation
10-14
10
Tire Repair
10-16
Hub Bearing
10-17
Hub Bearing Removal
10-17
Hub Bearing Installation
10-17
Hub Bearing Inspection
10-17
Hub Bearing Lubrication
10-18
10-2 WHEELS/TIRES
Exploded View
WHEELS/TIRES 10-3
Exploded View
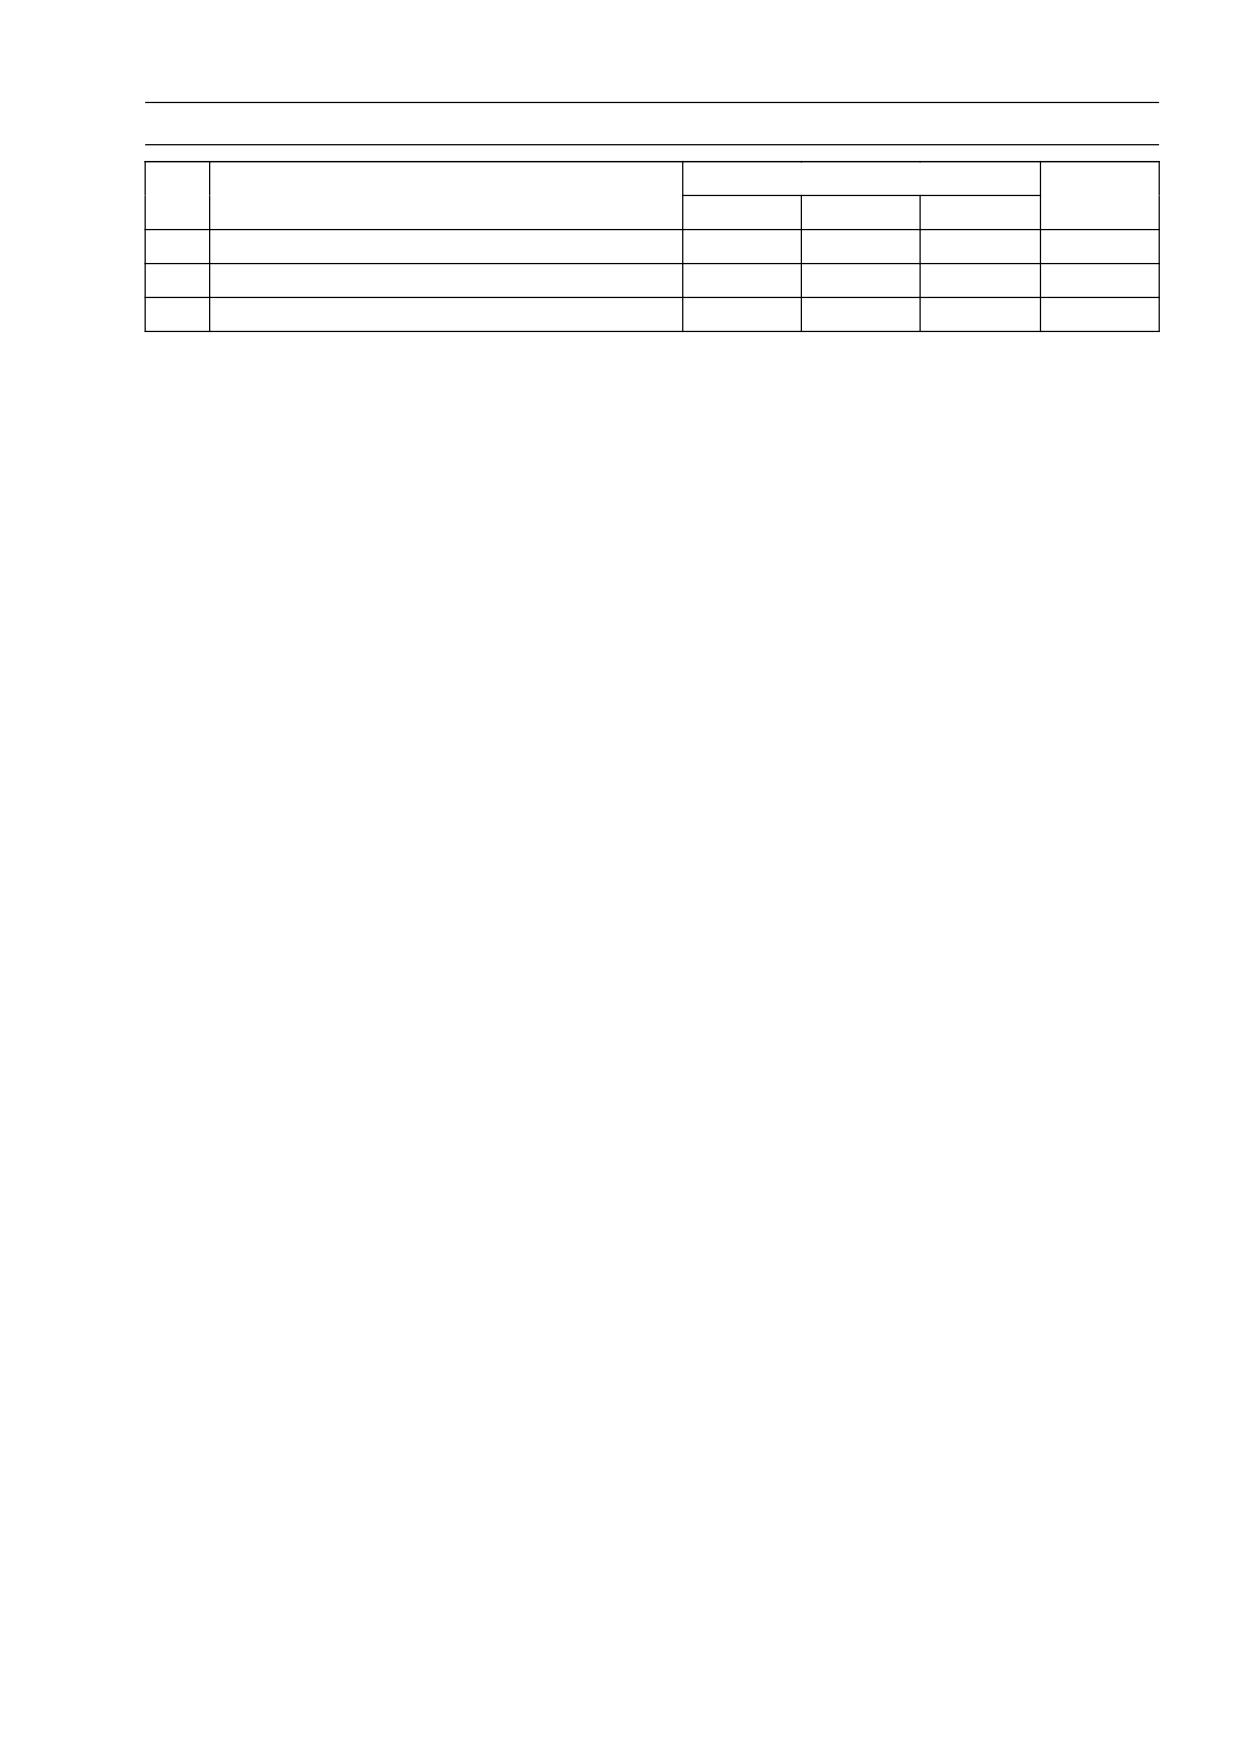
Torque
No.
Fastener
Remarks
N·m
kgf·m
ft·lb
1
Front Axle Clamp Bolts
20
2.0
15
AL
2
Front Axle Nut
127
13.0
94
3
Rear Axle Nut
127
13.0
94
4. Caliper Bracket (ZX1400B Models)
AL: Tighten the two clamp bolts alternately two time to ensure even tightening.
G: Apply grease.
HG: Apply high-temperature grease.
R: Replacement Parts
WL: Apply soap and water solution or rubber lubricant.

10-4 WHEELS/TIRES
Specifications
Item
Standard
Service Limit
Wheels (Rims)
Rim Runout:
Axial
TIR 0.5 mm (0.02 in.) or less
TIR 1.0
mm (0.04 in.)
Radial
TIR 0.8 mm (0.03 in.) or less
TIR 1.0
mm (0.04 in.)
Axle Runout/100 mm (3.94 in.)
TIR 0.03 mm (0.0012 in.) or less
TIR 0.2
mm (0.01 in.)
Wheel Balance
10 g (0.35 oz.) or less
- - -
Balance Weights
10 g (0.35 oz.), 20 g (0.71 oz.),
- - -
30 g (1.06 oz.)
Rim Size:
Front
17 × 3.50
- - -
Rear
17 × 6.00
- - -
Tires
Air Pressure (when Cold):
Front
Up to 180 kg (397 lb) load:
- - -
290 kPa (2.9 kgf/cm², 42 psi)
Rear
Up to 180 kg (397 lb) load:
- - -
290 kPa (2.9 kgf/cm², 42 psi)
Tread Depth:
Front
3.8 mm (0.15 in.)
1 mm (0.04 in.)
(AT, CH, DE) 1.6 mm (0.06 in.)
Rear
4.8 mm (0.19 in.)
Up to 130 km/h (80 mph):
2 mm (0.08 in.)
Over 130 km/h (80 mph):
3 mm (0.12 in.)
Standard Tires:
Make, Type
Size
Front
BRIDGESTONE,
120/70 ZR17 M/C (58 W)
BATTLAX BT014 F RADIAL SL
Rear
BRIDGESTONE,
190/50 ZR17 M/C (73 W)
BATTLAX BT014 R RADIAL L
WARNING
Use the same manufacturer’s tires on both front and rear wheels.
WHEELS/TIRES 10-5
Special Tools
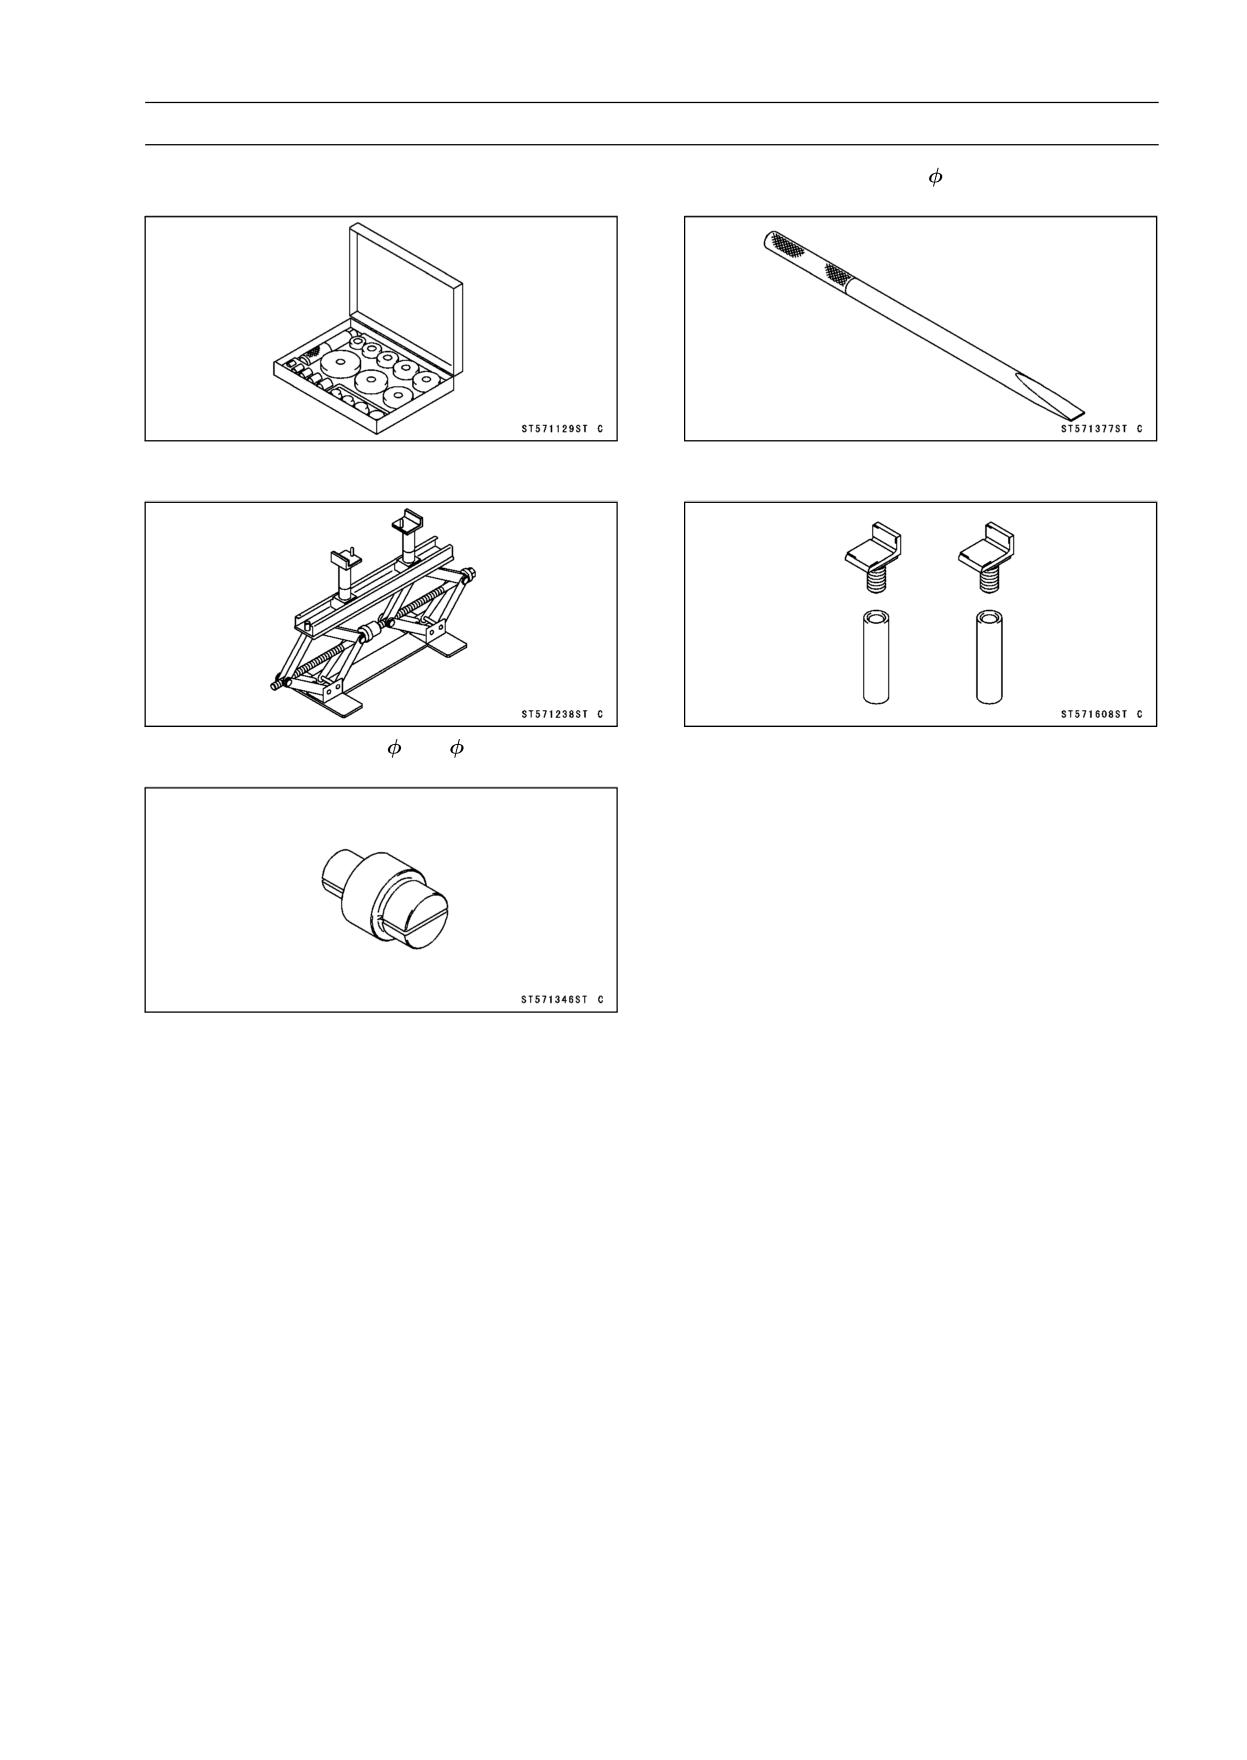
Bearing Driver Set:
Bearing Remover Shaft,
13:
57001-1129
57001-1377
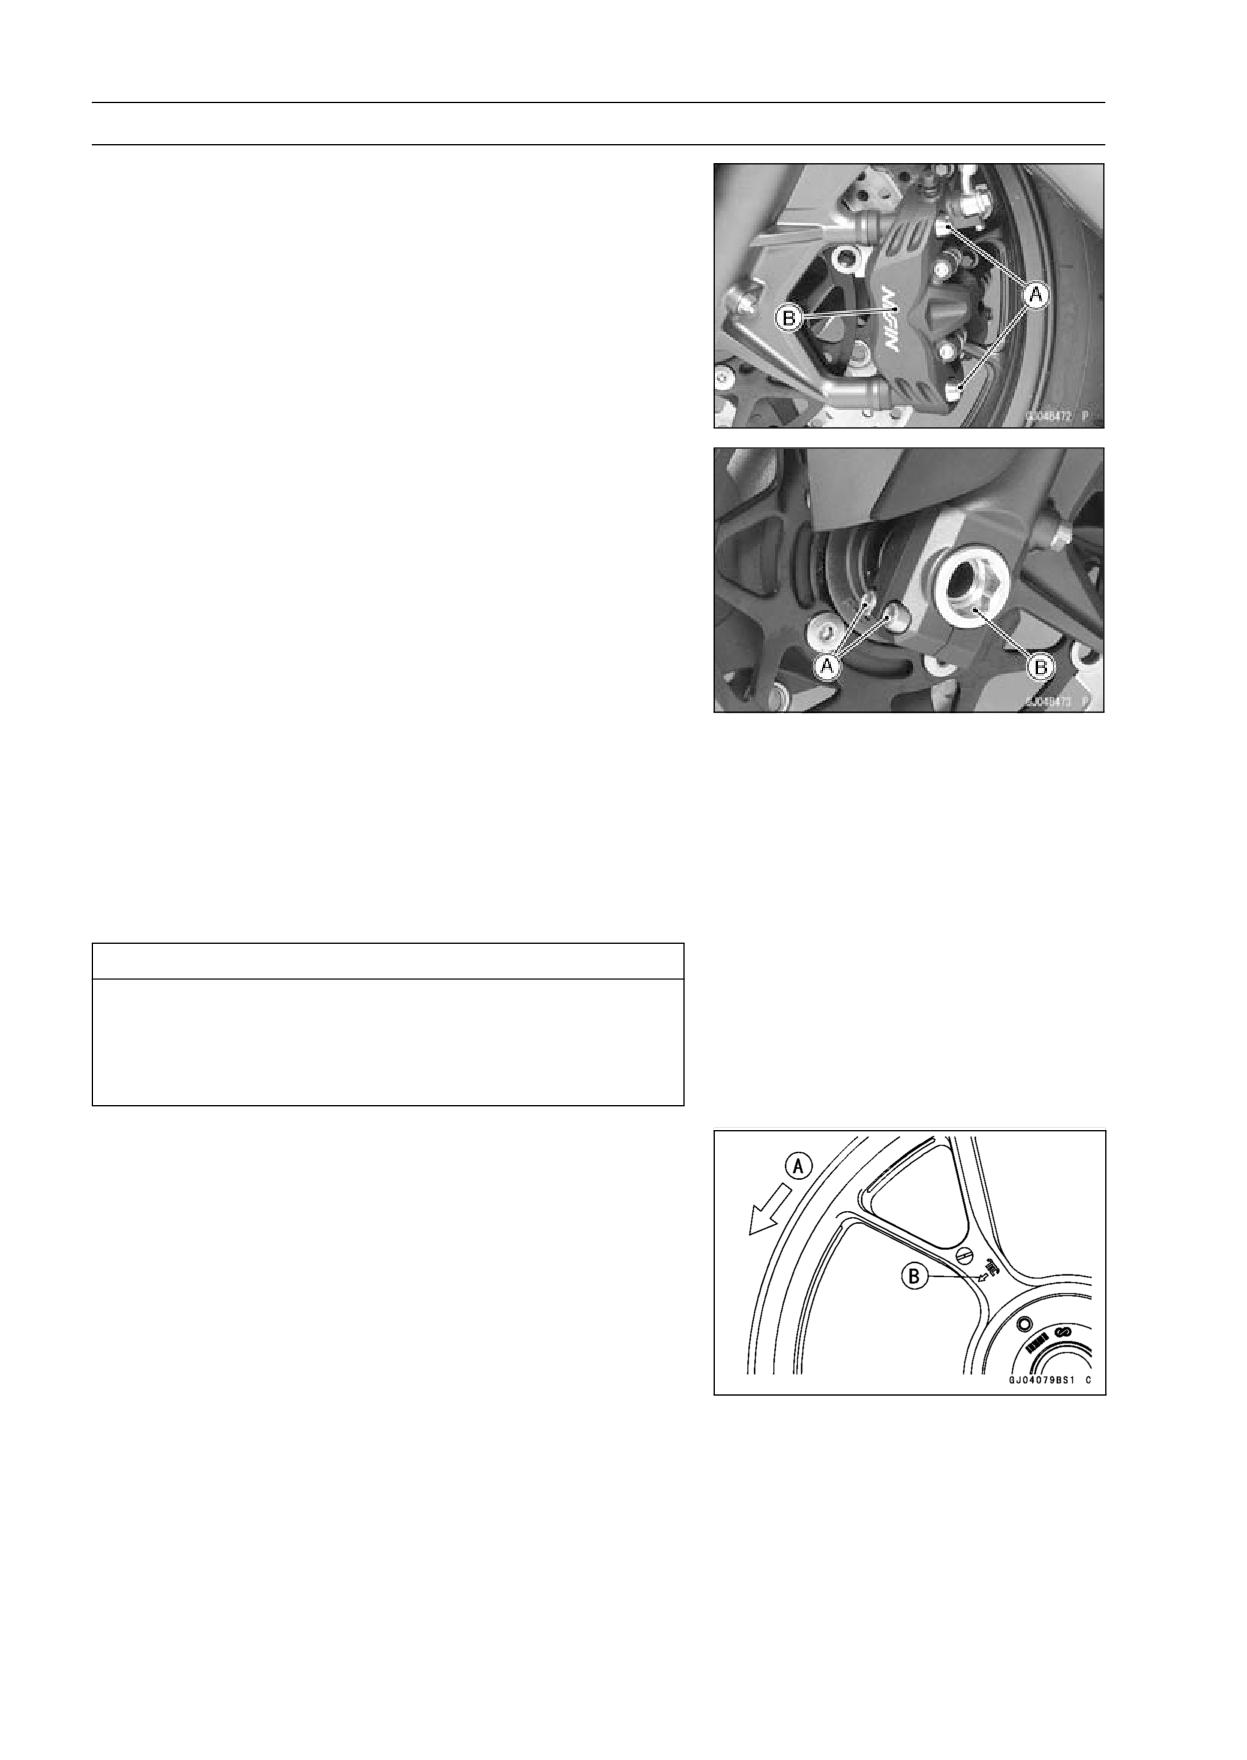
Jack:
Jack Attachment:
57001-1238
57001-1608
Bearing Remover Head,
25 ×
28:
57001-1346
10-6 WHEELS/TIRES
Wheels (Rims)
Front Wheel Removal
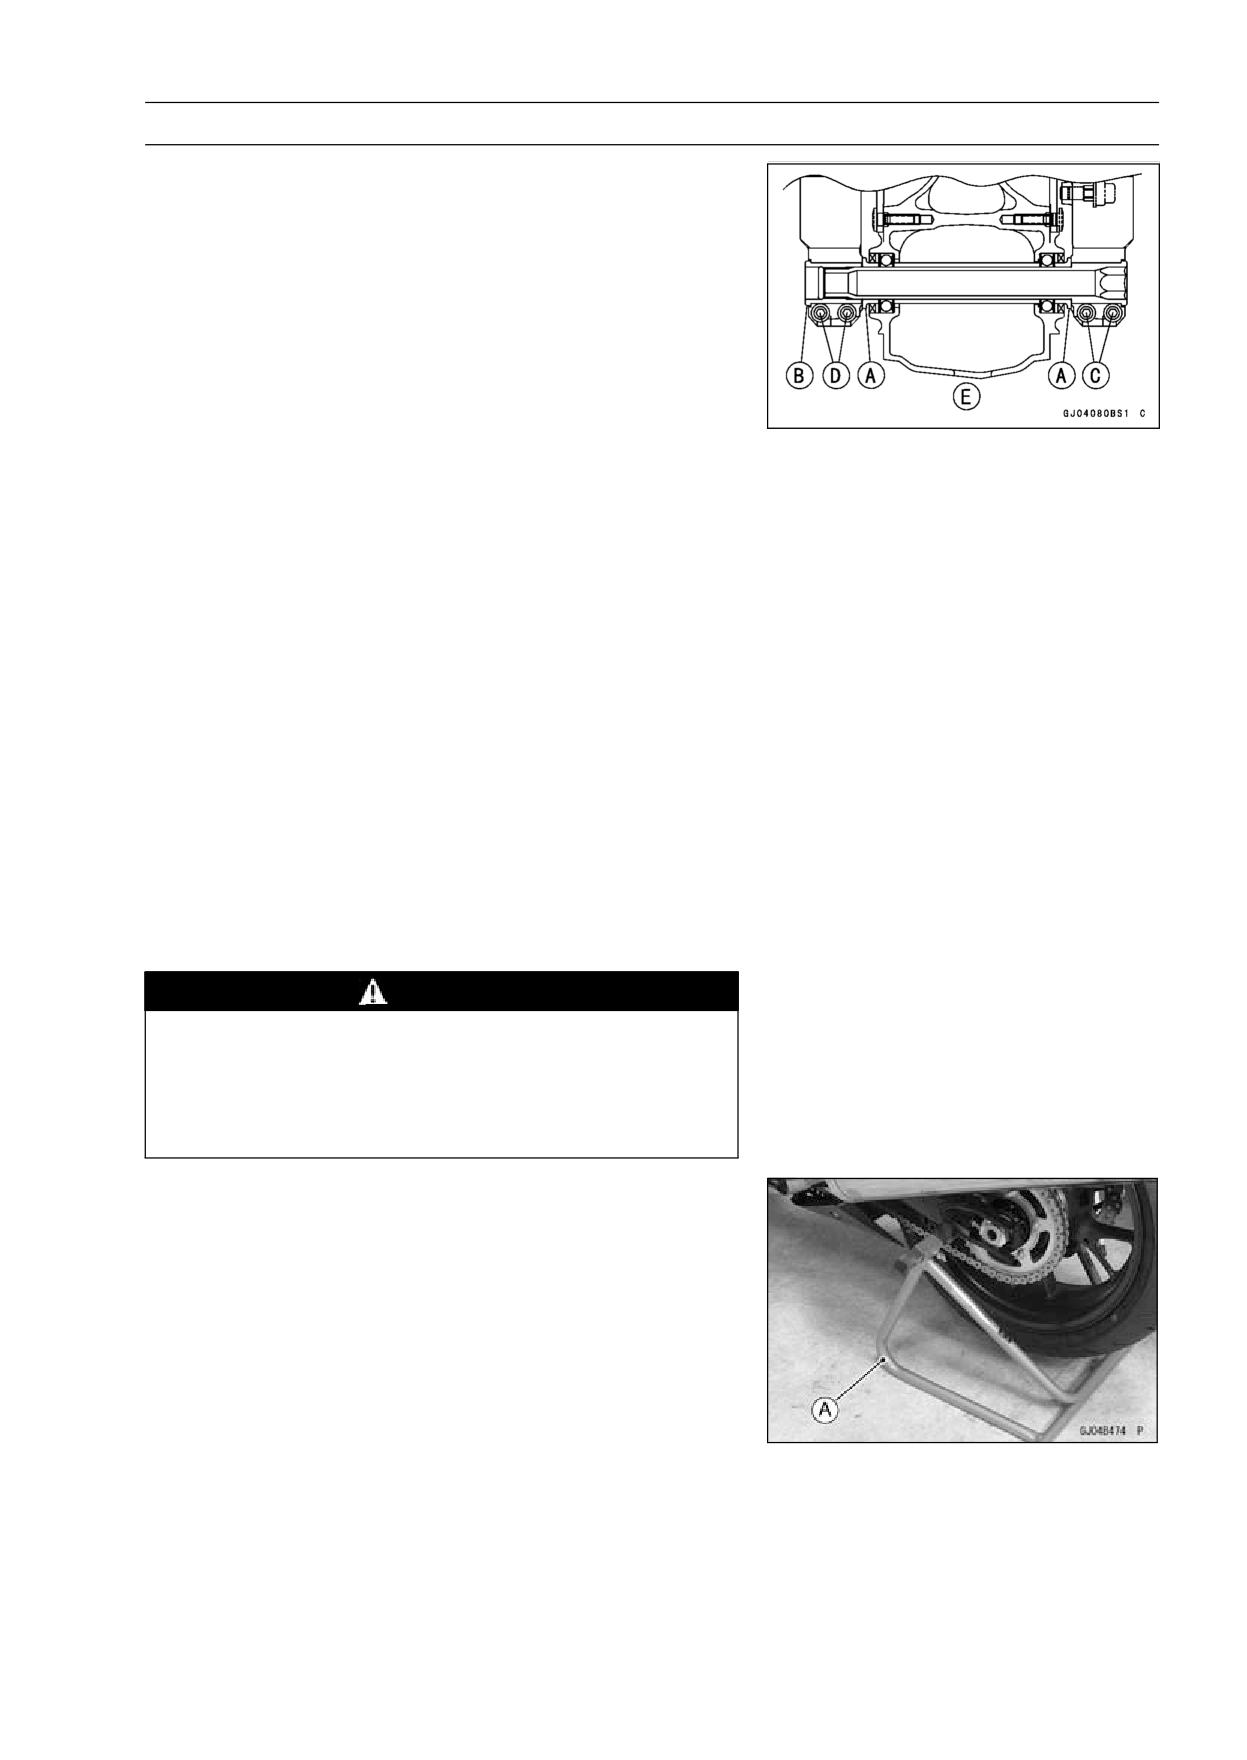
• Remove:
Front Caliper Mounting Bolts [A]
Front Calipers [B]
• Loosen:
Axle Clamp Bolts [A] (Left Side)
Axle Nut [B]
Axle Clamp Bolts (Right Side)
• Remove the lower fairings (see Lower Fairing Removal in
the Frame chapter).
• Raise the front wheel off the ground with the jack.
Special Tools - Jack: 57001-1238
Jack Attachment: 57001-1608
• Remove the axle nut and pull out the axle to the right and
drop the front wheel out of the forks.
CAUTION
Do not lay the wheel down on one of the discs. This
can damage or warp the disc. Place blocks un-
der the wheel so that the disc does not touch the
ground.
Front Wheel Installation
NOTE
○The direction of the wheel rotation [A] is shown by an
arrow [B] on the wheel spoke.
• Check the wheel rotation mark on the front wheel and
install it.
WHEELS/TIRES 10-7
Wheels (Rims)
• Apply high-temperature grease to the grease seal lip.
• Fit the collars [A] on the both sides of the hub.
○The collars are identical.
• Insert the axle from the right side.
• Tighten the axle nut [B].
Right Axle Clamp Bolts [C]
Left Axle Clamp Bolts [D]
Viewed from Rear [E]
Torque - Front Axle Nut: 127 N·m (13.0 kgf·m, 94 ft·lb)
• Before tightening the axle clamp bolts on the right front
fork leg, pump the front fork up and down 4 or 5 times to
all on the right front fork leg to seat on the front axle.
NOTE
○Put a block in front of the front wheel to stop moving.
• Tighten the axle clamp bolts on the right fork leg first.
Next, tighten the left axle clamp bolts.
Torque - Front Axle Clamp Bolts: 20 N·m (2.0 kgf·m, 15 ft·lb)
NOTE
○Tighten the two clamp bolts alternately two times to en-
sure even tightening torque.
• Install the lower fairings (see Lower Fairing Installation in
the Frame chapter).
• Install the front calipers (see Caliper Installation in the
Brakes chapter).
• Check the front brake effectiveness (see Brake Operation
Inspection in the Periodic Maintenance chapter).
WARNING
Do not attempt to drive the motorcycle until a full
brake lever is obtained by pumping the brake lever
until the pads are against the disc. The brake will
not function on the first application of the lever if
this is not done.
Rear Wheel Removal
• Raise the rear wheel off the ground with the stand [A].
10-8 WHEELS/TIRES
Wheels (Rims)
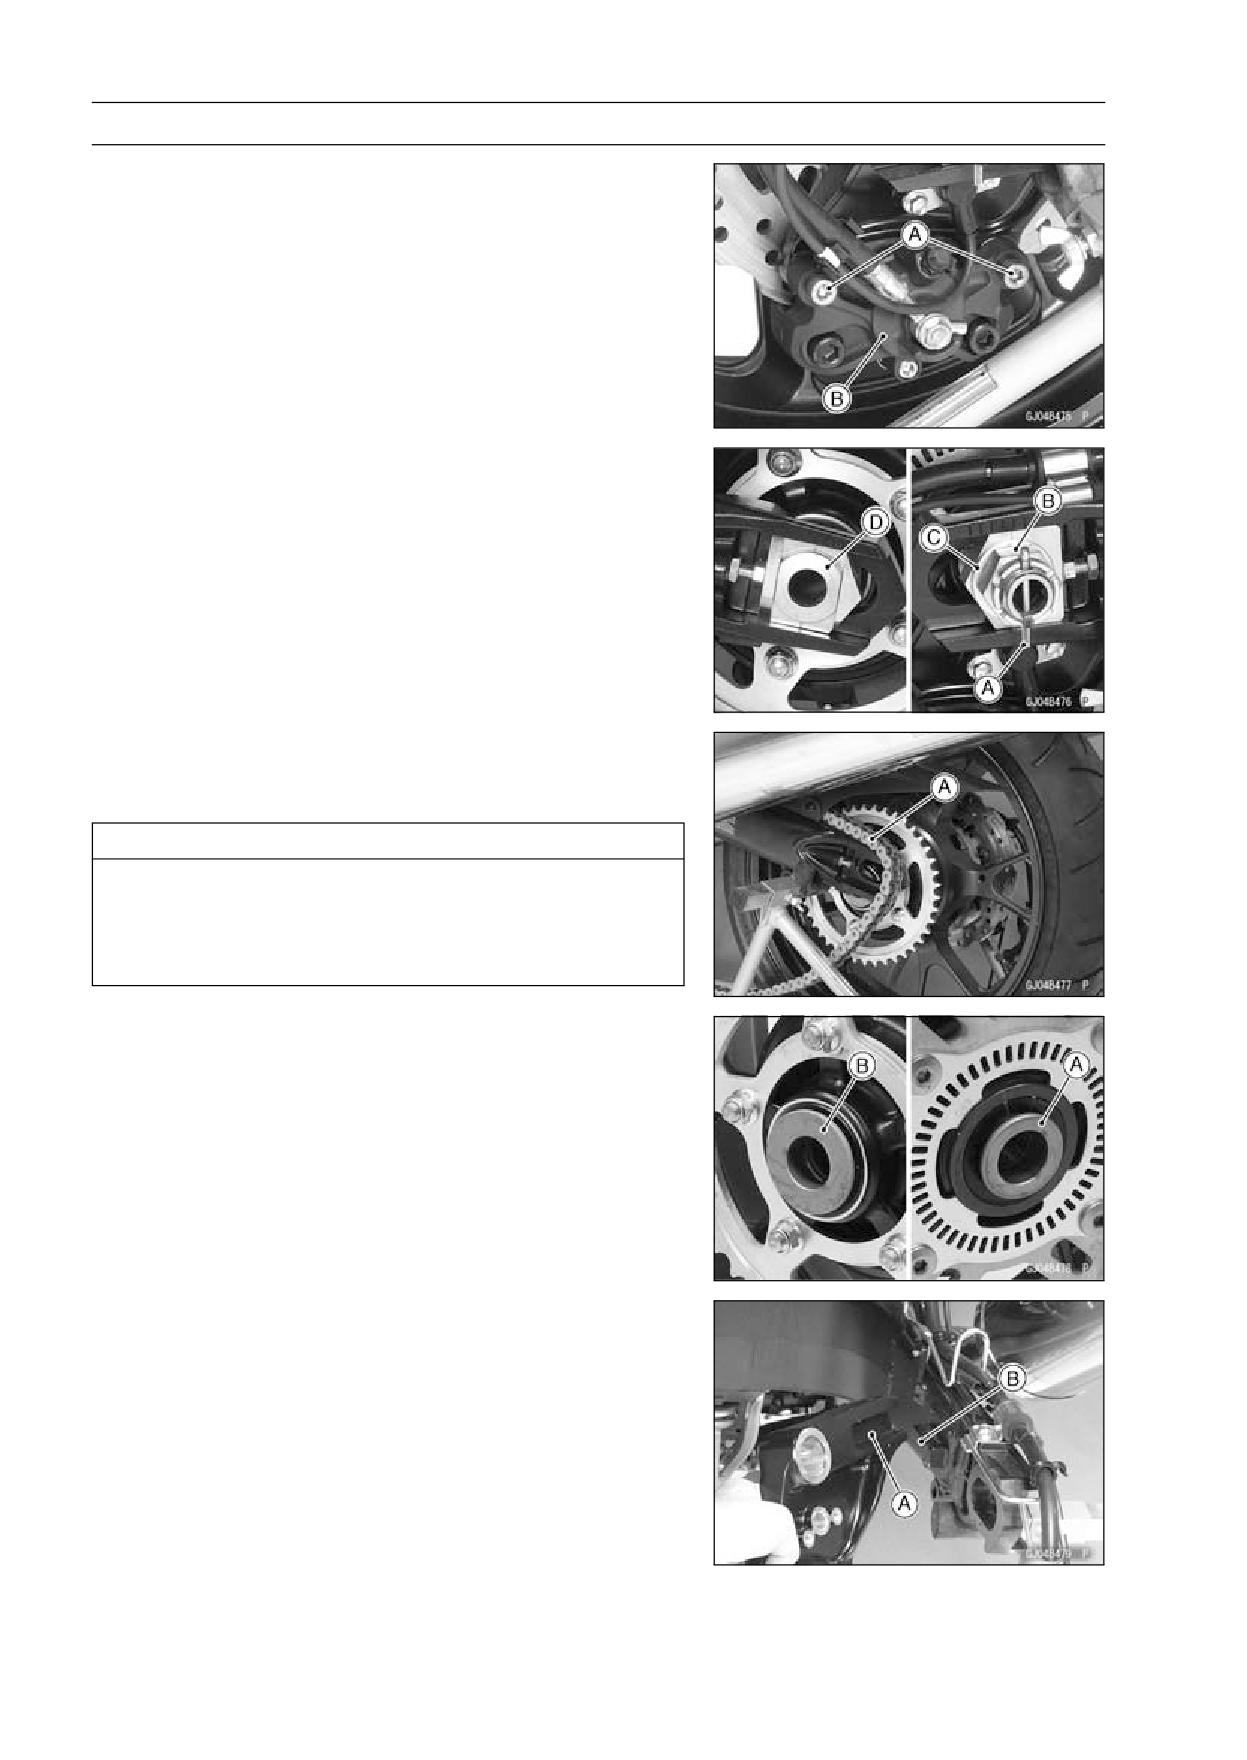
• Remove:
Rear Caliper Mounting Bolts [A]
Rear Caliper [B]
• Remove the rear wheel rotation sensor from the caliper
bracket (see Rear Wheel Rotation Sensor Removal in the
Brakes chapter) (ZX1400B Models).
• Remove:
Cotter Pin [A]
Axle Nut [B]
Washer [C]
Axle [D] (from Left Side)
• Remove the drive chain [A] from the rear sprocket toward
the left.
• Move the rear wheel back and remove it.
CAUTION
Do not lay the wheel on the ground with the disc
facing down. This can damage or warp the disc.
Place blocks under the wheel so that the disc does
not touch the ground.
Rear Wheel Installation
• Apply high-temperature grease to the grease seal lips.
• Fit the collars on the both sides of the hub.
Right Side Collar [A]
Left Side Collar [B]
• Engage the drive chain with the rear sprocket.
• Install the caliper bracket [A] onto the swingarm stop [B].
• Insert the axle from the left side of the wheel, and tighten
the axle nut.
Torque - Rear Axle Nut: 127 N·m (13.0 kgf·m, 94 ft·lb)
WHEELS/TIRES 10-9
Wheels (Rims)
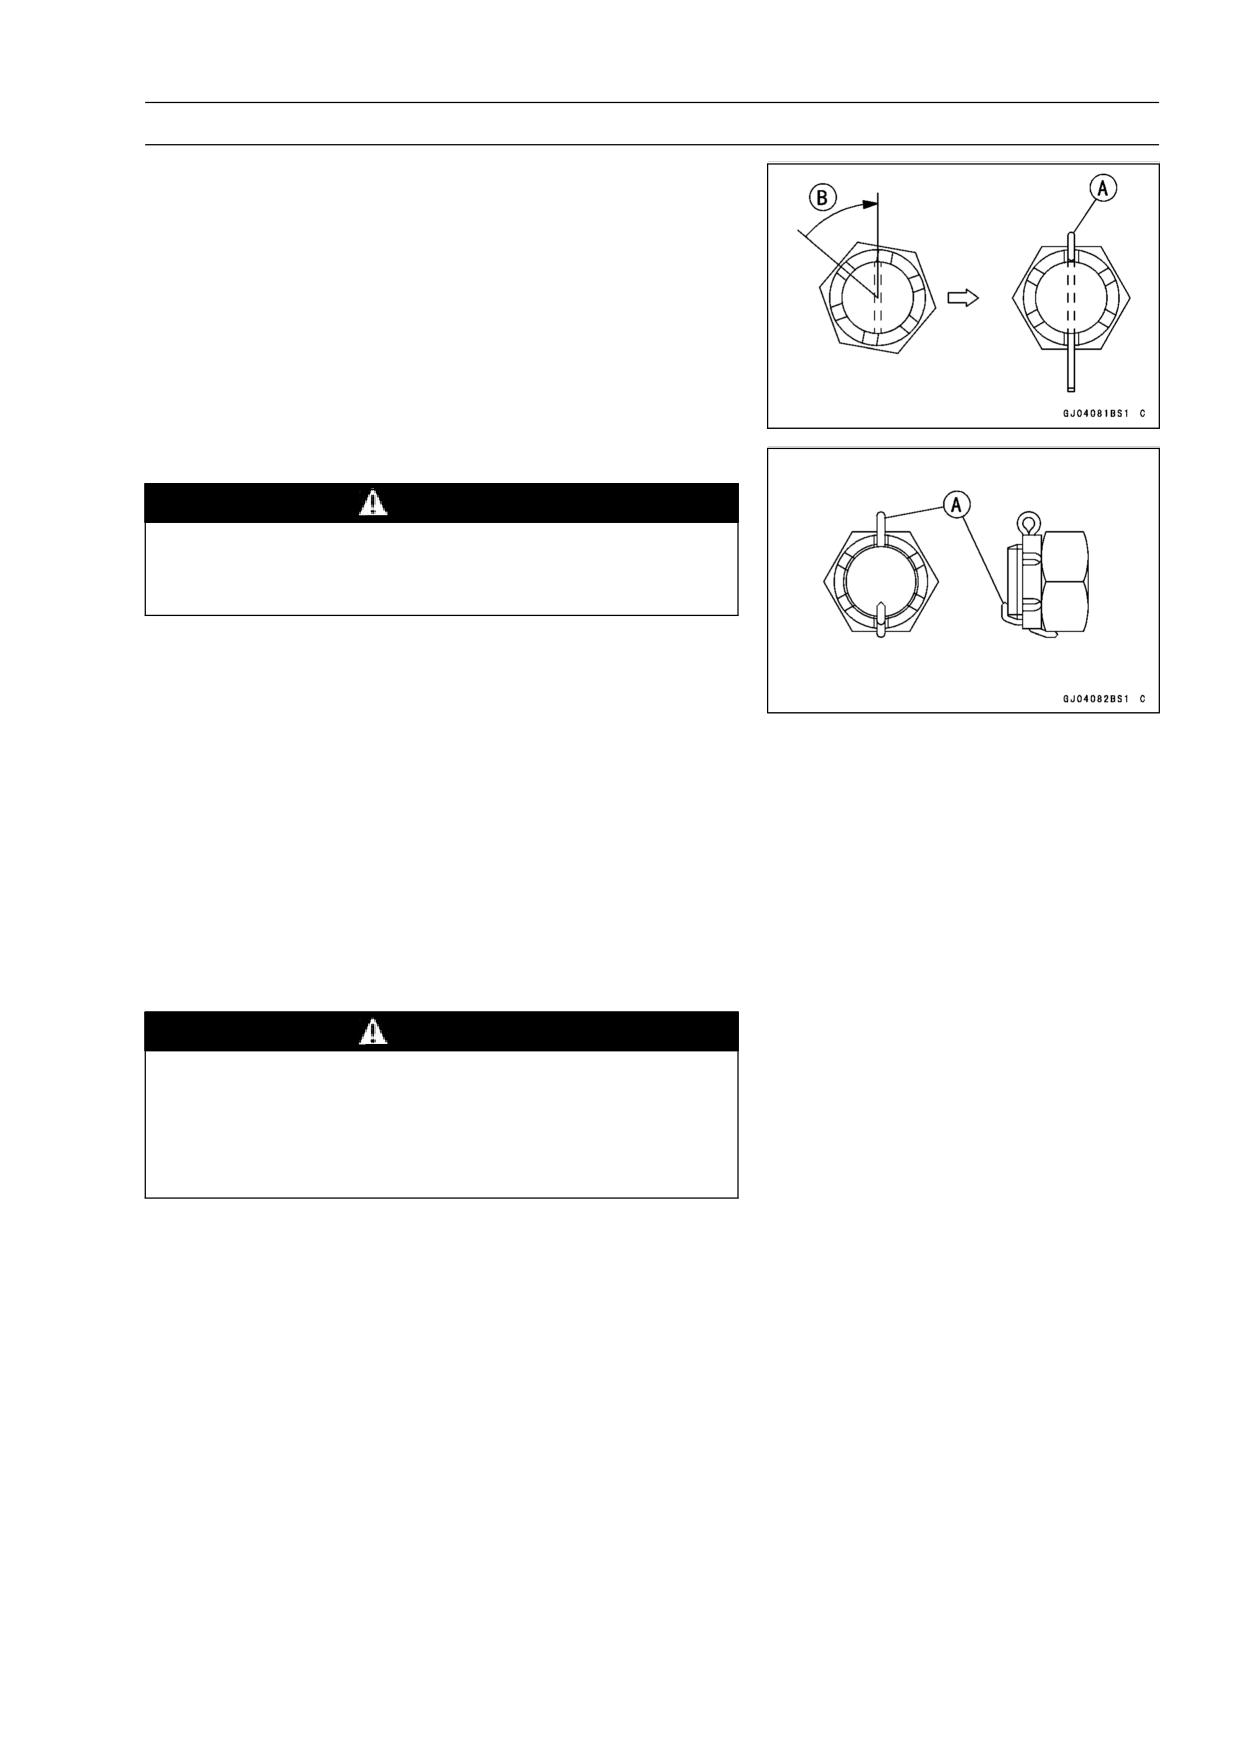
• Insert a new cotter pin [A].
NOTE
○When inserting the cotter pin, if the slots in the nut do
not align with the cotter pin hole in the axle, tighten the
nut clockwise [B] up to next alignment.
○It should be within 30°.
○Loosen once and tighten again when the slot goes past
the nearest hole.
• Bend the cotter pin [A] over the nut.
WARNING
If the rear axle nut is not securely tightened or the
cotter pin is not installed, an unsafe riding condi-
tion may result.
• Adjust the drive chain slack after installation (see Drive
Chain Slack Inspection in the Periodic Maintenance chap-
ter).
• Install the rear caliper (see Caliper Installation in the
Brakes chapter).
• Install the rear wheel rotation sensor (see Rear Wheel
Rotation Sensor Installation in the Brakes chapter)
(ZX1400B Models).
• Check the rear brake effectiveness (see Brake Operation
Inspection in the Periodic Maintenance chapter).
WARNING
Do not attempt to drive the motorcycle until a full
brake pedal is obtained by pumping the brake pedal
until the pads are against the disc. The brake will
not function on the first application of the pedal if
this is not done.
10-10 WHEELS/TIRES
Wheels (Rims)
Wheel Inspection
• Raise the front/rear wheel off the ground.
Special Tools - Jack: 57001-1238
Jack Attachment: 57001-1608
• Spin the wheel lightly, and check for roughness or binding.
If roughness or binding is found, replace the hub bearings
(see Hub Bearing Removal/Installation).
• Inspect the wheel for small cracks, dents, bending, or
warp.
If there is any damage to the wheel, replace the wheel.
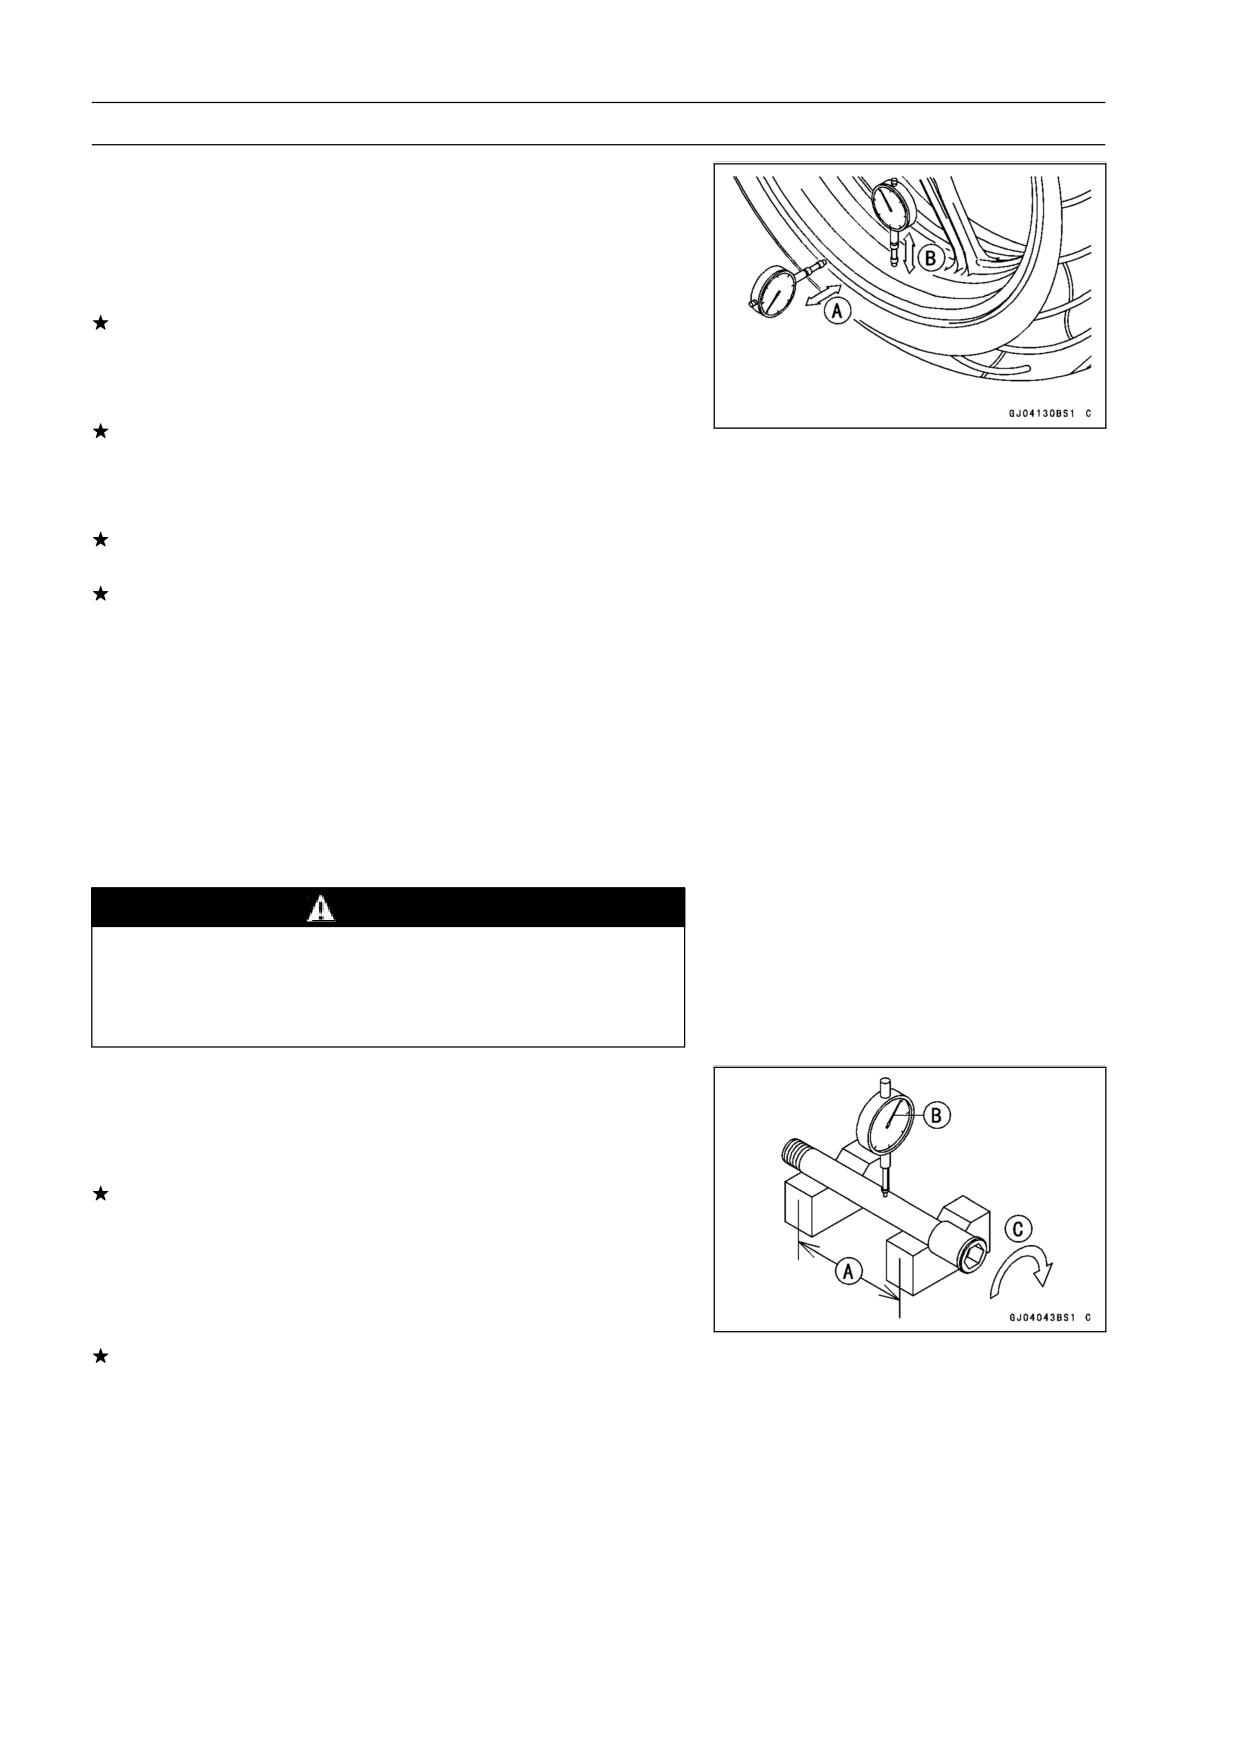
• Remove the wheel, and support it with the tire by the axle.
• Measure the rim runout, axial [A] and radial [B], with a dial
gauge.
If rim runout exceeds the service limit, check the hub bear-
ings (see Hub Bearing Inspection).
If the problem is not due to the bearings, replace the
wheel.
Rim Runout (with tire installed)
Standard:
Axial
TIR 0.5 mm (0.02 in.) or less
Radial
TIR 0.8 mm (0.03 in.) or less
Service Limit:
Axial
TIR 1.0 mm (0.04 in.)
Radial
TIR 1.0 mm (0.04 in.)
WARNING
Never attempt to repair a damaged wheel. If there
is any damage besides wheel bearings, the wheel
must be replaced to insure safe operational condi-
tion.
Axle Inspection
• Remove the front and rear axles (see Front/Rear Wheel
Removal).
• Visually inspect the front and rear axle for damages.
If the axle is damaged or bent, replace it.
• Place the axle in V blocks that are 100 mm (3.94 in.) [A]
apart, and set a dial gauge [B] on the axle at a point
halfway between the blocks. Turn [C] the axle to mea-
sure the runout. The difference between the highest and
lowest dial readings is the amount of runout.
If axle runout exceeds the service limit, replace the axle.
Axle Runout/100 mm (3.94 in.)
Standard:
TIR 0.03 mm (0.0012 in.) or less
Service Limit: TIR 0.2 mm (0.01 in.)
WHEELS/TIRES 10-11
Wheels (Rims)
Balance Inspection
• Remove the front and rear wheels (see Front/Rear Wheel
Removal).
• Support the wheel so that it can be spun freely.
• Spin the wheel lightly, and mark [A] the wheel at the top
when the wheel stops.
○Repeat this procedure several times. If the wheel stops
of its own accord in various positions, it is well balanced.
If the wheel always stops in one position, adjust the wheel
balance (see Balance Adjustment).
Balance Adjustment
• If the wheel always stops in one position, provisionally
attach a balance weight [A] on the rim at the marking using
adhesive tape.
• Rotate the wheel 1/4 turn [B], and see whether or not the
wheel stops in this position. If it does, the correct balance
weight is being used.
If the wheel rotates and the weight goes up, replace the
weight with the next heavier size. If the wheel rotates and
the weight goes down, replace the weight with the next
lighter size. Repeat these steps until the wheel remains
at rest after being rotated 1/4 turn.
• Rotate the wheel another 1/4 turn and then another 1/4
turn to see if the wheel is correctly balanced.
• Repeat the entire procedure as many times as necessary
to achieve correct wheel balance.
• Permanently install the balance weight.
Balance Weight Removal
• Insert a regular tip screwdrivers [A] [B] between the rib [C]
and weight [D] as shown.
• Pry the balance weight with two screwdrivers and remove
the balance weight.
• Discard the used balance weight.
CAUTION
Do not tap the screwdrivers. The rim could be dam-
aged.
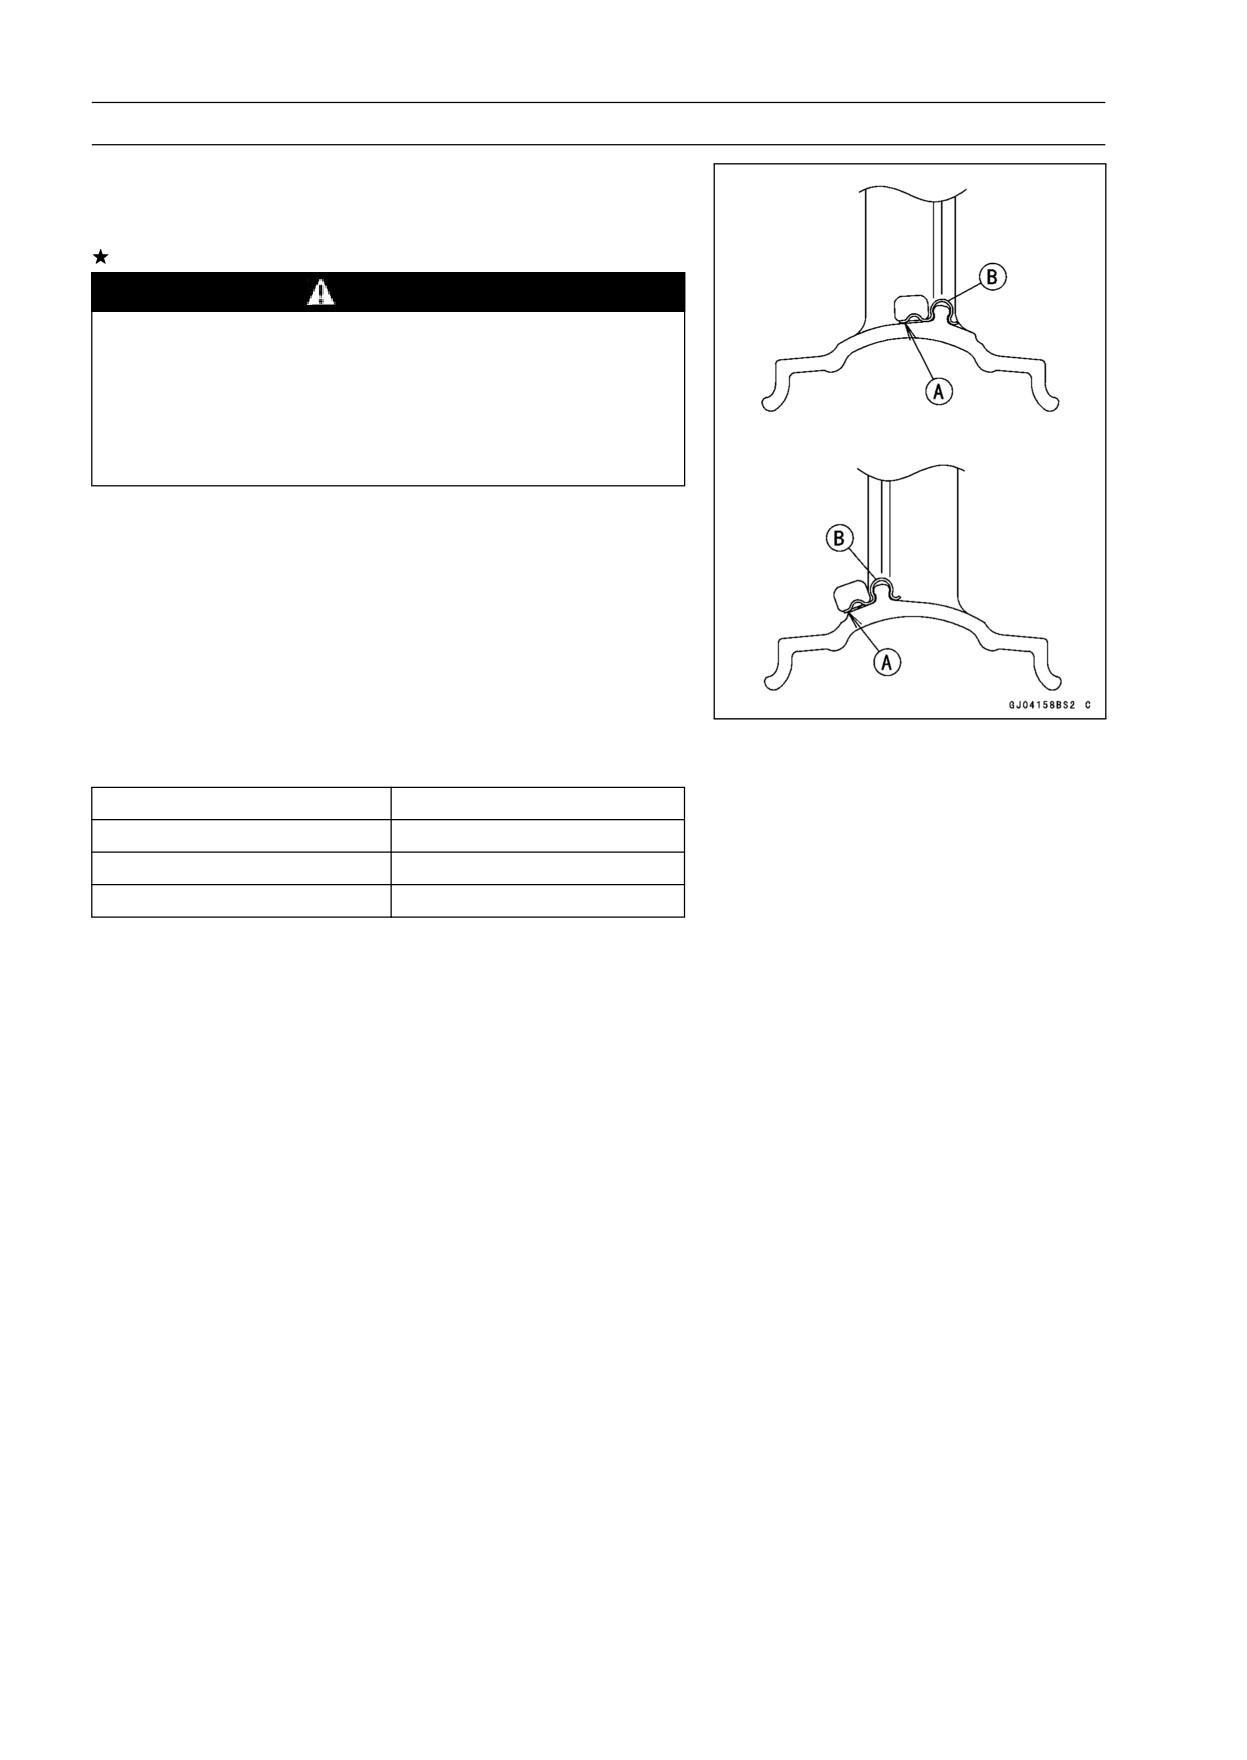
10-12 WHEELS/TIRES
Wheels (Rims)
Balance Weight Installation
• Check if the weight portion has any play on the blade [A]
and clip [B].
If it does, discard it.
WARNING
If the balance weight has any play on the rib of the
rim, the blade and/or clip have been stretched. Re-
place the loose balance weight.
Do not reuse used balance weight.
Unbalanced wheels can create an unsafe riding
condition.
Balance Weight
Part Number
Weight
41075-0007
10 g (0.35 oz.)
41075-0008
20 g (0.71 oz.)
41075-0017
30 g (1.06 oz.)
NOTE
○Balance weights are available from Kawasaki dealers
in 10, 20, and 30 grams (0.35 oz., 0.71 oz., and 1.06
oz.) sizes. An imbalance of less than 10 grams (0.35
oz.) will not usually affect running stability.
○Do not use four or more balance weight (more than 90
gram, 3.2 oz.). If the wheel requires an excess balance
weight, disassemble the wheel to find the cause.
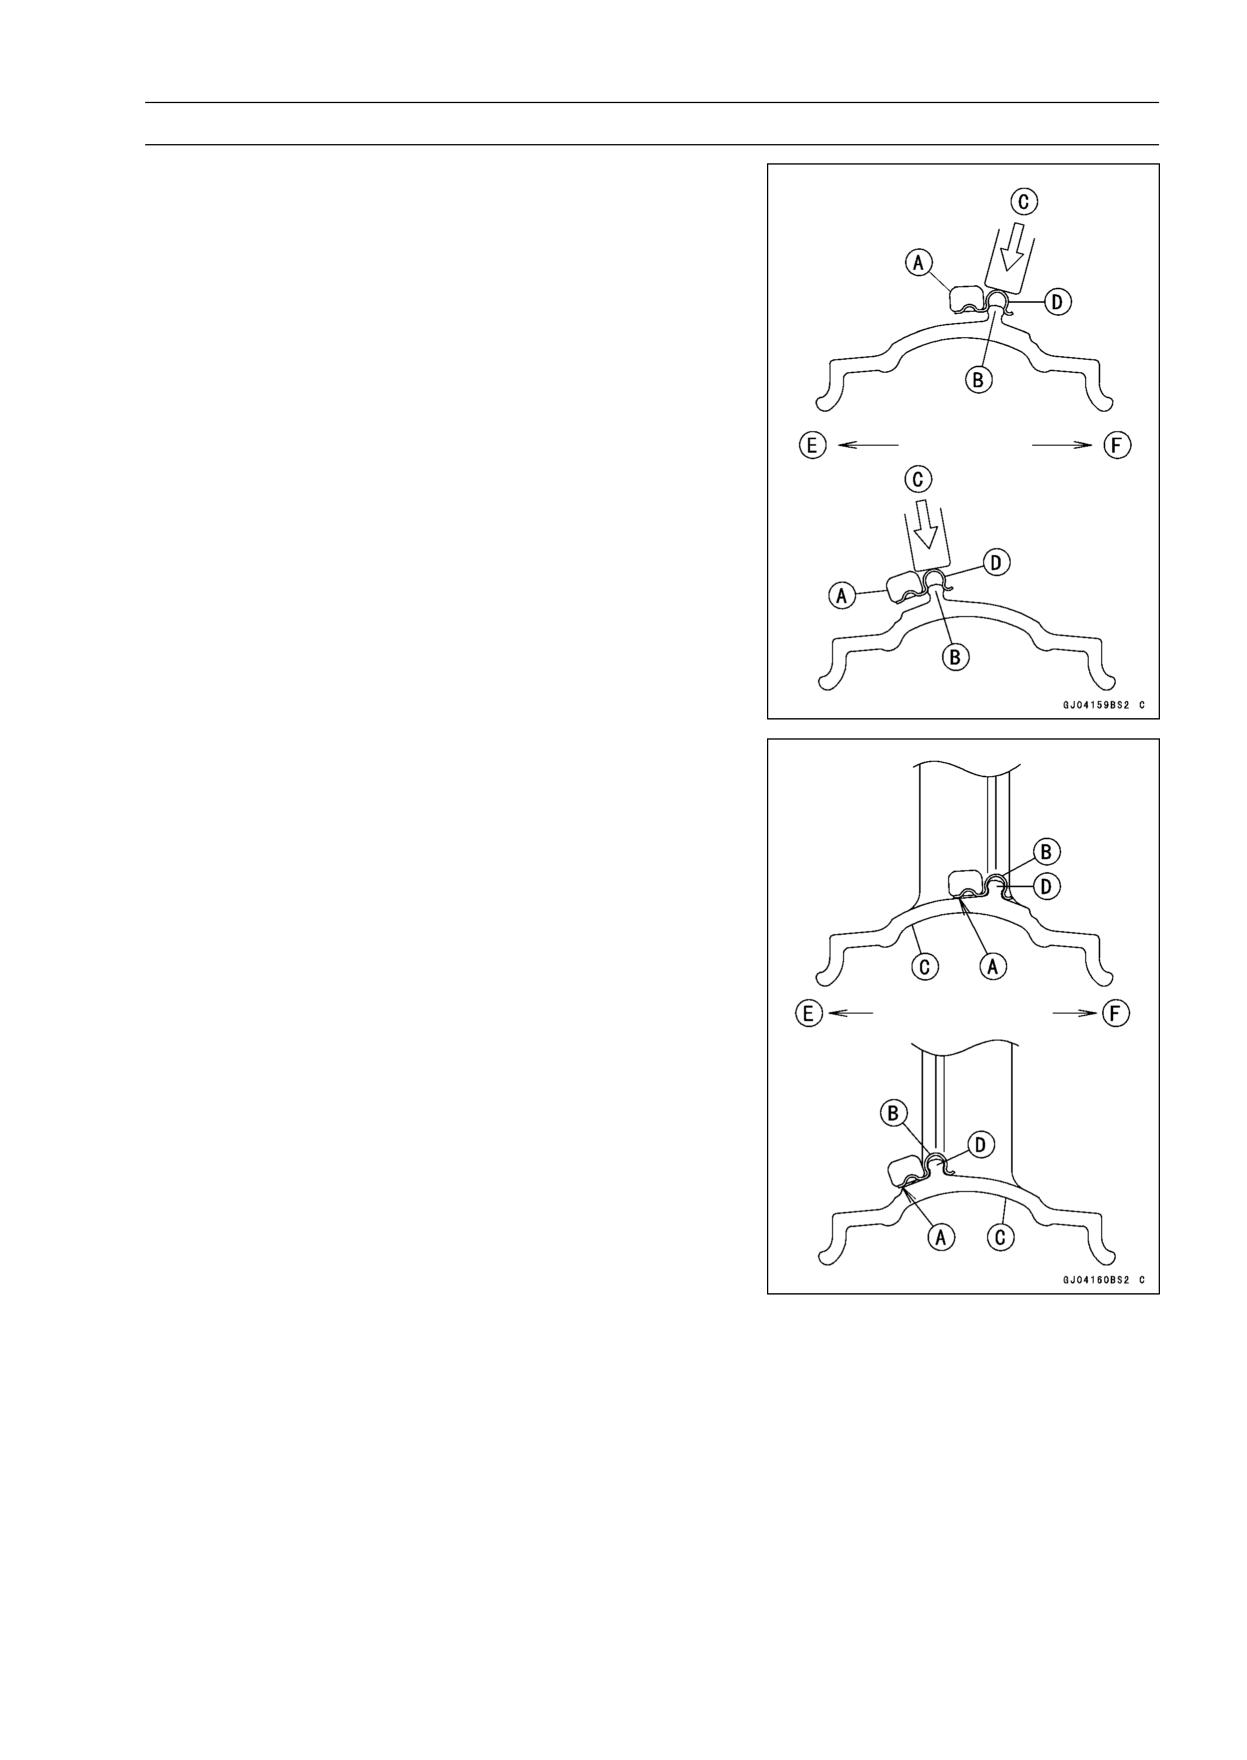
WHEELS/TIRES 10-13
Wheels (Rims)
• Slip the balance weight [A] on to the rib [B], by pushing or
lightly hammering [C] the clip [D].
○Install the balance weight at the left side of the motorcycle.
Left Side [E]
Right Side [F]
• Check that the blade [A] and clip [B] are fully seated on
the rim [C] and that the clip is hooked over the rib [D].
Left Side [E]
Right Side [F]
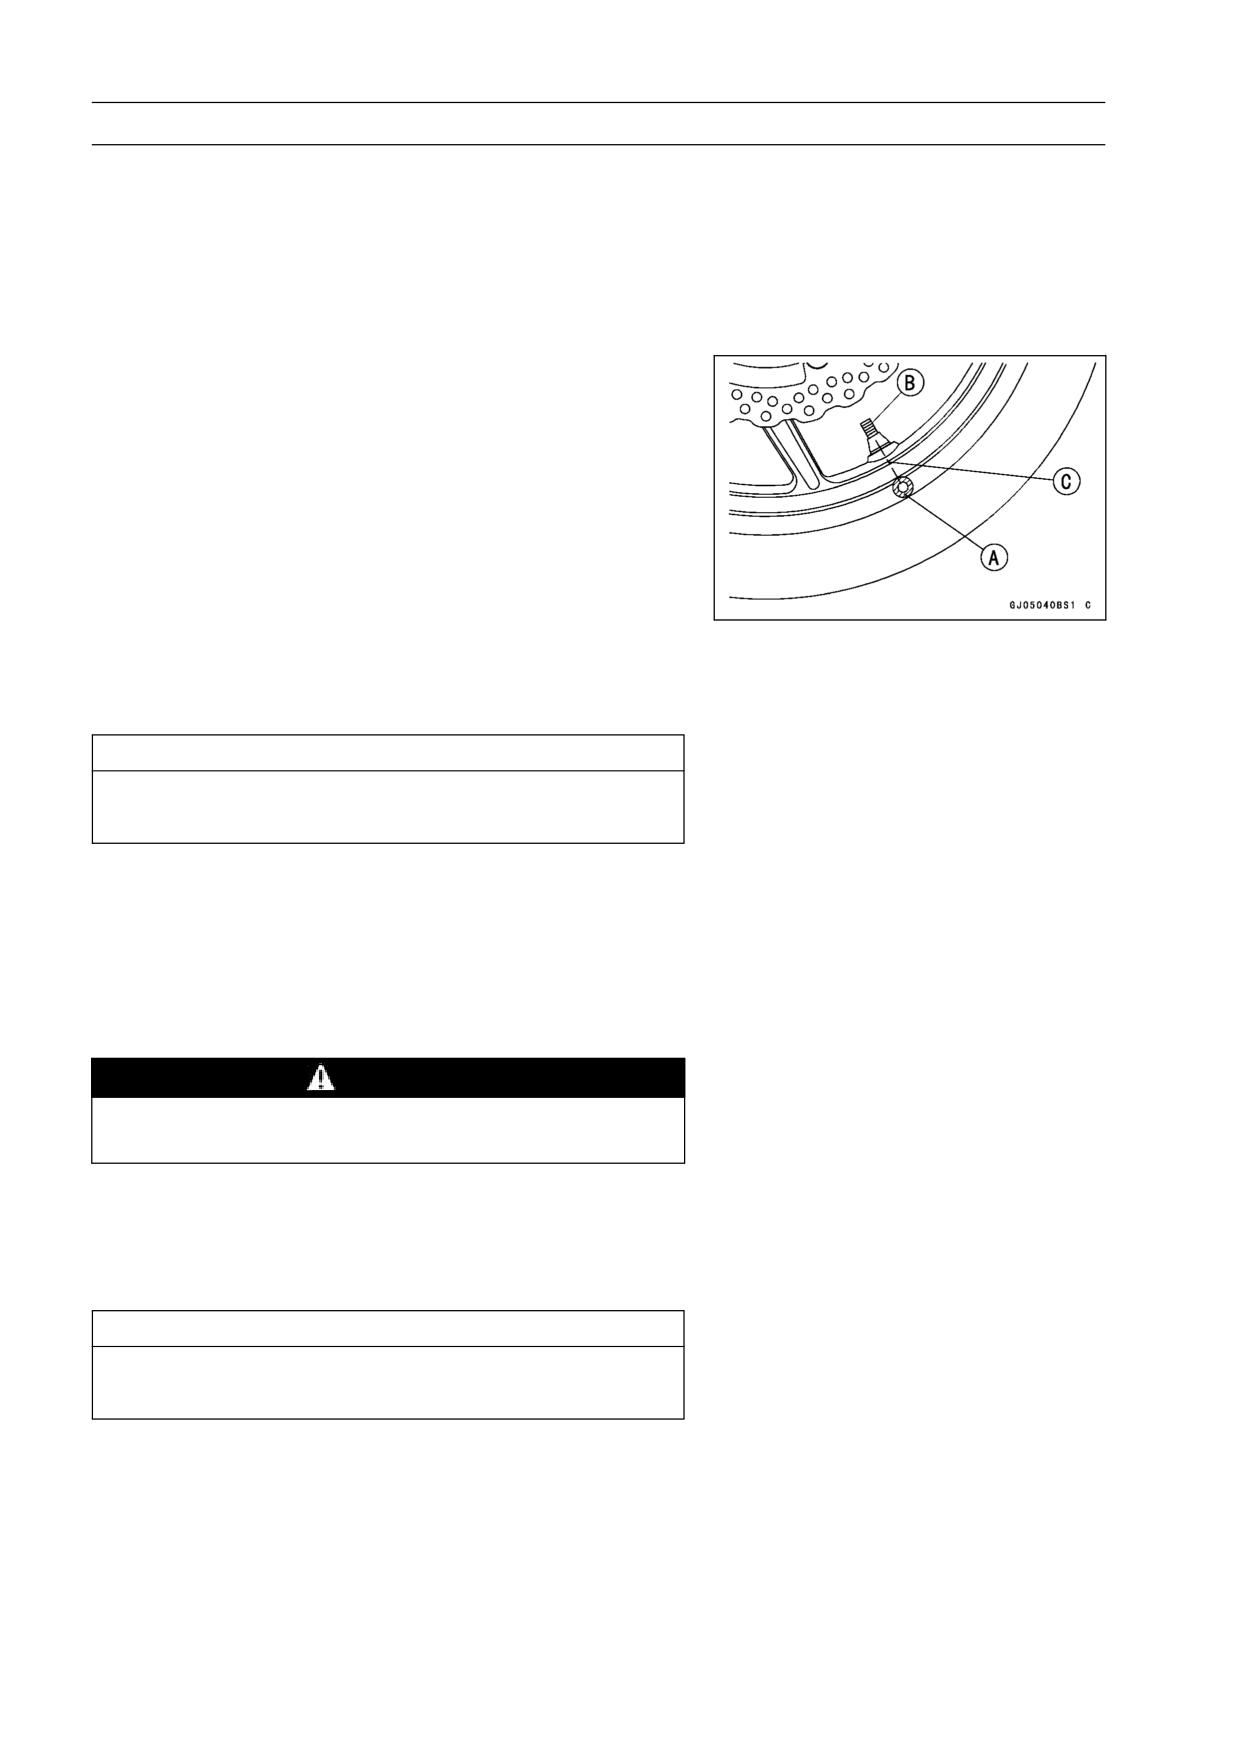
10-14 WHEELS/TIRES
Tires
Air Pressure Inspection/Adjustment
• Refer to the Air Pressure Inspection in the Periodic Main-
tenance chapter.
Tire Inspection
• Refer to the Wheel/Tire Damage Inspection in the Peri-
odic Maintenance chapter.
Tire Removal
• Remove:
Wheel (see Front/Rear Wheel Removal)
Valve Core (Let out the air)
• To maintain wheel balance, mark the valve stem position
on the tire with chalk so that the tire can be reinstalled in
the same position.
Chalk Mark or Yellow Mark [A]
Air Valve [B]
Align [C]
• Lubricate the tire beads and rim flanges on both sides with
a soap and water solution or rubber lubricant. This helps
the tire beads slip off the rim flanges.
CAUTION
Never lubricate with engine oil or petroleum distil-
lates because they will deteriorate the tire.
• Remove the tire from the rim using a suitable commer-
cially available tire changer.
NOTE
○The tires cannot be removed with hand tools because
they fit the rims too tightly.
Tire Installation
WARNING
Use the same manufacture’s on both front and rear
wheels.
• Inspect the rim and tire, and replace them if necessary.
• Clean the sealing surfaces of the rim and tire, and smooth
the sealing surfaces of the rim with a fine emery cloth if
necessary.
• Remove the air valve and discard it.
CAUTION
Replace the air valve whenever the tire is replaced.
Do not reuse the air valve.
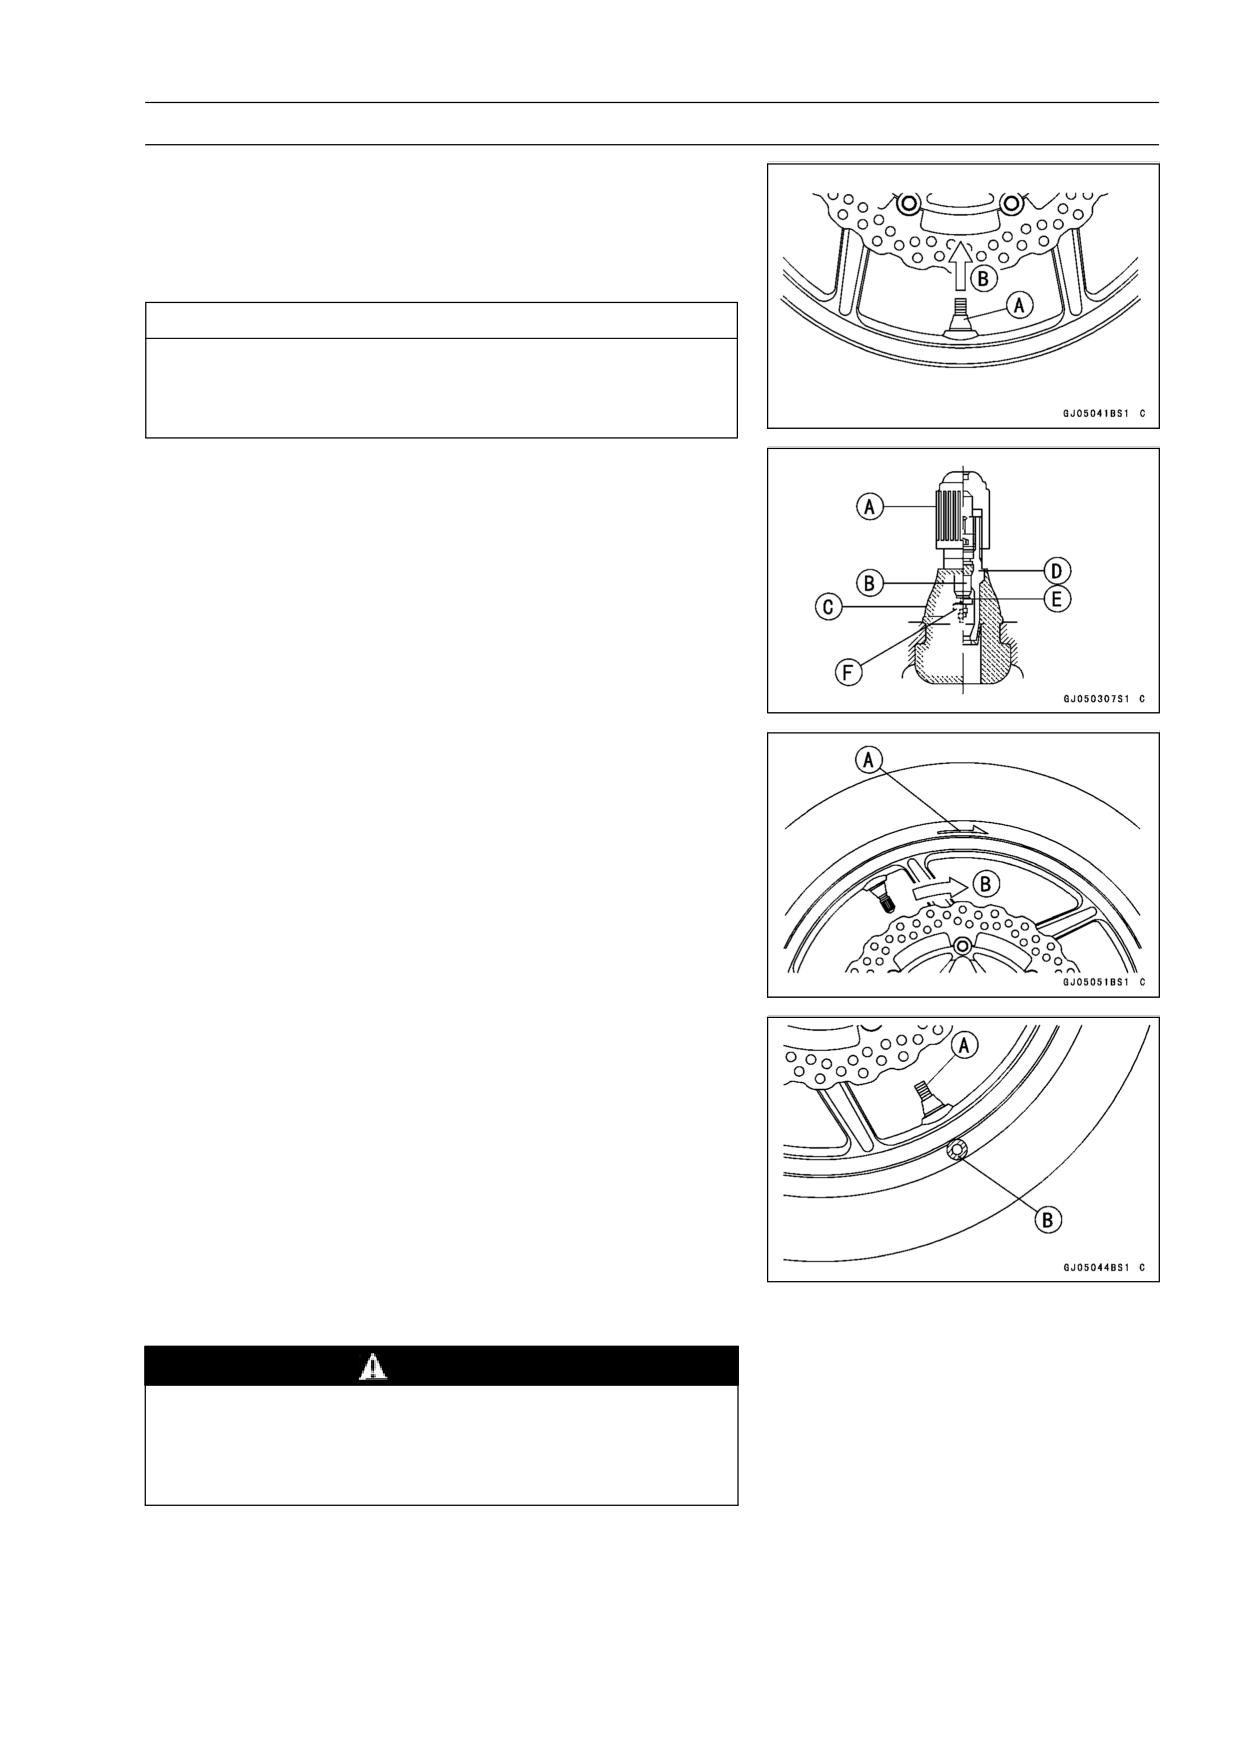
WHEELS/TIRES 10-15
Tires
• Install a new valve in the rim.
○Remove the valve cap, lubricate the stem seal [A] with a
soap and water solution or rubber lubricant, and pull [B]
the valve stem through the rim from the inside out until it
snaps into place.
CAUTION
Do not use engine oil or petroleum distillates to lu-
bricate the stem because they will deteriorate the
rubber.
○The air valve is shown in the figure.
Valve Cap [A]
Valve Core [B]
Stem Seal [C]
Valve Stem [D]
Valve Seat [E]
Valve Opened [F]
• Check the tire rotation mark on the front and rear tires and
install them on the rim accordingly.
Tire Rotation Mark [A]
Rotating Direction [B]
• Position the tire on the rim so that the valve [A] align with
the tire balance mark [B] (the chalk mark made during
removal, or the yellow paint mark on a new tire).
• Install the tire bead over the rim flange using a suitable
commercially available tire changer.
• Lubricate the tire beads and rim flanges with a soap and
water solution or rubber lubricant to help seat the tire
beads in the sealing surfaces of the rim while inflating the
tire.
• Center the rim in the tire beads, and inflate the tire with
compressed air until the tire beads seat in the sealing
surfaces.
WARNING
Be sure to install the valve core whenever inflating
the tire, and do not inflate the tire to more than 400
kPa (4.0 kgf/cm², 57 psi). Overinflation can explode
the tire with possibility of injury and loss of life.
10-16 WHEELS/TIRES
Tires
• Check to see that the rim lines [A] on both sides of the tire
sidewalls are parallel with the rim flanges.
If the rim flanges and tire sidewall rim lines are not parallel,
remove the valve core.
• Lubricate the rim flanges and tire beads.
• Install the valve core and inflate the tire again.
• After the tire beads seat in the rim flanges, check for air
leakage.
○Inflate the tire slightly above standard inflation.
○Use a soap and water solution or submerge the tire, and
check for bubbles that would indicate leakage.
• Adjust the air pressure to the specified pressure (see Air
Pressure Inspection in the Periodic Maintenance chap-
ter).
• Install the air valve cap.
• Adjust the wheel balance (see Balance Adjustment).
Tire Repair
Currently two types of repair for tubeless tires have come
into wide use. One type is called a temporary (external) re-
pair which can be carried out without removing the tire from
the rim, and the other type is called permanent (internal)
repair which requires tire removal. It is generally under-
stood that higher running durability is obtained by perma-
nent (internal) repairs than by temporary (external) ones.
Also, permanent (internal) repairs have the advantage of
permitting a thorough examination for secondary damage
not visible from external inspection of the tire. For these
reasons, Kawasaki does not recommend temporary (exter-
nal) repair. Only appropriate permanent (internal) repairs
are recommended. Repair methods may vary slightly from
make to make. Follow the repair methods indicated by the
manufacturer of the repair tools and materials so that safe
results can be obtained.
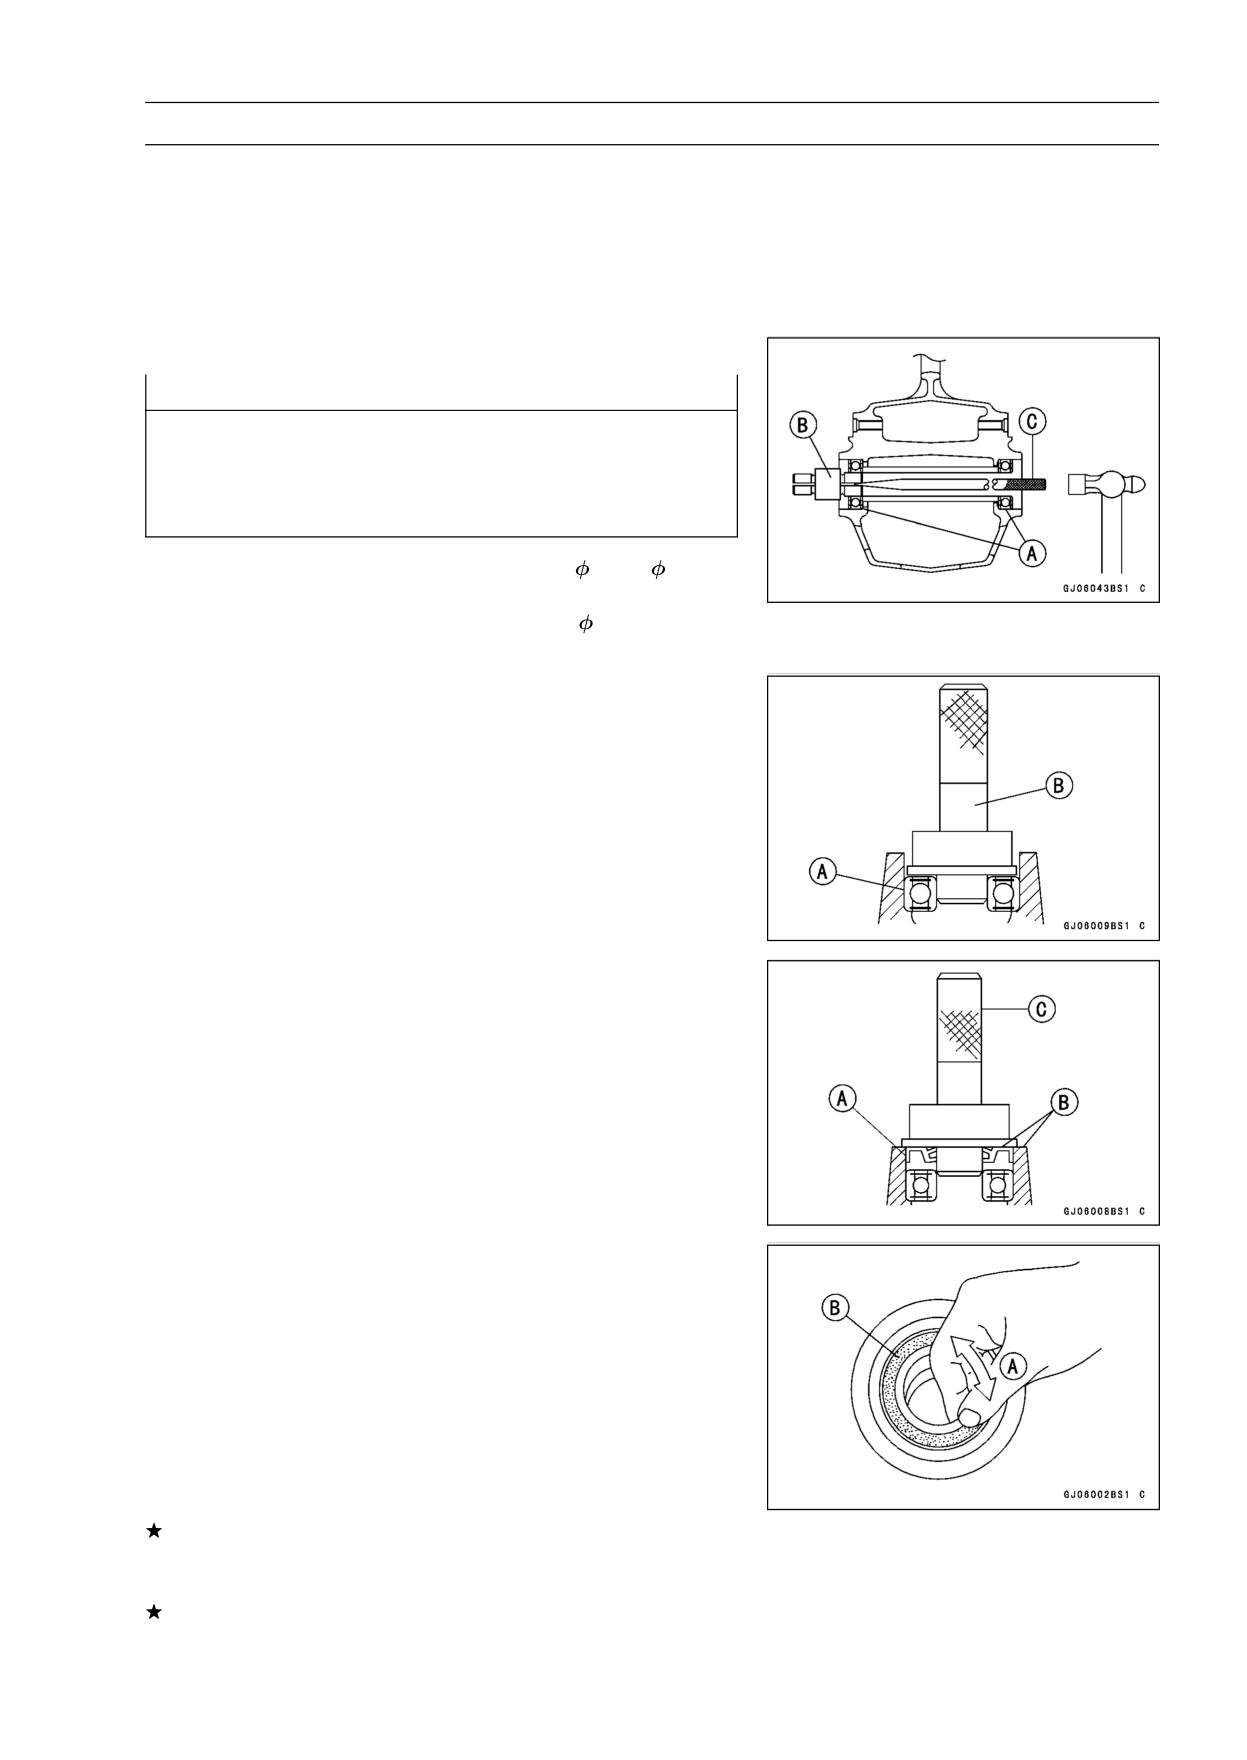
WHEELS/TIRES 10-17
Hub Bearing
Hub Bearing Removal
• Remove the wheel (see Front/Rear Wheel Removal), and
take out the following.
Collars
Coupling (Out of rear hub)
Grease Seals
• Use the bearing remover to remove the hub bearing [A].
CAUTION
Do not lay the wheel on the ground with the disc
facing down. This can damage or warp the disc.
Place blocks under the wheel so that the disc does
not touch the ground.
Special Tools - Bearing Remover Head,
25 ×
28 [B]:
57001-1346
Bearing Remover Shaft,
13 [C]:
57001
-1377
Hub Bearing Installation
• Before installing the hub bearings, blow any dirt or foreign
particles out of the hub with compressed air to prevent
contamination of the bearings.
• Replace the bearings with new ones.
• Install the bearings by using the bearing driver set which
does not contact the bearing inner race.
• Press in each right the bearing [A] until they are bottomed.
Special Tool - Bearing Driver Set [B]: 57001-1129
• Replace the grease seals with new ones.
• Press in the grease seals [A] so that the seal surface is
flush [B] with the end of the hole.
○Apply high-temperature grease to the grease seal lips.
Special Tool - Bearing Driver Set [C]: 57001-1129
Hub Bearing Inspection
Since the hub bearings are made to extremely close tol-
erances, the clearance can not normally be measured.
NOTE
○Do not remove any bearings for inspection. If any bear-
ings are removed, they will need to be replaced with
new ones.
• Turn each bearing in the hub back and forth [A] while
checking for plays, roughness, or binding.
If bearing play, roughness or binding is found, replace the
bearing.
• Examine the bearing seal [B] for tears or leakage.
If the seal is torn or is leaking, replace the bearing.
10-18 WHEELS/TIRES
Hub Bearing
Hub Bearing Lubrication
NOTE
○Since the hub bearings are packed with grease and
sealed, lubrication is not required.
FINAL DRIVE 11-1
Final Drive
Table of Contents
Exploded View
11-2
Specifications
11-4
Special Tools
11-5
Drive Chain
11-6
Drive Chain Slack Inspection
11-6
Drive Chain Slack Adjustment
11-6
Wheel Alignment Inspection/Adjustment
11-6
Drive Chain Wear Inspection
11-6
Drive Chain Lubrication
11-6
Drive Chain Removal
11-6
Drive Chain Installation
11-6
Sprocket, Coupling
11-7
Engine Sprocket Removal
11-7
Engine Sprocket Installation
11-7
Rear Sprocket Removal
11-8
Rear Sprocket Installation
11-8
Coupling Installation
11-8
Coupling Bearing Removal
11-9
Coupling Bearing Installation
11-9
Coupling Bearing Inspection
11-10
Coupling Bearing Lubrication
11-10
Coupling Damper Inspection
11-10
11
Sprocket Wear Inspection
11-10
Rear Sprocket Warp Inspection
11-11
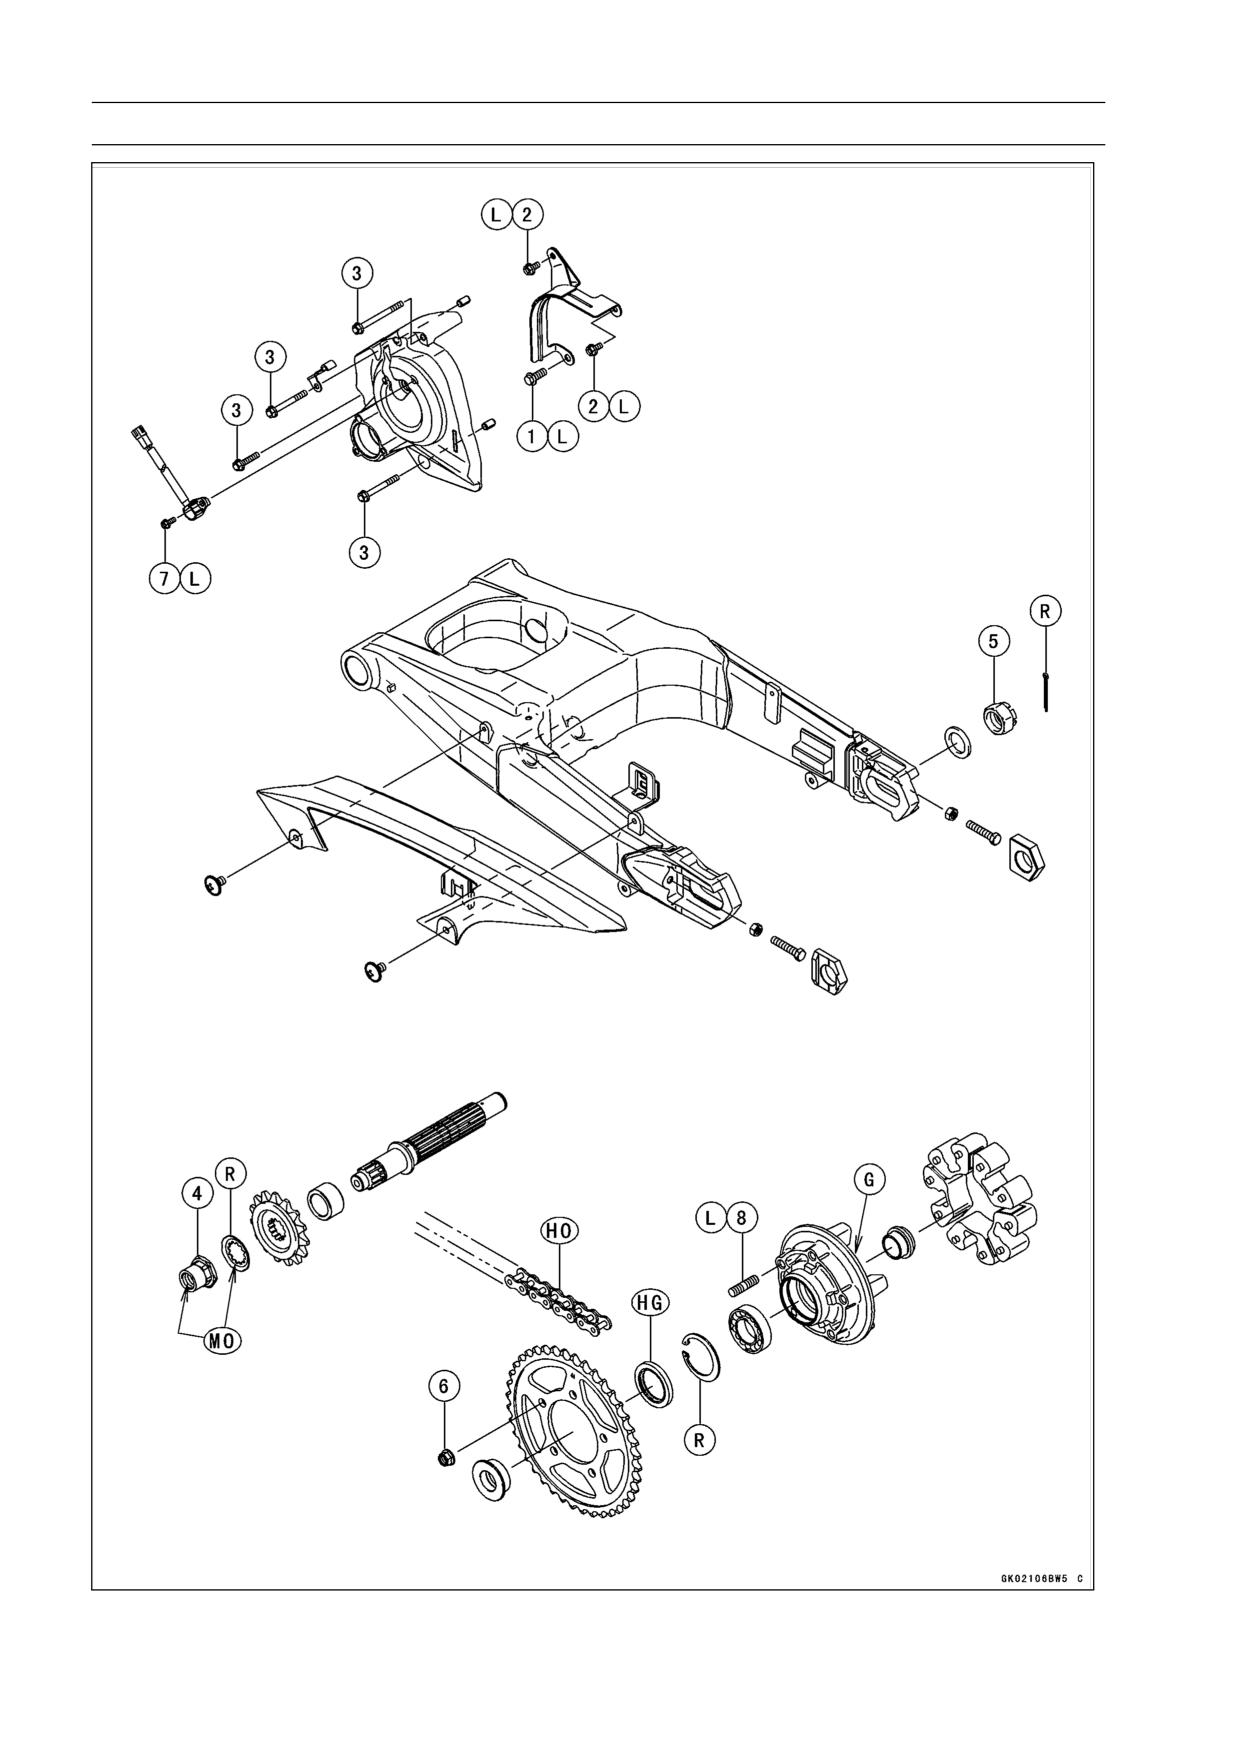
11-2 FINAL DRIVE
Exploded View
FINAL DRIVE 11-3
Exploded View
Torque
No.
Fastener
Remarks
N·m
kgf·m
ft·lb
1
Chain Guide Bolt
12
1.2
106 in·lb
L
2
Chain Guide Bolts
9.8
1.0
87 in·lb
L
3
Engine Sprocket Cover Bolts
9.8
1.0
87 in·lb
4
Engine Sprocket Nut
125
13.0
92
MO
5
Rear Axle Nut
127
13.0
94
6
Rear Sprocket Nuts
69
7.0
51
7
Speed Sensor Bolt
3.9
0.40
35 in·lb
L
8
Stud Bolts
14.7
1.5
11
L
G: Apply grease.
HG: Apply high-temperature grease.
HO: Apply heavy oil.
L: Apply a non-permanent locking agent.
MO: Apply molybdenum disulfide oil solution.
(mixture of the engine oil and molybdenum disulfide grease in a weight ratio 10 : 1)
R: Replacement Parts
11-4 FINAL DRIVE
Specifications
Item
Standard
Service Limit
Drive Chain
Drive Chain Slack
32 ∼ 38 mm (1.3 ∼ 1.5 in.)
- - -
Drive Chain Wear (20-link Length)
317.5 ∼ 318.2 mm (12.50 ∼ 12.53 in.)
323 mm (12.7 in.)
Standard Chain:
Make
DAIDO
- - -
Type
DID50ZVM4 GC&B
- - -
Link
116 links
- - -
Sprockets
Rear Sprocket Warp
0.4 mm (0.016 in.) or less
0.5 mm (0.020 in.)
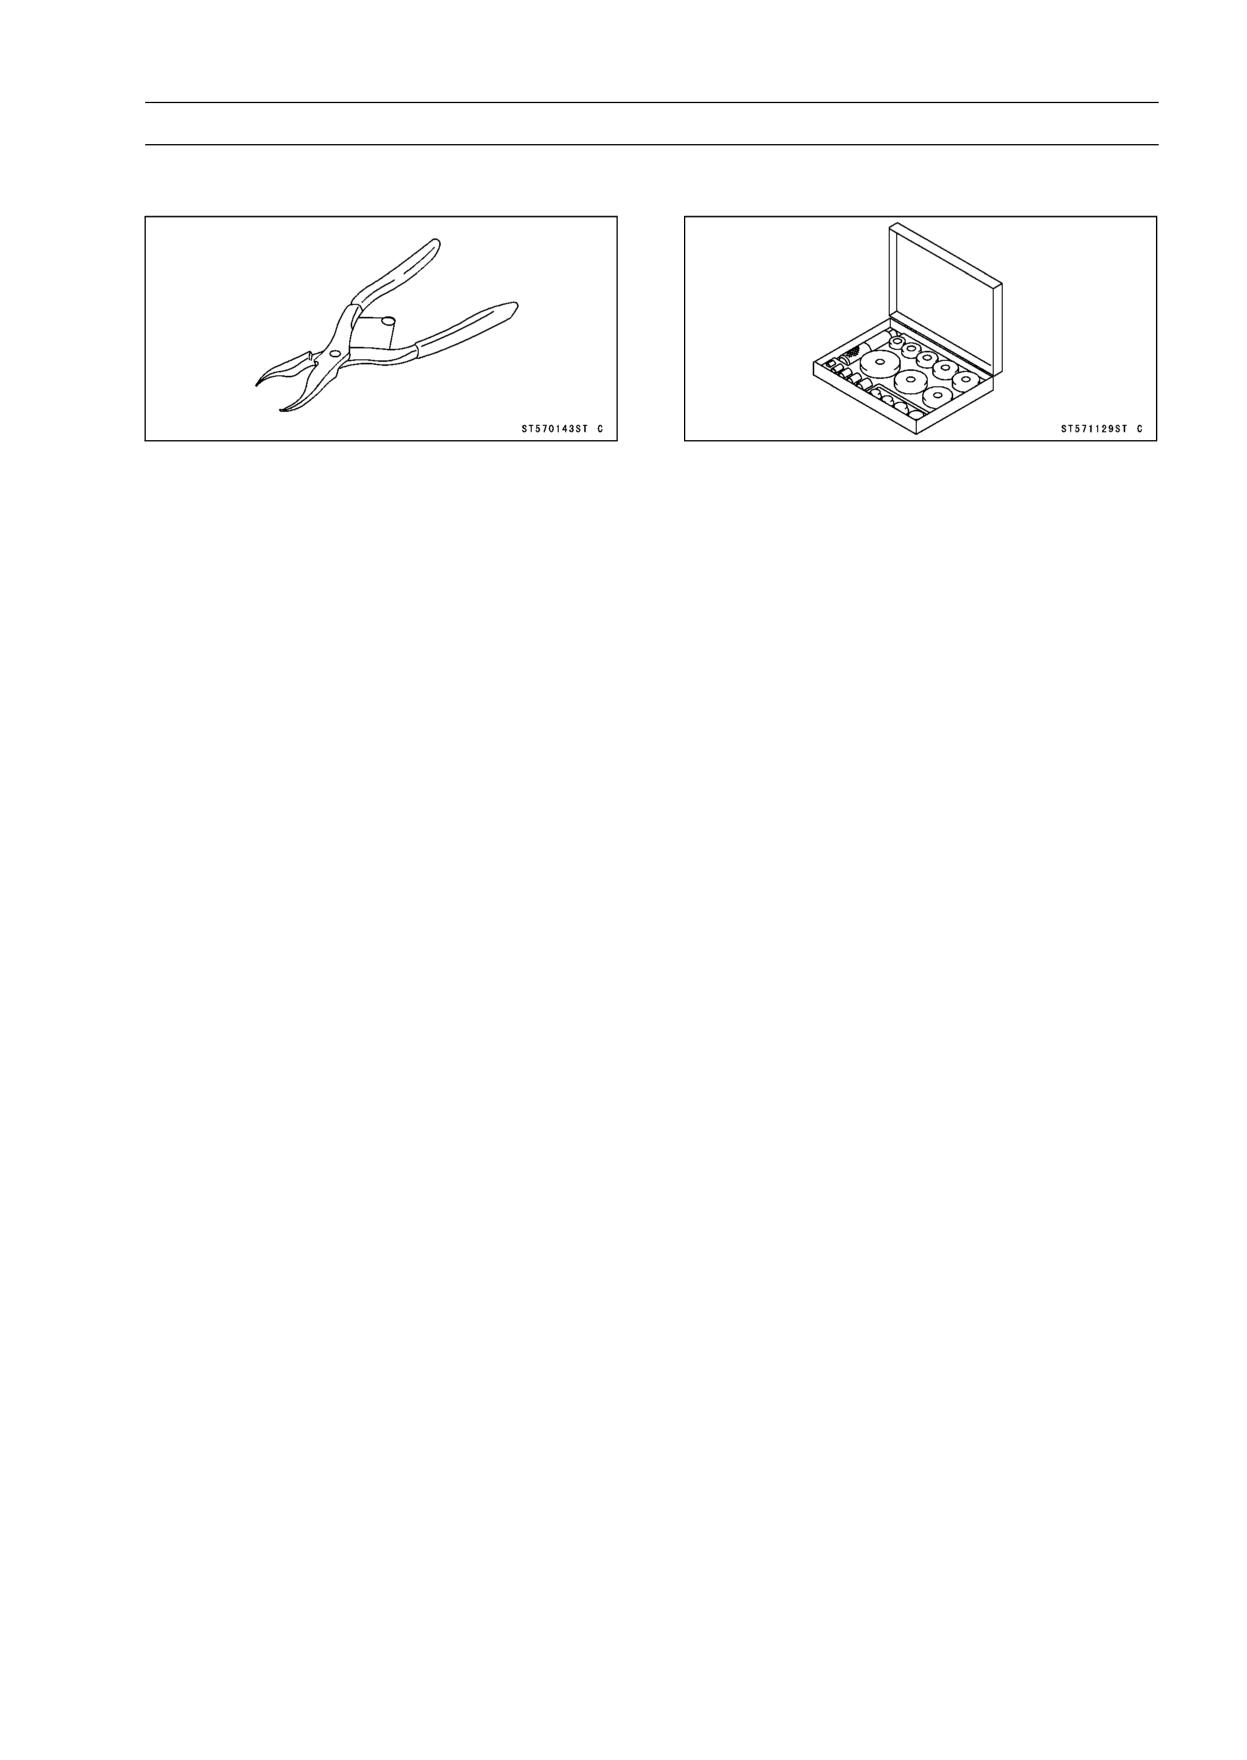
FINAL DRIVE 11-5
Special Tools
Inside Circlip Pliers:
Bearing Driver Set:
57001-143
57001-1129
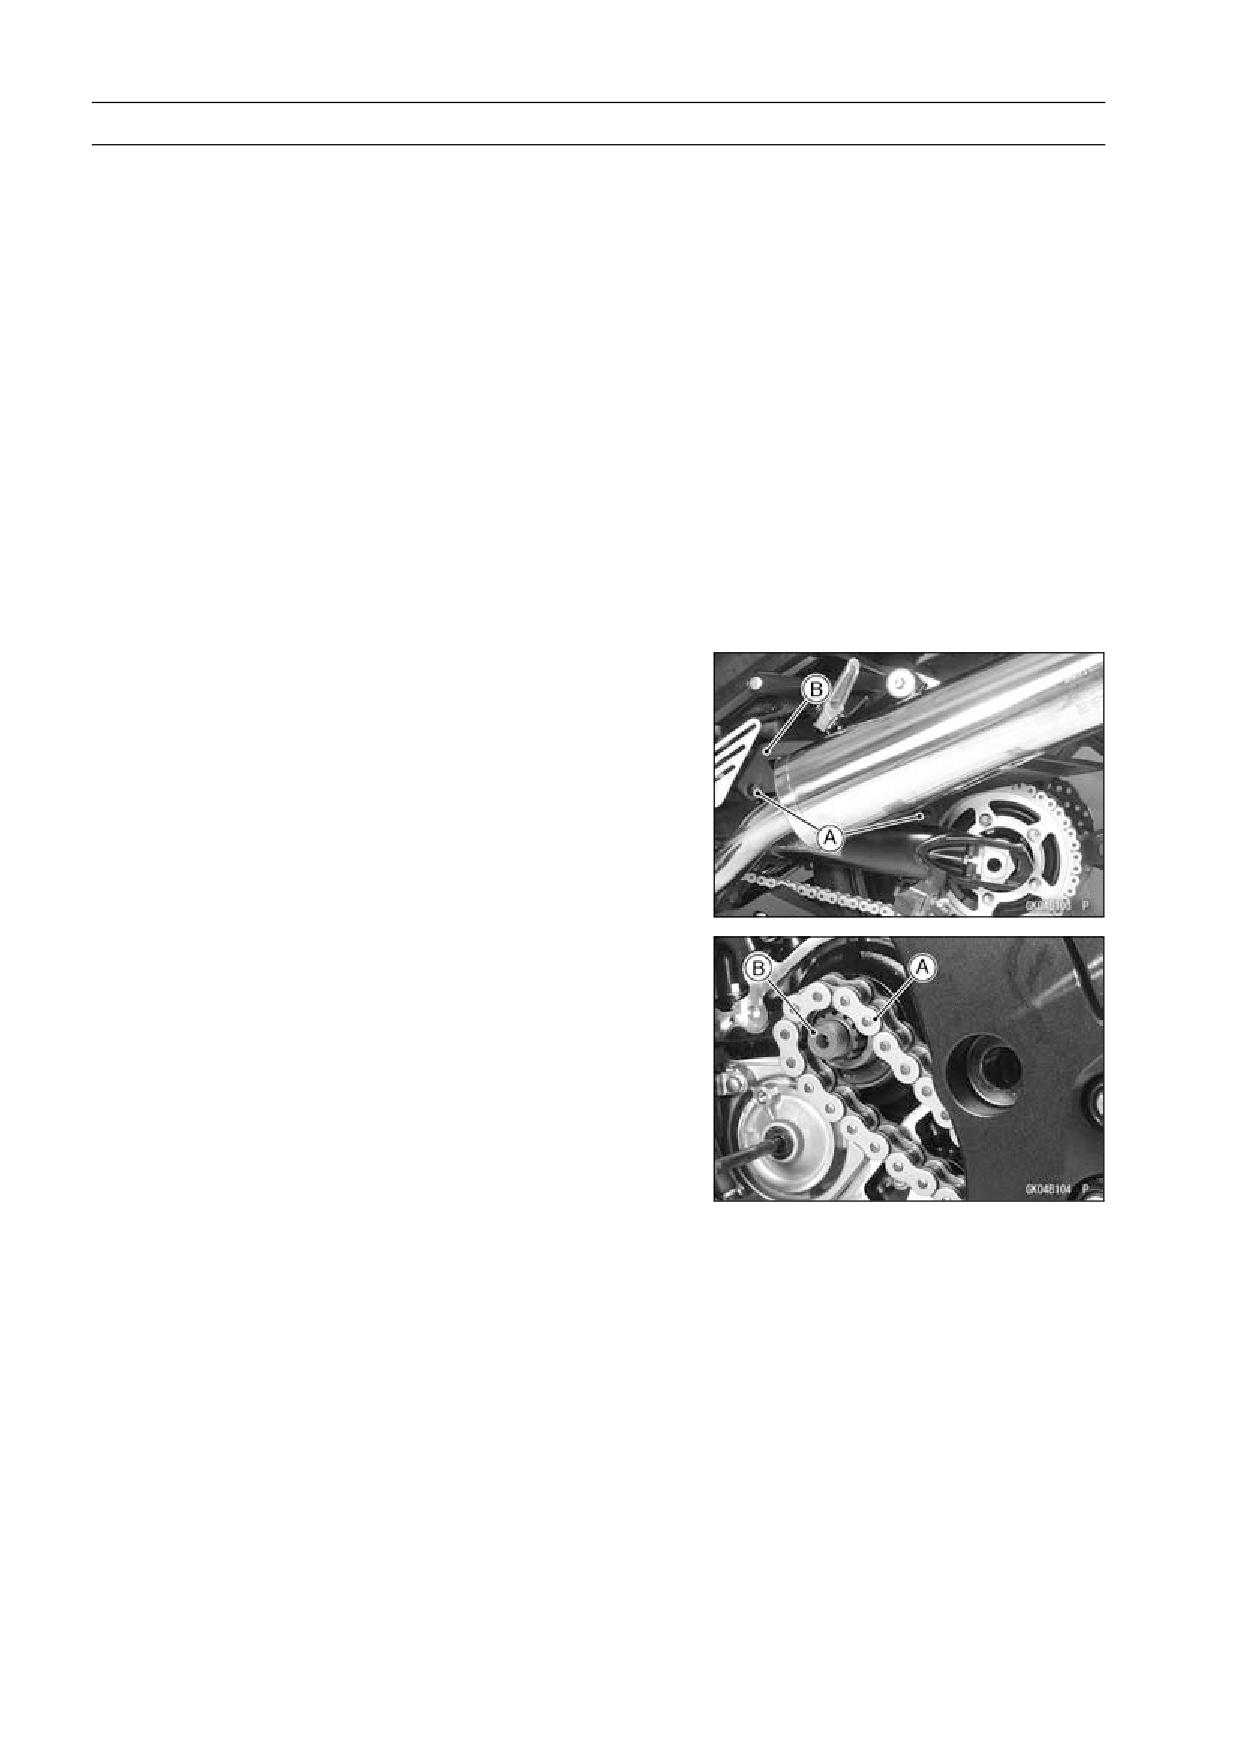
11-6 FINAL DRIVE
Drive Chain
Drive Chain Slack Inspection
• Refer to the Drive Chain Slack Inspection in the Periodic
Maintenance chapter.
Drive Chain Slack Adjustment
• Refer to the Drive Chain Slack Adjustment in the Periodic
Maintenance chapter.
Wheel Alignment Inspection/Adjustment
• Refer to the Wheel Alignment Inspection in the Periodic
Maintenance chapter.
Drive Chain Wear Inspection
• Refer to the Drive Chain Wear Inspection in the Periodic
Maintenance chapter.
Drive Chain Lubrication
• Refer to the Drive Chain Lubrication Condition Inspection
in the Periodic Maintenance chapter.
Drive Chain Removal
• Remove the chain cover screws [A] and chain cover [B].
○Clear the chain cover from the swingarm.
• Remove:
Rear Wheel (see Rear Wheel Removal in the
Wheels/Tires chapter)
Engine Sprocket (see Engine Sprocket Removal)
Swingarm (see Swingarm Removal in the Suspension
chapter)
• Remove the drive chain [A] from the output shaft [B], and
take it off the chassis.
Drive Chain Installation
• Install the drive chain to the output shaft.
• Install:
Swingarm (see Swingarm Installation in the Suspension
chapter)
Engine Sprocket (see Engine Sprocket Installation)
Rear Wheel (see Rear Wheel Installation in the
Wheels/Tires chapter)
Chain Cover
• Adjust the drive chain slack after installing the chain (see
Drive Chain Slack Adjustment in the Periodic Mainte-
nance chapter).
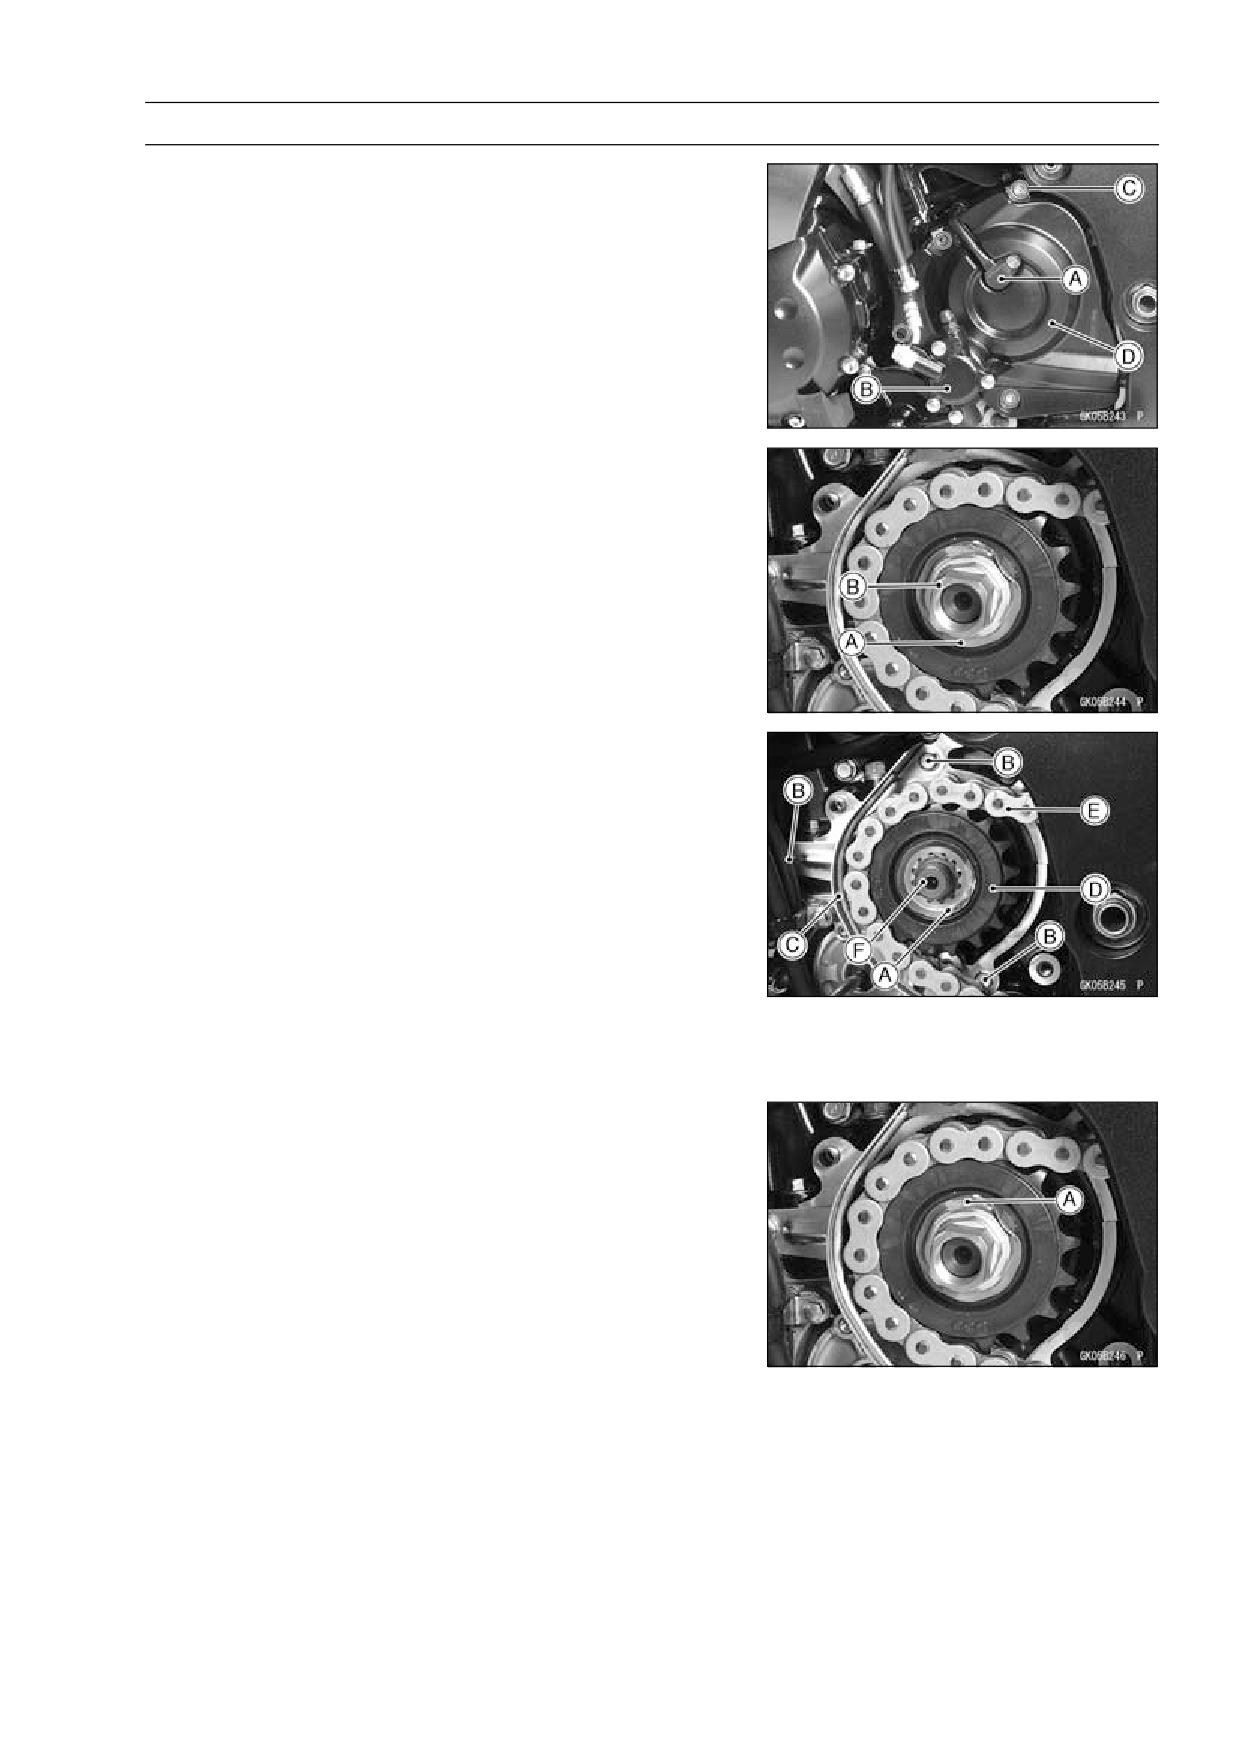
FINAL DRIVE 11-7
Sprocket, Coupling
Engine Sprocket Removal
• Remove:
Left Lower Fairing (see Lower Fairing Removal in the
Frame chapter)
Speed Sensor [A] (see Speed Sensor Removal in the
Electrical System chapter)
Clutch Slave Cylinder [B] (see Clutch Slave Cylinder in
the Clutch chapter)
Engine Sprocket Cover Bolts [C]
Engine Sprocket Cover [D]
• Flatten out the bended washer [A].
• Remove the engine sprocket nut [B].
NOTE
○When loosening the engine sprocket nut, hold the rear
brake on.
• Remove:
Washer [A]
Chain Guide Bolts [B]
Chain Guide [C]
• Raise the rear wheel off the ground with the stand.
• Remove the axle cotter pin, and loosen the rear axle nut.
• Loosen the both chain adjuster locknut to loosen the drive
chain.
• Remove the drive chain from the rear sprocket toward the
right.
• Pull the engine sprocket [D] with drive chain [E] off the
output shaft [F].
• Disengage the drive chain from the engine sprocket.
Engine Sprocket Installation
• Replace the sprocket washer and axle cotter pin.
• Install the engine sprocket onto the output shaft.
• Apply a non-permanent locking agent to the threads of
the chain guide bolts.
• Install the chain guide, and tighten the bolts.
Torque - Chain Guide Bolt: 12 N·m (1.2 kgf·m, 106 in·lb)
Chain Guide Bolts: 9.8 N·m (1.0 kgf·m, 87 in·lb)
• Apply molybdenum disulfide oil solution to the threads of
the output shaft and the seating surface of the engine
sprocket nut.
• After torquing the engine sprocket nut, bend the one side
of the washer [A] over the nut.
NOTE
○Tighten the nut while applying the rear brake.
Torque - Engine Sprocket Nut: 125 N·m (13.0 kgf·m, 92 ft·lb)
• Adjust the drive chain slack after installing the engine
sprocket (see Drive Chain Slack Adjustment in the Pe-
riodic Maintenance chapter).
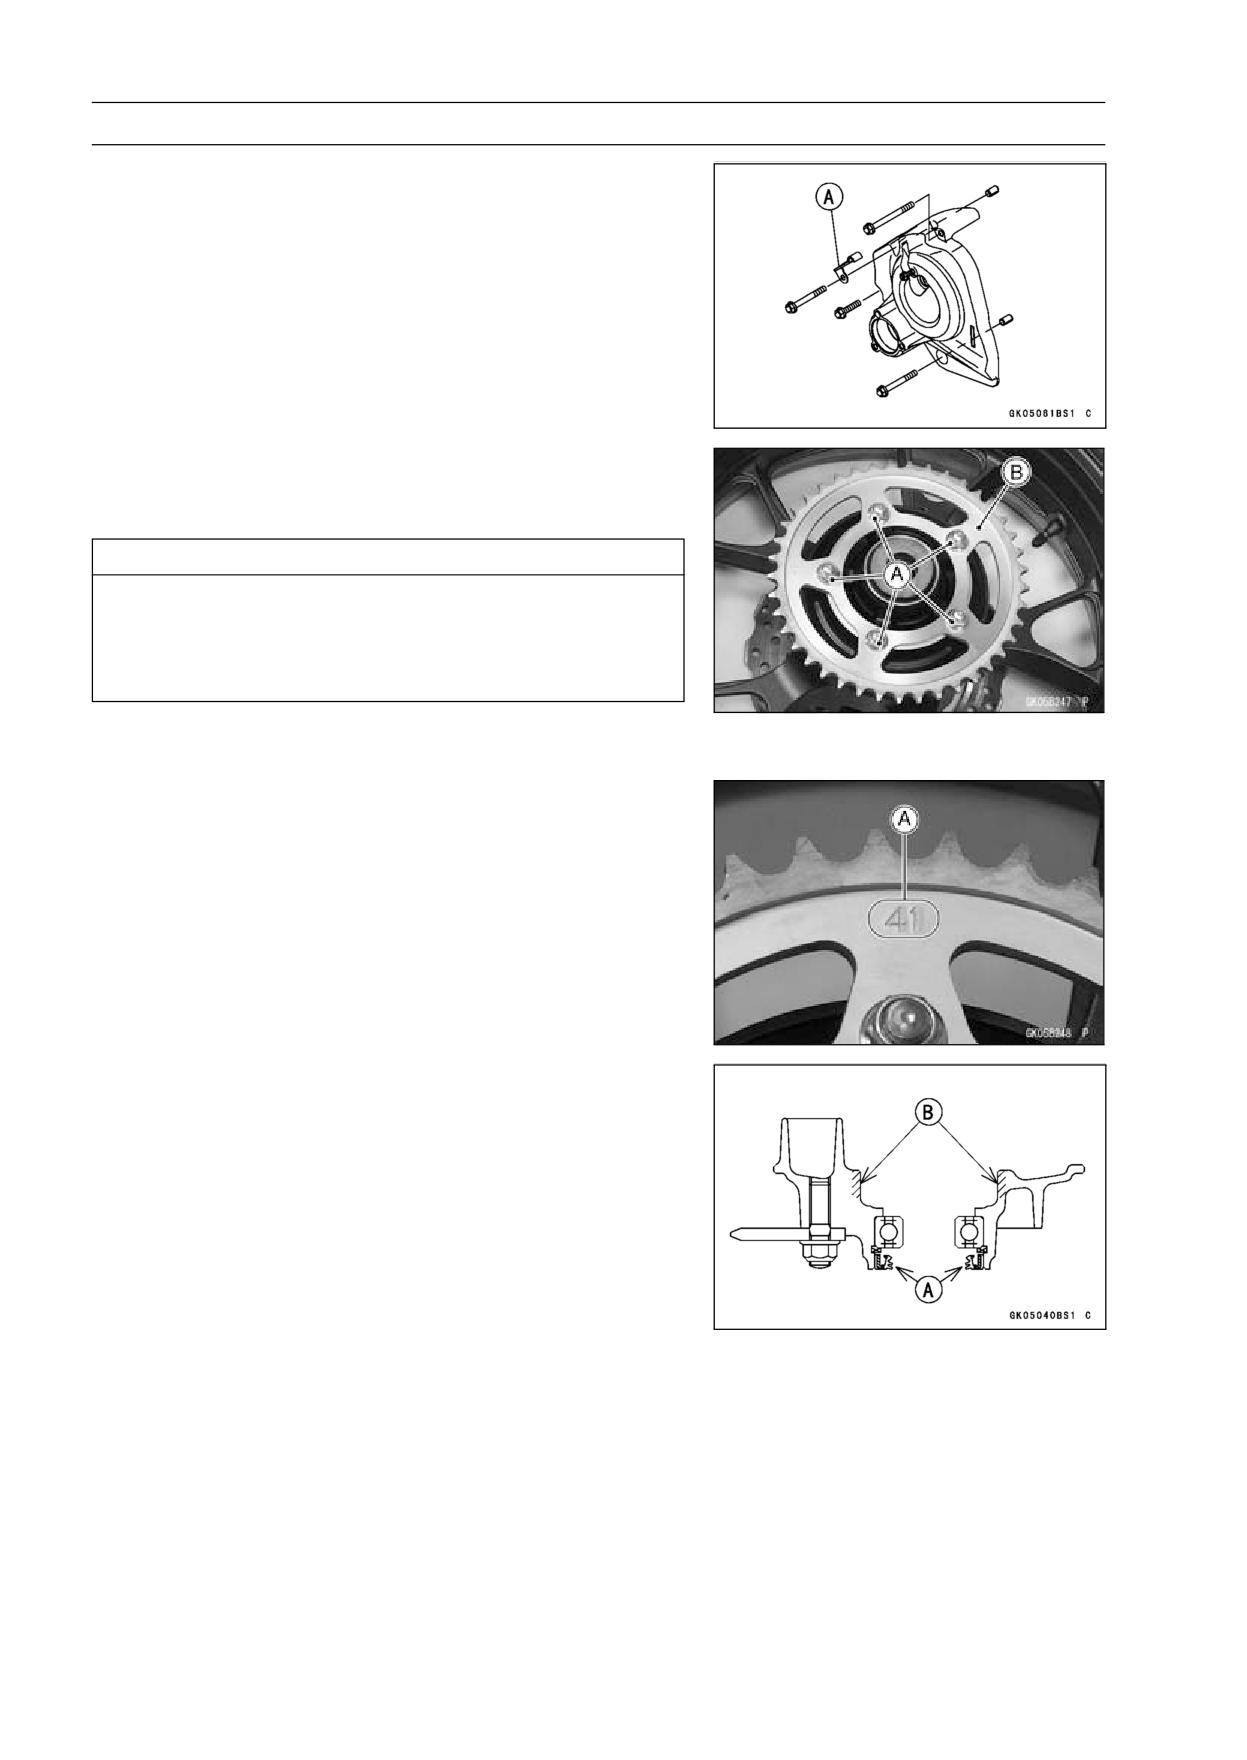
11-8 FINAL DRIVE
Sprocket, Coupling
• Install the engine sprocket cover.
• Install the clamp [A] as shown in the figure, and tighten
the cover bolts.
Torque - Engine Sprocket Cover Bolts: 9.8 N·m (1.0 kgf·m,
87 in·lb)
• Bend the end of axle cotter pin surely after tightening the
axle nut (see Rear Wheel Installation in the Wheels/Tires
chapter).
• Install the removed parts (see appropriate chapters).
Rear Sprocket Removal
• Remove the rear wheel (see Rear Wheel Removal in the
Wheels/Tires chapter).
CAUTION
Do not lay the wheel on the ground with the disc
facing down. This can damage or warp the disc.
Place blocks under the wheel so that the disc does
not touch the ground.
• Remove the rear sprocket nuts [A].
• Remove the rear sprocket [B].
Rear Sprocket Installation
• Install the sprocket facing the tooth number marking [A]
outward.
• Tighten the rear sprocket nuts.
Torque - Rear Sprocket Nuts: 69 N·m (7.0 kgf·m, 51 ft·lb)
• Install the rear wheel (see Rear Wheel Installation in the
Wheels/Tires chapter).
Coupling Installation
• High-temperature grease the following.
Coupling Grease Seal Lips [A]
Coupling Internal Surface [B]
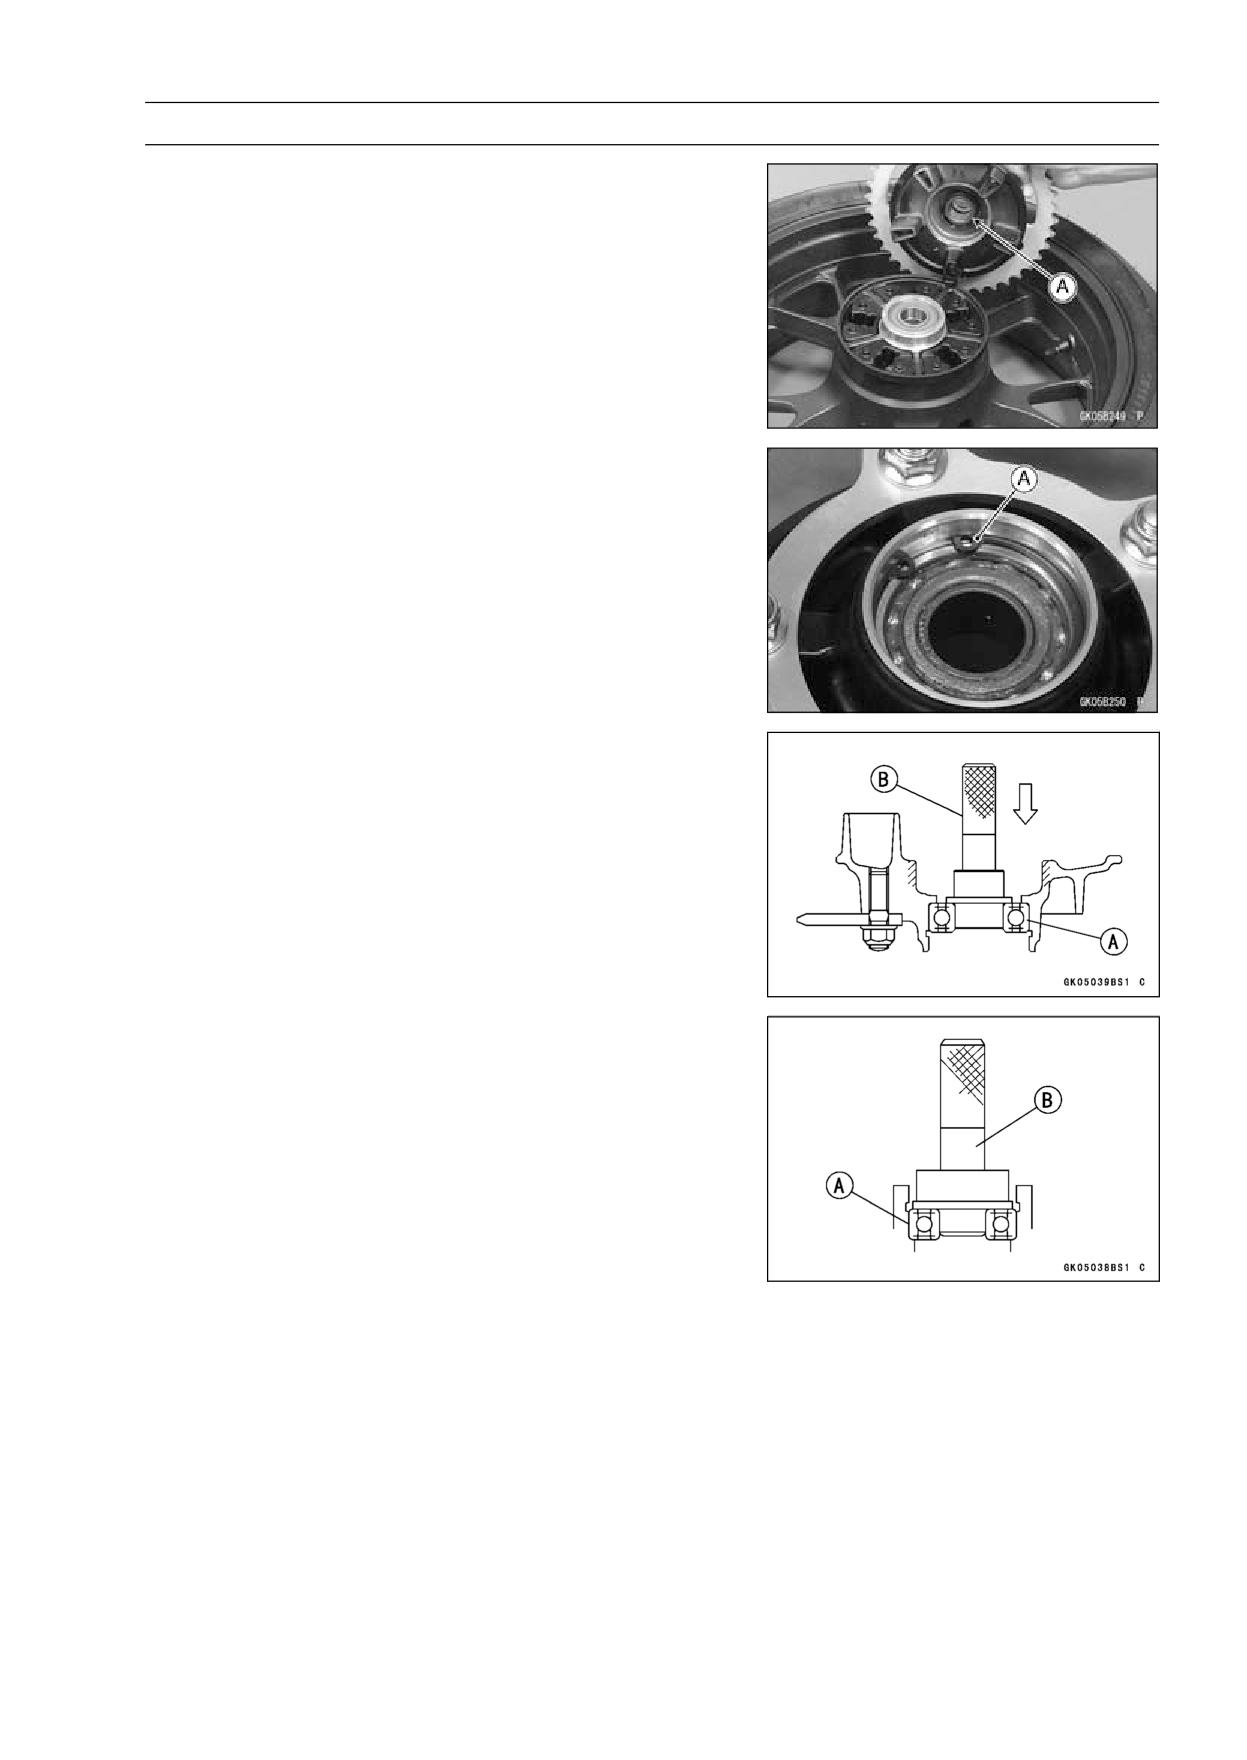
FINAL DRIVE 11-9
Sprocket, Coupling
• Install the collar [A].
• Install the coupling.
Coupling Bearing Removal
• Remove:
Coupling
Grease Seal
Circlip [A]
Special Tool - Inside Circlip Pliers: 57001-143
• Remove the bearing [A] by tapping from the wheel side.
Special Tool - Bearing Driver Set [B]: 57001-1129
Coupling Bearing Installation
• Replace the bearing with a new one.
NOTE
○Install the bearing so that the marked side faces out.
• Press in the bearing [A] until it is bottomed.
Special Tool - Bearing Driver Set [B]: 57001-1129
• Replace the circlip with a new one.
Special Tool - Inside Circlip Pliers: 57001-143
• Replace the grease seal with a new one.
• Press in the grease seal so that the seal surface is flush
with the end of the hole.
○Apply high-temperature grease to the grease seal lips.
Special Tool - Bearing Driver Set: 57001-1129
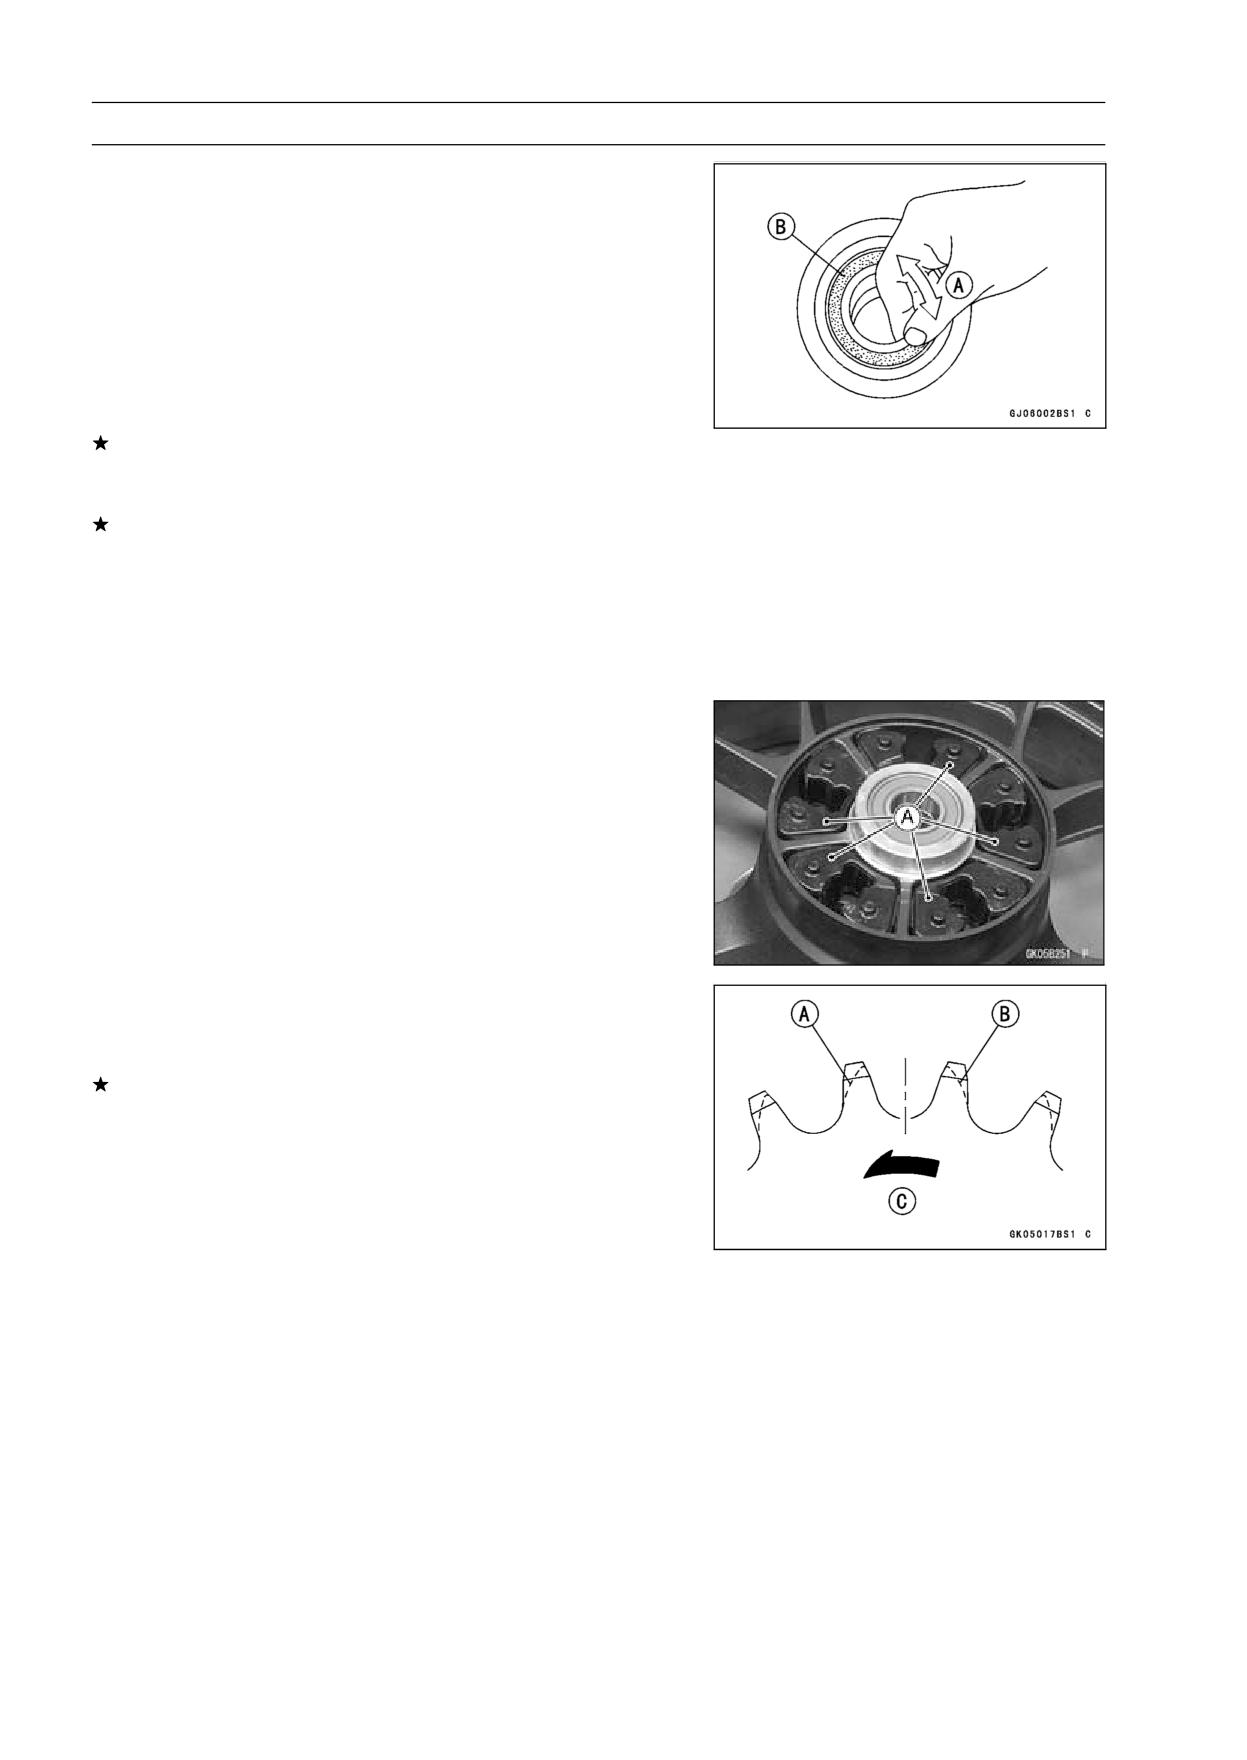
11-10 FINAL DRIVE
Sprocket, Coupling
Coupling Bearing Inspection
Since the coupling bearing is made to extremely close
tolerances, the clearance can not normally be measured.
NOTE
○It is not necessary to remove the coupling bearing for
inspection. If the bearing is removed, it will need to be
replaced with a new one.
• Turn the bearing in the coupling back and forth [A] while
checking for plays, roughness or binding.
If the bearing play, roughness or binding is found, replace
the bearing.
• Examine the bearing seal [B] for tears or leakage.
If the seal is torn or is leaking, replace the bearing.
Coupling Bearing Lubrication
NOTE
○Since the coupling bearing is packed with grease and
sealed, lubrication is not required.
Coupling Damper Inspection
• Remove the rear wheel coupling, and inspect the rubber
dampers [A].
• Replace the damper if it appears damaged or deterio-
rated.
Sprocket Wear Inspection
• Visually inspect the engine and rear sprocket teeth for
wear and damage.
If the teeth are worn as illustrated, replace the sprocket,
and inspect the drive chain wear (see Drive Chain Wear
Inspection in the Periodic Maintenance chapter).
Worn Tooth (Engine Sprocket) [A]
Worn Tooth (Rear Sprocket) [B]
Direction of Rotation [C]
NOTE
○If a sprocket requires replacement, the chain is proba-
bly worn also. When replacing a sprocket, inspect the
chain.
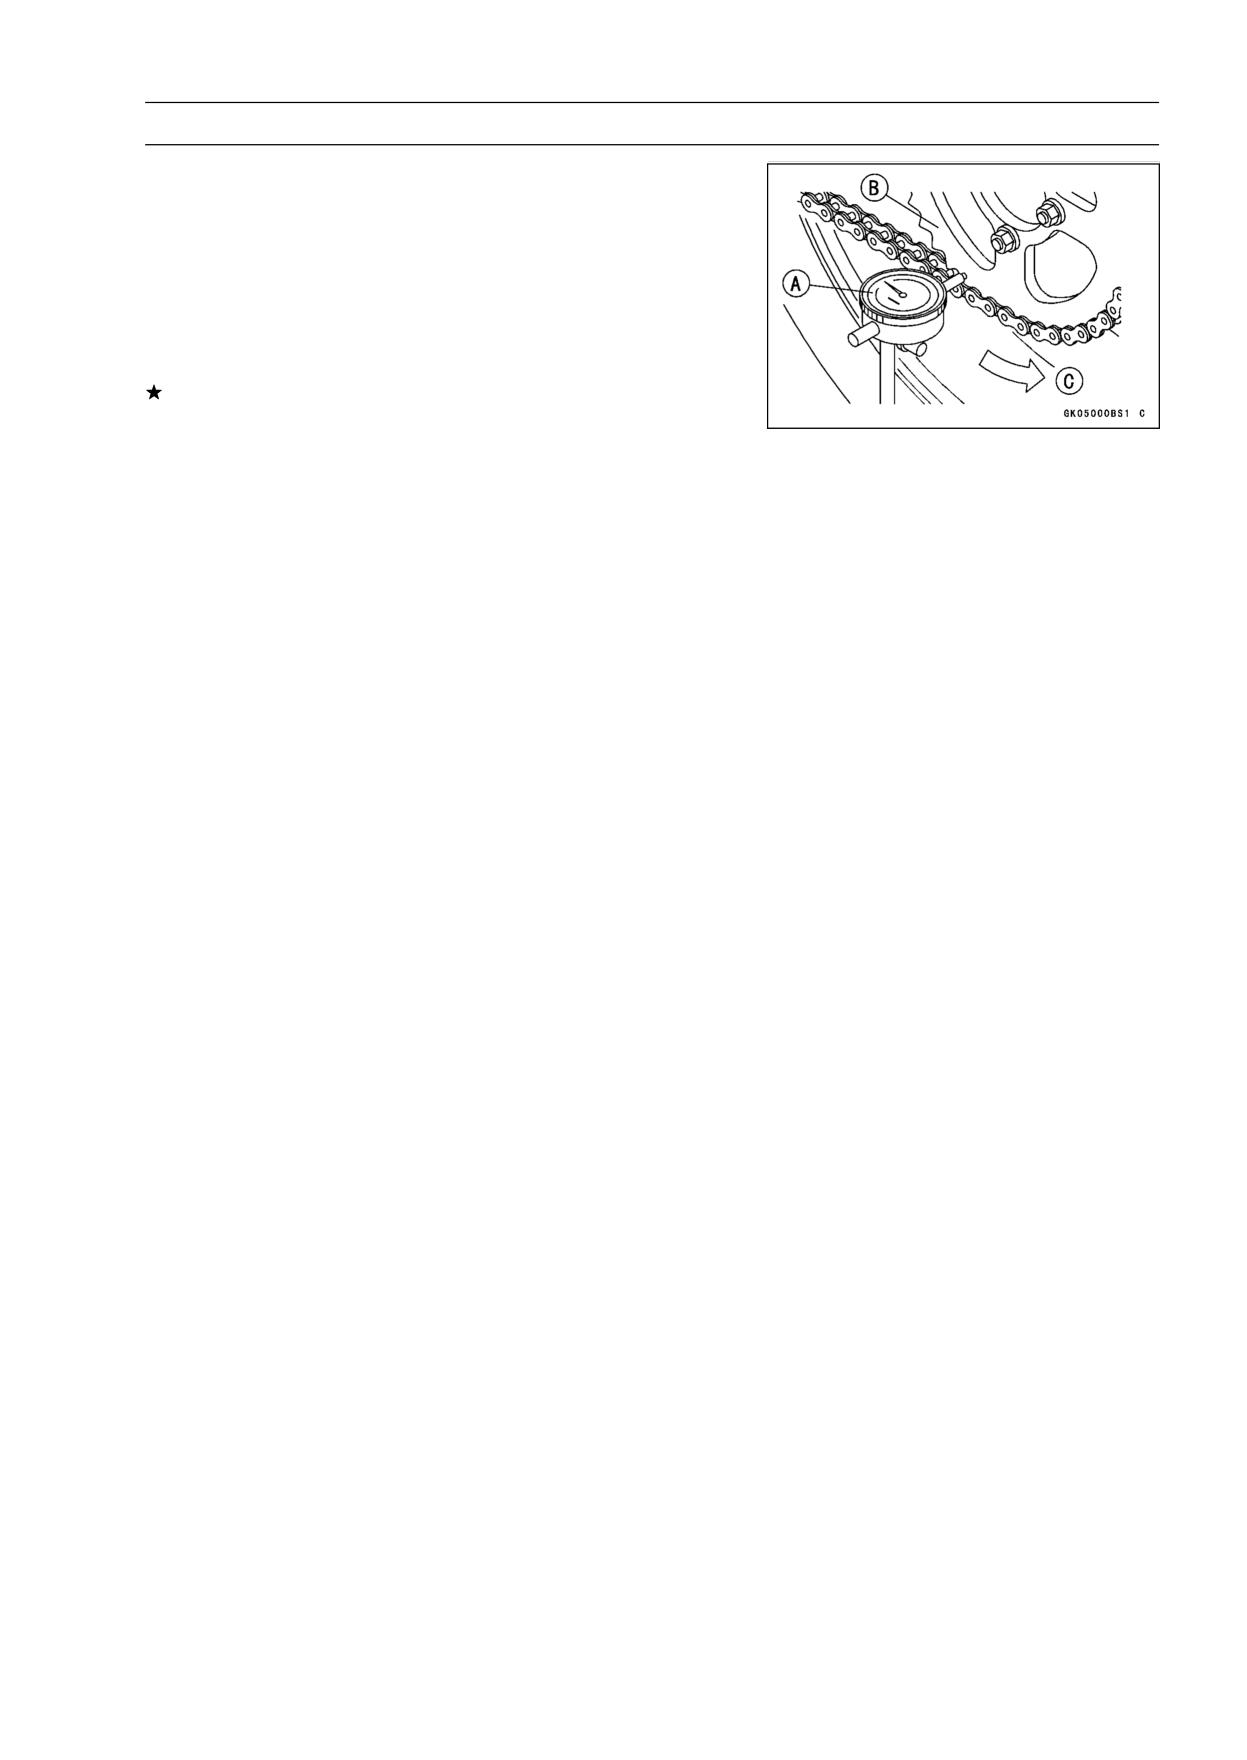
FINAL DRIVE 11-11
Sprocket, Coupling
Rear Sprocket Warp Inspection
• Raise the rear wheel off the ground with the stand so that
it will turn freely.
• Set a dial gauge [A] against the rear sprocket [B] near the
teeth as shown in the figure, and rotate [C] the rear wheel
to measure the sprocket runout (warp). The difference
between the highest and lowest dial gauge readings is
the amount of runout (warp).
If the runout exceeds the service limit, replace the rear
sprocket.
Rear Sprocket Warp
Standard:
0.4 mm (0.016 in.) or less
Service Limit:
0.5 mm (0.020 in.)
BRAKES 12-1
Brakes
Table of Contents
Exploded View
12-3
Specifications
12-12
Special Tools
12-13
Brake Lever, Brake Pedal
12-14
Brake Lever Position Adjustment
12-14
Brake Pedal Position Inspection
12-14
Brake Pedal Position Adjustment
12-14
Brake Pedal Removal
12-14
Brake Pedal Installation
12-15
Calipers
12-16
Front Caliper Removal
12-16
Rear Caliper Removal
12-16
Caliper Installation
12-17
Front Caliper Disassembly
12-17
Front Caliper Assembly
12-17
Rear Caliper Disassembly
12-17
Rear Caliper Assembly
12-17
Caliper Fluid Seal Damage
12-18
Caliper Dust Seal Damage
12-18
Caliper Piston and Cylinder Damage
12-19
Brake Pads
12-20
Front Brake Pad Removal
12-20
Front Brake Pad Installation
12-20
Rear Brake Pad Removal
12-21
12
Rear Brake Pad Installation
12-21
Brake Pad Wear Inspection
12-21
Master Cylinder
12-22
Front Master Cylinder Removal
12-22
Front Master Cylinder Installation
12-22
Rear Master Cylinder Removal
12-22
Rear Master Cylinder Installation
12-23
Front Master Cylinder Disassembly
12-23
Rear Master Cylinder Disassembly
12-23
Master Cylinder Assembly
12-23
Master Cylinder Inspection (Visual Inspection)
12-23
Brake Disc
12-25
Brake Disc Removal
12-25
Brake Disc Installation
12-25
Brake Disc Wear
12-25
Brake Disc Warp
12-25
Brake Fluid
12-26
Brake Fluid Level Inspection
12-26
Brake Fluid Change
12-26
Brake Line Bleeding
12-26
Brake Hose
12-30
Brake Hose and Pipe Removal/Installation
12-30
Brake Hose and Pipe Inspection
12-30
Anti-Lock Brake System (Equipped Models)
12-31
ABS Servicing Precautions
12-34
ABS Troubleshooting Outline
12-36
12-2 BRAKES
Inquiries to Rider
12-39
Self-diagnosis Outline
12-41
Self-diagnosis Procedures
12-41
Service Code Clearing Procedures
12-42
How to Read Service Codes
12-45
How to Erase Service Codes
12-45
ABS Indicator Light (LED) Inspection
12-47
ABS Indicator Light (LED) is Unlit (When the Ignition Switch turned to ON)
12-47
ABS Indicator Light (LED) Lights (When the Motorcycle is Running, - No Service Code)
12-48
Solenoid Valve Inspection (Service Code 13,14,17,18)
12-48
ABS Solenoid Valve Relay Inspection (Service Code 19)
12-48
Front, Rear Wheel Rotation Difference Abnormal (Service Code 25)
12-50
ABS Pump Motor Relay Inspection (Service Code 35)
12-50
Front Wheel Rotation Sensor Signal Abnormal (Service Code 42)
12-51
Front Wheel Rotation Sensor Wiring Inspection (Service Code 43)
12-52
Rear Wheel Rotation Sensor Signal Abnormal (Service Code 44)
12-53
Rear Wheel Rotation Sensor Wiring Inspection (Service Code 45)
12-54
Power Supply Voltage Abnormal (Under-Voltage) (Service Code 52)
12-54
Power Supply Voltage Abnormal (Over-Voltage) (Service Code 53)
12-55
ECU Inspection (Service Code 55)
12-56
ABS Hydraulic Unit Removal
12-56
ABS Hydraulic Unit Installation
12-58
ABS Hydraulic Unit Inspection
12-59
Front Wheel Rotation Sensor Removal
12-59
Front Wheel Rotation Sensor Installation
12-59
Rear Wheel Rotation Sensor Removal
12-60
Rear Wheel Rotation Sensor Installation
12-60
Wheel Rotation Sensor Inspection
12-61
Wheel Rotation Sensor Air Gap Inspection
12-61
Wheel Rotation Sensor Rotor Inspection
12-62
ABS Solenoid Valve Relay Fuse (20 A) Removal
12-62
ABS Motor Relay Fuse (30 A) Removal
12-62
ABS ECU Fuse (10 A) Removal
12-62
Fuse Installation
12-63
Fuse Inspection
12-63
BRAKES 12-3
Exploded View
Dummy Page
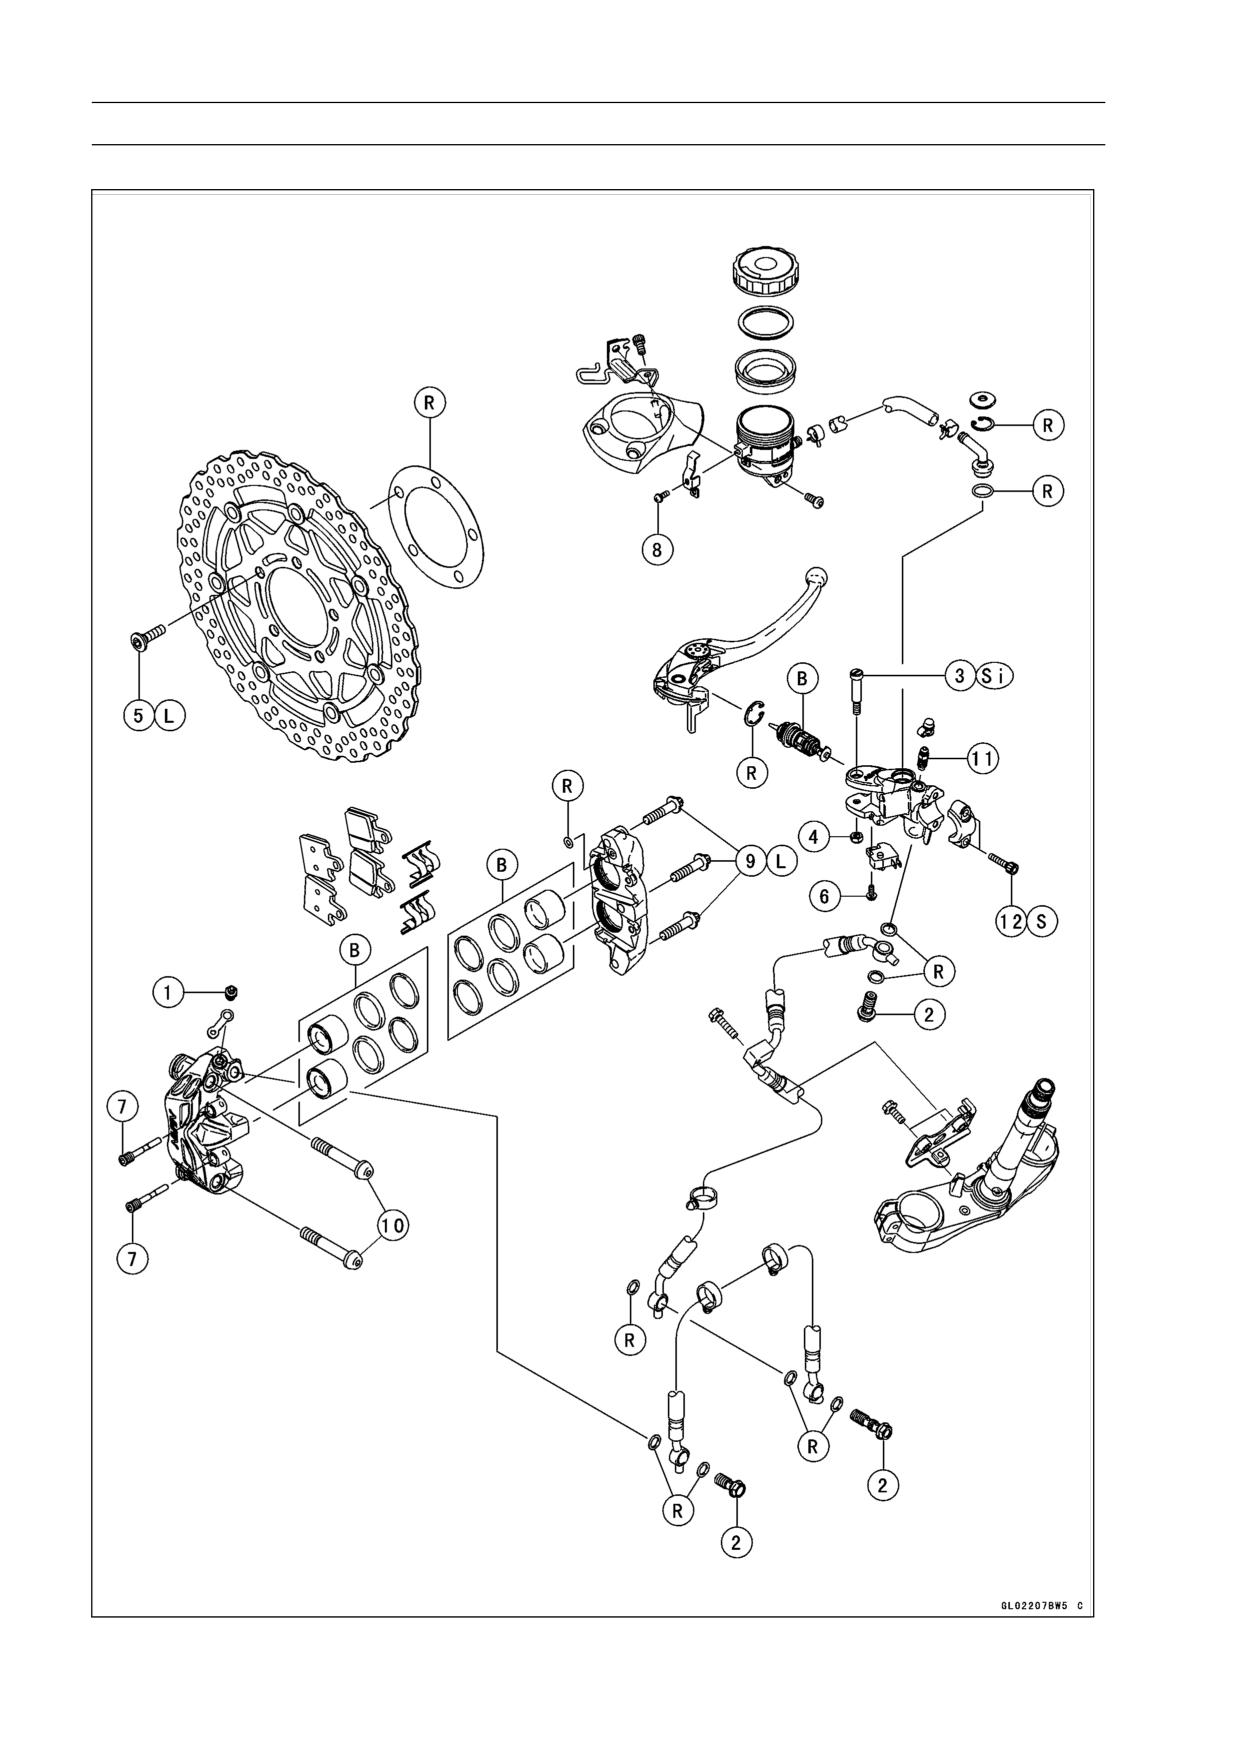
12-4 BRAKES
Exploded View
ZX1400A Models
BRAKES 12-5
Exploded View
Torque
No.
Fastener
Remarks
N·m
kgf·m
ft·lb
1
Bleed Valves
7.8
0.80
69 in·lb
2
Brake Hose Banjo Bolts
25
2.5
18
3
Brake Lever Pivot Bolt
1.0
0.10
9 in·lb
Si
4
Brake Lever Pivot Bolt Locknut
5.9
0.60
52 in·lb
5
Front Brake Disc Mounting Bolts
27
2.8
20
L
6
Front Brake Light Switch Screw
1.2
0.12
11 in·lb
7
Front Brake Pad Pins
17.2
1.8
13
8
Front Brake Reservoir Cap Stopper Screw
1.2
0.12
11 in·lb
9
Front Caliper Assembly Bolts
27
2.8
20
L
10
Front Caliper Mounting Bolts
34
3.5
25
11
Front Master Cylinder Bleed Valve
7.8
0.80
69 in·lb
12
Front Master Cylinder Clamp Bolts
8.8
0.90
78 in·lb
S
B: Apply brake fluid.
L: Apply a non-permanent locking agent.
R: Replacement Parts
S: Follow the specified tightening sequence.
Si: Apply silicone grease (ex. PBC grease).
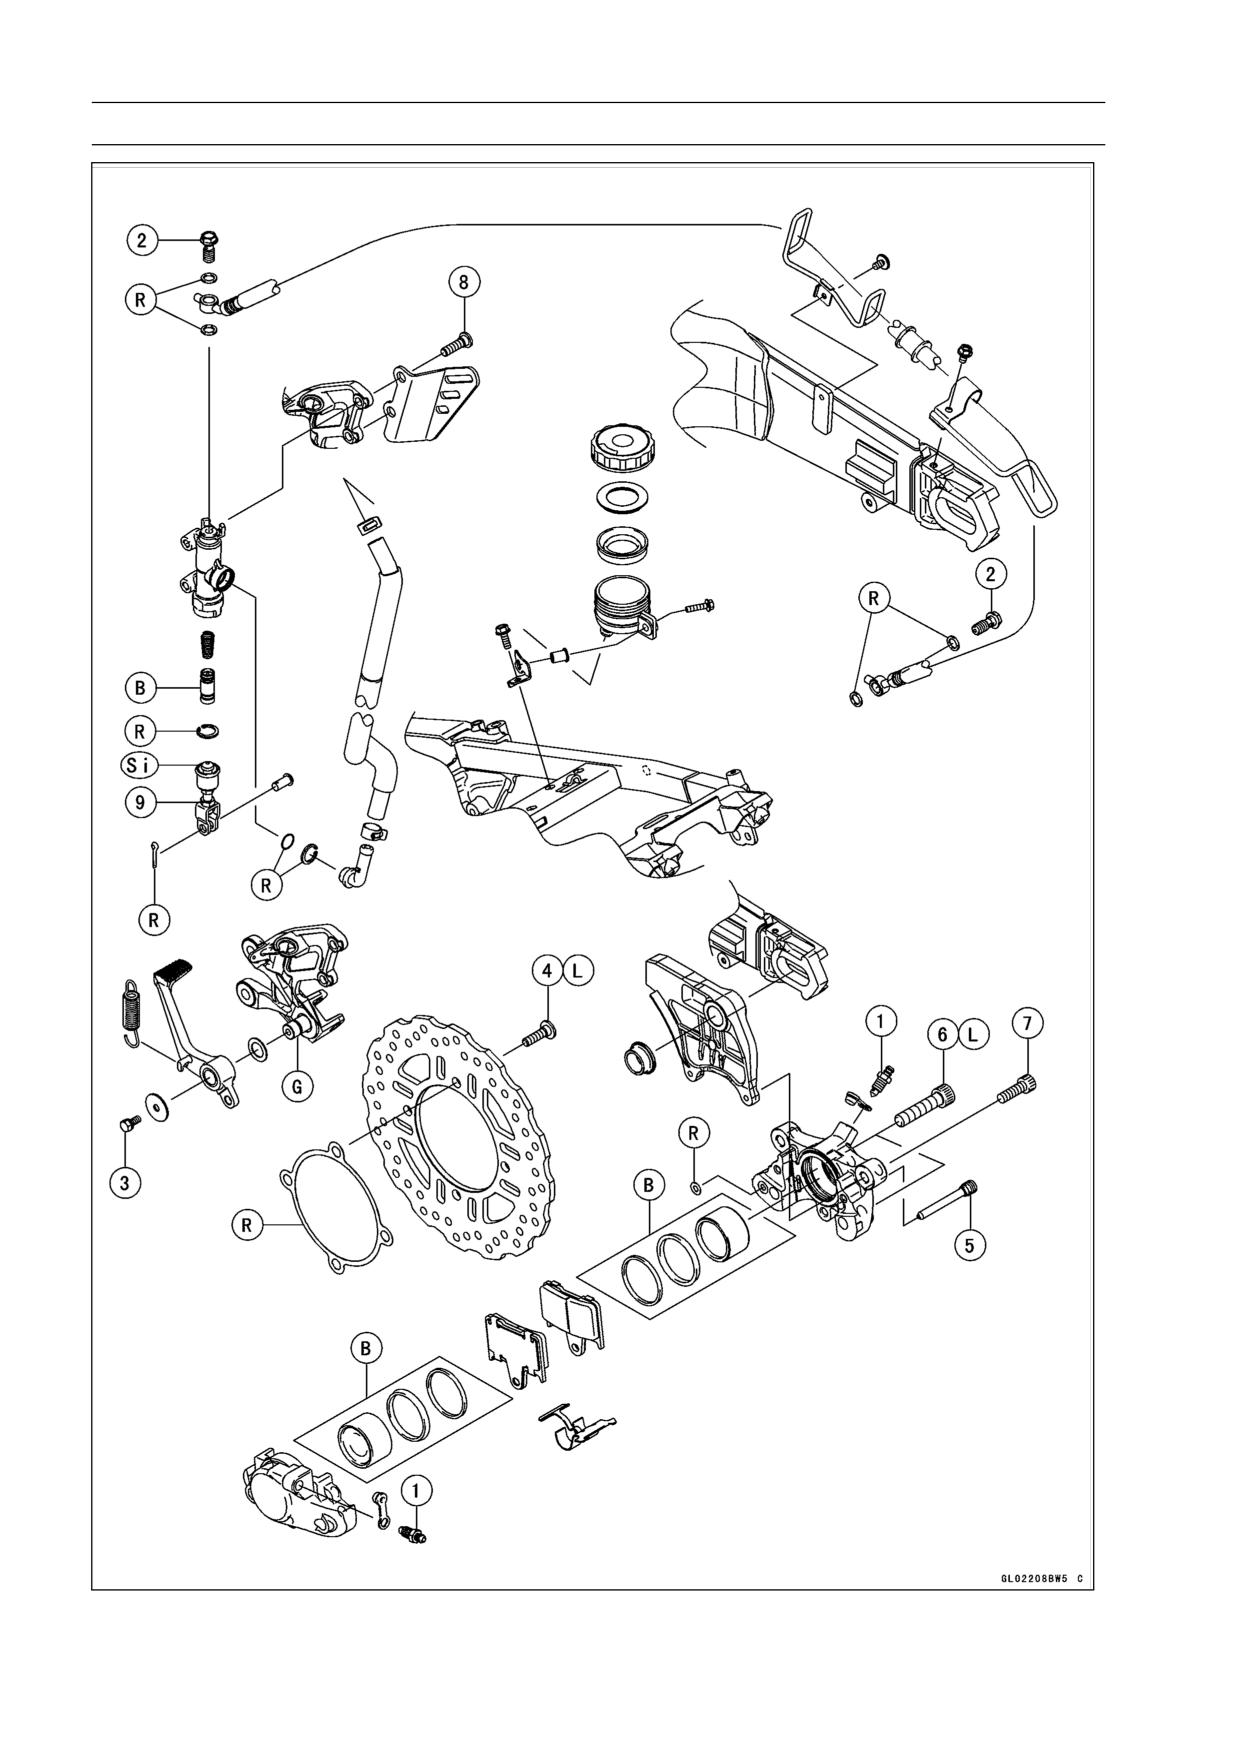
12-6 BRAKES
Exploded View
BRAKES 12-7
Exploded View
Torque
No.
Fastener
Remarks
N·m
kgf·m
ft·lb
1
Bleed Valves
7.8
0.80
69 in·lb
2
Brake Hose Banjo Bolts
25
2.5
18
3
Brake Pedal Bolt
8.8
0.90
78 in·lb
4
Rear Brake Disc Mounting Bolts
27
2.5
18
L
5
Rear Brake Pad Pin
17.2
1.8
13
6
Rear Caliper Assembly Bolts
37
3.8
27
L
7
Rear Caliper Mounting Bolts
25
2.5
18
8
Rear Master Cylinder Mounting Bolts
25
2.5
18
9
Rear Master Cylinder Push Rod Locknut
17.2
1.8
13
B: Apply brake fluid.
G: Apply grease.
L: Apply a non-permanent locking agent.
R: Replacement Parts
Si: Apply silicone grease (ex. PBC grease).
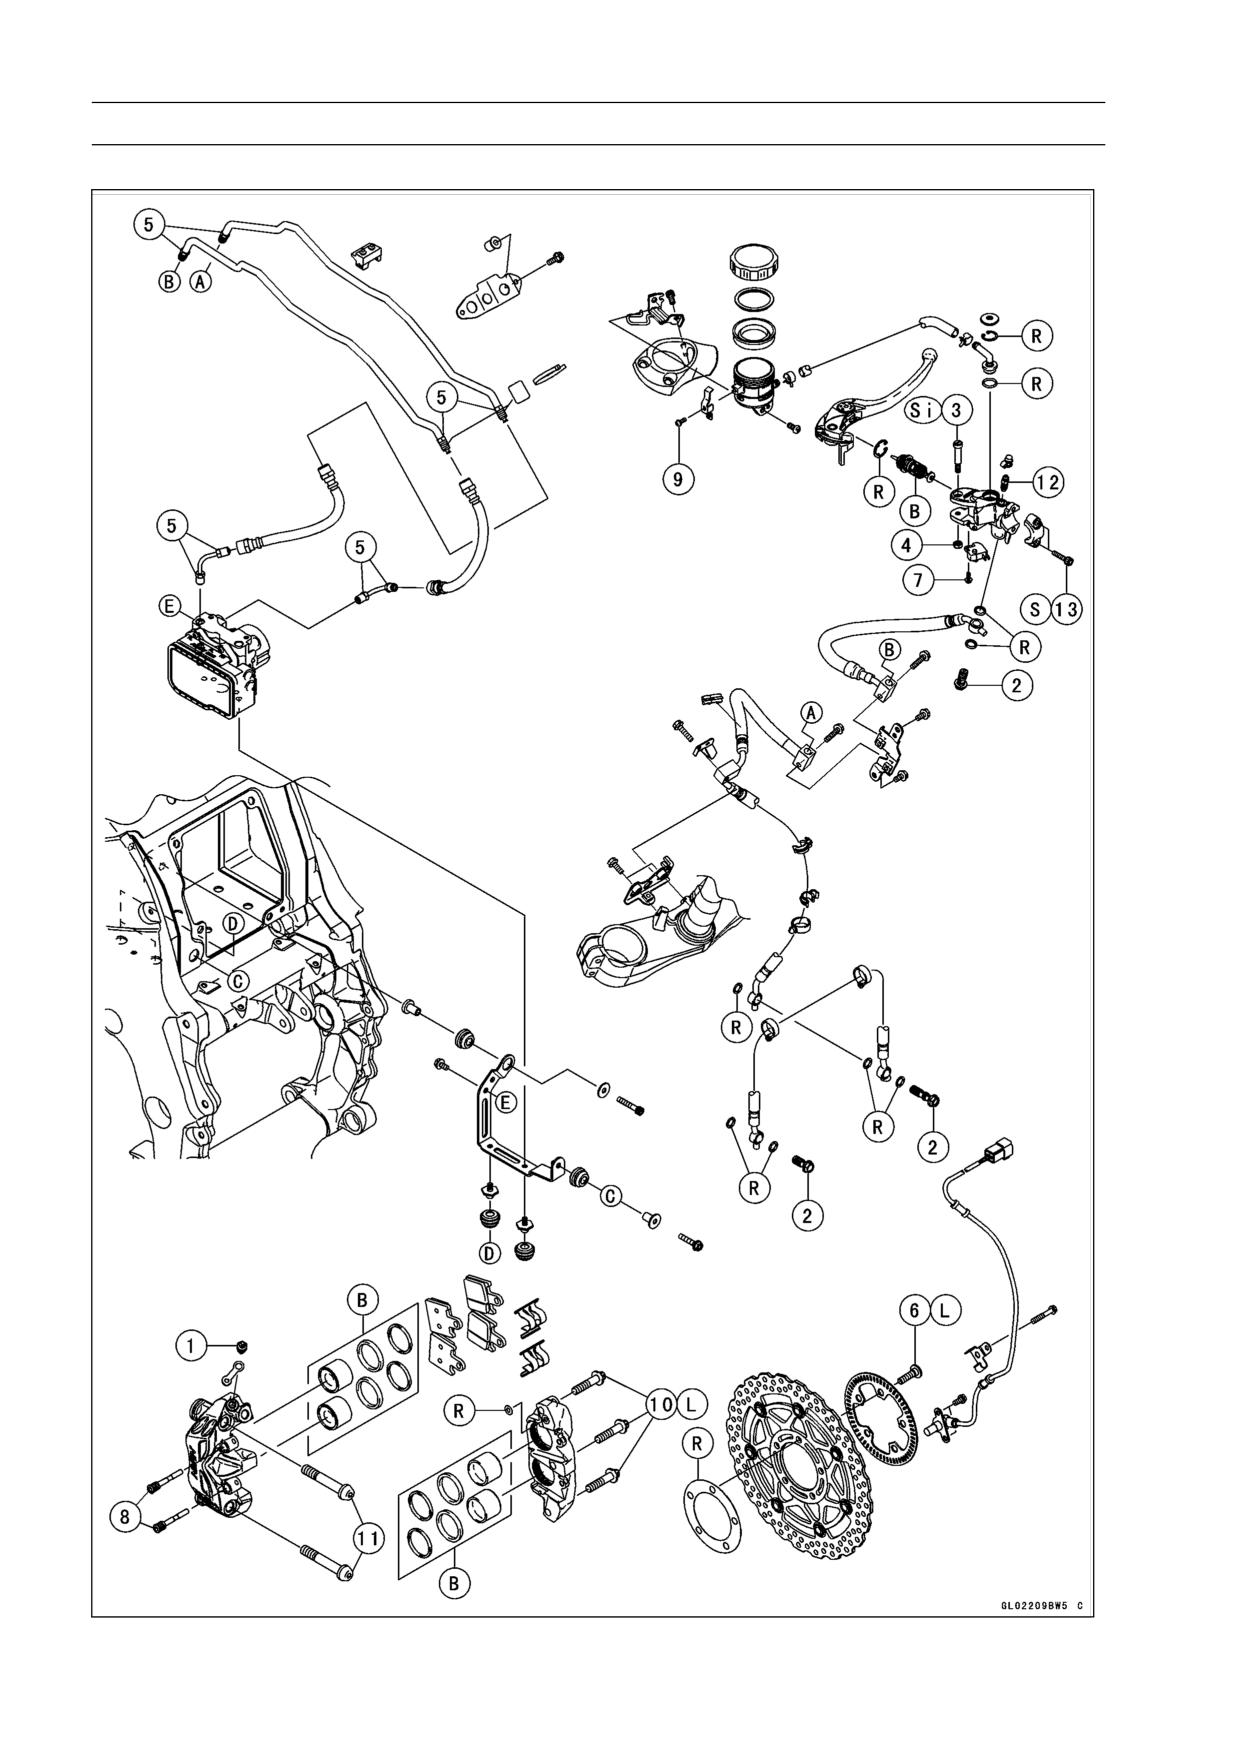
12-8 BRAKES
Exploded View
ZX1400B Models
BRAKES 12-9
Exploded View
Torque
No.
Fastener
Remarks
N·m
kgf·m
ft·lb
1
Bleed Valves
7.8
0.80
69 in·lb
2
Brake Hose Banjo Bolts
25
2.5
18
3
Brake Lever Pivot Bolt
1.0
0.10
9 in·lb
Si
4
Brake Lever Pivot Bolt Locknut
5.9
0.60
52 in·lb
5
Brake Pipe Joint Nuts
18
1.8
13
6
Front Brake Disc Mounting Bolts
27
2.8
20
L
7
Front Brake Light Switch Screw
1.2
0.12
11 in·lb
8
Front Brake Pad Pins
17.2
1.8
13
9
Front Brake Reservoir Cap Stopper Screw
1.2
0.12
11 in·lb
10
Front Caliper Assembly Bolts
27
2.8
20
L
11
Front Caliper Mounting Bolts
34
3.5
25
12
Front Master Cylinder Bleed Valve
7.8
0.80
69 in·lb
13
Front Master Cylinder Clamp Bolts
8.8
0.90
78 in·lb
S
B: Apply brake fluid.
L: Apply a non-permanent locking agent.
R: Replacement Parts
S: Follow the specified tightening sequence.
Si: Apply silicone grease (ex. PBC grease).
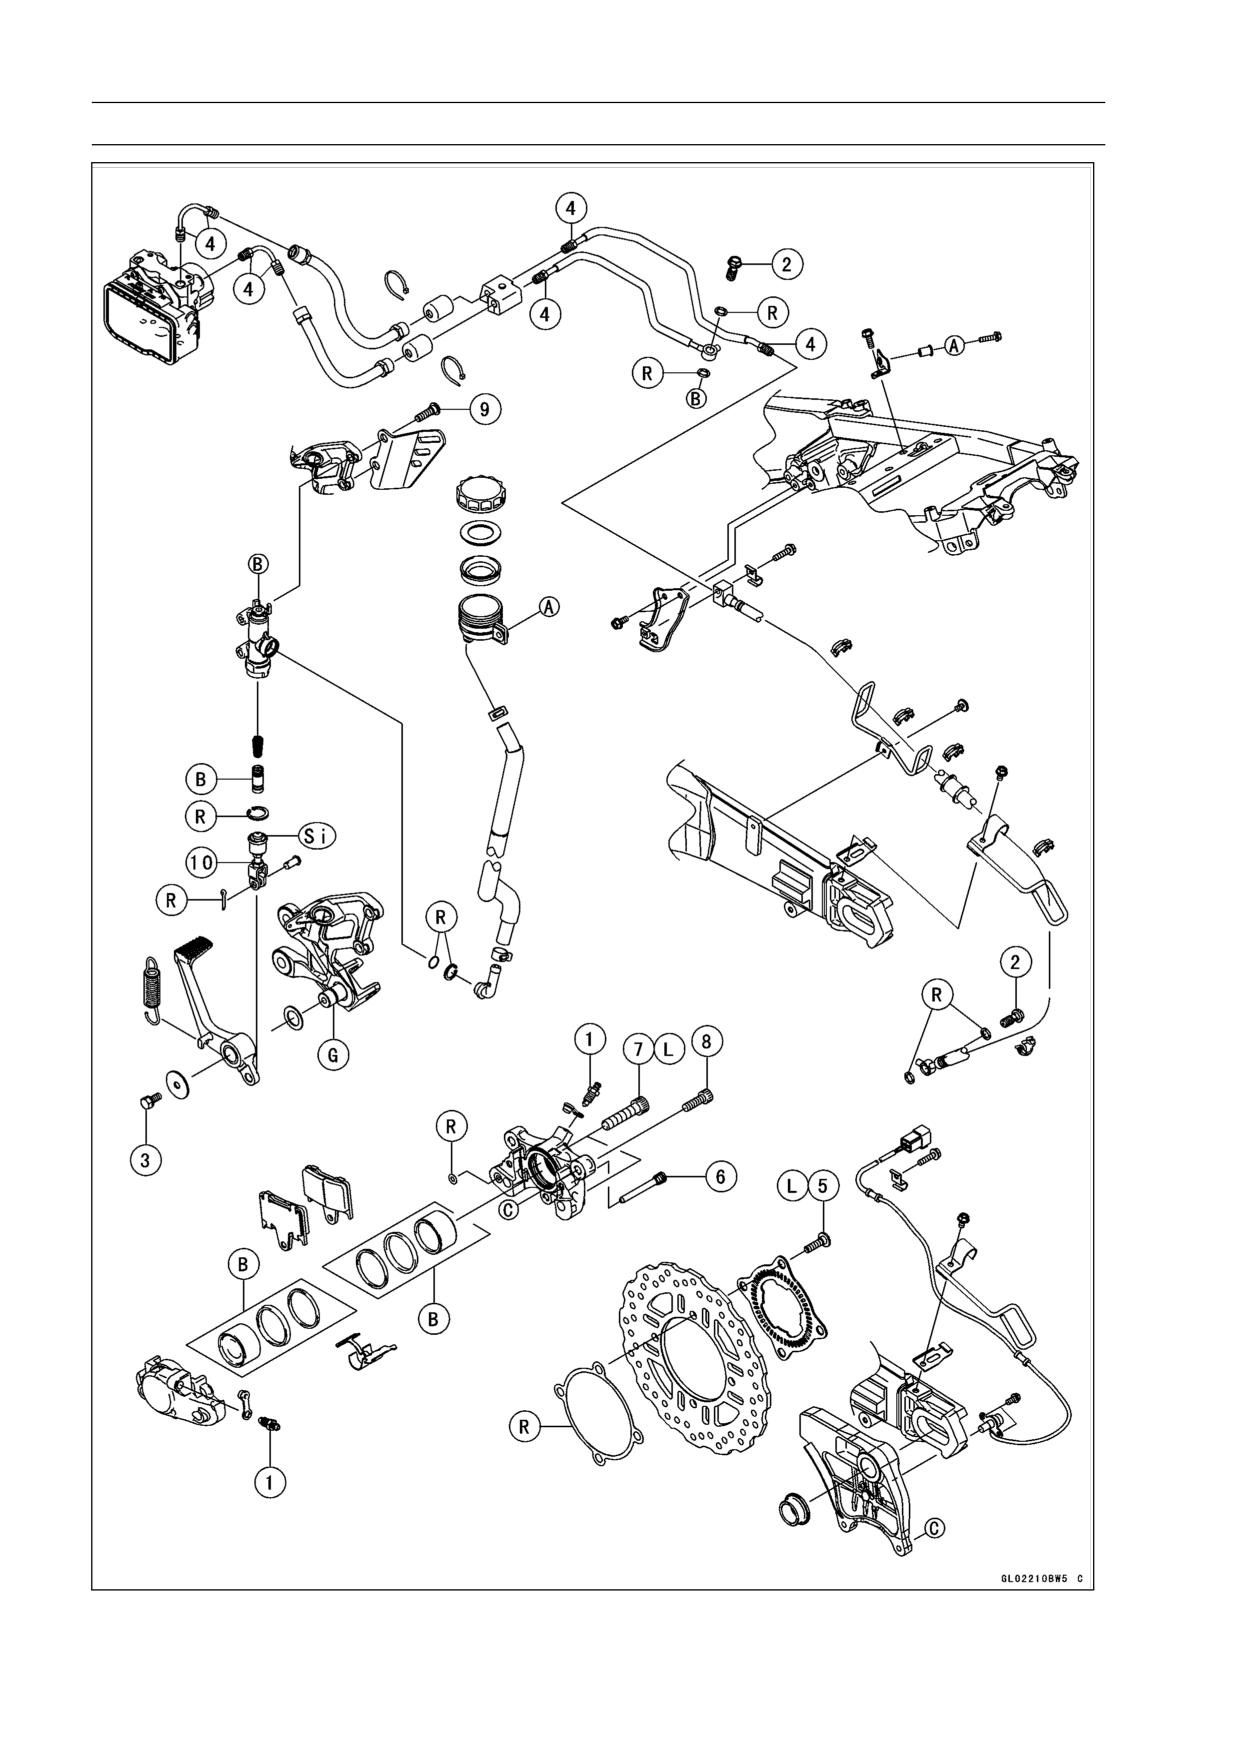
12-10 BRAKES
Exploded View
BRAKES 12-11
Exploded View
Torque
No.
Fastener
Remarks
N·m
kgf·m
ft·lb
1
Bleed Valves
7.8
0.80
69 in·lb
2
Brake Hose Banjo Bolts
25
2.5
18
3
Brake Pedal Bolt
8.8
0.90
78 in·lb
4
Brake Pipe Joint Nuts
18
1.8
13
5
Rear Brake Disc Mounting Bolts
27
2.8
20
L
6
Rear Brake Pad Pin
17.2
1.8
13
7
Rear Caliper Assembly Bolts
37
3.8
27
L
8
Rear Caliper Mounting Bolts
25
2.5
18
9
Rear Master Cylinder Mounting Bolts
25
2.5
18
10
Rear Master Cylinder Push Rod Locknut
17.2
1.8
13
B: Apply brake fluid.
G: Apply grease.
L: Apply a non-permanent locking agent.
R: Replacement Parts
Si: Apply silicone grease (ex. PBC grease).
12-12 BRAKES
Specifications
Item
Standard
Service Limit
Brake Lever, Brake Pedal
Brake Lever Position
6-way adjustable (to suit rider)
- - -
Brake Lever Free Play
Non-adjustable
- - -
Pedal Free Play
Non-adjustable
- - -
Pedal Position
About 45 mm (1.8 in.) below footpeg top
- - -
Brake Pads
Lining Thickness:
Front
4.0 mm (0.16 in.)
1 mm (0.04 in.)
Rear
5.0 mm (0.20 in.)
1 mm (0.04 in.)
Brake Discs
Thickness:
Front
4.8 ∼ 5.2 mm (0.19 ∼ 0.20 in.)
4.5 mm (0.18 in.)
Rear
5.8 ∼ 6.2 mm (0.23 ∼ 0.24 in.)
5.5 mm (0.22 in.)
Runout
TIR 0.15 mm (0.006 in.) or less
TIR 0.3 mm (0.01 in.)
Brake Fluid
Grade
DOT4
- - -
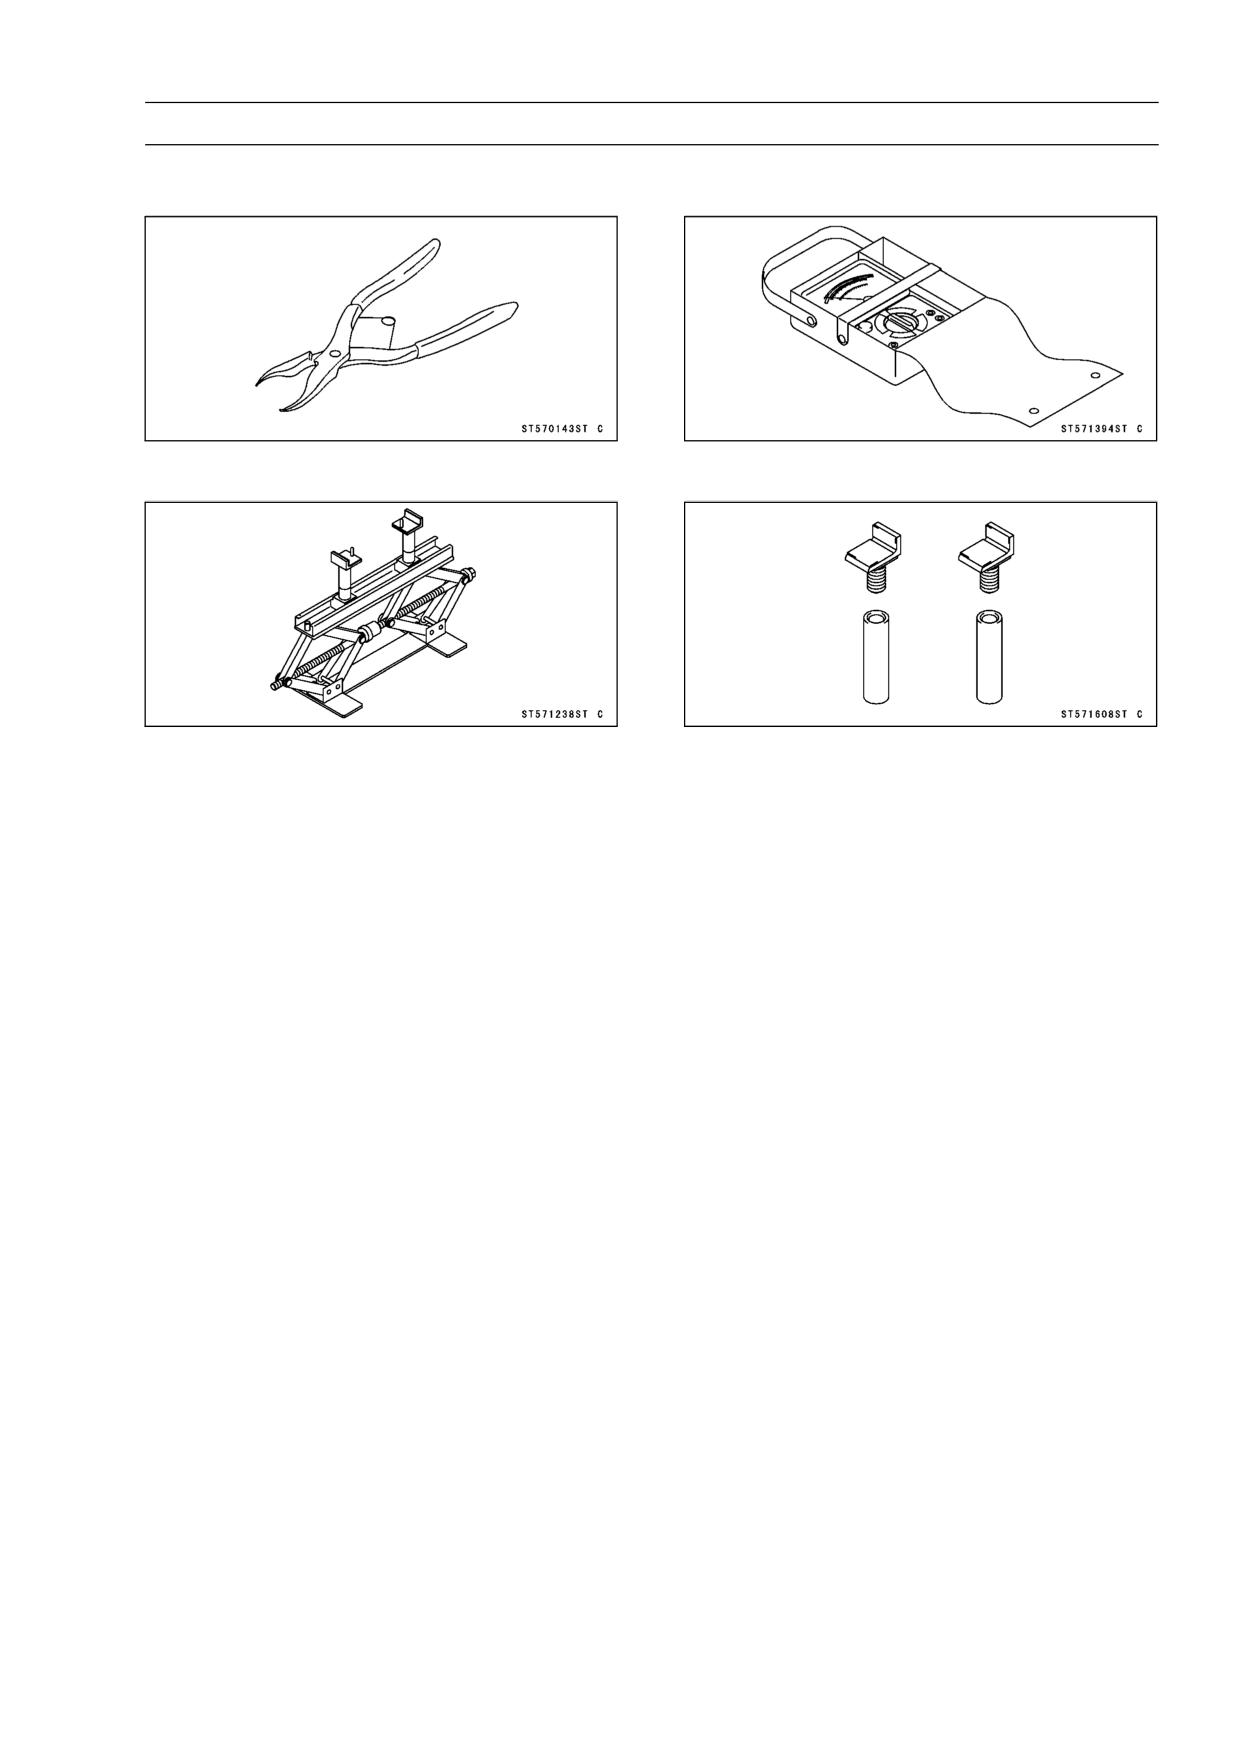
BRAKES 12-13
Special Tools
Inside Circlip Pliers:
Hand Tester:
57001-143
57001-1394
Jack:
Jack Attachment:
57001-1238
57001-1608
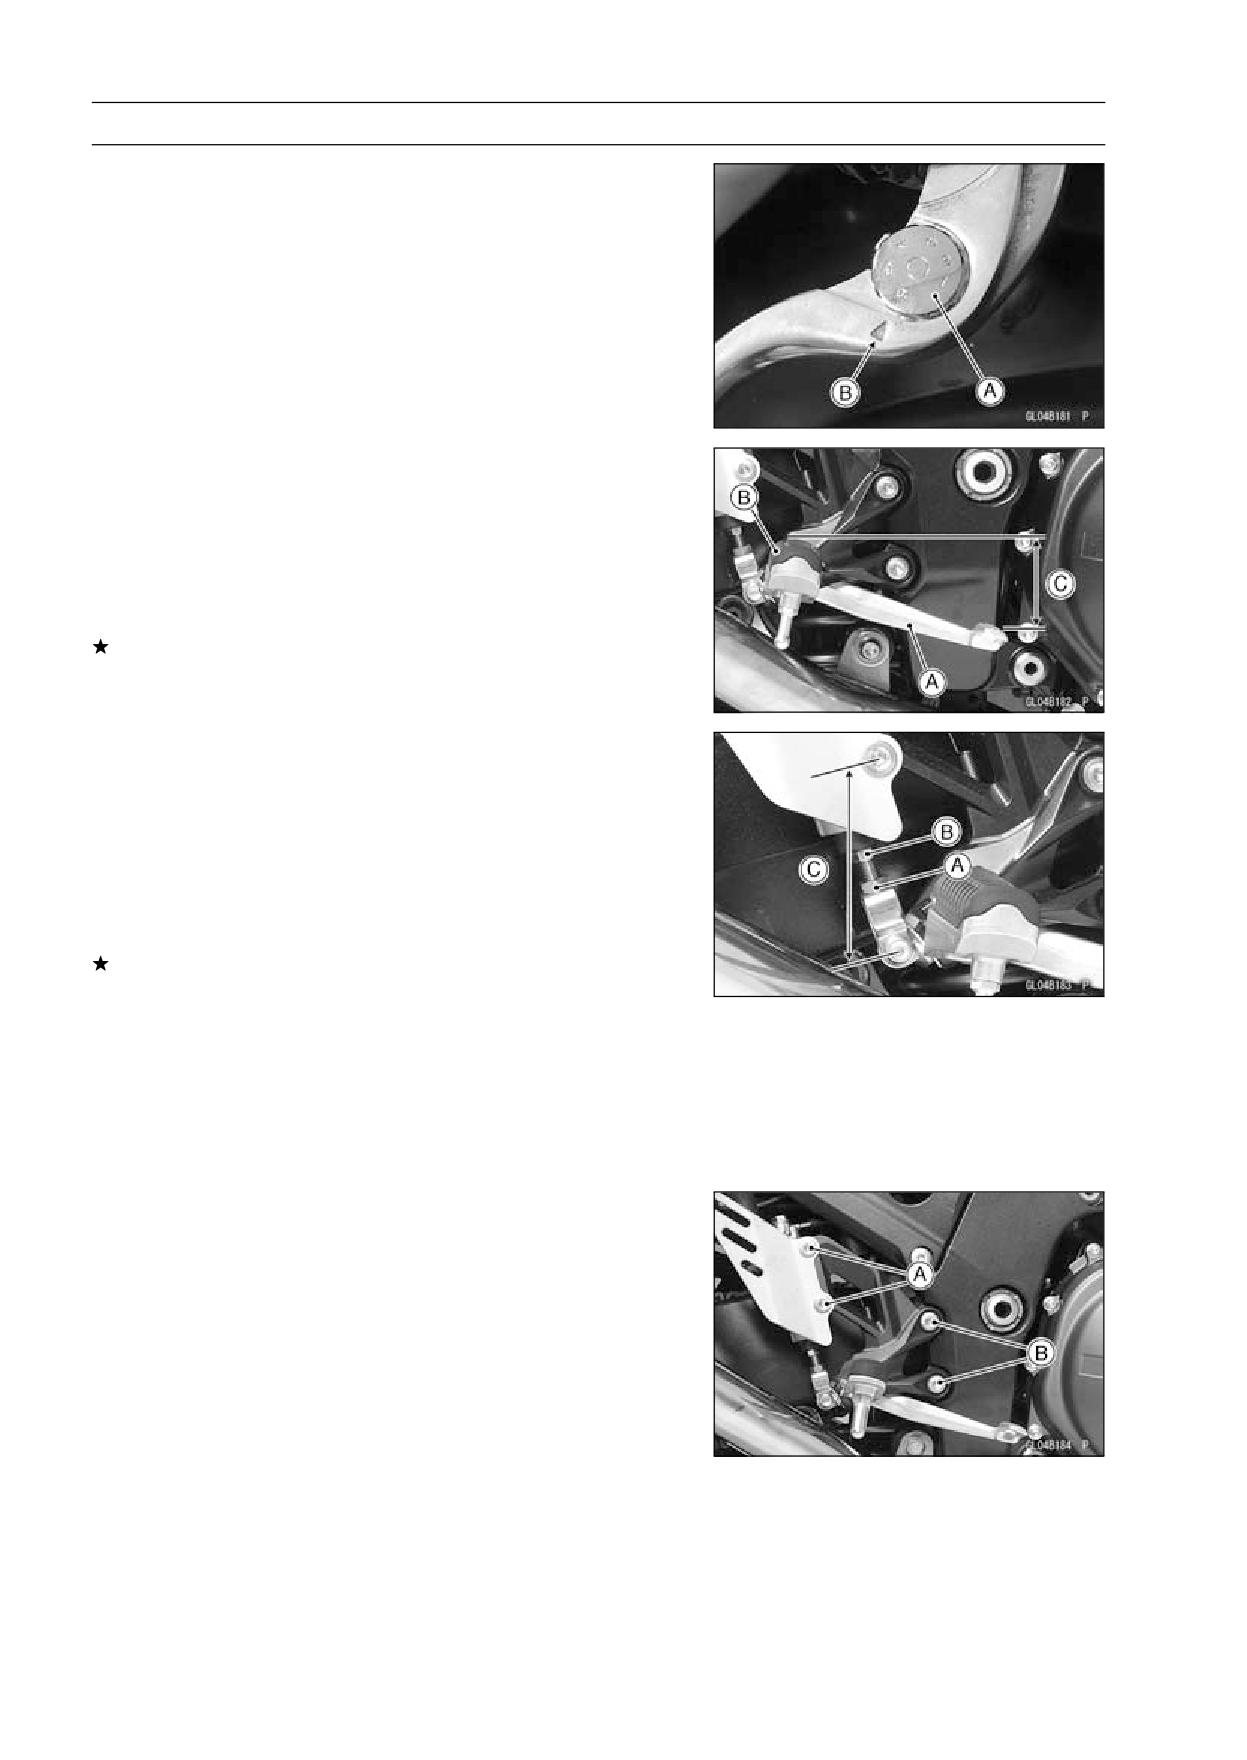
12-14 BRAKES
Brake Lever, Brake Pedal
Brake Lever Position Adjustment
The brake lever adjuster has 6 positions so that the brake
lever position can be adjusted to suit the operator’s hand.
• Push the lever forward and turn the adjuster [A] to align
the number with the arrow mark [B] on the lever holder.
○The distance from the grip to the lever is minimum at num-
ber 6 and maximum at number 1.
Brake Pedal Position Inspection
• Check that the brake pedal [A] is in the correct position.
Footpeg [B]
Pedal Position
Standard:
About 45 mm (1.8 in.) [C] below top of
footpeg
If it is incorrect, adjust the brake pedal position.
Brake Pedal Position Adjustment
NOTE
○Usually it is not necessary to adjust the pedal position,
but always adjust it when push rod locknut has been
loosened.
• Loosen the locknut [A] and turn the push rod with the hex
head [B] to achieve the correct pedal position.
If the length [C] shown is 80 ±1 mm (3.1 ±0.04 in.), the
pedal position will be within the standard range.
• Tighten:
Torque - Rear Master Cylinder Push Rod Locknut: 17.2 N·m
(1.8 kgf·m, 13 ft·lb)
• Check the brake light switch operation (see Brake Light
Switch Operation Inspection in the Periodic Maintenance
chapter).
Brake Pedal Removal
• Remove:
Rear Master Cylinder Mounting Bolts [A]
Right Footpeg Bracket Bolts [B]
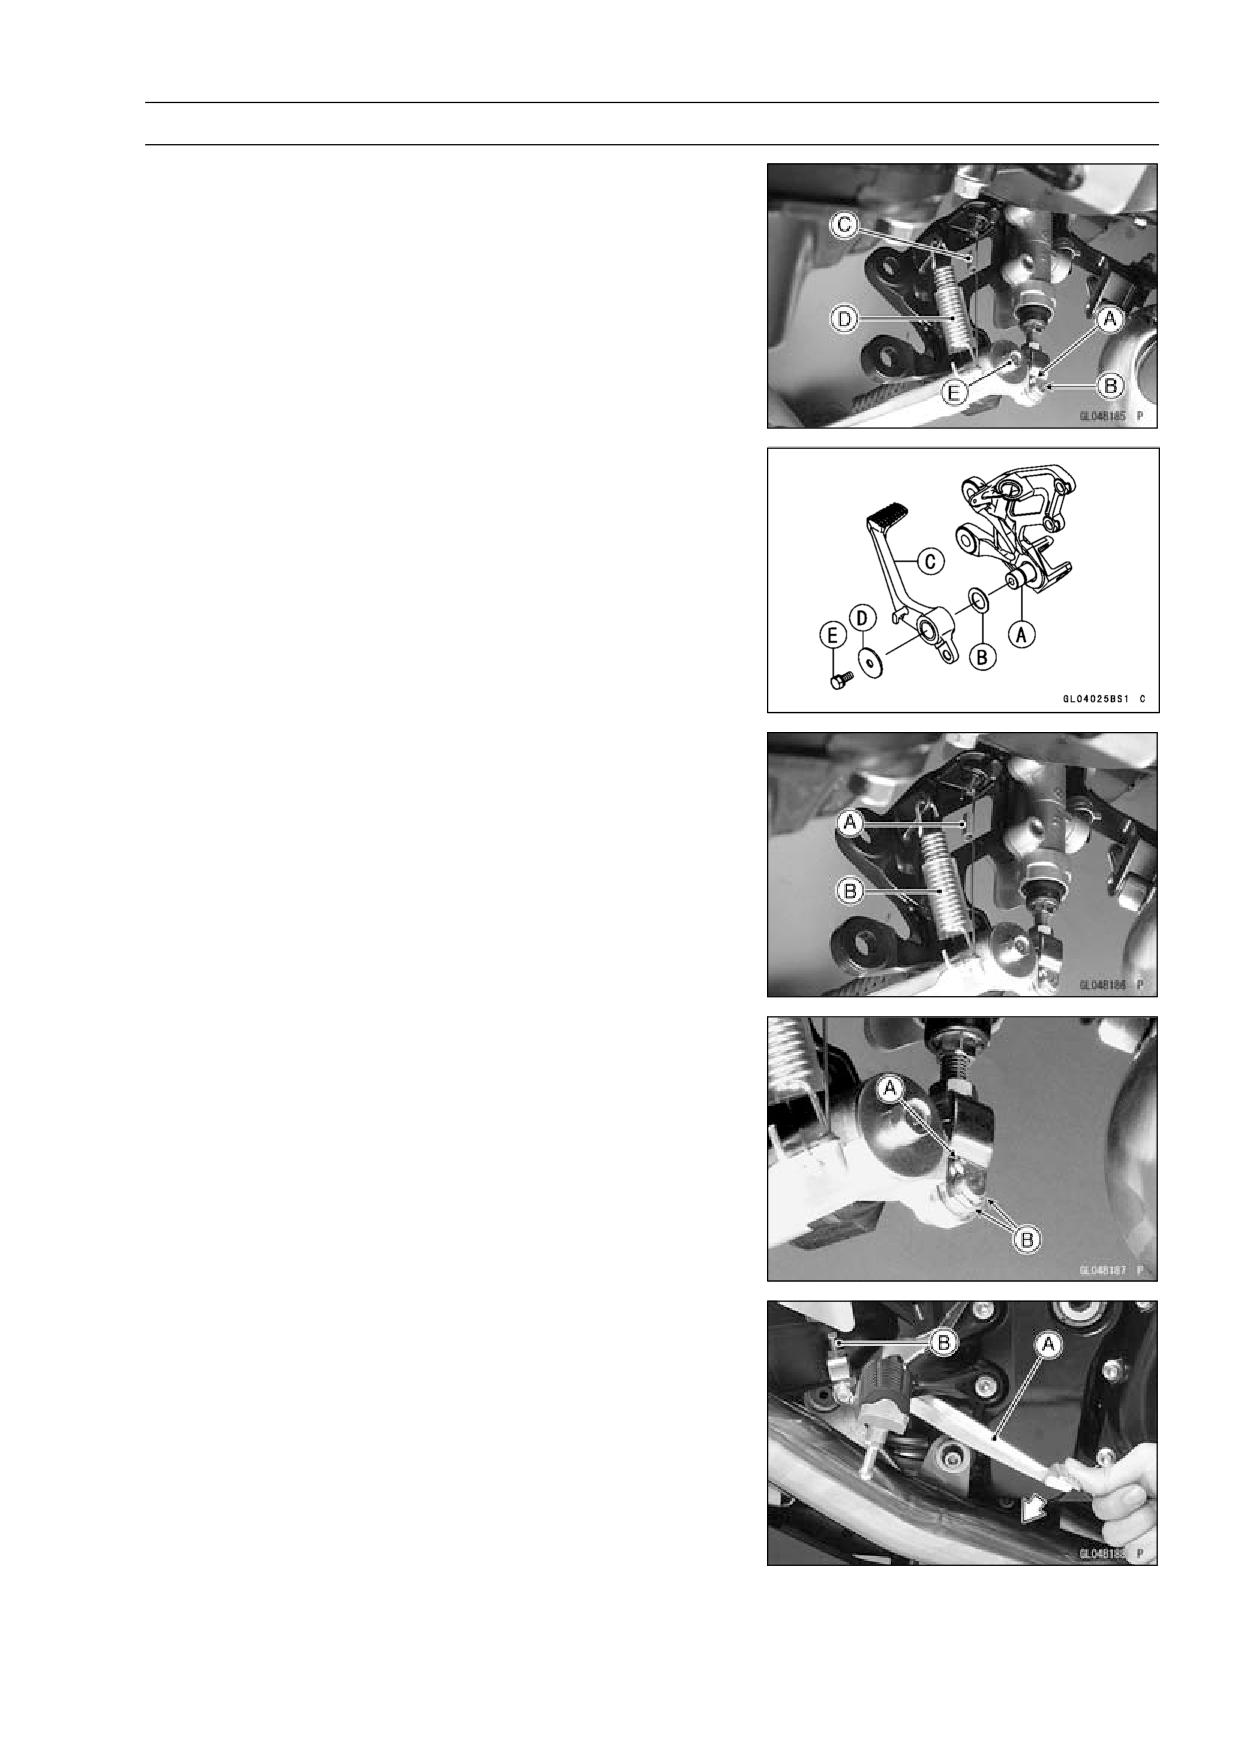
BRAKES 12-15
Brake Lever, Brake Pedal
• Remove:
Cotter Pin [A]
Joint Pin [B]
Rear Brake Light Switch Spring [C]
Return Spring [D]
• Remove the mounting bolt [E] and take out the brake
pedal.
Brake Pedal Installation
• Apply grease to the pivot shaft [A] and install the washer
[B].
• Install:
Brake Pedal [C]
Washer [D]
Brake Pedal Bolt [E]
Torque - Brake Pedal Bolt: 8.8 N·m (0.90 kgf·m, 78 in·lb)
• Hook the lower end of the rear brake light switch spring
[A] on the pedal hook.
• Hook the upper end of the return spring [B] on the pedal
hook.
• Replace the cotter pin with a new one.
• Insert the cotter pin [A] and bend the pin ends [B].
• Install the right footpeg bracket.
Torque - Front Footpeg Bracket Bolts: 25 N·m (2.5 kgf·m,
18 ft·lb)
○Depress the brake pedal [A] and then align the bolts holes
of the master cylinder [B].
Torque - Rear Master Cylinder Mounting Bolts: 25 N·m (2.5
kgf·m, 18 ft·lb)
• Check the brake pedal position (see Brake Pedal Position
Inspection).
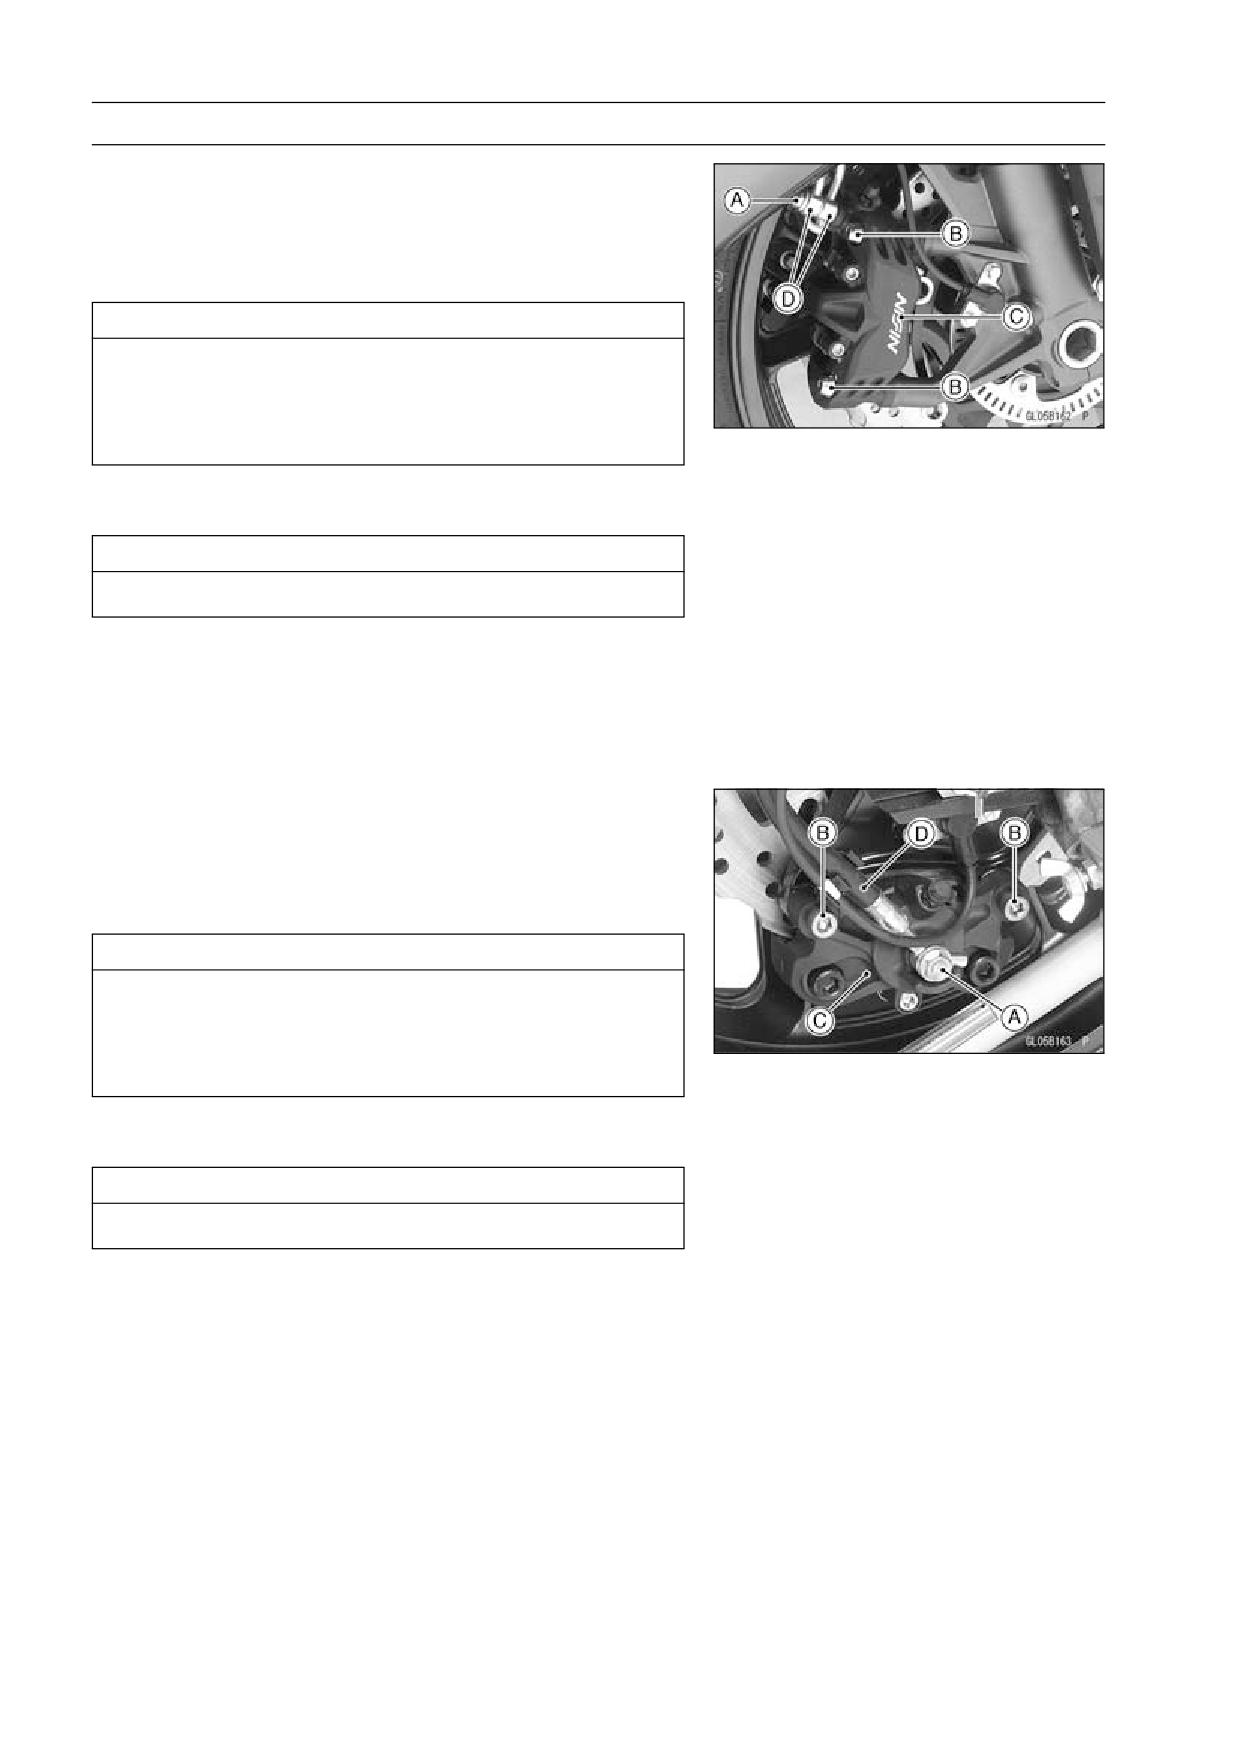
12-16 BRAKES
Calipers
Front Caliper Removal
• Loosen the banjo bolt [A] at the brake hose lower end,
and tighten it loosely.
• Unscrew the caliper mounting bolts [B], and detach the
caliper [C] from the disc.
CAUTION
Do not loosen the caliper assembly bolts. Take out
only the caliper mounting bolts for caliper removal.
Loosening the caliper assembly bolts will cause
brake fluid leakage.
• Unscrew the banjo bolt and remove the brake hoses [D]
from the caliper (see Brake Hose Removal/Installation).
CAUTION
Immediately wash away any brake fluid that spills.
NOTE
○If the caliper is to be disassembled after removal and if
compressed air is not available, disassemble the caliper
before the brake hose is removed (see Front Caliper
Disassembly).
Rear Caliper Removal
• Loosen the banjo bolt [A] at the brake hose lower end,
and tighten it loosely.
• Unscrew the caliper mounting bolts [B], and detach the
caliper [C] from the disc.
CAUTION
Do not loosen the caliper assembly bolts. Take out
only the caliper mounting bolts for caliper removal.
Loosening the caliper assembly bolts will cause
brake fluid leakage.
• Unscrew the banjo bolt and remove the brake hose [D]
from the caliper (see Brake Hose Removal/Installation).
CAUTION
Immediately wash away any brake fluid that spills.
NOTE
○If the caliper is to be disassembled after removal and if
compressed air is not available, disassemble the caliper
before the brake hose is removed (see Rear Caliper
Disassembly).
BRAKES 12-17
Calipers
Caliper Installation
• Install the caliper and brake hose lower end.
○Replace the washers on each side of hose fitting with new
ones.
• Tighten:
Torque - Caliper Mounting Bolts
Front: 34 N·m (3.5 kgf·m, 25 ft·lb)
Rear: 25 N·m (2.5 kgf·m, 18 ft·lb)
Brake Hose Banjo Bolts: 25 N·m (2.5 kgf·m, 18
ft·lb)
• Check the fluid level in the brake reservoirs.
• Bleed the brake line (see Brake Line Bleeding).
• Check the brake for good braking power, no brake drag,
and no fluid leakage.
WARNING
Do not attempt to drive the motorcycle until a full
brake lever or pedal is obtained by pumping the
brake lever or pedal until the pads are against the
disc. The brakes will not function on the first appli-
cation of the lever or pedal if this is not done.
Front Caliper Disassembly
• Refer to the Caliper Rubber Parts Replacement in the Pe-
riodic Maintenance chapter.
Front Caliper Assembly
• Refer to the Caliper Rubber Parts Replacement in the Pe-
riodic Maintenance chapter.
Rear Caliper Disassembly
• Refer to the Caliper Rubber Parts Replacement in the Pe-
riodic Maintenance chapter.
Rear Caliper Assembly
• Refer to the Caliper Rubber Parts Replacement in the Pe-
riodic Maintenance chapter.